# Laravel v13.x — Documentación técnica oficial

> **Espejo Offline de Documentación Técnica**
> Licencia: MIT | Documentos incluidos: 101 | Versión: 13.x
> Descargado/sincronizado: 2026-09-15
> Documentación oficial en línea: https://laravel.com/docs
> Mantenedor del espejo: Raúl Caro Pastorino (@raupulus) · https://raupulus.dev

---

## Índice de contenidos


### Laravel

- [Laravel AI SDK](#laravel-ai-sdk)
- [AI Assisted Development](#ai-assisted-development)
- [Artisan Console](#artisan-console)
- [Authentication](#authentication)
- [Authorization](#authorization)
- [Laravel Cashier (Stripe)](#laravel-cashier-stripe)
- [Blade Templates](#blade-templates)
- [Laravel Boost](#laravel-boost)
- [Broadcasting](#broadcasting)
- [Cache](#cache)
- [Laravel Cashier (Paddle)](#laravel-cashier-paddle)
- [Collections](#collections)
- [Concurrency](#concurrency)
- [Configuration](#configuration)
- [Console Tests](#console-tests)
- [Service Container](#service-container)
- [Context](#context)
- [Contracts](#contracts)
- [Controllers](#controllers)
- [CSRF Protection](#csrf-protection)
- [Database Testing](#database-testing)
- [Database: Getting Started](#database-getting-started)
- [Deployment](#deployment)
- [Laravel Dusk](#laravel-dusk)
- [Eloquent: Collections](#eloquent-collections)
- [Eloquent: Factories](#eloquent-factories)
- [Eloquent: Mutators & Casting](#eloquent-mutators-casting)
- [Eloquent: Relationships](#eloquent-relationships)
- [Eloquent: API Resources](#eloquent-api-resources)
- [Eloquent: Serialization](#eloquent-serialization)
- [Eloquent: Getting Started](#eloquent-getting-started)
- [Encryption](#encryption)
- [Laravel Envoy](#laravel-envoy)
- [Error Handling](#error-handling)
- [Events](#events)
- [Facades](#facades)
- [File Storage](#file-storage)
- [Laravel Folio](#laravel-folio)
- [Laravel Fortify](#laravel-fortify)
- [Frontend](#frontend)
- [Hashing](#hashing)
- [Laravel Head](#laravel-head)
- [Helpers](#helpers)
- [Laravel Homestead](#laravel-homestead)
- [Laravel Horizon](#laravel-horizon)
- [HTTP Client](#http-client)
- [HTTP Tests](#http-tests)
- [Image Manipulation](#image-manipulation)
- [Installation](#installation)
- [Request Lifecycle](#request-lifecycle)
- [Localization](#localization)
- [Logging](#logging)
- [Mail](#mail)
- [Laravel MCP](#laravel-mcp)
- [Middleware](#middleware)
- [Database: Migrations](#database-migrations)
- [Laravel Mix](#laravel-mix)
- [Mocking](#mocking)
- [MongoDB](#mongodb)
- [Notifications](#notifications)
- [Laravel Octane](#laravel-octane)
- [Package Development](#package-development)
- [Database: Pagination](#database-pagination)
- [Laravel Passport](#laravel-passport)
- [Resetting Passwords](#resetting-passwords)
- [Laravel Pennant](#laravel-pennant)
- [Laravel Pint](#laravel-pint)
- [Precognition](#precognition)
- [Processes](#processes)
- [Prompts](#prompts)
- [Service Providers](#service-providers)
- [Laravel Pulse](#laravel-pulse)
- [Database: Query Builder](#database-query-builder)
- [Queues](#queues)
- [Rate Limiting](#rate-limiting)
- [Redis](#redis)
- [Release Notes](#release-notes)
- [HTTP Requests](#http-requests)
- [HTTP Responses](#http-responses)
- [Laravel Reverb](#laravel-reverb)
- [Routing](#routing)
- [Laravel Sail](#laravel-sail)
- [Laravel Sanctum](#laravel-sanctum)
- [Task Scheduling](#task-scheduling)
- [Laravel Scout](#laravel-scout)
- [Search](#search)
- [Database: Seeding](#database-seeding)
- [HTTP Session](#http-session)
- [Laravel Socialite](#laravel-socialite)
- [Starter Kits](#starter-kits)
- [Strings](#strings)
- [Directory Structure](#directory-structure)
- [Laravel Telescope](#laravel-telescope)
- [Testing: Getting Started](#testing-getting-started)
- [Upgrade Guide](#upgrade-guide)
- [URL Generation](#url-generation)
- [Laravel Valet](#laravel-valet)
- [Validation](#validation)
- [Email Verification](#email-verification)
- [Views](#views)
- [Asset Bundling (Vite)](#asset-bundling-vite)

---


---

# Laravel AI SDK

*Sección: Laravel | Origen: https://laravel.com/docs/13.x/ai-sdk*

- [Introduction](#introduction)
- [Installation](#installation)
    - [Configuration](#configuration)
    - [Custom Base URLs](#custom-base-urls)
    - [OpenAI-Compatible Providers](#openai-compatible-providers)
    - [Provider Support](#provider-support)
- [Agents](#agents)
    - [Prompting](#prompting)
    - [Conversation Context](#conversation-context)
    - [Structured Output](#structured-output)
    - [Attachments](#attachments)
    - [Streaming](#streaming)
    - [Broadcasting](#broadcasting)
    - [Queueing](#queueing)
    - [Tools](#tools)
    - [Deferred Tool Loading](#deferred-tool-loading)
    - [File Storage Tools](#file-storage-tools)
    - [MCP Tools](#mcp-tools)
    - [Provider Tools](#provider-tools)
    - [Sub-Agents](#sub-agents)
    - [Middleware](#middleware)
    - [Anonymous Agents](#anonymous-agents)
    - [Agent Configuration](#agent-configuration)
    - [Provider Options](#provider-options)
    - [Prompt Caching](#prompt-caching)
- [Human Tool Approval](#human-tool-approval)
    - [Complete Approval Flow](#complete-approval-flow)
- [Images](#images)
- [Audio (TTS)](#audio)
- [Transcription (STT)](#transcription)
- [Text Summarization](#text-summarization)
- [Embeddings](#embeddings)
    - [Multimodal Embeddings](#multimodal-embeddings)
    - [Querying Embeddings](#querying-embeddings)
    - [Caching Embeddings](#caching-embeddings)
- [Reranking](#reranking)
- [Files](#files)
- [Vector Stores](#vector-stores)
    - [Adding Files to Stores](#adding-files-to-stores)
- [Failover](#failover)
- [Testing](#testing)
    - [Agents](#testing-agents)
    - [Images](#testing-images)
    - [Audio](#testing-audio)
    - [Transcriptions](#testing-transcriptions)
    - [Embeddings](#testing-embeddings)
    - [Reranking](#testing-reranking)
    - [Files](#testing-files)
    - [Vector Stores](#testing-vector-stores)
- [Events](#events)

<a name="introduction"></a>
## Introduction

The [Laravel AI SDK](https://github.com/laravel/ai) provides a unified, expressive API for interacting with AI providers such as OpenAI, Anthropic, Gemini, and more. With the AI SDK, you can build intelligent agents with tools and structured output, generate images, synthesize and transcribe audio, create vector embeddings, and much more — all using a consistent, Laravel-friendly interface.

<a name="installation"></a>
## Installation

You can install the Laravel AI SDK via Composer:

```shell
composer require laravel/ai
```

Next, you should publish the AI SDK configuration and migration files using the `vendor:publish` Artisan command:

```shell
php artisan vendor:publish --provider="Laravel\Ai\AiServiceProvider"
```

Finally, you should run your application's database migrations. This will create a `agent_conversations` and `agent_conversation_messages` table that the AI SDK uses to power its conversation storage:

```shell
php artisan migrate
```

<a name="configuration"></a>
### Configuration

You may define your AI provider credentials in your application's `config/ai.php` configuration file or as environment variables in your application's `.env` file:

```ini
ANTHROPIC_API_KEY=
AZURE_OPENAI_API_KEY=
COHERE_API_KEY=
DEEPSEEK_API_KEY=
ELEVENLABS_API_KEY=
GEMINI_API_KEY=
GROQ_API_KEY=
MISTRAL_API_KEY=
OLLAMA_API_KEY=
OPENAI_API_KEY=
OPENAI_COMPATIBLE_API_KEY=
OPENAI_COMPATIBLE_URL=
OPENROUTER_API_KEY=
JINA_API_KEY=
VOYAGEAI_API_KEY=
XAI_API_KEY=
```

The default models used for text, images, audio, transcription, and embeddings may also be configured in your application's `config/ai.php` configuration file.

<a name="custom-base-urls"></a>
### Custom Base URLs

By default, the Laravel AI SDK connects directly to each provider's public API endpoint. However, you may need to route requests through a different endpoint - for example, when using a proxy service to centralize API key management, implement rate limiting, or route traffic through a corporate gateway.

You may configure custom base URLs by adding a `url` parameter to your provider configuration:

```php
'providers' => [
    'openai' => [
        'driver' => 'openai',
        'key' => env('OPENAI_API_KEY'),
        'url' => env('OPENAI_URL'),
    ],

    'anthropic' => [
        'driver' => 'anthropic',
        'key' => env('ANTHROPIC_API_KEY'),
        'url' => env('ANTHROPIC_BASE_URL'),
    ],
],
```

This is useful when routing requests through a proxy service (such as LiteLLM or Azure OpenAI Gateway) or using alternative endpoints.

Custom base URLs are supported for the following providers: OpenAI, Anthropic, Gemini, Groq, Cohere, DeepSeek, xAI, and OpenRouter.

<a name="openai-compatible-providers"></a>
### OpenAI-Compatible Providers

If you are using an OpenAI-compatible API, such as LM Studio, vLLM, Together, Fireworks, or a local gateway, you may configure an `openai-compatible` provider. The `url` option is required, while the `key` option is optional and will be sent as a bearer token when present:

```php
'providers' => [
    'local' => [
        'driver' => 'openai-compatible',
        'url' => env('LOCAL_AI_URL'),
        'key' => env('LOCAL_AI_API_KEY'),
    ],
],
```

Once configured, you may use the named provider like any other provider:

```php
agent()->prompt('What is Laravel?', provider: 'local', model: 'local-model');
```

You may also configure a default text model for the provider so that you do not need to pass a model explicitly:

```php
'local' => [
    'driver' => 'openai-compatible',
    'url' => env('LOCAL_AI_URL'),
    'key' => env('LOCAL_AI_API_KEY'),
    'models' => [
        'text' => [
            'default' => env('LOCAL_AI_MODEL'),
        ],
    ],
],
```

You may add custom HTTP headers to every outgoing request for the provider by defining a `headers` array in its configuration. This is useful when an endpoint requires an additional identifying or authentication header beyond the bearer token:

```php
'local' => [
    'driver' => 'openai-compatible',
    'url' => env('LOCAL_AI_URL'),
    'key' => env('LOCAL_AI_API_KEY'),
    'headers' => [
        'X-Tenant-Id' => env('LOCAL_AI_TENANT_ID'),
    ],
],
```

OpenAI-compatible providers support text generation, streaming, tools, structured output, image attachments, embeddings, and transcription. If your endpoint requires additional request body fields, provide them using [provider options](#provider-options).

<a name="openai-compatible-embeddings"></a>
#### OpenAI-Compatible Embeddings

Since arbitrary endpoints have no known models, you must configure a default embeddings model to use `embeddings()` with an OpenAI-compatible provider. You may also configure a fixed dimensions value; if omitted, the request is sent without a `dimensions` parameter and the model's native dimensions are used.

```php
'local' => [
    'driver' => 'openai-compatible',
    'url' => env('LOCAL_AI_URL'),
    'key' => env('LOCAL_AI_API_KEY'),
    'models' => [
        'embeddings' => [
            'default' => 'text-embedding-qwen3-embedding-0.6b',
            'dimensions' => 1024, // optional
        ],
    ],
],
```

<a name="openai-compatible-transcriptions"></a>
#### OpenAI-Compatible Transcriptions

Likewise, you must configure a default transcription model to use `Transcription` with an OpenAI-compatible provider. The audio will be uploaded to the endpoint's `/audio/transcriptions` route as a standard multipart request:

```php
'local' => [
    'driver' => 'openai-compatible',
    'url' => env('LOCAL_AI_URL'),
    'key' => env('LOCAL_AI_API_KEY'),
    'models' => [
        'transcription' => [
            'default' => 'whisper-1',
        ],
    ],
],
```

> [!NOTE]
> OpenAI-compatible and Groq providers do not support diarization. Invoking the `diarize` method when using these providers will throw an exception.

<a name="provider-support"></a>
### Provider Support

The AI SDK supports a variety of providers across its features. The following table summarizes which providers are available for each feature:

<div class="overflow-auto">

| Feature | Providers |
|---|---|
| Text | OpenAI, OpenAI Compatible, Anthropic, Gemini, Azure, Bedrock, Groq, xAI, DeepSeek, Mistral, Ollama, OpenRouter |
| Images | OpenAI, Gemini, xAI, Azure, Bedrock, OpenRouter |
| TTS | OpenAI, ElevenLabs, Gemini, Mistral |
| STT | OpenAI, OpenAI Compatible, ElevenLabs, Groq, Mistral, Gemini |
| Embeddings | OpenAI, OpenAI Compatible, Gemini, Azure, Bedrock, Cohere, Mistral, Jina, VoyageAI, Ollama, OpenRouter |
| Reranking | Cohere, Jina, VoyageAI, Bedrock |
| Files | OpenAI, Anthropic, Gemini, Azure |

</div>

The `Laravel\Ai\Enums\Lab` enum may be used to reference providers throughout your code instead of using plain strings:

```php
use Laravel\Ai\Enums\Lab;

Lab::Anthropic;
Lab::OpenAI;
Lab::OpenAiCompatible;
Lab::Gemini;
// ...
```

<a name="agents"></a>
## Agents

Agents are the fundamental building block for interacting with AI providers in the Laravel AI SDK. Each agent is a dedicated PHP class that encapsulates the instructions, conversation context, tools, and output schema needed to interact with a large language model. Think of an agent as a specialized assistant — a sales coach, a document analyzer, a support bot — that you configure once and prompt as needed throughout your application.

You can create an agent via the `make:agent` Artisan command:

```shell
php artisan make:agent SalesCoach

php artisan make:agent SalesCoach --structured
```

Within the generated agent class, you can define the system prompt / instructions, message context, available tools, and output schema (if applicable):

```php
<?php

namespace App\Ai\Agents;

use App\Ai\Tools\RetrievePreviousTranscripts;
use App\Models\History;
use App\Models\User;
use Illuminate\Contracts\JsonSchema\JsonSchema;
use Laravel\Ai\Contracts\Agent;
use Laravel\Ai\Contracts\Conversational;
use Laravel\Ai\Contracts\HasStructuredOutput;
use Laravel\Ai\Contracts\HasTools;
use Laravel\Ai\Messages\Message;
use Laravel\Ai\Promptable;
use Stringable;

class SalesCoach implements Agent, Conversational, HasTools, HasStructuredOutput
{
    use Promptable;

    public function __construct(public User $user) {}

    /**
     * Get the instructions that the agent should follow.
     */
    public function instructions(): Stringable|string
    {
        return 'You are a sales coach, analyzing transcripts and providing feedback and an overall sales strength score.';
    }

    /**
     * Get the list of messages comprising the conversation so far.
     */
    public function messages(): iterable
    {
        return History::where('user_id', $this->user->id)
            ->latest()
            ->limit(50)
            ->get()
            ->reverse()
            ->map(function ($message) {
                return new Message($message->role, $message->content);
            })->all();
    }

    /**
     * Get the tools available to the agent.
     *
     * @return Tool[]
     */
    public function tools(): iterable
    {
        return [
            new RetrievePreviousTranscripts,
        ];
    }

    /**
     * Get the agent's structured output schema definition.
     */
    public function schema(JsonSchema $schema): array
    {
        return [
            'feedback' => $schema->string()->required(),
            'score' => $schema->integer()->min(1)->max(10)->required(),
        ];
    }
}
```

<a name="prompting"></a>
### Prompting

To prompt an agent, first create an instance using the `make` method or standard instantiation, then call `prompt`:

```php
$response = (new SalesCoach)
    ->prompt('Analyze this sales transcript...');

return (string) $response;
```

The `make` method resolves your agent from the container, allowing automatic dependency injection. You may also pass arguments to the agent's constructor:

```php
$agent = SalesCoach::make(user: $user);
```

By passing additional arguments to the `prompt` method, you may override the default provider, model, or HTTP timeout when prompting:

```php
$response = (new SalesCoach)->prompt(
    'Analyze this sales transcript...',
    provider: Lab::Anthropic,
    model: 'claude-sonnet-5',
    timeout: 120,
);
```

<a name="raw-http-responses"></a>
#### Raw HTTP Responses

Every response returned from a text-generating agent exposes the raw HTTP response from the underlying provider API call via a `raw` property. This gives you access to provider-specific information that isn't part of the AI SDK's generic response - rate-limit headers, request IDs, or other exact payload fields:

```php
$response = (new SalesCoach)->prompt('Analyze this sales transcript...');

$response->raw; // Illuminate\Http\Client\Response|null

$response->raw->header('X-RateLimit-Remaining-Requests');
$response->raw->json('id');
```

In a tool-call loop, each step retains the raw response of its own request:

```php
foreach ($response->steps as $step) {
    $step->raw?->header('X-RateLimit-Remaining-Requests');
}
```

> **Note:** The `raw` property is `null` when streaming a response, when using the Bedrock provider (which performs its API calls via the AWS SDK instead of an HTTP client), and on faked responses unless one is provided explicitly via `withRawResponse`.

<a name="conversation-context"></a>
### Conversation Context

If your agent implements the `Conversational` interface, you may use the `messages` method to return the previous conversation context, if applicable:

```php
use App\Models\History;
use Laravel\Ai\Messages\Message;

/**
 * Get the list of messages comprising the conversation so far.
 */
public function messages(): iterable
{
    return History::where('user_id', $this->user->id)
        ->latest()
        ->limit(50)
        ->get()
        ->reverse()
        ->map(function ($message) {
            return new Message($message->role, $message->content);
        })->all();
}
```

<a name="remembering-conversations"></a>
#### Remembering Conversations

> **Warning:** Before using the `RemembersConversations` trait, you should publish and run the AI SDK migrations using the `vendor:publish` Artisan command. These migrations will create the necessary database tables to store conversations.

If you would like Laravel to automatically store and retrieve conversation history for your agent, you may use the `RemembersConversations` trait. This trait provides a simple way to persist conversation messages to the database without manually implementing the `Conversational` interface:

```php
<?php

namespace App\Ai\Agents;

use Laravel\Ai\Concerns\RemembersConversations;
use Laravel\Ai\Contracts\Agent;
use Laravel\Ai\Contracts\Conversational;
use Laravel\Ai\Promptable;

class SalesCoach implements Agent, Conversational
{
    use Promptable, RemembersConversations;

    /**
     * Get the instructions that the agent should follow.
     */
    public function instructions(): string
    {
        return 'You are a sales coach...';
    }
}
```

When using the `RemembersConversations` trait, do not manually define a `messages` method in your agent class. If a `messages` method is present, it will take precedence over the trait's implementation and conversation history will not be loaded from the database.

To start a new conversation for a user, call the `forUser` method before prompting:

```php
$response = (new SalesCoach)->forUser($user)->prompt('Hello!');

$conversationId = $response->conversationId;
```

The conversation ID is returned on the response and can be stored for future reference. If you would like to retrieve all of a user's conversations using Eloquent, you may add the `HasConversations` trait to your user model:

```php
<?php

namespace App\Models;

use Illuminate\Foundation\Auth\User as Authenticatable;
use Laravel\Ai\Concerns\HasConversations;

class User extends Authenticatable
{
    use HasConversations;
}
```

Once the trait has been added to your model, you may retrieve and query the user's conversations via the `conversations` relationship:

```php
$conversations = $user->conversations()
    ->latest('updated_at')
    ->paginate(20);
```

To continue an existing conversation, use the `continue` method:

```php
$response = (new SalesCoach)
    ->continue($conversationId, as: $user)
    ->prompt('Tell me more about that.');
```

When using the `RemembersConversations` trait, previous messages are automatically loaded and included in the conversation context when prompting. New messages (both user and assistant) are automatically stored after each interaction.

<a name="conversation-participants"></a>
#### Conversation Participants

Although users are the most common conversation participants, conversations may belong to any Eloquent model. Use the `forParticipant` method to start a conversation for another type of model:

```php
$response = (new SalesCoach)
    ->forParticipant($team)
    ->prompt('Review our latest sales results.');
```

The participant's morph class and primary key are stored with the conversation. Therefore, models of different types that have the same primary key, such as `User` ID `1` and `Team` ID `1`, have separate conversation histories. The `forUser` method is an alias for `forParticipant`.

You may continue the participant's most recent conversation using the `continueLastConversation` method:

```php
$response = (new SalesCoach)
    ->continueLastConversation($team)
    ->prompt('Tell me more about that.');
```

When continuing a specific conversation, pass the participant to the `continue` method:

```php
$response = (new SalesCoach)
    ->continue($conversationId, as: $team)
    ->prompt('Tell me more about that.');
```

The `HasConversations` trait may be added to any Eloquent model that participates in conversations. The resulting `conversations` relationship is a polymorphic relationship scoped to that model's type and primary key. You may also access the participant that owns a conversation through its inverse relationship:

```php
$conversations = $team->conversations;

$participant = $conversation->participant;
```

If your application uses multiple participant model types, you should consider defining an [Eloquent morph map](/docs/{{version}}/eloquent-relationships#custom-polymorphic-types) so that stored participant types are not coupled to your model class names.

> [!WARNING]
> The `continue` method does not verify that the given participant owns the conversation. Your application should authorize access to the conversation before continuing it.

<a name="structured-output"></a>
### Structured Output

If you would like your agent to return structured output, implement the `HasStructuredOutput` interface, which requires that your agent define a `schema` method:

```php
<?php

namespace App\Ai\Agents;

use Illuminate\Contracts\JsonSchema\JsonSchema;
use Laravel\Ai\Contracts\Agent;
use Laravel\Ai\Contracts\HasStructuredOutput;
use Laravel\Ai\Promptable;

class SalesCoach implements Agent, HasStructuredOutput
{
    use Promptable;

    // ...

    /**
     * Get the agent's structured output schema definition.
     */
    public function schema(JsonSchema $schema): array
    {
        return [
            'score' => $schema->integer()->required(),
        ];
    }
}
```

When prompting an agent that returns structured output, you can access the returned `StructuredAgentResponse` like an array:

```php
$response = (new SalesCoach)->prompt('Analyze this sales transcript...');

return $response['score'];
```

<a name="structured-output-nested-objects"></a>
#### Nested Objects

To define nested structured output, use the `object` method with a closure:

```php
<?php

namespace App\Ai\Agents;

use Illuminate\Contracts\JsonSchema\JsonSchema;
use Laravel\Ai\Contracts\Agent;
use Laravel\Ai\Contracts\HasStructuredOutput;
use Laravel\Ai\Promptable;

class SalesCoach implements Agent, HasStructuredOutput
{
    use Promptable;

    // ...

    /**
     * Get the agent's structured output schema definition.
     */
    public function schema(JsonSchema $schema): array
    {
        return [
            'score' => $schema->integer()->required(),
            'metadata' => $schema->object(fn ($schema) => [
                'confidence' => $schema->string()->enum(['low', 'medium', 'high'])->required(),
                'language' => $schema->string()->required(),
            ])->required(),
        ];
    }
}
```

<a name="structured-output-arrays-of-objects"></a>
#### Arrays of Objects

If your agent should return a list of structured items, combine the `array` and `object` methods:

```php
public function schema(JsonSchema $schema): array
{
    return [
        'feedback' => $schema->array()
            ->items(
                $schema->object(fn ($schema) => [
                    'comment' => $schema->string()->required(),
                    'score' => $schema->integer()->required(),
                ])
            )
            ->required(),
    ];
}
```

If a value may match one of several schemas, use the `anyOf` method:

```php
public function schema(JsonSchema $schema): array
{
    return [
        'content' => $schema->anyOf([
            $schema->object(fn ($schema) => [
                'type' => $schema->string()->enum(['article'])->required(),
                'title' => $schema->string()->required(),
            ]),
            $schema->object(fn ($schema) => [
                'type' => $schema->string()->enum(['image'])->required(),
                'url' => $schema->string()->required(),
            ]),
        ])->required(),
    ];
}
```

<a name="attachments"></a>
### Attachments

When prompting, you may also pass attachments with the prompt to allow the model to inspect images and documents:

```php
use App\Ai\Agents\SalesCoach;
use Laravel\Ai\Files;

$response = (new SalesCoach)->prompt(
    'Analyze the attached sales transcript...',
    attachments: [
        Files\Document::fromStorage('transcript.pdf'), // Attach a document from a filesystem disk...
        Files\Document::fromPath('/home/laravel/transcript.md'), // Attach a document from a local path...
        $request->file('transcript'), // Attach an uploaded file...
    ]
);
```

Likewise, the `Laravel\Ai\Files\Image` class may be used to attach images to a prompt:

```php
use App\Ai\Agents\ImageAnalyzer;
use Laravel\Ai\Files;

$response = (new ImageAnalyzer)->prompt(
    'What is in this image?',
    attachments: [
        Files\Image::fromStorage('photo.jpg'), // Attach an image from a filesystem disk...
        Files\Image::fromPath('/home/laravel/photo.jpg'), // Attach an image from a local path...
        $request->file('photo'), // Attach an uploaded file...
    ]
);
```

<a name="streaming"></a>
### Streaming

You may stream an agent's response by invoking the `stream` method. The returned `StreamableAgentResponse` may be returned from a route to automatically send a streaming response (SSE) to the client:

```php
use App\Ai\Agents\SalesCoach;

Route::get('/coach', function () {
    return (new SalesCoach)->stream('Analyze this sales transcript...');
});
```

The `then` method may be used to provide a closure that will be invoked when the entire response has been streamed to the client:

```php
use App\Ai\Agents\SalesCoach;
use Laravel\Ai\Responses\StreamedAgentResponse;

Route::get('/coach', function () {
    return (new SalesCoach)
        ->stream('Analyze this sales transcript...')
        ->then(function (StreamedAgentResponse $response) {
            // $response->text, $response->events, $response->usage...
        });
});
```

Alternatively, you may iterate through the streamed events manually:

```php
$stream = (new SalesCoach)->stream('Analyze this sales transcript...');

foreach ($stream as $event) {
    // ...
}
```

<a name="streaming-using-the-vercel-ai-sdk-protocol"></a>
#### Streaming Using the Vercel AI SDK Protocol

You may stream the events using the [Vercel AI SDK stream protocol](https://ai-sdk.dev/docs/ai-sdk-ui/stream-protocol) by invoking the `usingVercelDataProtocol` method on the streamable response:

```php
use App\Ai\Agents\SalesCoach;

Route::get('/coach', function () {
    return (new SalesCoach)
        ->stream('Analyze this sales transcript...')
        ->usingVercelDataProtocol();
});
```

<a name="broadcasting"></a>
### Broadcasting

You may broadcast streamed events in a few different ways. First, you can simply invoke the `broadcast` or `broadcastNow` method on a streamed event:

```php
use App\Ai\Agents\SalesCoach;
use Illuminate\Broadcasting\Channel;

$stream = (new SalesCoach)->stream('Analyze this sales transcript...');

foreach ($stream as $event) {
    $event->broadcast(new Channel('channel-name'));
}
```

Or, you can invoke an agent's `broadcastOnQueue` method to queue the agent operation and broadcast the streamed events as they are available:

```php
(new SalesCoach)->broadcastOnQueue(
    'Analyze this sales transcript...'
    new Channel('channel-name'),
);
```

<a name="skipping-oversized-events"></a>
#### Skipping Oversized Events

Some broadcasting platforms limit WebSocket messages to around 10KB. Data-heavy stream events, like large tool results, can exceed this limit and cause broadcasting to fail. You may exclude specific event types from broadcasting using the `WithoutBroadcasting` attribute:

```php
<?php

namespace App\Ai\Agents;

use Laravel\Ai\Attributes\WithoutBroadcasting;
use Laravel\Ai\Contracts\Agent;
use Laravel\Ai\Contracts\HasTools;
use Laravel\Ai\Promptable;
use Laravel\Ai\Streaming\Events\ToolCall;
use Laravel\Ai\Streaming\Events\ToolResult;

#[WithoutBroadcasting(ToolCall::class, ToolResult::class)]
class SearchAgent implements Agent, HasTools
{
    use Promptable;

    // ...
}
```

The excluded events are never broadcast, but they are still persisted to the `agent_conversation_messages` table, so your frontend can load the full tool data after the stream completes. This works for both queued (`broadcastOnQueue`) and synchronous (`broadcast` / `broadcastNow`) broadcasting.

<a name="queueing"></a>
### Queueing

Using an agent's `queue` method, you may prompt the agent, but allow it to process the response in the background, keeping your application feeling fast and responsive. The `then` and `catch` methods may be used to register closures that will be invoked when a response is available or if an exception occurs:

```php
use Illuminate\Http\Request;
use Laravel\Ai\Responses\AgentResponse;
use Throwable;

Route::post('/coach', function (Request $request) {
    (new SalesCoach)
        ->queue($request->input('transcript'))
        ->then(function (AgentResponse $response) {
            // ...
        })
        ->catch(function (Throwable $e) {
            // ...
        });

    return back();
});
```

<a name="tools"></a>
### Tools

Tools may be used to give agents additional functionality that they can utilize while responding to prompts. Tools can be created using the `make:tool` Artisan command:

```shell
php artisan make:tool RandomNumberGenerator
```

The generated tool will be placed in your application's `app/Ai/Tools` directory. Each tool contains a `handle` method that will be invoked by the agent when it needs to utilize the tool:

```php
<?php

namespace App\Ai\Tools;

use Illuminate\Contracts\JsonSchema\JsonSchema;
use Laravel\Ai\Contracts\Tool;
use Laravel\Ai\Tools\Request;
use Stringable;

class RandomNumberGenerator implements Tool
{
    /**
     * Get the description of the tool's purpose.
     */
    public function description(): Stringable|string
    {
        return 'This tool may be used to generate cryptographically secure random numbers.';
    }

    /**
     * Execute the tool.
     */
    public function handle(Request $request): Stringable|string
    {
        return (string) random_int($request['min'], $request['max']);
    }

    /**
     * Get the tool's schema definition.
     */
    public function schema(JsonSchema $schema): array
    {
        return [
            'min' => $schema->integer()->min(0)->required(),
            'max' => $schema->integer()->required(),
        ];
    }
}
```

Once you have defined your tool, you may return it from the `tools` method of any of your agents:

```php
use App\Ai\Tools\RandomNumberGenerator;

/**
 * Get the tools available to the agent.
 *
 * @return Tool[]
 */
public function tools(): iterable
{
    return [
        new RandomNumberGenerator,
    ];
}
```

<a name="validating-tool-arguments"></a>
#### Validating Tool Arguments

Although your tool's schema constrains the arguments a model may provide, you may validate the incoming arguments using the request's `validate` method:

```php
public function handle(Request $request): Stringable|string
{
    $validated = $request->validate([
        'city' => 'required|string',
        'days' => 'required|integer|max:7',
    ]);

    return $this->forecast($validated['city'], $validated['days']);
}
```

When validation fails, the validation messages are returned to the model as the tool's result, allowing it to correct the arguments and call the tool again.

<a name="repairing-tool-calls"></a>
#### Repairing Tool Calls

Use the `RepairToolCalls` attribute to let an agent recover when a model calls an unknown local tool. Laravel returns the failed call to the model with the names of the available local tools, allowing it to correct the call:

```php
use Laravel\Ai\Attributes\RepairToolCalls;
use Laravel\Ai\Contracts\Agent;
use Laravel\Ai\Contracts\HasTools;
use Laravel\Ai\Promptable;

#[RepairToolCalls]
class SupportAgent implements Agent, HasTools
{
    use Promptable;

    // ...
}
```

When Laravel derives the maximum number of steps automatically, this attribute adds one step for the repaired call. Explicit `MaxSteps` limits are unchanged.

<a name="similarity-search"></a>
#### Similarity Search

The `SimilaritySearch` tool allows agents to search for documents similar to a given query using vector embeddings stored in your database. This is useful for retrieval-augmented generation (RAG) when you want to give agents access to search your application's data.

The simplest way to create a similarity search tool is using the `usingModel` method with an Eloquent model that has vector embeddings:

```php
use App\Models\Document;
use Laravel\Ai\Tools\SimilaritySearch;

public function tools(): iterable
{
    return [
        SimilaritySearch::usingModel(Document::class, 'embedding'),
    ];
}
```

The first argument is the Eloquent model class, and the second argument is the column containing the vector embeddings.

You may also provide a minimum similarity threshold between `0.0` and `1.0` and a closure to customize the query:

```php
SimilaritySearch::usingModel(
    model: Document::class,
    column: 'embedding',
    minSimilarity: 0.7,
    limit: 10,
    query: fn ($query) => $query->where('published', true),
),
```

For more control, you may create a similarity search tool with a custom closure that returns the search results:

```php
use App\Models\Document;
use Laravel\Ai\Tools\SimilaritySearch;

public function tools(): iterable
{
    return [
        new SimilaritySearch(using: function (string $query) {
            return Document::query()
                ->where('user_id', $this->user->id)
                ->whereVectorSimilarTo('embedding', $query)
                ->limit(10)
                ->get();
        }),
    ];
}
```

You may customize the tool's description using the `withDescription` method:

```php
SimilaritySearch::usingModel(Document::class, 'embedding')
    ->withDescription('Search the knowledge base for relevant articles.'),
```

<a name="deferred-tool-loading"></a>
### Deferred Tool Loading

By default, every tool an agent exposes is sent to the provider with each request. When an agent provides a large number of tools, this consumes tokens and may reduce the accuracy of the model's tool selection. Using the `ToolSearch` provider tool with OpenAI or Anthropic, you may defer tool definitions so that the provider only loads them when they are needed:

```php
use App\Ai\Tools\RefundOrder;
use App\Ai\Tools\SearchInvoices;
use App\Ai\Tools\Weather;
use Laravel\Ai\Providers\Tools\ToolSearch;

public function tools(): iterable
{
    return [
        new Weather,
        new ToolSearch(tools: [
            new SearchInvoices,
            new RefundOrder,
        ]),
    ];
}
```

The wrapped tools do not require any modification. The provider will search for and load them when they are relevant to the prompt, after which the agent may call them like any other tool.

When using Anthropic, the `strategy` argument may be used to determine how the provider should search for deferred tools. The supported strategies are `regex` (default) and `bm25`:

```php
new ToolSearch(tools: [new SearchInvoices], strategy: 'bm25'),
```

When using Anthropic, additional provider-specific options may be passed to the search tool using the `withProviderOptions` method:

```php
(new ToolSearch(tools: [new SearchInvoices]))
    ->withProviderOptions(['cache_control' => ['type' => 'ephemeral']]),
```

> [!WARNING]
> Providers that do not support tool search will throw an exception rather than silently discarding the deferred tools. In addition, Anthropic requires that at least one tool is provided outside of the `ToolSearch` wrapper.

<a name="file-storage-tools"></a>
### File Storage Tools

The `FileStorage` tool factory allows you to give agents access to a Laravel [filesystem disk](/docs/{{version}}/filesystem). The `all` method returns tools that allow the agent to list, read, inspect, generate URLs for, write, delete, and copy files on the given disk:

```php
use Laravel\Ai\Tools\FileStorage;

public function tools(): iterable
{
    return FileStorage::all('local');
}
```

If your agent should only be able to inspect files, use the `readOnly` method:

```php
return FileStorage::readOnly('local');
```

These methods return an `Illuminate\Support\Collection`, allowing you to further filter the tools that are provided to the agent:

```php
use Laravel\Ai\Tools\Filesystem\DeleteFile;

return FileStorage::all('s3')
    ->reject(fn ($tool) => $tool instanceof DeleteFile);
```

<a name="mcp-tools"></a>
### MCP Tools

If your application uses [Laravel MCP](/docs/{{version}}/mcp), you may give your agents tools exposed by [Model Context Protocol](https://modelcontextprotocol.io) servers. Using the [Laravel MCP client](/docs/{{version}}/mcp#client), you may connect to a remote or local MCP server and pass its tools directly to your agent.

> [!NOTE]
> MCP tools require the [Laravel MCP](/docs/{{version}}/mcp) package to be installed in your application.

Because an MCP client's `tools` method returns a collection, spread it into your agent's `tools` array using the `...` operator:

```php
use App\Ai\Tools\RandomNumberGenerator;
use Laravel\Mcp\Client;

/**
 * Get the tools available to the agent.
 *
 * @return Tool[]
 */
public function tools(): iterable
{
    return [
        ...Client::web('https://mcp.example.com')
            ->withToken($token)
            ->tools(),

        new RandomNumberGenerator,
    ];
}
```

The AI SDK automatically wraps each MCP tool so the agent can call it like any other tool. You may also use a [named MCP client](/docs/{{version}}/mcp#named-clients):

```php
use Laravel\Mcp\Facades\Mcp;

public function tools(): iterable
{
    return [
        ...Mcp::client('github')->tools(),
    ];
}
```

Or connect to a [local MCP server](/docs/{{version}}/mcp#client-connecting):

```php
use Laravel\Mcp\Client;

public function tools(): iterable
{
    return [
        ...Client::local('php', ['artisan', 'mcp:start'])->tools(),
    ];
}
```

For more information on creating and authenticating MCP clients, including bearer tokens and OAuth, consult the [MCP client documentation](/docs/{{version}}/mcp#client).

<a name="provider-tools"></a>
### Provider Tools

Provider tools are special tools implemented natively by AI providers, offering capabilities like web searching, URL fetching, and file searching. Unlike regular tools, provider tools are executed by the provider itself rather than your application.

Provider tools can be returned by your agent's `tools` method.

<a name="web-search"></a>
#### Web Search

The `WebSearch` provider tool allows agents to search the web for real-time information. This is useful for answering questions about current events, recent data, or topics that may have changed since the model's training cutoff.

**Supported providers:** Anthropic, OpenAI, Azure, Gemini, xAI, OpenRouter

```php
use Laravel\Ai\Providers\Tools\WebSearch;

public function tools(): iterable
{
    return [
        new WebSearch,
    ];
}
```

You may configure the web search tool to limit the number of searches or restrict results to specific domains:

```php
(new WebSearch)->max(5)->allow(['laravel.com', 'php.net']),
```

To refine search results based on user location, use the `location` method:

```php
(new WebSearch)->location(
    city: 'New York',
    region: 'NY',
    country: 'US'
);
```

<a name="web-fetch"></a>
#### Web Fetch

The `WebFetch` provider tool allows agents to fetch and read the contents of web pages. This is useful when you need the agent to analyze specific URLs or retrieve detailed information from known web pages.

**Supported providers:** Anthropic, Gemini, OpenRouter

```php
use Laravel\Ai\Providers\Tools\WebFetch;

public function tools(): iterable
{
    return [
        new WebFetch,
    ];
}
```

You may configure the web fetch tool to limit the number of fetches or restrict to specific domains:

```php
(new WebFetch)->max(3)->allow(['docs.laravel.com']),
```

<a name="file-search"></a>
#### File Search

The `FileSearch` provider tool allows agents to search through [files](#files) stored in [vector stores](#vector-stores). This enables retrieval-augmented generation (RAG) by allowing the agent to search your uploaded documents for relevant information.

**Supported providers:** OpenAI, Gemini, xAI

```php
use Laravel\Ai\Providers\Tools\FileSearch;

public function tools(): iterable
{
    return [
        new FileSearch(stores: ['store_id']),
    ];
}
```

You may provide multiple vector store IDs to search across multiple stores:

```php
new FileSearch(stores: ['store_1', 'store_2']);
```

If your files have [metadata](#adding-files-to-stores), you may filter the search results by providing a `where` argument. For simple equality filters, pass an array:

```php
new FileSearch(stores: ['store_id'], where: [
    'author' => 'Taylor Otwell',
    'year' => 2026,
]);
```

For more complex filters, you may pass a closure that receives a `FileSearchQuery` instance:

```php
use Laravel\Ai\Providers\Tools\FileSearchQuery;

new FileSearch(stores: ['store_id'], where: fn (FileSearchQuery $query) =>
    $query->where('author', 'Taylor Otwell')
        ->whereNot('status', 'draft')
        ->whereIn('category', ['news', 'updates'])
);
```

<a name="sub-agents"></a>
### Sub-Agents

Agents may also be returned from another agent's `tools` method. When an agent is returned as a tool, the parent agent may delegate a specific task to the sub-agent and use the sub-agent's response while answering the original prompt. This is useful when a general-purpose agent needs access to specialized agents with their own instructions, tools, model configuration, or provider preferences.

For example, a customer support agent could delegate refund eligibility questions to a dedicated refunds agent:

```php
<?php

namespace App\Ai\Agents;

use Laravel\Ai\Contracts\Agent;
use Laravel\Ai\Contracts\HasTools;
use Laravel\Ai\Promptable;

class CustomerSupportAgent implements Agent, HasTools
{
    use Promptable;

    /**
     * Get the instructions that the agent should follow.
     */
    public function instructions(): string
    {
        return 'You help customers with account, order, and billing questions. Delegate refund policy questions to the refunds specialist.';
    }

    /**
     * Get the tools available to the agent.
     *
     * @return Tool[]
     */
    public function tools(): iterable
    {
        return [
            new RefundsAgent,
        ];
    }
}
```

To customize how the sub-agent is exposed to the parent agent, implement the `CanActAsTool` interface on the sub-agent and define a tool-facing name and description:

```php
<?php

namespace App\Ai\Agents;

use App\Ai\Tools\LookupOrder;
use Laravel\Ai\Attributes\Provider;
use Laravel\Ai\Contracts\Agent;
use Laravel\Ai\Contracts\CanActAsTool;
use Laravel\Ai\Contracts\HasTools;
use Laravel\Ai\Enums\Lab;
use Laravel\Ai\Promptable;

#[Provider(Lab::Anthropic)]
class RefundsAgent implements Agent, CanActAsTool, HasTools
{
    use Promptable;

    /**
     * Get the instructions that the agent should follow.
     */
    public function instructions(): string
    {
        return 'You are a refunds specialist. Use order details and the refund policy to give concise eligibility guidance.';
    }

    /**
     * Get the agent's tool name.
     */
    public function name(): string
    {
        return 'refunds_specialist';
    }

    /**
     * Get the agent's tool description.
     */
    public function description(): string
    {
        return 'Determine whether an order is eligible for a refund and explain the next step.';
    }

    /**
     * Get the tools available to the agent.
     *
     * @return Tool[]
     */
    public function tools(): iterable
    {
        return [
            new LookupOrder,
        ];
    }
}
```

If a sub-agent does not implement `CanActAsTool`, Laravel will use the agent's class basename as the tool name and a generic description that asks the parent agent to pass a clear, self-contained task description. Each sub-agent invocation runs in isolation and does not receive the parent agent's conversation history.

<a name="middleware"></a>
### Middleware

Agents support middleware, allowing you to intercept and modify prompts before they are sent to the provider. Middleware can be created using the `make:agent-middleware` Artisan command:

```shell
php artisan make:agent-middleware LogPrompts
```

The generated middleware will be placed in your application's `app/Ai/Middleware` directory. To add middleware to an agent, implement the `HasMiddleware` interface and define a `middleware` method that returns an array of middleware classes:

```php
<?php

namespace App\Ai\Agents;

use App\Ai\Middleware\LogPrompts;
use Laravel\Ai\Contracts\Agent;
use Laravel\Ai\Contracts\HasMiddleware;
use Laravel\Ai\Promptable;

class SalesCoach implements Agent, HasMiddleware
{
    use Promptable;

    // ...

    /**
     * Get the agent's middleware.
     */
    public function middleware(): array
    {
        return [
            new LogPrompts,
        ];
    }
}
```

Each middleware class should define a `handle` method that receives the `AgentPrompt` and a `Closure` to pass the prompt to the next middleware:

```php
<?php

namespace App\Ai\Middleware;

use Closure;
use Laravel\Ai\Prompts\AgentPrompt;

class LogPrompts
{
    /**
     * Handle the incoming prompt.
     */
    public function handle(AgentPrompt $prompt, Closure $next)
    {
        Log::info('Prompting agent', ['prompt' => $prompt->prompt]);

        return $next($prompt);
    }
}
```

You may use the `then` method on the response to execute code after the agent has finished processing. This works for both synchronous and streaming responses:

```php
public function handle(AgentPrompt $prompt, Closure $next)
{
    return $next($prompt)->then(function (AgentResponse $response) {
        Log::info('Agent responded', ['text' => $response->text]);
    });
}
```

<a name="anonymous-agents"></a>
### Anonymous Agents

Sometimes you may want to quickly interact with a model without creating a dedicated agent class. You can create an ad-hoc, anonymous agent using the `agent` function:

```php
use function Laravel\Ai\{agent};

$response = agent(
    instructions: 'You are an expert at software development.',
    messages: [],
    tools: [],
)->prompt('Tell me about Laravel')
```

Anonymous agents may also produce structured output:

```php
use Illuminate\Contracts\JsonSchema\JsonSchema;

use function Laravel\Ai\{agent};

$response = agent(
    schema: fn (JsonSchema $schema) => [
        'number' => $schema->integer()->required(),
    ],
)->prompt('Generate a random number less than 100')
```

<a name="agent-configuration"></a>
### Agent Configuration

You may configure text generation options for an agent using PHP attributes. The following attributes are available:

- `MaxSteps`: The maximum number of steps the agent may take when using tools.
- `MaxTokens`: The maximum number of tokens the model may generate.
- `Model`: The model the agent should use.
- `Provider`: The AI provider (or providers for failover) to use for the agent.
- `Temperature`: The sampling temperature to use for generation (0.0 to 1.0).
- `Timeout`: The HTTP timeout in seconds for agent requests (default: 60).
- `TopP`: The nucleus sampling probability to use for generation (0.0 to 1.0).
- `UseCheapestModel`: Use the provider's cheapest text model for cost optimization.
- `UseSmartestModel`: Use the provider's most capable text model for complex tasks.

```php
<?php

namespace App\Ai\Agents;

use Laravel\Ai\Attributes\MaxSteps;
use Laravel\Ai\Attributes\MaxTokens;
use Laravel\Ai\Attributes\Model;
use Laravel\Ai\Attributes\Provider;
use Laravel\Ai\Attributes\Temperature;
use Laravel\Ai\Attributes\Timeout;
use Laravel\Ai\Attributes\TopP;
use Laravel\Ai\Contracts\Agent;
use Laravel\Ai\Enums\Lab;
use Laravel\Ai\Promptable;

#[Provider(Lab::Anthropic)]
#[Model('claude-sonnet-5')]
#[MaxSteps(10)]
#[MaxTokens(4096)]
#[Temperature(0.7)]
#[Timeout(120)]
#[TopP(0.9)]
class SalesCoach implements Agent
{
    use Promptable;

    // ...
}
```

The `UseCheapestModel` and `UseSmartestModel` attributes allow you to automatically select the most cost-effective or most capable model for a given provider without specifying a model name. This is useful when you want to optimize for cost or capability across different providers:

```php
use Laravel\Ai\Attributes\UseCheapestModel;
use Laravel\Ai\Attributes\UseSmartestModel;
use Laravel\Ai\Contracts\Agent;
use Laravel\Ai\Promptable;

#[UseCheapestModel]
class SimpleSummarizer implements Agent
{
    use Promptable;

    // Will use the cheapest model (e.g., Haiku)...
}

#[UseSmartestModel]
class ComplexReasoner implements Agent
{
    use Promptable;

    // Will use the most capable model (e.g., Opus)...
}
```

> [!NOTE]
> The underlying model selected by `UseCheapestModel` and `UseSmartestModel` may change between releases of the Laravel AI SDK as providers release new models. Switching models can introduce behavioral changes, deprecated parameters, and significant cost differences. If you need a stable, predictable model and pricing, specify the model explicitly using the `Model` attribute.

<a name="provider-options"></a>
### Provider Options

If your agent needs to pass provider-specific options (such as OpenAI reasoning effort or penalty settings), implement the `HasProviderOptions` contract and define a `providerOptions` method:

```php
<?php

namespace App\Ai\Agents;

use Laravel\Ai\Contracts\Agent;
use Laravel\Ai\Contracts\HasProviderOptions;
use Laravel\Ai\Enums\Lab;
use Laravel\Ai\Promptable;

class SalesCoach implements Agent, HasProviderOptions
{
    use Promptable;

    // ...

    /**
     * Get provider-specific generation options.
     */
    public function providerOptions(Lab|string $provider): array
    {
        return match ($provider) {
            Lab::OpenAI => [
                'reasoning' => ['effort' => 'low'],
                'frequency_penalty' => 0.5,
                'presence_penalty' => 0.3,
            ],
            Lab::Anthropic => [
                'thinking' => ['budget_tokens' => 1024],
                'cache_control' => ['type' => 'ephemeral'],
            ],
            default => [],
        };
    }
}
```

The `providerOptions` method receives the provider currently being used (`Lab` enum or string), allowing you to return different options per provider. This is especially useful when using [failover](#failover), since each fallback provider can receive its own configuration.

The Anthropic example above also enables [prompt caching](#prompt-caching) via `cache_control`.

<a name="prompt-caching"></a>
### Prompt Caching

Most providers cache repeated prompt prefixes automatically and bill the cached portion at a discount. OpenAI, Gemini, Groq, DeepSeek, and xAI require no configuration, and you may inspect the savings via the response's usage:

```php
$response->usage->cacheReadInputTokens;
$response->usage->cacheWriteInputTokens;
```

The `anthropic` and `bedrock` providers only cache when asked. The `CacheInstructions` and `CacheToolDefinitions` attributes place a cache breakpoint at the end of your agent's instructions and tool definitions, so every conversation reads that prefix from the cache instead of writing it again:

```php
use Laravel\Ai\Attributes\CacheInstructions;
use Laravel\Ai\Attributes\CacheToolDefinitions;

#[CacheInstructions]
#[CacheToolDefinitions]
class SalesCoach implements Agent
{
    use Promptable;

    // ...
}
```

If your instructions change on every request, such as when they embed the current date, use `CacheToolDefinitions` alone. Caching a prefix that changes on every request creates a new cache entry each time, so you pay to write it to the cache without ever reusing it.

Providers that do not support these attributes ignore them, so an agent may safely declare them while using [failover](#failover).

Cached prefixes are retained for five minutes by default. Anthropic may retain them for an hour if you pass a TTL to the attribute:

```php
#[CacheInstructions('1h')]
#[CacheToolDefinitions('1h')]
```

Alternatively, Anthropic's automatic caching may be enabled via a top-level `cache_control` [provider option](#provider-options). This places a single breakpoint after the last block of the request, so the breakpoint advances as the conversation grows and each turn reads the previous turns from the cache. Both mechanisms may be combined.

> [!WARNING]
> Because providers build prompts in the order tools, instructions, and messages, caching instructions for an hour also requires caching tool definitions for an hour. Mixing the two throws an `InvalidArgumentException`.

<a name="human-tool-approval"></a>
## Human Tool Approval

> [!WARNING]
> Tool approval requires a `Conversational` agent whose conversation history is persisted so the paused call can be resumed. The `RemembersConversations` trait provides the necessary persistence.

Tools that perform sensitive or irreversible actions may require human approval before they are executed. To make a tool approvable, implement the `Approvable` contract and use the `InteractsWithApprovals` trait. Approvable tools require approval by default:

```php
<?php

namespace App\Ai\Tools;

use Illuminate\Contracts\JsonSchema\JsonSchema;
use Illuminate\Support\Facades\Storage;
use Laravel\Ai\Concerns\InteractsWithApprovals;
use Laravel\Ai\Contracts\Approvable;
use Laravel\Ai\Contracts\Tool;
use Laravel\Ai\Tools\Request;
use Stringable;

class DeleteFile implements Approvable, Tool
{
    use InteractsWithApprovals;

    /**
     * Get the description of the tool's purpose.
     */
    public function description(): Stringable|string
    {
        return 'Delete a file from storage.';
    }

    /**
     * Execute the tool.
     */
    public function handle(Request $request): Stringable|string
    {
        Storage::delete($request['path']);

        return "Deleted [{$request['path']}].";
    }

    /**
     * Get the tool's schema definition.
     */
    public function schema(JsonSchema $schema): array
    {
        return [
            'path' => $schema->string()->required(),
        ];
    }
}
```

To determine whether approval is needed based on the tool call's arguments, define a `needsApproval` method on the tool. This method may return a boolean or an `Approval` instance that includes a reason for the approval request:

```php
use Laravel\Ai\Approvals\Approval;

/**
 * Determine whether the tool needs approval for the given request.
 */
protected function needsApproval(Request $request): Approval|bool
{
    return str_starts_with($request['path'], 'temporary/')
        ? false
        : Approval::required('This will permanently delete a file.');
}
```

You may override a tool's approval requirement when returning it from an agent's `tools` method:

```php
public function tools(): iterable
{
    return [
        (new SendNotification)->withoutApproval(),
        (new DeleteFile)->requireApproval('Deletion review required.'),
    ];
}
```

When an approvable tool is called, the agent pauses before executing it. You may inspect the response's pending approvals, which contain each tool call's ID, tool name, arguments, and approval reason:

```php
$response = (new FileAssistant)
    ->forUser($user)
    ->prompt('Delete the old invoice.');

if ($response->hasPendingApprovals()) {
    foreach ($response->pendingApprovals as $approval) {
        // $approval->id
        // $approval->tool
        // $approval->arguments
        // $approval->reason
    }
}
```

To resume the agent, continue the conversation and provide a `Decisions` instance containing a decision for each pending tool call. Decisions may approve the call, reject it, or edit its arguments before execution:

```php
use Laravel\Ai\Approvals\Decision;
use Laravel\Ai\Approvals\Decisions;

$response = (new FileAssistant)
    ->continue($conversationId, as: $user)
    ->prompt(Decisions::from([
        'call_abc' => Decision::approve(),
        'call_ghi' => Decision::reject('The invoice must be retained.'),
    ]));
```

The boolean values `true` and `false` may be used as shorthand for approval and rejection. Every pending tool call must receive a decision. Unknown, missing, or previously resolved tool call IDs will cause an `ApprovalMismatchException` to be thrown. You may provide a default for calls without an explicit decision using the `approveRemaining` or `rejectRemaining` methods:

```php
$decisions = Decisions::from([
    'call_abc' => true,
])->rejectRemaining('Not approved.');

$response = (new FileAssistant)
    ->continue($conversationId, as: $user)
    ->prompt($decisions);
```

A rejection with a result, such as `Decision::reject('Not approved.')`, is returned to the model so it may continue responding. A rejection without a result stops the generation loop after recording the rejection.

Tool approval is supported by the `prompt`, `stream`, `queue`, `broadcast`, `broadcastNow`, and `broadcastOnQueue` methods.

During streaming and broadcasting, a pause is represented by a `tool_approval_request` event. When using the [Vercel AI SDK stream protocol](#streaming-using-the-vercel-ai-sdk-protocol), approval requests and results are emitted using the protocol's native tool approval parts.

For queued agents, the resulting response is passed to the `then` callback, and Laravel also dispatches a `ToolApprovalRequested` event.

Laravel stores the result of an approved tool before asking the model to continue. If generation then fails, the approval has already been resolved. Continue the conversation with a normal text prompt instead of submitting the same approval decisions again.

<a name="complete-approval-flow"></a>
### Complete Approval Flow

The following routes demonstrate a complete approval flow. The `GET` route returns the chat screen, while the `POST` route accepts either a new text prompt or approval decisions from the chat screen. This example assumes the application's `User` model uses the `HasConversations` trait:

```php
use App\Ai\Agents\FileAssistant;
use Illuminate\Http\Request;
use Illuminate\Support\Facades\Gate;
use Illuminate\Support\Facades\Route;
use Illuminate\Validation\Rule;
use Laravel\Ai\Approvals\Decision;
use Laravel\Ai\Approvals\Decisions;
use Laravel\Ai\Models\Conversation;

Route::get('/chat/{conversation}', function (Request $request, Conversation $conversation) {
    Gate::authorize('view', $conversation);

    return view('chat', [
        'conversation' => $conversation,
    ]);
})->middleware('auth');

Route::post('/chat/{conversation}', function (Request $request, Conversation $conversation) {
    Gate::authorize('view', $conversation);

    $validated = $request->validate([
        'message' => ['nullable', 'string', 'required_without:decisions', 'prohibits:decisions'],
        'decisions' => ['nullable', 'array', 'required_without:message', 'prohibits:message'],
        'decisions.*.action' => ['required_with:decisions', Rule::in(['approve', 'reject'])],
        'decisions.*.result' => ['nullable', 'string'],
    ]);

    $prompt = isset($validated['decisions'])
        ? Decisions::from(collect($validated['decisions'])->map(
            fn (array $decision) => match ($decision['action']) {
                'approve' => Decision::approve(),
                'reject' => Decision::reject($decision['result'] ?? null),
            }
        )->all())
        : $validated['message'];

    $response = (new FileAssistant)
        ->continue($conversation->id, as: $request->user())
        ->prompt($prompt);

    return [
        'conversation_id' => $response->conversationId,
        'status' => $response->hasPendingApprovals() ? 'awaiting_approval' : 'complete',
        'message' => $response->text,
        'approvals' => $response->pendingApprovals,
    ];
})->middleware('auth');
```

When the response status is `awaiting_approval`, the chat screen should render the pending approvals and submit the user's choices to the same endpoint using the tool call ID as each decision's key:

```json
{
    "decisions": {
        "call_abc": {
            "action": "approve"
        },
        "call_def": {
            "action": "reject",
            "result": "The invoice must be retained."
        }
    }
}
```

For a normal chat message, the screen may instead submit a `message` value:

```json
{
    "message": "Delete the old invoice."
}
```

<a name="images"></a>
## Images

The `Laravel\Ai\Image` class may be used to generate images using the `openai`, `gemini`, or `xai` providers:

```php
use Laravel\Ai\Image;

$image = Image::of('A donut sitting on the kitchen counter')->generate();

$rawContent = (string) $image;
```

The `square`, `portrait`, and `landscape` methods may be used to control the aspect ratio of the image, while the `quality` method may be used to guide the model on final image quality (`high`, `medium`, `low`). The `timeout` method may be used to specify the HTTP timeout in seconds:

```php
use Laravel\Ai\Image;

$image = Image::of('A donut sitting on the kitchen counter')
    ->quality('high')
    ->landscape()
    ->timeout(120)
    ->generate();
```

You may attach reference images using the `attachments` method:

```php
use Laravel\Ai\Files;
use Laravel\Ai\Image;

$image = Image::of('Update this photo of me to be in the style of an impressionist painting.')
    ->attachments([
        Files\Image::fromStorage('photo.jpg'),
        // Files\Image::fromPath('/home/laravel/photo.jpg'),
        // Files\Image::fromUrl('https://example.com/photo.jpg'),
        // $request->file('photo'),
    ])
    ->landscape()
    ->generate();
```

Generated images may be easily stored on the default disk configured in your application's `config/filesystems.php` configuration file:

```php
$image = Image::of('A donut sitting on the kitchen counter');

$path = $image->store();
$path = $image->storeAs('image.jpg');
$path = $image->storePublicly();
$path = $image->storePubliclyAs('image.jpg');
```

Image generation may also be queued:

```php
use Laravel\Ai\Image;
use Laravel\Ai\Responses\ImageResponse;

Image::of('A donut sitting on the kitchen counter')
    ->portrait()
    ->queue()
    ->then(function (ImageResponse $image) {
        $path = $image->store();

        // ...
    });
```

<a name="audio"></a>
## Audio

The `Laravel\Ai\Audio` class may be used to generate audio from the given text:

```php
use Laravel\Ai\Audio;

$audio = Audio::of('I love coding with Laravel.')->generate();

$rawContent = (string) $audio;
```

You may also generate audio from a string using the `toAudio` method available via Laravel's `Stringable` class:

```php
use Illuminate\Support\Str;

$audio = Str::of('I love coding with Laravel.')->toAudio();
```

The `male`, `female`, and `voice` methods may be used to determine the voice of the generated audio:

```php
$audio = Audio::of('I love coding with Laravel.')
    ->female()
    ->generate();

$audio = Audio::of('I love coding with Laravel.')
    ->voice('voice-id-or-name')
    ->generate();
```

Similarly, the `instructions` method may be used to dynamically coach the model on how the generated audio should sound:

```php
$audio = Audio::of('I love coding with Laravel.')
    ->female()
    ->instructions('Said like a pirate')
    ->generate();
```

Generated audio may be easily stored on the default disk configured in your application's `config/filesystems.php` configuration file:

```php
$audio = Audio::of('I love coding with Laravel.')->generate();

$path = $audio->store();
$path = $audio->storeAs('audio.mp3');
$path = $audio->storePublicly();
$path = $audio->storePubliclyAs('audio.mp3');
```

Audio generation may also be queued:

```php
use Laravel\Ai\Audio;
use Laravel\Ai\Responses\AudioResponse;

Audio::of('I love coding with Laravel.')
    ->queue()
    ->then(function (AudioResponse $audio) {
        $path = $audio->store();

        // ...
    });
```

<a name="transcription"></a>
## Transcriptions

The `Laravel\Ai\Transcription` class may be used to generate a transcript of the given audio:

```php
use Laravel\Ai\Transcription;

$transcript = Transcription::fromPath('/home/laravel/audio.mp3')->generate();
$transcript = Transcription::fromStorage('audio.mp3')->generate();
$transcript = Transcription::fromUpload($request->file('audio'))->generate();

return (string) $transcript;
```

The `diarize` method may be used to indicate you would like the response to include the diarized transcript in addition to the raw text transcript, allowing you to access the segmented transcript by speaker:

```php
$transcript = Transcription::fromStorage('audio.mp3')
    ->diarize()
    ->generate();
```

Transcription generation may also be queued:

```php
use Laravel\Ai\Transcription;
use Laravel\Ai\Responses\TranscriptionResponse;

Transcription::fromStorage('audio.mp3')
    ->queue()
    ->then(function (TranscriptionResponse $transcript) {
        // ...
    });
```

<a name="text-summarization"></a>
## Text Summarization

You may summarize text using the `summarize` method available via Laravel's `Stringable` class. By default, the summary will contain no more than three sentences and will be generated using the configured provider's cheapest text model:

```php
use Illuminate\Support\Str;

$summary = Str::of($article)->summarize();
```

You may specify the maximum number of sentences, provider, model, and timeout used to generate the summary. The `Str` class also offers a static version of the method:

```php
use Laravel\Ai\Enums\Lab;

$summary = Str::of($article)->summarize(
    sentences: 4,
    provider: Lab::Anthropic,
    model: 'claude-sonnet-5',
    timeout: 30,
);

$summary = Str::summarize($article, sentences: 4);
```

<a name="embeddings"></a>
## Embeddings

You may easily generate vector embeddings for any given string using the new `toEmbeddings` method available via Laravel's `Stringable` class:

```php
use Illuminate\Support\Str;

$embeddings = Str::of('Napa Valley has great wine.')->toEmbeddings();
```

Alternatively, you may use the `Embeddings` class to generate embeddings for multiple inputs at once:

```php
use Laravel\Ai\Embeddings;

$response = Embeddings::for([
    'Napa Valley has great wine.',
    'Laravel is a PHP framework.',
])->generate();

$response->embeddings; // [[0.123, 0.456, ...], [0.789, 0.012, ...]]
```

You may specify the dimensions and provider for the embeddings:

```php
$response = Embeddings::for(['Napa Valley has great wine.'])
    ->dimensions(1536)
    ->generate(Lab::OpenAI, 'text-embedding-3-small');
```

<a name="multimodal-embeddings"></a>
### Multimodal Embeddings

In addition to strings, the `Embeddings::for` method accepts image, audio, document, and video inputs, allowing you to generate embeddings for non-text content. Gemini supports image, audio, document, and video embeddings, while VoyageAI supports image and video embeddings:

```php
use Laravel\Ai\Embeddings;
use Laravel\Ai\Enums\Lab;
use Laravel\Ai\Files\Image;
use Laravel\Ai\Files\Video;

$response = Embeddings::for([
    'A vineyard at sunset.',
    Image::fromStorage('vineyard.jpg'),
    Video::fromPath('/home/laravel/tour.mp4'),
])->generate(Lab::Gemini);
```

Multimodal inputs use the same [file classes used for attachments](#attachments). These files may be created from a local path, a filesystem disk, a remote URL, or Base64-encoded content. Images, documents, and videos may also be created from uploaded files, while documents may be created from raw string content:

```php
use Laravel\Ai\Files\Audio;
use Laravel\Ai\Files\Document;
use Laravel\Ai\Files\Image;
use Laravel\Ai\Files\Video;

Image::fromPath('/home/laravel/photo.jpg');
Image::fromStorage('photo.jpg');
Image::fromUpload($request->file('photo'));

Audio::fromPath('/home/laravel/clip.mp3');
Audio::fromStorage('clip.mp3');
Audio::fromUpload($request->file('clip.mp3'));

Video::fromPath('/home/laravel/video.mp4');
Video::fromStorage('video.mp4');
Video::fromUpload($request->file('video'));

Document::fromUrl('https://example.com/report.pdf');
Document::fromString('Laravel is a PHP framework.', 'text/plain');
Document::fromUpload($request->file('report'));
```

> [!NOTE]
> VoyageAI does not allow remote URL media and Base64-encoded media to be mixed in a single request. Local, stored, and uploaded files are sent as Base64-encoded content, and text inputs may be combined with either media source. Consult your provider's documentation to determine which multimodal models and inputs are available.

<a name="querying-embeddings"></a>
### Querying Embeddings

Once you have generated embeddings, you will typically store them in a `vector` column in your database for later querying. Laravel provides native support for vector columns on PostgreSQL via the `pgvector` extension and MariaDB. To get started, define a `vector` column in your migration, specifying the number of dimensions:

```php
Schema::ensureVectorExtensionExists();

Schema::create('documents', function (Blueprint $table) {
    $table->id();
    $table->string('title');
    $table->text('content');
    $table->vector('embedding', dimensions: 1536);
    $table->timestamps();
});
```

You may also add a vector index to speed up similarity searches. When calling `index` on a vector column, Laravel will automatically create an HNSW index with cosine distance:

```php
$table->vector('embedding', dimensions: 1536)->index();
```

On your Eloquent model, you should cast the vector column using the `AsVector` cast:

```php
use Illuminate\Database\Eloquent\Casts\AsVector;

protected function casts(): array
{
    return [
        'embedding' => AsVector::class,
    ];
}
```

To query for similar records, use the `whereVectorSimilarTo` method. This method filters results by a minimum cosine similarity (between `0.0` and `1.0`, where `1.0` is identical) and orders the results by similarity:

```php
use App\Models\Document;

$documents = Document::query()
    ->whereVectorSimilarTo('embedding', $queryEmbedding, minSimilarity: 0.4)
    ->limit(10)
    ->get();
```

The `$queryEmbedding` may be an array of floats or a plain string. When a string is given, Laravel will automatically generate embeddings for it:

```php
$documents = Document::query()
    ->whereVectorSimilarTo('embedding', 'best wineries in Napa Valley')
    ->limit(10)
    ->get();
```

If you need more control, you may use the lower-level `whereVectorDistanceLessThan`, `selectVectorDistance`, and `orderByVectorDistance` methods independently:

```php
$documents = Document::query()
    ->select('*')
    ->selectVectorDistance('embedding', $queryEmbedding, as: 'distance')
    ->whereVectorDistanceLessThan('embedding', $queryEmbedding, maxDistance: 0.3)
    ->orderByVectorDistance('embedding', $queryEmbedding)
    ->limit(10)
    ->get();
```

If you would like to give an agent the ability to perform similarity searches as a tool, check out the [Similarity Search](#similarity-search) tool documentation.

> [!NOTE]
> Vector queries are currently supported on PostgreSQL connections using the `pgvector` extension and MariaDB 11.7 or later.

<a name="caching-embeddings"></a>
### Caching Embeddings

Embedding generation can be cached to avoid redundant API calls for identical inputs. To enable caching, set the `ai.caching.embeddings.cache` configuration option to `true`:

```php
'caching' => [
    'embeddings' => [
        'cache' => true,
        'store' => env('CACHE_STORE', 'database'),
        'individually' => true,
        // ...
    ],
],
```

When caching is enabled, embeddings are cached for 30 days. The cache key is based on the provider, model, dimensions, and input content, ensuring that identical requests return cached results while different configurations generate fresh embeddings.

By default, each input's embedding is cached under its own key, so a later request may hit the cache for inputs it has seen before even when the set of inputs or their order has changed. To instead cache the entire set of inputs under a single key, set the `ai.caching.embeddings.individually` configuration option to `false`.

You may also enable caching for a specific request using the `cache` method, even when global caching is disabled:

```php
$response = Embeddings::for(['Napa Valley has great wine.'])
    ->cache()
    ->generate();
```

You may specify a custom cache duration in seconds:

```php
$response = Embeddings::for(['Napa Valley has great wine.'])
    ->cache(seconds: 3600) // Cache for 1 hour
    ->generate();
```

The `toEmbeddings` Stringable method also accepts a `cache` argument:

```php
// Cache with default duration...
$embeddings = Str::of('Napa Valley has great wine.')->toEmbeddings(cache: true);

// Cache for a specific duration...
$embeddings = Str::of('Napa Valley has great wine.')->toEmbeddings(cache: 3600);
```

<a name="reranking"></a>
## Reranking

Reranking allows you to reorder a list of documents based on their relevance to a given query. This is useful for improving search results by using semantic understanding:

The `Laravel\Ai\Reranking` class may be used to rerank documents:

```php
use Laravel\Ai\Reranking;

$response = Reranking::of([
    'Django is a Python web framework.',
    'Laravel is a PHP web application framework.',
    'React is a JavaScript library for building user interfaces.',
])->rerank('PHP frameworks');

// Access the top result...
$response->first()->document; // "Laravel is a PHP web application framework."
$response->first()->score;    // 0.95
$response->first()->index;    // 1 (original position)
```

The `limit` method may be used to restrict the number of results returned:

```php
$response = Reranking::of($documents)
    ->limit(5)
    ->rerank('search query');
```

<a name="reranking-collections"></a>
### Reranking Collections

For convenience, Laravel collections may be reranked using the `rerank` macro. The first argument specifies which field(s) to use for reranking, and the second argument is the query:

```php
// Rerank by a single field...
$posts = Post::all()
    ->rerank('body', 'Laravel tutorials');

// Rerank by multiple fields (sent as JSON)...
$reranked = $posts->rerank(['title', 'body'], 'Laravel tutorials');

// Rerank using a closure to build the document...
$reranked = $posts->rerank(
    fn ($post) => $post->title.': '.$post->body,
    'Laravel tutorials'
);
```

You may also limit the number of results and specify a provider:

```php
$reranked = $posts->rerank(
    by: 'content',
    query: 'Laravel tutorials',
    limit: 10,
    provider: Lab::Cohere
);
```

<a name="files"></a>
## Files

The `Laravel\Ai\Files` class or the individual file classes may be used to store files with your AI provider for later use in conversations. This is useful for large documents or files you want to reference multiple times without re-uploading:

```php
use Laravel\Ai\Files\Document;
use Laravel\Ai\Files\Image;

// Store a file from a local path...
$response = Document::fromPath('/home/laravel/document.pdf')->put();
$response = Image::fromPath('/home/laravel/photo.jpg')->put();

// Store a file that is stored on a filesystem disk...
$response = Document::fromStorage('document.pdf', disk: 'local')->put();
$response = Image::fromStorage('photo.jpg', disk: 'local')->put();

// Store a file that is stored on a remote URL...
$response = Document::fromUrl('https://example.com/document.pdf')->put();
$response = Image::fromUrl('https://example.com/photo.jpg')->put();

return $response->id;
```

You may also store raw content or uploaded files:

```php
use Laravel\Ai\Files;
use Laravel\Ai\Files\Document;

// Store raw content...
$stored = Document::fromString('Hello, World!', 'text/plain')->put();

// Store an uploaded file...
$stored = Document::fromUpload($request->file('document'))->put();
```

Once a file has been stored, you may reference the file when generating text via agents instead of re-uploading the file:

```php
use App\Ai\Agents\SalesCoach;
use Laravel\Ai\Files;

$response = (new SalesCoach)->prompt(
    'Analyze the attached sales transcript...'
    attachments: [
        Files\Document::fromId('file-id') // Attach a stored document...
    ]
);
```

To retrieve a previously stored file, use the `get` method on a file instance:

```php
use Laravel\Ai\Files\Document;

$file = Document::fromId('file-id')->get();

$file->id;
$file->mimeType();
```

To delete a file from the provider, use the `delete` method:

```php
Document::fromId('file-id')->delete();
```

By default, the `Files` class uses the default AI provider configured in your application's `config/ai.php` configuration file. For most operations, you may specify a different provider using the `provider` argument:

```php
$response = Document::fromPath(
    '/home/laravel/document.pdf'
)->put(provider: Lab::Anthropic);
```

You may pass provider-specific upload options using the `withProviderOptions` method. For example, you may set OpenAI's file `purpose`:

```php
use Laravel\Ai\Files\Document;

$response = Document::fromPath('/home/laravel/knowledge.txt')
    ->withProviderOptions(['purpose' => 'assistants'])
    ->put();
```

To scope options per provider, pass a closure that receives the current provider:

```php
use Laravel\Ai\Enums\Lab;
use Laravel\Ai\Files\Document;

$response = Document::fromPath('/home/laravel/training.jsonl')
    ->withProviderOptions(fn (Lab|string $provider) => match ($provider) {
        Lab::OpenAI => ['purpose' => 'fine-tune'],
        default => [],
    })
    ->put();
```

<a name="using-stored-files-in-conversations"></a>
### Using Stored Files in Conversations

Once a file has been stored with a provider, you may reference it in agent conversations using the `fromId` method on the `Document` or `Image` classes:

```php
use App\Ai\Agents\DocumentAnalyzer;
use Laravel\Ai\Files;
use Laravel\Ai\Files\Document;

$stored = Document::fromPath('/path/to/report.pdf')->put();

$response = (new DocumentAnalyzer)->prompt(
    'Summarize this document.',
    attachments: [
        Document::fromId($stored->id),
    ],
);
```

Similarly, stored images may be referenced using the `Image` class:

```php
use Laravel\Ai\Files;
use Laravel\Ai\Files\Image;

$stored = Image::fromPath('/path/to/photo.jpg')->put();

$response = (new ImageAnalyzer)->prompt(
    'What is in this image?',
    attachments: [
        Image::fromId($stored->id),
    ],
);
```

<a name="vector-stores"></a>
## Vector Stores

Vector stores allow you to create searchable collections of files that can be used for retrieval-augmented generation (RAG). The `Laravel\Ai\Stores` class provides methods for creating, retrieving, and deleting vector stores:

```php
use Laravel\Ai\Stores;

// Create a new vector store...
$store = Stores::create('Knowledge Base');

// Create a store with additional options...
$store = Stores::create(
    name: 'Knowledge Base',
    description: 'Documentation and reference materials.',
    expiresWhenIdleFor: days(30),
);

return $store->id;
```

To retrieve an existing vector store by its ID, use the `get` method:

```php
use Laravel\Ai\Stores;

$store = Stores::get('store_id');

$store->id;
$store->name;
$store->fileCounts;
$store->ready;
```

To delete a vector store, use the `delete` method on the `Stores` class or the store instance:

```php
use Laravel\Ai\Stores;

// Delete by ID...
Stores::delete('store_id');

// Or delete via a store instance...
$store = Stores::get('store_id');

$store->delete();
```

<a name="adding-files-to-stores"></a>
### Adding Files to Stores

Once you have a vector store, you may add [files](#files) to it using the `add` method. Files added to a store are automatically indexed for semantic searching using the [file search provider tool](#file-search):

```php
use Laravel\Ai\Files\Document;
use Laravel\Ai\Stores;

$store = Stores::get('store_id');

// Add a file that has already been stored with the provider...
$document = $store->add('file_id');
$document = $store->add(Document::fromId('file_id'));

// Or, store and add a file in one step...
$document = $store->add(Document::fromPath('/path/to/document.pdf'));
$document = $store->add(Document::fromStorage('manual.pdf'));
$document = $store->add($request->file('document'));

$document->id;
$document->fileId;
```

> **Note:** Typically, when adding previously stored files to vector stores, the returned document ID will match the file's previously assigned ID; however, some vector storage providers may return a new, different "document ID". Therefore, it's recommended that you always store both IDs in your database for future reference.

You may attach metadata to files when adding them to a store. This metadata can later be used to filter search results when using the [file search provider tool](#file-search):

```php
$store->add(Document::fromPath('/path/to/document.pdf'), metadata: [
    'author' => 'Taylor Otwell',
    'department' => 'Engineering',
    'year' => 2026,
]);
```

To remove a file from a store, use the `remove` method:

```php
$store->remove('file_id');
```

Removing a file from a vector store does not remove it from the provider's [file storage](#files). To remove a file from the vector store and delete it permanently from file storage, use the `deleteFile` argument:

```php
$store->remove('file_abc123', deleteFile: true);
```

<a name="failover"></a>
## Failover

When prompting or generating other media, you may provide an array of providers / models to automatically failover to a backup provider / model if a service interruption or rate limit is encountered on the primary provider:

```php
use App\Ai\Agents\SalesCoach;
use Laravel\Ai\Enums\Lab;
use Laravel\Ai\Image;

$response = (new SalesCoach)->prompt(
    'Analyze this sales transcript...',
    provider: [Lab::OpenAI, Lab::Anthropic],
);

$image = Image::of('A donut sitting on the kitchen counter')
    ->generate(provider: [Lab::Gemini, Lab::xAI]);
```

Failover only occurs when a `FailoverableException` is thrown — such as a rate limit (`RateLimitedException`), an overloaded or unavailable provider (`ProviderOverloadedException`), or insufficient credits (`InsufficientCreditsException`). Ordinary errors, like a validation or bad request error, will not trigger failover.

When you pass a plain list of providers, such as `[Lab::OpenAI, Lab::Anthropic]`, each provider uses its default model. To specify a particular model for each provider in the failover chain, pass an associative array keyed by the provider, using the `Lab` enum's `value` as the key (enum cases cannot be used directly as PHP array keys):

```php
use Laravel\Ai\Enums\Lab;

$response = (new SalesCoach)->prompt(
    'Analyze this sales transcript...',
    provider: [
        Lab::Gemini->value => 'gemini-3-flash-preview',
        Lab::DeepSeek->value => 'deepseek-v4-pro',
    ],
);
```

<a name="testing"></a>
## Testing

When faking queued image, audio, transcription, or embeddings generation, any `then` callback registered on the queued generation will be invoked with the faked response, allowing you to test the logic contained within the callback. If you would prefer that these callbacks are not invoked, you may fake the queue using `Queue::fake()` as well.

<a name="testing-agents"></a>
### Agents

To fake an agent's responses during tests, call the `fake` method on the agent class. You may optionally provide an array of responses or a closure:

```php
use App\Ai\Agents\SalesCoach;
use Laravel\Ai\Prompts\AgentPrompt;

// Automatically generate a fixed response for every prompt...
SalesCoach::fake();

// Provide a list of prompt responses...
SalesCoach::fake([
    'First response',
    'Second response',
]);

// Dynamically handle prompt responses based on the incoming prompt...
SalesCoach::fake(function (AgentPrompt $prompt) {
    return 'Response for: '.$prompt->prompt;
});
```

When faking an agent that returns structured output, you may provide arrays as responses. The agent will return a structured response containing the given data:

```php
SalesCoach::fake([
    ['score' => 87],
]);
```

You may also fake a response that is awaiting tool approval:

```php
use Laravel\Ai\Approvals\PendingApproval;
use Laravel\Ai\Responses\AgentResponse;

FileAssistant::fake([
    AgentResponse::fakeWithPendingApprovals([
        new PendingApproval(
            id: 'call_abc',
            tool: 'DeleteFile',
            arguments: ['path' => 'invoice.pdf'],
            reason: 'This will permanently delete a file.',
        ),
    ]),
]);

$response = (new FileAssistant)->prompt('Delete the invoice.');

$response->hasPendingApprovals(); // true
```

> **Note:** When `Agent::fake()` is invoked on an agent that returns structured output and fake output was not explicitly provided, Laravel will automatically generate fake data that matches your agent's defined output schema.

After prompting the agent, you may make assertions about the prompts that were received:

```php
use Laravel\Ai\Prompts\AgentPrompt;

SalesCoach::assertPrompted('Analyze this...');

SalesCoach::assertPrompted(function (AgentPrompt $prompt) {
    return $prompt->contains('Analyze');
});

SalesCoach::assertPromptedTimes(3);

SalesCoach::assertNotPrompted('Missing prompt');

SalesCoach::assertNeverPrompted();
```

When asserting an approval continuation, you may inspect the prompt's approval decisions:

```php
use Laravel\Ai\Approvals\Decisions;
use Laravel\Ai\Prompts\AgentPrompt;

FileAssistant::fake();

(new FileAssistant)->prompt(Decisions::from([
    'call_abc' => true,
]));

FileAssistant::assertPrompted(function (AgentPrompt $prompt) {
    return $prompt->hasApprovalDecisions()
        && $prompt->approvalDecisions->get('call_abc')->isApproved();
});
```

For queued agent invocations, use the queued assertion methods:

```php
use Laravel\Ai\QueuedAgentPrompt;

SalesCoach::assertQueued('Analyze this...');

SalesCoach::assertQueued(function (QueuedAgentPrompt $prompt) {
    return $prompt->contains('Analyze');
});

SalesCoach::assertNotQueued('Missing prompt');

SalesCoach::assertNeverQueued();
```

To ensure all agent invocations have a corresponding fake response, you may use `preventStrayPrompts`. If an agent is invoked without a defined fake response, an exception will be thrown:

```php
SalesCoach::fake()->preventStrayPrompts();
```

<a name="testing-images"></a>
### Images

Image generations may be faked by invoking the `fake` method on the `Image` class. Once image has been faked, various assertions may be performed against the recorded image generation prompts:

```php
use Laravel\Ai\Image;
use Laravel\Ai\Prompts\ImagePrompt;
use Laravel\Ai\Prompts\QueuedImagePrompt;

// Automatically generate a fixed response for every prompt...
Image::fake();

// Provide a list of prompt responses...
Image::fake([
    base64_encode($firstImage),
    base64_encode($secondImage),
]);

// Dynamically handle prompt responses based on the incoming prompt...
Image::fake(function (ImagePrompt $prompt) {
    return base64_encode('...');
});
```

After generating images, you may make assertions about the prompts that were received:

```php
Image::assertGenerated(function (ImagePrompt $prompt) {
    return $prompt->contains('sunset') && $prompt->isLandscape();
});

Image::assertNotGenerated('Missing prompt');

Image::assertNothingGenerated();
```

For queued image generations, use the queued assertion methods:

```php
Image::assertQueued(
    fn (QueuedImagePrompt $prompt) => $prompt->contains('sunset')
);

Image::assertNotQueued('Missing prompt');

Image::assertNothingQueued();
```

To ensure all image generations have a corresponding fake response, you may use `preventStrayImages`. If an image is generated without a defined fake response, an exception will be thrown:

```php
Image::fake()->preventStrayImages();
```

<a name="testing-audio"></a>
### Audio

Audio generations may be faked by invoking the `fake` method on the `Audio` class. Once audio has been faked, various assertions may be performed against the recorded audio generation prompts:

```php
use Laravel\Ai\Audio;
use Laravel\Ai\Prompts\AudioPrompt;
use Laravel\Ai\Prompts\QueuedAudioPrompt;

// Automatically generate a fixed response for every prompt...
Audio::fake();

// Provide a list of prompt responses...
Audio::fake([
    base64_encode($firstAudio),
    base64_encode($secondAudio),
]);

// Dynamically handle prompt responses based on the incoming prompt...
Audio::fake(function (AudioPrompt $prompt) {
    return base64_encode('...');
});
```

After generating audio, you may make assertions about the prompts that were received:

```php
Audio::assertGenerated(function (AudioPrompt $prompt) {
    return $prompt->contains('Hello') && $prompt->isFemale();
});

Audio::assertNotGenerated('Missing prompt');

Audio::assertNothingGenerated();
```

For queued audio generations, use the queued assertion methods:

```php
Audio::assertQueued(
    fn (QueuedAudioPrompt $prompt) => $prompt->contains('Hello')
);

Audio::assertNotQueued('Missing prompt');

Audio::assertNothingQueued();
```

To ensure all audio generations have a corresponding fake response, you may use `preventStrayAudio`. If audio is generated without a defined fake response, an exception will be thrown:

```php
Audio::fake()->preventStrayAudio();
```

<a name="testing-transcriptions"></a>
### Transcriptions

Transcription generations may be faked by invoking the `fake` method on the `Transcription` class. Once transcription has been faked, various assertions may be performed against the recorded transcription generation prompts:

```php
use Laravel\Ai\Transcription;
use Laravel\Ai\Prompts\TranscriptionPrompt;
use Laravel\Ai\Prompts\QueuedTranscriptionPrompt;

// Automatically generate a fixed response for every prompt...
Transcription::fake();

// Provide a list of prompt responses...
Transcription::fake([
    'First transcription text.',
    'Second transcription text.',
]);

// Dynamically handle prompt responses based on the incoming prompt...
Transcription::fake(function (TranscriptionPrompt $prompt) {
    return 'Transcribed text...';
});
```

After generating transcriptions, you may make assertions about the prompts that were received:

```php
Transcription::assertGenerated(function (TranscriptionPrompt $prompt) {
    return $prompt->language === 'en' && $prompt->isDiarized();
});

Transcription::assertNotGenerated(
    fn (TranscriptionPrompt $prompt) => $prompt->language === 'fr'
);

Transcription::assertNothingGenerated();
```

For queued transcription generations, use the queued assertion methods:

```php
Transcription::assertQueued(
    fn (QueuedTranscriptionPrompt $prompt) => $prompt->isDiarized()
);

Transcription::assertNotQueued(
    fn (QueuedTranscriptionPrompt $prompt) => $prompt->language === 'fr'
);

Transcription::assertNothingQueued();
```

To ensure all transcription generations have a corresponding fake response, you may use `preventStrayTranscriptions`. If a transcription is generated without a defined fake response, an exception will be thrown:

```php
Transcription::fake()->preventStrayTranscriptions();
```

<a name="testing-embeddings"></a>
### Embeddings

Embeddings generations may be faked by invoking the `fake` method on the `Embeddings` class. Once embeddings has been faked, various assertions may be performed against the recorded embeddings generation prompts:

```php
use Laravel\Ai\Embeddings;
use Laravel\Ai\Prompts\EmbeddingsPrompt;
use Laravel\Ai\Prompts\QueuedEmbeddingsPrompt;

// Automatically generate fake embeddings of the proper dimensions for every prompt...
Embeddings::fake();

// Provide a list of prompt responses...
Embeddings::fake([
    [$firstEmbeddingVector],
    [$secondEmbeddingVector],
]);

// Dynamically handle prompt responses based on the incoming prompt...
Embeddings::fake(function (EmbeddingsPrompt $prompt) {
    return array_map(
        fn () => Embeddings::fakeEmbedding($prompt->dimensions),
        $prompt->inputs
    );
});
```

After generating embeddings, you may make assertions about the prompts that were received:

```php
Embeddings::assertGenerated(function (EmbeddingsPrompt $prompt) {
    return $prompt->contains('Laravel') && $prompt->dimensions === 1536;
});

Embeddings::assertNotGenerated(
    fn (EmbeddingsPrompt $prompt) => $prompt->contains('Other')
);

Embeddings::assertNothingGenerated();
```

For queued embeddings generations, use the queued assertion methods:

```php
Embeddings::assertQueued(
    fn (QueuedEmbeddingsPrompt $prompt) => $prompt->contains('Laravel')
);

Embeddings::assertNotQueued(
    fn (QueuedEmbeddingsPrompt $prompt) => $prompt->contains('Other')
);

Embeddings::assertNothingQueued();
```

To ensure all embeddings generations have a corresponding fake response, you may use `preventStrayEmbeddings`. If embeddings are generated without a defined fake response, an exception will be thrown:

```php
Embeddings::fake()->preventStrayEmbeddings();
```

<a name="testing-reranking"></a>
### Reranking

Reranking operations may be faked by invoking the `fake` method on the `Reranking` class:

```php
use Laravel\Ai\Reranking;
use Laravel\Ai\Prompts\RerankingPrompt;
use Laravel\Ai\Responses\Data\RankedDocument;

// Automatically generate a fake reranked responses...
Reranking::fake();

// Provide custom responses...
Reranking::fake([
    [
        new RankedDocument(index: 0, document: 'First', score: 0.95),
        new RankedDocument(index: 1, document: 'Second', score: 0.80),
    ],
]);
```

After reranking, you may make assertions about the operations that were performed:

```php
Reranking::assertReranked(function (RerankingPrompt $prompt) {
    return $prompt->contains('Laravel') && $prompt->limit === 5;
});

Reranking::assertNotReranked(
    fn (RerankingPrompt $prompt) => $prompt->contains('Django')
);

Reranking::assertNothingReranked();
```

<a name="testing-files"></a>
### Files

File operations may be faked by invoking the `fake` method on the `Files` class:

```php
use Laravel\Ai\Files;

Files::fake();
```

Once file operations have been faked, you may make assertions about the uploads and deletions that occurred:

```php
use Laravel\Ai\Contracts\Files\StorableFile;
use Laravel\Ai\Files\Document;

// Store files...
Document::fromString('Hello, Laravel!', mimeType: 'text/plain')
    ->as('hello.txt')
    ->put();

// Make assertions...
Files::assertStored(fn (StorableFile $file) =>
    (string) $file === 'Hello, Laravel!' &&
        $file->mimeType() === 'text/plain';
);

Files::assertNotStored(fn (StorableFile $file) =>
    (string) $file === 'Hello, World!'
);

Files::assertNothingStored();
```

For asserting against file deletions, you may pass a file ID:

```php
Files::assertDeleted('file-id');
Files::assertNotDeleted('file-id');
Files::assertNothingDeleted();
```

<a name="testing-vector-stores"></a>
### Vector Stores

Vector store operations may be faked by invoking the `fake` method on the `Stores` class. Faking stores will also fake [file operations](#files) automatically:

```php
use Laravel\Ai\Stores;

Stores::fake();
```

Once store operations have been faked, you may make assertions about the stores that were created or deleted:

```php
use Laravel\Ai\Stores;

// Create store...
$store = Stores::create('Knowledge Base');

// Make assertions...
Stores::assertCreated('Knowledge Base');

Stores::assertCreated(fn (string $name, ?string $description) =>
    $name === 'Knowledge Base'
);

Stores::assertNotCreated('Other Store');

Stores::assertNothingCreated();
```

For asserting against store deletions, you may provide the store ID:

```php
Stores::assertDeleted('store_id');
Stores::assertNotDeleted('other_store_id');
Stores::assertNothingDeleted();
```

To assert files were added or removed from a store, use the assertion methods on a given `Store` instance:

```php
Stores::fake();

$store = Stores::get('store_id');

// Add / remove files...
$store->add('added_id');
$store->remove('removed_id');

// Make assertions...
$store->assertAdded('added_id');
$store->assertRemoved('removed_id');

$store->assertNotAdded('other_file_id');
$store->assertNotRemoved('other_file_id');
```

If a file is stored in the provider's [file storage](#files) and added to a vector store in the same request, you may not know the file's provider ID. In this case, you can pass a closure to the `assertAdded` method to assert against the content of the added file:

```php
use Laravel\Ai\Contracts\Files\StorableFile;
use Laravel\Ai\Files\Document;

$store->add(Document::fromString('Hello, World!', 'text/plain')->as('hello.txt'));

$store->assertAdded(fn (StorableFile $file) => $file->name() === 'hello.txt');
$store->assertAdded(fn (StorableFile $file) => $file->content() === 'Hello, World!');
```

<a name="events"></a>
## Events

The Laravel AI SDK dispatches a variety of [events](/docs/{{version}}/events), including:

- `AddingFileToStore`
- `AgentFailed`
- `AgentFailedOver`
- `AgentPrompted`
- `AgentStreamed`
- `AudioGenerated`
- `CreatingStore`
- `EmbeddingsGenerated`
- `FileAddedToStore`
- `FileDeleted`
- `FileRemovedFromStore`
- `FileStored`
- `GeneratingAudio`
- `GeneratingEmbeddings`
- `GeneratingImage`
- `GeneratingTranscription`
- `ImageGenerated`
- `InvokingTool`
- `PromptingAgent`
- `ProviderFailedOver`
- `RemovingFileFromStore`
- `Reranked`
- `Reranking`
- `StartingStep`
- `StepCompleted`
- `StepFailed`
- `StoreCreated`
- `StoreDeleted`
- `StoringFile`
- `StreamingAgent`
- `ToolApprovalRequested`
- `ToolApprovalResolved`
- `ToolFailed`
- `ToolInvoked`
- `TranscriptionGenerated`

You can listen to any of these events to log or store AI SDK usage information.


---

# AI Assisted Development

*Sección: Laravel | Origen: https://laravel.com/docs/13.x/ai*

- [Introduction](#introduction)
     - [Why Laravel for AI Development?](#why-laravel-for-ai-development)
 - [Laravel Boost](#laravel-boost)
     - [Installation](#installation)
     - [Available Tools](#available-tools)
     - [AI Guidelines](#ai-guidelines)
     - [Agent Skills](#agent-skills)
     - [Documentation Search](#documentation-search)
     - [Agents Integration](#agents-integration)

<a name="introduction"></a>
## Introduction

Laravel is uniquely positioned to be the best framework for AI assisted and agentic development. The rise of AI coding agents like [Claude Code](https://docs.anthropic.com/en/docs/claude-code), [OpenCode](https://opencode.ai), [Cursor](https://cursor.com), and [GitHub Copilot](https://github.com/features/copilot) has transformed how developers write code. These tools can generate entire features, debug complex issues, and refactor code at unprecedented speed - but their effectiveness depends heavily on how well they understand your codebase.

<a name="why-laravel-for-ai-development"></a>
### Why Laravel for AI Development?

Laravel's opinionated conventions and well-defined structure make it an ideal framework for AI assisted development. When you ask an AI agent to add a controller, it knows exactly where to place it. When you need a new migration, the naming conventions and file locations are predictable. This consistency eliminates the guesswork that often trips up AI tools in more flexible frameworks.

Beyond file organization, Laravel's expressive syntax and comprehensive documentation give AI agents the context they need to generate accurate, idiomatic code. Features like Eloquent relationships, form requests, and middleware follow patterns that agents can reliably understand and replicate. The result is AI-generated code that looks like it was written by a seasoned Laravel developer, not stitched together from generic PHP snippets.

<a name="laravel-boost"></a>
## Laravel Boost

[Laravel Boost](https://github.com/laravel/boost) bridges the gap between AI coding agents and your Laravel application. Boost is an MCP (Model Context Protocol) server equipped with over 15 specialized tools that provide AI agents with deep insight into your application's structure, database, routes, and more. When you install Boost, your AI agent transforms from a general-purpose code assistant into a Laravel expert that understands your specific application.

Boost provides three major capabilities: a suite of MCP tools for inspecting and interacting with your application, composable AI guidelines crafted specifically for the Laravel ecosystem, and a powerful documentation API containing over 17,000 pieces of Laravel-specific knowledge.

<a name="installation"></a>
### Installation

Boost can be installed in Laravel 10, 11, 12, and 13 applications running PHP 8.1 or higher. To get started, install Boost as a development dependency:

```shell
composer require laravel/boost --dev
```

Once installed, run the interactive installer:

```shell
php artisan boost:install
```

The installer will auto-detect your IDE and AI agents, allowing you to select the integrations that make sense for your project. Boost will generate the necessary configuration files, such as `.mcp.json` for MCP-compatible editors and guideline files for AI context.

> [!NOTE]
> Generated configuration files like `.mcp.json`, `CLAUDE.md`, and `boost.json` can be safely added to your `.gitignore` if you prefer each developer to configure their own environment.

<a name="available-tools"></a>
### Available Tools

Boost exposes a comprehensive set of tools to AI agents via the Model Context Protocol. These tools allow agents to deeply understand and interact with your Laravel application:

<div class="content-list" markdown="1">

- **Application Introspection** - Query your PHP and Laravel versions, list installed packages, and inspect your application's configuration and environment variables.
- **Database Tools** - Inspect your database schema, execute read-only queries, and understand your data structure without leaving the conversation.
- **Route Inspection** - List all registered routes with their middleware, controllers, and parameters.
- **Artisan Commands** - Discover available Artisan commands and their arguments, enabling agents to suggest and execute the right commands for your task.
- **Log Analysis** - Read and analyze your application's log files to help debug issues.
- **Browser Logs** - Access browser console logs and errors when developing with Laravel's frontend tools.
- **Tinker Integration** - Execute PHP code in the context of your application via Laravel Tinker, allowing agents to test hypotheses and verify behavior.
- **Documentation Search** - Search Laravel ecosystem documentation with results tailored to your installed package versions.

</div>

<a name="ai-guidelines"></a>
### AI Guidelines

Boost includes a comprehensive set of AI guidelines specifically crafted for the Laravel ecosystem. These guidelines teach AI agents how to write idiomatic Laravel code, follow framework conventions, and avoid common pitfalls. Guidelines are composable and version-aware, meaning agents receive instructions appropriate for your exact package versions.

Guidelines are available for Laravel itself and over 16 packages in the Laravel ecosystem, including:

<div class="content-list" markdown="1">

- Livewire (2.x, 3.x, and 4.x)
- Inertia.js (React, Svelte, and Vue variants)
- Tailwind CSS (3.x and 4.x)
- Filament (3.x and 4.x)
- PHPUnit
- Pest PHP
- Laravel Pint
- And many more

</div>

When you run `boost:install`, Boost automatically detects which packages your application uses and assembles the relevant guidelines into your project's AI context files.

<a name="agent-skills"></a>
### Agent Skills

[Agent Skills](https://agentskills.io/home) are lightweight, targeted knowledge modules that agents can activate on-demand when working on specific domains. Unlike guidelines, which are loaded upfront, skills allow detailed patterns and best practices to be loaded only when relevant, reducing context bloat and improving the relevance of AI-generated code.

Skills are available for popular Laravel packages like Livewire, Inertia, Tailwind CSS, Pest, and more. When you run `boost:install` and select skills as a feature, skills are automatically installed based on the packages detected in your `composer.json`.

<a name="documentation-search"></a>
### Documentation Search

Boost includes a powerful documentation API that gives AI agents access to over 17,000 pieces of Laravel ecosystem documentation. Unlike generic web searches, this documentation is indexed, vectorized, and filtered to match your exact package versions.

When an agent needs to understand how a feature works, it can search Boost's documentation API and receive accurate, version-specific information. This eliminates the common problem of AI agents suggesting deprecated methods or syntax from older framework versions.

<a name="agents-integration"></a>
### Agents Integration

Boost integrates with popular IDEs and AI tools that support the Model Context Protocol. For detailed setup instructions for Cursor, Claude Code, Codex, Gemini CLI, GitHub Copilot, and Junie, see the [Set Up Your Agents](/docs/{{version}}/boost#set-up-your-agents) section of the Boost documentation.


---

# Artisan Console

*Sección: Laravel | Origen: https://laravel.com/docs/13.x/artisan*

- [Introduction](#introduction)
    - [Tinker (REPL)](#tinker)
- [Writing Commands](#writing-commands)
    - [Generating Commands](#generating-commands)
    - [Command Structure](#command-structure)
    - [Closure Commands](#closure-commands)
    - [Isolatable Commands](#isolatable-commands)
- [Defining Input Expectations](#defining-input-expectations)
    - [Arguments](#arguments)
    - [Options](#options)
    - [Input Arrays](#input-arrays)
    - [Input Descriptions](#input-descriptions)
    - [Prompting for Missing Input](#prompting-for-missing-input)
- [Command I/O](#command-io)
    - [Retrieving Input](#retrieving-input)
    - [Prompting for Input](#prompting-for-input)
    - [Writing Output](#writing-output)
- [Registering Commands](#registering-commands)
- [Programmatically Executing Commands](#programmatically-executing-commands)
    - [Calling Commands From Other Commands](#calling-commands-from-other-commands)
- [Signal Handling](#signal-handling)
- [The Dev Command](#the-dev-command)
    - [Customizing Dev Processes](#customizing-dev-processes)
    - [Filtering Dev Processes](#filtering-dev-processes)
- [Stub Customization](#stub-customization)
- [Events](#events)

<a name="introduction"></a>
## Introduction

Artisan is the command line interface included with Laravel. Artisan exists at the root of your application as the `artisan` script and provides a number of helpful commands you can use while building your application. To view a list of all available Artisan commands, you may use the `list` command:

```shell
php artisan list
```

Every command also includes a "help" screen which displays and describes the command's available arguments and options. To view a help screen, precede the name of the command with `help`:

```shell
php artisan help migrate
```

<a name="laravel-sail"></a>
#### Laravel Sail

If you are using [Laravel Sail](/docs/{{version}}/sail) as your local development environment, remember to use the `sail` command line to invoke Artisan commands. Sail will execute your Artisan commands within your application's Docker containers:

```shell
./vendor/bin/sail artisan list
```

<a name="tinker"></a>
### Tinker (REPL)

[Laravel Tinker](https://github.com/laravel/tinker) is a powerful REPL for the Laravel framework, powered by the [PsySH](https://github.com/bobthecow/psysh) package.

<a name="installation"></a>
#### Installation

All Laravel applications include Tinker by default. However, you may install Tinker using Composer if you have previously removed it from your application:

```shell
composer require laravel/tinker
```

> [!NOTE]
> Looking for hot reloading, multiline code editing, and autocompletion when interacting with your Laravel application? Check out [Tinkerwell](https://tinkerwell.app)!

<a name="usage"></a>
#### Usage

Tinker allows you to interact with your entire Laravel application on the command line, including your Eloquent models, jobs, events, and more. To enter the Tinker environment, run the `tinker` Artisan command:

```shell
php artisan tinker
```

You can publish Tinker's configuration file using the `vendor:publish` command:

```shell
php artisan vendor:publish --provider="Laravel\Tinker\TinkerServiceProvider"
```

> [!WARNING]
> The `dispatch` helper function and `dispatch` method on the `Dispatchable` class depend on garbage collection to place the job on the queue. Therefore, when using Tinker, you should use `Bus::dispatch` or `Queue::push` to dispatch jobs.

<a name="command-allow-list"></a>
#### Command Allow List

Tinker utilizes an "allow" list to determine which Artisan commands are allowed to be run within its shell. By default, you may run the `clear-compiled`, `down`, `env`, `inspire`, `migrate`, `migrate:install`, `up`, and `optimize` commands. If you would like to allow more commands you may add them to the `commands` array in your `tinker.php` configuration file:

```php
'commands' => [
    // App\Console\Commands\ExampleCommand::class,
],
```

<a name="classes-that-should-not-be-aliased"></a>
#### Classes That Should Not Be Aliased

Typically, Tinker automatically aliases classes as you interact with them in Tinker. However, you may wish to never alias some classes. You may accomplish this by listing the classes in the `dont_alias` array of your `tinker.php` configuration file:

```php
'dont_alias' => [
    App\Models\User::class,
],
```

<a name="writing-commands"></a>
## Writing Commands

In addition to the commands provided with Artisan, you may build your own custom commands. Commands are typically stored in the `app/Console/Commands` directory; however, you are free to choose your own storage location as long as you instruct Laravel to [scan other directories for Artisan commands](#registering-commands).

<a name="generating-commands"></a>
### Generating Commands

To create a new command, you may use the `make:command` Artisan command. This command will create a new command class in the `app/Console/Commands` directory. Don't worry if this directory does not exist in your application - it will be created the first time you run the `make:command` Artisan command:

```shell
php artisan make:command SendEmails
```

<a name="command-structure"></a>
### Command Structure

After generating your command, you should define the command's signature and description using the `Signature` and `Description` attributes. The `Signature` attribute also allows you to define [your command's input expectations](#defining-input-expectations). The `handle` method will be called when your command is executed. You may place your command logic in this method.

Let's take a look at an example command. Note that we are able to request any dependencies we need via the command's `handle` method. The Laravel [service container](/docs/{{version}}/container) will automatically inject all dependencies that are type-hinted in this method's signature:

```php
<?php

namespace App\Console\Commands;

use App\Models\User;
use App\Support\DripEmailer;
use Illuminate\Console\Attributes\Description;
use Illuminate\Console\Attributes\Signature;
use Illuminate\Console\Command;

#[Signature('mail:send {user}')]
#[Description('Send a marketing email to a user')]
class SendEmails extends Command
{
    /**
     * Execute the console command.
     */
    public function handle(DripEmailer $drip): void
    {
        $drip->send(User::find($this->argument('user')));
    }
}
```

> [!NOTE]
> For greater code reuse, it is good practice to keep your console commands light and let them defer to application services to accomplish their tasks. In the example above, note that we inject a service class to do the "heavy lifting" of sending the emails.

<a name="exit-codes"></a>
#### Exit Codes

If nothing is returned from the `handle` method and the command executes successfully, the command will exit with a `0` exit code, indicating success. However, the `handle` method may optionally return an integer to manually specify the command's exit code:

```php
$this->error('Something went wrong.');

return 1;
```

If you would like to "fail" the command from any method within the command, you may utilize the `fail` method. The `fail` method will immediately terminate execution of the command and return an exit code of `1`:

```php
$this->fail('Something went wrong.');
```

<a name="closure-commands"></a>
### Closure Commands

Closure-based commands provide an alternative to defining console commands as classes. In the same way that route closures are an alternative to controllers, think of command closures as an alternative to command classes.

Even though the `routes/console.php` file does not define HTTP routes, it defines console-based entry points (routes) into your application. Within this file, you may define all of your closure-based console commands using the `Artisan::command` method. The `command` method accepts two arguments: the [command signature](#defining-input-expectations) and a closure which receives the command's arguments and options:

```php
Artisan::command('mail:send {user}', function (string $user) {
    $this->info("Sending email to: {$user}!");
});
```

The closure is bound to the underlying command instance, so you have full access to all of the helper methods you would typically be able to access on a full command class.

<a name="type-hinting-dependencies"></a>
#### Type-Hinting Dependencies

In addition to receiving your command's arguments and options, command closures may also type-hint additional dependencies that you would like resolved out of the [service container](/docs/{{version}}/container):

```php
use App\Models\User;
use App\Support\DripEmailer;
use Illuminate\Support\Facades\Artisan;

Artisan::command('mail:send {user}', function (DripEmailer $drip, string $user) {
    $drip->send(User::find($user));
});
```

<a name="closure-command-descriptions"></a>
#### Closure Command Descriptions

When defining a closure-based command, you may use the `purpose` method to add a description to the command. This description will be displayed when you run the `php artisan list` or `php artisan help` commands:

```php
Artisan::command('mail:send {user}', function (string $user) {
    // ...
})->purpose('Send a marketing email to a user');
```

<a name="isolatable-commands"></a>
### Isolatable Commands

> [!WARNING]
> To utilize this feature, your application must be using the `memcached`, `redis`, `dynamodb`, `database`, `file`, or `array` cache driver as your application's default cache driver. In addition, all servers must be communicating with the same central cache server.

Sometimes you may wish to ensure that only one instance of a command can run at a time. To accomplish this, you may implement the `Illuminate\Contracts\Console\Isolatable` interface on your command class:

```php
<?php

namespace App\Console\Commands;

use Illuminate\Console\Command;
use Illuminate\Contracts\Console\Isolatable;

class SendEmails extends Command implements Isolatable
{
    // ...
}
```

When you mark a command as `Isolatable`, Laravel automatically makes the `--isolated` option available for the command without needing to explicitly define it in the command's options. When the command is invoked with that option, Laravel will ensure that no other instances of that command are already running. Laravel accomplishes this by attempting to acquire an atomic lock using your application's default cache driver. If other instances of the command are running, the command will not execute; however, the command will still exit with a successful exit status code:

```shell
php artisan mail:send 1 --isolated
```

If you would like to specify the exit status code that the command should return if it is not able to execute, you may provide the desired status code via the `isolated` option:

```shell
php artisan mail:send 1 --isolated=12
```

<a name="lock-id"></a>
#### Lock ID

By default, Laravel will use the command's name to generate the string key that is used to acquire the atomic lock in your application's cache. However, you may customize this key by defining an `isolatableId` method on your Artisan command class, allowing you to integrate the command's arguments or options into the key:

```php
/**
 * Get the isolatable ID for the command.
 */
public function isolatableId(): string
{
    return $this->argument('user');
}
```

<a name="lock-expiration-time"></a>
#### Lock Expiration Time

By default, isolation locks expire after the command is finished. Or, if the command is interrupted and unable to finish, the lock will expire after one hour. However, you may adjust the lock expiration time by defining an `isolationLockExpiresAt` method on your command:

```php
use DateTimeInterface;
use DateInterval;

/**
 * Determine when an isolation lock expires for the command.
 */
public function isolationLockExpiresAt(): DateTimeInterface|DateInterval
{
    return now()->plus(minutes: 5);
}
```

<a name="defining-input-expectations"></a>
## Defining Input Expectations

When writing console commands, it is common to gather input from the user through arguments or options. Laravel makes it very convenient to define the input you expect from the user using the `signature` property on your commands. The `signature` property allows you to define the name, arguments, and options for the command in a single, expressive, route-like syntax.

<a name="arguments"></a>
### Arguments

All user supplied arguments and options are wrapped in curly braces. In the following example, the command defines one required argument: `user`:

```php
/**
 * The name and signature of the console command.
 *
 * @var string
 */
protected $signature = 'mail:send {user}';
```

You may also make arguments optional or define default values for arguments:

```php
// Optional argument...
'mail:send {user?}'

// Optional argument with default value...
'mail:send {user=foo}'
```

<a name="options"></a>
### Options

Options, like arguments, are another form of user input. Options are prefixed by two hyphens (`--`) when they are provided via the command line. There are two types of options: those that receive a value and those that don't. Options that don't receive a value serve as a boolean "switch". Let's take a look at an example of this type of option:

```php
/**
 * The name and signature of the console command.
 *
 * @var string
 */
protected $signature = 'mail:send {user} {--queue}';
```

In this example, the `--queue` switch may be specified when calling the Artisan command. If the `--queue` switch is passed, the value of the option will be `true`. Otherwise, the value will be `false`:

```shell
php artisan mail:send 1 --queue
```

<a name="options-with-values"></a>
#### Options With Values

Next, let's take a look at an option that expects a value. If the user must specify a value for an option, you should suffix the option name with a `=` sign:

```php
/**
 * The name and signature of the console command.
 *
 * @var string
 */
protected $signature = 'mail:send {user} {--queue=}';
```

In this example, the user may pass a value for the option like so. If the option is not specified when invoking the command, its value will be `null`:

```shell
php artisan mail:send 1 --queue=default
```

You may assign default values to options by specifying the default value after the option name. If no option value is passed by the user, the default value will be used:

```php
'mail:send {user} {--queue=default}'
```

<a name="option-shortcuts"></a>
#### Option Shortcuts

To assign a shortcut when defining an option, you may specify it before the option name and use the `|` character as a delimiter to separate the shortcut from the full option name:

```php
'mail:send {user} {--Q|queue=}'
```

When invoking the command on your terminal, option shortcuts should be prefixed with a single hyphen and no `=` character should be included when specifying a value for the option:

```shell
php artisan mail:send 1 -Qdefault
```

<a name="input-arrays"></a>
### Input Arrays

If you would like to define arguments or options to expect multiple input values, you may use the `*` character. First, let's take a look at an example that specifies such an argument:

```php
'mail:send {user*}'
```

When running this command, the `user` arguments may be passed in order to the command line. For example, the following command will set the value of `user` to an array with `1` and `2` as its values:

```shell
php artisan mail:send 1 2
```

This `*` character can be combined with an optional argument definition to allow zero or more instances of an argument:

```php
'mail:send {user?*}'
```

<a name="option-arrays"></a>
#### Option Arrays

When defining an option that expects multiple input values, each option value passed to the command should be prefixed with the option name:

```php
'mail:send {--id=*}'
```

Such a command may be invoked by passing multiple `--id` arguments:

```shell
php artisan mail:send --id=1 --id=2
```

<a name="input-descriptions"></a>
### Input Descriptions

You may assign descriptions to input arguments and options by separating the argument name from the description using a colon. If you need a little extra room to define your command, feel free to spread the definition across multiple lines:

```php
/**
 * The name and signature of the console command.
 *
 * @var string
 */
protected $signature = 'mail:send
                        {user : The ID of the user}
                        {--queue : Whether the job should be queued}';
```

<a name="prompting-for-missing-input"></a>
### Prompting for Missing Input

If your command contains required arguments, the user will receive an error message when they are not provided. Alternatively, you may configure your command to automatically prompt the user when required arguments are missing by implementing the `PromptsForMissingInput` interface:

```php
<?php

namespace App\Console\Commands;

use Illuminate\Console\Command;
use Illuminate\Contracts\Console\PromptsForMissingInput;

class SendEmails extends Command implements PromptsForMissingInput
{
    /**
     * The name and signature of the console command.
     *
     * @var string
     */
    protected $signature = 'mail:send {user}';

    // ...
}
```

If Laravel needs to gather a required argument from the user, it will automatically ask the user for the argument by intelligently phrasing the question using either the argument name or description. If you wish to customize the question used to gather the required argument, you may implement the `promptForMissingArgumentsUsing` method, returning an array of questions keyed by the argument names:

```php
/**
 * Prompt for missing input arguments using the returned questions.
 *
 * @return array<string, string>
 */
protected function promptForMissingArgumentsUsing(): array
{
    return [
        'user' => 'Which user ID should receive the mail?',
    ];
}
```

You may also provide placeholder text by using a tuple containing the question and placeholder:

```php
return [
    'user' => ['Which user ID should receive the mail?', 'E.g. 123'],
];
```

If you would like complete control over the prompt, you may provide a closure that should prompt the user and return their answer:

```php
use App\Models\User;
use function Laravel\Prompts\search;

// ...

return [
    'user' => fn () => search(
        label: 'Search for a user:',
        placeholder: 'E.g. Taylor Otwell',
        options: fn ($value) => strlen($value) > 0
            ? User::whereLike('name', "%{$value}%")->pluck('name', 'id')->all()
            : []
    ),
];
```

> [!NOTE]
The comprehensive [Laravel Prompts](/docs/{{version}}/prompts) documentation includes additional information on the available prompts and their usage.

If you wish to prompt the user to select or enter [options](#options), you may include prompts in your command's `handle` method. However, if you only wish to prompt the user when they have also been automatically prompted for missing arguments, then you may implement the `afterPromptingForMissingArguments` method:

```php
use Symfony\Component\Console\Input\InputInterface;
use Symfony\Component\Console\Output\OutputInterface;
use function Laravel\Prompts\confirm;

// ...

/**
 * Perform actions after the user was prompted for missing arguments.
 */
protected function afterPromptingForMissingArguments(InputInterface $input, OutputInterface $output): void
{
    $input->setOption('queue', confirm(
        label: 'Would you like to queue the mail?',
        default: $this->option('queue')
    ));
}
```

<a name="command-io"></a>
## Command I/O

<a name="retrieving-input"></a>
### Retrieving Input

While your command is executing, you will likely need to access the values for the arguments and options accepted by your command. To do so, you may use the `argument` and `option` methods. If an argument or option does not exist, `null` will be returned:

```php
/**
 * Execute the console command.
 */
public function handle(): void
{
    $userId = $this->argument('user');
}
```

If you need to retrieve all of the arguments as an `array`, call the `arguments` method:

```php
$arguments = $this->arguments();
```

Options may be retrieved just as easily as arguments using the `option` method. To retrieve all of the options as an array, call the `options` method:

```php
// Retrieve a specific option...
$queueName = $this->option('queue');

// Retrieve all options as an array...
$options = $this->options();
```

You may use the `input` method to retrieve a command's arguments and options as an `Illuminate\Console\CommandInput` instance, which provides the same typed accessors that are available on HTTP requests and other data containers:

```php
use App\Enums\ReportType;

/**
 * Execute the console command.
 */
public function handle(): void
{
    $input = $this->input()->date('from');

    // ...
}
```

The `input` method may also be used to retrieve a single input value from either the arguments or options:

```php
$queue = $this->input('queue', 'default');
```

<a name="prompting-for-input"></a>
### Prompting for Input

> [!NOTE]
> [Laravel Prompts](/docs/{{version}}/prompts) is a PHP package for adding beautiful and user-friendly forms to your command-line applications, with browser-like features including placeholder text and validation.

In addition to displaying output, you may also ask the user to provide input during the execution of your command. The `ask` method will prompt the user with the given question, accept their input, and then return the user's input back to your command:

```php
/**
 * Execute the console command.
 */
public function handle(): void
{
    $name = $this->ask('What is your name?');

    // ...
}
```

The `ask` method also accepts an optional second argument which specifies the default value that should be returned if no user input is provided:

```php
$name = $this->ask('What is your name?', 'Taylor');
```

The `secret` method is similar to `ask`, but the user's input will not be visible to them as they type in the console. This method is useful when asking for sensitive information such as passwords:

```php
$password = $this->secret('What is the password?');
```

<a name="asking-for-confirmation"></a>
#### Asking for Confirmation

If you need to ask the user for a simple "yes or no" confirmation, you may use the `confirm` method. By default, this method will return `false`. However, if the user enters `y` or `yes` in response to the prompt, the method will return `true`.

```php
if ($this->confirm('Do you wish to continue?')) {
    // ...
}
```

If necessary, you may specify that the confirmation prompt should return `true` by default by passing `true` as the second argument to the `confirm` method:

```php
if ($this->confirm('Do you wish to continue?', true)) {
    // ...
}
```

<a name="auto-completion"></a>
#### Auto-Completion

The `anticipate` method can be used to provide auto-completion for possible choices. The user can still provide any answer, regardless of the auto-completion hints:

```php
$name = $this->anticipate('What is your name?', ['Taylor', 'Dayle']);
```

Alternatively, you may pass a closure as the second argument to the `anticipate` method. The closure will be called each time the user types an input character. The closure should accept a string parameter containing the user's input so far, and return an array of options for auto-completion:

```php
use App\Models\Address;

$name = $this->anticipate('What is your address?', function (string $input) {
    return Address::whereLike('name', "{$input}%")
        ->limit(5)
        ->pluck('name')
        ->all();
});
```

<a name="multiple-choice-questions"></a>
#### Multiple Choice Questions

If you need to give the user a predefined set of choices when asking a question, you may use the `choice` method. You may set the array index of the default value to be returned if no option is chosen by passing the index as the third argument to the method:

```php
$name = $this->choice(
    'What is your name?',
    ['Taylor', 'Dayle'],
    $defaultIndex
);
```

In addition, the `choice` method accepts optional fourth and fifth arguments for determining the maximum number of attempts to select a valid response and whether multiple selections are permitted:

```php
$name = $this->choice(
    'What is your name?',
    ['Taylor', 'Dayle'],
    $defaultIndex,
    $maxAttempts = null,
    $allowMultipleSelections = false
);
```

<a name="writing-output"></a>
### Writing Output

To send output to the console, you may use the `line`, `newLine`, `info`, `comment`, `question`, `warn`, `alert`, and `error` methods. Each of these methods will use appropriate ANSI colors for their purpose. For example, let's display some general information to the user. Typically, the `info` method will display in the console as green colored text:

```php
/**
 * Execute the console command.
 */
public function handle(): void
{
    // ...

    $this->info('The command was successful!');
}
```

To display an error message, use the `error` method. Error message text is typically displayed in red:

```php
$this->error('Something went wrong!');
```

You may use the `line` method to display plain, uncolored text:

```php
$this->line('Display this on the screen');
```

You may use the `newLine` method to display a blank line:

```php
// Write a single blank line...
$this->newLine();

// Write three blank lines...
$this->newLine(3);
```

<a name="tables"></a>
#### Tables

The `table` method makes it easy to correctly format multiple rows / columns of data. All you need to do is provide the column names and the data for the table and Laravel will automatically calculate the appropriate width and height of the table for you:

```php
use App\Models\User;

$this->table(
    ['Name', 'Email'],
    User::all(['name', 'email'])->toArray()
);
```

<a name="progress-bars"></a>
#### Progress Bars

For long running tasks, it can be helpful to show a progress bar that informs users how complete the task is. Using the `withProgressBar` method, Laravel will display a progress bar and advance its progress for each iteration over a given iterable value:

```php
use App\Models\User;

$users = $this->withProgressBar(User::all(), function (User $user) {
    $this->performTask($user);
});
```

Sometimes, you may need more manual control over how a progress bar is advanced. First, define the total number of steps the process will iterate through. Then, advance the progress bar after processing each item:

```php
$users = App\Models\User::all();

$bar = $this->output->createProgressBar(count($users));

$bar->start();

foreach ($users as $user) {
    $this->performTask($user);

    $bar->advance();
}

$bar->finish();
```

> [!NOTE]
> For more advanced options, check out the [Symfony Progress Bar component documentation](https://symfony.com/doc/current/components/console/helpers/progressbar.html).

<a name="registering-commands"></a>
## Registering Commands

By default, Laravel automatically registers all commands within the `app/Console/Commands` directory. However, you can instruct Laravel to scan other directories for Artisan commands using the `withCommands` method in your application's `bootstrap/app.php` file:

```php
->withCommands([
    __DIR__.'/../app/Domain/Orders/Commands',
])
```

If necessary, you may also manually register commands by providing the command's class name to the `withCommands` method:

```php
use App\Domain\Orders\Commands\SendEmails;

->withCommands([
    SendEmails::class,
])
```

When Artisan boots, all the commands in your application will be resolved by the [service container](/docs/{{version}}/container) and registered with Artisan.

<a name="programmatically-executing-commands"></a>
## Programmatically Executing Commands

Sometimes you may wish to execute an Artisan command outside of the CLI. For example, you may wish to execute an Artisan command from a route or controller. You may use the `call` method on the `Artisan` facade to accomplish this. The `call` method accepts either the command's signature name or class name as its first argument, and an array of command parameters as the second argument. The exit code will be returned:

```php
use Illuminate\Support\Facades\Artisan;
use Illuminate\Support\Facades\Route;

Route::post('/user/{user}/mail', function (string $user) {
    $exitCode = Artisan::call('mail:send', [
        'user' => $user, '--queue' => 'default'
    ]);

    // ...
});
```

Alternatively, you may pass the entire Artisan command to the `call` method as a string:

```php
Artisan::call('mail:send 1 --queue=default');
```

<a name="passing-array-values"></a>
#### Passing Array Values

If your command defines an option that accepts an array, you may pass an array of values to that option:

```php
use Illuminate\Support\Facades\Artisan;
use Illuminate\Support\Facades\Route;

Route::post('/mail', function () {
    $exitCode = Artisan::call('mail:send', [
        '--id' => [5, 13]
    ]);
});
```

<a name="passing-boolean-values"></a>
#### Passing Boolean Values

If you need to specify the value of an option that does not accept string values, such as the `--force` flag on the `migrate:refresh` command, you should pass `true` or `false` as the value of the option:

```php
$exitCode = Artisan::call('migrate:refresh', [
    '--force' => true,
]);
```

<a name="queueing-artisan-commands"></a>
#### Queueing Artisan Commands

Using the `queue` method on the `Artisan` facade, you may even queue Artisan commands so they are processed in the background by your [queue workers](/docs/{{version}}/queues). Before using this method, make sure you have configured your queue and are running a queue listener:

```php
use Illuminate\Support\Facades\Artisan;
use Illuminate\Support\Facades\Route;

Route::post('/user/{user}/mail', function (string $user) {
    Artisan::queue('mail:send', [
        'user' => $user, '--queue' => 'default'
    ]);

    // ...
});
```

Using the `onConnection` and `onQueue` methods, you may specify the connection or queue the Artisan command should be dispatched to:

```php
Artisan::queue('mail:send', [
    'user' => 1, '--queue' => 'default'
])->onConnection('redis')->onQueue('commands');
```

<a name="calling-commands-from-other-commands"></a>
### Calling Commands From Other Commands

Sometimes you may wish to call other commands from an existing Artisan command. You may do so using the `call` method. This `call` method accepts the command name and an array of command arguments / options:

```php
/**
 * Execute the console command.
 */
public function handle(): void
{
    $this->call('mail:send', [
        'user' => 1, '--queue' => 'default'
    ]);

    // ...
}
```

If you would like to call another console command and suppress all of its output, you may use the `callSilently` method. The `callSilently` method has the same signature as the `call` method:

```php
$this->callSilently('mail:send', [
    'user' => 1, '--queue' => 'default'
]);
```

<a name="signal-handling"></a>
## Signal Handling

As you may know, operating systems allow signals to be sent to running processes. For example, the `SIGTERM` signal is how operating systems ask a program to terminate gracefully. If you wish to listen for signals in your Artisan console commands and execute code when they occur, you may use the `trap` method:

```php
/**
 * Execute the console command.
 */
public function handle(): void
{
    $this->trap(SIGTERM, fn () => $this->shouldKeepRunning = false);

    while ($this->shouldKeepRunning) {
        // ...
    }
}
```

To listen for multiple signals at once, you may provide an array of signals to the `trap` method:

```php
$this->trap([SIGTERM, SIGQUIT], function (int $signal) {
    $this->shouldKeepRunning = false;

    dump($signal); // SIGTERM / SIGQUIT
});
```

<a name="the-dev-command"></a>
## The Dev Command

The `dev` Artisan command starts all of the processes needed for local development in a single terminal window. By default, it concurrently runs the PHP development server, a queue worker, log tailing via [Pail](/docs/{{version}}/logging#tailing-log-messages-using-pail), and Vite asset compilation:

```shell
php artisan dev
```

Under the hood, the `dev` command uses the `@laravel/multiplex` npm package to manage the processes, giving each process its own tab with searchable, scrollable output. Each process is labeled and color-coded so you can easily distinguish between them. If a process crashes, it will be restarted automatically, and when you quit, all of the output is written back to your terminal so nothing is lost.

> [!NOTE]
> The `dev` command requires Node 22.13 or later. On Windows, it falls back to the `concurrently` npm package and the tabbed interface is not available.

The default processes are:

| Name | Command |
| --- | --- |
| `server` | `php artisan serve --host=localhost` |
| `queue` | `php artisan queue:listen --tries=1 --timeout=0` |
| `logs` | `php artisan pail --timeout=0` |
| `vite` | `npm run dev` |

> [!NOTE]
> The `vite` process automatically detects your Node package manager (npm, pnpm, Yarn, or Bun) and uses the appropriate run command.

<a name="customizing-dev-processes"></a>
### Customizing Dev Processes

You may customize the processes that the `dev` command runs by using the `DevCommands` class, typically within the `boot` method of your application's `AppServiceProvider`. The `register` method accepts a command string and an optional name:

```php
use Illuminate\Foundation\DevCommands;

/**
 * Bootstrap any application services.
 */
public function boot(): void
{
    DevCommands::register('some-command --flag', 'my-process');
}
```

When registering an Artisan command, you may use the `artisan` method which automatically prefixes the command with `php artisan`:

```php
DevCommands::artisan('horizon', 'horizon');
```

Likewise, the `node` method prefixes the command with your detected package manager's run command (e.g. `npm run`), and the `nodeExec` method prefixes the command with the package manager's exec command (e.g. `npx`):

```php
DevCommands::node('storybook', 'storybook');

DevCommands::nodeExec('tailwindcss -i resources/css/app.css -o public/css/app.css --watch', 'tailwind');
```

If you register a process with the same name as a default process, your process will replace the default. For example, you may customize the server process to use a different port:

```php
DevCommands::artisan('serve --host=localhost --port=9000', 'server');
```

You may also customize the color of a process label in your terminal. The available color methods are `blue`, `purple`, `pink`, `orange`, `green`, and `yellow`. You may also pass a custom hex color to the `color` method:

```php
DevCommands::register('my-command', 'my-process')->green();

DevCommands::register('my-command', 'my-process')->color('#ff6347');
```

To see all registered dev processes without starting them, use the `dev:list` command:

```shell
php artisan dev:list
```

<a name="restarting-failed-processes"></a>
#### Restarting Failed Processes

If a process crashes, Laravel will restart it after a short delay, up to five times, before marking it as failed. A process that dies within a second of starting is not restarted, since it likely never started successfully in the first place. Restarting a process manually with `r` resets the counter.

You may disable this behavior for a single run using the `--no-restart` option:

```shell
php artisan dev --no-restart
```

Or, you may disable it for your entire application using the `disableAutoRestart` method:

```php
DevCommands::disableAutoRestart();
```

<a name="filtering-dev-processes"></a>
### Filtering Dev Processes

You may instruct the `dev` command to only run specific processes when it is invoked using the `only` method. Similarly, you may exclude specific processes using the `except` method:

```php
// Only run the server and vite processes...
DevCommands::only('server', 'vite');

// Run all processes except the queue worker...
DevCommands::except('queue');
```

You may exclude commands registered by packages or Laravel's default commands using the `withoutVendorCommands` and `withoutDefaultCommands` methods:

```php
DevCommands::withoutVendorCommands();

DevCommands::withoutDefaultCommands();
```

<a name="stub-customization"></a>
## Stub Customization

The Artisan console's `make` commands are used to create a variety of classes, such as controllers, jobs, migrations, and tests. These classes are generated using "stub" files that are populated with values based on your input. However, you may want to make small changes to files generated by Artisan. To accomplish this, you may use the `stub:publish` command to publish the most common stubs to your application so that you can customize them:

```shell
php artisan stub:publish
```

The published stubs will be located within a `stubs` directory in the root of your application. Any changes you make to these stubs will be reflected when you generate their corresponding classes using Artisan's `make` commands.

<a name="events"></a>
## Events

Artisan dispatches three events when running commands: `Illuminate\Console\Events\ArtisanStarting`, `Illuminate\Console\Events\CommandStarting`, and `Illuminate\Console\Events\CommandFinished`. The `ArtisanStarting` event is dispatched immediately when Artisan starts running. Next, the `CommandStarting` event is dispatched immediately before a command runs. Finally, the `CommandFinished` event is dispatched once a command finishes executing.


---

# Authentication

*Sección: Laravel | Origen: https://laravel.com/docs/13.x/authentication*

- [Introduction](#introduction)
    - [Starter Kits](#starter-kits)
    - [Database Considerations](#introduction-database-considerations)
    - [Ecosystem Overview](#ecosystem-overview)
- [Authentication Quickstart](#authentication-quickstart)
    - [Install a Starter Kit](#install-a-starter-kit)
    - [Retrieving the Authenticated User](#retrieving-the-authenticated-user)
    - [Protecting Routes](#protecting-routes)
    - [Login Throttling](#login-throttling)
- [Manually Authenticating Users](#authenticating-users)
    - [Remembering Users](#remembering-users)
    - [Other Authentication Methods](#other-authentication-methods)
- [HTTP Basic Authentication](#http-basic-authentication)
    - [Stateless HTTP Basic Authentication](#stateless-http-basic-authentication)
- [Logging Out](#logging-out)
    - [Invalidating Sessions on Other Devices](#invalidating-sessions-on-other-devices)
- [Password Confirmation](#password-confirmation)
    - [Configuration](#password-confirmation-configuration)
    - [Routing](#password-confirmation-routing)
    - [Protecting Routes](#password-confirmation-protecting-routes)
- [Adding Custom Guards](#adding-custom-guards)
    - [Closure Request Guards](#closure-request-guards)
- [Adding Custom User Providers](#adding-custom-user-providers)
    - [The User Provider Contract](#the-user-provider-contract)
    - [The Authenticatable Contract](#the-authenticatable-contract)
- [Automatic Password Rehashing](#automatic-password-rehashing)
- [Social Authentication](/docs/{{version}}/socialite)
- [Events](#events)

<a name="introduction"></a>
## Introduction

Many web applications provide a way for their users to authenticate with the application and "login". Implementing this feature in web applications can be a complex and potentially risky endeavor. For this reason, Laravel strives to give you the tools you need to implement authentication quickly, securely, and easily.

At its core, Laravel's authentication facilities are made up of "guards" and "providers". Guards define how users are authenticated for each request. For example, Laravel ships with a `session` guard which maintains state using session storage and cookies.

Providers define how users are retrieved from your persistent storage. Laravel ships with support for retrieving users using [Eloquent](/docs/{{version}}/eloquent) and the database query builder. However, you are free to define additional providers as needed for your application.

Your application's authentication configuration file is located at `config/auth.php`. This file contains several well-documented options for tweaking the behavior of Laravel's authentication services.

> [!NOTE]
> Guards and providers should not be confused with "roles" and "permissions". To learn more about authorizing user actions via permissions, please refer to the [authorization](/docs/{{version}}/authorization) documentation.

<a name="starter-kits"></a>
### Starter Kits

Want to get started fast? Install a [Laravel application starter kit](/docs/{{version}}/starter-kits) in a fresh Laravel application. After migrating your database, navigate your browser to `/register` or any other URL that is assigned to your application. The starter kits will take care of scaffolding your entire authentication system!

**Even if you choose not to use a starter kit in your final Laravel application, installing a [starter kit](/docs/{{version}}/starter-kits) can be a wonderful opportunity to learn how to implement all of Laravel's authentication functionality in an actual Laravel project.** Since the Laravel starter kits contain authentication controllers, routes, and views for you, you can examine the code within these files to learn how Laravel's authentication features may be implemented.

<a name="introduction-database-considerations"></a>
### Database Considerations

By default, Laravel includes an `App\Models\User` [Eloquent model](/docs/{{version}}/eloquent) in your `app/Models` directory. This model may be used with the default Eloquent authentication driver.

If your application is not using Eloquent, you may use the `database` authentication provider which uses the Laravel query builder. If your application is using MongoDB, check out MongoDB's official [Laravel user authentication documentation](https://www.mongodb.com/docs/drivers/php/laravel-mongodb/current/user-authentication/).

When building the database schema for the `App\Models\User` model, make sure the password column is at least 60 characters in length. Of course, the `users` table migration that is included in new Laravel applications already creates a column that exceeds this length.

Also, you should verify that your `users` (or equivalent) table contains a nullable, string `remember_token` column of 100 characters. This column will be used to store a token for users that select the "remember me" option when logging into your application. Again, the default `users` table migration that is included in new Laravel applications already contains this column.

<a name="ecosystem-overview"></a>
### Ecosystem Overview

Laravel offers several packages related to authentication. Before continuing, we'll review the general authentication ecosystem in Laravel and discuss each package's intended purpose.

First, consider how authentication works. When using a web browser, a user will provide their username and password via a login form. If these credentials are correct, the application will store information about the authenticated user in the user's [session](/docs/{{version}}/session). A cookie issued to the browser contains the session ID so that subsequent requests to the application can associate the user with the correct session. After the session cookie is received, the application will retrieve the session data based on the session ID, note that the authentication information has been stored in the session, and will consider the user as "authenticated".

When a remote service needs to authenticate to access an API, cookies are not typically used for authentication because there is no web browser. Instead, the remote service sends an API token to the API on each request. The application may validate the incoming token against a table of valid API tokens and "authenticate" the request as being performed by the user associated with that API token.

<a name="laravels-built-in-browser-authentication-services"></a>
#### Laravel's Built-in Browser Authentication Services

Laravel includes built-in authentication and session services which are typically accessed via the `Auth` and `Session` facades. These features provide cookie-based authentication for requests that are initiated from web browsers. They provide methods that allow you to verify a user's credentials and authenticate the user. In addition, these services will automatically store the proper authentication data in the user's session and issue the user's session cookie. A discussion of how to use these services is contained within this documentation.

**Application Starter Kits**

As discussed in this documentation, you can interact with these authentication services manually to build your application's own authentication layer. However, to help you get started more quickly, we have released [free starter kits](/docs/{{version}}/starter-kits) that provide robust, modern scaffolding of the entire authentication layer.

<a name="laravels-api-authentication-services"></a>
#### Laravel's API Authentication Services

Laravel provides two optional packages to assist you in managing API tokens and authenticating requests made with API tokens: [Passport](/docs/{{version}}/passport) and [Sanctum](/docs/{{version}}/sanctum). Please note that these libraries and Laravel's built-in cookie based authentication libraries are not mutually exclusive. These libraries primarily focus on API token authentication while the built-in authentication services focus on cookie based browser authentication. Many applications will use both Laravel's built-in cookie based authentication services and one of Laravel's API authentication packages.

**Passport**

Passport is an OAuth2 authentication provider, offering a variety of OAuth2 "grant types" which allow you to issue various types of tokens. In general, this is a robust and complex package for API authentication. However, most applications do not require the complex features offered by the OAuth2 spec, which can be confusing for both users and developers. In addition, developers have been historically confused about how to authenticate SPA applications or mobile applications using OAuth2 authentication providers like Passport.

**Sanctum**

In response to the complexity of OAuth2 and developer confusion, we set out to build a simpler, more streamlined authentication package that could handle both first-party web requests from a web browser and API requests via tokens. This goal was realized with the release of [Laravel Sanctum](/docs/{{version}}/sanctum), which should be considered the preferred and recommended authentication package for applications that will be offering a first-party web UI in addition to an API, or will be powered by a single-page application (SPA) that exists separately from the backend Laravel application, or applications that offer a mobile client.

Laravel Sanctum is a hybrid web / API authentication package that can manage your application's entire authentication process. This is possible because when Sanctum based applications receive a request, Sanctum will first determine if the request includes a session cookie that references an authenticated session. Sanctum accomplishes this by calling Laravel's built-in authentication services which we discussed earlier. If the request is not being authenticated via a session cookie, Sanctum will inspect the request for an API token. If an API token is present, Sanctum will authenticate the request using that token. To learn more about this process, please consult Sanctum's ["how it works"](/docs/{{version}}/sanctum#how-it-works) documentation.

<a name="summary-choosing-your-stack"></a>
#### Summary and Choosing Your Stack

In summary, if your application will be accessed using a browser and you are building a monolithic Laravel application, your application will use Laravel's built-in authentication services.

Next, if your application offers an API that will be consumed by third parties, you will choose between [Passport](/docs/{{version}}/passport) or [Sanctum](/docs/{{version}}/sanctum) to provide API token authentication for your application. In general, Sanctum should be preferred when possible since it is a simple, complete solution for API authentication, SPA authentication, and mobile authentication, including support for "scopes" or "abilities".

If you are building a single-page application (SPA) that will be powered by a Laravel backend, you should use [Laravel Sanctum](/docs/{{version}}/sanctum). When using Sanctum, you will either need to [manually implement your own backend authentication routes](#authenticating-users) or utilize [Laravel Fortify](/docs/{{version}}/fortify) as a headless authentication backend service that provides routes and controllers for features such as registration, password reset, email verification, and more.

Passport may be chosen when your application absolutely needs all of the features provided by the OAuth2 specification. Additionally, if you are building an [MCP server](/docs/{{version}}/mcp) that will be accessed by AI clients, you should use Passport, as MCP clients typically expect to [authenticate using OAuth](/docs/{{version}}/mcp#oauth).

And, if you would like to get started quickly, we are pleased to recommend [our application starter kits](/docs/{{version}}/starter-kits) as a quick way to start a new Laravel application that already uses our preferred authentication stack of Laravel's built-in authentication services.

<a name="authentication-quickstart"></a>
## Authentication Quickstart

> [!WARNING]
> This portion of the documentation discusses authenticating users via the [Laravel application starter kits](/docs/{{version}}/starter-kits), which includes UI scaffolding to help you get started quickly. If you would like to integrate with Laravel's authentication systems directly, check out the documentation on [manually authenticating users](#authenticating-users).

<a name="install-a-starter-kit"></a>
### Install a Starter Kit

First, you should [install a Laravel application starter kit](/docs/{{version}}/starter-kits). Our starter kits offer beautifully designed starting points for incorporating authentication into your fresh Laravel application.

<a name="retrieving-the-authenticated-user"></a>
### Retrieving the Authenticated User

After creating an application from a starter kit and allowing users to register and authenticate with your application, you will often need to interact with the currently authenticated user. While handling an incoming request, you may access the authenticated user via the `Auth` facade's `user` method:

```php
use Illuminate\Support\Facades\Auth;

// Retrieve the currently authenticated user...
$user = Auth::user();

// Retrieve the currently authenticated user's ID...
$id = Auth::id();
```

Alternatively, once a user is authenticated, you may access the authenticated user via an `Illuminate\Http\Request` instance. Remember, type-hinted classes will automatically be injected into your controller methods. By type-hinting the `Illuminate\Http\Request` object, you may gain convenient access to the authenticated user from any controller method in your application via the request's `user` method:

```php
<?php

namespace App\Http\Controllers;

use Illuminate\Http\RedirectResponse;
use Illuminate\Http\Request;

class FlightController extends Controller
{
    /**
     * Update the flight information for an existing flight.
     */
    public function update(Request $request): RedirectResponse
    {
        $user = $request->user();

        // ...

        return redirect('/flights');
    }
}
```

<a name="determining-if-the-current-user-is-authenticated"></a>
#### Determining if the Current User is Authenticated

To determine if the user making the incoming HTTP request is authenticated, you may use the `check` method on the `Auth` facade. This method will return `true` if the user is authenticated:

```php
use Illuminate\Support\Facades\Auth;

if (Auth::check()) {
    // The user is logged in...
}
```

> [!NOTE]
> Even though it is possible to determine if a user is authenticated using the `check` method, you will typically use a middleware to verify that the user is authenticated before allowing the user access to certain routes / controllers. To learn more about this, check out the documentation on [protecting routes](/docs/{{version}}/authentication#protecting-routes).

<a name="protecting-routes"></a>
### Protecting Routes

[Route middleware](/docs/{{version}}/middleware) can be used to only allow authenticated users to access a given route. Laravel ships with an `auth` middleware, which is a [middleware alias](/docs/{{version}}/middleware#middleware-aliases) for the `Illuminate\Auth\Middleware\Authenticate` class. Since this middleware is already aliased internally by Laravel, all you need to do is attach the middleware to a route definition:

```php
Route::get('/flights', function () {
    // Only authenticated users may access this route...
})->middleware('auth');
```

<a name="redirecting-unauthenticated-users"></a>
#### Redirecting Unauthenticated Users

When the `auth` middleware detects an unauthenticated user, it will redirect the user to the `login` [named route](/docs/{{version}}/routing#named-routes). You may modify this behavior using the `redirectGuestsTo` method within your application's `bootstrap/app.php` file:

```php
use Illuminate\Http\Request;

->withMiddleware(function (Middleware $middleware): void {
    $middleware->redirectGuestsTo('/login');

    // Using a closure...
    $middleware->redirectGuestsTo(fn (Request $request) => route('login'));
})
```

<a name="redirecting-authenticated-users"></a>
#### Redirecting Authenticated Users

When the `guest` middleware detects an authenticated user, it will redirect the user to the `dashboard` or `home` named route. You may modify this behavior using the `redirectUsersTo` method within your application's `bootstrap/app.php` file:

```php
use Illuminate\Http\Request;

->withMiddleware(function (Middleware $middleware): void {
    $middleware->redirectUsersTo('/panel');

    // Using a closure...
    $middleware->redirectUsersTo(fn (Request $request) => route('panel'));
})
```

<a name="specifying-a-guard"></a>
#### Specifying a Guard

When attaching the `auth` middleware to a route, you may also specify which "guard" should be used to authenticate the user. The guard specified should correspond to one of the keys in the `guards` array of your `auth.php` configuration file:

```php
Route::get('/flights', function () {
    // Only authenticated users may access this route...
})->middleware('auth:admin');
```

<a name="login-throttling"></a>
### Login Throttling

If you are using one of our [application starter kits](/docs/{{version}}/starter-kits), rate limiting will automatically be applied to login attempts. By default, the user will not be able to login for one minute if they fail to provide the correct credentials after several attempts. The throttling is unique to the user's username / email address and their IP address.

> [!NOTE]
> If you would like to rate limit other routes in your application, check out the [rate limiting documentation](/docs/{{version}}/routing#rate-limiting).

<a name="authenticating-users"></a>
## Manually Authenticating Users

You are not required to use the authentication scaffolding included with Laravel's [application starter kits](/docs/{{version}}/starter-kits). If you choose not to use this scaffolding, you will need to manage user authentication using the Laravel authentication classes directly. Don't worry, it's a cinch!

We will access Laravel's authentication services via the `Auth` [facade](/docs/{{version}}/facades), so we'll need to make sure to import the `Auth` facade at the top of the class. Next, let's check out the `attempt` method. The `attempt` method is normally used to handle authentication attempts from your application's "login" form. If authentication is successful, you should regenerate the user's [session](/docs/{{version}}/session) to prevent [session fixation](https://en.wikipedia.org/wiki/Session_fixation):

```php
<?php

namespace App\Http\Controllers;

use Illuminate\Http\Request;
use Illuminate\Http\RedirectResponse;
use Illuminate\Support\Facades\Auth;

class LoginController extends Controller
{
    /**
     * Handle an authentication attempt.
     */
    public function authenticate(Request $request): RedirectResponse
    {
        $credentials = $request->validate([
            'email' => ['required', 'email'],
            'password' => ['required'],
        ]);

        if (Auth::attempt($credentials)) {
            $request->session()->regenerate();

            return redirect()->intended('dashboard');
        }

        return back()->withErrors([
            'email' => 'The provided credentials do not match our records.',
        ])->onlyInput('email');
    }
}
```

The `attempt` method accepts an array of key / value pairs as its first argument. The values in the array will be used to find the user in your database table. So, in the example above, the user will be retrieved by the value of the `email` column. If the user is found, the hashed password stored in the database will be compared with the `password` value passed to the method via the array. You should not hash the incoming request's `password` value, since the framework will automatically hash the value before comparing it to the hashed password in the database. An authenticated session will be started for the user if the two hashed passwords match.

Remember, Laravel's authentication services will retrieve users from your database based on your authentication guard's "provider" configuration. In the default `config/auth.php` configuration file, the Eloquent user provider is specified and it is instructed to use the `App\Models\User` model when retrieving users. You may change these values within your configuration file based on the needs of your application.

The `attempt` method will return `true` if authentication was successful. Otherwise, `false` will be returned.

The `intended` method provided by Laravel's redirector will redirect the user to the URL they were attempting to access before being intercepted by the authentication middleware. A fallback URI may be given to this method in case the intended destination is not available.

<a name="specifying-additional-conditions"></a>
#### Specifying Additional Conditions

If you wish, you may also add extra query conditions to the authentication query in addition to the user's email and password. To accomplish this, we may simply add the query conditions to the array passed to the `attempt` method. For example, we may verify that the user is marked as "active":

```php
if (Auth::attempt(['email' => $email, 'password' => $password, 'active' => 1])) {
    // Authentication was successful...
}
```

For complex query conditions, you may provide a closure in your array of credentials. This closure will be invoked with the query instance, allowing you to customize the query based on your application's needs:

```php
use Illuminate\Database\Eloquent\Builder;

if (Auth::attempt([
    'email' => $email,
    'password' => $password,
    fn (Builder $query) => $query->has('activeSubscription'),
])) {
    // Authentication was successful...
}
```

> [!WARNING]
> In these examples, `email` is not a required option, it is merely used as an example. You should use whatever column name corresponds to a "username" in your database table.

The `attemptWhen` method, which receives a closure as its second argument, may be used to perform more extensive inspection of the potential user before actually authenticating the user. The closure receives the potential user and should return `true` or `false` to indicate if the user may be authenticated:

```php
if (Auth::attemptWhen([
    'email' => $email,
    'password' => $password,
], function (User $user) {
    return $user->isNotBanned();
})) {
    // Authentication was successful...
}
```

<a name="accessing-specific-guard-instances"></a>
#### Accessing Specific Guard Instances

Via the `Auth` facade's `guard` method, you may specify which guard instance you would like to utilize when authenticating the user. This allows you to manage authentication for separate parts of your application using entirely separate authenticatable models or user tables.

The guard name passed to the `guard` method should correspond to one of the guards configured in your `auth.php` configuration file:

```php
if (Auth::guard('admin')->attempt($credentials)) {
    // ...
}
```

<a name="remembering-users"></a>
### Remembering Users

Many web applications provide a "remember me" checkbox on their login form. If you would like to provide "remember me" functionality in your application, you may pass a boolean value as the second argument to the `attempt` method.

When this value is `true`, Laravel will keep the user authenticated indefinitely or until they manually logout. Your `users` table must include the string `remember_token` column, which will be used to store the "remember me" token. The `users` table migration included with new Laravel applications already includes this column:

```php
use Illuminate\Support\Facades\Auth;

if (Auth::attempt(['email' => $email, 'password' => $password], $remember)) {
    // The user is being remembered...
}
```

If your application offers "remember me" functionality, you may use the `viaRemember` method to determine if the currently authenticated user was authenticated using the "remember me" cookie:

```php
use Illuminate\Support\Facades\Auth;

if (Auth::viaRemember()) {
    // ...
}
```

<a name="other-authentication-methods"></a>
### Other Authentication Methods

<a name="authenticate-a-user-instance"></a>
#### Authenticate a User Instance

If you need to set an existing user instance as the currently authenticated user, you may pass the user instance to the `Auth` facade's `login` method. The given user instance must be an implementation of the `Illuminate\Contracts\Auth\Authenticatable` [contract](/docs/{{version}}/contracts). The `App\Models\User` model included with Laravel already implements this interface. This method of authentication is useful when you already have a valid user instance, such as directly after a user registers with your application:

```php
use Illuminate\Support\Facades\Auth;

Auth::login($user);
```

You may pass a boolean value as the second argument to the `login` method. This value indicates if "remember me" functionality is desired for the authenticated session. Remember, this means that the session will be authenticated indefinitely or until the user manually logs out of the application:

```php
Auth::login($user, $remember = true);
```

If needed, you may specify an authentication guard before calling the `login` method:

```php
Auth::guard('admin')->login($user);
```

<a name="authenticate-a-user-by-id"></a>
#### Authenticate a User by ID

To authenticate a user using their database record's primary key, you may use the `loginUsingId` method. This method accepts the primary key of the user you wish to authenticate:

```php
Auth::loginUsingId(1);
```

You may pass a boolean value to the `remember` argument of the `loginUsingId` method. This value indicates if "remember me" functionality is desired for the authenticated session. Remember, this means that the session will be authenticated indefinitely or until the user manually logs out of the application:

```php
Auth::loginUsingId(1, remember: true);
```

<a name="authenticate-a-user-once"></a>
#### Authenticate a User Once

You may use the `once` method to authenticate a user with the application for a single request. No sessions or cookies will be utilized when calling this method, and the `Login` event will not be dispatched:

```php
if (Auth::once($credentials)) {
    // ...
}
```

<a name="http-basic-authentication"></a>
## HTTP Basic Authentication

[HTTP Basic Authentication](https://en.wikipedia.org/wiki/Basic_access_authentication) provides a quick way to authenticate users of your application without setting up a dedicated "login" page. To get started, attach the `auth.basic` [middleware](/docs/{{version}}/middleware) to a route. The `auth.basic` middleware is included with the Laravel framework, so you do not need to define it:

```php
Route::get('/profile', function () {
    // Only authenticated users may access this route...
})->middleware('auth.basic');
```

Once the middleware has been attached to the route, you will automatically be prompted for credentials when accessing the route in your browser. By default, the `auth.basic` middleware will assume the `email` column on your `users` database table is the user's "username".

<a name="a-note-on-fastcgi"></a>
#### A Note on FastCGI

If you are using [PHP FastCGI](https://www.php.net/manual/en/install.fpm.php) and Apache to serve your Laravel application, HTTP Basic authentication may not work correctly. To correct these problems, the following lines may be added to your application's `.htaccess` file:

```apache
RewriteCond %{HTTP:Authorization} ^(.+)$
RewriteRule .* - [E=HTTP_AUTHORIZATION:%{HTTP:Authorization}]
```

<a name="stateless-http-basic-authentication"></a>
### Stateless HTTP Basic Authentication

You may also use HTTP Basic Authentication without setting a user identifier cookie in the session. This is primarily helpful if you choose to use HTTP Authentication to authenticate requests to your application's API. To accomplish this, [define a middleware](/docs/{{version}}/middleware) that calls the `onceBasic` method. If no response is returned by the `onceBasic` method, the request may be passed further into the application:

```php
<?php

namespace App\Http\Middleware;

use Closure;
use Illuminate\Http\Request;
use Illuminate\Support\Facades\Auth;
use Symfony\Component\HttpFoundation\Response;

class AuthenticateOnceWithBasicAuth
{
    /**
     * Handle an incoming request.
     *
     * @param  \Closure(\Illuminate\Http\Request): (\Symfony\Component\HttpFoundation\Response)  $next
     */
    public function handle(Request $request, Closure $next): Response
    {
        return Auth::onceBasic() ?: $next($request);
    }

}
```

Next, attach the middleware to a route:

```php
Route::get('/api/user', function () {
    // Only authenticated users may access this route...
})->middleware(AuthenticateOnceWithBasicAuth::class);
```

<a name="logging-out"></a>
## Logging Out

To manually log users out of your application, you may use the `logout` method provided by the `Auth` facade. This will remove the authentication information from the user's session so that subsequent requests are not authenticated.

In addition to calling the `logout` method, it is recommended that you invalidate the user's session and regenerate their [CSRF token](/docs/{{version}}/csrf). After logging the user out, you would typically redirect the user to the root of your application:

```php
use Illuminate\Http\Request;
use Illuminate\Http\RedirectResponse;
use Illuminate\Support\Facades\Auth;

/**
 * Log the user out of the application.
 */
public function logout(Request $request): RedirectResponse
{
    Auth::logout();

    $request->session()->invalidate();

    $request->session()->regenerateToken();

    return redirect('/');
}
```

<a name="invalidating-sessions-on-other-devices"></a>
### Invalidating Sessions on Other Devices

Laravel also provides a mechanism for invalidating and "logging out" a user's sessions that are active on other devices without invalidating the session on their current device. This feature is typically utilized when a user is changing or updating their password and you would like to invalidate sessions on other devices while keeping the current device authenticated.

Before getting started, you should make sure that the `Illuminate\Session\Middleware\AuthenticateSession` middleware is included on the routes that should receive session authentication. Typically, you should place this middleware on a route group definition so that it can be applied to the majority of your application's routes. By default, the `AuthenticateSession` middleware may be attached to a route using the `auth.session` [middleware alias](/docs/{{version}}/middleware#middleware-aliases):

```php
Route::middleware(['auth', 'auth.session'])->group(function () {
    Route::get('/', function () {
        // ...
    });
});
```

Then, you may use the `logoutOtherDevices` method provided by the `Auth` facade. This method requires the user to confirm their current password, which your application should accept through an input form:

```php
use Illuminate\Support\Facades\Auth;

Auth::logoutOtherDevices($currentPassword);
```

When the `logoutOtherDevices` method is invoked, the user's other sessions will be invalidated entirely, meaning they will be "logged out" of all guards they were previously authenticated by.

<a name="password-confirmation"></a>
## Password Confirmation

While building your application, you may occasionally have actions that should require the user to confirm their password before the action is performed or before the user is redirected to a sensitive area of the application. Laravel includes built-in middleware to make this process a breeze. Implementing this feature will require you to define two routes: one route to display a view asking the user to confirm their password and another route to confirm that the password is valid and redirect the user to their intended destination.

> [!NOTE]
> The following documentation discusses how to integrate with Laravel's password confirmation features directly; however, if you would like to get started more quickly, the [Laravel application starter kits](/docs/{{version}}/starter-kits) include support for this feature!

<a name="password-confirmation-configuration"></a>
### Configuration

After confirming their password, a user will not be asked to confirm their password again for three hours. However, you may configure the length of time before the user is re-prompted for their password by changing the value of the `password_timeout` configuration value within your application's `config/auth.php` configuration file.

<a name="password-confirmation-routing"></a>
### Routing

<a name="the-password-confirmation-form"></a>
#### The Password Confirmation Form

First, we will define a route to display a view that requests the user to confirm their password:

```php
Route::get('/confirm-password', function () {
    return view('auth.confirm-password');
})->middleware('auth')->name('password.confirm');
```

As you might expect, the view that is returned by this route should have a form containing a `password` field. In addition, feel free to include text within the view that explains that the user is entering a protected area of the application and must confirm their password.

<a name="confirming-the-password"></a>
#### Confirming the Password

Next, we will define a route that will handle the form request from the "confirm password" view. This route will be responsible for validating the password and redirecting the user to their intended destination:

```php
use Illuminate\Http\Request;
use Illuminate\Support\Facades\Hash;

Route::post('/confirm-password', function (Request $request) {
    if (! Hash::check($request->password, $request->user()->password)) {
        return back()->withErrors([
            'password' => ['The provided password does not match our records.']
        ]);
    }

    $request->session()->passwordConfirmed();

    return redirect()->intended();
})->middleware(['auth', 'throttle:6,1']);
```

Before moving on, let's examine this route in more detail. First, the request's `password` field is determined to actually match the authenticated user's password. If the password is valid, we need to inform Laravel's session that the user has confirmed their password. The `passwordConfirmed` method will set a timestamp in the user's session that Laravel can use to determine when the user last confirmed their password. Finally, we can redirect the user to their intended destination.

<a name="password-confirmation-protecting-routes"></a>
### Protecting Routes

You should ensure that any route that performs an action which requires recent password confirmation is assigned the `password.confirm` middleware. This middleware is included with the default installation of Laravel and will automatically store the user's intended destination in the session so that the user may be redirected to that location after confirming their password. After storing the user's intended destination in the session, the middleware will redirect the user to the `password.confirm` [named route](/docs/{{version}}/routing#named-routes):

```php
Route::get('/settings', function () {
    // ...
})->middleware(['password.confirm']);

Route::post('/settings', function () {
    // ...
})->middleware(['password.confirm']);
```

<a name="adding-custom-guards"></a>
## Adding Custom Guards

You may define your own authentication guards using the `extend` method on the `Auth` facade. You should place your call to the `extend` method within a [service provider](/docs/{{version}}/providers). Since Laravel already ships with an `AppServiceProvider`, we can place the code in that provider:

```php
<?php

namespace App\Providers;

use App\Services\Auth\JwtGuard;
use Illuminate\Contracts\Foundation\Application;
use Illuminate\Support\Facades\Auth;
use Illuminate\Support\ServiceProvider;

class AppServiceProvider extends ServiceProvider
{
    // ...

    /**
     * Bootstrap any application services.
     */
    public function boot(): void
    {
        Auth::extend('jwt', function (Application $app, string $name, array $config) {
            // Return an instance of Illuminate\Contracts\Auth\Guard...

            return new JwtGuard(Auth::createUserProvider($config['provider']));
        });
    }
}
```

As you can see in the example above, the callback passed to the `extend` method should return an implementation of `Illuminate\Contracts\Auth\Guard`. This interface contains a few methods you will need to implement to define a custom guard. Once your custom guard has been defined, you may reference the guard in the `guards` configuration of your `auth.php` configuration file:

```php
'guards' => [
    'api' => [
        'driver' => 'jwt',
        'provider' => 'users',
    ],
],
```

<a name="closure-request-guards"></a>
### Closure Request Guards

The simplest way to implement a custom, HTTP request based authentication system is by using the `Auth::viaRequest` method. This method allows you to quickly define your authentication process using a single closure.

To get started, call the `Auth::viaRequest` method within the `boot` method of your application's `AppServiceProvider`. The `viaRequest` method accepts an authentication driver name as its first argument. This name can be any string that describes your custom guard. The second argument passed to the method should be a closure that receives the incoming HTTP request and returns a user instance or, if authentication fails, `null`:

```php
use App\Models\User;
use Illuminate\Http\Request;
use Illuminate\Support\Facades\Auth;

/**
 * Bootstrap any application services.
 */
public function boot(): void
{
    Auth::viaRequest('custom-token', function (Request $request) {
        return User::where('token', (string) $request->token)->first();
    });
}
```

Once your custom authentication driver has been defined, you may configure it as a driver within the `guards` configuration of your `auth.php` configuration file:

```php
'guards' => [
    'api' => [
        'driver' => 'custom-token',
    ],
],
```

Finally, you may reference the guard when assigning the authentication middleware to a route:

```php
Route::middleware('auth:api')->group(function () {
    // ...
});
```

<a name="adding-custom-user-providers"></a>
## Adding Custom User Providers

If you are not using a traditional relational database to store your users, you will need to extend Laravel with your own authentication user provider. We will use the `provider` method on the `Auth` facade to define a custom user provider. The user provider resolver should return an implementation of `Illuminate\Contracts\Auth\UserProvider`:

```php
<?php

namespace App\Providers;

use App\Extensions\MongoUserProvider;
use Illuminate\Contracts\Foundation\Application;
use Illuminate\Support\Facades\Auth;
use Illuminate\Support\ServiceProvider;

class AppServiceProvider extends ServiceProvider
{
    // ...

    /**
     * Bootstrap any application services.
     */
    public function boot(): void
    {
        Auth::provider('mongo', function (Application $app, array $config) {
            // Return an instance of Illuminate\Contracts\Auth\UserProvider...

            return new MongoUserProvider($app->make('mongo.connection'));
        });
    }
}
```

After you have registered the provider using the `provider` method, you may switch to the new user provider in your `auth.php` configuration file. First, define a `provider` that uses your new driver:

```php
'providers' => [
    'users' => [
        'driver' => 'mongo',
    ],
],
```

Finally, you may reference this provider in your `guards` configuration:

```php
'guards' => [
    'web' => [
        'driver' => 'session',
        'provider' => 'users',
    ],
],
```

<a name="the-user-provider-contract"></a>
### The User Provider Contract

`Illuminate\Contracts\Auth\UserProvider` implementations are responsible for fetching an `Illuminate\Contracts\Auth\Authenticatable` implementation out of a persistent storage system, such as MySQL, MongoDB, etc. These two interfaces allow the Laravel authentication mechanisms to continue functioning regardless of how the user data is stored or what type of class is used to represent the authenticated user:

Let's take a look at the `Illuminate\Contracts\Auth\UserProvider` contract:

```php
<?php

namespace Illuminate\Contracts\Auth;

interface UserProvider
{
    public function retrieveById($identifier);
    public function retrieveByToken($identifier, $token);
    public function updateRememberToken(Authenticatable $user, $token);
    public function retrieveByCredentials(array $credentials);
    public function validateCredentials(Authenticatable $user, array $credentials);
    public function rehashPasswordIfRequired(Authenticatable $user, array $credentials, bool $force = false);
}
```

The `retrieveById` function typically receives a key representing the user, such as an auto-incrementing ID from a MySQL database. The `Authenticatable` implementation matching the ID should be retrieved and returned by the method.

The `retrieveByToken` function retrieves a user by their unique `$identifier` and "remember me" `$token`, typically stored in a database column like `remember_token`. As with the previous method, the `Authenticatable` implementation with a matching token value should be returned by this method.

The `updateRememberToken` method updates the `$user` instance's `remember_token` with the new `$token`. A fresh token is assigned to users on a successful "remember me" authentication attempt or when the user is logging out.

The `retrieveByCredentials` method receives the array of credentials passed to the `Auth::attempt` method when attempting to authenticate with an application. The method should then "query" the underlying persistent storage for the user matching those credentials. Typically, this method will run a query with a "where" condition that searches for a user record with a "username" matching the value of `$credentials['username']`. The method should return an implementation of `Authenticatable`. **This method should not attempt to do any password validation or authentication.**

The `validateCredentials` method should compare the given `$user` with the `$credentials` to authenticate the user. For example, this method will typically use the `Hash::check` method to compare the value of `$user->getAuthPassword()` to the value of `$credentials['password']`. This method should return `true` or `false` indicating whether the password is valid.

The `rehashPasswordIfRequired` method should rehash the given `$user`'s password if required and supported. For example, this method will typically use the `Hash::needsRehash` method to determine if the `$credentials['password']` value needs to be rehashed. If the password needs to be rehashed, the method should use the `Hash::make` method to rehash the password and update the user's record in the underlying persistent storage.

<a name="the-authenticatable-contract"></a>
### The Authenticatable Contract

Now that we have explored each of the methods on the `UserProvider`, let's take a look at the `Authenticatable` contract. Remember, user providers should return implementations of this interface from the `retrieveById`, `retrieveByToken`, and `retrieveByCredentials` methods:

```php
<?php

namespace Illuminate\Contracts\Auth;

interface Authenticatable
{
    public function getAuthIdentifierName();
    public function getAuthIdentifier();
    public function getAuthPasswordName();
    public function getAuthPassword();
    public function getRememberToken();
    public function setRememberToken($value);
    public function getRememberTokenName();
}
```

This interface is simple. The `getAuthIdentifierName` method should return the name of the "primary key" column for the user and the `getAuthIdentifier` method should return the "primary key" of the user. When using a MySQL back-end, this would likely be the auto-incrementing primary key assigned to the user record. The `getAuthPasswordName` method should return the name of the user's password column. The `getAuthPassword` method should return the user's hashed password.

This interface allows the authentication system to work with any "user" class, regardless of what ORM or storage abstraction layer you are using. By default, Laravel includes an `App\Models\User` class in the `app/Models` directory which implements this interface.

<a name="automatic-password-rehashing"></a>
## Automatic Password Rehashing

Laravel's default password hashing algorithm is bcrypt. The "work factor" for bcrypt hashes can be adjusted via your application's `config/hashing.php` configuration file or the `BCRYPT_ROUNDS` environment variable.

Typically, the bcrypt work factor should be increased over time as CPU / GPU processing power increases. If you increase the bcrypt work factor for your application, Laravel will gracefully and automatically rehash user passwords as users authenticate with your application via Laravel's starter kits or when you [manually authenticate users](#authenticating-users) via the `attempt` method.

Typically, automatic password rehashing should not disrupt your application; however, you may disable this behavior by publishing the `hashing` configuration file:

```shell
php artisan config:publish hashing
```

Once the configuration file has been published, you may set the `rehash_on_login` configuration value to `false`:

```php
'rehash_on_login' => false,
```

<a name="events"></a>
## Events

Laravel dispatches a variety of [events](/docs/{{version}}/events) during the authentication process. You may [define listeners](/docs/{{version}}/events) for any of the following events:

<div class="overflow-auto">

| Event Name                                     |
| ---------------------------------------------- |
| `Illuminate\Auth\Events\Registered`            |
| `Illuminate\Auth\Events\Attempting`            |
| `Illuminate\Auth\Events\Authenticated`         |
| `Illuminate\Auth\Events\Login`                 |
| `Illuminate\Auth\Events\Failed`                |
| `Illuminate\Auth\Events\Validated`             |
| `Illuminate\Auth\Events\Verified`              |
| `Illuminate\Auth\Events\Logout`                |
| `Illuminate\Auth\Events\CurrentDeviceLogout`   |
| `Illuminate\Auth\Events\OtherDeviceLogout`     |
| `Illuminate\Auth\Events\Lockout`               |
| `Illuminate\Auth\Events\PasswordReset`         |
| `Illuminate\Auth\Events\PasswordResetLinkSent` |

</div>


---

# Authorization

*Sección: Laravel | Origen: https://laravel.com/docs/13.x/authorization*

- [Introduction](#introduction)
- [Gates](#gates)
    - [Writing Gates](#writing-gates)
    - [Authorizing Actions](#authorizing-actions-via-gates)
    - [Gate Responses](#gate-responses)
    - [Intercepting Gate Checks](#intercepting-gate-checks)
    - [Inline Authorization](#inline-authorization)
- [Creating Policies](#creating-policies)
    - [Generating Policies](#generating-policies)
    - [Registering Policies](#registering-policies)
- [Writing Policies](#writing-policies)
    - [Policy Methods](#policy-methods)
    - [Policy Responses](#policy-responses)
    - [Methods Without Models](#methods-without-models)
    - [Guest Users](#guest-users)
    - [Policy Filters](#policy-filters)
- [Authorizing Actions Using Policies](#authorizing-actions-using-policies)
    - [Via the User Model](#via-the-user-model)
    - [Via the Gate Facade](#via-the-gate-facade)
    - [Via Middleware](#via-middleware)
    - [Via Blade Templates](#via-blade-templates)
    - [Supplying Additional Context](#supplying-additional-context)
- [Authorization & Inertia](#authorization-and-inertia)

<a name="introduction"></a>
## Introduction

In addition to providing built-in [authentication](/docs/{{version}}/authentication) services, Laravel also provides a simple way to authorize user actions against a given resource. For example, even though a user is authenticated, they may not be authorized to update or delete certain Eloquent models or database records managed by your application. Laravel's authorization features provide an easy, organized way of managing these types of authorization checks.

Laravel provides two primary ways of authorizing actions: [gates](#gates) and [policies](#creating-policies). Think of gates and policies like routes and controllers. Gates provide a simple, closure-based approach to authorization while policies, like controllers, group logic around a particular model or resource. In this documentation, we'll explore gates first and then examine policies.

You do not need to choose between exclusively using gates or exclusively using policies when building an application. Most applications will most likely contain some mixture of gates and policies, and that is perfectly fine! Gates are most applicable to actions that are not related to any model or resource, such as viewing an administrator dashboard. In contrast, policies should be used when you wish to authorize an action for a particular model or resource.

<a name="gates"></a>
## Gates

<a name="writing-gates"></a>
### Writing Gates

> [!WARNING]
> Gates are a great way to learn the basics of Laravel's authorization features; however, when building robust Laravel applications you should consider using [policies](#creating-policies) to organize your authorization rules.

Gates are simply closures that determine if a user is authorized to perform a given action. Typically, gates are defined within the `boot` method of the `App\Providers\AppServiceProvider` class using the `Gate` facade. Gates always receive a user instance as their first argument and may optionally receive additional arguments such as a relevant Eloquent model.

In this example, we'll define a gate to determine if a user can update a given `App\Models\Post` model. The gate will accomplish this by comparing the user's `id` against the `user_id` of the user that created the post:

```php
use App\Models\Post;
use App\Models\User;
use Illuminate\Support\Facades\Gate;

/**
 * Bootstrap any application services.
 */
public function boot(): void
{
    Gate::define('update-post', function (User $user, Post $post) {
        return $user->id === $post->user_id;
    });
}
```

Like controllers, gates may also be defined using a class callback array:

```php
use App\Policies\PostPolicy;
use Illuminate\Support\Facades\Gate;

/**
 * Bootstrap any application services.
 */
public function boot(): void
{
    Gate::define('update-post', [PostPolicy::class, 'update']);
}
```

<a name="authorizing-actions-via-gates"></a>
### Authorizing Actions

To authorize an action using gates, you should use the `allows` or `denies` methods provided by the `Gate` facade. Note that you are not required to pass the currently authenticated user to these methods. Laravel will automatically take care of passing the user into the gate closure. It is typical to call the gate authorization methods within your application's controllers before performing an action that requires authorization:

```php
<?php

namespace App\Http\Controllers;

use App\Models\Post;
use Illuminate\Http\RedirectResponse;
use Illuminate\Http\Request;
use Illuminate\Support\Facades\Gate;

class PostController extends Controller
{
    /**
     * Update the given post.
     */
    public function update(Request $request, Post $post): RedirectResponse
    {
        if (! Gate::allows('update-post', $post)) {
            abort(403);
        }

        // Update the post...

        return redirect('/posts');
    }
}
```

If you would like to determine if a user other than the currently authenticated user is authorized to perform an action, you may use the `forUser` method on the `Gate` facade:

```php
if (Gate::forUser($user)->allows('update-post', $post)) {
    // The user can update the post...
}

if (Gate::forUser($user)->denies('update-post', $post)) {
    // The user can't update the post...
}
```

You may authorize multiple actions at a time using the `any` or `none` methods:

```php
if (Gate::any(['update-post', 'delete-post'], $post)) {
    // The user can update or delete the post...
}

if (Gate::none(['update-post', 'delete-post'], $post)) {
    // The user can't update or delete the post...
}
```

<a name="authorizing-or-throwing-exceptions"></a>
#### Authorizing or Throwing Exceptions

If you would like to attempt to authorize an action and automatically throw an `Illuminate\Auth\Access\AuthorizationException` if the user is not allowed to perform the given action, you may use the `Gate` facade's `authorize` method. Instances of `AuthorizationException` are automatically converted to a 403 HTTP response by Laravel:

```php
Gate::authorize('update-post', $post);

// The action is authorized...
```

<a name="gates-supplying-additional-context"></a>
#### Supplying Additional Context

The gate methods for authorizing abilities (`allows`, `denies`, `check`, `any`, `none`, `authorize`, `can`, `cannot`) and the authorization [Blade directives](#via-blade-templates) (`@can`, `@cannot`, `@canany`) can receive an array as their second argument. These array elements are passed as parameters to the gate closure, and can be used for additional context when making authorization decisions:

```php
use App\Models\Category;
use App\Models\User;
use Illuminate\Support\Facades\Gate;

Gate::define('create-post', function (User $user, Category $category, bool $pinned) {
    if (! $user->canPublishToGroup($category->group)) {
        return false;
    } elseif ($pinned && ! $user->canPinPosts()) {
        return false;
    }

    return true;
});

if (Gate::check('create-post', [$category, $pinned])) {
    // The user can create the post...
}
```

<a name="gate-responses"></a>
### Gate Responses

So far, we have only examined gates that return simple boolean values. However, sometimes you may wish to return a more detailed response, including an error message. To do so, you may return an `Illuminate\Auth\Access\Response` from your gate:

```php
use App\Models\User;
use Illuminate\Auth\Access\Response;
use Illuminate\Support\Facades\Gate;

Gate::define('edit-settings', function (User $user) {
    return $user->isAdmin
        ? Response::allow()
        : Response::deny('You must be an administrator.');
});
```

Even when you return an authorization response from your gate, the `Gate::allows` method will still return a simple boolean value; however, you may use the `Gate::inspect` method to get the full authorization response returned by the gate:

```php
$response = Gate::inspect('edit-settings');

if ($response->allowed()) {
    // The action is authorized...
} else {
    echo $response->message();
}
```

When using the `Gate::authorize` method, which throws an `AuthorizationException` if the action is not authorized, the error message provided by the authorization response will be propagated to the HTTP response:

```php
Gate::authorize('edit-settings');

// The action is authorized...
```

<a name="customizing-gate-response-status"></a>
#### Customizing The HTTP Response Status

When an action is denied via a Gate, a `403` HTTP response is returned; however, it can sometimes be useful to return an alternative HTTP status code. You may customize the HTTP status code returned for a failed authorization check using the `denyWithStatus` static constructor on the `Illuminate\Auth\Access\Response` class:

```php
use App\Models\User;
use Illuminate\Auth\Access\Response;
use Illuminate\Support\Facades\Gate;

Gate::define('edit-settings', function (User $user) {
    return $user->isAdmin
        ? Response::allow()
        : Response::denyWithStatus(404);
});
```

Because hiding resources via a `404` response is such a common pattern for web applications, the `denyAsNotFound` method is offered for convenience:

```php
use App\Models\User;
use Illuminate\Auth\Access\Response;
use Illuminate\Support\Facades\Gate;

Gate::define('edit-settings', function (User $user) {
    return $user->isAdmin
        ? Response::allow()
        : Response::denyAsNotFound();
});
```

<a name="intercepting-gate-checks"></a>
### Intercepting Gate Checks

Sometimes, you may wish to grant all abilities to a specific user. You may use the `before` method to define a closure that is run before all other authorization checks:

```php
use App\Models\User;
use Illuminate\Support\Facades\Gate;

Gate::before(function (User $user, string $ability) {
    if ($user->isAdministrator()) {
        return true;
    }
});
```

If the `before` closure returns a non-null result that result will be considered the result of the authorization check.

You may use the `after` method to define a closure to be executed after all other authorization checks:

```php
use App\Models\User;

Gate::after(function (User $user, string $ability, bool|null $result, mixed $arguments) {
    if ($user->isAdministrator()) {
        return true;
    }
});
```

Values returned by `after` closures will not override the result of the authorization check unless the gate or policy returned `null`.

<a name="inline-authorization"></a>
### Inline Authorization

Occasionally, you may wish to determine if the currently authenticated user is authorized to perform a given action without writing a dedicated gate that corresponds to the action. Laravel allows you to perform these types of "inline" authorization checks via the `Gate::allowIf` and `Gate::denyIf` methods. Inline authorization does not execute any defined ["before" or "after" authorization hooks](#intercepting-gate-checks):

```php
use App\Models\User;
use Illuminate\Support\Facades\Gate;

Gate::allowIf(fn (User $user) => $user->isAdministrator());

Gate::denyIf(fn (User $user) => $user->banned());
```

If the action is not authorized or if no user is currently authenticated, Laravel will automatically throw an `Illuminate\Auth\Access\AuthorizationException` exception. Instances of `AuthorizationException` are automatically converted to a 403 HTTP response by Laravel's exception handler.

<a name="creating-policies"></a>
## Creating Policies

<a name="generating-policies"></a>
### Generating Policies

Policies are classes that organize authorization logic around a particular model or resource. For example, if your application is a blog, you may have an `App\Models\Post` model and a corresponding `App\Policies\PostPolicy` to authorize user actions such as creating or updating posts.

You may generate a policy using the `make:policy` Artisan command. The generated policy will be placed in the `app/Policies` directory. If this directory does not exist in your application, Laravel will create it for you:

```shell
php artisan make:policy PostPolicy
```

The `make:policy` command will generate an empty policy class. If you would like to generate a class with example policy methods related to viewing, creating, updating, and deleting the resource, you may provide a `--model` option when executing the command:

```shell
php artisan make:policy PostPolicy --model=Post
```

<a name="registering-policies"></a>
### Registering Policies

<a name="policy-discovery"></a>
#### Policy Discovery

By default, Laravel automatically discover policies as long as the model and policy follow standard Laravel naming conventions. Specifically, the policies must be in a `Policies` directory at or above the directory that contains your models. So, for example, the models may be placed in the `app/Models` directory while the policies may be placed in the `app/Policies` directory. In this situation, Laravel will check for policies in `app/Models/Policies` then `app/Policies`. In addition, the policy name must match the model name and have a `Policy` suffix. So, a `User` model would correspond to a `UserPolicy` policy class.

If you would like to define your own policy discovery logic, you may register a custom policy discovery callback using the `Gate::guessPolicyNamesUsing` method. Typically, this method should be called from the `boot` method of your application's `AppServiceProvider`:

```php
use Illuminate\Support\Facades\Gate;

Gate::guessPolicyNamesUsing(function (string $modelClass) {
    // Return the name of the policy class for the given model...
});
```

<a name="manually-registering-policies"></a>
#### Manually Registering Policies

Using the `Gate` facade, you may manually register policies and their corresponding models within the `boot` method of your application's `AppServiceProvider`:

```php
use App\Models\Order;
use App\Policies\OrderPolicy;
use Illuminate\Support\Facades\Gate;

/**
 * Bootstrap any application services.
 */
public function boot(): void
{
    Gate::policy(Order::class, OrderPolicy::class);
}
```

Alternatively, you may place the `UsePolicy` attribute on a model class to inform Laravel of the model's corresponding policy:

```php
<?php

namespace App\Models;

use App\Policies\OrderPolicy;
use Illuminate\Database\Eloquent\Attributes\UsePolicy;
use Illuminate\Database\Eloquent\Model;

#[UsePolicy(OrderPolicy::class)]
class Order extends Model
{
    //
}
```

<a name="writing-policies"></a>
## Writing Policies

<a name="policy-methods"></a>
### Policy Methods

Once the policy class has been registered, you may add methods for each action it authorizes. For example, let's define an `update` method on our `PostPolicy` which determines if a given `App\Models\User` can update a given `App\Models\Post` instance.

The `update` method will receive a `User` and a `Post` instance as its arguments, and should return `true` or `false` indicating whether the user is authorized to update the given `Post`. So, in this example, we will verify that the user's `id` matches the `user_id` on the post:

```php
<?php

namespace App\Policies;

use App\Models\Post;
use App\Models\User;

class PostPolicy
{
    /**
     * Determine if the given post can be updated by the user.
     */
    public function update(User $user, Post $post): bool
    {
        return $user->id === $post->user_id;
    }
}
```

You may continue to define additional methods on the policy as needed for the various actions it authorizes. For example, you might define `view` or `delete` methods to authorize various `Post` related actions, but remember you are free to give your policy methods any name you like.

If you used the `--model` option when generating your policy via the Artisan console, it will already contain methods for the `viewAny`, `view`, `create`, `update`, `delete`, `restore`, and `forceDelete` actions.

> [!NOTE]
> All policies are resolved via the Laravel [service container](/docs/{{version}}/container), allowing you to type-hint any needed dependencies in the policy's constructor to have them automatically injected.

<a name="policy-responses"></a>
### Policy Responses

So far, we have only examined policy methods that return simple boolean values. However, sometimes you may wish to return a more detailed response, including an error message. To do so, you may return an `Illuminate\Auth\Access\Response` instance from your policy method:

```php
use App\Models\Post;
use App\Models\User;
use Illuminate\Auth\Access\Response;

/**
 * Determine if the given post can be updated by the user.
 */
public function update(User $user, Post $post): Response
{
    return $user->id === $post->user_id
        ? Response::allow()
        : Response::deny('You do not own this post.');
}
```

When returning an authorization response from your policy, the `Gate::allows` method will still return a simple boolean value; however, you may use the `Gate::inspect` method to get the full authorization response returned by the gate:

```php
use Illuminate\Support\Facades\Gate;

$response = Gate::inspect('update', $post);

if ($response->allowed()) {
    // The action is authorized...
} else {
    echo $response->message();
}
```

When using the `Gate::authorize` method, which throws an `AuthorizationException` if the action is not authorized, the error message provided by the authorization response will be propagated to the HTTP response:

```php
Gate::authorize('update', $post);

// The action is authorized...
```

<a name="customizing-policy-response-status"></a>
#### Customizing the HTTP Response Status

When an action is denied via a policy method, a `403` HTTP response is returned; however, it can sometimes be useful to return an alternative HTTP status code. You may customize the HTTP status code returned for a failed authorization check using the `denyWithStatus` static constructor on the `Illuminate\Auth\Access\Response` class:

```php
use App\Models\Post;
use App\Models\User;
use Illuminate\Auth\Access\Response;

/**
 * Determine if the given post can be updated by the user.
 */
public function update(User $user, Post $post): Response
{
    return $user->id === $post->user_id
        ? Response::allow()
        : Response::denyWithStatus(404);
}
```

Because hiding resources via a `404` response is such a common pattern for web applications, the `denyAsNotFound` method is offered for convenience:

```php
use App\Models\Post;
use App\Models\User;
use Illuminate\Auth\Access\Response;

/**
 * Determine if the given post can be updated by the user.
 */
public function update(User $user, Post $post): Response
{
    return $user->id === $post->user_id
        ? Response::allow()
        : Response::denyAsNotFound();
}
```

<a name="methods-without-models"></a>
### Methods Without Models

Some policy methods only receive an instance of the currently authenticated user. This situation is most common when authorizing `create` actions. For example, if you are creating a blog, you may wish to determine if a user is authorized to create any posts at all. In these situations, your policy method should only expect to receive a user instance:

```php
/**
 * Determine if the given user can create posts.
 */
public function create(User $user): bool
{
    return $user->role == 'writer';
}
```

<a name="guest-users"></a>
### Guest Users

By default, all gates and policies automatically return `false` if the incoming HTTP request was not initiated by an authenticated user. However, you may allow these authorization checks to pass through to your gates and policies by declaring an "optional" type-hint or supplying a `null` default value for the user argument definition:

```php
<?php

namespace App\Policies;

use App\Models\Post;
use App\Models\User;

class PostPolicy
{
    /**
     * Determine if the given post can be updated by the user.
     */
    public function update(?User $user, Post $post): bool
    {
        return $user?->id === $post->user_id;
    }
}
```

<a name="policy-filters"></a>
### Policy Filters

For certain users, you may wish to authorize all actions within a given policy. To accomplish this, define a `before` method on the policy. The `before` method will be executed before any other methods on the policy, giving you an opportunity to authorize the action before the intended policy method is actually called. This feature is most commonly used for authorizing application administrators to perform any action:

```php
use App\Models\User;

/**
 * Perform pre-authorization checks.
 */
public function before(User $user, string $ability): bool|null
{
    if ($user->isAdministrator()) {
        return true;
    }

    return null;
}
```

If you would like to deny all authorization checks for a particular type of user then you may return `false` from the `before` method. If `null` is returned, the authorization check will fall through to the policy method.

> [!WARNING]
> The `before` method of a policy class will not be called if the class doesn't contain a method with a name matching the name of the ability being checked.

<a name="authorizing-actions-using-policies"></a>
## Authorizing Actions Using Policies

<a name="via-the-user-model"></a>
### Via the User Model

The `App\Models\User` model that is included with your Laravel application includes two helpful methods for authorizing actions: `can` and `cannot`. The `can` and `cannot` methods receive the name of the action you wish to authorize and the relevant model. For example, let's determine if a user is authorized to update a given `App\Models\Post` model. Typically, this will be done within a controller method:

```php
<?php

namespace App\Http\Controllers;

use App\Models\Post;
use Illuminate\Http\RedirectResponse;
use Illuminate\Http\Request;

class PostController extends Controller
{
    /**
     * Update the given post.
     */
    public function update(Request $request, Post $post): RedirectResponse
    {
        if ($request->user()->cannot('update', $post)) {
            abort(403);
        }

        // Update the post...

        return redirect('/posts');
    }
}
```

If a [policy is registered](#registering-policies) for the given model, the `can` method will automatically call the appropriate policy and return the boolean result. If no policy is registered for the model, the `can` method will attempt to call the closure-based Gate matching the given action name.

<a name="user-model-actions-that-dont-require-models"></a>
#### Actions That Don't Require Models

Remember, some actions may correspond to policy methods like `create` that do not require a model instance. In these situations, you may pass a class name to the `can` method. The class name will be used to determine which policy to use when authorizing the action:

```php
<?php

namespace App\Http\Controllers;

use App\Models\Post;
use Illuminate\Http\RedirectResponse;
use Illuminate\Http\Request;

class PostController extends Controller
{
    /**
     * Create a post.
     */
    public function store(Request $request): RedirectResponse
    {
        if ($request->user()->cannot('create', Post::class)) {
            abort(403);
        }

        // Create the post...

        return redirect('/posts');
    }
}
```

<a name="via-the-gate-facade"></a>
### Via the `Gate` Facade

In addition to helpful methods provided to the `App\Models\User` model, you can always authorize actions via the `Gate` facade's `authorize` method.

Like the `can` method, this method accepts the name of the action you wish to authorize and the relevant model. If the action is not authorized, the `authorize` method will throw an `Illuminate\Auth\Access\AuthorizationException` exception which the Laravel exception handler will automatically convert to an HTTP response with a 403 status code:

```php
<?php

namespace App\Http\Controllers;

use App\Models\Post;
use Illuminate\Http\RedirectResponse;
use Illuminate\Http\Request;
use Illuminate\Support\Facades\Gate;

class PostController extends Controller
{
    /**
     * Update the given blog post.
     *
     * @throws \Illuminate\Auth\Access\AuthorizationException
     */
    public function update(Request $request, Post $post): RedirectResponse
    {
        Gate::authorize('update', $post);

        // The current user can update the blog post...

        return redirect('/posts');
    }
}
```

<a name="controller-actions-that-dont-require-models"></a>
#### Actions That Don't Require Models

As previously discussed, some policy methods like `create` do not require a model instance. In these situations, you should pass a class name to the `authorize` method. The class name will be used to determine which policy to use when authorizing the action:

```php
use App\Models\Post;
use Illuminate\Http\RedirectResponse;
use Illuminate\Http\Request;
use Illuminate\Support\Facades\Gate;

/**
 * Create a new blog post.
 *
 * @throws \Illuminate\Auth\Access\AuthorizationException
 */
public function create(Request $request): RedirectResponse
{
    Gate::authorize('create', Post::class);

    // The current user can create blog posts...

    return redirect('/posts');
}
```

<a name="via-middleware"></a>
### Via Middleware

Laravel includes a middleware that can authorize actions before the incoming request even reaches your routes or controllers. By default, the `Illuminate\Auth\Middleware\Authorize` middleware may be attached to a route using the `can` [middleware alias](/docs/{{version}}/middleware#middleware-aliases), which is automatically registered by Laravel. Let's explore an example of using the `can` middleware to authorize that a user can update a post:

```php
use App\Models\Post;

Route::put('/post/{post}', function (Post $post) {
    // The current user may update the post...
})->middleware('can:update,post');
```

In this example, we're passing the `can` middleware two arguments. The first is the name of the action we wish to authorize and the second is the route parameter we wish to pass to the policy method. In this case, since we are using [implicit model binding](/docs/{{version}}/routing#implicit-binding), an `App\Models\Post` model will be passed to the policy method. If the user is not authorized to perform the given action, an HTTP response with a 403 status code will be returned by the middleware.

For convenience, you may also attach the `can` middleware to your route using the `can` method:

```php
use App\Models\Post;

Route::put('/post/{post}', function (Post $post) {
    // The current user may update the post...
})->can('update', 'post');
```

If you are using [controller middleware attributes](/docs/{{version}}/controllers#middleware-attributes), you may apply the `can` middleware via the `Authorize` attribute:

```php
use Illuminate\Routing\Attributes\Controllers\Authorize;

#[Authorize('update', 'post')]
public function update(Post $post)
{
    // The current user may update the post...
}
```

<a name="middleware-actions-that-dont-require-models"></a>
#### Actions That Don't Require Models

Again, some policy methods like `create` do not require a model instance. In these situations, you may pass a class name to the middleware. The class name will be used to determine which policy to use when authorizing the action:

```php
Route::post('/post', function () {
    // The current user may create posts...
})->middleware('can:create,App\Models\Post');
```

Specifying the entire class name within a string middleware definition can become cumbersome. For that reason, you may choose to attach the `can` middleware to your route using the `can` method:

```php
use App\Models\Post;

Route::post('/post', function () {
    // The current user may create posts...
})->can('create', Post::class);
```

<a name="via-blade-templates"></a>
### Via Blade Templates

When writing Blade templates, you may wish to display a portion of the page only if the user is authorized to perform a given action. For example, you may wish to show an update form for a blog post only if the user can actually update the post. In this situation, you may use the `@can` and `@cannot` directives:

```blade
@can('update', $post)
    <!-- The current user can update the post... -->
@elsecan('create', App\Models\Post::class)
    <!-- The current user can create new posts... -->
@else
    <!-- ... -->
@endcan

@cannot('update', $post)
    <!-- The current user cannot update the post... -->
@elsecannot('create', App\Models\Post::class)
    <!-- The current user cannot create new posts... -->
@endcannot
```

These directives are convenient shortcuts for writing `@if` and `@unless` statements. The `@can` and `@cannot` statements above are equivalent to the following statements:

```blade
@if (Auth::user()->can('update', $post))
    <!-- The current user can update the post... -->
@endif

@unless (Auth::user()->can('update', $post))
    <!-- The current user cannot update the post... -->
@endunless
```

You may also determine if a user is authorized to perform any action from a given array of actions. To accomplish this, use the `@canany` directive:

```blade
@canany(['update', 'view', 'delete'], $post)
    <!-- The current user can update, view, or delete the post... -->
@elsecanany(['create'], \App\Models\Post::class)
    <!-- The current user can create a post... -->
@endcanany
```

<a name="blade-actions-that-dont-require-models"></a>
#### Actions That Don't Require Models

Like most of the other authorization methods, you may pass a class name to the `@can` and `@cannot` directives if the action does not require a model instance:

```blade
@can('create', App\Models\Post::class)
    <!-- The current user can create posts... -->
@endcan

@cannot('create', App\Models\Post::class)
    <!-- The current user can't create posts... -->
@endcannot
```

<a name="supplying-additional-context"></a>
### Supplying Additional Context

When authorizing actions using policies, you may pass an array as the second argument to the various authorization functions and helpers. The first element in the array will be used to determine which policy should be invoked, while the rest of the array elements are passed as parameters to the policy method and can be used for additional context when making authorization decisions. For example, consider the following `PostPolicy` method definition which contains an additional `$category` parameter:

```php
/**
 * Determine if the given post can be updated by the user.
 */
public function update(User $user, Post $post, int $category): bool
{
    return $user->id === $post->user_id &&
           $user->canUpdateCategory($category);
}
```

When attempting to determine if the authenticated user can update a given post, we can invoke this policy method like so:

```php
/**
 * Update the given blog post.
 *
 * @throws \Illuminate\Auth\Access\AuthorizationException
 */
public function update(Request $request, Post $post): RedirectResponse
{
    Gate::authorize('update', [$post, $request->category]);

    // The current user can update the blog post...

    return redirect('/posts');
}
```

<a name="authorization-and-inertia"></a>
## Authorization & Inertia

Although authorization must always be handled on the server, it can often be convenient to provide your frontend application with authorization data in order to properly render your application's UI. Laravel does not define a required convention for exposing authorization information to an Inertia powered frontend.

However, if you are using one of Laravel's Inertia-based [starter kits](/docs/{{version}}/starter-kits), your application already contains a `HandleInertiaRequests` middleware. Within this middleware's `share` method, you may return shared data that will be provided to all Inertia pages in your application. This shared data can serve as a convenient location to define authorization information for the user:

```php
<?php

namespace App\Http\Middleware;

use App\Models\Post;
use Illuminate\Http\Request;
use Inertia\Middleware;

class HandleInertiaRequests extends Middleware
{
    // ...

    /**
     * Define the props that are shared by default.
     *
     * @return array<string, mixed>
     */
    public function share(Request $request)
    {
        return [
            ...parent::share($request),
            'auth' => [
                'user' => $request->user(),
                'permissions' => [
                    'post' => [
                        'create' => $request->user()->can('create', Post::class),
                    ],
                ],
            ],
        ];
    }
}
```


---

# Laravel Cashier (Stripe)

*Sección: Laravel | Origen: https://laravel.com/docs/13.x/billing*

- [Introduction](#introduction)
- [Upgrading Cashier](#upgrading-cashier)
- [Installation](#installation)
- [Configuration](#configuration)
    - [Billable Model](#billable-model)
    - [API Keys](#api-keys)
    - [Currency Configuration](#currency-configuration)
    - [Tax Configuration](#tax-configuration)
    - [Logging](#logging)
    - [Using Custom Models](#using-custom-models)
- [Quickstart](#quickstart)
    - [Selling Products](#quickstart-selling-products)
    - [Selling Subscriptions](#quickstart-selling-subscriptions)
- [Customers](#customers)
    - [Retrieving Customers](#retrieving-customers)
    - [Creating Customers](#creating-customers)
    - [Updating Customers](#updating-customers)
    - [Balances](#balances)
    - [Tax IDs](#tax-ids)
    - [Syncing Customer Data With Stripe](#syncing-customer-data-with-stripe)
    - [Billing Portal](#billing-portal)
- [Payment Methods](#payment-methods)
    - [Storing Payment Methods](#storing-payment-methods)
    - [Retrieving Payment Methods](#retrieving-payment-methods)
    - [Payment Method Presence](#payment-method-presence)
    - [Updating the Default Payment Method](#updating-the-default-payment-method)
    - [Adding Payment Methods](#adding-payment-methods)
    - [Deleting Payment Methods](#deleting-payment-methods)
- [Subscriptions](#subscriptions)
    - [Creating Subscriptions](#creating-subscriptions)
    - [Checking Subscription Status](#checking-subscription-status)
    - [Changing Prices](#changing-prices)
    - [Subscription Quantity](#subscription-quantity)
    - [Subscriptions With Multiple Products](#subscriptions-with-multiple-products)
    - [Multiple Subscriptions](#multiple-subscriptions)
    - [Usage Based Billing](#usage-based-billing)
    - [Subscription Taxes](#subscription-taxes)
    - [Subscription Anchor Date](#subscription-anchor-date)
    - [Canceling Subscriptions](#cancelling-subscriptions)
    - [Resuming Subscriptions](#resuming-subscriptions)
- [Subscription Trials](#subscription-trials)
    - [With Payment Method Up Front](#with-payment-method-up-front)
    - [Without Payment Method Up Front](#without-payment-method-up-front)
    - [Extending Trials](#extending-trials)
- [Handling Stripe Webhooks](#handling-stripe-webhooks)
    - [Defining Webhook Event Handlers](#defining-webhook-event-handlers)
    - [Verifying Webhook Signatures](#verifying-webhook-signatures)
- [Single Charges](#single-charges)
    - [Simple Charge](#simple-charge)
    - [Charge With Invoice](#charge-with-invoice)
    - [Creating Payment Intents](#creating-payment-intents)
    - [Refunding Charges](#refunding-charges)
- [Invoices](#invoices)
    - [Retrieving Invoices](#retrieving-invoices)
    - [Upcoming Invoices](#upcoming-invoices)
    - [Previewing Subscription Invoices](#previewing-subscription-invoices)
    - [Generating Invoice PDFs](#generating-invoice-pdfs)
- [Checkout](#checkout)
    - [Product Checkouts](#product-checkouts)
    - [Single Charge Checkouts](#single-charge-checkouts)
    - [Subscription Checkouts](#subscription-checkouts)
    - [Collecting Tax IDs](#collecting-tax-ids)
    - [Guest Checkouts](#guest-checkouts)
- [Handling Failed Payments](#handling-failed-payments)
    - [Confirming Payments](#confirming-payments)
- [Strong Customer Authentication (SCA)](#strong-customer-authentication)
    - [Payments Requiring Additional Confirmation](#payments-requiring-additional-confirmation)
    - [Off-session Payment Notifications](#off-session-payment-notifications)
- [Stripe SDK](#stripe-sdk)
- [Testing](#testing)

<a name="introduction"></a>
## Introduction

[Laravel Cashier Stripe](https://github.com/laravel/cashier-stripe) provides an expressive, fluent interface to [Stripe's](https://stripe.com) subscription billing services. It handles almost all of the boilerplate subscription billing code you are dreading writing. In addition to basic subscription management, Cashier can handle coupons, swapping subscription, subscription "quantities", cancellation grace periods, and even generate invoice PDFs.

<a name="upgrading-cashier"></a>
## Upgrading Cashier

When upgrading to a new version of Cashier, it's important that you carefully review [the upgrade guide](https://github.com/laravel/cashier-stripe/blob/16.x/UPGRADE.md).

> [!WARNING]
> To prevent breaking changes, Cashier uses a fixed Stripe API version. Cashier 16 utilizes Stripe API version `2025-06-30.basil`. The Stripe API version will be updated on minor releases in order to make use of new Stripe features and improvements.

<a name="installation"></a>
## Installation

First, install the Cashier package for Stripe using the Composer package manager:

```shell
composer require laravel/cashier
```

After installing the package, publish Cashier's migrations using the `vendor:publish` Artisan command:

```shell
php artisan vendor:publish --tag="cashier-migrations"
```

Then, migrate your database:

```shell
php artisan migrate
```

Cashier's migrations will add several columns to your `users` table. They will also create a new `subscriptions` table to hold all of your customer's subscriptions and a `subscription_items` table for subscriptions with multiple prices.

If you wish, you can also publish Cashier's configuration file using the `vendor:publish` Artisan command:

```shell
php artisan vendor:publish --tag="cashier-config"
```

Lastly, to ensure Cashier properly handles all Stripe events, remember to [configure Cashier's webhook handling](#handling-stripe-webhooks).

> [!WARNING]
> Stripe recommends that any column used for storing Stripe identifiers should be case-sensitive. Therefore, you should ensure the column collation for the `stripe_id` column is set to `utf8_bin` when using MySQL. More information regarding this can be found in the [Stripe documentation](https://stripe.com/docs/upgrades#what-changes-does-stripe-consider-to-be-backwards-compatible).

<a name="configuration"></a>
## Configuration

<a name="billable-model"></a>
### Billable Model

Before using Cashier, add the `Billable` trait to your billable model definition. Typically, this will be the `App\Models\User` model. This trait provides various methods to allow you to perform common billing tasks, such as creating subscriptions, applying coupons, and updating payment method information:

```php
use Laravel\Cashier\Billable;

class User extends Authenticatable
{
    use Billable;
}
```

Cashier assumes your billable model will be the `App\Models\User` class that ships with Laravel. If you wish to change this you may specify a different model via the `useCustomerModel` method. This method should typically be called in the `boot` method of your `AppServiceProvider` class:

```php
use App\Models\Cashier\User;
use Laravel\Cashier\Cashier;

/**
 * Bootstrap any application services.
 */
public function boot(): void
{
    Cashier::useCustomerModel(User::class);
}
```

> [!WARNING]
> If you're using a model other than Laravel's supplied `App\Models\User` model, you'll need to publish and alter the [Cashier migrations](#installation) provided to match your alternative model's table name.

<a name="api-keys"></a>
### API Keys

Next, you should configure your Stripe API keys in your application's `.env` file. You can retrieve your Stripe API keys from the Stripe control panel:

```ini
STRIPE_KEY=your-stripe-key
STRIPE_SECRET=your-stripe-secret
STRIPE_WEBHOOK_SECRET=your-stripe-webhook-secret
```

> [!WARNING]
> You should ensure that the `STRIPE_WEBHOOK_SECRET` environment variable is defined in your application's `.env` file, as this variable is used to ensure that incoming webhooks are actually from Stripe.

<a name="currency-configuration"></a>
### Currency Configuration

The default Cashier currency is United States Dollars (USD). You can change the default currency by setting the `CASHIER_CURRENCY` environment variable within your application's `.env` file:

```ini
CASHIER_CURRENCY=eur
```

In addition to configuring Cashier's currency, you may also specify a locale to be used when formatting money values for display on invoices. Internally, Cashier utilizes [PHP's `NumberFormatter` class](https://www.php.net/manual/en/class.numberformatter.php) to set the currency locale:

```ini
CASHIER_CURRENCY_LOCALE=nl_BE
```

> [!WARNING]
> In order to use locales other than `en`, ensure the `ext-intl` PHP extension is installed and configured on your server.

<a name="tax-configuration"></a>
### Tax Configuration

Thanks to [Stripe Tax](https://stripe.com/tax), it's possible to automatically calculate taxes for all invoices generated by Stripe. You can enable automatic tax calculation by invoking the `calculateTaxes` method in the `boot` method of your application's `App\Providers\AppServiceProvider` class:

```php
use Laravel\Cashier\Cashier;

/**
 * Bootstrap any application services.
 */
public function boot(): void
{
    Cashier::calculateTaxes();
}
```

Once tax calculation has been enabled, any new subscriptions and any one-off invoices that are generated will receive automatic tax calculation.

For this feature to work properly, your customer's billing details, such as the customer's name, address, and tax ID, need to be synced to Stripe. You may use the [customer data synchronization](#syncing-customer-data-with-stripe) and [Tax ID](#tax-ids) methods offered by Cashier to accomplish this.

<a name="logging"></a>
### Logging

Cashier allows you to specify the log channel to be used when logging fatal Stripe errors. You may specify the log channel by defining the `CASHIER_LOGGER` environment variable within your application's `.env` file:

```ini
CASHIER_LOGGER=stack
```

Exceptions that are generated by API calls to Stripe will be logged through your application's default log channel.

<a name="using-custom-models"></a>
### Using Custom Models

You are free to extend the models used internally by Cashier by defining your own model and extending the corresponding Cashier model:

```php
use Laravel\Cashier\Subscription as CashierSubscription;

class Subscription extends CashierSubscription
{
    // ...
}
```

After defining your model, you may instruct Cashier to use your custom model via the `Laravel\Cashier\Cashier` class. Typically, you should inform Cashier about your custom models in the `boot` method of your application's `App\Providers\AppServiceProvider` class:

```php
use App\Models\Cashier\Subscription;
use App\Models\Cashier\SubscriptionItem;

/**
 * Bootstrap any application services.
 */
public function boot(): void
{
    Cashier::useSubscriptionModel(Subscription::class);
    Cashier::useSubscriptionItemModel(SubscriptionItem::class);
}
```

<a name="quickstart"></a>
## Quickstart

<a name="quickstart-selling-products"></a>
### Selling Products

> [!NOTE]
> Before utilizing Stripe Checkout, you should define Products with fixed prices in your Stripe dashboard. In addition, you should [configure Cashier's webhook handling](#handling-stripe-webhooks).

Offering product and subscription billing via your application can be intimidating. However, thanks to Cashier and [Stripe Checkout](https://stripe.com/payments/checkout), you can easily build modern, robust payment integrations.

To charge customers for non-recurring, single-charge products, we'll utilize Cashier to direct customers to Stripe Checkout, where they will provide their payment details and confirm their purchase. Once the payment has been made via Checkout, the customer will be redirected to a success URL of your choosing within your application:

```php
use Illuminate\Http\Request;

Route::get('/checkout', function (Request $request) {
    $stripePriceId = 'price_deluxe_album';

    $quantity = 1;

    return $request->user()->checkout([$stripePriceId => $quantity], [
        'success_url' => route('checkout-success'),
        'cancel_url' => route('checkout-cancel'),
    ]);
})->name('checkout');

Route::view('/checkout/success', 'checkout.success')->name('checkout-success');
Route::view('/checkout/cancel', 'checkout.cancel')->name('checkout-cancel');
```

As you can see in the example above, we will utilize Cashier's provided `checkout` method to redirect the customer to Stripe Checkout for a given "price identifier". When using Stripe, "prices" refer to [defined prices for specific products](https://stripe.com/docs/products-prices/how-products-and-prices-work).

If necessary, the `checkout` method will automatically create a customer in Stripe and connect that Stripe customer record to the corresponding user in your application's database. After completing the checkout session, the customer will be redirected to a dedicated success or cancellation page where you can display an informational message to the customer.

<a name="providing-meta-data-to-stripe-checkout"></a>
#### Providing Meta Data to Stripe Checkout

When selling products, it's common to keep track of completed orders and purchased products via `Cart` and `Order` models defined by your own application. When redirecting customers to Stripe Checkout to complete a purchase, you may need to provide an existing order identifier so that you can associate the completed purchase with the corresponding order when the customer is redirected back to your application.

To accomplish this, you may provide an array of `metadata` to the `checkout` method. Let's imagine that a pending `Order` is created within our application when a user begins the checkout process. Remember, the `Cart` and `Order` models in this example are illustrative and not provided by Cashier. You are free to implement these concepts based on the needs of your own application:

```php
use App\Models\Cart;
use App\Models\Order;
use Illuminate\Http\Request;

Route::get('/cart/{cart}/checkout', function (Request $request, Cart $cart) {
    $order = Order::create([
        'cart_id' => $cart->id,
        'price_ids' => $cart->price_ids,
        'status' => 'incomplete',
    ]);

    return $request->user()->checkout($order->price_ids, [
        'success_url' => route('checkout-success').'?session_id={CHECKOUT_SESSION_ID}',
        'cancel_url' => route('checkout-cancel'),
        'metadata' => ['order_id' => $order->id],
    ]);
})->name('checkout');
```

As you can see in the example above, when a user begins the checkout process, we will provide all of the cart / order's associated Stripe price identifiers to the `checkout` method. Of course, your application is responsible for associating these items with the "shopping cart" or order as a customer adds them. We also provide the order's ID to the Stripe Checkout session via the `metadata` array. Finally, we have added the `CHECKOUT_SESSION_ID` template variable to the Checkout success route. When Stripe redirects customers back to your application, this template variable will automatically be populated with the Checkout session ID.

Next, let's build the Checkout success route. This is the route that users will be redirected to after their purchase has been completed via Stripe Checkout. Within this route, we can retrieve the Stripe Checkout session ID and the associated Stripe Checkout instance in order to access our provided meta data and update our customer's order accordingly:

```php
use App\Models\Order;
use Illuminate\Http\Request;
use Laravel\Cashier\Cashier;

Route::get('/checkout/success', function (Request $request) {
    $sessionId = $request->get('session_id');

    if ($sessionId === null) {
        return;
    }

    $session = Cashier::stripe()->checkout->sessions->retrieve($sessionId);

    if ($session->payment_status !== 'paid') {
        return;
    }

    $orderId = $session['metadata']['order_id'] ?? null;

    $order = Order::findOrFail($orderId);

    $order->update(['status' => 'completed']);

    return view('checkout-success', ['order' => $order]);
})->name('checkout-success');
```

Please refer to Stripe's documentation for more information on the [data contained by the Checkout session object](https://stripe.com/docs/api/checkout/sessions/object).

<a name="quickstart-selling-subscriptions"></a>
### Selling Subscriptions

> [!NOTE]
> Before utilizing Stripe Checkout, you should define Products with fixed prices in your Stripe dashboard. In addition, you should [configure Cashier's webhook handling](#handling-stripe-webhooks).

Offering product and subscription billing via your application can be intimidating. However, thanks to Cashier and [Stripe Checkout](https://stripe.com/payments/checkout), you can easily build modern, robust payment integrations.

To learn how to sell subscriptions using Cashier and Stripe Checkout, let's consider the simple scenario of a subscription service with a basic monthly (`price_basic_monthly`) and yearly (`price_basic_yearly`) plan. These two prices could be grouped under a "Basic" product (`pro_basic`) in our Stripe dashboard. In addition, our subscription service might offer an Expert plan as `pro_expert`.

First, let's discover how a customer can subscribe to our services. Of course, you can imagine the customer might click a "subscribe" button for the Basic plan on our application's pricing page. This button or link should direct the user to a Laravel route which creates the Stripe Checkout session for their chosen plan:

```php
use Illuminate\Http\Request;

Route::get('/subscription-checkout', function (Request $request) {
    return $request->user()
        ->newSubscription('default', 'price_basic_monthly')
        ->trialDays(5)
        ->allowPromotionCodes()
        ->checkout([
            'success_url' => route('your-success-route'),
            'cancel_url' => route('your-cancel-route'),
        ]);
});
```

As you can see in the example above, we will redirect the customer to a Stripe Checkout session which will allow them to subscribe to our Basic plan. After a successful checkout or cancellation, the customer will be redirected back to the URL we provided to the `checkout` method. To know when their subscription has actually started (since some payment methods require a few seconds to process), we'll also need to [configure Cashier's webhook handling](#handling-stripe-webhooks).

Now that customers can start subscriptions, we need to restrict certain portions of our application so that only subscribed users can access them. Of course, we can always determine a user's current subscription status via the `subscribed` method provided by Cashier's `Billable` trait:

```blade
@if ($user->subscribed())
    <p>You are subscribed.</p>
@endif
```

We can even easily determine if a user is subscribed to specific product or price:

```blade
@if ($user->subscribedToProduct('pro_basic'))
    <p>You are subscribed to our Basic product.</p>
@endif

@if ($user->subscribedToPrice('price_basic_monthly'))
    <p>You are subscribed to our monthly Basic plan.</p>
@endif
```

<a name="quickstart-building-a-subscribed-middleware"></a>
#### Building a Subscribed Middleware

For convenience, you may wish to create a [middleware](/docs/{{version}}/middleware) which determines if the incoming request is from a subscribed user. Once this middleware has been defined, you may easily assign it to a route to prevent users that are not subscribed from accessing the route:

```php
<?php

namespace App\Http\Middleware;

use Closure;
use Illuminate\Http\Request;
use Symfony\Component\HttpFoundation\Response;

class Subscribed
{
    /**
     * Handle an incoming request.
     */
    public function handle(Request $request, Closure $next): Response
    {
        if (! $request->user()?->subscribed()) {
            // Redirect user to billing page and ask them to subscribe...
            return redirect('/billing');
        }

        return $next($request);
    }
}
```

Once the middleware has been defined, you may assign it to a route:

```php
use App\Http\Middleware\Subscribed;

Route::get('/dashboard', function () {
    // ...
})->middleware([Subscribed::class]);
```

<a name="quickstart-allowing-customers-to-manage-their-billing-plan"></a>
#### Allowing Customers to Manage Their Billing Plan

Of course, customers may want to change their subscription plan to another product or "tier". The easiest way to allow this is by directing customers to Stripe's [Customer Billing Portal](https://stripe.com/docs/no-code/customer-portal), which provides a hosted user interface that allows customers to download invoices, update their payment method, and change subscription plans.

First, define a link or button within your application that directs users to a Laravel route which we will utilize to initiate a Billing Portal session:

```blade
<a href="{{ route('billing') }}">
    Billing
</a>
```

Next, let's define the route that initiates a Stripe Customer Billing Portal session and redirects the user to the Portal. The `redirectToBillingPortal` method accepts the URL that users should be returned to when exiting the Portal:

```php
use Illuminate\Http\Request;

Route::get('/billing', function (Request $request) {
    return $request->user()->redirectToBillingPortal(route('dashboard'));
})->middleware(['auth'])->name('billing');
```

> [!NOTE]
> As long as you have configured Cashier's webhook handling, Cashier will automatically keep your application's Cashier-related database tables in sync by inspecting the incoming webhooks from Stripe. So, for example, when a user cancels their subscription via Stripe's Customer Billing Portal, Cashier will receive the corresponding webhook and mark the subscription as "canceled" in your application's database.

<a name="customers"></a>
## Customers

<a name="retrieving-customers"></a>
### Retrieving Customers

You can retrieve a customer by their Stripe ID using the `Cashier::findBillable` method. This method will return an instance of the billable model:

```php
use Laravel\Cashier\Cashier;

$user = Cashier::findBillable($stripeId);
```

<a name="creating-customers"></a>
### Creating Customers

Occasionally, you may wish to create a Stripe customer without beginning a subscription. You may accomplish this using the `createAsStripeCustomer` method:

```php
$stripeCustomer = $user->createAsStripeCustomer();
```

Once the customer has been created in Stripe, you may begin a subscription at a later date. You may provide an optional `$options` array to pass in any additional [customer creation parameters that are supported by the Stripe API](https://stripe.com/docs/api/customers/create):

```php
$stripeCustomer = $user->createAsStripeCustomer($options);
```

You may use the `asStripeCustomer` method if you want to return the Stripe customer object for a billable model:

```php
$stripeCustomer = $user->asStripeCustomer();
```

The `createOrGetStripeCustomer` method may be used if you would like to retrieve the Stripe customer object for a given billable model but are not sure whether the billable model is already a customer within Stripe. This method will create a new customer in Stripe if one does not already exist:

```php
$stripeCustomer = $user->createOrGetStripeCustomer();
```

<a name="updating-customers"></a>
### Updating Customers

Occasionally, you may wish to update the Stripe customer directly with additional information. You may accomplish this using the `updateStripeCustomer` method. This method accepts an array of [customer update options supported by the Stripe API](https://stripe.com/docs/api/customers/update):

```php
$stripeCustomer = $user->updateStripeCustomer($options);
```

<a name="balances"></a>
### Balances

Stripe allows you to credit or debit a customer's "balance". Later, this balance will be credited or debited on new invoices. To check the customer's total balance you may use the `balance` method that is available on your billable model. The `balance` method will return a formatted string representation of the balance in the customer's currency:

```php
$balance = $user->balance();
```

To credit a customer's balance, you may provide a value to the `creditBalance` method. If you wish, you may also provide a description:

```php
$user->creditBalance(500, 'Premium customer top-up.');
```

Providing a value to the `debitBalance` method will debit the customer's balance:

```php
$user->debitBalance(300, 'Bad usage penalty.');
```

The `applyBalance` method will create new customer balance transactions for the customer. You may retrieve these transaction records using the `balanceTransactions` method, which may be useful in order to provide a log of credits and debits for the customer to review:

```php
// Retrieve all transactions...
$transactions = $user->balanceTransactions();

foreach ($transactions as $transaction) {
    // Transaction amount...
    $amount = $transaction->amount(); // $2.31

    // Retrieve the related invoice when available...
    $invoice = $transaction->invoice();
}
```

<a name="tax-ids"></a>
### Tax IDs

Cashier offers an easy way to manage a customer's tax IDs. For example, the `taxIds` method may be used to retrieve all of the [tax IDs](https://stripe.com/docs/api/customer_tax_ids/object) that are assigned to a customer as a collection:

```php
$taxIds = $user->taxIds();
```

You can also retrieve a specific tax ID for a customer by its identifier:

```php
$taxId = $user->findTaxId('txi_belgium');
```

You may create a new Tax ID by providing a valid [type](https://stripe.com/docs/api/customer_tax_ids/object#tax_id_object-type) and value to the `createTaxId` method:

```php
$taxId = $user->createTaxId('eu_vat', 'BE0123456789');
```

The `createTaxId` method will immediately add the VAT ID to the customer's account. [Verification of VAT IDs is also done by Stripe](https://stripe.com/docs/invoicing/customer/tax-ids#validation); however, this is an asynchronous process. You can be notified of verification updates by subscribing to the `customer.tax_id.updated` webhook event and inspecting [the VAT IDs `verification` parameter](https://stripe.com/docs/api/customer_tax_ids/object#tax_id_object-verification). For more information on handling webhooks, please consult the [documentation on defining webhook handlers](#handling-stripe-webhooks).

You may delete a tax ID using the `deleteTaxId` method:

```php
$user->deleteTaxId('txi_belgium');
```

<a name="syncing-customer-data-with-stripe"></a>
### Syncing Customer Data With Stripe

Typically, when your application's users update their name, email address, or other information that is also stored by Stripe, you should inform Stripe of the updates. By doing so, Stripe's copy of the information will be in sync with your application's.

To automate this, you may define an event listener on your billable model that reacts to the model's `updated` event. Then, within your event listener, you may invoke the `syncStripeCustomerDetails` method on the model:

```php
use App\Models\User;
use function Illuminate\Events\queueable;

/**
 * The "booted" method of the model.
 */
protected static function booted(): void
{
    static::updated(queueable(function (User $customer) {
        if ($customer->hasStripeId()) {
            $customer->syncStripeCustomerDetails();
        }
    }));
}
```

Now, every time your customer model is updated, its information will be synced with Stripe. For convenience, Cashier will automatically sync your customer's information with Stripe on the initial creation of the customer.

You may customize the columns used for syncing customer information to Stripe by overriding a variety of methods provided by Cashier. For example, you may override the `stripeName` method to customize the attribute that should be considered the customer's "name" when Cashier syncs customer information to Stripe:

```php
/**
 * Get the customer name that should be synced to Stripe.
 */
public function stripeName(): string|null
{
    return $this->company_name;
}
```

Similarly, you may override the `stripeEmail`, `stripePhone` (20 character maximum), `stripeAddress`, and `stripePreferredLocales` methods. These methods will sync information to their corresponding customer parameters when [updating the Stripe customer object](https://stripe.com/docs/api/customers/update). If you wish to take total control over the customer information sync process, you may override the `syncStripeCustomerDetails` method.

<a name="billing-portal"></a>
### Billing Portal

Stripe offers [an easy way to set up a billing portal](https://stripe.com/docs/billing/subscriptions/customer-portal) so that your customer can manage their subscription, payment methods, and view their billing history. You can redirect your users to the billing portal by invoking the `redirectToBillingPortal` method on the billable model from a controller or route:

```php
use Illuminate\Http\Request;

Route::get('/billing-portal', function (Request $request) {
    return $request->user()->redirectToBillingPortal();
});
```

By default, when the user is finished managing their subscription, they will be able to return to the `home` route of your application via a link within the Stripe billing portal. You may provide a custom URL that the user should return to by passing the URL as an argument to the `redirectToBillingPortal` method:

```php
use Illuminate\Http\Request;

Route::get('/billing-portal', function (Request $request) {
    return $request->user()->redirectToBillingPortal(route('billing'));
});
```

If you would like to generate the URL to the billing portal without generating an HTTP redirect response, you may invoke the `billingPortalUrl` method:

```php
$url = $request->user()->billingPortalUrl(route('billing'));
```

<a name="payment-methods"></a>
## Payment Methods

<a name="storing-payment-methods"></a>
### Storing Payment Methods

In order to create subscriptions or perform "one-off" charges with Stripe, your application will need to securely collect payment details from the customer. The approach used to accomplish this differs based on whether you plan to store the payment method for future subscriptions or immediately process a single charge, so we will examine both below.

Stripe's [Payment Element](https://stripe.com/docs/payments/payment-element) may be used to support multiple payment methods, such as cards, Apple Pay, Google Pay, and iDEAL.

<a name="payment-element-for-subscriptions"></a>
#### Payment Element for Subscriptions

First, create a Setup Intent and pass it to your view:

```php
return view('subscribe', [
    'intent' => $user->createSetupIntent()
]);
```

Mount the Payment Element using the Setup Intent's `client_secret`:

```html
<div id="payment-element"></div>
<button id="submit">Subscribe</button>

<script src="https://js.stripe.com/v3/"></script>
<script>
    const stripe = Stripe('stripe-public-key');

    const elements = stripe.elements({
        clientSecret: '{{ $intent->client_secret }}'
    });

    const paymentElement = elements.create('payment');

    paymentElement.mount('#payment-element');

    document.getElementById('submit').addEventListener('click', async () => {
        const { error } = await stripe.confirmSetup({
            elements,
            confirmParams: {
                return_url: '{{ route("subscription.complete") }}',
            },
        });

        if (error) {
            // Display "error.message" to the user...
        }
    });
</script>
```

After Stripe redirects to your `return_url`, the `setup_intent` ID will be available as a query string parameter. You may use this value to retrieve the payment method and create the subscription:

```php
use Illuminate\Http\Request;

Route::get('/subscription/complete', function (Request $request) {
    $setupIntent = $request->user()->findSetupIntent(
        $request->setup_intent
    );

    $paymentMethod = $setupIntent->payment_method;

    $request->user()
        ->newSubscription('default', 'price_xxx')
        ->create($paymentMethod);

    return redirect('/dashboard');
})->name('subscription.complete');
```

If you are using the Payment Element to update a customer's default payment method instead of creating a subscription, you may pass the payment method identifier to the [`updateDefaultPaymentMethod`](#updating-the-default-payment-method) method.

<a name="payment-element-for-single-charges"></a>
#### Payment Element for Single Charges

For one-off payments, create a Payment Intent using Cashier's `pay` method. Typically, you should store the Payment Intent ID on your application's corresponding order so that the order can be retrieved after Stripe redirects the customer back to your application. The following example assumes your application has an `Order` model with `user_id`, `amount`, `status`, and `stripe_payment_intent_id` columns:

```php
use App\Models\Order;
use Illuminate\Http\Request;

Route::post('/pay', function (Request $request) {
    $amount = 1000;

    $payment = $request->user()->pay($amount);

    $order = Order::create([
        'user_id' => $request->user()->id,
        'amount' => $amount,
        'status' => 'pending',
        'stripe_payment_intent_id' => $payment->id,
    ]);

    return view('checkout', [
        'clientSecret' => $payment->client_secret,
        'order' => $order,
    ]);
});
```

Then, mount the Payment Element and confirm the payment:

```html
<div id="payment-element"></div>
<button id="submit">Pay Now</button>

<script src="https://js.stripe.com/v3/"></script>
<script>
    const stripe = Stripe('stripe-public-key');

    const elements = stripe.elements({
        clientSecret: '{{ $clientSecret }}'
    });

    const paymentElement = elements.create('payment');

    paymentElement.mount('#payment-element');

    document.getElementById('submit').addEventListener('click', async () => {
        const { error } = await stripe.confirmPayment({
            elements,
            confirmParams: {
                return_url: '{{ route("payment.complete") }}',
            },
        });

        if (error) {
            // Display "error.message" to the user...
        }
    });
</script>
```

After the redirect, you may use the `payment_intent` query string parameter to retrieve the corresponding order and Payment Intent. Before fulfilling the order, you should verify that the order belongs to the authenticated customer and that the Payment Intent belongs to the authenticated customer and has succeeded:

```php
use App\Models\Order;
use Illuminate\Http\Request;

Route::get('/payment/complete', function (Request $request) {
    $order = Order::where('user_id', $request->user()->id)
        ->where('stripe_payment_intent_id', $request->payment_intent)
        ->firstOrFail();

    $paymentIntent = $request->user()
        ->stripe()
        ->paymentIntents
        ->retrieve($request->payment_intent);

    if ($paymentIntent->customer === $request->user()->stripe_id &&
        $paymentIntent->status === 'succeeded') {
        $order->update(['status' => 'paid']);

        // Fulfill the order...
    }

    return redirect('/dashboard');
})->name('payment.complete');
```

<a name="retrieving-payment-methods"></a>
### Retrieving Payment Methods

The `paymentMethods` method on the billable model instance returns a collection of `Laravel\Cashier\PaymentMethod` instances:

```php
$paymentMethods = $user->paymentMethods();
```

By default, this method will return payment methods of every type. To retrieve payment methods of a specific type, you may pass the `type` as an argument to the method:

```php
$paymentMethods = $user->paymentMethods('sepa_debit');
```

To retrieve the customer's default payment method, the `defaultPaymentMethod` method may be used:

```php
$paymentMethod = $user->defaultPaymentMethod();
```

You can retrieve a specific payment method that is attached to the billable model using the `findPaymentMethod` method:

```php
$paymentMethod = $user->findPaymentMethod($paymentMethodId);
```

<a name="payment-method-presence"></a>
### Payment Method Presence

To determine if a billable model has a default payment method attached to their account, invoke the `hasDefaultPaymentMethod` method:

```php
if ($user->hasDefaultPaymentMethod()) {
    // ...
}
```

You may use the `hasPaymentMethod` method to determine if a billable model has at least one payment method attached to their account:

```php
if ($user->hasPaymentMethod()) {
    // ...
}
```

This method will determine if the billable model has any payment method at all. To determine if a payment method of a specific type exists for the model, you may pass the `type` as an argument to the method:

```php
if ($user->hasPaymentMethod('sepa_debit')) {
    // ...
}
```

<a name="updating-the-default-payment-method"></a>
### Updating the Default Payment Method

The `updateDefaultPaymentMethod` method may be used to update a customer's default payment method information. This method accepts a Stripe payment method identifier and will assign the new payment method as the default billing payment method:

```php
$user->updateDefaultPaymentMethod($paymentMethod);
```

To sync your default payment method information with the customer's default payment method information in Stripe, you may use the `updateDefaultPaymentMethodFromStripe` method:

```php
$user->updateDefaultPaymentMethodFromStripe();
```

> [!WARNING]
> The default payment method on a customer can only be used for invoicing and creating new subscriptions. Due to limitations imposed by Stripe, it may not be used for single charges.

<a name="adding-payment-methods"></a>
### Adding Payment Methods

To add a new payment method, you may call the `addPaymentMethod` method on the billable model, passing the payment method identifier:

```php
$user->addPaymentMethod($paymentMethod);
```

> [!NOTE]
> To learn how to retrieve payment method identifiers please review the [payment method storage documentation](#storing-payment-methods).

<a name="deleting-payment-methods"></a>
### Deleting Payment Methods

To delete a payment method, you may call the `delete` method on the `Laravel\Cashier\PaymentMethod` instance you wish to delete:

```php
$paymentMethod->delete();
```

The `deletePaymentMethod` method will delete a specific payment method from the billable model:

```php
$user->deletePaymentMethod('pm_visa');
```

The `deletePaymentMethods` method will delete all of the payment method information for the billable model:

```php
$user->deletePaymentMethods();
```

By default, this method will delete payment methods of every type. To delete payment methods of a specific type you can pass the `type` as an argument to the method:

```php
$user->deletePaymentMethods('sepa_debit');
```

> [!WARNING]
> If a user has an active subscription, your application should not allow them to delete their default payment method.

<a name="subscriptions"></a>
## Subscriptions

Subscriptions provide a way to set up recurring payments for your customers. Stripe subscriptions managed by Cashier provide support for multiple subscription prices, subscription quantities, trials, and more.

<a name="creating-subscriptions"></a>
### Creating Subscriptions

To create a subscription, first retrieve an instance of your billable model, which typically will be an instance of `App\Models\User`. Once you have retrieved the model instance, you may use the `newSubscription` method to create the model's subscription:

```php
use Illuminate\Http\Request;

Route::post('/user/subscribe', function (Request $request) {
    $request->user()->newSubscription(
        'default', 'price_monthly'
    )->create($request->paymentMethodId);

    // ...
});
```

The first argument passed to the `newSubscription` method should be the internal type of the subscription. If your application only offers a single subscription, you might call this `default` or `primary`. This subscription type is only for internal application usage and is not meant to be shown to users. In addition, it should not contain spaces and it should never be changed after creating the subscription. The second argument is the specific price the user is subscribing to. This value should correspond to the price's identifier in Stripe.

The `create` method, which accepts [a Stripe payment method identifier](#storing-payment-methods) or Stripe `PaymentMethod` object, will begin the subscription as well as update your database with the billable model's Stripe customer ID and other relevant billing information.

> [!WARNING]
> Passing a payment method identifier directly to the `create` subscription method will also automatically add it to the user's stored payment methods.

<a name="collecting-recurring-payments-via-invoice-emails"></a>
#### Collecting Recurring Payments via Invoice Emails

Instead of collecting a customer's recurring payments automatically, you may instruct Stripe to email an invoice to the customer each time their recurring payment is due. Then, the customer may manually pay the invoice once they receive it. The customer does not need to provide a payment method up front when collecting recurring payments via invoices:

```php
$user->newSubscription('default', 'price_monthly')->createAndSendInvoice();
```

The amount of time a customer has to pay their invoice before their subscription is canceled is determined by the `days_until_due` option. By default, this is 30 days; however, you may provide a specific value for this option if you wish:

```php
$user->newSubscription('default', 'price_monthly')->createAndSendInvoice([], [
    'days_until_due' => 30
]);
```

<a name="subscription-quantities"></a>
#### Quantities

If you would like to set a specific [quantity](https://stripe.com/docs/billing/subscriptions/quantities) for the price when creating the subscription, you should invoke the `quantity` method on the subscription builder before creating the subscription:

```php
$user->newSubscription('default', 'price_monthly')
    ->quantity(5)
    ->create($paymentMethod);
```

<a name="additional-details"></a>
#### Additional Details

If you would like to specify additional [customer](https://stripe.com/docs/api/customers/create) or [subscription](https://stripe.com/docs/api/subscriptions/create) options supported by Stripe, you may do so by passing them as the second and third arguments to the `create` method:

```php
$user->newSubscription('default', 'price_monthly')->create($paymentMethod, [
    'email' => $email,
], [
    'metadata' => ['note' => 'Some extra information.'],
]);
```

<a name="coupons"></a>
#### Coupons

If you would like to apply a coupon when creating the subscription, you may use the `withCoupon` method:

```php
$user->newSubscription('default', 'price_monthly')
    ->withCoupon('code')
    ->create($paymentMethod);
```

Or, if you would like to apply a [Stripe promotion code](https://stripe.com/docs/billing/subscriptions/discounts/codes), you may use the `withPromotionCode` method:

```php
$user->newSubscription('default', 'price_monthly')
    ->withPromotionCode('promo_code_id')
    ->create($paymentMethod);
```

The given promotion code ID should be the Stripe API ID assigned to the promotion code and not the customer facing promotion code. If you need to find a promotion code ID based on a given customer facing promotion code, you may use the `findPromotionCode` method:

```php
// Find a promotion code ID by its customer facing code...
$promotionCode = $user->findPromotionCode('SUMMERSALE');

// Find an active promotion code ID by its customer facing code...
$promotionCode = $user->findActivePromotionCode('SUMMERSALE');
```

In the example above, the returned `$promotionCode` object is an instance of `Laravel\Cashier\PromotionCode`. This class decorates an underlying `Stripe\PromotionCode` object. You can retrieve the coupon related to the promotion code by invoking the `coupon` method:

```php
$coupon = $user->findPromotionCode('SUMMERSALE')->coupon();
```

The coupon instance allows you to determine the discount amount and whether the coupon represents a fixed discount or percentage based discount:

```php
if ($coupon->isPercentage()) {
    return $coupon->percentOff().'%'; // 21.5%
} else {
    return $coupon->amountOff(); // $5.99
}
```

You can also retrieve the discounts that are currently applied to a customer or subscription:

```php
$discount = $billable->discount();

$discount = $subscription->discount();
```

The returned `Laravel\Cashier\Discount` instances decorate an underlying `Stripe\Discount` object instance. You may retrieve the coupon related to this discount by invoking the `coupon` method:

```php
$coupon = $subscription->discount()->coupon();
```

If you would like to apply a new coupon or promotion code to a customer or subscription, you may do so via the `applyCoupon` or `applyPromotionCode` methods:

```php
$billable->applyCoupon('coupon_id');
$billable->applyPromotionCode('promotion_code_id');

$subscription->applyCoupon('coupon_id');
$subscription->applyPromotionCode('promotion_code_id');
```

Remember, you should use the Stripe API ID assigned to the promotion code and not the customer facing promotion code. Only one coupon or promotion code can be applied to a customer or subscription at a given time.

For more info on this subject, please consult the Stripe documentation regarding [coupons](https://stripe.com/docs/billing/subscriptions/coupons) and [promotion codes](https://stripe.com/docs/billing/subscriptions/coupons/codes).

<a name="adding-subscriptions"></a>
#### Adding Subscriptions

If you would like to add a subscription to a customer who already has a default payment method you may invoke the `add` method on the subscription builder:

```php
use App\Models\User;

$user = User::find(1);

$user->newSubscription('default', 'price_monthly')->add();
```

<a name="creating-subscriptions-from-the-stripe-dashboard"></a>
#### Creating Subscriptions From the Stripe Dashboard

You may also create subscriptions from the Stripe dashboard itself. When doing so, Cashier will sync newly added subscriptions and assign them a type of `default`. To customize the subscription type that is assigned to dashboard created subscriptions, [define webhook event handlers](#defining-webhook-event-handlers).

In addition, you may only create one type of subscription via the Stripe dashboard. If your application offers multiple subscriptions that use different types, only one type of subscription may be added through the Stripe dashboard.

Finally, you should always make sure to only add one active subscription per type of subscription offered by your application. If a customer has two `default` subscriptions, only the most recently added subscription will be used by Cashier even though both would be synced with your application's database.

<a name="checking-subscription-status"></a>
### Checking Subscription Status

Once a customer is subscribed to your application, you may easily check their subscription status using a variety of convenient methods. First, the `subscribed` method returns `true` if the customer has an active subscription, even if the subscription is currently within its trial period. The `subscribed` method accepts the type of the subscription as its first argument:

```php
if ($user->subscribed('default')) {
    // ...
}
```

The `subscribed` method also makes a great candidate for a [route middleware](/docs/{{version}}/middleware), allowing you to filter access to routes and controllers based on the user's subscription status:

```php
<?php

namespace App\Http\Middleware;

use Closure;
use Illuminate\Http\Request;
use Symfony\Component\HttpFoundation\Response;

class EnsureUserIsSubscribed
{
    /**
     * Handle an incoming request.
     *
     * @param  \Closure(\Illuminate\Http\Request): (\Symfony\Component\HttpFoundation\Response)  $next
     */
    public function handle(Request $request, Closure $next): Response
    {
        if ($request->user() && ! $request->user()->subscribed('default')) {
            // This user is not a paying customer...
            return redirect('/billing');
        }

        return $next($request);
    }
}
```

If you would like to determine if a user is still within their trial period, you may use the `onTrial` method. This method can be useful for determining if you should display a warning to the user that they are still on their trial period:

```php
if ($user->subscription('default')->onTrial()) {
    // ...
}
```

The `subscribedToProduct` method may be used to determine if the user is subscribed to a given product based on a given Stripe product's identifier. In Stripe, products are collections of prices. In this example, we will determine if the user's `default` subscription is actively subscribed to the application's "premium" product. The given Stripe product identifier should correspond to one of your product's identifiers in the Stripe dashboard:

```php
if ($user->subscribedToProduct('prod_premium', 'default')) {
    // ...
}
```

By passing an array to the `subscribedToProduct` method, you may determine if the user's `default` subscription is actively subscribed to the application's "basic" or "premium" product:

```php
if ($user->subscribedToProduct(['prod_basic', 'prod_premium'], 'default')) {
    // ...
}
```

The `subscribedToPrice` method may be used to determine if a customer's subscription corresponds to a given price ID:

```php
if ($user->subscribedToPrice('price_basic_monthly', 'default')) {
    // ...
}
```

The `recurring` method may be used to determine if the user is currently subscribed and is no longer within their trial period:

```php
if ($user->subscription('default')->recurring()) {
    // ...
}
```

> [!WARNING]
> If a user has two subscriptions with the same type, the most recent subscription will always be returned by the `subscription` method. For example, a user might have two subscription records with the type of `default`; however, one of the subscriptions may be an old, expired subscription, while the other is the current, active subscription. The most recent subscription will always be returned while older subscriptions are kept in the database for historical review.

<a name="cancelled-subscription-status"></a>
#### Canceled Subscription Status

To determine if the user was once an active subscriber but has canceled their subscription, you may use the `canceled` method:

```php
if ($user->subscription('default')->canceled()) {
    // ...
}
```

You may also determine if a user has canceled their subscription but are still on their "grace period" until the subscription fully expires. For example, if a user cancels a subscription on March 5th that was originally scheduled to expire on March 10th, the user is on their "grace period" until March 10th. Note that the `subscribed` method still returns `true` during this time:

```php
if ($user->subscription('default')->onGracePeriod()) {
    // ...
}
```

To determine if the user has canceled their subscription and is no longer within their "grace period", you may use the `ended` method:

```php
if ($user->subscription('default')->ended()) {
    // ...
}
```

<a name="incomplete-and-past-due-status"></a>
#### Incomplete and Past Due Status

If a subscription requires a secondary payment action after creation the subscription will be marked as `incomplete`. Subscription statuses are stored in the `stripe_status` column of Cashier's `subscriptions` database table.

Similarly, if a secondary payment action is required when swapping prices the subscription will be marked as `past_due`. When your subscription is in either of these states it will not be active until the customer has confirmed their payment. Determining if a subscription has an incomplete payment may be accomplished using the `hasIncompletePayment` method on the billable model or a subscription instance:

```php
if ($user->hasIncompletePayment('default')) {
    // ...
}

if ($user->subscription('default')->hasIncompletePayment()) {
    // ...
}
```

When a subscription has an incomplete payment, you should direct the user to Cashier's payment confirmation page, passing the `latestPayment` identifier. You may use the `latestPayment` method available on subscription instance to retrieve this identifier:

```html
<a href="{{ route('cashier.payment', $subscription->latestPayment()->id) }}">
    Please confirm your payment.
</a>
```

If you would like the subscription to still be considered active when it's in a `past_due` or `incomplete` state, you may use the `keepPastDueSubscriptionsActive` and `keepIncompleteSubscriptionsActive` methods provided by Cashier. Typically, these methods should be called in the `register` method of your `App\Providers\AppServiceProvider`:

```php
use Laravel\Cashier\Cashier;

/**
 * Register any application services.
 */
public function register(): void
{
    Cashier::keepPastDueSubscriptionsActive();
    Cashier::keepIncompleteSubscriptionsActive();
}
```

> [!WARNING]
> When a subscription is in an `incomplete` state it cannot be changed until the payment is confirmed. Therefore, the `swap` and `updateQuantity` methods will throw an exception when the subscription is in an `incomplete` state.

<a name="subscription-scopes"></a>
#### Subscription Scopes

Most subscription states are also available as query scopes so that you may easily query your database for subscriptions that are in a given state:

```php
// Get all active subscriptions...
$subscriptions = Subscription::query()->active()->get();

// Get all of the canceled subscriptions for a user...
$subscriptions = $user->subscriptions()->canceled()->get();
```

A complete list of available scopes is available below:

```php
Subscription::query()->active();
Subscription::query()->canceled();
Subscription::query()->ended();
Subscription::query()->incomplete();
Subscription::query()->notCanceled();
Subscription::query()->notOnGracePeriod();
Subscription::query()->notOnTrial();
Subscription::query()->onGracePeriod();
Subscription::query()->onTrial();
Subscription::query()->pastDue();
Subscription::query()->recurring();
```

<a name="changing-prices"></a>
### Changing Prices

After a customer is subscribed to your application, they may occasionally want to change to a new subscription price. To swap a customer to a new price, pass the Stripe price's identifier to the `swap` method. When swapping prices, it is assumed that the user would like to re-activate their subscription if it was previously canceled. The given price identifier should correspond to a Stripe price identifier available in the Stripe dashboard:

```php
use App\Models\User;

$user = App\Models\User::find(1);

$user->subscription('default')->swap('price_yearly');
```

If the customer is on trial, the trial period will be maintained. Additionally, if a "quantity" exists for the subscription, that quantity will also be maintained.

If you would like to swap prices and cancel any trial period the customer is currently on, you may invoke the `skipTrial` method:

```php
$user->subscription('default')
    ->skipTrial()
    ->swap('price_yearly');
```

If you would like to swap prices and immediately invoice the customer instead of waiting for their next billing cycle, you may use the `swapAndInvoice` method:

```php
$user = User::find(1);

$user->subscription('default')->swapAndInvoice('price_yearly');
```

<a name="prorations"></a>
#### Prorations

By default, Stripe prorates charges when swapping between prices. The `noProrate` method may be used to update the subscription's price without prorating the charges:

```php
$user->subscription('default')->noProrate()->swap('price_yearly');
```

For more information on subscription proration, consult the [Stripe documentation](https://stripe.com/docs/billing/subscriptions/prorations).

> [!WARNING]
> Executing the `noProrate` method before the `swapAndInvoice` method will have no effect on proration. An invoice will always be issued.

<a name="subscription-quantity"></a>
### Subscription Quantity

Sometimes subscriptions are affected by "quantity". For example, a project management application might charge $10 per month per project. You may use the `incrementQuantity` and `decrementQuantity` methods to easily increment or decrement your subscription quantity:

```php
use App\Models\User;

$user = User::find(1);

$user->subscription('default')->incrementQuantity();

// Add five to the subscription's current quantity...
$user->subscription('default')->incrementQuantity(5);

$user->subscription('default')->decrementQuantity();

// Subtract five from the subscription's current quantity...
$user->subscription('default')->decrementQuantity(5);
```

Alternatively, you may set a specific quantity using the `updateQuantity` method:

```php
$user->subscription('default')->updateQuantity(10);
```

The `noProrate` method may be used to update the subscription's quantity without prorating the charges:

```php
$user->subscription('default')->noProrate()->updateQuantity(10);
```

For more information on subscription quantities, consult the [Stripe documentation](https://stripe.com/docs/subscriptions/quantities).

<a name="quantities-for-subscription-with-multiple-products"></a>
#### Quantities for Subscriptions With Multiple Products

If your subscription is a [subscription with multiple products](#subscriptions-with-multiple-products), you should pass the ID of the price whose quantity you wish to increment or decrement as the second argument to the increment / decrement methods:

```php
$user->subscription('default')->incrementQuantity(1, 'price_chat');
```

<a name="subscriptions-with-multiple-products"></a>
### Subscriptions With Multiple Products

[Subscription with multiple products](https://stripe.com/docs/billing/subscriptions/multiple-products) allow you to assign multiple billing products to a single subscription. For example, imagine you are building a customer service "helpdesk" application that has a base subscription price of $10 per month but offers a live chat add-on product for an additional $15 per month. Information for subscriptions with multiple products is stored in Cashier's `subscription_items` database table.

You may specify multiple products for a given subscription by passing an array of prices as the second argument to the `newSubscription` method:

```php
use Illuminate\Http\Request;

Route::post('/user/subscribe', function (Request $request) {
    $request->user()->newSubscription('default', [
        'price_monthly',
        'price_chat',
    ])->create($request->paymentMethodId);

    // ...
});
```

In the example above, the customer will have two prices attached to their `default` subscription. Both prices will be charged on their respective billing intervals. If necessary, you may use the `quantity` method to indicate a specific quantity for each price:

```php
$user = User::find(1);

$user->newSubscription('default', ['price_monthly', 'price_chat'])
    ->quantity(5, 'price_chat')
    ->create($paymentMethod);
```

If you would like to add another price to an existing subscription, you may invoke the subscription's `addPrice` method:

```php
$user = User::find(1);

$user->subscription('default')->addPrice('price_chat');
```

The example above will add the new price and the customer will be billed for it on their next billing cycle. If you would like to bill the customer immediately you may use the `addPriceAndInvoice` method:

```php
$user->subscription('default')->addPriceAndInvoice('price_chat');
```

If you would like to add a price with a specific quantity, you can pass the quantity as the second argument of the `addPrice` or `addPriceAndInvoice` methods:

```php
$user = User::find(1);

$user->subscription('default')->addPrice('price_chat', 5);
```

You may remove prices from subscriptions using the `removePrice` method:

```php
$user->subscription('default')->removePrice('price_chat');
```

> [!WARNING]
> You may not remove the last price on a subscription. Instead, you should simply cancel the subscription.

<a name="swapping-prices"></a>
#### Swapping Prices

You may also change the prices attached to a subscription with multiple products. For example, imagine a customer has a `price_basic` subscription with a `price_chat` add-on product and you want to upgrade the customer from the `price_basic` to the `price_pro` price:

```php
use App\Models\User;

$user = User::find(1);

$user->subscription('default')->swap(['price_pro', 'price_chat']);
```

When executing the example above, the underlying subscription item with the `price_basic` is deleted and the one with the `price_chat` is preserved. Additionally, a new subscription item for the `price_pro` is created.

You can also specify subscription item options by passing an array of key / value pairs to the `swap` method. For example, you may need to specify the subscription price quantities:

```php
$user = User::find(1);

$user->subscription('default')->swap([
    'price_pro' => ['quantity' => 5],
    'price_chat'
]);
```

If you want to swap a single price on a subscription, you may do so using the `swap` method on the subscription item itself. This approach is particularly useful if you would like to preserve all of the existing metadata on the subscription's other prices:

```php
$user = User::find(1);

$user->subscription('default')
    ->findItemOrFail('price_basic')
    ->swap('price_pro');
```

<a name="proration"></a>
#### Proration

By default, Stripe will prorate charges when adding or removing prices from a subscription with multiple products. If you would like to make a price adjustment without proration, you should chain the `noProrate` method onto your price operation:

```php
$user->subscription('default')->noProrate()->removePrice('price_chat');
```

<a name="swapping-quantities"></a>
#### Quantities

If you would like to update quantities on individual subscription prices, you may do so using the [existing quantity methods](#subscription-quantity) by passing the ID of the price as an additional argument to the method:

```php
$user = User::find(1);

$user->subscription('default')->incrementQuantity(5, 'price_chat');

$user->subscription('default')->decrementQuantity(3, 'price_chat');

$user->subscription('default')->updateQuantity(10, 'price_chat');
```

> [!WARNING]
> When a subscription has multiple prices the `stripe_price` and `quantity` attributes on the `Subscription` model will be `null`. To access the individual price attributes, you should use the `items` relationship available on the `Subscription` model.

<a name="subscription-items"></a>
#### Subscription Items

When a subscription has multiple prices, it will have multiple subscription "items" stored in your database's `subscription_items` table. You may access these via the `items` relationship on the subscription:

```php
use App\Models\User;

$user = User::find(1);

$subscriptionItem = $user->subscription('default')->items->first();

// Retrieve the Stripe price and quantity for a specific item...
$stripePrice = $subscriptionItem->stripe_price;
$quantity = $subscriptionItem->quantity;
```

You can also retrieve a specific price using the `findItemOrFail` method:

```php
$user = User::find(1);

$subscriptionItem = $user->subscription('default')->findItemOrFail('price_chat');
```

<a name="multiple-subscriptions"></a>
### Multiple Subscriptions

Stripe allows your customers to have multiple subscriptions simultaneously. For example, you may run a gym that offers a swimming subscription and a weight-lifting subscription, and each subscription may have different pricing. Of course, customers should be able to subscribe to either or both plans.

When your application creates subscriptions, you may provide the type of the subscription to the `newSubscription` method. The type may be any string that represents the type of subscription the user is initiating:

```php
use Illuminate\Http\Request;

Route::post('/swimming/subscribe', function (Request $request) {
    $request->user()->newSubscription('swimming')
        ->price('price_swimming_monthly')
        ->create($request->paymentMethodId);

    // ...
});
```

In this example, we initiated a monthly swimming subscription for the customer. However, they may want to swap to a yearly subscription at a later time. When adjusting the customer's subscription, we can simply swap the price on the `swimming` subscription:

```php
$user->subscription('swimming')->swap('price_swimming_yearly');
```

Of course, you may also cancel the subscription entirely:

```php
$user->subscription('swimming')->cancel();
```

<a name="usage-based-billing"></a>
### Usage Based Billing

[Usage based billing](https://stripe.com/docs/billing/subscriptions/metered-billing) allows you to charge customers based on their product usage during a billing cycle. For example, you may charge customers based on the number of text messages or emails they send per month.

To start using usage billing, you will first need to create a new product in your Stripe dashboard with a [usage based billing model](https://docs.stripe.com/billing/subscriptions/usage-based/implementation-guide) and a [meter](https://docs.stripe.com/billing/subscriptions/usage-based/recording-usage#configure-meter). After creating the meter, store the associated event name and meter ID, which you will need to report and retrieve usage. Then, use the `meteredPrice` method to add the metered price ID to a customer subscription:

```php
use Illuminate\Http\Request;

Route::post('/user/subscribe', function (Request $request) {
    $request->user()->newSubscription('default')
        ->meteredPrice('price_metered')
        ->create($request->paymentMethodId);

    // ...
});
```

You may also start a metered subscription via [Stripe Checkout](#checkout):

```php
$checkout = Auth::user()
    ->newSubscription('default', [])
    ->meteredPrice('price_metered')
    ->checkout();

return view('your-checkout-view', [
    'checkout' => $checkout,
]);
```

<a name="reporting-usage"></a>
#### Reporting Usage

As your customer uses your application, you will report their usage to Stripe so that they can be billed accurately. To report the usage of a metered event, you may use the `reportMeterEvent` method on your `Billable` model:

```php
$user = User::find(1);

$user->reportMeterEvent('emails-sent');
```

By default, a "usage quantity" of 1 is added to the billing period. Alternatively, you may pass a specific amount of "usage" to add to the customer's usage for the billing period:

```php
$user = User::find(1);

$user->reportMeterEvent('emails-sent', quantity: 15);
```

To retrieve a customer's event summary for a meter, you may use a `Billable` instance's `meterEventSummaries` method:

```php
$user = User::find(1);

$meterUsage = $user->meterEventSummaries($meterId);

$meterUsage->first()->aggregated_value // 10
```

Please refer to Stripe's [Meter Event Summary object documentation](https://docs.stripe.com/api/billing/meter-event_summary/object) for more information on meter event summaries.

To [list all meters](https://docs.stripe.com/api/billing/meter/list), you may use a `Billable` instance's `meters` method:

```php
$user = User::find(1);

$user->meters();
```

<a name="subscription-taxes"></a>
### Subscription Taxes

> [!WARNING]
> Instead of calculating Tax Rates manually, you can [automatically calculate taxes using Stripe Tax](#tax-configuration)

To specify the tax rates a user pays on a subscription, you should implement the `taxRates` method on your billable model and return an array containing the Stripe tax rate IDs. You can define these tax rates in [your Stripe dashboard](https://dashboard.stripe.com/test/tax-rates):

```php
/**
 * The tax rates that should apply to the customer's subscriptions.
 *
 * @return array<int, string>
 */
public function taxRates(): array
{
    return ['txr_id'];
}
```

The `taxRates` method enables you to apply a tax rate on a customer-by-customer basis, which may be helpful for a user base that spans multiple countries and tax rates.

If you're offering subscriptions with multiple products, you may define different tax rates for each price by implementing a `priceTaxRates` method on your billable model:

```php
/**
 * The tax rates that should apply to the customer's subscriptions.
 *
 * @return array<string, array<int, string>>
 */
public function priceTaxRates(): array
{
    return [
        'price_monthly' => ['txr_id'],
    ];
}
```

> [!WARNING]
> The `taxRates` method only applies to subscription charges. If you use Cashier to make "one-off" charges, you will need to manually specify the tax rate at that time.

<a name="syncing-tax-rates"></a>
#### Syncing Tax Rates

When changing the hard-coded tax rate IDs returned by the `taxRates` method, the tax settings on any existing subscriptions for the user will remain the same. If you wish to update the tax value for existing subscriptions with the new `taxRates` values, you should call the `syncTaxRates` method on the user's subscription instance:

```php
$user->subscription('default')->syncTaxRates();
```

This will also sync any item tax rates for a subscription with multiple products. If your application is offering subscriptions with multiple products, you should ensure that your billable model implements the `priceTaxRates` method [discussed above](#subscription-taxes).

<a name="tax-exemption"></a>
#### Tax Exemption

Cashier also offers the `isNotTaxExempt`, `isTaxExempt`, and `reverseChargeApplies` methods to determine if the customer is tax exempt. These methods will call the Stripe API to determine a customer's tax exemption status:

```php
use App\Models\User;

$user = User::find(1);

$user->isTaxExempt();
$user->isNotTaxExempt();
$user->reverseChargeApplies();
```

> [!WARNING]
> These methods are also available on any `Laravel\Cashier\Invoice` object. However, when invoked on an `Invoice` object, the methods will determine the exemption status at the time the invoice was created.

<a name="subscription-anchor-date"></a>
### Subscription Anchor Date

By default, the billing cycle anchor is the date the subscription was created or, if a trial period is used, the date that the trial ends. If you would like to modify the billing anchor date, you may use the `anchorBillingCycleOn` method:

```php
use Illuminate\Http\Request;

Route::post('/user/subscribe', function (Request $request) {
    $anchor = Carbon::parse('first day of next month');

    $request->user()->newSubscription('default', 'price_monthly')
        ->anchorBillingCycleOn($anchor->startOfDay())
        ->create($request->paymentMethodId);

    // ...
});
```

For more information on managing subscription billing cycles, consult the [Stripe billing cycle documentation](https://stripe.com/docs/billing/subscriptions/billing-cycle)

<a name="cancelling-subscriptions"></a>
### Cancelling Subscriptions

To cancel a subscription, call the `cancel` method on the user's subscription:

```php
$user->subscription('default')->cancel();
```

When a subscription is canceled, Cashier will automatically set the `ends_at` column in your `subscriptions` database table. This column is used to know when the `subscribed` method should begin returning `false`.

For example, if a customer cancels a subscription on March 1st, but the subscription was not scheduled to end until March 5th, the `subscribed` method will continue to return `true` until March 5th. This is done because a user is typically allowed to continue using an application until the end of their billing cycle.

You may determine if a user has canceled their subscription but are still on their "grace period" using the `onGracePeriod` method:

```php
if ($user->subscription('default')->onGracePeriod()) {
    // ...
}
```

If you wish to cancel a subscription immediately, call the `cancelNow` method on the user's subscription:

```php
$user->subscription('default')->cancelNow();
```

If you wish to cancel a subscription immediately and invoice any remaining un-invoiced metered usage or new / pending proration invoice items, call the `cancelNowAndInvoice` method on the user's subscription:

```php
$user->subscription('default')->cancelNowAndInvoice();
```

You may also choose to cancel the subscription at a specific moment in time:

```php
$user->subscription('default')->cancelAt(
    now()->plus(days: 10)
);
```

Finally, you should always cancel user subscriptions before deleting the associated user model:

```php
$user->subscription('default')->cancelNow();

$user->delete();
```

<a name="resuming-subscriptions"></a>
### Resuming Subscriptions

If a customer has canceled their subscription and you wish to resume it, you may invoke the `resume` method on the subscription. The customer must still be within their "grace period" in order to resume a subscription:

```php
$user->subscription('default')->resume();
```

If the customer cancels a subscription and then resumes that subscription before the subscription has fully expired the customer will not be billed immediately. Instead, their subscription will be re-activated and they will be billed on the original billing cycle.

<a name="subscription-trials"></a>
## Subscription Trials

<a name="with-payment-method-up-front"></a>
### With Payment Method Up Front

If you would like to offer trial periods to your customers while still collecting payment method information up front, you should use the `trialDays` method when creating your subscriptions:

```php
use Illuminate\Http\Request;

Route::post('/user/subscribe', function (Request $request) {
    $request->user()->newSubscription('default', 'price_monthly')
        ->trialDays(10)
        ->create($request->paymentMethodId);

    // ...
});
```

This method will set the trial period ending date on the subscription record within the database and instruct Stripe to not begin billing the customer until after this date. When using the `trialDays` method, Cashier will overwrite any default trial period configured for the price in Stripe.

> [!WARNING]
> If the customer's subscription is not canceled before the trial ending date they will be charged as soon as the trial expires, so you should be sure to notify your users of their trial ending date.

The `trialUntil` method allows you to provide a `DateTime` instance that specifies when the trial period should end:

```php
use Illuminate\Support\Carbon;

$user->newSubscription('default', 'price_monthly')
    ->trialUntil(Carbon::now()->plus(days: 10))
    ->create($paymentMethod);
```

You may determine if a user is within their trial period using either the `onTrial` method of the user instance or the `onTrial` method of the subscription instance. The two examples below are equivalent:

```php
if ($user->onTrial('default')) {
    // ...
}

if ($user->subscription('default')->onTrial()) {
    // ...
}
```

You may use the `endTrial` method to immediately end a subscription trial:

```php
$user->subscription('default')->endTrial();
```

To determine if an existing trial has expired, you may use the `hasExpiredTrial` methods:

```php
if ($user->hasExpiredTrial('default')) {
    // ...
}

if ($user->subscription('default')->hasExpiredTrial()) {
    // ...
}
```

<a name="defining-trial-days-in-stripe-cashier"></a>
#### Defining Trial Days in Stripe / Cashier

You may choose to define how many trial days your price's receive in the Stripe dashboard or always pass them explicitly using Cashier. If you choose to define your price's trial days in Stripe you should be aware that new subscriptions, including new subscriptions for a customer that had a subscription in the past, will always receive a trial period unless you explicitly call the `skipTrial()` method.

<a name="without-payment-method-up-front"></a>
### Without Payment Method Up Front

If you would like to offer trial periods without collecting the user's payment method information up front, you may set the `trial_ends_at` column on the user record to your desired trial ending date. This is typically done during user registration:

```php
use App\Models\User;

$user = User::create([
    // ...
    'trial_ends_at' => now()->plus(days: 10),
]);
```

> [!WARNING]
> Be sure to add a [date cast](/docs/{{version}}/eloquent-mutators#date-casting) for the `trial_ends_at` attribute within your billable model's class definition.

Cashier refers to this type of trial as a "generic trial", since it is not attached to any existing subscription. The `onTrial` method on the billable model instance will return `true` if the current date is not past the value of `trial_ends_at`:

```php
if ($user->onTrial()) {
    // User is within their trial period...
}
```

Once you are ready to create an actual subscription for the user, you may use the `newSubscription` method as usual:

```php
$user = User::find(1);

$user->newSubscription('default', 'price_monthly')->create($paymentMethod);
```

To retrieve the user's trial ending date, you may use the `trialEndsAt` method. This method will return a Carbon date instance if a user is on a trial or `null` if they aren't. You may also pass an optional subscription type parameter if you would like to get the trial ending date for a specific subscription other than the default one:

```php
if ($user->onTrial()) {
    $trialEndsAt = $user->trialEndsAt('main');
}
```

You may also use the `onGenericTrial` method if you wish to know specifically that the user is within their "generic" trial period and has not yet created an actual subscription:

```php
if ($user->onGenericTrial()) {
    // User is within their "generic" trial period...
}
```

<a name="extending-trials"></a>
### Extending Trials

The `extendTrial` method allows you to extend the trial period of a subscription after the subscription has been created. If the trial has already expired and the customer is already being billed for the subscription, you can still offer them an extended trial. The time spent within the trial period will be deducted from the customer's next invoice:

```php
use App\Models\User;

$subscription = User::find(1)->subscription('default');

// End the trial 7 days from now...
$subscription->extendTrial(
    now()->plus(days: 7)
);

// Add an additional 5 days to the trial...
$subscription->extendTrial(
    $subscription->trial_ends_at->plus(days: 5)
);
```

<a name="handling-stripe-webhooks"></a>
## Handling Stripe Webhooks

> [!NOTE]
> You may use [the Stripe CLI](https://stripe.com/docs/stripe-cli) to help test webhooks during local development.

Stripe can notify your application of a variety of events via webhooks. By default, a route that points to Cashier's webhook controller is automatically registered by the Cashier service provider. This controller will handle all incoming webhook requests.

By default, the Cashier webhook controller will automatically handle cancelling subscriptions that have too many failed charges (as defined by your Stripe settings), customer updates, customer deletions, subscription updates, and payment method changes; however, as we'll soon discover, you can extend this controller to handle any Stripe webhook event you like.

To ensure your application can handle Stripe webhooks, be sure to configure the webhook URL in the Stripe control panel. By default, Cashier's webhook controller responds to the `/stripe/webhook` URL path. The full list of all webhooks you should enable in the Stripe control panel are:

- `customer.subscription.created`
- `customer.subscription.updated`
- `customer.subscription.deleted`
- `customer.updated`
- `customer.deleted`
- `payment_method.automatically_updated`
- `invoice.payment_action_required`
- `invoice.payment_succeeded`

For convenience, Cashier includes a `cashier:webhook` Artisan command. This command will create a webhook in Stripe that listens to all of the events required by Cashier:

```shell
php artisan cashier:webhook
```

By default, the created webhook will point to the URL defined by the `APP_URL` environment variable and the `cashier.webhook` route that is included with Cashier. You may provide the `--url` option when invoking the command if you would like to use a different URL:

```shell
php artisan cashier:webhook --url "https://example.com/stripe/webhook"
```

The webhook that is created will use the Stripe API version that your version of Cashier is compatible with. If you would like to use a different Stripe version, you may provide the `--api-version` option:

```shell
php artisan cashier:webhook --api-version="2019-12-03"
```

After creation, the webhook will be immediately active. If you wish to create the webhook but have it disabled until you're ready, you may provide the `--disabled` option when invoking the command:

```shell
php artisan cashier:webhook --disabled
```

> [!WARNING]
> Make sure you protect incoming Stripe webhook requests with Cashier's included [webhook signature verification](#verifying-webhook-signatures) middleware.

<a name="webhooks-csrf-protection"></a>
#### Webhooks and CSRF Protection

Since Stripe webhooks need to bypass Laravel's [CSRF protection](/docs/{{version}}/csrf), you should ensure that Laravel does not attempt to validate the CSRF token for incoming Stripe webhooks. To accomplish this, you should exclude `stripe/*` from CSRF protection in your application's `bootstrap/app.php` file:

```php
->withMiddleware(function (Middleware $middleware): void {
    $middleware->preventRequestForgery(except: [
        'stripe/*',
    ]);
})
```

<a name="defining-webhook-event-handlers"></a>
### Defining Webhook Event Handlers

Cashier automatically handles subscription cancellations for failed charges and other common Stripe webhook events. However, if you have additional webhook events you would like to handle, you may do so by listening to the following events that are dispatched by Cashier:

- `Laravel\Cashier\Events\WebhookReceived`
- `Laravel\Cashier\Events\WebhookHandled`

Both events contain the full payload of the Stripe webhook. For example, if you wish to handle the `invoice.payment_succeeded` webhook, you may register a [listener](/docs/{{version}}/events#defining-listeners) that will handle the event:

```php
<?php

namespace App\Listeners;

use Laravel\Cashier\Events\WebhookReceived;

class StripeEventListener
{
    /**
     * Handle received Stripe webhooks.
     */
    public function handle(WebhookReceived $event): void
    {
        if ($event->payload['type'] === 'invoice.payment_succeeded') {
            // Handle the incoming event...
        }
    }
}
```

<a name="verifying-webhook-signatures"></a>
### Verifying Webhook Signatures

To secure your webhooks, you may use [Stripe's webhook signatures](https://stripe.com/docs/webhooks/signatures). For convenience, Cashier automatically includes a middleware which validates that the incoming Stripe webhook request is valid.

To enable webhook verification, ensure that the `STRIPE_WEBHOOK_SECRET` environment variable is set in your application's `.env` file. The webhook `secret` may be retrieved from your Stripe account dashboard.

<a name="single-charges"></a>
## Single Charges

<a name="simple-charge"></a>
### Simple Charge

If you would like to make a one-time charge against a customer using a payment method identifier, you may use the `charge` method on a billable model instance. If you need to collect payment details from a customer before processing a one-time charge, see the [Payment Element for Single Charges](#payment-element-for-single-charges) documentation:

```php
use Illuminate\Http\Request;

Route::post('/purchase', function (Request $request) {
    $payment = $request->user()->charge(
        100, $request->paymentMethodId
    );

    // ...
});
```

The `charge` method accepts an array as its third argument, allowing you to pass any options you wish to the underlying Stripe Payment Intent creation. More information regarding the options available to you when creating Payment Intents may be found in the [Stripe documentation](https://stripe.com/docs/api/payment_intents/create):

```php
$user->charge(100, $paymentMethod, [
    'custom_option' => $value,
]);
```

You may also use the `charge` method without an underlying customer or user. To accomplish this, invoke the `charge` method on a new instance of your application's billable model:

```php
use App\Models\User;

$payment = (new User)->charge(100, $paymentMethod);
```

The `charge` method will throw an exception if the charge fails. If the charge is successful, an instance of `Laravel\Cashier\Payment` will be returned from the method:

```php
try {
    $payment = $user->charge(100, $paymentMethod);
} catch (Exception $e) {
    // ...
}
```

> [!WARNING]
> The `charge` method accepts the payment amount in the lowest denominator of the currency used by your application. For example, if customers are paying in United States Dollars, amounts should be specified in pennies.

<a name="charge-with-invoice"></a>
### Charge With Invoice

Sometimes you may need to make a one-time charge and offer a PDF invoice to your customer. The `invoicePrice` method lets you do just that. For example, let's invoice a customer for five new shirts:

```php
$user->invoicePrice('price_tshirt', 5);
```

The invoice will be immediately charged against the user's default payment method. The `invoicePrice` method also accepts an array as its third argument. This array contains the billing options for the invoice item. The fourth argument accepted by the method is also an array which should contain the billing options for the invoice itself:

```php
$user->invoicePrice('price_tshirt', 5, [
    'discounts' => [
        ['coupon' => 'SUMMER21SALE']
    ],
], [
    'default_tax_rates' => ['txr_id'],
]);
```

Similarly to `invoicePrice`, you may use the `tabPrice` method to create a one-time charge for multiple items (up to 250 items per invoice) by adding them to the customer's "tab" and then invoicing the customer. For example, we may invoice a customer for five shirts and two mugs:

```php
$user->tabPrice('price_tshirt', 5);
$user->tabPrice('price_mug', 2);
$user->invoice();
```

Alternatively, you may use the `invoiceFor` method to make a "one-off" charge against the customer's default payment method:

```php
$user->invoiceFor('One Time Fee', 500);
```

Although the `invoiceFor` method is available for you to use, it is recommended that you use the `invoicePrice` and `tabPrice` methods with pre-defined prices. By doing so, you will have access to better analytics and data within your Stripe dashboard regarding your sales on a per-product basis.

> [!WARNING]
> The `invoice`, `invoicePrice`, and `invoiceFor` methods will create a Stripe invoice which will retry failed billing attempts. If you do not want invoices to retry failed charges, you will need to close them using the Stripe API after the first failed charge.

<a name="creating-payment-intents"></a>
### Creating Payment Intents

You can create a new Stripe payment intent by invoking the `pay` method on a billable model instance. Calling this method will create a payment intent that is wrapped in a `Laravel\Cashier\Payment` instance:

```php
use Illuminate\Http\Request;

Route::post('/pay', function (Request $request) {
    $payment = $request->user()->pay(
        $request->get('amount')
    );

    return $payment->client_secret;
});
```

After creating the payment intent, you can return the client secret to your application's frontend so that the user can complete the payment in their browser. To read more about building entire payment flows using Stripe payment intents, please consult the [Stripe documentation](https://stripe.com/docs/payments/accept-a-payment?platform=web).

When using the `pay` method, the default payment methods that are enabled within your Stripe dashboard will be available to the customer. Alternatively, if you only want to allow for some specific payment methods to be used, you may use the `payWith` method:

```php
use Illuminate\Http\Request;

Route::post('/pay', function (Request $request) {
    $payment = $request->user()->payWith(
        $request->get('amount'), ['card', 'bancontact']
    );

    return $payment->client_secret;
});
```

> [!WARNING]
> The `pay` and `payWith` methods accept the payment amount in the lowest denominator of the currency used by your application. For example, if customers are paying in United States Dollars, amounts should be specified in pennies.

<a name="refunding-charges"></a>
### Refunding Charges

If you need to refund a Stripe payment, you may use the `refund` method. This method accepts the Stripe Payment Intent ID as its first argument:

```php
$payment = $user->charge(100, $paymentMethodId);

$user->refund($payment->id);
```

<a name="invoices"></a>
## Invoices

<a name="retrieving-invoices"></a>
### Retrieving Invoices

You may easily retrieve an array of a billable model's invoices using the `invoices` method. The `invoices` method returns a collection of `Laravel\Cashier\Invoice` instances:

```php
$invoices = $user->invoices();
```

If you would like to include pending invoices in the results, you may use the `invoicesIncludingPending` method:

```php
$invoices = $user->invoicesIncludingPending();
```

You may use the `findInvoice` method to retrieve a specific invoice by its ID:

```php
$invoice = $user->findInvoice($invoiceId);
```

<a name="displaying-invoice-information"></a>
#### Displaying Invoice Information

When listing the invoices for the customer, you may use the invoice's methods to display the relevant invoice information. For example, you may wish to list every invoice in a table, allowing the user to easily download any of them:

```blade
<table>
    @foreach ($invoices as $invoice)
        <tr>
            <td>{{ $invoice->date()->toFormattedDateString() }}</td>
            <td>{{ $invoice->total() }}</td>
            <td><a href="/user/invoice/{{ $invoice->id }}">Download</a></td>
        </tr>
    @endforeach
</table>
```

<a name="upcoming-invoices"></a>
### Upcoming Invoices

To retrieve the upcoming invoice for a customer, you may use the `upcomingInvoice` method:

```php
$invoice = $user->upcomingInvoice();
```

Similarly, if the customer has multiple subscriptions, you can also retrieve the upcoming invoice for a specific subscription:

```php
$invoice = $user->subscription('default')->upcomingInvoice();
```

<a name="previewing-subscription-invoices"></a>
### Previewing Subscription Invoices

Using the `previewInvoice` method, you can preview an invoice before making price changes. This will allow you to determine what your customer's invoice will look like when a given price change is made:

```php
$invoice = $user->subscription('default')->previewInvoice('price_yearly');
```

You may pass an array of prices to the `previewInvoice` method in order to preview invoices with multiple new prices:

```php
$invoice = $user->subscription('default')->previewInvoice(['price_yearly', 'price_metered']);
```

<a name="generating-invoice-pdfs"></a>
### Generating Invoice PDFs

Before generating invoice PDFs, you should use Composer to install the Dompdf library, which is the default invoice renderer for Cashier:

```shell
composer require dompdf/dompdf
```

From within a route or controller, you may use the `downloadInvoice` method to generate a PDF download of a given invoice. This method will automatically generate the proper HTTP response needed to download the invoice:

```php
use Illuminate\Http\Request;

Route::get('/user/invoice/{invoice}', function (Request $request, string $invoiceId) {
    return $request->user()->downloadInvoice($invoiceId);
});
```

By default, all data on the invoice is derived from the customer and invoice data stored in Stripe. The filename is based on your `app.name` config value. However, you can customize some of this data by providing an array as the second argument to the `downloadInvoice` method. This array allows you to customize information such as your company and product details:

```php
return $request->user()->downloadInvoice($invoiceId, [
    'vendor' => 'Your Company',
    'product' => 'Your Product',
    'street' => 'Main Str. 1',
    'location' => '2000 Antwerp, Belgium',
    'phone' => '+32 499 00 00 00',
    'email' => 'info@example.com',
    'url' => 'https://example.com',
    'vendorVat' => 'BE123456789',
]);
```

The `downloadInvoice` method also allows for a custom filename via its third argument. This filename will automatically be suffixed with `.pdf`:

```php
return $request->user()->downloadInvoice($invoiceId, [], 'my-invoice');
```

<a name="custom-invoice-render"></a>
#### Custom Invoice Renderer

Cashier also makes it possible to use a custom invoice renderer. By default, Cashier uses the `DompdfInvoiceRenderer` implementation, which utilizes the [dompdf](https://github.com/dompdf/dompdf) PHP library to generate Cashier's invoices. However, you may use any renderer you wish by implementing the `Laravel\Cashier\Contracts\InvoiceRenderer` interface. For example, you may wish to render an invoice PDF using an API call to a third-party PDF rendering service:

```php
use Illuminate\Support\Facades\Http;
use Laravel\Cashier\Contracts\InvoiceRenderer;
use Laravel\Cashier\Invoice;

class ApiInvoiceRenderer implements InvoiceRenderer
{
    /**
     * Render the given invoice and return the raw PDF bytes.
     */
    public function render(Invoice $invoice, array $data = [], array $options = []): string
    {
        $html = $invoice->view($data)->render();

        return Http::get('https://example.com/html-to-pdf', ['html' => $html])->get()->body();
    }
}
```

Once you have implemented the invoice renderer contract, you should update the `cashier.invoices.renderer` configuration value in your application's `config/cashier.php` configuration file. This configuration value should be set to the class name of your custom renderer implementation.

<a name="checkout"></a>
## Checkout

Cashier Stripe also provides support for [Stripe Checkout](https://stripe.com/payments/checkout). Stripe Checkout takes the pain out of implementing custom pages to accept payments by providing a pre-built, hosted payment page.

The following documentation contains information on how to get started using Stripe Checkout with Cashier. To learn more about Stripe Checkout, you should also consider reviewing [Stripe's own documentation on Checkout](https://stripe.com/docs/payments/checkout).

<a name="product-checkouts"></a>
### Product Checkouts

You may perform a checkout for an existing product that has been created within your Stripe dashboard using the `checkout` method on a billable model. The `checkout` method will initiate a new Stripe Checkout session. By default, you're required to pass a Stripe Price ID:

```php
use Illuminate\Http\Request;

Route::get('/product-checkout', function (Request $request) {
    return $request->user()->checkout('price_tshirt');
});
```

If needed, you may also specify a product quantity:

```php
use Illuminate\Http\Request;

Route::get('/product-checkout', function (Request $request) {
    return $request->user()->checkout(['price_tshirt' => 15]);
});
```

When a customer visits this route they will be redirected to Stripe's Checkout page. By default, when a user successfully completes or cancels a purchase they will be redirected to your `home` route location, but you may specify custom callback URLs using the `success_url` and `cancel_url` options:

```php
use Illuminate\Http\Request;

Route::get('/product-checkout', function (Request $request) {
    return $request->user()->checkout(['price_tshirt' => 1], [
        'success_url' => route('your-success-route'),
        'cancel_url' => route('your-cancel-route'),
    ]);
});
```

When defining your `success_url` checkout option, you may instruct Stripe to add the checkout session ID as a query string parameter when invoking your URL. To do so, add the literal string `{CHECKOUT_SESSION_ID}` to your `success_url` query string. Stripe will replace this placeholder with the actual checkout session ID:

```php
use Illuminate\Http\Request;
use Stripe\Checkout\Session;
use Stripe\Customer;

Route::get('/product-checkout', function (Request $request) {
    return $request->user()->checkout(['price_tshirt' => 1], [
        'success_url' => route('checkout-success').'?session_id={CHECKOUT_SESSION_ID}',
        'cancel_url' => route('checkout-cancel'),
    ]);
});

Route::get('/checkout-success', function (Request $request) {
    $checkoutSession = $request->user()->stripe()->checkout->sessions->retrieve($request->get('session_id'));

    return view('checkout.success', ['checkoutSession' => $checkoutSession]);
})->name('checkout-success');
```

<a name="checkout-promotion-codes"></a>
#### Promotion Codes

By default, Stripe Checkout does not allow [user redeemable promotion codes](https://stripe.com/docs/billing/subscriptions/discounts/codes). Luckily, there's an easy way to enable these for your Checkout page. To do so, you may invoke the `allowPromotionCodes` method:

```php
use Illuminate\Http\Request;

Route::get('/product-checkout', function (Request $request) {
    return $request->user()
        ->allowPromotionCodes()
        ->checkout('price_tshirt');
});
```

<a name="single-charge-checkouts"></a>
### Single Charge Checkouts

You can also perform a simple charge for an ad-hoc product that has not been created in your Stripe dashboard. To do so you may use the `checkoutCharge` method on a billable model and pass it a chargeable amount, a product name, and an optional quantity. When a customer visits this route they will be redirected to Stripe's Checkout page:

```php
use Illuminate\Http\Request;

Route::get('/charge-checkout', function (Request $request) {
    return $request->user()->checkoutCharge(1200, 'T-Shirt', 5);
});
```

> [!WARNING]
> When using the `checkoutCharge` method, Stripe will always create a new product and price in your Stripe dashboard. Therefore, we recommend that you create the products up front in your Stripe dashboard and use the `checkout` method instead.

<a name="subscription-checkouts"></a>
### Subscription Checkouts

> [!WARNING]
> Using Stripe Checkout for subscriptions requires you to enable the `customer.subscription.created` webhook in your Stripe dashboard. This webhook will create the subscription record in your database and store all of the relevant subscription items.

You may also use Stripe Checkout to initiate subscriptions. After defining your subscription with Cashier's subscription builder methods, you may call the `checkout `method. When a customer visits this route they will be redirected to Stripe's Checkout page:

```php
use Illuminate\Http\Request;

Route::get('/subscription-checkout', function (Request $request) {
    return $request->user()
        ->newSubscription('default', 'price_monthly')
        ->checkout();
});
```

Just as with product checkouts, you may customize the success and cancellation URLs:

```php
use Illuminate\Http\Request;

Route::get('/subscription-checkout', function (Request $request) {
    return $request->user()
        ->newSubscription('default', 'price_monthly')
        ->checkout([
            'success_url' => route('your-success-route'),
            'cancel_url' => route('your-cancel-route'),
        ]);
});
```

Of course, you can also enable promotion codes for subscription checkouts:

```php
use Illuminate\Http\Request;

Route::get('/subscription-checkout', function (Request $request) {
    return $request->user()
        ->newSubscription('default', 'price_monthly')
        ->allowPromotionCodes()
        ->checkout();
});
```

> [!WARNING]
> Unfortunately Stripe Checkout does not support all subscription billing options when starting subscriptions. Using the `anchorBillingCycleOn` method on the subscription builder, setting proration behavior, or setting payment behavior will not have any effect during Stripe Checkout sessions. Please consult [the Stripe Checkout Session API documentation](https://stripe.com/docs/api/checkout/sessions/create) to review which parameters are available.

<a name="stripe-checkout-trial-periods"></a>
#### Stripe Checkout and Trial Periods

Of course, you can define a trial period when building a subscription that will be completed using Stripe Checkout:

```php
$checkout = Auth::user()->newSubscription('default', 'price_monthly')
    ->trialDays(3)
    ->checkout();
```

However, the trial period must be at least 48 hours, which is the minimum amount of trial time supported by Stripe Checkout.

<a name="stripe-checkout-subscriptions-and-webhooks"></a>
#### Subscriptions and Webhooks

Remember, Stripe and Cashier update subscription statuses via webhooks, so there's a possibility a subscription might not yet be active when the customer returns to the application after entering their payment information. To handle this scenario, you may wish to display a message informing the user that their payment or subscription is pending.

<a name="collecting-tax-ids"></a>
### Collecting Tax IDs

Checkout also supports collecting a customer's Tax ID. To enable this on a checkout session, invoke the `collectTaxIds` method when creating the session:

```php
$checkout = $user->collectTaxIds()->checkout('price_tshirt');
```

When this method is invoked, a new checkbox will be available to the customer that allows them to indicate if they're purchasing as a company. If so, they will have the opportunity to provide their Tax ID number.

> [!WARNING]
> If you have already configured [automatic tax collection](#tax-configuration) in your application's service provider then this feature will be enabled automatically and there is no need to invoke the `collectTaxIds` method.

<a name="guest-checkouts"></a>
### Guest Checkouts

Using the `Checkout::guest` method, you may initiate checkout sessions for guests of your application that do not have an "account":

```php
use Illuminate\Http\Request;
use Laravel\Cashier\Checkout;

Route::get('/product-checkout', function (Request $request) {
    return Checkout::guest()->create('price_tshirt', [
        'success_url' => route('your-success-route'),
        'cancel_url' => route('your-cancel-route'),
    ]);
});
```

Similarly to when creating checkout sessions for existing users, you may utilize additional methods available on the `Laravel\Cashier\CheckoutBuilder` instance to customize the guest checkout session:

```php
use Illuminate\Http\Request;
use Laravel\Cashier\Checkout;

Route::get('/product-checkout', function (Request $request) {
    return Checkout::guest()
        ->withPromotionCode('promo-code')
        ->create('price_tshirt', [
            'success_url' => route('your-success-route'),
            'cancel_url' => route('your-cancel-route'),
        ]);
});
```

After a guest checkout has been completed, Stripe can dispatch a `checkout.session.completed` webhook event, so make sure to [configure your Stripe webhook](https://dashboard.stripe.com/webhooks) to actually send this event to your application. Once the webhook has been enabled within the Stripe dashboard, you may [handle the webhook with Cashier](#handling-stripe-webhooks). The object contained in the webhook payload will be a [checkout object](https://stripe.com/docs/api/checkout/sessions/object) that you may inspect in order to fulfill your customer's order.

<a name="handling-failed-payments"></a>
## Handling Failed Payments

Sometimes, payments for subscriptions or single charges can fail. When this happens, Cashier will throw an `Laravel\Cashier\Exceptions\IncompletePayment` exception that informs you that this happened. After catching this exception, you have two options on how to proceed.

First, you could redirect your customer to the dedicated payment confirmation page which is included with Cashier. This page already has an associated named route that is registered via Cashier's service provider. So, you may catch the `IncompletePayment` exception and redirect the user to the payment confirmation page:

```php
use Laravel\Cashier\Exceptions\IncompletePayment;

try {
    $subscription = $user->newSubscription('default', 'price_monthly')
        ->create($paymentMethod);
} catch (IncompletePayment $exception) {
    return redirect()->route(
        'cashier.payment',
        [$exception->payment->id, 'redirect' => route('home')]
    );
}
```

On the payment confirmation page, the customer will be prompted to enter their credit card information again and perform any additional actions required by Stripe, such as "3D Secure" confirmation. After confirming their payment, the user will be redirected to the URL provided by the `redirect` parameter specified above. Upon redirection, `message` (string) and `success` (integer) query string variables will be added to the URL. The payment page currently supports the following payment method types:

<div class="content-list" markdown="1">

- Credit Cards
- Alipay
- Bancontact
- BECS Direct Debit
- EPS
- Giropay
- iDEAL
- SEPA Direct Debit

</div>

Alternatively, you could allow Stripe to handle the payment confirmation for you. In this case, instead of redirecting to the payment confirmation page, you may [set up Stripe's automatic billing emails](https://dashboard.stripe.com/account/billing/automatic) in your Stripe dashboard. However, if an `IncompletePayment` exception is caught, you should still inform the user they will receive an email with further payment confirmation instructions.

Payment exceptions may be thrown for the following methods: `charge`, `invoiceFor`, and `invoice` on models using the `Billable` trait. When interacting with subscriptions, the `create` method on the `SubscriptionBuilder`, and the `incrementAndInvoice` and `swapAndInvoice` methods on the `Subscription` and `SubscriptionItem` models may throw incomplete payment exceptions.

Determining if an existing subscription has an incomplete payment may be accomplished using the `hasIncompletePayment` method on the billable model or a subscription instance:

```php
if ($user->hasIncompletePayment('default')) {
    // ...
}

if ($user->subscription('default')->hasIncompletePayment()) {
    // ...
}
```

You can derive the specific status of an incomplete payment by inspecting the `payment` property on the exception instance:

```php
use Laravel\Cashier\Exceptions\IncompletePayment;

try {
    $user->charge(1000, 'pm_card_threeDSecure2Required');
} catch (IncompletePayment $exception) {
    // Get the payment intent status...
    $exception->payment->status;

    // Check specific conditions...
    if ($exception->payment->requiresPaymentMethod()) {
        // ...
    } elseif ($exception->payment->requiresConfirmation()) {
        // ...
    }
}
```

<a name="confirming-payments"></a>
### Confirming Payments

Some payment methods require additional data in order to confirm payments. For example, SEPA payment methods require additional "mandate" data during the payment process. You may provide this data to Cashier using the `withPaymentConfirmationOptions` method:

```php
$subscription->withPaymentConfirmationOptions([
    'mandate_data' => '...',
])->swap('price_xxx');
```

You may consult the [Stripe API documentation](https://stripe.com/docs/api/payment_intents/confirm) to review all of the options accepted when confirming payments.

<a name="strong-customer-authentication"></a>
## Strong Customer Authentication

If your business or one of your customers is based in Europe you will need to abide by the EU's Strong Customer Authentication (SCA) regulations. These regulations were imposed in September 2019 by the European Union to prevent payment fraud. Luckily, Stripe and Cashier are prepared for building SCA compliant applications.

> [!WARNING]
> Before getting started, review [Stripe's guide on PSD2 and SCA](https://stripe.com/guides/strong-customer-authentication) as well as their [documentation on the new SCA APIs](https://stripe.com/docs/strong-customer-authentication).

<a name="payments-requiring-additional-confirmation"></a>
### Payments Requiring Additional Confirmation

SCA regulations often require extra verification in order to confirm and process a payment. When this happens, Cashier will throw a `Laravel\Cashier\Exceptions\IncompletePayment` exception that informs you that extra verification is needed. More information on how to handle these exceptions can be found in the documentation on [handling failed payments](#handling-failed-payments).

Payment confirmation screens presented by Stripe or Cashier may be tailored to a specific bank or card issuer's payment flow and can include additional card confirmation, a temporary small charge, separate device authentication, or other forms of verification.

<a name="incomplete-and-past-due-state"></a>
#### Incomplete and Past Due State

When a payment needs additional confirmation, the subscription will remain in an `incomplete` or `past_due` state as indicated by its `stripe_status` database column. Cashier will automatically activate the customer's subscription as soon as payment confirmation is complete and your application is notified by Stripe via webhook of its completion.

For more information on `incomplete` and `past_due` states, please refer to [our additional documentation on these states](#incomplete-and-past-due-status).

<a name="off-session-payment-notifications"></a>
### Off-Session Payment Notifications

Since SCA regulations require customers to occasionally verify their payment details even while their subscription is active, Cashier can send a notification to the customer when off-session payment confirmation is required. For example, this may occur when a subscription is renewing. Cashier's payment notification can be enabled by setting the `CASHIER_PAYMENT_NOTIFICATION` environment variable to a notification class. By default, this notification is disabled. Of course, Cashier includes a notification class you may use for this purpose, but you are free to provide your own notification class if desired:

```ini
CASHIER_PAYMENT_NOTIFICATION=Laravel\Cashier\Notifications\ConfirmPayment
```

To ensure that off-session payment confirmation notifications are delivered, verify that [Stripe webhooks are configured](#handling-stripe-webhooks) for your application and the `invoice.payment_action_required` webhook is enabled in your Stripe dashboard. In addition, your `Billable` model should also use Laravel's `Illuminate\Notifications\Notifiable` trait.

> [!WARNING]
> Notifications will be sent even when customers are manually making a payment that requires additional confirmation. Unfortunately, there is no way for Stripe to know that the payment was done manually or "off-session". But, a customer will simply see a "Payment Successful" message if they visit the payment page after already confirming their payment. The customer will not be allowed to accidentally confirm the same payment twice and incur an accidental second charge.

<a name="stripe-sdk"></a>
## Stripe SDK

Many of Cashier's objects are wrappers around Stripe SDK objects. If you would like to interact with the Stripe objects directly, you may conveniently retrieve them using the `asStripe` method:

```php
$stripeSubscription = $subscription->asStripeSubscription();

$stripeSubscription->application_fee_percent = 5;

$stripeSubscription->save();
```

You may also use the `updateStripeSubscription` method to update a Stripe subscription directly:

```php
$subscription->updateStripeSubscription(['application_fee_percent' => 5]);
```

You may invoke the `stripe` method on the `Cashier` class if you would like to use the `Stripe\StripeClient` client directly. For example, you could use this method to access the `StripeClient` instance and retrieve a list of prices from your Stripe account:

```php
use Laravel\Cashier\Cashier;

$prices = Cashier::stripe()->prices->all();
```

<a name="testing"></a>
## Testing

When testing an application that uses Cashier, you may mock the actual HTTP requests to the Stripe API; however, this requires you to partially re-implement Cashier's own behavior. Therefore, we recommend allowing your tests to hit the actual Stripe API. While this is slower, it provides more confidence that your application is working as expected and any slow tests may be placed within their own Pest / PHPUnit testing group.

When testing, remember that Cashier itself already has a great test suite, so you should only focus on testing the subscription and payment flow of your own application and not every underlying Cashier behavior.

To get started, add the **testing** version of your Stripe secret to your `phpunit.xml` file:

```xml
<env name="STRIPE_SECRET" value="sk_test_<your-key>"/>
```

Now, whenever you interact with Cashier while testing, it will send actual API requests to your Stripe testing environment. For convenience, you should pre-fill your Stripe testing account with subscriptions / prices that you may use during testing.

> [!NOTE]
> In order to test a variety of billing scenarios, such as credit card denials and failures, you may use the vast range of [testing card numbers and tokens](https://stripe.com/docs/testing) provided by Stripe.


---

# Blade Templates

*Sección: Laravel | Origen: https://laravel.com/docs/13.x/blade*

- [Introduction](#introduction)
    - [Supercharging Blade With Livewire](#supercharging-blade-with-livewire)
- [Displaying Data](#displaying-data)
    - [HTML Entity Encoding](#html-entity-encoding)
    - [Blade and JavaScript Frameworks](#blade-and-javascript-frameworks)
- [Blade Directives](#blade-directives)
    - [If Statements](#if-statements)
    - [Switch Statements](#switch-statements)
    - [Loops](#loops)
    - [The Loop Variable](#the-loop-variable)
    - [Conditional Classes](#conditional-classes)
    - [Additional Attributes](#additional-attributes)
    - [Including Subviews](#including-subviews)
    - [The `@once` Directive](#the-once-directive)
    - [Raw PHP](#raw-php)
    - [Fonts](#fonts)
    - [Comments](#comments)
- [Components](#components)
    - [Rendering Components](#rendering-components)
    - [Index Components](#index-components)
    - [Passing Data to Components](#passing-data-to-components)
    - [Component Attributes](#component-attributes)
    - [Reserved Keywords](#reserved-keywords)
    - [Slots](#slots)
    - [Inline Component Views](#inline-component-views)
    - [Dynamic Components](#dynamic-components)
    - [Manually Registering Components](#manually-registering-components)
- [Anonymous Components](#anonymous-components)
    - [Anonymous Index Components](#anonymous-index-components)
    - [Data Properties / Attributes](#data-properties-attributes)
    - [Accessing Parent Data](#accessing-parent-data)
    - [Anonymous Component Paths](#anonymous-component-paths)
- [Building Layouts](#building-layouts)
    - [Layouts Using Components](#layouts-using-components)
    - [Layouts Using Template Inheritance](#layouts-using-template-inheritance)
- [Forms](#forms)
    - [CSRF Field](#csrf-field)
    - [Method Field](#method-field)
    - [Validation Errors](#validation-errors)
- [Stacks](#stacks)
- [Service Injection](#service-injection)
- [Rendering Inline Blade Templates](#rendering-inline-blade-templates)
- [Rendering Blade Fragments](#rendering-blade-fragments)
- [Extending Blade](#extending-blade)
    - [Custom Echo Handlers](#custom-echo-handlers)
    - [Custom If Statements](#custom-if-statements)

<a name="introduction"></a>
## Introduction

Blade is the simple, yet powerful templating engine that is included with Laravel. Unlike some PHP templating engines, Blade does not restrict you from using plain PHP code in your templates. In fact, all Blade templates are compiled into plain PHP code and cached until they are modified, meaning Blade adds essentially zero overhead to your application. Blade template files use the `.blade.php` file extension and are typically stored in the `resources/views` directory.

Blade views may be returned from routes or controllers using the global `view` helper. Of course, as mentioned in the documentation on [views](/docs/{{version}}/views), data may be passed to the Blade view using the `view` helper's second argument:

```php
Route::get('/', function () {
    return view('greeting', ['name' => 'Finn']);
});
```

<a name="supercharging-blade-with-livewire"></a>
### Supercharging Blade With Livewire

Want to take your Blade templates to the next level and build dynamic interfaces with ease? Check out [Laravel Livewire](https://livewire.laravel.com). Livewire allows you to write Blade components that are augmented with dynamic functionality that would typically only be possible via frontend frameworks like React, Svelte, or Vue, providing a great approach to building modern, reactive frontends without the complexities, client-side rendering, or build steps of many JavaScript frameworks.

<a name="displaying-data"></a>
## Displaying Data

You may display data that is passed to your Blade views by wrapping the variable in curly braces. For example, given the following route:

```php
Route::get('/', function () {
    return view('welcome', ['name' => 'Samantha']);
});
```

You may display the contents of the `name` variable like so:

```blade
Hello, {{ $name }}.
```

> [!NOTE]
> Blade's `{{ }}` echo statements are automatically sent through PHP's `htmlspecialchars` function to prevent XSS attacks.

You are not limited to displaying the contents of the variables passed to the view. You may also echo the results of any PHP function. In fact, you can put any PHP code you wish inside of a Blade echo statement:

```blade
The current UNIX timestamp is {{ time() }}.
```

<a name="html-entity-encoding"></a>
### HTML Entity Encoding

By default, Blade (and the Laravel `e` function) will double encode HTML entities. If you would like to disable double encoding, call the `Blade::withoutDoubleEncoding` method from the `boot` method of your `AppServiceProvider`:

```php
<?php

namespace App\Providers;

use Illuminate\Support\Facades\Blade;
use Illuminate\Support\ServiceProvider;

class AppServiceProvider extends ServiceProvider
{
    /**
     * Bootstrap any application services.
     */
    public function boot(): void
    {
        Blade::withoutDoubleEncoding();
    }
}
```

<a name="displaying-unescaped-data"></a>
#### Displaying Unescaped Data

By default, Blade `{{ }}` statements are automatically sent through PHP's `htmlspecialchars` function to prevent XSS attacks. If you do not want your data to be escaped, you may use the following syntax:

```blade
Hello, {!! $name !!}.
```

> [!WARNING]
> Be very careful when echoing content that is supplied by users of your application. You should typically use the escaped, double curly brace syntax to prevent XSS attacks when displaying user supplied data.

<a name="blade-and-javascript-frameworks"></a>
### Blade and JavaScript Frameworks

Since many JavaScript frameworks also use "curly" braces to indicate a given expression should be displayed in the browser, you may use the `@` symbol to inform the Blade rendering engine an expression should remain untouched. For example:

```blade
<h1>Laravel</h1>

Hello, @{{ name }}.
```

In this example, the `@` symbol will be removed by Blade; however, the `{{ name }}` expression will remain untouched by the Blade engine, allowing it to be rendered by your JavaScript framework.

The `@` symbol may also be used to escape Blade directives:

```blade
{{-- Blade template --}}
@@if()

<!-- HTML output -->
@if()
```

<a name="rendering-json"></a>
#### Rendering JSON

Sometimes you may pass an array to your view with the intention of rendering it as JSON in order to initialize a JavaScript variable. For example:

```php
<script>
    var app = <?php echo json_encode($array); ?>;
</script>
```

However, instead of manually calling `json_encode`, you may use the `Illuminate\Support\Js::from` method. The `from` method accepts the same arguments as PHP's `json_encode` function; however, it will ensure that the resulting JSON has been properly escaped for inclusion within HTML quotes. The `from` method will return a string `JSON.parse` JavaScript statement that will convert the given object or array into a valid JavaScript object:

```blade
<script>
    var app = {{ Illuminate\Support\Js::from($array) }};
</script>
```

The latest versions of the Laravel application skeleton include a `Js` facade, which provides convenient access to this functionality within your Blade templates:

```blade
<script>
    var app = {{ Js::from($array) }};
</script>
```

> [!WARNING]
> You should only use the `Js::from` method to render existing variables as JSON. The Blade templating is based on regular expressions and attempts to pass a complex expression to the directive may cause unexpected failures.

<a name="the-at-verbatim-directive"></a>
#### The `@verbatim` Directive

If you are displaying JavaScript variables in a large portion of your template, you may wrap the HTML in the `@verbatim` directive so that you do not have to prefix each Blade echo statement with an `@` symbol:

```blade
@verbatim
    <div class="container">
        Hello, {{ name }}.
    </div>
@endverbatim
```

<a name="blade-directives"></a>
## Blade Directives

In addition to template inheritance and displaying data, Blade also provides convenient shortcuts for common PHP control structures, such as conditional statements and loops. These shortcuts provide a very clean, terse way of working with PHP control structures while also remaining familiar to their PHP counterparts.

<a name="if-statements"></a>
### If Statements

You may construct `if` statements using the `@if`, `@elseif`, `@else`, and `@endif` directives. These directives function identically to their PHP counterparts:

```blade
@if (count($records) === 1)
    I have one record!
@elseif (count($records) > 1)
    I have multiple records!
@else
    I don't have any records!
@endif
```

For convenience, Blade also provides an `@unless` directive:

```blade
@unless (Auth::check())
    You are not signed in.
@endunless
```

In addition to the conditional directives already discussed, the `@isset` and `@empty` directives may be used as convenient shortcuts for their respective PHP functions:

```blade
@isset($records)
    // $records is defined and is not null...
@endisset

@empty($records)
    // $records is "empty"...
@endempty
```

<a name="authentication-directives"></a>
#### Authentication Directives

The `@auth` and `@guest` directives may be used to quickly determine if the current user is [authenticated](/docs/{{version}}/authentication) or is a guest:

```blade
@auth
    // The user is authenticated...
@endauth

@guest
    // The user is not authenticated...
@endguest
```

If needed, you may specify the authentication guard that should be checked when using the `@auth` and `@guest` directives:

```blade
@auth('admin')
    // The user is authenticated...
@endauth

@guest('admin')
    // The user is not authenticated...
@endguest
```

<a name="environment-directives"></a>
#### Environment Directives

You may check if the application is running in the production environment using the `@production` directive:

```blade
@production
    // Production specific content...
@endproduction
```

Or, you may determine if the application is running in a specific environment using the `@env` directive:

```blade
@env('staging')
    // The application is running in "staging"...
@endenv

@env(['staging', 'production'])
    // The application is running in "staging" or "production"...
@endenv
```

<a name="section-directives"></a>
#### Section Directives

You may determine if a template inheritance section has content using the `@hasSection` directive:

```blade
@hasSection('navigation')
    <div class="pull-right">
        @yield('navigation')
    </div>

    <div class="clearfix"></div>
@endif
```

You may use the `sectionMissing` directive to determine if a section does not have content:

```blade
@sectionMissing('navigation')
    <div class="pull-right">
        @include('default-navigation')
    </div>
@endif
```

<a name="session-directives"></a>
#### Session Directives

The `@session` directive may be used to determine if a [session](/docs/{{version}}/session) value exists. If the session value exists, the template contents within the `@session` and `@endsession` directives will be evaluated. Within the `@session` directive's contents, you may echo the `$value` variable to display the session value:

```blade
@session('status')
    <div class="p-4 bg-green-100">
        {{ $value }}
    </div>
@endsession
```

<a name="context-directives"></a>
#### Context Directives

The `@context` directive may be used to determine if a [context](/docs/{{version}}/context) value exists. If the context value exists, the template contents within the `@context` and `@endcontext` directives will be evaluated. Within the `@context` directive's contents, you may echo the `$value` variable to display the context value:

```blade
@context('canonical')
    <link href="{{ $value }}" rel="canonical">
@endcontext
```

<a name="switch-statements"></a>
### Switch Statements

Switch statements can be constructed using the `@switch`, `@case`, `@break`, `@default` and `@endswitch` directives:

```blade
@switch($i)
    @case(1)
        First case...
        @break

    @case(2)
        Second case...
        @break

    @default
        Default case...
@endswitch
```

<a name="loops"></a>
### Loops

In addition to conditional statements, Blade provides simple directives for working with PHP's loop structures. Again, each of these directives functions identically to their PHP counterparts:

```blade
@for ($i = 0; $i < 10; $i++)
    The current value is {{ $i }}
@endfor

@foreach ($users as $user)
    <p>This is user {{ $user->id }}</p>
@endforeach

@forelse ($users as $user)
    <li>{{ $user->name }}</li>
@empty
    <p>No users</p>
@endforelse

@while (true)
    <p>I'm looping forever.</p>
@endwhile
```

> [!NOTE]
> While iterating through a `foreach` loop, you may use the [loop variable](#the-loop-variable) to gain valuable information about the loop, such as whether you are in the first or last iteration through the loop.

When using loops you may also skip the current iteration or end the loop using the `@continue` and `@break` directives:

```blade
@foreach ($users as $user)
    @if ($user->type == 1)
        @continue
    @endif

    <li>{{ $user->name }}</li>

    @if ($user->number == 5)
        @break
    @endif
@endforeach
```

You may also include the continuation or break condition within the directive declaration:

```blade
@foreach ($users as $user)
    @continue($user->type == 1)

    <li>{{ $user->name }}</li>

    @break($user->number == 5)
@endforeach
```

<a name="the-loop-variable"></a>
### The Loop Variable

While iterating through a `foreach` loop, a `$loop` variable will be available inside of your loop. This variable provides access to some useful bits of information such as the current loop index and whether this is the first or last iteration through the loop:

```blade
@foreach ($users as $user)
    @if ($loop->first)
        This is the first iteration.
    @endif

    @if ($loop->last)
        This is the last iteration.
    @endif

    <p>This is user {{ $user->id }}</p>
@endforeach
```

If you are in a nested loop, you may access the parent loop's `$loop` variable via the `parent` property:

```blade
@foreach ($users as $user)
    @foreach ($user->posts as $post)
        @if ($loop->parent->first)
            This is the first iteration of the parent loop.
        @endif
    @endforeach
@endforeach
```

The `$loop` variable also contains a variety of other useful properties:

<div class="overflow-auto">

| Property           | Description                                            |
| ------------------ | ------------------------------------------------------ |
| `$loop->index`     | The index of the current loop iteration (starts at 0). |
| `$loop->iteration` | The current loop iteration (starts at 1).              |
| `$loop->remaining` | The iterations remaining in the loop.                  |
| `$loop->count`     | The total number of items in the array being iterated. |
| `$loop->first`     | Whether this is the first iteration through the loop.  |
| `$loop->last`      | Whether this is the last iteration through the loop.   |
| `$loop->even`      | Whether this is an even iteration through the loop.    |
| `$loop->odd`       | Whether this is an odd iteration through the loop.     |
| `$loop->depth`     | The nesting level of the current loop.                 |
| `$loop->parent`    | When in a nested loop, the parent's loop variable.     |

</div>

<a name="conditional-classes"></a>
### Conditional Classes & Styles

The `@class` directive conditionally compiles a CSS class string. The directive accepts an array of classes where the array key contains the class or classes you wish to add, while the value is a boolean expression. If the array element has a numeric key, it will always be included in the rendered class list:

```blade
@php
    $isActive = false;
    $hasError = true;
@endphp

<span @class([
    'p-4',
    'font-bold' => $isActive,
    'text-gray-500' => ! $isActive,
    'bg-red' => $hasError,
])></span>

<span class="p-4 text-gray-500 bg-red"></span>
```

Likewise, the `@style` directive may be used to conditionally add inline CSS styles to an HTML element:

```blade
@php
    $isActive = true;
@endphp

<span @style([
    'background-color: red',
    'font-weight: bold' => $isActive,
])></span>

<span style="background-color: red; font-weight: bold;"></span>
```

<a name="additional-attributes"></a>
### Additional Attributes

For convenience, you may use the `@checked` directive to easily indicate if a given HTML checkbox input is "checked". This directive will echo `checked` if the provided condition evaluates to `true`:

```blade
<input
    type="checkbox"
    name="active"
    value="active"
    @checked(old('active', $user->active))
/>
```

Likewise, the `@selected` directive may be used to indicate if a given select option should be "selected":

```blade
<select name="version">
    @foreach ($product->versions as $version)
        <option value="{{ $version }}" @selected(old('version') == $version)>
            {{ $version }}
        </option>
    @endforeach
</select>
```

Additionally, the `@disabled` directive may be used to indicate if a given element should be "disabled":

```blade
<button type="submit" @disabled($errors->isNotEmpty())>Submit</button>
```

Moreover, the `@readonly` directive may be used to indicate if a given element should be "readonly":

```blade
<input
    type="email"
    name="email"
    value="email@laravel.com"
    @readonly($user->isNotAdmin())
/>
```

In addition, the `@required` directive may be used to indicate if a given element should be "required":

```blade
<input
    type="text"
    name="title"
    value="title"
    @required($user->isAdmin())
/>
```

<a name="including-subviews"></a>
### Including Subviews

> [!NOTE]
> While you're free to use the `@include` directive, Blade [components](#components) provide similar functionality and offer several benefits over the `@include` directive such as data and attribute binding.

Blade's `@include` directive allows you to include a Blade view from within another view. All variables that are available to the parent view will be made available to the included view:

```blade
<div>
    @include('shared.errors')

    <form>
        <!-- Form Contents -->
    </form>
</div>
```

Even though the included view will inherit all data available in the parent view, you may also pass an array of additional data that should be made available to the included view:

```blade
@include('view.name', ['status' => 'complete'])
```

If you attempt to `@include` a view which does not exist, Laravel will throw an error. If you would like to include a view that may or may not be present, you should use the `@includeIf` directive:

```blade
@includeIf('view.name', ['status' => 'complete'])
```

If you would like to `@include` a view if a given boolean expression evaluates to `true` or `false`, you may use the `@includeWhen` and `@includeUnless` directives:

```blade
@includeWhen($boolean, 'view.name', ['status' => 'complete'])

@includeUnless($boolean, 'view.name', ['status' => 'complete'])
```

To include the first view that exists from a given array of views, you may use the `includeFirst` directive:

```blade
@includeFirst(['custom.admin', 'admin'], ['status' => 'complete'])
```

If you would like to include a view without inheriting any variables from the parent view, you may use the `@includeIsolated` directive. The included view will only have access to variables you explicitly pass:

```blade
@includeIsolated('view.name', ['user' => $user])
```

> [!WARNING]
> You should avoid using the `__DIR__` and `__FILE__` constants in your Blade views, since they will refer to the location of the cached, compiled view.

<a name="rendering-views-for-collections"></a>
#### Rendering Views for Collections

You may combine loops and includes into one line with Blade's `@each` directive:

```blade
@each('view.name', $jobs, 'job')
```

The `@each` directive's first argument is the view to render for each element in the array or collection. The second argument is the array or collection you wish to iterate over, while the third argument is the variable name that will be assigned to the current iteration within the view. So, for example, if you are iterating over an array of `jobs`, typically you will want to access each job as a `job` variable within the view. The array key for the current iteration will be available as the `key` variable within the view.

You may also pass a fourth argument to the `@each` directive. This argument determines the view that will be rendered if the given array is empty.

```blade
@each('view.name', $jobs, 'job', 'view.empty')
```

> [!WARNING]
> Views rendered via `@each` do not inherit the variables from the parent view. If the child view requires these variables, you should use the `@foreach` and `@include` directives instead.

<a name="the-once-directive"></a>
### The `@once` Directive

The `@once` directive allows you to define a portion of the template that will only be evaluated once per rendering cycle. This may be useful for pushing a given piece of JavaScript into the page's header using [stacks](#stacks). For example, if you are rendering a given [component](#components) within a loop, you may wish to only push the JavaScript to the header the first time the component is rendered:

```blade
@once
    @push('scripts')
        <script>
            // Your custom JavaScript...
        </script>
    @endpush
@endonce
```

Since the `@once` directive is often used in conjunction with the `@push` or `@prepend` directives, the `@pushOnce` and `@prependOnce` directives are available for your convenience:

```blade
@pushOnce('scripts')
    <script>
        // Your custom JavaScript...
    </script>
@endPushOnce
```

If you are pushing duplicate content from two separate Blade templates, you should provide a unique identifier as the second argument to the `@pushOnce` directive to ensure the content is only rendered once:

```blade
<!-- pie-chart.blade.php -->
@pushOnce('scripts', 'chart.js')
    <script src="/chart.js"></script>
@endPushOnce

<!-- line-chart.blade.php -->
@pushOnce('scripts', 'chart.js')
    <script src="/chart.js"></script>
@endPushOnce
```

<a name="raw-php"></a>
### Raw PHP

In some situations, it's useful to embed PHP code into your views. You can use the Blade `@php` directive to execute a block of plain PHP within your template:

```blade
@php
    $counter = 1;
@endphp
```

Or, if you only need to use PHP to import a class, you may use the `@use` directive:

```blade
@use('App\Models\Flight')
```

A second argument may be provided to the `@use` directive to alias the imported class:

```blade
@use('App\Models\Flight', 'FlightModel')
```

If you have multiple classes within the same namespace, you may group the imports of those classes:

```blade
@use('App\Models\{Flight, Airport}')
```

The `@use` directive also supports importing PHP functions and constants by prefixing the import path with the `function` or `const` modifiers:

```blade
@use(function App\Helpers\format_currency)
@use(const App\Constants\MAX_ATTEMPTS)
```

Just like class imports, aliases are supported for functions and constants as well:

```blade
@use(function App\Helpers\format_currency, 'formatMoney')
@use(const App\Constants\MAX_ATTEMPTS, 'MAX_TRIES')
```

Grouped imports are also supported with both function and const modifiers, allowing you to import multiple symbols from the same namespace in a single directive:

```blade
@use(function App\Helpers\{format_currency, format_date})
@use(const App\Constants\{MAX_ATTEMPTS, DEFAULT_TIMEOUT})
```

<a name="fonts"></a>
### Fonts

When using [Laravel's Vite font optimization](/docs/{{version}}/vite#working-with-fonts), you may use the `@fonts` directive to render your configured font preload links and inline font CSS in your application's layout:

```blade
<!doctype html>
<head>
    {{-- ... --}}

    @fonts
    @vite('resources/js/app.js')
</head>
```

The `@fonts` directive renders all font families configured in your `vite.config.js` file. The directive should typically be placed in the `<head>` of your application's root layout before any content that uses those fonts.

If a page only needs some of your configured fonts, you may pass one or more font aliases to the directive:

```blade
{{-- Load a single font alias... --}}
@fonts('sans')

{{-- Load multiple font aliases... --}}
@fonts(['sans', 'mono'])
```

Font aliases are configured using the `alias` option when defining fonts in your Vite configuration. The `@fonts` directive calls the `fonts` method provided by the `Vite` facade, which may also be invoked directly:

```blade
{{ Vite::fonts(['sans', 'mono']) }}
```

<a name="comments"></a>
### Comments

Blade also allows you to define comments in your views. However, unlike HTML comments, Blade comments are not included in the HTML returned by your application:

```blade
{{-- This comment will not be present in the rendered HTML --}}
```

<a name="components"></a>
## Components

Components and slots provide similar benefits to sections, layouts, and includes; however, some may find the mental model of components and slots easier to understand. There are two approaches to writing components: class-based components and anonymous components.

To create a class-based component, you may use the `make:component` Artisan command. To illustrate how to use components, we will create a simple `Alert` component. The `make:component` command will place the component in the `app/View/Components` directory:

```shell
php artisan make:component Alert
```

The `make:component` command will also create a view template for the component. The view will be placed in the `resources/views/components` directory. When writing components for your own application, components are automatically discovered within the `app/View/Components` directory and `resources/views/components` directory, so no further component registration is typically required.

You may also create components within subdirectories:

```shell
php artisan make:component Forms/Input
```

The command above will create an `Input` component in the `app/View/Components/Forms` directory and the view will be placed in the `resources/views/components/forms` directory.

<a name="manually-registering-package-components"></a>
#### Manually Registering Package Components

When writing components for your own application, components are automatically discovered within the `app/View/Components` directory and `resources/views/components` directory.

However, if you are building a package that utilizes Blade components, you will need to manually register your component class and its HTML tag alias. You should typically register your components in the `boot` method of your package's service provider:

```php
use Illuminate\Support\Facades\Blade;

/**
 * Bootstrap your package's services.
 */
public function boot(): void
{
    Blade::component('package-alert', Alert::class);
}
```

Once your component has been registered, it may be rendered using its tag alias:

```blade
<x-package-alert/>
```

Alternatively, you may use the `componentNamespace` method to autoload component classes by convention. For example, a `Nightshade` package might have `Calendar` and `ColorPicker` components that reside within the `Package\Views\Components` namespace:

```php
use Illuminate\Support\Facades\Blade;

/**
 * Bootstrap your package's services.
 */
public function boot(): void
{
    Blade::componentNamespace('Nightshade\\Views\\Components', 'nightshade');
}
```

This will allow the usage of package components by their vendor namespace using the `package-name::` syntax:

```blade
<x-nightshade::calendar />
<x-nightshade::color-picker />
```

Blade will automatically detect the class that's linked to this component by pascal-casing the component name. Subdirectories are also supported using "dot" notation.

<a name="rendering-components"></a>
### Rendering Components

To display a component, you may use a Blade component tag within one of your Blade templates. Blade component tags start with the string `x-` followed by the kebab case name of the component class:

```blade
<x-alert/>

<x-user-profile/>
```

If the component class is nested deeper within the `app/View/Components` directory, you may use the `.` character to indicate directory nesting. For example, if we assume a component is located at `app/View/Components/Inputs/Button.php`, we may render it like so:

```blade
<x-inputs.button/>
```

If you would like to conditionally render your component, you may define a `shouldRender` method on your component class. If the `shouldRender` method returns `false` the component will not be rendered:

```php
use Illuminate\Support\Str;

/**
 * Whether the component should be rendered
 */
public function shouldRender(): bool
{
    return Str::length($this->message) > 0;
}
```

<a name="index-components"></a>
### Index Components

Sometimes components are part of a component group and you may wish to group the related components within a single directory. For example, imagine a "card" component with the following class structure:

```text
App\Views\Components\Card\Card
App\Views\Components\Card\Header
App\Views\Components\Card\Body
```

Since the root `Card` component is nested within a `Card` directory, you might expect that you would need to render the component via `<x-card.card>`. However, when a component's file name matches the name of the component's directory, Laravel automatically assumes that component is the "root" component and allows you to render the component without repeating the directory name:

```blade
<x-card>
    <x-card.header>...</x-card.header>
    <x-card.body>...</x-card.body>
</x-card>
```

<a name="passing-data-to-components"></a>
### Passing Data to Components

You may pass data to Blade components using HTML attributes. Hard-coded, primitive values may be passed to the component using simple HTML attribute strings. PHP expressions and variables should be passed to the component via attributes that use the `:` character as a prefix:

```blade
<x-alert type="error" :message="$message"/>
```

You should define all of the component's data attributes in its class constructor. All public properties on a component will automatically be made available to the component's view. It is not necessary to pass the data to the view from the component's `render` method:

```php
<?php

namespace App\View\Components;

use Illuminate\View\Component;
use Illuminate\View\View;

class Alert extends Component
{
    /**
     * Create the component instance.
     */
    public function __construct(
        public string $type,
        public string $message,
    ) {}

    /**
     * Get the view / contents that represent the component.
     */
    public function render(): View
    {
        return view('components.alert');
    }
}
```

When your component is rendered, you may display the contents of your component's public variables by echoing the variables by name:

```blade
<div class="alert alert-{{ $type }}">
    {{ $message }}
</div>
```

<a name="casing"></a>
#### Casing

Component constructor arguments should be specified using `camelCase`, while `kebab-case` should be used when referencing the argument names in your HTML attributes. For example, given the following component constructor:

```php
/**
 * Create the component instance.
 */
public function __construct(
    public string $alertType,
) {}
```

The `$alertType` argument may be provided to the component like so:

```blade
<x-alert alert-type="danger" />
```

<a name="short-attribute-syntax"></a>
#### Short Attribute Syntax

When passing attributes to components, you may also use a "short attribute" syntax. This is often convenient since attribute names frequently match the variable names they correspond to:

```blade
{{-- Short attribute syntax... --}}
<x-profile :$userId :$name />

{{-- Is equivalent to... --}}
<x-profile :user-id="$userId" :name="$name" />
```

<a name="escaping-attribute-rendering"></a>
#### Escaping Attribute Rendering

Since some JavaScript frameworks such as Alpine.js also use colon-prefixed attributes, you may use a double colon (`::`) prefix to inform Blade that the attribute is not a PHP expression. For example, given the following component:

```blade
<x-button ::class="{ danger: isDeleting }">
    Submit
</x-button>
```

The following HTML will be rendered by Blade:

```blade
<button :class="{ danger: isDeleting }">
    Submit
</button>
```

<a name="component-methods"></a>
#### Component Methods

In addition to public variables being available to your component template, any public methods on the component may be invoked. For example, imagine a component that has an `isSelected` method:

```php
/**
 * Determine if the given option is the currently selected option.
 */
public function isSelected(string $option): bool
{
    return $option === $this->selected;
}
```

You may execute this method from your component template by invoking the variable matching the name of the method:

```blade
<option {{ $isSelected($value) ? 'selected' : '' }} value="{{ $value }}">
    {{ $label }}
</option>
```

<a name="using-attributes-slots-within-component-class"></a>
#### Accessing Attributes and Slots Within Component Classes

Blade components also allow you to access the component name, attributes, and slot inside the class's render method. However, in order to access this data, you should return a closure from your component's `render` method:

```php
use Closure;

/**
 * Get the view / contents that represent the component.
 */
public function render(): Closure
{
    return function () {
        return '<div {{ $attributes }}>Components content</div>';
    };
}
```

The closure returned by your component's `render` method may also receive a `$data` array as its only argument. This array will contain several elements that provide information about the component:

```php
return function (array $data) {
    // $data['componentName'];
    // $data['attributes'];
    // $data['slot'];

    return '<div {{ $attributes }}>Components content</div>';
}
```

> [!WARNING]
> The elements in the `$data` array should never be directly embedded into the Blade string returned by your `render` method, as doing so could allow remote code execution via malicious attribute content.

The `componentName` is equal to the name used in the HTML tag after the `x-` prefix. So `<x-alert />`'s `componentName` will be `alert`. The `attributes` element will contain all of the attributes that were present on the HTML tag. The `slot` element is an `Illuminate\Support\HtmlString` instance with the contents of the component's slot.

The closure should return a string. If the returned string corresponds to an existing view, that view will be rendered; otherwise, the returned string will be evaluated as an inline Blade view.

<a name="additional-dependencies"></a>
#### Additional Dependencies

If your component requires dependencies from Laravel's [service container](/docs/{{version}}/container), you may list them before any of the component's data attributes and they will automatically be injected by the container:

```php
use App\Services\AlertCreator;

/**
 * Create the component instance.
 */
public function __construct(
    public AlertCreator $creator,
    public string $type,
    public string $message,
) {}
```

<a name="hiding-attributes-and-methods"></a>
#### Hiding Attributes / Methods

If you would like to prevent some public methods or properties from being exposed as variables to your component template, you may add them to an `$except` array property on your component:

```php
<?php

namespace App\View\Components;

use Illuminate\View\Component;

class Alert extends Component
{
    /**
     * The properties / methods that should not be exposed to the component template.
     *
     * @var array
     */
    protected $except = ['type'];

    /**
     * Create the component instance.
     */
    public function __construct(
        public string $type,
    ) {}
}
```

<a name="component-attributes"></a>
### Component Attributes

We've already examined how to pass data attributes to a component; however, sometimes you may need to specify additional HTML attributes, such as `class`, that are not part of the data required for a component to function. Typically, you want to pass these additional attributes down to the root element of the component template. For example, imagine we want to render an `alert` component like so:

```blade
<x-alert type="error" :message="$message" class="mt-4"/>
```

All of the attributes that are not part of the component's constructor will automatically be added to the component's "attribute bag". This attribute bag is automatically made available to the component via the `$attributes` variable. All of the attributes may be rendered within the component by echoing this variable:

```blade
<div {{ $attributes }}>
    <!-- Component content -->
</div>
```

> [!WARNING]
> Using directives such as `@env` within component tags is not supported at this time. For example, `<x-alert :live="@env('production')"/>` will not be compiled.

<a name="default-merged-attributes"></a>
#### Default / Merged Attributes

Sometimes you may need to specify default values for attributes or merge additional values into some of the component's attributes. To accomplish this, you may use the attribute bag's `merge` method. This method is particularly useful for defining a set of default CSS classes that should always be applied to a component:

```blade
<div {{ $attributes->merge(['class' => 'alert alert-'.$type]) }}>
    {{ $message }}
</div>
```

If we assume this component is utilized like so:

```blade
<x-alert type="error" :message="$message" class="mb-4"/>
```

The final, rendered HTML of the component will appear like the following:

```blade
<div class="alert alert-error mb-4">
    <!-- Contents of the $message variable -->
</div>
```

<a name="conditionally-merge-classes"></a>
#### Conditionally Merge Classes

Sometimes you may wish to merge classes if a given condition is `true`. You can accomplish this via the `class` method, which accepts an array of classes where the array key contains the class or classes you wish to add, while the value is a boolean expression. If the array element has a numeric key, it will always be included in the rendered class list:

```blade
<div {{ $attributes->class(['p-4', 'bg-red' => $hasError]) }}>
    {{ $message }}
</div>
```

If you need to merge other attributes onto your component, you can chain the `merge` method onto the `class` method:

```blade
<button {{ $attributes->class(['p-4'])->merge(['type' => 'button']) }}>
    {{ $slot }}
</button>
```

> [!NOTE]
> If you need to conditionally compile classes on other HTML elements that shouldn't receive merged attributes, you can use the [@class directive](#conditional-classes).

<a name="non-class-attribute-merging"></a>
#### Non-Class Attribute Merging

When merging attributes that are not `class` attributes, the values provided to the `merge` method will be considered the "default" values of the attribute. However, unlike the `class` attribute, these attributes will not be merged with injected attribute values. Instead, they will be overwritten. For example, a `button` component's implementation may look like the following:

```blade
<button {{ $attributes->merge(['type' => 'button']) }}>
    {{ $slot }}
</button>
```

To render the button component with a custom `type`, it may be specified when consuming the component. If no type is specified, the `button` type will be used:

```blade
<x-button type="submit">
    Submit
</x-button>
```

The rendered HTML of the `button` component in this example would be:

```blade
<button type="submit">
    Submit
</button>
```

If you would like an attribute other than `class` to have its default value and injected values joined together, you may use the `prepends` method. In this example, the `data-controller` attribute will always begin with `profile-controller` and any additional injected `data-controller` values will be placed after this default value:

```blade
<div {{ $attributes->merge(['data-controller' => $attributes->prepends('profile-controller')]) }}>
    {{ $slot }}
</div>
```

<a name="filtering-attributes"></a>
#### Retrieving and Filtering Attributes

You may filter attributes using the `filter` method. This method accepts a closure which should return `true` if you wish to retain the attribute in the attribute bag:

```blade
{{ $attributes->filter(fn (string $value, string $key) => $key == 'foo') }}
```

For convenience, you may use the `whereStartsWith` method to retrieve all attributes whose keys begin with a given string:

```blade
{{ $attributes->whereStartsWith('wire:model') }}
```

Conversely, the `whereDoesntStartWith` method may be used to exclude all attributes whose keys begin with a given string:

```blade
{{ $attributes->whereDoesntStartWith('wire:model') }}
```

Using the `first` method, you may render the first attribute in a given attribute bag:

```blade
{{ $attributes->whereStartsWith('wire:model')->first() }}
```

If you would like to check if an attribute is present on the component, you may use the `has` method. This method accepts the attribute name as its only argument and returns a boolean indicating whether or not the attribute is present:

```blade
@if ($attributes->has('class'))
    <div>Class attribute is present</div>
@endif
```

If an array is passed to the `has` method, the method will determine if all of the given attributes are present on the component:

```blade
@if ($attributes->has(['name', 'class']))
    <div>All of the attributes are present</div>
@endif
```

The `hasAny` method may be used to determine if any of the given attributes are present on the component:

```blade
@if ($attributes->hasAny(['href', ':href', 'v-bind:href']))
    <div>One of the attributes is present</div>
@endif
```

You may retrieve a specific attribute's value using the `get` method:

```blade
{{ $attributes->get('class') }}
```

The `only` method may be used to retrieve only the attributes with the given keys:

```blade
{{ $attributes->only(['class']) }}
```

The `except` method may be used to retrieve all attributes except those with the given keys:

```blade
{{ $attributes->except(['class']) }}
```

<a name="reserved-keywords"></a>
### Reserved Keywords

By default, some keywords are reserved for Blade's internal use in order to render components. The following keywords cannot be defined as public properties or method names within your components:

<div class="content-list" markdown="1">

- `data`
- `render`
- `resolve`
- `resolveView`
- `shouldRender`
- `view`
- `withAttributes`
- `withName`

</div>

<a name="slots"></a>
### Slots

You will often need to pass additional content to your component via "slots". Component slots are rendered by echoing the `$slot` variable. To explore this concept, let's imagine that an `alert` component has the following markup:

```blade
<!-- /resources/views/components/alert.blade.php -->

<div class="alert alert-danger">
    {{ $slot }}
</div>
```

We may pass content to the `slot` by injecting content into the component:

```blade
<x-alert>
    <strong>Whoops!</strong> Something went wrong!
</x-alert>
```

Sometimes a component may need to render multiple different slots in different locations within the component. Let's modify our alert component to allow for the injection of a "title" slot:

```blade
<!-- /resources/views/components/alert.blade.php -->

<span class="alert-title">{{ $title }}</span>

<div class="alert alert-danger">
    {{ $slot }}
</div>
```

You may define the content of the named slot using the `x-slot` tag. Any content not within an explicit `x-slot` tag will be passed to the component in the `$slot` variable:

```xml
<x-alert>
    <x-slot:title>
        Server Error
    </x-slot>

    <strong>Whoops!</strong> Something went wrong!
</x-alert>
```

You may invoke a slot's `isEmpty` method to determine if the slot contains content:

```blade
<span class="alert-title">{{ $title }}</span>

<div class="alert alert-danger">
    @if ($slot->isEmpty())
        This is default content if the slot is empty.
    @else
        {{ $slot }}
    @endif
</div>
```

Additionally, the `hasActualContent` method may be used to determine if the slot contains any "actual" content that is not an HTML comment:

```blade
@if ($slot->hasActualContent())
    The scope has non-comment content.
@endif
```

<a name="scoped-slots"></a>
#### Scoped Slots

If you have used a JavaScript framework such as Vue, you may be familiar with "scoped slots", which allow you to access data or methods from the component within your slot. You may achieve similar behavior in Laravel by defining public methods or properties on your component and accessing the component within your slot via the `$component` variable. In this example, we will assume that the `x-alert` component has a public `formatAlert` method defined on its component class:

```blade
<x-alert>
    <x-slot:title>
        {{ $component->formatAlert('Server Error') }}
    </x-slot>

    <strong>Whoops!</strong> Something went wrong!
</x-alert>
```

<a name="slot-attributes"></a>
#### Slot Attributes

Like Blade components, you may assign additional [attributes](#component-attributes) to slots such as CSS class names:

```xml
<x-card class="shadow-sm">
    <x-slot:heading class="font-bold">
        Heading
    </x-slot>

    Content

    <x-slot:footer class="text-sm">
        Footer
    </x-slot>
</x-card>
```

To interact with slot attributes, you may access the `attributes` property of the slot's variable. For more information on how to interact with attributes, please consult the documentation on [component attributes](#component-attributes):

```blade
@props([
    'heading',
    'footer',
])

<div {{ $attributes->class(['border']) }}>
    <h1 {{ $heading->attributes->class(['text-lg']) }}>
        {{ $heading }}
    </h1>

    {{ $slot }}

    <footer {{ $footer->attributes->class(['text-gray-700']) }}>
        {{ $footer }}
    </footer>
</div>
```

<a name="inline-component-views"></a>
### Inline Component Views

For very small components, it may feel cumbersome to manage both the component class and the component's view template. For this reason, you may return the component's markup directly from the `render` method:

```php
/**
 * Get the view / contents that represent the component.
 */
public function render(): string
{
    return <<<'blade'
        <div class="alert alert-danger">
            {{ $slot }}
        </div>
    blade;
}
```

<a name="generating-inline-view-components"></a>
#### Generating Inline View Components

To create a component that renders an inline view, you may use the `inline` option when executing the `make:component` command:

```shell
php artisan make:component Alert --inline
```

<a name="dynamic-components"></a>
### Dynamic Components

Sometimes you may need to render a component but not know which component should be rendered until runtime. In this situation, you may use Laravel's built-in `dynamic-component` component to render the component based on a runtime value or variable:

```blade
// $componentName = "secondary-button";

<x-dynamic-component :component="$componentName" class="mt-4" />
```

<a name="manually-registering-components"></a>
### Manually Registering Components

> [!WARNING]
> The following documentation on manually registering components is primarily applicable to those who are writing Laravel packages that include view components. If you are not writing a package, this portion of the component documentation may not be relevant to you.

When writing components for your own application, components are automatically discovered within the `app/View/Components` directory and `resources/views/components` directory.

However, if you are building a package that utilizes Blade components or placing components in non-conventional directories, you will need to manually register your component class and its HTML tag alias so that Laravel knows where to find the component. You should typically register your components in the `boot` method of your package's service provider:

```php
use Illuminate\Support\Facades\Blade;
use VendorPackage\View\Components\AlertComponent;

/**
 * Bootstrap your package's services.
 */
public function boot(): void
{
    Blade::component('package-alert', AlertComponent::class);
}
```

Once your component has been registered, it may be rendered using its tag alias:

```blade
<x-package-alert/>
```

#### Autoloading Package Components

Alternatively, you may use the `componentNamespace` method to autoload component classes by convention. For example, a `Nightshade` package might have `Calendar` and `ColorPicker` components that reside within the `Package\Views\Components` namespace:

```php
use Illuminate\Support\Facades\Blade;

/**
 * Bootstrap your package's services.
 */
public function boot(): void
{
    Blade::componentNamespace('Nightshade\\Views\\Components', 'nightshade');
}
```

This will allow the usage of package components by their vendor namespace using the `package-name::` syntax:

```blade
<x-nightshade::calendar />
<x-nightshade::color-picker />
```

Blade will automatically detect the class that's linked to this component by pascal-casing the component name. Subdirectories are also supported using "dot" notation.

<a name="anonymous-components"></a>
## Anonymous Components

Similar to inline components, anonymous components provide a mechanism for managing a component via a single file. However, anonymous components utilize a single view file and have no associated class. To define an anonymous component, you only need to place a Blade template within your `resources/views/components` directory. For example, assuming you have defined a component at `resources/views/components/alert.blade.php`, you may simply render it like so:

```blade
<x-alert/>
```

You may use the `.` character to indicate if a component is nested deeper inside the `components` directory. For example, assuming the component is defined at `resources/views/components/inputs/button.blade.php`, you may render it like so:

```blade
<x-inputs.button/>
```

To create an anonymous component via Artisan, you may use the `--view` flag when invoking the `make:component` command:

```shell
php artisan make:component forms.input --view
```

The command above will create a Blade file at `resources/views/components/forms/input.blade.php` which can be rendered as a component via `<x-forms.input />`.

<a name="anonymous-index-components"></a>
### Anonymous Index Components

Sometimes, when a component is made up of many Blade templates, you may wish to group the given component's templates within a single directory. For example, imagine an "accordion" component with the following directory structure:

```text
/resources/views/components/accordion.blade.php
/resources/views/components/accordion/item.blade.php
```

This directory structure allows you to render the accordion component and its item like so:

```blade
<x-accordion>
    <x-accordion.item>
        ...
    </x-accordion.item>
</x-accordion>
```

However, in order to render the accordion component via `x-accordion`, we were forced to place the "index" accordion component template in the `resources/views/components` directory instead of nesting it within the `accordion` directory with the other accordion related templates.

Thankfully, Blade allows you to place a file matching the component's directory name within the component's directory itself. When this template exists, it can be rendered as the "root" element of the component even though it is nested within a directory. So, we can continue to use the same Blade syntax given in the example above; however, we will adjust our directory structure like so:

```text
/resources/views/components/accordion/accordion.blade.php
/resources/views/components/accordion/item.blade.php
```

<a name="data-properties-attributes"></a>
### Data Properties / Attributes

Since anonymous components do not have any associated class, you may wonder how you may differentiate which data should be passed to the component as variables and which attributes should be placed in the component's [attribute bag](#component-attributes).

You may specify which attributes should be considered data variables using the `@props` directive at the top of your component's Blade template. All other attributes on the component will be available via the component's attribute bag. If you wish to give a data variable a default value, you may specify the variable's name as the array key and the default value as the array value:

```blade
<!-- /resources/views/components/alert.blade.php -->

@props(['type' => 'info', 'message'])

<div {{ $attributes->merge(['class' => 'alert alert-'.$type]) }}>
    {{ $message }}
</div>
```

Given the component definition above, we may render the component like so:

```blade
<x-alert type="error" :message="$message" class="mb-4"/>
```

<a name="accessing-parent-data"></a>
### Accessing Parent Data

Sometimes you may want to access data from a parent component inside a child component. In these cases, you may use the `@aware` directive. For example, imagine we are building a complex menu component consisting of a parent `<x-menu>` and child `<x-menu.item>`:

```blade
<x-menu color="purple">
    <x-menu.item>...</x-menu.item>
    <x-menu.item>...</x-menu.item>
</x-menu>
```

The `<x-menu>` component may have an implementation like the following:

```blade
<!-- /resources/views/components/menu/index.blade.php -->

@props(['color' => 'gray'])

<ul {{ $attributes->merge(['class' => 'bg-'.$color.'-200']) }}>
    {{ $slot }}
</ul>
```

Because the `color` prop was only passed into the parent (`<x-menu>`), it won't be available inside `<x-menu.item>`. However, if we use the `@aware` directive, we can make it available inside `<x-menu.item>` as well:

```blade
<!-- /resources/views/components/menu/item.blade.php -->

@aware(['color' => 'gray'])

<li {{ $attributes->merge(['class' => 'text-'.$color.'-800']) }}>
    {{ $slot }}
</li>
```

> [!WARNING]
> The `@aware` directive cannot access parent data that is not explicitly passed to the parent component via HTML attributes. Default `@props` values that are not explicitly passed to the parent component cannot be accessed by the `@aware` directive.

<a name="anonymous-component-paths"></a>
### Anonymous Component Paths

As previously discussed, anonymous components are typically defined by placing a Blade template within your `resources/views/components` directory. However, you may occasionally want to register other anonymous component paths with Laravel in addition to the default path.

The `anonymousComponentPath` method accepts the "path" to the anonymous component location as its first argument and an optional "namespace" that components should be placed under as its second argument. Typically, this method should be called from the `boot` method of one of your application's [service providers](/docs/{{version}}/providers):

```php
/**
 * Bootstrap any application services.
 */
public function boot(): void
{
    Blade::anonymousComponentPath(__DIR__.'/../components');
}
```

When component paths are registered without a specified prefix as in the example above, they may be rendered in your Blade components without a corresponding prefix as well. For example, if a `panel.blade.php` component exists in the path registered above, it may be rendered like so:

```blade
<x-panel />
```

Prefix "namespaces" may be provided as the second argument to the `anonymousComponentPath` method:

```php
Blade::anonymousComponentPath(__DIR__.'/../components', 'dashboard');
```

When a prefix is provided, components within that "namespace" may be rendered by prefixing the component's namespace to the component name when the component is rendered:

```blade
<x-dashboard::panel />
```

<a name="building-layouts"></a>
## Building Layouts

<a name="layouts-using-components"></a>
### Layouts Using Components

Most web applications maintain the same general layout across various pages. It would be incredibly cumbersome and hard to maintain our application if we had to repeat the entire layout HTML in every view we create. Thankfully, it's convenient to define this layout as a single [Blade component](#components) and then use it throughout our application.

<a name="defining-the-layout-component"></a>
#### Defining the Layout Component

For example, imagine we are building a "todo" list application. We might define a `layout` component that looks like the following:

```blade
<!-- resources/views/components/layout.blade.php -->

<html>
    <head>
        <title>{{ $title ?? 'Todo Manager' }}</title>
    </head>
    <body>
        <h1>Todos</h1>
        <hr/>
        {{ $slot }}
    </body>
</html>
```

<a name="applying-the-layout-component"></a>
#### Applying the Layout Component

Once the `layout` component has been defined, we may create a Blade view that utilizes the component. In this example, we will define a simple view that displays our task list:

```blade
<!-- resources/views/tasks.blade.php -->

<x-layout>
    @foreach ($tasks as $task)
        <div>{{ $task }}</div>
    @endforeach
</x-layout>
```

Remember, content that is injected into a component will be supplied to the default `$slot` variable within our `layout` component. As you may have noticed, our `layout` also respects a `$title` slot if one is provided; otherwise, a default title is shown. We may inject a custom title from our task list view using the standard slot syntax discussed in the [component documentation](#components):

```blade
<!-- resources/views/tasks.blade.php -->

<x-layout>
    <x-slot:title>
        Custom Title
    </x-slot>

    @foreach ($tasks as $task)
        <div>{{ $task }}</div>
    @endforeach
</x-layout>
```

Now that we have defined our layout and task list views, we just need to return the `task` view from a route:

```php
use App\Models\Task;

Route::get('/tasks', function () {
    return view('tasks', ['tasks' => Task::all()]);
});
```

<a name="layouts-using-template-inheritance"></a>
### Layouts Using Template Inheritance

<a name="defining-a-layout"></a>
#### Defining a Layout

Layouts may also be created via "template inheritance". This was the primary way of building applications prior to the introduction of [components](#components).

To get started, let's take a look at a simple example. First, we will examine a page layout. Since most web applications maintain the same general layout across various pages, it's convenient to define this layout as a single Blade view:

```blade
<!-- resources/views/layouts/app.blade.php -->

<html>
    <head>
        <title>App Name - @yield('title')</title>
    </head>
    <body>
        @section('sidebar')
            This is the master sidebar.
        @show

        <div class="container">
            @yield('content')
        </div>
    </body>
</html>
```

As you can see, this file contains typical HTML mark-up. However, take note of the `@section` and `@yield` directives. The `@section` directive, as the name implies, defines a section of content, while the `@yield` directive is used to display the contents of a given section.

Now that we have defined a layout for our application, let's define a child page that inherits the layout.

<a name="extending-a-layout"></a>
#### Extending a Layout

When defining a child view, use the `@extends` Blade directive to specify which layout the child view should "inherit". Views which extend a Blade layout may inject content into the layout's sections using `@section` directives. Remember, as seen in the example above, the contents of these sections will be displayed in the layout using `@yield`:

```blade
<!-- resources/views/child.blade.php -->

@extends('layouts.app')

@section('title', 'Page Title')

@section('sidebar')
    @@parent

    <p>This is appended to the master sidebar.</p>
@endsection

@section('content')
    <p>This is my body content.</p>
@endsection
```

In this example, the `sidebar` section is utilizing the `@@parent` directive to append (rather than overwriting) content to the layout's sidebar. The `@@parent` directive will be replaced by the content of the layout when the view is rendered.

> [!NOTE]
> Contrary to the previous example, this `sidebar` section ends with `@endsection` instead of `@show`. The `@endsection` directive will only define a section while `@show` will define and **immediately yield** the section.

The `@yield` directive also accepts a default value as its second parameter. This value will be rendered if the section being yielded is undefined:

```blade
@yield('content', 'Default content')
```

<a name="forms"></a>
## Forms

<a name="csrf-field"></a>
### CSRF Field

Anytime you define an HTML form in your application, you should include a hidden CSRF token field in the form so that [the CSRF protection](/docs/{{version}}/csrf) middleware can validate the request. You may use the `@csrf` Blade directive to generate the token field:

```blade
<form method="POST" action="/profile">
    @csrf

    ...
</form>
```

<a name="method-field"></a>
### Method Field

Since HTML forms can't make `PUT`, `PATCH`, or `DELETE` requests, you will need to add a hidden `_method` field to spoof these HTTP verbs. The `@method` Blade directive can create this field for you:

```blade
<form action="/foo/bar" method="POST">
    @method('PUT')

    ...
</form>
```

<a name="validation-errors"></a>
### Validation Errors

The `@error` directive may be used to quickly check if [validation error messages](/docs/{{version}}/validation#quick-displaying-the-validation-errors) exist for a given attribute. Within an `@error` directive, you may echo the `$message` variable to display the error message:

```blade
<!-- /resources/views/post/create.blade.php -->

<label for="title">Post Title</label>

<input
    id="title"
    type="text"
    class="@error('title') is-invalid @enderror"
/>

@error('title')
    <div class="alert alert-danger">{{ $message }}</div>
@enderror
```

Since the `@error` directive compiles to an "if" statement, you may use the `@else` directive to render content when there is not an error for an attribute:

```blade
<!-- /resources/views/auth.blade.php -->

<label for="email">Email address</label>

<input
    id="email"
    type="email"
    class="@error('email') is-invalid @else is-valid @enderror"
/>
```

You may pass [the name of a specific error bag](/docs/{{version}}/validation#named-error-bags) as the second parameter to the `@error` directive to retrieve validation error messages on pages containing multiple forms:

```blade
<!-- /resources/views/auth.blade.php -->

<label for="email">Email address</label>

<input
    id="email"
    type="email"
    class="@error('email', 'login') is-invalid @enderror"
/>

@error('email', 'login')
    <div class="alert alert-danger">{{ $message }}</div>
@enderror
```

<a name="stacks"></a>
## Stacks

Blade allows you to push to named stacks which can be rendered somewhere else in another view or layout. This can be particularly useful for specifying any JavaScript libraries required by your child views:

```blade
@push('scripts')
    <script src="/example.js"></script>
@endpush
```

If you would like to `@push` content if a given boolean expression evaluates to `true`, you may use the `@pushIf` directive:

```blade
@pushIf($shouldPush, 'scripts')
    <script src="/example.js"></script>
@endPushIf
```

You may push to a stack as many times as needed. To render the complete stack contents, pass the name of the stack to the `@stack` directive:

```blade
<head>
    <!-- Head Contents -->

    @stack('scripts')
</head>
```

If you would like to prepend content onto the beginning of a stack, you should use the `@prepend` directive:

```blade
@push('scripts')
    This will be second...
@endpush

// Later...

@prepend('scripts')
    This will be first...
@endprepend
```

The `@hasstack` directive may be used to determine if a stack is empty:

```blade
@hasstack('list')
    <ul>
        @stack('list')
    </ul>
@endif
```

<a name="service-injection"></a>
## Service Injection

The `@inject` directive may be used to retrieve a service from the Laravel [service container](/docs/{{version}}/container). The first argument passed to `@inject` is the name of the variable the service will be placed into, while the second argument is the class or interface name of the service you wish to resolve:

```blade
@inject('metrics', 'App\Services\MetricsService')

<div>
    Monthly Revenue: {{ $metrics->monthlyRevenue() }}.
</div>
```

<a name="rendering-inline-blade-templates"></a>
## Rendering Inline Blade Templates

Sometimes you may need to transform a raw Blade template string into valid HTML. You may accomplish this using the `render` method provided by the `Blade` facade. The `render` method accepts the Blade template string and an optional array of data to provide to the template:

```php
use Illuminate\Support\Facades\Blade;

return Blade::render('Hello, {{ $name }}', ['name' => 'Julian Bashir']);
```

Laravel renders inline Blade templates by writing them to the `storage/framework/views` directory. If you would like Laravel to remove these temporary files after rendering the Blade template, you may provide the `deleteCachedView` argument to the method:

```php
return Blade::render(
    'Hello, {{ $name }}',
    ['name' => 'Julian Bashir'],
    deleteCachedView: true
);
```

<a name="rendering-blade-fragments"></a>
## Rendering Blade Fragments

When using frontend frameworks such as [Turbo](https://turbo.hotwired.dev/) and [htmx](https://htmx.org/), you may occasionally need to only return a portion of a Blade template within your HTTP response. Blade "fragments" allow you to do just that. To get started, place a portion of your Blade template within `@fragment` and `@endfragment` directives:

```blade
@fragment('user-list')
    <ul>
        @foreach ($users as $user)
            <li>{{ $user->name }}</li>
        @endforeach
    </ul>
@endfragment
```

Then, when rendering the view that utilizes this template, you may invoke the `fragment` method to specify that only the specified fragment should be included in the outgoing HTTP response:

```php
return view('dashboard', ['users' => $users])->fragment('user-list');
```

The `fragmentIf` method allows you to conditionally return a fragment of a view based on a given condition. Otherwise, the entire view will be returned:

```php
return view('dashboard', ['users' => $users])
    ->fragmentIf($request->hasHeader('HX-Request'), 'user-list');
```

The `fragments` and `fragmentsIf` methods allow you to return multiple view fragments in the response. The fragments will be concatenated together:

```php
view('dashboard', ['users' => $users])
    ->fragments(['user-list', 'comment-list']);

view('dashboard', ['users' => $users])
    ->fragmentsIf(
        $request->hasHeader('HX-Request'),
        ['user-list', 'comment-list']
    );
```

<a name="extending-blade"></a>
## Extending Blade

Blade allows you to define your own custom directives using the `directive` method. When the Blade compiler encounters the custom directive, it will call the provided callback with the expression that the directive contains.

The following example creates a `@datetime($var)` directive which formats a given `$var`, which should be an instance of `DateTime`:

```php
<?php

namespace App\Providers;

use Illuminate\Support\Facades\Blade;
use Illuminate\Support\ServiceProvider;

class AppServiceProvider extends ServiceProvider
{
    /**
     * Register any application services.
     */
    public function register(): void
    {
        // ...
    }

    /**
     * Bootstrap any application services.
     */
    public function boot(): void
    {
        Blade::directive('datetime', function (string $expression) {
            return "<?php echo ($expression)->format('m/d/Y H:i'); ?>";
        });
    }
}
```

As you can see, we will chain the `format` method onto whatever expression is passed into the directive. So, in this example, the final PHP generated by this directive will be:

```php
<?php echo ($var)->format('m/d/Y H:i'); ?>
```

> [!WARNING]
> After updating the logic of a Blade directive, you will need to delete all of the cached Blade views. The cached Blade views may be removed using the `view:clear` Artisan command.

<a name="custom-echo-handlers"></a>
### Custom Echo Handlers

If you attempt to "echo" an object using Blade, the object's `__toString` method will be invoked. The [__toString](https://www.php.net/manual/en/language.oop5.magic.php#object.tostring) method is one of PHP's built-in "magic methods". However, sometimes you may not have control over the `__toString` method of a given class, such as when the class that you are interacting with belongs to a third-party library.

In these cases, Blade allows you to register a custom echo handler for that particular type of object. To accomplish this, you should invoke Blade's `stringable` method. The `stringable` method accepts a closure. This closure should type-hint the type of object that it is responsible for rendering. Typically, the `stringable` method should be invoked within the `boot` method of your application's `AppServiceProvider` class:

```php
use Illuminate\Support\Facades\Blade;
use Money\Money;

/**
 * Bootstrap any application services.
 */
public function boot(): void
{
    Blade::stringable(function (Money $money) {
        return $money->formatTo('en_GB');
    });
}
```

Once your custom echo handler has been defined, you may simply echo the object in your Blade template:

```blade
Cost: {{ $money }}
```

<a name="custom-if-statements"></a>
### Custom If Statements

Programming a custom directive is sometimes more complex than necessary when defining simple, custom conditional statements. For that reason, Blade provides a `Blade::if` method which allows you to quickly define custom conditional directives using closures. For example, let's define a custom conditional that checks the configured default "disk" for the application. We may do this in the `boot` method of our `AppServiceProvider`:

```php
use Illuminate\Support\Facades\Blade;

/**
 * Bootstrap any application services.
 */
public function boot(): void
{
    Blade::if('disk', function (string $value) {
        return config('filesystems.default') === $value;
    });
}
```

Once the custom conditional has been defined, you can use it within your templates:

```blade
@disk('local')
    <!-- The application is using the local disk... -->
@elsedisk('s3')
    <!-- The application is using the s3 disk... -->
@else
    <!-- The application is using some other disk... -->
@enddisk

@unlessdisk('local')
    <!-- The application is not using the local disk... -->
@enddisk
```


---

# Laravel Boost

*Sección: Laravel | Origen: https://laravel.com/docs/13.x/boost*

- [Introduction](#introduction)
- [Installation](#installation)
    - [Set Up Your Agents](#set-up-your-agents)
    - [Keeping Boost Resources Updated](#keeping-boost-resources-updated)
- [MCP Server](#mcp-server)
    - [Available MCP Tools](#available-mcp-tools)
    - [Manually Registering the MCP Server](#manually-registering-the-mcp-server)
- [AI Guidelines](#ai-guidelines)
    - [Available AI Guidelines](#available-ai-guidelines)
    - [Adding Custom AI Guidelines](#adding-custom-ai-guidelines)
    - [Overriding Boost AI Guidelines](#overriding-boost-ai-guidelines)
    - [Third-Party Package AI Guidelines](#third-party-package-ai-guidelines)
- [Agent Skills](#agent-skills)
    - [Available Skills](#available-skills)
    - [Custom Skills](#custom-skills)
    - [Overriding Skills](#overriding-skills)
    - [Third-Party Package Skills](#third-party-package-skills)
- [Guidelines vs. Skills](#guidelines-vs-skills)
- [Project Rules](#project-rules)
    - [Recording Rules](#recording-rules)
    - [Inferring Your Application's Conventions](#inferring-your-applications-conventions)
    - [Disabling Project Rules](#disabling-project-rules)
- [Documentation API](#documentation-api)
- [Extending Boost](#extending-boost)
    - [Adding Support for Other IDEs / AI Agents](#adding-support-for-other-ides-ai-agents)

<a name="introduction"></a>
## Introduction

Laravel Boost accelerates AI-assisted development by providing the essential guidelines and agent skills that help AI agents write high-quality Laravel applications that adhere to Laravel best practices.

Boost also provides a powerful Laravel ecosystem documentation API that combines a built-in MCP tool with an extensive knowledge base containing over 17,000 pieces of Laravel-specific information, all enhanced by semantic search capabilities using embeddings for precise, context-aware results. Boost instructs AI agents like Claude Code and Cursor to use this API to learn about the latest Laravel features and best practices.

<a name="installation"></a>
## Installation

Laravel Boost can be installed via Composer:

```shell
composer require laravel/boost --dev
```

Next, install the MCP server and coding guidelines:

```shell
php artisan boost:install
```

The `boost:install` command will generate the relevant agent guideline and skill files for the coding agents you selected during the installation process.

Once Laravel Boost has been installed, you're ready to start coding with Cursor, Claude Code, or your AI agent of choice.

> [!NOTE]
> Feel free to add the generated MCP configuration file (`.mcp.json`), guideline files (`CLAUDE.md`, `AGENTS.md`, `junie/`, etc.), and the `boost.json` configuration file to your application's `.gitignore`, as these files are automatically regenerated when running `boost:install` and `boost:update`.

<a name="set-up-your-agents"></a>
### Set Up Your Agents

```text tab=Cursor
1. Open the command palette (`Cmd+Shift+P` or `Ctrl+Shift+P`)
2. Press `enter` on "/open MCP Settings"
3. Turn the toggle on for `laravel-boost`
```

```text tab=Claude Code
Claude Code support is typically enabled automatically. If you find it isn't, open a shell in the project's directory and run the following command:

claude mcp add -s local -t stdio laravel-boost php artisan boost:mcp
```

```text tab=Codex
Codex support is typically enabled automatically. If you find it isn't, open a shell in the project's directory and run the following command:

codex mcp add laravel-boost -- php "artisan" "boost:mcp"
```

```text tab=Gemini CLI
Gemini CLI support is typically enabled automatically. If you find it isn't, open a shell in the project's directory and run the following command:

gemini mcp add -s project -t stdio laravel-boost php artisan boost:mcp
```

```text tab=GitHub Copilot (VS Code)
1. Open the command palette (`Cmd+Shift+P` or `Ctrl+Shift+P`)
2. Press `enter` on "MCP: List Servers"
3. Arrow to `laravel-boost` and press `enter`
4. Choose "Start server"
```

```text tab=Junie
1. Press `shift` twice to open the command palette
2. Search "MCP Settings" and press `enter`
3. Check the box next to `laravel-boost`
4. Click "Apply" at the bottom right
```

<a name="keeping-boost-resources-updated"></a>
### Keeping Boost Resources Updated

You may want to periodically update your local Boost resources (AI guidelines and skills) to ensure they reflect the latest versions of the Laravel ecosystem packages you have installed. To do so, you can use the `boost:update` Artisan command.

```shell
php artisan boost:update
```

You may also automate this process by adding it to your Composer "post-update-cmd" scripts:

```json
{
  "scripts": {
    "post-update-cmd": [
      "@php artisan boost:update --ansi"
    ]
  }
}
```

By default, the `boost:update` command will only update the existing Boost resources already published within your application. If you would like Boost to scan your application for any newly installed packages and offer to publish their corresponding guidelines and skills, you may use the `--discover` option:

```shell
php artisan boost:update --discover
```

<a name="mcp-server"></a>
## MCP Server

Laravel Boost provides an MCP (Model Context Protocol) server that exposes tools for AI agents to interact with your Laravel application. These tools give agents the ability to inspect your application's structure, query the database, execute code, and more.

<a name="available-mcp-tools"></a>
### Available MCP Tools

<div class="overflow-auto">

| Name                 | Notes                                                                                                       |
| -------------------- | ----------------------------------------------------------------------------------------------------------- |
| Application Info     | Read PHP & Laravel versions, database engine, list of ecosystem packages with versions, and Eloquent models |
| Browser Logs         | Read logs and errors from the browser                                                                       |
| Database Connections | Inspect available database connections, including the default connection                                    |
| Database Query       | Execute a query against the database                                                                        |
| Database Schema      | Read the database schema                                                                                    |
| Get Absolute URL     | Convert relative path URIs to absolute so agents generate valid URLs                                        |
| Last Error           | Read the last error from the application's log files                                                        |
| Read Log Entries     | Read the last N log entries                                                                                 |
| Record Rule          | Record a durable [project rule](#project-rules) into `.ai/rules` so future agents inherit it                |
| Search Docs          | Query the Laravel hosted documentation API service to retrieve documentation based on installed packages    |

</div>

<a name="manually-registering-the-mcp-server"></a>
### Manually Registering the MCP Server

Sometimes you may need to manually register the Laravel Boost MCP server with your editor of choice. You should register the MCP server using the following details:

<table>
<tr><td><strong>Command</strong></td><td><code>php</code></td></tr>
<tr><td><strong>Args</strong></td><td><code>artisan boost:mcp</code></td></tr>
</table>

JSON example:

```json
{
    "mcpServers": {
        "laravel-boost": {
            "command": "php",
            "args": ["artisan", "boost:mcp"]
        }
    }
}
```

<a name="ai-guidelines"></a>
## AI Guidelines

AI guidelines are composable instruction files that are loaded upfront to provide AI agents with essential context about Laravel ecosystem packages. These guidelines contain core conventions, best practices, and framework-specific patterns that help agents generate consistent, high-quality code.

<a name="available-ai-guidelines"></a>
### Available AI Guidelines

Laravel Boost includes AI guidelines for the following packages and frameworks. The `core` guidelines provide generic, generalized advice to the AI for the given package that is applicable across all versions.

<div class="overflow-auto">

| Package           | Versions Supported     |
| ----------------- | ---------------------- |
| Core & Boost      | core                   |
| Laravel Framework | core, 10.x, 11.x, 12.x, 13.x |
| Livewire          | core, 2.x, 3.x, 4.x    |
| Flux UI           | core, free, pro        |
| Folio             | core                   |
| Herd              | core                   |
| Inertia Laravel   | core, 1.x, 2.x, 3.x    |
| Inertia React     | core, 1.x, 2.x, 3.x    |
| Inertia Vue       | core, 1.x, 2.x, 3.x    |
| Inertia Svelte    | core, 1.x, 2.x, 3.x    |
| MCP               | core                   |
| Pennant           | core                   |
| Pest              | core, 3.x, 4.x         |
| PHPUnit           | core                   |
| Pint              | core                   |
| Sail              | core                   |
| Tailwind CSS      | core, 3.x, 4.x         |
| Livewire Volt     | core                   |
| Wayfinder         | core                   |
| Enforce Tests     | conditional            |

</div>

> **Note:** To keep your AI guidelines up-to-date, see the [Keeping Boost Resources Updated](#keeping-boost-resources-updated) section.

<a name="adding-custom-ai-guidelines"></a>
### Adding Custom AI Guidelines

To augment Laravel Boost with your own custom AI guidelines, add `.blade.php` or `.md` files to your application's `.ai/guidelines/*` directory. These files will automatically be included with Laravel Boost's guidelines when you run `boost:install`.

<a name="overriding-boost-ai-guidelines"></a>
### Overriding Boost AI Guidelines

You can override Boost's built-in AI guidelines by creating your own custom guidelines with matching file paths. When you create a custom guideline that matches an existing Boost guideline path, Boost will use your custom version instead of the built-in one.

For example, to override Boost's "Inertia React v2 Form Guidance" guidelines, create a file at `.ai/guidelines/inertia-react/2/forms.blade.php`. When you run `boost:install`, Boost will include your custom guideline instead of the default one.

<a name="third-party-package-ai-guidelines"></a>
### Third-Party Package AI Guidelines

If you maintain a third-party package and would like Boost to include AI guidelines for it, you can do so by adding a `resources/boost/guidelines/core.blade.php` file to your package. When users of your package run `php artisan boost:install`, Boost will automatically load your guidelines.

AI guidelines should provide a short overview of what your package does, outline any required file structure or conventions, and explain how to create or use its main features (with example commands or code snippets). Keep them concise, actionable, and focused on best practices so AI can generate correct code for your users. Here is an example:

```php
## Package Name

This package provides [brief description of functionality].

### Features

- Feature 1: [clear & short description].
- Feature 2: [clear & short description]. Example usage:

@verbatim
<code-snippet name="How to use Feature 2" lang="php">
$result = PackageName::featureTwo($param1, $param2);
</code-snippet>
@endverbatim
```

<a name="agent-skills"></a>
## Agent Skills

[Agent Skills](https://agentskills.io/home) are lightweight, targeted knowledge modules that agents can activate on-demand when working on specific domains. Unlike guidelines, which are loaded upfront, skills allow detailed patterns and best practices to be loaded only when relevant, reducing context bloat and improving the relevance of AI-generated code.

When you run `boost:install` and select skills as a feature, skills are automatically installed based on the packages detected in your `composer.json`. For example, if your project includes `livewire/livewire`, the `livewire-development` skill will be installed automatically. Skills included with Boost, such as `infer-conventions`, are installed regardless of which packages you have.

<a name="available-skills"></a>
### Available Skills

<div class="overflow-auto">

| Skill                      | Package        |
| -------------------------- | -------------- |
| fluxui-development         | Flux UI        |
| folio-routing              | Folio          |
| infer-conventions          | Boost          |
| inertia-react-development  | Inertia React  |
| inertia-svelte-development | Inertia Svelte |
| inertia-vue-development    | Inertia Vue    |
| livewire-development       | Livewire       |
| mcp-development            | MCP            |
| pennant-development        | Pennant        |
| pest-testing               | Pest           |
| tailwindcss-development    | Tailwind CSS   |
| volt-development           | Volt           |
| wayfinder-development      | Wayfinder      |

</div>

> **Note:** To keep your skills up-to-date, see the [Keeping Boost Resources Updated](#keeping-boost-resources-updated) section.

<a name="custom-skills"></a>
### Custom Skills

To create your own custom skills, add a `SKILL.md` file to your application's `.ai/skills/{skill-name}/` directory. When you run `boost:update`, your custom skills will be installed alongside Boost's built-in skills.

For example, to create a custom skill for your application's domain logic:

```
.ai/skills/creating-invoices/SKILL.md
```

<a name="overriding-skills"></a>
### Overriding Skills

You can override Boost's built-in skills by creating your own custom skills with matching names. When you create a custom skill that matches an existing Boost skill name, Boost will use your custom version instead of the built-in one.

For example, to override Boost's `livewire-development` skill, create a file at `.ai/skills/livewire-development/SKILL.md`. When you run `boost:update`, Boost will include your custom skill instead of the default one.

<a name="third-party-package-skills"></a>
### Third-Party Package Skills

If you maintain a third-party package and would like Boost to include skills for it, you can do so by adding a `resources/boost/skills/{skill-name}/SKILL.md` file to your package. When users of your package run `php artisan boost:install`, Boost will automatically install your skills based on user preference.

Boost Skills support the [Agent Skills format](https://agentskills.io/what-are-skills) and should be structured as a folder containing a `SKILL.md` file with YAML frontmatter and Markdown instructions. The `SKILL.md` file must include required frontmatter (`name` and `description`) and can optionally include scripts, templates, and reference materials.

Skills should outline any required file structure or conventions, and explain how to create or use its main features (with example commands or code snippets). Keep them concise, actionable, and focused on best practices so AI can generate correct code for your users:

```markdown
---
name: package-name-development
description: Build and work with PackageName features, including components and workflows.
---

# Package Name Development

## When to use this skill
Use this skill when working with PackageName features...

## Features

- Feature 1: [clear & short description].
- Feature 2: [clear & short description]. Example usage:

$result = PackageName::featureTwo($param1, $param2);
```

<a name="guidelines-vs-skills"></a>
## Guidelines vs. Skills

Laravel Boost provides two distinct ways to give AI agents context about your application: **guidelines** and **skills**.

**Guidelines** are loaded upfront when the AI agent starts, providing essential context about Laravel conventions and best practices that apply broadly across your codebase.

**Skills** are activated on-demand when working on specific tasks, containing detailed patterns for particular domains (like Livewire components or Pest tests). Loading skills only when relevant reduces context bloat and improves code quality.

<div class="overflow-auto">

| Aspect      | Guidelines                        | Skills                           |
| ----------- | --------------------------------- | -------------------------------- |
| **Loaded**  | Upfront, always present           | On-demand, when relevant         |
| **Scope**   | Broad, foundational               | Focused, task-specific           |
| **Purpose** | Core conventions & best practices | Detailed implementation patterns |

</div>

Both guidelines and skills describe the Laravel ecosystem. To capture the conventions of your own application, you should use [project rules](#project-rules).

<a name="project-rules"></a>
## Project Rules

While guidelines and skills teach agents how to write Laravel, project rules teach them how to write your application. A rule is anything you would otherwise need to explain again in every new session:

<div class="content-list" markdown="1">

- Decisions made along the way by you, your agents, or your teammates.
- Style guidelines and preferences that are difficult to get an agent to follow.
- Traps and constraints that can't be inferred from the surrounding code.

</div>

Rules are stored as Markdown files within your application's `.ai/rules` directory and should be committed to source control. Unlike an agent's own memory, which is personal and session-scoped, your rules are shared with your team and with every agent that works on your application.

Each rule file declares the file globs it applies to within its frontmatter:

```markdown
---
paths:
  - app/Http/Controllers/**
---

# Http Controllers

## Extend BaseController for tenant scoping

All controllers must extend `App\Http\Controllers\BaseController`, which applies the
current tenant's query scope. Extending Laravel's base controller directly will leak
data across tenants.
```

In addition, Boost maintains an `.ai/rules/index.md` file which maps globs to their rule files. Agents are instructed to consult this index before planning or editing any file, so a rule is only loaded when it is relevant:

```markdown
# Project Rules Index

Before planning or editing, find the row whose globs match the file's path and read that rule file.

| Applies to | Rule file |
| --- | --- |
| app/Http/Controllers/** | .ai/rules/controllers.md |
| app/Models/** | .ai/rules/models.md |
```

> [!NOTE]
> Unlike the `.mcp.json` and generated guideline files, the `.ai/rules` directory should be committed to source control so that your rules are shared with your team.

<a name="recording-rules"></a>
### Recording Rules

To record a rule, you may simply ask your agent to remember it:

```text
Remember that all money values are stored as integer cents, never as floats.
```

The agent will invoke Boost's `record-rule` MCP tool with a `glob`, a short `title`, and a `note`. Boost will then file the rule under the matching area, creating the rule file if needed, and update the index.

You should always record rules using the `record-rule` tool rather than creating rule files by hand. Boost regenerates `.ai/rules/index.md` as part of recording a rule, and agents rely on that index to discover which rules apply to the file they are working on. A rule file that is added manually will not be discovered until the index is next regenerated.

<a name="inferring-your-applications-conventions"></a>
### Inferring Your Application's Conventions

Recording rules one at a time works well going forward; however, an existing application already contains years of conventions. The `infer-conventions` skill will bootstrap your rules from the code you have already written. To get started, ask your agent to use the skill:

```text
Use the infer-conventions skill
```

The skill will sweep your application across a checklist of Laravel convention dimensions, including validation, controllers, authorization, models, architecture, testing, frontend, database, and console, followed by an open-ended pass for patterns such as base classes, shared traits, and module layouts.

The skill documents what your code actually does rather than what it should do. It records only well-supported, non-default conventions, skips framework defaults and anything Pint or Rector already enforces, and reports genuinely mixed patterns instead of recording them. Before writing any rules, the skill will present each convention it discovered, along with its supporting evidence, for your approval. If you would like the skill to record all discovered conventions without confirmation, you may tell it to "yolo".

<a name="disabling-project-rules"></a>
### Disabling Project Rules

Project rules are enabled by default. To disable them entirely, define the following environment variable. This removes the `record-rule` MCP tool and stops Boost from managing the `.ai/rules` directory:

```ini
BOOST_RULES_ENABLED=false
```

<a name="documentation-api"></a>
## Documentation API

Laravel Boost includes a Documentation API that provides AI agents with access to an extensive knowledge base containing over 17,000 pieces of Laravel-specific information. The API uses semantic search with embeddings to deliver precise, context-aware results.

The `Search Docs` MCP tool allows agents to query the Laravel hosted documentation API service to retrieve documentation based on your installed packages. Boost's AI guidelines and skills will automatically instruct your coding agent to use this API.

<div class="overflow-auto">

| Package           | Versions Supported |
| ----------------- | ------------------ |
| Laravel Framework | 10.x, 11.x, 12.x, 13.x |
| Filament          | 2.x, 3.x, 4.x, 5.x |
| Flux UI           | 2.x Free, 2.x Pro  |
| Inertia           | 1.x, 2.x           |
| Livewire          | 1.x, 2.x, 3.x, 4.x |
| Nova              | 4.x, 5.x           |
| Pest              | 3.x, 4.x           |
| Tailwind CSS      | 3.x, 4.x           |

</div>

<a name="extending-boost"></a>
## Extending Boost

Boost works with many popular IDEs and AI agents out of the box. If your coding tool isn't supported yet, you can create your own agent and integrate it with Boost.

<a name="adding-support-for-other-ides-ai-agents"></a>
### Adding Support for Other IDEs / AI Agents

To add support for a new IDE or AI agent, create a class that extends `Laravel\Boost\Install\Agents\Agent` and implement one or more of the following contracts depending on what you need:

- `Laravel\Boost\Contracts\SupportsGuidelines` - Adds support for AI guidelines.
- `Laravel\Boost\Contracts\SupportsMcp` - Adds support for MCP.
- `Laravel\Boost\Contracts\SupportsSkills` - Adds support for Agent Skills.

<a name="writing-the-agent"></a>
#### Writing the Agent

```php
<?php

declare(strict_types=1);

namespace App;

use Laravel\Boost\Contracts\SupportsGuidelines;
use Laravel\Boost\Contracts\SupportsMcp;
use Laravel\Boost\Contracts\SupportsSkills;
use Laravel\Boost\Install\Agents\Agent;

class CustomAgent extends Agent implements SupportsGuidelines, SupportsMcp, SupportsSkills
{
    // Your implementation...
}
```

For an example implementation, see [ClaudeCode.php](https://github.com/laravel/boost/blob/main/src/Install/Agents/ClaudeCode.php).

<a name="registering-the-agent"></a>
#### Registering the Agent

Register your custom agent in the `boot` method of your application's `App\Providers\AppServiceProvider`:

```php
use Laravel\Boost\Boost;

public function boot(): void
{
    Boost::registerAgent('customagent', CustomAgent::class);
}
```

Once registered, your agent will be available for selection when running `php artisan boost:install`.


---

# Broadcasting

*Sección: Laravel | Origen: https://laravel.com/docs/13.x/broadcasting*

- [Introduction](#introduction)
- [Quickstart](#quickstart)
- [Server Side Installation](#server-side-installation)
    - [Reverb](#reverb)
    - [Pusher Channels](#pusher-channels)
    - [Ably](#ably)
- [Client Side Installation](#client-side-installation)
    - [Reverb](#client-reverb)
    - [Pusher Channels](#client-pusher-channels)
    - [Ably](#client-ably)
- [Concept Overview](#concept-overview)
    - [Using an Example Application](#using-example-application)
- [Defining Broadcast Events](#defining-broadcast-events)
    - [Broadcast Name](#broadcast-name)
    - [Broadcast Data](#broadcast-data)
    - [Broadcast Queue](#broadcast-queue)
    - [Broadcast Conditions](#broadcast-conditions)
    - [Broadcasting and Database Transactions](#broadcasting-and-database-transactions)
- [Authorizing Channels](#authorizing-channels)
    - [Defining Authorization Callbacks](#defining-authorization-callbacks)
    - [Defining Channel Classes](#defining-channel-classes)
- [Broadcasting Events](#broadcasting-events)
    - [Only to Others](#only-to-others)
    - [Customizing the Connection](#customizing-the-connection)
    - [Anonymous Events](#anonymous-events)
    - [Rescuing Broadcasts](#rescuing-broadcasts)
- [Receiving Broadcasts](#receiving-broadcasts)
    - [Listening for Events](#listening-for-events)
    - [Leaving a Channel](#leaving-a-channel)
    - [Namespaces](#namespaces)
    - [Using React, Vue, or Svelte](#using-react-or-vue)
- [Presence Channels](#presence-channels)
    - [Authorizing Presence Channels](#authorizing-presence-channels)
    - [Joining Presence Channels](#joining-presence-channels)
    - [Broadcasting to Presence Channels](#broadcasting-to-presence-channels)
- [Model Broadcasting](#model-broadcasting)
    - [Model Broadcasting Conventions](#model-broadcasting-conventions)
    - [Listening for Model Broadcasts](#listening-for-model-broadcasts)
- [Client Events](#client-events)
- [Notifications](#notifications)

<a name="introduction"></a>
## Introduction

In many modern web applications, WebSockets are used to implement realtime, live-updating user interfaces. When some data is updated on the server, a message is typically sent over a WebSocket connection to be handled by the client. WebSockets provide a more efficient alternative to continually polling your application's server for data changes that should be reflected in your UI.

For example, imagine your application is able to export a user's data to a CSV file and email it to them. However, creating this CSV file takes several minutes so you choose to create and mail the CSV within a [queued job](/docs/{{version}}/queues). When the CSV has been created and mailed to the user, we can use event broadcasting to dispatch an `App\Events\UserDataExported` event that is received by our application's JavaScript. Once the event is received, we can display a message to the user that their CSV has been emailed to them without them ever needing to refresh the page.

To assist you in building these types of features, Laravel makes it easy to "broadcast" your server-side Laravel [events](/docs/{{version}}/events) over a WebSocket connection. Broadcasting your Laravel events allows you to share the same event names and data between your server-side Laravel application and your client-side JavaScript application.

The core concepts behind broadcasting are simple: clients connect to named channels on the frontend, while your Laravel application broadcasts events to these channels on the backend. These events can contain any additional data you wish to make available to the frontend.

<a name="supported-drivers"></a>
#### Supported Drivers

By default, Laravel includes three server-side broadcasting drivers for you to choose from: [Laravel Reverb](https://reverb.laravel.com), [Pusher Channels](https://pusher.com/channels), and [Ably](https://ably.com).

> [!NOTE]
> Before diving into event broadcasting, make sure you have read Laravel's documentation on [events and listeners](/docs/{{version}}/events).

<a name="quickstart"></a>
## Quickstart

By default, broadcasting is not enabled in new Laravel applications. You may enable broadcasting using the `install:broadcasting` Artisan command:

```shell
php artisan install:broadcasting
```

The `install:broadcasting` command will prompt you for which event broadcasting service you would like to use. In addition, it will create the `config/broadcasting.php` configuration file and the `routes/channels.php` file where you may register your application's broadcast authorization routes and callbacks.

Laravel supports several broadcast drivers out of the box: [Laravel Reverb](/docs/{{version}}/reverb), [Pusher Channels](https://pusher.com/channels), [Ably](https://ably.com), and a `log` driver for local development and debugging. Additionally, a `null` driver is included which allows you to disable broadcasting during testing. A configuration example is included for each of these drivers in the `config/broadcasting.php` configuration file.

All of your application's event broadcasting configuration is stored in the `config/broadcasting.php` configuration file. Don't worry if this file does not exist in your application; it will be created when you run the `install:broadcasting` Artisan command.

<a name="quickstart-next-steps"></a>
#### Next Steps

Once you have enabled event broadcasting, you're ready to learn more about [defining broadcast events](#defining-broadcast-events) and [listening for events](#listening-for-events). If you're using Laravel's React, Vue, or Svelte [starter kits](/docs/{{version}}/starter-kits), you may listen for events using Echo's [useEcho hook](#using-react-or-vue).

> [!NOTE]
> Before broadcasting any events, you should first configure and run a [queue worker](/docs/{{version}}/queues). All event broadcasting is done via queued jobs so that the response time of your application is not seriously affected by events being broadcast.

<a name="server-side-installation"></a>
## Server Side Installation

To get started using Laravel's event broadcasting, we need to do some configuration within the Laravel application as well as install a few packages.

Event broadcasting is accomplished by a server-side broadcasting driver that broadcasts your Laravel events so that Laravel Echo (a JavaScript library) can receive them within the browser client. Don't worry - we'll walk through each part of the installation process step-by-step.

<a name="reverb"></a>
### Reverb

To quickly enable support for Laravel's broadcasting features while using Reverb as your event broadcaster, invoke the `install:broadcasting` Artisan command with the `--reverb` option. This Artisan command will install Reverb's required Composer and NPM packages and update your application's `.env` file with the appropriate variables:

```shell
php artisan install:broadcasting --reverb
```

<a name="reverb-manual-installation"></a>
#### Manual Installation

When running the `install:broadcasting` command, you will be prompted to install [Laravel Reverb](/docs/{{version}}/reverb). Of course, you may also install Reverb manually using the Composer package manager:

```shell
composer require laravel/reverb
```

Once the package is installed, you may run Reverb's installation command to publish the configuration, add Reverb's required environment variables, and enable event broadcasting in your application:

```shell
php artisan reverb:install
```

You can find detailed Reverb installation and usage instructions in the [Reverb documentation](/docs/{{version}}/reverb).

<a name="pusher-channels"></a>
### Pusher Channels

To quickly enable support for Laravel's broadcasting features while using Pusher as your event broadcaster, invoke the `install:broadcasting` Artisan command with the `--pusher` option. This Artisan command will prompt you for your Pusher credentials, install the Pusher PHP and JavaScript SDKs, and update your application's `.env` file with the appropriate variables:

```shell
php artisan install:broadcasting --pusher
```

<a name="pusher-manual-installation"></a>
#### Manual Installation

To install Pusher support manually, you should install the Pusher Channels PHP SDK using the Composer package manager:

```shell
composer require pusher/pusher-php-server
```

Next, you should configure your Pusher Channels credentials in the `config/broadcasting.php` configuration file. An example Pusher Channels configuration is already included in this file, allowing you to quickly specify your key, secret, and application ID. Typically, you should configure your Pusher Channels credentials in your application's `.env` file:

```ini
PUSHER_APP_ID="your-pusher-app-id"
PUSHER_APP_KEY="your-pusher-key"
PUSHER_APP_SECRET="your-pusher-secret"
PUSHER_HOST=
PUSHER_PORT=443
PUSHER_SCHEME="https"
PUSHER_APP_CLUSTER="mt1"
```

The `config/broadcasting.php` file's `pusher` configuration also allows you to specify additional `options` that are supported by Channels, such as the cluster.

Then, set the `BROADCAST_CONNECTION` environment variable to `pusher` in your application's `.env` file:

```ini
BROADCAST_CONNECTION=pusher
```

Finally, you are ready to install and configure [Laravel Echo](#client-side-installation), which will receive the broadcast events on the client-side.

<a name="ably"></a>
### Ably

> [!NOTE]
> The documentation below discusses how to use Ably in "Pusher compatibility" mode. However, the Ably team recommends and maintains a broadcaster and Echo client that is able to take advantage of the unique capabilities offered by Ably. For more information on using the Ably maintained drivers, please [consult Ably's Laravel broadcaster documentation](https://github.com/ably/laravel-broadcaster).

To quickly enable support for Laravel's broadcasting features while using [Ably](https://ably.com) as your event broadcaster, invoke the `install:broadcasting` Artisan command with the `--ably` option. This Artisan command will prompt you for your Ably credentials, install the Ably PHP and JavaScript SDKs, and update your application's `.env` file with the appropriate variables:

```shell
php artisan install:broadcasting --ably
```

**Before continuing, you should enable Pusher protocol support in your Ably application settings. You may enable this feature within the "Protocol Adapter Settings" portion of your Ably application's settings dashboard.**

<a name="ably-manual-installation"></a>
#### Manual Installation

To install Ably support manually, you should install the Ably PHP SDK using the Composer package manager:

```shell
composer require ably/ably-php
```

Next, you should configure your Ably credentials in the `config/broadcasting.php` configuration file. An example Ably configuration is already included in this file, allowing you to quickly specify your key. Typically, this value should be set via the `ABLY_KEY` [environment variable](/docs/{{version}}/configuration#environment-configuration):

```ini
ABLY_KEY=your-ably-key
```

Then, set the `BROADCAST_CONNECTION` environment variable to `ably` in your application's `.env` file:

```ini
BROADCAST_CONNECTION=ably
```

Finally, you are ready to install and configure [Laravel Echo](#client-side-installation), which will receive the broadcast events on the client-side.

<a name="client-side-installation"></a>
## Client Side Installation

<a name="client-reverb"></a>
### Reverb

[Laravel Echo](https://github.com/laravel/echo) is a JavaScript library that makes it painless to subscribe to channels and listen for events broadcast by your server-side broadcasting driver.

When installing Laravel Reverb via the `install:broadcasting` Artisan command, Reverb and Echo's scaffolding and configuration will be injected into your application automatically. However, if you wish to manually configure Laravel Echo, you may do so by following the instructions below.

<a name="reverb-client-manual-installation"></a>
#### Manual Installation

To manually configure Laravel Echo for your application's frontend, first install the `pusher-js` package since Reverb utilizes the Pusher protocol for WebSocket subscriptions, channels, and messages:

```shell
npm install --save-dev laravel-echo pusher-js
```

Once Echo is installed, you are ready to create a fresh Echo instance in your application's JavaScript. A great place to do this is at the bottom of the `resources/js/app.js` file that is included with the Laravel framework:

```js tab=JavaScript
import Echo from 'laravel-echo';

import Pusher from 'pusher-js';
window.Pusher = Pusher;

window.Echo = new Echo({
    broadcaster: 'reverb',
    key: import.meta.env.VITE_REVERB_APP_KEY,
    wsHost: import.meta.env.VITE_REVERB_HOST,
    wsPort: import.meta.env.VITE_REVERB_PORT ?? 80,
    wssPort: import.meta.env.VITE_REVERB_PORT ?? 443,
    forceTLS: (import.meta.env.VITE_REVERB_SCHEME ?? 'https') === 'https',
    enabledTransports: ['ws', 'wss'],
});
```

```js tab=React
import { configureEcho } from "@laravel/echo-react";

configureEcho({
    broadcaster: "reverb",
    // key: import.meta.env.VITE_REVERB_APP_KEY,
    // wsHost: import.meta.env.VITE_REVERB_HOST,
    // wsPort: import.meta.env.VITE_REVERB_PORT,
    // wssPort: import.meta.env.VITE_REVERB_PORT,
    // forceTLS: (import.meta.env.VITE_REVERB_SCHEME ?? 'https') === 'https',
    // enabledTransports: ['ws', 'wss'],
});
```

```js tab=Vue
import { configureEcho } from "@laravel/echo-vue";

configureEcho({
    broadcaster: "reverb",
    // key: import.meta.env.VITE_REVERB_APP_KEY,
    // wsHost: import.meta.env.VITE_REVERB_HOST,
    // wsPort: import.meta.env.VITE_REVERB_PORT,
    // wssPort: import.meta.env.VITE_REVERB_PORT,
    // forceTLS: (import.meta.env.VITE_REVERB_SCHEME ?? 'https') === 'https',
    // enabledTransports: ['ws', 'wss'],
});
```

```js tab=Svelte
import { configureEcho } from "@laravel/echo-svelte";

configureEcho({
    broadcaster: "reverb",
    // key: import.meta.env.VITE_REVERB_APP_KEY,
    // wsHost: import.meta.env.VITE_REVERB_HOST,
    // wsPort: import.meta.env.VITE_REVERB_PORT,
    // wssPort: import.meta.env.VITE_REVERB_PORT,
    // forceTLS: (import.meta.env.VITE_REVERB_SCHEME ?? 'https') === 'https',
    // enabledTransports: ['ws', 'wss'],
});
```

Next, you should compile your application's assets:

```shell
npm run build
```

> [!WARNING]
> The Laravel Echo `reverb` broadcaster requires laravel-echo v1.16.0+.

<a name="client-pusher-channels"></a>
### Pusher Channels

[Laravel Echo](https://github.com/laravel/echo) is a JavaScript library that makes it painless to subscribe to channels and listen for events broadcast by your server-side broadcasting driver.

When installing broadcasting support via the `install:broadcasting --pusher` Artisan command, Pusher and Echo's scaffolding and configuration will be injected into your application automatically. However, if you wish to manually configure Laravel Echo, you may do so by following the instructions below.

<a name="pusher-client-manual-installation"></a>
#### Manual Installation

To manually configure Laravel Echo for your application's frontend, first install the `laravel-echo` and `pusher-js` packages which utilize the Pusher protocol for WebSocket subscriptions, channels, and messages:

```shell
npm install --save-dev laravel-echo pusher-js
```

Once Echo is installed, you are ready to create a fresh Echo instance in your application's `resources/js/app.js` file:

```js tab=JavaScript
import Echo from 'laravel-echo';

import Pusher from 'pusher-js';
window.Pusher = Pusher;

window.Echo = new Echo({
    broadcaster: 'pusher',
    key: import.meta.env.VITE_PUSHER_APP_KEY,
    cluster: import.meta.env.VITE_PUSHER_APP_CLUSTER,
    forceTLS: true
});
```

```js tab=React
import { configureEcho } from "@laravel/echo-react";

configureEcho({
    broadcaster: "pusher",
    // key: import.meta.env.VITE_PUSHER_APP_KEY,
    // cluster: import.meta.env.VITE_PUSHER_APP_CLUSTER,
    // forceTLS: true,
    // wsHost: import.meta.env.VITE_PUSHER_HOST,
    // wsPort: import.meta.env.VITE_PUSHER_PORT,
    // wssPort: import.meta.env.VITE_PUSHER_PORT,
    // enabledTransports: ["ws", "wss"],
});
```

```js tab=Vue
import { configureEcho } from "@laravel/echo-vue";

configureEcho({
    broadcaster: "pusher",
    // key: import.meta.env.VITE_PUSHER_APP_KEY,
    // cluster: import.meta.env.VITE_PUSHER_APP_CLUSTER,
    // forceTLS: true,
    // wsHost: import.meta.env.VITE_PUSHER_HOST,
    // wsPort: import.meta.env.VITE_PUSHER_PORT,
    // wssPort: import.meta.env.VITE_PUSHER_PORT,
    // enabledTransports: ["ws", "wss"],
});
```

```js tab=Svelte
import { configureEcho } from "@laravel/echo-svelte";

configureEcho({
    broadcaster: "pusher",
    // key: import.meta.env.VITE_PUSHER_APP_KEY,
    // cluster: import.meta.env.VITE_PUSHER_APP_CLUSTER,
    // forceTLS: true,
    // wsHost: import.meta.env.VITE_PUSHER_HOST,
    // wsPort: import.meta.env.VITE_PUSHER_PORT,
    // wssPort: import.meta.env.VITE_PUSHER_PORT,
    // enabledTransports: ["ws", "wss"],
});
```

Next, you should define the appropriate values for the Pusher environment variables in your application's `.env` file. If these variables do not already exist in your `.env` file, you should add them:

```ini
PUSHER_APP_ID="your-pusher-app-id"
PUSHER_APP_KEY="your-pusher-key"
PUSHER_APP_SECRET="your-pusher-secret"
PUSHER_HOST=
PUSHER_PORT=443
PUSHER_SCHEME="https"
PUSHER_APP_CLUSTER="mt1"

VITE_APP_NAME="${APP_NAME}"
VITE_PUSHER_APP_KEY="${PUSHER_APP_KEY}"
VITE_PUSHER_HOST="${PUSHER_HOST}"
VITE_PUSHER_PORT="${PUSHER_PORT}"
VITE_PUSHER_SCHEME="${PUSHER_SCHEME}"
VITE_PUSHER_APP_CLUSTER="${PUSHER_APP_CLUSTER}"
```

Once you have adjusted the Echo configuration according to your application's needs, you may compile your application's assets:

```shell
npm run build
```

> [!NOTE]
> To learn more about compiling your application's JavaScript assets, please consult the documentation on [Vite](/docs/{{version}}/vite).

<a name="using-an-existing-client-instance"></a>
#### Using an Existing Client Instance

If you already have a pre-configured Pusher Channels client instance that you would like Echo to utilize, you may pass it to Echo via the `client` configuration option:

```js
import Echo from 'laravel-echo';
import Pusher from 'pusher-js';

const options = {
    broadcaster: 'pusher',
    key: import.meta.env.VITE_PUSHER_APP_KEY
}

window.Echo = new Echo({
    ...options,
    client: new Pusher(options.key, options)
});
```

<a name="client-ably"></a>
### Ably

> [!NOTE]
> The documentation below discusses how to use Ably in "Pusher compatibility" mode. However, the Ably team recommends and maintains a broadcaster and Echo client that is able to take advantage of the unique capabilities offered by Ably. For more information on using the Ably maintained drivers, please [consult Ably's Laravel broadcaster documentation](https://github.com/ably/laravel-broadcaster).

[Laravel Echo](https://github.com/laravel/echo) is a JavaScript library that makes it painless to subscribe to channels and listen for events broadcast by your server-side broadcasting driver.

When installing broadcasting support via the `install:broadcasting --ably` Artisan command, Ably and Echo's scaffolding and configuration will be injected into your application automatically. However, if you wish to manually configure Laravel Echo, you may do so by following the instructions below.

<a name="ably-client-manual-installation"></a>
#### Manual Installation

To manually configure Laravel Echo for your application's frontend, first install the `laravel-echo` and `pusher-js` packages which utilize the Pusher protocol for WebSocket subscriptions, channels, and messages:

```shell
npm install --save-dev laravel-echo pusher-js
```

**Before continuing, you should enable Pusher protocol support in your Ably application settings. You may enable this feature within the "Protocol Adapter Settings" portion of your Ably application's settings dashboard.**

Once Echo is installed, you are ready to create a fresh Echo instance in your application's `resources/js/app.js` file:

```js tab=JavaScript
import Echo from 'laravel-echo';

import Pusher from 'pusher-js';
window.Pusher = Pusher;

window.Echo = new Echo({
    broadcaster: 'pusher',
    key: import.meta.env.VITE_ABLY_PUBLIC_KEY,
    wsHost: 'realtime-pusher.ably.io',
    wsPort: 443,
    disableStats: true,
    encrypted: true,
});
```

```js tab=React
import { configureEcho } from "@laravel/echo-react";

configureEcho({
    broadcaster: "ably",
    // key: import.meta.env.VITE_ABLY_PUBLIC_KEY,
    // wsHost: "realtime-pusher.ably.io",
    // wsPort: 443,
    // disableStats: true,
    // encrypted: true,
});
```

```js tab=Vue
import { configureEcho } from "@laravel/echo-vue";

configureEcho({
    broadcaster: "ably",
    // key: import.meta.env.VITE_ABLY_PUBLIC_KEY,
    // wsHost: "realtime-pusher.ably.io",
    // wsPort: 443,
    // disableStats: true,
    // encrypted: true,
});
```

```js tab=Svelte
import { configureEcho } from "@laravel/echo-svelte";

configureEcho({
    broadcaster: "ably",
    // key: import.meta.env.VITE_ABLY_PUBLIC_KEY,
    // wsHost: "realtime-pusher.ably.io",
    // wsPort: 443,
    // disableStats: true,
    // encrypted: true,
});
```

You may have noticed our Ably Echo configuration references a `VITE_ABLY_PUBLIC_KEY` environment variable. This variable's value should be your Ably public key. Your public key is the portion of your Ably key that occurs before the `:` character.

Once you have adjusted the Echo configuration according to your needs, you may compile your application's assets:

```shell
npm run dev
```

> [!NOTE]
> To learn more about compiling your application's JavaScript assets, please consult the documentation on [Vite](/docs/{{version}}/vite).

<a name="concept-overview"></a>
## Concept Overview

Laravel's event broadcasting allows you to broadcast your server-side Laravel events to your client-side JavaScript application using a driver-based approach to WebSockets. Currently, Laravel ships with [Laravel Reverb](https://reverb.laravel.com), [Pusher Channels](https://pusher.com/channels), and [Ably](https://ably.com) drivers. The events may be easily consumed on the client-side using the [Laravel Echo](#client-side-installation) JavaScript package.

Events are broadcast over "channels", which may be specified as public or private. Any visitor to your application may subscribe to a public channel without any authentication or authorization; however, in order to subscribe to a private channel, a user must be authenticated and authorized to listen on that channel.

<a name="using-example-application"></a>
### Using an Example Application

Before diving into each component of event broadcasting, let's take a high level overview using an e-commerce store as an example.

In our application, let's assume we have a page that allows users to view the shipping status for their orders. Let's also assume that an `OrderShipmentStatusUpdated` event is fired when a shipping status update is processed by the application:

```php
use App\Events\OrderShipmentStatusUpdated;

OrderShipmentStatusUpdated::dispatch($order);
```

<a name="the-shouldbroadcast-interface"></a>
#### The `ShouldBroadcast` Interface

When a user is viewing one of their orders, we don't want them to have to refresh the page to view status updates. Instead, we want to broadcast the updates to the application as they are created. So, we need to mark the `OrderShipmentStatusUpdated` event with the `ShouldBroadcast` interface. This will instruct Laravel to broadcast the event when it is fired:

```php
<?php

namespace App\Events;

use App\Models\Order;
use Illuminate\Broadcasting\Channel;
use Illuminate\Broadcasting\InteractsWithSockets;
use Illuminate\Broadcasting\PresenceChannel;
use Illuminate\Contracts\Broadcasting\ShouldBroadcast;
use Illuminate\Queue\SerializesModels;

class OrderShipmentStatusUpdated implements ShouldBroadcast
{
    /**
     * The order instance.
     *
     * @var \App\Models\Order
     */
    public $order;
}
```

The `ShouldBroadcast` interface requires our event to define a `broadcastOn` method. This method is responsible for returning the channels that the event should broadcast on. An empty stub of this method is already defined on generated event classes, so we only need to fill in its details. We only want the creator of the order to be able to view status updates, so we will broadcast the event on a private channel that is tied to the order:

```php
use Illuminate\Broadcasting\Channel;
use Illuminate\Broadcasting\PrivateChannel;

/**
 * Get the channel the event should broadcast on.
 */
public function broadcastOn(): Channel
{
    return new PrivateChannel('orders.'.$this->order->id);
}
```

If you wish the event to broadcast on multiple channels, you may return an `array` instead:

```php
use Illuminate\Broadcasting\PrivateChannel;

/**
 * Get the channels the event should broadcast on.
 *
 * @return array<int, \Illuminate\Broadcasting\Channel>
 */
public function broadcastOn(): array
{
    return [
        new PrivateChannel('orders.'.$this->order->id),
        // ...
    ];
}
```

<a name="example-application-authorizing-channels"></a>
#### Authorizing Channels

Remember, users must be authorized to listen on private channels. We may define our channel authorization rules in our application's `routes/channels.php` file. In this example, we need to verify that any user attempting to listen on the private `orders.1` channel is actually the creator of the order:

```php
use App\Models\Order;
use App\Models\User;

Broadcast::channel('orders.{orderId}', function (User $user, int $orderId) {
    return $user->id === Order::findOrNew($orderId)->user_id;
});
```

The `channel` method accepts two arguments: the name of the channel and a callback which returns `true` or `false` indicating whether the user is authorized to listen on the channel.

All authorization callbacks receive the currently authenticated user as their first argument and any additional wildcard parameters as their subsequent arguments. In this example, we are using the `{orderId}` placeholder to indicate that the "ID" portion of the channel name is a wildcard.

<a name="listening-for-event-broadcasts"></a>
#### Listening for Event Broadcasts

Next, all that remains is to listen for the event in our JavaScript application. We can do this using [Laravel Echo](#client-side-installation). Laravel Echo's built-in React, Vue, and Svelte hooks make it simple to get started, and, by default, all of the event's public properties will be included on the broadcast event:

```js tab=React
import { useEcho } from "@laravel/echo-react";

useEcho(
    `orders.${orderId}`,
    "OrderShipmentStatusUpdated",
    (e) => {
        console.log(e.order);
    },
);
```

```vue tab=Vue
<script setup lang="ts">
import { useEcho } from "@laravel/echo-vue";

useEcho(
    `orders.${orderId}`,
    "OrderShipmentStatusUpdated",
    (e) => {
        console.log(e.order);
    },
);
</script>
```

```svelte tab=Svelte
<script>
import { useEcho } from "@laravel/echo-svelte";

useEcho(
    `orders.${orderId}`,
    "OrderShipmentStatusUpdated",
    (e) => {
        console.log(e.order);
    },
);
</script>
```

<a name="defining-broadcast-events"></a>
## Defining Broadcast Events

To inform Laravel that a given event should be broadcast, you must implement the `Illuminate\Contracts\Broadcasting\ShouldBroadcast` interface on the event class. This interface is already imported into all event classes generated by the framework so you may easily add it to any of your events.

The `ShouldBroadcast` interface requires you to implement a single method: `broadcastOn`. The `broadcastOn` method should return a channel or array of channels that the event should broadcast on. The channels should be instances of `Channel`, `PrivateChannel`, or `PresenceChannel`. Instances of `Channel` represent public channels that any user may subscribe to, while `PrivateChannels` and `PresenceChannels` represent private channels that require [channel authorization](#authorizing-channels):

```php
<?php

namespace App\Events;

use App\Models\User;
use Illuminate\Broadcasting\Channel;
use Illuminate\Broadcasting\InteractsWithSockets;
use Illuminate\Broadcasting\PresenceChannel;
use Illuminate\Broadcasting\PrivateChannel;
use Illuminate\Contracts\Broadcasting\ShouldBroadcast;
use Illuminate\Queue\SerializesModels;

class ServerCreated implements ShouldBroadcast
{
    use SerializesModels;

    /**
     * Create a new event instance.
     */
    public function __construct(
        public User $user,
    ) {}

    /**
     * Get the channels the event should broadcast on.
     *
     * @return array<int, \Illuminate\Broadcasting\Channel>
     */
    public function broadcastOn(): array
    {
        return [
            new PrivateChannel('user.'.$this->user->id),
        ];
    }
}
```

After implementing the `ShouldBroadcast` interface, you only need to [fire the event](/docs/{{version}}/events) as you normally would. Once the event has been fired, a [queued job](/docs/{{version}}/queues) will automatically broadcast the event using your specified broadcast driver.

<a name="broadcast-name"></a>
### Broadcast Name

By default, Laravel will broadcast the event using the event's class name. However, you may customize the broadcast name by defining a `broadcastAs` method on the event:

```php
/**
 * The event's broadcast name.
 */
public function broadcastAs(): string
{
    return 'server.created';
}
```

If you customize the broadcast name using the `broadcastAs` method, you should make sure to register your listener with a leading `.` character. This will instruct Echo to not prepend the application's namespace to the event:

```javascript
.listen('.server.created', function (e) {
    // ...
});
```

<a name="broadcast-data"></a>
### Broadcast Data

When an event is broadcast, all of its `public` properties are automatically serialized and broadcast as the event's payload, allowing you to access any of its public data from your JavaScript application. So, for example, if your event has a single public `$user` property that contains an Eloquent model, the event's broadcast payload would be:

```json
{
    "user": {
        "id": 1,
        "name": "Patrick Stewart"
        ...
    }
}
```

However, if you wish to have more fine-grained control over your broadcast payload, you may add a `broadcastWith` method to your event. This method should return the array of data that you wish to broadcast as the event payload:

```php
/**
 * Get the data to broadcast.
 *
 * @return array<string, mixed>
 */
public function broadcastWith(): array
{
    return ['id' => $this->user->id];
}
```

<a name="broadcast-queue"></a>
### Broadcast Queue

By default, each broadcast event is placed on the default queue for the default queue connection specified in your `queue.php` configuration file. You may customize the queue connection and name used by the broadcaster by using the `Connection` and `Queue` attributes on your event class:

```php
use Illuminate\Queue\Attributes\Connection;
use Illuminate\Queue\Attributes\Queue;

#[Connection('redis')]
#[Queue('default')]
class ServerCreated implements ShouldBroadcast
{
    // ...
}
```

Alternatively, you may customize the queue name by defining a `broadcastQueue` method on your event:

```php
/**
 * The name of the queue on which to place the broadcasting job.
 */
public function broadcastQueue(): string
{
    return 'default';
}
```

If you would like to broadcast your event using the `sync` queue instead of the default queue driver, you can implement the `ShouldBroadcastNow` interface instead of `ShouldBroadcast`:

```php
<?php

namespace App\Events;

use Illuminate\Contracts\Broadcasting\ShouldBroadcastNow;

class OrderShipmentStatusUpdated implements ShouldBroadcastNow
{
    // ...
}
```

<a name="broadcast-conditions"></a>
### Broadcast Conditions

Sometimes you want to broadcast your event only if a given condition is true. You may define these conditions by adding a `broadcastWhen` method to your event class:

```php
/**
 * Determine if this event should broadcast.
 */
public function broadcastWhen(): bool
{
    return $this->order->value > 100;
}
```

<a name="broadcasting-and-database-transactions"></a>
#### Broadcasting and Database Transactions

When broadcast events are dispatched within database transactions, they may be processed by the queue before the database transaction has committed. When this happens, any updates you have made to models or database records during the database transaction may not yet be reflected in the database. In addition, any models or database records created within the transaction may not exist in the database. If your event depends on these models, unexpected errors can occur when the job that broadcasts the event is processed.

If your queue connection's `after_commit` configuration option is set to `false`, you may still indicate that a particular broadcast event should be dispatched after all open database transactions have been committed by implementing the `ShouldDispatchAfterCommit` interface on the event class:

```php
<?php

namespace App\Events;

use Illuminate\Contracts\Broadcasting\ShouldBroadcast;
use Illuminate\Contracts\Events\ShouldDispatchAfterCommit;
use Illuminate\Queue\SerializesModels;

class ServerCreated implements ShouldBroadcast, ShouldDispatchAfterCommit
{
    use SerializesModels;
}
```

> [!NOTE]
> To learn more about working around these issues, please review the documentation regarding [queued jobs and database transactions](/docs/{{version}}/queues#jobs-and-database-transactions).

<a name="authorizing-channels"></a>
## Authorizing Channels

Private channels require you to authorize that the currently authenticated user can actually listen on the channel. This is accomplished by making an HTTP request to your Laravel application with the channel name and allowing your application to determine if the user can listen on that channel. When using [Laravel Echo](#client-side-installation), the HTTP request to authorize subscriptions to private channels will be made automatically.

When broadcasting is installed Laravel attempts to automatically register the `/broadcasting/auth` route to handle authorization requests. If Laravel fails to automatically register these routes, you may register them manually in your application's `/bootstrap/app.php` file:

```php
->withRouting(
    web: __DIR__.'/../routes/web.php',
    channels: __DIR__.'/../routes/channels.php',
    health: '/up',
)
```

<a name="defining-authorization-callbacks"></a>
### Defining Authorization Callbacks

Next, we need to define the logic that will actually determine if the currently authenticated user can listen to a given channel. This is done in the `routes/channels.php` file that was created by the `install:broadcasting` Artisan command. In this file, you may use the `Broadcast::channel` method to register channel authorization callbacks:

```php
use App\Models\User;

Broadcast::channel('orders.{orderId}', function (User $user, int $orderId) {
    return $user->id === Order::findOrNew($orderId)->user_id;
});
```

The `channel` method accepts two arguments: the name of the channel and a callback which returns `true` or `false` indicating whether the user is authorized to listen on the channel.

All authorization callbacks receive the currently authenticated user as their first argument and any additional wildcard parameters as their subsequent arguments. In this example, we are using the `{orderId}` placeholder to indicate that the "ID" portion of the channel name is a wildcard.

You may view a list of your application's broadcast authorization callbacks using the `channel:list` Artisan command:

```shell
php artisan channel:list
```

<a name="authorization-callback-model-binding"></a>
#### Authorization Callback Model Binding

Just like HTTP routes, channel routes may also take advantage of implicit and explicit [route model binding](/docs/{{version}}/routing#route-model-binding). For example, instead of receiving a string or numeric order ID, you may request an actual `Order` model instance:

```php
use App\Models\Order;
use App\Models\User;

Broadcast::channel('orders.{order}', function (User $user, Order $order) {
    return $user->id === $order->user_id;
});
```

> [!WARNING]
> Unlike HTTP route model binding, channel model binding does not support automatic [implicit model binding scoping](/docs/{{version}}/routing#implicit-model-binding-scoping). However, this is rarely a problem because most channels can be scoped based on a single model's unique, primary key.

<a name="authorization-callback-authentication"></a>
#### Authorization Callback Authentication

Private and presence broadcast channels authenticate the current user via your application's default authentication guard. If the user is not authenticated, channel authorization is automatically denied and the authorization callback is never executed. However, you may assign multiple, custom guards that should authenticate the incoming request if necessary:

```php
Broadcast::channel('channel', function () {
    // ...
}, ['guards' => ['web', 'admin']]);
```

<a name="defining-channel-classes"></a>
### Defining Channel Classes

If your application is consuming many different channels, your `routes/channels.php` file could become bulky. So, instead of using closures to authorize channels, you may use channel classes. To generate a channel class, use the `make:channel` Artisan command. This command will place a new channel class in the `App/Broadcasting` directory.

```shell
php artisan make:channel OrderChannel
```

Next, register your channel in your `routes/channels.php` file:

```php
use App\Broadcasting\OrderChannel;

Broadcast::channel('orders.{order}', OrderChannel::class);
```

Finally, you may place the authorization logic for your channel in the channel class' `join` method. This `join` method will house the same logic you would have typically placed in your channel authorization closure. You may also take advantage of channel model binding:

```php
<?php

namespace App\Broadcasting;

use App\Models\Order;
use App\Models\User;

class OrderChannel
{
    /**
     * Create a new channel instance.
     */
    public function __construct() {}

    /**
     * Authenticate the user's access to the channel.
     */
    public function join(User $user, Order $order): array|bool
    {
        return $user->id === $order->user_id;
    }
}
```

> [!NOTE]
> Like many other classes in Laravel, channel classes will automatically be resolved by the [service container](/docs/{{version}}/container). So, you may type-hint any dependencies required by your channel in its constructor.

<a name="broadcasting-events"></a>
## Broadcasting Events

Once you have defined an event and marked it with the `ShouldBroadcast` interface, you only need to fire the event using the event's dispatch method. The event dispatcher will notice that the event is marked with the `ShouldBroadcast` interface and will queue the event for broadcasting:

```php
use App\Events\OrderShipmentStatusUpdated;

OrderShipmentStatusUpdated::dispatch($order);
```

<a name="only-to-others"></a>
### Only to Others

When building an application that utilizes event broadcasting, you may occasionally need to broadcast an event to all subscribers to a given channel except for the current user. You may accomplish this using the `broadcast` helper and the `toOthers` method:

```php
use App\Events\OrderShipmentStatusUpdated;

broadcast(new OrderShipmentStatusUpdated($update))->toOthers();
```

To better understand when you may want to use the `toOthers` method, let's imagine a task list application where a user may create a new task by entering a task name. To create a task, your application might make a request to a `/task` URL which broadcasts the task's creation and returns a JSON representation of the new task. When your JavaScript application receives the response from the end-point, it might directly insert the new task into its task list like so:

```js
axios.post('/task', task)
    .then((response) => {
        this.tasks.push(response.data);
    });
```

However, remember that we also broadcast the task's creation. If your JavaScript application is also listening for this event in order to add tasks to the task list, you will have duplicate tasks in your list: one from the end-point and one from the broadcast. You may solve this by using the `toOthers` method to instruct the broadcaster to not broadcast the event to the current user.

> [!WARNING]
> Your event must use the `Illuminate\Broadcasting\InteractsWithSockets` trait in order to call the `toOthers` method.

<a name="only-to-others-configuration"></a>
#### Configuration

When you initialize a Laravel Echo instance, a socket ID is assigned to the connection. If you are using a global [Axios](https://github.com/axios/axios) instance to make HTTP requests from your JavaScript application, the socket ID will automatically be attached to every outgoing request as an `X-Socket-ID` header. Then, when you call the `toOthers` method, Laravel will extract the socket ID from the header and instruct the broadcaster to not broadcast to any connections with that socket ID.

If you are not using a global Axios instance, you will need to manually configure your JavaScript application to send the `X-Socket-ID` header with all outgoing requests. You may retrieve the socket ID using the `Echo.socketId` method:

```js
var socketId = Echo.socketId();
```

<a name="customizing-the-connection"></a>
### Customizing the Connection

If your application interacts with multiple broadcast connections and you want to broadcast an event using a broadcaster other than your default, you may specify which connection to push an event to using the `via` method:

```php
use App\Events\OrderShipmentStatusUpdated;

broadcast(new OrderShipmentStatusUpdated($update))->via('pusher');
```

Alternatively, you may specify the event's broadcast connection by calling the `broadcastVia` method within the event's constructor. However, before doing so, you should ensure that the event class uses the `InteractsWithBroadcasting` trait:

```php
<?php

namespace App\Events;

use Illuminate\Broadcasting\Channel;
use Illuminate\Broadcasting\InteractsWithBroadcasting;
use Illuminate\Broadcasting\InteractsWithSockets;
use Illuminate\Broadcasting\PresenceChannel;
use Illuminate\Broadcasting\PrivateChannel;
use Illuminate\Contracts\Broadcasting\ShouldBroadcast;
use Illuminate\Queue\SerializesModels;

class OrderShipmentStatusUpdated implements ShouldBroadcast
{
    use InteractsWithBroadcasting;

    /**
     * Create a new event instance.
     */
    public function __construct()
    {
        $this->broadcastVia('pusher');
    }
}
```

<a name="anonymous-events"></a>
### Anonymous Events

Sometimes, you may want to broadcast a simple event to your application's frontend without creating a dedicated event class. To accommodate this, the `Broadcast` facade allows you to broadcast "anonymous events":

```php
Broadcast::on('orders.'.$order->id)->send();
```

The example above will broadcast the following event:

```json
{
    "event": "AnonymousEvent",
    "data": "[]",
    "channel": "orders.1"
}
```

Using the `as` and `with` methods, you may customize the event's name and data:

```php
Broadcast::on('orders.'.$order->id)
    ->as('OrderPlaced')
    ->with($order)
    ->send();
```

The example above will broadcast an event like the following:

```json
{
    "event": "OrderPlaced",
    "data": "{ id: 1, total: 100 }",
    "channel": "orders.1"
}
```

If you would like to broadcast the anonymous event on a private or presence channel, you may utilize the `private` and `presence` methods:

```php
Broadcast::private('orders.'.$order->id)->send();
Broadcast::presence('channels.'.$channel->id)->send();
```

Broadcasting an anonymous event using the `send` method dispatches the event to your application's [queue](/docs/{{version}}/queues) for processing. However, if you would like to broadcast the event immediately, you may use the `sendNow` method:

```php
Broadcast::on('orders.'.$order->id)->sendNow();
```

To broadcast the event to all channel subscribers except the currently authenticated user, you can invoke the `toOthers` method:

```php
Broadcast::on('orders.'.$order->id)
    ->toOthers()
    ->send();
```

<a name="rescuing-broadcasts"></a>
### Rescuing Broadcasts

When your application's queue server is unavailable or Laravel encounters an error while broadcasting an event, an exception is thrown that typically causes the end user to see an application error. Since event broadcasting is often supplementary to your application's core functionality, you can prevent these exceptions from disrupting the user experience by implementing the `ShouldRescue` interface on your events.

Events that implement the `ShouldRescue` interface automatically utilize Laravel's [rescue helper function](/docs/{{version}}/helpers#method-rescue) during broadcast attempts. This helper catches any exceptions, reports them to your application's exception handler for logging, and allows the application to continue executing normally without interrupting the user's workflow:

```php
<?php

namespace App\Events;

use Illuminate\Contracts\Broadcasting\ShouldBroadcast;
use Illuminate\Contracts\Broadcasting\ShouldRescue;

class ServerCreated implements ShouldBroadcast, ShouldRescue
{
    // ...
}
```

<a name="receiving-broadcasts"></a>
## Receiving Broadcasts

<a name="listening-for-events"></a>
### Listening for Events

Once you have [installed and instantiated Laravel Echo](#client-side-installation), you are ready to start listening for events that are broadcast from your Laravel application. First, use the `channel` method to retrieve an instance of a channel, then call the `listen` method to listen for a specified event:

```js
Echo.channel(`orders.${this.order.id}`)
    .listen('OrderShipmentStatusUpdated', (e) => {
        console.log(e.order.name);
    });
```

If you would like to listen for events on a private channel, use the `private` method instead. You may continue to chain calls to the `listen` method to listen for multiple events on a single channel:

```js
Echo.private(`orders.${this.order.id}`)
    .listen(/* ... */)
    .listen(/* ... */)
    .listen(/* ... */);
```

<a name="stop-listening-for-events"></a>
#### Stop Listening for Events

If you would like to stop listening to a given event without [leaving the channel](#leaving-a-channel), you may use the `stopListening` method:

```js
Echo.private(`orders.${this.order.id}`)
    .stopListening('OrderShipmentStatusUpdated');
```

<a name="leaving-a-channel"></a>
### Leaving a Channel

To leave a channel, you may call the `leaveChannel` method on your Echo instance:

```js
Echo.leaveChannel(`orders.${this.order.id}`);
```

If you would like to leave a channel and also its associated private and presence channels, you may call the `leave` method:

```js
Echo.leave(`orders.${this.order.id}`);
```
<a name="namespaces"></a>
### Namespaces

You may have noticed in the examples above that we did not specify the full `App\Events` namespace for the event classes. This is because Echo will automatically assume the events are located in the `App\Events` namespace. However, you may configure the root namespace when you instantiate Echo by passing a `namespace` configuration option:

```js
window.Echo = new Echo({
    broadcaster: 'pusher',
    // ...
    namespace: 'App.Other.Namespace'
});
```

Alternatively, you may prefix event classes with a `.` when subscribing to them using Echo. This will allow you to always specify the fully-qualified class name:

```js
Echo.channel('orders')
    .listen('.Namespace\\Event\\Class', (e) => {
        // ...
    });
```

<a name="using-react-or-vue"></a>
### Using React, Vue, or Svelte

Laravel Echo includes React, Vue, and Svelte hooks that make it painless to listen for events. To get started, invoke the `useEcho` hook, which is used to listen for private events. The `useEcho` hook will automatically leave channels when the consuming component is unmounted:

```js tab=React
import { useEcho } from "@laravel/echo-react";

useEcho(
    `orders.${orderId}`,
    "OrderShipmentStatusUpdated",
    (e) => {
        console.log(e.order);
    },
);
```

```vue tab=Vue
<script setup lang="ts">
import { useEcho } from "@laravel/echo-vue";

useEcho(
    `orders.${orderId}`,
    "OrderShipmentStatusUpdated",
    (e) => {
        console.log(e.order);
    },
);
</script>
```

```svelte tab=Svelte
<script>
import { useEcho } from "@laravel/echo-svelte";

useEcho(
    `orders.${orderId}`,
    "OrderShipmentStatusUpdated",
    (e) => {
        console.log(e.order);
    },
);
</script>
```

You may listen to multiple events by providing an array of events to `useEcho`:

```js
useEcho(
    `orders.${orderId}`,
    ["OrderShipmentStatusUpdated", "OrderShipped"],
    (e) => {
        console.log(e.order);
    },
);
```

You may also specify the shape of the broadcast event payload data, providing greater type safety and editing convenience:

```ts
type OrderData = {
    order: {
        id: number;
        user: {
            id: number;
            name: string;
        };
        created_at: string;
    };
};

useEcho<OrderData>(`orders.${orderId}`, "OrderShipmentStatusUpdated", (e) => {
    console.log(e.order.id);
    console.log(e.order.user.id);
});
```

The `useEcho` hook will automatically leave channels when the consuming component is unmounted; however, you may utilize the returned functions to manually stop / start listening to channels programmatically when necessary:

```js tab=React
import { useEcho } from "@laravel/echo-react";

const { leaveChannel, leave, stopListening, listen } = useEcho(
    `orders.${orderId}`,
    "OrderShipmentStatusUpdated",
    (e) => {
        console.log(e.order);
    },
);

// Stop listening without leaving channel...
stopListening();

// Start listening again...
listen();

// Leave channel...
leaveChannel();

// Leave a channel and also its associated private and presence channels...
leave();
```

```vue tab=Vue
<script setup lang="ts">
import { useEcho } from "@laravel/echo-vue";

const { leaveChannel, leave, stopListening, listen } = useEcho(
    `orders.${orderId}`,
    "OrderShipmentStatusUpdated",
    (e) => {
        console.log(e.order);
    },
);

// Stop listening without leaving channel...
stopListening();

// Start listening again...
listen();

// Leave channel...
leaveChannel();

// Leave a channel and also its associated private and presence channels...
leave();
</script>
```

```svelte tab=Svelte
<script>
import { useEcho } from "@laravel/echo-svelte";

const { leaveChannel, leave, stopListening, listen } = useEcho(
    `orders.${orderId}`,
    "OrderShipmentStatusUpdated",
    (e) => {
        console.log(e.order);
    },
);

// Stop listening without leaving channel...
stopListening();

// Start listening again...
listen();

// Leave channel...
leaveChannel();

// Leave a channel and also its associated private and presence channels...
leave();
</script>
```

<a name="react-vue-connecting-to-public-channels"></a>
#### Connecting to Public Channels

To connect to a public channel, you may use the `useEchoPublic` hook:

```js tab=React
import { useEchoPublic } from "@laravel/echo-react";

useEchoPublic("posts", "PostPublished", (e) => {
    console.log(e.post);
});
```

```vue tab=Vue
<script setup lang="ts">
import { useEchoPublic } from "@laravel/echo-vue";

useEchoPublic("posts", "PostPublished", (e) => {
    console.log(e.post);
});
</script>
```

```svelte tab=Svelte
<script>
import { useEchoPublic } from "@laravel/echo-svelte";

useEchoPublic("posts", "PostPublished", (e) => {
    console.log(e.post);
});
</script>
```

<a name="react-vue-connecting-to-presence-channels"></a>
#### Connecting to Presence Channels

To connect to a presence channel, you may use the `useEchoPresence` hook:

```js tab=React
import { useEchoPresence } from "@laravel/echo-react";

useEchoPresence("posts", "PostPublished", (e) => {
    console.log(e.post);
});
```

```vue tab=Vue
<script setup lang="ts">
import { useEchoPresence } from "@laravel/echo-vue";

useEchoPresence("posts", "PostPublished", (e) => {
    console.log(e.post);
});
</script>
```

```svelte tab=Svelte
<script>
import { useEchoPresence } from "@laravel/echo-svelte";

useEchoPresence("posts", "PostPublished", (e) => {
    console.log(e.post);
});
</script>
```

<a name="react-vue-connection-status"></a>
#### Connection Status

You may retrieve the current WebSocket connection status using the `useConnectionStatus` hook, which provides reactive status that automatically updates when the connection state changes:

```js tab=React
import { useConnectionStatus } from "@laravel/echo-react";

function ConnectionIndicator() {
    const status = useConnectionStatus();

    return <div>Connection: {status}</div>;
}
```

```vue tab=Vue
<script setup lang="ts">
import { useConnectionStatus } from "@laravel/echo-vue";

const status = useConnectionStatus();
</script>

<template>
    <div>Connection: {{ status }}</div>
</template>
```

```svelte tab=Svelte
<script>
import { useConnectionStatus } from "@laravel/echo-svelte";

const status = useConnectionStatus();
</script>

<div>Connection: {status()}</div>
```

The possible status values are:

<div class="content-list" markdown="1">

- `connected` - Successfully connected to the WebSocket server.
- `connecting` - Initial connection attempt in progress.
- `reconnecting` - Attempting to reconnect after a disconnection.
- `disconnected` - Not connected and not attempting to reconnect.
- `failed` - Connection failed and won't retry.

</div>

<a name="react-vue-socket-id"></a>
#### Socket ID

You may retrieve the current WebSocket socket ID using the `useSocketId` hook, which provides a reactive value that automatically updates when the connection reconnects with a new socket ID:

```js tab=React
import { useSocketId } from "@laravel/echo-react";

function SocketIndicator() {
    const socketId = useSocketId();

    return <div>Socket ID: {socketId}</div>;
}
```

```vue tab=Vue
<script setup lang="ts">
import { useSocketId } from "@laravel/echo-vue";

const socketId = useSocketId();
</script>

<template>
    <div>Socket ID: {{ socketId }}</div>
</template>
```

```svelte tab=Svelte
<script>
import { useSocketId } from "@laravel/echo-svelte";

const socketId = useSocketId();
</script>

<div>Socket ID: {socketId()}</div>
```

<a name="presence-channels"></a>
## Presence Channels

Presence channels build on the security of private channels while exposing the additional feature of awareness of who is subscribed to the channel. This makes it easy to build powerful, collaborative application features such as notifying users when another user is viewing the same page or listing the inhabitants of a chat room.

<a name="authorizing-presence-channels"></a>
### Authorizing Presence Channels

All presence channels are also private channels; therefore, users must be [authorized to access them](#authorizing-channels). However, when defining authorization callbacks for presence channels, you will not return `true` if the user is authorized to join the channel. Instead, you should return an array of data about the user.

The data returned by the authorization callback will be made available to the presence channel event listeners in your JavaScript application. If the user is not authorized to join the presence channel, you should return `false` or `null`:

```php
use App\Models\User;

Broadcast::channel('chat.{roomId}', function (User $user, int $roomId) {
    if ($user->canJoinRoom($roomId)) {
        return ['id' => $user->id, 'name' => $user->name];
    }
});
```

<a name="joining-presence-channels"></a>
### Joining Presence Channels

To join a presence channel, you may use Echo's `join` method. The `join` method will return a `PresenceChannel` implementation which, along with exposing the `listen` method, allows you to subscribe to the `here`, `joining`, and `leaving` events.

```js
Echo.join(`chat.${roomId}`)
    .here((users) => {
        // ...
    })
    .joining((user) => {
        console.log(user.name);
    })
    .leaving((user) => {
        console.log(user.name);
    })
    .error((error) => {
        console.error(error);
    });
```

The `here` callback will be executed immediately once the channel is joined successfully, and will receive an array containing the user information for all of the other users currently subscribed to the channel. The `joining` method will be executed when a new user joins a channel, while the `leaving` method will be executed when a user leaves the channel. The `error` method will be executed when the authentication endpoint returns an HTTP status code other than 200 or if there is a problem parsing the returned JSON.

<a name="broadcasting-to-presence-channels"></a>
### Broadcasting to Presence Channels

Presence channels may receive events just like public or private channels. Using the example of a chatroom, we may want to broadcast `NewMessage` events to the room's presence channel. To do so, we'll return an instance of `PresenceChannel` from the event's `broadcastOn` method:

```php
/**
 * Get the channels the event should broadcast on.
 *
 * @return array<int, \Illuminate\Broadcasting\Channel>
 */
public function broadcastOn(): array
{
    return [
        new PresenceChannel('chat.'.$this->message->room_id),
    ];
}
```

As with other events, you may use the `broadcast` helper and the `toOthers` method to exclude the current user from receiving the broadcast:

```php
broadcast(new NewMessage($message));

broadcast(new NewMessage($message))->toOthers();
```

As typical of other types of events, you may listen for events sent to presence channels using Echo's `listen` method:

```js
Echo.join(`chat.${roomId}`)
    .here(/* ... */)
    .joining(/* ... */)
    .leaving(/* ... */)
    .listen('NewMessage', (e) => {
        // ...
    });
```

<a name="model-broadcasting"></a>
## Model Broadcasting

> [!WARNING]
> Before reading the following documentation about model broadcasting, we recommend you become familiar with the general concepts of Laravel's model broadcasting services as well as how to manually create and listen to broadcast events.

It is common to broadcast events when your application's [Eloquent models](/docs/{{version}}/eloquent) are created, updated, or deleted. Of course, this can easily be accomplished by manually [defining custom events for Eloquent model state changes](/docs/{{version}}/eloquent#events) and marking those events with the `ShouldBroadcast` interface.

However, if you are not using these events for any other purposes in your application, it can be cumbersome to create event classes for the sole purpose of broadcasting them. To remedy this, Laravel allows you to indicate that an Eloquent model should automatically broadcast its state changes.

To get started, your Eloquent model should use the `Illuminate\Database\Eloquent\BroadcastsEvents` trait. In addition, the model should define a `broadcastOn` method, which will return an array of channels that the model's events should broadcast on:

```php
<?php

namespace App\Models;

use Illuminate\Broadcasting\Channel;
use Illuminate\Broadcasting\PrivateChannel;
use Illuminate\Database\Eloquent\BroadcastsEvents;
use Illuminate\Database\Eloquent\Factories\HasFactory;
use Illuminate\Database\Eloquent\Model;
use Illuminate\Database\Eloquent\Relations\BelongsTo;

class Post extends Model
{
    use BroadcastsEvents, HasFactory;

    /**
     * Get the user that the post belongs to.
     */
    public function user(): BelongsTo
    {
        return $this->belongsTo(User::class);
    }

    /**
     * Get the channels that model events should broadcast on.
     *
     * @return array<int, \Illuminate\Broadcasting\Channel|\Illuminate\Database\Eloquent\Model>
     */
    public function broadcastOn(string $event): array
    {
        return [$this, $this->user];
    }
}
```

Once your model includes this trait and defines its broadcast channels, it will begin automatically broadcasting events when a model instance is created, updated, deleted, trashed, or restored.

In addition, you may have noticed that the `broadcastOn` method receives a string `$event` argument. This argument contains the type of event that has occurred on the model and will have a value of `created`, `updated`, `deleted`, `trashed`, or `restored`. By inspecting the value of this variable, you may determine which channels (if any) the model should broadcast to for a particular event:

```php
/**
 * Get the channels that model events should broadcast on.
 *
 * @return array<string, array<int, \Illuminate\Broadcasting\Channel|\Illuminate\Database\Eloquent\Model>>
 */
public function broadcastOn(string $event): array
{
    return match ($event) {
        'deleted' => [],
        default => [$this, $this->user],
    };
}
```

<a name="customizing-model-broadcasting-event-creation"></a>
#### Customizing Model Broadcasting Event Creation

Occasionally, you may wish to customize how Laravel creates the underlying model broadcasting event. You may accomplish this by defining a `newBroadcastableEvent` method on your Eloquent model. This method should return an `Illuminate\Database\Eloquent\BroadcastableModelEventOccurred` instance:

```php
use Illuminate\Database\Eloquent\BroadcastableModelEventOccurred;

/**
 * Create a new broadcastable model event for the model.
 */
protected function newBroadcastableEvent(string $event): BroadcastableModelEventOccurred
{
    return (new BroadcastableModelEventOccurred(
        $this, $event
    ))->dontBroadcastToCurrentUser();
}
```

<a name="model-broadcasting-conventions"></a>
### Model Broadcasting Conventions

<a name="model-broadcasting-channel-conventions"></a>
#### Channel Conventions

As you may have noticed, the `broadcastOn` method in the model example above did not return `Channel` instances. Instead, Eloquent models were returned directly. If an Eloquent model instance is returned by your model's `broadcastOn` method (or is contained in an array returned by the method), Laravel will automatically instantiate a private channel instance for the model using the model's class name and primary key identifier as the channel name.

So, an `App\Models\User` model with an `id` of `1` would be converted into an `Illuminate\Broadcasting\PrivateChannel` instance with a name of `App.Models.User.1`. Of course, in addition to returning Eloquent model instances from your model's `broadcastOn` method, you may return complete `Channel` instances in order to have full control over the model's channel names:

```php
use Illuminate\Broadcasting\PrivateChannel;

/**
 * Get the channels that model events should broadcast on.
 *
 * @return array<int, \Illuminate\Broadcasting\Channel>
 */
public function broadcastOn(string $event): array
{
    return [
        new PrivateChannel('user.'.$this->id)
    ];
}
```

If you plan to explicitly return a channel instance from your model's `broadcastOn` method, you may pass an Eloquent model instance to the channel's constructor. When doing so, Laravel will use the model channel conventions discussed above to convert the Eloquent model into a channel name string:

```php
return [new Channel($this->user)];
```

If you need to determine the channel name of a model, you may call the `broadcastChannel` method on any model instance. For example, this method returns the string `App.Models.User.1` for an `App\Models\User` model with an `id` of `1`:

```php
$user->broadcastChannel();
```

<a name="model-broadcasting-event-conventions"></a>
#### Event Conventions

Since model broadcast events are not associated with an "actual" event within your application's `App\Events` directory, they are assigned a name and a payload based on conventions. Laravel's convention is to broadcast the event using the class name of the model (not including the namespace) and the name of the model event that triggered the broadcast.

So, for example, an update to the `App\Models\Post` model would broadcast an event to your client-side application as `PostUpdated` with the following payload:

```json
{
    "model": {
        "id": 1,
        "title": "My first post"
        ...
    },
    ...
    "socket": "someSocketId"
}
```

The deletion of the `App\Models\User` model would broadcast an event named `UserDeleted`.

If you would like, you may define a custom broadcast name and payload by adding a `broadcastAs` and `broadcastWith` method to your model. These methods receive the name of the model event / operation that is occurring, allowing you to customize the event's name and payload for each model operation. If `null` is returned from the `broadcastAs` method, Laravel will use the model broadcasting event name conventions discussed above when broadcasting the event:

```php
/**
 * The model event's broadcast name.
 */
public function broadcastAs(string $event): string|null
{
    return match ($event) {
        'created' => 'post.created',
        default => null,
    };
}

/**
 * Get the data to broadcast for the model.
 *
 * @return array<string, mixed>
 */
public function broadcastWith(string $event): array
{
    return match ($event) {
        'created' => ['title' => $this->title],
        default => ['model' => $this],
    };
}
```

<a name="listening-for-model-broadcasts"></a>
### Listening for Model Broadcasts

Once you have added the `BroadcastsEvents` trait to your model and defined your model's `broadcastOn` method, you are ready to start listening for broadcasted model events within your client-side application. Before getting started, you may wish to consult the complete documentation on [listening for events](#listening-for-events).

First, use the `private` method to retrieve an instance of a channel, then call the `listen` method to listen for a specified event. Typically, the channel name given to the `private` method should correspond to Laravel's [model broadcasting conventions](#model-broadcasting-conventions).

Once you have obtained a channel instance, you may use the `listen` method to listen for a particular event. Since model broadcast events are not associated with an "actual" event within your application's `App\Events` directory, the [event name](#model-broadcasting-event-conventions) must be prefixed with a `.` to indicate it does not belong to a particular namespace. Each model broadcast event has a `model` property which contains all of the broadcastable properties of the model:

```js
Echo.private(`App.Models.User.${this.user.id}`)
    .listen('.UserUpdated', (e) => {
        console.log(e.model);
    });
```

<a name="model-broadcasts-with-react-or-vue"></a>
#### Using React, Vue, or Svelte

If you are using React, Vue, or Svelte, you may use Laravel Echo's included `useEchoModel` hook to easily listen for model broadcasts:

```js tab=React
import { useEchoModel } from "@laravel/echo-react";

useEchoModel("App.Models.User", userId, ["UserUpdated"], (e) => {
    console.log(e.model);
});
```

```vue tab=Vue
<script setup lang="ts">
import { useEchoModel } from "@laravel/echo-vue";

useEchoModel("App.Models.User", userId, ["UserUpdated"], (e) => {
    console.log(e.model);
});
</script>
```

```svelte tab=Svelte
<script>
import { useEchoModel } from "@laravel/echo-svelte";

useEchoModel("App.Models.User", userId, ["UserUpdated"], (e) => {
    console.log(e.model);
});
</script>
```

You may also specify the shape of the model event payload data, providing greater type safety and editing convenience:

```ts
type User = {
    id: number;
    name: string;
    email: string;
};

useEchoModel<User, "App.Models.User">("App.Models.User", userId, ["UserUpdated"], (e) => {
    console.log(e.model.id);
    console.log(e.model.name);
});
```

<a name="client-events"></a>
## Client Events

> [!NOTE]
> When using [Pusher Channels](https://pusher.com/channels), you must enable the "Client Events" option in the "App Settings" section of your [application dashboard](https://dashboard.pusher.com/) in order to send client events.

Sometimes you may wish to broadcast an event to other connected clients without hitting your Laravel application at all. This can be particularly useful for things like "typing" notifications, where you want to alert users of your application that another user is typing a message on a given screen.

To broadcast client events, you may use Echo's `whisper` method:

```js tab=JavaScript
Echo.private(`chat.${roomId}`)
    .whisper('typing', {
        name: this.user.name
    });
```

```js tab=React
import { useEcho } from "@laravel/echo-react";

const { channel } = useEcho(`chat.${roomId}`, ['update'], (e) => {
    console.log('Chat event received:', e);
});

channel().whisper('typing', { name: user.name });
```

```vue tab=Vue
<script setup lang="ts">
import { useEcho } from "@laravel/echo-vue";

const { channel } = useEcho(`chat.${roomId}`, ['update'], (e) => {
    console.log('Chat event received:', e);
});

channel().whisper('typing', { name: user.name });
</script>
```

```svelte tab=Svelte
<script>
import { useEcho } from "@laravel/echo-svelte";

const { channel } = useEcho(`chat.${roomId}`, ['update'], (e) => {
    console.log('Chat event received:', e);
});

channel().whisper('typing', { name: user.name });
</script>
```

To listen for client events, you may use the `listenForWhisper` method:

```js tab=JavaScript
Echo.private(`chat.${roomId}`)
    .listenForWhisper('typing', (e) => {
        console.log(e.name);
    });
```

```js tab=React
import { useEcho } from "@laravel/echo-react";

const { channel } = useEcho(`chat.${roomId}`, ['update'], (e) => {
    console.log('Chat event received:', e);
});

channel().listenForWhisper('typing', (e) => {
    console.log(e.name);
});
```

```vue tab=Vue
<script setup lang="ts">
import { useEcho } from "@laravel/echo-vue";

const { channel } = useEcho(`chat.${roomId}`, ['update'], (e) => {
    console.log('Chat event received:', e);
});

channel().listenForWhisper('typing', (e) => {
    console.log(e.name);
});
</script>
```

```svelte tab=Svelte
<script>
import { useEcho } from "@laravel/echo-svelte";

const { channel } = useEcho(`chat.${roomId}`, ['update'], (e) => {
    console.log('Chat event received:', e);
});

channel().listenForWhisper('typing', (e) => {
    console.log(e.name);
});
</script>
```

<a name="notifications"></a>
## Notifications

By pairing event broadcasting with [notifications](/docs/{{version}}/notifications), your JavaScript application may receive new notifications as they occur without needing to refresh the page. Before getting started, be sure to read over the documentation on using [the broadcast notification channel](/docs/{{version}}/notifications#broadcast-notifications).

Once you have configured a notification to use the broadcast channel, you may listen for the broadcast events using Echo's `notification` method. Remember, the channel name should match the class name of the entity receiving the notifications:

```js tab=JavaScript
Echo.private(`App.Models.User.${userId}`)
    .notification((notification) => {
        console.log(notification.type);
    });
```

```js tab=React
import { useEchoModel } from "@laravel/echo-react";

const { channel } = useEchoModel('App.Models.User', userId);

channel().notification((notification) => {
    console.log(notification.type);
});
```

```vue tab=Vue
<script setup lang="ts">
import { useEchoModel } from "@laravel/echo-vue";

const { channel } = useEchoModel('App.Models.User', userId);

channel().notification((notification) => {
    console.log(notification.type);
});
</script>
```

```svelte tab=Svelte
<script>
import { useEchoModel } from "@laravel/echo-svelte";

const { channel } = useEchoModel('App.Models.User', userId);

channel().notification((notification) => {
    console.log(notification.type);
});
</script>
```

In this example, all notifications sent to `App\Models\User` instances via the `broadcast` channel would be received by the callback. A channel authorization callback for the `App.Models.User.{id}` channel is included in your application's `routes/channels.php` file.

<a name="stop-listening-for-notifications"></a>
#### Stop Listening for Notifications

If you would like to stop listening to notifications without [leaving the channel](#leaving-a-channel), you may use the `stopListeningForNotification` method:

```js
const callback = (notification) => {
    console.log(notification.type);
}

// Start listening...
Echo.private(`App.Models.User.${userId}`)
    .notification(callback);

// Stop listening (callback must be the same)...
Echo.private(`App.Models.User.${userId}`)
    .stopListeningForNotification(callback);
```


---

# Cache

*Sección: Laravel | Origen: https://laravel.com/docs/13.x/cache*

- [Introduction](#introduction)
- [Configuration](#configuration)
    - [Driver Prerequisites](#driver-prerequisites)
- [Cache Usage](#cache-usage)
    - [Obtaining a Cache Instance](#obtaining-a-cache-instance)
    - [Retrieving Items From the Cache](#retrieving-items-from-the-cache)
    - [Storing Items in the Cache](#storing-items-in-the-cache)
    - [Extending Item Lifetime](#extending-item-lifetime)
    - [Removing Items From the Cache](#removing-items-from-the-cache)
    - [Cache Memoization](#cache-memoization)
    - [The Cache Helper](#the-cache-helper)
- [Cache Tags](#cache-tags)
    - [Storing Tagged Cache Items](#storing-tagged-cache-items)
    - [Accessing Tagged Cache Items](#accessing-tagged-cache-items)
    - [Removing Tagged Cache Items](#removing-tagged-cache-items)
- [Atomic Locks](#atomic-locks)
    - [Managing Locks](#managing-locks)
    - [Managing Locks Across Processes](#managing-locks-across-processes)
    - [Refreshing Locks](#refreshing-locks)
    - [Concurrency Limiting](#concurrency-limiting)
- [Cache Failover](#cache-failover)
- [Adding Custom Cache Drivers](#adding-custom-cache-drivers)
    - [Writing the Driver](#writing-the-driver)
    - [Registering the Driver](#registering-the-driver)
- [Events](#events)

<a name="introduction"></a>
## Introduction

Some of the data retrieval or processing tasks performed by your application could be CPU intensive or take several seconds to complete. When this is the case, it is common to cache the retrieved data for a time so it can be retrieved quickly on subsequent requests for the same data. The cached data is usually stored in a very fast data store such as [Memcached](https://memcached.org) or [Redis](https://redis.io).

Thankfully, Laravel provides an expressive, unified API for various cache backends, allowing you to take advantage of their blazing fast data retrieval and speed up your web application.

<a name="configuration"></a>
## Configuration

Your application's cache configuration file is located at `config/cache.php`. In this file, you may specify which cache store you would like to be used by default throughout your application. Laravel supports popular caching backends like [Memcached](https://memcached.org), [Redis](https://redis.io), [DynamoDB](https://aws.amazon.com/dynamodb), relational databases, and filesystem disks out of the box. In addition, a file based cache driver is available, while `array` and `null` cache drivers provide convenient cache backends for your automated tests.

The cache configuration file also contains a variety of other options that you may review. By default, Laravel is configured to use the `database` cache driver, which stores the serialized, cached objects in your application's database.

<a name="driver-prerequisites"></a>
### Driver Prerequisites

<a name="prerequisites-database"></a>
#### Database

When using the `database` cache driver, you will need a database table to contain the cache data. Typically, this is included in Laravel's default `0001_01_01_000001_create_cache_table.php` [database migration](/docs/{{version}}/migrations); however, if your application does not contain this migration, you may use the `make:cache-table` Artisan command to create it:

```shell
php artisan make:cache-table

php artisan migrate
```

<a name="memcached"></a>
#### Memcached

Using the Memcached driver requires the [Memcached PECL package](https://pecl.php.net/package/memcached) to be installed. You may list all of your Memcached servers in the `config/cache.php` configuration file. This file already contains a `memcached.servers` entry to get you started:

```php
'memcached' => [
    // ...

    'servers' => [
        [
            'host' => env('MEMCACHED_HOST', '127.0.0.1'),
            'port' => env('MEMCACHED_PORT', 11211),
            'weight' => 100,
        ],
    ],
],
```

If needed, you may set the `host` option to a UNIX socket path. If you do this, the `port` option should be set to `0`:

```php
'memcached' => [
    // ...

    'servers' => [
        [
            'host' => '/var/run/memcached/memcached.sock',
            'port' => 0,
            'weight' => 100
        ],
    ],
],
```

<a name="redis"></a>
#### Redis

Before using a Redis cache with Laravel, you will need to either install the PhpRedis PHP extension via PECL or install the `predis/predis` package via Composer. [Laravel Sail](/docs/{{version}}/sail) already includes this extension. In addition, official Laravel application platforms such as [Laravel Cloud](https://cloud.laravel.com) and [Laravel Forge](https://forge.laravel.com) have the PhpRedis extension installed by default.

For more information on configuring Redis, consult its [Laravel documentation page](/docs/{{version}}/redis#configuration).

<a name="storage"></a>
#### Storage

The `storage` cache driver allows you to store cached values on any of your application's configured [filesystem disks](/docs/{{version}}/filesystem). This can be useful when you want to use an existing disk, such as an S3 disk, as a key / value cache store:

```php
'storage' => [
    'driver' => 'storage',
    'disk' => env('CACHE_STORAGE_DISK'),
    'path' => env('CACHE_STORAGE_PATH', 'framework/cache/data'),
],
```

<a name="dynamodb"></a>
#### DynamoDB

Before using the [DynamoDB](https://aws.amazon.com/dynamodb) cache driver, you must create a DynamoDB table to store all of the cached data. Typically, this table should be named `cache`. However, you should name the table based on the value of the `stores.dynamodb.table` configuration value within the `cache` configuration file. The table name may also be set via the `DYNAMODB_CACHE_TABLE` environment variable.

This table should also have a string partition key with a name that corresponds to the value of the `stores.dynamodb.attributes.key` configuration item within your application's `cache` configuration file. By default, the partition key should be named `key`.

Typically, DynamoDB will not proactively remove expired items from a table. Therefore, you should [enable Time to Live (TTL)](https://docs.aws.amazon.com/amazondynamodb/latest/developerguide/TTL.html) on the table. When configuring the table's TTL settings, you should set the TTL attribute name to `expires_at`.

Next, install the AWS SDK so that your Laravel application can communicate with DynamoDB:

```shell
composer require aws/aws-sdk-php
```

In addition, you should ensure that values are provided for the DynamoDB cache store configuration options. Typically these options, such as `AWS_ACCESS_KEY_ID` and `AWS_SECRET_ACCESS_KEY`, should be defined in your application's `.env` configuration file:

```php
'dynamodb' => [
    'driver' => 'dynamodb',
    'key' => env('AWS_ACCESS_KEY_ID'),
    'secret' => env('AWS_SECRET_ACCESS_KEY'),
    'region' => env('AWS_DEFAULT_REGION', 'us-east-1'),
    'table' => env('DYNAMODB_CACHE_TABLE', 'cache'),
    'endpoint' => env('DYNAMODB_ENDPOINT'),
],
```

<a name="mongodb"></a>
#### MongoDB

If you are using MongoDB, a `mongodb` cache driver is provided by the official `mongodb/laravel-mongodb` package and can be configured using a `mongodb` database connection. MongoDB supports TTL indexes, which can be used to automatically clear expired cache items.

For more information on configuring MongoDB, please refer to the MongoDB [Cache and Locks documentation](https://www.mongodb.com/docs/drivers/php/laravel-mongodb/current/cache/).

<a name="cache-usage"></a>
## Cache Usage

<a name="obtaining-a-cache-instance"></a>
### Obtaining a Cache Instance

To obtain a cache store instance, you may use the `Cache` facade, which is what we will use throughout this documentation. The `Cache` facade provides convenient, terse access to the underlying implementations of the Laravel cache contracts:

```php
<?php

namespace App\Http\Controllers;

use Illuminate\Support\Facades\Cache;

class UserController extends Controller
{
    /**
     * Show a list of all users of the application.
     */
    public function index(): array
    {
        $value = Cache::get('key');

        return [
            // ...
        ];
    }
}
```

<a name="accessing-multiple-cache-stores"></a>
#### Accessing Multiple Cache Stores

Using the `Cache` facade, you may access various cache stores via the `store` method. The key passed to the `store` method should correspond to one of the stores listed in the `stores` configuration array in your `cache` configuration file:

```php
$value = Cache::store('file')->get('foo');

Cache::store('redis')->put('bar', 'baz', 600); // 10 Minutes
```

<a name="retrieving-items-from-the-cache"></a>
### Retrieving Items From the Cache

The `Cache` facade's `get` method is used to retrieve items from the cache. If the item does not exist in the cache, `null` will be returned. If you wish, you may pass a second argument to the `get` method specifying the default value you wish to be returned if the item doesn't exist:

```php
$value = Cache::get('key');

$value = Cache::get('key', 'default');
```

You may even pass a closure as the default value. The result of the closure will be returned if the specified item does not exist in the cache. Passing a closure allows you to defer the retrieval of default values from a database or other external service:

```php
$value = Cache::get('key', function () {
    return DB::table(/* ... */)->get();
});
```

<a name="determining-item-existence"></a>
#### Determining Item Existence

The `has` method may be used to determine if an item exists in the cache. This method will also return `false` if the item exists but its value is `null`:

```php
if (Cache::has('key')) {
    // ...
}
```

<a name="incrementing-decrementing-values"></a>
#### Incrementing / Decrementing Values

The `increment` and `decrement` methods may be used to adjust the value of integer items in the cache. Both of these methods accept an optional second argument indicating the amount by which to increment or decrement the item's value:

```php
// Initialize the value if it does not exist...
Cache::add('key', 0, now()->plus(hours: 4));

// Increment or decrement the value...
Cache::increment('key');
Cache::increment('key', $amount);
Cache::decrement('key');
Cache::decrement('key', $amount);
```

<a name="retrieve-store"></a>
#### Retrieve and Store

Sometimes you may wish to retrieve an item from the cache, but also store a default value if the requested item doesn't exist. For example, you may wish to retrieve all users from the cache or, if they don't exist, retrieve them from the database and add them to the cache. You may do this using the `Cache::remember` method:

```php
$value = Cache::remember('users', $seconds, function () {
    return DB::table('users')->get();
});
```

If the item does not exist in the cache, the closure passed to the `remember` method will be executed and its result will be placed in the cache.

If you need to know whether the item was retrieved from the cache instead of by executing the given closure, you may use the `rememberWithWarmth` method. This method returns an array containing the cached value and a boolean indicating whether the item was "warm", meaning it was retrieved from the cache and not resolved from the closure:

```php
[$value, $warm] = Cache::rememberWithWarmth('users', $seconds, function () {
    return DB::table('users')->get();
});
```

You may use the `rememberForever` method to retrieve an item from the cache or store it forever if it does not exist:

```php
$value = Cache::rememberForever('users', function () {
    return DB::table('users')->get();
});
```

<a name="swr"></a>
#### Stale While Revalidate

When using the `Cache::remember` method, some users may experience slow response times if the cached value has expired. For certain types of data, it can be useful to allow partially stale data to be served while the cached value is recalculated in the background, preventing some users from experiencing slow response times while cached values are calculated. This is often referred to as the "stale-while-revalidate" pattern, and the `Cache::flexible` method provides an implementation of this pattern.

The flexible method accepts an array that specifies how long the cached value is considered "fresh" and when it becomes "stale". The first value in the array represents the number of seconds the cache is considered fresh, while the second value defines how long it can be served as stale data before recalculation is necessary.

If a request is made within the fresh period (before the first value), the cache is returned immediately without recalculation. If a request is made during the stale period (between the two values), the stale value is served to the user, and a [deferred function](/docs/{{version}}/helpers#deferred-functions) is registered to refresh the cached value after the response is sent to the user. If a request is made after the second value, the cache is considered expired, and the value is recalculated immediately, which may result in a slower response for the user:

```php
$value = Cache::flexible('users', [5, 10], function () {
    return DB::table('users')->get();
});
```

<a name="retrieve-delete"></a>
#### Retrieve and Delete

If you need to retrieve an item from the cache and then delete the item, you may use the `pull` method. Like the `get` method, `null` will be returned if the item does not exist in the cache:

```php
$value = Cache::pull('key');

$value = Cache::pull('key', 'default');
```

<a name="storing-items-in-the-cache"></a>
### Storing Items in the Cache

You may use the `put` method on the `Cache` facade to store items in the cache:

```php
Cache::put('key', 'value', $seconds = 10);
```

If the storage time is not passed to the `put` method, the item will be stored indefinitely:

```php
Cache::put('key', 'value');
```

Instead of passing the number of seconds as an integer, you may also pass a `DateTime` instance representing the desired expiration time of the cached item:

```php
Cache::put('key', 'value', now()->plus(minutes: 10));
```

<a name="store-if-not-present"></a>
#### Store if Not Present

The `add` method will only add the item to the cache if it does not already exist in the cache store. The method will return `true` if the item is actually added to the cache. Otherwise, the method will return `false`. The `add` method is an atomic operation:

```php
Cache::add('key', 'value', $seconds);
```

<a name="extending-item-lifetime"></a>
### Extending Item Lifetime

The `touch` method allows you to extend the lifetime (TTL) of an existing cache item. The `touch` method will return `true` if the cache item exists and its expiration time was successfully extended. If the item does not exist in the cache, the method will return `false`:

```php
Cache::touch('key', 3600);
```

You may provide a `DateTimeInterface`, `DateInterval`, or `Carbon` instance to specify an exact expiration time:

```php
Cache::touch('key', now()->addHours(2));
```

<a name="storing-items-forever"></a>
#### Storing Items Forever

The `forever` method may be used to store an item in the cache permanently. Since these items will not expire, they must be manually removed from the cache using the `forget` method:

```php
Cache::forever('key', 'value');
```

> [!NOTE]
> If you are using the Memcached driver, items that are stored "forever" may be removed when the cache reaches its size limit.

<a name="removing-items-from-the-cache"></a>
### Removing Items From the Cache

You may remove items from the cache using the `forget` method:

```php
Cache::forget('key');
```

You may also remove items by providing a zero or negative number of expiration seconds:

```php
Cache::put('key', 'value', 0);

Cache::put('key', 'value', -5);
```

You may clear the entire cache using the `flush` method:

```php
Cache::flush();
```

You may clear all atomic locks in the cache using the `flushLocks` method:

```php
Cache::flushLocks();
```

> [!WARNING]
> Flushing the cache does not respect your configured cache "prefix" and will remove all entries from the cache. Consider this carefully when clearing a cache which is shared by other applications.

<a name="cache-memoization"></a>
### Cache Memoization

Laravel's `memo` cache driver allows you to temporarily store resolved cache values in memory during a single request or job execution. This prevents repeated cache hits within the same execution, significantly improving performance.

To use the memoized cache, invoke the `memo` method:

```php
use Illuminate\Support\Facades\Cache;

$value = Cache::memo()->get('key');
```

The `memo` method optionally accepts the name of a cache store, which specifies the underlying cache store the memoized driver will decorate:

```php
// Using the default cache store...
$value = Cache::memo()->get('key');

// Using the Redis cache store...
$value = Cache::memo('redis')->get('key');
```

The first `get` call for a given key retrieves the value from your cache store, but subsequent calls within the same request or job will retrieve the value from memory:

```php
// Hits the cache...
$value = Cache::memo()->get('key');

// Does not hit the cache, returns memoized value...
$value = Cache::memo()->get('key');
```

When calling methods that modify cache values (such as `put`, `increment`, `remember`, etc.), the memoized cache automatically forgets the memoized value and delegates the mutating method call to the underlying cache store:

```php
Cache::memo()->put('name', 'Taylor'); // Writes to underlying cache...
Cache::memo()->get('name');           // Hits underlying cache...
Cache::memo()->get('name');           // Memoized, does not hit cache...

Cache::memo()->put('name', 'Tim');    // Forgets memoized value, writes new value...
Cache::memo()->get('name');           // Hits underlying cache again...
```

<a name="the-cache-helper"></a>
### The Cache Helper

In addition to using the `Cache` facade, you may also use the global `cache` function to retrieve and store data via the cache. When the `cache` function is called with a single, string argument, it will return the value of the given key:

```php
$value = cache('key');
```

If you provide an array of key / value pairs and an expiration time to the function, it will store values in the cache for the specified duration:

```php
cache(['key' => 'value'], $seconds);

cache(['key' => 'value'], now()->plus(minutes: 10));
```

When the `cache` function is called without any arguments, it returns an instance of the `Illuminate\Contracts\Cache\Factory` implementation, allowing you to call other caching methods:

```php
cache()->remember('users', $seconds, function () {
    return DB::table('users')->get();
});
```

> [!NOTE]
> When testing calls to the global `cache` function, you may use the `Cache::shouldReceive` method just as if you were [testing the facade](/docs/{{version}}/mocking#mocking-facades).

<a name="cache-tags"></a>
## Cache Tags

> [!WARNING]
> Cache tags are not supported when using the `file`, `dynamodb`, `database`, or `storage` cache drivers.

<a name="storing-tagged-cache-items"></a>
### Storing Tagged Cache Items

Cache tags allow you to tag related items in the cache and then flush all cached values that have been assigned a given tag. You may access a tagged cache by passing in an ordered array of tag names. For example, let's access a tagged cache and `put` a value into the cache:

```php
use Illuminate\Support\Facades\Cache;

Cache::tags(['people', 'artists'])->put('John', $john, $seconds);
Cache::tags(['people', 'authors'])->put('Anne', $anne, $seconds);
```

<a name="accessing-tagged-cache-items"></a>
### Accessing Tagged Cache Items

Items stored via tags may not be accessed without also providing the tags that were used to store the value. To retrieve a tagged cache item, pass the same ordered list of tags to the `tags` method, then call the `get` method with the key you wish to retrieve:

```php
$john = Cache::tags(['people', 'artists'])->get('John');

$anne = Cache::tags(['people', 'authors'])->get('Anne');
```

<a name="removing-tagged-cache-items"></a>
### Removing Tagged Cache Items

You may flush all items that are assigned a tag or list of tags. For example, the following code would remove all caches tagged with either `people`, `authors`, or both. So, both `Anne` and `John` would be removed from the cache:

```php
Cache::tags(['people', 'authors'])->flush();
```

In contrast, the code below would remove only cached values tagged with `authors`, so `Anne` would be removed, but not `John`:

```php
Cache::tags('authors')->flush();
```

<a name="atomic-locks"></a>
## Atomic Locks

> [!WARNING]
> To utilize this feature, your application must be using the `memcached`, `redis`, `dynamodb`, `database`, `file`, or `array` cache driver as your application's default cache driver. In addition, all servers must be communicating with the same central cache server.

<a name="managing-locks"></a>
### Managing Locks

Atomic locks allow for the manipulation of distributed locks without worrying about race conditions. For example, [Laravel Cloud](https://cloud.laravel.com) uses atomic locks to ensure that only one remote task is being executed on a server at a time. You may create and manage locks using the `Cache::lock` method:

```php
use Illuminate\Support\Facades\Cache;

$lock = Cache::lock('foo', 10);

if ($lock->get()) {
    // Lock acquired for 10 seconds...

    $lock->release();
}
```

The `get` method also accepts a closure. After the closure is executed, Laravel will automatically release the lock:

```php
Cache::lock('foo', 10)->get(function () {
    // Lock acquired for 10 seconds and automatically released...
});
```

If the lock is not available at the moment you request it, you may instruct Laravel to wait for a specified number of seconds. If the lock cannot be acquired within the specified time limit, an `Illuminate\Contracts\Cache\LockTimeoutException` will be thrown:

```php
use Illuminate\Contracts\Cache\LockTimeoutException;

$lock = Cache::lock('foo', 10);

try {
    $lock->block(5);

    // Lock acquired after waiting a maximum of 5 seconds...
} catch (LockTimeoutException $e) {
    // Unable to acquire lock...
} finally {
    $lock->release();
}
```

The example above may be simplified by passing a closure to the `block` method. When a closure is passed to this method, Laravel will attempt to acquire the lock for the specified number of seconds and will automatically release the lock once the closure has been executed:

```php
Cache::lock('foo', 10)->block(5, function () {
    // Lock acquired for 10 seconds after waiting a maximum of 5 seconds...
});
```

<a name="managing-locks-across-processes"></a>
### Managing Locks Across Processes

Sometimes, you may wish to acquire a lock in one process and release it in another process. For example, you may acquire a lock during a web request and wish to release the lock at the end of a queued job that is triggered by that request. In this scenario, you should pass the lock's scoped "owner token" to the queued job so that the job can re-instantiate the lock using the given token.

In the example below, we will dispatch a queued job if a lock is successfully acquired. In addition, we will pass the lock's owner token to the queued job via the lock's `owner` method:

```php
$podcast = Podcast::find($id);

$lock = Cache::lock('processing', 120);

if ($lock->get()) {
    ProcessPodcast::dispatch($podcast, $lock->owner());
}
```

Within our application's `ProcessPodcast` job, we can restore and release the lock using the owner token:

```php
Cache::restoreLock('processing', $this->owner)->release();
```

If you would like to release a lock without respecting its current owner, you may use the `forceRelease` method:

```php
Cache::lock('processing')->forceRelease();
```

<a name="refreshing-locks"></a>
### Refreshing Locks

If you need to extend the expiration of a lock that you currently own, you may use the `refresh` method. If no number of seconds is provided, the lock's original duration will be used. This is useful for long-running operations where you prefer to acquire a short lock and periodically extend it instead of acquiring a lock with a very long expiration time:

```php
$lock = Cache::lock('generate-reports', 60);

if ($lock->get()) {
    foreach ($reports as $report) {
        $report->generate();

        // Extend the lock for another 60 seconds...
        $lock->refresh();
    }

    $lock->release();
}
```

<a name="concurrency-limiting"></a>
### Concurrency Limiting

Laravel's atomic lock functionality also provides a few ways to limit concurrent execution of closures. Use `withoutOverlapping` when you want to allow only one running instance across your infrastructure:

```php
Cache::withoutOverlapping('foo', function () {
    // Lock acquired after waiting a maximum of 10 seconds...
});
```

By default, the lock is held until the closure finishes executing, and the method waits up to 10 seconds to acquire the lock. You may customize these values using additional arguments:

```php
Cache::withoutOverlapping('foo', function () {
    // Lock acquired for 120 seconds after waiting a maximum of 5 seconds...
}, lockFor: 120, waitFor: 5);
```

If the lock cannot be acquired within the specified wait time, an `Illuminate\Contracts\Cache\LockTimeoutException` will be thrown.

If you want controlled parallelism, use the `funnel` method to set a maximum number of concurrent executions. The `funnel` method works with any cache driver that supports locks:

```php
Cache::funnel('foo')
    ->limit(3)
    ->releaseAfter(60)
    ->block(10)
    ->then(function () {
        // Concurrency lock acquired...
    }, function () {
        // Could not acquire concurrency lock...
    });
```

The `funnel` key identifies the resource being limited. The `limit` method defines the maximum concurrent executions. The `releaseAfter` method sets a safety timeout in seconds before an acquired slot is automatically released. The `block` method sets how many seconds to wait for an available slot.

If you prefer to handle the timeout via exceptions instead of providing a failure closure, you may omit the second closure. An `Illuminate\Cache\Limiters\LimiterTimeoutException` will be thrown if the lock cannot be acquired within the specified wait time:

```php
use Illuminate\Cache\Limiters\LimiterTimeoutException;

try {
    Cache::funnel('foo')
        ->limit(3)
        ->releaseAfter(60)
        ->block(10)
        ->then(function () {
            // Concurrency lock acquired...
        });
} catch (LimiterTimeoutException $e) {
    // Unable to acquire concurrency lock...
}
```

If you would like to use a specific cache store for the concurrency limiter, you may invoke the `funnel` method on the desired store:

```php
Cache::store('redis')->funnel('foo')
    ->limit(3)
    ->block(10)
    ->then(function () {
        // Concurrency lock acquired using the "redis" store...
    });
```

> [!NOTE]
> The `funnel` method requires the cache store to implement the `Illuminate\Contracts\Cache\LockProvider` interface. If you attempt to use `funnel` with a cache store that does not support locks, a `BadMethodCallException` will be thrown.

<a name="cache-failover"></a>
## Cache Failover

The `failover` cache driver provides automatic failover functionality when interacting with the cache. If the primary cache store of the `failover` store fails for any reason, Laravel will automatically attempt to use the next configured store in the list. This is particularly useful for ensuring high availability in production environments where cache reliability is critical.

To configure a failover cache store, specify the `failover` driver and provide an array of store names to attempt in order. By default, Laravel includes an example failover configuration in your application's `config/cache.php` configuration file:

```php
'failover' => [
    'driver' => 'failover',
    'stores' => [
        'database',
        'array',
    ],
],
```

Once you have configured a store that uses the `failover` driver, you will need to set the failover store as your default cache store in your application's `.env` file to make use of the failover functionality:

```ini
CACHE_STORE=failover
```

When a cache store operation fails and failover is activated, Laravel will dispatch the `Illuminate\Cache\Events\CacheFailedOver` event, allowing you to report or log that a cache store has failed.

<a name="adding-custom-cache-drivers"></a>
## Adding Custom Cache Drivers

<a name="writing-the-driver"></a>
### Writing the Driver

To create our custom cache driver, we first need to implement the `Illuminate\Contracts\Cache\Store` [contract](/docs/{{version}}/contracts). So, a MongoDB cache implementation might look something like this:

```php
<?php

namespace App\Extensions;

use Illuminate\Contracts\Cache\Store;

class MongoStore implements Store
{
    public function get($key) {}
    public function many(array $keys) {}
    public function put($key, $value, $seconds) {}
    public function putMany(array $values, $seconds) {}
    public function increment($key, $value = 1) {}
    public function decrement($key, $value = 1) {}
    public function forever($key, $value) {}
    public function forget($key) {}
    public function flush() {}
    public function getPrefix() {}
}
```

We just need to implement each of these methods using a MongoDB connection. For an example of how to implement each of these methods, take a look at the `Illuminate\Cache\MemcachedStore` in the [Laravel framework source code](https://github.com/laravel/framework). Once our implementation is complete, we can finish our custom driver registration by calling the `Cache` facade's `extend` method:

```php
Cache::extend('mongo', function (Application $app) {
    return Cache::repository(new MongoStore);
});
```

> [!NOTE]
> If you're wondering where to put your custom cache driver code, you could create an `Extensions` namespace within your `app` directory. However, keep in mind that Laravel does not have a rigid application structure and you are free to organize your application according to your preferences.

<a name="registering-the-driver"></a>
### Registering the Driver

To register the custom cache driver with Laravel, we will use the `extend` method on the `Cache` facade. Since other service providers may attempt to read cached values within their `boot` method, we will register our custom driver within a `booting` callback. By using the `booting` callback, we can ensure that the custom driver is registered just before the `boot` method is called on our application's service providers but after the `register` method is called on all of the service providers. We will register our `booting` callback within the `register` method of our application's `App\Providers\AppServiceProvider` class:

```php
<?php

namespace App\Providers;

use App\Extensions\MongoStore;
use Illuminate\Contracts\Foundation\Application;
use Illuminate\Support\Facades\Cache;
use Illuminate\Support\ServiceProvider;

class AppServiceProvider extends ServiceProvider
{
    /**
     * Register any application services.
     */
    public function register(): void
    {
        $this->app->booting(function () {
             Cache::extend('mongo', function (Application $app) {
                 return Cache::repository(new MongoStore);
             });
         });
    }

    /**
     * Bootstrap any application services.
     */
    public function boot(): void
    {
        // ...
    }
}
```

The first argument passed to the `extend` method is the name of the driver. This will correspond to your `driver` option in the `config/cache.php` configuration file. The second argument is a closure that should return an `Illuminate\Cache\Repository` instance. The closure will be passed an `$app` instance, which is an instance of the [service container](/docs/{{version}}/container).

Once your extension is registered, update the `CACHE_STORE` environment variable or `default` option within your application's `config/cache.php` configuration file to the name of your extension.

<a name="events"></a>
## Events

To execute code on every cache operation, you may listen for various [events](/docs/{{version}}/events) dispatched by the cache:

<div class="overflow-auto">

| Event Name                                      |
|-------------------------------------------------|
| `Illuminate\Cache\Events\CacheFlushed`          |
| `Illuminate\Cache\Events\CacheFlushing`         |
| `Illuminate\Cache\Events\CacheFlushFailed`      |
| `Illuminate\Cache\Events\CacheLocksFlushed`     |
| `Illuminate\Cache\Events\CacheLocksFlushing`    |
| `Illuminate\Cache\Events\CacheLocksFlushFailed` |
| `Illuminate\Cache\Events\CacheHit`              |
| `Illuminate\Cache\Events\CacheMissed`           |
| `Illuminate\Cache\Events\ForgettingKey`         |
| `Illuminate\Cache\Events\KeyForgetFailed`       |
| `Illuminate\Cache\Events\KeyForgotten`          |
| `Illuminate\Cache\Events\KeyWriteFailed`        |
| `Illuminate\Cache\Events\KeyWritten`            |
| `Illuminate\Cache\Events\RetrievingKey`         |
| `Illuminate\Cache\Events\RetrievingManyKeys`    |
| `Illuminate\Cache\Events\WritingKey`            |
| `Illuminate\Cache\Events\WritingManyKeys`       |

</div>

To increase performance, you may disable cache events by setting the `events` configuration option to `false` for a given cache store in your application's `config/cache.php` configuration file:

```php
'database' => [
    'driver' => 'database',
    // ...
    'events' => false,
],
```


---

# Laravel Cashier (Paddle)

*Sección: Laravel | Origen: https://laravel.com/docs/13.x/cashier-paddle*

- [Introduction](#introduction)
- [Upgrading Cashier](#upgrading-cashier)
- [Installation](#installation)
    - [Paddle Sandbox](#paddle-sandbox)
- [Configuration](#configuration)
    - [Billable Model](#billable-model)
    - [API Keys](#api-keys)
    - [Paddle JS](#paddle-js)
    - [Currency Configuration](#currency-configuration)
    - [Overriding Default Models](#overriding-default-models)
- [Quickstart](#quickstart)
    - [Selling Products](#quickstart-selling-products)
    - [Selling Subscriptions](#quickstart-selling-subscriptions)
- [Checkout Sessions](#checkout-sessions)
    - [Overlay Checkout](#overlay-checkout)
    - [Inline Checkout](#inline-checkout)
    - [Guest Checkouts](#guest-checkouts)
- [Price Previews](#price-previews)
    - [Customer Price Previews](#customer-price-previews)
    - [Discounts](#price-discounts)
- [Customers](#customers)
    - [Customer Defaults](#customer-defaults)
    - [Retrieving Customers](#retrieving-customers)
    - [Creating Customers](#creating-customers)
- [Subscriptions](#subscriptions)
    - [Creating Subscriptions](#creating-subscriptions)
    - [Checking Subscription Status](#checking-subscription-status)
    - [Subscription Single Charges](#subscription-single-charges)
    - [Updating Payment Information](#updating-payment-information)
    - [Changing Plans](#changing-plans)
    - [Subscription Quantity](#subscription-quantity)
    - [Subscriptions With Multiple Products](#subscriptions-with-multiple-products)
    - [Multiple Subscriptions](#multiple-subscriptions)
    - [Pausing Subscriptions](#pausing-subscriptions)
    - [Canceling Subscriptions](#canceling-subscriptions)
- [Subscription Trials](#subscription-trials)
    - [With Payment Method Up Front](#with-payment-method-up-front)
    - [Without Payment Method Up Front](#without-payment-method-up-front)
    - [Extend or Activate a Trial](#extend-or-activate-a-trial)
- [Handling Paddle Webhooks](#handling-paddle-webhooks)
    - [Defining Webhook Event Handlers](#defining-webhook-event-handlers)
    - [Verifying Webhook Signatures](#verifying-webhook-signatures)
- [Single Charges](#single-charges)
    - [Charging for Products](#charging-for-products)
    - [Refunding Transactions](#refunding-transactions)
    - [Crediting Transactions](#crediting-transactions)
- [Transactions](#transactions)
    - [Past and Upcoming Payments](#past-and-upcoming-payments)
- [Testing](#testing)

<a name="introduction"></a>
## Introduction

> [!WARNING]
> This documentation is for Cashier Paddle 2.x's integration with Paddle Billing. If you're still using Paddle Classic, you should use [Cashier Paddle 1.x](https://github.com/laravel/cashier-paddle/tree/1.x).

[Laravel Cashier Paddle](https://github.com/laravel/cashier-paddle) provides an expressive, fluent interface to [Paddle's](https://paddle.com) subscription billing services. It handles almost all of the boilerplate subscription billing code you are dreading. In addition to basic subscription management, Cashier can handle: swapping subscriptions, subscription "quantities", subscription pausing, cancelation grace periods, and more.

Before digging into Cashier Paddle, we recommend you also review Paddle's [concept guides](https://developer.paddle.com/concepts/overview) and [API documentation](https://developer.paddle.com/api-reference/overview).

<a name="upgrading-cashier"></a>
## Upgrading Cashier

When upgrading to a new version of Cashier, it's important that you carefully review [the upgrade guide](https://github.com/laravel/cashier-paddle/blob/master/UPGRADE.md).

<a name="installation"></a>
## Installation

First, install the Cashier package for Paddle using the Composer package manager:

```shell
composer require laravel/cashier-paddle
```

Next, you should publish the Cashier migration files using the `vendor:publish` Artisan command:

```shell
php artisan vendor:publish --tag="cashier-migrations"
```

Then, you should run your application's database migrations. The Cashier migrations will create a new `customers` table. In addition, new `subscriptions` and `subscription_items` tables will be created to store all of your customer's subscriptions. Lastly, a new `transactions` table will be created to store all of the Paddle transactions associated with your customers:

```shell
php artisan migrate
```

> [!WARNING]
> To ensure Cashier properly handles all Paddle events, remember to [set up Cashier's webhook handling](#handling-paddle-webhooks).

<a name="paddle-sandbox"></a>
### Paddle Sandbox

During local and staging development, you should [register a Paddle Sandbox account](https://sandbox-login.paddle.com/signup). This account will give you a sandboxed environment to test and develop your applications without making actual payments. You may use Paddle's [test card numbers](https://developer.paddle.com/concepts/payment-methods/credit-debit-card#test-payment-method) to simulate various payment scenarios.

When using the Paddle Sandbox environment, you should set the `PADDLE_SANDBOX` environment variable to `true` within your application's `.env` file:

```ini
PADDLE_SANDBOX=true
```

After you have finished developing your application you may [apply for a Paddle vendor account](https://paddle.com). Before your application is placed into production, Paddle will need to approve your application's domain.

<a name="configuration"></a>
## Configuration

<a name="billable-model"></a>
### Billable Model

Before using Cashier, you must add the `Billable` trait to your user model definition. This trait provides various methods to allow you to perform common billing tasks, such as creating subscriptions and updating payment method information:

```php
use Laravel\Paddle\Billable;

class User extends Authenticatable
{
    use Billable;
}
```

If you have billable entities that are not users, you may also add the trait to those classes:

```php
use Illuminate\Database\Eloquent\Model;
use Laravel\Paddle\Billable;

class Team extends Model
{
    use Billable;
}
```

<a name="api-keys"></a>
### API Keys

Next, you should configure your Paddle keys in your application's `.env` file. You can retrieve your Paddle API keys from the Paddle control panel:

```ini
PADDLE_CLIENT_SIDE_TOKEN=your-paddle-client-side-token
PADDLE_API_KEY=your-paddle-api-key
PADDLE_RETAIN_KEY=your-paddle-retain-key
PADDLE_WEBHOOK_SECRET="your-paddle-webhook-secret"
PADDLE_SANDBOX=true
```

The `PADDLE_SANDBOX` environment variable should be set to `true` when you are using [Paddle's Sandbox environment](#paddle-sandbox). The `PADDLE_SANDBOX` variable should be set to `false` if you are deploying your application to production and are using Paddle's live vendor environment.

The `PADDLE_RETAIN_KEY` is optional and should only be set if you're using Paddle with [Retain](https://developer.paddle.com/concepts/retain/overview).

<a name="paddle-js"></a>
### Paddle JS

Paddle relies on its own JavaScript library to initiate the Paddle checkout widget. You can load the JavaScript library by placing the `@paddleJS` Blade directive right before your application layout's closing `</head>` tag:

```blade
<head>
    ...

    @paddleJS
</head>
```

<a name="currency-configuration"></a>
### Currency Configuration

You can specify a locale to be used when formatting money values for display on invoices. Internally, Cashier utilizes [PHP's `NumberFormatter` class](https://www.php.net/manual/en/class.numberformatter.php) to set the currency locale:

```ini
CASHIER_CURRENCY_LOCALE=nl_BE
```

> [!WARNING]
> In order to use locales other than `en`, ensure the `ext-intl` PHP extension is installed and configured on your server.

<a name="overriding-default-models"></a>
### Overriding Default Models

You are free to extend the models used internally by Cashier by defining your own model and extending the corresponding Cashier model:

```php
use Laravel\Paddle\Subscription as CashierSubscription;

class Subscription extends CashierSubscription
{
    // ...
}
```

After defining your model, you may instruct Cashier to use your custom model via the `Laravel\Paddle\Cashier` class. Typically, you should inform Cashier about your custom models in the `boot` method of your application's `App\Providers\AppServiceProvider` class:

```php
use App\Models\Cashier\Subscription;
use App\Models\Cashier\Transaction;

/**
 * Bootstrap any application services.
 */
public function boot(): void
{
    Cashier::useSubscriptionModel(Subscription::class);
    Cashier::useTransactionModel(Transaction::class);
}
```

<a name="quickstart"></a>
## Quickstart

<a name="quickstart-selling-products"></a>
### Selling Products

> [!NOTE]
> Before utilizing Paddle Checkout, you should define Products with fixed prices in your Paddle dashboard. In addition, you should [configure Paddle's webhook handling](#handling-paddle-webhooks).

Offering product and subscription billing via your application can be intimidating. However, thanks to Cashier and [Paddle's Checkout Overlay](https://developer.paddle.com/concepts/sell/overlay-checkout), you can easily build modern, robust payment integrations.

To charge customers for non-recurring, single-charge products, we'll utilize Cashier to charge customers with Paddle's Checkout Overlay, where they will provide their payment details and confirm their purchase. Once the payment has been made via the Checkout Overlay, the customer will be redirected to a success URL of your choosing within your application:

```php
use Illuminate\Http\Request;

Route::get('/buy', function (Request $request) {
    $checkout = $request->user()->checkout('pri_deluxe_album')
        ->returnTo(route('dashboard'));

    return view('buy', ['checkout' => $checkout]);
})->name('checkout');
```

As you can see in the example above, we will utilize Cashier's provided `checkout` method to create a checkout object to present the customer the Paddle Checkout Overlay for a given "price identifier". When using Paddle, "prices" refer to [defined prices for specific products](https://developer.paddle.com/build/products/create-products-prices).

If necessary, the `checkout` method will automatically create a customer in Paddle and connect that Paddle customer record to the corresponding user in your application's database. After completing the checkout session, the customer will be redirected to a dedicated success page where you can display an informational message to the customer.

In the `buy` view, we will include a button to display the Checkout Overlay. The `paddle-button` Blade component is included with Cashier Paddle; however, you may also [manually render an overlay checkout](#manually-rendering-an-overlay-checkout):

```html
<x-paddle-button :checkout="$checkout" class="px-8 py-4">
    Buy Product
</x-paddle-button>
```

<a name="providing-meta-data-to-paddle-checkout"></a>
#### Providing Meta Data to Paddle Checkout

When selling products, it's common to keep track of completed orders and purchased products via `Cart` and `Order` models defined by your own application. When redirecting customers to Paddle's Checkout Overlay to complete a purchase, you may need to provide an existing order identifier so that you can associate the completed purchase with the corresponding order when the customer is redirected back to your application.

To accomplish this, you may provide an array of custom data to the `checkout` method. Let's imagine that a pending `Order` is created within our application when a user begins the checkout process. Remember, the `Cart` and `Order` models in this example are illustrative and not provided by Cashier. You are free to implement these concepts based on the needs of your own application:

```php
use App\Models\Cart;
use App\Models\Order;
use Illuminate\Http\Request;

Route::get('/cart/{cart}/checkout', function (Request $request, Cart $cart) {
    $order = Order::create([
        'cart_id' => $cart->id,
        'price_ids' => $cart->price_ids,
        'status' => 'incomplete',
    ]);

    $checkout = $request->user()->checkout($order->price_ids)
        ->customData(['order_id' => $order->id]);

    return view('billing', ['checkout' => $checkout]);
})->name('checkout');
```

As you can see in the example above, when a user begins the checkout process, we will provide all of the cart / order's associated Paddle price identifiers to the `checkout` method. Of course, your application is responsible for associating these items with the "shopping cart" or order as a customer adds them. We also provide the order's ID to the Paddle Checkout Overlay via the `customData` method.

Of course, you will likely want to mark the order as "complete" once the customer has finished the checkout process. To accomplish this, you may listen to the webhooks dispatched by Paddle and raised via events by Cashier to store order information in your database.

To get started, listen for the `TransactionCompleted` event dispatched by Cashier. Typically, you should register the event listener in the `boot` method of your application's `AppServiceProvider`:

```php
use App\Listeners\CompleteOrder;
use Illuminate\Support\Facades\Event;
use Laravel\Paddle\Events\TransactionCompleted;

/**
 * Bootstrap any application services.
 */
public function boot(): void
{
    Event::listen(TransactionCompleted::class, CompleteOrder::class);
}
```

In this example, the `CompleteOrder` listener might look like the following:

```php
namespace App\Listeners;

use App\Models\Order;
use Laravel\Paddle\Cashier;
use Laravel\Paddle\Events\TransactionCompleted;

class CompleteOrder
{
    /**
     * Handle the incoming Cashier webhook event.
     */
    public function handle(TransactionCompleted $event): void
    {
        $orderId = $event->payload['data']['custom_data']['order_id'] ?? null;

        $order = Order::findOrFail($orderId);

        $order->update(['status' => 'completed']);
    }
}
```

Please refer to Paddle's documentation for more information on the [data contained by the `transaction.completed` event](https://developer.paddle.com/webhooks/transactions/transaction-completed).

<a name="quickstart-selling-subscriptions"></a>
### Selling Subscriptions

> [!NOTE]
> Before utilizing Paddle Checkout, you should define Products with fixed prices in your Paddle dashboard. In addition, you should [configure Paddle's webhook handling](#handling-paddle-webhooks).

Offering product and subscription billing via your application can be intimidating. However, thanks to Cashier and [Paddle's Checkout Overlay](https://developer.paddle.com/concepts/sell/overlay-checkout), you can easily build modern, robust payment integrations.

To learn how to sell subscriptions using Cashier and Paddle's Checkout Overlay, let's consider the simple scenario of a subscription service with a basic monthly (`price_basic_monthly`) and yearly (`price_basic_yearly`) plan. These two prices could be grouped under a "Basic" product (`pro_basic`) in our Paddle dashboard. In addition, our subscription service might offer an "Expert" plan as `pro_expert`.

First, let's discover how a customer can subscribe to our services. Of course, you can imagine the customer might click a "subscribe" button for the Basic plan on our application's pricing page. This button will invoke a Paddle Checkout Overlay for their chosen plan. To get started, let's initiate a checkout session via the `checkout` method:

```php
use Illuminate\Http\Request;

Route::get('/subscribe', function (Request $request) {
    $checkout = $request->user()->checkout('price_basic_monthly')
        ->returnTo(route('dashboard'));

    return view('subscribe', ['checkout' => $checkout]);
})->name('subscribe');
```

In the `subscribe` view, we will include a button to display the Checkout Overlay. The `paddle-button` Blade component is included with Cashier Paddle; however, you may also [manually render an overlay checkout](#manually-rendering-an-overlay-checkout):

```html
<x-paddle-button :checkout="$checkout" class="px-8 py-4">
    Subscribe
</x-paddle-button>
```

Now, when the Subscribe button is clicked, the customer will be able to enter their payment details and initiate their subscription. To know when their subscription has actually started (since some payment methods require a few seconds to process), you should also [configure Cashier's webhook handling](#handling-paddle-webhooks).

Now that customers can start subscriptions, we need to restrict certain portions of our application so that only subscribed users can access them. Of course, we can always determine a user's current subscription status via the `subscribed` method provided by Cashier's `Billable` trait:

```blade
@if ($user->subscribed())
    <p>You are subscribed.</p>
@endif
```

We can even easily determine if a user is subscribed to specific product or price:

```blade
@if ($user->subscribedToProduct('pro_basic'))
    <p>You are subscribed to our Basic product.</p>
@endif

@if ($user->subscribedToPrice('price_basic_monthly'))
    <p>You are subscribed to our monthly Basic plan.</p>
@endif
```

<a name="quickstart-building-a-subscribed-middleware"></a>
#### Building a Subscribed Middleware

For convenience, you may wish to create a [middleware](/docs/{{version}}/middleware) which determines if the incoming request is from a subscribed user. Once this middleware has been defined, you may easily assign it to a route to prevent users that are not subscribed from accessing the route:

```php
<?php

namespace App\Http\Middleware;

use Closure;
use Illuminate\Http\Request;
use Symfony\Component\HttpFoundation\Response;

class Subscribed
{
    /**
     * Handle an incoming request.
     */
    public function handle(Request $request, Closure $next): Response
    {
        if (! $request->user()?->subscribed()) {
            // Redirect user to billing page and ask them to subscribe...
            return redirect('/subscribe');
        }

        return $next($request);
    }
}
```

Once the middleware has been defined, you may assign it to a route:

```php
use App\Http\Middleware\Subscribed;

Route::get('/dashboard', function () {
    // ...
})->middleware([Subscribed::class]);
```

<a name="quickstart-allowing-customers-to-manage-their-billing-plan"></a>
#### Allowing Customers to Manage Their Billing Plan

Of course, customers may want to change their subscription plan to another product or "tier". In our example from above, we'd want to allow the customer to change their plan from a monthly subscription to a yearly subscription. For this you'll need to implement something like a button that leads to the below route:

```php
use Illuminate\Http\Request;

Route::put('/subscription/{price}/swap', function (Request $request, $price) {
    $user->subscription()->swap($price); // With "$price" being "price_basic_yearly" for this example.

    return redirect()->route('dashboard');
})->name('subscription.swap');
```

Besides swapping plans you'll also need to allow your customers to cancel their subscription. Like swapping plans, provide a button that leads to the following route:

```php
use Illuminate\Http\Request;

Route::put('/subscription/cancel', function (Request $request, $price) {
    $user->subscription()->cancel();

    return redirect()->route('dashboard');
})->name('subscription.cancel');
```

And now your subscription will get canceled at the end of its billing period.

> [!NOTE]
> As long as you have configured Cashier's webhook handling, Cashier will automatically keep your application's Cashier-related database tables in sync by inspecting the incoming webhooks from Paddle. So, for example, when you cancel a customer's subscription via Paddle's dashboard, Cashier will receive the corresponding webhook and mark the subscription as "canceled" in your application's database.

<a name="checkout-sessions"></a>
## Checkout Sessions

Most operations to bill customers are performed using "checkouts" via Paddle's [Checkout Overlay widget](https://developer.paddle.com/build/checkout/build-overlay-checkout) or by utilizing [inline checkout](https://developer.paddle.com/build/checkout/build-branded-inline-checkout).

Before processing checkout payments using Paddle, you should define your application's [default payment link](https://developer.paddle.com/build/transactions/default-payment-link#set-default-link) in your Paddle checkout settings dashboard.

<a name="overlay-checkout"></a>
### Overlay Checkout

Before displaying the Checkout Overlay widget, you must generate a checkout session using Cashier. A checkout session will inform the checkout widget of the billing operation that should be performed:

```php
use Illuminate\Http\Request;

Route::get('/buy', function (Request $request) {
    $checkout = $user->checkout('pri_34567')
        ->returnTo(route('dashboard'));

    return view('billing', ['checkout' => $checkout]);
});
```

Cashier includes a `paddle-button` [Blade component](/docs/{{version}}/blade#components). You may pass the checkout session to this component as a "prop". Then, when this button is clicked, Paddle's checkout widget will be displayed:

```html
<x-paddle-button :checkout="$checkout" class="px-8 py-4">
    Subscribe
</x-paddle-button>
```

By default, this will display the widget using Paddle's default styling. You can customize the widget by adding [Paddle supported attributes](https://developer.paddle.com/paddlejs/html-data-attributes) like the `data-theme='light'` attribute to the component:

```html
<x-paddle-button :checkout="$checkout" class="px-8 py-4" data-theme="light">
    Subscribe
</x-paddle-button>
```

The Paddle checkout widget is asynchronous. Once the user creates a subscription within the widget, Paddle will send your application a webhook so that you may properly update the subscription state in your application's database. Therefore, it's important that you properly [set up webhooks](#handling-paddle-webhooks) to accommodate for state changes from Paddle.

> [!WARNING]
> After a subscription state change, the delay for receiving the corresponding webhook is typically minimal but you should account for this in your application by considering that your user's subscription might not be immediately available after completing the checkout.

<a name="manually-rendering-an-overlay-checkout"></a>
#### Manually Rendering an Overlay Checkout

You may also manually render an overlay checkout without using Laravel's built-in Blade components. To get started, generate the checkout session [as demonstrated in previous examples](#overlay-checkout):

```php
use Illuminate\Http\Request;

Route::get('/buy', function (Request $request) {
    $checkout = $user->checkout('pri_34567')
        ->returnTo(route('dashboard'));

    return view('billing', ['checkout' => $checkout]);
});
```

Next, you may use Paddle.js to initialize the checkout. In this example, we will create a link that is assigned the `paddle_button` class. Paddle.js will detect this class and display the overlay checkout when the link is clicked:

```blade
<?php
$items = $checkout->getItems();
$customer = $checkout->getCustomer();
$custom = $checkout->getCustomData();
?>

<a
    href='#!'
    class='paddle_button'
    data-items='{!! json_encode($items) !!}'
    @if ($customer) data-customer-id='{{ $customer->paddle_id }}' @endif
    @if ($custom) data-custom-data='{{ json_encode($custom) }}' @endif
    @if ($returnUrl = $checkout->getReturnUrl()) data-success-url='{{ $returnUrl }}' @endif
>
    Buy Product
</a>
```

<a name="inline-checkout"></a>
### Inline Checkout

If you don't want to make use of Paddle's "overlay" style checkout widget, Paddle also provides the option to display the widget inline. While this approach does not allow you to adjust any of the checkout's HTML fields, it allows you to embed the widget within your application.

To make it easy for you to get started with inline checkout, Cashier includes a `paddle-checkout` Blade component. To get started, you should [generate a checkout session](#overlay-checkout):

```php
use Illuminate\Http\Request;

Route::get('/buy', function (Request $request) {
    $checkout = $user->checkout('pri_34567')
        ->returnTo(route('dashboard'));

    return view('billing', ['checkout' => $checkout]);
});
```

Then, you may pass the checkout session to the component's `checkout` attribute:

```blade
<x-paddle-checkout :checkout="$checkout" class="w-full" />
```

To adjust the height of the inline checkout component, you may pass the `height` attribute to the Blade component:

```blade
<x-paddle-checkout :checkout="$checkout" class="w-full" height="500" />
```

Please consult Paddle's [guide on Inline Checkout](https://developer.paddle.com/build/checkout/build-branded-inline-checkout) and [available checkout settings](https://developer.paddle.com/build/checkout/set-up-checkout-default-settings) for further details on the inline checkout's customization options.

<a name="manually-rendering-an-inline-checkout"></a>
#### Manually Rendering an Inline Checkout

You may also manually render an inline checkout without using Laravel's built-in Blade components. To get started, generate the checkout session [as demonstrated in previous examples](#inline-checkout):

```php
use Illuminate\Http\Request;

Route::get('/buy', function (Request $request) {
    $checkout = $user->checkout('pri_34567')
        ->returnTo(route('dashboard'));

    return view('billing', ['checkout' => $checkout]);
});
```

Next, you may use Paddle.js to initialize the checkout. In this example, we will demonstrate this using [Alpine.js](https://github.com/alpinejs/alpine); however, you are free to modify this example for your own frontend stack:

```blade
<?php
$options = $checkout->options();

$options['settings']['frameTarget'] = 'paddle-checkout';
$options['settings']['frameInitialHeight'] = 366;
?>

<div class="paddle-checkout" x-data="{}" x-init="
    Paddle.Checkout.open(@json($options));
">
</div>
```

<a name="guest-checkouts"></a>
### Guest Checkouts

Sometimes, you may need to create a checkout session for users that do not need an account with your application. To do so, you may use the `guest` method:

```php
use Illuminate\Http\Request;
use Laravel\Paddle\Checkout;

Route::get('/buy', function (Request $request) {
    $checkout = Checkout::guest(['pri_34567'])
        ->returnTo(route('home'));

    return view('billing', ['checkout' => $checkout]);
});
```

Then, you may provide the checkout session to the [Paddle button](#overlay-checkout) or [inline checkout](#inline-checkout) Blade components.

<a name="price-previews"></a>
## Price Previews

Paddle allows you to customize prices per currency, essentially allowing you to configure different prices for different countries. Cashier Paddle allows you to retrieve all of these prices using the `previewPrices` method. This method accepts the price IDs you wish to retrieve prices for:

```php
use Laravel\Paddle\Cashier;

$prices = Cashier::previewPrices(['pri_123', 'pri_456']);
```

The currency will be determined based on the IP address of the request; however, you may optionally provide a specific country to retrieve prices for:

```php
use Laravel\Paddle\Cashier;

$prices = Cashier::previewPrices(['pri_123', 'pri_456'], ['address' => [
    'country_code' => 'BE',
    'postal_code' => '1234',
]]);
```

After retrieving the prices you may display them however you wish:

```blade
<ul>
    @foreach ($prices as $price)
        <li>{{ $price->product['name'] }} - {{ $price->total() }}</li>
    @endforeach
</ul>
```

You may also display the subtotal price and tax amount separately:

```blade
<ul>
    @foreach ($prices as $price)
        <li>{{ $price->product['name'] }} - {{ $price->subtotal() }} (+ {{ $price->tax() }} tax)</li>
    @endforeach
</ul>
```

For more information, [checkout Paddle's API documentation regarding price previews](https://developer.paddle.com/api-reference/pricing-preview/preview-prices).

<a name="customer-price-previews"></a>
### Customer Price Previews

If a user is already a customer and you would like to display the prices that apply to that customer, you may do so by retrieving the prices directly from the customer instance:

```php
use App\Models\User;

$prices = User::find(1)->previewPrices(['pri_123', 'pri_456']);
```

Internally, Cashier will use the user's customer ID to retrieve the prices in their currency. So, for example, a user living in the United States will see prices in US dollars while a user in Belgium will see prices in Euros. If no matching currency can be found, the default currency of the product will be used. You can customize all prices of a product or subscription plan in the Paddle control panel.

<a name="price-discounts"></a>
### Discounts

You may also choose to display prices after a discount. When calling the `previewPrices` method, you provide the discount ID via the `discount_id` option:

```php
use Laravel\Paddle\Cashier;

$prices = Cashier::previewPrices(['pri_123', 'pri_456'], [
    'discount_id' => 'dsc_123'
]);
```

Then, display the calculated prices:

```blade
<ul>
    @foreach ($prices as $price)
        <li>{{ $price->product['name'] }} - {{ $price->total() }}</li>
    @endforeach
</ul>
```

<a name="customers"></a>
## Customers

<a name="customer-defaults"></a>
### Customer Defaults

Cashier allows you to define some useful defaults for your customers when creating checkout sessions. Setting these defaults allow you to pre-fill a customer's email address and name so that they can immediately move on to the payment portion of the checkout widget. You can set these defaults by overriding the following methods on your billable model:

```php
/**
 * Get the customer's name to associate with Paddle.
 */
public function paddleName(): string|null
{
    return $this->name;
}

/**
 * Get the customer's email address to associate with Paddle.
 */
public function paddleEmail(): string|null
{
    return $this->email;
}
```

These defaults will be used for every action in Cashier that generates a [checkout session](#checkout-sessions).

<a name="retrieving-customers"></a>
### Retrieving Customers

You can retrieve a customer by their Paddle Customer ID using the `Cashier::findBillable` method. This method will return an instance of the billable model:

```php
use Laravel\Paddle\Cashier;

$user = Cashier::findBillable($customerId);
```

<a name="creating-customers"></a>
### Creating Customers

Occasionally, you may wish to create a Paddle customer without beginning a subscription. You may accomplish this using the `createAsCustomer` method:

```php
$customer = $user->createAsCustomer();
```

An instance of `Laravel\Paddle\Customer` is returned. Once the customer has been created in Paddle, you may begin a subscription at a later date. You may provide an optional `$options` array to pass in any additional [customer creation parameters that are supported by the Paddle API](https://developer.paddle.com/api-reference/customers/create-customer):

```php
$customer = $user->createAsCustomer($options);
```

<a name="subscriptions"></a>
## Subscriptions

<a name="creating-subscriptions"></a>
### Creating Subscriptions

To create a subscription, first retrieve an instance of your billable model from your database, which will typically be an instance of `App\Models\User`. Once you have retrieved the model instance, you may use the `subscribe` method to create the model's checkout session:

```php
use Illuminate\Http\Request;

Route::get('/user/subscribe', function (Request $request) {
    $checkout = $request->user()->subscribe($premium = 'pri_123', 'default')
        ->returnTo(route('home'));

    return view('billing', ['checkout' => $checkout]);
});
```

The first argument given to the `subscribe` method is the specific price the user is subscribing to. This value should correspond to the price's identifier in Paddle. The `returnTo` method accepts a URL that your user will be redirected to after they successfully complete the checkout. The second argument passed to the `subscribe` method should be the internal "type" of the subscription. If your application only offers a single subscription, you might call this `default` or `primary`. This subscription type is only for internal application usage and is not meant to be displayed to users. In addition, it should not contain spaces and it should never be changed after creating the subscription.

You may also provide an array of custom metadata regarding the subscription using the `customData` method:

```php
$checkout = $request->user()->subscribe($premium = 'pri_123', 'default')
    ->customData(['key' => 'value'])
    ->returnTo(route('home'));
```

Once a subscription checkout session has been created, the checkout session may be provided to the `paddle-button` [Blade component](#overlay-checkout) that is included with Cashier Paddle:

```blade
<x-paddle-button :checkout="$checkout" class="px-8 py-4">
    Subscribe
</x-paddle-button>
```

After the user has finished their checkout, a `subscription_created` webhook will be dispatched from Paddle. Cashier will receive this webhook and set up the subscription for your customer. In order to make sure all webhooks are properly received and handled by your application, ensure you have properly [set up webhook handling](#handling-paddle-webhooks).

<a name="checking-subscription-status"></a>
### Checking Subscription Status

Once a user is subscribed to your application, you may check their subscription status using a variety of convenient methods. First, the `subscribed` method returns `true` if the user has a valid subscription, even if the subscription is currently within its trial period:

```php
if ($user->subscribed()) {
    // ...
}
```

If your application offers multiple subscriptions, you may specify the subscription when invoking the `subscribed` method:

```php
if ($user->subscribed('default')) {
    // ...
}
```

The `subscribed` method also makes a great candidate for a [route middleware](/docs/{{version}}/middleware), allowing you to filter access to routes and controllers based on the user's subscription status:

```php
<?php

namespace App\Http\Middleware;

use Closure;
use Illuminate\Http\Request;
use Symfony\Component\HttpFoundation\Response;

class EnsureUserIsSubscribed
{
    /**
     * Handle an incoming request.
     *
     * @param  \Closure(\Illuminate\Http\Request): (\Symfony\Component\HttpFoundation\Response)  $next
     */
    public function handle(Request $request, Closure $next): Response
    {
        if ($request->user() && ! $request->user()->subscribed()) {
            // This user is not a paying customer...
            return redirect('/billing');
        }

        return $next($request);
    }
}
```

If you would like to determine if a user is still within their trial period, you may use the `onTrial` method. This method can be useful for determining if you should display a warning to the user that they are still on their trial period:

```php
if ($user->subscription()->onTrial()) {
    // ...
}
```

The `subscribedToPrice` method may be used to determine if the user is subscribed to a given plan based on a given Paddle price ID. In this example, we will determine if the user's `default` subscription is actively subscribed to the monthly price:

```php
if ($user->subscribedToPrice($monthly = 'pri_123', 'default')) {
    // ...
}
```

The `recurring` method may be used to determine if the user is currently on an active subscription and is no longer within their trial period or on a grace period:

```php
if ($user->subscription()->recurring()) {
    // ...
}
```

<a name="canceled-subscription-status"></a>
#### Canceled Subscription Status

To determine if the user was once an active subscriber but has canceled their subscription, you may use the `canceled` method:

```php
if ($user->subscription()->canceled()) {
    // ...
}
```

You may also determine if a user has canceled their subscription, but are still on their "grace period" until the subscription fully expires. For example, if a user cancels a subscription on March 5th that was originally scheduled to expire on March 10th, the user is on their "grace period" until March 10th. In addition, the `subscribed` method will still return `true` during this time:

```php
if ($user->subscription()->onGracePeriod()) {
    // ...
}
```

<a name="past-due-status"></a>
#### Past Due Status

If a payment fails for a subscription, it will be marked as `past_due`. When your subscription is in this state it will not be active until the customer has updated their payment information. You may determine if a subscription is past due using the `pastDue` method on the subscription instance:

```php
if ($user->subscription()->pastDue()) {
    // ...
}
```

When a subscription is past due, you should instruct the user to [update their payment information](#updating-payment-information).

If you would like subscriptions to still be considered valid when they are `past_due`, you may use the `keepPastDueSubscriptionsActive` method provided by Cashier. Typically, this method should be called in the `register` method of your `AppServiceProvider`:

```php
use Laravel\Paddle\Cashier;

/**
 * Register any application services.
 */
public function register(): void
{
    Cashier::keepPastDueSubscriptionsActive();
}
```

> [!WARNING]
> When a subscription is in a `past_due` state it cannot be changed until payment information has been updated. Therefore, the `swap` and `updateQuantity` methods will throw an exception when the subscription is in a `past_due` state.

<a name="subscription-scopes"></a>
#### Subscription Scopes

Most subscription states are also available as query scopes so that you may easily query your database for subscriptions that are in a given state:

```php
// Get all valid subscriptions...
$subscriptions = Subscription::query()->valid()->get();

// Get all of the canceled subscriptions for a user...
$subscriptions = $user->subscriptions()->canceled()->get();
```

A complete list of available scopes is available below:

```php
Subscription::query()->valid();
Subscription::query()->onTrial();
Subscription::query()->expiredTrial();
Subscription::query()->notOnTrial();
Subscription::query()->active();
Subscription::query()->recurring();
Subscription::query()->pastDue();
Subscription::query()->paused();
Subscription::query()->notPaused();
Subscription::query()->onPausedGracePeriod();
Subscription::query()->notOnPausedGracePeriod();
Subscription::query()->canceled();
Subscription::query()->notCanceled();
Subscription::query()->onGracePeriod();
Subscription::query()->notOnGracePeriod();
```

<a name="subscription-single-charges"></a>
### Subscription Single Charges

Subscription single charges allow you to charge subscribers with a one-time charge on top of their subscriptions. You must provide one or multiple price ID's when invoking the `charge` method:

```php
// Charge a single price...
$response = $user->subscription()->charge('pri_123');

// Charge multiple prices at once...
$response = $user->subscription()->charge(['pri_123', 'pri_456']);
```

The `charge` method will not actually charge the customer until the next billing interval of their subscription. If you would like to bill the customer immediately, you may use the `chargeAndInvoice` method instead:

```php
$response = $user->subscription()->chargeAndInvoice('pri_123');
```

<a name="updating-payment-information"></a>
### Updating Payment Information

Paddle always saves a payment method per subscription. If you want to update the default payment method for a subscription, you should redirect your customer to Paddle's hosted payment method update page using the `redirectToUpdatePaymentMethod` method on the subscription model:

```php
use Illuminate\Http\Request;

Route::get('/update-payment-method', function (Request $request) {
    $user = $request->user();

    return $user->subscription()->redirectToUpdatePaymentMethod();
});
```

When a user has finished updating their information, a `subscription_updated` webhook will be dispatched by Paddle and the subscription details will be updated in your application's database.

<a name="changing-plans"></a>
### Changing Plans

After a user has subscribed to your application, they may occasionally want to change to a new subscription plan. To update the subscription plan for a user, you should pass the Paddle price's identifier to the subscription's `swap` method:

```php
use App\Models\User;

$user = User::find(1);

$user->subscription()->swap($premium = 'pri_456');
```

If you would like to swap plans and immediately invoice the user instead of waiting for their next billing cycle, you may use the `swapAndInvoice` method:

```php
$user = User::find(1);

$user->subscription()->swapAndInvoice($premium = 'pri_456');
```

<a name="prorations"></a>
#### Prorations

By default, Paddle prorates charges when swapping between plans. The `noProrate` method may be used to update the subscriptions without prorating the charges:

```php
$user->subscription('default')->noProrate()->swap($premium = 'pri_456');
```

If you would like to disable proration and invoice customers immediately, you may use the `swapAndInvoice` method in combination with `noProrate`:

```php
$user->subscription('default')->noProrate()->swapAndInvoice($premium = 'pri_456');
```

Or, to not bill your customer for a subscription change, you may utilize the `doNotBill` method:

```php
$user->subscription('default')->doNotBill()->swap($premium = 'pri_456');
```

For more information on Paddle's proration policies, please consult Paddle's [proration documentation](https://developer.paddle.com/concepts/subscriptions/proration).

<a name="subscription-quantity"></a>
### Subscription Quantity

Sometimes subscriptions are affected by "quantity". For example, a project management application might charge $10 per month per project. To easily increment or decrement your subscription's quantity, use the `incrementQuantity` and `decrementQuantity` methods:

```php
$user = User::find(1);

$user->subscription()->incrementQuantity();

// Add five to the subscription's current quantity...
$user->subscription()->incrementQuantity(5);

$user->subscription()->decrementQuantity();

// Subtract five from the subscription's current quantity...
$user->subscription()->decrementQuantity(5);
```

Alternatively, you may set a specific quantity using the `updateQuantity` method:

```php
$user->subscription()->updateQuantity(10);
```

The `noProrate` method may be used to update the subscription's quantity without prorating the charges:

```php
$user->subscription()->noProrate()->updateQuantity(10);
```

<a name="quantities-for-subscription-with-multiple-products"></a>
#### Quantities for Subscriptions With Multiple Products

If your subscription is a [subscription with multiple products](#subscriptions-with-multiple-products), you should pass the ID of the price whose quantity you wish to increment or decrement as the second argument to the increment / decrement methods:

```php
$user->subscription()->incrementQuantity(1, 'price_chat');
```

<a name="subscriptions-with-multiple-products"></a>
### Subscriptions With Multiple Products

[Subscription with multiple products](https://developer.paddle.com/build/subscriptions/add-remove-products-prices-addons) allow you to assign multiple billing products to a single subscription. For example, imagine you are building a customer service "helpdesk" application that has a base subscription price of $10 per month but offers a live chat add-on product for an additional $15 per month.

When creating subscription checkout sessions, you may specify multiple products for a given subscription by passing an array of prices as the first argument to the `subscribe` method:

```php
use Illuminate\Http\Request;

Route::post('/user/subscribe', function (Request $request) {
    $checkout = $request->user()->subscribe([
        'price_monthly',
        'price_chat',
    ]);

    return view('billing', ['checkout' => $checkout]);
});
```

In the example above, the customer will have two prices attached to their `default` subscription. Both prices will be charged on their respective billing intervals. If necessary, you may pass an associative array of key / value pairs to indicate a specific quantity for each price:

```php
$user = User::find(1);

$checkout = $user->subscribe('default', ['price_monthly', 'price_chat' => 5]);
```

If you would like to add another price to an existing subscription, you must use the subscription's `swap` method. When invoking the `swap` method, you should also include the subscription's current prices and quantities as well:

```php
$user = User::find(1);

$user->subscription()->swap(['price_chat', 'price_original' => 2]);
```

The example above will add the new price, but the customer will not be billed for it until their next billing cycle. If you would like to bill the customer immediately you may use the `swapAndInvoice` method:

```php
$user->subscription()->swapAndInvoice(['price_chat', 'price_original' => 2]);
```

You may remove prices from subscriptions using the `swap` method and omitting the price you want to remove:

```php
$user->subscription()->swap(['price_original' => 2]);
```

> [!WARNING]
> You may not remove the last price on a subscription. Instead, you should simply cancel the subscription.

<a name="multiple-subscriptions"></a>
### Multiple Subscriptions

Paddle allows your customers to have multiple subscriptions simultaneously. For example, you may run a gym that offers a swimming subscription and a weight-lifting subscription, and each subscription may have different pricing. Of course, customers should be able to subscribe to either or both plans.

When your application creates subscriptions, you may provide the type of the subscription to the `subscribe` method as the second argument. The type may be any string that represents the type of subscription the user is initiating:

```php
use Illuminate\Http\Request;

Route::post('/swimming/subscribe', function (Request $request) {
    $checkout = $request->user()->subscribe($swimmingMonthly = 'pri_123', 'swimming');

    return view('billing', ['checkout' => $checkout]);
});
```

In this example, we initiated a monthly swimming subscription for the customer. However, they may want to swap to a yearly subscription at a later time. When adjusting the customer's subscription, we can simply swap the price on the `swimming` subscription:

```php
$user->subscription('swimming')->swap($swimmingYearly = 'pri_456');
```

Of course, you may also cancel the subscription entirely:

```php
$user->subscription('swimming')->cancel();
```

<a name="pausing-subscriptions"></a>
### Pausing Subscriptions

To pause a subscription, call the `pause` method on the user's subscription:

```php
$user->subscription()->pause();
```

When a subscription is paused, Cashier will automatically set the `paused_at` column in your database. This column is used to determine when the `paused` method should begin returning `true`. For example, if a customer pauses a subscription on March 1st, but the subscription was not scheduled to recur until March 5th, the `paused` method will continue to return `false` until March 5th. This is because a user is typically allowed to continue using an application until the end of their billing cycle.

By default, pausing happens at the next billing interval so the customer can use the remainder of the period they paid for. If you want to pause a subscription immediately, you may use the `pauseNow` method:

```php
$user->subscription()->pauseNow();
```

Using the `pauseUntil` method, you can pause the subscription until a specific moment in time:

```php
$user->subscription()->pauseUntil(now()->plus(months: 1));
```

Or, you may use the `pauseNowUntil` method to immediately pause the subscription until a given point in time:

```php
$user->subscription()->pauseNowUntil(now()->plus(months: 1));
```

You may determine if a user has paused their subscription but are still on their "grace period" using the `onPausedGracePeriod` method:

```php
if ($user->subscription()->onPausedGracePeriod()) {
    // ...
}
```

To resume a paused subscription, you may invoke the `resume` method on the subscription:

```php
$user->subscription()->resume();
```

> [!WARNING]
> A subscription cannot be modified while it is paused. If you want to swap to a different plan or update quantities you must resume the subscription first.

<a name="canceling-subscriptions"></a>
### Canceling Subscriptions

To cancel a subscription, call the `cancel` method on the user's subscription:

```php
$user->subscription()->cancel();
```

When a subscription is canceled, Cashier will automatically set the `ends_at` column in your database. This column is used to determine when the `subscribed` method should begin returning `false`. For example, if a customer cancels a subscription on March 1st, but the subscription was not scheduled to end until March 5th, the `subscribed` method will continue to return `true` until March 5th. This is done because a user is typically allowed to continue using an application until the end of their billing cycle.

You may determine if a user has canceled their subscription but are still on their "grace period" using the `onGracePeriod` method:

```php
if ($user->subscription()->onGracePeriod()) {
    // ...
}
```

If you wish to cancel a subscription immediately, you may call the `cancelNow` method on the subscription:

```php
$user->subscription()->cancelNow();
```

To stop a subscription on its grace period from canceling, you may invoke the `stopCancelation` method:

```php
$user->subscription()->stopCancelation();
```

> [!WARNING]
> Paddle's subscriptions cannot be resumed after cancelation. If your customer wishes to resume their subscription, they will have to create a new subscription.

<a name="subscription-trials"></a>
## Subscription Trials

<a name="with-payment-method-up-front"></a>
### With Payment Method Up Front

If you would like to offer trial periods to your customers while still collecting payment method information up front, you should use set a trial time in the Paddle dashboard on the price your customer is subscribing to. Then, initiate the checkout session as normal:

```php
use Illuminate\Http\Request;

Route::get('/user/subscribe', function (Request $request) {
    $checkout = $request->user()
        ->subscribe('pri_monthly')
        ->returnTo(route('home'));

    return view('billing', ['checkout' => $checkout]);
});
```

When your application receives the `subscription_created` event, Cashier will set the trial period ending date on the subscription record within your application's database as well as instruct Paddle to not begin billing the customer until after this date.

> [!WARNING]
> If the customer's subscription is not canceled before the trial ending date they will be charged as soon as the trial expires, so you should be sure to notify your users of their trial ending date.

You may determine if the user is within their trial period using either the `onTrial` method of the user instance:

```php
if ($user->onTrial()) {
    // ...
}
```

To determine if an existing trial has expired, you may use the `hasExpiredTrial` methods:

```php
if ($user->hasExpiredTrial()) {
    // ...
}
```

To determine if a user is on trial for a specific subscription type, you may provide the type to the `onTrial` or `hasExpiredTrial` methods:

```php
if ($user->onTrial('default')) {
    // ...
}

if ($user->hasExpiredTrial('default')) {
    // ...
}
```

<a name="without-payment-method-up-front"></a>
### Without Payment Method Up Front

If you would like to offer trial periods without collecting the user's payment method information up front, you may set the `trial_ends_at` column on the customer record attached to your user to your desired trial ending date. This is typically done during user registration:

```php
use App\Models\User;

$user = User::create([
    // ...
]);

$user->createAsCustomer([
    'trial_ends_at' => now()->plus(days: 10)
]);
```

Cashier refers to this type of trial as a "generic trial", since it is not attached to any existing subscription. The `onTrial` method on the `User` instance will return `true` if the current date is not past the value of `trial_ends_at`:

```php
if ($user->onTrial()) {
    // User is within their trial period...
}
```

Once you are ready to create an actual subscription for the user, you may use the `subscribe` method as usual:

```php
use Illuminate\Http\Request;

Route::get('/user/subscribe', function (Request $request) {
    $checkout = $request->user()
        ->subscribe('pri_monthly')
        ->returnTo(route('home'));

    return view('billing', ['checkout' => $checkout]);
});
```

To retrieve the user's trial ending date, you may use the `trialEndsAt` method. This method will return a Carbon date instance if a user is on a trial or `null` if they aren't. You may also pass an optional subscription type parameter if you would like to get the trial ending date for a specific subscription other than the default one:

```php
if ($user->onTrial('default')) {
    $trialEndsAt = $user->trialEndsAt();
}
```

You may use the `onGenericTrial` method if you wish to know specifically that the user is within their "generic" trial period and has not created an actual subscription yet:

```php
if ($user->onGenericTrial()) {
    // User is within their "generic" trial period...
}
```

<a name="extend-or-activate-a-trial"></a>
### Extend or Activate a Trial

You can extend an existing trial period on a subscription by invoking the `extendTrial` method and specifying the moment in time that the trial should end:

```php
$user->subscription()->extendTrial(now()->plus(days: 5));
```

Or, you may immediately activate a subscription by ending its trial by calling the `activate` method on the subscription:

```php
$user->subscription()->activate();
```

<a name="handling-paddle-webhooks"></a>
## Handling Paddle Webhooks

Paddle can notify your application of a variety of events via webhooks. By default, a route that points to Cashier's webhook controller is registered by the Cashier service provider. This controller will handle all incoming webhook requests.

By default, this controller will automatically handle canceling subscriptions that have too many failed charges, subscription updates, and payment method changes; however, as we'll soon discover, you can extend this controller to handle any Paddle webhook event you like.

To ensure your application can handle Paddle webhooks, be sure to [configure the webhook URL in the Paddle control panel](https://vendors.paddle.com/notifications-v2). By default, Cashier's webhook controller responds to the `/paddle/webhook` URL path. The full list of all webhooks you should enable in the Paddle control panel are:

- Customer Updated
- Transaction Completed
- Transaction Updated
- Subscription Created
- Subscription Updated
- Subscription Paused
- Subscription Canceled

> [!WARNING]
> Make sure you protect incoming requests with Cashier's included [webhook signature verification](/docs/{{version}}/cashier-paddle#verifying-webhook-signatures) middleware.

<a name="webhooks-csrf-protection"></a>
#### Webhooks and CSRF Protection

Since Paddle webhooks need to bypass Laravel's [CSRF protection](/docs/{{version}}/csrf), you should ensure that Laravel does not attempt to verify the CSRF token for incoming Paddle webhooks. To accomplish this, you should exclude `paddle/*` from CSRF protection in your application's `bootstrap/app.php` file:

```php
->withMiddleware(function (Middleware $middleware): void {
    $middleware->preventRequestForgery(except: [
        'paddle/*',
    ]);
})
```

<a name="webhooks-local-development"></a>
#### Webhooks and Local Development

For Paddle to be able to send your application webhooks during local development, you will need to expose your application via a site sharing service such as [Ngrok](https://ngrok.com/) or [Expose](https://expose.dev/docs/introduction). If you are developing your application locally using [Laravel Sail](/docs/{{version}}/sail), you may use Sail's [site sharing command](/docs/{{version}}/sail#sharing-your-site).

<a name="defining-webhook-event-handlers"></a>
### Defining Webhook Event Handlers

Cashier automatically handles subscription cancelation on failed charges and other common Paddle webhooks. However, if you have additional webhook events you would like to handle, you may do so by listening to the following events that are dispatched by Cashier:

- `Laravel\Paddle\Events\WebhookReceived`
- `Laravel\Paddle\Events\WebhookHandled`

Both events contain the full payload of the Paddle webhook. For example, if you wish to handle the `transaction.billed` webhook, you may register a [listener](/docs/{{version}}/events#defining-listeners) that will handle the event:

```php
<?php

namespace App\Listeners;

use Laravel\Paddle\Events\WebhookReceived;

class PaddleEventListener
{
    /**
     * Handle received Paddle webhooks.
     */
    public function handle(WebhookReceived $event): void
    {
        if ($event->payload['event_type'] === 'transaction.billed') {
            // Handle the incoming event...
        }
    }
}
```

Cashier also emit events dedicated to the type of the received webhook. In addition to the full payload from Paddle, they also contain the relevant models that were used to process the webhook such as the billable model, the subscription, or the receipt:

<div class="content-list" markdown="1">

- `Laravel\Paddle\Events\CustomerUpdated`
- `Laravel\Paddle\Events\TransactionCompleted`
- `Laravel\Paddle\Events\TransactionUpdated`
- `Laravel\Paddle\Events\SubscriptionCreated`
- `Laravel\Paddle\Events\SubscriptionUpdated`
- `Laravel\Paddle\Events\SubscriptionPaused`
- `Laravel\Paddle\Events\SubscriptionCanceled`

</div>

You can also override the default, built-in webhook route by defining the `CASHIER_WEBHOOK` environment variable in your application's `.env` file. This value should be the full URL to your webhook route and needs to match the URL set in your Paddle control panel:

```ini
CASHIER_WEBHOOK=https://example.com/my-paddle-webhook-url
```

<a name="verifying-webhook-signatures"></a>
### Verifying Webhook Signatures

To secure your webhooks, you may use [Paddle's webhook signatures](https://developer.paddle.com/webhooks/signature-verification). For convenience, Cashier automatically includes a middleware which validates that the incoming Paddle webhook request is valid.

To enable webhook verification, ensure that the `PADDLE_WEBHOOK_SECRET` environment variable is defined in your application's `.env` file. The webhook secret may be retrieved from your Paddle account dashboard.

<a name="single-charges"></a>
## Single Charges

<a name="charging-for-products"></a>
### Charging for Products

If you would like to initiate a product purchase for a customer, you may use the `checkout` method on a billable model instance to generate a checkout session for the purchase. The `checkout` method accepts one or multiple price ID's. If necessary, an associative array may be used to provide the quantity of the product that is being purchased:

```php
use Illuminate\Http\Request;

Route::get('/buy', function (Request $request) {
    $checkout = $request->user()->checkout(['pri_tshirt', 'pri_socks' => 5]);

    return view('buy', ['checkout' => $checkout]);
});
```

After generating the checkout session, you may use Cashier's provided `paddle-button` [Blade component](#overlay-checkout) to allow the user to view the Paddle checkout widget and complete the purchase:

```blade
<x-paddle-button :checkout="$checkout" class="px-8 py-4">
    Buy
</x-paddle-button>
```

A checkout session has a `customData` method, allowing you to pass any custom data you wish to the underlying transaction creation. Please consult [the Paddle documentation](https://developer.paddle.com/build/transactions/custom-data) to learn more about the options available to you when passing custom data:

```php
$checkout = $user->checkout('pri_tshirt')
    ->customData([
        'custom_option' => $value,
    ]);
```

<a name="refunding-transactions"></a>
### Refunding Transactions

Refunding transactions will return the refunded amount to your customer's payment method that was used at the time of purchase. If you need to refund a Paddle purchase, you may use the `refund` method on a `Cashier\Paddle\Transaction` model. This method accepts a reason as the first argument, one or more price ID's to refund with optional amounts as an associative array. You may retrieve the transactions for a given billable model using the `transactions` method.

For example, imagine we want to refund a specific transaction for prices `pri_123` and `pri_456`. We want to fully refund `pri_123`, but only refund two dollars for `pri_456`:

```php
use App\Models\User;

$user = User::find(1);

$transaction = $user->transactions()->first();

$response = $transaction->refund('Accidental charge', [
    'pri_123', // Fully refund this price...
    'pri_456' => 200, // Only partially refund this price...
]);
```

The example above refunds specific line items in a transaction. If you want to refund the entire transaction, simply provide a reason:

```php
$response = $transaction->refund('Accidental charge');
```

For more information on refunds, please consult [Paddle's refund documentation](https://developer.paddle.com/build/transactions/create-transaction-adjustments).

> [!WARNING]
> Refunds must always be approved by Paddle before fully processing.

<a name="crediting-transactions"></a>
### Crediting Transactions

Just like refunding, you can also credit transactions. Crediting transactions will add the funds to the customer's balance so it may be used for future purchases. Crediting transactions can only be done for manually-collected transactions and not for automatically-collected transactions (like subscriptions) since Paddle handles subscription credits automatically:

```php
$transaction = $user->transactions()->first();

// Credit a specific line item fully...
$response = $transaction->credit('Compensation', 'pri_123');
```

For more info, [see Paddle's documentation on crediting](https://developer.paddle.com/build/transactions/create-transaction-adjustments).

> [!WARNING]
> Credits can only be applied for manually-collected transactions. Automatically-collected transactions are credited by Paddle themselves.

<a name="transactions"></a>
## Transactions

You may easily retrieve an array of a billable model's transactions via the `transactions` property:

```php
use App\Models\User;

$user = User::find(1);

$transactions = $user->transactions;
```

Transactions represent payments for your products and purchases and are accompanied by invoices. Only completed transactions are stored in your application's database.

When listing the transactions for a customer, you may use the transaction instance's methods to display the relevant payment information. For example, you may wish to list every transaction in a table, allowing the user to easily download any of the invoices:

```html
<table>
    @foreach ($transactions as $transaction)
        <tr>
            <td>{{ $transaction->billed_at->toFormattedDateString() }}</td>
            <td>{{ $transaction->total() }}</td>
            <td>{{ $transaction->tax() }}</td>
            <td><a href="{{ route('download-invoice', $transaction->id) }}" target="_blank">Download</a></td>
        </tr>
    @endforeach
</table>
```

The `download-invoice` route may look like the following:

```php
use Illuminate\Http\Request;
use Laravel\Paddle\Transaction;

Route::get('/download-invoice/{transaction}', function (Request $request, Transaction $transaction) {
    return $transaction->redirectToInvoicePdf();
})->name('download-invoice');
```

<a name="past-and-upcoming-payments"></a>
### Past and Upcoming Payments

You may use the `lastPayment` and `nextPayment` methods to retrieve and display a customer's past or upcoming payments for recurring subscriptions:

```php
use App\Models\User;

$user = User::find(1);

$subscription = $user->subscription();

$lastPayment = $subscription->lastPayment();
$nextPayment = $subscription->nextPayment();
```

Both of these methods will return an instance of `Laravel\Paddle\Payment`; however, `lastPayment` will return `null` when transactions have not been synced by webhooks yet, while `nextPayment` will return `null` when the billing cycle has ended (such as when a subscription has been canceled):

```blade
Next payment: {{ $nextPayment->amount() }} due on {{ $nextPayment->date()->format('d/m/Y') }}
```

<a name="testing"></a>
## Testing

While testing, you should manually test your billing flow to make sure your integration works as expected.

For automated tests, including those executed within a CI environment, you may use [Laravel's HTTP Client](/docs/{{version}}/http-client#testing) to fake HTTP calls made to Paddle. Although this does not test the actual responses from Paddle, it does provide a way to test your application without actually calling Paddle's API.


---

# Collections

*Sección: Laravel | Origen: https://laravel.com/docs/13.x/collections*

- [Introduction](#introduction)
    - [Creating Collections](#creating-collections)
    - [Extending Collections](#extending-collections)
- [Available Methods](#available-methods)
- [Higher Order Messages](#higher-order-messages)
- [Lazy Collections](#lazy-collections)
    - [Introduction](#lazy-collection-introduction)
    - [Creating Lazy Collections](#creating-lazy-collections)
    - [The Enumerable Contract](#the-enumerable-contract)
    - [Lazy Collection Methods](#lazy-collection-methods)

<a name="introduction"></a>
## Introduction

The `Illuminate\Support\Collection` class provides a fluent, convenient wrapper for working with arrays of data. For example, check out the following code. We'll use the `collect` helper to create a new collection instance from the array, run the `strtoupper` function on each element, and then remove all empty elements:

```php
$collection = collect(['Taylor', 'Abigail', null])->map(function (?string $name) {
    return strtoupper($name);
})->reject(function (string $name) {
    return empty($name);
});
```

As you can see, the `Collection` class allows you to chain its methods to perform fluent mapping and reducing of the underlying array. In general, collections are immutable, meaning every `Collection` method returns an entirely new `Collection` instance.

<a name="creating-collections"></a>
### Creating Collections

As mentioned above, the `collect` helper returns a new `Illuminate\Support\Collection` instance for the given array. So, creating a collection is as simple as:

```php
$collection = collect([1, 2, 3]);
```

You may also create a collection using the [make](#method-make) and [fromJson](#method-fromjson) methods.

> [!NOTE]
> The results of [Eloquent](/docs/{{version}}/eloquent) queries are always returned as `Collection` instances.

<a name="extending-collections"></a>
### Extending Collections

Collections are "macroable", which allows you to add additional methods to the `Collection` class at run time. The `Illuminate\Support\Collection` class' `macro` method accepts a closure that will be executed when your macro is called. The macro closure may access the collection's other methods via `$this`, just as if it were a real method of the collection class. For example, the following code adds a `toUpper` method to the `Collection` class:

```php
use Illuminate\Support\Collection;
use Illuminate\Support\Str;

Collection::macro('toUpper', function () {
    return $this->map(function (string $value) {
        return Str::upper($value);
    });
});

$collection = collect(['first', 'second']);

$upper = $collection->toUpper();

// ['FIRST', 'SECOND']
```

Typically, you should declare collection macros in the `boot` method of a [service provider](/docs/{{version}}/providers).

<a name="macro-arguments"></a>
#### Macro Arguments

If necessary, you may define macros that accept additional arguments:

```php
use Illuminate\Support\Collection;
use Illuminate\Support\Facades\Lang;

Collection::macro('toLocale', function (string $locale) {
    return $this->map(function (string $value) use ($locale) {
        return Lang::get($value, [], $locale);
    });
});

$collection = collect(['first', 'second']);

$translated = $collection->toLocale('es');

// ['primero', 'segundo'];
```

<a name="available-methods"></a>
## Available Methods

For the majority of the remaining collection documentation, we'll discuss each method available on the `Collection` class. Remember, all of these methods may be chained to fluently manipulate the underlying array. Furthermore, almost every method returns a new `Collection` instance, allowing you to preserve the original copy of the collection when necessary:

<style>
    .collection-method-list > p {
        columns: 10.8em 3; -moz-columns: 10.8em 3; -webkit-columns: 10.8em 3;
    }

    .collection-method-list a {
        display: block;
        overflow: hidden;
        text-overflow: ellipsis;
        white-space: nowrap;
    }
</style>

<div class="collection-method-list" markdown="1">

[after](#method-after)
[all](#method-all)
[average](#method-average)
[avg](#method-avg)
[before](#method-before)
[chunk](#method-chunk)
[chunkBy](#method-chunkby)
[chunkWhile](#method-chunkwhile)
[collapse](#method-collapse)
[collapseWithKeys](#method-collapsewithkeys)
[collect](#method-collect)
[combine](#method-combine)
[concat](#method-concat)
[contains](#method-contains)
[containsStrict](#method-containsstrict)
[count](#method-count)
[countBy](#method-countBy)
[crossJoin](#method-crossjoin)
[dd](#method-dd)
[diff](#method-diff)
[diffAssoc](#method-diffassoc)
[diffAssocUsing](#method-diffassocusing)
[diffKeys](#method-diffkeys)
[doesntContain](#method-doesntcontain)
[doesntContainStrict](#method-doesntcontainstrict)
[dot](#method-dot)
[dump](#method-dump)
[duplicates](#method-duplicates)
[duplicatesStrict](#method-duplicatesstrict)
[each](#method-each)
[eachSpread](#method-eachspread)
[ensure](#method-ensure)
[every](#method-every)
[except](#method-except)
[filter](#method-filter)
[first](#method-first)
[firstOrFail](#method-first-or-fail)
[firstWhere](#method-first-where)
[flatMap](#method-flatmap)
[flatten](#method-flatten)
[flip](#method-flip)
[forget](#method-forget)
[forPage](#method-forpage)
[fromJson](#method-fromjson)
[get](#method-get)
[groupBy](#method-groupby)
[has](#method-has)
[hasAny](#method-hasany)
[hasMany](#method-hasmany)
[hasSole](#method-hassole)
[implode](#method-implode)
[intersect](#method-intersect)
[intersectUsing](#method-intersectusing)
[intersectAssoc](#method-intersectAssoc)
[intersectAssocUsing](#method-intersectassocusing)
[intersectByKeys](#method-intersectbykeys)
[isEmpty](#method-isempty)
[isNotEmpty](#method-isnotempty)
[join](#method-join)
[keyBy](#method-keyby)
[keys](#method-keys)
[last](#method-last)
[lazy](#method-lazy)
[macro](#method-macro)
[make](#method-make)
[map](#method-map)
[mapInto](#method-mapinto)
[mapSpread](#method-mapspread)
[mapToGroups](#method-maptogroups)
[mapWithKeys](#method-mapwithkeys)
[max](#method-max)
[median](#method-median)
[merge](#method-merge)
[mergeRecursive](#method-mergerecursive)
[min](#method-min)
[mode](#method-mode)
[multiply](#method-multiply)
[nth](#method-nth)
[only](#method-only)
[pad](#method-pad)
[partition](#method-partition)
[percentage](#method-percentage)
[pipe](#method-pipe)
[pipeInto](#method-pipeinto)
[pipeThrough](#method-pipethrough)
[pluck](#method-pluck)
[pop](#method-pop)
[prepend](#method-prepend)
[pull](#method-pull)
[push](#method-push)
[put](#method-put)
[random](#method-random)
[range](#method-range)
[reduce](#method-reduce)
[reduceInto](#method-reduce-into)
[reduceSpread](#method-reduce-spread)
[reject](#method-reject)
[replace](#method-replace)
[replaceRecursive](#method-replacerecursive)
[reverse](#method-reverse)
[search](#method-search)
[select](#method-select)
[shift](#method-shift)
[shuffle](#method-shuffle)
[skip](#method-skip)
[skipUntil](#method-skipuntil)
[skipWhile](#method-skipwhile)
[slice](#method-slice)
[sliding](#method-sliding)
[sole](#method-sole)
[some](#method-some)
[sort](#method-sort)
[sortBy](#method-sortby)
[sortByDesc](#method-sortbydesc)
[sortDesc](#method-sortdesc)
[sortKeys](#method-sortkeys)
[sortKeysDesc](#method-sortkeysdesc)
[sortKeysUsing](#method-sortkeysusing)
[splice](#method-splice)
[split](#method-split)
[splitIn](#method-splitin)
[sum](#method-sum)
[take](#method-take)
[takeUntil](#method-takeuntil)
[takeWhile](#method-takewhile)
[tap](#method-tap)
[times](#method-times)
[toArray](#method-toarray)
[toJson](#method-tojson)
[toPrettyJson](#method-to-pretty-json)
[transform](#method-transform)
[undot](#method-undot)
[union](#method-union)
[unique](#method-unique)
[uniqueStrict](#method-uniquestrict)
[unless](#method-unless)
[unlessEmpty](#method-unlessempty)
[unlessNotEmpty](#method-unlessnotempty)
[unwrap](#method-unwrap)
[value](#method-value)
[values](#method-values)
[when](#method-when)
[whenEmpty](#method-whenempty)
[whenNotEmpty](#method-whennotempty)
[where](#method-where)
[whereStrict](#method-wherestrict)
[whereBetween](#method-wherebetween)
[whereIn](#method-wherein)
[whereInStrict](#method-whereinstrict)
[whereInstanceOf](#method-whereinstanceof)
[whereNotBetween](#method-wherenotbetween)
[whereNotIn](#method-wherenotin)
[whereNotInStrict](#method-wherenotinstrict)
[whereNotNull](#method-wherenotnull)
[whereNull](#method-wherenull)
[wrap](#method-wrap)
[zip](#method-zip)

</div>

<a name="method-listing"></a>
## Method Listing

<style>
    .collection-method code {
        font-size: 14px;
    }

    .collection-method:not(.first-collection-method) {
        margin-top: 50px;
    }
</style>

<a name="method-after"></a>
#### `after()` {.collection-method .first-collection-method}

The `after` method returns the item after the given item. `null` is returned if the given item is not found or is the last item:

```php
$collection = collect([1, 2, 3, 4, 5]);

$collection->after(3);

// 4

$collection->after(5);

// null
```

This method searches for the given item using "loose" comparison, meaning a string containing an integer value will be considered equal to an integer of the same value. To use "strict" comparison, you may provide the `strict` argument to the method:

```php
collect([2, 4, 6, 8])->after('4', strict: true);

// null
```

Alternatively, you may provide your own closure to search for the first item that passes a given truth test:

```php
collect([2, 4, 6, 8])->after(function (int $item, int $key) {
    return $item > 5;
});

// 8
```

<a name="method-all"></a>
#### `all()` {.collection-method}

The `all` method returns the underlying array represented by the collection:

```php
collect([1, 2, 3])->all();

// [1, 2, 3]
```

<a name="method-average"></a>
#### `average()` {.collection-method}

Alias for the [avg](#method-avg) method.

<a name="method-avg"></a>
#### `avg()` {.collection-method}

The `avg` method returns the [average value](https://en.wikipedia.org/wiki/Average) of a given key:

```php
$average = collect([
    ['foo' => 10],
    ['foo' => 10],
    ['foo' => 20],
    ['foo' => 40]
])->avg('foo');

// 20

$average = collect([1, 1, 2, 4])->avg();

// 2
```

<a name="method-before"></a>
#### `before()` {.collection-method}

The `before` method is the opposite of the [after](#method-after) method. It returns the item before the given item. `null` is returned if the given item is not found or is the first item:

```php
$collection = collect([1, 2, 3, 4, 5]);

$collection->before(3);

// 2

$collection->before(1);

// null

collect([2, 4, 6, 8])->before('4', strict: true);

// null

collect([2, 4, 6, 8])->before(function (int $item, int $key) {
    return $item > 5;
});

// 4
```

<a name="method-chunk"></a>
#### `chunk()` {.collection-method}

The `chunk` method breaks the collection into multiple, smaller collections of a given size:

```php
$collection = collect([1, 2, 3, 4, 5, 6, 7]);

$chunks = $collection->chunk(4);

$chunks->all();

// [[1, 2, 3, 4], [5, 6, 7]]
```

This method is especially useful in [views](/docs/{{version}}/views) when working with a grid system such as [Bootstrap](https://getbootstrap.com/docs/5.3/layout/grid/). For example, imagine you have a collection of [Eloquent](/docs/{{version}}/eloquent) models you want to display in a grid:

```blade
@foreach ($products->chunk(3) as $chunk)
    <div class="row">
        @foreach ($chunk as $product)
            <div class="col-xs-4">{{ $product->name }}</div>
        @endforeach
    </div>
@endforeach
```

<a name="method-chunkby"></a>
#### `chunkBy()` {.collection-method}

The `chunkBy` method breaks the collection into multiple, smaller collections by grouping adjacent items that have the same value for a given key or callback. For example, you may group adjacent products that share the same parent:

```php
$chunks = $products->chunkBy('parent');
```

Unlike the `groupBy` method, items with the same value that are not adjacent are placed in separate chunks:

```php
$collection = collect([1, 1, 2, 2, 1]);

$chunks = $collection->chunkBy(fn (int $value) => $value);

$chunks->all();

// [[1, 1], [2, 2], [1]]
```

<a name="method-chunkwhile"></a>
#### `chunkWhile()` {.collection-method}

The `chunkWhile` method breaks the collection into multiple, smaller collections based on the evaluation of the given callback. The `$chunk` variable passed to the closure may be used to inspect the previous element:

```php
$collection = collect(str_split('AABBCCCD'));

$chunks = $collection->chunkWhile(function (string $value, int $key, Collection $chunk) {
    return $value === $chunk->last();
});

$chunks->all();

// [['A', 'A'], ['B', 'B'], ['C', 'C', 'C'], ['D']]
```

<a name="method-collapse"></a>
#### `collapse()` {.collection-method}

The `collapse` method collapses a collection of arrays or collections into a single, flat collection:

```php
$collection = collect([
    [1, 2, 3],
    [4, 5, 6],
    [7, 8, 9],
]);

$collapsed = $collection->collapse();

$collapsed->all();

// [1, 2, 3, 4, 5, 6, 7, 8, 9]
```

<a name="method-collapsewithkeys"></a>
#### `collapseWithKeys()` {.collection-method}

The `collapseWithKeys` method flattens a collection of arrays or collections into a single collection, keeping the original keys intact. If the collection is already flat, it will return an empty collection:

```php
$collection = collect([
    ['first'  => collect([1, 2, 3])],
    ['second' => [4, 5, 6]],
    ['third'  => collect([7, 8, 9])]
]);

$collapsed = $collection->collapseWithKeys();

$collapsed->all();

// [
//     'first'  => [1, 2, 3],
//     'second' => [4, 5, 6],
//     'third'  => [7, 8, 9],
// ]
```

<a name="method-collect"></a>
#### `collect()` {.collection-method}

The `collect` method returns a new `Collection` instance with the items currently in the collection:

```php
$collectionA = collect([1, 2, 3]);

$collectionB = $collectionA->collect();

$collectionB->all();

// [1, 2, 3]
```

The `collect` method is primarily useful for converting [lazy collections](#lazy-collections) into standard `Collection` instances:

```php
$lazyCollection = LazyCollection::make(function () {
    yield 1;
    yield 2;
    yield 3;
});

$collection = $lazyCollection->collect();

$collection::class;

// 'Illuminate\Support\Collection'

$collection->all();

// [1, 2, 3]
```

> [!NOTE]
> The `collect` method is especially useful when you have an instance of `Enumerable` and need a non-lazy collection instance. Since `collect()` is part of the `Enumerable` contract, you can safely use it to get a `Collection` instance.

<a name="method-combine"></a>
#### `combine()` {.collection-method}

The `combine` method combines the values of the collection, as keys, with the values of another array or collection:

```php
$collection = collect(['name', 'age']);

$combined = $collection->combine(['George', 29]);

$combined->all();

// ['name' => 'George', 'age' => 29]
```

<a name="method-concat"></a>
#### `concat()` {.collection-method}

The `concat` method appends the given array or collection's values onto the end of another collection:

```php
$collection = collect(['John Doe']);

$concatenated = $collection->concat(['Jane Doe'])->concat(['name' => 'Johnny Doe']);

$concatenated->all();

// ['John Doe', 'Jane Doe', 'Johnny Doe']
```

The `concat` method numerically reindexes keys for items concatenated onto the original collection. To maintain keys in associative collections, see the [merge](#method-merge) method.

<a name="method-contains"></a>
#### `contains()` {.collection-method}

The `contains` method determines whether the collection contains a given item. You may pass a closure to the `contains` method to determine if an element exists in the collection matching a given truth test:

```php
$collection = collect([1, 2, 3, 4, 5]);

$collection->contains(function (int $value, int $key) {
    return $value > 5;
});

// false
```

Alternatively, you may pass a string to the `contains` method to determine whether the collection contains a given item value:

```php
$collection = collect(['name' => 'Desk', 'price' => 100]);

$collection->contains('Desk');

// true

$collection->contains('New York');

// false
```

You may also pass a key / value pair to the `contains` method, which will determine if the given pair exists in the collection:

```php
$collection = collect([
    ['product' => 'Desk', 'price' => 200],
    ['product' => 'Chair', 'price' => 100],
]);

$collection->contains('product', 'Bookcase');

// false
```

The `contains` method uses "loose" comparisons when checking item values, meaning a string with an integer value will be considered equal to an integer of the same value. Use the [containsStrict](#method-containsstrict) method to filter using "strict" comparisons.

For the inverse of `contains`, see the [doesntContain](#method-doesntcontain) method.

<a name="method-containsstrict"></a>
#### `containsStrict()` {.collection-method}

This method has the same signature as the [contains](#method-contains) method; however, all values are compared using "strict" comparisons.

> [!NOTE]
> This method's behavior is modified when using [Eloquent Collections](/docs/{{version}}/eloquent-collections#method-contains).

<a name="method-count"></a>
#### `count()` {.collection-method}

The `count` method returns the total number of items in the collection:

```php
$collection = collect([1, 2, 3, 4]);

$collection->count();

// 4
```

<a name="method-countBy"></a>
#### `countBy()` {.collection-method}

The `countBy` method counts the occurrences of values in the collection. By default, the method counts the occurrences of every element, allowing you to count certain "types" of elements in the collection:

```php
$collection = collect([1, 2, 2, 2, 3]);

$counted = $collection->countBy();

$counted->all();

// [1 => 1, 2 => 3, 3 => 1]
```

You may pass a closure to the `countBy` method to count all items by a custom value:

```php
$collection = collect(['alice@gmail.com', 'bob@yahoo.com', 'carlos@gmail.com']);

$counted = $collection->countBy(function (string $email) {
    return substr(strrchr($email, '@'), 1);
});

$counted->all();

// ['gmail.com' => 2, 'yahoo.com' => 1]
```

<a name="method-crossjoin"></a>
#### `crossJoin()` {.collection-method}

The `crossJoin` method cross joins the collection's values among the given arrays or collections, returning a Cartesian product with all possible combinations:

```php
$collection = collect([1, 2]);

$matrix = $collection->crossJoin(['a', 'b']);

$matrix->all();

/*
    [
        [1, 'a'],
        [1, 'b'],
        [2, 'a'],
        [2, 'b'],
    ]
*/

$collection = collect([1, 2]);

$matrix = $collection->crossJoin(['a', 'b'], ['I', 'II']);

$matrix->all();

/*
    [
        [1, 'a', 'I'],
        [1, 'a', 'II'],
        [1, 'b', 'I'],
        [1, 'b', 'II'],
        [2, 'a', 'I'],
        [2, 'a', 'II'],
        [2, 'b', 'I'],
        [2, 'b', 'II'],
    ]
*/
```

<a name="method-dd"></a>
#### `dd()` {.collection-method}

The `dd` method dumps the collection's items and ends execution of the script:

```php
$collection = collect(['John Doe', 'Jane Doe']);

$collection->dd();

/*
    array:2 [
        0 => "John Doe"
        1 => "Jane Doe"
    ]
*/
```

If you do not want to stop executing the script, use the [dump](#method-dump) method instead.

<a name="method-diff"></a>
#### `diff()` {.collection-method}

The `diff` method compares the collection against another collection or a plain PHP `array` based on its values. This method will return the values in the original collection that are not present in the given collection:

```php
$collection = collect([1, 2, 3, 4, 5]);

$diff = $collection->diff([2, 4, 6, 8]);

$diff->all();

// [1, 3, 5]
```

> [!NOTE]
> This method's behavior is modified when using [Eloquent Collections](/docs/{{version}}/eloquent-collections#method-diff).

<a name="method-diffassoc"></a>
#### `diffAssoc()` {.collection-method}

The `diffAssoc` method compares the collection against another collection or a plain PHP `array` based on its keys and values. This method will return the key / value pairs in the original collection that are not present in the given collection:

```php
$collection = collect([
    'color' => 'orange',
    'type' => 'fruit',
    'remain' => 6,
]);

$diff = $collection->diffAssoc([
    'color' => 'yellow',
    'type' => 'fruit',
    'remain' => 3,
    'used' => 6,
]);

$diff->all();

// ['color' => 'orange', 'remain' => 6]
```

<a name="method-diffassocusing"></a>
#### `diffAssocUsing()` {.collection-method}

Unlike `diffAssoc`, `diffAssocUsing` accepts a user supplied callback function for the indices comparison:

```php
$collection = collect([
    'color' => 'orange',
    'type' => 'fruit',
    'remain' => 6,
]);

$diff = $collection->diffAssocUsing([
    'Color' => 'yellow',
    'Type' => 'fruit',
    'Remain' => 3,
], 'strnatcasecmp');

$diff->all();

// ['color' => 'orange', 'remain' => 6]
```

The callback must be a comparison function that returns an integer less than, equal to, or greater than zero. For more information, refer to the PHP documentation on [array_diff_uassoc](https://www.php.net/array_diff_uassoc#refsect1-function.array-diff-uassoc-parameters), which is the PHP function that the `diffAssocUsing` method utilizes internally.

<a name="method-diffkeys"></a>
#### `diffKeys()` {.collection-method}

The `diffKeys` method compares the collection against another collection or a plain PHP `array` based on its keys. This method will return the key / value pairs in the original collection that are not present in the given collection:

```php
$collection = collect([
    'one' => 10,
    'two' => 20,
    'three' => 30,
    'four' => 40,
    'five' => 50,
]);

$diff = $collection->diffKeys([
    'two' => 2,
    'four' => 4,
    'six' => 6,
    'eight' => 8,
]);

$diff->all();

// ['one' => 10, 'three' => 30, 'five' => 50]
```

<a name="method-doesntcontain"></a>
#### `doesntContain()` {.collection-method}

The `doesntContain` method determines whether the collection does not contain a given item. You may pass a closure to the `doesntContain` method to determine if an element does not exist in the collection matching a given truth test:

```php
$collection = collect([1, 2, 3, 4, 5]);

$collection->doesntContain(function (int $value, int $key) {
    return $value < 5;
});

// false
```

Alternatively, you may pass a string to the `doesntContain` method to determine whether the collection does not contain a given item value:

```php
$collection = collect(['name' => 'Desk', 'price' => 100]);

$collection->doesntContain('Table');

// true

$collection->doesntContain('Desk');

// false
```

You may also pass a key / value pair to the `doesntContain` method, which will determine if the given pair does not exist in the collection:

```php
$collection = collect([
    ['product' => 'Desk', 'price' => 200],
    ['product' => 'Chair', 'price' => 100],
]);

$collection->doesntContain('product', 'Bookcase');

// true
```

The `doesntContain` method uses "loose" comparisons when checking item values, meaning a string with an integer value will be considered equal to an integer of the same value.

<a name="method-doesntcontainstrict"></a>
#### `doesntContainStrict()` {.collection-method}

This method has the same signature as the [doesntContain](#method-doesntcontain) method; however, all values are compared using "strict" comparisons.

<a name="method-dot"></a>
#### `dot()` {.collection-method}

The `dot` method flattens a multi-dimensional collection into a single level collection that uses "dot" notation to indicate depth:

```php
$collection = collect(['products' => ['desk' => ['price' => 100]]]);

$flattened = $collection->dot();

$flattened->all();

// ['products.desk.price' => 100]
```

<a name="method-dump"></a>
#### `dump()` {.collection-method}

The `dump` method dumps the collection's items:

```php
$collection = collect(['John Doe', 'Jane Doe']);

$collection->dump();

/*
    array:2 [
        0 => "John Doe"
        1 => "Jane Doe"
    ]
*/
```

If you want to stop executing the script after dumping the collection, use the [dd](#method-dd) method instead.

<a name="method-duplicates"></a>
#### `duplicates()` {.collection-method}

The `duplicates` method retrieves and returns duplicate values from the collection:

```php
$collection = collect(['a', 'b', 'a', 'c', 'b']);

$collection->duplicates();

// [2 => 'a', 4 => 'b']
```

If the collection contains arrays or objects, you can pass the key of the attributes that you wish to check for duplicate values:

```php
$employees = collect([
    ['email' => 'abigail@example.com', 'position' => 'Developer'],
    ['email' => 'james@example.com', 'position' => 'Designer'],
    ['email' => 'victoria@example.com', 'position' => 'Developer'],
]);

$employees->duplicates('position');

// [2 => 'Developer']
```

<a name="method-duplicatesstrict"></a>
#### `duplicatesStrict()` {.collection-method}

This method has the same signature as the [duplicates](#method-duplicates) method; however, all values are compared using "strict" comparisons.

<a name="method-each"></a>
#### `each()` {.collection-method}

The `each` method iterates over the items in the collection and passes each item to a closure:

```php
$collection = collect([1, 2, 3, 4]);

$collection->each(function (int $item, int $key) {
    // ...
});
```

If you would like to stop iterating through the items, you may return `false` from your closure:

```php
$collection->each(function (int $item, int $key) {
    if (/* condition */) {
        return false;
    }
});
```

<a name="method-eachspread"></a>
#### `eachSpread()` {.collection-method}

The `eachSpread` method iterates over the collection's items, passing each nested item value into the given callback:

```php
$collection = collect([['John Doe', 35], ['Jane Doe', 33]]);

$collection->eachSpread(function (string $name, int $age) {
    // ...
});
```

You may stop iterating through the items by returning `false` from the callback:

```php
$collection->eachSpread(function (string $name, int $age) {
    return false;
});
```

<a name="method-ensure"></a>
#### `ensure()` {.collection-method}

The `ensure` method may be used to verify that all elements of a collection are of a given type or list of types. Otherwise, an `UnexpectedValueException` will be thrown:

```php
return $collection->ensure(User::class);

return $collection->ensure([User::class, Customer::class]);
```

Primitive types such as `string`, `int`, `float`, `bool`, and `array` may also be specified:

```php
return $collection->ensure('int');
```

> [!WARNING]
> The `ensure` method does not guarantee that elements of different types will not be added to the collection at a later time.

<a name="method-every"></a>
#### `every()` {.collection-method}

The `every` method may be used to verify that all elements of a collection pass a given truth test:

```php
collect([1, 2, 3, 4])->every(function (int $value, int $key) {
    return $value > 2;
});

// false
```

If the collection is empty, the `every` method will return true:

```php
$collection = collect([]);

$collection->every(function (int $value, int $key) {
    return $value > 2;
});

// true
```

<a name="method-except"></a>
#### `except()` {.collection-method}

The `except` method returns all items in the collection except for those with the specified keys:

```php
$collection = collect(['product_id' => 1, 'price' => 100, 'discount' => false]);

$filtered = $collection->except(['price', 'discount']);

$filtered->all();

// ['product_id' => 1]
```

For the inverse of `except`, see the [only](#method-only) method.

> [!NOTE]
> This method's behavior is modified when using [Eloquent Collections](/docs/{{version}}/eloquent-collections#method-except).

<a name="method-filter"></a>
#### `filter()` {.collection-method}

The `filter` method filters the collection using the given callback, keeping only those items that pass a given truth test:

```php
$collection = collect([1, 2, 3, 4]);

$filtered = $collection->filter(function (int $value, int $key) {
    return $value > 2;
});

$filtered->all();

// [3, 4]
```

If no callback is supplied, all entries of the collection that are equivalent to `false` will be removed:

```php
$collection = collect([1, 2, 3, null, false, '', 0, []]);

$collection->filter()->all();

// [1, 2, 3]
```

For the inverse of `filter`, see the [reject](#method-reject) method.

<a name="method-first"></a>
#### `first()` {.collection-method}

The `first` method returns the first element in the collection that passes a given truth test:

```php
collect([1, 2, 3, 4])->first(function (int $value, int $key) {
    return $value > 2;
});

// 3
```

You may also call the `first` method with no arguments to get the first element in the collection. If the collection is empty, `null` is returned:

```php
collect([1, 2, 3, 4])->first();

// 1
```

<a name="method-first-or-fail"></a>
#### `firstOrFail()` {.collection-method}

The `firstOrFail` method is identical to the `first` method; however, if no result is found, an `Illuminate\Support\ItemNotFoundException` exception will be thrown:

```php
collect([1, 2, 3, 4])->firstOrFail(function (int $value, int $key) {
    return $value > 5;
});

// Throws ItemNotFoundException...
```

You may also call the `firstOrFail` method with no arguments to get the first element in the collection. If the collection is empty, an `Illuminate\Support\ItemNotFoundException` exception will be thrown:

```php
collect([])->firstOrFail();

// Throws ItemNotFoundException...
```

<a name="method-first-where"></a>
#### `firstWhere()` {.collection-method}

The `firstWhere` method returns the first element in the collection with the given key / value pair:

```php
$collection = collect([
    ['name' => 'Regena', 'age' => null],
    ['name' => 'Linda', 'age' => 14],
    ['name' => 'Diego', 'age' => 23],
    ['name' => 'Linda', 'age' => 84],
]);

$collection->firstWhere('name', 'Linda');

// ['name' => 'Linda', 'age' => 14]
```

You may also call the `firstWhere` method with a comparison operator:

```php
$collection->firstWhere('age', '>=', 18);

// ['name' => 'Diego', 'age' => 23]
```

Like the [where](#method-where) method, you may pass one argument to the `firstWhere` method. In this scenario, the `firstWhere` method will return the first item where the given item key's value is "truthy":

```php
$collection->firstWhere('age');

// ['name' => 'Linda', 'age' => 14]
```

<a name="method-flatmap"></a>
#### `flatMap()` {.collection-method}

The `flatMap` method iterates through the collection and passes each value to the given closure. The closure is free to modify the item and return it, thus forming a new collection of modified items. Then, the array is flattened by one level:

```php
$collection = collect([
    ['name' => 'Sally'],
    ['school' => 'Arkansas'],
    ['age' => 28]
]);

$flattened = $collection->flatMap(function (array $values) {
    return array_map('strtoupper', $values);
});

$flattened->all();

// ['name' => 'SALLY', 'school' => 'ARKANSAS', 'age' => '28'];
```

<a name="method-flatten"></a>
#### `flatten()` {.collection-method}

The `flatten` method flattens a multi-dimensional collection into a single dimension:

```php
$collection = collect([
    'name' => 'Taylor',
    'languages' => [
        'PHP', 'JavaScript'
    ]
]);

$flattened = $collection->flatten();

$flattened->all();

// ['Taylor', 'PHP', 'JavaScript'];
```

If necessary, you may pass the `flatten` method a "depth" argument:

```php
$collection = collect([
    'Apple' => [
        [
            'name' => 'iPhone 6S',
            'brand' => 'Apple'
        ],
    ],
    'Samsung' => [
        [
            'name' => 'Galaxy S7',
            'brand' => 'Samsung'
        ],
    ],
]);

$products = $collection->flatten(1);

$products->values()->all();

/*
    [
        ['name' => 'iPhone 6S', 'brand' => 'Apple'],
        ['name' => 'Galaxy S7', 'brand' => 'Samsung'],
    ]
*/
```

In this example, calling `flatten` without providing the depth would have also flattened the nested arrays, resulting in `['iPhone 6S', 'Apple', 'Galaxy S7', 'Samsung']`. Providing a depth allows you to specify the number of levels nested arrays will be flattened.

<a name="method-flip"></a>
#### `flip()` {.collection-method}

The `flip` method swaps the collection's keys with their corresponding values:

```php
$collection = collect(['name' => 'Taylor', 'framework' => 'Laravel']);

$flipped = $collection->flip();

$flipped->all();

// ['Taylor' => 'name', 'Laravel' => 'framework']
```

<a name="method-forget"></a>
#### `forget()` {.collection-method}

The `forget` method removes an item from the collection by its key:

```php
$collection = collect(['name' => 'Taylor', 'framework' => 'Laravel']);

// Forget a single key...
$collection->forget('name');

// ['framework' => 'Laravel']

// Forget multiple keys...
$collection->forget(['name', 'framework']);

// []
```

> [!WARNING]
> Unlike most other collection methods, `forget` does not return a new modified collection; it modifies and returns the collection it is called on.

<a name="method-forpage"></a>
#### `forPage()` {.collection-method}

The `forPage` method returns a new collection containing the items that would be present on a given page number. The method accepts the page number as its first argument and the number of items to show per page as its second argument:

```php
$collection = collect([1, 2, 3, 4, 5, 6, 7, 8, 9]);

$chunk = $collection->forPage(2, 3);

$chunk->all();

// [4, 5, 6]
```

<a name="method-fromjson"></a>
#### `fromJson()` {.collection-method}

The static `fromJson` method creates a new collection instance by decoding a given JSON string using the `json_decode` PHP function:

```php
use Illuminate\Support\Collection;

$json = json_encode([
    'name' => 'Taylor Otwell',
    'role' => 'Developer',
    'status' => 'Active',
]);

$collection = Collection::fromJson($json);
```

<a name="method-get"></a>
#### `get()` {.collection-method}

The `get` method returns the item at a given key. If the key does not exist, `null` is returned:

```php
$collection = collect(['name' => 'Taylor', 'framework' => 'Laravel']);

$value = $collection->get('name');

// Taylor
```

You may optionally pass a default value as the second argument:

```php
$collection = collect(['name' => 'Taylor', 'framework' => 'Laravel']);

$value = $collection->get('age', 34);

// 34
```

You may even pass a callback as the method's default value. The result of the callback will be returned if the specified key does not exist:

```php
$collection->get('email', function () {
    return 'taylor@example.com';
});

// taylor@example.com
```

<a name="method-groupby"></a>
#### `groupBy()` {.collection-method}

The `groupBy` method groups the collection's items by a given key:

```php
$collection = collect([
    ['account_id' => 'account-x10', 'product' => 'Chair'],
    ['account_id' => 'account-x10', 'product' => 'Bookcase'],
    ['account_id' => 'account-x11', 'product' => 'Desk'],
]);

$grouped = $collection->groupBy('account_id');

$grouped->all();

/*
    [
        'account-x10' => [
            ['account_id' => 'account-x10', 'product' => 'Chair'],
            ['account_id' => 'account-x10', 'product' => 'Bookcase'],
        ],
        'account-x11' => [
            ['account_id' => 'account-x11', 'product' => 'Desk'],
        ],
    ]
*/
```

Instead of passing a string `key`, you may pass a callback. The callback should return the value you wish to key the group by:

```php
$grouped = $collection->groupBy(function (array $item, int $key) {
    return substr($item['account_id'], -3);
});

$grouped->all();

/*
    [
        'x10' => [
            ['account_id' => 'account-x10', 'product' => 'Chair'],
            ['account_id' => 'account-x10', 'product' => 'Bookcase'],
        ],
        'x11' => [
            ['account_id' => 'account-x11', 'product' => 'Desk'],
        ],
    ]
*/
```

Multiple grouping criteria may be passed as an array. Each array element will be applied to the corresponding level within a multi-dimensional array:

```php
$data = new Collection([
    10 => ['user' => 1, 'skill' => 1, 'roles' => ['Role_1', 'Role_3']],
    20 => ['user' => 2, 'skill' => 1, 'roles' => ['Role_1', 'Role_2']],
    30 => ['user' => 3, 'skill' => 2, 'roles' => ['Role_1']],
    40 => ['user' => 4, 'skill' => 2, 'roles' => ['Role_2']],
]);

$result = $data->groupBy(['skill', function (array $item) {
    return $item['roles'];
}], preserveKeys: true);

/*
[
    1 => [
        'Role_1' => [
            10 => ['user' => 1, 'skill' => 1, 'roles' => ['Role_1', 'Role_3']],
            20 => ['user' => 2, 'skill' => 1, 'roles' => ['Role_1', 'Role_2']],
        ],
        'Role_2' => [
            20 => ['user' => 2, 'skill' => 1, 'roles' => ['Role_1', 'Role_2']],
        ],
        'Role_3' => [
            10 => ['user' => 1, 'skill' => 1, 'roles' => ['Role_1', 'Role_3']],
        ],
    ],
    2 => [
        'Role_1' => [
            30 => ['user' => 3, 'skill' => 2, 'roles' => ['Role_1']],
        ],
        'Role_2' => [
            40 => ['user' => 4, 'skill' => 2, 'roles' => ['Role_2']],
        ],
    ],
];
*/
```

<a name="method-has"></a>
#### `has()` {.collection-method}

The `has` method determines if a given key exists in the collection:

```php
$collection = collect(['account_id' => 1, 'product' => 'Desk', 'amount' => 5]);

$collection->has('product');

// true

$collection->has(['product', 'amount']);

// true

$collection->has(['amount', 'price']);

// false
```

<a name="method-hasany"></a>
#### `hasAny()` {.collection-method}

The `hasAny` method determines whether any of the given keys exist in the collection:

```php
$collection = collect(['account_id' => 1, 'product' => 'Desk', 'amount' => 5]);

$collection->hasAny(['product', 'price']);

// true

$collection->hasAny(['name', 'price']);

// false
```

<a name="method-hasmany"></a>
#### `hasMany()` {.collection-method}

The `hasMany` method determines whether the collection contains multiple items:

```php
collect([])->hasMany();

// false

collect(['1'])->hasMany();

// false

collect([1, 2, 3])->hasMany();

// true

collect([
    ['age' => 2],
    ['age' => 3],
])->hasMany(fn ($item) => $item['age'] === 2)

// false
```

<a name="method-hassole"></a>
#### `hasSole()` {.collection-method}

The `hasSole` method determines if the collection contains a single item, optionally matching the given criteria:

```php
collect([])->hasSole();

// false

collect(['1'])->hasSole();

// true

collect([1, 2, 3])->hasSole(fn (int $item) => $item === 2);

// true
```

<a name="method-implode"></a>
#### `implode()` {.collection-method}

The `implode` method joins items in a collection. Its arguments depend on the type of items in the collection. If the collection contains arrays or objects, you should pass the key of the attributes you wish to join, and the "glue" string you wish to place between the values:

```php
$collection = collect([
    ['account_id' => 1, 'product' => 'Desk'],
    ['account_id' => 2, 'product' => 'Chair'],
]);

$collection->implode('product', ', ');

// 'Desk, Chair'
```

If the collection contains simple strings or numeric values, you should pass the "glue" as the only argument to the method:

```php
collect([1, 2, 3, 4, 5])->implode('-');

// '1-2-3-4-5'
```

You may pass a closure to the `implode` method if you would like to format the values being imploded:

```php
$collection->implode(function (array $item, int $key) {
    return strtoupper($item['product']);
}, ', ');

// 'DESK, CHAIR'
```

<a name="method-intersect"></a>
#### `intersect()` {.collection-method}

The `intersect` method removes any values from the original collection that are not present in the given array or collection. The resulting collection will preserve the original collection's keys:

```php
$collection = collect(['Desk', 'Sofa', 'Chair']);

$intersect = $collection->intersect(['Desk', 'Chair', 'Bookcase']);

$intersect->all();

// [0 => 'Desk', 2 => 'Chair']
```

> [!NOTE]
> This method's behavior is modified when using [Eloquent Collections](/docs/{{version}}/eloquent-collections#method-intersect).

<a name="method-intersectusing"></a>
#### `intersectUsing()` {.collection-method}

The `intersectUsing` method removes any values from the original collection that are not present in the given array or collection, using a custom callback to compare the values. The resulting collection will preserve the original collection's keys:

```php
$collection = collect(['Desk', 'Sofa', 'Chair']);

$intersect = $collection->intersectUsing(['desk', 'chair', 'bookcase'], function (string $a, string $b) {
    return strcasecmp($a, $b);
});

$intersect->all();

// [0 => 'Desk', 2 => 'Chair']
```

<a name="method-intersectAssoc"></a>
#### `intersectAssoc()` {.collection-method}

The `intersectAssoc` method compares the original collection against another collection or array, returning the key / value pairs that are present in all of the given collections:

```php
$collection = collect([
    'color' => 'red',
    'size' => 'M',
    'material' => 'cotton'
]);

$intersect = $collection->intersectAssoc([
    'color' => 'blue',
    'size' => 'M',
    'material' => 'polyester'
]);

$intersect->all();

// ['size' => 'M']
```

<a name="method-intersectassocusing"></a>
#### `intersectAssocUsing()` {.collection-method}

The `intersectAssocUsing` method compares the original collection against another collection or array, returning the key / value pairs that are present in both, using a custom comparison callback to determine equality for both keys and values:

```php
$collection = collect([
    'color' => 'red',
    'Size' => 'M',
    'material' => 'cotton',
]);

$intersect = $collection->intersectAssocUsing([
    'color' => 'blue',
    'size' => 'M',
    'material' => 'polyester',
], function (string $a, string $b) {
    return strcasecmp($a, $b);
});

$intersect->all();

// ['Size' => 'M']
```

<a name="method-intersectbykeys"></a>
#### `intersectByKeys()` {.collection-method}

The `intersectByKeys` method removes any keys and their corresponding values from the original collection that are not present in the given array or collection:

```php
$collection = collect([
    'serial' => 'UX301', 'type' => 'screen', 'year' => 2009,
]);

$intersect = $collection->intersectByKeys([
    'reference' => 'UX404', 'type' => 'tab', 'year' => 2011,
]);

$intersect->all();

// ['type' => 'screen', 'year' => 2009]
```

<a name="method-isempty"></a>
#### `isEmpty()` {.collection-method}

The `isEmpty` method returns `true` if the collection is empty; otherwise, `false` is returned:

```php
collect([])->isEmpty();

// true
```

<a name="method-isnotempty"></a>
#### `isNotEmpty()` {.collection-method}

The `isNotEmpty` method returns `true` if the collection is not empty; otherwise, `false` is returned:

```php
collect([])->isNotEmpty();

// false
```

<a name="method-join"></a>
#### `join()` {.collection-method}

The `join` method joins the collection's values with a string. Using this method's second argument, you may also specify how the final element should be appended to the string:

```php
collect(['a', 'b', 'c'])->join(', '); // 'a, b, c'
collect(['a', 'b', 'c'])->join(', ', ', and '); // 'a, b, and c'
collect(['a', 'b'])->join(', ', ' and '); // 'a and b'
collect(['a'])->join(', ', ' and '); // 'a'
collect([])->join(', ', ' and '); // ''
```

<a name="method-keyby"></a>
#### `keyBy()` {.collection-method}

The `keyBy` method keys the collection by the given key. If multiple items have the same key, only the last one will appear in the new collection:

```php
$collection = collect([
    ['product_id' => 'prod-100', 'name' => 'Desk'],
    ['product_id' => 'prod-200', 'name' => 'Chair'],
]);

$keyed = $collection->keyBy('product_id');

$keyed->all();

/*
    [
        'prod-100' => ['product_id' => 'prod-100', 'name' => 'Desk'],
        'prod-200' => ['product_id' => 'prod-200', 'name' => 'Chair'],
    ]
*/
```

You may also pass a callback to the method. The callback should return the value to key the collection by:

```php
$keyed = $collection->keyBy(function (array $item, int $key) {
    return strtoupper($item['product_id']);
});

$keyed->all();

/*
    [
        'PROD-100' => ['product_id' => 'prod-100', 'name' => 'Desk'],
        'PROD-200' => ['product_id' => 'prod-200', 'name' => 'Chair'],
    ]
*/
```

<a name="method-keys"></a>
#### `keys()` {.collection-method}

The `keys` method returns all of the collection's keys:

```php
$collection = collect([
    'prod-100' => ['product_id' => 'prod-100', 'name' => 'Desk'],
    'prod-200' => ['product_id' => 'prod-200', 'name' => 'Chair'],
]);

$keys = $collection->keys();

$keys->all();

// ['prod-100', 'prod-200']
```

<a name="method-last"></a>
#### `last()` {.collection-method}

The `last` method returns the last element in the collection that passes a given truth test:

```php
collect([1, 2, 3, 4])->last(function (int $value, int $key) {
    return $value < 3;
});

// 2
```

You may also call the `last` method with no arguments to get the last element in the collection. If the collection is empty, `null` is returned:

```php
collect([1, 2, 3, 4])->last();

// 4
```

<a name="method-lazy"></a>
#### `lazy()` {.collection-method}

The `lazy` method returns a new [LazyCollection](#lazy-collections) instance from the underlying array of items:

```php
$lazyCollection = collect([1, 2, 3, 4])->lazy();

$lazyCollection::class;

// Illuminate\Support\LazyCollection

$lazyCollection->all();

// [1, 2, 3, 4]
```

This is especially useful when you need to perform transformations on a huge `Collection` that contains many items:

```php
$count = $hugeCollection
    ->lazy()
    ->where('country', 'FR')
    ->where('balance', '>', '100')
    ->count();
```

By converting the collection to a `LazyCollection`, we avoid having to allocate a ton of additional memory. Though the original collection still keeps _its_ values in memory, the subsequent filters will not. Therefore, virtually no additional memory will be allocated when filtering the collection's results.

<a name="method-macro"></a>
#### `macro()` {.collection-method}

The static `macro` method allows you to add methods to the `Collection` class at run time. Refer to the documentation on [extending collections](#extending-collections) for more information.

<a name="method-make"></a>
#### `make()` {.collection-method}

The static `make` method creates a new collection instance. See the [Creating Collections](#creating-collections) section.

```php
use Illuminate\Support\Collection;

$collection = Collection::make([1, 2, 3]);
```

<a name="method-map"></a>
#### `map()` {.collection-method}

The `map` method iterates through the collection and passes each value to the given callback. The callback is free to modify the item and return it, thus forming a new collection of modified items:

```php
$collection = collect([1, 2, 3, 4, 5]);

$multiplied = $collection->map(function (int $item, int $key) {
    return $item * 2;
});

$multiplied->all();

// [2, 4, 6, 8, 10]
```

> [!WARNING]
> Like most other collection methods, `map` returns a new collection instance; it does not modify the collection it is called on. If you want to transform the original collection, use the [transform](#method-transform) method.

<a name="method-mapinto"></a>
#### `mapInto()` {.collection-method}

The `mapInto()` method iterates over the collection, creating a new instance of the given class by passing the value into the constructor:

```php
class Currency
{
    /**
     * Create a new currency instance.
     */
    function __construct(
        public string $code,
    ) {}
}

$collection = collect(['USD', 'EUR', 'GBP']);

$currencies = $collection->mapInto(Currency::class);

$currencies->all();

// [Currency('USD'), Currency('EUR'), Currency('GBP')]
```

<a name="method-mapspread"></a>
#### `mapSpread()` {.collection-method}

The `mapSpread` method iterates over the collection's items, passing each nested item value into the given closure. The closure is free to modify the item and return it, thus forming a new collection of modified items:

```php
$collection = collect([0, 1, 2, 3, 4, 5, 6, 7, 8, 9]);

$chunks = $collection->chunk(2);

$sequence = $chunks->mapSpread(function (int $even, int $odd) {
    return $even + $odd;
});

$sequence->all();

// [1, 5, 9, 13, 17]
```

<a name="method-maptogroups"></a>
#### `mapToGroups()` {.collection-method}

The `mapToGroups` method groups the collection's items by the given closure. The closure should return an associative array containing a single key / value pair, thus forming a new collection of grouped values:

```php
$collection = collect([
    [
        'name' => 'John Doe',
        'department' => 'Sales',
    ],
    [
        'name' => 'Jane Doe',
        'department' => 'Sales',
    ],
    [
        'name' => 'Johnny Doe',
        'department' => 'Marketing',
    ]
]);

$grouped = $collection->mapToGroups(function (array $item, int $key) {
    return [$item['department'] => $item['name']];
});

$grouped->all();

/*
    [
        'Sales' => ['John Doe', 'Jane Doe'],
        'Marketing' => ['Johnny Doe'],
    ]
*/

$grouped->get('Sales')->all();

// ['John Doe', 'Jane Doe']
```

<a name="method-mapwithkeys"></a>
#### `mapWithKeys()` {.collection-method}

The `mapWithKeys` method iterates through the collection and passes each value to the given callback. The callback should return an associative array containing a single key / value pair:

```php
$collection = collect([
    [
        'name' => 'John',
        'department' => 'Sales',
        'email' => 'john@example.com',
    ],
    [
        'name' => 'Jane',
        'department' => 'Marketing',
        'email' => 'jane@example.com',
    ]
]);

$keyed = $collection->mapWithKeys(function (array $item, int $key) {
    return [$item['email'] => $item['name']];
});

$keyed->all();

/*
    [
        'john@example.com' => 'John',
        'jane@example.com' => 'Jane',
    ]
*/
```

<a name="method-max"></a>
#### `max()` {.collection-method}

The `max` method returns the maximum value of a given key:

```php
$max = collect([
    ['foo' => 10],
    ['foo' => 20]
])->max('foo');

// 20

$max = collect([1, 2, 3, 4, 5])->max();

// 5
```

<a name="method-median"></a>
#### `median()` {.collection-method}

The `median` method returns the [median value](https://en.wikipedia.org/wiki/Median) of a given key:

```php
$median = collect([
    ['foo' => 10],
    ['foo' => 10],
    ['foo' => 20],
    ['foo' => 40]
])->median('foo');

// 15

$median = collect([1, 1, 2, 4])->median();

// 1.5
```

<a name="method-merge"></a>
#### `merge()` {.collection-method}

The `merge` method merges the given array or collection with the original collection. If a string key in the given items matches a string key in the original collection, the given item's value will overwrite the value in the original collection:

```php
$collection = collect(['product_id' => 1, 'price' => 100]);

$merged = $collection->merge(['price' => 200, 'discount' => false]);

$merged->all();

// ['product_id' => 1, 'price' => 200, 'discount' => false]
```

If the given item's keys are numeric, the values will be appended to the end of the collection:

```php
$collection = collect(['Desk', 'Chair']);

$merged = $collection->merge(['Bookcase', 'Door']);

$merged->all();

// ['Desk', 'Chair', 'Bookcase', 'Door']
```

<a name="method-mergerecursive"></a>
#### `mergeRecursive()` {.collection-method}

The `mergeRecursive` method merges the given array or collection recursively with the original collection. If a string key in the given items matches a string key in the original collection, then the values for these keys are merged together into an array, and this is done recursively:

```php
$collection = collect(['product_id' => 1, 'price' => 100]);

$merged = $collection->mergeRecursive([
    'product_id' => 2,
    'price' => 200,
    'discount' => false
]);

$merged->all();

// ['product_id' => [1, 2], 'price' => [100, 200], 'discount' => false]
```

<a name="method-min"></a>
#### `min()` {.collection-method}

The `min` method returns the minimum value of a given key:

```php
$min = collect([
    ['foo' => 10],
    ['foo' => 20]
])->min('foo');

// 10

$min = collect([1, 2, 3, 4, 5])->min();

// 1
```

<a name="method-mode"></a>
#### `mode()` {.collection-method}

The `mode` method returns the [mode value](https://en.wikipedia.org/wiki/Mode_(statistics)) of a given key:

```php
$mode = collect([
    ['foo' => 10],
    ['foo' => 10],
    ['foo' => 20],
    ['foo' => 40]
])->mode('foo');

// [10]

$mode = collect([1, 1, 2, 4])->mode();

// [1]

$mode = collect([1, 1, 2, 2])->mode();

// [1, 2]
```

<a name="method-multiply"></a>
#### `multiply()` {.collection-method}

The `multiply` method creates the specified number of copies of all items in the collection:

```php
$users = collect([
    ['name' => 'User #1', 'email' => 'user1@example.com'],
    ['name' => 'User #2', 'email' => 'user2@example.com'],
])->multiply(3);

/*
    [
        ['name' => 'User #1', 'email' => 'user1@example.com'],
        ['name' => 'User #2', 'email' => 'user2@example.com'],
        ['name' => 'User #1', 'email' => 'user1@example.com'],
        ['name' => 'User #2', 'email' => 'user2@example.com'],
        ['name' => 'User #1', 'email' => 'user1@example.com'],
        ['name' => 'User #2', 'email' => 'user2@example.com'],
    ]
*/
```

<a name="method-nth"></a>
#### `nth()` {.collection-method}

The `nth` method creates a new collection consisting of every n-th element:

```php
$collection = collect(['a', 'b', 'c', 'd', 'e', 'f']);

$collection->nth(4);

// ['a', 'e']
```

You may optionally pass a starting offset as the second argument:

```php
$collection->nth(4, 1);

// ['b', 'f']
```

<a name="method-only"></a>
#### `only()` {.collection-method}

The `only` method returns the items in the collection with the specified keys:

```php
$collection = collect([
    'product_id' => 1,
    'name' => 'Desk',
    'price' => 100,
    'discount' => false
]);

$filtered = $collection->only(['product_id', 'name']);

$filtered->all();

// ['product_id' => 1, 'name' => 'Desk']
```

For the inverse of `only`, see the [except](#method-except) method.

> [!NOTE]
> This method's behavior is modified when using [Eloquent Collections](/docs/{{version}}/eloquent-collections#method-only).

<a name="method-pad"></a>
#### `pad()` {.collection-method}

The `pad` method will fill the array with the given value until the array reaches the specified size. This method behaves like the [array_pad](https://secure.php.net/manual/en/function.array-pad.php) PHP function.

To pad to the left, you should specify a negative size. No padding will take place if the absolute value of the given size is less than or equal to the length of the array:

```php
$collection = collect(['A', 'B', 'C']);

$filtered = $collection->pad(5, 0);

$filtered->all();

// ['A', 'B', 'C', 0, 0]

$filtered = $collection->pad(-5, 0);

$filtered->all();

// [0, 0, 'A', 'B', 'C']
```

<a name="method-partition"></a>
#### `partition()` {.collection-method}

The `partition` method may be combined with PHP array destructuring to separate elements that pass a given truth test from those that do not:

```php
$collection = collect([1, 2, 3, 4, 5, 6]);

[$underThree, $equalOrAboveThree] = $collection->partition(function (int $i) {
    return $i < 3;
});

$underThree->all();

// [1, 2]

$equalOrAboveThree->all();

// [3, 4, 5, 6]
```

> [!NOTE]
> This method's behavior is modified when interacting with [Eloquent collections](/docs/{{version}}/eloquent-collections#method-partition).

<a name="method-percentage"></a>
#### `percentage()` {.collection-method}

The `percentage` method may be used to quickly determine the percentage of items in the collection that pass a given truth test:

```php
$collection = collect([1, 1, 2, 2, 2, 3]);

$percentage = $collection->percentage(fn (int $value) => $value === 1);

// 33.33
```

By default, the percentage will be rounded to two decimal places. However, you may customize this behavior by providing a second argument to the method:

```php
$percentage = $collection->percentage(fn (int $value) => $value === 1, precision: 3);

// 33.333
```

<a name="method-pipe"></a>
#### `pipe()` {.collection-method}

The `pipe` method passes the collection to the given closure and returns the result of the executed closure:

```php
$collection = collect([1, 2, 3]);

$piped = $collection->pipe(function (Collection $collection) {
    return $collection->sum();
});

// 6
```

<a name="method-pipeinto"></a>
#### `pipeInto()` {.collection-method}

The `pipeInto` method creates a new instance of the given class and passes the collection into the constructor:

```php
class ResourceCollection
{
    /**
     * Create a new ResourceCollection instance.
     */
    public function __construct(
        public Collection $collection,
    ) {}
}

$collection = collect([1, 2, 3]);

$resource = $collection->pipeInto(ResourceCollection::class);

$resource->collection->all();

// [1, 2, 3]
```

<a name="method-pipethrough"></a>
#### `pipeThrough()` {.collection-method}

The `pipeThrough` method passes the collection to the given array of closures and returns the result of the executed closures:

```php
use Illuminate\Support\Collection;

$collection = collect([1, 2, 3]);

$result = $collection->pipeThrough([
    function (Collection $collection) {
        return $collection->merge([4, 5]);
    },
    function (Collection $collection) {
        return $collection->sum();
    },
]);

// 15
```

<a name="method-pluck"></a>
#### `pluck()` {.collection-method}

The `pluck` method retrieves all of the values for a given key:

```php
$collection = collect([
    ['product_id' => 'prod-100', 'name' => 'Desk'],
    ['product_id' => 'prod-200', 'name' => 'Chair'],
]);

$plucked = $collection->pluck('name');

$plucked->all();

// ['Desk', 'Chair']
```

You may also specify how you wish the resulting collection to be keyed:

```php
$plucked = $collection->pluck('name', 'product_id');

$plucked->all();

// ['prod-100' => 'Desk', 'prod-200' => 'Chair']
```

The `pluck` method also supports retrieving nested values using "dot" notation:

```php
$collection = collect([
    [
        'name' => 'Laracon',
        'speakers' => [
            'first_day' => ['Rosa', 'Judith'],
        ],
    ],
    [
        'name' => 'VueConf',
        'speakers' => [
            'first_day' => ['Abigail', 'Joey'],
        ],
    ],
]);

$plucked = $collection->pluck('speakers.first_day');

$plucked->all();

// [['Rosa', 'Judith'], ['Abigail', 'Joey']]
```

If duplicate keys exist, the last matching element will be inserted into the plucked collection:

```php
$collection = collect([
    ['brand' => 'Tesla',  'color' => 'red'],
    ['brand' => 'Pagani', 'color' => 'white'],
    ['brand' => 'Tesla',  'color' => 'black'],
    ['brand' => 'Pagani', 'color' => 'orange'],
]);

$plucked = $collection->pluck('color', 'brand');

$plucked->all();

// ['Tesla' => 'black', 'Pagani' => 'orange']
```

<a name="method-pop"></a>
#### `pop()` {.collection-method}

The `pop` method removes and returns the last item from the collection. If the collection is empty, `null` will be returned:

```php
$collection = collect([1, 2, 3, 4, 5]);

$collection->pop();

// 5

$collection->all();

// [1, 2, 3, 4]
```

You may pass an integer to the `pop` method to remove and return multiple items from the end of a collection:

```php
$collection = collect([1, 2, 3, 4, 5]);

$collection->pop(3);

// collect([5, 4, 3])

$collection->all();

// [1, 2]
```

<a name="method-prepend"></a>
#### `prepend()` {.collection-method}

The `prepend` method adds an item to the beginning of the collection:

```php
$collection = collect([1, 2, 3, 4, 5]);

$collection->prepend(0);

$collection->all();

// [0, 1, 2, 3, 4, 5]
```

You may also pass a second argument to specify the key of the prepended item:

```php
$collection = collect(['one' => 1, 'two' => 2]);

$collection->prepend(0, 'zero');

$collection->all();

// ['zero' => 0, 'one' => 1, 'two' => 2]
```

<a name="method-pull"></a>
#### `pull()` {.collection-method}

The `pull` method removes and returns an item from the collection by its key:

```php
$collection = collect(['product_id' => 'prod-100', 'name' => 'Desk']);

$collection->pull('name');

// 'Desk'

$collection->all();

// ['product_id' => 'prod-100']
```

<a name="method-push"></a>
#### `push()` {.collection-method}

The `push` method appends an item to the end of the collection:

```php
$collection = collect([1, 2, 3, 4]);

$collection->push(5);

$collection->all();

// [1, 2, 3, 4, 5]
```

You may also provide multiple items to append to the end of the collection:

```php
$collection = collect([1, 2, 3, 4]);

$collection->push(5, 6, 7);
 
$collection->all();
 
// [1, 2, 3, 4, 5, 6, 7]
```

<a name="method-put"></a>
#### `put()` {.collection-method}

The `put` method sets the given key and value in the collection:

```php
$collection = collect(['product_id' => 1, 'name' => 'Desk']);

$collection->put('price', 100);

$collection->all();

// ['product_id' => 1, 'name' => 'Desk', 'price' => 100]
```

<a name="method-random"></a>
#### `random()` {.collection-method}

The `random` method returns a random item from the collection:

```php
$collection = collect([1, 2, 3, 4, 5]);

$collection->random();

// 4 - (retrieved randomly)
```

You may pass an integer to `random` to specify how many items you would like to randomly retrieve. A collection of items is always returned when explicitly passing the number of items you wish to receive:

```php
$random = $collection->random(3);

$random->all();

// [2, 4, 5] - (retrieved randomly)
```

If the collection instance has fewer items than requested, the `random` method will throw an `InvalidArgumentException`.

The `random` method also accepts a closure, which will receive the current collection instance:

```php
use Illuminate\Support\Collection;

$random = $collection->random(fn (Collection $items) => min(10, count($items)));

$random->all();

// [1, 2, 3, 4, 5] - (retrieved randomly)
```

<a name="method-range"></a>
#### `range()` {.collection-method}

The `range` method returns a collection containing integers between the specified range:

```php
$collection = collect()->range(3, 6);

$collection->all();

// [3, 4, 5, 6]
```

<a name="method-reduce"></a>
#### `reduce()` {.collection-method}

The `reduce` method reduces the collection to a single value, passing the result of each iteration into the subsequent iteration:

```php
$collection = collect([1, 2, 3]);

$total = $collection->reduce(function (?int $carry, int $item) {
    return $carry + $item;
});

// 6
```

The value for `$carry` on the first iteration is `null`; however, you may specify its initial value by passing a second argument to `reduce`:

```php
$collection->reduce(function (int $carry, int $item) {
    return $carry + $item;
}, 4);

// 10
```

The `reduce` method also passes array keys to the given callback:

```php
$collection = collect([
    'usd' => 1400,
    'gbp' => 1200,
    'eur' => 1000,
]);

$ratio = [
    'usd' => 1,
    'gbp' => 1.37,
    'eur' => 1.22,
];

$collection->reduce(function (int $carry, int $value, string $key) use ($ratio) {
    return $carry + ($value * $ratio[$key]);
}, 0);

// 4264
```

<a name="method-reduce-into"></a>
#### `reduceInto()` {.collection-method}

The `reduceInto` method reduces the collection to a single value by mutating the given initial value. Unlike the `reduce` method, the given callback does not need to return the accumulated value:

```php
class OrderStats
{
    public int $total = 0;

    public int $count = 0;
}

$orders = collect([
    ['amount' => 100],
    ['amount' => 250],
    ['amount' => 50],
]);

$stats = $orders->reduceInto(new OrderStats, function (OrderStats $stats, array $order) {
    $stats->total += $order['amount'];
    $stats->count++;
});

$stats->total;

// 400
```

When reducing into a scalar or array, you should accept it by reference in the callback so that your mutations are applied to the original value:

```php
$collection = collect([1, 2, 3, 4, 5]);

$even = $collection->reduceInto([], function (array &$result, int $value) {
    if ($value % 2 === 0) {
        $result[] = $value;
    }
});

// [2, 4]
```

<a name="method-reduce-spread"></a>
#### `reduceSpread()` {.collection-method}

The `reduceSpread` method reduces the collection to an array of values, passing the results of each iteration into the subsequent iteration. This method is similar to the `reduce` method; however, it can accept multiple initial values:

```php
[$creditsRemaining, $batch] = Image::where('status', 'unprocessed')
    ->get()
    ->reduceSpread(function (int $creditsRemaining, Collection $batch, Image $image) {
        if ($creditsRemaining >= $image->creditsRequired()) {
            $batch->push($image);

            $creditsRemaining -= $image->creditsRequired();
        }

        return [$creditsRemaining, $batch];
    }, $creditsAvailable, collect());
```

<a name="method-reject"></a>
#### `reject()` {.collection-method}

The `reject` method filters the collection using the given closure. The closure should return `true` if the item should be removed from the resulting collection:

```php
$collection = collect([1, 2, 3, 4]);

$filtered = $collection->reject(function (int $value, int $key) {
    return $value > 2;
});

$filtered->all();

// [1, 2]
```

For the inverse of the `reject` method, see the [filter](#method-filter) method.

<a name="method-replace"></a>
#### `replace()` {.collection-method}

The `replace` method behaves similarly to `merge`; however, in addition to overwriting matching items that have string keys, the `replace` method will also overwrite items in the collection that have matching numeric keys:

```php
$collection = collect(['Taylor', 'Abigail', 'James']);

$replaced = $collection->replace([1 => 'Victoria', 3 => 'Finn']);

$replaced->all();

// ['Taylor', 'Victoria', 'James', 'Finn']
```

<a name="method-replacerecursive"></a>
#### `replaceRecursive()` {.collection-method}

The `replaceRecursive` method behaves similarly to `replace`, but it will recur into arrays and apply the same replacement process to the inner values:

```php
$collection = collect([
    'Taylor',
    'Abigail',
    [
        'James',
        'Victoria',
        'Finn'
    ]
]);

$replaced = $collection->replaceRecursive([
    'Charlie',
    2 => [1 => 'King']
]);

$replaced->all();

// ['Charlie', 'Abigail', ['James', 'King', 'Finn']]
```

<a name="method-reverse"></a>
#### `reverse()` {.collection-method}

The `reverse` method reverses the order of the collection's items, preserving the original keys:

```php
$collection = collect(['a', 'b', 'c', 'd', 'e']);

$reversed = $collection->reverse();

$reversed->all();

/*
    [
        4 => 'e',
        3 => 'd',
        2 => 'c',
        1 => 'b',
        0 => 'a',
    ]
*/
```

<a name="method-search"></a>
#### `search()` {.collection-method}

The `search` method searches the collection for the given value and returns its key if found. If the item is not found, `false` is returned:

```php
$collection = collect([2, 4, 6, 8]);

$collection->search(4);

// 1
```

The search is done using a "loose" comparison, meaning a string with an integer value will be considered equal to an integer of the same value. To use "strict" comparison, pass `true` as the second argument to the method:

```php
collect([2, 4, 6, 8])->search('4', strict: true);

// false
```

Alternatively, you may provide your own closure to search for the first item that passes a given truth test:

```php
collect([2, 4, 6, 8])->search(function (int $item, int $key) {
    return $item > 5;
});

// 2
```

<a name="method-select"></a>
#### `select()` {.collection-method}

The `select` method selects the given keys from the collection, similar to an SQL `SELECT` statement:

```php
$users = collect([
    ['name' => 'Taylor Otwell', 'role' => 'Developer', 'status' => 'active'],
    ['name' => 'Victoria Faith', 'role' => 'Researcher', 'status' => 'active'],
]);

$users->select(['name', 'role']);

/*
    [
        ['name' => 'Taylor Otwell', 'role' => 'Developer'],
        ['name' => 'Victoria Faith', 'role' => 'Researcher'],
    ],
*/
```

<a name="method-shift"></a>
#### `shift()` {.collection-method}

The `shift` method removes and returns the first item from the collection:

```php
$collection = collect([1, 2, 3, 4, 5]);

$collection->shift();

// 1

$collection->all();

// [2, 3, 4, 5]
```

You may pass an integer to the `shift` method to remove and return multiple items from the beginning of a collection:

```php
$collection = collect([1, 2, 3, 4, 5]);

$collection->shift(3);

// collect([1, 2, 3])

$collection->all();

// [4, 5]
```

<a name="method-shuffle"></a>
#### `shuffle()` {.collection-method}

The `shuffle` method randomly shuffles the items in the collection:

```php
$collection = collect([1, 2, 3, 4, 5]);

$shuffled = $collection->shuffle();

$shuffled->all();

// [3, 2, 5, 1, 4] - (generated randomly)
```

<a name="method-skip"></a>
#### `skip()` {.collection-method}

The `skip` method returns a new collection, with the given number of elements removed from the beginning of the collection:

```php
$collection = collect([1, 2, 3, 4, 5, 6, 7, 8, 9, 10]);

$collection = $collection->skip(4);

$collection->all();

// [5, 6, 7, 8, 9, 10]
```

<a name="method-skipuntil"></a>
#### `skipUntil()` {.collection-method}

The `skipUntil` method skips over items from the collection while the given callback returns `false`. Once the callback returns `true` all of the remaining items in the collection will be returned as a new collection:

```php
$collection = collect([1, 2, 3, 4]);

$subset = $collection->skipUntil(function (int $item) {
    return $item >= 3;
});

$subset->all();

// [3, 4]
```

You may also pass a simple value to the `skipUntil` method to skip all items until the given value is found:

```php
$collection = collect([1, 2, 3, 4]);

$subset = $collection->skipUntil(3);

$subset->all();

// [3, 4]
```

> [!WARNING]
> If the given value is not found or the callback never returns `true`, the `skipUntil` method will return an empty collection.

<a name="method-skipwhile"></a>
#### `skipWhile()` {.collection-method}

The `skipWhile` method skips over items from the collection while the given callback returns `true`. Once the callback returns `false` all of the remaining items in the collection will be returned as a new collection:

```php
$collection = collect([1, 2, 3, 4]);

$subset = $collection->skipWhile(function (int $item) {
    return $item <= 3;
});

$subset->all();

// [4]
```

> [!WARNING]
> If the callback never returns `false`, the `skipWhile` method will return an empty collection.

<a name="method-slice"></a>
#### `slice()` {.collection-method}

The `slice` method returns a slice of the collection starting at the given index:

```php
$collection = collect([1, 2, 3, 4, 5, 6, 7, 8, 9, 10]);

$slice = $collection->slice(4);

$slice->all();

// [5, 6, 7, 8, 9, 10]
```

If you would like to limit the size of the returned slice, pass the desired size as the second argument to the method:

```php
$slice = $collection->slice(4, 2);

$slice->all();

// [5, 6]
```

The returned slice will preserve keys by default. If you do not wish to preserve the original keys, you can use the [values](#method-values) method to reindex them.

<a name="method-sliding"></a>
#### `sliding()` {.collection-method}

The `sliding` method returns a new collection of chunks representing a "sliding window" view of the items in the collection:

```php
$collection = collect([1, 2, 3, 4, 5]);

$chunks = $collection->sliding(2);

$chunks->toArray();

// [[1, 2], [2, 3], [3, 4], [4, 5]]
```

This is especially useful in conjunction with the [eachSpread](#method-eachspread) method:

```php
$transactions->sliding(2)->eachSpread(function (Collection $previous, Collection $current) {
    $current->total = $previous->total + $current->amount;
});
```

You may optionally pass a second "step" value, which determines the distance between the first item of every chunk:

```php
$collection = collect([1, 2, 3, 4, 5]);

$chunks = $collection->sliding(3, step: 2);

$chunks->toArray();

// [[1, 2, 3], [3, 4, 5]]
```

<a name="method-sole"></a>
#### `sole()` {.collection-method}

The `sole` method returns the first element in the collection that passes a given truth test, but only if the truth test matches exactly one element:

```php
collect([1, 2, 3, 4])->sole(function (int $value, int $key) {
    return $value === 2;
});

// 2
```

You may also pass a key / value pair to the `sole` method, which will return the first element in the collection that matches the given pair, but only if it exactly one element matches:

```php
$collection = collect([
    ['product' => 'Desk', 'price' => 200],
    ['product' => 'Chair', 'price' => 100],
]);

$collection->sole('product', 'Chair');

// ['product' => 'Chair', 'price' => 100]
```

Alternatively, you may also call the `sole` method with no argument to get the first element in the collection if there is only one element:

```php
$collection = collect([
    ['product' => 'Desk', 'price' => 200],
]);

$collection->sole();

// ['product' => 'Desk', 'price' => 200]
```

If there are no elements in the collection that should be returned by the `sole` method, an `\Illuminate\Collections\ItemNotFoundException` exception will be thrown. If there is more than one element that should be returned, an `\Illuminate\Collections\MultipleItemsFoundException` will be thrown.

<a name="method-some"></a>
#### `some()` {.collection-method}

Alias for the [contains](#method-contains) method.

<a name="method-sort"></a>
#### `sort()` {.collection-method}

The `sort` method sorts the collection. The sorted collection keeps the original array keys, so in the following example we will use the [values](#method-values) method to reset the keys to consecutively numbered indexes:

```php
$collection = collect([5, 3, 1, 2, 4]);

$sorted = $collection->sort();

$sorted->values()->all();

// [1, 2, 3, 4, 5]
```

If your sorting needs are more advanced, you may pass a callback to `sort` with your own algorithm. Refer to the PHP documentation on [uasort](https://secure.php.net/manual/en/function.uasort.php#refsect1-function.uasort-parameters), which is what the collection's `sort` method calls utilizes internally.

> [!NOTE]
> If you need to sort a collection of nested arrays or objects, see the [sortBy](#method-sortby) and [sortByDesc](#method-sortbydesc) methods.

<a name="method-sortby"></a>
#### `sortBy()` {.collection-method}

The `sortBy` method sorts the collection by the given key. The sorted collection keeps the original array keys, so in the following example we will use the [values](#method-values) method to reset the keys to consecutively numbered indexes:

```php
$collection = collect([
    ['name' => 'Desk', 'price' => 200],
    ['name' => 'Chair', 'price' => 100],
    ['name' => 'Bookcase', 'price' => 150],
]);

$sorted = $collection->sortBy('price');

$sorted->values()->all();

/*
    [
        ['name' => 'Chair', 'price' => 100],
        ['name' => 'Bookcase', 'price' => 150],
        ['name' => 'Desk', 'price' => 200],
    ]
*/
```

The `sortBy` method accepts [sort flags](https://www.php.net/manual/en/function.sort.php) as its second argument:

```php
$collection = collect([
    ['title' => 'Item 1'],
    ['title' => 'Item 12'],
    ['title' => 'Item 3'],
]);

$sorted = $collection->sortBy('title', SORT_NATURAL);

$sorted->values()->all();

/*
    [
        ['title' => 'Item 1'],
        ['title' => 'Item 3'],
        ['title' => 'Item 12'],
    ]
*/
```

Alternatively, you may pass your own closure to determine how to sort the collection's values:

```php
$collection = collect([
    ['name' => 'Desk', 'colors' => ['Black', 'Mahogany']],
    ['name' => 'Chair', 'colors' => ['Black']],
    ['name' => 'Bookcase', 'colors' => ['Red', 'Beige', 'Brown']],
]);

$sorted = $collection->sortBy(function (array $product, int $key) {
    return count($product['colors']);
});

$sorted->values()->all();

/*
    [
        ['name' => 'Chair', 'colors' => ['Black']],
        ['name' => 'Desk', 'colors' => ['Black', 'Mahogany']],
        ['name' => 'Bookcase', 'colors' => ['Red', 'Beige', 'Brown']],
    ]
*/
```

If you would like to sort your collection by multiple attributes, you may pass an array of sort operations to the `sortBy` method. Each sort operation should be an array consisting of the attribute that you wish to sort by and the direction of the desired sort:

```php
$collection = collect([
    ['name' => 'Taylor Otwell', 'age' => 34],
    ['name' => 'Abigail Otwell', 'age' => 30],
    ['name' => 'Taylor Otwell', 'age' => 36],
    ['name' => 'Abigail Otwell', 'age' => 32],
]);

$sorted = $collection->sortBy([
    ['name', 'asc'],
    ['age', 'desc'],
]);

$sorted->values()->all();

/*
    [
        ['name' => 'Abigail Otwell', 'age' => 32],
        ['name' => 'Abigail Otwell', 'age' => 30],
        ['name' => 'Taylor Otwell', 'age' => 36],
        ['name' => 'Taylor Otwell', 'age' => 34],
    ]
*/
```

When sorting a collection by multiple attributes, you may also provide closures that define each sort operation:

```php
$collection = collect([
    ['name' => 'Taylor Otwell', 'age' => 34],
    ['name' => 'Abigail Otwell', 'age' => 30],
    ['name' => 'Taylor Otwell', 'age' => 36],
    ['name' => 'Abigail Otwell', 'age' => 32],
]);

$sorted = $collection->sortBy([
    fn (array $a, array $b) => $a['name'] <=> $b['name'],
    fn (array $a, array $b) => $b['age'] <=> $a['age'],
]);

$sorted->values()->all();

/*
    [
        ['name' => 'Abigail Otwell', 'age' => 32],
        ['name' => 'Abigail Otwell', 'age' => 30],
        ['name' => 'Taylor Otwell', 'age' => 36],
        ['name' => 'Taylor Otwell', 'age' => 34],
    ]
*/
```

<a name="method-sortbydesc"></a>
#### `sortByDesc()` {.collection-method}

This method has the same signature as the [sortBy](#method-sortby) method, but will sort the collection in the opposite order.

<a name="method-sortdesc"></a>
#### `sortDesc()` {.collection-method}

This method will sort the collection in the opposite order as the [sort](#method-sort) method:

```php
$collection = collect([5, 3, 1, 2, 4]);

$sorted = $collection->sortDesc();

$sorted->values()->all();

// [5, 4, 3, 2, 1]
```

Unlike `sort`, you may not pass a closure to `sortDesc`. Instead, you should use the [sort](#method-sort) method and invert your comparison.

<a name="method-sortkeys"></a>
#### `sortKeys()` {.collection-method}

The `sortKeys` method sorts the collection by the keys of the underlying associative array:

```php
$collection = collect([
    'id' => 22345,
    'first' => 'John',
    'last' => 'Doe',
]);

$sorted = $collection->sortKeys();

$sorted->all();

/*
    [
        'first' => 'John',
        'id' => 22345,
        'last' => 'Doe',
    ]
*/
```

<a name="method-sortkeysdesc"></a>
#### `sortKeysDesc()` {.collection-method}

This method has the same signature as the [sortKeys](#method-sortkeys) method, but will sort the collection in the opposite order.

<a name="method-sortkeysusing"></a>
#### `sortKeysUsing()` {.collection-method}

The `sortKeysUsing` method sorts the collection by the keys of the underlying associative array using a callback:

```php
$collection = collect([
    'ID' => 22345,
    'first' => 'John',
    'last' => 'Doe',
]);

$sorted = $collection->sortKeysUsing('strnatcasecmp');

$sorted->all();

/*
    [
        'first' => 'John',
        'ID' => 22345,
        'last' => 'Doe',
    ]
*/
```

The callback must be a comparison function that returns an integer less than, equal to, or greater than zero. For more information, refer to the PHP documentation on [uksort](https://www.php.net/manual/en/function.uksort.php#refsect1-function.uksort-parameters), which is the PHP function that `sortKeysUsing` method utilizes internally.

<a name="method-splice"></a>
#### `splice()` {.collection-method}

The `splice` method removes and returns a slice of items starting at the specified index:

```php
$collection = collect([1, 2, 3, 4, 5]);

$chunk = $collection->splice(2);

$chunk->all();

// [3, 4, 5]

$collection->all();

// [1, 2]
```

You may pass a second argument to limit the size of the resulting collection:

```php
$collection = collect([1, 2, 3, 4, 5]);

$chunk = $collection->splice(2, 1);

$chunk->all();

// [3]

$collection->all();

// [1, 2, 4, 5]
```

In addition, you may pass a third argument containing the new items to replace the items removed from the collection:

```php
$collection = collect([1, 2, 3, 4, 5]);

$chunk = $collection->splice(2, 1, [10, 11]);

$chunk->all();

// [3]

$collection->all();

// [1, 2, 10, 11, 4, 5]
```

<a name="method-split"></a>
#### `split()` {.collection-method}

The `split` method breaks a collection into the given number of groups:

```php
$collection = collect([1, 2, 3, 4, 5]);

$groups = $collection->split(3);

$groups->all();

// [[1, 2], [3, 4], [5]]
```

<a name="method-splitin"></a>
#### `splitIn()` {.collection-method}

The `splitIn` method breaks a collection into the given number of groups, filling non-terminal groups completely before allocating the remainder to the final group:

```php
$collection = collect([1, 2, 3, 4, 5, 6, 7, 8, 9, 10]);

$groups = $collection->splitIn(3);

$groups->all();

// [[1, 2, 3, 4], [5, 6, 7, 8], [9, 10]]
```

<a name="method-sum"></a>
#### `sum()` {.collection-method}

The `sum` method returns the sum of all items in the collection:

```php
collect([1, 2, 3, 4, 5])->sum();

// 15
```

If the collection contains nested arrays or objects, you should pass a key that will be used to determine which values to sum:

```php
$collection = collect([
    ['name' => 'JavaScript: The Good Parts', 'pages' => 176],
    ['name' => 'JavaScript: The Definitive Guide', 'pages' => 1096],
]);

$collection->sum('pages');

// 1272
```

In addition, you may pass your own closure to determine which values of the collection to sum:

```php
$collection = collect([
    ['name' => 'Chair', 'colors' => ['Black']],
    ['name' => 'Desk', 'colors' => ['Black', 'Mahogany']],
    ['name' => 'Bookcase', 'colors' => ['Red', 'Beige', 'Brown']],
]);

$collection->sum(function (array $product) {
    return count($product['colors']);
});

// 6
```

<a name="method-take"></a>
#### `take()` {.collection-method}

The `take` method returns a new collection with the specified number of items:

```php
$collection = collect([0, 1, 2, 3, 4, 5]);

$chunk = $collection->take(3);

$chunk->all();

// [0, 1, 2]
```

You may also pass a negative integer to take the specified number of items from the end of the collection:

```php
$collection = collect([0, 1, 2, 3, 4, 5]);

$chunk = $collection->take(-2);

$chunk->all();

// [4, 5]
```

<a name="method-takeuntil"></a>
#### `takeUntil()` {.collection-method}

The `takeUntil` method returns items in the collection until the given callback returns `true`:

```php
$collection = collect([1, 2, 3, 4]);

$subset = $collection->takeUntil(function (int $item) {
    return $item >= 3;
});

$subset->all();

// [1, 2]
```

You may also pass a simple value to the `takeUntil` method to get the items until the given value is found:

```php
$collection = collect([1, 2, 3, 4]);

$subset = $collection->takeUntil(3);

$subset->all();

// [1, 2]
```

> [!WARNING]
> If the given value is not found or the callback never returns `true`, the `takeUntil` method will return all items in the collection.

<a name="method-takewhile"></a>
#### `takeWhile()` {.collection-method}

The `takeWhile` method returns items in the collection until the given callback returns `false`:

```php
$collection = collect([1, 2, 3, 4]);

$subset = $collection->takeWhile(function (int $item) {
    return $item < 3;
});

$subset->all();

// [1, 2]
```

> [!WARNING]
> If the callback never returns `false`, the `takeWhile` method will return all items in the collection.

<a name="method-tap"></a>
#### `tap()` {.collection-method}

The `tap` method passes the collection to the given callback, allowing you to "tap" into the collection at a specific point and do something with the items while not affecting the collection itself. The collection is then returned by the `tap` method:

```php
collect([2, 4, 3, 1, 5])
    ->sort()
    ->tap(function (Collection $collection) {
        Log::debug('Values after sorting', $collection->values()->all());
    })
    ->shift();

// 1
```

<a name="method-times"></a>
#### `times()` {.collection-method}

The static `times` method creates a new collection by invoking the given closure a specified number of times:

```php
$collection = Collection::times(10, function (int $number) {
    return $number * 9;
});

$collection->all();

// [9, 18, 27, 36, 45, 54, 63, 72, 81, 90]
```

<a name="method-toarray"></a>
#### `toArray()` {.collection-method}

The `toArray` method converts the collection into a plain PHP `array`. If the collection's values are [Eloquent](/docs/{{version}}/eloquent) models, the models will also be converted to arrays:

```php
$collection = collect(['name' => 'Desk', 'price' => 200]);

$collection->toArray();

/*
    [
        ['name' => 'Desk', 'price' => 200],
    ]
*/
```

> [!WARNING]
> `toArray` also converts all of the collection's nested objects that are an instance of `Arrayable` to an array. If you want to get the raw array underlying the collection, use the [all](#method-all) method instead.

<a name="method-tojson"></a>
#### `toJson()` {.collection-method}

The `toJson` method converts the collection into a JSON serialized string:

```php
$collection = collect(['name' => 'Desk', 'price' => 200]);

$collection->toJson();

// '{"name":"Desk", "price":200}'
```

<a name="method-to-pretty-json"></a>
#### `toPrettyJson()` {.collection-method}

The `toPrettyJson` method converts the collection into a formatted JSON string using the `JSON_PRETTY_PRINT` option:

```php
$collection = collect(['name' => 'Desk', 'price' => 200]);

$collection->toPrettyJson();
```

<a name="method-transform"></a>
#### `transform()` {.collection-method}

The `transform` method iterates over the collection and calls the given callback with each item in the collection. The items in the collection will be replaced by the values returned by the callback:

```php
$collection = collect([1, 2, 3, 4, 5]);

$collection->transform(function (int $item, int $key) {
    return $item * 2;
});

$collection->all();

// [2, 4, 6, 8, 10]
```

> [!WARNING]
> Unlike most other collection methods, `transform` modifies the collection itself. If you wish to create a new collection instead, use the [map](#method-map) method.

<a name="method-undot"></a>
#### `undot()` {.collection-method}

The `undot` method expands a single-dimensional collection that uses "dot" notation into a multi-dimensional collection:

```php
$person = collect([
    'name.first_name' => 'Marie',
    'name.last_name' => 'Valentine',
    'address.line_1' => '2992 Eagle Drive',
    'address.line_2' => '',
    'address.suburb' => 'Detroit',
    'address.state' => 'MI',
    'address.postcode' => '48219'
]);

$person = $person->undot();

$person->toArray();

/*
    [
        "name" => [
            "first_name" => "Marie",
            "last_name" => "Valentine",
        ],
        "address" => [
            "line_1" => "2992 Eagle Drive",
            "line_2" => "",
            "suburb" => "Detroit",
            "state" => "MI",
            "postcode" => "48219",
        ],
    ]
*/
```

<a name="method-union"></a>
#### `union()` {.collection-method}

The `union` method adds the given array to the collection. If the given array contains keys that are already in the original collection, the original collection's values will be preferred:

```php
$collection = collect([1 => ['a'], 2 => ['b']]);

$union = $collection->union([3 => ['c'], 1 => ['d']]);

$union->all();

// [1 => ['a'], 2 => ['b'], 3 => ['c']]
```

<a name="method-unique"></a>
#### `unique()` {.collection-method}

The `unique` method returns all of the unique items in the collection. The returned collection keeps the original array keys, so in the following example we will use the [values](#method-values) method to reset the keys to consecutively numbered indexes:

```php
$collection = collect([1, 1, 2, 2, 3, 4, 2]);

$unique = $collection->unique();

$unique->values()->all();

// [1, 2, 3, 4]
```

When dealing with nested arrays or objects, you may specify the key used to determine uniqueness:

```php
$collection = collect([
    ['name' => 'iPhone 6', 'brand' => 'Apple', 'type' => 'phone'],
    ['name' => 'iPhone 5', 'brand' => 'Apple', 'type' => 'phone'],
    ['name' => 'Apple Watch', 'brand' => 'Apple', 'type' => 'watch'],
    ['name' => 'Galaxy S6', 'brand' => 'Samsung', 'type' => 'phone'],
    ['name' => 'Galaxy Gear', 'brand' => 'Samsung', 'type' => 'watch'],
]);

$unique = $collection->unique('brand');

$unique->values()->all();

/*
    [
        ['name' => 'iPhone 6', 'brand' => 'Apple', 'type' => 'phone'],
        ['name' => 'Galaxy S6', 'brand' => 'Samsung', 'type' => 'phone'],
    ]
*/
```

Finally, you may also pass your own closure to the `unique` method to specify which value should determine an item's uniqueness:

```php
$unique = $collection->unique(function (array $item) {
    return $item['brand'].$item['type'];
});

$unique->values()->all();

/*
    [
        ['name' => 'iPhone 6', 'brand' => 'Apple', 'type' => 'phone'],
        ['name' => 'Apple Watch', 'brand' => 'Apple', 'type' => 'watch'],
        ['name' => 'Galaxy S6', 'brand' => 'Samsung', 'type' => 'phone'],
        ['name' => 'Galaxy Gear', 'brand' => 'Samsung', 'type' => 'watch'],
    ]
*/
```

The `unique` method uses "loose" comparisons when checking item values, meaning a string with an integer value will be considered equal to an integer of the same value. Use the [uniqueStrict](#method-uniquestrict) method to filter using "strict" comparisons.

> [!NOTE]
> This method's behavior is modified when using [Eloquent Collections](/docs/{{version}}/eloquent-collections#method-unique).

<a name="method-uniquestrict"></a>
#### `uniqueStrict()` {.collection-method}

This method has the same signature as the [unique](#method-unique) method; however, all values are compared using "strict" comparisons.

<a name="method-unless"></a>
#### `unless()` {.collection-method}

The `unless` method will execute the given callback unless the first argument given to the method evaluates to `true`. The collection instance and the first argument given to the `unless` method will be provided to the closure:

```php
$collection = collect([1, 2, 3]);

$collection->unless(true, function (Collection $collection, bool $value) {
    return $collection->push(4);
});

$collection->unless(false, function (Collection $collection, bool $value) {
    return $collection->push(5);
});

$collection->all();

// [1, 2, 3, 5]
```

A second callback may be passed to the `unless` method. The second callback will be executed when the first argument given to the `unless` method evaluates to `true`:

```php
$collection = collect([1, 2, 3]);

$collection->unless(true, function (Collection $collection, bool $value) {
    return $collection->push(4);
}, function (Collection $collection, bool $value) {
    return $collection->push(5);
});

$collection->all();

// [1, 2, 3, 5]
```

For the inverse of `unless`, see the [when](#method-when) method.

<a name="method-unlessempty"></a>
#### `unlessEmpty()` {.collection-method}

Alias for the [whenNotEmpty](#method-whennotempty) method.

<a name="method-unlessnotempty"></a>
#### `unlessNotEmpty()` {.collection-method}

Alias for the [whenEmpty](#method-whenempty) method.

<a name="method-unwrap"></a>
#### `unwrap()` {.collection-method}

The static `unwrap` method returns the collection's underlying items from the given value when applicable:

```php
Collection::unwrap(collect('John Doe'));

// ['John Doe']

Collection::unwrap(['John Doe']);

// ['John Doe']

Collection::unwrap('John Doe');

// 'John Doe'
```

<a name="method-value"></a>
#### `value()` {.collection-method}

The `value` method retrieves a given value from the first element of the collection:

```php
$collection = collect([
    ['product' => 'Desk', 'price' => 200],
    ['product' => 'Speaker', 'price' => 400],
]);

$value = $collection->value('price');

// 200
```

<a name="method-values"></a>
#### `values()` {.collection-method}

The `values` method returns a new collection with the keys reset to consecutive integers:

```php
$collection = collect([
    10 => ['product' => 'Desk', 'price' => 200],
    11 => ['product' => 'Speaker', 'price' => 400],
]);

$values = $collection->values();

$values->all();

/*
    [
        0 => ['product' => 'Desk', 'price' => 200],
        1 => ['product' => 'Speaker', 'price' => 400],
    ]
*/
```

<a name="method-when"></a>
#### `when()` {.collection-method}

The `when` method will execute the given callback when the first argument given to the method evaluates to `true`. The collection instance and the first argument given to the `when` method will be provided to the closure:

```php
$collection = collect([1, 2, 3]);

$collection->when(true, function (Collection $collection, bool $value) {
    return $collection->push(4);
});

$collection->when(false, function (Collection $collection, bool $value) {
    return $collection->push(5);
});

$collection->all();

// [1, 2, 3, 4]
```

A second callback may be passed to the `when` method. The second callback will be executed when the first argument given to the `when` method evaluates to `false`:

```php
$collection = collect([1, 2, 3]);

$collection->when(false, function (Collection $collection, bool $value) {
    return $collection->push(4);
}, function (Collection $collection, bool $value) {
    return $collection->push(5);
});

$collection->all();

// [1, 2, 3, 5]
```

For the inverse of `when`, see the [unless](#method-unless) method.

<a name="method-whenempty"></a>
#### `whenEmpty()` {.collection-method}

The `whenEmpty` method will execute the given callback when the collection is empty:

```php
$collection = collect(['Michael', 'Tom']);

$collection->whenEmpty(function (Collection $collection) {
    return $collection->push('Adam');
});

$collection->all();

// ['Michael', 'Tom']

$collection = collect();

$collection->whenEmpty(function (Collection $collection) {
    return $collection->push('Adam');
});

$collection->all();

// ['Adam']
```

A second closure may be passed to the `whenEmpty` method that will be executed when the collection is not empty:

```php
$collection = collect(['Michael', 'Tom']);

$collection->whenEmpty(function (Collection $collection) {
    return $collection->push('Adam');
}, function (Collection $collection) {
    return $collection->push('Taylor');
});

$collection->all();

// ['Michael', 'Tom', 'Taylor']
```

For the inverse of `whenEmpty`, see the [whenNotEmpty](#method-whennotempty) method.

<a name="method-whennotempty"></a>
#### `whenNotEmpty()` {.collection-method}

The `whenNotEmpty` method will execute the given callback when the collection is not empty:

```php
$collection = collect(['Michael', 'Tom']);

$collection->whenNotEmpty(function (Collection $collection) {
    return $collection->push('Adam');
});

$collection->all();

// ['Michael', 'Tom', 'Adam']

$collection = collect();

$collection->whenNotEmpty(function (Collection $collection) {
    return $collection->push('Adam');
});

$collection->all();

// []
```

A second closure may be passed to the `whenNotEmpty` method that will be executed when the collection is empty:

```php
$collection = collect();

$collection->whenNotEmpty(function (Collection $collection) {
    return $collection->push('Adam');
}, function (Collection $collection) {
    return $collection->push('Taylor');
});

$collection->all();

// ['Taylor']
```

For the inverse of `whenNotEmpty`, see the [whenEmpty](#method-whenempty) method.

<a name="method-where"></a>
#### `where()` {.collection-method}

The `where` method filters the collection by a given key / value pair:

```php
$collection = collect([
    ['product' => 'Desk', 'price' => 200],
    ['product' => 'Chair', 'price' => 100],
    ['product' => 'Bookcase', 'price' => 150],
    ['product' => 'Door', 'price' => 100],
]);

$filtered = $collection->where('price', 100);

$filtered->all();

/*
    [
        ['product' => 'Chair', 'price' => 100],
        ['product' => 'Door', 'price' => 100],
    ]
*/
```

The `where` method uses "loose" comparisons when checking item values, meaning a string with an integer value will be considered equal to an integer of the same value. Use the [whereStrict](#method-wherestrict) method to filter using "strict" comparisons, or the [whereNull](#method-wherenull) and [whereNotNull](#method-wherenotnull) methods to filter for `null` values.

Optionally, you may pass a comparison operator as the second parameter. Supported operators are: '===', '!==', '!=', '==', '=', '<>', '>', '<', '>=', and '<=':

```php
$collection = collect([
    ['name' => 'Jim', 'platform' => 'Mac'],
    ['name' => 'Sally', 'platform' => 'Mac'],
    ['name' => 'Sue', 'platform' => 'Linux'],
]);

$filtered = $collection->where('platform', '!=', 'Linux');

$filtered->all();

/*
    [
        ['name' => 'Jim', 'platform' => 'Mac'],
        ['name' => 'Sally', 'platform' => 'Mac'],
    ]
*/
```

<a name="method-wherestrict"></a>
#### `whereStrict()` {.collection-method}

This method has the same signature as the [where](#method-where) method; however, all values are compared using "strict" comparisons.

<a name="method-wherebetween"></a>
#### `whereBetween()` {.collection-method}

The `whereBetween` method filters the collection by determining if a specified item value is within a given range:

```php
$collection = collect([
    ['product' => 'Desk', 'price' => 200],
    ['product' => 'Chair', 'price' => 80],
    ['product' => 'Bookcase', 'price' => 150],
    ['product' => 'Pencil', 'price' => 30],
    ['product' => 'Door', 'price' => 100],
]);

$filtered = $collection->whereBetween('price', [100, 200]);

$filtered->all();

/*
    [
        ['product' => 'Desk', 'price' => 200],
        ['product' => 'Bookcase', 'price' => 150],
        ['product' => 'Door', 'price' => 100],
    ]
*/
```

<a name="method-wherein"></a>
#### `whereIn()` {.collection-method}

The `whereIn` method removes elements from the collection that do not have a specified item value that is contained within the given array:

```php
$collection = collect([
    ['product' => 'Desk', 'price' => 200],
    ['product' => 'Chair', 'price' => 100],
    ['product' => 'Bookcase', 'price' => 150],
    ['product' => 'Door', 'price' => 100],
]);

$filtered = $collection->whereIn('price', [150, 200]);

$filtered->all();

/*
    [
        ['product' => 'Desk', 'price' => 200],
        ['product' => 'Bookcase', 'price' => 150],
    ]
*/
```

The `whereIn` method uses "loose" comparisons when checking item values, meaning a string with an integer value will be considered equal to an integer of the same value. Use the [whereInStrict](#method-whereinstrict) method to filter using "strict" comparisons.

<a name="method-whereinstrict"></a>
#### `whereInStrict()` {.collection-method}

This method has the same signature as the [whereIn](#method-wherein) method; however, all values are compared using "strict" comparisons.

<a name="method-whereinstanceof"></a>
#### `whereInstanceOf()` {.collection-method}

The `whereInstanceOf` method filters the collection by a given class type:

```php
use App\Models\User;
use App\Models\Post;

$collection = collect([
    new User,
    new User,
    new Post,
]);

$filtered = $collection->whereInstanceOf(User::class);

$filtered->all();

// [App\Models\User, App\Models\User]
```

<a name="method-wherenotbetween"></a>
#### `whereNotBetween()` {.collection-method}

The `whereNotBetween` method filters the collection by determining if a specified item value is outside of a given range:

```php
$collection = collect([
    ['product' => 'Desk', 'price' => 200],
    ['product' => 'Chair', 'price' => 80],
    ['product' => 'Bookcase', 'price' => 150],
    ['product' => 'Pencil', 'price' => 30],
    ['product' => 'Door', 'price' => 100],
]);

$filtered = $collection->whereNotBetween('price', [100, 200]);

$filtered->all();

/*
    [
        ['product' => 'Chair', 'price' => 80],
        ['product' => 'Pencil', 'price' => 30],
    ]
*/
```

<a name="method-wherenotin"></a>
#### `whereNotIn()` {.collection-method}

The `whereNotIn` method removes elements from the collection that have a specified item value that is contained within the given array:

```php
$collection = collect([
    ['product' => 'Desk', 'price' => 200],
    ['product' => 'Chair', 'price' => 100],
    ['product' => 'Bookcase', 'price' => 150],
    ['product' => 'Door', 'price' => 100],
]);

$filtered = $collection->whereNotIn('price', [150, 200]);

$filtered->all();

/*
    [
        ['product' => 'Chair', 'price' => 100],
        ['product' => 'Door', 'price' => 100],
    ]
*/
```

The `whereNotIn` method uses "loose" comparisons when checking item values, meaning a string with an integer value will be considered equal to an integer of the same value. Use the [whereNotInStrict](#method-wherenotinstrict) method to filter using "strict" comparisons.

<a name="method-wherenotinstrict"></a>
#### `whereNotInStrict()` {.collection-method}

This method has the same signature as the [whereNotIn](#method-wherenotin) method; however, all values are compared using "strict" comparisons.

<a name="method-wherenotnull"></a>
#### `whereNotNull()` {.collection-method}

The `whereNotNull` method returns items from the collection where the given key is not `null`:

```php
$collection = collect([
    ['name' => 'Desk'],
    ['name' => null],
    ['name' => 'Bookcase'],
    ['name' => 0],
    ['name' => ''],
]);

$filtered = $collection->whereNotNull('name');

$filtered->all();

/*
    [
        ['name' => 'Desk'],
        ['name' => 'Bookcase'],
        ['name' => 0],
        ['name' => ''],
    ]
*/
```

<a name="method-wherenull"></a>
#### `whereNull()` {.collection-method}

The `whereNull` method returns items from the collection where the given key is `null`:

```php
$collection = collect([
    ['name' => 'Desk'],
    ['name' => null],
    ['name' => 'Bookcase'],
    ['name' => 0],
    ['name' => ''],
]);

$filtered = $collection->whereNull('name');

$filtered->all();

/*
    [
        ['name' => null],
    ]
*/
```

<a name="method-wrap"></a>
#### `wrap()` {.collection-method}

The static `wrap` method wraps the given value in a collection when applicable:

```php
use Illuminate\Support\Collection;

$collection = Collection::wrap('John Doe');

$collection->all();

// ['John Doe']

$collection = Collection::wrap(['John Doe']);

$collection->all();

// ['John Doe']

$collection = Collection::wrap(collect('John Doe'));

$collection->all();

// ['John Doe']
```

<a name="method-zip"></a>
#### `zip()` {.collection-method}

The `zip` method merges together the values of the given array with the values of the original collection at their corresponding index:

```php
$collection = collect(['Chair', 'Desk']);

$zipped = $collection->zip([100, 200]);

$zipped->all();

// [['Chair', 100], ['Desk', 200]]
```

<a name="higher-order-messages"></a>
## Higher Order Messages

Collections also provide support for "higher order messages", which are short-cuts for performing common actions on collections. The collection methods that provide higher order messages are: [average](#method-average), [avg](#method-avg), [contains](#method-contains), [each](#method-each), [every](#method-every), [filter](#method-filter), [first](#method-first), [flatMap](#method-flatmap), [groupBy](#method-groupby), [keyBy](#method-keyby), [map](#method-map), [max](#method-max), [min](#method-min), [partition](#method-partition), [reject](#method-reject), [skipUntil](#method-skipuntil), [skipWhile](#method-skipwhile), [some](#method-some), [sortBy](#method-sortby), [sortByDesc](#method-sortbydesc), [sum](#method-sum), [takeUntil](#method-takeuntil), [takeWhile](#method-takewhile), and [unique](#method-unique).

Each higher order message can be accessed as a dynamic property on a collection instance. For instance, let's use the `each` higher order message to call a method on each object within a collection:

```php
use App\Models\User;

$users = User::where('votes', '>', 500)->get();

$users->each->markAsVip();
```

Likewise, we can use the `sum` higher order message to gather the total number of "votes" for a collection of users:

```php
$users = User::where('group', 'Development')->get();

return $users->sum->votes;
```

<a name="lazy-collections"></a>
## Lazy Collections

<a name="lazy-collection-introduction"></a>
### Introduction

> [!WARNING]
> Before learning more about Laravel's lazy collections, take some time to familiarize yourself with [PHP generators](https://www.php.net/manual/en/language.generators.overview.php).

To supplement the already powerful `Collection` class, the `LazyCollection` class leverages PHP's [generators](https://www.php.net/manual/en/language.generators.overview.php) to allow you to work with very large datasets while keeping memory usage low.

For example, imagine your application needs to process a multi-gigabyte log file while taking advantage of Laravel's collection methods to parse the logs. Instead of reading the entire file into memory at once, lazy collections may be used to keep only a small part of the file in memory at a given time:

```php
use App\Models\LogEntry;
use Illuminate\Support\LazyCollection;

LazyCollection::make(function () {
    $handle = fopen('log.txt', 'r');

    while (($line = fgets($handle)) !== false) {
        yield $line;
    }

    fclose($handle);
})->chunk(4)->map(function (array $lines) {
    return LogEntry::fromLines($lines);
})->each(function (LogEntry $logEntry) {
    // Process the log entry...
});
```

Or, imagine you need to iterate through 10,000 Eloquent models. When using traditional Laravel collections, all 10,000 Eloquent models must be loaded into memory at the same time:

```php
use App\Models\User;

$users = User::all()->filter(function (User $user) {
    return $user->id > 500;
});
```

However, the query builder's `cursor` method returns a `LazyCollection` instance. This allows you to still only run a single query against the database but also only keep one Eloquent model loaded in memory at a time. In this example, the `filter` callback is not executed until we actually iterate over each user individually, allowing for a drastic reduction in memory usage:

```php
use App\Models\User;

$users = User::cursor()->filter(function (User $user) {
    return $user->id > 500;
});

foreach ($users as $user) {
    echo $user->id;
}
```

<a name="creating-lazy-collections"></a>
### Creating Lazy Collections

To create a lazy collection instance, you should pass a PHP generator function to the collection's `make` method:

```php
use Illuminate\Support\LazyCollection;

LazyCollection::make(function () {
    $handle = fopen('log.txt', 'r');

    while (($line = fgets($handle)) !== false) {
        yield $line;
    }

    fclose($handle);
});
```

<a name="the-enumerable-contract"></a>
### The Enumerable Contract

Almost all methods available on the `Collection` class are also available on the `LazyCollection` class. Both of these classes implement the `Illuminate\Support\Enumerable` contract, which defines the following methods:

<style>
    .collection-method-list > p {
        columns: 10.8em 3; -moz-columns: 10.8em 3; -webkit-columns: 10.8em 3;
    }

    .collection-method-list a {
        display: block;
        overflow: hidden;
        text-overflow: ellipsis;
        white-space: nowrap;
    }
</style>

<div class="collection-method-list" markdown="1">

[all](#method-all)
[average](#method-average)
[avg](#method-avg)
[chunk](#method-chunk)
[chunkBy](#method-chunkby)
[chunkWhile](#method-chunkwhile)
[collapse](#method-collapse)
[collect](#method-collect)
[combine](#method-combine)
[concat](#method-concat)
[contains](#method-contains)
[containsStrict](#method-containsstrict)
[count](#method-count)
[countBy](#method-countBy)
[crossJoin](#method-crossjoin)
[dd](#method-dd)
[diff](#method-diff)
[diffAssoc](#method-diffassoc)
[diffKeys](#method-diffkeys)
[dump](#method-dump)
[duplicates](#method-duplicates)
[duplicatesStrict](#method-duplicatesstrict)
[each](#method-each)
[eachSpread](#method-eachspread)
[every](#method-every)
[except](#method-except)
[filter](#method-filter)
[first](#method-first)
[firstOrFail](#method-first-or-fail)
[firstWhere](#method-first-where)
[flatMap](#method-flatmap)
[flatten](#method-flatten)
[flip](#method-flip)
[forPage](#method-forpage)
[get](#method-get)
[groupBy](#method-groupby)
[has](#method-has)
[implode](#method-implode)
[intersect](#method-intersect)
[intersectAssoc](#method-intersectAssoc)
[intersectByKeys](#method-intersectbykeys)
[isEmpty](#method-isempty)
[isNotEmpty](#method-isnotempty)
[join](#method-join)
[keyBy](#method-keyby)
[keys](#method-keys)
[last](#method-last)
[macro](#method-macro)
[make](#method-make)
[map](#method-map)
[mapInto](#method-mapinto)
[mapSpread](#method-mapspread)
[mapToGroups](#method-maptogroups)
[mapWithKeys](#method-mapwithkeys)
[max](#method-max)
[median](#method-median)
[merge](#method-merge)
[mergeRecursive](#method-mergerecursive)
[min](#method-min)
[mode](#method-mode)
[nth](#method-nth)
[only](#method-only)
[pad](#method-pad)
[partition](#method-partition)
[pipe](#method-pipe)
[pluck](#method-pluck)
[random](#method-random)
[reduce](#method-reduce)
[reduceInto](#method-reduce-into)
[reject](#method-reject)
[replace](#method-replace)
[replaceRecursive](#method-replacerecursive)
[reverse](#method-reverse)
[search](#method-search)
[shuffle](#method-shuffle)
[skip](#method-skip)
[slice](#method-slice)
[sole](#method-sole)
[some](#method-some)
[sort](#method-sort)
[sortBy](#method-sortby)
[sortByDesc](#method-sortbydesc)
[sortKeys](#method-sortkeys)
[sortKeysDesc](#method-sortkeysdesc)
[split](#method-split)
[sum](#method-sum)
[take](#method-take)
[tap](#method-tap)
[times](#method-times)
[toArray](#method-toarray)
[toJson](#method-tojson)
[union](#method-union)
[unique](#method-unique)
[uniqueStrict](#method-uniquestrict)
[unless](#method-unless)
[unlessEmpty](#method-unlessempty)
[unlessNotEmpty](#method-unlessnotempty)
[unwrap](#method-unwrap)
[values](#method-values)
[when](#method-when)
[whenEmpty](#method-whenempty)
[whenNotEmpty](#method-whennotempty)
[where](#method-where)
[whereStrict](#method-wherestrict)
[whereBetween](#method-wherebetween)
[whereIn](#method-wherein)
[whereInStrict](#method-whereinstrict)
[whereInstanceOf](#method-whereinstanceof)
[whereNotBetween](#method-wherenotbetween)
[whereNotIn](#method-wherenotin)
[whereNotInStrict](#method-wherenotinstrict)
[wrap](#method-wrap)
[zip](#method-zip)

</div>

> [!WARNING]
> Methods that mutate the collection (such as `shift`, `pop`, `prepend` etc.) are **not** available on the `LazyCollection` class.

<a name="lazy-collection-methods"></a>
### Lazy Collection Methods

In addition to the methods defined in the `Enumerable` contract, the `LazyCollection` class contains the following methods:

<a name="method-takeUntilTimeout"></a>
#### `takeUntilTimeout()` {.collection-method}

The `takeUntilTimeout` method returns a new lazy collection that will enumerate values until the specified time. After that time, the collection will then stop enumerating:

```php
$lazyCollection = LazyCollection::times(INF)
    ->takeUntilTimeout(now()->plus(minutes: 1));

$lazyCollection->each(function (int $number) {
    dump($number);

    sleep(1);
});

// 1
// 2
// ...
// 58
// 59
```

To illustrate the usage of this method, imagine an application that submits invoices from the database using a cursor. You could define a [scheduled task](/docs/{{version}}/scheduling) that runs every 15 minutes and only processes invoices for a maximum of 14 minutes:

```php
use App\Models\Invoice;
use Illuminate\Support\Carbon;

Invoice::pending()->cursor()
    ->takeUntilTimeout(
        Carbon::createFromTimestamp(LARAVEL_START)->add(14, 'minutes')
    )
    ->each(fn (Invoice $invoice) => $invoice->submit());
```

<a name="method-tapEach"></a>
#### `tapEach()` {.collection-method}

While the `each` method calls the given callback for each item in the collection right away, the `tapEach` method only calls the given callback as the items are being pulled out of the list one by one:

```php
// Nothing has been dumped so far...
$lazyCollection = LazyCollection::times(INF)->tapEach(function (int $value) {
    dump($value);
});

// Three items are dumped...
$array = $lazyCollection->take(3)->all();

// 1
// 2
// 3
```

<a name="method-throttle"></a>
#### `throttle()` {.collection-method}

The `throttle` method will throttle the lazy collection such that each value is returned after the specified number of seconds. This method is especially useful for situations where you may be interacting with external APIs that rate limit incoming requests:

```php
use App\Models\User;

User::where('vip', true)
    ->cursor()
    ->throttle(seconds: 1)
    ->each(function (User $user) {
        // Call external API...
    });
```

<a name="method-remember"></a>
#### `remember()` {.collection-method}

The `remember` method returns a new lazy collection that will remember any values that have already been enumerated and will not retrieve them again on subsequent collection enumerations:

```php
// No query has been executed yet...
$users = User::cursor()->remember();

// The query is executed...
// The first 5 users are hydrated from the database...
$users->take(5)->all();

// First 5 users come from the collection's cache...
// The rest are hydrated from the database...
$users->take(20)->all();
```

<a name="method-with-heartbeat"></a>
#### `withHeartbeat()` {.collection-method}

The `withHeartbeat` method allows you to execute a callback at regular time intervals while a lazy collection is being enumerated. This is particularly useful for long-running operations that require periodic maintenance tasks, such as extending locks or sending progress updates:

```php
use Carbon\CarbonInterval;
use Illuminate\Support\Facades\Cache;

$lock = Cache::lock('generate-reports', seconds: 60 * 5);

if ($lock->get()) {
    try {
        Report::where('status', 'pending')
            ->lazy()
            ->withHeartbeat(
                CarbonInterval::minutes(4),
                fn () => $lock->extend(CarbonInterval::minutes(5))
            )
            ->each(fn ($report) => $report->process());
    } finally {
        $lock->release();
    }
}
```


---

# Concurrency

*Sección: Laravel | Origen: https://laravel.com/docs/13.x/concurrency*

- [Introduction](#introduction)
- [Running Concurrent Tasks](#running-concurrent-tasks)
    - [Named Results](#named-results)
    - [Task Timeouts](#task-timeouts)
- [Deferring Concurrent Tasks](#deferring-concurrent-tasks)

<a name="introduction"></a>
## Introduction

Sometimes you may need to execute several slow tasks which do not depend on one another. In many cases, significant performance improvements can be realized by executing the tasks concurrently. Laravel's `Concurrency` facade provides a simple, convenient API for executing closures concurrently.

<a name="how-it-works"></a>
#### How it Works

Laravel achieves concurrency by serializing the given closures and dispatching them to a hidden Artisan CLI command, which unserializes the closures and invokes it within its own PHP process. After the closure has been invoked, the resulting value is serialized back to the parent process.

The `Concurrency` facade supports three drivers: `process` (the default), `fork`, and `sync`.

The `fork` driver offers improved performance compared to the default `process` driver, but it may only be used within PHP's CLI context, as PHP does not support forking during web requests. Before using the `fork` driver, you need to install the `spatie/fork` package:

```shell
composer require spatie/fork
```

The `sync` driver is primarily useful during testing when you want to disable all concurrency and simply execute the given closures in sequence within the parent process.

<a name="running-concurrent-tasks"></a>
## Running Concurrent Tasks

To run concurrent tasks, you may invoke the `Concurrency` facade's `run` method. The `run` method accepts an array of closures which should be executed simultaneously in child PHP processes:

```php
use Illuminate\Support\Facades\Concurrency;
use Illuminate\Support\Facades\DB;

[$userCount, $orderCount] = Concurrency::run([
    fn () => DB::table('users')->count(),
    fn () => DB::table('orders')->count(),
]);
```

To use a specific driver, you may use the `driver` method:

```php
$results = Concurrency::driver('fork')->run(...);
```

Or, to change the default concurrency driver, you should publish the `concurrency` configuration file via the `config:publish` Artisan command and update the `default` option within the file:

```shell
php artisan config:publish concurrency
```

<a name="named-results"></a>
### Named Results

If you would like to access concurrent task results by name rather than by position, you may provide an associative array of closures. Each result will be returned using the same key as its corresponding closure:

```php
use Illuminate\Support\Facades\Concurrency;
use Illuminate\Support\Facades\DB;

$results = Concurrency::run([
    'users' => fn () => DB::table('users')->count(),
    'orders' => fn () => DB::table('orders')->count(),
]);

$userCount = $results['users'];
$orderCount = $results['orders'];
```

<a name="task-timeouts"></a>
### Task Timeouts

When using the `process` driver (the default), you may specify a maximum number of seconds a concurrent task is allowed to run before it is terminated by providing a timeout to the `run` method:

```php
use Illuminate\Support\Facades\Concurrency;
use Illuminate\Support\Facades\DB;

[$userCount, $orderCount] = Concurrency::run([
    fn () => DB::table('users')->count(),
    fn () => DB::table('orders')->count(),
], timeout: 30);
```

You may also provide a `CarbonInterval` instance if you prefer a more expressive timeout definition:

```php
use Illuminate\Support\Facades\Concurrency;

use function Illuminate\Support\seconds;

Concurrency::run([...], timeout: seconds(30));
```

<a name="deferring-concurrent-tasks"></a>
## Deferring Concurrent Tasks

If you would like to execute an array of closures concurrently, but are not interested in the results returned by those closures, you should consider using the `defer` method. When the `defer` method is invoked, the given closures are not executed immediately. Instead, Laravel will execute the closures concurrently after the HTTP response has been sent to the user:

```php
use App\Services\Metrics;
use Illuminate\Support\Facades\Concurrency;

Concurrency::defer([
    fn () => Metrics::report('users'),
    fn () => Metrics::report('orders'),
]);
```


---

# Configuration

*Sección: Laravel | Origen: https://laravel.com/docs/13.x/configuration*

- [Introduction](#introduction)
- [Environment Configuration](#environment-configuration)
    - [Environment Variable Types](#environment-variable-types)
    - [Retrieving Environment Configuration](#retrieving-environment-configuration)
    - [Determining the Current Environment](#determining-the-current-environment)
    - [Encrypting Environment Files](#encrypting-environment-files)
- [Accessing Configuration Values](#accessing-configuration-values)
- [Configuration Caching](#configuration-caching)
- [Configuration Publishing](#configuration-publishing)
- [Debug Mode](#debug-mode)
- [Maintenance Mode](#maintenance-mode)

<a name="introduction"></a>
## Introduction

All of the configuration files for the Laravel framework are stored in the `config` directory. Each option is documented, so feel free to look through the files and get familiar with the options available to you.

These configuration files allow you to configure things like your database connection information, your mail server information, as well as various other core configuration values such as your application URL and encryption key.

<a name="the-about-command"></a>
#### The `about` Command

Laravel can display an overview of your application's configuration, drivers, and environment via the `about` Artisan command.

```shell
php artisan about
```

If you're only interested in a particular section of the application overview output, you may filter for that section using the `--only` option:

```shell
php artisan about --only=environment
```

Or, to explore a specific configuration file's values in detail, you may use the `config:show` Artisan command:

```shell
php artisan config:show database
```

<a name="environment-configuration"></a>
## Environment Configuration

It is often helpful to have different configuration values based on the environment where the application is running. For example, you may wish to use a different cache driver locally than you do on your production server.

To make this a cinch, Laravel utilizes the [DotEnv](https://github.com/vlucas/phpdotenv) PHP library. In a fresh Laravel installation, the root directory of your application will contain a `.env.example` file that defines many common environment variables. During the Laravel installation process, this file will automatically be copied to `.env`.

Laravel's default `.env` file contains some common configuration values that may differ based on whether your application is running locally or on a production web server. These values are then read by the configuration files within the `config` directory using Laravel's `env` function.

If you are developing with a team, you may wish to continue including and updating the `.env.example` file with your application. By putting placeholder values in the example configuration file, other developers on your team can clearly see which environment variables are needed to run your application.

> [!NOTE]
> Any variable in your `.env` file can be overridden by external environment variables such as server-level or system-level environment variables.

<a name="environment-file-security"></a>
#### Environment File Security

Your `.env` file should not be committed to your application's source control, since each developer / server using your application could require a different environment configuration. Furthermore, this would be a security risk in the event an intruder gains access to your source control repository, since any sensitive credentials would get exposed.

However, it is possible to encrypt your environment file using Laravel's built-in [environment encryption](#encrypting-environment-files). Encrypted environment files may be placed in source control safely.

<a name="additional-environment-files"></a>
#### Additional Environment Files

Before loading your application's environment variables, Laravel determines if an `APP_ENV` environment variable has been externally provided or if the `--env` CLI argument has been specified. If so, Laravel will attempt to load an `.env.[APP_ENV]` file if it exists. If it does not exist, the default `.env` file will be loaded.

<a name="environment-variable-types"></a>
### Environment Variable Types

All variables in your `.env` files are typically parsed as strings, so some reserved values have been created to allow you to return a wider range of types from the `env()` function:

<div class="overflow-auto">

| `.env` Value | `env()` Value |
| ------------ | ------------- |
| true         | (bool) true   |
| (true)       | (bool) true   |
| false        | (bool) false  |
| (false)      | (bool) false  |
| empty        | (string) ''   |
| (empty)      | (string) ''   |
| null         | (null) null   |
| (null)       | (null) null   |

</div>

If you need to define an environment variable with a value that contains spaces, you may do so by enclosing the value in double quotes:

```ini
APP_NAME="My Application"
```

<a name="retrieving-environment-configuration"></a>
### Retrieving Environment Configuration

All of the variables listed in the `.env` file will be loaded into the `$_ENV` PHP super-global when your application receives a request. However, you may use the `env` function to retrieve values from these variables in your configuration files. In fact, if you review the Laravel configuration files, you will notice many of the options are already using this function:

```php
'debug' => (bool) env('APP_DEBUG', false),
```

The second value passed to the `env` function is the "default value". This value will be returned if no environment variable exists for the given key.

<a name="determining-the-current-environment"></a>
### Determining the Current Environment

The current application environment is determined via the `APP_ENV` variable from your `.env` file. You may access this value via the `environment` method on the `App` [facade](/docs/{{version}}/facades):

```php
use Illuminate\Support\Facades\App;

$environment = App::environment();
```

You may also pass arguments to the `environment` method to determine if the environment matches a given value. The method will return `true` if the environment matches any of the given values:

```php
if (App::environment('local')) {
    // The environment is local
}

if (App::environment(['local', 'staging'])) {
    // The environment is either local OR staging...
}
```

> [!NOTE]
> The current application environment detection can be overridden by defining a server-level `APP_ENV` environment variable.

<a name="encrypting-environment-files"></a>
### Encrypting Environment Files

Unencrypted environment files should never be stored in source control. However, Laravel allows you to encrypt your environment files so that they may safely be added to source control with the rest of your application.

<a name="encryption"></a>
#### Encryption

To encrypt an environment file, you may use the `env:encrypt` command:

```shell
php artisan env:encrypt
```

Running the `env:encrypt` command will encrypt your `.env` file and place the encrypted contents in an `.env.encrypted` file. The decryption key is presented in the output of the command and should be stored in a secure password manager. If you would like to provide your own encryption key you may use the `--key` option when invoking the command:

```shell
php artisan env:encrypt --key=3UVsEgGVK36XN82KKeyLFMhvosbZN1aF
```

> [!NOTE]
> The length of the key provided should match the key length required by the encryption cipher being used. By default, Laravel will use the `AES-256-CBC` cipher which requires a 32 character key. You are free to use any cipher supported by Laravel's [encrypter](/docs/{{version}}/encryption) by passing the `--cipher` option when invoking the command.

If your application has multiple environment files, such as `.env` and `.env.staging`, you may specify the environment file that should be encrypted by providing the environment name via the `--env` option:

```shell
php artisan env:encrypt --env=staging
```

<a name="readable-variable-names"></a>
#### Readable Variable Names

When encrypting your environment file, you may use the `--readable` option to retain visible variable names while encrypting their values:

```shell
php artisan env:encrypt --readable
```

This will produce an encrypted file with the following format:

```ini
APP_NAME=eyJpdiI6...
APP_ENV=eyJpdiI6...
APP_KEY=eyJpdiI6...
APP_DEBUG=eyJpdiI6...
APP_URL=eyJpdiI6...
```

Using the readable format allows you to see which environment variables exist without exposing sensitive data. It also makes reviewing pull requests much easier since you can see which variables were added, removed, or renamed without needing to decrypt the file.

When decrypting environment files, Laravel automatically detects which format was used, so no additional options are needed for the `env:decrypt` command.

> [!NOTE]
> When using the `--readable` option, comments, and blank lines from the original environment file are not included in the encrypted output.

<a name="decryption"></a>
#### Decryption

To decrypt an environment file, you may use the `env:decrypt` command. This command requires a decryption key, which Laravel will retrieve from the `LARAVEL_ENV_ENCRYPTION_KEY` environment variable:

```shell
php artisan env:decrypt
```

Or, the key may be provided directly to the command via the `--key` option:

```shell
php artisan env:decrypt --key=3UVsEgGVK36XN82KKeyLFMhvosbZN1aF
```

When the `env:decrypt` command is invoked, Laravel will decrypt the contents of the `.env.encrypted` file and place the decrypted contents in the `.env` file.

The `--cipher` option may be provided to the `env:decrypt` command in order to use a custom encryption cipher:

```shell
php artisan env:decrypt --key=qUWuNRdfuImXcKxZ --cipher=AES-128-CBC
```

If your application has multiple environment files, such as `.env` and `.env.staging`, you may specify the environment file that should be decrypted by providing the environment name via the `--env` option:

```shell
php artisan env:decrypt --env=staging
```

In order to overwrite an existing environment file, you may provide the `--force` option to the `env:decrypt` command:

```shell
php artisan env:decrypt --force
```

<a name="accessing-configuration-values"></a>
## Accessing Configuration Values

You may easily access your configuration values using the `Config` facade or global `config` function from anywhere in your application. The configuration values may be accessed using "dot" syntax, which includes the name of the file and option you wish to access. A default value may also be specified and will be returned if the configuration option does not exist:

```php
use Illuminate\Support\Facades\Config;

$value = Config::get('app.timezone');

$value = config('app.timezone');

// Retrieve a default value if the configuration value does not exist...
$value = config('app.timezone', 'Asia/Seoul');
```

To set configuration values at runtime, you may invoke the `Config` facade's `set` method or pass an array to the `config` function:

```php
Config::set('app.timezone', 'America/Chicago');

config(['app.timezone' => 'America/Chicago']);
```

To assist with static analysis, the `Config` facade also provides typed configuration retrieval methods. If the retrieved configuration value does not match the expected type, an exception will be thrown:

```php
Config::string('config-key');
Config::integer('config-key');
Config::float('config-key');
Config::boolean('config-key');
Config::array('config-key');
Config::collection('config-key');
```

<a name="configuration-caching"></a>
## Configuration Caching

To give your application a speed boost, you should cache all of your configuration files into a single file using the `config:cache` Artisan command. This will combine all of the configuration options for your application into a single file which can be quickly loaded by the framework.

You should typically run the `php artisan config:cache` command as part of your production deployment process. The command should not be run during local development as configuration options will frequently need to be changed during the course of your application's development.

Once the configuration has been cached, your application's `.env` file will not be loaded by the framework during requests or Artisan commands; therefore, the `env` function will only return external, system level environment variables.

For this reason, you should ensure you are only calling the `env` function from within your application's configuration (`config`) files. You can see many examples of this by examining Laravel's default configuration files. Configuration values may be accessed from anywhere in your application using the `config` function [described above](#accessing-configuration-values).

The `config:clear` command may be used to purge the cached configuration:

```shell
php artisan config:clear
```

> [!WARNING]
> If you execute the `config:cache` command during your deployment process, you should be sure that you are only calling the `env` function from within your configuration files. Once the configuration has been cached, the `.env` file will not be loaded; therefore, the `env` function will only return external, system level environment variables.

<a name="configuration-publishing"></a>
## Configuration Publishing

Most of Laravel's configuration files are already published in your application's `config` directory; however, certain configuration files like `cors.php` and `view.php` are not published by default, as most applications will never need to modify them.

However, you may use the `config:publish` Artisan command to publish any configuration files that are not published by default:

```shell
php artisan config:publish

php artisan config:publish --all
```

<a name="debug-mode"></a>
## Debug Mode

The `debug` option in your `config/app.php` configuration file determines how much information about an error is actually displayed to the user. By default, this option is set to respect the value of the `APP_DEBUG` environment variable, which is stored in your `.env` file.

> [!WARNING]
> For local development, you should set the `APP_DEBUG` environment variable to `true`. **In your production environment, this value should always be `false`. If the variable is set to `true` in production, you risk exposing sensitive configuration values to your application's end users.**

<a name="maintenance-mode"></a>
## Maintenance Mode

When your application is in maintenance mode, a custom view will be displayed for all requests into your application. This makes it easy to "disable" your application while it is updating or when you are performing maintenance. A maintenance mode check is included in the default middleware stack for your application. If the application is in maintenance mode, a `Symfony\Component\HttpKernel\Exception\HttpException` instance will be thrown with a status code of 503.

To enable maintenance mode, execute the `down` Artisan command:

```shell
php artisan down
```

If you would like the `Refresh` HTTP header to be sent with all maintenance mode responses, you may provide the `refresh` option when invoking the `down` command. The `Refresh` header will instruct the browser to automatically refresh the page after the specified number of seconds:

```shell
php artisan down --refresh=15
```

You may also provide a `retry` option to the `down` command, which will be set as the `Retry-After` HTTP header's value, although browsers generally ignore this header:

```shell
php artisan down --retry=60
```

<a name="bypassing-maintenance-mode"></a>
#### Bypassing Maintenance Mode

To allow maintenance mode to be bypassed using a secret token, you may use the `secret` option to specify a maintenance mode bypass token:

```shell
php artisan down --secret="1630542a-246b-4b66-afa1-dd72a4c43515"
```

After placing the application in maintenance mode, you may navigate to the application URL matching this token and Laravel will issue a maintenance mode bypass cookie to your browser:

```shell
https://example.com/1630542a-246b-4b66-afa1-dd72a4c43515
```

If you would like Laravel to generate the secret token for you, you may use the `with-secret` option. The secret will be displayed to you once the application is in maintenance mode:

```shell
php artisan down --with-secret
```

When accessing this hidden route, you will then be redirected to the `/` route of the application. Once the cookie has been issued to your browser, you will be able to browse the application normally as if it was not in maintenance mode.

> [!NOTE]
> Your maintenance mode secret should typically consist of alpha-numeric characters and, optionally, dashes. You should avoid using characters that have special meaning in URLs such as `?` or `&`.

<a name="maintenance-mode-on-multiple-servers"></a>
#### Maintenance Mode on Multiple Servers

By default, Laravel determines if your application is in maintenance mode using a file-based system. This means to activate maintenance mode, the `php artisan down` command has to be executed on each server hosting your application.

Alternatively, Laravel offers a cache-based method for handling maintenance mode. This method requires running the `php artisan down` command on just one server. To use this approach, modify the maintenance mode variables in your application's `.env` file. You should select a cache `store` that is accessible by all of your servers. This ensures the maintenance mode status is consistently maintained across every server:

```ini
APP_MAINTENANCE_DRIVER=cache
APP_MAINTENANCE_STORE=database
```

<a name="pre-rendering-the-maintenance-mode-view"></a>
#### Pre-Rendering the Maintenance Mode View

If you utilize the `php artisan down` command during deployment, your users may still occasionally encounter errors if they access the application while your Composer dependencies or other infrastructure components are updating. This occurs because a significant part of the Laravel framework must boot in order to determine your application is in maintenance mode and render the maintenance mode view using the templating engine.

For this reason, Laravel allows you to pre-render a maintenance mode view that will be returned at the very beginning of the request cycle. This view is rendered before any of your application's dependencies have loaded. You may pre-render a template of your choice using the `down` command's `render` option:

```shell
php artisan down --render="errors::503"
```

<a name="redirecting-maintenance-mode-requests"></a>
#### Redirecting Maintenance Mode Requests

While in maintenance mode, Laravel will display the maintenance mode view for all application URLs the user attempts to access. If you wish, you may instruct Laravel to redirect all requests to a specific URL. This may be accomplished using the `redirect` option. For example, you may wish to redirect all requests to the `/` URI:

```shell
php artisan down --redirect=/
```

<a name="disabling-maintenance-mode"></a>
#### Disabling Maintenance Mode

To disable maintenance mode, use the `up` command:

```shell
php artisan up
```

> [!NOTE]
> You may customize the default maintenance mode template by defining your own template at `resources/views/errors/503.blade.php`.

<a name="maintenance-mode-queues"></a>
#### Maintenance Mode and Queues

While your application is in maintenance mode, no [queued jobs](/docs/{{version}}/queues) will be handled. The jobs will continue to be handled as normal once the application is out of maintenance mode.

<a name="alternatives-to-maintenance-mode"></a>
#### Alternatives to Maintenance Mode

Since maintenance mode requires your application to have several seconds of downtime, consider running your applications on a fully-managed platform like [Laravel Cloud](https://cloud.laravel.com) to accomplish zero-downtime deployment with Laravel.


---

# Console Tests

*Sección: Laravel | Origen: https://laravel.com/docs/13.x/console-tests*

- [Introduction](#introduction)
- [Success / Failure Expectations](#success-failure-expectations)
- [Input / Output Expectations](#input-output-expectations)
- [Console Events](#console-events)

<a name="introduction"></a>
## Introduction

In addition to simplifying HTTP testing, Laravel provides a simple API for testing your application's [custom console commands](/docs/{{version}}/artisan).

<a name="success-failure-expectations"></a>
## Success / Failure Expectations

To get started, let's explore how to make assertions regarding an Artisan command's exit code. To accomplish this, we will use the `artisan` method to invoke an Artisan command from our test. Then, we will use the `assertExitCode` method to assert that the command completed with a given exit code:

```php tab=Pest
test('console command', function () {
    $this->artisan('inspire')->assertExitCode(0);
});
```

```php tab=PHPUnit
/**
 * Test a console command.
 */
public function test_console_command(): void
{
    $this->artisan('inspire')->assertExitCode(0);
}
```

You may use the `assertNotExitCode` method to assert that the command did not exit with a given exit code:

```php
$this->artisan('inspire')->assertNotExitCode(1);
```

Of course, all terminal commands typically exit with a status code of `0` when they are successful and a non-zero exit code when they are not successful. Therefore, for convenience, you may utilize the `assertSuccessful` and `assertFailed` assertions to assert that a given command exited with a successful exit code or not:

```php
$this->artisan('inspire')->assertSuccessful();

$this->artisan('inspire')->assertFailed();
```

<a name="input-output-expectations"></a>
## Input / Output Expectations

Laravel allows you to easily "mock" user input for your console commands using the `expectsQuestion` method. In addition, you may specify the exit code and text that you expect to be output by the console command using the `assertExitCode` and `expectsOutput` methods. For example, consider the following console command:

```php
Artisan::command('question', function () {
    $name = $this->ask('What is your name?');

    $language = $this->choice('Which language do you prefer?', [
        'PHP',
        'Ruby',
        'Python',
    ]);

    $this->line('Your name is '.$name.' and you prefer '.$language.'.');
});
```

You may test this command with the following test:

```php tab=Pest
test('console command', function () {
    $this->artisan('question')
        ->expectsQuestion('What is your name?', 'Taylor Otwell')
        ->expectsQuestion('Which language do you prefer?', 'PHP')
        ->expectsOutput('Your name is Taylor Otwell and you prefer PHP.')
        ->doesntExpectOutput('Your name is Taylor Otwell and you prefer Ruby.')
        ->assertExitCode(0);
});
```

```php tab=PHPUnit
/**
 * Test a console command.
 */
public function test_console_command(): void
{
    $this->artisan('question')
        ->expectsQuestion('What is your name?', 'Taylor Otwell')
        ->expectsQuestion('Which language do you prefer?', 'PHP')
        ->expectsOutput('Your name is Taylor Otwell and you prefer PHP.')
        ->doesntExpectOutput('Your name is Taylor Otwell and you prefer Ruby.')
        ->assertExitCode(0);
}
```

If you are utilizing the `search` or `multisearch` functions provided by [Laravel Prompts](/docs/{{version}}/prompts), you may use the `expectsSearch` assertion to mock the user's input, search results, and selection:

```php tab=Pest
test('console command', function () {
    $this->artisan('example')
        ->expectsSearch('What is your name?', search: 'Tay', answers: [
            'Taylor Otwell',
            'Taylor Swift',
            'Darian Taylor'
        ], answer: 'Taylor Otwell')
        ->assertExitCode(0);
});
```

```php tab=PHPUnit
/**
 * Test a console command.
 */
public function test_console_command(): void
{
    $this->artisan('example')
        ->expectsSearch('What is your name?', search: 'Tay', answers: [
            'Taylor Otwell',
            'Taylor Swift',
            'Darian Taylor'
        ], answer: 'Taylor Otwell')
        ->assertExitCode(0);
}
```

You may also assert that a console command does not generate any output using the `doesntExpectOutput` method:

```php tab=Pest
test('console command', function () {
    $this->artisan('example')
        ->doesntExpectOutput()
        ->assertExitCode(0);
});
```

```php tab=PHPUnit
/**
 * Test a console command.
 */
public function test_console_command(): void
{
    $this->artisan('example')
        ->doesntExpectOutput()
        ->assertExitCode(0);
}
```

The `expectsOutputToContain` and `doesntExpectOutputToContain` methods may be used to make assertions against a portion of the output:

```php tab=Pest
test('console command', function () {
    $this->artisan('example')
        ->expectsOutputToContain('Taylor')
        ->assertExitCode(0);
});
```

```php tab=PHPUnit
/**
 * Test a console command.
 */
public function test_console_command(): void
{
    $this->artisan('example')
        ->expectsOutputToContain('Taylor')
        ->assertExitCode(0);
}
```

<a name="confirmation-expectations"></a>
#### Confirmation Expectations

When writing a command which expects confirmation in the form of a "yes" or "no" answer, you may utilize the `expectsConfirmation` method:

```php
$this->artisan('module:import')
    ->expectsConfirmation('Do you really wish to run this command?', 'no')
    ->assertExitCode(1);
```

<a name="table-expectations"></a>
#### Table Expectations

If your command displays a table of information using Artisan's `table` method, it can be cumbersome to write output expectations for the entire table. Instead, you may use the `expectsTable` method. This method accepts the table's headers as its first argument and the table's data as its second argument:

```php
$this->artisan('users:all')
    ->expectsTable([
        'ID',
        'Email',
    ], [
        [1, 'taylor@example.com'],
        [2, 'abigail@example.com'],
    ]);
```

<a name="console-events"></a>
## Console Events

By default, the `Illuminate\Console\Events\CommandStarting` and `Illuminate\Console\Events\CommandFinished` events are not dispatched while running your application's tests. However, you can enable these events for a given test class by adding the `Illuminate\Foundation\Testing\WithConsoleEvents` trait to the class:

```php tab=Pest
<?php

use Illuminate\Foundation\Testing\WithConsoleEvents;

pest()->use(WithConsoleEvents::class);

// ...
```

```php tab=PHPUnit
<?php

namespace Tests\Feature;

use Illuminate\Foundation\Testing\WithConsoleEvents;
use Tests\TestCase;

class ConsoleEventTest extends TestCase
{
    use WithConsoleEvents;

    // ...
}
```


---

# Service Container

*Sección: Laravel | Origen: https://laravel.com/docs/13.x/container*

- [Introduction](#introduction)
    - [Zero Configuration Resolution](#zero-configuration-resolution)
    - [When to Utilize the Container](#when-to-use-the-container)
- [Binding](#binding)
    - [Binding Basics](#binding-basics)
    - [Binding Interfaces to Implementations](#binding-interfaces-to-implementations)
    - [Contextual Binding](#contextual-binding)
    - [Contextual Attributes](#contextual-attributes)
    - [Binding Primitives](#binding-primitives)
    - [Binding Typed Variadics](#binding-typed-variadics)
    - [Tagging](#tagging)
    - [Extending Bindings](#extending-bindings)
- [Resolving](#resolving)
    - [The Make Method](#the-make-method)
    - [Automatic Injection](#automatic-injection)
- [Method Invocation and Injection](#method-invocation-and-injection)
- [Container Events](#container-events)
    - [Rebinding](#rebinding)
- [PSR-11](#psr-11)

<a name="introduction"></a>
## Introduction

The Laravel service container is a powerful tool for managing class dependencies and performing dependency injection. Dependency injection is a fancy phrase that essentially means this: class dependencies are "injected" into the class via the constructor or, in some cases, "setter" methods.

Let's look at a simple example:

```php
<?php

namespace App\Http\Controllers;

use App\Services\AppleMusic;
use Illuminate\View\View;

class PodcastController extends Controller
{
    /**
     * Create a new controller instance.
     */
    public function __construct(
        protected AppleMusic $apple,
    ) {}

    /**
     * Show information about the given podcast.
     */
    public function show(string $id): View
    {
        return view('podcasts.show', [
            'podcast' => $this->apple->findPodcast($id)
        ]);
    }
}
```

In this example, the `PodcastController` needs to retrieve podcasts from a data source such as Apple Music. So, we will **inject** a service that is able to retrieve podcasts. Since the service is injected, we are able to easily "mock", or create a dummy implementation of the `AppleMusic` service when testing our application.

A deep understanding of the Laravel service container is essential to building a powerful, large application, as well as for contributing to the Laravel core itself.

<a name="zero-configuration-resolution"></a>
### Zero Configuration Resolution

If a class has no dependencies or only depends on other concrete classes (not interfaces), the container does not need to be instructed on how to resolve that class. For example, you may place the following code in your `routes/web.php` file:

```php
<?php

class Service
{
    // ...
}

Route::get('/', function (Service $service) {
    dd($service::class);
});
```

In this example, hitting your application's `/` route will automatically resolve the `Service` class and inject it into your route's handler. This is game changing. It means you can develop your application and take advantage of dependency injection without worrying about bloated configuration files.

Thankfully, many of the classes you will be writing when building a Laravel application automatically receive their dependencies via the container, including [controllers](/docs/{{version}}/controllers), [event listeners](/docs/{{version}}/events), [middleware](/docs/{{version}}/middleware), and more. Additionally, you may type-hint dependencies in the `handle` method of [queued jobs](/docs/{{version}}/queues). Once you taste the power of automatic and zero configuration dependency injection it feels impossible to develop without it.

<a name="when-to-use-the-container"></a>
### When to Utilize the Container

Thanks to zero configuration resolution, you will often type-hint dependencies on routes, controllers, event listeners, and elsewhere without ever manually interacting with the container. For example, you might type-hint the `Illuminate\Http\Request` object on your route definition so that you can easily access the current request. Even though we never have to interact with the container to write this code, it is managing the injection of these dependencies behind the scenes:

```php
use Illuminate\Http\Request;

Route::get('/', function (Request $request) {
    // ...
});
```

In many cases, thanks to automatic dependency injection and [facades](/docs/{{version}}/facades), you can build Laravel applications without **ever** manually binding or resolving anything from the container. **So, when would you ever manually interact with the container?** Let's examine two situations.

First, if you write a class that implements an interface and you wish to type-hint that interface on a route or class constructor, you must [tell the container how to resolve that interface](#binding-interfaces-to-implementations). Secondly, if you are [writing a Laravel package](/docs/{{version}}/packages) that you plan to share with other Laravel developers, you may need to bind your package's services into the container.

<a name="binding"></a>
## Binding

<a name="binding-basics"></a>
### Binding Basics

<a name="simple-bindings"></a>
#### Simple Bindings

Almost all of your service container bindings will be registered within [service providers](/docs/{{version}}/providers), so most of these examples will demonstrate using the container in that context.

Within a service provider, you always have access to the container via the `$this->app` property. We can register a binding using the `bind` method, passing the class or interface name that we wish to register along with a closure that returns an instance of the class:

```php
use App\Services\Transistor;
use App\Services\PodcastParser;
use Illuminate\Contracts\Foundation\Application;

$this->app->bind(Transistor::class, function (Application $app) {
    return new Transistor($app->make(PodcastParser::class));
});
```

Note that we receive the container itself as an argument to the resolver. We can then use the container to resolve sub-dependencies of the object we are building.

As mentioned, you will typically be interacting with the container within service providers; however, if you would like to interact with the container outside of a service provider, you may do so via the `App` [facade](/docs/{{version}}/facades):

```php
use App\Services\Transistor;
use Illuminate\Contracts\Foundation\Application;
use Illuminate\Support\Facades\App;

App::bind(Transistor::class, function (Application $app) {
    // ...
});
```

You may use the `bindIf` method to register a container binding only if a binding has not already been registered for the given type:

```php
$this->app->bindIf(Transistor::class, function (Application $app) {
    return new Transistor($app->make(PodcastParser::class));
});
```

For convenience, you may omit providing the class or interface name that you wish to register as a separate argument and instead allow Laravel to infer the type from the return type of the closure you provide to the `bind` method:

```php
App::bind(function (Application $app): Transistor {
    return new Transistor($app->make(PodcastParser::class));
});
```

> [!NOTE]
> There is no need to bind classes into the container if they do not depend on any interfaces. The container does not need to be instructed on how to build these objects, since it can automatically resolve these objects using reflection.

<a name="binding-a-singleton"></a>
#### Binding A Singleton

The `singleton` method binds a class or interface into the container that should only be resolved one time. Once a singleton binding is resolved, the same object instance will be returned on subsequent calls into the container:

```php
use App\Services\Transistor;
use App\Services\PodcastParser;
use Illuminate\Contracts\Foundation\Application;

$this->app->singleton(Transistor::class, function (Application $app) {
    return new Transistor($app->make(PodcastParser::class));
});
```

You may use the `singletonIf` method to register a singleton container binding only if a binding has not already been registered for the given type:

```php
$this->app->singletonIf(Transistor::class, function (Application $app) {
    return new Transistor($app->make(PodcastParser::class));
});
```

<a name="singleton-attribute"></a>
#### Singleton Attribute

Alternatively, you may mark an interface or class with the `#[Singleton]` attribute to indicate to the container that it should be resolved one time:

```php
<?php

namespace App\Services;

use Illuminate\Container\Attributes\Singleton;

#[Singleton]
class Transistor
{
    // ...
}
```

<a name="binding-scoped"></a>
#### Binding Scoped Singletons

The `scoped` method binds a class or interface into the container that should only be resolved one time within a given Laravel request / job lifecycle. While this method is similar to the `singleton` method, instances registered using the `scoped` method will be flushed whenever the Laravel application starts a new "lifecycle", such as when a [Laravel Octane](/docs/{{version}}/octane) worker processes a new request or when a Laravel [queue worker](/docs/{{version}}/queues) processes a new job:

```php
use App\Services\Transistor;
use App\Services\PodcastParser;
use Illuminate\Contracts\Foundation\Application;

$this->app->scoped(Transistor::class, function (Application $app) {
    return new Transistor($app->make(PodcastParser::class));
});
```

You may use the `scopedIf` method to register a scoped container binding only if a binding has not already been registered for the given type:

```php
$this->app->scopedIf(Transistor::class, function (Application $app) {
    return new Transistor($app->make(PodcastParser::class));
});
```

<a name="scoped-attribute"></a>
#### Scoped Attribute

Alternatively, you may mark an interface or class with the `#[Scoped]` attribute to indicate to the container that it should be resolved one time within a given Laravel request / job lifecycle:

```php
<?php

namespace App\Services;

use Illuminate\Container\Attributes\Scoped;

#[Scoped]
class Transistor
{
    // ...
}
```

<a name="binding-instances"></a>
#### Binding Instances

You may also bind an existing object instance into the container using the `instance` method. The given instance will always be returned on subsequent calls into the container:

```php
use App\Services\Transistor;
use App\Services\PodcastParser;

$service = new Transistor(new PodcastParser);

$this->app->instance(Transistor::class, $service);
```

<a name="binding-interfaces-to-implementations"></a>
### Binding Interfaces to Implementations

A very powerful feature of the service container is its ability to bind an interface to a given implementation. For example, let's assume we have an `EventPusher` interface and a `RedisEventPusher` implementation. Once we have coded our `RedisEventPusher` implementation of this interface, we can register it with the service container like so:

```php
use App\Contracts\EventPusher;
use App\Services\RedisEventPusher;

$this->app->bind(EventPusher::class, RedisEventPusher::class);
```

This statement tells the container that it should inject the `RedisEventPusher` when a class needs an implementation of `EventPusher`. Now we can type-hint the `EventPusher` interface in the constructor of a class that is resolved by the container. Remember, controllers, event listeners, middleware, and various other types of classes within Laravel applications are always resolved using the container:

```php
use App\Contracts\EventPusher;

/**
 * Create a new class instance.
 */
public function __construct(
    protected EventPusher $pusher,
) {}
```

<a name="bind-attribute"></a>
#### Bind Attribute

Laravel also provides a `Bind` attribute for added convenience. You can apply this attribute to any interface to tell Laravel which implementation should be automatically injected whenever that interface is requested. When using the `Bind` attribute, there is no need to perform any additional service registration in your application's service providers.

In addition, multiple `Bind` attributes may be placed on an interface in order to configure a different implementation that should be injected for a given set of environments:

```php
<?php

namespace App\Contracts;

use App\Services\FakeEventPusher;
use App\Services\RedisEventPusher;
use Illuminate\Container\Attributes\Bind;

#[Bind(RedisEventPusher::class)]
#[Bind(FakeEventPusher::class, environments: ['local', 'testing'])]
interface EventPusher
{
    // ...
}
```

Furthermore, [Singleton](#singleton-attribute) and [Scoped](#scoped-attribute) attributes may be applied to indicate if the container bindings should be resolved once or once per request / job lifecycle:

```php
use App\Services\RedisEventPusher;
use Illuminate\Container\Attributes\Bind;
use Illuminate\Container\Attributes\Singleton;

#[Bind(RedisEventPusher::class)]
#[Singleton]
interface EventPusher
{
    // ...
}
```

For bindings that depend on an arbitrary condition, you may use the `BindWhen` attribute. The closure may receive the container and should return `true` when the binding should be applied. `Bind` and `BindWhen` attributes are evaluated in the order they are declared:

```php
use App\Services\BetaEventPusher;
use Illuminate\Container\Attributes\BindWhen;
use Laravel\Pennant\Feature;

#[BindWhen(BetaEventPusher::class, static fn () => Feature::active('beta-events'))]
interface EventPusher
{
    // ...
}
```

> [!NOTE]
> The `BindWhen` attribute requires PHP 8.5 or greater.

<a name="contextual-binding"></a>
### Contextual Binding

Sometimes you may have two classes that utilize the same interface, but you wish to inject different implementations into each class. For example, two controllers may depend on different implementations of the `Illuminate\Contracts\Filesystem\Filesystem` [contract](/docs/{{version}}/contracts). Laravel provides a simple, fluent interface for defining this behavior:

```php
use App\Http\Controllers\PhotoController;
use App\Http\Controllers\UploadController;
use App\Http\Controllers\VideoController;
use Illuminate\Contracts\Filesystem\Filesystem;
use Illuminate\Support\Facades\Storage;

$this->app->when(PhotoController::class)
    ->needs(Filesystem::class)
    ->give(function () {
        return Storage::disk('local');
    });

$this->app->when([VideoController::class, UploadController::class])
    ->needs(Filesystem::class)
    ->give(function () {
        return Storage::disk('s3');
    });
```

<a name="contextual-attributes"></a>
### Contextual Attributes

Since contextual binding is often used to inject implementations of drivers or configuration values, Laravel offers a variety of contextual binding attributes that allow to inject these types of values without manually defining the contextual bindings in your service providers.

For example, the `Storage` attribute may be used to inject a specific [storage disk](/docs/{{version}}/filesystem):

```php
<?php

namespace App\Http\Controllers;

use Illuminate\Container\Attributes\Storage;
use Illuminate\Contracts\Filesystem\Filesystem;

class PhotoController extends Controller
{
    public function __construct(
        #[Storage('local')] protected Filesystem $filesystem
    ) {
        // ...
    }
}
```

In addition to the `Storage` attribute, Laravel offers `Auth`, `Cache`, `Config`, `Context`, `DB`, `Give`, `Log`, `RequestAttribute`, `RouteParameter`, and [Tag](#tagging) attributes:

```php
<?php

namespace App\Http\Controllers;

use App\Contracts\UserRepository;
use App\Models\Organization;
use App\Models\Photo;
use App\Repositories\DatabaseRepository;
use Illuminate\Container\Attributes\Auth;
use Illuminate\Container\Attributes\Cache;
use Illuminate\Container\Attributes\Config;
use Illuminate\Container\Attributes\Context;
use Illuminate\Container\Attributes\DB;
use Illuminate\Container\Attributes\Give;
use Illuminate\Container\Attributes\Log;
use Illuminate\Container\Attributes\RequestAttribute;
use Illuminate\Container\Attributes\RouteParameter;
use Illuminate\Container\Attributes\Tag;
use Illuminate\Contracts\Auth\Guard;
use Illuminate\Contracts\Cache\Repository;
use Illuminate\Database\Connection;
use Psr\Log\LoggerInterface;

class PhotoController extends Controller
{
    public function __construct(
        #[Auth('web')] protected Guard $auth,
        #[Cache('redis')] protected Repository $cache,
        #[Config('app.timezone')] protected string $timezone,
        #[Context('uuid')] protected string $uuid,
        #[Context('ulid', hidden: true)] protected string $ulid,
        #[DB('mysql')] protected Connection $connection,
        #[Give(DatabaseRepository::class)] protected UserRepository $users,
        #[Log('daily')] protected LoggerInterface $log,
        #[RequestAttribute('organization')] protected Organization $organization,
        #[RouteParameter] protected Photo $photo,
        #[Tag('reports')] protected iterable $reports,
    ) {
        // ...
    }
}
```

The `RouteParameter` attribute will resolve the route parameter matching the variable name. If needed, you may specify the route parameter name explicitly: `#[RouteParameter('photo')]`.

The `RequestAttribute` attribute will resolve the value stored under the given key in the current request's [attribute bag](https://symfony.com/doc/current/components/http_foundation.html#accessing-request-data): `#[RequestAttribute('organization')]`.

In addition, Laravel provides a `CurrentUser` attribute for injecting the currently authenticated user into a given route or class:

```php
use App\Models\User;
use Illuminate\Container\Attributes\CurrentUser;

Route::get('/user', function (#[CurrentUser] User $user) {
    return $user;
})->middleware('auth');
```

<a name="defining-custom-attributes"></a>
#### Defining Custom Attributes

You can create your own contextual attributes by implementing the `Illuminate\Contracts\Container\ContextualAttribute` contract. The container will call your attribute's `resolve` method, which should resolve the value that should be injected into the class utilizing the attribute. In the example below, we will re-implement Laravel's built-in `Config` attribute:

```php
<?php

namespace App\Attributes;

use Attribute;
use Illuminate\Contracts\Container\Container;
use Illuminate\Contracts\Container\ContextualAttribute;
use ReflectionParameter;

#[Attribute(Attribute::TARGET_PARAMETER)]
class Config implements ContextualAttribute
{
    /**
     * Create a new attribute instance.
     */
    public function __construct(public string $key, public mixed $default = null)
    {
    }

    /**
     * Resolve the configuration value.
     *
     * @param  self  $attribute
     * @param  \Illuminate\Contracts\Container\Container  $container
     * @param  \ReflectionParameter  $parameter
     * @return mixed
     */
    public static function resolve(self $attribute, Container $container, ReflectionParameter $parameter)
    {
        return $container->make('config')->get($attribute->key, $attribute->default);
    }
}
```

<a name="binding-primitives"></a>
### Binding Primitives

Sometimes you may have a class that receives some injected classes, but also needs an injected primitive value such as an integer. You may easily use contextual binding to inject any value your class may need:

```php
use App\Http\Controllers\UserController;

$this->app->when(UserController::class)
    ->needs('$variableName')
    ->give($value);
```

Sometimes a class may depend on an array of [tagged](#tagging) instances. Using the `giveTagged` method, you may easily inject all of the container bindings with that tag:

```php
$this->app->when(ReportAggregator::class)
    ->needs('$reports')
    ->giveTagged('reports');
```

If you need to inject a value from one of your application's configuration files, you may use the `giveConfig` method:

```php
$this->app->when(ReportAggregator::class)
    ->needs('$timezone')
    ->giveConfig('app.timezone');
```

<a name="binding-typed-variadics"></a>
### Binding Typed Variadics

Occasionally, you may have a class that receives an array of typed objects using a variadic constructor argument:

```php
<?php

use App\Models\Filter;
use App\Services\Logger;

class Firewall
{
    /**
     * The filter instances.
     *
     * @var array
     */
    protected $filters;

    /**
     * Create a new class instance.
     */
    public function __construct(
        protected Logger $logger,
        Filter ...$filters,
    ) {
        $this->filters = $filters;
    }
}
```

Using contextual binding, you may resolve this dependency by providing the `give` method with a closure that returns an array of resolved `Filter` instances:

```php
$this->app->when(Firewall::class)
    ->needs(Filter::class)
    ->give(function (Application $app) {
          return [
              $app->make(NullFilter::class),
              $app->make(ProfanityFilter::class),
              $app->make(TooLongFilter::class),
          ];
    });
```

For convenience, you may also just provide an array of class names to be resolved by the container whenever `Firewall` needs `Filter` instances:

```php
$this->app->when(Firewall::class)
    ->needs(Filter::class)
    ->give([
        NullFilter::class,
        ProfanityFilter::class,
        TooLongFilter::class,
    ]);
```

<a name="variadic-tag-dependencies"></a>
#### Variadic Tag Dependencies

Sometimes a class may have a variadic dependency that is type-hinted as a given class (`Report ...$reports`). Using the `needs` and `giveTagged` methods, you may easily inject all of the container bindings with that [tag](#tagging) for the given dependency:

```php
$this->app->when(ReportAggregator::class)
    ->needs(Report::class)
    ->giveTagged('reports');
```

<a name="tagging"></a>
### Tagging

Occasionally, you may need to resolve all of a certain "category" of binding. For example, perhaps you are building a report analyzer that receives an array of many different `Report` interface implementations. After registering the `Report` implementations, you can assign them a tag using the `tag` method:

```php
$this->app->bind(CpuReport::class, function () {
    // ...
});

$this->app->bind(MemoryReport::class, function () {
    // ...
});

$this->app->tag([CpuReport::class, MemoryReport::class], 'reports');
```

Once the services have been tagged, you may easily resolve them all via the container's `tagged` method:

```php
$this->app->bind(ReportAnalyzer::class, function (Application $app) {
    return new ReportAnalyzer($app->tagged('reports'));
});
```

<a name="extending-bindings"></a>
### Extending Bindings

The `extend` method allows the modification of resolved services. For example, when a service is resolved, you may run additional code to decorate or configure the service. The `extend` method accepts two arguments, the service class you're extending and a closure that should return the modified service. The closure receives the service being resolved and the container instance:

```php
$this->app->extend(Service::class, function (Service $service, Application $app) {
    return new DecoratedService($service);
});
```

<a name="resolving"></a>
## Resolving

<a name="the-make-method"></a>
### The `make` Method

You may use the `make` method to resolve a class instance from the container. The `make` method accepts the name of the class or interface you wish to resolve:

```php
use App\Services\Transistor;

$transistor = $this->app->make(Transistor::class);
```

If some of your class's dependencies are not resolvable via the container, you may inject them by passing them as an associative array into the `makeWith` method. For example, we may manually pass the `$id` constructor argument required by the `Transistor` service:

```php
use App\Services\Transistor;

$transistor = $this->app->makeWith(Transistor::class, ['id' => 1]);
```

The `bound` method may be used to determine if a class or interface has been explicitly bound in the container:

```php
if ($this->app->bound(Transistor::class)) {
    // ...
}
```

If you are outside of a service provider in a location of your code that does not have access to the `$app` variable, you may use the `App` [facade](/docs/{{version}}/facades) or the `app` [helper](/docs/{{version}}/helpers#method-app) to resolve a class instance from the container:

```php
use App\Services\Transistor;
use Illuminate\Support\Facades\App;

$transistor = App::make(Transistor::class);

$transistor = app(Transistor::class);
```

If you would like to have the Laravel container instance itself injected into a class that is being resolved by the container, you may type-hint the `Illuminate\Container\Container` class on your class's constructor:

```php
use Illuminate\Container\Container;

/**
 * Create a new class instance.
 */
public function __construct(
    protected Container $container,
) {}
```

<a name="automatic-injection"></a>
### Automatic Injection

Alternatively, and importantly, you may type-hint the dependency in the constructor of a class that is resolved by the container, including [controllers](/docs/{{version}}/controllers), [event listeners](/docs/{{version}}/events), [middleware](/docs/{{version}}/middleware), and more. Additionally, you may type-hint dependencies in the `handle` method of [queued jobs](/docs/{{version}}/queues). In practice, this is how most of your objects should be resolved by the container.

For example, you may type-hint a service defined by your application in a controller's constructor. The service will automatically be resolved and injected into the class:

```php
<?php

namespace App\Http\Controllers;

use App\Services\AppleMusic;

class PodcastController extends Controller
{
    /**
     * Create a new controller instance.
     */
    public function __construct(
        protected AppleMusic $apple,
    ) {}

    /**
     * Show information about the given podcast.
     */
    public function show(string $id): Podcast
    {
        return $this->apple->findPodcast($id);
    }
}
```

<a name="method-invocation-and-injection"></a>
## Method Invocation and Injection

Sometimes you may wish to invoke a method on an object instance while allowing the container to automatically inject that method's dependencies. For example, given the following class:

```php
<?php

namespace App;

use App\Services\AppleMusic;

class PodcastStats
{
    /**
     * Generate a new podcast stats report.
     */
    public function generate(AppleMusic $apple): array
    {
        return [
            // ...
        ];
    }
}
```

You may invoke the `generate` method via the container like so:

```php
use App\PodcastStats;
use Illuminate\Support\Facades\App;

$stats = App::call([new PodcastStats, 'generate']);
```

The `call` method accepts any PHP callable. The container's `call` method may even be used to invoke a closure while automatically injecting its dependencies:

```php
use App\Services\AppleMusic;
use Illuminate\Support\Facades\App;

$result = App::call(function (AppleMusic $apple) {
    // ...
});
```

<a name="container-events"></a>
## Container Events

The service container fires an event each time it resolves an object. You may listen to this event using the `resolving` method:

```php
use App\Services\Transistor;
use Illuminate\Contracts\Foundation\Application;

$this->app->resolving(Transistor::class, function (Transistor $transistor, Application $app) {
    // Called when container resolves objects of type "Transistor"...
});

$this->app->resolving(function (mixed $object, Application $app) {
    // Called when container resolves object of any type...
});
```

As you can see, the object being resolved will be passed to the callback, allowing you to set any additional properties on the object before it is given to its consumer.

<a name="rebinding"></a>
### Rebinding

The `rebinding` method allows you to listen for when a service is re-bound to the container, meaning it is registered again or overridden after its initial binding. This can be useful when you need to update dependencies or modify behavior each time a specific binding is updated:

```php
use App\Contracts\PodcastPublisher;
use App\Services\SpotifyPublisher;
use App\Services\TransistorPublisher;
use Illuminate\Contracts\Foundation\Application;

$this->app->bind(PodcastPublisher::class, SpotifyPublisher::class);

$this->app->rebinding(
    PodcastPublisher::class,
    function (Application $app, PodcastPublisher $newInstance) {
        //
    },
);

// New binding will trigger rebinding closure...
$this->app->bind(PodcastPublisher::class, TransistorPublisher::class);
```

<a name="psr-11"></a>
## PSR-11

Laravel's service container implements the [PSR-11](https://github.com/php-fig/fig-standards/blob/master/accepted/PSR-11-container.md) interface. Therefore, you may type-hint the PSR-11 container interface to obtain an instance of the Laravel container:

```php
use App\Services\Transistor;
use Psr\Container\ContainerInterface;

Route::get('/', function (ContainerInterface $container) {
    $service = $container->get(Transistor::class);

    // ...
});
```

An exception is thrown if the given identifier can't be resolved. The exception will be an instance of `Psr\Container\NotFoundExceptionInterface` if the identifier was never bound. If the identifier was bound but was unable to be resolved, an instance of `Psr\Container\ContainerExceptionInterface` will be thrown.


---

# Context

*Sección: Laravel | Origen: https://laravel.com/docs/13.x/context*

- [Introduction](#introduction)
    - [How it Works](#how-it-works)
- [Capturing Context](#capturing-context)
    - [Stacks](#stacks)
- [Retrieving Context](#retrieving-context)
    - [Determining Item Existence](#determining-item-existence)
- [Removing Context](#removing-context)
- [Hidden Context](#hidden-context)
- [Events](#events)
    - [Dehydrating](#dehydrating)
    - [Hydrated](#hydrated)

<a name="introduction"></a>
## Introduction

Laravel's "context" capabilities enable you to capture, retrieve, and share information throughout requests, jobs, and commands executing within your application. This captured information is also included in logs written by your application, giving you deeper insight into the surrounding code execution history that occurred before a log entry was written and allowing you to trace execution flows throughout a distributed system.

<a name="how-it-works"></a>
### How it Works

The best way to understand Laravel's context capabilities is to see it in action using the built-in logging features. To get started, you may [add information to the context](#capturing-context) using the `Context` facade. In this example, we will use a [middleware](/docs/{{version}}/middleware) to add the request URL and a unique trace ID to the context on every incoming request:

```php
<?php

namespace App\Http\Middleware;

use Closure;
use Illuminate\Http\Request;
use Illuminate\Support\Facades\Context;
use Illuminate\Support\Str;
use Symfony\Component\HttpFoundation\Response;

class AddContext
{
    /**
     * Handle an incoming request.
     */
    public function handle(Request $request, Closure $next): Response
    {
        Context::add('url', $request->url());
        Context::add('trace_id', Str::uuid()->toString());

        return $next($request);
    }
}
```

Information added to the context is automatically appended as metadata to any [log entries](/docs/{{version}}/logging) that are written throughout the request. Appending context as metadata allows information passed to individual log entries to be differentiated from the information shared via `Context`. For example, imagine we write the following log entry:

```php
Log::info('User authenticated.', ['auth_id' => Auth::id()]);
```

The written log will contain the `auth_id` passed to the log entry, but it will also contain the context's `url` and `trace_id` as metadata:

```text
User authenticated. {"auth_id":27} {"url":"https://example.com/login","trace_id":"e04e1a11-e75c-4db3-b5b5-cfef4ef56697"}
```

Information added to the context is also made available to jobs dispatched to the queue. For example, imagine we dispatch a `ProcessPodcast` job to the queue after adding some information to the context:

```php
// In our middleware...
Context::add('url', $request->url());
Context::add('trace_id', Str::uuid()->toString());

// In our controller...
ProcessPodcast::dispatch($podcast);
```

When the job is dispatched, any information currently stored in the context is captured and shared with the job. The captured information is then hydrated back into the current context while the job is executing. So, if our job's handle method was to write to the log:

```php
class ProcessPodcast implements ShouldQueue
{
    use Queueable;

    // ...

    /**
     * Execute the job.
     */
    public function handle(): void
    {
        Log::info('Processing podcast.', [
            'podcast_id' => $this->podcast->id,
        ]);

        // ...
    }
}
```

The resulting log entry would contain the information that was added to the context during the request that originally dispatched the job:

```text
Processing podcast. {"podcast_id":95} {"url":"https://example.com/login","trace_id":"e04e1a11-e75c-4db3-b5b5-cfef4ef56697"}
```

Although we have focused on the built-in logging related features of Laravel's context, the following documentation will illustrate how context allows you to share information across the HTTP request / queued job boundary and even how to add [hidden context data](#hidden-context) that is not written with log entries.

<a name="capturing-context"></a>
## Capturing Context

You may store information in the current context using the `Context` facade's `add` method:

```php
use Illuminate\Support\Facades\Context;

Context::add('key', 'value');
```

To add multiple items at once, you may pass an associative array to the `add` method:

```php
Context::add([
    'first_key' => 'value',
    'second_key' => 'value',
]);
```

The `add` method will override any existing value that shares the same key. If you only wish to add information to the context if the key does not already exist, you may use the `addIf` method:

```php
Context::add('key', 'first');

Context::get('key');
// "first"

Context::addIf('key', 'second');

Context::get('key');
// "first"
```

Context also provides convenient methods for incrementing or decrementing a given key. Both of these methods accept at least one argument: the key to track. A second argument may be provided to specify the amount by which the key should be incremented or decremented:

```php
Context::increment('records_added');
Context::increment('records_added', 5);

Context::decrement('records_added');
Context::decrement('records_added', 5);
```

<a name="conditional-context"></a>
#### Conditional Context

The `when` method may be used to add data to the context based on a given condition. The first closure provided to the `when` method will be invoked if the given condition evaluates to `true`, while the second closure will be invoked if the condition evaluates to `false`:

```php
use Illuminate\Support\Facades\Auth;
use Illuminate\Support\Facades\Context;

Context::when(
    Auth::user()->isAdmin(),
    fn ($context) => $context->add('permissions', Auth::user()->permissions),
    fn ($context) => $context->add('permissions', []),
);
```

<a name="scoped-context"></a>
#### Scoped Context

The `scope` method provides a way to temporarily modify the context during the execution of a given callback and restore the context to its original state when the callback finishes executing. Additionally, you can pass extra data that should be merged into the context (as the second and third arguments) while the closure executes.

```php
use Illuminate\Support\Facades\Context;
use Illuminate\Support\Facades\Log;

Context::add('trace_id', 'abc-999');
Context::addHidden('user_id', 123);

Context::scope(
    function () {
        Context::add('action', 'adding_friend');

        $userId = Context::getHidden('user_id');

        Log::debug("Adding user [{$userId}] to friends list.");
        // Adding user [987] to friends list.  {"trace_id":"abc-999","user_name":"taylor_otwell","action":"adding_friend"}
    },
    data: ['user_name' => 'taylor_otwell'],
    hidden: ['user_id' => 987],
);

Context::all();
// [
//     'trace_id' => 'abc-999',
// ]

Context::allHidden();
// [
//     'user_id' => 123,
// ]
```

> [!WARNING]
> If an object within the context is modified inside the scoped closure, that mutation will be reflected outside of the scope.

<a name="stacks"></a>
### Stacks

Context offers the ability to create "stacks", which are lists of data stored in the order that they were added. You can add information to a stack by invoking the `push` method:

```php
use Illuminate\Support\Facades\Context;

Context::push('breadcrumbs', 'first_value');

Context::push('breadcrumbs', 'second_value', 'third_value');

Context::get('breadcrumbs');
// [
//     'first_value',
//     'second_value',
//     'third_value',
// ]
```

Stacks can be useful to capture historical information about a request, such as events that are happening throughout your application. For example, you could create an event listener to push to a stack every time a query is executed, capturing the query SQL and duration as a tuple:

```php
use Illuminate\Support\Facades\Context;
use Illuminate\Support\Facades\DB;

// In AppServiceProvider.php...
DB::listen(function ($event) {
    Context::push('queries', [$event->time, $event->sql]);
});
```

You may determine if a value is in a stack using the `stackContains` and `hiddenStackContains` methods:

```php
if (Context::stackContains('breadcrumbs', 'first_value')) {
    //
}

if (Context::hiddenStackContains('secrets', 'first_value')) {
    //
}
```

The `stackContains` and `hiddenStackContains` methods also accept a closure as their second argument, allowing more control over the value comparison operation:

```php
use Illuminate\Support\Facades\Context;
use Illuminate\Support\Str;

return Context::stackContains('breadcrumbs', function ($value) {
    return Str::startsWith($value, 'query_');
});
```

<a name="retrieving-context"></a>
## Retrieving Context

You may retrieve information from the context using the `Context` facade's `get` method:

```php
use Illuminate\Support\Facades\Context;

$value = Context::get('key');
```

The `only` and `except` methods may be used to retrieve a subset of the information in the context:

```php
$data = Context::only(['first_key', 'second_key']);

$data = Context::except(['first_key']);
```

The `pull` method may be used to retrieve information from the context and immediately remove it from the context:

```php
$value = Context::pull('key');
```

If context data is stored in a [stack](#stacks), you may pop items from the stack using the `pop` method:

```php
Context::push('breadcrumbs', 'first_value', 'second_value');

Context::pop('breadcrumbs');
// second_value

Context::get('breadcrumbs');
// ['first_value']
```

The `remember` and `rememberHidden` methods may be used to retrieve information from the context, while setting the context value to the value returned by the given closure if the requested information doesn't exist:

```php
$permissions = Context::remember(
    'user-permissions',
    fn () => $user->permissions,
);
```

If you would like to retrieve all of the information stored in the context, you may invoke the `all` method:

```php
$data = Context::all();
```

<a name="determining-item-existence"></a>
### Determining Item Existence

You may use the `has` and `missing` methods to determine if the context has any value stored for the given key:

```php
use Illuminate\Support\Facades\Context;

if (Context::has('key')) {
    // ...
}

if (Context::missing('key')) {
    // ...
}
```

The `has` method will return `true` regardless of the value stored. So, for example, a key with a `null` value will be considered present:

```php
Context::add('key', null);

Context::has('key');
// true
```

<a name="removing-context"></a>
## Removing Context

The `forget` method may be used to remove a key and its value from the current context:

```php
use Illuminate\Support\Facades\Context;

Context::add(['first_key' => 1, 'second_key' => 2]);

Context::forget('first_key');

Context::all();

// ['second_key' => 2]
```

You may forget several keys at once by providing an array to the `forget` method:

```php
Context::forget(['first_key', 'second_key']);
```

<a name="hidden-context"></a>
## Hidden Context

Context offers the ability to store "hidden" data. This hidden information is not appended to logs, and is not accessible via the data retrieval methods documented above. Context provides a different set of methods to interact with hidden context information:

```php
use Illuminate\Support\Facades\Context;

Context::addHidden('key', 'value');

Context::getHidden('key');
// 'value'

Context::get('key');
// null
```

The "hidden" methods mirror the functionality of the non-hidden methods documented above:

```php
Context::addHidden(/* ... */);
Context::addHiddenIf(/* ... */);
Context::pushHidden(/* ... */);
Context::getHidden(/* ... */);
Context::pullHidden(/* ... */);
Context::popHidden(/* ... */);
Context::onlyHidden(/* ... */);
Context::exceptHidden(/* ... */);
Context::allHidden(/* ... */);
Context::hasHidden(/* ... */);
Context::missingHidden(/* ... */);
Context::forgetHidden(/* ... */);
```

<a name="events"></a>
## Events

Context dispatches two events that allow you to hook into the hydration and dehydration process of the context.

To illustrate how these events may be used, imagine that in a middleware of your application you set the `app.locale` configuration value based on the incoming HTTP request's `Accept-Language` header. Context's events allow you to capture this value during the request and restore it on the queue, ensuring notifications sent on the queue have the correct `app.locale` value. We can use context's events and [hidden](#hidden-context) data to achieve this, which the following documentation will illustrate.

<a name="dehydrating"></a>
### Dehydrating

Whenever a job is dispatched to the queue the data in the context is "dehydrated" and captured alongside the job's payload. The `Context::dehydrating` method allows you to register a closure that will be invoked during the dehydration process. Within this closure, you may make changes to the data that will be shared with the queued job.

Typically, you should register `dehydrating` callbacks within the `boot` method of your application's `AppServiceProvider` class:

```php
use Illuminate\Log\Context\Repository;
use Illuminate\Support\Facades\Config;
use Illuminate\Support\Facades\Context;

/**
 * Bootstrap any application services.
 */
public function boot(): void
{
    Context::dehydrating(function (Repository $context) {
        $context->addHidden('locale', Config::get('app.locale'));
    });
}
```

> [!NOTE]
> You should not use the `Context` facade within the `dehydrating` callback, as that will change the context of the current process. Ensure you only make changes to the repository passed to the callback.

<a name="hydrated"></a>
### Hydrated

Whenever a queued job begins executing on the queue, any context that was shared with the job will be "hydrated" back into the current context. The `Context::hydrated` method allows you to register a closure that will be invoked during the hydration process.

Typically, you should register `hydrated` callbacks within the `boot` method of your application's `AppServiceProvider` class:

```php
use Illuminate\Log\Context\Repository;
use Illuminate\Support\Facades\Config;
use Illuminate\Support\Facades\Context;

/**
 * Bootstrap any application services.
 */
public function boot(): void
{
    Context::hydrated(function (Repository $context) {
        if ($context->hasHidden('locale')) {
            Config::set('app.locale', $context->getHidden('locale'));
        }
    });
}
```

> [!NOTE]
> You should not use the `Context` facade within the `hydrated` callback and instead ensure you only make changes to the repository passed to the callback.


---

# Contracts

*Sección: Laravel | Origen: https://laravel.com/docs/13.x/contracts*

- [Introduction](#introduction)
    - [Contracts vs. Facades](#contracts-vs-facades)
- [When to Use Contracts](#when-to-use-contracts)
- [How to Use Contracts](#how-to-use-contracts)
- [Contract Reference](#contract-reference)

<a name="introduction"></a>
## Introduction

Laravel's "contracts" are a set of interfaces that define the core services provided by the framework. For example, an `Illuminate\Contracts\Queue\Queue` contract defines the methods needed for queueing jobs, while the `Illuminate\Contracts\Mail\Mailer` contract defines the methods needed for sending e-mail.

Each contract has a corresponding implementation provided by the framework. For example, Laravel provides a queue implementation with a variety of drivers, and a mailer implementation that is powered by [Symfony Mailer](https://symfony.com/doc/current/mailer.html).

All of the Laravel contracts live in [their own GitHub repository](https://github.com/illuminate/contracts). This provides a quick reference point for all available contracts, as well as a single, decoupled package that may be utilized when building packages that interact with Laravel services.

<a name="contracts-vs-facades"></a>
### Contracts vs. Facades

Laravel's [facades](/docs/{{version}}/facades) and helper functions provide a simple way of utilizing Laravel's services without needing to type-hint and resolve contracts out of the service container. In most cases, each facade has an equivalent contract.

Unlike facades, which do not require you to require them in your class' constructor, contracts allow you to define explicit dependencies for your classes. Some developers prefer to explicitly define their dependencies in this way and therefore prefer to use contracts, while other developers enjoy the convenience of facades. **In general, most applications can use facades without issue during development.**

<a name="when-to-use-contracts"></a>
## When to Use Contracts

The decision to use contracts or facades will come down to personal taste and the tastes of your development team. Both contracts and facades can be used to create robust, well-tested Laravel applications. Contracts and facades are not mutually exclusive. Some parts of your applications may use facades while others depend on contracts. As long as you are keeping your class' responsibilities focused, you will notice very few practical differences between using contracts and facades.

In general, most applications can use facades without issue during development. If you are building a package that integrates with multiple PHP frameworks you may wish to use the `illuminate/contracts` package to define your integration with Laravel's services without the need to require Laravel's concrete implementations in your package's `composer.json` file.

<a name="how-to-use-contracts"></a>
## How to Use Contracts

So, how do you get an implementation of a contract? It's actually quite simple.

Many types of classes in Laravel are resolved through the [service container](/docs/{{version}}/container), including controllers, event listeners, middleware, queued jobs, and even route closures. So, to get an implementation of a contract, you can just "type-hint" the interface in the constructor of the class being resolved.

For example, take a look at this event listener:

```php
<?php

namespace App\Listeners;

use App\Events\OrderWasPlaced;
use App\Models\User;
use Illuminate\Contracts\Redis\Factory;

class CacheOrderInformation
{
    /**
     * Create the event listener.
     */
    public function __construct(
        protected Factory $redis,
    ) {}

    /**
     * Handle the event.
     */
    public function handle(OrderWasPlaced $event): void
    {
        // ...
    }
}
```

When the event listener is resolved, the service container will read the type-hints on the constructor of the class, and inject the appropriate value. To learn more about registering things in the service container, check out [its documentation](/docs/{{version}}/container).

<a name="contract-reference"></a>
## Contract Reference

This table provides a quick reference to all of the Laravel contracts and their equivalent facades:

<div class="overflow-auto">

| Contract | References Facade |
| --- | --- |
| [Illuminate\Contracts\Auth\Access\Authorizable](https://github.com/illuminate/contracts/blob/{{version}}/Auth/Access/Authorizable.php) | &nbsp; |
| [Illuminate\Contracts\Auth\Access\Gate](https://github.com/illuminate/contracts/blob/{{version}}/Auth/Access/Gate.php) | `Gate` |
| [Illuminate\Contracts\Auth\Authenticatable](https://github.com/illuminate/contracts/blob/{{version}}/Auth/Authenticatable.php) | &nbsp; |
| [Illuminate\Contracts\Auth\CanResetPassword](https://github.com/illuminate/contracts/blob/{{version}}/Auth/CanResetPassword.php) | &nbsp; |
| [Illuminate\Contracts\Auth\Factory](https://github.com/illuminate/contracts/blob/{{version}}/Auth/Factory.php) | `Auth` |
| [Illuminate\Contracts\Auth\Guard](https://github.com/illuminate/contracts/blob/{{version}}/Auth/Guard.php) | `Auth::guard()` |
| [Illuminate\Contracts\Auth\PasswordBroker](https://github.com/illuminate/contracts/blob/{{version}}/Auth/PasswordBroker.php) | `Password::broker()` |
| [Illuminate\Contracts\Auth\PasswordBrokerFactory](https://github.com/illuminate/contracts/blob/{{version}}/Auth/PasswordBrokerFactory.php) | `Password` |
| [Illuminate\Contracts\Auth\StatefulGuard](https://github.com/illuminate/contracts/blob/{{version}}/Auth/StatefulGuard.php) | &nbsp; |
| [Illuminate\Contracts\Auth\SupportsBasicAuth](https://github.com/illuminate/contracts/blob/{{version}}/Auth/SupportsBasicAuth.php) | &nbsp; |
| [Illuminate\Contracts\Auth\UserProvider](https://github.com/illuminate/contracts/blob/{{version}}/Auth/UserProvider.php) | &nbsp; |
| [Illuminate\Contracts\Broadcasting\Broadcaster](https://github.com/illuminate/contracts/blob/{{version}}/Broadcasting/Broadcaster.php) | `Broadcast::connection()` |
| [Illuminate\Contracts\Broadcasting\Factory](https://github.com/illuminate/contracts/blob/{{version}}/Broadcasting/Factory.php) | `Broadcast` |
| [Illuminate\Contracts\Broadcasting\ShouldBroadcast](https://github.com/illuminate/contracts/blob/{{version}}/Broadcasting/ShouldBroadcast.php) | &nbsp; |
| [Illuminate\Contracts\Broadcasting\ShouldBroadcastNow](https://github.com/illuminate/contracts/blob/{{version}}/Broadcasting/ShouldBroadcastNow.php) | &nbsp; |
| [Illuminate\Contracts\Bus\Dispatcher](https://github.com/illuminate/contracts/blob/{{version}}/Bus/Dispatcher.php) | `Bus` |
| [Illuminate\Contracts\Bus\QueueingDispatcher](https://github.com/illuminate/contracts/blob/{{version}}/Bus/QueueingDispatcher.php) | `Bus::dispatchToQueue()` |
| [Illuminate\Contracts\Cache\Factory](https://github.com/illuminate/contracts/blob/{{version}}/Cache/Factory.php) | `Cache` |
| [Illuminate\Contracts\Cache\Lock](https://github.com/illuminate/contracts/blob/{{version}}/Cache/Lock.php) | &nbsp; |
| [Illuminate\Contracts\Cache\LockProvider](https://github.com/illuminate/contracts/blob/{{version}}/Cache/LockProvider.php) | &nbsp; |
| [Illuminate\Contracts\Cache\Repository](https://github.com/illuminate/contracts/blob/{{version}}/Cache/Repository.php) | `Cache::driver()` |
| [Illuminate\Contracts\Cache\Store](https://github.com/illuminate/contracts/blob/{{version}}/Cache/Store.php) | &nbsp; |
| [Illuminate\Contracts\Config\Repository](https://github.com/illuminate/contracts/blob/{{version}}/Config/Repository.php) | `Config` |
| [Illuminate\Contracts\Console\Application](https://github.com/illuminate/contracts/blob/{{version}}/Console/Application.php) | &nbsp; |
| [Illuminate\Contracts\Console\Kernel](https://github.com/illuminate/contracts/blob/{{version}}/Console/Kernel.php) | `Artisan` |
| [Illuminate\Contracts\Container\Container](https://github.com/illuminate/contracts/blob/{{version}}/Container/Container.php) | `App` |
| [Illuminate\Contracts\Cookie\Factory](https://github.com/illuminate/contracts/blob/{{version}}/Cookie/Factory.php) | `Cookie` |
| [Illuminate\Contracts\Cookie\QueueingFactory](https://github.com/illuminate/contracts/blob/{{version}}/Cookie/QueueingFactory.php) | `Cookie::queue()` |
| [Illuminate\Contracts\Database\ModelIdentifier](https://github.com/illuminate/contracts/blob/{{version}}/Database/ModelIdentifier.php) | &nbsp; |
| [Illuminate\Contracts\Debug\ExceptionHandler](https://github.com/illuminate/contracts/blob/{{version}}/Debug/ExceptionHandler.php) | &nbsp; |
| [Illuminate\Contracts\Encryption\Encrypter](https://github.com/illuminate/contracts/blob/{{version}}/Encryption/Encrypter.php) | `Crypt` |
| [Illuminate\Contracts\Events\Dispatcher](https://github.com/illuminate/contracts/blob/{{version}}/Events/Dispatcher.php) | `Event` |
| [Illuminate\Contracts\Filesystem\Cloud](https://github.com/illuminate/contracts/blob/{{version}}/Filesystem/Cloud.php) | `Storage::cloud()` |
| [Illuminate\Contracts\Filesystem\Factory](https://github.com/illuminate/contracts/blob/{{version}}/Filesystem/Factory.php) | `Storage` |
| [Illuminate\Contracts\Filesystem\Filesystem](https://github.com/illuminate/contracts/blob/{{version}}/Filesystem/Filesystem.php) | `Storage::disk()` |
| [Illuminate\Contracts\Foundation\Application](https://github.com/illuminate/contracts/blob/{{version}}/Foundation/Application.php) | `App` |
| [Illuminate\Contracts\Hashing\Hasher](https://github.com/illuminate/contracts/blob/{{version}}/Hashing/Hasher.php) | `Hash` |
| [Illuminate\Contracts\Http\Kernel](https://github.com/illuminate/contracts/blob/{{version}}/Http/Kernel.php) | &nbsp; |
| [Illuminate\Contracts\Mail\Mailable](https://github.com/illuminate/contracts/blob/{{version}}/Mail/Mailable.php) | &nbsp; |
| [Illuminate\Contracts\Mail\Mailer](https://github.com/illuminate/contracts/blob/{{version}}/Mail/Mailer.php) | `Mail` |
| [Illuminate\Contracts\Mail\MailQueue](https://github.com/illuminate/contracts/blob/{{version}}/Mail/MailQueue.php) | `Mail::queue()` |
| [Illuminate\Contracts\Notifications\Dispatcher](https://github.com/illuminate/contracts/blob/{{version}}/Notifications/Dispatcher.php) | `Notification`|
| [Illuminate\Contracts\Notifications\Factory](https://github.com/illuminate/contracts/blob/{{version}}/Notifications/Factory.php) | `Notification` |
| [Illuminate\Contracts\Pagination\LengthAwarePaginator](https://github.com/illuminate/contracts/blob/{{version}}/Pagination/LengthAwarePaginator.php) | &nbsp; |
| [Illuminate\Contracts\Pagination\Paginator](https://github.com/illuminate/contracts/blob/{{version}}/Pagination/Paginator.php) | &nbsp; |
| [Illuminate\Contracts\Pipeline\Hub](https://github.com/illuminate/contracts/blob/{{version}}/Pipeline/Hub.php) | &nbsp; |
| [Illuminate\Contracts\Pipeline\Pipeline](https://github.com/illuminate/contracts/blob/{{version}}/Pipeline/Pipeline.php) | `Pipeline` |
| [Illuminate\Contracts\Queue\EntityResolver](https://github.com/illuminate/contracts/blob/{{version}}/Queue/EntityResolver.php) | &nbsp; |
| [Illuminate\Contracts\Queue\Factory](https://github.com/illuminate/contracts/blob/{{version}}/Queue/Factory.php) | `Queue` |
| [Illuminate\Contracts\Queue\Job](https://github.com/illuminate/contracts/blob/{{version}}/Queue/Job.php) | &nbsp; |
| [Illuminate\Contracts\Queue\Monitor](https://github.com/illuminate/contracts/blob/{{version}}/Queue/Monitor.php) | `Queue` |
| [Illuminate\Contracts\Queue\Queue](https://github.com/illuminate/contracts/blob/{{version}}/Queue/Queue.php) | `Queue::connection()` |
| [Illuminate\Contracts\Queue\QueueableCollection](https://github.com/illuminate/contracts/blob/{{version}}/Queue/QueueableCollection.php) | &nbsp; |
| [Illuminate\Contracts\Queue\QueueableEntity](https://github.com/illuminate/contracts/blob/{{version}}/Queue/QueueableEntity.php) | &nbsp; |
| [Illuminate\Contracts\Queue\ShouldQueue](https://github.com/illuminate/contracts/blob/{{version}}/Queue/ShouldQueue.php) | &nbsp; |
| [Illuminate\Contracts\Redis\Factory](https://github.com/illuminate/contracts/blob/{{version}}/Redis/Factory.php) | `Redis` |
| [Illuminate\Contracts\Routing\BindingRegistrar](https://github.com/illuminate/contracts/blob/{{version}}/Routing/BindingRegistrar.php) | `Route` |
| [Illuminate\Contracts\Routing\Registrar](https://github.com/illuminate/contracts/blob/{{version}}/Routing/Registrar.php) | `Route` |
| [Illuminate\Contracts\Routing\ResponseFactory](https://github.com/illuminate/contracts/blob/{{version}}/Routing/ResponseFactory.php) | `Response` |
| [Illuminate\Contracts\Routing\UrlGenerator](https://github.com/illuminate/contracts/blob/{{version}}/Routing/UrlGenerator.php) | `URL` |
| [Illuminate\Contracts\Routing\UrlRoutable](https://github.com/illuminate/contracts/blob/{{version}}/Routing/UrlRoutable.php) | &nbsp; |
| [Illuminate\Contracts\Session\Session](https://github.com/illuminate/contracts/blob/{{version}}/Session/Session.php) | `Session::driver()` |
| [Illuminate\Contracts\Support\Arrayable](https://github.com/illuminate/contracts/blob/{{version}}/Support/Arrayable.php) | &nbsp; |
| [Illuminate\Contracts\Support\Htmlable](https://github.com/illuminate/contracts/blob/{{version}}/Support/Htmlable.php) | &nbsp; |
| [Illuminate\Contracts\Support\Jsonable](https://github.com/illuminate/contracts/blob/{{version}}/Support/Jsonable.php) | &nbsp; |
| [Illuminate\Contracts\Support\MessageBag](https://github.com/illuminate/contracts/blob/{{version}}/Support/MessageBag.php) | &nbsp; |
| [Illuminate\Contracts\Support\MessageProvider](https://github.com/illuminate/contracts/blob/{{version}}/Support/MessageProvider.php) | &nbsp; |
| [Illuminate\Contracts\Support\Renderable](https://github.com/illuminate/contracts/blob/{{version}}/Support/Renderable.php) | &nbsp; |
| [Illuminate\Contracts\Support\Responsable](https://github.com/illuminate/contracts/blob/{{version}}/Support/Responsable.php) | &nbsp; |
| [Illuminate\Contracts\Translation\Loader](https://github.com/illuminate/contracts/blob/{{version}}/Translation/Loader.php) | &nbsp; |
| [Illuminate\Contracts\Translation\Translator](https://github.com/illuminate/contracts/blob/{{version}}/Translation/Translator.php) | `Lang` |
| [Illuminate\Contracts\Validation\Factory](https://github.com/illuminate/contracts/blob/{{version}}/Validation/Factory.php) | `Validator` |
| [Illuminate\Contracts\Validation\ValidatesWhenResolved](https://github.com/illuminate/contracts/blob/{{version}}/Validation/ValidatesWhenResolved.php) | &nbsp; |
| [Illuminate\Contracts\Validation\ValidationRule](https://github.com/illuminate/contracts/blob/{{version}}/Validation/ValidationRule.php) | &nbsp; |
| [Illuminate\Contracts\Validation\Validator](https://github.com/illuminate/contracts/blob/{{version}}/Validation/Validator.php) | `Validator::make()` |
| [Illuminate\Contracts\View\Engine](https://github.com/illuminate/contracts/blob/{{version}}/View/Engine.php) | &nbsp; |
| [Illuminate\Contracts\View\Factory](https://github.com/illuminate/contracts/blob/{{version}}/View/Factory.php) | `View` |
| [Illuminate\Contracts\View\View](https://github.com/illuminate/contracts/blob/{{version}}/View/View.php) | `View::make()` |

</div>


---

# Controllers

*Sección: Laravel | Origen: https://laravel.com/docs/13.x/controllers*

- [Introduction](#introduction)
- [Writing Controllers](#writing-controllers)
    - [Basic Controllers](#basic-controllers)
    - [Single Action Controllers](#single-action-controllers)
- [Controller Middleware](#controller-middleware)
    - [Middleware Attributes](#middleware-attributes)
    - [Authorization Attributes](#authorization-attributes)
- [Resource Controllers](#resource-controllers)
    - [Partial Resource Routes](#restful-partial-resource-routes)
    - [Nested Resources](#restful-nested-resources)
    - [Naming Resource Routes](#restful-naming-resource-routes)
    - [Naming Resource Route Parameters](#restful-naming-resource-route-parameters)
    - [Scoping Resource Routes](#restful-scoping-resource-routes)
    - [Localizing Resource URIs](#restful-localizing-resource-uris)
    - [Supplementing Resource Controllers](#restful-supplementing-resource-controllers)
    - [Singleton Resource Controllers](#singleton-resource-controllers)
    - [Middleware and Resource Controllers](#middleware-and-resource-controllers)
- [Dependency Injection and Controllers](#dependency-injection-and-controllers)

<a name="introduction"></a>
## Introduction

Instead of defining all of your request handling logic as closures in your route files, you may wish to organize this behavior using "controller" classes. Controllers can group related request handling logic into a single class. For example, a `UserController` class might handle all incoming requests related to users, including showing, creating, updating, and deleting users. By default, controllers are stored in the `app/Http/Controllers` directory.

<a name="writing-controllers"></a>
## Writing Controllers

<a name="basic-controllers"></a>
### Basic Controllers

To quickly generate a new controller, you may run the `make:controller` Artisan command. By default, all of the controllers for your application are stored in the `app/Http/Controllers` directory:

```shell
php artisan make:controller UserController
```

Let's take a look at an example of a basic controller. A controller may have any number of public methods which will respond to incoming HTTP requests:

```php
<?php

namespace App\Http\Controllers;

use App\Models\User;
use Illuminate\View\View;

class UserController extends Controller
{
    /**
     * Show the profile for a given user.
     */
    public function show(string $id): View
    {
        return view('user.profile', [
            'user' => User::findOrFail($id)
        ]);
    }
}
```

Once you have written a controller class and method, you may define a route to the controller method like so:

```php
use App\Http\Controllers\UserController;

Route::get('/user/{id}', [UserController::class, 'show']);
```

When an incoming request matches the specified route URI, the `show` method on the `App\Http\Controllers\UserController` class will be invoked and the route parameters will be passed to the method.

> [!NOTE]
> Controllers are not **required** to extend a base class. However, it is sometimes convenient to extend a base controller class that contains methods that should be shared across all of your controllers.

<a name="single-action-controllers"></a>
### Single Action Controllers

If a controller action is particularly complex, you might find it convenient to dedicate an entire controller class to that single action. To accomplish this, you may define a single `__invoke` method within the controller:

```php
<?php

namespace App\Http\Controllers;

class ProvisionServer extends Controller
{
    /**
     * Provision a new web server.
     */
    public function __invoke()
    {
        // ...
    }
}
```

When registering routes for single action controllers, you do not need to specify a controller method. Instead, you may simply pass the name of the controller to the router:

```php
use App\Http\Controllers\ProvisionServer;

Route::post('/server', ProvisionServer::class);
```

You may generate an invokable controller by using the `--invokable` option of the `make:controller` Artisan command:

```shell
php artisan make:controller ProvisionServer --invokable
```

> [!NOTE]
> Controller stubs may be customized using [stub publishing](/docs/{{version}}/artisan#stub-customization).

<a name="controller-middleware"></a>
## Controller Middleware

[Middleware](/docs/{{version}}/middleware) may be assigned to the controller's routes in your route files:

```php
Route::get('/profile', [UserController::class, 'show'])->middleware('auth');
```

Or, you may find it convenient to specify middleware within your controller class. To do so, your controller should implement the `HasMiddleware` interface, which dictates that the controller should have a static `middleware` method. From this method, you may return an array of middleware that should be applied to the controller's actions:

```php
<?php

namespace App\Http\Controllers;

use Illuminate\Routing\Controllers\HasMiddleware;
use Illuminate\Routing\Controllers\Middleware;

class UserController implements HasMiddleware
{
    /**
     * Get the middleware that should be assigned to the controller.
     */
    public static function middleware(): array
    {
        return [
            'auth',
            new Middleware('log', only: ['index']),
            new Middleware('subscribed', except: ['store']),
        ];
    }

    // ...
}
```

You may also define controller middleware as closures, which provides a convenient way to define an inline middleware without writing an entire middleware class:

```php
use Closure;
use Illuminate\Http\Request;

/**
 * Get the middleware that should be assigned to the controller.
 */
public static function middleware(): array
{
    return [
        function (Request $request, Closure $next) {
            return $next($request);
        },
    ];
}
```

<a name="middleware-attributes"></a>
### Middleware Attributes

You may also assign middleware to controllers using PHP attributes:

```php
<?php

namespace App\Http\Controllers;

use Illuminate\Routing\Attributes\Controllers\Middleware;

#[Middleware('auth')]
#[Middleware('log', only: ['index'])]
#[Middleware('subscribed', except: ['store'])]
class UserController
{
    // ...
}
```

You may place middleware attributes on individual controller methods as well. Middleware assigned to methods will be merged with middleware assigned at the class level:

```php
<?php

namespace App\Http\Controllers;

use Closure;
use Illuminate\Http\Request;
use Illuminate\Routing\Attributes\Controllers\Middleware;

#[Middleware('auth')]
class UserController
{
    #[Middleware('log')]
    #[Middleware('subscribed')]
    public function index()
    {
        // ...
    }

    #[Middleware(static function (Request $request, Closure $next) {
        // ...

        return $next($request);
    })]
    public function store()
    {
        // ...
    }
}
```

To exclude middleware from a controller or individual controller methods, use the `WithoutMiddleware` attribute. You may use the `only` and `except` arguments to limit a class-level attribute to particular controller methods:

```php
<?php

namespace App\Http\Controllers;

use App\Http\Middleware\EnsureTokenIsValid;
use Illuminate\Routing\Attributes\Controllers\WithoutMiddleware;

#[WithoutMiddleware('subscribed', except: ['index'])]
class UserController
{
    #[WithoutMiddleware(EnsureTokenIsValid::class)]
    public function index()
    {
        // ...
    }

    public function show()
    {
        // ...
    }
}
```

Class-level `WithoutMiddleware` attributes are inherited by child controllers. The attribute can only remove route middleware and does not apply to [global middleware](/docs/{{version}}/middleware#global-middleware).

<a name="authorization-attributes"></a>
### Authorization Attributes

If you are authorizing controller actions via policies, you may use the `Authorize` attribute as a convenient shortcut for the `can` middleware:

```php
<?php

namespace App\Http\Controllers;

use App\Models\Comment;
use App\Models\Post;
use Illuminate\Routing\Attributes\Controllers\Authorize;

class CommentController
{
    #[Authorize('create', [Comment::class, 'post'])]
    public function store(Post $post)
    {
        // ...
    }

    #[Authorize('delete', 'comment')]
    public function destroy(Comment $comment)
    {
        // ...
    }
}
```

The first argument is the ability you wish to authorize. The second argument is the model class, route parameter, or parameters that should be passed to the policy.

<a name="resource-controllers"></a>
## Resource Controllers

If you think of each Eloquent model in your application as a "resource", it is typical to perform the same sets of actions against each resource in your application. For example, imagine your application contains a `Photo` model and a `Movie` model. It is likely that users can create, read, update, or delete these resources.

Because of this common use case, Laravel resource routing assigns the typical create, read, update, and delete ("CRUD") routes to a controller with a single line of code. To get started, we can use the `make:controller` Artisan command's `--resource` option to quickly create a controller to handle these actions:

```shell
php artisan make:controller PhotoController --resource
```

This command will generate a controller at `app/Http/Controllers/PhotoController.php`. The controller will contain a method for each of the available resource operations. Next, you may register a resource route that points to the controller:

```php
use App\Http\Controllers\PhotoController;

Route::resource('photos', PhotoController::class);
```

This single route declaration creates multiple routes to handle a variety of actions on the resource. The generated controller will already have methods stubbed for each of these actions. Remember, you can always get a quick overview of your application's routes by running the `route:list` Artisan command.

You may even register many resource controllers at once by passing an array to the `resources` method:

```php
Route::resources([
    'photos' => PhotoController::class,
    'posts' => PostController::class,
]);
```

The `softDeletableResources` method registers many resources controllers that all use the `withTrashed` method:

```php
Route::softDeletableResources([
    'photos' => PhotoController::class,
    'posts' => PostController::class,
]);
```

<a name="actions-handled-by-resource-controllers"></a>
#### Actions Handled by Resource Controllers

<div class="overflow-auto">

| Verb      | URI                    | Action  | Route Name     |
| --------- | ---------------------- | ------- | -------------- |
| GET       | `/photos`              | index   | photos.index   |
| GET       | `/photos/create`       | create  | photos.create  |
| POST      | `/photos`              | store   | photos.store   |
| GET       | `/photos/{photo}`      | show    | photos.show    |
| GET       | `/photos/{photo}/edit` | edit    | photos.edit    |
| PUT/PATCH | `/photos/{photo}`      | update  | photos.update  |
| DELETE    | `/photos/{photo}`      | destroy | photos.destroy |

</div>

<a name="customizing-missing-model-behavior"></a>
#### Customizing Missing Model Behavior

Typically, a 404 HTTP response will be generated if an implicitly bound resource model is not found. However, you may customize this behavior by calling the `missing` method when defining your resource route. The `missing` method accepts a closure that will be invoked if an implicitly bound model cannot be found for any of the resource's routes:

```php
use App\Http\Controllers\PhotoController;
use Illuminate\Http\Request;
use Illuminate\Support\Facades\Redirect;

Route::resource('photos', PhotoController::class)
    ->missing(function (Request $request) {
        return Redirect::route('photos.index');
    });
```

<a name="soft-deleted-models"></a>
#### Soft Deleted Models

Typically, implicit model binding will not retrieve models that have been [soft deleted](/docs/{{version}}/eloquent#soft-deleting), and will instead return a 404 HTTP response. However, you can instruct the framework to allow soft deleted models by invoking the `withTrashed` method when defining your resource route:

```php
use App\Http\Controllers\PhotoController;

Route::resource('photos', PhotoController::class)->withTrashed();
```

Calling `withTrashed` with no arguments will allow soft deleted models for the `show`, `edit`, and `update` resource routes. You may specify a subset of these routes by passing an array to the `withTrashed` method:

```php
Route::resource('photos', PhotoController::class)->withTrashed(['show']);
```

<a name="specifying-the-resource-model"></a>
#### Specifying the Resource Model

If you are using [route model binding](/docs/{{version}}/routing#route-model-binding) and would like the resource controller's methods to type-hint a model instance, you may use the `--model` option when generating the controller:

```shell
php artisan make:controller PhotoController --model=Photo --resource
```

<a name="generating-form-requests"></a>
#### Generating Form Requests

You may provide the `--requests` option when generating a resource controller to instruct Artisan to generate [form request classes](/docs/{{version}}/validation#form-request-validation) for the controller's storage and update methods:

```shell
php artisan make:controller PhotoController --model=Photo --resource --requests
```

<a name="restful-partial-resource-routes"></a>
### Partial Resource Routes

When declaring a resource route, you may specify a subset of actions the controller should handle instead of the full set of default actions:

```php
use App\Http\Controllers\PhotoController;

Route::resource('photos', PhotoController::class)->only([
    'index', 'show'
]);

Route::resource('photos', PhotoController::class)->except([
    'create', 'store', 'update', 'destroy'
]);
```

<a name="api-resource-routes"></a>
#### API Resource Routes

When declaring resource routes that will be consumed by APIs, you will commonly want to exclude routes that present HTML templates such as `create` and `edit`. For convenience, you may use the `apiResource` method to automatically exclude these two routes:

```php
use App\Http\Controllers\PhotoController;

Route::apiResource('photos', PhotoController::class);
```

You may register many API resource controllers at once by passing an array to the `apiResources` method:

```php
use App\Http\Controllers\PhotoController;
use App\Http\Controllers\PostController;

Route::apiResources([
    'photos' => PhotoController::class,
    'posts' => PostController::class,
]);
```

To quickly generate an API resource controller that does not include the `create` or `edit` methods, use the `--api` switch when executing the `make:controller` command:

```shell
php artisan make:controller PhotoController --api
```

<a name="restful-nested-resources"></a>
### Nested Resources

Sometimes you may need to define routes to a nested resource. For example, a photo resource may have multiple comments that may be attached to the photo. To nest the resource controllers, you may use "dot" notation in your route declaration:

```php
use App\Http\Controllers\PhotoCommentController;

Route::resource('photos.comments', PhotoCommentController::class);
```

This route will register a nested resource that may be accessed with URIs like the following:

```text
/photos/{photo}/comments/{comment}
```

<a name="scoping-nested-resources"></a>
#### Scoping Nested Resources

Laravel's [implicit model binding](/docs/{{version}}/routing#implicit-model-binding-scoping) feature can automatically scope nested bindings such that the resolved child model is confirmed to belong to the parent model. By using the `scoped` method when defining your nested resource, you may enable automatic scoping as well as instruct Laravel which field the child resource should be retrieved by. For more information on how to accomplish this, please see the documentation on [scoping resource routes](#restful-scoping-resource-routes).

<a name="shallow-nesting"></a>
#### Shallow Nesting

Often, it is not entirely necessary to have both the parent and the child IDs within a URI since the child ID is already a unique identifier. When using unique identifiers such as auto-incrementing primary keys to identify your models in URI segments, you may choose to use "shallow nesting":

```php
use App\Http\Controllers\CommentController;

Route::resource('photos.comments', CommentController::class)->shallow();
```

This route definition will define the following routes:

<div class="overflow-auto">

| Verb      | URI                               | Action  | Route Name             |
| --------- | --------------------------------- | ------- | ---------------------- |
| GET       | `/photos/{photo}/comments`        | index   | photos.comments.index  |
| GET       | `/photos/{photo}/comments/create` | create  | photos.comments.create |
| POST      | `/photos/{photo}/comments`        | store   | photos.comments.store  |
| GET       | `/comments/{comment}`             | show    | comments.show          |
| GET       | `/comments/{comment}/edit`        | edit    | comments.edit          |
| PUT/PATCH | `/comments/{comment}`             | update  | comments.update        |
| DELETE    | `/comments/{comment}`             | destroy | comments.destroy       |

</div>

<a name="restful-naming-resource-routes"></a>
### Naming Resource Routes

By default, all resource controller actions have a route name; however, you can override these names by passing a `names` array with your desired route names:

```php
use App\Http\Controllers\PhotoController;

Route::resource('photos', PhotoController::class)->names([
    'create' => 'photos.build'
]);
```

<a name="restful-naming-resource-route-parameters"></a>
### Naming Resource Route Parameters

By default, `Route::resource` will create the route parameters for your resource routes based on the "singularized" version of the resource name. You can easily override this on a per resource basis using the `parameters` method. The array passed into the `parameters` method should be an associative array of resource names and parameter names:

```php
use App\Http\Controllers\AdminUserController;

Route::resource('users', AdminUserController::class)->parameters([
    'users' => 'admin_user'
]);
```

The example above generates the following URI for the resource's `show` route:

```text
/users/{admin_user}
```

<a name="restful-scoping-resource-routes"></a>
### Scoping Resource Routes

Laravel's [scoped implicit model binding](/docs/{{version}}/routing#implicit-model-binding-scoping) feature can automatically scope nested bindings such that the resolved child model is confirmed to belong to the parent model. By using the `scoped` method when defining your nested resource, you may enable automatic scoping as well as instruct Laravel which field the child resource should be retrieved by:

```php
use App\Http\Controllers\PhotoCommentController;

Route::resource('photos.comments', PhotoCommentController::class)->scoped([
    'comment' => 'slug',
]);
```

This route will register a scoped nested resource that may be accessed with URIs like the following:

```text
/photos/{photo}/comments/{comment:slug}
```

When using a custom keyed implicit binding as a nested route parameter, Laravel will automatically scope the query to retrieve the nested model by its parent using conventions to guess the relationship name on the parent. In this case, it will be assumed that the `Photo` model has a relationship named `comments` (the plural of the route parameter name) which can be used to retrieve the `Comment` model.

<a name="restful-localizing-resource-uris"></a>
### Localizing Resource URIs

By default, `Route::resource` will create resource URIs using English verbs and plural rules. If you need to localize the `create` and `edit` action verbs, you may use the `Route::resourceVerbs` method. This may be done at the beginning of the `boot` method within your application's `App\Providers\AppServiceProvider`:

```php
/**
 * Bootstrap any application services.
 */
public function boot(): void
{
    Route::resourceVerbs([
        'create' => 'crear',
        'edit' => 'editar',
    ]);
}
```

Laravel's pluralizer supports [several different languages which you may configure based on your needs](/docs/{{version}}/localization#pluralization-language). Once the verbs and pluralization language have been customized, a resource route registration such as `Route::resource('publicacion', PublicacionController::class)` will produce the following URIs:

```text
/publicacion/crear

/publicacion/{publicaciones}/editar
```

<a name="restful-supplementing-resource-controllers"></a>
### Supplementing Resource Controllers

If you need to add additional routes to a resource controller beyond the default set of resource routes, you should define those routes before your call to the `Route::resource` method; otherwise, the routes defined by the `resource` method may unintentionally take precedence over your supplemental routes:

```php
use App\Http\Controller\PhotoController;

Route::get('/photos/popular', [PhotoController::class, 'popular']);
Route::resource('photos', PhotoController::class);
```

> [!NOTE]
> Remember to keep your controllers focused. If you find yourself routinely needing methods outside of the typical set of resource actions, consider splitting your controller into two, smaller controllers.

<a name="singleton-resource-controllers"></a>
### Singleton Resource Controllers

Sometimes, your application will have resources that may only have a single instance. For example, a user's "profile" can be edited or updated, but a user may not have more than one "profile". Likewise, an image may have a single "thumbnail". These resources are called "singleton resources", meaning one and only one instance of the resource may exist. In these scenarios, you may register a "singleton" resource controller:

```php
use App\Http\Controllers\ProfileController;
use Illuminate\Support\Facades\Route;

Route::singleton('profile', ProfileController::class);
```

The singleton resource definition above will register the following routes. As you can see, "creation" routes are not registered for singleton resources, and the registered routes do not accept an identifier since only one instance of the resource may exist:

<div class="overflow-auto">

| Verb      | URI             | Action | Route Name     |
| --------- | --------------- | ------ | -------------- |
| GET       | `/profile`      | show   | profile.show   |
| GET       | `/profile/edit` | edit   | profile.edit   |
| PUT/PATCH | `/profile`      | update | profile.update |

</div>

Singleton resources may also be nested within a standard resource:

```php
Route::singleton('photos.thumbnail', ThumbnailController::class);
```

In this example, the `photos` resource would receive all of the [standard resource routes](#actions-handled-by-resource-controllers); however, the `thumbnail` resource would be a singleton resource with the following routes:

<div class="overflow-auto">

| Verb      | URI                              | Action | Route Name              |
| --------- | -------------------------------- | ------ | ----------------------- |
| GET       | `/photos/{photo}/thumbnail`      | show   | photos.thumbnail.show   |
| GET       | `/photos/{photo}/thumbnail/edit` | edit   | photos.thumbnail.edit   |
| PUT/PATCH | `/photos/{photo}/thumbnail`      | update | photos.thumbnail.update |

</div>

<a name="creatable-singleton-resources"></a>
#### Creatable Singleton Resources

Occasionally, you may want to define creation and storage routes for a singleton resource. To accomplish this, you may invoke the `creatable` method when registering the singleton resource route:

```php
Route::singleton('photos.thumbnail', ThumbnailController::class)->creatable();
```

In this example, the following routes will be registered. As you can see, a `DELETE` route will also be registered for creatable singleton resources:

<div class="overflow-auto">

| Verb      | URI                                | Action  | Route Name               |
| --------- | ---------------------------------- | ------- | ------------------------ |
| GET       | `/photos/{photo}/thumbnail/create` | create  | photos.thumbnail.create  |
| POST      | `/photos/{photo}/thumbnail`        | store   | photos.thumbnail.store   |
| GET       | `/photos/{photo}/thumbnail`        | show    | photos.thumbnail.show    |
| GET       | `/photos/{photo}/thumbnail/edit`   | edit    | photos.thumbnail.edit    |
| PUT/PATCH | `/photos/{photo}/thumbnail`        | update  | photos.thumbnail.update  |
| DELETE    | `/photos/{photo}/thumbnail`        | destroy | photos.thumbnail.destroy |

</div>

If you would like Laravel to register the `DELETE` route for a singleton resource but not register the creation or storage routes, you may utilize the `destroyable` method:

```php
Route::singleton(...)->destroyable();
```

<a name="api-singleton-resources"></a>
#### API Singleton Resources

The `apiSingleton` method may be used to register a singleton resource that will be manipulated via an API, thus rendering the `create` and `edit` routes unnecessary:

```php
Route::apiSingleton('profile', ProfileController::class);
```

Of course, API singleton resources may also be `creatable`, which will register `store` and `destroy` routes for the resource:

```php
Route::apiSingleton('photos.thumbnail', ProfileController::class)->creatable();
```
<a name="middleware-and-resource-controllers"></a>
### Middleware and Resource Controllers

Laravel allows you to assign middleware to all, or only specific, methods of resource routes using the `middleware`, `middlewareFor`, and `withoutMiddlewareFor` methods. These methods provide fine-grained control over which middleware is applied to each resource action.

#### Applying Middleware to all Methods

You may use the `middleware` method to assign middleware to all routes generated by a resource or singleton resource route:

```php
Route::resource('users', UserController::class)
    ->middleware(['auth', 'verified']);

Route::singleton('profile', ProfileController::class)
    ->middleware('auth');
```

#### Applying Middleware to Specific Methods

You may use the `middlewareFor` method to assign middleware to one or more specific methods of a given resource controller:

```php
Route::resource('users', UserController::class)
    ->middlewareFor('show', 'auth');

Route::apiResource('users', UserController::class)
    ->middlewareFor(['show', 'update'], 'auth');

Route::resource('users', UserController::class)
    ->middlewareFor('show', 'auth')
    ->middlewareFor('update', 'auth');

Route::apiResource('users', UserController::class)
    ->middlewareFor(['show', 'update'], ['auth', 'verified']);
```

The `middlewareFor` method may also be used in conjunction with singleton and API singleton resource controllers:

```php
Route::singleton('profile', ProfileController::class)
    ->middlewareFor('show', 'auth');

Route::apiSingleton('profile', ProfileController::class)
    ->middlewareFor(['show', 'update'], 'auth');
```

#### Excluding Middleware from Specific Methods

You may use the `withoutMiddlewareFor` method to exclude middleware from specific methods of a resource controller:

```php
Route::middleware(['auth', 'verified', 'subscribed'])->group(function () {
    Route::resource('users', UserController::class)
        ->withoutMiddlewareFor('index', ['auth', 'verified'])
        ->withoutMiddlewareFor(['create', 'store'], 'verified')
        ->withoutMiddlewareFor('destroy', 'subscribed');
});
```

<a name="dependency-injection-and-controllers"></a>
## Dependency Injection and Controllers

<a name="constructor-injection"></a>
#### Constructor Injection

The Laravel [service container](/docs/{{version}}/container) is used to resolve all Laravel controllers. As a result, you are able to type-hint any dependencies your controller may need in its constructor. The declared dependencies will automatically be resolved and injected into the controller instance:

```php
<?php

namespace App\Http\Controllers;

use App\Repositories\UserRepository;

class UserController extends Controller
{
    /**
     * Create a new controller instance.
     */
    public function __construct(
        protected UserRepository $users,
    ) {}
}
```

<a name="method-injection"></a>
#### Method Injection

In addition to constructor injection, you may also type-hint dependencies on your controller's methods. A common use-case for method injection is injecting the `Illuminate\Http\Request` instance into your controller methods:

```php
<?php

namespace App\Http\Controllers;

use Illuminate\Http\RedirectResponse;
use Illuminate\Http\Request;

class UserController extends Controller
{
    /**
     * Store a new user.
     */
    public function store(Request $request): RedirectResponse
    {
        $name = $request->name;

        // Store the user...

        return redirect('/users');
    }
}
```

If your controller method is also expecting input from a route parameter, list your route arguments after your other dependencies. For example, if your route is defined like so:

```php
use App\Http\Controllers\UserController;

Route::put('/user/{id}', [UserController::class, 'update']);
```

You may still type-hint the `Illuminate\Http\Request` and access your `id` parameter by defining your controller method as follows:

```php
<?php

namespace App\Http\Controllers;

use Illuminate\Http\RedirectResponse;
use Illuminate\Http\Request;

class UserController extends Controller
{
    /**
     * Update the given user.
     */
    public function update(Request $request, string $id): RedirectResponse
    {
        // Update the user...

        return redirect('/users');
    }
}
```


---

# CSRF Protection

*Sección: Laravel | Origen: https://laravel.com/docs/13.x/csrf*

- [Introduction](#csrf-introduction)
- [Preventing CSRF Requests](#preventing-csrf-requests)
    - [Origin Verification](#origin-verification)
    - [Excluding URIs](#csrf-excluding-uris)
- [X-CSRF-Token](#csrf-x-csrf-token)
- [X-XSRF-Token](#csrf-x-xsrf-token)

<a name="csrf-introduction"></a>
## Introduction

Cross-site request forgeries are a type of malicious exploit whereby unauthorized commands are performed on behalf of an authenticated user. Thankfully, Laravel makes it easy to protect your application from [cross-site request forgery](https://en.wikipedia.org/wiki/Cross-site_request_forgery) (CSRF) attacks.

<a name="csrf-explanation"></a>
#### An Explanation of the Vulnerability

In case you're not familiar with cross-site request forgeries, let's discuss an example of how this vulnerability can be exploited. Imagine your application has a `/user/email` route that accepts a `POST` request to change the authenticated user's email address. Most likely, this route expects an `email` input field to contain the email address the user would like to begin using.

Without CSRF protection, a malicious website could create an HTML form that points to your application's `/user/email` route and submits the malicious user's own email address:

```blade
<form action="https://your-application.com/user/email" method="POST">
    <input type="email" value="malicious-email@example.com">
</form>

<script>
    document.forms[0].submit();
</script>
```

If the malicious website automatically submits the form when the page is loaded, the malicious user only needs to lure an unsuspecting user of your application to visit their website and their email address will be changed in your application.

To prevent this vulnerability, we need to inspect every incoming `POST`, `PUT`, `PATCH`, or `DELETE` request for a secret session value that the malicious application is unable to access.

<a name="preventing-csrf-requests"></a>
## Preventing CSRF Requests

The `Illuminate\Foundation\Http\Middleware\PreventRequestForgery` [middleware](/docs/{{version}}/middleware), which is included in the `web` middleware group by default, protects your application from cross-site request forgeries using a two-layer approach.

First, the middleware checks the browser's `Sec-Fetch-Site` header. Modern browsers automatically set this header on every request, indicating whether it originated from the same origin, the same site, or a cross-site source. If the header indicates the request came from the same origin, the request is allowed immediately without any token verification.

If origin verification does not pass — for example, because the request comes from an older browser that doesn't send the `Sec-Fetch-Site` header or because the connection is not secure — the middleware falls back to traditional CSRF token validation.

Laravel automatically generates a CSRF "token" for each active [user session](/docs/{{version}}/session) managed by the application. This token is used to verify that the authenticated user is the person actually making the requests to the application. Since this token is stored in the user's session and changes each time the session is regenerated, a malicious application is unable to access it.

The current session's CSRF token can be accessed via the request's session or via the `csrf_token` helper function:

```php
use Illuminate\Http\Request;

Route::get('/token', function (Request $request) {
    $token = $request->session()->token();

    $token = csrf_token();

    // ...
});
```

Anytime you define a "POST", "PUT", "PATCH", or "DELETE" HTML form in your application, you should include a hidden CSRF `_token` field in the form so that the CSRF protection middleware can validate the request. For convenience, you may use the `@csrf` Blade directive to generate the hidden token input field:

```blade
<form method="POST" action="/profile">
    @csrf

    <!-- Equivalent to... -->
    <input type="hidden" name="_token" value="{{ csrf_token() }}" />
</form>
```

<a name="csrf-tokens-and-spas"></a>
#### CSRF Tokens & SPAs

If you are building an SPA that is utilizing Laravel as an API backend, you should consult the [Laravel Sanctum documentation](/docs/{{version}}/sanctum) for information on authenticating with your API and protecting against CSRF vulnerabilities.

<a name="origin-verification"></a>
### Origin Verification

As discussed above, Laravel's request forgery middleware first checks the `Sec-Fetch-Site` header to determine if the request is from the same origin. By default, if this check does not pass, the middleware falls back to CSRF token validation.

However, if you would like to rely solely on origin verification and disable the CSRF token fallback entirely, you may do so using the `preventRequestForgery` method in your application's `bootstrap/app.php` file:

```php
->withMiddleware(function (Middleware $middleware): void {
    $middleware->preventRequestForgery(originOnly: true);
})
```

When using origin-only mode, requests that fail origin verification will receive a `403` HTTP response instead of the `419` response typically associated with CSRF token mismatches.

> [!WARNING]
> The `Sec-Fetch-Site` header is only sent by browsers over secure (HTTPS) connections. If your application is not served over HTTPS, origin verification will not be available and the middleware will fall back to CSRF token validation.

If your application needs to accept requests from subdomains (for example, `dashboard.example.com` accepting requests from `example.com`), you may allow same-site requests in addition to same-origin requests:

```php
->withMiddleware(function (Middleware $middleware): void {
    $middleware->preventRequestForgery(allowSameSite: true);
})
```

<a name="csrf-excluding-uris"></a>
### Excluding URIs From CSRF Protection

Sometimes you may wish to exclude a set of URIs from CSRF protection. For example, if you are using [Stripe](https://stripe.com) to process payments and are utilizing their webhook system, you will need to exclude your Stripe webhook handler route from CSRF protection since Stripe will not know what CSRF token to send to your routes.

Typically, you should place these kinds of routes outside of the `web` middleware group that Laravel applies to all routes in the `routes/web.php` file. However, you may also exclude specific routes by providing their URIs to the `preventRequestForgery` method in your application's `bootstrap/app.php` file:

```php
->withMiddleware(function (Middleware $middleware): void {
    $middleware->preventRequestForgery(except: [
        'stripe/*',
        'http://example.com/foo/bar',
        'http://example.com/foo/*',
    ]);
})
```

> [!NOTE]
> For convenience, the CSRF middleware is automatically disabled for all routes when [running tests](/docs/{{version}}/testing).

<a name="csrf-x-csrf-token"></a>
## X-CSRF-TOKEN

In addition to checking for the CSRF token as a POST parameter, the `PreventRequestForgery` middleware will also check for the `X-CSRF-TOKEN` request header. You could, for example, store the token in an HTML `meta` tag:

```blade
<meta name="csrf-token" content="{{ csrf_token() }}">
```

Then, you can instruct a library like jQuery to automatically add the token to all request headers. This provides simple, convenient CSRF protection for your AJAX based applications using legacy JavaScript technology:

```js
$.ajaxSetup({
    headers: {
        'X-CSRF-TOKEN': $('meta[name="csrf-token"]').attr('content')
    }
});
```

<a name="csrf-x-xsrf-token"></a>
## X-XSRF-TOKEN

Laravel stores the current CSRF token in an encrypted `XSRF-TOKEN` cookie that is included with each response generated by the framework. You can use the cookie value to set the `X-XSRF-TOKEN` request header.

This cookie is primarily sent as a developer convenience since some JavaScript frameworks and libraries, like Angular and Axios, automatically place its value in the `X-XSRF-TOKEN` header on same-origin requests.


---

# Database Testing

*Sección: Laravel | Origen: https://laravel.com/docs/13.x/database-testing*

- [Introduction](#introduction)
    - [Resetting the Database After Each Test](#resetting-the-database-after-each-test)
- [Model Factories](#model-factories)
- [Running Seeders](#running-seeders)
- [Available Assertions](#available-assertions)

<a name="introduction"></a>
## Introduction

Laravel provides a variety of helpful tools and assertions to make it easier to test your database driven applications. In addition, Laravel model factories and seeders make it painless to create test database records using your application's Eloquent models and relationships. We'll discuss all of these powerful features in the following documentation.

<a name="resetting-the-database-after-each-test"></a>
### Resetting the Database After Each Test

Before proceeding much further, let's discuss how to reset your database after each of your tests so that data from a previous test does not interfere with subsequent tests. Laravel's included `Illuminate\Foundation\Testing\RefreshDatabase` trait will take care of this for you. Simply use the trait on your test class:

```php tab=Pest
<?php

use Illuminate\Foundation\Testing\RefreshDatabase;

pest()->use(RefreshDatabase::class);

test('basic example', function () {
    $response = $this->get('/');

    // ...
});
```

```php tab=PHPUnit
<?php

namespace Tests\Feature;

use Illuminate\Foundation\Testing\RefreshDatabase;
use Tests\TestCase;

class ExampleTest extends TestCase
{
    use RefreshDatabase;

    /**
     * A basic functional test example.
     */
    public function test_basic_example(): void
    {
        $response = $this->get('/');

        // ...
    }
}
```

The `Illuminate\Foundation\Testing\RefreshDatabase` trait does not migrate your database if your schema is up to date. Instead, it will only execute the test within a database transaction. Therefore, any records added to the database by test cases that do not use this trait may still exist in the database.

If you would like to totally reset the database, you may use the `Illuminate\Foundation\Testing\DatabaseMigrations` or `Illuminate\Foundation\Testing\DatabaseTruncation` traits instead. However, both of these options are significantly slower than the `RefreshDatabase` trait.

<a name="model-factories"></a>
## Model Factories

When testing, you may need to insert a few records into your database before executing your test. Instead of manually specifying the value of each column when you create this test data, Laravel allows you to define a set of default attributes for each of your [Eloquent models](/docs/{{version}}/eloquent) using [model factories](/docs/{{version}}/eloquent-factories).

To learn more about creating and utilizing model factories to create models, please consult the complete [model factory documentation](/docs/{{version}}/eloquent-factories). Once you have defined a model factory, you may utilize the factory within your test to create models:

```php tab=Pest
use App\Models\User;

test('models can be instantiated', function () {
    $user = User::factory()->create();

    // ...
});
```

```php tab=PHPUnit
use App\Models\User;

public function test_models_can_be_instantiated(): void
{
    $user = User::factory()->create();

    // ...
}
```

<a name="running-seeders"></a>
## Running Seeders

If you would like to use [database seeders](/docs/{{version}}/seeding) to populate your database during a feature test, you may invoke the `seed` method. By default, the `seed` method will execute the `DatabaseSeeder`, which should execute all of your other seeders. Alternatively, you pass a specific seeder class name to the `seed` method:

```php tab=Pest
<?php

use Database\Seeders\OrderStatusSeeder;
use Database\Seeders\TransactionStatusSeeder;
use Illuminate\Foundation\Testing\RefreshDatabase;

pest()->use(RefreshDatabase::class);

test('orders can be created', function () {
    // Run the DatabaseSeeder...
    $this->seed();

    // Run a specific seeder...
    $this->seed(OrderStatusSeeder::class);

    // ...

    // Run an array of specific seeders...
    $this->seed([
        OrderStatusSeeder::class,
        TransactionStatusSeeder::class,
        // ...
    ]);
});
```

```php tab=PHPUnit
<?php

namespace Tests\Feature;

use Database\Seeders\OrderStatusSeeder;
use Database\Seeders\TransactionStatusSeeder;
use Illuminate\Foundation\Testing\RefreshDatabase;
use Tests\TestCase;

class ExampleTest extends TestCase
{
    use RefreshDatabase;

    /**
     * Test creating a new order.
     */
    public function test_orders_can_be_created(): void
    {
        // Run the DatabaseSeeder...
        $this->seed();

        // Run a specific seeder...
        $this->seed(OrderStatusSeeder::class);

        // ...

        // Run an array of specific seeders...
        $this->seed([
            OrderStatusSeeder::class,
            TransactionStatusSeeder::class,
            // ...
        ]);
    }
}
```

Alternatively, you may instruct Laravel to automatically seed the database before each test that uses the `RefreshDatabase` trait. You may accomplish this by adding the `Seed` attribute to your base test class:

```php
<?php

namespace Tests;

use Illuminate\Foundation\Testing\Attributes\Seed;
use Illuminate\Foundation\Testing\TestCase as BaseTestCase;

#[Seed]
abstract class TestCase extends BaseTestCase
{
}
```

When the `Seed` attribute is present, the test will run the `Database\Seeders\DatabaseSeeder` class before each test that uses the `RefreshDatabase` trait. However, you may specify a specific seeder that should be executed by using the `Seeder` attribute on your test class:

```php
<?php

namespace Tests\Feature;

use Database\Seeders\OrderStatusSeeder;
use Illuminate\Foundation\Testing\Attributes\Seeder;
use Illuminate\Foundation\Testing\RefreshDatabase;
use Tests\TestCase;

#[Seeder(OrderStatusSeeder::class)]
class OrderTest extends TestCase
{
    use RefreshDatabase;

    // ...
}
```

<a name="available-assertions"></a>
## Available Assertions

Laravel provides several database assertions for your [Pest](https://pestphp.com) or [PHPUnit](https://phpunit.de) feature tests. We'll discuss each of these assertions below.

<a name="assert-database-count"></a>
#### assertDatabaseCount

Assert that a table in the database contains the given number of records:

```php
$this->assertDatabaseCount('users', 5);
```

<a name="assert-database-empty"></a>
#### assertDatabaseEmpty

Assert that a table in the database contains no records:

```php
$this->assertDatabaseEmpty('users');
```

<a name="assert-database-has"></a>
#### assertDatabaseHas

Assert that a table in the database contains records matching the given key / value query constraints:

```php
$this->assertDatabaseHas('users', [
    'email' => 'sally@example.com',
]);
```

<a name="assert-database-missing"></a>
#### assertDatabaseMissing

Assert that a table in the database does not contain records matching the given key / value query constraints:

```php
$this->assertDatabaseMissing('users', [
    'email' => 'sally@example.com',
]);
```

<a name="assert-deleted"></a>
#### assertSoftDeleted

The `assertSoftDeleted` method may be used to assert a given Eloquent model has been "soft deleted":

```php
$this->assertSoftDeleted($user);
```

<a name="assert-not-deleted"></a>
#### assertNotSoftDeleted

The `assertNotSoftDeleted` method may be used to assert a given Eloquent model hasn't been "soft deleted":

```php
$this->assertNotSoftDeleted($user);
```

<a name="assert-model-exists"></a>
#### assertModelExists

Assert that a given model or collection of models exist in the database:

```php
use App\Models\User;

$user = User::factory()->create();

$this->assertModelExists($user);
```

<a name="assert-model-missing"></a>
#### assertModelMissing

Assert that a given model or collection of models do not exist in the database:

```php
use App\Models\User;

$user = User::factory()->create();

$user->delete();

$this->assertModelMissing($user);
```

<a name="expects-database-query-count"></a>
#### expectsDatabaseQueryCount

The `expectsDatabaseQueryCount` method may be invoked at the beginning of your test to specify the total number of database queries that you expect to be run during the test. If the actual number of executed queries does not exactly match this expectation, the test will fail:

```php
$this->expectsDatabaseQueryCount(5);

// Test...
```


---

# Database: Getting Started

*Sección: Laravel | Origen: https://laravel.com/docs/13.x/database*

- [Introduction](#introduction)
    - [Configuration](#configuration)
    - [Read and Write Connections](#read-and-write-connections)
    - [Pooled PostgreSQL Connections](#pooled-postgresql-connections)
- [Running SQL Queries](#running-queries)
    - [Using Multiple Database Connections](#using-multiple-database-connections)
    - [Listening for Query Events](#listening-for-query-events)
    - [Monitoring Cumulative Query Time](#monitoring-cumulative-query-time)
- [Database Transactions](#database-transactions)
- [Connecting to the Database CLI](#connecting-to-the-database-cli)
- [Inspecting Your Databases](#inspecting-your-databases)
- [Monitoring Your Databases](#monitoring-your-databases)

<a name="introduction"></a>
## Introduction

Almost every modern web application interacts with a database. Laravel makes interacting with databases extremely simple across a variety of supported databases using raw SQL, a [fluent query builder](/docs/{{version}}/queries), and the [Eloquent ORM](/docs/{{version}}/eloquent). Currently, Laravel provides first-party support for five databases:

<div class="content-list" markdown="1">

- MariaDB 10.3+ ([Version Policy](https://mariadb.org/about/#maintenance-policy))
- MySQL 5.7+ ([Version Policy](https://en.wikipedia.org/wiki/MySQL#Release_history))
- PostgreSQL 10.0+ ([Version Policy](https://www.postgresql.org/support/versioning/))
- SQLite 3.26.0+
- SQL Server 2017+ ([Version Policy](https://docs.microsoft.com/en-us/lifecycle/products/?products=sql-server))

</div>

Additionally, MongoDB is supported via the `mongodb/laravel-mongodb` package, which is officially maintained by MongoDB. Check out the [Laravel MongoDB](https://www.mongodb.com/docs/drivers/php/laravel-mongodb/) documentation for more information.

<a name="configuration"></a>
### Configuration

The configuration for Laravel's database services is located in your application's `config/database.php` configuration file. In this file, you may define all of your database connections, as well as specify which connection should be used by default. Most of the configuration options within this file are driven by the values of your application's environment variables. Examples for most of Laravel's supported database systems are provided in this file.

By default, Laravel's sample [environment configuration](/docs/{{version}}/configuration#environment-configuration) is ready to use with [Laravel Sail](/docs/{{version}}/sail), which is a Docker configuration for developing Laravel applications on your local machine. However, you are free to modify your database configuration as needed for your local database.

<a name="sqlite-configuration"></a>
#### SQLite Configuration

SQLite databases are contained within a single file on your filesystem. You can create a new SQLite database using the `touch` command in your terminal: `touch database/database.sqlite`. After the database has been created, you may easily configure your environment variables to point to this database by placing the absolute path to the database in the `DB_DATABASE` environment variable:

```ini
DB_CONNECTION=sqlite
DB_DATABASE=/absolute/path/to/database.sqlite
```

By default, foreign key constraints are enabled for SQLite connections. If you would like to disable them, you should set the `DB_FOREIGN_KEYS` environment variable to `false`:

```ini
DB_FOREIGN_KEYS=false
```

> [!NOTE]
> If you use the [Laravel installer](/docs/{{version}}/installation#creating-a-laravel-project) to create your Laravel application and select SQLite as your database, Laravel will automatically create a `database/database.sqlite` file and run the default [database migrations](/docs/{{version}}/migrations) for you.

<a name="mssql-configuration"></a>
#### Microsoft SQL Server Configuration

To use a Microsoft SQL Server database, you should ensure that you have the `sqlsrv` and `pdo_sqlsrv` PHP extensions installed as well as any dependencies they may require such as the Microsoft SQL ODBC driver.

<a name="configuration-using-urls"></a>
#### Configuration Using URLs

Typically, database connections are configured using multiple configuration values such as `host`, `database`, `username`, `password`, etc. Each of these configuration values has its own corresponding environment variable. This means that when configuring your database connection information on a production server, you need to manage several environment variables.

Some managed database providers such as AWS and Heroku provide a single database "URL" that contains all of the connection information for the database in a single string. An example database URL may look something like the following:

```html
mysql://root:password@127.0.0.1/forge?charset=UTF-8
```

These URLs typically follow a standard schema convention:

```html
driver://username:password@host:port/database?options
```

For convenience, Laravel supports these URLs as an alternative to configuring your database with multiple configuration options. If the `url` (or corresponding `DB_URL` environment variable) configuration option is present, it will be used to extract the database connection and credential information.

<a name="read-and-write-connections"></a>
### Read and Write Connections

Sometimes you may wish to use one database connection for SELECT statements, and another for INSERT, UPDATE, and DELETE statements. Laravel makes this a breeze, and the proper connections will always be used whether you are using raw queries, the query builder, or the Eloquent ORM.

To see how read / write connections should be configured, let's look at this example:

```php
'mysql' => [
    'driver' => 'mysql',
    
    'read' => [
        'host' => [
            '192.168.1.1',
            '196.168.1.2',
        ],
    ],
    'write' => [
        'host' => [
            '192.168.1.3',
        ],
    ],
    'sticky' => true,
    
    'port' => env('DB_PORT', '3306'),
    'database' => env('DB_DATABASE', 'laravel'),
    'username' => env('DB_USERNAME', 'root'),
    'password' => env('DB_PASSWORD', ''),
    'unix_socket' => env('DB_SOCKET', ''),
    'charset' => env('DB_CHARSET', 'utf8mb4'),
    'collation' => env('DB_COLLATION', 'utf8mb4_unicode_ci'),
    'prefix' => '',
    'prefix_indexes' => true,
    'strict' => true,
    'engine' => null,
    'options' => extension_loaded('pdo_mysql') ? array_filter([
        (PHP_VERSION_ID >= 80500 ? \Pdo\Mysql::ATTR_SSL_CA : \PDO::MYSQL_ATTR_SSL_CA) => env('MYSQL_ATTR_SSL_CA'),
    ]) : [],
],
```

Note that three keys have been added to the configuration array: `read`, `write` and `sticky`. The `read` and `write` keys have array values containing a single key: `host`. The rest of the database options for the `read` and `write` connections will be merged from the main `mysql` configuration array.

You only need to place items in the `read` and `write` arrays if you wish to override the values from the main `mysql` array. So, in this case, `192.168.1.1` will be used as the host for the "read" connection, while `192.168.1.3` will be used for the "write" connection. The database credentials, prefix, character set, and all other options in the main `mysql` array will be shared across both connections. When multiple values exist in the `host` configuration array, a database host will be randomly chosen for each request.

<a name="the-sticky-option"></a>
#### The `sticky` Option

The `sticky` option is an *optional* value that can be used to allow the immediate reading of records that have been written to the database during the current request cycle. If the `sticky` option is enabled and a "write" operation has been performed against the database during the current request cycle, any further "read" operations will use the "write" connection. This ensures that any data written during the request cycle can be immediately read back from the database during that same request. It is up to you to decide if this is the desired behavior for your application.

<a name="pooled-postgresql-connections"></a>
### Pooled PostgreSQL Connections

Many managed PostgreSQL providers offer transaction-mode connection pooling through services such as PgBouncer or connection proxying. These poolers are ideal for application queries, but some schema operations, migrations, and maintenance commands require a direct database connection.

To use a transaction pooler with PostgreSQL, configure the pooled connection as usual and provide direct connection details via the `direct` configuration option:

```php
'pgsql' => [
    'driver' => 'pgsql',
    // ...
    'pooled' => env('DB_POOLED', false),
    'direct' => array_filter([
        'host' => env('DB_DIRECT_HOST'),
        'port' => env('DB_DIRECT_PORT'),
        'username' => env('DB_DIRECT_USERNAME'),
        'password' => env('DB_DIRECT_PASSWORD'),
        'sslmode' => env('DB_DIRECT_SSLMODE'),
    ]),
],
```

When a PostgreSQL connection is configured as pooled, Laravel automatically enables emulated prepares for the pooled connection. The direct connection inherits any options not explicitly defined in the `direct` configuration and uses native prepares by default.

Laravel automatically uses the direct connection for migrations, schema dumps and restores, `db:wipe`, `db:show`, and `db:table`. The `db` command also uses the direct connection by default when pooled mode is enabled and a direct connection is configured; you may pass the `--pooled` option to connect to the pooled connection instead:

```shell
php artisan db --pooled
```

If you need to explicitly use the direct connection in your application, append the `::direct` suffix to the connection name:

```php
DB::connection('pgsql::direct')->statement('create extension if not exists "uuid-ossp"');
```

<a name="running-queries"></a>
## Running SQL Queries

Once you have configured your database connection, you may run queries using the `DB` facade. The `DB` facade provides methods for each type of query: `select`, `update`, `insert`, `delete`, and `statement`.

<a name="running-a-select-query"></a>
#### Running a Select Query

To run a basic SELECT query, you may use the `select` method on the `DB` facade:

```php
<?php

namespace App\Http\Controllers;

use Illuminate\Support\Facades\DB;
use Illuminate\View\View;

class UserController extends Controller
{
    /**
     * Show a list of all of the application's users.
     */
    public function index(): View
    {
        $users = DB::select('select * from users where active = ?', [1]);

        return view('user.index', ['users' => $users]);
    }
}
```

The first argument passed to the `select` method is the SQL query, while the second argument is any parameter bindings that need to be bound to the query. Typically, these are the values of the `where` clause constraints. Parameter binding provides protection against SQL injection.

The `select` method will always return an `array` of results. Each result within the array will be a PHP `stdClass` object representing a record from the database:

```php
use Illuminate\Support\Facades\DB;

$users = DB::select('select * from users');

foreach ($users as $user) {
    echo $user->name;
}
```

<a name="selecting-scalar-values"></a>
#### Selecting Scalar Values

Sometimes your database query may result in a single, scalar value. Instead of being required to retrieve the query's scalar result from a record object, Laravel allows you to retrieve this value directly using the `scalar` method:

```php
$burgers = DB::scalar(
    "select count(case when food = 'burger' then 1 end) as burgers from menu"
);
```

<a name="selecting-multiple-result-sets"></a>
#### Selecting Multiple Result Sets

If your application calls stored procedures that return multiple result sets, you may use the `selectResultSets` method to retrieve all of the result sets returned by the stored procedure:

```php
[$options, $notifications] = DB::selectResultSets(
    "CALL get_user_options_and_notifications(?)", $request->user()->id
);
```

<a name="using-named-bindings"></a>
#### Using Named Bindings

Instead of using `?` to represent your parameter bindings, you may execute a query using named bindings:

```php
$results = DB::select('select * from users where id = :id', ['id' => 1]);
```

<a name="running-an-insert-statement"></a>
#### Running an Insert Statement

To execute an `insert` statement, you may use the `insert` method on the `DB` facade. Like `select`, this method accepts the SQL query as its first argument and bindings as its second argument:

```php
use Illuminate\Support\Facades\DB;

DB::insert('insert into users (id, name) values (?, ?)', [1, 'Marc']);
```

<a name="running-an-update-statement"></a>
#### Running an Update Statement

The `update` method should be used to update existing records in the database. The number of rows affected by the statement is returned by the method:

```php
use Illuminate\Support\Facades\DB;

$affected = DB::update(
    'update users set votes = 100 where name = ?',
    ['Anita']
);
```

<a name="running-a-delete-statement"></a>
#### Running a Delete Statement

The `delete` method should be used to delete records from the database. Like `update`, the number of rows affected will be returned by the method:

```php
use Illuminate\Support\Facades\DB;

$deleted = DB::delete('delete from users');
```

<a name="running-a-general-statement"></a>
#### Running a General Statement

Some database statements do not return any value. For these types of operations, you may use the `statement` method on the `DB` facade:

```php
DB::statement('drop table users');
```

<a name="running-an-unprepared-statement"></a>
#### Running an Unprepared Statement

Sometimes you may want to execute an SQL statement without binding any values. You may use the `DB` facade's `unprepared` method to accomplish this:

```php
DB::unprepared('update users set votes = 100 where name = "Dries"');
```

> [!WARNING]
> Since unprepared statements do not bind parameters, they may be vulnerable to SQL injection. You should never allow user controlled values within an unprepared statement.

<a name="implicit-commits-in-transactions"></a>
#### Implicit Commits

When using the `DB` facade's `statement` and `unprepared` methods within transactions you must be careful to avoid statements that cause [implicit commits](https://dev.mysql.com/doc/refman/8.0/en/implicit-commit.html). These statements will cause the database engine to indirectly commit the entire transaction, leaving Laravel unaware of the database's transaction level. An example of such a statement is creating a database table:

```php
DB::unprepared('create table a (col varchar(1) null)');
```

Please refer to the MySQL manual for [a list of all statements](https://dev.mysql.com/doc/refman/8.0/en/implicit-commit.html) that trigger implicit commits.

<a name="using-multiple-database-connections"></a>
### Using Multiple Database Connections

If your application defines multiple connections in your `config/database.php` configuration file, you may access each connection via the `connection` method provided by the `DB` facade. The connection name passed to the `connection` method should correspond to one of the connections listed in your `config/database.php` configuration file or configured at runtime using the `config` helper:

```php
use Illuminate\Support\Facades\DB;

$users = DB::connection('sqlite')->select(/* ... */);
```

You may access the raw, underlying PDO instance of a connection using the `getPdo` method on a connection instance:

```php
$pdo = DB::connection()->getPdo();
```

<a name="listening-for-query-events"></a>
### Listening for Query Events

If you would like to specify a closure that is invoked for each SQL query executed by your application, you may use the `DB` facade's `listen` method. This method can be useful for logging queries or debugging. You may register your query listener closure in the `boot` method of a [service provider](/docs/{{version}}/providers):

```php
<?php

namespace App\Providers;

use Illuminate\Database\Events\QueryExecuted;
use Illuminate\Support\Facades\DB;
use Illuminate\Support\ServiceProvider;

class AppServiceProvider extends ServiceProvider
{
    /**
     * Register any application services.
     */
    public function register(): void
    {
        // ...
    }

    /**
     * Bootstrap any application services.
     */
    public function boot(): void
    {
        DB::listen(function (QueryExecuted $query) {
            // $query->sql;
            // $query->bindings;
            // $query->time;
            // $query->toRawSql();
        });
    }
}
```

<a name="monitoring-cumulative-query-time"></a>
### Monitoring Cumulative Query Time

A common performance bottleneck of modern web applications is the amount of time they spend querying databases. Thankfully, Laravel can invoke a closure or callback of your choice when it spends too much time querying the database during a single request. To get started, provide a query time threshold (in milliseconds) and closure to the `whenQueryingForLongerThan` method. You may invoke this method in the `boot` method of a [service provider](/docs/{{version}}/providers):

```php
<?php

namespace App\Providers;

use Illuminate\Database\Connection;
use Illuminate\Support\Facades\DB;
use Illuminate\Support\ServiceProvider;
use Illuminate\Database\Events\QueryExecuted;

class AppServiceProvider extends ServiceProvider
{
    /**
     * Register any application services.
     */
    public function register(): void
    {
        // ...
    }

    /**
     * Bootstrap any application services.
     */
    public function boot(): void
    {
        DB::whenQueryingForLongerThan(500, function (Connection $connection, QueryExecuted $event) {
            // Notify development team...
        });
    }
}
```

<a name="database-transactions"></a>
## Database Transactions

You may use the `transaction` method provided by the `DB` facade to run a set of operations within a database transaction. If an exception is thrown within the transaction closure, the transaction will automatically be rolled back and the exception is re-thrown. If the closure executes successfully, the transaction will automatically be committed. You don't need to worry about manually rolling back or committing while using the `transaction` method:

```php
use Illuminate\Support\Facades\DB;

DB::transaction(function () {
    DB::update('update users set votes = 1');

    DB::delete('delete from posts');
});
```

<a name="handling-deadlocks"></a>
#### Handling Deadlocks

The `transaction` method accepts an optional second argument which defines the number of times a transaction should be retried when a deadlock occurs. Once these attempts have been exhausted, an exception will be thrown:

```php
use Illuminate\Support\Facades\DB;

DB::transaction(function () {
    DB::update('update users set votes = 1');

    DB::delete('delete from posts');
}, attempts: 5);
```

<a name="manually-using-transactions"></a>
#### Manually Using Transactions

If you would like to begin a transaction manually and have complete control over rollbacks and commits, you may use the `beginTransaction` method provided by the `DB` facade:

```php
use Illuminate\Support\Facades\DB;

DB::beginTransaction();
```

You can rollback the transaction via the `rollBack` method:

```php
DB::rollBack();
```

Lastly, you can commit a transaction via the `commit` method:

```php
DB::commit();
```

> [!NOTE]
> The `DB` facade's transaction methods control the transactions for both the [query builder](/docs/{{version}}/queries) and [Eloquent ORM](/docs/{{version}}/eloquent).

<a name="connecting-to-the-database-cli"></a>
## Connecting to the Database CLI

If you would like to connect to your database's CLI, you may use the `db` Artisan command:

```shell
php artisan db
```

If needed, you may specify a database connection name to connect to a database connection that is not the default connection:

```shell
php artisan db mysql
```

<a name="inspecting-your-databases"></a>
## Inspecting Your Databases

Using the `db:show` and `db:table` Artisan commands, you can get valuable insight into your database and its associated tables. To see an overview of your database, including its size, type, number of open connections, and a summary of its tables, you may use the `db:show` command:

```shell
php artisan db:show
```

You may specify which database connection should be inspected by providing the database connection name to the command via the `--database` option:

```shell
php artisan db:show --database=pgsql
```

If you would like to include table row counts and database view details within the output of the command, you may provide the `--counts` and `--views` options, respectively. On large databases, retrieving row counts and view details can be slow:

```shell
php artisan db:show --counts --views
```

In addition, you may use the following `Schema` methods to inspect your database:

```php
use Illuminate\Support\Facades\Schema;

$tables = Schema::getTables();
$views = Schema::getViews();
$columns = Schema::getColumns('users');
$indexes = Schema::getIndexes('users');
$foreignKeys = Schema::getForeignKeys('users');
```

If you would like to inspect a database connection that is not your application's default connection, you may use the `connection` method:

```php
$columns = Schema::connection('sqlite')->getColumns('users');
```

<a name="table-overview"></a>
#### Table Overview

If you would like to get an overview of an individual table within your database, you may execute the `db:table` Artisan command. This command provides a general overview of a database table, including its columns, types, attributes, keys, and indexes:

```shell
php artisan db:table users
```

<a name="monitoring-your-databases"></a>
## Monitoring Your Databases

Using the `db:monitor` Artisan command, you can instruct Laravel to dispatch an `Illuminate\Database\Events\DatabaseBusy` event if your database is managing more than a specified number of open connections.

To get started, you should schedule the `db:monitor` command to [run every minute](/docs/{{version}}/scheduling). The command accepts the names of the database connection configurations that you wish to monitor as well as the maximum number of open connections that should be tolerated before dispatching an event:

```shell
php artisan db:monitor --databases=mysql,pgsql --max=100
```

Scheduling this command alone is not enough to trigger a notification alerting you of the number of open connections. When the command encounters a database that has an open connection count that exceeds your threshold, a `DatabaseBusy` event will be dispatched. You should listen for this event within your application's `AppServiceProvider` in order to send a notification to you or your development team:

```php
use App\Notifications\DatabaseApproachingMaxConnections;
use Illuminate\Database\Events\DatabaseBusy;
use Illuminate\Support\Facades\Event;
use Illuminate\Support\Facades\Notification;

/**
 * Bootstrap any application services.
 */
public function boot(): void
{
    Event::listen(function (DatabaseBusy $event) {
        Notification::route('mail', 'dev@example.com')
            ->notify(new DatabaseApproachingMaxConnections(
                $event->connectionName,
                $event->connections
            ));
    });
}
```


---

# Deployment

*Sección: Laravel | Origen: https://laravel.com/docs/13.x/deployment*

- [Introduction](#introduction)
- [Server Requirements](#server-requirements)
- [Server Configuration](#server-configuration)
    - [Nginx](#nginx)
    - [FrankenPHP](#frankenphp)
    - [Directory Permissions](#directory-permissions)
- [Optimization](#optimization)
    - [Caching Configuration](#optimizing-configuration-loading)
    - [Caching Events](#caching-events)
    - [Caching Routes](#optimizing-route-loading)
    - [Caching Views](#optimizing-view-loading)
- [Reloading Services](#reloading-services)
- [Debug Mode](#debug-mode)
- [The Health Route](#the-health-route)
- [Deploying With Laravel Cloud or Forge](#deploying-with-cloud-or-forge)

<a name="introduction"></a>
## Introduction

When you're ready to deploy your Laravel application to production, there are some important things you can do to make sure your application is running as efficiently as possible. In this document, we'll cover some great starting points for making sure your Laravel application is deployed properly.

<a name="server-requirements"></a>
## Server Requirements

The Laravel framework has a few system requirements. You should ensure that your web server has the following minimum PHP version and extensions:

<div class="content-list" markdown="1">

- PHP >= 8.3
- Ctype PHP Extension
- cURL PHP Extension
- DOM PHP Extension
- Fileinfo PHP Extension
- Filter PHP Extension
- Hash PHP Extension
- Mbstring PHP Extension
- OpenSSL PHP Extension
- PCRE PHP Extension
- PDO PHP Extension
- Session PHP Extension
- Tokenizer PHP Extension
- XML PHP Extension

</div>

<a name="server-configuration"></a>
## Server Configuration

<a name="nginx"></a>
### Nginx

If you are deploying your application to a server that is running Nginx, you may use the following configuration file as a starting point for configuring your web server. Most likely, this file will need to be customized depending on your server's configuration. **If you would like assistance in managing your server, consider using a fully-managed Laravel platform like [Laravel Cloud](https://cloud.laravel.com).**

Please ensure, like the configuration below, your web server directs all requests to your application's `public/index.php` file. You should never attempt to move the `index.php` file to your project's root, as serving the application from the project root will expose many sensitive configuration files to the public Internet:

```nginx
server {
    listen 80;
    listen [::]:80;
    server_name example.com;
    root /srv/example.com/public;

    add_header X-Frame-Options "SAMEORIGIN";
    add_header X-Content-Type-Options "nosniff";

    index index.php;

    charset utf-8;

    location / {
        try_files $uri $uri/ /index.php?$query_string;
    }

    location = /favicon.ico { access_log off; log_not_found off; }
    location = /robots.txt  { access_log off; log_not_found off; }

    error_page 404 /index.php;

    location ~ ^/index\.php(/|$) {
        fastcgi_pass unix:/var/run/php/php8.3-fpm.sock;
        fastcgi_param SCRIPT_FILENAME $realpath_root$fastcgi_script_name;
        include fastcgi_params;
        fastcgi_buffer_size 32k;
        fastcgi_buffers 8 32k;
        fastcgi_busy_buffers_size 64k;
        fastcgi_hide_header X-Powered-By;
    }

    location ~ /\.(?!well-known).* {
        deny all;
    }
}
```

<a name="frankenphp"></a>
### FrankenPHP

[FrankenPHP](https://frankenphp.dev/) may also be used to serve your Laravel applications. FrankenPHP is a modern PHP application server written in Go. To serve a Laravel PHP application using FrankenPHP, you may simply invoke its `php-server` command:

```shell
frankenphp php-server -r public/
```

To take advantage of more powerful features supported by FrankenPHP, such as its [Laravel Octane](/docs/{{version}}/octane) integration, HTTP/3, modern compression, or the ability to package Laravel applications as standalone binaries, please consult FrankenPHP's [Laravel documentation](https://frankenphp.dev/docs/laravel/).

<a name="directory-permissions"></a>
### Directory Permissions

Laravel will need to write to the `bootstrap/cache` and `storage` directories, so you should ensure the web server process owner has permission to write to these directories.

<a name="optimization"></a>
## Optimization

When deploying your application to production, there are a variety of files that should be cached, including your configuration, events, routes, and views. Laravel provides a single, convenient `optimize` Artisan command that will cache all of these files. This command should typically be invoked as part of your application's deployment process:

```shell
php artisan optimize
```

The `optimize:clear` method may be used to remove all of the cache files generated by the `optimize` command as well as all keys in the default cache driver:

```shell
php artisan optimize:clear
```

In the following documentation, we will discuss each of the granular optimization commands that are executed by the `optimize` command.

<a name="optimizing-configuration-loading"></a>
### Caching Configuration

When deploying your application to production, you should make sure that you run the `config:cache` Artisan command during your deployment process:

```shell
php artisan config:cache
```

This command will combine all of Laravel's configuration files into a single, cached file, which greatly reduces the number of trips the framework must make to the filesystem when loading your configuration values.

> [!WARNING]
> If you execute the `config:cache` command during your deployment process, you should be sure that you are only calling the `env` function from within your configuration files. Once the configuration has been cached, the `.env` file will not be loaded and all calls to the `env` function for `.env` variables will return `null`.

<a name="caching-events"></a>
### Caching Events

You should cache your application's auto-discovered event to listener mappings during your deployment process. This can be accomplished by invoking the `event:cache` Artisan command during deployment:

```shell
php artisan event:cache
```

<a name="optimizing-route-loading"></a>
### Caching Routes

If you are building a large application with many routes, you should make sure that you are running the `route:cache` Artisan command during your deployment process:

```shell
php artisan route:cache
```

This command reduces all of your route registrations into a single method call within a cached file, improving the performance of route registration when registering hundreds of routes.

<a name="optimizing-view-loading"></a>
### Caching Views

When deploying your application to production, you should make sure that you run the `view:cache` Artisan command during your deployment process:

```shell
php artisan view:cache
```

This command precompiles all your Blade views so they are not compiled on demand, improving the performance of each request that returns a view.

<a name="reloading-services"></a>
## Reloading Services

> [!NOTE]
> When deploying to [Laravel Cloud](https://cloud.laravel.com), it is not necessary to use the `reload` command, as gracefully reloading of all services is handled automatically.

After deploying a new version of your application, any long-running services such as queue workers, Laravel Reverb, or Laravel Octane should be reloaded / restarted to use the new code. Laravel provides a single `reload` Artisan command that will terminate these services:

```shell
php artisan reload
```

If you are not using [Laravel Cloud](https://cloud.laravel.com), you should manually configure a process monitor that can detect when your reloadable processes exit and automatically restart them.

<a name="debug-mode"></a>
## Debug Mode

The debug option in your `config/app.php` configuration file determines how much information about an error is actually displayed to the user. By default, this option is set to respect the value of the `APP_DEBUG` environment variable, which is stored in your application's `.env` file.

> [!WARNING]
> **In your production environment, this value should always be `false`. If the `APP_DEBUG` variable is set to `true` in production, you risk exposing sensitive configuration values to your application's end users.**

<a name="the-health-route"></a>
## The Health Route

Laravel includes a built-in health check route that can be used to monitor the status of your application. In production, this route may be used to report the status of your application to an uptime monitor, load balancer, or orchestration system such as Kubernetes.

By default, the health check route is served at `/up` and will return a 200 HTTP response if the application has booted without exceptions. Otherwise, a 500 HTTP response will be returned. You may configure the URI for this route in your application's `bootstrap/app` file:

```php
->withRouting(
    web: __DIR__.'/../routes/web.php',
    commands: __DIR__.'/../routes/console.php',
    health: '/up', // [tl! remove]
    health: '/status', // [tl! add]
)
```

When HTTP requests are made to this route, Laravel will also dispatch a `Illuminate\Foundation\Events\DiagnosingHealth` event, allowing you to perform additional health checks relevant to your application. Within a [listener](/docs/{{version}}/events) for this event, you may check your application's database or cache status. If you detect a problem with your application, you may simply throw an exception from the listener.

<a name="deploying-with-cloud-or-forge"></a>
## Deploying With Laravel Cloud or Forge

<a name="laravel-cloud"></a>
#### Laravel Cloud

If you would like a fully-managed, auto-scaling deployment platform tuned for Laravel, check out [Laravel Cloud](https://cloud.laravel.com). Laravel Cloud is a robust deployment platform for Laravel, offering managed compute, databases, caches, and object storage.

Launch your Laravel application on Cloud and fall in love with the scalable simplicity. Laravel Cloud is fine-tuned by Laravel's creators to work seamlessly with the framework so you can keep writing your Laravel applications exactly like you're used to.

<a name="laravel-forge"></a>
#### Laravel Forge

If you prefer to manage your own servers but aren't comfortable configuring all of the various services needed to run a robust Laravel application, [Laravel Forge](https://forge.laravel.com) is a VPS server management platform for Laravel applications.

Laravel Forge can create servers on various infrastructure providers such as DigitalOcean, Linode, AWS, and more. In addition, Forge installs and manages all of the tools needed to build robust Laravel applications, such as Nginx, MySQL, Redis, Memcached, Beanstalk, and more.


---

# Laravel Dusk

*Sección: Laravel | Origen: https://laravel.com/docs/13.x/dusk*

- [Introduction](#introduction)
- [Installation](#installation)
    - [Managing ChromeDriver Installations](#managing-chromedriver-installations)
    - [Using Other Browsers](#using-other-browsers)
- [Getting Started](#getting-started)
    - [Generating Tests](#generating-tests)
    - [Resetting the Database After Each Test](#resetting-the-database-after-each-test)
    - [Running Tests](#running-tests)
    - [Environment Handling](#environment-handling)
- [Browser Basics](#browser-basics)
    - [Creating Browsers](#creating-browsers)
    - [Navigation](#navigation)
    - [Resizing Browser Windows](#resizing-browser-windows)
    - [Browser Macros](#browser-macros)
    - [Authentication](#authentication)
    - [Cookies](#cookies)
    - [Executing JavaScript](#executing-javascript)
    - [Taking a Screenshot](#taking-a-screenshot)
    - [Storing Console Output to Disk](#storing-console-output-to-disk)
    - [Storing Page Source to Disk](#storing-page-source-to-disk)
- [Interacting With Elements](#interacting-with-elements)
    - [Dusk Selectors](#dusk-selectors)
    - [Text, Values, and Attributes](#text-values-and-attributes)
    - [Interacting With Forms](#interacting-with-forms)
    - [Attaching Files](#attaching-files)
    - [Pressing Buttons](#pressing-buttons)
    - [Clicking Links](#clicking-links)
    - [Using the Keyboard](#using-the-keyboard)
    - [Using the Mouse](#using-the-mouse)
    - [JavaScript Dialogs](#javascript-dialogs)
    - [Interacting With Inline Frames](#interacting-with-iframes)
    - [Scoping Selectors](#scoping-selectors)
    - [Waiting for Elements](#waiting-for-elements)
    - [Scrolling an Element Into View](#scrolling-an-element-into-view)
- [Available Assertions](#available-assertions)
- [Pages](#pages)
    - [Generating Pages](#generating-pages)
    - [Configuring Pages](#configuring-pages)
    - [Navigating to Pages](#navigating-to-pages)
    - [Shorthand Selectors](#shorthand-selectors)
    - [Page Methods](#page-methods)
- [Components](#components)
    - [Generating Components](#generating-components)
    - [Using Components](#using-components)
- [Continuous Integration](#continuous-integration)
    - [Heroku CI](#running-tests-on-heroku-ci)
    - [Travis CI](#running-tests-on-travis-ci)
    - [GitHub Actions](#running-tests-on-github-actions)
    - [Chipper CI](#running-tests-on-chipper-ci)

<a name="introduction"></a>
## Introduction

> [!WARNING]
> [Pest 4](https://pestphp.com/) now includes automated browser testing which offers significant performance and usability improvements compared to Laravel Dusk. For new projects, we recommend using Pest for browser testing.

[Laravel Dusk](https://github.com/laravel/dusk) provides an expressive, easy-to-use browser automation and testing API. By default, Dusk does not require you to install JDK or Selenium on your local computer. Instead, Dusk uses a standalone [ChromeDriver](https://sites.google.com/chromium.org/driver) installation. However, you are free to utilize any other Selenium compatible driver you wish.

<a name="installation"></a>
## Installation

To get started, you should install [Google Chrome](https://www.google.com/chrome) and add the `laravel/dusk` Composer dependency to your project:

```shell
composer require laravel/dusk --dev
```

> [!WARNING]
> If you are manually registering Dusk's service provider, you should **never** register it in your production environment, as doing so could lead to arbitrary users being able to authenticate with your application.

After installing the Dusk package, execute the `dusk:install` Artisan command. The `dusk:install` command will create a `tests/Browser` directory, an example Dusk test, and install the Chrome Driver binary for your operating system:

```shell
php artisan dusk:install
```

Next, set the `APP_URL` environment variable in your application's `.env` file. This value should match the URL you use to access your application in a browser.

> [!NOTE]
> If you are using [Laravel Sail](/docs/{{version}}/sail) to manage your local development environment, please also consult the Sail documentation on [configuring and running Dusk tests](/docs/{{version}}/sail#laravel-dusk).

<a name="managing-chromedriver-installations"></a>
### Managing ChromeDriver Installations

If you would like to install a different version of ChromeDriver than what is installed by Laravel Dusk via the `dusk:install` command, you may use the `dusk:chrome-driver` command:

```shell
# Install the latest version of ChromeDriver for your OS...
php artisan dusk:chrome-driver

# Install a given version of ChromeDriver for your OS...
php artisan dusk:chrome-driver 86

# Install a given version of ChromeDriver for all supported OSs...
php artisan dusk:chrome-driver --all

# Install the version of ChromeDriver that matches the detected version of Chrome / Chromium for your OS...
php artisan dusk:chrome-driver --detect
```

> [!WARNING]
> Dusk requires the `chromedriver` binaries to be executable. If you're having problems running Dusk, you should ensure the binaries are executable using the following command: `chmod -R 0755 vendor/laravel/dusk/bin/`.

<a name="using-other-browsers"></a>
### Using Other Browsers

By default, Dusk uses Google Chrome and a standalone [ChromeDriver](https://sites.google.com/chromium.org/driver) installation to run your browser tests. However, you may start your own Selenium server and run your tests against any browser you wish.

To get started, open your `tests/DuskTestCase.php` file, which is the base Dusk test case for your application. Within this file, you can remove the call to the `startChromeDriver` method. This will stop Dusk from automatically starting the ChromeDriver:

```php
/**
 * Prepare for Dusk test execution.
 *
 * @beforeClass
 */
public static function prepare(): void
{
    // static::startChromeDriver();
}
```

Next, you may modify the `driver` method to connect to the URL and port of your choice. In addition, you may modify the "desired capabilities" that should be passed to the WebDriver:

```php
use Facebook\WebDriver\Remote\RemoteWebDriver;

/**
 * Create the RemoteWebDriver instance.
 */
protected function driver(): RemoteWebDriver
{
    return RemoteWebDriver::create(
        'http://localhost:4444/wd/hub', DesiredCapabilities::phantomjs()
    );
}
```

<a name="getting-started"></a>
## Getting Started

<a name="generating-tests"></a>
### Generating Tests

To generate a Dusk test, use the `dusk:make` Artisan command. The generated test will be placed in the `tests/Browser` directory:

```shell
php artisan dusk:make LoginTest
```

<a name="resetting-the-database-after-each-test"></a>
### Resetting the Database After Each Test

Most of the tests you write will interact with pages that retrieve data from your application's database; however, your Dusk tests should never use the `RefreshDatabase` trait. The `RefreshDatabase` trait leverages database transactions which will not be applicable or available across HTTP requests. Instead, you have two options: the `DatabaseMigrations` trait and the `DatabaseTruncation` trait.

<a name="reset-migrations"></a>
#### Using Database Migrations

The `DatabaseMigrations` trait will run your database migrations before each test. However, dropping and re-creating your database tables for each test is typically slower than truncating the tables:

```php tab=Pest
<?php

use Illuminate\Foundation\Testing\DatabaseMigrations;

pest()->use(DatabaseMigrations::class);

//
```

```php tab=PHPUnit
<?php

namespace Tests\Browser;

use Illuminate\Foundation\Testing\DatabaseMigrations;
use Laravel\Dusk\Browser;
use Tests\DuskTestCase;

class ExampleTest extends DuskTestCase
{
    use DatabaseMigrations;

    //
}
```

> [!WARNING]
> SQLite in-memory databases may not be used when executing Dusk tests. Since the browser executes within its own process, it will not be able to access the in-memory databases of other processes.

<a name="reset-truncation"></a>
#### Using Database Truncation

The `DatabaseTruncation` trait will migrate your database on the first test in order to ensure your database tables have been properly created. However, on subsequent tests, the database's tables will simply be truncated - providing a speed boost over re-running all of your database migrations:

```php tab=Pest
<?php

use Illuminate\Foundation\Testing\DatabaseTruncation;

pest()->use(DatabaseTruncation::class);

//
```

```php tab=PHPUnit
<?php

namespace Tests\Browser;

use App\Models\User;
use Illuminate\Foundation\Testing\DatabaseTruncation;
use Laravel\Dusk\Browser;
use Tests\DuskTestCase;

class ExampleTest extends DuskTestCase
{
    use DatabaseTruncation;

    //
}
```

By default, this trait will truncate all tables except the `migrations` table. If you would like to customize the tables that should be truncated, you may define a `$tablesToTruncate` property on your test class:

> [!NOTE]
> If you are using Pest, you should define properties or methods on the base `DuskTestCase` class or on any class your test file extends.

```php
/**
 * Indicates which tables should be truncated.
 *
 * @var array
 */
protected $tablesToTruncate = ['users'];
```

Alternatively, you may define an `$exceptTables` property on your test class to specify which tables should be excluded from truncation:

```php
/**
 * Indicates which tables should be excluded from truncation.
 *
 * @var array
 */
protected $exceptTables = ['users'];
```

To specify the database connections that should have their tables truncated, you may define a `$connectionsToTruncate` property on your test class:

```php
/**
 * Indicates which connections should have their tables truncated.
 *
 * @var array
 */
protected $connectionsToTruncate = ['mysql'];
```

If you would like to execute code before or after database truncation is performed, you may define `beforeTruncatingDatabase` or `afterTruncatingDatabase` methods on your test class:

```php
/**
 * Perform any work that should take place before the database has started truncating.
 */
protected function beforeTruncatingDatabase(): void
{
    //
}

/**
 * Perform any work that should take place after the database has finished truncating.
 */
protected function afterTruncatingDatabase(): void
{
    //
}
```

<a name="running-tests"></a>
### Running Tests

To run your browser tests, execute the `dusk` Artisan command:

```shell
php artisan dusk
```

If you had test failures the last time you ran the `dusk` command, you may save time by re-running the failing tests first using the `dusk:fails` command:

```shell
php artisan dusk:fails
```

The `dusk` command accepts any argument that is normally accepted by the Pest / PHPUnit test runner, such as allowing you to only run the tests for a given [group](https://docs.phpunit.de/en/10.5/annotations.html#group):

```shell
php artisan dusk --group=foo
```

> [!NOTE]
> If you are using [Laravel Sail](/docs/{{version}}/sail) to manage your local development environment, please consult the Sail documentation on [configuring and running Dusk tests](/docs/{{version}}/sail#laravel-dusk).

<a name="manually-starting-chromedriver"></a>
#### Manually Starting ChromeDriver

By default, Dusk will automatically attempt to start ChromeDriver. If this does not work for your particular system, you may manually start ChromeDriver before running the `dusk` command. If you choose to start ChromeDriver manually, you should comment out the following line of your `tests/DuskTestCase.php` file:

```php
/**
 * Prepare for Dusk test execution.
 *
 * @beforeClass
 */
public static function prepare(): void
{
    // static::startChromeDriver();
}
```

In addition, if you start ChromeDriver on a port other than 9515, you should modify the `driver` method of the same class to reflect the correct port:

```php
use Facebook\WebDriver\Remote\RemoteWebDriver;

/**
 * Create the RemoteWebDriver instance.
 */
protected function driver(): RemoteWebDriver
{
    return RemoteWebDriver::create(
        'http://localhost:9515', DesiredCapabilities::chrome()
    );
}
```

<a name="environment-handling"></a>
### Environment Handling

To force Dusk to use its own environment file when running tests, create a `.env.dusk.{environment}` file in the root of your project. For example, if you will be initiating the `dusk` command from your `local` environment, you should create a `.env.dusk.local` file.

When running tests, Dusk will back-up your `.env` file and rename your Dusk environment to `.env`. Once the tests have completed, your `.env` file will be restored.

<a name="browser-basics"></a>
## Browser Basics

<a name="creating-browsers"></a>
### Creating Browsers

To get started, let's write a test that verifies we can log into our application. After generating a test, we can modify it to navigate to the login page, enter some credentials, and click the "Login" button. To create a browser instance, you may call the `browse` method from within your Dusk test:

```php tab=Pest
<?php

use App\Models\User;
use Illuminate\Foundation\Testing\DatabaseMigrations;

pest()->use(DatabaseMigrations::class);

test('basic example', function () {
    $user = User::factory()->create([
        'email' => 'taylor@laravel.com',
    ]);

    $this->browse(function (Browser $browser) use ($user) {
        $browser->visit('/login')
            ->type('email', $user->email)
            ->type('password', 'password')
            ->press('Login')
            ->assertPathIs('/home');
    });
});
```

```php tab=PHPUnit
<?php

namespace Tests\Browser;

use App\Models\User;
use Illuminate\Foundation\Testing\DatabaseMigrations;
use Laravel\Dusk\Browser;
use Tests\DuskTestCase;

class ExampleTest extends DuskTestCase
{
    use DatabaseMigrations;

    /**
     * A basic browser test example.
     */
    public function test_basic_example(): void
    {
        $user = User::factory()->create([
            'email' => 'taylor@laravel.com',
        ]);

        $this->browse(function (Browser $browser) use ($user) {
            $browser->visit('/login')
                ->type('email', $user->email)
                ->type('password', 'password')
                ->press('Login')
                ->assertPathIs('/home');
        });
    }
}
```

As you can see in the example above, the `browse` method accepts a closure. A browser instance will automatically be passed to this closure by Dusk and is the main object used to interact with and make assertions against your application.

<a name="creating-multiple-browsers"></a>
#### Creating Multiple Browsers

Sometimes you may need multiple browsers in order to properly carry out a test. For example, multiple browsers may be needed to test a chat screen that interacts with websockets. To create multiple browsers, simply add more browser arguments to the signature of the closure given to the `browse` method:

```php
$this->browse(function (Browser $first, Browser $second) {
    $first->loginAs(User::find(1))
        ->visit('/home')
        ->waitForText('Message');

    $second->loginAs(User::find(2))
        ->visit('/home')
        ->waitForText('Message')
        ->type('message', 'Hey Taylor')
        ->press('Send');

    $first->waitForText('Hey Taylor')
        ->assertSee('Jeffrey Way');
});
```

<a name="navigation"></a>
### Navigation

The `visit` method may be used to navigate to a given URI within your application:

```php
$browser->visit('/login');
```

You may use the `visitRoute` method to navigate to a [named route](/docs/{{version}}/routing#named-routes):

```php
$browser->visitRoute($routeName, $parameters);
```

You may navigate "back" and "forward" using the `back` and `forward` methods:

```php
$browser->back();

$browser->forward();
```

You may use the `refresh` method to refresh the page:

```php
$browser->refresh();
```

<a name="resizing-browser-windows"></a>
### Resizing Browser Windows

You may use the `resize` method to adjust the size of the browser window:

```php
$browser->resize(1920, 1080);
```

The `maximize` method may be used to maximize the browser window:

```php
$browser->maximize();
```

The `fitContent` method will resize the browser window to match the size of its content:

```php
$browser->fitContent();
```

When a test fails, Dusk will automatically resize the browser to fit the content prior to taking a screenshot. You may disable this feature by calling the `disableFitOnFailure` method within your test:

```php
$browser->disableFitOnFailure();
```

You may use the `move` method to move the browser window to a different position on your screen:

```php
$browser->move($x = 100, $y = 100);
```

<a name="browser-macros"></a>
### Browser Macros

If you would like to define a custom browser method that you can re-use in a variety of your tests, you may use the `macro` method on the `Browser` class. Typically, you should call this method from a [service provider's](/docs/{{version}}/providers) `boot` method:

```php
<?php

namespace App\Providers;

use Illuminate\Support\ServiceProvider;
use Laravel\Dusk\Browser;

class DuskServiceProvider extends ServiceProvider
{
    /**
     * Register Dusk's browser macros.
     */
    public function boot(): void
    {
        Browser::macro('scrollToElement', function (string $element = null) {
            $this->script("$('html, body').animate({ scrollTop: $('$element').offset().top }, 0);");

            return $this;
        });
    }
}
```

The `macro` function accepts a name as its first argument, and a closure as its second. The macro's closure will be executed when calling the macro as a method on a `Browser` instance:

```php
$this->browse(function (Browser $browser) use ($user) {
    $browser->visit('/pay')
        ->scrollToElement('#credit-card-details')
        ->assertSee('Enter Credit Card Details');
});
```

<a name="authentication"></a>
### Authentication

Often, you will be testing pages that require authentication. You can use Dusk's `loginAs` method in order to avoid interacting with your application's login screen during every test. The `loginAs` method accepts a primary key associated with your authenticatable model or an authenticatable model instance:

```php
use App\Models\User;
use Laravel\Dusk\Browser;

$this->browse(function (Browser $browser) {
    $browser->loginAs(User::find(1))
        ->visit('/home');
});
```

> [!WARNING]
> After using the `loginAs` method, the user session will be maintained for all tests within the file.

<a name="cookies"></a>
### Cookies

You may use the `cookie` method to get or set an encrypted cookie's value. By default, all of the cookies created by Laravel are encrypted:

```php
$browser->cookie('name');

$browser->cookie('name', 'Taylor');
```

You may use the `plainCookie` method to get or set an unencrypted cookie's value:

```php
$browser->plainCookie('name');

$browser->plainCookie('name', 'Taylor');
```

You may use the `deleteCookie` method to delete the given cookie:

```php
$browser->deleteCookie('name');
```

<a name="executing-javascript"></a>
### Executing JavaScript

You may use the `script` method to execute arbitrary JavaScript statements within the browser:

```php
$browser->script('document.documentElement.scrollTop = 0');

$browser->script([
    'document.body.scrollTop = 0',
    'document.documentElement.scrollTop = 0',
]);

$output = $browser->script('return window.location.pathname');
```

<a name="taking-a-screenshot"></a>
### Taking a Screenshot

You may use the `screenshot` method to take a screenshot and store it with the given filename. All screenshots will be stored within the `tests/Browser/screenshots` directory:

```php
$browser->screenshot('filename');
```

The `responsiveScreenshots` method may be used to take a series of screenshots at various breakpoints:

```php
$browser->responsiveScreenshots('filename');
```

The `screenshotElement` method may be used to take a screenshot of a specific element on the page:

```php
$browser->screenshotElement('#selector', 'filename');
```

<a name="storing-console-output-to-disk"></a>
### Storing Console Output to Disk

You may use the `storeConsoleLog` method to write the current browser's console output to disk with the given filename. Console output will be stored within the `tests/Browser/console` directory:

```php
$browser->storeConsoleLog('filename');
```

<a name="storing-page-source-to-disk"></a>
### Storing Page Source to Disk

You may use the `storeSource` method to write the current page's source to disk with the given filename. The page source will be stored within the `tests/Browser/source` directory:

```php
$browser->storeSource('filename');
```

<a name="interacting-with-elements"></a>
## Interacting With Elements

<a name="dusk-selectors"></a>
### Dusk Selectors

Choosing good CSS selectors for interacting with elements is one of the hardest parts of writing Dusk tests. Over time, frontend changes can cause CSS selectors like the following to break your tests:

```html
// HTML...

<button>Login</button>
```

```php
// Test...

$browser->click('.login-page .container div > button');
```

Dusk selectors allow you to focus on writing effective tests rather than remembering CSS selectors. To define a selector, add a `dusk` attribute to your HTML element. Then, when interacting with a Dusk browser, prefix the selector with `@` to manipulate the attached element within your test:

```html
// HTML...

<button dusk="login-button">Login</button>
```

```php
// Test...

$browser->click('@login-button');
```

If desired, you may customize the HTML attribute that the Dusk selector utilizes via the `selectorHtmlAttribute` method. Typically, this method should be called from the `boot` method of your application's `AppServiceProvider`:

```php
use Laravel\Dusk\Dusk;

Dusk::selectorHtmlAttribute('data-dusk');
```

<a name="text-values-and-attributes"></a>
### Text, Values, and Attributes

<a name="retrieving-setting-values"></a>
#### Retrieving and Setting Values

Dusk provides several methods for interacting with the current value, display text, and attributes of elements on the page. For example, to get the "value" of an element that matches a given CSS or Dusk selector, use the `value` method:

```php
// Retrieve the value...
$value = $browser->value('selector');

// Set the value...
$browser->value('selector', 'value');
```

You may use the `inputValue` method to get the "value" of an input element that has a given field name:

```php
$value = $browser->inputValue('field');
```

<a name="retrieving-text"></a>
#### Retrieving Text

The `text` method may be used to retrieve the display text of an element that matches the given selector:

```php
$text = $browser->text('selector');
```

<a name="retrieving-attributes"></a>
#### Retrieving Attributes

Finally, the `attribute` method may be used to retrieve the value of an attribute of an element matching the given selector:

```php
$attribute = $browser->attribute('selector', 'value');
```

<a name="interacting-with-forms"></a>
### Interacting With Forms

<a name="typing-values"></a>
#### Typing Values

Dusk provides a variety of methods for interacting with forms and input elements. First, let's take a look at an example of typing text into an input field:

```php
$browser->type('email', 'taylor@laravel.com');
```

Note that, although the method accepts one if necessary, we are not required to pass a CSS selector into the `type` method. If a CSS selector is not provided, Dusk will search for an `input` or `textarea` field with the given `name` attribute.

To append text to a field without clearing its content, you may use the `append` method:

```php
$browser->type('tags', 'foo')
    ->append('tags', ', bar, baz');
```

You may clear the value of an input using the `clear` method:

```php
$browser->clear('email');
```

You can instruct Dusk to type slowly using the `typeSlowly` method. By default, Dusk will pause for 100 milliseconds between key presses. To customize the amount of time between key presses, you may pass the appropriate number of milliseconds as the third argument to the method:

```php
$browser->typeSlowly('mobile', '+1 (202) 555-5555');

$browser->typeSlowly('mobile', '+1 (202) 555-5555', 300);
```

You may use the `appendSlowly` method to append text slowly:

```php
$browser->type('tags', 'foo')
    ->appendSlowly('tags', ', bar, baz');
```

<a name="dropdowns"></a>
#### Dropdowns

To select a value available on a `select` element, you may use the `select` method. Like the `type` method, the `select` method does not require a full CSS selector. When passing a value to the `select` method, you should pass the underlying option value instead of the display text:

```php
$browser->select('size', 'Large');
```

You may select a random option by omitting the second argument:

```php
$browser->select('size');
```

By providing an array as the second argument to the `select` method, you can instruct the method to select multiple options:

```php
$browser->select('categories', ['Art', 'Music']);
```

<a name="checkboxes"></a>
#### Checkboxes

To "check" a checkbox input, you may use the `check` method. Like many other input related methods, a full CSS selector is not required. If a CSS selector match can't be found, Dusk will search for a checkbox with a matching `name` attribute:

```php
$browser->check('terms');
```

The `uncheck` method may be used to "uncheck" a checkbox input:

```php
$browser->uncheck('terms');
```

<a name="radio-buttons"></a>
#### Radio Buttons

To "select" a `radio` input option, you may use the `radio` method. Like many other input related methods, a full CSS selector is not required. If a CSS selector match can't be found, Dusk will search for a `radio` input with matching `name` and `value` attributes:

```php
$browser->radio('size', 'large');
```

<a name="attaching-files"></a>
### Attaching Files

The `attach` method may be used to attach a file to a `file` input element. Like many other input related methods, a full CSS selector is not required. If a CSS selector match can't be found, Dusk will search for a `file` input with a matching `name` attribute:

```php
$browser->attach('photo', __DIR__.'/photos/mountains.png');
```

> [!WARNING]
> The attach function requires the `Zip` PHP extension to be installed and enabled on your server.

<a name="pressing-buttons"></a>
### Pressing Buttons

The `press` method may be used to click a button element on the page. The argument given to the `press` method may be either the display text of the button or a CSS / Dusk selector:

```php
$browser->press('Login');
```

When submitting forms, many applications disable the form's submission button after it is pressed and then re-enable the button when the form submission's HTTP request is complete. To press a button and wait for the button to be re-enabled, you may use the `pressAndWaitFor` method:

```php
// Press the button and wait a maximum of 5 seconds for it to be enabled...
$browser->pressAndWaitFor('Save');

// Press the button and wait a maximum of 1 second for it to be enabled...
$browser->pressAndWaitFor('Save', 1);
```

<a name="clicking-links"></a>
### Clicking Links

To click a link, you may use the `clickLink` method on the browser instance. The `clickLink` method will click the link that has the given display text:

```php
$browser->clickLink($linkText);
```

You may use the `seeLink` method to determine if a link with the given display text is visible on the page:

```php
if ($browser->seeLink($linkText)) {
    // ...
}
```

> [!WARNING]
> These methods interact with jQuery. If jQuery is not available on the page, Dusk will automatically inject it into the page so it is available for the test's duration.

<a name="using-the-keyboard"></a>
### Using the Keyboard

The `keys` method allows you to provide more complex input sequences to a given element than normally allowed by the `type` method. For example, you may instruct Dusk to hold modifier keys while entering values. In this example, the `shift` key will be held while `taylor` is entered into the element matching the given selector. After `taylor` is typed, `swift` will be typed without any modifier keys:

```php
$browser->keys('selector', ['{shift}', 'taylor'], 'swift');
```

Another valuable use case for the `keys` method is sending a "keyboard shortcut" combination to the primary CSS selector for your application:

```php
$browser->keys('.app', ['{command}', 'j']);
```

> [!NOTE]
> All modifier keys such as `{command}` are wrapped in `{}` characters, and match the constants defined in the `Facebook\WebDriver\WebDriverKeys` class, which can be [found on GitHub](https://github.com/php-webdriver/php-webdriver/blob/master/lib/WebDriverKeys.php).

<a name="fluent-keyboard-interactions"></a>
#### Fluent Keyboard Interactions

Dusk also provides a `withKeyboard` method, allowing you to fluently perform complex keyboard interactions via the `Laravel\Dusk\Keyboard` class. The `Keyboard` class provides `press`, `release`, `type`, and `pause` methods:

```php
use Laravel\Dusk\Keyboard;

$browser->withKeyboard(function (Keyboard $keyboard) {
    $keyboard->press('c')
        ->pause(1000)
        ->release('c')
        ->type(['c', 'e', 'o']);
});
```

<a name="keyboard-macros"></a>
#### Keyboard Macros

If you would like to define custom keyboard interactions that you can easily re-use throughout your test suite, you may use the `macro` method provided by the `Keyboard` class. Typically, you should call this method from a [service provider's](/docs/{{version}}/providers) `boot` method:

```php
<?php

namespace App\Providers;

use Facebook\WebDriver\WebDriverKeys;
use Illuminate\Support\ServiceProvider;
use Laravel\Dusk\Keyboard;
use Laravel\Dusk\OperatingSystem;

class DuskServiceProvider extends ServiceProvider
{
    /**
     * Register Dusk's browser macros.
     */
    public function boot(): void
    {
        Keyboard::macro('copy', function (string $element = null) {
            $this->type([
                OperatingSystem::onMac() ? WebDriverKeys::META : WebDriverKeys::CONTROL, 'c',
            ]);

            return $this;
        });

        Keyboard::macro('paste', function (string $element = null) {
            $this->type([
                OperatingSystem::onMac() ? WebDriverKeys::META : WebDriverKeys::CONTROL, 'v',
            ]);

            return $this;
        });
    }
}
```

The `macro` function accepts a name as its first argument and a closure as its second. The macro's closure will be executed when calling the macro as a method on a `Keyboard` instance:

```php
$browser->click('@textarea')
    ->withKeyboard(fn (Keyboard $keyboard) => $keyboard->copy())
    ->click('@another-textarea')
    ->withKeyboard(fn (Keyboard $keyboard) => $keyboard->paste());
```

<a name="using-the-mouse"></a>
### Using the Mouse

<a name="clicking-on-elements"></a>
#### Clicking on Elements

The `click` method may be used to click on an element matching the given CSS or Dusk selector:

```php
$browser->click('.selector');
```

The `clickAtXPath` method may be used to click on an element matching the given XPath expression:

```php
$browser->clickAtXPath('//div[@class = "selector"]');
```

The `clickAtPoint` method may be used to click on the topmost element at a given pair of coordinates relative to the viewable area of the browser:

```php
$browser->clickAtPoint($x = 0, $y = 0);
```

The `doubleClick` method may be used to simulate the double click of a mouse:

```php
$browser->doubleClick();

$browser->doubleClick('.selector');
```

The `rightClick` method may be used to simulate the right click of a mouse:

```php
$browser->rightClick();

$browser->rightClick('.selector');
```

The `clickAndHold` method may be used to simulate a mouse button being clicked and held down. A subsequent call to the `releaseMouse` method will undo this behavior and release the mouse button:

```php
$browser->clickAndHold('.selector');

$browser->clickAndHold()
    ->pause(1000)
    ->releaseMouse();
```

The `controlClick` method may be used to simulate the `ctrl+click` event within the browser:

```php
$browser->controlClick();

$browser->controlClick('.selector');
```

The `clickWhenVisible` or `clickWhenEnabled` method may be used to wait for an element to be ready before clicking it exactly once:

```php
$browser->clickWhenVisible('@save-button');
$browser->clickWhenEnabled('@submit-button');
```

<a name="mouseover"></a>
#### Mouseover

The `mouseover` method may be used when you need to move the mouse over an element matching the given CSS or Dusk selector:

```php
$browser->mouseover('.selector');
```

<a name="drag-drop"></a>
#### Drag and Drop

The `drag` method may be used to drag an element matching the given selector to another element:

```php
$browser->drag('.from-selector', '.to-selector');
```

Or, you may drag an element in a single direction:

```php
$browser->dragLeft('.selector', $pixels = 10);
$browser->dragRight('.selector', $pixels = 10);
$browser->dragUp('.selector', $pixels = 10);
$browser->dragDown('.selector', $pixels = 10);
```

Finally, you may drag an element by a given offset:

```php
$browser->dragOffset('.selector', $x = 10, $y = 10);
```

<a name="javascript-dialogs"></a>
### JavaScript Dialogs

Dusk provides various methods to interact with JavaScript Dialogs. For example, you may use the `waitForDialog` method to wait for a JavaScript dialog to appear. This method accepts an optional argument indicating how many seconds to wait for the dialog to appear:

```php
$browser->waitForDialog($seconds = null);
```

The `assertDialogOpened` method may be used to assert that a dialog has been displayed and contains the given message:

```php
$browser->assertDialogOpened('Dialog message');
```

If the JavaScript dialog contains a prompt, you may use the `typeInDialog` method to type a value into the prompt:

```php
$browser->typeInDialog('Hello World');
```

To close an open JavaScript dialog by clicking the "OK" button, you may invoke the `acceptDialog` method:

```php
$browser->acceptDialog();
```

To close an open JavaScript dialog by clicking the "Cancel" button, you may invoke the `dismissDialog` method:

```php
$browser->dismissDialog();
```

<a name="interacting-with-iframes"></a>
### Interacting With Inline Frames

If you need to interact with elements within an iframe, you may use the `withinFrame` method. All element interactions that take place within the closure provided to the `withinFrame` method will be scoped to the context of the specified iframe:

```php
$browser->withinFrame('#credit-card-details', function ($browser) {
    $browser->type('input[name="cardnumber"]', '4242424242424242')
        ->type('input[name="exp-date"]', '1224')
        ->type('input[name="cvc"]', '123')
        ->press('Pay');
});
```

<a name="scoping-selectors"></a>
### Scoping Selectors

Sometimes you may wish to perform several operations while scoping all of the operations within a given selector. For example, you may wish to assert that some text exists only within a table and then click a button within that table. You may use the `with` method to accomplish this. All operations performed within the closure given to the `with` method will be scoped to the original selector:

```php
$browser->with('.table', function (Browser $table) {
    $table->assertSee('Hello World')
        ->clickLink('Delete');
});
```

You may occasionally need to execute assertions outside of the current scope. You may use the `elsewhere` and `elsewhereWhenAvailable` methods to accomplish this:

```php
$browser->with('.table', function (Browser $table) {
    // Current scope is `body .table`...

    $browser->elsewhere('.page-title', function (Browser $title) {
        // Current scope is `body .page-title`...
        $title->assertSee('Hello World');
    });

    $browser->elsewhereWhenAvailable('.page-title', function (Browser $title) {
        // Current scope is `body .page-title`...
        $title->assertSee('Hello World');
    });
});
```

<a name="waiting-for-elements"></a>
### Waiting for Elements

When testing applications that use JavaScript extensively, it often becomes necessary to "wait" for certain elements or data to be available before proceeding with a test. Dusk makes this a cinch. Using a variety of methods, you may wait for elements to become visible on the page or even wait until a given JavaScript expression evaluates to `true`.

<a name="waiting"></a>
#### Waiting

If you just need to pause the test for a given number of milliseconds, use the `pause` method:

```php
$browser->pause(1000);
```

If you need to pause the test only if a given condition is `true`, use the `pauseIf` method:

```php
$browser->pauseIf(App::environment('production'), 1000);
```

Likewise, if you need to pause the test unless a given condition is `true`, you may use the `pauseUnless` method:

```php
$browser->pauseUnless(App::environment('testing'), 1000);
```

<a name="waiting-for-selectors"></a>
#### Waiting for Selectors

The `waitFor` method may be used to pause the execution of the test until the element matching the given CSS or Dusk selector is displayed on the page. By default, this will pause the test for a maximum of five seconds before throwing an exception. If necessary, you may pass a custom timeout threshold as the second argument to the method:

```php
// Wait a maximum of five seconds for the selector...
$browser->waitFor('.selector');

// Wait a maximum of one second for the selector...
$browser->waitFor('.selector', 1);
```

You may also wait until the element matching the given selector contains the given text:

```php
// Wait a maximum of five seconds for the selector to contain the given text...
$browser->waitForTextIn('.selector', 'Hello World');

// Wait a maximum of one second for the selector to contain the given text...
$browser->waitForTextIn('.selector', 'Hello World', 1);
```

You may also wait until the element matching the given selector is missing from the page:

```php
// Wait a maximum of five seconds until the selector is missing...
$browser->waitUntilMissing('.selector');

// Wait a maximum of one second until the selector is missing...
$browser->waitUntilMissing('.selector', 1);
```

Or, you may wait until the element matching the given selector is enabled or disabled:

```php
// Wait a maximum of five seconds until the selector is enabled...
$browser->waitUntilEnabled('.selector');

// Wait a maximum of one second until the selector is enabled...
$browser->waitUntilEnabled('.selector', 1);

// Wait a maximum of five seconds until the selector is disabled...
$browser->waitUntilDisabled('.selector');

// Wait a maximum of one second until the selector is disabled...
$browser->waitUntilDisabled('.selector', 1);
```

<a name="scoping-selectors-when-available"></a>
#### Scoping Selectors When Available

Occasionally, you may wish to wait for an element to appear that matches a given selector and then interact with the element. For example, you may wish to wait until a modal window is available and then press the "OK" button within the modal. The `whenAvailable` method may be used to accomplish this. All element operations performed within the given closure will be scoped to the original selector:

```php
$browser->whenAvailable('.modal', function (Browser $modal) {
    $modal->assertSee('Hello World')
        ->press('OK');
});
```

<a name="waiting-for-text"></a>
#### Waiting for Text

The `waitForText` method may be used to wait until the given text is displayed on the page:

```php
// Wait a maximum of five seconds for the text...
$browser->waitForText('Hello World');

// Wait a maximum of one second for the text...
$browser->waitForText('Hello World', 1);
```

You may use the `waitUntilMissingText` method to wait until the displayed text has been removed from the page:

```php
// Wait a maximum of five seconds for the text to be removed...
$browser->waitUntilMissingText('Hello World');

// Wait a maximum of one second for the text to be removed...
$browser->waitUntilMissingText('Hello World', 1);
```

<a name="waiting-for-links"></a>
#### Waiting for Links

The `waitForLink` method may be used to wait until the given link text is displayed on the page:

```php
// Wait a maximum of five seconds for the link...
$browser->waitForLink('Create');

// Wait a maximum of one second for the link...
$browser->waitForLink('Create', 1);
```

<a name="waiting-for-inputs"></a>
#### Waiting for Inputs

The `waitForInput` method may be used to wait until the given input field is visible on the page:

```php
// Wait a maximum of five seconds for the input...
$browser->waitForInput($field);

// Wait a maximum of one second for the input...
$browser->waitForInput($field, 1);
```

<a name="waiting-on-the-page-location"></a>
#### Waiting on the Page Location

When making a path assertion such as `$browser->assertPathIs('/home')`, the assertion can fail if `window.location.pathname` is being updated asynchronously. You may use the `waitForLocation` method to wait for the location to be a given value:

```php
$browser->waitForLocation('/secret');
```

The `waitForLocation` method can also be used to wait for the current window location to be a fully qualified URL:

```php
$browser->waitForLocation('https://example.com/path');
```

You may also wait for a [named route's](/docs/{{version}}/routing#named-routes) location:

```php
$browser->waitForRoute($routeName, $parameters);
```

<a name="waiting-for-page-reloads"></a>
#### Waiting for Page Reloads

If you need to wait for a page to reload after performing an action, use the `waitForReload` method:

```php
use Laravel\Dusk\Browser;

$browser->waitForReload(function (Browser $browser) {
    $browser->press('Submit');
})
->assertSee('Success!');
```

Since the need to wait for the page to reload typically occurs after clicking a button, you may use the `clickAndWaitForReload` method for convenience:

```php
$browser->clickAndWaitForReload('.selector')
    ->assertSee('something');
```

<a name="waiting-on-javascript-expressions"></a>
#### Waiting on JavaScript Expressions

Sometimes you may wish to pause the execution of a test until a given JavaScript expression evaluates to `true`. You may easily accomplish this using the `waitUntil` method. When passing an expression to this method, you do not need to include the `return` keyword or an ending semi-colon:

```php
// Wait a maximum of five seconds for the expression to be true...
$browser->waitUntil('App.data.servers.length > 0');

// Wait a maximum of one second for the expression to be true...
$browser->waitUntil('App.data.servers.length > 0', 1);
```

<a name="waiting-on-vue-expressions"></a>
#### Waiting on Vue Expressions

The `waitUntilVue` and `waitUntilVueIsNot` methods may be used to wait until a [Vue component](https://vuejs.org) attribute has a given value:

```php
// Wait until the component attribute contains the given value...
$browser->waitUntilVue('user.name', 'Taylor', '@user');

// Wait until the component attribute doesn't contain the given value...
$browser->waitUntilVueIsNot('user.name', null, '@user');
```

<a name="waiting-for-javascript-events"></a>
#### Waiting for JavaScript Events

The `waitForEvent` method can be used to pause the execution of a test until a JavaScript event occurs:

```php
$browser->waitForEvent('load');
```

The event listener is attached to the current scope, which is the `body` element by default. When using a scoped selector, the event listener will be attached to the matching element:

```php
$browser->with('iframe', function (Browser $iframe) {
    // Wait for the iframe's load event...
    $iframe->waitForEvent('load');
});
```

You may also provide a selector as the second argument to the `waitForEvent` method to attach the event listener to a specific element:

```php
$browser->waitForEvent('load', '.selector');
```

You may also wait for events on the `document` and `window` objects:

```php
// Wait until the document is scrolled...
$browser->waitForEvent('scroll', 'document');

// Wait a maximum of five seconds until the window is resized...
$browser->waitForEvent('resize', 'window', 5);
```

<a name="waiting-with-a-callback"></a>
#### Waiting With a Callback

Many of the "wait" methods in Dusk rely on the underlying `waitUsing` method. You may use this method directly to wait for a given closure to return `true`. The `waitUsing` method accepts the maximum number of seconds to wait, the interval at which the closure should be evaluated, the closure, and an optional failure message:

```php
$browser->waitUsing(10, 1, function () use ($something) {
    return $something->isReady();
}, "Something wasn't ready in time.");
```

<a name="scrolling-an-element-into-view"></a>
### Scrolling an Element Into View

Sometimes you may not be able to click on an element because it is outside of the viewable area of the browser. The `scrollIntoView` method will scroll the browser window until the element at the given selector is within the view:

```php
$browser->scrollIntoView('.selector')
    ->click('.selector');
```

<a name="available-assertions"></a>
## Available Assertions

Dusk provides a variety of assertions that you may make against your application. All of the available assertions are documented in the list below:

<style>
    .collection-method-list > p {
        columns: 10.8em 3; -moz-columns: 10.8em 3; -webkit-columns: 10.8em 3;
    }

    .collection-method-list a {
        display: block;
        overflow: hidden;
        text-overflow: ellipsis;
        white-space: nowrap;
    }
</style>

<div class="collection-method-list" markdown="1">

[assertTitle](#assert-title)
[assertTitleContains](#assert-title-contains)
[assertUrlIs](#assert-url-is)
[assertSchemeIs](#assert-scheme-is)
[assertSchemeIsNot](#assert-scheme-is-not)
[assertHostIs](#assert-host-is)
[assertHostIsNot](#assert-host-is-not)
[assertPortIs](#assert-port-is)
[assertPortIsNot](#assert-port-is-not)
[assertPathBeginsWith](#assert-path-begins-with)
[assertPathEndsWith](#assert-path-ends-with)
[assertPathContains](#assert-path-contains)
[assertPathIs](#assert-path-is)
[assertPathIsNot](#assert-path-is-not)
[assertRouteIs](#assert-route-is)
[assertQueryStringHas](#assert-query-string-has)
[assertQueryStringMissing](#assert-query-string-missing)
[assertFragmentIs](#assert-fragment-is)
[assertFragmentBeginsWith](#assert-fragment-begins-with)
[assertFragmentIsNot](#assert-fragment-is-not)
[assertHasCookie](#assert-has-cookie)
[assertHasPlainCookie](#assert-has-plain-cookie)
[assertCookieMissing](#assert-cookie-missing)
[assertPlainCookieMissing](#assert-plain-cookie-missing)
[assertCookieValue](#assert-cookie-value)
[assertPlainCookieValue](#assert-plain-cookie-value)
[assertSee](#assert-see)
[assertDontSee](#assert-dont-see)
[assertSeeIn](#assert-see-in)
[assertDontSeeIn](#assert-dont-see-in)
[assertSeeAnythingIn](#assert-see-anything-in)
[assertSeeNothingIn](#assert-see-nothing-in)
[assertCount](#assert-count)
[assertScript](#assert-script)
[assertSourceHas](#assert-source-has)
[assertSourceMissing](#assert-source-missing)
[assertSeeLink](#assert-see-link)
[assertDontSeeLink](#assert-dont-see-link)
[assertInputValue](#assert-input-value)
[assertInputValueIsNot](#assert-input-value-is-not)
[assertChecked](#assert-checked)
[assertNotChecked](#assert-not-checked)
[assertIndeterminate](#assert-indeterminate)
[assertRadioSelected](#assert-radio-selected)
[assertRadioNotSelected](#assert-radio-not-selected)
[assertSelected](#assert-selected)
[assertNotSelected](#assert-not-selected)
[assertSelectHasOptions](#assert-select-has-options)
[assertSelectMissingOptions](#assert-select-missing-options)
[assertSelectHasOption](#assert-select-has-option)
[assertSelectMissingOption](#assert-select-missing-option)
[assertValue](#assert-value)
[assertValueIsNot](#assert-value-is-not)
[assertAttribute](#assert-attribute)
[assertAttributeMissing](#assert-attribute-missing)
[assertAttributeContains](#assert-attribute-contains)
[assertAttributeDoesntContain](#assert-attribute-doesnt-contain)
[assertAriaAttribute](#assert-aria-attribute)
[assertDataAttribute](#assert-data-attribute)
[assertVisible](#assert-visible)
[assertPresent](#assert-present)
[assertNotPresent](#assert-not-present)
[assertMissing](#assert-missing)
[assertInputPresent](#assert-input-present)
[assertInputMissing](#assert-input-missing)
[assertDialogOpened](#assert-dialog-opened)
[assertEnabled](#assert-enabled)
[assertDisabled](#assert-disabled)
[assertButtonEnabled](#assert-button-enabled)
[assertButtonDisabled](#assert-button-disabled)
[assertFocused](#assert-focused)
[assertNotFocused](#assert-not-focused)
[assertAuthenticated](#assert-authenticated)
[assertGuest](#assert-guest)
[assertAuthenticatedAs](#assert-authenticated-as)
[assertVue](#assert-vue)
[assertVueIsNot](#assert-vue-is-not)
[assertVueContains](#assert-vue-contains)
[assertVueDoesntContain](#assert-vue-doesnt-contain)

</div>

<a name="assert-title"></a>
#### assertTitle

Assert that the page title matches the given text:

```php
$browser->assertTitle($title);
```

<a name="assert-title-contains"></a>
#### assertTitleContains

Assert that the page title contains the given text:

```php
$browser->assertTitleContains($title);
```

<a name="assert-url-is"></a>
#### assertUrlIs

Assert that the current URL (without the query string) matches the given string:

```php
$browser->assertUrlIs($url);
```

<a name="assert-scheme-is"></a>
#### assertSchemeIs

Assert that the current URL scheme matches the given scheme:

```php
$browser->assertSchemeIs($scheme);
```

<a name="assert-scheme-is-not"></a>
#### assertSchemeIsNot

Assert that the current URL scheme does not match the given scheme:

```php
$browser->assertSchemeIsNot($scheme);
```

<a name="assert-host-is"></a>
#### assertHostIs

Assert that the current URL host matches the given host:

```php
$browser->assertHostIs($host);
```

<a name="assert-host-is-not"></a>
#### assertHostIsNot

Assert that the current URL host does not match the given host:

```php
$browser->assertHostIsNot($host);
```

<a name="assert-port-is"></a>
#### assertPortIs

Assert that the current URL port matches the given port:

```php
$browser->assertPortIs($port);
```

<a name="assert-port-is-not"></a>
#### assertPortIsNot

Assert that the current URL port does not match the given port:

```php
$browser->assertPortIsNot($port);
```

<a name="assert-path-begins-with"></a>
#### assertPathBeginsWith

Assert that the current URL path begins with the given path:

```php
$browser->assertPathBeginsWith('/home');
```

<a name="assert-path-ends-with"></a>
#### assertPathEndsWith

Assert that the current URL path ends with the given path:

```php
$browser->assertPathEndsWith('/home');
```

<a name="assert-path-contains"></a>
#### assertPathContains

Assert that the current URL path contains the given path:

```php
$browser->assertPathContains('/home');
```

<a name="assert-path-is"></a>
#### assertPathIs

Assert that the current path matches the given path:

```php
$browser->assertPathIs('/home');
```

<a name="assert-path-is-not"></a>
#### assertPathIsNot

Assert that the current path does not match the given path:

```php
$browser->assertPathIsNot('/home');
```

<a name="assert-route-is"></a>
#### assertRouteIs

Assert that the current URL matches the given [named route's](/docs/{{version}}/routing#named-routes) URL:

```php
$browser->assertRouteIs($name, $parameters);
```

<a name="assert-query-string-has"></a>
#### assertQueryStringHas

Assert that the given query string parameter is present:

```php
$browser->assertQueryStringHas($name);
```

Assert that the given query string parameter is present and has a given value:

```php
$browser->assertQueryStringHas($name, $value);
```

<a name="assert-query-string-missing"></a>
#### assertQueryStringMissing

Assert that the given query string parameter is missing:

```php
$browser->assertQueryStringMissing($name);
```

<a name="assert-fragment-is"></a>
#### assertFragmentIs

Assert that the URL's current hash fragment matches the given fragment:

```php
$browser->assertFragmentIs('anchor');
```

<a name="assert-fragment-begins-with"></a>
#### assertFragmentBeginsWith

Assert that the URL's current hash fragment begins with the given fragment:

```php
$browser->assertFragmentBeginsWith('anchor');
```

<a name="assert-fragment-is-not"></a>
#### assertFragmentIsNot

Assert that the URL's current hash fragment does not match the given fragment:

```php
$browser->assertFragmentIsNot('anchor');
```

<a name="assert-has-cookie"></a>
#### assertHasCookie

Assert that the given encrypted cookie is present:

```php
$browser->assertHasCookie($name);
```

<a name="assert-has-plain-cookie"></a>
#### assertHasPlainCookie

Assert that the given unencrypted cookie is present:

```php
$browser->assertHasPlainCookie($name);
```

<a name="assert-cookie-missing"></a>
#### assertCookieMissing

Assert that the given encrypted cookie is not present:

```php
$browser->assertCookieMissing($name);
```

<a name="assert-plain-cookie-missing"></a>
#### assertPlainCookieMissing

Assert that the given unencrypted cookie is not present:

```php
$browser->assertPlainCookieMissing($name);
```

<a name="assert-cookie-value"></a>
#### assertCookieValue

Assert that an encrypted cookie has a given value:

```php
$browser->assertCookieValue($name, $value);
```

<a name="assert-plain-cookie-value"></a>
#### assertPlainCookieValue

Assert that an unencrypted cookie has a given value:

```php
$browser->assertPlainCookieValue($name, $value);
```

<a name="assert-see"></a>
#### assertSee

Assert that the given text is present on the page:

```php
$browser->assertSee($text);
```

<a name="assert-dont-see"></a>
#### assertDontSee

Assert that the given text is not present on the page:

```php
$browser->assertDontSee($text);
```

<a name="assert-see-in"></a>
#### assertSeeIn

Assert that the given text is present within the selector:

```php
$browser->assertSeeIn($selector, $text);
```

<a name="assert-dont-see-in"></a>
#### assertDontSeeIn

Assert that the given text is not present within the selector:

```php
$browser->assertDontSeeIn($selector, $text);
```

<a name="assert-see-anything-in"></a>
#### assertSeeAnythingIn

Assert that any text is present within the selector:

```php
$browser->assertSeeAnythingIn($selector);
```

<a name="assert-see-nothing-in"></a>
#### assertSeeNothingIn

Assert that no text is present within the selector:

```php
$browser->assertSeeNothingIn($selector);
```

<a name="assert-count"></a>
#### assertCount

Assert that elements matching the given selector appear the specified number of times:

```php
$browser->assertCount($selector, $count);
```

<a name="assert-script"></a>
#### assertScript

Assert that the given JavaScript expression evaluates to the given value:

```php
$browser->assertScript('window.isLoaded')
    ->assertScript('document.readyState', 'complete');
```

<a name="assert-source-has"></a>
#### assertSourceHas

Assert that the given source code is present on the page:

```php
$browser->assertSourceHas($code);
```

<a name="assert-source-missing"></a>
#### assertSourceMissing

Assert that the given source code is not present on the page:

```php
$browser->assertSourceMissing($code);
```

<a name="assert-see-link"></a>
#### assertSeeLink

Assert that the given link is present on the page:

```php
$browser->assertSeeLink($linkText);
```

<a name="assert-dont-see-link"></a>
#### assertDontSeeLink

Assert that the given link is not present on the page:

```php
$browser->assertDontSeeLink($linkText);
```

<a name="assert-input-value"></a>
#### assertInputValue

Assert that the given input field has the given value:

```php
$browser->assertInputValue($field, $value);
```

<a name="assert-input-value-is-not"></a>
#### assertInputValueIsNot

Assert that the given input field does not have the given value:

```php
$browser->assertInputValueIsNot($field, $value);
```

<a name="assert-checked"></a>
#### assertChecked

Assert that the given checkbox is checked:

```php
$browser->assertChecked($field);
```

<a name="assert-not-checked"></a>
#### assertNotChecked

Assert that the given checkbox is not checked:

```php
$browser->assertNotChecked($field);
```

<a name="assert-indeterminate"></a>
#### assertIndeterminate

Assert that the given checkbox is in an indeterminate state:

```php
$browser->assertIndeterminate($field);
```

<a name="assert-radio-selected"></a>
#### assertRadioSelected

Assert that the given radio field is selected:

```php
$browser->assertRadioSelected($field, $value);
```

<a name="assert-radio-not-selected"></a>
#### assertRadioNotSelected

Assert that the given radio field is not selected:

```php
$browser->assertRadioNotSelected($field, $value);
```

<a name="assert-selected"></a>
#### assertSelected

Assert that the given dropdown has the given value selected:

```php
$browser->assertSelected($field, $value);
```

<a name="assert-not-selected"></a>
#### assertNotSelected

Assert that the given dropdown does not have the given value selected:

```php
$browser->assertNotSelected($field, $value);
```

<a name="assert-select-has-options"></a>
#### assertSelectHasOptions

Assert that the given array of values are available to be selected:

```php
$browser->assertSelectHasOptions($field, $values);
```

<a name="assert-select-missing-options"></a>
#### assertSelectMissingOptions

Assert that the given array of values are not available to be selected:

```php
$browser->assertSelectMissingOptions($field, $values);
```

<a name="assert-select-has-option"></a>
#### assertSelectHasOption

Assert that the given value is available to be selected on the given field:

```php
$browser->assertSelectHasOption($field, $value);
```

<a name="assert-select-missing-option"></a>
#### assertSelectMissingOption

Assert that the given value is not available to be selected:

```php
$browser->assertSelectMissingOption($field, $value);
```

<a name="assert-value"></a>
#### assertValue

Assert that the element matching the given selector has the given value:

```php
$browser->assertValue($selector, $value);
```

<a name="assert-value-is-not"></a>
#### assertValueIsNot

Assert that the element matching the given selector does not have the given value:

```php
$browser->assertValueIsNot($selector, $value);
```

<a name="assert-attribute"></a>
#### assertAttribute

Assert that the element matching the given selector has the given value in the provided attribute:

```php
$browser->assertAttribute($selector, $attribute, $value);
```

<a name="assert-attribute-missing"></a>
#### assertAttributeMissing

Assert that the element matching the given selector is missing the provided attribute:

```php
$browser->assertAttributeMissing($selector, $attribute);
```

<a name="assert-attribute-contains"></a>
#### assertAttributeContains

Assert that the element matching the given selector contains the given value in the provided attribute:

```php
$browser->assertAttributeContains($selector, $attribute, $value);
```

<a name="assert-attribute-doesnt-contain"></a>
#### assertAttributeDoesntContain

Assert that the element matching the given selector does not contain the given value in the provided attribute:

```php
$browser->assertAttributeDoesntContain($selector, $attribute, $value);
```

<a name="assert-aria-attribute"></a>
#### assertAriaAttribute

Assert that the element matching the given selector has the given value in the provided aria attribute:

```php
$browser->assertAriaAttribute($selector, $attribute, $value);
```

For example, given the markup `<button aria-label="Add"></button>`, you may assert against the `aria-label` attribute like so:

```php
$browser->assertAriaAttribute('button', 'label', 'Add')
```

<a name="assert-data-attribute"></a>
#### assertDataAttribute

Assert that the element matching the given selector has the given value in the provided data attribute:

```php
$browser->assertDataAttribute($selector, $attribute, $value);
```

For example, given the markup `<tr id="row-1" data-content="attendees"></tr>`, you may assert against the `data-content` attribute like so:

```php
$browser->assertDataAttribute('#row-1', 'content', 'attendees')
```

<a name="assert-visible"></a>
#### assertVisible

Assert that the element matching the given selector is visible:

```php
$browser->assertVisible($selector);
```

<a name="assert-present"></a>
#### assertPresent

Assert that the element matching the given selector is present in the source:

```php
$browser->assertPresent($selector);
```

<a name="assert-not-present"></a>
#### assertNotPresent

Assert that the element matching the given selector is not present in the source:

```php
$browser->assertNotPresent($selector);
```

<a name="assert-missing"></a>
#### assertMissing

Assert that the element matching the given selector is not visible:

```php
$browser->assertMissing($selector);
```

<a name="assert-input-present"></a>
#### assertInputPresent

Assert that an input with the given name is present:

```php
$browser->assertInputPresent($name);
```

<a name="assert-input-missing"></a>
#### assertInputMissing

Assert that an input with the given name is not present in the source:

```php
$browser->assertInputMissing($name);
```

<a name="assert-dialog-opened"></a>
#### assertDialogOpened

Assert that a JavaScript dialog with the given message has been opened:

```php
$browser->assertDialogOpened($message);
```

<a name="assert-enabled"></a>
#### assertEnabled

Assert that the given field is enabled:

```php
$browser->assertEnabled($field);
```

<a name="assert-disabled"></a>
#### assertDisabled

Assert that the given field is disabled:

```php
$browser->assertDisabled($field);
```

<a name="assert-button-enabled"></a>
#### assertButtonEnabled

Assert that the given button is enabled:

```php
$browser->assertButtonEnabled($button);
```

<a name="assert-button-disabled"></a>
#### assertButtonDisabled

Assert that the given button is disabled:

```php
$browser->assertButtonDisabled($button);
```

<a name="assert-focused"></a>
#### assertFocused

Assert that the given field is focused:

```php
$browser->assertFocused($field);
```

<a name="assert-not-focused"></a>
#### assertNotFocused

Assert that the given field is not focused:

```php
$browser->assertNotFocused($field);
```

<a name="assert-authenticated"></a>
#### assertAuthenticated

Assert that the user is authenticated:

```php
$browser->assertAuthenticated();
```

<a name="assert-guest"></a>
#### assertGuest

Assert that the user is not authenticated:

```php
$browser->assertGuest();
```

<a name="assert-authenticated-as"></a>
#### assertAuthenticatedAs

Assert that the user is authenticated as the given user:

```php
$browser->assertAuthenticatedAs($user);
```

<a name="assert-vue"></a>
#### assertVue

Dusk even allows you to make assertions on the state of [Vue component](https://vuejs.org) data. For example, imagine your application contains the following Vue component:

    // HTML...

    <profile dusk="profile-component"></profile>

    // Component Definition...

    Vue.component('profile', {
        template: '<div>{{ user.name }}</div>',

        data: function () {
            return {
                user: {
                    name: 'Taylor'
                }
            };
        }
    });

You may assert on the state of the Vue component like so:

```php tab=Pest
test('vue', function () {
    $this->browse(function (Browser $browser) {
        $browser->visit('/')
            ->assertVue('user.name', 'Taylor', '@profile-component');
    });
});
```

```php tab=PHPUnit
/**
 * A basic Vue test example.
 */
public function test_vue(): void
{
    $this->browse(function (Browser $browser) {
        $browser->visit('/')
            ->assertVue('user.name', 'Taylor', '@profile-component');
    });
}
```

<a name="assert-vue-is-not"></a>
#### assertVueIsNot

Assert that a given Vue component data property does not match the given value:

```php
$browser->assertVueIsNot($property, $value, $componentSelector = null);
```

<a name="assert-vue-contains"></a>
#### assertVueContains

Assert that a given Vue component data property is an array and contains the given value:

```php
$browser->assertVueContains($property, $value, $componentSelector = null);
```

<a name="assert-vue-doesnt-contain"></a>
#### assertVueDoesntContain

Assert that a given Vue component data property is an array and does not contain the given value:

```php
$browser->assertVueDoesntContain($property, $value, $componentSelector = null);
```

<a name="pages"></a>
## Pages

Sometimes, tests require several complicated actions to be performed in sequence. This can make your tests harder to read and understand. Dusk Pages allow you to define expressive actions that may then be performed on a given page via a single method. Pages also allow you to define short-cuts to common selectors for your application or for a single page.

<a name="generating-pages"></a>
### Generating Pages

To generate a page object, execute the `dusk:page` Artisan command. All page objects will be placed in your application's `tests/Browser/Pages` directory:

```shell
php artisan dusk:page Login
```

<a name="configuring-pages"></a>
### Configuring Pages

By default, pages have three methods: `url`, `assert`, and `elements`. We will discuss the `url` and `assert` methods now. The `elements` method will be [discussed in more detail below](#shorthand-selectors).

<a name="the-url-method"></a>
#### The `url` Method

The `url` method should return the path of the URL that represents the page. Dusk will use this URL when navigating to the page in the browser:

```php
/**
 * Get the URL for the page.
 */
public function url(): string
{
    return '/login';
}
```

<a name="the-assert-method"></a>
#### The `assert` Method

The `assert` method may make any assertions necessary to verify that the browser is actually on the given page. It is not actually necessary to place anything within this method; however, you are free to make these assertions if you wish. These assertions will be run automatically when navigating to the page:

```php
/**
 * Assert that the browser is on the page.
 */
public function assert(Browser $browser): void
{
    $browser->assertPathIs($this->url());
}
```

<a name="navigating-to-pages"></a>
### Navigating to Pages

Once a page has been defined, you may navigate to it using the `visit` method:

```php
use Tests\Browser\Pages\Login;

$browser->visit(new Login);
```

Sometimes you may already be on a given page and need to "load" the page's selectors and methods into the current test context. This is common when pressing a button and being redirected to a given page without explicitly navigating to it. In this situation, you may use the `on` method to load the page:

```php
use Tests\Browser\Pages\CreatePlaylist;

$browser->visit('/dashboard')
    ->clickLink('Create Playlist')
    ->on(new CreatePlaylist)
    ->assertSee('@create');
```

<a name="shorthand-selectors"></a>
### Shorthand Selectors

The `elements` method within page classes allows you to define quick, easy-to-remember shortcuts for any CSS selector on your page. For example, let's define a shortcut for the "email" input field of the application's login page:

```php
/**
 * Get the element shortcuts for the page.
 *
 * @return array<string, string>
 */
public function elements(): array
{
    return [
        '@email' => 'input[name=email]',
    ];
}
```

Once the shortcut has been defined, you may use the shorthand selector anywhere you would typically use a full CSS selector:

```php
$browser->type('@email', 'taylor@laravel.com');
```

<a name="global-shorthand-selectors"></a>
#### Global Shorthand Selectors

After installing Dusk, a base `Page` class will be placed in your `tests/Browser/Pages` directory. This class contains a `siteElements` method which may be used to define global shorthand selectors that should be available on every page throughout your application:

```php
/**
 * Get the global element shortcuts for the site.
 *
 * @return array<string, string>
 */
public static function siteElements(): array
{
    return [
        '@element' => '#selector',
    ];
}
```

<a name="page-methods"></a>
### Page Methods

In addition to the default methods defined on pages, you may define additional methods which may be used throughout your tests. For example, let's imagine we are building a music management application. A common action for one page of the application might be to create a playlist. Instead of re-writing the logic to create a playlist in each test, you may define a `createPlaylist` method on a page class:

```php
<?php

namespace Tests\Browser\Pages;

use Laravel\Dusk\Browser;
use Laravel\Dusk\Page;

class Dashboard extends Page
{
    // Other page methods...

    /**
     * Create a new playlist.
     */
    public function createPlaylist(Browser $browser, string $name): void
    {
        $browser->type('name', $name)
            ->check('share')
            ->press('Create Playlist');
    }
}
```

Once the method has been defined, you may use it within any test that utilizes the page. The browser instance will automatically be passed as the first argument to custom page methods:

```php
use Tests\Browser\Pages\Dashboard;

$browser->visit(new Dashboard)
    ->createPlaylist('My Playlist')
    ->assertSee('My Playlist');
```

<a name="components"></a>
## Components

Components are similar to Dusk's "page objects", but are intended for pieces of UI and functionality that are re-used throughout your application, such as a navigation bar or notification window. As such, components are not bound to specific URLs.

<a name="generating-components"></a>
### Generating Components

To generate a component, execute the `dusk:component` Artisan command. New components are placed in the `tests/Browser/Components` directory:

```shell
php artisan dusk:component DatePicker
```

As shown above, a "date picker" is an example of a component that might exist throughout your application on a variety of pages. It can become cumbersome to manually write the browser automation logic to select a date in dozens of tests throughout your test suite. Instead, we can define a Dusk component to represent the date picker, allowing us to encapsulate that logic within the component:

```php
<?php

namespace Tests\Browser\Components;

use Laravel\Dusk\Browser;
use Laravel\Dusk\Component as BaseComponent;

class DatePicker extends BaseComponent
{
    /**
     * Get the root selector for the component.
     */
    public function selector(): string
    {
        return '.date-picker';
    }

    /**
     * Assert that the browser page contains the component.
     */
    public function assert(Browser $browser): void
    {
        $browser->assertVisible($this->selector());
    }

    /**
     * Get the element shortcuts for the component.
     *
     * @return array<string, string>
     */
    public function elements(): array
    {
        return [
            '@date-field' => 'input.datepicker-input',
            '@year-list' => 'div > div.datepicker-years',
            '@month-list' => 'div > div.datepicker-months',
            '@day-list' => 'div > div.datepicker-days',
        ];
    }

    /**
     * Select the given date.
     */
    public function selectDate(Browser $browser, int $year, int $month, int $day): void
    {
        $browser->click('@date-field')
            ->within('@year-list', function (Browser $browser) use ($year) {
                $browser->click($year);
            })
            ->within('@month-list', function (Browser $browser) use ($month) {
                $browser->click($month);
            })
            ->within('@day-list', function (Browser $browser) use ($day) {
                $browser->click($day);
            });
    }
}
```

<a name="using-components"></a>
### Using Components

Once the component has been defined, we can easily select a date within the date picker from any test. And, if the logic necessary to select a date changes, we only need to update the component:

```php tab=Pest
<?php

use Illuminate\Foundation\Testing\DatabaseMigrations;
use Tests\Browser\Components\DatePicker;

pest()->use(DatabaseMigrations::class);

test('basic example', function () {
    $this->browse(function (Browser $browser) {
        $browser->visit('/')
            ->within(new DatePicker, function (Browser $browser) {
                $browser->selectDate(2019, 1, 30);
            })
            ->assertSee('January');
    });
});
```

```php tab=PHPUnit
<?php

namespace Tests\Browser;

use Illuminate\Foundation\Testing\DatabaseMigrations;
use Laravel\Dusk\Browser;
use Tests\Browser\Components\DatePicker;
use Tests\DuskTestCase;

class ExampleTest extends DuskTestCase
{
    /**
     * A basic component test example.
     */
    public function test_basic_example(): void
    {
        $this->browse(function (Browser $browser) {
            $browser->visit('/')
                ->within(new DatePicker, function (Browser $browser) {
                    $browser->selectDate(2019, 1, 30);
                })
                ->assertSee('January');
        });
    }
}
```

The `component` method may be used to retrieve a browser instance scoped to the given component:

```php
$datePicker = $browser->component(new DatePickerComponent);

$datePicker->selectDate(2019, 1, 30);

$datePicker->assertSee('January');
```

<a name="continuous-integration"></a>
## Continuous Integration

> [!WARNING]
> Most Dusk continuous integration configurations expect your Laravel application to be served using the built-in PHP development server on port 8000. Therefore, before continuing, you should ensure that your continuous integration environment has an `APP_URL` environment variable value of `http://127.0.0.1:8000`.

<a name="running-tests-on-heroku-ci"></a>
### Heroku CI

To run Dusk tests on [Heroku CI](https://www.heroku.com/continuous-integration), add the following Google Chrome buildpack and scripts to your Heroku `app.json` file:

```json
{
  "environments": {
    "test": {
      "buildpacks": [
        { "url": "heroku/php" },
        { "url": "https://github.com/heroku/heroku-buildpack-chrome-for-testing" }
      ],
      "scripts": {
        "test-setup": "cp .env.testing .env",
        "test": "nohup bash -c './vendor/laravel/dusk/bin/chromedriver-linux --port=9515 > /dev/null 2>&1 &' && nohup bash -c 'php artisan serve --no-reload > /dev/null 2>&1 &' && php artisan dusk"
      }
    }
  }
}
```

<a name="running-tests-on-travis-ci"></a>
### Travis CI

To run your Dusk tests on [Travis CI](https://travis-ci.org), use the following `.travis.yml` configuration. Since Travis CI is not a graphical environment, we will need to take some extra steps in order to launch a Chrome browser. In addition, we will use `php artisan serve` to launch PHP's built-in web server:

```yaml
language: php

php:
  - 8.2

addons:
  chrome: stable

install:
  - cp .env.testing .env
  - travis_retry composer install --no-interaction --prefer-dist
  - php artisan key:generate
  - php artisan dusk:chrome-driver

before_script:
  - google-chrome-stable --headless --disable-gpu --remote-debugging-port=9222 http://localhost &
  - php artisan serve --no-reload &

script:
  - php artisan dusk
```

<a name="running-tests-on-github-actions"></a>
### GitHub Actions

If you are using [GitHub Actions](https://github.com/features/actions) to run your Dusk tests, you may use the following configuration file as a starting point. Like TravisCI, we will use the `php artisan serve` command to launch PHP's built-in web server:

```yaml
name: CI
on: [push]
jobs:

  dusk-php:
    runs-on: ubuntu-latest
    env:
      APP_URL: "http://127.0.0.1:8000"
      DB_USERNAME: root
      DB_PASSWORD: root
      MAIL_MAILER: log
    steps:
      - uses: actions/checkout@v5
      - name: Prepare The Environment
        run: cp .env.example .env
      - name: Create Database
        run: |
          sudo systemctl start mysql
          mysql --user="root" --password="root" -e "CREATE DATABASE \`my-database\` character set UTF8mb4 collate utf8mb4_bin;"
      - name: Install Composer Dependencies
        run: composer install --no-progress --prefer-dist --optimize-autoloader
      - name: Generate Application Key
        run: php artisan key:generate
      - name: Upgrade Chrome Driver
        run: php artisan dusk:chrome-driver --detect
      - name: Start Chrome Driver
        run: ./vendor/laravel/dusk/bin/chromedriver-linux --port=9515 &
      - name: Run Laravel Server
        run: php artisan serve --no-reload &
      - name: Run Dusk Tests
        run: php artisan dusk
      - name: Upload Screenshots
        if: failure()
        uses: actions/upload-artifact@v4
        with:
          name: screenshots
          path: tests/Browser/screenshots
      - name: Upload Console Logs
        if: failure()
        uses: actions/upload-artifact@v4
        with:
          name: console
          path: tests/Browser/console
```

<a name="running-tests-on-chipper-ci"></a>
### Chipper CI

If you are using [Chipper CI](https://chipperci.com) to run your Dusk tests, you may use the following configuration file as a starting point. We will use PHP's built-in server to run Laravel so we can listen for requests:

```yaml
# file .chipperci.yml
version: 1

environment:
  php: 8.2
  node: 16

# Include Chrome in the build environment
services:
  - dusk

# Build all commits
on:
   push:
      branches: .*

pipeline:
  - name: Setup
    cmd: |
      cp -v .env.example .env
      composer install --no-interaction --prefer-dist --optimize-autoloader
      php artisan key:generate

      # Create a dusk env file, ensuring APP_URL uses BUILD_HOST
      cp -v .env .env.dusk.ci
      sed -i "s@APP_URL=.*@APP_URL=http://$BUILD_HOST:8000@g" .env.dusk.ci

  - name: Compile Assets
    cmd: |
      npm ci --no-audit
      npm run build

  - name: Browser Tests
    cmd: |
      php -S [::0]:8000 -t public 2>server.log &
      sleep 2
      php artisan dusk:chrome-driver $CHROME_DRIVER
      php artisan dusk --env=ci
```

To learn more about running Dusk tests on Chipper CI, including how to use databases, consult the [official Chipper CI documentation](https://chipperci.com/docs/testing/laravel-dusk-new/).


---

# Eloquent: Collections

*Sección: Laravel | Origen: https://laravel.com/docs/13.x/eloquent-collections*

- [Introduction](#introduction)
- [Available Methods](#available-methods)
- [Custom Collections](#custom-collections)

<a name="introduction"></a>
## Introduction

All Eloquent methods that return more than one model result will return instances of the `Illuminate\Database\Eloquent\Collection` class, including results retrieved via the `get` method or accessed via a relationship. The Eloquent collection object extends Laravel's [base collection](/docs/{{version}}/collections), so it naturally inherits dozens of methods used to fluently work with the underlying array of Eloquent models. Be sure to review the Laravel collection documentation to learn all about these helpful methods!

All collections also serve as iterators, allowing you to loop over them as if they were simple PHP arrays:

```php
use App\Models\User;

$users = User::where('active', 1)->get();

foreach ($users as $user) {
    echo $user->name;
}
```

However, as previously mentioned, collections are much more powerful than arrays and expose a variety of map / reduce operations that may be chained using an intuitive interface. For example, we may remove all inactive models and then gather the first name for each remaining user:

```php
$names = User::all()->reject(function (User $user) {
    return $user->active === false;
})->map(function (User $user) {
    return $user->name;
});
```

<a name="eloquent-collection-conversion"></a>
#### Eloquent Collection Conversion

While most Eloquent collection methods return a new instance of an Eloquent collection, the `collapse`, `flatten`, `flip`, `keys`, `pluck`, and `zip` methods return a [base collection](/docs/{{version}}/collections) instance. Likewise, if a `map` operation returns a collection that does not contain any Eloquent models, it will be converted to a base collection instance.

<a name="available-methods"></a>
## Available Methods

All Eloquent collections extend the base [Laravel collection](/docs/{{version}}/collections#available-methods) object; therefore, they inherit all of the powerful methods provided by the base collection class.

In addition, the `Illuminate\Database\Eloquent\Collection` class provides a superset of methods to aid with managing your model collections. Most methods return `Illuminate\Database\Eloquent\Collection` instances; however, some methods, like `modelKeys`, return an `Illuminate\Support\Collection` instance.

<style>
    .collection-method-list > p {
        columns: 14.4em 1; -moz-columns: 14.4em 1; -webkit-columns: 14.4em 1;
    }

    .collection-method-list a {
        display: block;
        overflow: hidden;
        text-overflow: ellipsis;
        white-space: nowrap;
    }

    .collection-method code {
        font-size: 14px;
    }

    .collection-method:not(.first-collection-method) {
        margin-top: 50px;
    }
</style>

<div class="collection-method-list" markdown="1">

[append](#method-append)
[contains](#method-contains)
[diff](#method-diff)
[except](#method-except)
[find](#method-find)
[findOrFail](#method-find-or-fail)
[fresh](#method-fresh)
[intersect](#method-intersect)
[load](#method-load)
[loadMissing](#method-loadMissing)
[modelKeys](#method-modelKeys)
[makeVisible](#method-makeVisible)
[makeHidden](#method-makeHidden)
[mergeVisible](#method-mergeVisible)
[mergeHidden](#method-mergeHidden)
[only](#method-only)
[partition](#method-partition)
[setAppends](#method-setAppends)
[setVisible](#method-setVisible)
[setHidden](#method-setHidden)
[toQuery](#method-toquery)
[unique](#method-unique)
[withoutAppends](#method-withoutAppends)

</div>

<a name="method-append"></a>
#### `append($attributes)` {.collection-method .first-collection-method}

The `append` method may be used to indicate that an attribute should be [appended](/docs/{{version}}/eloquent-serialization#appending-values-to-json) for every model in the collection. This method accepts an array of attributes or a single attribute:

```php
$users->append('team');

$users->append(['team', 'is_admin']);
```

<a name="method-contains"></a>
#### `contains($key, $operator = null, $value = null)` {.collection-method}

The `contains` method may be used to determine if a given model instance is contained by the collection. This method accepts a primary key or a model instance:

```php
$users->contains(1);

$users->contains(User::find(1));
```

<a name="method-diff"></a>
#### `diff($items)` {.collection-method}

The `diff` method returns all of the models that are not present in the given collection:

```php
use App\Models\User;

$users = $users->diff(User::whereIn('id', [1, 2, 3])->get());
```

<a name="method-except"></a>
#### `except($keys)` {.collection-method}

The `except` method returns all of the models that do not have the given primary keys:

```php
$users = $users->except([1, 2, 3]);
```

<a name="method-find"></a>
#### `find($key)` {.collection-method}

The `find` method returns the model that has a primary key matching the given key. If `$key` is a model instance, `find` will attempt to return a model matching the primary key. If `$key` is an array of keys, `find` will return all models which have a primary key in the given array:

```php
$users = User::all();

$user = $users->find(1);
```

<a name="method-find-or-fail"></a>
#### `findOrFail($key)` {.collection-method}

The `findOrFail` method returns the model that has a primary key matching the given key or throws an `Illuminate\Database\Eloquent\ModelNotFoundException` exception if no matching model can be found in the collection:

```php
$users = User::all();

$user = $users->findOrFail(1);
```

<a name="method-fresh"></a>
#### `fresh($with = [])` {.collection-method}

The `fresh` method retrieves a fresh instance of each model in the collection from the database. In addition, any specified relationships will be eager loaded:

```php
$users = $users->fresh();

$users = $users->fresh('comments');
```

<a name="method-intersect"></a>
#### `intersect($items)` {.collection-method}

The `intersect` method returns all of the models that are also present in the given collection:

```php
use App\Models\User;

$users = $users->intersect(User::whereIn('id', [1, 2, 3])->get());
```

<a name="method-load"></a>
#### `load($relations)` {.collection-method}

The `load` method eager loads the given relationships for all models in the collection:

```php
$users->load(['comments', 'posts']);

$users->load('comments.author');

$users->load(['comments', 'posts' => fn ($query) => $query->where('active', 1)]);
```

<a name="method-loadMissing"></a>
#### `loadMissing($relations)` {.collection-method}

The `loadMissing` method eager loads the given relationships for all models in the collection if the relationships are not already loaded:

```php
$users->loadMissing(['comments', 'posts']);

$users->loadMissing('comments.author');

$users->loadMissing(['comments', 'posts' => fn ($query) => $query->where('active', 1)]);
```

<a name="method-modelKeys"></a>
#### `modelKeys()` {.collection-method}

The `modelKeys` method returns the primary keys for all models in the collection:

```php
$users->modelKeys();

// [1, 2, 3, 4, 5]
```

<a name="method-makeVisible"></a>
#### `makeVisible($attributes)` {.collection-method}

The `makeVisible` method [makes attributes visible](/docs/{{version}}/eloquent-serialization#hiding-attributes-from-json) that are typically "hidden" on each model in the collection:

```php
$users = $users->makeVisible(['address', 'phone_number']);
```

<a name="method-makeHidden"></a>
#### `makeHidden($attributes)` {.collection-method}

The `makeHidden` method [hides attributes](/docs/{{version}}/eloquent-serialization#hiding-attributes-from-json) that are typically "visible" on each model in the collection:

```php
$users = $users->makeHidden(['address', 'phone_number']);
```

<a name="method-mergeVisible"></a>
#### `mergeVisible($attributes)` {.collection-method}

The `mergeVisible` method [makes additional attributes visible](/docs/{{version}}/eloquent-serialization#hiding-attributes-from-json) while retaining existing visible attributes:

```php
$users = $users->mergeVisible(['middle_name']);
```

<a name="method-mergeHidden"></a>
#### `mergeHidden($attributes)` {.collection-method}

The `mergeHidden` method [hides additional attributes](/docs/{{version}}/eloquent-serialization#hiding-attributes-from-json) while retaining existing hidden attributes:

```php
$users = $users->mergeHidden(['last_login_at']);
```

<a name="method-only"></a>
#### `only($keys)` {.collection-method}

The `only` method returns all of the models that have the given primary keys:

```php
$users = $users->only([1, 2, 3]);
```

<a name="method-partition"></a>
#### `partition` {.collection-method}

The `partition` method returns an instance of `Illuminate\Support\Collection` containing `Illuminate\Database\Eloquent\Collection` collection instances:

```php
$partition = $users->partition(fn ($user) => $user->age > 18);

dump($partition::class);    // Illuminate\Support\Collection
dump($partition[0]::class); // Illuminate\Database\Eloquent\Collection
dump($partition[1]::class); // Illuminate\Database\Eloquent\Collection
```

<a name="method-setAppends"></a>
#### `setAppends($attributes)` {.collection-method}

The `setAppends` method temporarily overrides all of the [appended attributes](/docs/{{version}}/eloquent-serialization#appending-values-to-json) on each model in the collection:

```php
$users = $users->setAppends(['is_admin']);
```

<a name="method-setVisible"></a>
#### `setVisible($attributes)` {.collection-method}

The `setVisible` method [temporarily overrides](/docs/{{version}}/eloquent-serialization#temporarily-modifying-attribute-visibility) all of the visible attributes on each model in the collection:

```php
$users = $users->setVisible(['id', 'name']);
```

<a name="method-setHidden"></a>
#### `setHidden($attributes)` {.collection-method}

The `setHidden` method [temporarily overrides](/docs/{{version}}/eloquent-serialization#temporarily-modifying-attribute-visibility) all of the hidden attributes on each model in the collection:

```php
$users = $users->setHidden(['email', 'password', 'remember_token']);
```

<a name="method-toquery"></a>
#### `toQuery()` {.collection-method}

The `toQuery` method returns an Eloquent query builder instance containing a `whereIn` constraint on the collection model's primary keys:

```php
use App\Models\User;

$users = User::where('status', 'VIP')->get();

$users->toQuery()->update([
    'status' => 'Administrator',
]);
```

<a name="method-unique"></a>
#### `unique($key = null, $strict = false)` {.collection-method}

The `unique` method returns all of the unique models in the collection. Any models with the same primary key as another model in the collection are removed:

```php
$users = $users->unique();
```

<a name="method-withoutAppends"></a>
#### `withoutAppends()` {.collection-method}

The `withoutAppends` method temporarily removes all of the [appended attributes](/docs/{{version}}/eloquent-serialization#appending-values-to-json) on each model in the collection:

```php
$users = $users->withoutAppends();
```

<a name="custom-collections"></a>
## Custom Collections

If you would like to use a custom `Collection` object when interacting with a given model, you may add the `CollectedBy` attribute to your model:

```php
<?php

namespace App\Models;

use App\Support\UserCollection;
use Illuminate\Database\Eloquent\Attributes\CollectedBy;
use Illuminate\Database\Eloquent\Model;

#[CollectedBy(UserCollection::class)]
class User extends Model
{
    // ...
}
```

Alternatively, you may define a `newCollection` method on your model:

```php
<?php

namespace App\Models;

use App\Support\UserCollection;
use Illuminate\Database\Eloquent\Collection;
use Illuminate\Database\Eloquent\Model;

class User extends Model
{
    /**
     * Create a new Eloquent Collection instance.
     *
     * @param  array<int, \Illuminate\Database\Eloquent\Model>  $models
     * @return \Illuminate\Database\Eloquent\Collection<int, \Illuminate\Database\Eloquent\Model>
     */
    public function newCollection(array $models = []): Collection
    {
        $collection = new UserCollection($models);

        if (Model::isAutomaticallyEagerLoadingRelationships()) {
            $collection->withRelationshipAutoloading();
        }

        return $collection;
    }
}
```

Once you have defined a `newCollection` method or added the `CollectedBy` attribute to your model, you will receive an instance of your custom collection anytime Eloquent would normally return an `Illuminate\Database\Eloquent\Collection` instance.

If you would like to use a custom collection for every model in your application, you should define the `newCollection` method on a base model class that is extended by all of your application's models.


---

# Eloquent: Factories

*Sección: Laravel | Origen: https://laravel.com/docs/13.x/eloquent-factories*

- [Introduction](#introduction)
- [Defining Model Factories](#defining-model-factories)
    - [Generating Factories](#generating-factories)
    - [Factory States](#factory-states)
    - [Factory Callbacks](#factory-callbacks)
- [Creating Models Using Factories](#creating-models-using-factories)
    - [Instantiating Models](#instantiating-models)
    - [Persisting Models](#persisting-models)
    - [Sequences](#sequences)
- [Factory Relationships](#factory-relationships)
    - [Has Many Relationships](#has-many-relationships)
    - [Belongs To Relationships](#belongs-to-relationships)
    - [Many to Many Relationships](#many-to-many-relationships)
    - [Polymorphic Relationships](#polymorphic-relationships)
    - [Defining Relationships Within Factories](#defining-relationships-within-factories)
    - [Recycling an Existing Model for Relationships](#recycling-an-existing-model-for-relationships)

<a name="introduction"></a>
## Introduction

When testing your application or seeding your database, you may need to insert a few records into your database. Instead of manually specifying the value of each column, Laravel allows you to define a set of default attributes for each of your [Eloquent models](/docs/{{version}}/eloquent) using model factories.

To see an example of how to write a factory, take a look at the `database/factories/UserFactory.php` file in your application. This factory is included with all new Laravel applications and contains the following factory definition:

```php
namespace Database\Factories;

use Illuminate\Database\Eloquent\Factories\Factory;
use Illuminate\Support\Facades\Hash;
use Illuminate\Support\Str;

/**
 * @extends \Illuminate\Database\Eloquent\Factories\Factory<\App\Models\User>
 */
class UserFactory extends Factory
{
    /**
     * The current password being used by the factory.
     */
    protected static ?string $password;

    /**
     * Define the model's default state.
     *
     * @return array<string, mixed>
     */
    public function definition(): array
    {
        return [
            'name' => fake()->name(),
            'email' => fake()->unique()->safeEmail(),
            'email_verified_at' => now(),
            'password' => static::$password ??= Hash::make('password'),
            'remember_token' => Str::random(10),
        ];
    }

    /**
     * Indicate that the model's email address should be unverified.
     */
    public function unverified(): static
    {
        return $this->state(fn (array $attributes) => [
            'email_verified_at' => null,
        ]);
    }
}
```

As you can see, in their most basic form, factories are classes that extend Laravel's base factory class and define a `definition` method. The `definition` method returns the default set of attribute values that should be applied when creating a model using the factory.

Via the `fake` helper, factories have access to the [Faker](https://github.com/FakerPHP/Faker) PHP library, which allows you to conveniently generate various kinds of random data for testing and seeding.

> [!NOTE]
> You can change your application's Faker locale by updating the `faker_locale` option in your `config/app.php` configuration file.

<a name="defining-model-factories"></a>
## Defining Model Factories

<a name="generating-factories"></a>
### Generating Factories

To create a factory, execute the `make:factory` [Artisan command](/docs/{{version}}/artisan):

```shell
php artisan make:factory PostFactory
```

The new factory class will be placed in your `database/factories` directory.

<a name="factory-and-model-discovery-conventions"></a>
#### Model and Factory Discovery Conventions

Once you have defined your factories, you may use the static `factory` method provided to your models by the `Illuminate\Database\Eloquent\Factories\HasFactory` trait in order to instantiate a factory instance for that model.

The `HasFactory` trait's `factory` method will use conventions to determine the proper factory for the model the trait is assigned to. Specifically, the method will look for a factory in the `Database\Factories` namespace that has a class name matching the model name and is suffixed with `Factory`. If these conventions do not apply to your particular application or factory, you may add the `UseFactory` attribute to the model to manually specify the model's factory:

```php
use Illuminate\Database\Eloquent\Attributes\UseFactory;
use Database\Factories\Administration\FlightFactory;

#[UseFactory(FlightFactory::class)]
class Flight extends Model
{
    // ...
}
```

Alternatively, you may overwrite the `newFactory` method on your model to return an instance of the model's corresponding factory directly:

```php
use Database\Factories\Administration\FlightFactory;

/**
 * Create a new factory instance for the model.
 */
protected static function newFactory()
{
    return FlightFactory::new();
}
```

Then, use the `UseModel` attribute on the corresponding factory to specify the model:

```php
use App\Administration\Flight;
use Illuminate\Database\Eloquent\Factories\Attributes\UseModel;
use Illuminate\Database\Eloquent\Factories\Factory;

#[UseModel(Flight::class)]
class FlightFactory extends Factory
{
    // ...
}
```

<a name="factory-states"></a>
### Factory States

State manipulation methods allow you to define discrete modifications that can be applied to your model factories in any combination. For example, your `Database\Factories\UserFactory` factory might contain a `suspended` state method that modifies one of its default attribute values.

State transformation methods typically call the `state` method provided by Laravel's base factory class. The `state` method accepts a closure which will receive the array of raw attributes defined for the factory and should return an array of attributes to modify:

```php
use Illuminate\Database\Eloquent\Factories\Factory;

/**
 * Indicate that the user is suspended.
 */
public function suspended(): Factory
{
    return $this->state(function (array $attributes) {
        return [
            'account_status' => 'suspended',
        ];
    });
}
```

<a name="trashed-state"></a>
#### "Trashed" State

If your Eloquent model can be [soft deleted](/docs/{{version}}/eloquent#soft-deleting), you may invoke the built-in `trashed` state method to indicate that the created model should already be "soft deleted". You do not need to manually define the `trashed` state as it is automatically available to all factories:

```php
use App\Models\User;

$user = User::factory()->trashed()->create();
```

<a name="factory-callbacks"></a>
### Factory Callbacks

Factory callbacks are registered using the `afterMaking` and `afterCreating` methods and allow you to perform additional tasks after making or creating a model. You should register these callbacks by defining a `configure` method on your factory class. This method will be automatically called by Laravel when the factory is instantiated:

```php
namespace Database\Factories;

use App\Models\User;
use Illuminate\Database\Eloquent\Factories\Factory;

class UserFactory extends Factory
{
    /**
     * Configure the model factory.
     */
    public function configure(): static
    {
        return $this->afterMaking(function (User $user) {
            // ...
        })->afterCreating(function (User $user) {
            // ...
        });
    }

    // ...
}
```

You may also register factory callbacks within state methods to perform additional tasks that are specific to a given state:

```php
use App\Models\User;
use Illuminate\Database\Eloquent\Factories\Factory;

/**
 * Indicate that the user is suspended.
 */
public function suspended(): Factory
{
    return $this->state(function (array $attributes) {
        return [
            'account_status' => 'suspended',
        ];
    })->afterMaking(function (User $user) {
        // ...
    })->afterCreating(function (User $user) {
        // ...
    });
}
```

<a name="creating-models-using-factories"></a>
## Creating Models Using Factories

<a name="instantiating-models"></a>
### Instantiating Models

Once you have defined your factories, you may use the static `factory` method provided to your models by the `Illuminate\Database\Eloquent\Factories\HasFactory` trait in order to instantiate a factory instance for that model. Let's take a look at a few examples of creating models. First, we'll use the `make` method to create models without persisting them to the database:

```php
use App\Models\User;

$user = User::factory()->make();
```

You may create a collection of many models using the `count` method:

```php
$users = User::factory()->count(3)->make();
```

<a name="applying-states"></a>
#### Applying States

You may also apply any of your [states](#factory-states) to the models. If you would like to apply multiple state transformations to the models, you may simply call the state transformation methods directly:

```php
$users = User::factory()->count(5)->suspended()->make();
```

<a name="overriding-attributes"></a>
#### Overriding Attributes

If you would like to override some of the default values of your models, you may pass an array of values to the `make` method. Only the specified attributes will be replaced while the rest of the attributes remain set to their default values as specified by the factory:

```php
$user = User::factory()->make([
    'name' => 'Abigail Otwell',
]);
```

Alternatively, the `state` method may be called directly on the factory instance to perform an inline state transformation:

```php
$user = User::factory()->state([
    'name' => 'Abigail Otwell',
])->make();
```

> [!NOTE]
> [Mass assignment protection](/docs/{{version}}/eloquent#mass-assignment) is automatically disabled when creating models using factories.

<a name="persisting-models"></a>
### Persisting Models

The `create` method instantiates model instances and persists them to the database using Eloquent's `save` method:

```php
use App\Models\User;

// Create a single App\Models\User instance...
$user = User::factory()->create();

// Create three App\Models\User instances...
$users = User::factory()->count(3)->create();
```

You may override the factory's default model attributes by passing an array of attributes to the `create` method:

```php
$user = User::factory()->create([
    'name' => 'Abigail',
]);
```

<a name="sequences"></a>
### Sequences

Sometimes you may wish to alternate the value of a given model attribute for each created model. You may accomplish this by defining a state transformation as a sequence. For example, you may wish to alternate the value of an `admin` column between `Y` and `N` for each created user:

```php
use App\Models\User;
use Illuminate\Database\Eloquent\Factories\Sequence;

$users = User::factory()
    ->count(10)
    ->state(new Sequence(
        ['admin' => 'Y'],
        ['admin' => 'N'],
    ))
    ->create();
```

In this example, five users will be created with an `admin` value of `Y` and five users will be created with an `admin` value of `N`.

If necessary, you may include a closure as a sequence value. The closure will be invoked each time the sequence needs a new value:

```php
use Illuminate\Database\Eloquent\Factories\Sequence;

$users = User::factory()
    ->count(10)
    ->state(new Sequence(
        fn (Sequence $sequence) => ['role' => UserRoles::all()->random()],
    ))
    ->create();
```

Within a sequence closure, you may access the `$index` property on the sequence instance that is injected into the closure. The `$index` property contains the number of iterations through the sequence that have occurred thus far:

```php
$users = User::factory()
    ->count(10)
    ->state(new Sequence(
        fn (Sequence $sequence) => ['name' => 'Name '.$sequence->index],
    ))
    ->create();
```

For convenience, sequences may also be applied using the `sequence` method, which simply invokes the `state` method internally. The `sequence` method accepts a closure or arrays of sequenced attributes:

```php
$users = User::factory()
    ->count(2)
    ->sequence(
        ['name' => 'First User'],
        ['name' => 'Second User'],
    )
    ->create();
```

<a name="factory-relationships"></a>
## Factory Relationships

<a name="has-many-relationships"></a>
### Has Many Relationships

Next, let's explore building Eloquent model relationships using Laravel's fluent factory methods. First, let's assume our application has an `App\Models\User` model and an `App\Models\Post` model. Also, let's assume that the `User` model defines a `hasMany` relationship with `Post`. We can create a user that has three posts using the `has` method provided by the Laravel's factories. The `has` method accepts a factory instance:

```php
use App\Models\Post;
use App\Models\User;

$user = User::factory()
    ->has(Post::factory()->count(3))
    ->create();
```

By convention, when passing a `Post` model to the `has` method, Laravel will assume that the `User` model must have a `posts` method that defines the relationship. If necessary, you may explicitly specify the name of the relationship that you would like to manipulate:

```php
$user = User::factory()
    ->has(Post::factory()->count(3), 'posts')
    ->create();
```

Of course, you may perform state manipulations on the related models. In addition, you may pass a closure-based state transformation if your state change requires access to the parent model:

```php
$user = User::factory()
    ->has(
        Post::factory()
            ->count(3)
            ->state(function (array $attributes, User $user) {
                return ['user_type' => $user->type];
            })
    )
    ->create();
```

<a name="has-many-relationships-using-magic-methods"></a>
#### Using Magic Methods

For convenience, you may use Laravel's magic factory relationship methods to build relationships. For example, the following example will use convention to determine that the related models should be created via a `posts` relationship method on the `User` model:

```php
$user = User::factory()
    ->hasPosts(3)
    ->create();
```

When using magic methods to create factory relationships, you may pass an array of attributes to override on the related models:

```php
$user = User::factory()
    ->hasPosts(3, [
        'published' => false,
    ])
    ->create();
```

You may also pass multiple attribute arrays to create related models with per-model state. Laravel will apply each array in sequence:

```php
$user = User::factory()
    ->hasPosts(
        ['title' => 'First Post'],
        ['title' => 'Second Post'],
        ['title' => 'Third Post'],
    )
    ->create();
```

You may provide a closure-based state transformation if your state change requires access to the parent model:

```php
$user = User::factory()
    ->hasPosts(3, function (array $attributes, User $user) {
        return ['user_type' => $user->type];
    })
    ->create();
```

<a name="belongs-to-relationships"></a>
### Belongs To Relationships

Now that we have explored how to build "has many" relationships using factories, let's explore the inverse of the relationship. The `for` method may be used to define the parent model that factory created models belong to. For example, we can create three `App\Models\Post` model instances that belong to a single user:

```php
use App\Models\Post;
use App\Models\User;

$posts = Post::factory()
    ->count(3)
    ->for(User::factory()->state([
        'name' => 'Jessica Archer',
    ]))
    ->create();
```

If you already have a parent model instance that should be associated with the models you are creating, you may pass the model instance to the `for` method:

```php
$user = User::factory()->create();

$posts = Post::factory()
    ->count(3)
    ->for($user)
    ->create();
```

<a name="belongs-to-relationships-using-magic-methods"></a>
#### Using Magic Methods

For convenience, you may use Laravel's magic factory relationship methods to define "belongs to" relationships. For example, the following example will use convention to determine that the three posts should belong to the `user` relationship on the `Post` model:

```php
$posts = Post::factory()
    ->count(3)
    ->forUser([
        'name' => 'Jessica Archer',
    ])
    ->create();
```

<a name="many-to-many-relationships"></a>
### Many to Many Relationships

Like [has many relationships](#has-many-relationships), "many to many" relationships may be created using the `has` method:

```php
use App\Models\Role;
use App\Models\User;

$user = User::factory()
    ->has(Role::factory()->count(3))
    ->create();
```

<a name="pivot-table-attributes"></a>
#### Pivot Table Attributes

If you need to define attributes that should be set on the pivot / intermediate table linking the models, you may use the `hasAttached` method. This method accepts an array of pivot table attribute names and values as its second argument:

```php
use App\Models\Role;
use App\Models\User;

$user = User::factory()
    ->hasAttached(
        Role::factory()->count(3),
        ['active' => true]
    )
    ->create();
```

You may provide a closure-based state transformation if your state change requires access to the related model:

```php
$user = User::factory()
    ->hasAttached(
        Role::factory()
            ->count(3)
            ->state(function (array $attributes, User $user) {
                return ['name' => $user->name.' Role'];
            }),
        ['active' => true]
    )
    ->create();
```

You may also pass an array of pivot arrays to provide unique pivot data for each related model:

```php
$user = User::factory()
    ->hasAttached(
        Role::factory(),
        [
            ['active' => true],
            ['active' => false],
        ]
    )
    ->create();
```

If you already have model instances that you would like to be attached to the models you are creating, you may pass the model instances to the `hasAttached` method. In this example, the same three roles will be attached to all three users:

```php
$roles = Role::factory()->count(3)->create();

$users = User::factory()
    ->count(3)
    ->hasAttached($roles, ['active' => true])
    ->create();
```

<a name="many-to-many-relationships-using-magic-methods"></a>
#### Using Magic Methods

For convenience, you may use Laravel's magic factory relationship methods to define many to many relationships. For example, the following example will use convention to determine that the related models should be created via a `roles` relationship method on the `User` model:

```php
$user = User::factory()
    ->hasRoles(1, [
        'name' => 'Editor'
    ])
    ->create();
```

<a name="polymorphic-relationships"></a>
### Polymorphic Relationships

[Polymorphic relationships](/docs/{{version}}/eloquent-relationships#polymorphic-relationships) may also be created using factories. Polymorphic "morph many" relationships are created in the same way as typical "has many" relationships. For example, if an `App\Models\Post` model has a `morphMany` relationship with an `App\Models\Comment` model:

```php
use App\Models\Post;

$post = Post::factory()->hasComments(3)->create();
```

<a name="morph-to-relationships"></a>
#### Morph To Relationships

Magic methods may not be used to create `morphTo` relationships. Instead, the `for` method must be used directly and the name of the relationship must be explicitly provided. For example, imagine that the `Comment` model has a `commentable` method that defines a `morphTo` relationship. In this situation, we may create three comments that belong to a single post by using the `for` method directly:

```php
$comments = Comment::factory()->count(3)->for(
    Post::factory(), 'commentable'
)->create();
```

<a name="polymorphic-many-to-many-relationships"></a>
#### Polymorphic Many to Many Relationships

Polymorphic "many to many" (`morphToMany` / `morphedByMany`) relationships may be created just like non-polymorphic "many to many" relationships:

```php
use App\Models\Tag;
use App\Models\Video;

$video = Video::factory()
    ->hasAttached(
        Tag::factory()->count(3),
        ['public' => true]
    )
    ->create();
```

Of course, the magic `has` method may also be used to create polymorphic "many to many" relationships:

```php
$video = Video::factory()
    ->hasTags(3, ['public' => true])
    ->create();
```

<a name="defining-relationships-within-factories"></a>
### Defining Relationships Within Factories

To define a relationship within your model factory, you will typically assign a new factory instance to the foreign key of the relationship. This is normally done for the "inverse" relationships such as `belongsTo` and `morphTo` relationships. For example, if you would like to create a new user when creating a post, you may do the following:

```php
use App\Models\User;

/**
 * Define the model's default state.
 *
 * @return array<string, mixed>
 */
public function definition(): array
{
    return [
        'user_id' => User::factory(),
        'title' => fake()->title(),
        'content' => fake()->paragraph(),
    ];
}
```

If the relationship's columns depend on the factory that defines it you may assign a closure to an attribute. The closure will receive the factory's evaluated attribute array:

```php
/**
 * Define the model's default state.
 *
 * @return array<string, mixed>
 */
public function definition(): array
{
    return [
        'user_id' => User::factory(),
        'user_type' => function (array $attributes) {
            return User::find($attributes['user_id'])->type;
        },
        'title' => fake()->title(),
        'content' => fake()->paragraph(),
    ];
}
```

<a name="recycling-an-existing-model-for-relationships"></a>
### Recycling an Existing Model for Relationships

If you have models that share a common relationship with another model, you may use the `recycle` method to ensure a single instance of the related model is recycled for all of the relationships created by the factory.

For example, imagine you have `Airline`, `Flight`, and `Ticket` models, where the ticket belongs to an airline and a flight, and the flight also belongs to an airline. When creating tickets, you will probably want the same airline for both the ticket and the flight, so you may pass an airline instance to the `recycle` method:

```php
Ticket::factory()
    ->recycle(Airline::factory()->create())
    ->create();
```

You may find the `recycle` method particularly useful if you have models belonging to a common user or team.

The `recycle` method also accepts a collection of existing models. When a collection is provided to the `recycle` method, a random model from the collection will be chosen when the factory needs a model of that type:

```php
Ticket::factory()
    ->recycle($airlines)
    ->create();
```


---

# Eloquent: Mutators & Casting

*Sección: Laravel | Origen: https://laravel.com/docs/13.x/eloquent-mutators*

- [Introduction](#introduction)
- [Accessors and Mutators](#accessors-and-mutators)
    - [Defining an Accessor](#defining-an-accessor)
    - [Defining a Mutator](#defining-a-mutator)
- [Attribute Casting](#attribute-casting)
    - [Array and JSON Casting](#array-and-json-casting)
    - [Vector Casting](#vector-casting)
    - [Binary Casting](#binary-casting)
    - [Date Casting](#date-casting)
    - [Enum Casting](#enum-casting)
    - [Encrypted Casting](#encrypted-casting)
    - [Query Time Casting](#query-time-casting)
- [Custom Casts](#custom-casts)
    - [Value Object Casting](#value-object-casting)
    - [Array / JSON Serialization](#array-json-serialization)
    - [Inbound Casting](#inbound-casting)
    - [Cast Parameters](#cast-parameters)
    - [Comparing Cast Values](#comparing-cast-values)
    - [Castables](#castables)

<a name="introduction"></a>
## Introduction

Accessors, mutators, and attribute casting allow you to transform Eloquent attribute values when you retrieve or set them on model instances. For example, you may want to use the [Laravel encrypter](/docs/{{version}}/encryption) to encrypt a value while it is stored in the database, and then automatically decrypt the attribute when you access it on an Eloquent model. Or, you may want to convert a JSON string that is stored in your database to an array when it is accessed via your Eloquent model.

<a name="accessors-and-mutators"></a>
## Accessors and Mutators

<a name="defining-an-accessor"></a>
### Defining an Accessor

An accessor transforms an Eloquent attribute value when it is accessed. To define an accessor, create a protected method on your model to represent the accessible attribute. This method name should correspond to the "camel case" representation of the true underlying model attribute / database column when applicable.

In this example, we'll define an accessor for the `first_name` attribute. The accessor will automatically be called by Eloquent when attempting to retrieve the value of the `first_name` attribute. All attribute accessor / mutator methods must declare a return type-hint of `Illuminate\Database\Eloquent\Casts\Attribute`:

```php
<?php

namespace App\Models;

use Illuminate\Database\Eloquent\Casts\Attribute;
use Illuminate\Database\Eloquent\Model;

class User extends Model
{
    /**
     * Get the user's first name.
     */
    protected function firstName(): Attribute
    {
        return Attribute::make(
            get: fn (string $value) => ucfirst($value),
        );
    }
}
```

All accessor methods return an `Attribute` instance which defines how the attribute will be accessed and, optionally, mutated. In this example, we are only defining how the attribute will be accessed. To do so, we supply the `get` argument to the `Attribute` class constructor.

As you can see, the original value of the column is passed to the accessor, allowing you to manipulate and return the value. To access the value of the accessor, you may simply access the `first_name` attribute on a model instance:

```php
use App\Models\User;

$user = User::find(1);

$firstName = $user->first_name;
```

> [!NOTE]
> If you would like these computed values to be added to the array / JSON representations of your model, [you will need to append them](/docs/{{version}}/eloquent-serialization#appending-values-to-json).

<a name="building-value-objects-from-multiple-attributes"></a>
#### Building Value Objects From Multiple Attributes

Sometimes your accessor may need to transform multiple model attributes into a single "value object". To do so, your `get` closure may accept a second argument of `$attributes`, which will be automatically supplied to the closure and will contain an array of all of the model's current attributes:

```php
use App\Support\Address;
use Illuminate\Database\Eloquent\Casts\Attribute;

/**
 * Interact with the user's address.
 */
protected function address(): Attribute
{
    return Attribute::make(
        get: fn (mixed $value, array $attributes) => new Address(
            $attributes['address_line_one'],
            $attributes['address_line_two'],
        ),
    );
}
```

<a name="accessor-caching"></a>
#### Accessor Caching

When returning value objects from accessors, any changes made to the value object will automatically be synced back to the model before the model is saved. This is possible because Eloquent retains instances returned by accessors so it can return the same instance each time the accessor is invoked:

```php
use App\Models\User;

$user = User::find(1);

$user->address->lineOne = 'Updated Address Line 1 Value';
$user->address->lineTwo = 'Updated Address Line 2 Value';

$user->save();
```

However, you may sometimes wish to enable caching for primitive values like strings and booleans, particularly if they are computationally intensive. To accomplish this, you may invoke the `shouldCache` method when defining your accessor:

```php
protected function hash(): Attribute
{
    return Attribute::make(
        get: fn (string $value) => bcrypt(gzuncompress($value)),
    )->shouldCache();
}
```

If you would like to disable the object caching behavior of attributes, you may invoke the `withoutObjectCaching` method when defining the attribute:

```php
/**
 * Interact with the user's address.
 */
protected function address(): Attribute
{
    return Attribute::make(
        get: fn (mixed $value, array $attributes) => new Address(
            $attributes['address_line_one'],
            $attributes['address_line_two'],
        ),
    )->withoutObjectCaching();
}
```

<a name="defining-a-mutator"></a>
### Defining a Mutator

A mutator transforms an Eloquent attribute value when it is set. To define a mutator, you may provide the `set` argument when defining your attribute. Let's define a mutator for the `first_name` attribute. This mutator will be automatically called when we attempt to set the value of the `first_name` attribute on the model:

```php
<?php

namespace App\Models;

use Illuminate\Database\Eloquent\Casts\Attribute;
use Illuminate\Database\Eloquent\Model;

class User extends Model
{
    /**
     * Interact with the user's first name.
     */
    protected function firstName(): Attribute
    {
        return Attribute::make(
            get: fn (string $value) => ucfirst($value),
            set: fn (string $value) => strtolower($value),
        );
    }
}
```

The mutator closure will receive the value that is being set on the attribute, allowing you to manipulate the value and return the manipulated value. To use our mutator, we only need to set the `first_name` attribute on an Eloquent model:

```php
use App\Models\User;

$user = User::find(1);

$user->first_name = 'Sally';
```

In this example, the `set` callback will be called with the value `Sally`. The mutator will then apply the `strtolower` function to the name and set its resulting value in the model's internal `$attributes` array.

<a name="mutating-multiple-attributes"></a>
#### Mutating Multiple Attributes

Sometimes your mutator may need to set multiple attributes on the underlying model. To do so, you may return an array from the `set` closure. Each key in the array should correspond with an underlying attribute / database column associated with the model:

```php
use App\Support\Address;
use Illuminate\Database\Eloquent\Casts\Attribute;

/**
 * Interact with the user's address.
 */
protected function address(): Attribute
{
    return Attribute::make(
        get: fn (mixed $value, array $attributes) => new Address(
            $attributes['address_line_one'],
            $attributes['address_line_two'],
        ),
        set: fn (Address $value) => [
            'address_line_one' => $value->lineOne,
            'address_line_two' => $value->lineTwo,
        ],
    );
}
```

<a name="attribute-casting"></a>
## Attribute Casting

Attribute casting provides functionality similar to accessors and mutators without requiring you to define any additional methods on your model. Instead, your model's `casts` method provides a convenient way of converting attributes to common data types.

The `casts` method should return an array where the key is the name of the attribute being cast and the value is the type you wish to cast the column to. The supported cast types are:

<div class="content-list" markdown="1">

- `array`
- `AsFluent::class`
- `AsStringable::class`
- `AsUri::class`
- `AsVector::class`
- `boolean`
- `collection`
- `date`
- `datetime`
- `immutable_date`
- `immutable_datetime`
- <code>decimal:&lt;precision&gt;</code>
- `double`
- `encrypted`
- `encrypted:array`
- `encrypted:collection`
- `encrypted:object`
- `float`
- `hashed`
- `integer`
- `object`
- `real`
- `string`
- `timestamp`

</div>

To demonstrate attribute casting, let's cast the `is_admin` attribute, which is stored in our database as an integer (`0` or `1`) to a boolean value:

```php
<?php

namespace App\Models;

use Illuminate\Database\Eloquent\Model;

class User extends Model
{
    /**
     * Get the attributes that should be cast.
     *
     * @return array<string, string>
     */
    protected function casts(): array
    {
        return [
            'is_admin' => 'boolean',
        ];
    }
}
```

After defining the cast, the `is_admin` attribute will always be cast to a boolean when you access it, even if the underlying value is stored in the database as an integer:

```php
$user = App\Models\User::find(1);

if ($user->is_admin) {
    // ...
}
```

If you need to add a new, temporary cast at runtime, you may use the `mergeCasts` method. These cast definitions will be added to any of the casts already defined on the model:

```php
$user->mergeCasts([
    'is_admin' => 'integer',
    'options' => 'object',
]);
```

> [!WARNING]
> Attributes that are `null` will not be cast. In addition, you should never define a cast (or an attribute) that has the same name as a relationship or assign a cast to the model's primary key.

<a name="stringable-casting"></a>
#### Stringable Casting

You may use the `Illuminate\Database\Eloquent\Casts\AsStringable` cast class to cast a model attribute to a [fluent Illuminate\Support\Stringable object](/docs/{{version}}/strings#fluent-strings-method-list):

```php
<?php

namespace App\Models;

use Illuminate\Database\Eloquent\Casts\AsStringable;
use Illuminate\Database\Eloquent\Model;

class User extends Model
{
    /**
     * Get the attributes that should be cast.
     *
     * @return array<string, string>
     */
    protected function casts(): array
    {
        return [
            'directory' => AsStringable::class,
        ];
    }
}
```

<a name="array-and-json-casting"></a>
### Array and JSON Casting

The `array` cast is particularly useful when working with columns that are stored as serialized JSON. For example, if your database has a `JSON` or `TEXT` field type that contains serialized JSON, adding the `array` cast to that attribute will automatically deserialize the attribute to a PHP array when you access it on your Eloquent model:

```php
<?php

namespace App\Models;

use Illuminate\Database\Eloquent\Model;

class User extends Model
{
    /**
     * Get the attributes that should be cast.
     *
     * @return array<string, string>
     */
    protected function casts(): array
    {
        return [
            'options' => 'array',
        ];
    }
}
```

Once the cast is defined, you may access the `options` attribute and it will automatically be deserialized from JSON into a PHP array. When you set the value of the `options` attribute, the given array will automatically be serialized back into JSON for storage:

```php
use App\Models\User;

$user = User::find(1);

$options = $user->options;

$options['key'] = 'value';

$user->options = $options;

$user->save();
```

To update a single field of a JSON attribute with a more terse syntax, you may [make the attribute mass assignable](/docs/{{version}}/eloquent#mass-assignment-json-columns) and use the `->` operator when calling the `update` method:

```php
$user = User::find(1);

$user->update(['options->key' => 'value']);
```

<a name="json-and-unicode"></a>
#### JSON and Unicode

If you would like to store an array attribute as JSON with unescaped Unicode characters, you may use the `json:unicode` cast:

```php
/**
 * Get the attributes that should be cast.
 *
 * @return array<string, string>
 */
protected function casts(): array
{
    return [
        'options' => 'json:unicode',
    ];
}
```

<a name="array-object-and-collection-casting"></a>
#### Array Object and Collection Casting

Although the standard `array` cast is sufficient for many applications, it does have some disadvantages. Since the `array` cast returns a primitive type, it is not possible to mutate an offset of the array directly. For example, the following code will trigger a PHP error:

```php
$user = User::find(1);

$user->options['key'] = $value;
```

To solve this, Laravel offers an `AsArrayObject` cast that casts your JSON attribute to an [ArrayObject](https://www.php.net/manual/en/class.arrayobject.php) class. This feature is implemented using Laravel's [custom cast](#custom-casts) implementation, which allows Laravel to intelligently cache and transform the mutated object such that individual offsets may be modified without triggering a PHP error. To use the `AsArrayObject` cast, simply assign it to an attribute:

```php
use Illuminate\Database\Eloquent\Casts\AsArrayObject;

/**
 * Get the attributes that should be cast.
 *
 * @return array<string, string>
 */
protected function casts(): array
{
    return [
        'options' => AsArrayObject::class,
    ];
}
```

Similarly, Laravel offers an `AsCollection` cast that casts your JSON attribute to a Laravel [Collection](/docs/{{version}}/collections) instance:

```php
use Illuminate\Database\Eloquent\Casts\AsCollection;

/**
 * Get the attributes that should be cast.
 *
 * @return array<string, string>
 */
protected function casts(): array
{
    return [
        'options' => AsCollection::class,
    ];
}
```

If you would like the `AsCollection` cast to instantiate a custom collection class instead of Laravel's base collection class, you may provide the collection class name as a cast argument:

```php
use App\Collections\OptionCollection;
use Illuminate\Database\Eloquent\Casts\AsCollection;

/**
 * Get the attributes that should be cast.
 *
 * @return array<string, string>
 */
protected function casts(): array
{
    return [
        'options' => AsCollection::using(OptionCollection::class),
    ];
}
```

The `of` method may be used to indicate collection items should be mapped into a given class via the collection's [mapInto method](/docs/{{version}}/collections#method-mapinto):

```php
use App\ValueObjects\Option;
use Illuminate\Database\Eloquent\Casts\AsCollection;

/**
 * Get the attributes that should be cast.
 *
 * @return array<string, string>
 */
protected function casts(): array
{
    return [
        'options' => AsCollection::of(Option::class)
    ];
}
```

When mapping collections to objects, the object should implement the `Illuminate\Contracts\Support\Arrayable` and `JsonSerializable` interfaces to define how their instances should be serialized into the database as JSON:

```php
<?php

namespace App\ValueObjects;

use Illuminate\Contracts\Support\Arrayable;
use JsonSerializable;

class Option implements Arrayable, JsonSerializable
{
    public string $name;
    public mixed $value;
    public bool $isLocked;

    /**
     * Create a new Option instance.
     */
    public function __construct(array $data)
    {
        $this->name = $data['name'];
        $this->value = $data['value'];
        $this->isLocked = $data['is_locked'];
    }

    /**
     * Get the instance as an array.
     *
     * @return array{name: string, data: string, is_locked: bool}
     */
    public function toArray(): array
    {
        return [
            'name' => $this->name,
            'value' => $this->value,
            'is_locked' => $this->isLocked,
        ];
    }

    /**
     * Specify the data which should be serialized to JSON.
     *
     * @return array{name: string, data: string, is_locked: bool}
     */
    public function jsonSerialize(): array
    {
        return $this->toArray();
    }
}
```

<a name="vector-casting"></a>
### Vector Casting

You may use the `Illuminate\Database\Eloquent\Casts\AsVector` cast class to cast a database vector column to and from a PHP array:

```php
use Illuminate\Database\Eloquent\Casts\AsVector;

/**
 * Get the attributes that should be cast.
 *
 * @return array<string, string>
 */
protected function casts(): array
{
    return [
        'embedding' => AsVector::class,
    ];
}
```

When setting the attribute, the cast accepts a PHP array or an `Arrayable` instance, such as a Laravel collection. When retrieving the attribute, the cast returns an array of floats.

<a name="binary-casting"></a>
### Binary Casting

If your Eloquent model has a [binary type](/docs/{{version}}/migrations#column-method-binary) `uuid` or `ulid` column in addition to your model's auto-incrementing ID column, you may use the `AsBinary` cast to automatically cast the value to and from its binary representation:

```php
use Illuminate\Database\Eloquent\Casts\AsBinary;

/**
 * Get the attributes that should be cast.
 *
 * @return array<string, string>
 */
protected function casts(): array
{
    return [
        'uuid' => AsBinary::uuid(),
        'ulid' => AsBinary::ulid(),
    ];
}
```

Once the cast has been defined on the model, you may set the UUID / ULID attribute value to an object instance or a string. Eloquent will automatically cast the value to its binary representation. When retrieving the attribute's value, you will always receive a plain-text string value:

```php
use Illuminate\Support\Str;

$user->uuid = Str::uuid();

return $user->uuid;

// "6e8cdeed-2f32-40bd-b109-1e4405be2140"
```

<a name="date-casting"></a>
### Date Casting

By default, Eloquent will cast the `created_at` and `updated_at` columns to instances of [Carbon](https://github.com/briannesbitt/Carbon), which extends the PHP `DateTime` class and provides an assortment of helpful methods. You may cast additional date attributes by defining additional date casts within your model's `casts` method. Typically, dates should be cast using the `datetime` or `immutable_datetime` cast types.

When defining a `date` or `datetime` cast, you may also specify the date's format. This format will be used when the [model is serialized to an array or JSON](/docs/{{version}}/eloquent-serialization):

```php
/**
 * Get the attributes that should be cast.
 *
 * @return array<string, string>
 */
protected function casts(): array
{
    return [
        'created_at' => 'datetime:Y-m-d',
    ];
}
```

When a column is cast as a date, you may set the corresponding model attribute value to a UNIX timestamp, date string (`Y-m-d`), date-time string, or a `DateTime` / `Carbon` instance. The date's value will be correctly converted and stored in your database.

You may customize the default serialization format for all of your model's dates by defining a `serializeDate` method on your model. This method does not affect how your dates are formatted for storage in the database:

```php
/**
 * Prepare a date for array / JSON serialization.
 */
protected function serializeDate(DateTimeInterface $date): string
{
    return $date->format('Y-m-d');
}
```

To specify the format that should be used when actually storing a model's dates within your database, you should use the `dateFormat` argument on your model's `Table` attribute:

```php
use Illuminate\Database\Eloquent\Attributes\Table;

#[Table(dateFormat: 'U')]
class Flight extends Model
{
    // ...
}
```

<a name="date-casting-and-timezones"></a>
#### Date Casting, Serialization, and Timezones

By default, the `date` and `datetime` casts will serialize dates to a UTC ISO-8601 date string (`YYYY-MM-DDTHH:MM:SS.uuuuuuZ`), regardless of the timezone specified in your application's `timezone` configuration option. You are strongly encouraged to always use this serialization format, as well as to store your application's dates in the UTC timezone by not changing your application's `timezone` configuration option from its default `UTC` value. Consistently using the UTC timezone throughout your application will provide the maximum level of interoperability with other date manipulation libraries written in PHP and JavaScript.

If a custom format is applied to the `date` or `datetime` cast, such as `datetime:Y-m-d H:i:s`, the inner timezone of the Carbon instance will be used during date serialization. Typically, this will be the timezone specified in your application's `timezone` configuration option. However, it's important to note that `timestamp` columns such as `created_at` and `updated_at` are exempt from this behavior and are always formatted in UTC, regardless of the application's timezone setting.

<a name="enum-casting"></a>
### Enum Casting

Eloquent also allows you to cast your attribute values to PHP [Enums](https://www.php.net/manual/en/language.enumerations.backed.php). To accomplish this, you may specify the attribute and enum you wish to cast in your model's `casts` method:

```php
use App\Enums\ServerStatus;

/**
 * Get the attributes that should be cast.
 *
 * @return array<string, string>
 */
protected function casts(): array
{
    return [
        'status' => ServerStatus::class,
    ];
}
```

Once you have defined the cast on your model, the specified attribute will be automatically cast to and from an enum when you interact with the attribute:

```php
if ($server->status == ServerStatus::Provisioned) {
    $server->status = ServerStatus::Ready;

    $server->save();
}
```

<a name="casting-arrays-of-enums"></a>
#### Casting Arrays of Enums

Sometimes you may need your model to store an array of enum values within a single column. To accomplish this, you may utilize the `AsEnumArrayObject` or `AsEnumCollection` casts provided by Laravel:

```php
use App\Enums\ServerStatus;
use Illuminate\Database\Eloquent\Casts\AsEnumCollection;

/**
 * Get the attributes that should be cast.
 *
 * @return array<string, string>
 */
protected function casts(): array
{
    return [
        'statuses' => AsEnumCollection::of(ServerStatus::class),
    ];
}
```

<a name="encrypted-casting"></a>
### Encrypted Casting

The `encrypted` cast will encrypt a model's attribute value using Laravel's built-in [encryption](/docs/{{version}}/encryption) features. In addition, the `encrypted:array`, `encrypted:collection`, `encrypted:object`, `AsEncryptedArrayObject`, and `AsEncryptedCollection` casts work like their unencrypted counterparts; however, as you might expect, the underlying value is encrypted when stored in your database.

As the final length of the encrypted text is not predictable and is longer than its plain text counterpart, make sure the associated database column is of `TEXT` type or larger. In addition, since the values are encrypted in the database, you will not be able to query or search encrypted attribute values.

<a name="key-rotation"></a>
#### Key Rotation

As you may know, Laravel encrypts strings using the `key` configuration value specified in your application's `app` configuration file. Typically, this value corresponds to the value of the `APP_KEY` environment variable. If you need to rotate your application's encryption key, you may [gracefully do so](/docs/{{version}}/encryption#gracefully-rotating-encryption-keys).

<a name="query-time-casting"></a>
### Query Time Casting

Sometimes you may need to apply casts while executing a query, such as when selecting a raw value from a table. For example, consider the following query:

```php
use App\Models\Post;
use App\Models\User;

$users = User::select([
    'users.*',
    'last_posted_at' => Post::selectRaw('MAX(created_at)')
        ->whereColumn('user_id', 'users.id')
])->get();
```

The `last_posted_at` attribute on the results of this query will be a simple string. It would be wonderful if we could apply a `datetime` cast to this attribute when executing the query. Thankfully, we may accomplish this using the `withCasts` method:

```php
$users = User::select([
    'users.*',
    'last_posted_at' => Post::selectRaw('MAX(created_at)')
        ->whereColumn('user_id', 'users.id')
])->withCasts([
    'last_posted_at' => 'datetime'
])->get();
```

<a name="custom-casts"></a>
## Custom Casts

Laravel has a variety of built-in, helpful cast types; however, you may occasionally need to define your own cast types. To create a cast, execute the `make:cast` Artisan command. The new cast class will be placed in your `app/Casts` directory:

```shell
php artisan make:cast AsJson
```

All custom cast classes implement the `CastsAttributes` interface. Classes that implement this interface must define a `get` and `set` method. The `get` method is responsible for transforming a raw value from the database into a cast value, while the `set` method should transform a cast value into a raw value that can be stored in the database. As an example, we will re-implement the built-in `json` cast type as a custom cast type:

```php
<?php

namespace App\Casts;

use Illuminate\Contracts\Database\Eloquent\CastsAttributes;
use Illuminate\Database\Eloquent\Model;

class AsJson implements CastsAttributes
{
    /**
     * Cast the given value.
     *
     * @param  array<string, mixed>  $attributes
     * @return array<string, mixed>
     */
    public function get(
        Model $model,
        string $key,
        mixed $value,
        array $attributes,
    ): array {
        return json_decode($value, true);
    }

    /**
     * Prepare the given value for storage.
     *
     * @param  array<string, mixed>  $attributes
     */
    public function set(
        Model $model,
        string $key,
        mixed $value,
        array $attributes,
    ): string {
        return json_encode($value);
    }
}
```

Once you have defined a custom cast type, you may attach it to a model attribute using its class name:

```php
<?php

namespace App\Models;

use App\Casts\AsJson;
use Illuminate\Database\Eloquent\Model;

class User extends Model
{
    /**
     * Get the attributes that should be cast.
     *
     * @return array<string, string>
     */
    protected function casts(): array
    {
        return [
            'options' => AsJson::class,
        ];
    }
}
```

<a name="value-object-casting"></a>
### Value Object Casting

You are not limited to casting values to primitive types. You may also cast values to objects. Defining custom casts that cast values to objects is very similar to casting to primitive types; however, if your value object encompasses more than one database column, the `set` method must return an array of key / value pairs that will be used to set raw, storable values on the model. If your value object only affects a single column, you should simply return the storable value.

As an example, we will define a custom cast class that casts multiple model values into a single `Address` value object. We will assume the `Address` value object has two public properties: `lineOne` and `lineTwo`:

```php
<?php

namespace App\Casts;

use App\ValueObjects\Address;
use Illuminate\Contracts\Database\Eloquent\CastsAttributes;
use Illuminate\Database\Eloquent\Model;
use InvalidArgumentException;

class AsAddress implements CastsAttributes
{
    /**
     * Cast the given value.
     *
     * @param  array<string, mixed>  $attributes
     */
    public function get(
        Model $model,
        string $key,
        mixed $value,
        array $attributes,
    ): Address {
        return new Address(
            $attributes['address_line_one'],
            $attributes['address_line_two']
        );
    }

    /**
     * Prepare the given value for storage.
     *
     * @param  array<string, mixed>  $attributes
     * @return array<string, string>
     */
    public function set(
        Model $model,
        string $key,
        mixed $value,
        array $attributes,
    ): array {
        if (! $value instanceof Address) {
            throw new InvalidArgumentException('The given value is not an Address instance.');
        }

        return [
            'address_line_one' => $value->lineOne,
            'address_line_two' => $value->lineTwo,
        ];
    }
}
```

When casting to value objects, any changes made to the value object will automatically be synced back to the model before the model is saved:

```php
use App\Models\User;

$user = User::find(1);

$user->address->lineOne = 'Updated Address Value';

$user->save();
```

> [!NOTE]
> If you plan to serialize your Eloquent models containing value objects to JSON or arrays, you should implement the `Illuminate\Contracts\Support\Arrayable` and `JsonSerializable` interfaces on the value object.

<a name="value-object-caching"></a>
#### Value Object Caching

When attributes that are cast to value objects are resolved, they are cached by Eloquent. Therefore, the same object instance will be returned if the attribute is accessed again.

If you would like to disable the object caching behavior of custom cast classes, you may declare a public `withoutObjectCaching` property on your custom cast class:

```php
class AsAddress implements CastsAttributes
{
    public bool $withoutObjectCaching = true;

    // ...
}
```

<a name="array-json-serialization"></a>
### Array / JSON Serialization

When an Eloquent model is converted to an array or JSON using the `toArray` and `toJson` methods, your custom cast value objects will typically be serialized as well as long as they implement the `Illuminate\Contracts\Support\Arrayable` and `JsonSerializable` interfaces. However, when using value objects provided by third-party libraries, you may not have the ability to add these interfaces to the object.

Therefore, you may specify that your custom cast class will be responsible for serializing the value object. To do so, your custom cast class should implement the `Illuminate\Contracts\Database\Eloquent\SerializesCastableAttributes` interface. This interface states that your class should contain a `serialize` method which should return the serialized form of your value object:

```php
/**
 * Get the serialized representation of the value.
 *
 * @param  array<string, mixed>  $attributes
 */
public function serialize(
    Model $model,
    string $key,
    mixed $value,
    array $attributes,
): string {
    return (string) $value;
}
```

<a name="inbound-casting"></a>
### Inbound Casting

Occasionally, you may need to write a custom cast class that only transforms values that are being set on the model and does not perform any operations when attributes are being retrieved from the model.

Inbound only custom casts should implement the `CastsInboundAttributes` interface, which only requires a `set` method to be defined. The `make:cast` Artisan command may be invoked with the `--inbound` option to generate an inbound only cast class:

```shell
php artisan make:cast AsHash --inbound
```

A classic example of an inbound only cast is a "hashing" cast. For example, we may define a cast that hashes inbound values via a given algorithm:

```php
<?php

namespace App\Casts;

use Illuminate\Contracts\Database\Eloquent\CastsInboundAttributes;
use Illuminate\Database\Eloquent\Model;

class AsHash implements CastsInboundAttributes
{
    /**
     * Create a new cast class instance.
     */
    public function __construct(
        protected string|null $algorithm = null,
    ) {}

    /**
     * Prepare the given value for storage.
     *
     * @param  array<string, mixed>  $attributes
     */
    public function set(
        Model $model,
        string $key,
        mixed $value,
        array $attributes,
    ): string {
        return is_null($this->algorithm)
            ? bcrypt($value)
            : hash($this->algorithm, $value);
    }
}
```

<a name="cast-parameters"></a>
### Cast Parameters

When attaching a custom cast to a model, cast parameters may be specified by separating them from the class name using a `:` character and comma-delimiting multiple parameters. The parameters will be passed to the constructor of the cast class:

```php
/**
 * Get the attributes that should be cast.
 *
 * @return array<string, string>
 */
protected function casts(): array
{
    return [
        'secret' => AsHash::class.':sha256',
    ];
}
```

<a name="comparing-cast-values"></a>
### Comparing Cast Values

If you would like to define how two given cast values should be compared to determine if they have been changed, your custom cast class may implement the `Illuminate\Contracts\Database\Eloquent\ComparesCastableAttributes` interface. This allows you to have fine-grained control over which values Eloquent considers changed and thus saves to the database when a model is updated.

This interface states that your class should contain a `compare` method which should return `true` if the given values are considered equal:

```php
/**
 * Determine if the given values are equal.
 *
 * @param  \Illuminate\Database\Eloquent\Model  $model
 * @param  string  $key
 * @param  mixed  $firstValue
 * @param  mixed  $secondValue
 * @return bool
 */
public function compare(
    Model $model,
    string $key,
    mixed $firstValue,
    mixed $secondValue
): bool {
    return $firstValue === $secondValue;
}
```

<a name="castables"></a>
### Castables

You may want to allow your application's value objects to define their own custom cast classes. Instead of attaching the custom cast class to your model, you may alternatively attach a value object class that implements the `Illuminate\Contracts\Database\Eloquent\Castable` interface:

```php
use App\ValueObjects\Address;

protected function casts(): array
{
    return [
        'address' => Address::class,
    ];
}
```

Objects that implement the `Castable` interface must define a `castUsing` method that returns the class name of the custom caster class that is responsible for casting to and from the `Castable` class:

```php
<?php

namespace App\ValueObjects;

use Illuminate\Contracts\Database\Eloquent\Castable;
use App\Casts\AsAddress;

class Address implements Castable
{
    /**
     * Get the name of the caster class to use when casting from / to this cast target.
     *
     * @param  array<string, mixed>  $arguments
     */
    public static function castUsing(array $arguments): string
    {
        return AsAddress::class;
    }
}
```

When using `Castable` classes, you may still provide arguments in the `casts` method definition. The arguments will be passed to the `castUsing` method:

```php
use App\ValueObjects\Address;

protected function casts(): array
{
    return [
        'address' => Address::class.':argument',
    ];
}
```

<a name="anonymous-cast-classes"></a>
#### Castables & Anonymous Cast Classes

By combining "castables" with PHP's [anonymous classes](https://www.php.net/manual/en/language.oop5.anonymous.php), you may define a value object and its casting logic as a single castable object. To accomplish this, return an anonymous class from your value object's `castUsing` method. The anonymous class should implement the `CastsAttributes` interface:

```php
<?php

namespace App\ValueObjects;

use Illuminate\Contracts\Database\Eloquent\Castable;
use Illuminate\Contracts\Database\Eloquent\CastsAttributes;

class Address implements Castable
{
    // ...

    /**
     * Get the caster class to use when casting from / to this cast target.
     *
     * @param  array<string, mixed>  $arguments
     */
    public static function castUsing(array $arguments): CastsAttributes
    {
        return new class implements CastsAttributes
        {
            public function get(
                Model $model,
                string $key,
                mixed $value,
                array $attributes,
            ): Address {
                return new Address(
                    $attributes['address_line_one'],
                    $attributes['address_line_two']
                );
            }

            public function set(
                Model $model,
                string $key,
                mixed $value,
                array $attributes,
            ): array {
                return [
                    'address_line_one' => $value->lineOne,
                    'address_line_two' => $value->lineTwo,
                ];
            }
        };
    }
}
```


---

# Eloquent: Relationships

*Sección: Laravel | Origen: https://laravel.com/docs/13.x/eloquent-relationships*

- [Introduction](#introduction)
- [Defining Relationships](#defining-relationships)
    - [One to One / Has One](#one-to-one)
    - [One to Many / Has Many](#one-to-many)
    - [One to Many (Inverse) / Belongs To](#one-to-many-inverse)
    - [Has One of Many](#has-one-of-many)
    - [Has One Through](#has-one-through)
    - [Has Many Through](#has-many-through)
- [Scoped Relationships](#scoped-relationships)
- [Many to Many Relationships](#many-to-many)
    - [Retrieving Intermediate Table Columns](#retrieving-intermediate-table-columns)
    - [Filtering Queries via Intermediate Table Columns](#filtering-queries-via-intermediate-table-columns)
    - [Ordering Queries via Intermediate Table Columns](#ordering-queries-via-intermediate-table-columns)
    - [Defining Custom Intermediate Table Models](#defining-custom-intermediate-table-models)
        - [Automatically Hydrating Pivot Relationships](#automatically-hydrating-pivot-relationships)
- [Polymorphic Relationships](#polymorphic-relationships)
    - [One to One](#one-to-one-polymorphic-relations)
    - [One to Many](#one-to-many-polymorphic-relations)
    - [One of Many](#one-of-many-polymorphic-relations)
    - [Many to Many](#many-to-many-polymorphic-relations)
    - [Custom Polymorphic Types](#custom-polymorphic-types)
- [Dynamic Relationships](#dynamic-relationships)
- [Querying Relations](#querying-relations)
    - [Relationship Methods vs. Dynamic Properties](#relationship-methods-vs-dynamic-properties)
    - [Querying Relationship Existence](#querying-relationship-existence)
    - [Querying Relationship Absence](#querying-relationship-absence)
    - [Querying Morph To Relationships](#querying-morph-to-relationships)
- [Aggregating Related Models](#aggregating-related-models)
    - [Counting Related Models](#counting-related-models)
    - [Other Aggregate Functions](#other-aggregate-functions)
    - [Counting Related Models on Morph To Relationships](#counting-related-models-on-morph-to-relationships)
- [Eager Loading](#eager-loading)
    - [Constraining Eager Loads](#constraining-eager-loads)
    - [Lazy Eager Loading](#lazy-eager-loading)
    - [Automatic Eager Loading](#automatic-eager-loading)
    - [Preventing Lazy Loading](#preventing-lazy-loading)
- [Inserting and Updating Related Models](#inserting-and-updating-related-models)
    - [The `save` Method](#the-save-method)
    - [The `create` Method](#the-create-method)
    - [Belongs To Relationships](#updating-belongs-to-relationships)
    - [Many to Many Relationships](#updating-many-to-many-relationships)
- [Touching Parent Timestamps](#touching-parent-timestamps)

<a name="introduction"></a>
## Introduction

Database tables are often related to one another. For example, a blog post may have many comments or an order could be related to the user who placed it. Eloquent makes managing and working with these relationships easy, and supports a variety of common relationships:

<div class="content-list" markdown="1">

- [One To One](#one-to-one)
- [One To Many](#one-to-many)
- [Many To Many](#many-to-many)
- [Has One Through](#has-one-through)
- [Has Many Through](#has-many-through)
- [One To One (Polymorphic)](#one-to-one-polymorphic-relations)
- [One To Many (Polymorphic)](#one-to-many-polymorphic-relations)
- [Many To Many (Polymorphic)](#many-to-many-polymorphic-relations)

</div>

<a name="defining-relationships"></a>
## Defining Relationships

Eloquent relationships are defined as methods on your Eloquent model classes. Since relationships also serve as powerful [query builders](/docs/{{version}}/queries), defining relationships as methods provides powerful method chaining and querying capabilities. For example, we may chain additional query constraints on this `posts` relationship:

```php
$user->posts()->where('active', 1)->get();
```

But, before diving too deep into using relationships, let's learn how to define each type of relationship supported by Eloquent.

<a name="one-to-one"></a>
### One to One / Has One

A one-to-one relationship is a very basic type of database relationship. For example, a `User` model might be associated with one `Phone` model. To define this relationship, we will place a `phone` method on the `User` model. The `phone` method should call the `hasOne` method and return its result. The `hasOne` method is available to your model via the model's `Illuminate\Database\Eloquent\Model` base class:

```php
<?php

namespace App\Models;

use Illuminate\Database\Eloquent\Model;
use Illuminate\Database\Eloquent\Relations\HasOne;

class User extends Model
{
    /**
     * Get the phone associated with the user.
     */
    public function phone(): HasOne
    {
        return $this->hasOne(Phone::class);
    }
}
```

The first argument passed to the `hasOne` method is the name of the related model class. Once the relationship is defined, we may retrieve the related record using Eloquent's dynamic properties. Dynamic properties allow you to access relationship methods as if they were properties defined on the model:

```php
$phone = User::find(1)->phone;
```

Eloquent determines the foreign key of the relationship based on the parent model name. In this case, the `Phone` model is automatically assumed to have a `user_id` foreign key. If you wish to override this convention, you may pass a second argument to the `hasOne` method:

```php
return $this->hasOne(Phone::class, 'foreign_key');
```

Additionally, Eloquent assumes that the foreign key should have a value matching the primary key column of the parent. In other words, Eloquent will look for the value of the user's `id` column in the `user_id` column of the `Phone` record. If you would like the relationship to use a primary key value other than `id` or your model's primary key, you may pass a third argument to the `hasOne` method:

```php
return $this->hasOne(Phone::class, 'foreign_key', 'local_key');
```

<a name="one-to-one-defining-the-inverse-of-the-relationship"></a>
#### Defining the Inverse of the Relationship

So, we can access the `Phone` model from our `User` model. Next, let's define a relationship on the `Phone` model that will let us access the user that owns the phone. We can define the inverse of a `hasOne` relationship using the `belongsTo` method:

```php
<?php

namespace App\Models;

use Illuminate\Database\Eloquent\Model;
use Illuminate\Database\Eloquent\Relations\BelongsTo;

class Phone extends Model
{
    /**
     * Get the user that owns the phone.
     */
    public function user(): BelongsTo
    {
        return $this->belongsTo(User::class);
    }
}
```

When invoking the `user` method, Eloquent will attempt to find a `User` model that has an `id` which matches the `user_id` column on the `Phone` model.

Eloquent determines the foreign key name by examining the name of the relationship method and suffixing the method name with `_id`. So, in this case, Eloquent assumes that the `Phone` model has a `user_id` column. However, if the foreign key on the `Phone` model is not `user_id`, you may pass a custom key name as the second argument to the `belongsTo` method:

```php
/**
 * Get the user that owns the phone.
 */
public function user(): BelongsTo
{
    return $this->belongsTo(User::class, 'foreign_key');
}
```

If the parent model does not use `id` as its primary key, or you wish to find the associated model using a different column, you may pass a third argument to the `belongsTo` method specifying the parent table's custom key:

```php
/**
 * Get the user that owns the phone.
 */
public function user(): BelongsTo
{
    return $this->belongsTo(User::class, 'foreign_key', 'owner_key');
}
```

<a name="one-to-many"></a>
### One to Many / Has Many

A one-to-many relationship is used to define relationships where a single model is the parent to one or more child models. For example, a blog post may have an infinite number of comments. Like all other Eloquent relationships, one-to-many relationships are defined by defining a method on your Eloquent model:

```php
<?php

namespace App\Models;

use Illuminate\Database\Eloquent\Model;
use Illuminate\Database\Eloquent\Relations\HasMany;

class Post extends Model
{
    /**
     * Get the comments for the blog post.
     */
    public function comments(): HasMany
    {
        return $this->hasMany(Comment::class);
    }
}
```

Remember, Eloquent will automatically determine the proper foreign key column for the `Comment` model. By convention, Eloquent will take the "snake case" name of the parent model and suffix it with `_id`. So, in this example, Eloquent will assume the foreign key column on the `Comment` model is `post_id`.

Once the relationship method has been defined, we can access the [collection](/docs/{{version}}/eloquent-collections) of related comments by accessing the `comments` property. Remember, since Eloquent provides "dynamic relationship properties", we can access relationship methods as if they were defined as properties on the model:

```php
use App\Models\Post;

$comments = Post::find(1)->comments;

foreach ($comments as $comment) {
    // ...
}
```

Since all relationships also serve as query builders, you may add further constraints to the relationship query by calling the `comments` method and continuing to chain conditions onto the query:

```php
$comment = Post::find(1)->comments()
    ->where('title', 'foo')
    ->first();
```

Like the `hasOne` method, you may also override the foreign and local keys by passing additional arguments to the `hasMany` method:

```php
return $this->hasMany(Comment::class, 'foreign_key');

return $this->hasMany(Comment::class, 'foreign_key', 'local_key');
```

<a name="automatically-hydrating-parent-models-on-children"></a>
#### Automatically Hydrating Parent Models on Children

Even when utilizing Eloquent eager loading, "N + 1" query problems can arise if you try to access the parent model from a child model while looping through the child models:

```php
$posts = Post::with('comments')->get();

foreach ($posts as $post) {
    foreach ($post->comments as $comment) {
        echo $comment->post->title;
    }
}
```

In the example above, an "N + 1" query problem has been introduced because, even though comments were eager loaded for every `Post` model, Eloquent does not automatically hydrate the parent `Post` on each child `Comment` model.

If you would like Eloquent to automatically hydrate parent models onto their children, you may invoke the `chaperone` method when defining a `hasMany` relationship:

```php
<?php

namespace App\Models;

use Illuminate\Database\Eloquent\Model;
use Illuminate\Database\Eloquent\Relations\HasMany;

class Post extends Model
{
    /**
     * Get the comments for the blog post.
     */
    public function comments(): HasMany
    {
        return $this->hasMany(Comment::class)->chaperone();
    }
}
```

Or, if you would like to opt-in to automatic parent hydration at run time, you may invoke the `chaperone` model when eager loading the relationship:

```php
use App\Models\Post;

$posts = Post::with([
    'comments' => fn ($comments) => $comments->chaperone(),
])->get();
```

<a name="one-to-many-inverse"></a>
### One to Many (Inverse) / Belongs To

Now that we can access all of a post's comments, let's define a relationship to allow a comment to access its parent post. To define the inverse of a `hasMany` relationship, define a relationship method on the child model which calls the `belongsTo` method:

```php
<?php

namespace App\Models;

use Illuminate\Database\Eloquent\Model;
use Illuminate\Database\Eloquent\Relations\BelongsTo;

class Comment extends Model
{
    /**
     * Get the post that owns the comment.
     */
    public function post(): BelongsTo
    {
        return $this->belongsTo(Post::class);
    }
}
```

Once the relationship has been defined, we can retrieve a comment's parent post by accessing the `post` "dynamic relationship property":

```php
use App\Models\Comment;

$comment = Comment::find(1);

return $comment->post->title;
```

In the example above, Eloquent will attempt to find a `Post` model that has an `id` which matches the `post_id` column on the `Comment` model.

Eloquent determines the default foreign key name by examining the name of the relationship method and suffixing the method name with a `_` followed by the name of the parent model's primary key column. So, in this example, Eloquent will assume the `Post` model's foreign key on the `comments` table is `post_id`.

However, if the foreign key for your relationship does not follow these conventions, you may pass a custom foreign key name as the second argument to the `belongsTo` method:

```php
/**
 * Get the post that owns the comment.
 */
public function post(): BelongsTo
{
    return $this->belongsTo(Post::class, 'foreign_key');
}
```

If your parent model does not use `id` as its primary key, or you wish to find the associated model using a different column, you may pass a third argument to the `belongsTo` method specifying your parent table's custom key:

```php
/**
 * Get the post that owns the comment.
 */
public function post(): BelongsTo
{
    return $this->belongsTo(Post::class, 'foreign_key', 'owner_key');
}
```

<a name="default-models"></a>
#### Default Models

The `belongsTo`, `hasOne`, `hasOneThrough`, and `morphOne` relationships allow you to define a default model that will be returned if the given relationship is `null`. This pattern is often referred to as the [Null Object pattern](https://en.wikipedia.org/wiki/Null_Object_pattern) and can help remove conditional checks in your code. In the following example, the `user` relation will return an empty `App\Models\User` model if no user is attached to the `Post` model:

```php
/**
 * Get the author of the post.
 */
public function user(): BelongsTo
{
    return $this->belongsTo(User::class)->withDefault();
}
```

To populate the default model with attributes, you may pass an array or closure to the `withDefault` method:

```php
/**
 * Get the author of the post.
 */
public function user(): BelongsTo
{
    return $this->belongsTo(User::class)->withDefault([
        'name' => 'Guest Author',
    ]);
}

/**
 * Get the author of the post.
 */
public function user(): BelongsTo
{
    return $this->belongsTo(User::class)->withDefault(function (User $user, Post $post) {
        $user->name = 'Guest Author';
    });
}
```

<a name="querying-belongs-to-relationships"></a>
#### Querying Belongs To Relationships

When querying for the children of a "belongs to" relationship, you may manually build the `where` clause to retrieve the corresponding Eloquent models:

```php
use App\Models\Post;

$posts = Post::where('user_id', $user->id)->get();
```

However, you may find it more convenient to use the `whereBelongsTo` method, which will automatically determine the proper relationship and foreign key for the given model:

```php
$posts = Post::whereBelongsTo($user)->get();
```

You may also provide a [collection](/docs/{{version}}/eloquent-collections) instance to the `whereBelongsTo` method. When doing so, Laravel will retrieve models that belong to any of the parent models within the collection:

```php
$users = User::where('vip', true)->get();

$posts = Post::whereBelongsTo($users)->get();
```

By default, Laravel will determine the relationship associated with the given model based on the class name of the model; however, you may specify the relationship name manually by providing it as the second argument to the `whereBelongsTo` method:

```php
$posts = Post::whereBelongsTo($user, 'author')->get();
```

<a name="has-one-of-many"></a>
### Has One of Many

Sometimes a model may have many related models, yet you want to easily retrieve the "latest" or "oldest" related model of the relationship. For example, a `User` model may be related to many `Order` models, but you want to define a convenient way to interact with the most recent order the user has placed. You may accomplish this using the `hasOne` relationship type combined with the `ofMany` methods:

```php
/**
 * Get the user's most recent order.
 */
public function latestOrder(): HasOne
{
    return $this->hasOne(Order::class)->latestOfMany();
}
```

Likewise, you may define a method to retrieve the "oldest", or first, related model of a relationship:

```php
/**
 * Get the user's oldest order.
 */
public function oldestOrder(): HasOne
{
    return $this->hasOne(Order::class)->oldestOfMany();
}
```

By default, the `latestOfMany` and `oldestOfMany` methods will retrieve the latest or oldest related model based on the model's primary key, which must be sortable. However, sometimes you may wish to retrieve a single model from a larger relationship using a different sorting criteria.

For example, using the `ofMany` method, you may retrieve the user's most expensive order. The `ofMany` method accepts the sortable column as its first argument and which aggregate function (`min` or `max`) to apply when querying for the related model:

```php
/**
 * Get the user's largest order.
 */
public function largestOrder(): HasOne
{
    return $this->hasOne(Order::class)->ofMany('price', 'max');
}
```

> [!WARNING]
> Because PostgreSQL does not support executing the `MAX` function against UUID columns, it is not currently possible to use one-of-many relationships in combination with PostgreSQL UUID columns.

<a name="converting-many-relationships-to-has-one-relationships"></a>
#### Converting "Many" Relationships to Has One Relationships

Often, when retrieving a single model using the `latestOfMany`, `oldestOfMany`, or `ofMany` methods, you already have a "has many" relationship defined for the same model. For convenience, Laravel allows you to easily convert this relationship into a "has one" relationship by invoking the `one` method on the relationship:

```php
/**
 * Get the user's orders.
 */
public function orders(): HasMany
{
    return $this->hasMany(Order::class);
}

/**
 * Get the user's largest order.
 */
public function largestOrder(): HasOne
{
    return $this->orders()->one()->ofMany('price', 'max');
}
```

You may also use the `one` method to convert `HasManyThrough` relationships to `HasOneThrough` relationships:

```php
public function latestDeployment(): HasOneThrough
{
    return $this->deployments()->one()->latestOfMany();
}
```

<a name="advanced-has-one-of-many-relationships"></a>
#### Advanced Has One of Many Relationships

It is possible to construct more advanced "has one of many" relationships. For example, a `Product` model may have many associated `Price` models that are retained in the system even after new pricing is published. In addition, new pricing data for the product may be able to be published in advance to take effect at a future date via a `published_at` column.

So, in summary, we need to retrieve the latest published pricing where the published date is not in the future. In addition, if two prices have the same published date, we will prefer the price with the greatest ID. To accomplish this, we must pass an array to the `ofMany` method that contains the sortable columns which determine the latest price. In addition, a closure will be provided as the second argument to the `ofMany` method. This closure will be responsible for adding additional publish date constraints to the relationship query:

```php
/**
 * Get the current pricing for the product.
 */
public function currentPricing(): HasOne
{
    return $this->hasOne(Price::class)->ofMany([
        'published_at' => 'max',
        'id' => 'max',
    ], function (Builder $query) {
        $query->where('published_at', '<', now());
    });
}
```

<a name="has-one-through"></a>
### Has One Through

The "has-one-through" relationship defines a one-to-one relationship with another model. However, this relationship indicates that the declaring model can be matched with one instance of another model by proceeding _through_ a third model.

For example, in a vehicle repair shop application, each `Mechanic` model may be associated with one `Car` model, and each `Car` model may be associated with one `Owner` model. While the mechanic and the owner have no direct relationship within the database, the mechanic can access the owner _through_ the `Car` model. Let's look at the tables necessary to define this relationship:

```text
mechanics
    id - integer
    name - string

cars
    id - integer
    model - string
    mechanic_id - integer

owners
    id - integer
    name - string
    car_id - integer
```

Now that we have examined the table structure for the relationship, let's define the relationship on the `Mechanic` model:

```php
<?php

namespace App\Models;

use Illuminate\Database\Eloquent\Model;
use Illuminate\Database\Eloquent\Relations\HasOneThrough;

class Mechanic extends Model
{
    /**
     * Get the car's owner.
     */
    public function carOwner(): HasOneThrough
    {
        return $this->hasOneThrough(Owner::class, Car::class);
    }
}
```

The first argument passed to the `hasOneThrough` method is the name of the final model we wish to access, while the second argument is the name of the intermediate model.

Or, if the relevant relationships have already been defined on all of the models involved in the relationship, you may fluently define a "has-one-through" relationship by invoking the `through` method and supplying the names of those relationships. For example, if the `Mechanic` model has a `cars` relationship and the `Car` model has an `owner` relationship, you may define a "has-one-through" relationship connecting the mechanic and the owner like so:

```php
// String based syntax...
return $this->through('cars')->has('owner');

// Dynamic syntax...
return $this->throughCars()->hasOwner();
```

<a name="has-one-through-key-conventions"></a>
#### Key Conventions

Typical Eloquent foreign key conventions will be used when performing the relationship's queries. If you would like to customize the keys of the relationship, you may pass them as the third and fourth arguments to the `hasOneThrough` method. The third argument is the name of the foreign key on the intermediate model. The fourth argument is the name of the foreign key on the final model. The fifth argument is the local key, while the sixth argument is the local key of the intermediate model:

```php
class Mechanic extends Model
{
    /**
     * Get the car's owner.
     */
    public function carOwner(): HasOneThrough
    {
        return $this->hasOneThrough(
            Owner::class,
            Car::class,
            'mechanic_id', // Foreign key on the cars table...
            'car_id', // Foreign key on the owners table...
            'id', // Local key on the mechanics table...
            'id' // Local key on the cars table...
        );
    }
}
```

Or, as discussed earlier, if the relevant relationships have already been defined on all of the models involved in the relationship, you may fluently define a "has-one-through" relationship by invoking the `through` method and supplying the names of those relationships. This approach offers the advantage of reusing the key conventions already defined on the existing relationships:

```php
// String based syntax...
return $this->through('cars')->has('owner');

// Dynamic syntax...
return $this->throughCars()->hasOwner();
```

<a name="has-many-through"></a>
### Has Many Through

The "has-many-through" relationship provides a convenient way to access distant relations via an intermediate relation. For example, let's assume we are building a deployment platform like [Laravel Cloud](https://cloud.laravel.com). An `Application` model might access many `Deployment` models through an intermediate `Environment` model. Using this example, you could easily gather all deployments for a given application. Let's look at the tables required to define this relationship:

```text
applications
    id - integer
    name - string

environments
    id - integer
    application_id - integer
    name - string

deployments
    id - integer
    environment_id - integer
    commit_hash - string
```

Now that we have examined the table structure for the relationship, let's define the relationship on the `Application` model:

```php
<?php

namespace App\Models;

use Illuminate\Database\Eloquent\Model;
use Illuminate\Database\Eloquent\Relations\HasManyThrough;

class Application extends Model
{
    /**
     * Get all of the deployments for the application.
     */
    public function deployments(): HasManyThrough
    {
        return $this->hasManyThrough(Deployment::class, Environment::class);
    }
}
```

The first argument passed to the `hasManyThrough` method is the name of the final model we wish to access, while the second argument is the name of the intermediate model.

Or, if the relevant relationships have already been defined on all of the models involved in the relationship, you may fluently define a "has-many-through" relationship by invoking the `through` method and supplying the names of those relationships. For example, if the `Application` model has a `environments` relationship and the `Environment` model has a `deployments` relationship, you may define a "has-many-through" relationship connecting the application and the deployments like so:

```php
// String based syntax...
return $this->through('environments')->has('deployments');

// Dynamic syntax...
return $this->throughEnvironments()->hasDeployments();
```

Though the `Deployment` model's table does not contain a `application_id` column, the `hasManyThrough` relation provides access to an application's deployments via `$application->deployments`. To retrieve these models, Eloquent inspects the `application_id` column on the intermediate `Environment` model's table. After finding the relevant environment IDs, they are used to query the `Deployment` model's table.

<a name="has-many-through-key-conventions"></a>
#### Key Conventions

Typical Eloquent foreign key conventions will be used when performing the relationship's queries. If you would like to customize the keys of the relationship, you may pass them as the third and fourth arguments to the `hasManyThrough` method. The third argument is the name of the foreign key on the intermediate model. The fourth argument is the name of the foreign key on the final model. The fifth argument is the local key, while the sixth argument is the local key of the intermediate model:

```php
class Application extends Model
{
    public function deployments(): HasManyThrough
    {
        return $this->hasManyThrough(
            Deployment::class,
            Environment::class,
            'application_id', // Foreign key on the environments table...
            'environment_id', // Foreign key on the deployments table...
            'id', // Local key on the applications table...
            'id' // Local key on the environments table...
        );
    }
}
```

Or, as discussed earlier, if the relevant relationships have already been defined on all of the models involved in the relationship, you may fluently define a "has-many-through" relationship by invoking the `through` method and supplying the names of those relationships. This approach offers the advantage of reusing the key conventions already defined on the existing relationships:

```php
// String based syntax...
return $this->through('environments')->has('deployments');

// Dynamic syntax...
return $this->throughEnvironments()->hasDeployments();
```

<a name="scoped-relationships"></a>
### Scoped Relationships

It's common to add additional methods to models that constrain relationships. For example, you might add a `featuredPosts` method to a `User` model which constrains the broader `posts` relationship with an additional `where` constraint:

```php
<?php

namespace App\Models;

use Illuminate\Database\Eloquent\Model;
use Illuminate\Database\Eloquent\Relations\HasMany;

class User extends Model
{
    /**
     * Get the user's posts.
     */
    public function posts(): HasMany
    {
        return $this->hasMany(Post::class)->latest();
    }

    /**
     * Get the user's featured posts.
     */
    public function featuredPosts(): HasMany
    {
        return $this->posts()->where('featured', true);
    }
}
```

However, if you attempt to create a model via the `featuredPosts` method, its `featured` attribute would not be set to `true`. If you would like to create models via relationship methods and also specify attributes that should be added to all models created via that relationship, you may use the `withAttributes` method when building the relationship query:

```php
/**
 * Get the user's featured posts.
 */
public function featuredPosts(): HasMany
{
    return $this->posts()->withAttributes(['featured' => true]);
}
```

The `withAttributes` method will add `where` conditions to the query using the given attributes, and it will also add the given attributes to any models created via the relationship method:

```php
$post = $user->featuredPosts()->create(['title' => 'Featured Post']);

$post->featured; // true
```

To instruct the `withAttributes` method to not add `where` conditions to the query, you may set the `asConditions` argument to `false`:

```php
return $this->posts()->withAttributes(['featured' => true], asConditions: false);
```

<a name="many-to-many"></a>
## Many to Many Relationships

Many-to-many relations are slightly more complicated than `hasOne` and `hasMany` relationships. An example of a many-to-many relationship is a user that has many roles and those roles are also shared by other users in the application. For example, a user may be assigned the role of "Author" and "Editor"; however, those roles may also be assigned to other users as well. So, a user has many roles and a role has many users.

<a name="many-to-many-table-structure"></a>
#### Table Structure

To define this relationship, three database tables are needed: `users`, `roles`, and `role_user`. The `role_user` table is derived from the alphabetical order of the related model names and contains `user_id` and `role_id` columns. This table is used as an intermediate table linking the users and roles.

Remember, since a role can belong to many users, we cannot simply place a `user_id` column on the `roles` table. This would mean that a role could only belong to a single user. In order to provide support for roles being assigned to multiple users, the `role_user` table is needed. We can summarize the relationship's table structure like so:

```text
users
    id - integer
    name - string

roles
    id - integer
    name - string

role_user
    user_id - integer
    role_id - integer
```

<a name="many-to-many-model-structure"></a>
#### Model Structure

Many-to-many relationships are defined by writing a method that returns the result of the `belongsToMany` method. The `belongsToMany` method is provided by the `Illuminate\Database\Eloquent\Model` base class that is used by all of your application's Eloquent models. For example, let's define a `roles` method on our `User` model. The first argument passed to this method is the name of the related model class:

```php
<?php

namespace App\Models;

use Illuminate\Database\Eloquent\Model;
use Illuminate\Database\Eloquent\Relations\BelongsToMany;

class User extends Model
{
    /**
     * The roles that belong to the user.
     */
    public function roles(): BelongsToMany
    {
        return $this->belongsToMany(Role::class);
    }
}
```

Once the relationship is defined, you may access the user's roles using the `roles` dynamic relationship property:

```php
use App\Models\User;

$user = User::find(1);

foreach ($user->roles as $role) {
    // ...
}
```

Since all relationships also serve as query builders, you may add further constraints to the relationship query by calling the `roles` method and continuing to chain conditions onto the query:

```php
$roles = User::find(1)->roles()->orderBy('name')->get();
```

To determine the table name of the relationship's intermediate table, Eloquent will join the two related model names in alphabetical order. However, you are free to override this convention. You may do so by passing a second argument to the `belongsToMany` method:

```php
return $this->belongsToMany(Role::class, 'role_user');
```

In addition to customizing the name of the intermediate table, you may also customize the column names of the keys on the table by passing additional arguments to the `belongsToMany` method. The third argument is the foreign key name of the model on which you are defining the relationship, while the fourth argument is the foreign key name of the model that you are joining to:

```php
return $this->belongsToMany(Role::class, 'role_user', 'user_id', 'role_id');
```

<a name="many-to-many-defining-the-inverse-of-the-relationship"></a>
#### Defining the Inverse of the Relationship

To define the "inverse" of a many-to-many relationship, you should define a method on the related model which also returns the result of the `belongsToMany` method. To complete our user / role example, let's define the `users` method on the `Role` model:

```php
<?php

namespace App\Models;

use Illuminate\Database\Eloquent\Model;
use Illuminate\Database\Eloquent\Relations\BelongsToMany;

class Role extends Model
{
    /**
     * The users that belong to the role.
     */
    public function users(): BelongsToMany
    {
        return $this->belongsToMany(User::class);
    }
}
```

As you can see, the relationship is defined exactly the same as its `User` model counterpart with the exception of referencing the `App\Models\User` model. Since we're reusing the `belongsToMany` method, all of the usual table and key customization options are available when defining the "inverse" of many-to-many relationships.

<a name="retrieving-intermediate-table-columns"></a>
### Retrieving Intermediate Table Columns

As you have already learned, working with many-to-many relations requires the presence of an intermediate table. Eloquent provides some very helpful ways of interacting with this table. For example, let's assume our `User` model has many `Role` models that it is related to. After accessing this relationship, we may access the intermediate table using the `pivot` attribute on the models:

```php
use App\Models\User;

$user = User::find(1);

foreach ($user->roles as $role) {
    echo $role->pivot->created_at;
}
```

Notice that each `Role` model we retrieve is automatically assigned a `pivot` attribute. This attribute contains a model representing the intermediate table.

By default, only the model keys will be present on the `pivot` model. If your intermediate table contains extra attributes, you must specify them when defining the relationship:

```php
return $this->belongsToMany(Role::class)->withPivot('active', 'created_by');
```

If you would like your intermediate table to have `created_at` and `updated_at` timestamps that are automatically maintained by Eloquent, call the `withTimestamps` method when defining the relationship:

```php
return $this->belongsToMany(Role::class)->withTimestamps();
```

> [!WARNING]
> Intermediate tables that utilize Eloquent's automatically maintained timestamps are required to have both `created_at` and `updated_at` timestamp columns.

<a name="customizing-the-pivot-attribute-name"></a>
#### Customizing the `pivot` Attribute Name

As noted previously, attributes from the intermediate table may be accessed on models via the `pivot` attribute. However, you are free to customize the name of this attribute to better reflect its purpose within your application.

For example, if your application contains users that may subscribe to podcasts, you likely have a many-to-many relationship between users and podcasts. If this is the case, you may wish to rename your intermediate table attribute to `subscription` instead of `pivot`. This can be done using the `as` method when defining the relationship:

```php
return $this->belongsToMany(Podcast::class)
    ->as('subscription')
    ->withTimestamps();
```

Once the custom intermediate table attribute has been specified, you may access the intermediate table data using the customized name:

```php
$users = User::with('podcasts')->get();

foreach ($users->flatMap->podcasts as $podcast) {
    echo $podcast->subscription->created_at;
}
```

<a name="filtering-queries-via-intermediate-table-columns"></a>
### Filtering Queries via Intermediate Table Columns

You can also filter the results returned by `belongsToMany` relationship queries using the `wherePivot`, `wherePivotIn`, `wherePivotNotIn`, `wherePivotBetween`, `wherePivotNotBetween`, `wherePivotNull`, and `wherePivotNotNull` methods when defining the relationship:

```php
return $this->belongsToMany(Role::class)
    ->wherePivot('approved', 1);

return $this->belongsToMany(Role::class)
    ->wherePivotIn('priority', [1, 2]);

return $this->belongsToMany(Role::class)
    ->wherePivotNotIn('priority', [1, 2]);

return $this->belongsToMany(Podcast::class)
    ->as('subscriptions')
    ->wherePivotBetween('created_at', ['2020-01-01 00:00:00', '2020-12-31 00:00:00']);

return $this->belongsToMany(Podcast::class)
    ->as('subscriptions')
    ->wherePivotNotBetween('created_at', ['2020-01-01 00:00:00', '2020-12-31 00:00:00']);

return $this->belongsToMany(Podcast::class)
    ->as('subscriptions')
    ->wherePivotNull('expired_at');

return $this->belongsToMany(Podcast::class)
    ->as('subscriptions')
    ->wherePivotNotNull('expired_at');
```

The `wherePivot` adds a where clause constraint to the query, but does not add the specified value when creating new models via the defined relationship. If you need to both query and create relationships with a particular pivot value, you may use the `withPivotValue` method:

```php
return $this->belongsToMany(Role::class)
    ->withPivotValue('approved', 1);
```

<a name="ordering-queries-via-intermediate-table-columns"></a>
### Ordering Queries via Intermediate Table Columns

You can order the results returned by `belongsToMany` relationship queries using the `orderByPivot` and `orderByPivotDesc` methods. In the following example, we will retrieve all of the latest badges for the user:

```php
return $this->belongsToMany(Badge::class)
    ->where('rank', 'gold')
    ->orderByPivotDesc('created_at');
```

<a name="defining-custom-intermediate-table-models"></a>
### Defining Custom Intermediate Table Models

If you would like to define a custom model to represent the intermediate table of your many-to-many relationship, you may call the `using` method when defining the relationship. Custom pivot models give you the opportunity to define additional behavior on the pivot model, such as methods and casts.

Custom many-to-many pivot models should extend the `Illuminate\Database\Eloquent\Relations\Pivot` class while custom polymorphic many-to-many pivot models should extend the `Illuminate\Database\Eloquent\Relations\MorphPivot` class. For example, we may define a `Role` model which uses a custom `RoleUser` pivot model:

```php
<?php

namespace App\Models;

use Illuminate\Database\Eloquent\Model;
use Illuminate\Database\Eloquent\Relations\BelongsToMany;

class Role extends Model
{
    /**
     * The users that belong to the role.
     */
    public function users(): BelongsToMany
    {
        return $this->belongsToMany(User::class)->using(RoleUser::class);
    }
}
```

When defining the `RoleUser` model, you should extend the `Illuminate\Database\Eloquent\Relations\Pivot` class:

```php
<?php

namespace App\Models;

use Illuminate\Database\Eloquent\Relations\Pivot;

class RoleUser extends Pivot
{
    // ...
}
```

> [!WARNING]
> Pivot models may not use the `SoftDeletes` trait. If you need to soft delete pivot records consider converting your pivot model to an actual Eloquent model.

<a name="custom-pivot-models-and-incrementing-ids"></a>
#### Custom Pivot Models and Incrementing IDs

If you have defined a many-to-many relationship that uses a custom pivot model, and that pivot model has an auto-incrementing primary key, you should ensure your custom pivot model class uses the `Table` attribute with `incrementing` set to `true`:

```php
use Illuminate\Database\Eloquent\Attributes\Table;
use Illuminate\Database\Eloquent\Relations\Pivot;

#[Table(incrementing: true)]
class RoleUser extends Pivot
{
    // ...
}
```

<a name="automatically-hydrating-pivot-relationships"></a>
#### Automatically Hydrating Pivot Relationships

When a custom pivot model defines `belongsTo` relationships for the declaring and related models, you may invoke `chaperone` to automatically hydrate those relationships on each pivot model. This avoids additional queries when accessing the models through the pivot:

```php
use Illuminate\Database\Eloquent\Model;
use Illuminate\Database\Eloquent\Relations\BelongsTo;
use Illuminate\Database\Eloquent\Relations\BelongsToMany;
use Illuminate\Database\Eloquent\Relations\Pivot;

class RoleUser extends Pivot
{
    public function role(): BelongsTo
    {
        return $this->belongsTo(Role::class);
    }

    public function user(): BelongsTo
    {
        return $this->belongsTo(User::class);
    }
}

class Role extends Model
{
    public function users(): BelongsToMany
    {
        return $this->belongsToMany(User::class)
            ->using(RoleUser::class)
            ->chaperone();
    }
}
```

Eloquent will attempt to infer the pivot relationship names. If your pivot model uses non-standard names, pass the declaring and related relationship names to `chaperone`:

```php
return $this->belongsToMany(User::class)
    ->using(RoleUser::class)
    ->chaperone(declaring: 'role', related: 'user');
```

<a name="polymorphic-relationships"></a>
## Polymorphic Relationships

A polymorphic relationship allows the child model to belong to more than one type of model using a single association. For example, imagine you are building an application that allows users to share blog posts and videos. In such an application, a `Comment` model might belong to both the `Post` and `Video` models.

<a name="one-to-one-polymorphic-relations"></a>
### One to One (Polymorphic)

<a name="one-to-one-polymorphic-table-structure"></a>
#### Table Structure

A one-to-one polymorphic relation is similar to a typical one-to-one relation; however, the child model can belong to more than one type of model using a single association. For example, a blog `Post` and a `User` may share a polymorphic relation to an `Image` model. Using a one-to-one polymorphic relation allows you to have a single table of unique images that may be associated with posts and users. First, let's examine the table structure:

```text
posts
    id - integer
    name - string

users
    id - integer
    name - string

images
    id - integer
    url - string
    imageable_type - string
    imageable_id - integer
```

Note the `imageable_id` and `imageable_type` columns on the `images` table. The `imageable_id` column will contain the ID value of the post or user, while the `imageable_type` column will contain the class name of the parent model. The `imageable_type` column is used by Eloquent to determine which "type" of parent model to return when accessing the `imageable` relation. In this case, the column would contain either `App\Models\Post` or `App\Models\User`.

<a name="one-to-one-polymorphic-model-structure"></a>
#### Model Structure

Next, let's examine the model definitions needed to build this relationship:

```php
<?php

namespace App\Models;

use Illuminate\Database\Eloquent\Model;
use Illuminate\Database\Eloquent\Relations\MorphTo;

class Image extends Model
{
    /**
     * Get the parent imageable model (user or post).
     */
    public function imageable(): MorphTo
    {
        return $this->morphTo();
    }
}

use Illuminate\Database\Eloquent\Model;
use Illuminate\Database\Eloquent\Relations\MorphOne;

class Post extends Model
{
    /**
     * Get the post's image.
     */
    public function image(): MorphOne
    {
        return $this->morphOne(Image::class, 'imageable');
    }
}

use Illuminate\Database\Eloquent\Model;
use Illuminate\Database\Eloquent\Relations\MorphOne;

class User extends Model
{
    /**
     * Get the user's image.
     */
    public function image(): MorphOne
    {
        return $this->morphOne(Image::class, 'imageable');
    }
}
```

<a name="one-to-one-polymorphic-retrieving-the-relationship"></a>
#### Retrieving the Relationship

Once your database table and models are defined, you may access the relationships via your models. For example, to retrieve the image for a post, we can access the `image` dynamic relationship property:

```php
use App\Models\Post;

$post = Post::find(1);

$image = $post->image;
```

You may retrieve the parent of the polymorphic model by accessing the name of the method that performs the call to `morphTo`. In this case, that is the `imageable` method on the `Image` model. So, we will access that method as a dynamic relationship property:

```php
use App\Models\Image;

$image = Image::find(1);

$imageable = $image->imageable;
```

The `imageable` relation on the `Image` model will return either a `Post` or `User` instance, depending on which type of model owns the image.

<a name="morph-one-to-one-key-conventions"></a>
#### Key Conventions

If necessary, you may specify the name of the "id" and "type" columns utilized by your polymorphic child model. If you do so, ensure that you always pass the name of the relationship as the first argument to the `morphTo` method. Typically, this value should match the method name, so you may use PHP's `__FUNCTION__` constant:

```php
/**
 * Get the model that the image belongs to.
 */
public function imageable(): MorphTo
{
    return $this->morphTo(__FUNCTION__, 'imageable_type', 'imageable_id');
}
```

<a name="one-to-many-polymorphic-relations"></a>
### One to Many (Polymorphic)

<a name="one-to-many-polymorphic-table-structure"></a>
#### Table Structure

A one-to-many polymorphic relation is similar to a typical one-to-many relation; however, the child model can belong to more than one type of model using a single association. For example, imagine users of your application can "comment" on posts and videos. Using polymorphic relationships, you may use a single `comments` table to contain comments for both posts and videos. First, let's examine the table structure required to build this relationship:

```text
posts
    id - integer
    title - string
    body - text

videos
    id - integer
    title - string
    url - string

comments
    id - integer
    body - text
    commentable_type - string
    commentable_id - integer
```

<a name="one-to-many-polymorphic-model-structure"></a>
#### Model Structure

Next, let's examine the model definitions needed to build this relationship:

```php
<?php

namespace App\Models;

use Illuminate\Database\Eloquent\Model;
use Illuminate\Database\Eloquent\Relations\MorphTo;

class Comment extends Model
{
    /**
     * Get the parent commentable model (post or video).
     */
    public function commentable(): MorphTo
    {
        return $this->morphTo();
    }
}

use Illuminate\Database\Eloquent\Model;
use Illuminate\Database\Eloquent\Relations\MorphMany;

class Post extends Model
{
    /**
     * Get all of the post's comments.
     */
    public function comments(): MorphMany
    {
        return $this->morphMany(Comment::class, 'commentable');
    }
}

use Illuminate\Database\Eloquent\Model;
use Illuminate\Database\Eloquent\Relations\MorphMany;

class Video extends Model
{
    /**
     * Get all of the video's comments.
     */
    public function comments(): MorphMany
    {
        return $this->morphMany(Comment::class, 'commentable');
    }
}
```

<a name="one-to-many-polymorphic-retrieving-the-relationship"></a>
#### Retrieving the Relationship

Once your database table and models are defined, you may access the relationships via your model's dynamic relationship properties. For example, to access all of the comments for a post, we can use the `comments` dynamic property:

```php
use App\Models\Post;

$post = Post::find(1);

foreach ($post->comments as $comment) {
    // ...
}
```

You may also retrieve the parent of a polymorphic child model by accessing the name of the method that performs the call to `morphTo`. In this case, that is the `commentable` method on the `Comment` model. So, we will access that method as a dynamic relationship property in order to access the comment's parent model:

```php
use App\Models\Comment;

$comment = Comment::find(1);

$commentable = $comment->commentable;
```

The `commentable` relation on the `Comment` model will return either a `Post` or `Video` instance, depending on which type of model is the comment's parent.

<a name="polymorphic-automatically-hydrating-parent-models-on-children"></a>
#### Automatically Hydrating Parent Models on Children

Even when utilizing Eloquent eager loading, "N + 1" query problems can arise if you try to access the parent model from a child model while looping through the child models:

```php
$posts = Post::with('comments')->get();

foreach ($posts as $post) {
    foreach ($post->comments as $comment) {
        echo $comment->commentable->title;
    }
}
```

In the example above, an "N + 1" query problem has been introduced because, even though comments were eager loaded for every `Post` model, Eloquent does not automatically hydrate the parent `Post` on each child `Comment` model.

If you would like Eloquent to automatically hydrate parent models onto their children, you may invoke the `chaperone` method when defining a `morphMany` relationship:

```php
class Post extends Model
{
    /**
     * Get all of the post's comments.
     */
    public function comments(): MorphMany
    {
        return $this->morphMany(Comment::class, 'commentable')->chaperone();
    }
}
```

Or, if you would like to opt-in to automatic parent hydration at run time, you may invoke the `chaperone` model when eager loading the relationship:

```php
use App\Models\Post;

$posts = Post::with([
    'comments' => fn ($comments) => $comments->chaperone(),
])->get();
```

<a name="one-of-many-polymorphic-relations"></a>
### One of Many (Polymorphic)

Sometimes a model may have many related models, yet you want to easily retrieve the "latest" or "oldest" related model of the relationship. For example, a `User` model may be related to many `Image` models, but you want to define a convenient way to interact with the most recent image the user has uploaded. You may accomplish this using the `morphOne` relationship type combined with the `ofMany` methods:

```php
/**
 * Get the user's most recent image.
 */
public function latestImage(): MorphOne
{
    return $this->morphOne(Image::class, 'imageable')->latestOfMany();
}
```

Likewise, you may define a method to retrieve the "oldest", or first, related model of a relationship:

```php
/**
 * Get the user's oldest image.
 */
public function oldestImage(): MorphOne
{
    return $this->morphOne(Image::class, 'imageable')->oldestOfMany();
}
```

By default, the `latestOfMany` and `oldestOfMany` methods will retrieve the latest or oldest related model based on the model's primary key, which must be sortable. However, sometimes you may wish to retrieve a single model from a larger relationship using a different sorting criteria.

For example, using the `ofMany` method, you may retrieve the user's most "liked" image. The `ofMany` method accepts the sortable column as its first argument and which aggregate function (`min` or `max`) to apply when querying for the related model:

```php
/**
 * Get the user's most popular image.
 */
public function bestImage(): MorphOne
{
    return $this->morphOne(Image::class, 'imageable')->ofMany('likes', 'max');
}
```

> [!NOTE]
> It is possible to construct more advanced "one of many" relationships. For more information, please consult the [has one of many documentation](#advanced-has-one-of-many-relationships).

<a name="many-to-many-polymorphic-relations"></a>
### Many to Many (Polymorphic)

<a name="many-to-many-polymorphic-table-structure"></a>
#### Table Structure

Many-to-many polymorphic relations are slightly more complicated than "morph one" and "morph many" relationships. For example, a `Post` model and `Video` model could share a polymorphic relation to a `Tag` model. Using a many-to-many polymorphic relation in this situation would allow your application to have a single table of unique tags that may be associated with posts or videos. First, let's examine the table structure required to build this relationship:

```text
posts
    id - integer
    name - string

videos
    id - integer
    name - string

tags
    id - integer
    name - string

taggables
    tag_id - integer
    taggable_type - string
    taggable_id - integer
```

> [!NOTE]
> Before diving into polymorphic many-to-many relationships, you may benefit from reading the documentation on typical [many-to-many relationships](#many-to-many).

<a name="many-to-many-polymorphic-model-structure"></a>
#### Model Structure

Next, we're ready to define the relationships on the models. The `Post` and `Video` models will both contain a `tags` method that calls the `morphToMany` method provided by the base Eloquent model class.

The `morphToMany` method accepts the name of the related model as well as the "relationship name". Based on the name we assigned to our intermediate table name and the keys it contains, we will refer to the relationship as "taggable":

```php
<?php

namespace App\Models;

use Illuminate\Database\Eloquent\Model;
use Illuminate\Database\Eloquent\Relations\MorphToMany;

class Post extends Model
{
    /**
     * Get all of the tags for the post.
     */
    public function tags(): MorphToMany
    {
        return $this->morphToMany(Tag::class, 'taggable');
    }
}
```

<a name="many-to-many-polymorphic-defining-the-inverse-of-the-relationship"></a>
#### Defining the Inverse of the Relationship

Next, on the `Tag` model, you should define a method for each of its possible parent models. So, in this example, we will define a `posts` method and a `videos` method. Both of these methods should return the result of the `morphedByMany` method.

The `morphedByMany` method accepts the name of the related model as well as the "relationship name". Based on the name we assigned to our intermediate table name and the keys it contains, we will refer to the relationship as "taggable":

```php
<?php

namespace App\Models;

use Illuminate\Database\Eloquent\Model;
use Illuminate\Database\Eloquent\Relations\MorphToMany;

class Tag extends Model
{
    /**
     * Get all of the posts that are assigned this tag.
     */
    public function posts(): MorphToMany
    {
        return $this->morphedByMany(Post::class, 'taggable');
    }

    /**
     * Get all of the videos that are assigned this tag.
     */
    public function videos(): MorphToMany
    {
        return $this->morphedByMany(Video::class, 'taggable');
    }
}
```

<a name="many-to-many-polymorphic-retrieving-the-relationship"></a>
#### Retrieving the Relationship

Once your database table and models are defined, you may access the relationships via your models. For example, to access all of the tags for a post, you may use the `tags` dynamic relationship property:

```php
use App\Models\Post;

$post = Post::find(1);

foreach ($post->tags as $tag) {
    // ...
}
```

You may retrieve the parent of a polymorphic relation from the polymorphic child model by accessing the name of the method that performs the call to `morphedByMany`. In this case, that is the `posts` or `videos` methods on the `Tag` model:

```php
use App\Models\Tag;

$tag = Tag::find(1);

foreach ($tag->posts as $post) {
    // ...
}

foreach ($tag->videos as $video) {
    // ...
}
```

<a name="custom-polymorphic-types"></a>
### Custom Polymorphic Types

By default, Laravel will use the fully qualified class name to store the "type" of the related model. For instance, given the one-to-many relationship example above where a `Comment` model may belong to a `Post` or a `Video` model, the default `commentable_type` would be either `App\Models\Post` or `App\Models\Video`, respectively. However, you may wish to decouple these values from your application's internal structure.

For example, instead of using the model names as the "type", we may use simple strings such as `post` and `video`. By doing so, the polymorphic "type" column values in our database will remain valid even if the models are renamed:

```php
use Illuminate\Database\Eloquent\Relations\Relation;

Relation::enforceMorphMap([
    'post' => 'App\Models\Post',
    'video' => 'App\Models\Video',
]);
```

You may call the `enforceMorphMap` method in the `boot` method of your `App\Providers\AppServiceProvider` class or create a separate service provider if you wish.

You may determine the morph alias of a given model at runtime using the model's `getMorphClass` method. Conversely, you may determine the fully-qualified class name associated with a morph alias using the `Relation::getMorphedModel` method:

```php
use Illuminate\Database\Eloquent\Relations\Relation;

$alias = $post->getMorphClass();

$class = Relation::getMorphedModel($alias);
```

> [!WARNING]
> When adding a "morph map" to your existing application, every morphable `*_type` column value in your database that still contains a fully-qualified class will need to be converted to its "map" name.

<a name="dynamic-relationships"></a>
### Dynamic Relationships

You may use the `resolveRelationUsing` method to define relations between Eloquent models at runtime. While not typically recommended for normal application development, this may occasionally be useful when developing Laravel packages.

The `resolveRelationUsing` method accepts the desired relationship name as its first argument. The second argument passed to the method should be a closure that accepts the model instance and returns a valid Eloquent relationship definition. Typically, you should configure dynamic relationships within the boot method of a [service provider](/docs/{{version}}/providers):

```php
use App\Models\Order;
use App\Models\Customer;

Order::resolveRelationUsing('customer', function (Order $orderModel) {
    return $orderModel->belongsTo(Customer::class, 'customer_id');
});
```

> [!WARNING]
> When defining dynamic relationships, always provide explicit key name arguments to the Eloquent relationship methods.

<a name="querying-relations"></a>
## Querying Relations

Since all Eloquent relationships are defined via methods, you may call those methods to obtain an instance of the relationship without actually executing a query to load the related models. In addition, all types of Eloquent relationships also serve as [query builders](/docs/{{version}}/queries), allowing you to continue to chain constraints onto the relationship query before finally executing the SQL query against your database.

For example, imagine a blog application in which a `User` model has many associated `Post` models:

```php
<?php

namespace App\Models;

use Illuminate\Database\Eloquent\Model;
use Illuminate\Database\Eloquent\Relations\HasMany;

class User extends Model
{
    /**
     * Get all of the posts for the user.
     */
    public function posts(): HasMany
    {
        return $this->hasMany(Post::class);
    }
}
```

You may query the `posts` relationship and add additional constraints to the relationship like so:

```php
use App\Models\User;

$user = User::find(1);

$user->posts()->where('active', 1)->get();
```

You are able to use any of the Laravel [query builder's](/docs/{{version}}/queries) methods on the relationship, so be sure to explore the query builder documentation to learn about all of the methods that are available to you.

<a name="chaining-orwhere-clauses-after-relationships"></a>
#### Chaining `orWhere` Clauses After Relationships

As demonstrated in the example above, you are free to add additional constraints to relationships when querying them. However, use caution when chaining `orWhere` clauses onto a relationship, as the `orWhere` clauses will be logically grouped at the same level as the relationship constraint:

```php
$user->posts()
    ->where('active', 1)
    ->orWhere('votes', '>=', 100)
    ->get();
```

The example above will generate the following SQL. As you can see, the `or` clause instructs the query to return _any_ post with greater than 100 votes. The query is no longer constrained to a specific user:

```sql
select *
from posts
where user_id = ? and active = 1 or votes >= 100
```

In most situations, you should use [logical groups](/docs/{{version}}/queries#logical-grouping) to group the conditional checks between parentheses:

```php
use Illuminate\Database\Eloquent\Builder;

$user->posts()
    ->where(function (Builder $query) {
        return $query->where('active', 1)
            ->orWhere('votes', '>=', 100);
    })
    ->get();
```

The example above will produce the following SQL. Note that the logical grouping has properly grouped the constraints and the query remains constrained to a specific user:

```sql
select *
from posts
where user_id = ? and (active = 1 or votes >= 100)
```

<a name="relationship-methods-vs-dynamic-properties"></a>
### Relationship Methods vs. Dynamic Properties

If you do not need to add additional constraints to an Eloquent relationship query, you may access the relationship as if it were a property. For example, continuing to use our `User` and `Post` example models, we may access all of a user's posts like so:

```php
use App\Models\User;

$user = User::find(1);

foreach ($user->posts as $post) {
    // ...
}
```

Dynamic relationship properties perform "lazy loading", meaning they will only load their relationship data when you actually access them. Because of this, developers often use [eager loading](#eager-loading) to pre-load relationships they know will be accessed after loading the model. Eager loading provides a significant reduction in SQL queries that must be executed to load a model's relations.

<a name="querying-relationship-existence"></a>
### Querying Relationship Existence

When retrieving model records, you may wish to limit your results based on the existence of a relationship. For example, imagine you want to retrieve all blog posts that have at least one comment. To do so, you may pass the name of the relationship to the `has` and `orHas` methods:

```php
use App\Models\Post;

// Retrieve all posts that have at least one comment...
$posts = Post::has('comments')->get();
```

You may also specify an operator and count value to further customize the query:

```php
// Retrieve all posts that have three or more comments...
$posts = Post::has('comments', '>=', 3)->get();
```

Nested `has` statements may be constructed using "dot" notation. For example, you may retrieve all posts that have at least one comment that has at least one image:

```php
// Retrieve posts that have at least one comment with images...
$posts = Post::has('comments.images')->get();
```

If you need even more power, you may use the `whereHas` and `orWhereHas` methods to define additional query constraints on your `has` queries, such as inspecting the content of a comment:

```php
use Illuminate\Database\Eloquent\Builder;

// Retrieve posts with at least one comment containing words like code%...
$posts = Post::whereHas('comments', function (Builder $query) {
    $query->where('content', 'like', 'code%');
})->get();

// Retrieve posts with at least ten comments containing words like code%...
$posts = Post::whereHas('comments', function (Builder $query) {
    $query->where('content', 'like', 'code%');
}, '>=', 10)->get();
```

> [!WARNING]
> Eloquent does not currently support querying for relationship existence across databases. The relationships must exist within the same database.

<a name="many-to-many-relationship-existence-queries"></a>
#### Many to Many Relationship Existence Queries

The `whereAttachedTo` method may be used to query for models that have a many to many attachment to a model or collection of models:

```php
$users = User::whereAttachedTo($role)->get();
```

You may also provide a [collection](/docs/{{version}}/eloquent-collections) instance to the `whereAttachedTo` method. When doing so, Laravel will retrieve models that are attached to any of the models within the collection:

```php
$tags = Tag::whereLike('name', '%laravel%')->get();

$posts = Post::whereAttachedTo($tags)->get();
```

<a name="inline-relationship-existence-queries"></a>
#### Inline Relationship Existence Queries

If you would like to query for a relationship's existence with a single, simple where condition attached to the relationship query, you may find it more convenient to use the `whereRelation`, `orWhereRelation`, `whereMorphRelation`, and `orWhereMorphRelation` methods. For example, we may query for all posts that have unapproved comments:

```php
use App\Models\Post;

$posts = Post::whereRelation('comments', 'is_approved', false)->get();
```

Of course, like calls to the query builder's `where` method, you may also specify an operator:

```php
$posts = Post::whereRelation(
    'comments', 'created_at', '>=', now()->minus(hours: 1)
)->get();
```

<a name="querying-relationship-absence"></a>
### Querying Relationship Absence

When retrieving model records, you may wish to limit your results based on the absence of a relationship. For example, imagine you want to retrieve all blog posts that **don't** have any comments. To do so, you may pass the name of the relationship to the `doesntHave` and `orDoesntHave` methods:

```php
use App\Models\Post;

$posts = Post::doesntHave('comments')->get();
```

If you need even more power, you may use the `whereDoesntHave` and `orWhereDoesntHave` methods to add additional query constraints to your `doesntHave` queries, such as inspecting the content of a comment:

```php
use Illuminate\Database\Eloquent\Builder;

$posts = Post::whereDoesntHave('comments', function (Builder $query) {
    $query->where('content', 'like', 'code%');
})->get();
```

You may use "dot" notation to execute a query against a nested relationship. For example, the following query will retrieve all posts that do not have comments as well as posts that have comments where none of the comments are from banned users:

```php
use Illuminate\Database\Eloquent\Builder;

$posts = Post::whereDoesntHave('comments.author', function (Builder $query) {
    $query->where('banned', 1);
})->get();
```

<a name="querying-morph-to-relationships"></a>
### Querying Morph To Relationships

To query the existence of "morph to" relationships, you may use the `whereHasMorph` and `whereDoesntHaveMorph` methods. These methods accept the name of the relationship as their first argument. Next, the methods accept the names of the related models that you wish to include in the query. Finally, you may provide a closure which customizes the relationship query:

```php
use App\Models\Comment;
use App\Models\Post;
use App\Models\Video;
use Illuminate\Database\Eloquent\Builder;

// Retrieve comments associated to posts or videos with a title like code%...
$comments = Comment::whereHasMorph(
    'commentable',
    [Post::class, Video::class],
    function (Builder $query) {
        $query->where('title', 'like', 'code%');
    }
)->get();

// Retrieve comments associated to posts with a title not like code%...
$comments = Comment::whereDoesntHaveMorph(
    'commentable',
    Post::class,
    function (Builder $query) {
        $query->where('title', 'like', 'code%');
    }
)->get();
```

You may occasionally need to add query constraints based on the "type" of the related polymorphic model. The closure passed to the `whereHasMorph` method may receive a `$type` value as its second argument. This argument allows you to inspect the "type" of the query that is being built:

```php
use Illuminate\Database\Eloquent\Builder;

$comments = Comment::whereHasMorph(
    'commentable',
    [Post::class, Video::class],
    function (Builder $query, string $type) {
        $column = $type === Post::class ? 'content' : 'title';

        $query->where($column, 'like', 'code%');
    }
)->get();
```

Sometimes you may want to query for the children of a "morph to" relationship's parent. You may accomplish this using the `whereMorphedTo` and `whereNotMorphedTo` methods, which will automatically determine the proper morph type mapping for the given model. These methods accept the name of the `morphTo` relationship as their first argument and the related parent model as their second argument:

```php
$comments = Comment::whereMorphedTo('commentable', $post)
    ->orWhereMorphedTo('commentable', $video)
    ->get();
```

<a name="querying-all-morph-to-related-models"></a>
#### Querying All Related Models

Instead of passing an array of possible polymorphic models, you may provide `*` as a wildcard value. This will instruct Laravel to retrieve all of the possible polymorphic types from the database. Laravel will execute an additional query in order to perform this operation:

```php
use Illuminate\Database\Eloquent\Builder;

$comments = Comment::whereHasMorph('commentable', '*', function (Builder $query) {
    $query->where('title', 'like', 'foo%');
})->get();
```

<a name="aggregating-related-models"></a>
## Aggregating Related Models

<a name="counting-related-models"></a>
### Counting Related Models

Sometimes you may want to count the number of related models for a given relationship without actually loading the models. To accomplish this, you may use the `withCount` method. The `withCount` method will place a `{relation}_count` attribute on the resulting models:

```php
use App\Models\Post;

$posts = Post::withCount('comments')->get();

foreach ($posts as $post) {
    echo $post->comments_count;
}
```

By passing an array to the `withCount` method, you may add the "counts" for multiple relations as well as add additional constraints to the queries:

```php
use Illuminate\Database\Eloquent\Builder;

$posts = Post::withCount(['votes', 'comments' => function (Builder $query) {
    $query->where('content', 'like', 'code%');
}])->get();

echo $posts[0]->votes_count;
echo $posts[0]->comments_count;
```

You may also alias the relationship count result, allowing multiple counts on the same relationship:

```php
use Illuminate\Database\Eloquent\Builder;

$posts = Post::withCount([
    'comments',
    'comments as pending_comments_count' => function (Builder $query) {
        $query->where('approved', false);
    },
])->get();

echo $posts[0]->comments_count;
echo $posts[0]->pending_comments_count;
```

<a name="deferred-count-loading"></a>
#### Deferred Count Loading

Using the `loadCount` method, you may load a relationship count after the parent model has already been retrieved:

```php
$book = Book::first();

$book->loadCount('genres');
```

If you need to set additional query constraints on the count query, you may pass an array keyed by the relationships you wish to count. The array values should be closures which receive the query builder instance:

```php
$book->loadCount(['reviews' => function (Builder $query) {
    $query->where('rating', 5);
}])
```

<a name="relationship-counting-and-custom-select-statements"></a>
#### Relationship Counting and Custom Select Statements

If you're combining `withCount` with a `select` statement, ensure that you call `withCount` after the `select` method:

```php
$posts = Post::select(['title', 'body'])
    ->withCount('comments')
    ->get();
```

<a name="other-aggregate-functions"></a>
### Other Aggregate Functions

In addition to the `withCount` method, Eloquent provides `withMin`, `withMax`, `withAvg`, `withSum`, and `withExists` methods. These methods will place a `{relation}_{function}_{column}` attribute on your resulting models:

```php
use App\Models\Post;

$posts = Post::withSum('comments', 'votes')->get();

foreach ($posts as $post) {
    echo $post->comments_sum_votes;
}
```

If you wish to access the result of the aggregate function using another name, you may specify your own alias:

```php
$posts = Post::withSum('comments as total_comments', 'votes')->get();

foreach ($posts as $post) {
    echo $post->total_comments;
}
```

Like the `loadCount` method, deferred versions of these methods are also available. These additional aggregate operations may be performed on Eloquent models that have already been retrieved:

```php
$post = Post::first();

$post->loadSum('comments', 'votes');
```

If you're combining these aggregate methods with a `select` statement, ensure that you call the aggregate methods after the `select` method:

```php
$posts = Post::select(['title', 'body'])
    ->withExists('comments')
    ->get();
```

<a name="counting-related-models-on-morph-to-relationships"></a>
### Counting Related Models on Morph To Relationships

If you would like to eager load a "morph to" relationship, as well as related model counts for the various entities that may be returned by that relationship, you may utilize the `with` method in combination with the `morphTo` relationship's `morphWithCount` method.

In this example, let's assume that `Photo` and `Post` models may create `ActivityFeed` models. We will assume the `ActivityFeed` model defines a "morph to" relationship named `parentable` that allows us to retrieve the parent `Photo` or `Post` model for a given `ActivityFeed` instance. Additionally, let's assume that `Photo` models "have many" `Tag` models and `Post` models "have many" `Comment` models.

Now, let's imagine we want to retrieve `ActivityFeed` instances and eager load the `parentable` parent models for each `ActivityFeed` instance. In addition, we want to retrieve the number of tags that are associated with each parent photo and the number of comments that are associated with each parent post:

```php
use Illuminate\Database\Eloquent\Relations\MorphTo;

$activities = ActivityFeed::with([
    'parentable' => function (MorphTo $morphTo) {
        $morphTo->morphWithCount([
            Photo::class => ['tags'],
            Post::class => ['comments'],
        ]);
    }])->get();
```

<a name="morph-to-deferred-count-loading"></a>
#### Deferred Count Loading

Let's assume we have already retrieved a set of `ActivityFeed` models and now we would like to load the nested relationship counts for the various `parentable` models associated with the activity feeds. You may use the `loadMorphCount` method to accomplish this:

```php
$activities = ActivityFeed::with('parentable')->get();

$activities->loadMorphCount('parentable', [
    Photo::class => ['tags'],
    Post::class => ['comments'],
]);
```

<a name="eager-loading"></a>
## Eager Loading

When accessing Eloquent relationships as properties, the related models are "lazy loaded". This means the relationship data is not actually loaded until you first access the property. However, Eloquent can "eager load" relationships at the time you query the parent model. Eager loading alleviates the "N + 1" query problem. To illustrate the N + 1 query problem, consider a `Book` model that "belongs to" to an `Author` model:

```php
<?php

namespace App\Models;

use Illuminate\Database\Eloquent\Model;
use Illuminate\Database\Eloquent\Relations\BelongsTo;

class Book extends Model
{
    /**
     * Get the author that wrote the book.
     */
    public function author(): BelongsTo
    {
        return $this->belongsTo(Author::class);
    }
}
```

Now, let's retrieve all books and their authors:

```php
use App\Models\Book;

$books = Book::all();

foreach ($books as $book) {
    echo $book->author->name;
}
```

This loop will execute one query to retrieve all of the books within the database table, then another query for each book in order to retrieve the book's author. So, if we have 25 books, the code above would run 26 queries: one for the original book, and 25 additional queries to retrieve the author of each book.

Thankfully, we can use eager loading to reduce this operation to just two queries. When building a query, you may specify which relationships should be eager loaded using the `with` method:

```php
$books = Book::with('author')->get();

foreach ($books as $book) {
    echo $book->author->name;
}
```

For this operation, only two queries will be executed - one query to retrieve all of the books and one query to retrieve all of the authors for all of the books:

```sql
select * from books

select * from authors where id in (1, 2, 3, 4, 5, ...)
```

<a name="eager-loading-multiple-relationships"></a>
#### Eager Loading Multiple Relationships

Sometimes you may need to eager load several different relationships. To do so, just pass an array of relationships to the `with` method:

```php
$books = Book::with(['author', 'publisher'])->get();
```

<a name="nested-eager-loading"></a>
#### Nested Eager Loading

To eager load a relationship's relationships, you may use "dot" syntax. For example, let's eager load all of the book's authors and all of the author's personal contacts:

```php
$books = Book::with('author.contacts')->get();
```

Alternatively, you may specify nested eager loaded relationships by providing a nested array to the `with` method, which can be convenient when eager loading multiple nested relationships:

```php
$books = Book::with([
    'author' => [
        'contacts',
        'publisher',
    ],
])->get();
```

<a name="nested-eager-loading-morphto-relationships"></a>
#### Nested Eager Loading `morphTo` Relationships

If you would like to eager load a `morphTo` relationship, as well as nested relationships on the various entities that may be returned by that relationship, you may use the `with` method in combination with the `morphTo` relationship's `morphWith` method. To help illustrate this method, let's consider the following model:

```php
<?php

use Illuminate\Database\Eloquent\Model;
use Illuminate\Database\Eloquent\Relations\MorphTo;

class ActivityFeed extends Model
{
    /**
     * Get the parent of the activity feed record.
     */
    public function parentable(): MorphTo
    {
        return $this->morphTo();
    }
}
```

In this example, let's assume `Event`, `Photo`, and `Post` models may create `ActivityFeed` models. Additionally, let's assume that `Event` models belong to a `Calendar` model, `Photo` models are associated with `Tag` models, and `Post` models belong to an `Author` model.

Using these model definitions and relationships, we may retrieve `ActivityFeed` model instances and eager load all `parentable` models and their respective nested relationships:

```php
use Illuminate\Database\Eloquent\Relations\MorphTo;

$activities = ActivityFeed::query()
    ->with(['parentable' => function (MorphTo $morphTo) {
        $morphTo->morphWith([
            Event::class => ['calendar'],
            Photo::class => ['tags'],
            Post::class => ['author'],
        ]);
    }])->get();
```

<a name="eager-loading-specific-columns"></a>
#### Eager Loading Specific Columns

You may not always need every column from the relationships you are retrieving. For this reason, Eloquent allows you to specify which columns of the relationship you would like to retrieve:

```php
$books = Book::with('author:id,name,book_id')->get();
```

> [!WARNING]
> When using this feature, you should always include the `id` column and any relevant foreign key columns in the list of columns you wish to retrieve.

<a name="eager-loading-by-default"></a>
#### Eager Loading by Default

Sometimes you might want to always load some relationships when retrieving a model. To accomplish this, you may define a `$with` property on the model:

```php
<?php

namespace App\Models;

use Illuminate\Database\Eloquent\Model;
use Illuminate\Database\Eloquent\Relations\BelongsTo;

class Book extends Model
{
    /**
     * The relationships that should always be loaded.
     *
     * @var array
     */
    protected $with = ['author'];

    /**
     * Get the author that wrote the book.
     */
    public function author(): BelongsTo
    {
        return $this->belongsTo(Author::class);
    }

    /**
     * Get the genre of the book.
     */
    public function genre(): BelongsTo
    {
        return $this->belongsTo(Genre::class);
    }
}
```

If you would like to remove an item from the `$with` property for a single query, you may use the `without` method:

```php
$books = Book::without('author')->get();
```

If you would like to override all items within the `$with` property for a single query, you may use the `withOnly` method:

```php
$books = Book::withOnly('genre')->get();
```

<a name="constraining-eager-loads"></a>
### Constraining Eager Loads

Sometimes you may wish to eager load a relationship but also specify additional query conditions for the eager loading query. You can accomplish this by passing an array of relationships to the `with` method where the array key is a relationship name and the array value is a closure that adds additional constraints to the eager loading query:

```php
use App\Models\User;

$users = User::with(['posts' => function ($query) {
    $query->where('title', 'like', '%code%');
}])->get();
```

In this example, Eloquent will only eager load posts where the post's `title` column contains the word `code`. You may call other [query builder](/docs/{{version}}/queries) methods to further customize the eager loading operation:

```php
$users = User::with(['posts' => function ($query) {
    $query->orderBy('created_at', 'desc');
}])->get();
```

<a name="constraining-eager-loading-of-morph-to-relationships"></a>
#### Constraining Eager Loading of `morphTo` Relationships

If you are eager loading a `morphTo` relationship, Eloquent will run multiple queries to fetch each type of related model. You may add additional constraints to each of these queries using the `MorphTo` relation's `constrain` method:

```php
use Illuminate\Database\Eloquent\Relations\MorphTo;

$comments = Comment::with(['commentable' => function (MorphTo $morphTo) {
    $morphTo->constrain([
        Post::class => function ($query) {
            $query->whereNull('hidden_at');
        },
        Video::class => function ($query) {
            $query->where('type', 'educational');
        },
    ]);
}])->get();
```

In this example, Eloquent will only eager load posts that have not been hidden and videos that have a `type` value of "educational".

<a name="constraining-eager-loads-with-relationship-existence"></a>
#### Constraining Eager Loads With Relationship Existence

You may sometimes find yourself needing to check for the existence of a relationship while simultaneously loading the relationship based on the same conditions. For example, you may wish to only retrieve `User` models that have child `Post` models matching a given query condition while also eager loading the matching posts. You may accomplish this using the `withWhereHas` method:

```php
use App\Models\User;

$users = User::withWhereHas('posts', function ($query) {
    $query->where('featured', true);
})->get();
```

<a name="lazy-eager-loading"></a>
### Lazy Eager Loading

Sometimes you may need to eager load a relationship after the parent model has already been retrieved. For example, this may be useful if you need to dynamically decide whether to load related models:

```php
use App\Models\Book;

$books = Book::all();

if ($condition) {
    $books->load('author', 'publisher');
}
```

If you need to set additional query constraints on the eager loading query, you may pass an array keyed by the relationships you wish to load. The array values should be closure instances which receive the query instance:

```php
$author->load(['books' => function ($query) {
    $query->orderBy('published_date', 'asc');
}]);
```

To load a relationship only when it has not already been loaded, use the `loadMissing` method:

```php
$book->loadMissing('author');
```

<a name="nested-lazy-eager-loading-morphto"></a>
#### Nested Lazy Eager Loading and `morphTo`

If you would like to eager load a `morphTo` relationship, as well as nested relationships on the various entities that may be returned by that relationship, you may use the `loadMorph` method.

This method accepts the name of the `morphTo` relationship as its first argument, and an array of model / relationship pairs as its second argument. To help illustrate this method, let's consider the following model:

```php
<?php

use Illuminate\Database\Eloquent\Model;
use Illuminate\Database\Eloquent\Relations\MorphTo;

class ActivityFeed extends Model
{
    /**
     * Get the parent of the activity feed record.
     */
    public function parentable(): MorphTo
    {
        return $this->morphTo();
    }
}
```

In this example, let's assume `Event`, `Photo`, and `Post` models may create `ActivityFeed` models. Additionally, let's assume that `Event` models belong to a `Calendar` model, `Photo` models are associated with `Tag` models, and `Post` models belong to an `Author` model.

Using these model definitions and relationships, we may retrieve `ActivityFeed` model instances and eager load all `parentable` models and their respective nested relationships:

```php
$activities = ActivityFeed::with('parentable')
    ->get()
    ->loadMorph('parentable', [
        Event::class => ['calendar'],
        Photo::class => ['tags'],
        Post::class => ['author'],
    ]);
```

<a name="automatic-eager-loading"></a>
### Automatic Eager Loading

In many cases, Laravel can automatically eager load the relationships you access. To enable automatic eager loading, you should invoke the `Model::automaticallyEagerLoadRelationships` method within the `boot` method of your application's `AppServiceProvider`:

```php
use Illuminate\Database\Eloquent\Model;

/**
 * Bootstrap any application services.
 */
public function boot(): void
{
    Model::automaticallyEagerLoadRelationships();
}
```

When this feature is enabled, Laravel will attempt to automatically load any relationships you access that have not been previously loaded. For example, consider the following scenario:

```php
use App\Models\User;

$users = User::all();

foreach ($users as $user) {
    foreach ($user->posts as $post) {
        foreach ($post->comments as $comment) {
            echo $comment->content;
        }
    }
}
```

Typically, the code above would execute a query for each user in order to retrieve their posts, as well as a query for each post to retrieve its comments. However, when the `automaticallyEagerLoadRelationships` feature has been enabled, Laravel will automatically [lazy eager load](#lazy-eager-loading) the posts for all users in the user collection when you attempt to access the posts on any of the retrieved users. Likewise, when you attempt to access the comments for any retrieved post, all comments will be lazy eager loaded for all posts that were originally retrieved.

If you do not want to globally enable automatic eager loading, you can still enable this feature for a single Eloquent collection instance by invoking the `withRelationshipAutoloading` method on the collection:

```php
$users = User::where('vip', true)->get();

return $users->withRelationshipAutoloading();
```

<a name="preventing-lazy-loading"></a>
### Preventing Lazy Loading

As previously discussed, eager loading relationships can often provide significant performance benefits to your application. Therefore, if you would like, you may instruct Laravel to always prevent the lazy loading of relationships. To accomplish this, you may invoke the `preventLazyLoading` method offered by the base Eloquent model class. Typically, you should call this method within the `boot` method of your application's `AppServiceProvider` class.

The `preventLazyLoading` method accepts an optional boolean argument that indicates if lazy loading should be prevented. For example, you may wish to only disable lazy loading in non-production environments so that your production environment will continue to function normally even if a lazy loaded relationship is accidentally present in production code:

```php
use Illuminate\Database\Eloquent\Model;

/**
 * Bootstrap any application services.
 */
public function boot(): void
{
    Model::preventLazyLoading(! $this->app->isProduction());
}
```

After preventing lazy loading, Eloquent will throw a `Illuminate\Database\LazyLoadingViolationException` exception when your application attempts to lazy load any Eloquent relationship.

You may customize the behavior of lazy loading violations using the `handleLazyLoadingViolationsUsing` method. For example, using this method, you may instruct lazy loading violations to only be logged instead of interrupting the application's execution with exceptions:

```php
Model::handleLazyLoadingViolationUsing(function (Model $model, string $relation) {
    $class = $model::class;

    info("Attempted to lazy load [{$relation}] on model [{$class}].");
});
```

<a name="inserting-and-updating-related-models"></a>
## Inserting and Updating Related Models

<a name="the-save-method"></a>
### The `save` Method

Eloquent provides convenient methods for adding new models to relationships. For example, perhaps you need to add a new comment to a post. Instead of manually setting the `post_id` attribute on the `Comment` model you may insert the comment using the relationship's `save` method:

```php
use App\Models\Comment;
use App\Models\Post;

$comment = new Comment(['message' => 'A new comment.']);

$post = Post::find(1);

$post->comments()->save($comment);
```

Note that we did not access the `comments` relationship as a dynamic property. Instead, we called the `comments` method to obtain an instance of the relationship. The `save` method will automatically add the appropriate `post_id` value to the new `Comment` model.

If you need to save multiple related models, you may use the `saveMany` method:

```php
$post = Post::find(1);

$post->comments()->saveMany([
    new Comment(['message' => 'A new comment.']),
    new Comment(['message' => 'Another new comment.']),
]);
```

The `save` and `saveMany` methods will persist the given model instances, but will not add the newly persisted models to any in-memory relationships that are already loaded onto the parent model. If you plan on accessing the relationship after using the `save` or `saveMany` methods, you may wish to use the `refresh` method to reload the model and its relationships:

```php
$post->comments()->save($comment);

$post->refresh();

// All comments, including the newly saved comment...
$post->comments;
```

<a name="the-push-method"></a>
#### Recursively Saving Models and Relationships

If you would like to `save` your model and all of its associated relationships, you may use the `push` method. In this example, the `Post` model will be saved as well as its comments and the comment's authors:

```php
$post = Post::find(1);

$post->comments[0]->message = 'Message';
$post->comments[0]->author->name = 'Author Name';

$post->push();
```

The `pushQuietly` method may be used to save a model and its associated relationships without raising any events:

```php
$post->pushQuietly();
```

<a name="the-create-method"></a>
### The `create` Method

In addition to the `save` and `saveMany` methods, you may also use the `create` method, which accepts an array of attributes, creates a model, and inserts it into the database. The difference between `save` and `create` is that `save` accepts a full Eloquent model instance while `create` accepts a plain PHP `array`. The newly created model will be returned by the `create` method:

```php
use App\Models\Post;

$post = Post::find(1);

$comment = $post->comments()->create([
    'message' => 'A new comment.',
]);
```

You may use the `createMany` method to create multiple related models:

```php
$post = Post::find(1);

$post->comments()->createMany([
    ['message' => 'A new comment.'],
    ['message' => 'Another new comment.'],
]);
```

The `createQuietly` and `createManyQuietly` methods may be used to create a model(s) without dispatching any events:

```php
$user = User::find(1);

$user->posts()->createQuietly([
    'title' => 'Post title.',
]);

$user->posts()->createManyQuietly([
    ['title' => 'First post.'],
    ['title' => 'Second post.'],
]);
```

You may also use the `findOrNew`, `firstOrNew`, `firstOrCreate`, and `updateOrCreate` methods to [create and update models on relationships](/docs/{{version}}/eloquent#upserts).

> [!NOTE]
> Before using the `create` method, be sure to review the [mass assignment](/docs/{{version}}/eloquent#mass-assignment) documentation.

<a name="updating-belongs-to-relationships"></a>
### Belongs To Relationships

If you would like to assign a child model to a new parent model, you may use the `associate` method. In this example, the `User` model defines a `belongsTo` relationship to the `Account` model. This `associate` method will set the foreign key on the child model:

```php
use App\Models\Account;

$account = Account::find(10);

$user->account()->associate($account);

$user->save();
```

To remove a parent model from a child model, you may use the `dissociate` method. This method will set the relationship's foreign key to `null`:

```php
$user->account()->dissociate();

$user->save();
```

<a name="updating-many-to-many-relationships"></a>
### Many to Many Relationships

<a name="attaching-detaching"></a>
#### Attaching / Detaching

Eloquent also provides methods to make working with many-to-many relationships more convenient. For example, let's imagine a user can have many roles and a role can have many users. You may use the `attach` method to attach a role to a user by inserting a record in the relationship's intermediate table:

```php
use App\Models\User;

$user = User::find(1);

$user->roles()->attach($roleId);
```

When attaching a relationship to a model, you may also pass an array of additional data to be inserted into the intermediate table:

```php
$user->roles()->attach($roleId, ['expires' => $expires]);
```

Sometimes it may be necessary to remove a role from a user. To remove a many-to-many relationship record, use the `detach` method. The `detach` method will delete the appropriate record out of the intermediate table; however, both models will remain in the database:

```php
// Detach a single role from the user...
$user->roles()->detach($roleId);

// Detach all roles from the user...
$user->roles()->detach();
```

For convenience, `attach` and `detach` also accept arrays of IDs as input:

```php
$user = User::find(1);

$user->roles()->detach([1, 2, 3]);

$user->roles()->attach([
    1 => ['expires' => $expires],
    2 => ['expires' => $expires],
]);
```

<a name="syncing-associations"></a>
#### Syncing Associations

You may also use the `sync` method to construct many-to-many associations. The `sync` method accepts an array of IDs to place on the intermediate table. Any IDs that are not in the given array will be removed from the intermediate table. So, after this operation is complete, only the IDs in the given array will exist in the intermediate table:

```php
$user->roles()->sync([1, 2, 3]);
```

You may also pass additional intermediate table values with the IDs:

```php
$user->roles()->sync([1 => ['expires' => true], 2, 3]);
```

If you would like to insert the same intermediate table values with each of the synced model IDs, you may use the `syncWithPivotValues` method:

```php
$user->roles()->syncWithPivotValues([1, 2, 3], ['active' => true]);
```

If you do not want to detach existing IDs that are missing from the given array, you may use the `syncWithoutDetaching` method:

```php
$user->roles()->syncWithoutDetaching([1, 2, 3]);
```

<a name="toggling-associations"></a>
#### Toggling Associations

The many-to-many relationship also provides a `toggle` method which "toggles" the attachment status of the given related model IDs. If the given ID is currently attached, it will be detached. Likewise, if it is currently detached, it will be attached:

```php
$user->roles()->toggle([1, 2, 3]);
```

You may also pass additional intermediate table values with the IDs:

```php
$user->roles()->toggle([
    1 => ['expires' => true],
    2 => ['expires' => true],
]);
```

<a name="transactional-pivot-operations"></a>
#### Transactional Pivot Operations

Each of the pivot operations discussed above also has an `OrFail` variant (`attachOrFail`, `detachOrFail`, `syncOrFail`, `syncWithoutDetachingOrFail`, and `toggleOrFail`) that wraps the operation within a database transaction, so that all changes are automatically rolled back if an exception is thrown:

```php
$user->roles()->attachOrFail([1, 2, 3]);

$user->roles()->syncOrFail([1, 2, 3]);
```

<a name="updating-a-record-on-the-intermediate-table"></a>
#### Updating a Record on the Intermediate Table

If you need to update an existing row in your relationship's intermediate table, you may use the `updateExistingPivot` method. This method accepts the intermediate record foreign key and an array of attributes to update:

```php
$user = User::find(1);

$user->roles()->updateExistingPivot($roleId, [
    'active' => false,
]);
```

<a name="touching-parent-timestamps"></a>
## Touching Parent Timestamps

When a model defines a `belongsTo` or `belongsToMany` relationship to another model, such as a `Comment` which belongs to a `Post`, it is sometimes helpful to update the parent's timestamp when the child model is updated.

For example, when a `Comment` model is updated, you may want to automatically "touch" the `updated_at` timestamp of the owning `Post` so that it is set to the current date and time. To accomplish this, you may use the `Touches` attribute on your child model containing the names of the relationships that should have their `updated_at` timestamps updated when the child model is updated:

```php
<?php

namespace App\Models;

use Illuminate\Database\Eloquent\Attributes\Touches;
use Illuminate\Database\Eloquent\Model;
use Illuminate\Database\Eloquent\Relations\BelongsTo;

#[Touches(['post'])]
class Comment extends Model
{
    /**
     * Get the post that the comment belongs to.
     */
    public function post(): BelongsTo
    {
        return $this->belongsTo(Post::class);
    }
}
```

> [!WARNING]
> Parent model timestamps will only be updated if the child model is updated using Eloquent's `save` method.


---

# Eloquent: API Resources

*Sección: Laravel | Origen: https://laravel.com/docs/13.x/eloquent-resources*

- [Introduction](#introduction)
- [Generating Resources](#generating-resources)
- [Concept Overview](#concept-overview)
    - [Resource Collections](#resource-collections)
- [Writing Resources](#writing-resources)
    - [Data Wrapping](#data-wrapping)
    - [Pagination](#pagination)
    - [Conditional Attributes](#conditional-attributes)
    - [Conditional Relationships](#conditional-relationships)
    - [Adding Meta Data](#adding-meta-data)
- [JSON:API Resources](#jsonapi-resources)
    - [Generating JSON:API Resources](#generating-jsonapi-resources)
    - [Defining Attributes](#defining-jsonapi-attributes)
    - [Defining Relationships](#defining-jsonapi-relationships)
    - [Resource Type and ID](#jsonapi-resource-type-and-id)
    - [Sparse Fieldsets and Includes](#jsonapi-sparse-fieldsets-and-includes)
    - [Links and Meta](#jsonapi-links-and-meta)
- [Resource Responses](#resource-responses)

<a name="introduction"></a>
## Introduction

When building an API, you may need a transformation layer that sits between your Eloquent models and the JSON responses that are actually returned to your application's users. For example, you may wish to display certain attributes for a subset of users and not others, or you may wish to always include certain relationships in the JSON representation of your models. Eloquent's resource classes allow you to expressively and easily transform your models and model collections into JSON.

Of course, you may always convert Eloquent models or collections to JSON using their `toJson` methods; however, Eloquent resources provide more granular and robust control over the JSON serialization of your models and their relationships.

<a name="generating-resources"></a>
## Generating Resources

To generate a resource class, you may use the `make:resource` Artisan command. By default, resources will be placed in the `app/Http/Resources` directory of your application. Resources extend the `Illuminate\Http\Resources\Json\JsonResource` class:

```shell
php artisan make:resource UserResource
```

<a name="generating-resource-collections"></a>
#### Resource Collections

In addition to generating resources that transform individual models, you may generate resources that are responsible for transforming collections of models. This allows your JSON responses to include links and other meta information that is relevant to an entire collection of a given resource.

To create a resource collection, you should use the `--collection` flag when creating the resource. Or, including the word `Collection` in the resource name will indicate to Laravel that it should create a collection resource. Collection resources extend the `Illuminate\Http\Resources\Json\ResourceCollection` class:

```shell
php artisan make:resource User --collection

php artisan make:resource UserCollection
```

<a name="concept-overview"></a>
## Concept Overview

> [!NOTE]
> This is a high-level overview of resources and resource collections. You are highly encouraged to read the other sections of this documentation to gain a deeper understanding of the customization and power offered to you by resources.

Before diving into all of the options available to you when writing resources, let's first take a high-level look at how resources are used within Laravel. A resource class represents a single model that needs to be transformed into a JSON structure. For example, here is a simple `UserResource` resource class:

```php
<?php

namespace App\Http\Resources;

use Illuminate\Http\Request;
use Illuminate\Http\Resources\Json\JsonResource;

class UserResource extends JsonResource
{
    /**
     * Transform the resource into an array.
     *
     * @return array<string, mixed>
     */
    public function toArray(Request $request): array
    {
        return [
            'id' => $this->id,
            'name' => $this->name,
            'email' => $this->email,
            'created_at' => $this->created_at,
            'updated_at' => $this->updated_at,
        ];
    }
}
```

Every resource class defines a `toArray` method which returns the array of attributes that should be converted to JSON when the resource is returned as a response from a route or controller method.

Note that we can access model properties directly from the `$this` variable. This is because a resource class will automatically proxy property and method access down to the underlying model for convenient access. Once the resource is defined, it may be returned from a route or controller. The resource accepts the underlying model instance via its constructor:

```php
use App\Http\Resources\UserResource;
use App\Models\User;

Route::get('/user/{id}', function (string $id) {
    return new UserResource(User::findOrFail($id));
});
```

For convenience, you may use the model's `toResource` method, which will use framework conventions to automatically discover the model's underlying resource:

```php
return User::findOrFail($id)->toResource();
```

When invoking the `toResource` method, Laravel will attempt to locate a resource that matches the model's name and is optionally suffixed with `Resource` within the `Http\Resources` namespace closest to the model's namespace.

If your resource class doesn't follow this naming convention or is located in a different namespace, you may specify the default resource for the model using the `UseResource` attribute:

```php
<?php

namespace App\Models;

use App\Http\Resources\CustomUserResource;
use Illuminate\Database\Eloquent\Model;
use Illuminate\Database\Eloquent\Attributes\UseResource;

#[UseResource(CustomUserResource::class)]
class User extends Model
{
    // ...
}
```

Alternatively, you may specify resource class by passing it to the `toResource` method:

```php
return User::findOrFail($id)->toResource(CustomUserResource::class);
```

<a name="resource-collections"></a>
### Resource Collections

If you are returning a collection of resources or a paginated response, you should use the `collection` method provided by your resource class when creating the resource instance in your route or controller:

```php
use App\Http\Resources\UserResource;
use App\Models\User;

Route::get('/users', function () {
    return UserResource::collection(User::all());
});
```

Or, for convenience, you may use the Eloquent collection's `toResourceCollection` method, which will use framework conventions to automatically discover the model's underlying resource collection:

```php
return User::all()->toResourceCollection();
```

When invoking the `toResourceCollection` method, Laravel will attempt to locate a resource collection that matches the model's name and is suffixed with `Collection` within the `Http\Resources` namespace closest to the model's namespace.

If your resource collection class doesn't follow this naming convention or is located in a different namespace, you may specify the default resource collection for the model using the `UseResourceCollection` attribute:

```php
<?php

namespace App\Models;

use App\Http\Resources\CustomUserCollection;
use Illuminate\Database\Eloquent\Model;
use Illuminate\Database\Eloquent\Attributes\UseResourceCollection;

#[UseResourceCollection(CustomUserCollection::class)]
class User extends Model
{
    // ...
}
```

Alternatively, you may specify the resource collection class by passing it to the `toResourceCollection` method:

```php
return User::all()->toResourceCollection(CustomUserCollection::class);
```

<a name="custom-resource-collections"></a>
#### Custom Resource Collections

By default, resource collections do not allow any addition of custom meta data that may need to be returned with your collection. If you would like to customize the resource collection response, you may create a dedicated resource to represent the collection:

```shell
php artisan make:resource UserCollection
```

Once the resource collection class has been generated, you may easily define any meta data that should be included with the response:

```php
<?php

namespace App\Http\Resources;

use Illuminate\Http\Request;
use Illuminate\Http\Resources\Json\ResourceCollection;

class UserCollection extends ResourceCollection
{
    /**
     * Transform the resource collection into an array.
     *
     * @return array<int|string, mixed>
     */
    public function toArray(Request $request): array
    {
        return [
            'data' => $this->collection,
            'links' => [
                'self' => 'link-value',
            ],
        ];
    }
}
```

After defining your resource collection, it may be returned from a route or controller:

```php
use App\Http\Resources\UserCollection;
use App\Models\User;

Route::get('/users', function () {
    return new UserCollection(User::all());
});
```

Or, for convenience, you may use the Eloquent collection's `toResourceCollection` method, which will use framework conventions to automatically discover the model's underlying resource collection:

```php
return User::all()->toResourceCollection();
```

When invoking the `toResourceCollection` method, Laravel will attempt to locate a resource collection that matches the model's name and is suffixed with `Collection` within the `Http\Resources` namespace closest to the model's namespace.

<a name="preserving-collection-keys"></a>
#### Preserving Collection Keys

When returning a resource collection from a route, Laravel resets the collection's keys so that they are in numerical order. However, you may use the `PreserveKeys` attribute on your resource class indicating whether a collection's original keys should be preserved:

```php
<?php

namespace App\Http\Resources;

use Illuminate\Http\Resources\Attributes\PreserveKeys;
use Illuminate\Http\Resources\Json\JsonResource;

#[PreserveKeys]
class UserResource extends JsonResource
{
    // ...
}
```

When the `preserveKeys` property is set to `true`, collection keys will be preserved when the collection is returned from a route or controller:

```php
use App\Http\Resources\UserResource;
use App\Models\User;

Route::get('/users', function () {
    return UserResource::collection(User::all()->keyBy->id);
});
```

<a name="customizing-the-underlying-resource-class"></a>
#### Customizing the Underlying Resource Class

Typically, the `$this->collection` property of a resource collection is automatically populated with the result of mapping each item of the collection to its singular resource class. The singular resource class is assumed to be the collection's class name without the trailing `Collection` portion of the class name. In addition, depending on your personal preference, the singular resource class may or may not be suffixed with `Resource`.

For example, `UserCollection` will attempt to map the given user instances into the `UserResource` resource. To customize this behavior, you may use the `Collects` attribute on your resource collection:

```php
<?php

namespace App\Http\Resources;

use Illuminate\Http\Resources\Attributes\Collects;
use Illuminate\Http\Resources\Json\ResourceCollection;

#[Collects(Member::class)]
class UserCollection extends ResourceCollection
{
    // ...
}
```

<a name="writing-resources"></a>
## Writing Resources

> [!NOTE]
> If you have not read the [concept overview](#concept-overview), you are highly encouraged to do so before proceeding with this documentation.

Resources only need to transform a given model into an array. So, each resource contains a `toArray` method which translates your model's attributes into an API friendly array that can be returned from your application's routes or controllers:

```php
<?php

namespace App\Http\Resources;

use Illuminate\Http\Request;
use Illuminate\Http\Resources\Json\JsonResource;

class UserResource extends JsonResource
{
    /**
     * Transform the resource into an array.
     *
     * @return array<string, mixed>
     */
    public function toArray(Request $request): array
    {
        return [
            'id' => $this->id,
            'name' => $this->name,
            'email' => $this->email,
            'created_at' => $this->created_at,
            'updated_at' => $this->updated_at,
        ];
    }
}
```

Once a resource has been defined, it may be returned directly from a route or controller:

```php
use App\Models\User;

Route::get('/user/{id}', function (string $id) {
    return User::findOrFail($id)->toUserResource();
});
```

<a name="relationships"></a>
#### Relationships

If you would like to include related resources in your response, you may add them to the array returned by your resource's `toArray` method. In this example, we will use the `PostResource` resource's `collection` method to add the user's blog posts to the resource response:

```php
use App\Http\Resources\PostResource;
use Illuminate\Http\Request;

/**
 * Transform the resource into an array.
 *
 * @return array<string, mixed>
 */
public function toArray(Request $request): array
{
    return [
        'id' => $this->id,
        'name' => $this->name,
        'email' => $this->email,
        'posts' => PostResource::collection($this->posts),
        'created_at' => $this->created_at,
        'updated_at' => $this->updated_at,
    ];
}
```

> [!NOTE]
> If you would like to include relationships only when they have already been loaded, check out the documentation on [conditional relationships](#conditional-relationships).

<a name="writing-resource-collections"></a>
#### Resource Collections

While resources transform a single model into an array, resource collections transform a collection of models into an array. However, it is not absolutely necessary to define a resource collection class for each one of your models since all Eloquent model collections provide a `toResourceCollection` method to generate an "ad-hoc" resource collection on the fly:

```php
use App\Models\User;

Route::get('/users', function () {
    return User::all()->toResourceCollection();
});
```

However, if you need to customize the meta data returned with the collection, it is necessary to define your own resource collection:

```php
<?php

namespace App\Http\Resources;

use Illuminate\Http\Request;
use Illuminate\Http\Resources\Json\ResourceCollection;

class UserCollection extends ResourceCollection
{
    /**
     * Transform the resource collection into an array.
     *
     * @return array<string, mixed>
     */
    public function toArray(Request $request): array
    {
        return [
            'data' => $this->collection,
            'links' => [
                'self' => 'link-value',
            ],
        ];
    }
}
```

Like singular resources, resource collections may be returned directly from routes or controllers:

```php
use App\Http\Resources\UserCollection;
use App\Models\User;

Route::get('/users', function () {
    return new UserCollection(User::all());
});
```

Or, for convenience, you may use the Eloquent collection's `toResourceCollection` method, which will use framework conventions to automatically discover the model's underlying resource collection:

```php
return User::all()->toResourceCollection();
```

When invoking the `toResourceCollection` method, Laravel will attempt to locate a resource collection that matches the model's name and is suffixed with `Collection` within the `Http\Resources` namespace closest to the model's namespace.

<a name="data-wrapping"></a>
### Data Wrapping

By default, your outermost resource is wrapped in a `data` key when the resource response is converted to JSON. So, for example, a typical resource collection response looks like the following:

```json
{
    "data": [
        {
            "id": 1,
            "name": "Eladio Schroeder Sr.",
            "email": "therese28@example.com"
        },
        {
            "id": 2,
            "name": "Liliana Mayert",
            "email": "evandervort@example.com"
        }
    ]
}
```

If you would like to disable the wrapping of the outermost resource, you should invoke the `withoutWrapping` method on the base `Illuminate\Http\Resources\Json\JsonResource` class. Typically, you should call this method from your `AppServiceProvider` or another [service provider](/docs/{{version}}/providers) that is loaded on every request to your application:

```php
<?php

namespace App\Providers;

use Illuminate\Http\Resources\Json\JsonResource;
use Illuminate\Support\ServiceProvider;

class AppServiceProvider extends ServiceProvider
{
    /**
     * Register any application services.
     */
    public function register(): void
    {
        // ...
    }

    /**
     * Bootstrap any application services.
     */
    public function boot(): void
    {
        JsonResource::withoutWrapping();
    }
}
```

> [!WARNING]
> The `withoutWrapping` method only affects the outermost response and will not remove `data` keys that you manually add to your own resource collections.

<a name="wrapping-nested-resources"></a>
#### Wrapping Nested Resources

You have total freedom to determine how your resource's relationships are wrapped. If you would like all resource collections to be wrapped in a `data` key, regardless of their nesting, you should define a resource collection class for each resource and return the collection within a `data` key.

You may be wondering if this will cause your outermost resource to be wrapped in two `data` keys. Don't worry, Laravel will never let your resources be accidentally double-wrapped, so you don't have to be concerned about the nesting level of the resource collection you are transforming:

```php
<?php

namespace App\Http\Resources;

use Illuminate\Http\Resources\Json\ResourceCollection;

class CommentsCollection extends ResourceCollection
{
    /**
     * Transform the resource collection into an array.
     *
     * @return array<string, mixed>
     */
    public function toArray(Request $request): array
    {
        return ['data' => $this->collection];
    }
}
```

<a name="data-wrapping-and-pagination"></a>
#### Data Wrapping and Pagination

When returning paginated collections via a resource response, Laravel will wrap your resource data in a `data` key even if the `withoutWrapping` method has been called. This is because paginated responses always contain `meta` and `links` keys with information about the paginator's state:

```json
{
    "data": [
        {
            "id": 1,
            "name": "Eladio Schroeder Sr.",
            "email": "therese28@example.com"
        },
        {
            "id": 2,
            "name": "Liliana Mayert",
            "email": "evandervort@example.com"
        }
    ],
    "links":{
        "first": "http://example.com/users?page=1",
        "last": "http://example.com/users?page=1",
        "prev": null,
        "next": null
    },
    "meta":{
        "current_page": 1,
        "from": 1,
        "last_page": 1,
        "path": "http://example.com/users",
        "per_page": 15,
        "to": 10,
        "total": 10
    }
}
```

<a name="pagination"></a>
### Pagination

You may pass a Laravel paginator instance to the `collection` method of a resource or to a custom resource collection:

```php
use App\Http\Resources\UserCollection;
use App\Models\User;

Route::get('/users', function () {
    return new UserCollection(User::paginate());
});
```

Or, for convenience, you may use the paginator's `toResourceCollection` method, which will use framework conventions to automatically discover the paginated model's underlying resource collection:

```php
return User::paginate()->toResourceCollection();
```

Paginated responses always contain `meta` and `links` keys with information about the paginator's state:

```json
{
    "data": [
        {
            "id": 1,
            "name": "Eladio Schroeder Sr.",
            "email": "therese28@example.com"
        },
        {
            "id": 2,
            "name": "Liliana Mayert",
            "email": "evandervort@example.com"
        }
    ],
    "links":{
        "first": "http://example.com/users?page=1",
        "last": "http://example.com/users?page=1",
        "prev": null,
        "next": null
    },
    "meta":{
        "current_page": 1,
        "from": 1,
        "last_page": 1,
        "path": "http://example.com/users",
        "per_page": 15,
        "to": 10,
        "total": 10
    }
}
```

<a name="customizing-the-pagination-information"></a>
#### Customizing the Pagination Information

If you would like to customize the information included in the `links` or `meta` keys of the pagination response, you may define a `paginationInformation` method on the resource. This method will receive the `$paginated` data and the array of `$default` information, which is an array containing the `links` and `meta` keys:

```php
/**
 * Customize the pagination information for the resource.
 *
 * @param  \Illuminate\Http\Request  $request
 * @param  array  $paginated
 * @param  array  $default
 * @return array
 */
public function paginationInformation($request, $paginated, $default)
{
    $default['links']['custom'] = 'https://example.com';

    return $default;
}
```

<a name="conditional-attributes"></a>
### Conditional Attributes

Sometimes you may wish to only include an attribute in a resource response if a given condition is met. For example, you may wish to only include a value if the current user is an "administrator". Laravel provides a variety of helper methods to assist you in this situation. The `when` method may be used to conditionally add an attribute to a resource response:

```php
/**
 * Transform the resource into an array.
 *
 * @return array<string, mixed>
 */
public function toArray(Request $request): array
{
    return [
        'id' => $this->id,
        'name' => $this->name,
        'email' => $this->email,
        'secret' => $this->when($request->user()->isAdmin(), 'secret-value'),
        'created_at' => $this->created_at,
        'updated_at' => $this->updated_at,
    ];
}
```

In this example, the `secret` key will only be returned in the final resource response if the authenticated user's `isAdmin` method returns `true`. If the method returns `false`, the `secret` key will be removed from the resource response before it is sent to the client. The `when` method allows you to expressively define your resources without resorting to conditional statements when building the array.

The `when` method also accepts a closure as its second argument, allowing you to calculate the resulting value only if the given condition is `true`:

```php
'secret' => $this->when($request->user()->isAdmin(), function () {
    return 'secret-value';
}),
```

The `whenHas` method may be used to include an attribute if it is actually present on the underlying model:

```php
'name' => $this->whenHas('name'),
```

Additionally, the `whenNotNull` method may be used to include an attribute in the resource response if the attribute is not null:

```php
'name' => $this->whenNotNull($this->name),
```

<a name="merging-conditional-attributes"></a>
#### Merging Conditional Attributes

Sometimes you may have several attributes that should only be included in the resource response based on the same condition. In this case, you may use the `mergeWhen` method to include the attributes in the response only when the given condition is `true`:

```php
/**
 * Transform the resource into an array.
 *
 * @return array<string, mixed>
 */
public function toArray(Request $request): array
{
    return [
        'id' => $this->id,
        'name' => $this->name,
        'email' => $this->email,
        $this->mergeWhen($request->user()->isAdmin(), [
            'first-secret' => 'value',
            'second-secret' => 'value',
        ]),
        'created_at' => $this->created_at,
        'updated_at' => $this->updated_at,
    ];
}
```

Again, if the given condition is `false`, these attributes will be removed from the resource response before it is sent to the client.

> [!WARNING]
> The `mergeWhen` method should not be used within arrays that mix string and numeric keys. Furthermore, it should not be used within arrays with numeric keys that are not ordered sequentially.

<a name="conditional-relationships"></a>
### Conditional Relationships

In addition to conditionally loading attributes, you may conditionally include relationships on your resource responses based on if the relationship has already been loaded on the model. This allows your controller to decide which relationships should be loaded on the model and your resource can easily include them only when they have actually been loaded. Ultimately, this makes it easier to avoid "N+1" query problems within your resources.

The `whenLoaded` method may be used to conditionally load a relationship. In order to avoid unnecessarily loading relationships, this method accepts the name of the relationship instead of the relationship itself:

```php
use App\Http\Resources\PostResource;

/**
 * Transform the resource into an array.
 *
 * @return array<string, mixed>
 */
public function toArray(Request $request): array
{
    return [
        'id' => $this->id,
        'name' => $this->name,
        'email' => $this->email,
        'posts' => PostResource::collection($this->whenLoaded('posts')),
        'created_at' => $this->created_at,
        'updated_at' => $this->updated_at,
    ];
}
```

In this example, if the relationship has not been loaded, the `posts` key will be removed from the resource response before it is sent to the client.

<a name="conditional-relationship-counts"></a>
#### Conditional Relationship Counts

In addition to conditionally including relationships, you may conditionally include relationship "counts" on your resource responses based on if the relationship's count has been loaded on the model:

```php
new UserResource($user->loadCount('posts'));
```

The `whenCounted` method may be used to conditionally include a relationship's count in your resource response. This method avoids unnecessarily including the attribute if the relationships' count is not present:

```php
/**
 * Transform the resource into an array.
 *
 * @return array<string, mixed>
 */
public function toArray(Request $request): array
{
    return [
        'id' => $this->id,
        'name' => $this->name,
        'email' => $this->email,
        'posts_count' => $this->whenCounted('posts'),
        'created_at' => $this->created_at,
        'updated_at' => $this->updated_at,
    ];
}
```

In this example, if the `posts` relationship's count has not been loaded, the `posts_count` key will be removed from the resource response before it is sent to the client.

Other types of aggregates, such as `avg`, `sum`, `min`, and `max` may also be conditionally loaded using the `whenAggregated` method:

```php
'words_avg' => $this->whenAggregated('posts', 'words', 'avg'),
'words_sum' => $this->whenAggregated('posts', 'words', 'sum'),
'words_min' => $this->whenAggregated('posts', 'words', 'min'),
'words_max' => $this->whenAggregated('posts', 'words', 'max'),
```

<a name="conditional-pivot-information"></a>
#### Conditional Pivot Information

In addition to conditionally including relationship information in your resource responses, you may conditionally include data from the intermediate tables of many-to-many relationships using the `whenPivotLoaded` method. The `whenPivotLoaded` method accepts the name of the pivot table as its first argument. The second argument should be a closure that returns the value to be returned if the pivot information is available on the model:

```php
/**
 * Transform the resource into an array.
 *
 * @return array<string, mixed>
 */
public function toArray(Request $request): array
{
    return [
        'id' => $this->id,
        'name' => $this->name,
        'expires_at' => $this->whenPivotLoaded('role_user', function () {
            return $this->pivot->expires_at;
        }),
    ];
}
```

If your relationship is using a [custom intermediate table model](/docs/{{version}}/eloquent-relationships#defining-custom-intermediate-table-models), you may pass an instance of the intermediate table model as the first argument to the `whenPivotLoaded` method:

```php
'expires_at' => $this->whenPivotLoaded(new Membership, function () {
    return $this->pivot->expires_at;
}),
```

If your intermediate table is using an accessor other than `pivot`, you may use the `whenPivotLoadedAs` method:

```php
/**
 * Transform the resource into an array.
 *
 * @return array<string, mixed>
 */
public function toArray(Request $request): array
{
    return [
        'id' => $this->id,
        'name' => $this->name,
        'expires_at' => $this->whenPivotLoadedAs('subscription', 'role_user', function () {
            return $this->subscription->expires_at;
        }),
    ];
}
```

<a name="adding-meta-data"></a>
### Adding Meta Data

Some JSON API standards require the addition of meta data to your resource and resource collections responses. This often includes things like `links` to the resource or related resources, or meta data about the resource itself. If you need to return additional meta data about a resource, include it in your `toArray` method. For example, you might include `links` information when transforming a resource collection:

```php
/**
 * Transform the resource into an array.
 *
 * @return array<string, mixed>
 */
public function toArray(Request $request): array
{
    return [
        'data' => $this->collection,
        'links' => [
            'self' => 'link-value',
        ],
    ];
}
```

When returning additional meta data from your resources, you never have to worry about accidentally overriding the `links` or `meta` keys that are automatically added by Laravel when returning paginated responses. Any additional `links` you define will be merged with the links provided by the paginator.

<a name="top-level-meta-data"></a>
#### Top Level Meta Data

Sometimes you may wish to only include certain meta data with a resource response if the resource is the outermost resource being returned. Typically, this includes meta information about the response as a whole. To define this meta data, add a `with` method to your resource class. This method should return an array of meta data to be included with the resource response only when the resource is the outermost resource being transformed:

```php
<?php

namespace App\Http\Resources;

use Illuminate\Http\Resources\Json\ResourceCollection;

class UserCollection extends ResourceCollection
{
    /**
     * Transform the resource collection into an array.
     *
     * @return array<string, mixed>
     */
    public function toArray(Request $request): array
    {
        return parent::toArray($request);
    }

    /**
     * Get additional data that should be returned with the resource array.
     *
     * @return array<string, mixed>
     */
    public function with(Request $request): array
    {
        return [
            'meta' => [
                'key' => 'value',
            ],
        ];
    }
}
```

<a name="adding-meta-data-when-constructing-resources"></a>
#### Adding Meta Data When Constructing Resources

You may also add top-level data when constructing resource instances in your route or controller. The `additional` method, which is available on all resources, accepts an array of data that should be added to the resource response:

```php
return User::all()
    ->load('roles')
    ->toResourceCollection()
    ->additional(['meta' => [
        'key' => 'value',
    ]]);
```

<a name="jsonapi-resources"></a>
## JSON:API Resources

Laravel ships with `JsonApiResource`, a resource class that produces responses compliant with the [JSON:API specification](https://jsonapi.org/). It extends the standard `JsonResource` class and automatically handles resource object structure, relationships, sparse fieldsets, includes, lazy attribute evaluation, and sets the `Content-Type` header to `application/vnd.api+json`.

> [!NOTE]
> Laravel's JSON:API resources handle the serialization of your responses. If you also need to parse incoming JSON:API query parameters such as filters and sorts, [Spatie's Laravel Query Builder](https://spatie.be/docs/laravel-query-builder) is a great companion package.

<a name="generating-jsonapi-resources"></a>
### Generating JSON:API Resources

To generate a JSON:API resource, use the `make:resource` Artisan command with the `--json-api` flag:

```shell
php artisan make:resource PostResource --json-api
```

The generated class will extend `Illuminate\Http\Resources\JsonApi\JsonApiResource` and include `$attributes` and `$relationships` properties for you to define:

```php
<?php

namespace App\Http\Resources;

use Illuminate\Http\Request;
use Illuminate\Http\Resources\JsonApi\JsonApiResource;

class PostResource extends JsonApiResource
{
    /**
     * The resource's attributes.
     */
    public $attributes = [
        // ...
    ];

    /**
     * The resource's relationships.
     */
    public $relationships = [
        // ...
    ];
}
```

JSON:API resources may be returned from routes and controllers just like standard resources:

```php
use App\Http\Resources\PostResource;
use App\Models\Post;

Route::get('/api/posts/{post}', function (Post $post) {
    return new PostResource($post);
});
```

Or, for convenience, you may use the model's `toResource` method:

```php
Route::get('/api/posts/{post}', function (Post $post) {
    return $post->toResource();
});
```

This will produce a JSON:API compliant response:

```json
{
    "data": {
        "id": "1",
        "type": "posts",
        "attributes": {
            "title": "Hello World",
            "body": "This is my first post."
        }
    }
}
```

To return a collection of JSON:API resources, use the `collection` method or the `toResourceCollection` convenience method:

```php
return PostResource::collection(Post::all());

return Post::all()->toResourceCollection();
```

<a name="defining-jsonapi-attributes"></a>
### Defining Attributes

There are two ways to define which attributes are included in your JSON:API resource.

The simplest approach is to define an `$attributes` property on your resource. You may list attribute names as values, which will be read directly from the underlying model:

```php
public $attributes = [
    'title',
    'body',
    'created_at',
];
```

If an attribute is expensive to calculate, you may return it from `toAttributes` as a closure so it is only evaluated when the attribute is actually needed in the response.

Or, for full control over the resource's attributes, you may override the `toAttributes` method on the resource:

```php
/**
 * Get the resource's attributes.
 *
 * @return array<string, mixed>
 */
public function toAttributes(Request $request): array
{
    return [
        'title' => $this->title,
        'body' => $this->body,
        'is_published' => fn () => $this->published_at !== null,
        'created_at' => $this->created_at,
        'updated_at' => $this->updated_at,
    ];
}
```

<a name="defining-jsonapi-relationships"></a>
### Defining Relationships

JSON:API resources support defining relationships that follow the JSON:API specification. Relationships are only serialized when requested by the client via the `include` query parameter.

#### The `$relationships` Property

You may define your resource's includable relationships via the `$relationships` property on your resource:

```php
public $relationships = [
    'author',
    'comments',
];
```

When listing a relationship name as a value, Laravel will resolve the corresponding Eloquent relationship and automatically discover the appropriate resource class. If you need to specify the resource class explicitly, you may define the relationship as a key / class pair:

```php
use App\Http\Resources\UserResource;

public $relationships = [
    'author' => UserResource::class,
    'comments',
];
```

Alternatively, you may override the `toRelationships` method on the resource:

```php
/**
 * Get the resource's relationships.
 */
public function toRelationships(Request $request): array
{
    return [
        'author' => UserResource::class,
        'comments' => fn () => CommentResource::collection(
            $request->user()->is($this->resource)
                ? $this->comments
                : $this->comments->where('is_public', true),
        ),
    ];
}
```

Using closures gives you more control over the relationship payload, while still only resolving the relationship when the client requests it.

#### Including Relationships

Clients may request related resources using the `include` query parameter:

```
GET /api/posts/1?include=author,comments
```

This produces a response with resource identifier objects in the `relationships` key and full resource objects in the top-level `included` array:

```json
{
    "data": {
        "id": "1",
        "type": "posts",
        "attributes": {
            "title": "Hello World"
        },
        "relationships": {
            "author": {
                "data": {
                    "id": "1",
                    "type": "users"
                }
            },
            "comments": {
                "data": [
                    {
                        "id": "1",
                        "type": "comments"
                    }
                ]
            }
        }
    },
    "included": [
        {
            "id": "1",
            "type": "users",
            "attributes": {
                "name": "Taylor Otwell"
            }
        },
        {
            "id": "1",
            "type": "comments",
            "attributes": {
                "body": "Great post!"
            }
        }
    ]
}
```

Nested relationships may be included using dot notation:

```
GET /api/posts/1?include=comments.author
```

<a name="jsonapi-relationship-depth"></a>
#### Relationship Depth

By default, nested relationship includes are limited to a maximum depth. You may customize this limit using the `maxRelationshipDepth` method, typically in one of you application's service provider:

```php
use Illuminate\Http\Resources\JsonApi\JsonApiResource;

JsonApiResource::maxRelationshipDepth(3);
```

<a name="jsonapi-resource-type-and-id"></a>
### Resource Type and ID

By default, the resource's `type` is derived from the resource class name. For example, `PostResource` produces the type `posts` and `BlogPostResource` produces `blog-posts`. The resource's `id` is resolved from the model's primary key.

If you need to customize these values, you may override the `toType` and `toId` methods on your resource:

```php
/**
 * Get the resource's type.
 */
public function toType(Request $request): string
{
    return 'articles';
}

/**
 * Get the resource's ID.
 */
public function toId(Request $request): string
{
    return (string) $this->uuid;
}
```

This is particularly useful when a resource's type should differ from its class name, such as when an `AuthorResource` wraps a `User` model and should output the type `authors`.

<a name="jsonapi-sparse-fieldsets-and-includes"></a>
### Sparse Fieldsets and Includes

JSON:API resources support [sparse fieldsets](https://jsonapi.org/format/#fetching-sparse-fieldsets), allowing clients to request only specific attributes for each resource type using the `fields` query parameter:

```
GET /api/posts?fields[posts]=title,created_at&fields[users]=name
```

This will only include the `title` and `created_at` attributes for `posts` resources, and the `name` attribute for `users` resources.

<a name="jsonapi-ignoring-query-string"></a>
#### Ignoring the Query String

If you would like to disable sparse fieldset filtering for a given resource response, you may call the `ignoreFieldsAndIncludesInQueryString` method:

```php
return $post->toResource()
    ->ignoreFieldsAndIncludesInQueryString();
```

<a name="jsonapi-including-previously-loaded-relationships"></a>
#### Including Previously Loaded Relationships

By default, relationships are only included in the response when requested via the `include` query parameter. If you would like to include all previously eager-loaded relationships regardless of the query string, you may call the `includePreviouslyLoadedRelationships` method:

```php
return $post->load('author', 'comments')
    ->toResource()
    ->includePreviouslyLoadedRelationships();
```

<a name="jsonapi-links-and-meta"></a>
### Links and Meta

You may add links and meta information to your JSON:API resource objects by overriding the `toLinks` and `toMeta` methods on the resource:

```php
/**
 * Get the resource's links.
 */
public function toLinks(Request $request): array
{
    return [
        'self' => route('api.posts.show', $this->resource),
    ];
}

/**
 * Get the resource's meta information.
 */
public function toMeta(Request $request): array
{
    return [
        'readable_created_at' => $this->created_at->diffForHumans(),
    ];
}
```

This will add `links` and `meta` keys to the resource object in the response:

```json
{
    "data": {
        "id": "1",
        "type": "posts",
        "attributes": {
            "title": "Hello World"
        },
        "links": {
            "self": "https://example.com/api/posts/1"
        },
        "meta": {
            "readable_created_at": "2 hours ago"
        }
    }
}
```

<a name="resource-responses"></a>
## Resource Responses

As you have already read, resources may be returned directly from routes and controllers:

```php
use App\Models\User;

Route::get('/user/{id}', function (string $id) {
    return User::findOrFail($id)->toResource();
});
```

However, sometimes you may need to customize the outgoing HTTP response before it is sent to the client. There are two ways to accomplish this. First, you may chain the `response` method onto the resource. This method will return an `Illuminate\Http\JsonResponse` instance, giving you full control over the response's headers:

```php
use App\Http\Resources\UserResource;
use App\Models\User;

Route::get('/user', function () {
    return User::find(1)
        ->toResource()
        ->response()
        ->header('X-Value', 'True');
});
```

Alternatively, you may define a `withResponse` method within the resource itself. This method will be called when the resource is returned as the outermost resource in a response:

```php
<?php

namespace App\Http\Resources;

use Illuminate\Http\JsonResponse;
use Illuminate\Http\Request;
use Illuminate\Http\Resources\Json\JsonResource;

class UserResource extends JsonResource
{
    /**
     * Transform the resource into an array.
     *
     * @return array<string, mixed>
     */
    public function toArray(Request $request): array
    {
        return [
            'id' => $this->id,
        ];
    }

    /**
     * Customize the outgoing response for the resource.
     */
    public function withResponse(Request $request, JsonResponse $response): void
    {
        $response->header('X-Value', 'True');
    }
}
```


---

# Eloquent: Serialization

*Sección: Laravel | Origen: https://laravel.com/docs/13.x/eloquent-serialization*

- [Introduction](#introduction)
- [Serializing Models and Collections](#serializing-models-and-collections)
    - [Serializing to Arrays](#serializing-to-arrays)
    - [Serializing to JSON](#serializing-to-json)
- [Hiding Attributes From JSON](#hiding-attributes-from-json)
- [Appending Values to JSON](#appending-values-to-json)
- [Date Serialization](#date-serialization)

<a name="introduction"></a>
## Introduction

When building APIs using Laravel, you will often need to convert your models and relationships to arrays or JSON. Eloquent includes convenient methods for making these conversions, as well as controlling which attributes are included in the serialized representation of your models.

> [!NOTE]
> For an even more robust way of handling Eloquent model and collection JSON serialization, check out the documentation on [Eloquent API resources](/docs/{{version}}/eloquent-resources).

<a name="serializing-models-and-collections"></a>
## Serializing Models and Collections

<a name="serializing-to-arrays"></a>
### Serializing to Arrays

To convert a model and its loaded [relationships](/docs/{{version}}/eloquent-relationships) to an array, you should use the `toArray` method. This method is recursive, so all attributes and all relations (including the relations of relations) will be converted to arrays:

```php
use App\Models\User;

$user = User::with('roles')->first();

return $user->toArray();
```

The `attributesToArray` method may be used to convert a model's attributes to an array but not its relationships:

```php
$user = User::first();

return $user->attributesToArray();
```

You may also convert entire [collections](/docs/{{version}}/eloquent-collections) of models to arrays by calling the `toArray` method on the collection instance:

```php
$users = User::all();

return $users->toArray();
```

<a name="serializing-to-json"></a>
### Serializing to JSON

To convert a model to JSON, you should use the `toJson` method. Like `toArray`, the `toJson` method is recursive, so all attributes and relations will be converted to JSON. You may also specify any JSON encoding options that are [supported by PHP](https://secure.php.net/manual/en/function.json-encode.php):

```php
use App\Models\User;

$user = User::find(1);

return $user->toJson();

return $user->toJson(JSON_PRETTY_PRINT);
```

Alternatively, you may cast a model or collection to a string, which will automatically call the `toJson` method on the model or collection:

```php
return (string) User::find(1);
```

Since models and collections are converted to JSON when cast to a string, you can return Eloquent objects directly from your application's routes or controllers. Laravel will automatically serialize your Eloquent models and collections to JSON when they are returned from routes or controllers:

```php
Route::get('/users', function () {
    return User::all();
});
```

<a name="relationships"></a>
#### Relationships

When an Eloquent model is converted to JSON, its loaded relationships will automatically be included as attributes on the JSON object. Also, though Eloquent relationship methods are defined using "camel case" method names, a relationship's JSON attribute will be "snake case".

<a name="hiding-attributes-from-json"></a>
## Hiding Attributes From JSON

Sometimes you may wish to limit the attributes, such as passwords, that are included in your model's array or JSON representation. To do so, you may use the `Hidden` attribute on your model. Attributes that are listed in the `Hidden` attribute will not be included in the serialized representation of your model:

```php
<?php

namespace App\Models;

use Illuminate\Database\Eloquent\Attributes\Hidden;
use Illuminate\Database\Eloquent\Model;

#[Hidden(['password'])]
class User extends Model
{
    // ...
}
```


> [!NOTE]
> To hide relationships, add the relationship's method name to your Eloquent model's `Hidden` attribute.

Alternatively, you may use the `Visible` attribute to define an "allow list" of attributes that should be included in your model's array and JSON representation. All attributes that are not present in the `Visible` attribute will be hidden when the model is converted to an array or JSON:

```php
<?php

namespace App\Models;

use Illuminate\Database\Eloquent\Attributes\Visible;
use Illuminate\Database\Eloquent\Model;

#[Visible(['first_name', 'last_name'])]
class User extends Model
{
    // ...
}
```

<a name="temporarily-modifying-attribute-visibility"></a>
#### Temporarily Modifying Attribute Visibility

If you would like to make some typically hidden attributes visible on a given model instance, you may use the `makeVisible` or `mergeVisible` methods. The `makeVisible` method returns the model instance:

```php
return $user->makeVisible('attribute')->toArray();

return $user->mergeVisible(['name', 'email'])->toArray();
```

Likewise, if you would like to hide some attributes that are typically visible, you may use the `makeHidden` or `mergeHidden` methods:

```php
return $user->makeHidden('attribute')->toArray();

return $user->mergeHidden(['name', 'email'])->toArray();
```

If you wish to temporarily override all of the visible or hidden attributes, you may use the `setVisible` and `setHidden` methods respectively:

```php
return $user->setVisible(['id', 'name'])->toArray();

return $user->setHidden(['email', 'password', 'remember_token'])->toArray();
```

<a name="appending-values-to-json"></a>
## Appending Values to JSON

Occasionally, when converting models to arrays or JSON, you may wish to add attributes that do not have a corresponding column in your database. To do so, first define an [accessor](/docs/{{version}}/eloquent-mutators) for the value:

```php
<?php

namespace App\Models;

use Illuminate\Database\Eloquent\Casts\Attribute;
use Illuminate\Database\Eloquent\Model;

class User extends Model
{
    /**
     * Determine if the user is an administrator.
     */
    protected function isAdmin(): Attribute
    {
        return new Attribute(
            get: fn () => 'yes',
        );
    }
}
```

If you would like the accessor to always be appended to your model's array and JSON representations, you may use the `Appends` attribute on your model. Note that attribute names are typically referenced using their "snake case" serialized representation, even though the accessor's PHP method is defined using "camel case":

```php
<?php

namespace App\Models;

use Illuminate\Database\Eloquent\Attributes\Appends;
use Illuminate\Database\Eloquent\Model;

#[Appends(['is_admin'])]
class User extends Model
{
    // ...
}
```

Once the attribute has been added to the `appends` list, it will be included in both the model's array and JSON representations. Attributes in the `appends` array will also respect the `visible` and `hidden` settings configured on the model.

<a name="appending-at-run-time"></a>
#### Appending at Run Time

At runtime, you may instruct a model instance to append additional attributes using the `append` or `mergeAppends` methods. Or, you may use the `setAppends` method to override the entire array of appended properties for a given model instance:

```php
return $user->append('is_admin')->toArray();

return $user->mergeAppends(['is_admin', 'status'])->toArray();

return $user->setAppends(['is_admin'])->toArray();
```

Likewise, if you would like to remove all appended properties from a model, you may use the `withoutAppends` method:

```php
return $user->withoutAppends()->toArray();
```

<a name="date-serialization"></a>
## Date Serialization

<a name="customizing-the-default-date-format"></a>
#### Customizing the Default Date Format

You may customize the default serialization format by overriding the `serializeDate` method. This method does not affect how your dates are formatted for storage in the database:

```php
/**
 * Prepare a date for array / JSON serialization.
 */
protected function serializeDate(DateTimeInterface $date): string
{
    return $date->format('Y-m-d');
}
```

<a name="customizing-the-date-format-per-attribute"></a>
#### Customizing the Date Format per Attribute

You may customize the serialization format of individual Eloquent date attributes by specifying the date format in the model's [cast declarations](/docs/{{version}}/eloquent-mutators#attribute-casting):

```php
protected function casts(): array
{
    return [
        'birthday' => 'date:Y-m-d',
        'joined_at' => 'datetime:Y-m-d H:00',
    ];
}
```


---

# Eloquent: Getting Started

*Sección: Laravel | Origen: https://laravel.com/docs/13.x/eloquent*

- [Introduction](#introduction)
- [Generating Model Classes](#generating-model-classes)
- [Eloquent Model Conventions](#eloquent-model-conventions)
    - [Table Names](#table-names)
    - [Primary Keys](#primary-keys)
    - [UUID and ULID Keys](#uuid-and-ulid-keys)
    - [Timestamps](#timestamps)
    - [Database Connections](#database-connections)
    - [Default Attribute Values](#default-attribute-values)
    - [Configuring Eloquent Strictness](#configuring-eloquent-strictness)
- [Retrieving Models](#retrieving-models)
    - [Collections](#collections)
    - [Chunking Results](#chunking-results)
    - [Chunking Using Lazy Collections](#chunking-using-lazy-collections)
    - [Cursors](#cursors)
    - [Advanced Subqueries](#advanced-subqueries)
- [Retrieving Single Models / Aggregates](#retrieving-single-models)
    - [Retrieving or Creating Models](#retrieving-or-creating-models)
    - [Retrieving Aggregates](#retrieving-aggregates)
- [Inserting and Updating Models](#inserting-and-updating-models)
    - [Inserts](#inserts)
    - [Updates](#updates)
    - [Mass Assignment](#mass-assignment)
    - [Upserts](#upserts)
- [Deleting Models](#deleting-models)
    - [Soft Deleting](#soft-deleting)
    - [Querying Soft Deleted Models](#querying-soft-deleted-models)
- [Pruning Models](#pruning-models)
- [Replicating Models](#replicating-models)
- [Query Scopes](#query-scopes)
    - [Global Scopes](#global-scopes)
    - [Local Scopes](#local-scopes)
    - [Pending Attributes](#pending-attributes)
- [Comparing Models](#comparing-models)
- [Events](#events)
    - [Using Closures](#events-using-closures)
    - [Observers](#observers)
    - [Muting Events](#muting-events)

<a name="introduction"></a>
## Introduction

Laravel includes Eloquent, an object-relational mapper (ORM) that makes it enjoyable to interact with your database. When using Eloquent, each database table has a corresponding "Model" that is used to interact with that table. In addition to retrieving records from the database table, Eloquent models allow you to insert, update, and delete records from the table as well.

> [!NOTE]
> Before getting started, be sure to configure a database connection in your application's `config/database.php` configuration file. For more information on configuring your database, check out [the database configuration documentation](/docs/{{version}}/database#configuration).

<a name="generating-model-classes"></a>
## Generating Model Classes

To get started, let's create an Eloquent model. Models typically live in the `app\Models` directory and extend the `Illuminate\Database\Eloquent\Model` class. You may use the `make:model` [Artisan command](/docs/{{version}}/artisan) to generate a new model:

```shell
php artisan make:model Flight
```

If you would like to generate a [database migration](/docs/{{version}}/migrations) when you generate the model, you may use the `--migration` or `-m` option:

```shell
php artisan make:model Flight --migration
```

You may generate various other types of classes when generating a model, such as factories, seeders, policies, controllers, and form requests. In addition, these options may be combined to create multiple classes at once:

```shell
# Generate a model and a FlightFactory class...
php artisan make:model Flight --factory
php artisan make:model Flight -f

# Generate a model and a FlightSeeder class...
php artisan make:model Flight --seed
php artisan make:model Flight -s

# Generate a model and a FlightController class...
php artisan make:model Flight --controller
php artisan make:model Flight -c

# Generate a model, FlightController resource class, and form request classes...
php artisan make:model Flight --controller --resource --requests
php artisan make:model Flight -crR

# Generate a model and a FlightPolicy class...
php artisan make:model Flight --policy

# Generate a model and a migration, factory, seeder, and controller...
php artisan make:model Flight -mfsc

# Shortcut to generate a model, migration, factory, seeder, policy, controller, and form requests...
php artisan make:model Flight --all
php artisan make:model Flight -a

# Generate a pivot model...
php artisan make:model Member --pivot
php artisan make:model Member -p
```

<a name="inspecting-models"></a>
#### Inspecting Models

Sometimes it can be difficult to determine all of a model's available attributes and relationships just by skimming its code. Instead, try the `model:show` Artisan command, which provides a convenient overview of all the model's attributes and relations:

```shell
php artisan model:show Flight
```

<a name="eloquent-model-conventions"></a>
## Eloquent Model Conventions

Models generated by the `make:model` command will be placed in the `app/Models` directory. Let's examine a basic model class and discuss some of Eloquent's key conventions:

```php
<?php

namespace App\Models;

use Illuminate\Database\Eloquent\Model;

class Flight extends Model
{
    // ...
}
```

<a name="table-names"></a>
### Table Names

After glancing at the example above, you may have noticed that we did not tell Eloquent which database table corresponds to our `Flight` model. By convention, the "snake case", plural name of the class will be used as the table name unless another name is explicitly specified. So, in this case, Eloquent will assume the `Flight` model stores records in the `flights` table, while an `AirTrafficController` model would store records in an `air_traffic_controllers` table.

If your model's corresponding database table does not fit this convention, you may manually specify the model's table name using the `Table` attribute:

```php
<?php

namespace App\Models;

use Illuminate\Database\Eloquent\Attributes\Table;
use Illuminate\Database\Eloquent\Model;

#[Table('my_flights')]
class Flight extends Model
{
    // ...
}
```


<a name="primary-keys"></a>
### Primary Keys

Eloquent will also assume that each model's corresponding database table has a primary key column named `id`. If necessary, you may specify a different column that serves as your model's primary key using the `key` argument on the `Table` attribute:

```php
<?php

namespace App\Models;

use Illuminate\Database\Eloquent\Attributes\Table;
use Illuminate\Database\Eloquent\Model;

#[Table(key: 'flight_id')]
class Flight extends Model
{
    // ...
}
```

In addition, Eloquent assumes that the primary key is an incrementing integer value, which means that Eloquent will automatically cast the primary key to an integer. If you wish to use a non-incrementing or a non-numeric primary key, you should specify the `keyType` and `incrementing` arguments on the `Table` attribute:

```php
<?php

namespace App\Models;

use Illuminate\Database\Eloquent\Attributes\Table;
use Illuminate\Database\Eloquent\Model;

#[Table(key: 'uuid', keyType: 'string', incrementing: false)]
class Flight extends Model
{
    // ...
}
```

If you only need to disable auto-incrementing IDs, you may use the `WithoutIncrementing` attribute:

```php
<?php

namespace App\Models;

use Illuminate\Database\Eloquent\Attributes\WithoutIncrementing;
use Illuminate\Database\Eloquent\Model;

#[WithoutIncrementing]
class Flight extends Model
{
    // ...
}
```

<a name="composite-primary-keys"></a>
#### "Composite" Primary Keys

Eloquent requires each model to have at least one uniquely identifying "ID" that can serve as its primary key. "Composite" primary keys are not supported by Eloquent models. However, you are free to add additional multi-column, unique indexes to your database tables in addition to the table's uniquely identifying primary key.

<a name="uuid-and-ulid-keys"></a>
### UUID and ULID Keys

Instead of using auto-incrementing integers as your Eloquent model's primary keys, you may choose to use UUIDs instead. UUIDs are universally unique alpha-numeric identifiers that are 36 characters long.

If you would like a model to use a UUID key instead of an auto-incrementing integer key, you may use the `Illuminate\Database\Eloquent\Concerns\HasUuids` trait on the model. Of course, you should ensure that the model has a [UUID equivalent primary key column](/docs/{{version}}/migrations#column-method-uuid):

```php
use Illuminate\Database\Eloquent\Concerns\HasUuids;
use Illuminate\Database\Eloquent\Model;

class Article extends Model
{
    use HasUuids;

    // ...
}

$article = Article::create(['title' => 'Traveling to Europe']);

$article->id; // "018f2b5c-6a7f-7b12-9d6f-2f8a4e0c9c11"
```

By default, the `HasUuids` trait will generate [UUIDv7](/docs/{{version}}/strings#method-str-uuid7) identifiers for your models. These UUIDs are more efficient for indexed database storage because they can be sorted lexicographically.

You can override the UUID generation process for a given model by defining a `newUniqueId` method on the model. In addition, you may specify which columns should receive UUIDs by defining a `uniqueIds` method on the model:

```php
use Ramsey\Uuid\Uuid;

/**
 * Generate a new UUID for the model.
 */
public function newUniqueId(): string
{
    return (string) Uuid::uuid4();
}

/**
 * Get the columns that should receive a unique identifier.
 *
 * @return array<int, string>
 */
public function uniqueIds(): array
{
    return ['id', 'discount_code'];
}
```

If you wish, you may choose to utilize "ULIDs" instead of UUIDs. ULIDs are similar to UUIDs; however, they are only 26 characters in length. Like ordered UUIDs, ULIDs are lexicographically sortable for efficient database indexing. To utilize ULIDs, you should use the `Illuminate\Database\Eloquent\Concerns\HasUlids` trait on your model. You should also ensure that the model has a [ULID equivalent primary key column](/docs/{{version}}/migrations#column-method-ulid):

```php
use Illuminate\Database\Eloquent\Concerns\HasUlids;
use Illuminate\Database\Eloquent\Model;

class Article extends Model
{
    use HasUlids;

    // ...
}

$article = Article::create(['title' => 'Traveling to Asia']);

$article->id; // "01gd4d3tgrrfqeda94gdbtdk5c"
```

<a name="timestamps"></a>
### Timestamps

By default, Eloquent expects `created_at` and `updated_at` columns to exist on your model's corresponding database table. Eloquent will automatically set these column's values when models are created or updated. If you do not want these columns to be automatically managed by Eloquent, you may set `timestamps` to `false` on your model's `Table` attribute:

```php
<?php

namespace App\Models;

use Illuminate\Database\Eloquent\Attributes\Table;
use Illuminate\Database\Eloquent\Model;

#[Table(timestamps: false)]
class Flight extends Model
{
    // ...
}
```

If you only need to disable timestamps, you may use the `WithoutTimestamps` attribute:

```php
<?php

namespace App\Models;

use Illuminate\Database\Eloquent\Attributes\WithoutTimestamps;
use Illuminate\Database\Eloquent\Model;

#[WithoutTimestamps]
class Flight extends Model
{
    // ...
}
```

If you need to customize the format of your model's timestamps, you may use the `dateFormat` argument on the `Table` attribute. This determines how date attributes are stored in the database as well as their format when the model is serialized to an array or JSON:

```php
<?php

namespace App\Models;

use Illuminate\Database\Eloquent\Attributes\Table;
use Illuminate\Database\Eloquent\Model;

#[Table(dateFormat: 'U')]
class Flight extends Model
{
    // ...
}
```

If you only need to define a date format, you may use the `DateFormat` attribute:

```php
<?php

namespace App\Models;

use Illuminate\Database\Eloquent\Attributes\DateFormat;
use Illuminate\Database\Eloquent\Model;

#[DateFormat('U')]
class Flight extends Model
{
    // ...
}
```

If you need to customize the names of the columns used to store the timestamps, you may define `CREATED_AT` and `UPDATED_AT` constants on your model:

```php
<?php

class Flight extends Model
{
    /**
     * The name of the "created at" column.
     *
     * @var string|null
     */
    public const CREATED_AT = 'creation_date';

    /**
     * The name of the "updated at" column.
     *
     * @var string|null
     */
    public const UPDATED_AT = 'updated_date';
}
```

If you would like to perform model operations without the model having its `updated_at` timestamp modified, you may operate on the model within a closure given to the `withoutTimestamps` method:

```php
Model::withoutTimestamps(fn () => $post->increment('reads'));
```

<a name="database-connections"></a>
### Database Connections

By default, all Eloquent models will use the default database connection that is configured for your application. If you would like to specify a different connection that should be used when interacting with a particular model, you may use the `Connection` attribute:

```php
<?php

namespace App\Models;

use Illuminate\Database\Eloquent\Attributes\Connection;
use Illuminate\Database\Eloquent\Model;

#[Connection('mysql')]
class Flight extends Model
{
    // ...
}
```

<a name="default-attribute-values"></a>
### Default Attribute Values

By default, a newly instantiated model instance will not contain any attribute values. If you would like to define the default values for some of your model's attributes, you may define an `$attributes` property on your model. Attribute values placed in the `$attributes` array should be in their raw, "storable" format as if they were just read from the database:

```php
<?php

namespace App\Models;

use Illuminate\Database\Eloquent\Model;

class Flight extends Model
{
    /**
     * The model's default values for attributes.
     *
     * @var array<string, mixed>
     */
    protected $attributes = [
        'options' => '[]',
        'delayed' => false,
    ];
}
```

<a name="configuring-eloquent-strictness"></a>
### Configuring Eloquent Strictness

Laravel offers several methods that allow you to configure Eloquent's behavior and "strictness" in a variety of situations.

First, the `preventLazyLoading` method accepts an optional boolean argument that indicates if lazy loading should be prevented. For example, you may wish to only disable lazy loading in non-production environments so that your production environment will continue to function normally even if a lazy loaded relationship is accidentally present in production code. Typically, this method should be invoked in the `boot` method of your application's `AppServiceProvider`:

```php
use Illuminate\Database\Eloquent\Model;

/**
 * Bootstrap any application services.
 */
public function boot(): void
{
    Model::preventLazyLoading(! $this->app->isProduction());
}
```

Also, you may instruct Laravel to throw an exception when attempting to fill an unfillable attribute by invoking the `preventSilentlyDiscardingAttributes` method. This can help prevent unexpected errors during local development when attempting to set an attribute that has not been added to the model's `fillable` array:

```php
Model::preventSilentlyDiscardingAttributes(! $this->app->isProduction());
```

<a name="retrieving-models"></a>
## Retrieving Models

Once you have created a model and [its associated database table](/docs/{{version}}/migrations#generating-migrations), you are ready to start retrieving data from your database. You can think of each Eloquent model as a powerful [query builder](/docs/{{version}}/queries) allowing you to fluently query the database table associated with the model. The model's `all` method will retrieve all of the records from the model's associated database table:

```php
use App\Models\Flight;

foreach (Flight::all() as $flight) {
    echo $flight->name;
}
```

<a name="building-queries"></a>
#### Building Queries

The Eloquent `all` method will return all of the results in the model's table. However, since each Eloquent model serves as a [query builder](/docs/{{version}}/queries), you may add additional constraints to queries and then invoke the `get` method to retrieve the results:

```php
$flights = Flight::where('active', 1)
    ->orderBy('name')
    ->limit(10)
    ->get();
```

> [!NOTE]
> Since Eloquent models are query builders, you should review all of the methods provided by Laravel's [query builder](/docs/{{version}}/queries). You may use any of these methods when writing your Eloquent queries.

<a name="refreshing-models"></a>
#### Refreshing Models

If you already have an instance of an Eloquent model that was retrieved from the database, you can "refresh" the model using the `fresh` and `refresh` methods. The `fresh` method will re-retrieve the model from the database. The existing model instance will not be affected:

```php
$flight = Flight::where('number', 'FR 900')->first();

$freshFlight = $flight->fresh();
```

The `refresh` method will re-hydrate the existing model using fresh data from the database. In addition, all of its loaded relationships will be refreshed as well:

```php
$flight = Flight::where('number', 'FR 900')->first();

$flight->number = 'FR 456';

$flight->refresh();

$flight->number; // "FR 900"
```

If you need to refresh a model and acquire a pessimistic lock within a transaction, you may use the `refreshForUpdate` method. This method reloads the model using a `FOR UPDATE` lock:

```php
DB::transaction(function () use ($flight) {
    $flight->refreshForUpdate();

    // Update the locked model...
});
```

<a name="collections"></a>
### Collections

As we have seen, Eloquent methods like `all` and `get` retrieve multiple records from the database. However, these methods don't return a plain PHP array. Instead, an instance of `Illuminate\Database\Eloquent\Collection` is returned.

The Eloquent `Collection` class extends Laravel's base `Illuminate\Support\Collection` class, which provides a [variety of helpful methods](/docs/{{version}}/collections#available-methods) for interacting with data collections. For example, the `reject` method may be used to remove models from a collection based on the results of an invoked closure:

```php
$flights = Flight::where('destination', 'Paris')->get();

$flights = $flights->reject(function (Flight $flight) {
    return $flight->cancelled;
});
```

In addition to the methods provided by Laravel's base collection class, the Eloquent collection class provides [a few extra methods](/docs/{{version}}/eloquent-collections#available-methods) that are specifically intended for interacting with collections of Eloquent models.

Since all of Laravel's collections implement PHP's iterable interfaces, you may loop over collections as if they were an array:

```php
foreach ($flights as $flight) {
    echo $flight->name;
}
```

<a name="chunking-results"></a>
### Chunking Results

Your application may run out of memory if you attempt to load tens of thousands of Eloquent records via the `all` or `get` methods. Instead of using these methods, the `chunk` method may be used to process large numbers of models more efficiently.

The `chunk` method will retrieve a subset of Eloquent models, passing them to a closure for processing. Since only the current chunk of Eloquent models is retrieved at a time, the `chunk` method will provide significantly reduced memory usage when working with a large number of models:

```php
use App\Models\Flight;
use Illuminate\Database\Eloquent\Collection;

Flight::chunk(200, function (Collection $flights) {
    foreach ($flights as $flight) {
        // ...
    }
});
```

The first argument passed to the `chunk` method is the number of records you wish to receive per "chunk". The closure passed as the second argument will be invoked for each chunk that is retrieved from the database. A database query will be executed to retrieve each chunk of records passed to the closure.

If you are filtering the results of the `chunk` method based on a column that you will also be updating while iterating over the results, you should use the `chunkById` method. Using the `chunk` method in these scenarios could lead to unexpected and inconsistent results. Internally, the `chunkById` method will always retrieve models with an `id` column greater than the last model in the previous chunk:

```php
Flight::where('departed', true)
    ->chunkById(200, function (Collection $flights) {
        $flights->each->update(['departed' => false]);
    }, column: 'id');
```

Since the `chunkById` and `lazyById` methods add their own "where" conditions to the query being executed, you should typically [logically group](/docs/{{version}}/queries#logical-grouping) your own conditions within a closure:

```php
Flight::where(function ($query) {
    $query->where('delayed', true)->orWhere('cancelled', true);
})->chunkById(200, function (Collection $flights) {
    $flights->each->update([
        'departed' => false,
        'cancelled' => true
    ]);
}, column: 'id');
```

<a name="chunking-using-lazy-collections"></a>
### Chunking Using Lazy Collections

The `lazy` method works similarly to [the `chunk` method](#chunking-results) in the sense that, behind the scenes, it executes the query in chunks. However, instead of passing each chunk directly into a callback as is, the `lazy` method returns a flattened [LazyCollection](/docs/{{version}}/collections#lazy-collections) of Eloquent models, which lets you interact with the results as a single stream:

```php
use App\Models\Flight;

foreach (Flight::lazy() as $flight) {
    // ...
}
```

If you are filtering the results of the `lazy` method based on a column that you will also be updating while iterating over the results, you should use the `lazyById` method. Internally, the `lazyById` method will always retrieve models with an `id` column greater than the last model in the previous chunk:

```php
Flight::where('departed', true)
    ->lazyById(200, column: 'id')
    ->each->update(['departed' => false]);
```

You may filter the results based on the descending order of the `id` using the `lazyByIdDesc` method.

<a name="cursors"></a>
### Cursors

Similar to the `lazy` method, the `cursor` method may be used to significantly reduce your application's memory consumption when iterating through tens of thousands of Eloquent model records.

The `cursor` method will only execute a single database query; however, the individual Eloquent models will not be hydrated until they are actually iterated over. Therefore, only one Eloquent model is kept in memory at any given time while iterating over the cursor.

> [!WARNING]
> Since the `cursor` method only ever holds a single Eloquent model in memory at a time, it cannot eager load relationships. If you need to eager load relationships, consider using [the `lazy` method](#chunking-using-lazy-collections) instead.

Internally, the `cursor` method uses PHP [generators](https://www.php.net/manual/en/language.generators.overview.php) to implement this functionality:

```php
use App\Models\Flight;

foreach (Flight::where('destination', 'Zurich')->cursor() as $flight) {
    // ...
}
```

The `cursor` returns an `Illuminate\Support\LazyCollection` instance. [Lazy collections](/docs/{{version}}/collections#lazy-collections) allow you to use many of the collection methods available on typical Laravel collections while only loading a single model into memory at a time:

```php
use App\Models\User;

$users = User::cursor()->filter(function (User $user) {
    return $user->id > 500;
});

foreach ($users as $user) {
    echo $user->id;
}
```

Although the `cursor` method uses far less memory than a regular query (by only holding a single Eloquent model in memory at a time), it will still eventually run out of memory. This is [due to PHP's PDO driver internally caching all raw query results in its buffer](https://www.php.net/manual/en/mysqlinfo.concepts.buffering.php). If you're dealing with a very large number of Eloquent records, consider using [the `lazy` method](#chunking-using-lazy-collections) instead.

<a name="advanced-subqueries"></a>
### Advanced Subqueries

<a name="subquery-selects"></a>
#### Subquery Selects

Eloquent also offers advanced subquery support, which allows you to pull information from related tables in a single query. For example, let's imagine that we have a table of flight `destinations` and a table of `flights` to destinations. The `flights` table contains an `arrived_at` column which indicates when the flight arrived at the destination.

Using the subquery functionality available to the query builder's `select` and `addSelect` methods, we can select all of the `destinations` and the name of the flight that most recently arrived at that destination using a single query:

```php
use App\Models\Destination;
use App\Models\Flight;

return Destination::addSelect(['last_flight' => Flight::select('name')
    ->whereColumn('destination_id', 'destinations.id')
    ->orderByDesc('arrived_at')
    ->limit(1)
])->get();
```

<a name="subquery-ordering"></a>
#### Subquery Ordering

In addition, the query builder's `orderBy` function supports subqueries. Continuing to use our flight example, we may use this functionality to sort all destinations based on when the last flight arrived at that destination. Again, this may be done while executing a single database query:

```php
return Destination::orderByDesc(
    Flight::select('arrived_at')
        ->whereColumn('destination_id', 'destinations.id')
        ->orderByDesc('arrived_at')
        ->limit(1)
)->get();
```

<a name="retrieving-single-models"></a>
## Retrieving Single Models / Aggregates

In addition to retrieving all of the records matching a given query, you may also retrieve single records using the `find`, `first`, or `firstWhere` methods. Instead of returning a collection of models, these methods return a single model instance:

```php
use App\Models\Flight;

// Retrieve a model by its primary key...
$flight = Flight::find(1);

// Retrieve the first model matching the query constraints...
$flight = Flight::where('active', 1)->first();

// Alternative to retrieving the first model matching the query constraints...
$flight = Flight::firstWhere('active', 1);
```

Sometimes you may wish to perform some other action if no results are found. The `findOr` and `firstOr` methods will return a single model instance or, if no results are found, execute the given closure. The value returned by the closure will be considered the result of the method:

```php
$flight = Flight::findOr(1, function () {
    // ...
});

$flight = Flight::where('legs', '>', 3)->firstOr(function () {
    // ...
});
```

<a name="not-found-exceptions"></a>
#### Not Found Exceptions

Sometimes you may wish to throw an exception if a model is not found. This is particularly useful in routes or controllers. The `findOrFail` and `firstOrFail` methods will retrieve the first result of the query; however, if no result is found, an `Illuminate\Database\Eloquent\ModelNotFoundException` will be thrown:

```php
$flight = Flight::findOrFail(1);

$flight = Flight::where('legs', '>', 3)->firstOrFail();
```

If the `ModelNotFoundException` is not caught, a 404 HTTP response is automatically sent back to the client:

```php
use App\Models\Flight;

Route::get('/api/flights/{id}', function (string $id) {
    return Flight::findOrFail($id);
});
```

<a name="retrieving-or-creating-models"></a>
### Retrieving or Creating Models

The `firstOrCreate` method will attempt to locate a database record using the given column / value pairs. If the model cannot be found in the database, a record will be inserted with the attributes resulting from merging the first array argument with the optional second array argument.

The `firstOrNew` method, like `firstOrCreate`, will attempt to locate a record in the database matching the given attributes. However, if a model is not found, a new model instance will be returned. Note that the model returned by `firstOrNew` has not yet been persisted to the database. You will need to manually call the `save` method to persist it:

```php
use App\Models\Flight;

// Retrieve flight by name or create it if it doesn't exist...
$flight = Flight::firstOrCreate([
    'name' => 'London to Paris'
]);

// Retrieve flight by name or create it with the name, delayed, and arrival_time attributes...
$flight = Flight::firstOrCreate(
    ['name' => 'London to Paris'],
    ['delayed' => 1, 'arrival_time' => '11:30']
);

// Retrieve flight by name or instantiate a new Flight instance...
$flight = Flight::firstOrNew([
    'name' => 'London to Paris'
]);

// Retrieve flight by name or instantiate with the name, delayed, and arrival_time attributes...
$flight = Flight::firstOrNew(
    ['name' => 'Tokyo to Sydney'],
    ['delayed' => 1, 'arrival_time' => '11:30']
);
```

<a name="retrieving-aggregates"></a>
### Retrieving Aggregates

When interacting with Eloquent models, you may also use the `count`, `sum`, `max`, and other [aggregate methods](/docs/{{version}}/queries#aggregates) provided by the Laravel [query builder](/docs/{{version}}/queries). As you might expect, these methods return a scalar value instead of an Eloquent model instance:

```php
$count = Flight::where('active', 1)->count();

$max = Flight::where('active', 1)->max('price');
```

<a name="inserting-and-updating-models"></a>
## Inserting and Updating Models

<a name="inserts"></a>
### Inserts

Of course, when using Eloquent, we don't only need to retrieve models from the database. We also need to insert new records. Thankfully, Eloquent makes it simple. To insert a new record into the database, you should instantiate a new model instance and set attributes on the model. Then, call the `save` method on the model instance:

```php
<?php

namespace App\Http\Controllers;

use App\Models\Flight;
use Illuminate\Http\RedirectResponse;
use Illuminate\Http\Request;

class FlightController extends Controller
{
    /**
     * Store a new flight in the database.
     */
    public function store(Request $request): RedirectResponse
    {
        // Validate the request...

        $flight = new Flight;

        $flight->name = $request->name;

        $flight->save();

        return redirect('/flights');
    }
}
```

In this example, we assign the `name` field from the incoming HTTP request to the `name` attribute of the `App\Models\Flight` model instance. When we call the `save` method, a record will be inserted into the database. The model's `created_at` and `updated_at` timestamps will automatically be set when the `save` method is called, so there is no need to set them manually.

If you would like to save the model within a database transaction, you may use the `saveOrFail` method. If an exception is thrown during the save, the transaction will automatically be rolled back:

```php
$flight->saveOrFail();
```

Alternatively, you may use the `create` method to "save" a new model using a single PHP statement. The inserted model instance will be returned to you by the `create` method:

```php
use App\Models\Flight;

$flight = Flight::create([
    'name' => 'London to Paris',
]);
```

However, before using the `create` method, you will need to specify either a `Fillable` or `Guarded` attribute on your model class. These attributes are required because all Eloquent models are protected against mass assignment vulnerabilities by default. To learn more about mass assignment, please consult the [mass assignment documentation](#mass-assignment).

<a name="updates"></a>
### Updates

The `save` method may also be used to update models that already exist in the database. To update a model, you should retrieve it and set any attributes you wish to update. Then, you should call the model's `save` method. Again, the `updated_at` timestamp will automatically be updated, so there is no need to manually set its value:

```php
use App\Models\Flight;

$flight = Flight::find(1);

$flight->name = 'Paris to London';

$flight->save();
```

If you would like to update the model within a database transaction, you may use the `updateOrFail` method. If an exception is thrown during the update, the transaction will automatically be rolled back:

```php
$flight->updateOrFail(['name' => 'Paris to London']);
```

Occasionally, you may need to update an existing model or create a new model if no matching model exists. Like the `firstOrCreate` method, the `updateOrCreate` method persists the model, so there's no need to manually call the `save` method.

In the example below, if a flight exists with a `departure` location of `Oakland` and a `destination` location of `San Diego`, its `price` and `discounted` columns will be updated. If no such flight exists, a new flight will be created which has the attributes resulting from merging the first argument array with the second argument array:

```php
$flight = Flight::updateOrCreate(
    ['departure' => 'Oakland', 'destination' => 'San Diego'],
    ['price' => 99, 'discounted' => 1]
);
```

When using methods such as `firstOrCreate` or `updateOrCreate`, you may not know whether a new model has been created or an existing one has been updated. The `wasRecentlyCreated` property indicates if the model was created during its current lifecycle:

```php
$flight = Flight::updateOrCreate(
    // ...
);

if ($flight->wasRecentlyCreated) {
    // New flight record was inserted...
}
```

<a name="mass-updates"></a>
#### Mass Updates

Updates can also be performed against models that match a given query. In this example, all flights that are `active` and have a `destination` of `San Diego` will be marked as delayed:

```php
Flight::where('active', 1)
    ->where('destination', 'San Diego')
    ->update(['delayed' => 1]);
```

The `update` method expects an array of column and value pairs representing the columns that should be updated. The `update` method returns the number of affected rows.

> [!WARNING]
> When issuing a mass update via Eloquent, the `saving`, `saved`, `updating`, and `updated` model events will not be fired for the updated models. This is because the models are never actually retrieved when issuing a mass update.

<a name="examining-attribute-changes"></a>
#### Examining Attribute Changes

Eloquent provides the `isDirty`, `isClean`, and `wasChanged` methods to examine the internal state of your model and determine how its attributes have changed from when the model was originally retrieved.

The `isDirty` method determines if any of the model's attributes have been changed since the model was retrieved. You may pass a specific attribute name or an array of attributes to the `isDirty` method to determine if any of the attributes are "dirty". The `isClean` method will determine if an attribute has remained unchanged since the model was retrieved. This method also accepts an optional attribute argument:

```php
use App\Models\User;

$user = User::create([
    'first_name' => 'Taylor',
    'last_name' => 'Otwell',
    'title' => 'Developer',
]);

$user->title = 'Painter';

$user->isDirty(); // true
$user->isDirty('title'); // true
$user->isDirty('first_name'); // false
$user->isDirty(['first_name', 'title']); // true

$user->isClean(); // false
$user->isClean('title'); // false
$user->isClean('first_name'); // true
$user->isClean(['first_name', 'title']); // false

$user->save();

$user->isDirty(); // false
$user->isClean(); // true
```

The `wasChanged` method determines if any attributes were changed when the model was last saved within the current request cycle. If needed, you may pass an attribute name to see if a particular attribute was changed:

```php
$user = User::create([
    'first_name' => 'Taylor',
    'last_name' => 'Otwell',
    'title' => 'Developer',
]);

$user->title = 'Painter';

$user->save();

$user->wasChanged(); // true
$user->wasChanged('title'); // true
$user->wasChanged(['title', 'slug']); // true
$user->wasChanged('first_name'); // false
$user->wasChanged(['first_name', 'title']); // true
```

The `getOriginal` method returns an array containing the original attributes of the model regardless of any changes to the model since it was retrieved. If needed, you may pass a specific attribute name to get the original value of a particular attribute:

```php
$user = User::find(1);

$user->name; // John
$user->email; // john@example.com

$user->name = 'Jack';
$user->name; // Jack

$user->getOriginal('name'); // John
$user->getOriginal(); // Array of original attributes...
```

The `getChanges` method returns an array containing the attributes that changed when the model was last saved, while the `getPrevious` method returns an array containing the original attribute values before the model was last saved:

```php
$user = User::find(1);

$user->name; // John
$user->email; // john@example.com

$user->update([
    'name' => 'Jack',
    'email' => 'jack@example.com',
]);

$user->getChanges();

/*
    [
        'name' => 'Jack',
        'email' => 'jack@example.com',
    ]
*/

$user->getPrevious();

/*
    [
        'name' => 'John',
        'email' => 'john@example.com',
    ]
*/
```

<a name="mass-assignment"></a>
### Mass Assignment

You may use the `create` method to "save" a new model using a single PHP statement. The inserted model instance will be returned to you by the method:

```php
use App\Models\Flight;

$flight = Flight::create([
    'name' => 'London to Paris',
]);
```

However, before using the `create` method, you will need to specify either a `Fillable` or `Guarded` attribute on your model class. These attributes are required because all Eloquent models are protected against mass assignment vulnerabilities by default.

A mass assignment vulnerability occurs when a user passes an unexpected HTTP request field and that field changes a column in your database that you did not expect. For example, a malicious user might send an `is_admin` parameter through an HTTP request, which is then passed to your model's `create` method, allowing the user to escalate themselves to an administrator.

So, to get started, you should define which model attributes you want to make mass assignable. You may do this using the `Fillable` attribute on the model. For example, let's make the `name` attribute of our `Flight` model mass assignable:

```php
<?php

namespace App\Models;

use Illuminate\Database\Eloquent\Attributes\Fillable;
use Illuminate\Database\Eloquent\Model;

#[Fillable(['name'])]
class Flight extends Model
{
    // ...
}
```

Once you have specified which attributes are mass assignable, you may use the `create` method to insert a new record in the database. The `create` method returns the newly created model instance:

```php
$flight = Flight::create(['name' => 'London to Paris']);
```

If you already have a model instance, you may use the `fill` method to populate it with an array of attributes:

```php
$flight->fill(['name' => 'Amsterdam to Frankfurt']);
```

<a name="mass-assignment-json-columns"></a>
#### Mass Assignment and JSON Columns

When assigning JSON columns, each column's mass assignable key must be specified in your model's `Fillable` attribute. For security, Laravel does not support updating nested JSON attributes when using the `Guarded` attribute:

```php
use Illuminate\Database\Eloquent\Attributes\Fillable;

#[Fillable(['options->enabled'])]
class Flight extends Model
{
    // ...
}
```

<a name="allowing-mass-assignment"></a>
#### Allowing Mass Assignment

If you would like to make all of your attributes mass assignable, you may use the `Unguarded` attribute on your model. If you choose to unguard your model, you should take special care to always hand-craft the arrays passed to Eloquent's `fill`, `create`, and `update` methods:

```php
<?php

namespace App\Models;

use Illuminate\Database\Eloquent\Attributes\Unguarded;
use Illuminate\Database\Eloquent\Model;

#[Unguarded]
class Flight extends Model
{
    // ...
}
```

<a name="mass-assignment-exceptions"></a>
#### Mass Assignment Exceptions

By default, attributes that are not included in the `Fillable` attribute are silently discarded when performing mass-assignment operations. In production, this is expected behavior; however, during local development it can lead to confusion as to why model changes are not taking effect.

If you wish, you may instruct Laravel to throw an exception when attempting to fill an unfillable attribute by invoking the `preventSilentlyDiscardingAttributes` method. Typically, this method should be invoked in the `boot` method of your application's `AppServiceProvider` class:

```php
use Illuminate\Database\Eloquent\Model;

/**
 * Bootstrap any application services.
 */
public function boot(): void
{
    Model::preventSilentlyDiscardingAttributes($this->app->isLocal());
}
```

<a name="upserts"></a>
### Upserts

Eloquent's `upsert` method may be used to update or create records in a single, atomic operation. The method's first argument consists of the values to insert or update, while the second argument lists the column(s) that uniquely identify records within the associated table. The method's third and final argument is an array of the columns that should be updated if a matching record already exists in the database. The `upsert` method will automatically set the `created_at` and `updated_at` timestamps if timestamps are enabled on the model:

```php
Flight::upsert([
    ['departure' => 'Oakland', 'destination' => 'San Diego', 'price' => 99],
    ['departure' => 'Chicago', 'destination' => 'New York', 'price' => 150]
], uniqueBy: ['departure', 'destination'], update: ['price']);
```

> [!WARNING]
> All databases except SQL Server require the columns in the second argument of the `upsert` method to have a "primary" or "unique" index. In addition, the MariaDB and MySQL database drivers ignore the second argument of the `upsert` method and always use the "primary" and "unique" indexes of the table to detect existing records.

<a name="deleting-models"></a>
## Deleting Models

To delete a model, you may call the `delete` method on the model instance:

```php
use App\Models\Flight;

$flight = Flight::find(1);

$flight->delete();
```

If you would like to delete the model within a database transaction, you may use the `deleteOrFail` method. If an exception is thrown during the delete, the transaction will automatically be rolled back:

```php
$flight->deleteOrFail();
```

<a name="deleting-an-existing-model-by-its-primary-key"></a>
#### Deleting an Existing Model by its Primary Key

In the example above, we are retrieving the model from the database before calling the `delete` method. However, if you know the primary key of the model, you may delete the model without explicitly retrieving it by calling the `destroy` method. In addition to accepting the single primary key, the `destroy` method will accept multiple primary keys, an array of primary keys, or a [collection](/docs/{{version}}/collections) of primary keys:

```php
Flight::destroy(1);

Flight::destroy(1, 2, 3);

Flight::destroy([1, 2, 3]);

Flight::destroy(collect([1, 2, 3]));
```

If you are utilizing [soft deleting models](#soft-deleting), you may permanently delete models via the `forceDestroy` method:

```php
Flight::forceDestroy(1);
```

> [!WARNING]
> The `destroy` method loads each model individually and calls the `delete` method so that the `deleting` and `deleted` events are properly dispatched for each model.

<a name="deleting-models-using-queries"></a>
#### Deleting Models Using Queries

Of course, you may build an Eloquent query to delete all models matching your query's criteria. In this example, we will delete all flights that are marked as inactive. Like mass updates, mass deletes will not dispatch model events for the models that are deleted:

```php
$deleted = Flight::where('active', 0)->delete();
```

To delete all models in a table, you should execute a query without adding any conditions:

```php
$deleted = Flight::query()->delete();
```

> [!WARNING]
> When executing a mass delete statement via Eloquent, the `deleting` and `deleted` model events will not be dispatched for the deleted models. This is because the models are never actually retrieved when executing the delete statement.

<a name="soft-deleting"></a>
### Soft Deleting

In addition to actually removing records from your database, Eloquent can also "soft delete" models. When models are soft deleted, they are not actually removed from your database. Instead, a `deleted_at` attribute is set on the model indicating the date and time at which the model was "deleted". To enable soft deletes for a model, add the `Illuminate\Database\Eloquent\SoftDeletes` trait to the model:

```php
<?php

namespace App\Models;

use Illuminate\Database\Eloquent\Model;
use Illuminate\Database\Eloquent\SoftDeletes;

class Flight extends Model
{
    use SoftDeletes;
}
```

> [!NOTE]
> The `SoftDeletes` trait will automatically cast the `deleted_at` attribute to a `DateTime` / `Carbon` instance for you.

You should also add the `deleted_at` column to your database table. The Laravel [schema builder](/docs/{{version}}/migrations) contains a helper method to create this column:

```php
use Illuminate\Database\Schema\Blueprint;
use Illuminate\Support\Facades\Schema;

Schema::table('flights', function (Blueprint $table) {
    $table->softDeletes();
});

Schema::table('flights', function (Blueprint $table) {
    $table->dropSoftDeletes();
});
```

Now, when you call the `delete` method on the model, the `deleted_at` column will be set to the current date and time. However, the model's database record will be left in the table. When querying a model that uses soft deletes, the soft deleted models will automatically be excluded from all query results.

To determine if a given model instance has been soft deleted, you may use the `trashed` method:

```php
if ($flight->trashed()) {
    // ...
}
```

<a name="restoring-soft-deleted-models"></a>
#### Restoring Soft Deleted Models

Sometimes you may wish to "un-delete" a soft deleted model. To restore a soft deleted model, you may call the `restore` method on a model instance. The `restore` method will set the model's `deleted_at` column to `null`:

```php
$flight->restore();
```

You may also use the `restore` method in a query to restore multiple models. Again, like other "mass" operations, this will not dispatch any model events for the models that are restored:

```php
Flight::withTrashed()
    ->where('airline_id', 1)
    ->restore();
```

The `restore` method may also be used when building [relationship](/docs/{{version}}/eloquent-relationships) queries:

```php
$flight->history()->restore();
```

<a name="permanently-deleting-models"></a>
#### Permanently Deleting Models

Sometimes you may need to truly remove a model from your database. You may use the `forceDelete` method to permanently remove a soft deleted model from the database table:

```php
$flight->forceDelete();
```

You may also use the `forceDelete` method when building Eloquent relationship queries:

```php
$flight->history()->forceDelete();
```

<a name="querying-soft-deleted-models"></a>
### Querying Soft Deleted Models

<a name="including-soft-deleted-models"></a>
#### Including Soft Deleted Models

As noted above, soft deleted models will automatically be excluded from query results. However, you may force soft deleted models to be included in a query's results by calling the `withTrashed` method on the query:

```php
use App\Models\Flight;

$flights = Flight::withTrashed()
    ->where('account_id', 1)
    ->get();
```

The `withTrashed` method may also be called when building a [relationship](/docs/{{version}}/eloquent-relationships) query:

```php
$flight->history()->withTrashed()->get();
```

<a name="retrieving-only-soft-deleted-models"></a>
#### Retrieving Only Soft Deleted Models

The `onlyTrashed` method will retrieve **only** soft deleted models:

```php
$flights = Flight::onlyTrashed()
    ->where('airline_id', 1)
    ->get();
```

<a name="pruning-models"></a>
## Pruning Models

Sometimes you may want to periodically delete models that are no longer needed. To accomplish this, you may add the `Illuminate\Database\Eloquent\Prunable` or `Illuminate\Database\Eloquent\MassPrunable` trait to the models you would like to periodically prune. After adding one of the traits to the model, implement a `prunable` method which returns an Eloquent query builder that resolves the models that are no longer needed:

```php
<?php

namespace App\Models;

use Illuminate\Database\Eloquent\Builder;
use Illuminate\Database\Eloquent\Model;
use Illuminate\Database\Eloquent\Prunable;

class Flight extends Model
{
    use Prunable;

    /**
     * Get the prunable model query.
     */
    public function prunable(): Builder
    {
        return static::where('created_at', '<=', now()->minus(months: 1));
    }
}
```

When marking models as `Prunable`, you may also define a `pruning` method on the model. This method will be called before the model is deleted. This method can be useful for deleting any additional resources associated with the model, such as stored files, before the model is permanently removed from the database:

```php
/**
 * Prepare the model for pruning.
 */
protected function pruning(): void
{
    // ...
}
```

After configuring your prunable model, you should schedule the `model:prune` Artisan command in your application's `routes/console.php` file. You are free to choose the appropriate interval at which this command should be run:

```php
use Illuminate\Support\Facades\Schedule;

Schedule::command('model:prune')->daily();
```

Behind the scenes, the `model:prune` command will automatically detect "Prunable" models within your application's `app/Models` directory. If your models are in a different location, you may use the `--model` option to specify the model class names:

```php
Schedule::command('model:prune', [
    '--model' => [Address::class, Flight::class],
])->daily();
```

If you wish to exclude certain models from being pruned while pruning all other detected models, you may use the `--except` option:

```php
Schedule::command('model:prune', [
    '--except' => [Address::class, Flight::class],
])->daily();
```

You may test your `prunable` query by executing the `model:prune` command with the `--pretend` option. When pretending, the `model:prune` command will simply report how many records would be pruned if the command were to actually run:

```shell
php artisan model:prune --pretend
```

> [!WARNING]
> Soft deleting models will be permanently deleted (`forceDelete`) if they match the prunable query.

<a name="mass-pruning"></a>
#### Mass Pruning

When models are marked with the `Illuminate\Database\Eloquent\MassPrunable` trait, models are deleted from the database using mass-deletion queries. Therefore, the `pruning` method will not be invoked, nor will the `deleting` and `deleted` model events be dispatched. This is because the models are never actually retrieved before deletion, thus making the pruning process much more efficient:

```php
<?php

namespace App\Models;

use Illuminate\Database\Eloquent\Builder;
use Illuminate\Database\Eloquent\Model;
use Illuminate\Database\Eloquent\MassPrunable;

class Flight extends Model
{
    use MassPrunable;

    /**
     * Get the prunable model query.
     */
    public function prunable(): Builder
    {
        return static::where('created_at', '<=', now()->minus(months: 1));
    }
}
```

<a name="replicating-models"></a>
## Replicating Models

You may create an unsaved copy of an existing model instance using the `replicate` method. This method is particularly useful when you have model instances that share many of the same attributes:

```php
use App\Models\Address;

$shipping = Address::create([
    'type' => 'shipping',
    'line_1' => '123 Example Street',
    'city' => 'Victorville',
    'state' => 'CA',
    'postcode' => '90001',
]);

$billing = $shipping->replicate()->fill([
    'type' => 'billing'
]);

$billing->save();
```

To exclude one or more attributes from being replicated to the new model, you may pass an array to the `replicate` method:

```php
$flight = Flight::create([
    'destination' => 'LAX',
    'origin' => 'LHR',
    'last_flown' => '2020-03-04 11:00:00',
    'last_pilot_id' => 747,
]);

$flight = $flight->replicate([
    'last_flown',
    'last_pilot_id'
]);
```

<a name="query-scopes"></a>
## Query Scopes

<a name="global-scopes"></a>
### Global Scopes

Global scopes allow you to add constraints to all queries for a given model. Laravel's own [soft delete](#soft-deleting) functionality utilizes global scopes to only retrieve "non-deleted" models from the database. Writing your own global scopes can provide a convenient, easy way to make sure every query for a given model receives certain constraints.

<a name="generating-scopes"></a>
#### Generating Scopes

To generate a new global scope, you may invoke the `make:scope` Artisan command, which will place the generated scope in your application's `app/Models/Scopes` directory:

```shell
php artisan make:scope AncientScope
```

<a name="writing-global-scopes"></a>
#### Writing Global Scopes

Writing a global scope is simple. First, use the `make:scope` command to generate a class that implements the `Illuminate\Database\Eloquent\Scope` interface. The `Scope` interface requires you to implement one method: `apply`. The `apply` method may add `where` constraints or other types of clauses to the query as needed:

```php
<?php

namespace App\Models\Scopes;

use Illuminate\Database\Eloquent\Builder;
use Illuminate\Database\Eloquent\Model;
use Illuminate\Database\Eloquent\Scope;

class AncientScope implements Scope
{
    /**
     * Apply the scope to a given Eloquent query builder.
     */
    public function apply(Builder $builder, Model $model): void
    {
        $builder->where('created_at', '<', now()->minus(years: 2000));
    }
}
```

> [!NOTE]
> If your global scope is adding columns to the select clause of the query, you should use the `addSelect` method instead of `select`. This will prevent the unintentional replacement of the query's existing select clause.

<a name="applying-global-scopes"></a>
#### Applying Global Scopes

To assign a global scope to a model, you may simply place the `ScopedBy` attribute on the model:

```php
<?php

namespace App\Models;

use App\Models\Scopes\AncientScope;
use Illuminate\Database\Eloquent\Attributes\ScopedBy;

#[ScopedBy([AncientScope::class])]
class User extends Model
{
    //
}
```

Or, you may manually register the global scope by overriding the model's `booted` method and invoke the model's `addGlobalScope` method. The `addGlobalScope` method accepts an instance of your scope as its only argument:

```php
<?php

namespace App\Models;

use App\Models\Scopes\AncientScope;
use Illuminate\Database\Eloquent\Model;

class User extends Model
{
    /**
     * The "booted" method of the model.
     */
    protected static function booted(): void
    {
        static::addGlobalScope(new AncientScope);
    }
}
```

After adding the scope in the example above to the `App\Models\User` model, a call to the `User::all()` method will execute the following SQL query:

```sql
select * from `users` where `created_at` < 0021-02-18 00:00:00
```

<a name="anonymous-global-scopes"></a>
#### Anonymous Global Scopes

Eloquent also allows you to define global scopes using closures, which is particularly useful for simple scopes that do not warrant a separate class of their own. When defining a global scope using a closure, you should provide a scope name of your own choosing as the first argument to the `addGlobalScope` method:

```php
<?php

namespace App\Models;

use Illuminate\Database\Eloquent\Builder;
use Illuminate\Database\Eloquent\Model;

class User extends Model
{
    /**
     * The "booted" method of the model.
     */
    protected static function booted(): void
    {
        static::addGlobalScope('ancient', function (Builder $builder) {
            $builder->where('created_at', '<', now()->minus(years: 2000));
        });
    }
}
```

<a name="removing-global-scopes"></a>
#### Removing Global Scopes

If you would like to remove a global scope for a given query, you may use the `withoutGlobalScope` method. This method accepts the class name of the global scope as its only argument:

```php
User::withoutGlobalScope(AncientScope::class)->get();
```

Or, if you defined the global scope using a closure, you should pass the string name that you assigned to the global scope:

```php
User::withoutGlobalScope('ancient')->get();
```

If you would like to remove several or even all of the query's global scopes, you may use the `withoutGlobalScopes` and `withoutGlobalScopesExcept` methods:

```php
// Remove all of the global scopes...
User::withoutGlobalScopes()->get();

// Remove some of the global scopes...
User::withoutGlobalScopes([
    FirstScope::class, SecondScope::class
])->get();

// Remove all global scopes except the given ones...
User::withoutGlobalScopesExcept([
    SecondScope::class,
])->get();
```

<a name="local-scopes"></a>
### Local Scopes

Local scopes allow you to define common sets of query constraints that you may easily re-use throughout your application. For example, you may need to frequently retrieve all users that are considered "popular". To define a scope, add the `Scope` attribute to an Eloquent method.

Scopes should always return the same query builder instance or `void`:

```php
<?php

namespace App\Models;

use Illuminate\Database\Eloquent\Attributes\Scope;
use Illuminate\Database\Eloquent\Builder;
use Illuminate\Database\Eloquent\Model;

class User extends Model
{
    /**
     * Scope a query to only include popular users.
     */
    #[Scope]
    protected function popular(Builder $query): void
    {
        $query->where('votes', '>', 100);
    }

    /**
     * Scope a query to only include active users.
     */
    #[Scope]
    protected function active(Builder $query): void
    {
        $query->where('active', 1);
    }
}
```

<a name="utilizing-a-local-scope"></a>
#### Utilizing a Local Scope

Once the scope has been defined, you may call the scope methods when querying the model. You can even chain calls to various scopes:

```php
use App\Models\User;

$users = User::popular()->active()->orderBy('created_at')->get();
```

Combining multiple Eloquent model scopes via an `or` query operator may require the use of closures to achieve the correct [logical grouping](/docs/{{version}}/queries#logical-grouping):

```php
$users = User::popular()->orWhere(function (Builder $query) {
    $query->active();
})->get();
```

However, since this can be cumbersome, Laravel provides a "higher order" `orWhere` method that allows you to fluently chain scopes together without the use of closures:

```php
$users = User::popular()->orWhere->active()->get();
```

<a name="dynamic-scopes"></a>
#### Dynamic Scopes

Sometimes you may wish to define a scope that accepts parameters. To get started, just add your additional parameters to your scope method's signature. Scope parameters should be defined after the `$query` parameter:

```php
<?php

namespace App\Models;

use Illuminate\Database\Eloquent\Attributes\Scope;
use Illuminate\Database\Eloquent\Builder;
use Illuminate\Database\Eloquent\Model;

class User extends Model
{
    /**
     * Scope a query to only include users of a given type.
     */
    #[Scope]
    protected function ofType(Builder $query, string $type): void
    {
        $query->where('type', $type);
    }
}
```

Once the expected arguments have been added to your scope method's signature, you may pass the arguments when calling the scope:

```php
$users = User::ofType('admin')->get();
```

Attributed scope methods should be `protected`. When calling an attributed scope from within the model class, call the scope through a query builder instance, such as `static::query()->ofType('admin')`, to ensure the call is routed through Eloquent's scope handling.

<a name="pending-attributes"></a>
### Pending Attributes

If you would like to use scopes to create models that have the same attributes as those used to constrain the scope, you may use the `withAttributes` method when building the scope query:

```php
<?php

namespace App\Models;

use Illuminate\Database\Eloquent\Attributes\Scope;
use Illuminate\Database\Eloquent\Builder;
use Illuminate\Database\Eloquent\Model;

class Post extends Model
{
    /**
     * Scope the query to only include drafts.
     */
    #[Scope]
    protected function draft(Builder $query): void
    {
        $query->withAttributes([
            'hidden' => true,
        ]);
    }
}
```

The `withAttributes` method will add `where` conditions to the query using the given attributes, and it will also add the given attributes to any models created via the scope:

```php
$draft = Post::draft()->create(['title' => 'In Progress']);

$draft->hidden; // true
```

To instruct the `withAttributes` method to not add `where` conditions to the query, you may set the `asConditions` argument to `false`:

```php
$query->withAttributes([
    'hidden' => true,
], asConditions: false);
```

<a name="comparing-models"></a>
## Comparing Models

Sometimes you may need to determine if two models are the "same" or not. The `is` and `isNot` methods may be used to quickly verify two models have the same primary key, table, and database connection or not:

```php
if ($post->is($anotherPost)) {
    // ...
}

if ($post->isNot($anotherPost)) {
    // ...
}
```

The `is` and `isNot` methods are also available when using the `belongsTo`, `hasOne`, `morphTo`, and `morphOne` [relationships](/docs/{{version}}/eloquent-relationships). This method is particularly helpful when you would like to compare a related model without issuing a query to retrieve that model:

```php
if ($post->author()->is($user)) {
    // ...
}
```

<a name="events"></a>
## Events

> [!NOTE]
> Want to broadcast your Eloquent events directly to your client-side application? Check out Laravel's [model event broadcasting](/docs/{{version}}/broadcasting#model-broadcasting).

Eloquent models dispatch several events, allowing you to hook into the following moments in a model's lifecycle: `retrieved`, `creating`, `created`, `updating`, `updated`, `saving`, `saved`, `deleting`, `deleted`, `trashed`, `forceDeleting`, `forceDeleted`, `restoring`, `restored`, and `replicating`.

The `retrieved` event will dispatch when an existing model is retrieved from the database. When a new model is saved for the first time, the `creating` and `created` events will dispatch. The `updating` / `updated` events will dispatch when an existing model is modified and the `save` method is called. The `saving` / `saved` events will dispatch when a model is created or updated - even if the model's attributes have not been changed. Event names ending with `-ing` are dispatched before any changes to the model are persisted, while events ending with `-ed` are dispatched after the changes to the model are persisted.

To start listening to model events, define a `$dispatchesEvents` property on your Eloquent model. This property maps various points of the Eloquent model's lifecycle to your own [event classes](/docs/{{version}}/events). Each model event class should expect to receive an instance of the affected model via its constructor:

```php
<?php

namespace App\Models;

use App\Events\UserDeleted;
use App\Events\UserSaved;
use Illuminate\Foundation\Auth\User as Authenticatable;
use Illuminate\Notifications\Notifiable;

class User extends Authenticatable
{
    use Notifiable;

    /**
     * The event map for the model.
     *
     * @var array<string, string>
     */
    protected $dispatchesEvents = [
        'saved' => UserSaved::class,
        'deleted' => UserDeleted::class,
    ];
}
```

After defining and mapping your Eloquent events, you may use [event listeners](/docs/{{version}}/events#defining-listeners) to handle the events.

> [!WARNING]
> When issuing a mass update or delete query via Eloquent, the `saved`, `updated`, `deleting`, and `deleted` model events will not be dispatched for the affected models. This is because the models are never actually retrieved when performing mass updates or deletes.

<a name="events-using-closures"></a>
### Using Closures

Instead of using custom event classes, you may register closures that execute when various model events are dispatched. Typically, you should register these closures in the `booted` method of your model:

```php
<?php

namespace App\Models;

use Illuminate\Database\Eloquent\Model;

class User extends Model
{
    /**
     * The "booted" method of the model.
     */
    protected static function booted(): void
    {
        static::created(function (User $user) {
            // ...
        });
    }
}
```

If needed, you may utilize [queueable anonymous event listeners](/docs/{{version}}/events#queueable-anonymous-event-listeners) when registering model events. This will instruct Laravel to execute the model event listener in the background using your application's [queue](/docs/{{version}}/queues):

```php
use function Illuminate\Events\queueable;

static::created(queueable(function (User $user) {
    // ...
}));
```

<a name="observers"></a>
### Observers

<a name="defining-observers"></a>
#### Defining Observers

If you are listening for many events on a given model, you may use observers to group all of your listeners into a single class. Observer classes have method names which reflect the Eloquent events you wish to listen for. Each of these methods receives the affected model as their only argument. The `make:observer` Artisan command is the easiest way to create a new observer class:

```shell
php artisan make:observer UserObserver --model=User
```

This command will place the new observer in your `app/Observers` directory. If this directory does not exist, Artisan will create it for you. Your fresh observer will look like the following:

```php
<?php

namespace App\Observers;

use App\Models\User;

class UserObserver
{
    /**
     * Handle the User "created" event.
     */
    public function created(User $user): void
    {
        // ...
    }

    /**
     * Handle the User "updated" event.
     */
    public function updated(User $user): void
    {
        // ...
    }

    /**
     * Handle the User "deleted" event.
     */
    public function deleted(User $user): void
    {
        // ...
    }

    /**
     * Handle the User "restored" event.
     */
    public function restored(User $user): void
    {
        // ...
    }

    /**
     * Handle the User "forceDeleted" event.
     */
    public function forceDeleted(User $user): void
    {
        // ...
    }
}
```

To register an observer, you may place the `ObservedBy` attribute on the corresponding model:

```php
use App\Observers\UserObserver;
use Illuminate\Database\Eloquent\Attributes\ObservedBy;

#[ObservedBy([UserObserver::class])]
class User extends Authenticatable
{
    //
}
```

Or, you may manually register an observer by invoking the `observe` method on the model you wish to observe. You may register observers in the `boot` method of your application's `AppServiceProvider` class:

```php
use App\Models\User;
use App\Observers\UserObserver;

/**
 * Bootstrap any application services.
 */
public function boot(): void
{
    User::observe(UserObserver::class);
}
```

> [!NOTE]
> There are additional events an observer can listen to, such as `saving` and `retrieved`. These events are described within the [events](#events) documentation.

<a name="observers-and-database-transactions"></a>
#### Observers and Database Transactions

When models are being created within a database transaction, you may want to instruct an observer to only execute its event handlers after the database transaction is committed. You may accomplish this by implementing the `ShouldHandleEventsAfterCommit` interface on your observer. If a database transaction is not in progress, the event handlers will execute immediately:

```php
<?php

namespace App\Observers;

use App\Models\User;
use Illuminate\Contracts\Events\ShouldHandleEventsAfterCommit;

class UserObserver implements ShouldHandleEventsAfterCommit
{
    /**
     * Handle the User "created" event.
     */
    public function created(User $user): void
    {
        // ...
    }
}
```

<a name="muting-events"></a>
### Muting Events

You may occasionally need to temporarily "mute" all events fired by a model. You may achieve this using the `withoutEvents` method. The `withoutEvents` method accepts a closure as its only argument. Any code executed within this closure will not dispatch model events, and any value returned by the closure will be returned by the `withoutEvents` method:

```php
use App\Models\User;

$user = User::withoutEvents(function () {
    User::findOrFail(1)->delete();

    return User::find(2);
});
```

<a name="saving-a-single-model-without-events"></a>
#### Saving a Single Model Without Events

Sometimes you may wish to "save" a given model without dispatching any events. You may accomplish this using the `saveQuietly` method:

```php
$user = User::findOrFail(1);

$user->name = 'Victoria Faith';

$user->saveQuietly();
```

You may also "update", "delete", "soft delete", "restore", and "replicate" a given model without dispatching any events:

```php
$user->deleteQuietly();
$user->forceDeleteQuietly();
$user->restoreQuietly();
```


---

# Encryption

*Sección: Laravel | Origen: https://laravel.com/docs/13.x/encryption*

- [Introduction](#introduction)
- [Configuration](#configuration)
    - [Gracefully Rotating Encryption Keys](#gracefully-rotating-encryption-keys)
- [Using the Encrypter](#using-the-encrypter)

<a name="introduction"></a>
## Introduction

Laravel's encryption services provide a simple, convenient interface for encrypting and decrypting text via OpenSSL using AES-256 and AES-128 encryption. All of Laravel's encrypted values are signed using a message authentication code (MAC) so that their underlying value cannot be modified or tampered with once encrypted.

<a name="configuration"></a>
## Configuration

Before using Laravel's encrypter, you must set the `key` configuration option in your `config/app.php` configuration file. This configuration value is driven by the `APP_KEY` environment variable. You should use the `php artisan key:generate` command to generate this variable's value since the `key:generate` command will use PHP's secure random bytes generator to build a cryptographically secure key for your application. Typically, the value of the `APP_KEY` environment variable will be generated for you during [Laravel's installation](/docs/{{version}}/installation).

<a name="gracefully-rotating-encryption-keys"></a>
### Gracefully Rotating Encryption Keys

If you change your application's encryption key, all authenticated user sessions will be logged out of your application. This is because every cookie, including session cookies, are encrypted by Laravel. In addition, it will no longer be possible to decrypt any data that was encrypted with your previous encryption key.

To mitigate this issue, Laravel allows you to list your previous encryption keys in your application's `APP_PREVIOUS_KEYS` environment variable. This variable may contain a comma-delimited list of all of your previous encryption keys:

```ini
APP_KEY="base64:J63qRTDLub5NuZvP+kb8YIorGS6qFYHKVo6u7179stY="
APP_PREVIOUS_KEYS="base64:2nLsGFGzyoae2ax3EF2Lyq/hH6QghBGLIq5uL+Gp8/w="
```

When you set this environment variable, Laravel will always use the "current" encryption key when encrypting values. However, when decrypting values, Laravel will first try the current key, and if decryption fails using the current key, Laravel will try all previous keys until one of the keys is able to decrypt the value.

This approach to graceful decryption allows users to keep using your application uninterrupted even if your encryption key is rotated.

<a name="using-the-encrypter"></a>
## Using the Encrypter

<a name="encrypting-a-value"></a>
#### Encrypting a Value

You may encrypt a value using the `encryptString` method provided by the `Crypt` facade. All encrypted values are encrypted using OpenSSL and the AES-256-CBC cipher. Furthermore, all encrypted values are signed with a message authentication code (MAC). The integrated message authentication code will prevent the decryption of any values that have been tampered with by malicious users:

```php
<?php

namespace App\Http\Controllers;

use Illuminate\Http\RedirectResponse;
use Illuminate\Http\Request;
use Illuminate\Support\Facades\Crypt;

class DigitalOceanTokenController extends Controller
{
    /**
     * Store a DigitalOcean API token for the user.
     */
    public function store(Request $request): RedirectResponse
    {
        $request->user()->fill([
            'token' => Crypt::encryptString($request->token),
        ])->save();

        return redirect('/secrets');
    }
}
```

<a name="decrypting-a-value"></a>
#### Decrypting a Value

You may decrypt values using the `decryptString` method provided by the `Crypt` facade. If the value cannot be properly decrypted, such as when the message authentication code is invalid, an `Illuminate\Contracts\Encryption\DecryptException` will be thrown:

```php
use Illuminate\Contracts\Encryption\DecryptException;
use Illuminate\Support\Facades\Crypt;

try {
    $decrypted = Crypt::decryptString($encryptedValue);
} catch (DecryptException $e) {
    // ...
}
```


---

# Laravel Envoy

*Sección: Laravel | Origen: https://laravel.com/docs/13.x/envoy*

- [Introduction](#introduction)
- [Installation](#installation)
- [Writing Tasks](#writing-tasks)
    - [Defining Tasks](#defining-tasks)
    - [Multiple Servers](#multiple-servers)
    - [Setup](#setup)
    - [Variables](#variables)
    - [Stories](#stories)
    - [Hooks](#completion-hooks)
- [Running Tasks](#running-tasks)
    - [Confirming Task Execution](#confirming-task-execution)
- [Notifications](#notifications)
    - [Slack](#slack)
    - [Discord](#discord)
    - [Telegram](#telegram)
    - [Microsoft Teams](#microsoft-teams)

<a name="introduction"></a>
## Introduction

[Laravel Envoy](https://github.com/laravel/envoy) is a tool for executing common tasks you run on your remote servers. Using [Blade](/docs/{{version}}/blade) style syntax, you can easily set up tasks for deployment, Artisan commands, and more. Currently, Envoy only supports the Mac and Linux operating systems. However, Windows support is achievable using [WSL2](https://docs.microsoft.com/en-us/windows/wsl/install-win10).

<a name="installation"></a>
## Installation

First, install Envoy into your project using the Composer package manager:

```shell
composer require laravel/envoy --dev
```

Once Envoy has been installed, the Envoy binary will be available in your application's `vendor/bin` directory:

```shell
php vendor/bin/envoy
```

<a name="writing-tasks"></a>
## Writing Tasks

<a name="defining-tasks"></a>
### Defining Tasks

Tasks are the basic building block of Envoy. Tasks define the shell commands that should execute on your remote servers when the task is invoked. For example, you might define a task that executes the `php artisan queue:restart` command on all of your application's queue worker servers.

All of your Envoy tasks should be defined in an `Envoy.blade.php` file at the root of your application. Here's an example to get you started:

```blade
@servers(['web' => ['user@192.168.1.1'], 'workers' => ['user@192.168.1.2']])

@task('restart-queues', ['on' => 'workers'])
    cd /home/user/example.com
    php artisan queue:restart
@endtask
```

As you can see, an array of `@servers` is defined at the top of the file, allowing you to reference these servers via the `on` option of your task declarations. The `@servers` declaration should always be placed on a single line. Within your `@task` declarations, you should place the shell commands that should execute on your servers when the task is invoked.

<a name="local-tasks"></a>
#### Local Tasks

You can force a script to run on your local computer by specifying the server's IP address as `127.0.0.1`:

```blade
@servers(['localhost' => '127.0.0.1'])
```

<a name="importing-envoy-tasks"></a>
#### Importing Envoy Tasks

Using the `@import` directive, you may import other Envoy files so their stories and tasks are added to yours. After the files have been imported, you may execute the tasks they contain as if they were defined in your own Envoy file:

```blade
@import('vendor/package/Envoy.blade.php')
```

<a name="multiple-servers"></a>
### Multiple Servers

Envoy allows you to easily run a task across multiple servers. First, add additional servers to your `@servers` declaration. Each server should be assigned a unique name. Once you have defined your additional servers you may list each of the servers in the task's `on` array:

```blade
@servers(['web-1' => '192.168.1.1', 'web-2' => '192.168.1.2'])

@task('deploy', ['on' => ['web-1', 'web-2']])
    cd /home/user/example.com
    git pull origin {{ $branch }}
    php artisan migrate --force
@endtask
```

<a name="parallel-execution"></a>
#### Parallel Execution

By default, tasks will be executed on each server serially. In other words, a task will finish running on the first server before proceeding to execute on the second server. If you would like to run a task across multiple servers in parallel, add the `parallel` option to your task declaration:

```blade
@servers(['web-1' => '192.168.1.1', 'web-2' => '192.168.1.2'])

@task('deploy', ['on' => ['web-1', 'web-2'], 'parallel' => true])
    cd /home/user/example.com
    git pull origin {{ $branch }}
    php artisan migrate --force
@endtask
```

<a name="setup"></a>
### Setup

Sometimes, you may need to execute arbitrary PHP code before running your Envoy tasks. You may use the `@setup` directive to define a block of PHP code that should execute before your tasks:

```php
@setup
    $now = new DateTime;
@endsetup
```

If you need to require other PHP files before your task is executed, you may use the `@include` directive at the top of your `Envoy.blade.php` file:

```blade
@include('vendor/autoload.php')

@task('restart-queues')
    # ...
@endtask
```

<a name="variables"></a>
### Variables

If needed, you may pass arguments to Envoy tasks by specifying them on the command line when invoking Envoy:

```shell
php vendor/bin/envoy run deploy --branch=master
```

You may access the options within your tasks using Blade's "echo" syntax. You may also define Blade `if` statements and loops within your tasks. For example, let's verify the presence of the `$branch` variable before executing the `git pull` command:

```blade
@servers(['web' => ['user@192.168.1.1']])

@task('deploy', ['on' => 'web'])
    cd /home/user/example.com

    @if ($branch)
        git pull origin {{ $branch }}
    @endif

    php artisan migrate --force
@endtask
```

<a name="stories"></a>
### Stories

Stories group a set of tasks under a single, convenient name. For instance, a `deploy` story may run the `update-code` and `install-dependencies` tasks by listing the task names within its definition:

```blade
@servers(['web' => ['user@192.168.1.1']])

@story('deploy')
    update-code
    install-dependencies
@endstory

@task('update-code')
    cd /home/user/example.com
    git pull origin master
@endtask

@task('install-dependencies')
    cd /home/user/example.com
    composer install
@endtask
```

Once the story has been written, you may invoke it in the same way you would invoke a task:

```shell
php vendor/bin/envoy run deploy
```

<a name="completion-hooks"></a>
### Hooks

When tasks and stories run, a number of hooks are executed. The hook types supported by Envoy are `@before`, `@after`, `@error`, `@success`, and `@finished`. All of the code in these hooks is interpreted as PHP and executed locally, not on the remote servers that your tasks interact with.

You may define as many of each of these hooks as you like. They will be executed in the order that they appear in your Envoy script.

<a name="hook-before"></a>
#### `@before`

Before each task execution, all of the `@before` hooks registered in your Envoy script will execute. The `@before` hooks receive the name of the task that will be executed:

```blade
@before
    if ($task === 'deploy') {
        // ...
    }
@endbefore
```

<a name="completion-after"></a>
#### `@after`

After each task execution, all of the `@after` hooks registered in your Envoy script will execute. The `@after` hooks receive the name of the task that was executed:

```blade
@after
    if ($task === 'deploy') {
        // ...
    }
@endafter
```

<a name="completion-error"></a>
#### `@error`

After every task failure (exits with a status code greater than `0`), all of the `@error` hooks registered in your Envoy script will execute. The `@error` hooks receive the name of the task that was executed:

```blade
@error
    if ($task === 'deploy') {
        // ...
    }
@enderror
```

<a name="completion-success"></a>
#### `@success`

If all tasks have executed without errors, all of the `@success` hooks registered in your Envoy script will execute:

```blade
@success
    // ...
@endsuccess
```

<a name="completion-finished"></a>
#### `@finished`

After all tasks have been executed (regardless of exit status), all of the `@finished` hooks will be executed. The `@finished` hooks receive the status code of the completed task, which may be `null` or an `integer` greater than or equal to `0`:

```blade
@finished
    if ($exitCode > 0) {
        // There were errors in one of the tasks...
    }
@endfinished
```

<a name="running-tasks"></a>
## Running Tasks

To run a task or story that is defined in your application's `Envoy.blade.php` file, execute Envoy's `run` command, passing the name of the task or story you would like to execute. Envoy will execute the task and display the output from your remote servers as the task is running:

```shell
php vendor/bin/envoy run deploy
```

<a name="confirming-task-execution"></a>
### Confirming Task Execution

If you would like to be prompted for confirmation before running a given task on your servers, you should add the `confirm` directive to your task declaration. This option is particularly useful for destructive operations:

```blade
@task('deploy', ['on' => 'web', 'confirm' => true])
    cd /home/user/example.com
    git pull origin {{ $branch }}
    php artisan migrate
@endtask
```

<a name="notifications"></a>
## Notifications

<a name="slack"></a>
### Slack

Envoy supports sending notifications to [Slack](https://slack.com) after each task is executed. The `@slack` directive accepts a Slack hook URL and a channel / user name. You may retrieve your webhook URL by creating an "Incoming WebHooks" integration in your Slack control panel.

You should pass the entire webhook URL as the first argument given to the `@slack` directive. The second argument given to the `@slack` directive should be a channel name (`#channel`) or a user name (`@user`):

```blade
@finished
    @slack('webhook-url', '#bots')
@endfinished
```

By default, Envoy notifications will send a message to the notification channel describing the task that was executed. However, you may overwrite this message with your own custom message by passing a third argument to the `@slack` directive:

```blade
@finished
    @slack('webhook-url', '#bots', 'Hello, Slack.')
@endfinished
```

<a name="discord"></a>
### Discord

Envoy also supports sending notifications to [Discord](https://discord.com) after each task is executed. The `@discord` directive accepts a Discord hook URL and a message. You may retrieve your webhook URL by creating a "Webhook" in your Server Settings and choosing which channel the webhook should post to. You should pass the entire Webhook URL into the `@discord` directive:

```blade
@finished
    @discord('discord-webhook-url')
@endfinished
```

<a name="telegram"></a>
### Telegram

Envoy also supports sending notifications to [Telegram](https://telegram.org) after each task is executed. The `@telegram` directive accepts a Telegram Bot ID and a Chat ID. You may retrieve your Bot ID by creating a new bot using [BotFather](https://t.me/botfather). You can retrieve a valid Chat ID using [@username_to_id_bot](https://t.me/username_to_id_bot). You should pass the entire Bot ID and Chat ID into the `@telegram` directive:

```blade
@finished
    @telegram('bot-id','chat-id')
@endfinished
```

<a name="microsoft-teams"></a>
### Microsoft Teams

Envoy also supports sending notifications to [Microsoft Teams](https://www.microsoft.com/en-us/microsoft-teams) after each task is executed. The `@microsoftTeams` directive accepts a Teams Webhook (required), a message, theme color (success, info, warning, error), and an array of options. You may retrieve your Teams Webhook by creating a new [incoming webhook](https://docs.microsoft.com/en-us/microsoftteams/platform/webhooks-and-connectors/how-to/add-incoming-webhook). The Teams API has many other attributes to customize your message box like title, summary, and sections. You can find more information on the [Microsoft Teams documentation](https://docs.microsoft.com/en-us/microsoftteams/platform/webhooks-and-connectors/how-to/connectors-using?tabs=cURL#example-of-connector-message). You should pass the entire Webhook URL into the `@microsoftTeams` directive:

```blade
@finished
    @microsoftTeams('webhook-url')
@endfinished
```


---

# Error Handling

*Sección: Laravel | Origen: https://laravel.com/docs/13.x/errors*

- [Introduction](#introduction)
- [Configuration](#configuration)
- [Handling Exceptions](#handling-exceptions)
    - [Reporting Exceptions](#reporting-exceptions)
    - [Exception Log Levels](#exception-log-levels)
    - [Ignoring Exceptions by Type](#ignoring-exceptions-by-type)
    - [Rendering Exceptions](#rendering-exceptions)
    - [Reportable and Renderable Exceptions](#renderable-exceptions)
- [Throttling Reported Exceptions](#throttling-reported-exceptions)
- [HTTP Exceptions](#http-exceptions)
    - [Custom HTTP Error Pages](#custom-http-error-pages)

<a name="introduction"></a>
## Introduction

When you start a new Laravel project, error and exception handling is already configured for you; however, at any point, you may use the `withExceptions` method in your application's `bootstrap/app.php` to manage how exceptions are reported and rendered by your application.

The `$exceptions` object provided to the `withExceptions` closure is an instance of `Illuminate\Foundation\Configuration\Exceptions` and is responsible for managing exception handling in your application. We'll dive deeper into this object throughout this documentation.

<a name="configuration"></a>
## Configuration

The `debug` option in your `config/app.php` configuration file determines how much information about an error is actually displayed to the user. By default, this option is set to respect the value of the `APP_DEBUG` environment variable, which is stored in your `.env` file.

During local development, you should set the `APP_DEBUG` environment variable to `true`.

> [!WARNING]
> In your production environment, the value of `APP_DEBUG` should always be `false`. If the value is set to `true` in production, you risk exposing sensitive configuration values to your application's end users.

<a name="handling-exceptions"></a>
## Handling Exceptions

<a name="reporting-exceptions"></a>
### Reporting Exceptions

In Laravel, exception reporting is used to log exceptions or send them to an external service like [Laravel Nightwatch](https://nightwatch.laravel.com), [Sentry](https://github.com/getsentry/sentry-laravel), or [Flare](https://flareapp.io). By default, exceptions will be logged based on your [logging](/docs/{{version}}/logging) configuration. However, you are free to log exceptions however you wish.

If you need to report different types of exceptions in different ways, you may use the `report` exception method in your application's `bootstrap/app.php` to register a closure that should be executed when an exception of a given type needs to be reported. Laravel will determine what type of exception the closure reports by examining the type-hint of the closure:

```php
use App\Exceptions\InvalidOrderException;

->withExceptions(function (Exceptions $exceptions): void {
    $exceptions->report(function (InvalidOrderException $e) {
        // ...
    });
})
```

When you register a custom exception reporting callback using the `report` method, Laravel will still log the exception using the default logging configuration for the application. If you wish to stop the propagation of the exception to the default logging stack, you may use the `stop` method when defining your reporting callback or return `false` from the callback:

```php
use App\Exceptions\InvalidOrderException;

->withExceptions(function (Exceptions $exceptions): void {
    $exceptions->report(function (InvalidOrderException $e) {
        // ...
    })->stop();

    $exceptions->report(function (InvalidOrderException $e) {
        return false;
    });
})
```

> [!NOTE]
> To customize the exception reporting for a given exception, you may also utilize [reportable exceptions](/docs/{{version}}/errors#renderable-exceptions).

<a name="global-log-context"></a>
#### Global Log Context

If available, Laravel automatically adds the current user's ID to every exception's log message as contextual data. You may define your own global contextual data using the `context` exception method in your application's `bootstrap/app.php` file. This information will be included in every exception's log message written by your application:

```php
->withExceptions(function (Exceptions $exceptions): void {
    $exceptions->context(fn () => [
        'foo' => 'bar',
    ]);
})
```

<a name="exception-log-context"></a>
#### Exception Log Context

While adding context to every log message can be useful, sometimes a particular exception may have unique context that you would like to include in your logs. By defining a `context` method on one of your application's exceptions, you may specify any data relevant to that exception that should be added to the exception's log entry:

```php
<?php

namespace App\Exceptions;

use Exception;

class InvalidOrderException extends Exception
{
    // ...

    /**
     * Get the exception's context information.
     *
     * @return array<string, mixed>
     */
    public function context(): array
    {
        return ['order_id' => $this->orderId];
    }
}
```

<a name="the-report-helper"></a>
#### The `report` Helper

Sometimes you may need to report an exception but continue handling the current request. The `report` helper function allows you to quickly report an exception without rendering an error page to the user:

```php
public function isValid(string $value): bool
{
    try {
        // Validate the value...
    } catch (Throwable $e) {
        report($e);

        return false;
    }
}
```

<a name="deduplicating-reported-exceptions"></a>
#### Deduplicating Reported Exceptions

If you are using the `report` function throughout your application, you may occasionally report the same exception multiple times, creating duplicate entries in your logs.

If you would like to ensure that a single instance of an exception is only ever reported once, you may invoke the `dontReportDuplicates` exception method in your application's `bootstrap/app.php` file:

```php
->withExceptions(function (Exceptions $exceptions): void {
    $exceptions->dontReportDuplicates();
})
```

Now, when the `report` helper is called with the same instance of an exception, only the first call will be reported:

```php
$original = new RuntimeException('Whoops!');

report($original); // reported

try {
    throw $original;
} catch (Throwable $caught) {
    report($caught); // ignored
}

report($original); // ignored
report($caught); // ignored
```

<a name="exception-log-levels"></a>
### Exception Log Levels

When messages are written to your application's [logs](/docs/{{version}}/logging), the messages are written at a specified [log level](/docs/{{version}}/logging#log-levels), which indicates the severity or importance of the message being logged.

As noted above, even when you register a custom exception reporting callback using the `report` method, Laravel will still log the exception using the default logging configuration for the application; however, since the log level can sometimes influence the channels on which a message is logged, you may wish to configure the log level that certain exceptions are logged at.

To accomplish this, you may use the `level` exception method in your application's `bootstrap/app.php` file. This method receives the exception type as its first argument and the log level as its second argument:

```php
use PDOException;
use Psr\Log\LogLevel;

->withExceptions(function (Exceptions $exceptions): void {
    $exceptions->level(PDOException::class, LogLevel::CRITICAL);
})
```

<a name="ignoring-exceptions-by-type"></a>
### Ignoring Exceptions by Type

When building your application, there will be some types of exceptions you never want to report. To ignore these exceptions, you may use the `dontReport` exception method in your application's `bootstrap/app.php` file. Any class provided to this method will never be reported; however, they may still have custom rendering logic:

```php
use App\Exceptions\InvalidOrderException;

->withExceptions(function (Exceptions $exceptions): void {
    $exceptions->dontReport([
        InvalidOrderException::class,
    ]);
})
```

Alternatively, you may simply "mark" an exception class with the `Illuminate\Contracts\Debug\ShouldntReport` interface. When an exception is marked with this interface, it will never be reported by Laravel's exception handler:

```php
<?php

namespace App\Exceptions;

use Exception;
use Illuminate\Contracts\Debug\ShouldntReport;

class PodcastProcessingException extends Exception implements ShouldntReport
{
    //
}
```

If you need even more control over when a particular type of exception is ignored, you may provide a closure to the `dontReportWhen` method:

```php
use App\Exceptions\InvalidOrderException;
use Throwable;

->withExceptions(function (Exceptions $exceptions): void {
    $exceptions->dontReportWhen(function (Throwable $e) {
        return $e instanceof PodcastProcessingException &&
               $e->reason() === 'Subscription expired';
    });
})
```

Internally, Laravel already ignores some types of errors for you, such as exceptions resulting from 404 HTTP errors, 403 HTTP responses generated by origin mismatches, or 419 HTTP responses generated by invalid CSRF tokens. If you would like to instruct Laravel to stop ignoring a given type of exception, you may use the `stopIgnoring` exception method in your application's `bootstrap/app.php` file:

```php
use Symfony\Component\HttpKernel\Exception\HttpException;

->withExceptions(function (Exceptions $exceptions): void {
    $exceptions->stopIgnoring(HttpException::class);
})
```

<a name="rendering-exceptions"></a>
### Rendering Exceptions

By default, the Laravel exception handler will convert exceptions into an HTTP response for you. However, you are free to register a custom rendering closure for exceptions of a given type. You may accomplish this by using the `render` exception method in your application's `bootstrap/app.php` file.

The closure passed to the `render` method should return an instance of `Illuminate\Http\Response`, which may be generated via the `response` helper. Laravel will determine what type of exception the closure renders by examining the type-hint of the closure:

```php
use App\Exceptions\InvalidOrderException;
use Illuminate\Http\Request;

->withExceptions(function (Exceptions $exceptions): void {
    $exceptions->render(function (InvalidOrderException $e, Request $request) {
        return response()->view('errors.invalid-order', status: 500);
    });
})
```

You may also use the `render` method to override the rendering behavior for built-in Laravel or Symfony exceptions such as `NotFoundHttpException`. If the closure given to the `render` method does not return a value, Laravel's default exception rendering will be utilized:

```php
use Illuminate\Http\Request;
use Symfony\Component\HttpKernel\Exception\NotFoundHttpException;

->withExceptions(function (Exceptions $exceptions): void {
    $exceptions->render(function (NotFoundHttpException $e, Request $request) {
        if ($request->is('api/*')) {
            return response()->json([
                'message' => 'Record not found.'
            ], 404);
        }
    });
})
```

<a name="rendering-exceptions-as-json"></a>
#### Rendering Exceptions as JSON

When rendering an exception, Laravel will automatically determine if the exception should be rendered as an HTML or JSON response based on the `Accept` header of the request. If you would like to customize how Laravel determines whether to render HTML or JSON exception responses, you may utilize the `shouldRenderJsonWhen` method:

```php
use Illuminate\Http\Request;
use Throwable;

->withExceptions(function (Exceptions $exceptions): void {
    $exceptions->shouldRenderJsonWhen(function (Request $request, Throwable $e) {
        if ($request->is('admin/*')) {
            return true;
        }

        return $request->expectsJson();
    });
})
```

<a name="customizing-the-exception-response"></a>
#### Customizing the Exception Response

Rarely, you may need to customize the entire HTTP response rendered by Laravel's exception handler. To accomplish this, you may register a response customization closure using the `respond` method:

```php
use Symfony\Component\HttpFoundation\Response;

->withExceptions(function (Exceptions $exceptions): void {
    $exceptions->respond(function (Response $response) {
        if ($response->getStatusCode() === 419) {
            return back()->with([
                'message' => 'The page expired, please try again.',
            ]);
        }

        return $response;
    });
})
```

<a name="renderable-exceptions"></a>
### Reportable and Renderable Exceptions

Instead of defining custom reporting and rendering behavior in your application's `bootstrap/app.php` file, you may define `report` and `render` methods directly on your application's exceptions. When these methods exist, they will automatically be called by the framework:

```php
<?php

namespace App\Exceptions;

use Exception;
use Illuminate\Http\Request;
use Illuminate\Http\Response;

class InvalidOrderException extends Exception
{
    /**
     * Report the exception.
     */
    public function report(): void
    {
        // ...
    }

    /**
     * Render the exception as an HTTP response.
     */
    public function render(Request $request): Response
    {
        return response(/* ... */);
    }
}
```

If your exception extends an exception that is already renderable, such as a built-in Laravel or Symfony exception, you may return `false` from the exception's `render` method to render the exception's default HTTP response:

```php
/**
 * Render the exception as an HTTP response.
 */
public function render(Request $request): Response|bool
{
    if (/** Determine if the exception needs custom rendering */) {

        return response(/* ... */);
    }

    return false;
}
```

If your exception contains custom reporting logic that is only necessary when certain conditions are met, you may need to instruct Laravel to sometimes report the exception using the default exception handling configuration. To accomplish this, you may return `false` from the exception's `report` method:

```php
/**
 * Report the exception.
 */
public function report(): bool
{
    if (/** Determine if the exception needs custom reporting */) {

        // ...

        return true;
    }

    return false;
}
```

> [!NOTE]
> You may type-hint any required dependencies of the `report` method and they will automatically be injected into the method by Laravel's [service container](/docs/{{version}}/container).

<a name="throttling-reported-exceptions"></a>
### Throttling Reported Exceptions

If your application reports a very large number of exceptions, you may want to throttle how many exceptions are actually logged or sent to your application's external error tracking service.

To take a random sample rate of exceptions, you may use the `throttle` exception method in your application's `bootstrap/app.php` file. The `throttle` method receives a closure that should return a `Lottery` instance:

```php
use Illuminate\Support\Lottery;
use Throwable;

->withExceptions(function (Exceptions $exceptions): void {
    $exceptions->throttle(function (Throwable $e) {
        return Lottery::odds(1, 1000);
    });
})
```

It is also possible to conditionally sample based on the exception type. If you would like to only sample instances of a specific exception class, you may return a `Lottery` instance only for that class:

```php
use App\Exceptions\ApiMonitoringException;
use Illuminate\Support\Lottery;
use Throwable;

->withExceptions(function (Exceptions $exceptions): void {
    $exceptions->throttle(function (Throwable $e) {
        if ($e instanceof ApiMonitoringException) {
            return Lottery::odds(1, 1000);
        }
    });
})
```

You may also rate limit exceptions logged or sent to an external error tracking service by returning a `Limit` instance instead of a `Lottery`. This is useful if you want to protect against sudden bursts of exceptions flooding your logs, for example, when a third-party service used by your application is down:

```php
use Illuminate\Broadcasting\BroadcastException;
use Illuminate\Cache\RateLimiting\Limit;
use Throwable;

->withExceptions(function (Exceptions $exceptions): void {
    $exceptions->throttle(function (Throwable $e) {
        if ($e instanceof BroadcastException) {
            return Limit::perMinute(300);
        }
    });
})
```

By default, limits will use the exception's class as the rate limit key. You can customize this by specifying your own key using the `by` method on the `Limit`:

```php
use Illuminate\Broadcasting\BroadcastException;
use Illuminate\Cache\RateLimiting\Limit;
use Throwable;

->withExceptions(function (Exceptions $exceptions): void {
    $exceptions->throttle(function (Throwable $e) {
        if ($e instanceof BroadcastException) {
            return Limit::perMinute(300)->by($e->getMessage());
        }
    });
})
```

Of course, you may return a mixture of `Lottery` and `Limit` instances for different exceptions:

```php
use App\Exceptions\ApiMonitoringException;
use Illuminate\Broadcasting\BroadcastException;
use Illuminate\Cache\RateLimiting\Limit;
use Illuminate\Support\Lottery;
use Throwable;

->withExceptions(function (Exceptions $exceptions): void {
    $exceptions->throttle(function (Throwable $e) {
        return match (true) {
            $e instanceof BroadcastException => Limit::perMinute(300),
            $e instanceof ApiMonitoringException => Lottery::odds(1, 1000),
            default => Limit::none(),
        };
    });
})
```

<a name="http-exceptions"></a>
## HTTP Exceptions

Some exceptions describe HTTP error codes from the server. For example, this may be a "page not found" error (404), an "unauthorized error" (401), or even a developer generated 500 error. In order to generate such a response from anywhere in your application, you may use the `abort` helper:

```php
abort(404);
```

<a name="custom-http-error-pages"></a>
### Custom HTTP Error Pages

Laravel makes it easy to display custom error pages for various HTTP status codes. For example, to customize the error page for 404 HTTP status codes, create a `resources/views/errors/404.blade.php` view template. This view will be rendered for all 404 errors generated by your application. The views within this directory should be named to match the HTTP status code they correspond to. The `Symfony\Component\HttpKernel\Exception\HttpException` instance raised by the `abort` function will be passed to the view as an `$exception` variable:

```blade
<h2>{{ $exception->getMessage() }}</h2>
```

You may publish Laravel's default error page templates using the `vendor:publish` Artisan command. Once the templates have been published, you may customize them to your liking:

```shell
php artisan vendor:publish --tag=laravel-errors
```

<a name="fallback-http-error-pages"></a>
#### Fallback HTTP Error Pages

You may also define a "fallback" error page for a given series of HTTP status codes. This page will be rendered if there is not a corresponding page for the specific HTTP status code that occurred. To accomplish this, define a `4xx.blade.php` template and a `5xx.blade.php` template in your application's `resources/views/errors` directory.

When defining fallback error pages, the fallback pages will not affect `404`, `500`, and `503` error responses since Laravel has internal, dedicated pages for these status codes. To customize the pages rendered for these status codes, you should define a custom error page for each of them individually.


---

# Events

*Sección: Laravel | Origen: https://laravel.com/docs/13.x/events*

- [Introduction](#introduction)
- [Generating Events and Listeners](#generating-events-and-listeners)
- [Registering Events and Listeners](#registering-events-and-listeners)
    - [Event Discovery](#event-discovery)
    - [Manually Registering Events](#manually-registering-events)
    - [Closure Listeners](#closure-listeners)
- [Defining Events](#defining-events)
- [Defining Listeners](#defining-listeners)
- [Queued Event Listeners](#queued-event-listeners)
    - [Manually Interacting With the Queue](#manually-interacting-with-the-queue)
    - [Queued Event Listeners and Database Transactions](#queued-event-listeners-and-database-transactions)
    - [Queued Listener Middleware](#queued-listener-middleware)
    - [Encrypted Queued Listeners](#encrypted-queued-listeners)
    - [Unique Event Listeners](#unique-event-listeners)
        - [Keeping Listeners Unique Until Processing Begins](#keeping-listeners-unique-until-processing-begins)
        - [Unique Listener Locks](#unique-listener-locks)
    - [Debounced Event Listeners](#debounced-event-listeners)
    - [Handling Failed Jobs](#handling-failed-jobs)
- [Dispatching Events](#dispatching-events)
    - [Dispatching Events After Database Transactions](#dispatching-events-after-database-transactions)
    - [Deferring Events](#deferring-events)
- [Event Subscribers](#event-subscribers)
    - [Writing Event Subscribers](#writing-event-subscribers)
    - [Registering Event Subscribers](#registering-event-subscribers)
- [Testing](#testing)
    - [Faking a Subset of Events](#faking-a-subset-of-events)
    - [Scoped Event Fakes](#scoped-event-fakes)

<a name="introduction"></a>
## Introduction

Laravel's events provide a simple observer pattern implementation, allowing you to subscribe and listen for various events that occur within your application. Event classes are typically stored in the `app/Events` directory, while their listeners are stored in `app/Listeners`. Don't worry if you don't see these directories in your application as they will be created for you as you generate events and listeners using Artisan console commands.

Events serve as a great way to decouple various aspects of your application, since a single event can have multiple listeners that do not depend on each other. For example, you may wish to send a Slack notification to your user each time an order has shipped. Instead of coupling your order processing code to your Slack notification code, you can raise an `App\Events\OrderShipped` event which a listener can receive and use to dispatch a Slack notification.

<a name="generating-events-and-listeners"></a>
## Generating Events and Listeners

To quickly generate events and listeners, you may use the `make:event` and `make:listener` Artisan commands:

```shell
php artisan make:event PodcastProcessed

php artisan make:listener SendPodcastNotification --event=PodcastProcessed
```

For convenience, you may also invoke the `make:event` and `make:listener` Artisan commands without additional arguments. When you do so, Laravel will automatically prompt you for the class name and, when creating a listener, the event it should listen to:

```shell
php artisan make:event

php artisan make:listener
```

<a name="registering-events-and-listeners"></a>
## Registering Events and Listeners

<a name="event-discovery"></a>
### Event Discovery

By default, Laravel will automatically find and register your event listeners by scanning your application's `Listeners` directory. When Laravel finds any listener class method that begins with `handle` or `__invoke`, Laravel will register those methods as event listeners for the event that is type-hinted in the method's signature:

```php
use App\Events\PodcastProcessed;

class SendPodcastNotification
{
    /**
     * Handle the event.
     */
    public function handle(PodcastProcessed $event): void
    {
        // ...
    }
}
```

You may listen to multiple events using PHP's union types:

```php
/**
 * Handle the event.
 */
public function handle(PodcastProcessed|PodcastPublished $event): void
{
    // ...
}
```

If you plan to store your listeners in a different directory or within multiple directories, you may instruct Laravel to scan those directories using the `withEvents` method in your application's `bootstrap/app.php` file:

```php
->withEvents(discover: [
    __DIR__.'/../app/Domain/Orders/Listeners',
])
```

You may scan for listeners in multiple similar directories using the `*` character as a wildcard:

```php
->withEvents(discover: [
    __DIR__.'/../app/Domain/*/Listeners',
])
```

The `event:list` command may be used to list all of the listeners registered within your application:

```shell
php artisan event:list
```

<a name="event-discovery-in-production"></a>
#### Event Discovery in Production

To give your application a speed boost, you should cache a manifest of all of your application's listeners using the `optimize` or `event:cache` Artisan commands. Typically, this command should be run as part of your application's [deployment process](/docs/{{version}}/deployment#optimization). This manifest will be used by the framework to speed up the event registration process. The `event:clear` command may be used to destroy the event cache.

<a name="dynamic-event-discovery"></a>
#### Dynamic Event Discovery

To dynamically control whether a given listener is discovered, you may implement the `ShouldBeDiscovered` interface on the listener class and define a `shouldBeDiscovered` method that returns a boolean value. If the method returns `false`, the listener will not be registered during event discovery:

```php
use Illuminate\Contracts\Events\ShouldBeDiscovered;

class SendPodcastNotification implements ShouldBeDiscovered
{
    /**
     * Handle the event.
     */
    public function handle(PodcastProcessed $event): void
    {
        // ...
    }

    /**
     * Determine if the listener should be discovered.
     */
    public static function shouldBeDiscovered(): bool
    {
        return app()->environment('production');
    }
}
```

<a name="manually-registering-events"></a>
### Manually Registering Events

Using the `Event` facade, you may manually register events and their corresponding listeners within the `boot` method of your application's `AppServiceProvider`:

```php
use App\Domain\Orders\Events\PodcastProcessed;
use App\Domain\Orders\Listeners\SendPodcastNotification;
use Illuminate\Support\Facades\Event;

/**
 * Bootstrap any application services.
 */
public function boot(): void
{
    Event::listen(
        PodcastProcessed::class,
        SendPodcastNotification::class,
    );
}
```

The `event:list` command may be used to list all of the listeners registered within your application:

```shell
php artisan event:list
```

<a name="closure-listeners"></a>
### Closure Listeners

Typically, listeners are defined as classes; however, you may also manually register closure-based event listeners in the `boot` method of your application's `AppServiceProvider`:

```php
use App\Events\PodcastProcessed;
use Illuminate\Support\Facades\Event;

/**
 * Bootstrap any application services.
 */
public function boot(): void
{
    Event::listen(function (PodcastProcessed $event) {
        // ...
    });
}
```

<a name="queueable-anonymous-event-listeners"></a>
#### Queueable Anonymous Event Listeners

When registering closure-based event listeners, you may wrap the listener closure within the `Illuminate\Events\queueable` function to instruct Laravel to execute the listener using the [queue](/docs/{{version}}/queues):

```php
use App\Events\PodcastProcessed;
use function Illuminate\Events\queueable;
use Illuminate\Support\Facades\Event;

/**
 * Bootstrap any application services.
 */
public function boot(): void
{
    Event::listen(queueable(function (PodcastProcessed $event) {
        // ...
    }));
}
```

Like queued jobs, you may use the `onConnection`, `onQueue`, and `delay` methods to customize the execution of the queued listener:

```php
Event::listen(queueable(function (PodcastProcessed $event) {
    // ...
})->onConnection('redis')->onQueue('podcasts')->delay(now()->plus(seconds: 10)));
```

If you would like to handle anonymous queued listener failures, you may provide a closure to the `catch` method while defining the `queueable` listener. This closure will receive the event instance and the `Throwable` instance that caused the listener's failure:

```php
use App\Events\PodcastProcessed;
use function Illuminate\Events\queueable;
use Illuminate\Support\Facades\Event;
use Throwable;

Event::listen(queueable(function (PodcastProcessed $event) {
    // ...
})->catch(function (PodcastProcessed $event, Throwable $e) {
    // The queued listener failed...
}));
```

<a name="wildcard-event-listeners"></a>
#### Wildcard Event Listeners

You may also register listeners using the `*` character as a wildcard parameter, allowing you to catch multiple events on the same listener. Wildcard listeners receive the event name as their first argument and the entire event data array as their second argument:

```php
Event::listen('event.*', function (string $eventName, array $data) {
    // ...
});
```

<a name="defining-events"></a>
## Defining Events

An event class is essentially a data container which holds the information related to the event. For example, let's assume an `App\Events\OrderShipped` event receives an [Eloquent ORM](/docs/{{version}}/eloquent) object:

```php
<?php

namespace App\Events;

use App\Models\Order;
use Illuminate\Broadcasting\InteractsWithSockets;
use Illuminate\Foundation\Events\Dispatchable;
use Illuminate\Queue\SerializesModels;

class OrderShipped
{
    use Dispatchable, InteractsWithSockets, SerializesModels;

    /**
     * Create a new event instance.
     */
    public function __construct(
        public Order $order,
    ) {}
}
```

As you can see, this event class contains no logic. It is a container for the `App\Models\Order` instance that was purchased. The `SerializesModels` trait used by the event will gracefully serialize any Eloquent models if the event object is serialized using PHP's `serialize` function, such as when utilizing [queued listeners](#queued-event-listeners).

<a name="defining-listeners"></a>
## Defining Listeners

Next, let's take a look at the listener for our example event. Event listeners receive event instances in their `handle` method. The `make:listener` Artisan command, when invoked with the `--event` option, will automatically import the proper event class and type-hint the event in the `handle` method. Within the `handle` method, you may perform any actions necessary to respond to the event:

```php
<?php

namespace App\Listeners;

use App\Events\OrderShipped;

class SendShipmentNotification
{
    /**
     * Create the event listener.
     */
    public function __construct() {}

    /**
     * Handle the event.
     */
    public function handle(OrderShipped $event): void
    {
        // Access the order using $event->order...
    }
}
```

> [!NOTE]
> Your event listeners may also type-hint any dependencies they need on their constructors. All event listeners are resolved via the Laravel [service container](/docs/{{version}}/container), so dependencies will be injected automatically.

<a name="stopping-the-propagation-of-an-event"></a>
#### Stopping The Propagation Of An Event

Sometimes, you may wish to stop the propagation of an event to other listeners. You may do so by returning `false` from your listener's `handle` method.

<a name="queued-event-listeners"></a>
## Queued Event Listeners

Queueing listeners can be beneficial if your listener is going to perform a slow task such as sending an email or making an HTTP request. Before using queued listeners, make sure to [configure your queue](/docs/{{version}}/queues) and start a queue worker on your server or local development environment.

To specify that a listener should be queued, add the `ShouldQueue` interface to the listener class. Listeners generated by the `make:listener` Artisan commands already have this interface imported into the current namespace so you can use it immediately:

```php
<?php

namespace App\Listeners;

use App\Events\OrderShipped;
use Illuminate\Contracts\Queue\ShouldQueue;

class SendShipmentNotification implements ShouldQueue
{
    // ...
}
```

That's it! Now, when an event handled by this listener is dispatched, the listener will automatically be queued by the event dispatcher using Laravel's [queue system](/docs/{{version}}/queues). If no exceptions are thrown when the listener is executed by the queue, the queued job will automatically be deleted after it has finished processing.

<a name="customizing-the-queue-connection-queue-name"></a>
#### Customizing The Queue Connection, Name, & Delay

If you would like to customize the queue connection, queue name, or queue delay time of an event listener, you may use the `Connection`, `Queue`, and `Delay` attributes on your listener class:

```php
<?php

namespace App\Listeners;

use App\Events\OrderShipped;
use Illuminate\Contracts\Queue\ShouldQueue;
use Illuminate\Queue\Attributes\Connection;
use Illuminate\Queue\Attributes\Delay;
use Illuminate\Queue\Attributes\Queue;

#[Connection('sqs')]
#[Queue('listeners')]
#[Delay(60)]
class SendShipmentNotification implements ShouldQueue
{
    // ...
}
```
If you would like to define the listener's queue connection, queue name, or delay at runtime, you may define `viaConnection`, `viaQueue`, or `withDelay` methods on the listener:

```php
/**
 * Get the name of the listener's queue connection.
 */
public function viaConnection(): string
{
    return 'sqs';
}

/**
 * Get the name of the listener's queue.
 */
public function viaQueue(): string
{
    return 'listeners';
}

/**
 * Get the number of seconds before the job should be processed.
 */
public function withDelay(OrderShipped $event): int
{
    return $event->highPriority ? 0 : 60;
}
```

<a name="conditionally-queueing-listeners"></a>
#### Conditionally Queueing Listeners

Sometimes, you may need to determine whether a listener should be queued based on some data that are only available at runtime. To accomplish this, a `shouldQueue` method may be added to a listener to determine whether the listener should be queued. If the `shouldQueue` method returns `false`, the listener will not be queued:

```php
<?php

namespace App\Listeners;

use App\Events\OrderCreated;
use Illuminate\Contracts\Queue\ShouldQueue;

class RewardGiftCard implements ShouldQueue
{
    /**
     * Reward a gift card to the customer.
     */
    public function handle(OrderCreated $event): void
    {
        // ...
    }

    /**
     * Determine whether the listener should be queued.
     */
    public function shouldQueue(OrderCreated $event): bool
    {
        return $event->order->subtotal >= 5000;
    }
}
```

<a name="manually-interacting-with-the-queue"></a>
### Manually Interacting With the Queue

If you need to manually access the listener's underlying queue job's `delete` and `release` methods, you may do so using the `Illuminate\Queue\InteractsWithQueue` trait. This trait is imported by default on generated listeners and provides access to these methods:

```php
<?php

namespace App\Listeners;

use App\Events\OrderShipped;
use Illuminate\Contracts\Queue\ShouldQueue;
use Illuminate\Queue\InteractsWithQueue;

class SendShipmentNotification implements ShouldQueue
{
    use InteractsWithQueue;

    /**
     * Handle the event.
     */
    public function handle(OrderShipped $event): void
    {
        if ($condition) {
            $this->release(30);
        }
    }
}
```

<a name="queued-event-listeners-and-database-transactions"></a>
### Queued Event Listeners and Database Transactions

When queued listeners are dispatched within database transactions, they may be processed by the queue before the database transaction has committed. When this happens, any updates you have made to models or database records during the database transaction may not yet be reflected in the database. In addition, any models or database records created within the transaction may not exist in the database. If your listener depends on these models, unexpected errors can occur when the job that dispatches the queued listener is processed.

If your queue connection's `after_commit` configuration option is set to `false`, you may still indicate that a particular queued listener should be dispatched after all open database transactions have been committed by implementing the `ShouldQueueAfterCommit` interface on the listener class:

```php
<?php

namespace App\Listeners;

use Illuminate\Contracts\Queue\ShouldQueueAfterCommit;
use Illuminate\Queue\InteractsWithQueue;

class SendShipmentNotification implements ShouldQueueAfterCommit
{
    use InteractsWithQueue;
}
```

> [!NOTE]
> To learn more about working around these issues, please review the documentation regarding [queued jobs and database transactions](/docs/{{version}}/queues#jobs-and-database-transactions).

<a name="queued-listener-middleware"></a>
### Queued Listener Middleware

Queued listeners can also utilize [job middleware](/docs/{{version}}/queues#job-middleware). Job middleware allow you to wrap custom logic around the execution of queued listeners, reducing boilerplate in the listeners themselves. After creating job middleware, they may be attached to a listener by returning them from the listener's `middleware` method:

```php
<?php

namespace App\Listeners;

use App\Events\OrderShipped;
use App\Jobs\Middleware\RateLimited;
use Illuminate\Contracts\Queue\ShouldQueue;

class SendShipmentNotification implements ShouldQueue
{
    /**
     * Handle the event.
     */
    public function handle(OrderShipped $event): void
    {
        // Process the event...
    }

    /**
     * Get the middleware the listener should pass through.
     *
     * @return array<int, object>
     */
    public function middleware(OrderShipped $event): array
    {
        return [new RateLimited];
    }
}
```

<a name="encrypted-queued-listeners"></a>
#### Encrypted Queued Listeners

Laravel allows you to ensure the privacy and integrity of a queued listener's data via [encryption](/docs/{{version}}/encryption). To get started, simply add the `ShouldBeEncrypted` interface to the listener class. Once this interface has been added to the class, Laravel will automatically encrypt your listener before pushing it onto a queue:

```php
<?php

namespace App\Listeners;

use App\Events\OrderShipped;
use Illuminate\Contracts\Queue\ShouldBeEncrypted;
use Illuminate\Contracts\Queue\ShouldQueue;

class SendShipmentNotification implements ShouldQueue, ShouldBeEncrypted
{
    // ...
}
```

<a name="unique-event-listeners"></a>
### Unique Event Listeners

> [!WARNING]
> Unique listeners require a cache driver that supports [locks](/docs/{{version}}/cache#atomic-locks). Currently, the `memcached`, `redis`, `dynamodb`, `database`, `file`, and `array` cache drivers support atomic locks.

Sometimes, you may want to ensure that only one instance of a specific listener is on the queue at any point in time. You may do so by implementing the `ShouldBeUnique` interface on your listener class:

```php
<?php

namespace App\Listeners;

use App\Events\LicenseSaved;
use Illuminate\Contracts\Queue\ShouldBeUnique;
use Illuminate\Contracts\Queue\ShouldQueue;

class AcquireProductKey implements ShouldQueue, ShouldBeUnique
{
    public function __invoke(LicenseSaved $event): void
    {
        // ...
    }
}
```

In the example above, the `AcquireProductKey` listener is unique. So, the listener will not be queued if another instance of the listener is already on the queue and has not finished processing. This ensures that only one product key is acquired for each license, even if the license is saved multiple times in quick succession.

In certain cases, you may want to define a specific "key" that makes the listener unique or you may want to specify a timeout beyond which the listener no longer stays unique. To accomplish this, you may define `uniqueId` and `uniqueFor` properties or methods on your listener class. The methods receive the event instance, allowing you to use event data to construct the return value:

```php
<?php

namespace App\Listeners;

use App\Events\LicenseSaved;
use Illuminate\Contracts\Queue\ShouldBeUnique;
use Illuminate\Contracts\Queue\ShouldQueue;

class AcquireProductKey implements ShouldQueue, ShouldBeUnique
{
    /**
     * The number of seconds after which the listener's unique lock will be released.
     *
     * @var int
     */
    public $uniqueFor = 3600;

    public function __invoke(LicenseSaved $event): void
    {
        // ...
    }

    /**
     * Get the unique ID for the listener.
     */
    public function uniqueId(LicenseSaved $event): string
    {
        return 'listener:'.$event->license->id;
    }
}
```

In the example above, the `AcquireProductKey` listener is unique by license ID. So, any new dispatches of the listener for the same license will be ignored until the existing listener has completed processing. This prevents duplicate product keys from being acquired for the same license. In addition, if the existing listener is not processed within one hour, the unique lock will be released and another listener with the same unique key can be queued.

> [!WARNING]
> If your application dispatches events from multiple web servers or containers, you should ensure that all of your servers are communicating with the same central cache server so that Laravel can accurately determine if a listener is unique.

<a name="keeping-listeners-unique-until-processing-begins"></a>
#### Keeping Listeners Unique Until Processing Begins

By default, unique listeners are "unlocked" after a listener completes processing or fails all of its retry attempts. However, there may be situations where you would like your listener to unlock immediately before it is processed. To accomplish this, your listener should implement the `ShouldBeUniqueUntilProcessing` contract instead of the `ShouldBeUnique` contract:

```php
<?php

namespace App\Listeners;

use App\Events\LicenseSaved;
use Illuminate\Contracts\Queue\ShouldBeUniqueUntilProcessing;
use Illuminate\Contracts\Queue\ShouldQueue;

class AcquireProductKey implements ShouldQueue, ShouldBeUniqueUntilProcessing
{
    // ...
}
```

<a name="unique-listener-locks"></a>
#### Unique Listener Locks

Behind the scenes, when a `ShouldBeUnique` listener is dispatched, Laravel attempts to acquire a [lock](/docs/{{version}}/cache#atomic-locks) with the `uniqueId` key. If the lock is already held, the listener is not dispatched. This lock is released when the listener completes processing or fails all of its retry attempts. By default, Laravel will use the default cache driver to obtain this lock. However, if you wish to use another driver for acquiring the lock, you may define a `uniqueVia` method that returns the cache driver that should be used:

```php
<?php

namespace App\Listeners;

use App\Events\LicenseSaved;
use Illuminate\Contracts\Cache\Repository;
use Illuminate\Support\Facades\Cache;

class AcquireProductKey implements ShouldQueue, ShouldBeUnique
{
    // ...

    /**
     * Get the cache driver for the unique listener lock.
     */
    public function uniqueVia(LicenseSaved $event): Repository
    {
        return Cache::driver('redis');
    }
}
```

> [!NOTE]
> If you only need to limit the concurrent processing of a listener, use the [WithoutOverlapping](/docs/{{version}}/queues#preventing-job-overlaps) job middleware instead.

<a name="debounced-event-listeners"></a>
### Debounced Event Listeners

Sometimes, you may want to handle only the latest instance of an event dispatched repeatedly within a short period. You may do so by adding the `DebounceFor` attribute to a queued listener:

```php
<?php

namespace App\Listeners;

use App\Events\ProductUpdated;
use Illuminate\Contracts\Queue\ShouldQueue;
use Illuminate\Queue\Attributes\DebounceFor;

#[DebounceFor(30)]
class UpdateProductSearchIndex implements ShouldQueue
{
    /**
     * Handle the event.
     */
    public function handle(ProductUpdated $event): void
    {
        // Update the product's search index...
    }

    /**
     * Get the debounce ID for the listener.
     */
    public function debounceId(ProductUpdated $event): string
    {
        return (string) $event->product->getKey();
    }
}
```

In the example above, repeatedly dispatching `ProductUpdated` events for the same product within `30` seconds will debounce the listener so that only the latest event is handled. Different debounce IDs are handled independently.

If you would like to cap how long a frequently dispatched event can defer a listener, you may provide the `maxWait` argument to the `DebounceFor` attribute:

```php
#[DebounceFor(30, maxWait: 120)]
class UpdateProductSearchIndex implements ShouldQueue
{
    // ...
}
```

You may customize the cache store used for debounce tracking by defining a `debounceVia` method on your listener. The method receives the event instance and should return a cache repository:

```php
use Illuminate\Contracts\Cache\Repository;
use Illuminate\Support\Facades\Cache;

public function debounceVia(ProductUpdated $event): Repository
{
    return Cache::driver('redis');
}
```

Debounced listeners and unique listeners are mutually exclusive. A listener using the `DebounceFor` attribute should not implement `ShouldBeUnique`.

> [!WARNING]
> If your application dispatches events from multiple web servers or containers, you should ensure that all of your servers are communicating with the same central cache server.

<a name="handling-failed-jobs"></a>
### Handling Failed Jobs

Sometimes your queued event listeners may fail. If the queued listener exceeds the maximum number of attempts as defined by your queue worker, the `failed` method will be called on your listener. The `failed` method receives the event instance and the `Throwable` that caused the failure:

```php
<?php

namespace App\Listeners;

use App\Events\OrderShipped;
use Illuminate\Contracts\Queue\ShouldQueue;
use Illuminate\Queue\InteractsWithQueue;
use Throwable;

class SendShipmentNotification implements ShouldQueue
{
    use InteractsWithQueue;

    /**
     * Handle the event.
     */
    public function handle(OrderShipped $event): void
    {
        // ...
    }

    /**
     * Handle a job failure.
     */
    public function failed(OrderShipped $event, Throwable $exception): void
    {
        // ...
    }
}
```

<a name="specifying-queued-listener-maximum-attempts"></a>
#### Specifying Queued Listener Maximum Attempts

If one of your queued listeners is encountering an error, you likely do not want it to keep retrying indefinitely. Therefore, Laravel provides various ways to specify how many times or for how long a listener may be attempted.

You may use the `Tries` attribute on your listener class to specify how many times the listener may be attempted before it is considered to have failed:

```php
<?php

namespace App\Listeners;

use App\Events\OrderShipped;
use Illuminate\Contracts\Queue\ShouldQueue;
use Illuminate\Queue\Attributes\Tries;
use Illuminate\Queue\InteractsWithQueue;

#[Tries(5)]
class SendShipmentNotification implements ShouldQueue
{
    use InteractsWithQueue;

    // ...
}
```

As an alternative to defining how many times a listener may be attempted before it fails, you may define a time at which the listener should no longer be attempted. This allows a listener to be attempted any number of times within a given time frame. To define the time at which a listener should no longer be attempted, add a `retryUntil` method to your listener class. This method should return a `DateTimeInterface` instance:

```php
use DateTimeInterface;

/**
 * Determine the time at which the listener should timeout.
 */
public function retryUntil(): DateTimeInterface
{
    return now()->plus(minutes: 5);
}
```

If both `retryUntil` and `tries` are defined, Laravel gives precedence to the `retryUntil` method.

<a name="specifying-queued-listener-backoff"></a>
#### Specifying Queued Listener Backoff

If you would like to configure how many seconds Laravel should wait before retrying a listener that has encountered an exception, you may use the `Backoff` attribute on your listener class:

```php
<?php

namespace App\Listeners;

use Illuminate\Contracts\Queue\ShouldQueue;
use Illuminate\Queue\Attributes\Backoff;

#[Backoff(3)]
class SendShipmentNotification implements ShouldQueue
{
    // ...
}
```

If you require more complex logic for determining the listeners's backoff time, you may define a `backoff` method on your listener class:

```php
/**
 * Calculate the number of seconds to wait before retrying the queued listener.
 */
public function backoff(OrderShipped $event): int
{
    return 3;
}
```

You may easily configure "exponential" backoffs by returning an array of backoff values from the `backoff` method. In this example, the retry delay will be 1 second for the first retry, 5 seconds for the second retry, 10 seconds for the third retry, and 10 seconds for every subsequent retry if there are more attempts remaining:

```php
/**
 * Calculate the number of seconds to wait before retrying the queued listener.
 *
 * @return list<int>
 */
public function backoff(OrderShipped $event): array
{
    return [1, 5, 10];
}
```

<a name="specifying-queued-listener-max-exceptions"></a>
#### Specifying Queued Listener Max Exceptions

Sometimes you may wish to specify that a queued listener may be attempted many times, but should fail if the retries are triggered by a given number of unhandled exceptions (as opposed to being released by the `release` method directly). To accomplish this, you may use the `Tries` and `MaxExceptions` attributes on your listener class:

```php
<?php

namespace App\Listeners;

use App\Events\OrderShipped;
use Illuminate\Contracts\Queue\ShouldQueue;
use Illuminate\Queue\Attributes\MaxExceptions;
use Illuminate\Queue\Attributes\Tries;
use Illuminate\Queue\InteractsWithQueue;

#[Tries(25)]
#[MaxExceptions(3)]
class SendShipmentNotification implements ShouldQueue
{
    use InteractsWithQueue;

    /**
     * Handle the event.
     */
    public function handle(OrderShipped $event): void
    {
        // Process the event...
    }
}
```

In this example, the listener will be retried up to 25 times. However, the listener will fail if three unhandled exceptions are thrown by the listener.

<a name="specifying-queued-listener-timeout"></a>
#### Specifying Queued Listener Timeout

Often, you know roughly how long you expect your queued listeners to take. For this reason, Laravel allows you to specify a "timeout" value. If a listener is processing for longer than the number of seconds specified by the timeout value, the worker processing the listener will exit with an error. You may define the maximum number of seconds a listener should be allowed to run by using the `Timeout` attribute on your listener class:

```php
<?php

namespace App\Listeners;

use App\Events\OrderShipped;
use Illuminate\Contracts\Queue\ShouldQueue;
use Illuminate\Queue\Attributes\Timeout;

#[Timeout(120)]
class SendShipmentNotification implements ShouldQueue
{
    // ...
}
```

If you would like to indicate that a listener should be marked as failed on timeout, you may use the `FailOnTimeout` attribute on the listener class:

```php
<?php

namespace App\Listeners;

use App\Events\OrderShipped;
use Illuminate\Contracts\Queue\ShouldQueue;
use Illuminate\Queue\Attributes\FailOnTimeout;

#[FailOnTimeout]
class SendShipmentNotification implements ShouldQueue
{
    // ...
}
```

<a name="dispatching-events"></a>
## Dispatching Events

To dispatch an event, you may call the static `dispatch` method on the event. This method is made available on the event by the `Illuminate\Foundation\Events\Dispatchable` trait. Any arguments passed to the `dispatch` method will be passed to the event's constructor:

```php
<?php

namespace App\Http\Controllers;

use App\Events\OrderShipped;
use App\Models\Order;
use Illuminate\Http\RedirectResponse;
use Illuminate\Http\Request;

class OrderShipmentController extends Controller
{
    /**
     * Ship the given order.
     */
    public function store(Request $request): RedirectResponse
    {
        $order = Order::findOrFail($request->order_id);

        // Order shipment logic...

        OrderShipped::dispatch($order);

        return redirect('/orders');
    }
}
```

If you would like to conditionally dispatch an event, you may use the `dispatchIf` and `dispatchUnless` methods:

```php
OrderShipped::dispatchIf($condition, $order);

OrderShipped::dispatchUnless($condition, $order);
```

> [!NOTE]
> When testing, it can be helpful to assert that certain events were dispatched without actually triggering their listeners. Laravel's [built-in testing helpers](#testing) make it a cinch.

<a name="dispatching-events-after-database-transactions"></a>
### Dispatching Events After Database Transactions

Sometimes, you may want to instruct Laravel to only dispatch an event after the active database transaction has committed. To do so, you may implement the `ShouldDispatchAfterCommit` interface on the event class.

This interface instructs Laravel to not dispatch the event until the current database transaction is committed. If the transaction fails, the event will be discarded. If no database transaction is in progress when the event is dispatched, the event will be dispatched immediately:

```php
<?php

namespace App\Events;

use App\Models\Order;
use Illuminate\Broadcasting\InteractsWithSockets;
use Illuminate\Contracts\Events\ShouldDispatchAfterCommit;
use Illuminate\Foundation\Events\Dispatchable;
use Illuminate\Queue\SerializesModels;

class OrderShipped implements ShouldDispatchAfterCommit
{
    use Dispatchable, InteractsWithSockets, SerializesModels;

    /**
     * Create a new event instance.
     */
    public function __construct(
        public Order $order,
    ) {}
}
```

<a name="deferring-events"></a>
### Deferring Events

Deferred events allow you to delay the dispatching of model events and execution of event listeners until after a specific block of code has completed. This is particularly useful when you need to ensure that all related records are created before event listeners are triggered.

To defer events, provide a closure to the `Event::defer()` method:

```php
use App\Models\User;
use Illuminate\Support\Facades\Event;

Event::defer(function () {
    $user = User::create(['name' => 'Victoria Otwell']);

    $user->posts()->create(['title' => 'My first post!']);
});
```

All events triggered within the closure will be dispatched after the closure is executed. This ensures that event listeners have access to all related records that were created during the deferred execution. If an exception occurs within the closure, the deferred events will not be dispatched.

To defer only specific events, pass an array of events as the second argument to the `defer` method:

```php
use App\Models\User;
use Illuminate\Support\Facades\Event;

Event::defer(function () {
    $user = User::create(['name' => 'Victoria Otwell']);

    $user->posts()->create(['title' => 'My first post!']);
}, ['eloquent.created: '.User::class]);
```

<a name="event-subscribers"></a>
## Event Subscribers

<a name="writing-event-subscribers"></a>
### Writing Event Subscribers

Event subscribers are classes that may subscribe to multiple events from within the subscriber class itself, allowing you to define several event handlers within a single class. Subscribers should define a `subscribe` method, which receives an event dispatcher instance. You may call the `listen` method on the given dispatcher to register event listeners:

```php
<?php

namespace App\Listeners;

use Illuminate\Auth\Events\Login;
use Illuminate\Auth\Events\Logout;
use Illuminate\Events\Dispatcher;

class UserEventSubscriber
{
    /**
     * Handle user login events.
     */
    public function handleUserLogin(Login $event): void {}

    /**
     * Handle user logout events.
     */
    public function handleUserLogout(Logout $event): void {}

    /**
     * Register the listeners for the subscriber.
     */
    public function subscribe(Dispatcher $events): void
    {
        $events->listen(
            Login::class,
            [UserEventSubscriber::class, 'handleUserLogin']
        );

        $events->listen(
            Logout::class,
            [UserEventSubscriber::class, 'handleUserLogout']
        );
    }
}
```

If your event listener methods are defined within the subscriber itself, you may find it more convenient to return an array of events and method names from the subscriber's `subscribe` method. Laravel will automatically determine the subscriber's class name when registering the event listeners:

```php
<?php

namespace App\Listeners;

use Illuminate\Auth\Events\Login;
use Illuminate\Auth\Events\Logout;
use Illuminate\Events\Dispatcher;

class UserEventSubscriber
{
    /**
     * Handle user login events.
     */
    public function handleUserLogin(Login $event): void {}

    /**
     * Handle user logout events.
     */
    public function handleUserLogout(Logout $event): void {}

    /**
     * Register the listeners for the subscriber.
     *
     * @return array<string, string>
     */
    public function subscribe(Dispatcher $events): array
    {
        return [
            Login::class => 'handleUserLogin',
            Logout::class => 'handleUserLogout',
        ];
    }
}
```

<a name="registering-event-subscribers"></a>
### Registering Event Subscribers

After writing the subscriber, Laravel will automatically register handler methods within the subscriber if they follow Laravel's [event discovery conventions](#event-discovery). Otherwise, you may manually register your subscriber using the `subscribe` method of the `Event` facade. Typically, this should be done within the `boot` method of your application's `AppServiceProvider`:

```php
<?php

namespace App\Providers;

use App\Listeners\UserEventSubscriber;
use Illuminate\Support\Facades\Event;
use Illuminate\Support\ServiceProvider;

class AppServiceProvider extends ServiceProvider
{
    /**
     * Bootstrap any application services.
     */
    public function boot(): void
    {
        Event::subscribe(UserEventSubscriber::class);
    }
}
```

<a name="testing"></a>
## Testing

When testing code that dispatches events, you may wish to instruct Laravel to not actually execute the event's listeners, since the listener's code can be tested directly and separately of the code that dispatches the corresponding event. Of course, to test the listener itself, you may instantiate a listener instance and invoke the `handle` method directly in your test.

Using the `Event` facade's `fake` method, you may prevent listeners from executing, execute the code under test, and then assert which events were dispatched by your application using the `assertDispatched`, `assertNotDispatched`, and `assertNothingDispatched` methods:

```php tab=Pest
<?php

use App\Events\OrderFailedToShip;
use App\Events\OrderShipped;
use Illuminate\Support\Facades\Event;

test('orders can be shipped', function () {
    Event::fake();

    // Perform order shipping...

    // Assert that an event was dispatched...
    Event::assertDispatched(OrderShipped::class);

    // Assert an event was dispatched twice...
    Event::assertDispatched(OrderShipped::class, 2);

    // Assert an event was dispatched once...
    Event::assertDispatchedOnce(OrderShipped::class);

    // Assert an event was not dispatched...
    Event::assertNotDispatched(OrderFailedToShip::class);

    // Assert that no events were dispatched...
    Event::assertNothingDispatched();
});
```

```php tab=PHPUnit
<?php

namespace Tests\Feature;

use App\Events\OrderFailedToShip;
use App\Events\OrderShipped;
use Illuminate\Support\Facades\Event;
use Tests\TestCase;

class ExampleTest extends TestCase
{
    /**
     * Test order shipping.
     */
    public function test_orders_can_be_shipped(): void
    {
        Event::fake();

        // Perform order shipping...

        // Assert that an event was dispatched...
        Event::assertDispatched(OrderShipped::class);

        // Assert an event was dispatched twice...
        Event::assertDispatched(OrderShipped::class, 2);

        // Assert an event was dispatched once...
        Event::assertDispatchedOnce(OrderShipped::class);

        // Assert an event was not dispatched...
        Event::assertNotDispatched(OrderFailedToShip::class);

        // Assert that no events were dispatched...
        Event::assertNothingDispatched();
    }
}
```

You may pass a closure to the `assertDispatched` or `assertNotDispatched` methods in order to assert that an event was dispatched that passes a given "truth test". If at least one event was dispatched that passes the given truth test then the assertion will be successful:

```php
Event::assertDispatched(function (OrderShipped $event) use ($order) {
    return $event->order->id === $order->id;
});
```

If you would simply like to assert that an event listener is listening to a given event, you may use the `assertListening` method:

```php
Event::assertListening(
    OrderShipped::class,
    SendShipmentNotification::class
);
```

> [!WARNING]
> After calling `Event::fake()`, no event listeners will be executed. So, if your tests use model factories that rely on events, such as creating a UUID during a model's `creating` event, you should call `Event::fake()` **after** using your factories.

<a name="faking-a-subset-of-events"></a>
### Faking a Subset of Events

If you only want to fake event listeners for a specific set of events, you may pass them to the `fake` or `fakeFor` method:

```php tab=Pest
test('orders can be processed', function () {
    Event::fake([
        OrderCreated::class,
    ]);

    $order = Order::factory()->create();

    Event::assertDispatched(OrderCreated::class);

    // Other events are dispatched as normal...
    $order->update([
        // ...
    ]);
});
```

```php tab=PHPUnit
/**
 * Test order process.
 */
public function test_orders_can_be_processed(): void
{
    Event::fake([
        OrderCreated::class,
    ]);

    $order = Order::factory()->create();

    Event::assertDispatched(OrderCreated::class);

    // Other events are dispatched as normal...
    $order->update([
        // ...
    ]);
}
```

You may fake all events except for a set of specified events using the `except` method:

```php
Event::fake()->except([
    OrderCreated::class,
]);
```

<a name="scoped-event-fakes"></a>
### Scoped Event Fakes

If you only want to fake event listeners for a portion of your test, you may use the `fakeFor` method:

```php tab=Pest
<?php

use App\Events\OrderCreated;
use App\Models\Order;
use Illuminate\Support\Facades\Event;

test('orders can be processed', function () {
    $order = Event::fakeFor(function () {
        $order = Order::factory()->create();

        Event::assertDispatched(OrderCreated::class);

        return $order;
    });

    // Events are dispatched as normal and observers will run...
    $order->update([
        // ...
    ]);
});
```

```php tab=PHPUnit
<?php

namespace Tests\Feature;

use App\Events\OrderCreated;
use App\Models\Order;
use Illuminate\Support\Facades\Event;
use Tests\TestCase;

class ExampleTest extends TestCase
{
    /**
     * Test order process.
     */
    public function test_orders_can_be_processed(): void
    {
        $order = Event::fakeFor(function () {
            $order = Order::factory()->create();

            Event::assertDispatched(OrderCreated::class);

            return $order;
        });

        // Events are dispatched as normal and observers will run...
        $order->update([
            // ...
        ]);
    }
}
```


---

# Facades

*Sección: Laravel | Origen: https://laravel.com/docs/13.x/facades*

- [Introduction](#introduction)
- [When to Utilize Facades](#when-to-use-facades)
    - [Facades vs. Dependency Injection](#facades-vs-dependency-injection)
    - [Facades vs. Helper Functions](#facades-vs-helper-functions)
- [How Facades Work](#how-facades-work)
- [Real-Time Facades](#real-time-facades)
- [Facade Class Reference](#facade-class-reference)

<a name="introduction"></a>
## Introduction

Throughout the Laravel documentation, you will see examples of code that interacts with Laravel's features via "facades". Facades provide a "static" interface to classes that are available in the application's [service container](/docs/{{version}}/container). Laravel ships with many facades which provide access to almost all of Laravel's features.

Laravel facades serve as "static proxies" to underlying classes in the service container, providing the benefit of a terse, expressive syntax while maintaining more testability and flexibility than traditional static methods. It's perfectly fine if you don't totally understand how facades work - just go with the flow and continue learning about Laravel.

All of Laravel's facades are defined in the `Illuminate\Support\Facades` namespace. So, we can easily access a facade like so:

```php
use Illuminate\Support\Facades\Cache;
use Illuminate\Support\Facades\Route;

Route::get('/cache', function () {
    return Cache::get('key');
});
```

Throughout the Laravel documentation, many of the examples will use facades to demonstrate various features of the framework.

<a name="helper-functions"></a>
#### Helper Functions

To complement facades, Laravel offers a variety of global "helper functions" that make it even easier to interact with common Laravel features. Some of the common helper functions you may interact with are `view`, `response`, `url`, `config`, and more. Each helper function offered by Laravel is documented with their corresponding feature; however, a complete list is available within the dedicated [helper documentation](/docs/{{version}}/helpers).

For example, instead of using the `Illuminate\Support\Facades\Response` facade to generate a JSON response, we may simply use the `response` function. Because helper functions are globally available, you do not need to import any classes in order to use them:

```php
use Illuminate\Support\Facades\Response;

Route::get('/users', function () {
    return Response::json([
        // ...
    ]);
});

Route::get('/users', function () {
    return response()->json([
        // ...
    ]);
});
```

<a name="when-to-use-facades"></a>
## When to Utilize Facades

Facades have many benefits. They provide a terse, memorable syntax that allows you to use Laravel's features without remembering long class names that must be injected or configured manually. Furthermore, because of their unique usage of PHP's dynamic methods, they are easy to test.

However, some care must be taken when using facades. The primary danger of facades is class "scope creep". Since facades are so easy to use and do not require injection, it can be easy to let your classes continue to grow and use many facades in a single class. Using dependency injection, this potential is mitigated by the visual feedback a large constructor gives you that your class is growing too large. So, when using facades, pay special attention to the size of your class so that its scope of responsibility stays narrow. If your class is getting too large, consider splitting it into multiple smaller classes.

<a name="facades-vs-dependency-injection"></a>
### Facades vs. Dependency Injection

One of the primary benefits of dependency injection is the ability to swap implementations of the injected class. This is useful during testing since you can inject a mock or stub and assert that various methods were called on the stub.

Typically, it would not be possible to mock or stub a truly static class method. However, since facades use dynamic methods to proxy method calls to objects resolved from the service container, we actually can test facades just as we would test an injected class instance. For example, given the following route:

```php
use Illuminate\Support\Facades\Cache;

Route::get('/cache', function () {
    return Cache::get('key');
});
```

Using Laravel's facade testing methods, we can write the following test to verify that the `Cache::get` method was called with the argument we expected:

```php tab=Pest
use Illuminate\Support\Facades\Cache;

test('basic example', function () {
    Cache::shouldReceive('get')
        ->with('key')
        ->andReturn('value');

    $response = $this->get('/cache');

    $response->assertSee('value');
});
```

```php tab=PHPUnit
use Illuminate\Support\Facades\Cache;

/**
 * A basic functional test example.
 */
public function test_basic_example(): void
{
    Cache::shouldReceive('get')
        ->with('key')
        ->andReturn('value');

    $response = $this->get('/cache');

    $response->assertSee('value');
}
```

<a name="facades-vs-helper-functions"></a>
### Facades vs. Helper Functions

In addition to facades, Laravel includes a variety of "helper" functions which can perform common tasks like generating views, firing events, dispatching jobs, or sending HTTP responses. Many of these helper functions perform the same function as a corresponding facade. For example, this facade call and helper call are equivalent:

```php
return Illuminate\Support\Facades\View::make('profile');

return view('profile');
```

There is absolutely no practical difference between facades and helper functions. When using helper functions, you may still test them exactly as you would the corresponding facade. For example, given the following route:

```php
Route::get('/cache', function () {
    return cache('key');
});
```

The `cache` helper is going to call the `get` method on the class underlying the `Cache` facade. So, even though we are using the helper function, we can write the following test to verify that the method was called with the argument we expected:

```php
use Illuminate\Support\Facades\Cache;

/**
 * A basic functional test example.
 */
public function test_basic_example(): void
{
    Cache::shouldReceive('get')
        ->with('key')
        ->andReturn('value');

    $response = $this->get('/cache');

    $response->assertSee('value');
}
```

<a name="how-facades-work"></a>
## How Facades Work

In a Laravel application, a facade is a class that provides access to an object from the container. The machinery that makes this work is in the `Facade` class. Laravel's facades, and any custom facades you create, will extend the base `Illuminate\Support\Facades\Facade` class.

The `Facade` base class makes use of the `__callStatic()` magic-method to defer calls from your facade to an object resolved from the container. In the example below, a call is made to the Laravel cache system. By glancing at this code, one might assume that the static `get` method is being called on the `Cache` class:

```php
<?php

namespace App\Http\Controllers;

use Illuminate\Support\Facades\Cache;
use Illuminate\View\View;

class UserController extends Controller
{
    /**
     * Show the profile for the given user.
     */
    public function showProfile(string $id): View
    {
        $user = Cache::get('user:'.$id);

        return view('profile', ['user' => $user]);
    }
}
```

Notice that near the top of the file we are "importing" the `Cache` facade. This facade serves as a proxy for accessing the underlying implementation of the `Illuminate\Contracts\Cache\Factory` interface. Any calls we make using the facade will be passed to the underlying instance of Laravel's cache service.

If we look at that `Illuminate\Support\Facades\Cache` class, you'll see that there is no static method `get`:

```php
class Cache extends Facade
{
    /**
     * Get the registered name of the component.
     */
    protected static function getFacadeAccessor(): string
    {
        return 'cache';
    }
}
```

Instead, the `Cache` facade extends the base `Facade` class and defines the method `getFacadeAccessor()`. This method's job is to return the name of a service container binding. When a user references any static method on the `Cache` facade, Laravel resolves the `cache` binding from the [service container](/docs/{{version}}/container) and runs the requested method (in this case, `get`) against that object.

<a name="real-time-facades"></a>
## Real-Time Facades

Using real-time facades, you may treat any class in your application as if it was a facade. To illustrate how this can be used, let's first examine some code that does not use real-time facades. For example, let's assume our `Podcast` model has a `publish` method. However, in order to publish the podcast, we need to inject a `Publisher` instance:

```php
<?php

namespace App\Models;

use App\Contracts\Publisher;
use Illuminate\Database\Eloquent\Model;

class Podcast extends Model
{
    /**
     * Publish the podcast.
     */
    public function publish(Publisher $publisher): void
    {
        $this->update(['publishing' => now()]);

        $publisher->publish($this);
    }
}
```

Injecting a publisher implementation into the method allows us to easily test the method in isolation since we can mock the injected publisher. However, it requires us to always pass a publisher instance each time we call the `publish` method. Using real-time facades, we can maintain the same testability while not being required to explicitly pass a `Publisher` instance. To generate a real-time facade, prefix the namespace of the imported class with `Facades`:

```php
<?php

namespace App\Models;

use App\Contracts\Publisher; // [tl! remove]
use Facades\App\Contracts\Publisher; // [tl! add]
use Illuminate\Database\Eloquent\Model;

class Podcast extends Model
{
    /**
     * Publish the podcast.
     */
    public function publish(Publisher $publisher): void // [tl! remove]
    public function publish(): void // [tl! add]
    {
        $this->update(['publishing' => now()]);

        $publisher->publish($this); // [tl! remove]
        Publisher::publish($this); // [tl! add]
    }
}
```

When the real-time facade is used, the publisher implementation will be resolved out of the service container using the portion of the interface or class name that appears after the `Facades` prefix. When testing, we can use Laravel's built-in facade testing helpers to mock this method call:

```php tab=Pest
<?php

use App\Models\Podcast;
use Facades\App\Contracts\Publisher;
use Illuminate\Foundation\Testing\RefreshDatabase;

pest()->use(RefreshDatabase::class);

test('podcast can be published', function () {
    $podcast = Podcast::factory()->create();

    Publisher::shouldReceive('publish')->once()->with($podcast);

    $podcast->publish();
});
```

```php tab=PHPUnit
<?php

namespace Tests\Feature;

use App\Models\Podcast;
use Facades\App\Contracts\Publisher;
use Illuminate\Foundation\Testing\RefreshDatabase;
use Tests\TestCase;

class PodcastTest extends TestCase
{
    use RefreshDatabase;

    /**
     * A test example.
     */
    public function test_podcast_can_be_published(): void
    {
        $podcast = Podcast::factory()->create();

        Publisher::shouldReceive('publish')->once()->with($podcast);

        $podcast->publish();
    }
}
```

<a name="facade-class-reference"></a>
## Facade Class Reference

Below you will find every facade and its underlying class. This is a useful tool for quickly digging into the API documentation for a given facade root. The [service container binding](/docs/{{version}}/container) key is also included where applicable.

<div class="overflow-auto">

| Facade | Class | Service Container Binding |
| --- | --- | --- |
| App | [Illuminate\Foundation\Application](https://api.laravel.com/docs/{{version}}/Illuminate/Foundation/Application.html) | `app` |
| Artisan | [Illuminate\Contracts\Console\Kernel](https://api.laravel.com/docs/{{version}}/Illuminate/Contracts/Console/Kernel.html) | `artisan` |
| Auth (Instance) | [Illuminate\Contracts\Auth\Guard](https://api.laravel.com/docs/{{version}}/Illuminate/Contracts/Auth/Guard.html) | `auth.driver` |
| Auth | [Illuminate\Auth\AuthManager](https://api.laravel.com/docs/{{version}}/Illuminate/Auth/AuthManager.html) | `auth` |
| Blade | [Illuminate\View\Compilers\BladeCompiler](https://api.laravel.com/docs/{{version}}/Illuminate/View/Compilers/BladeCompiler.html) | `blade.compiler` |
| Broadcast (Instance) | [Illuminate\Contracts\Broadcasting\Broadcaster](https://api.laravel.com/docs/{{version}}/Illuminate/Contracts/Broadcasting/Broadcaster.html) | &nbsp; |
| Broadcast | [Illuminate\Contracts\Broadcasting\Factory](https://api.laravel.com/docs/{{version}}/Illuminate/Contracts/Broadcasting/Factory.html) | &nbsp; |
| Bus | [Illuminate\Contracts\Bus\Dispatcher](https://api.laravel.com/docs/{{version}}/Illuminate/Contracts/Bus/Dispatcher.html) | &nbsp; |
| Cache (Instance) | [Illuminate\Cache\Repository](https://api.laravel.com/docs/{{version}}/Illuminate/Cache/Repository.html) | `cache.store` |
| Cache | [Illuminate\Cache\CacheManager](https://api.laravel.com/docs/{{version}}/Illuminate/Cache/CacheManager.html) | `cache` |
| Cloud | [Illuminate\Foundation\Cloud\CloudManager](https://api.laravel.com/docs/{{version}}/Illuminate/Foundation/Cloud/CloudManager.html) | &nbsp; |
| Config | [Illuminate\Config\Repository](https://api.laravel.com/docs/{{version}}/Illuminate/Config/Repository.html) | `config` |
| Context | [Illuminate\Log\Context\Repository](https://api.laravel.com/docs/{{version}}/Illuminate/Log/Context/Repository.html) | &nbsp; |
| Cookie | [Illuminate\Cookie\CookieJar](https://api.laravel.com/docs/{{version}}/Illuminate/Cookie/CookieJar.html) | `cookie` |
| Crypt | [Illuminate\Encryption\Encrypter](https://api.laravel.com/docs/{{version}}/Illuminate/Encryption/Encrypter.html) | `encrypter` |
| Date | [Illuminate\Support\DateFactory](https://api.laravel.com/docs/{{version}}/Illuminate/Support/DateFactory.html) | `date` |
| DB (Instance) | [Illuminate\Database\Connection](https://api.laravel.com/docs/{{version}}/Illuminate/Database/Connection.html) | `db.connection` |
| DB | [Illuminate\Database\DatabaseManager](https://api.laravel.com/docs/{{version}}/Illuminate/Database/DatabaseManager.html) | `db` |
| Event | [Illuminate\Events\Dispatcher](https://api.laravel.com/docs/{{version}}/Illuminate/Events/Dispatcher.html) | `events` |
| Exceptions (Instance) | [Illuminate\Contracts\Debug\ExceptionHandler](https://api.laravel.com/docs/{{version}}/Illuminate/Contracts/Debug/ExceptionHandler.html) | &nbsp; |
| Exceptions | [Illuminate\Foundation\Exceptions\Handler](https://api.laravel.com/docs/{{version}}/Illuminate/Foundation/Exceptions/Handler.html) | &nbsp; |
| File | [Illuminate\Filesystem\Filesystem](https://api.laravel.com/docs/{{version}}/Illuminate/Filesystem/Filesystem.html) | `files` |
| Gate | [Illuminate\Contracts\Auth\Access\Gate](https://api.laravel.com/docs/{{version}}/Illuminate/Contracts/Auth/Access/Gate.html) | &nbsp; |
| Hash | [Illuminate\Contracts\Hashing\Hasher](https://api.laravel.com/docs/{{version}}/Illuminate/Contracts/Hashing/Hasher.html) | `hash` |
| Http | [Illuminate\Http\Client\Factory](https://api.laravel.com/docs/{{version}}/Illuminate/Http/Client/Factory.html) | &nbsp; |
| Lang | [Illuminate\Translation\Translator](https://api.laravel.com/docs/{{version}}/Illuminate/Translation/Translator.html) | `translator` |
| Log | [Illuminate\Log\LogManager](https://api.laravel.com/docs/{{version}}/Illuminate/Log/LogManager.html) | `log` |
| Mail | [Illuminate\Mail\Mailer](https://api.laravel.com/docs/{{version}}/Illuminate/Mail/Mailer.html) | `mailer` |
| Notification | [Illuminate\Notifications\ChannelManager](https://api.laravel.com/docs/{{version}}/Illuminate/Notifications/ChannelManager.html) | &nbsp; |
| Password (Instance) | [Illuminate\Auth\Passwords\PasswordBroker](https://api.laravel.com/docs/{{version}}/Illuminate/Auth/Passwords/PasswordBroker.html) | `auth.password.broker` |
| Password | [Illuminate\Auth\Passwords\PasswordBrokerManager](https://api.laravel.com/docs/{{version}}/Illuminate/Auth/Passwords/PasswordBrokerManager.html) | `auth.password` |
| Pipeline (Instance) | [Illuminate\Pipeline\Pipeline](https://api.laravel.com/docs/{{version}}/Illuminate/Pipeline/Pipeline.html) | &nbsp; |
| Process | [Illuminate\Process\Factory](https://api.laravel.com/docs/{{version}}/Illuminate/Process/Factory.html) | &nbsp; |
| Queue (Base Class) | [Illuminate\Queue\Queue](https://api.laravel.com/docs/{{version}}/Illuminate/Queue/Queue.html) | &nbsp; |
| Queue (Instance) | [Illuminate\Contracts\Queue\Queue](https://api.laravel.com/docs/{{version}}/Illuminate/Contracts/Queue/Queue.html) | `queue.connection` |
| Queue | [Illuminate\Queue\QueueManager](https://api.laravel.com/docs/{{version}}/Illuminate/Queue/QueueManager.html) | `queue` |
| RateLimiter | [Illuminate\Cache\RateLimiter](https://api.laravel.com/docs/{{version}}/Illuminate/Cache/RateLimiter.html) | &nbsp; |
| Redirect | [Illuminate\Routing\Redirector](https://api.laravel.com/docs/{{version}}/Illuminate/Routing/Redirector.html) | `redirect` |
| Redis (Instance) | [Illuminate\Redis\Connections\Connection](https://api.laravel.com/docs/{{version}}/Illuminate/Redis/Connections/Connection.html) | `redis.connection` |
| Redis | [Illuminate\Redis\RedisManager](https://api.laravel.com/docs/{{version}}/Illuminate/Redis/RedisManager.html) | `redis` |
| Request | [Illuminate\Http\Request](https://api.laravel.com/docs/{{version}}/Illuminate/Http/Request.html) | `request` |
| Response (Instance) | [Illuminate\Http\Response](https://api.laravel.com/docs/{{version}}/Illuminate/Http/Response.html) | &nbsp; |
| Response | [Illuminate\Contracts\Routing\ResponseFactory](https://api.laravel.com/docs/{{version}}/Illuminate/Contracts/Routing/ResponseFactory.html) | &nbsp; |
| Route | [Illuminate\Routing\Router](https://api.laravel.com/docs/{{version}}/Illuminate/Routing/Router.html) | `router` |
| Schedule | [Illuminate\Console\Scheduling\Schedule](https://api.laravel.com/docs/{{version}}/Illuminate/Console/Scheduling/Schedule.html) | &nbsp; |
| Schema | [Illuminate\Database\Schema\Builder](https://api.laravel.com/docs/{{version}}/Illuminate/Database/Schema/Builder.html) | &nbsp; |
| Session (Instance) | [Illuminate\Session\Store](https://api.laravel.com/docs/{{version}}/Illuminate/Session/Store.html) | `session.store` |
| Session | [Illuminate\Session\SessionManager](https://api.laravel.com/docs/{{version}}/Illuminate/Session/SessionManager.html) | `session` |
| Storage (Instance) | [Illuminate\Contracts\Filesystem\Filesystem](https://api.laravel.com/docs/{{version}}/Illuminate/Contracts/Filesystem/Filesystem.html) | `filesystem.disk` |
| Storage | [Illuminate\Filesystem\FilesystemManager](https://api.laravel.com/docs/{{version}}/Illuminate/Filesystem/FilesystemManager.html) | `filesystem` |
| URL | [Illuminate\Routing\UrlGenerator](https://api.laravel.com/docs/{{version}}/Illuminate/Routing/UrlGenerator.html) | `url` |
| Validator (Instance) | [Illuminate\Validation\Validator](https://api.laravel.com/docs/{{version}}/Illuminate/Validation/Validator.html) | &nbsp; |
| Validator | [Illuminate\Validation\Factory](https://api.laravel.com/docs/{{version}}/Illuminate/Validation/Factory.html) | `validator` |
| View (Instance) | [Illuminate\View\View](https://api.laravel.com/docs/{{version}}/Illuminate/View/View.html) | &nbsp; |
| View | [Illuminate\View\Factory](https://api.laravel.com/docs/{{version}}/Illuminate/View/Factory.html) | `view` |
| Vite | [Illuminate\Foundation\Vite](https://api.laravel.com/docs/{{version}}/Illuminate/Foundation/Vite.html) | &nbsp; |

</div>


---

# File Storage

*Sección: Laravel | Origen: https://laravel.com/docs/13.x/filesystem*

- [Introduction](#introduction)
- [Configuration](#configuration)
    - [The Local Driver](#the-local-driver)
    - [The Public Disk](#the-public-disk)
    - [Driver Prerequisites](#driver-prerequisites)
    - [Scoped, Read-Only, and Read-Through Filesystems](#scoped-and-read-only-filesystems)
    - [Amazon S3 Compatible Filesystems](#amazon-s3-compatible-filesystems)
- [Obtaining Disk Instances](#obtaining-disk-instances)
    - [On-Demand Disks](#on-demand-disks)
- [Retrieving Files](#retrieving-files)
    - [Downloading Files](#downloading-files)
    - [File URLs](#file-urls)
    - [Temporary URLs](#temporary-urls)
    - [File Metadata](#file-metadata)
- [Storing Files](#storing-files)
    - [Prepending and Appending To Files](#prepending-appending-to-files)
    - [Copying and Moving Files](#copying-moving-files)
    - [Automatic Streaming](#automatic-streaming)
    - [File Uploads](#file-uploads)
    - [File Visibility](#file-visibility)
    - [Image Manipulation](#image-manipulation)
- [Deleting Files](#deleting-files)
- [Directories](#directories)
- [Testing](#testing)
- [Custom Filesystems](#custom-filesystems)

<a name="introduction"></a>
## Introduction

Laravel provides a powerful filesystem abstraction thanks to the wonderful [Flysystem](https://github.com/thephpleague/flysystem) PHP package by Frank de Jonge. The Laravel Flysystem integration provides simple drivers for working with local filesystems, SFTP, and Amazon S3. Even better, it's amazingly simple to switch between these storage options between your local development machine and production server as the API remains the same for each system.

<a name="configuration"></a>
## Configuration

Laravel's filesystem configuration file is located at `config/filesystems.php`. Within this file, you may configure all of your filesystem "disks". Each disk represents a particular storage driver and storage location. Example configurations for each supported driver are included in the configuration file so you can modify the configuration to reflect your storage preferences and credentials.

The `local` driver interacts with files stored locally on the server running the Laravel application, while the `sftp` storage driver is used for SSH key-based FTP. The `s3` driver is used to write to Amazon's S3 cloud storage service.

> [!NOTE]
> You may configure as many disks as you like and may even have multiple disks that use the same driver.

<a name="the-local-driver"></a>
### The Local Driver

When using the `local` driver, all file operations are relative to the `root` directory defined in your `filesystems` configuration file. By default, this value is set to the `storage/app/private` directory. Therefore, the following method would write to `storage/app/private/example.txt`:

```php
use Illuminate\Support\Facades\Storage;

Storage::disk('local')->put('example.txt', 'Contents');
```

<a name="the-public-disk"></a>
### The Public Disk

The `public` disk included in your application's `filesystems` configuration file is intended for files that are going to be publicly accessible. By default, the `public` disk uses the `local` driver and stores its files in `storage/app/public`.

If your `public` disk uses the `local` driver and you want to make these files accessible from the web, you should create a symbolic link from source directory `storage/app/public` to target directory `public/storage`:

To create the symbolic link, you may use the `storage:link` Artisan command:

```shell
php artisan storage:link
```

Once a file has been stored and the symbolic link has been created, you can create a URL to the files using the `asset` helper:

```php
echo asset('storage/file.txt');
```

You may configure additional symbolic links in your `filesystems` configuration file. Each of the configured links will be created when you run the `storage:link` command:

```php
'links' => [
    public_path('storage') => storage_path('app/public'),
    public_path('images') => storage_path('app/images'),
],
```

The `storage:unlink` command may be used to destroy your configured symbolic links:

```shell
php artisan storage:unlink
```

<a name="driver-prerequisites"></a>
### Driver Prerequisites

<a name="s3-driver-configuration"></a>
#### S3 Driver Configuration

Before using the S3 driver, you will need to install the Flysystem S3 package via the Composer package manager:

```shell
composer require league/flysystem-aws-s3-v3 "^3.0" --with-all-dependencies
```

An S3 disk configuration array is located in your `config/filesystems.php` configuration file. Typically, you should configure your S3 information and credentials using the following environment variables which are referenced by the `config/filesystems.php` configuration file:

```ini
AWS_ACCESS_KEY_ID=<your-key-id>
AWS_SECRET_ACCESS_KEY=<your-secret-access-key>
AWS_DEFAULT_REGION=us-east-1
AWS_BUCKET=<your-bucket-name>
AWS_USE_PATH_STYLE_ENDPOINT=false
```

For convenience, these environment variables match the naming convention used by the AWS CLI.

<a name="ftp-driver-configuration"></a>
#### FTP Driver Configuration

Before using the FTP driver, you will need to install the Flysystem FTP package via the Composer package manager:

```shell
composer require league/flysystem-ftp "^3.0"
```

Laravel's Flysystem integrations work great with FTP; however, a sample configuration is not included with the framework's default `config/filesystems.php` configuration file. If you need to configure an FTP filesystem, you may use the configuration example below:

```php
'ftp' => [
    'driver' => 'ftp',
    'host' => env('FTP_HOST'),
    'username' => env('FTP_USERNAME'),
    'password' => env('FTP_PASSWORD'),

    // Optional FTP Settings...
    // 'port' => env('FTP_PORT', 21),
    // 'root' => env('FTP_ROOT'),
    // 'passive' => true,
    // 'ssl' => true,
    // 'timeout' => 30,
],
```

<a name="sftp-driver-configuration"></a>
#### SFTP Driver Configuration

Before using the SFTP driver, you will need to install the Flysystem SFTP package via the Composer package manager:

```shell
composer require league/flysystem-sftp-v3 "^3.0"
```

Laravel's Flysystem integrations work great with SFTP; however, a sample configuration is not included with the framework's default `config/filesystems.php` configuration file. If you need to configure an SFTP filesystem, you may use the configuration example below:

```php
'sftp' => [
    'driver' => 'sftp',
    'host' => env('SFTP_HOST'),

    // Settings for basic authentication...
    'username' => env('SFTP_USERNAME'),
    'password' => env('SFTP_PASSWORD'),

    // Settings for SSH key-based authentication with encryption password...
    'privateKey' => env('SFTP_PRIVATE_KEY'),
    'passphrase' => env('SFTP_PASSPHRASE'),

    // Settings for file / directory permissions...
    'visibility' => 'private', // `private` = 0600, `public` = 0644
    'directory_visibility' => 'private', // `private` = 0700, `public` = 0755

    // Optional SFTP Settings...
    // 'hostFingerprint' => env('SFTP_HOST_FINGERPRINT'),
    // 'maxTries' => 4,
    // 'passphrase' => env('SFTP_PASSPHRASE'),
    // 'port' => env('SFTP_PORT', 22),
    // 'root' => env('SFTP_ROOT', ''),
    // 'timeout' => 30,
    // 'useAgent' => true,
],
```

<a name="scoped-and-read-only-filesystems"></a>
### Scoped, Read-Only, and Read-Through Filesystems

Scoped disks allow you to define a filesystem where all paths are automatically prefixed with a given path prefix. Before creating a scoped filesystem disk, you will need to install an additional Flysystem package via the Composer package manager:

```shell
composer require league/flysystem-path-prefixing "^3.0"
```

You may create a path scoped instance of any existing filesystem disk by defining a disk that utilizes the `scoped` driver. For example, you may create a disk which scopes your existing `s3` disk to a specific path prefix, and then every file operation using your scoped disk will utilize the specified prefix:

```php
's3-videos' => [
    'driver' => 'scoped',
    'disk' => 's3',
    'prefix' => 'path/to/videos',
],
```

"Read-only" disks allow you to create filesystem disks that do not allow write operations. Before using the `read-only` configuration option, you will need to install an additional Flysystem package via the Composer package manager:

```shell
composer require league/flysystem-read-only "^3.0"
```

Next, you may include the `read-only` configuration option in one or more of your disk's configuration arrays:

```php
's3-videos' => [
    'driver' => 's3',
    // ...
    'read-only' => true,
],
```

Read-through disks allow you to migrate files between disks without downtime. When reading a file, Laravel checks the primary disk first. If the file only exists on the fallback disk, Laravel reads the file from the fallback disk and copies it to the primary disk for future requests:

```php
'assets' => [
    'driver' => 'read-through',
    'primary' => 's3',
    'fallback' => 'legacy-s3',
],
```

Writes and directory listings target the primary disk. File existence and metadata checks use either disk without copying files to the primary disk. If copying a fallback file to the primary disk fails, the read still succeeds by default. To throw an exception instead, set the `throw_on_promotion_failure` configuration option to `true`.

<a name="amazon-s3-compatible-filesystems"></a>
### Amazon S3 Compatible Filesystems

By default, your application's `filesystems` configuration file contains a disk configuration for the `s3` disk. In addition to using this disk to interact with [Amazon S3](https://aws.amazon.com/s3/), you may use it to interact with any S3-compatible file storage service such as [RustFS](https://github.com/rustfs/rustfs), [DigitalOcean Spaces](https://www.digitalocean.com/products/spaces/), [Vultr Object Storage](https://www.vultr.com/products/object-storage/), [Cloudflare R2](https://www.cloudflare.com/developer-platform/products/r2/), or [Hetzner Cloud Storage](https://www.hetzner.com/storage/object-storage/).

Typically, after updating the disk's credentials to match the credentials of the service you are planning to use, you only need to update the value of the `endpoint` configuration option. This option's value is typically defined via the `AWS_ENDPOINT` environment variable:

```php
'endpoint' => env('AWS_ENDPOINT', 'https://rustfs:9000'),
```

<a name="obtaining-disk-instances"></a>
## Obtaining Disk Instances

The `Storage` facade may be used to interact with any of your configured disks. For example, you may use the `put` method on the facade to store an avatar on the default disk. If you call methods on the `Storage` facade without first calling the `disk` method, the method will automatically be passed to the default disk:

```php
use Illuminate\Support\Facades\Storage;

Storage::put('avatars/1', $content);
```

If your application interacts with multiple disks, you may use the `disk` method on the `Storage` facade to work with files on a particular disk:

```php
Storage::disk('s3')->put('avatars/1', $content);
```

<a name="on-demand-disks"></a>
### On-Demand Disks

Sometimes you may wish to create a disk at runtime using a given configuration without that configuration actually being present in your application's `filesystems` configuration file. To accomplish this, you may pass a configuration array to the `Storage` facade's `build` method:

```php
use Illuminate\Support\Facades\Storage;

$disk = Storage::build([
    'driver' => 'local',
    'root' => '/path/to/root',
]);

$disk->put('image.jpg', $content);
```

<a name="retrieving-files"></a>
## Retrieving Files

The `get` method may be used to retrieve the contents of a file. The raw string contents of the file will be returned by the method. Remember, all file paths should be specified relative to the disk's "root" location:

```php
$contents = Storage::get('file.jpg');
```

If the file you are retrieving contains JSON, you may use the `json` method to retrieve the file and decode its contents:

```php
$orders = Storage::json('orders.json');
```

The `exists` method may be used to determine if a file exists on the disk:

```php
if (Storage::disk('s3')->exists('file.jpg')) {
    // ...
}
```

The `missing` method may be used to determine if a file is missing from the disk:

```php
if (Storage::disk('s3')->missing('file.jpg')) {
    // ...
}
```

<a name="downloading-files"></a>
### Downloading Files

The `download` method may be used to generate a response that forces the user's browser to download the file at the given path. The `download` method accepts a filename as the second argument to the method, which will determine the filename that is seen by the user downloading the file. Finally, you may pass an array of HTTP headers as the third argument to the method:

```php
return Storage::download('file.jpg');

return Storage::download('file.jpg', $name, $headers);
```

<a name="file-urls"></a>
### File URLs

You may use the `url` method to get the URL for a given file. If you are using the `local` driver, this will typically just prepend `/storage` to the given path and return a relative URL to the file. If you are using the `s3` driver, the fully qualified remote URL will be returned:

```php
use Illuminate\Support\Facades\Storage;

$url = Storage::url('file.jpg');
```

When using the `local` driver, all files that should be publicly accessible should be placed in the `storage/app/public` directory. Furthermore, you should [create a symbolic link](#the-public-disk) at `public/storage` which points to the `storage/app/public` directory.

> [!WARNING]
> When using the `local` driver, the return value of `url` is not URL encoded. For this reason, we recommend always storing your files using names that will create valid URLs.

<a name="url-host-customization"></a>
#### URL Host Customization

If you would like to modify the host for URLs generated using the `Storage` facade, you may add or change the `url` option in the disk's configuration array:

```php
'public' => [
    'driver' => 'local',
    'root' => storage_path('app/public'),
    'url' => env('APP_URL').'/storage',
    'visibility' => 'public',
    'throw' => false,
],
```

<a name="temporary-urls"></a>
### Temporary URLs

Using the `temporaryUrl` method, you may create temporary URLs to files stored using the `local` and `s3` drivers. This method accepts a path and a `DateTime` instance specifying when the URL should expire:

```php
use Illuminate\Support\Facades\Storage;

$url = Storage::temporaryUrl(
    'file.jpg', now()->plus(minutes: 5)
);
```

<a name="enabling-local-temporary-urls"></a>
#### Enabling Local Temporary URLs

If you started developing your application before support for temporary URLs was introduced to the `local` driver, you may need to enable local temporary URLs. To do so, add the `serve` option to your `local` disk's configuration array within the `config/filesystems.php` configuration file:

```php
'local' => [
    'driver' => 'local',
    'root' => storage_path('app/private'),
    'serve' => true, // [tl! add]
    'throw' => false,
],
```

<a name="s3-request-parameters"></a>
#### S3 Request Parameters

If you need to specify additional [S3 request parameters](https://docs.aws.amazon.com/AmazonS3/latest/API/RESTObjectGET.html#RESTObjectGET-requests), you may pass the array of request parameters as the third argument to the `temporaryUrl` method:

```php
$url = Storage::temporaryUrl(
    'file.jpg',
    now()->plus(minutes: 5),
    [
        'ResponseContentType' => 'application/octet-stream',
        'ResponseContentDisposition' => 'attachment; filename=file2.jpg',
    ]
);
```

<a name="customizing-temporary-urls"></a>
#### Customizing Temporary URLs

If you need to customize how temporary URLs are created for a specific storage disk, you can use the `buildTemporaryUrlsUsing` method. For example, this can be useful if you have a controller that allows you to download files stored via a disk that doesn't typically support temporary URLs. Usually, this method should be called from the `boot` method of a service provider:

```php
<?php

namespace App\Providers;

use DateTime;
use Illuminate\Support\Facades\Storage;
use Illuminate\Support\Facades\URL;
use Illuminate\Support\ServiceProvider;

class AppServiceProvider extends ServiceProvider
{
    /**
     * Bootstrap any application services.
     */
    public function boot(): void
    {
        Storage::disk('local')->buildTemporaryUrlsUsing(
            function (string $path, DateTime $expiration, array $options) {
                return URL::temporarySignedRoute(
                    'files.download',
                    $expiration,
                    array_merge($options, ['path' => $path])
                );
            }
        );
    }
}
```

<a name="temporary-upload-urls"></a>
#### Temporary Upload URLs

> [!WARNING]
> The ability to generate temporary upload URLs is only supported by the `s3` and `local` drivers.

If you need to generate a temporary URL that can be used to upload a file directly from your client-side application, you may use the `temporaryUploadUrl` method. This method accepts a path and a `DateTime` instance specifying when the URL should expire. The `temporaryUploadUrl` method returns an associative array which may be destructured into the upload URL and the headers that should be included with the upload request:

```php
use Illuminate\Support\Facades\Storage;

['url' => $url, 'headers' => $headers] = Storage::temporaryUploadUrl(
    'file.jpg', now()->plus(minutes: 5)
);
```

This method is primarily useful in serverless environments that require the client-side application to directly upload files to a cloud storage system such as Amazon S3.

<a name="file-metadata"></a>
### File Metadata

In addition to reading and writing files, Laravel can also provide information about the files themselves. For example, the `size` method may be used to get the size of a file in bytes:

```php
use Illuminate\Support\Facades\Storage;

$size = Storage::size('file.jpg');
```

The `lastModified` method returns the UNIX timestamp of the last time the file was modified:

```php
$time = Storage::lastModified('file.jpg');
```

The MIME type of a given file may be obtained via the `mimeType` method:

```php
$mime = Storage::mimeType('file.jpg');
```

<a name="file-paths"></a>
#### File Paths

You may use the `path` method to get the path for a given file. If you are using the `local` driver, this will return the absolute path to the file. If you are using the `s3` driver, this method will return the relative path to the file in the S3 bucket:

```php
use Illuminate\Support\Facades\Storage;

$path = Storage::path('file.jpg');
```

<a name="storing-files"></a>
## Storing Files

The `put` method may be used to store file contents on a disk. You may also pass a PHP `resource` to the `put` method, which will use Flysystem's underlying stream support. Remember, all file paths should be specified relative to the "root" location configured for the disk:

```php
use Illuminate\Support\Facades\Storage;

Storage::put('file.jpg', $contents);

Storage::put('file.jpg', $resource);
```

<a name="failed-writes"></a>
#### Failed Writes

If the `put` method (or other "write" operations) is unable to write the file to disk, `false` will be returned:

```php
if (! Storage::put('file.jpg', $contents)) {
    // The file could not be written to disk...
}
```

If you wish, you may define the `throw` option within your filesystem disk's configuration array. When this option is defined as `true`, "write" methods such as `put` will throw an instance of `League\Flysystem\UnableToWriteFile` when write operations fail:

```php
'public' => [
    'driver' => 'local',
    // ...
    'throw' => true,
],
```

<a name="prepending-appending-to-files"></a>
### Prepending and Appending To Files

The `prepend` and `append` methods allow you to write to the beginning or end of a file:

```php
Storage::prepend('file.log', 'Prepended Text');

Storage::append('file.log', 'Appended Text');
```

<a name="copying-moving-files"></a>
### Copying and Moving Files

The `copy` method may be used to copy an existing file to a new location on the disk, while the `move` method may be used to rename or move an existing file to a new location:

```php
Storage::copy('old/file.jpg', 'new/file.jpg');

Storage::move('old/file.jpg', 'new/file.jpg');
```

<a name="automatic-streaming"></a>
### Automatic Streaming

Streaming files to storage offers significantly reduced memory usage. If you would like Laravel to automatically manage streaming a given file to your storage location, you may use the `putFile` or `putFileAs` method. This method accepts either an `Illuminate\Http\File` or `Illuminate\Http\UploadedFile` instance and will automatically stream the file to your desired location:

```php
use Illuminate\Http\File;
use Illuminate\Support\Facades\Storage;

// Automatically generate a unique ID for filename...
$path = Storage::putFile('photos', new File('/path/to/photo'));

// Manually specify a filename...
$path = Storage::putFileAs('photos', new File('/path/to/photo'), 'photo.jpg');
```

There are a few important things to note about the `putFile` method. Note that we only specified a directory name and not a filename. By default, the `putFile` method will generate a unique ID to serve as the filename. The file's extension will be determined by examining the file's MIME type. The path to the file will be returned by the `putFile` method so you can store the path, including the generated filename, in your database.

The `putFile` and `putFileAs` methods also accept an argument to specify the "visibility" of the stored file. This is particularly useful if you are storing the file on a cloud disk such as Amazon S3 and would like the file to be publicly accessible via generated URLs:

```php
Storage::putFile('photos', new File('/path/to/photo'), 'public');
```

<a name="file-uploads"></a>
### File Uploads

In web applications, one of the most common use-cases for storing files is storing user uploaded files such as photos and documents. Laravel makes it very easy to store uploaded files using the `store` method on an uploaded file instance. Call the `store` method with the path at which you wish to store the uploaded file:

```php
<?php

namespace App\Http\Controllers;

use Illuminate\Http\Request;

class UserAvatarController extends Controller
{
    /**
     * Update the avatar for the user.
     */
    public function update(Request $request): string
    {
        $path = $request->file('avatar')->store('avatars');

        return $path;
    }
}
```

There are a few important things to note about this example. Note that we only specified a directory name, not a filename. By default, the `store` method will generate a unique ID to serve as the filename. The file's extension will be determined by examining the file's MIME type. The path to the file will be returned by the `store` method so you can store the path, including the generated filename, in your database.

You may also call the `putFile` method on the `Storage` facade to perform the same file storage operation as the example above:

```php
$path = Storage::putFile('avatars', $request->file('avatar'));
```

<a name="specifying-a-file-name"></a>
#### Specifying a File Name

If you do not want a filename to be automatically assigned to your stored file, you may use the `storeAs` method, which receives the path, the filename, and the (optional) disk as its arguments:

```php
$path = $request->file('avatar')->storeAs(
    'avatars', $request->user()->id
);
```

You may also use the `putFileAs` method on the `Storage` facade, which will perform the same file storage operation as the example above:

```php
$path = Storage::putFileAs(
    'avatars', $request->file('avatar'), $request->user()->id
);
```

> [!WARNING]
> Unprintable and invalid unicode characters will automatically be removed from file paths. Therefore, you may wish to sanitize your file paths before passing them to Laravel's file storage methods. File paths are normalized using the `League\Flysystem\WhitespacePathNormalizer::normalizePath` method.

<a name="specifying-a-disk"></a>
#### Specifying a Disk

By default, this uploaded file's `store` method will use your default disk. If you would like to specify another disk, pass the disk name as the second argument to the `store` method:

```php
$path = $request->file('avatar')->store(
    'avatars/'.$request->user()->id, 's3'
);
```

If you are using the `storeAs` method, you may pass the disk name as the third argument to the method:

```php
$path = $request->file('avatar')->storeAs(
    'avatars',
    $request->user()->id,
    's3'
);
```

<a name="other-uploaded-file-information"></a>
#### Other Uploaded File Information

If you would like to get the original name and extension of the uploaded file, you may do so using the `getClientOriginalName` and `getClientOriginalExtension` methods:

```php
$file = $request->file('avatar');

$name = $file->getClientOriginalName();
$extension = $file->getClientOriginalExtension();
```

However, keep in mind that the `getClientOriginalName` and `getClientOriginalExtension` methods are considered unsafe, as the file name and extension may be tampered with by a malicious user. For this reason, you should typically prefer the `hashName` and `extension` methods to get a name and an extension for the given file upload:

```php
$file = $request->file('avatar');

$name = $file->hashName(); // Generate a unique, random name...
$extension = $file->extension(); // Determine the file's extension based on the file's MIME type...
```

<a name="file-visibility"></a>
### File Visibility

In Laravel's Flysystem integration, "visibility" is an abstraction of file permissions across multiple platforms. Files may either be declared `public` or `private`. When a file is declared `public`, you are indicating that the file should generally be accessible to others. For example, when using the S3 driver, you may retrieve URLs for `public` files.

You can set the visibility when writing the file via the `put` method:

```php
use Illuminate\Support\Facades\Storage;

Storage::put('file.jpg', $contents, 'public');
```

If the file has already been stored, its visibility can be retrieved and set via the `getVisibility` and `setVisibility` methods:

```php
$visibility = Storage::getVisibility('file.jpg');

Storage::setVisibility('file.jpg', 'public');
```

When interacting with uploaded files, you may use the `storePublicly` and `storePubliclyAs` methods to store the uploaded file with `public` visibility:

```php
$path = $request->file('avatar')->storePublicly('avatars', 's3');

$path = $request->file('avatar')->storePubliclyAs(
    'avatars',
    $request->user()->id,
    's3'
);
```

<a name="image-manipulation"></a>
### Image Manipulation

If you need to resize, crop, or convert an uploaded image before storing it, you may use Laravel's [image manipulation features](/docs/{{version}}/images):

```php
$path = $request->image('avatar')
    ->cover(400, 400)
    ->toWebp()
    ->storePublicly('avatars', 'public');
```

You may also create an image instance from a file already stored on one of your filesystem disks:

```php
$image = Storage::disk('public')->image('avatars/photo.jpg');
```

<a name="local-files-and-visibility"></a>
#### Local Files and Visibility

When using the `local` driver, `public` [visibility](#file-visibility) translates to `0755` permissions for directories and `0644` permissions for files. You can modify the permissions mappings in your application's `filesystems` configuration file:

```php
'local' => [
    'driver' => 'local',
    'root' => storage_path('app'),
    'permissions' => [
        'file' => [
            'public' => 0644,
            'private' => 0600,
        ],
        'dir' => [
            'public' => 0755,
            'private' => 0700,
        ],
    ],
    'throw' => false,
],
```

<a name="deleting-files"></a>
## Deleting Files

The `delete` method accepts a single filename or an array of files to delete:

```php
use Illuminate\Support\Facades\Storage;

Storage::delete('file.jpg');

Storage::delete(['file.jpg', 'file2.jpg']);
```

If necessary, you may specify the disk that the file should be deleted from:

```php
use Illuminate\Support\Facades\Storage;

Storage::disk('s3')->delete('path/file.jpg');
```

<a name="directories"></a>
## Directories

<a name="get-all-files-within-a-directory"></a>
#### Get All Files Within a Directory

The `files` method returns an array of all files within a given directory. If you would like to retrieve a list of all files within a given directory including subdirectories, you may use the `allFiles` method:

```php
use Illuminate\Support\Facades\Storage;

$files = Storage::files($directory);

$files = Storage::allFiles($directory);
```

<a name="get-all-directories-within-a-directory"></a>
#### Get All Directories Within a Directory

The `directories` method returns an array of all directories within a given directory. If you would like to retrieve a list of all directories within a given directory including subdirectories, you may use the `allDirectories` method:

```php
$directories = Storage::directories($directory);

$directories = Storage::allDirectories($directory);
```

<a name="create-a-directory"></a>
#### Create a Directory

The `makeDirectory` method will create the given directory, including any needed subdirectories:

```php
Storage::makeDirectory($directory);
```

<a name="delete-a-directory"></a>
#### Delete a Directory

Finally, the `deleteDirectory` method may be used to remove a directory and all of its files:

```php
Storage::deleteDirectory($directory);
```

<a name="testing"></a>
## Testing

The `Storage` facade's `fake` method allows you to easily generate a fake disk that, combined with the file generation utilities of the `Illuminate\Http\UploadedFile` class, greatly simplifies the testing of file uploads. For example:

```php tab=Pest
<?php

use Illuminate\Http\UploadedFile;
use Illuminate\Support\Facades\Storage;

test('albums can be uploaded', function () {
    Storage::fake('photos');

    $response = $this->json('POST', '/photos', [
        UploadedFile::fake()->image('photo1.jpg'),
        UploadedFile::fake()->image('photo2.jpg')
    ]);

    // Assert one or more files were stored...
    Storage::disk('photos')->assertExists('photo1.jpg');
    Storage::disk('photos')->assertExists(['photo1.jpg', 'photo2.jpg']);

    // Assert one or more files were not stored...
    Storage::disk('photos')->assertMissing('missing.jpg');
    Storage::disk('photos')->assertMissing(['missing.jpg', 'non-existing.jpg']);

    // Assert that the number of files in a given directory matches the expected count...
    Storage::disk('photos')->assertCount('/wallpapers', 2);

    // Assert that a given directory is empty...
    Storage::disk('photos')->assertDirectoryEmpty('/wallpapers');

    // Assert that the disk contains no files...
    Storage::disk('photos')->assertEmpty();
});
```

```php tab=PHPUnit
<?php

namespace Tests\Feature;

use Illuminate\Http\UploadedFile;
use Illuminate\Support\Facades\Storage;
use Tests\TestCase;

class ExampleTest extends TestCase
{
    public function test_albums_can_be_uploaded(): void
    {
        Storage::fake('photos');

        $response = $this->json('POST', '/photos', [
            UploadedFile::fake()->image('photo1.jpg'),
            UploadedFile::fake()->image('photo2.jpg')
        ]);

        // Assert one or more files were stored...
        Storage::disk('photos')->assertExists('photo1.jpg');
        Storage::disk('photos')->assertExists(['photo1.jpg', 'photo2.jpg']);

        // Assert one or more files were not stored...
        Storage::disk('photos')->assertMissing('missing.jpg');
        Storage::disk('photos')->assertMissing(['missing.jpg', 'non-existing.jpg']);

        // Assert that the number of files in a given directory matches the expected count...
        Storage::disk('photos')->assertCount('/wallpapers', 2);

        // Assert that a given directory is empty...
        Storage::disk('photos')->assertDirectoryEmpty('/wallpapers');

        // Assert that the disk contains no files...
        Storage::disk('photos')->assertEmpty();
    }
}
```

By default, the `fake` method will delete all files in its temporary directory. If you would like to keep these files, you may use the "persistentFake" method instead. For more information on testing file uploads, you may consult the [HTTP testing documentation's information on file uploads](/docs/{{version}}/http-tests#testing-file-uploads).

> [!WARNING]
> The `image` method requires the [GD extension](https://www.php.net/manual/en/book.image.php).

<a name="custom-filesystems"></a>
## Custom Filesystems

Laravel's Flysystem integration provides support for several "drivers" out of the box; however, Flysystem is not limited to these and has adapters for many other storage systems. You can create a custom driver if you want to use one of these additional adapters in your Laravel application.

In order to define a custom filesystem you will need a Flysystem adapter. Let's add a community maintained Dropbox adapter to our project:

```shell
composer require spatie/flysystem-dropbox
```

Next, you can register the driver within the `boot` method of one of your application's [service providers](/docs/{{version}}/providers). To accomplish this, you should use the `extend` method of the `Storage` facade:

```php
<?php

namespace App\Providers;

use Illuminate\Contracts\Foundation\Application;
use Illuminate\Filesystem\FilesystemAdapter;
use Illuminate\Support\Facades\Storage;
use Illuminate\Support\ServiceProvider;
use League\Flysystem\Filesystem;
use Spatie\Dropbox\Client as DropboxClient;
use Spatie\FlysystemDropbox\DropboxAdapter;

class AppServiceProvider extends ServiceProvider
{
    /**
     * Register any application services.
     */
    public function register(): void
    {
        // ...
    }

    /**
     * Bootstrap any application services.
     */
    public function boot(): void
    {
        Storage::extend('dropbox', function (Application $app, array $config) {
            $adapter = new DropboxAdapter(new DropboxClient(
                $config['authorization_token']
            ));

            return new FilesystemAdapter(
                new Filesystem($adapter, $config),
                $adapter,
                $config
            );
        });
    }
}
```

The first argument of the `extend` method is the name of the driver and the second is a closure that receives the `$app` and `$config` variables. The closure must return an instance of `Illuminate\Filesystem\FilesystemAdapter`. The `$config` variable contains the values defined in `config/filesystems.php` for the specified disk.

Once you have created and registered the extension's service provider, you may use the `dropbox` driver in your `config/filesystems.php` configuration file.


---

# Laravel Folio

*Sección: Laravel | Origen: https://laravel.com/docs/13.x/folio*

- [Introduction](#introduction)
- [Installation](#installation)
    - [Page Paths / URIs](#page-paths-uris)
    - [Subdomain Routing](#subdomain-routing)
- [Creating Routes](#creating-routes)
    - [Nested Routes](#nested-routes)
    - [Index Routes](#index-routes)
- [Route Parameters](#route-parameters)
- [Route Model Binding](#route-model-binding)
    - [Soft Deleted Models](#soft-deleted-models)
- [Render Hooks](#render-hooks)
- [Named Routes](#named-routes)
- [Middleware](#middleware)
- [Route Caching](#route-caching)

<a name="introduction"></a>
## Introduction

[Laravel Folio](https://github.com/laravel/folio) is a powerful page based router designed to simplify routing in Laravel applications. With Laravel Folio, generating a route becomes as effortless as creating a Blade template within your application's `resources/views/pages` directory.

For example, to create a page that is accessible at the `/greeting` URL, just create a `greeting.blade.php` file in your application's `resources/views/pages` directory:

```php
<div>
    Hello World
</div>
```

<a name="installation"></a>
## Installation

To get started, install Folio into your project using the Composer package manager:

```shell
composer require laravel/folio
```

After installing Folio, you may execute the `folio:install` Artisan command, which will install Folio's service provider into your application. This service provider registers the directory where Folio will search for routes / pages:

```shell
php artisan folio:install
```

<a name="page-paths-uris"></a>
### Page Paths / URIs

By default, Folio serves pages from your application's `resources/views/pages` directory, but you may customize these directories in your Folio service provider's `boot` method.

For example, sometimes it may be convenient to specify multiple Folio paths in the same Laravel application. You may wish to have a separate directory of Folio pages for your application's "admin" area, while using another directory for the rest of your application's pages.

You may accomplish this using the `Folio::path` and `Folio::uri` methods. The `path` method registers a directory that Folio will scan for pages when routing incoming HTTP requests, while the `uri` method specifies the "base URI" for that directory of pages:

```php
use Laravel\Folio\Folio;

Folio::path(resource_path('views/pages/guest'))->uri('/');

Folio::path(resource_path('views/pages/admin'))
    ->uri('/admin')
    ->middleware([
        '*' => [
            'auth',
            'verified',

            // ...
        ],
    ]);
```

<a name="subdomain-routing"></a>
### Subdomain Routing

You may also route to pages based on the incoming request's subdomain. For example, you may wish to route requests from `admin.example.com` to a different page directory than the rest of your Folio pages. You may accomplish this by invoking the `domain` method after invoking the `Folio::path` method:

```php
use Laravel\Folio\Folio;

Folio::domain('admin.example.com')
    ->path(resource_path('views/pages/admin'));
```

The `domain` method also allows you to capture parts of the domain or subdomain as parameters. These parameters will be injected into your page template:

```php
use Laravel\Folio\Folio;

Folio::domain('{account}.example.com')
    ->path(resource_path('views/pages/admin'));
```

<a name="creating-routes"></a>
## Creating Routes

You may create a Folio route by placing a Blade template in any of your Folio mounted directories. By default, Folio mounts the `resources/views/pages` directory, but you may customize these directories in your Folio service provider's `boot` method.

Once a Blade template has been placed in a Folio mounted directory, you may immediately access it via your browser. For example, a page placed in `pages/schedule.blade.php` may be accessed in your browser at `http://example.com/schedule`.

To quickly view a list of all of your Folio pages / routes, you may invoke the `folio:list` Artisan command:

```shell
php artisan folio:list
```

<a name="nested-routes"></a>
### Nested Routes

You may create a nested route by creating one or more directories within one of Folio's directories. For instance, to create a page that is accessible via `/user/profile`, create a `profile.blade.php` template within the `pages/user` directory:

```shell
php artisan folio:page user/profile

# pages/user/profile.blade.php → /user/profile
```

<a name="index-routes"></a>
### Index Routes

Sometimes, you may wish to make a given page the "index" of a directory. By placing an `index.blade.php` template within a Folio directory, any requests to the root of that directory will be routed to that page:

```shell
php artisan folio:page index
# pages/index.blade.php → /

php artisan folio:page users/index
# pages/users/index.blade.php → /users
```

<a name="route-parameters"></a>
## Route Parameters

Often, you will need to have segments of the incoming request's URL injected into your page so that you can interact with them. For example, you may need to access the "ID" of the user whose profile is being displayed. To accomplish this, you may encapsulate a segment of the page's filename in square brackets:

```shell
php artisan folio:page "users/[id]"

# pages/users/[id].blade.php → /users/1
```

Captured segments can be accessed as variables within your Blade template:

```html
<div>
    User {{ $id }}
</div>
```

To capture multiple segments, you can prefix the encapsulated segment with three dots `...`:

```shell
php artisan folio:page "users/[...ids]"

# pages/users/[...ids].blade.php → /users/1/2/3
```

When capturing multiple segments, the captured segments will be injected into the page as an array:

```html
<ul>
    @foreach ($ids as $id)
        <li>User {{ $id }}</li>
    @endforeach
</ul>
```

<a name="route-model-binding"></a>
## Route Model Binding

If a wildcard segment of your page template's filename corresponds one of your application's Eloquent models, Folio will automatically take advantage of Laravel's route model binding capabilities and attempt to inject the resolved model instance into your page:

```shell
php artisan folio:page "users/[User]"

# pages/users/[User].blade.php → /users/1
```

Captured models can be accessed as variables within your Blade template. The model's variable name will be converted to "camel case":

```html
<div>
    User {{ $user->id }}
</div>
```

#### Customizing the Key

Sometimes you may wish to resolve bound Eloquent models using a column other than `id`. To do so, you may specify the column in the page's filename. For example, a page with the filename `[Post:slug].blade.php` will attempt to resolve the bound model via the `slug` column instead of the `id` column.

On Windows, you should use `-` to separate the model name from the key: `[Post-slug].blade.php`.

#### Model Location

By default, Folio will search for your model within your application's `app/Models` directory. However, if needed, you may specify the fully-qualified model class name in your template's filename:

```shell
php artisan folio:page "users/[.App.Models.User]"

# pages/users/[.App.Models.User].blade.php → /users/1
```

<a name="soft-deleted-models"></a>
### Soft Deleted Models

By default, models that have been soft deleted are not retrieved when resolving implicit model bindings. However, if you wish, you can instruct Folio to retrieve soft deleted models by invoking the `withTrashed` function within the page's template:

```php
<?php

use function Laravel\Folio\{withTrashed};

withTrashed();

?>

<div>
    User {{ $user->id }}
</div>
```

<a name="render-hooks"></a>
## Render Hooks

By default, Folio will return the content of the page's Blade template as the response to the incoming request. However, you may customize the response by invoking the `render` function within the page's template.

The `render` function accepts a closure which will receive the `View` instance being rendered by Folio, allowing you to add additional data to the view or customize the entire response. In addition to receiving the `View` instance, any additional route parameters or model bindings will also be provided to the `render` closure:

```php
<?php

use App\Models\Post;
use Illuminate\Support\Facades\Auth;
use Illuminate\View\View;

use function Laravel\Folio\render;

render(function (View $view, Post $post) {
    if (! Auth::user()->can('view', $post)) {
        return response('Unauthorized', 403);
    }

    return $view->with('photos', $post->author->photos);
}); ?>

<div>
    {{ $post->content }}
</div>

<div>
    This author has also taken {{ count($photos) }} photos.
</div>
```

<a name="named-routes"></a>
## Named Routes

You may specify a name for a given page's route using the `name` function:

```php
<?php

use function Laravel\Folio\name;

name('users.index');
```

Just like Laravel's named routes, you may use the `route` function to generate URLs to Folio pages that have been assigned a name:

```php
<a href="{{ route('users.index') }}">
    All Users
</a>
```

If the page has parameters, you may simply pass their values to the `route` function:

```php
route('users.show', ['user' => $user]);
```

<a name="middleware"></a>
## Middleware

You can apply middleware to a specific page by invoking the `middleware` function within the page's template:

```php
<?php

use function Laravel\Folio\{middleware};

middleware(['auth', 'verified']);

?>

<div>
    Dashboard
</div>
```

Or, to assign middleware to a group of pages, you may chain the `middleware` method after invoking the `Folio::path` method.

To specify which pages the middleware should be applied to, the array of middleware may be keyed using the corresponding URL patterns of the pages they should be applied to. The `*` character may be utilized as a wildcard character:

```php
use Laravel\Folio\Folio;

Folio::path(resource_path('views/pages'))->middleware([
    'admin/*' => [
        'auth',
        'verified',

        // ...
    ],
]);
```

You may include closures in the array of middleware to define inline, anonymous middleware:

```php
use Closure;
use Illuminate\Http\Request;
use Laravel\Folio\Folio;

Folio::path(resource_path('views/pages'))->middleware([
    'admin/*' => [
        'auth',
        'verified',

        function (Request $request, Closure $next) {
            // ...

            return $next($request);
        },
    ],
]);
```

<a name="route-caching"></a>
## Route Caching

When using Folio, you should always take advantage of [Laravel's route caching capabilities](/docs/{{version}}/routing#route-caching). Folio listens for the `route:cache` Artisan command to ensure that Folio page definitions and route names are properly cached for maximum performance.


---

# Laravel Fortify

*Sección: Laravel | Origen: https://laravel.com/docs/13.x/fortify*

- [Introduction](#introduction)
    - [What is Fortify?](#what-is-fortify)
    - [When Should I Use Fortify?](#when-should-i-use-fortify)
- [Installation](#installation)
    - [Fortify Features](#fortify-features)
    - [Disabling Views](#disabling-views)
- [Authentication](#authentication)
    - [Customizing User Authentication](#customizing-user-authentication)
    - [Customizing the Authentication Pipeline](#customizing-the-authentication-pipeline)
    - [Customizing Redirects](#customizing-authentication-redirects)
- [Two-Factor Authentication](#two-factor-authentication)
    - [Enabling Two-Factor Authentication](#enabling-two-factor-authentication)
    - [Authenticating With Two-Factor Authentication](#authenticating-with-two-factor-authentication)
    - [Disabling Two-Factor Authentication](#disabling-two-factor-authentication)
- [Passkeys](#passkeys)
    - [Enabling Passkeys](#enabling-passkeys)
    - [JavaScript Client](#passkeys-javascript-client)
    - [Authenticating With Passkeys](#authenticating-with-passkeys)
    - [Confirming Password With Passkeys](#confirming-password-with-passkeys)
    - [Registering Passkeys](#registering-passkeys)
    - [Deleting Passkeys](#deleting-passkeys)
- [Registration](#registration)
    - [Customizing Registration](#customizing-registration)
- [Password Reset](#password-reset)
    - [Requesting a Password Reset Link](#requesting-a-password-reset-link)
    - [Resetting the Password](#resetting-the-password)
    - [Customizing Password Resets](#customizing-password-resets)
- [Email Verification](#email-verification)
    - [Protecting Routes](#protecting-routes)
- [Password Confirmation](#password-confirmation)

<a name="introduction"></a>
## Introduction

[Laravel Fortify](https://github.com/laravel/fortify) is a frontend agnostic authentication backend implementation for Laravel. Fortify registers the routes and controllers needed to implement all of Laravel's authentication features, including login, registration, password reset, email verification, and more. After installing Fortify, you may run the `route:list` Artisan command to see the routes that Fortify has registered.

Since Fortify does not provide its own user interface, it is meant to be paired with your own user interface which makes requests to the routes it registers. We will discuss exactly how to make requests to these routes in the remainder of this documentation.

> [!NOTE]
> Remember, Fortify is a package that is meant to give you a head start implementing Laravel's authentication features. **You are not required to use it.** You are always free to manually interact with Laravel's authentication services by following the documentation available in the [authentication](/docs/{{version}}/authentication), [password reset](/docs/{{version}}/passwords), and [email verification](/docs/{{version}}/verification) documentation.

<a name="what-is-fortify"></a>
### What is Fortify?

As mentioned previously, Laravel Fortify is a frontend agnostic authentication backend implementation for Laravel. Fortify registers the routes and controllers needed to implement all of Laravel's authentication features, including login, registration, password reset, email verification, and more.

**You are not required to use Fortify in order to use Laravel's authentication features.** You are always free to manually interact with Laravel's authentication services by following the documentation available in the [authentication](/docs/{{version}}/authentication), [password reset](/docs/{{version}}/passwords), and [email verification](/docs/{{version}}/verification) documentation.

If you are new to Laravel, you may wish to explore [our application starter kits](/docs/{{version}}/starter-kits). Laravel's application starter kits use Fortify internally to provide authentication scaffolding for your application that includes a user interface built with [Tailwind CSS](https://tailwindcss.com). This allows you to study and get comfortable with Laravel's authentication features.

Laravel Fortify essentially takes the routes and controllers of our application starter kits and offers them as a package that does not include a user interface. This allows you to still quickly scaffold the backend implementation of your application's authentication layer without being tied to any particular frontend opinions.

<a name="when-should-i-use-fortify"></a>
### When Should I Use Fortify?

You may be wondering when it is appropriate to use Laravel Fortify. First, if you are using one of Laravel's [application starter kits](/docs/{{version}}/starter-kits), you do not need to install Laravel Fortify since all of Laravel's application starter kits use Fortify and already provide a full authentication implementation.

If you are not using an application starter kit and your application needs authentication features, you have two options: manually implement your application's authentication features or use Laravel Fortify to provide the backend implementation of these features.

If you choose to install Fortify, your user interface will make requests to Fortify's authentication routes that are detailed in this documentation in order to authenticate and register users.

If you choose to manually interact with Laravel's authentication services instead of using Fortify, you may do so by following the documentation available in the [authentication](/docs/{{version}}/authentication), [password reset](/docs/{{version}}/passwords), and [email verification](/docs/{{version}}/verification) documentation.

<a name="laravel-fortify-and-laravel-sanctum"></a>
#### Laravel Fortify and Laravel Sanctum

Some developers become confused regarding the difference between [Laravel Sanctum](/docs/{{version}}/sanctum) and Laravel Fortify. Because the two packages solve two different but related problems, Laravel Fortify and Laravel Sanctum are not mutually exclusive or competing packages.

Laravel Sanctum is only concerned with managing API tokens and authenticating existing users using session cookies or tokens. Sanctum does not provide any routes that handle user registration, password reset, etc.

If you are attempting to manually build the authentication layer for an application that offers an API or serves as the backend for a single-page application, it is entirely possible that you will utilize both Laravel Fortify (for user registration, password reset, etc.) and Laravel Sanctum (API token management, session authentication).

<a name="installation"></a>
## Installation

To get started, install Fortify using the Composer package manager:

```shell
composer require laravel/fortify
```

Next, publish Fortify's resources using the `fortify:install` Artisan command:

```shell
php artisan fortify:install
```

This command will publish Fortify's actions to your `app/Actions` directory, which will be created if it does not exist. In addition, the `FortifyServiceProvider`, configuration file, and all necessary database migrations will be published.

Next, you should migrate your database:

```shell
php artisan migrate
```

<a name="fortify-features"></a>
### Fortify Features

The `fortify` configuration file contains a `features` configuration array. This array defines which backend routes / features Fortify will expose by default. We recommend that you only enable the following features, which are the basic authentication features provided by most Laravel applications:

```php
'features' => [
    Features::registration(),
    Features::resetPasswords(),
    Features::emailVerification(),
],
```

<a name="disabling-views"></a>
### Disabling Views

By default, Fortify defines routes that are intended to return views, such as a login screen or registration screen. However, if you are building a JavaScript driven single-page application, you may not need these routes. For that reason, you may disable these routes entirely by setting the `views` configuration value within your application's `config/fortify.php` configuration file to `false`:

```php
'views' => false,
```

<a name="disabling-views-and-password-reset"></a>
#### Disabling Views and Password Reset

If you choose to disable Fortify's views and you will be implementing password reset features for your application, you should still define a route named `password.reset` that is responsible for displaying your application's "reset password" view. This is necessary because Laravel's `Illuminate\Auth\Notifications\ResetPassword` notification will generate the password reset URL via the `password.reset` named route.

<a name="authentication"></a>
## Authentication

To get started, we need to instruct Fortify how to return our "login" view. Remember, Fortify is a headless authentication library. If you would like a frontend implementation of Laravel's authentication features that are already completed for you, you should use an [application starter kit](/docs/{{version}}/starter-kits).

All of the authentication view's rendering logic may be customized using the appropriate methods available via the `Laravel\Fortify\Fortify` class. Typically, you should call this method from the `boot` method of your application's `App\Providers\FortifyServiceProvider` class. Fortify will take care of defining the `/login` route that returns this view:

```php
use Laravel\Fortify\Fortify;

/**
 * Bootstrap any application services.
 */
public function boot(): void
{
    Fortify::loginView(function () {
        return view('auth.login');
    });

    // ...
}
```

Your login template should include a form that makes a POST request to `/login`. The `/login` endpoint expects a string `email` / `username` and a `password`. The name of the email / username field should match the `username` value within the `config/fortify.php` configuration file. In addition, a boolean `remember` field may be provided to indicate that the user would like to use the "remember me" functionality provided by Laravel.

If the login attempt is successful, Fortify will redirect you to the URI configured via the `home` configuration option within your application's `fortify` configuration file. If the login request was an XHR request, a 200 HTTP response will be returned.

If the request was not successful, the user will be redirected back to the login screen and the validation errors will be available to you via the shared `$errors` [Blade template variable](/docs/{{version}}/validation#quick-displaying-the-validation-errors). Or, in the case of an XHR request, the validation errors will be returned with the 422 HTTP response.

<a name="customizing-user-authentication"></a>
### Customizing User Authentication

Fortify will automatically retrieve and authenticate the user based on the provided credentials and the authentication guard that is configured for your application. However, you may sometimes wish to have full customization over how login credentials are authenticated and users are retrieved. Thankfully, Fortify allows you to easily accomplish this using the `Fortify::authenticateUsing` method.

This method accepts a closure which receives the incoming HTTP request. The closure is responsible for validating the login credentials attached to the request and returning the associated user instance. If the credentials are invalid or no user can be found, `null` or `false` should be returned by the closure. Typically, this method should be called from the `boot` method of your `FortifyServiceProvider`:

```php
use App\Models\User;
use Illuminate\Http\Request;
use Illuminate\Support\Facades\Hash;
use Laravel\Fortify\Fortify;

/**
 * Bootstrap any application services.
 */
public function boot(): void
{
    Fortify::authenticateUsing(function (Request $request) {
        $user = User::where('email', $request->email)->first();

        if ($user &&
            Hash::check($request->password, $user->password)) {
            return $user;
        }
    });

    // ...
}
```

<a name="authentication-guard"></a>
#### Authentication Guard

You may customize the authentication guard used by Fortify within your application's `fortify` configuration file. However, you should ensure that the configured guard is an implementation of `Illuminate\Contracts\Auth\StatefulGuard`. If you are attempting to use Laravel Fortify to authenticate an SPA, you should use Laravel's default `web` guard in combination with [Laravel Sanctum](https://laravel.com/docs/sanctum).

<a name="customizing-the-authentication-pipeline"></a>
### Customizing the Authentication Pipeline

Laravel Fortify authenticates login requests through a pipeline of invokable classes. If you would like, you may define a custom pipeline of classes that login requests should be piped through. Each class should have an `__invoke` method which receives the incoming `Illuminate\Http\Request` instance and, like [middleware](/docs/{{version}}/middleware), a `$next` variable that is invoked in order to pass the request to the next class in the pipeline.

To define your custom pipeline, you may use the `Fortify::authenticateThrough` method. This method accepts a closure which should return the array of classes to pipe the login request through. Typically, this method should be called from the `boot` method of your `App\Providers\FortifyServiceProvider` class.

The example below contains the default pipeline definition that you may use as a starting point when making your own modifications:

```php
use Laravel\Fortify\Actions\AttemptToAuthenticate;
use Laravel\Fortify\Actions\CanonicalizeUsername;
use Laravel\Fortify\Actions\EnsureLoginIsNotThrottled;
use Laravel\Fortify\Actions\PrepareAuthenticatedSession;
use Laravel\Fortify\Actions\RedirectIfTwoFactorAuthenticatable;
use Laravel\Fortify\Features;
use Laravel\Fortify\Fortify;
use Illuminate\Http\Request;

Fortify::authenticateThrough(function (Request $request) {
    return array_filter([
            config('fortify.limiters.login') ? null : EnsureLoginIsNotThrottled::class,
            config('fortify.lowercase_usernames') ? CanonicalizeUsername::class : null,
            Features::enabled(Features::twoFactorAuthentication()) ? RedirectIfTwoFactorAuthenticatable::class : null,
            AttemptToAuthenticate::class,
            PrepareAuthenticatedSession::class,
    ]);
});
```

#### Authentication Throttling

By default, Fortify will throttle authentication attempts using the `EnsureLoginIsNotThrottled` middleware. This middleware throttles attempts that are unique to a username and IP address combination.

Some applications may require a different approach to throttling authentication attempts, such as throttling by IP address alone. Therefore, Fortify allows you to specify your own [rate limiter](/docs/{{version}}/routing#rate-limiting) via the `fortify.limiters.login` configuration option. Of course, this configuration option is located in your application's `config/fortify.php` configuration file.

> [!NOTE]
> Utilizing a mixture of throttling, [two-factor authentication](/docs/{{version}}/fortify#two-factor-authentication), and an external web application firewall (WAF) will provide the most robust defense for your legitimate application users.

<a name="customizing-authentication-redirects"></a>
### Customizing Redirects

If the login attempt is successful, Fortify will redirect you to the URI configured via the `home` configuration option within your application's `fortify` configuration file. If the login request was an XHR request, a 200 HTTP response will be returned. After a user logs out of the application, the user will be redirected to the `/` URI.

If you need advanced customization of this behavior, you may bind implementations of the `LoginResponse` and `LogoutResponse` contracts into the Laravel [service container](/docs/{{version}}/container). Typically, this should be done within the `register` method of your application's `App\Providers\FortifyServiceProvider` class:

```php
use Laravel\Fortify\Contracts\LogoutResponse;

/**
 * Register any application services.
 */
public function register(): void
{
    $this->app->instance(LogoutResponse::class, new class implements LogoutResponse {
        public function toResponse($request)
        {
            return redirect('/');
        }
    });
}
```

<a name="two-factor-authentication"></a>
## Two-Factor Authentication

When Fortify's two-factor authentication feature is enabled, the user is required to input a six digit numeric token during the authentication process. This token is generated using a time-based one-time password (TOTP) that can be retrieved from any TOTP compatible mobile authentication application such as Google Authenticator.

Before getting started, you should first ensure that your application's `App\Models\User` model uses the `Laravel\Fortify\TwoFactorAuthenticatable` trait:

```php
<?php

namespace App\Models;

use Illuminate\Foundation\Auth\User as Authenticatable;
use Illuminate\Notifications\Notifiable;
use Laravel\Fortify\TwoFactorAuthenticatable;

class User extends Authenticatable
{
    use Notifiable, TwoFactorAuthenticatable;
}
```

Next, you should build a screen within your application where users can manage their two-factor authentication settings. This screen should allow the user to enable and disable two-factor authentication, as well as regenerate their two-factor authentication recovery codes.

> By default, the `features` array of the `fortify` configuration file instructs Fortify's two-factor authentication settings to require password confirmation before modification. Therefore, your application should implement Fortify's [password confirmation](#password-confirmation) feature before continuing.

<a name="enabling-two-factor-authentication"></a>
### Enabling Two-Factor Authentication

To begin enabling two-factor authentication, your application should make a POST request to the `/user/two-factor-authentication` endpoint defined by Fortify. If the request is successful, the user will be redirected back to the previous URL and the `status` session variable will be set to `two-factor-authentication-enabled`. You may detect this `status` session variable within your templates to display the appropriate success message. If the request was an XHR request, `200` HTTP response will be returned.

After choosing to enable two-factor authentication, the user must still "confirm" their two-factor authentication configuration by providing a valid two-factor authentication code. So, your "success" message should instruct the user that two-factor authentication confirmation is still required:

```html
@if (session('status') == 'two-factor-authentication-enabled')
    <div class="mb-4 font-medium text-sm">
        Please finish configuring two-factor authentication below.
    </div>
@endif
```

Next, you should display the two-factor authentication QR code for the user to scan into their authenticator application. If you are using Blade to render your application's frontend, you may retrieve the QR code SVG using the `twoFactorQrCodeSvg` method available on the user instance:

```php
$request->user()->twoFactorQrCodeSvg();
```

If you are building a JavaScript powered frontend, you may make an XHR GET request to the `/user/two-factor-qr-code` endpoint to retrieve the user's two-factor authentication QR code. This endpoint will return a JSON object containing an `svg` key.

<a name="confirming-two-factor-authentication"></a>
#### Confirming Two-Factor Authentication

In addition to displaying the user's two-factor authentication QR code, you should provide a text input where the user can supply a valid authentication code to "confirm" their two-factor authentication configuration. This code should be provided to the Laravel application via a POST request to the `/user/confirmed-two-factor-authentication` endpoint defined by Fortify.

If the request is successful, the user will be redirected back to the previous URL and the `status` session variable will be set to `two-factor-authentication-confirmed`:

```html
@if (session('status') == 'two-factor-authentication-confirmed')
    <div class="mb-4 font-medium text-sm">
        Two-factor authentication confirmed and enabled successfully.
    </div>
@endif
```

If the request to the two-factor authentication confirmation endpoint was made via an XHR request, a `200` HTTP response will be returned.

<a name="displaying-the-recovery-codes"></a>
#### Displaying the Recovery Codes

You should also display the user's two-factor recovery codes. These recovery codes allow the user to authenticate if they lose access to their mobile device. If you are using Blade to render your application's frontend, you may access the recovery codes via the authenticated user instance:

```php
(array) $request->user()->recoveryCodes()
```

If you are building a JavaScript powered frontend, you may make an XHR GET request to the `/user/two-factor-recovery-codes` endpoint. This endpoint will return a JSON array containing the user's recovery codes.

To regenerate the user's recovery codes, your application should make a POST request to the `/user/two-factor-recovery-codes` endpoint.

<a name="authenticating-with-two-factor-authentication"></a>
### Authenticating With Two-Factor Authentication

During the authentication process, Fortify will automatically redirect the user to your application's two-factor authentication challenge screen. However, if your application is making an XHR login request, the JSON response returned after a successful authentication attempt will contain a JSON object that has a `two_factor` boolean property. You should inspect this value to know whether you should redirect to your application's two-factor authentication challenge screen.

To begin implementing two-factor authentication functionality, we need to instruct Fortify how to return our two-factor authentication challenge view. All of Fortify's authentication view rendering logic may be customized using the appropriate methods available via the `Laravel\Fortify\Fortify` class. Typically, you should call this method from the `boot` method of your application's `App\Providers\FortifyServiceProvider` class:

```php
use Laravel\Fortify\Fortify;

/**
 * Bootstrap any application services.
 */
public function boot(): void
{
    Fortify::twoFactorChallengeView(function () {
        return view('auth.two-factor-challenge');
    });

    // ...
}
```

Fortify will take care of defining the `/two-factor-challenge` route that returns this view. Your `two-factor-challenge` template should include a form that makes a POST request to the `/two-factor-challenge` endpoint. The `/two-factor-challenge` action expects a `code` field that contains a valid TOTP token or a `recovery_code` field that contains one of the user's recovery codes.

If the login attempt is successful, Fortify will redirect the user to the URI configured via the `home` configuration option within your application's `fortify` configuration file. If the login request was an XHR request, a 204 HTTP response will be returned.

If the request was not successful, the user will be redirected back to the two-factor challenge screen and the validation errors will be available to you via the shared `$errors` [Blade template variable](/docs/{{version}}/validation#quick-displaying-the-validation-errors). Or, in the case of an XHR request, the validation errors will be returned with a 422 HTTP response.

<a name="disabling-two-factor-authentication"></a>
### Disabling Two-Factor Authentication

To disable two-factor authentication, your application should make a DELETE request to the `/user/two-factor-authentication` endpoint. Remember, Fortify's two-factor authentication endpoints require [password confirmation](#password-confirmation) prior to being called.

<a name="passkeys"></a>
## Passkeys

Fortify supports passkey authentication using WebAuthn. Passkeys allow users to authenticate without passwords using platform authenticators such as Face ID, Touch ID, Windows Hello, or hardware security keys.

<a name="enabling-passkeys"></a>
### Enabling Passkeys

To get started, ensure the `passkeys` feature is enabled in your application's `fortify` configuration file:

```php
use Laravel\Fortify\Features;

'features' => [
    // ...
    Features::passkeys([
        'confirmPassword' => true,
    ]),
],
```

The `confirmPassword` option determines whether Fortify requires [password confirmation](#password-confirmation) before passkeys may be registered or deleted.

Next, ensure your application's `App\Models\User` model implements `Laravel\Fortify\Contracts\PasskeyUser` and uses the `Laravel\Fortify\PasskeyAuthenticatable` trait:

```php
<?php

namespace App\Models;

use Illuminate\Foundation\Auth\User as Authenticatable;
use Illuminate\Notifications\Notifiable;
use Laravel\Fortify\Contracts\PasskeyUser;
use Laravel\Fortify\PasskeyAuthenticatable;

class User extends Authenticatable implements PasskeyUser
{
    use Notifiable, PasskeyAuthenticatable;
}
```

Fortify's passkeys configuration options may be customized using the `passkeys` configuration array in your application's `config/fortify.php` file:

```php
'passkeys' => [
    'relying_party_id' => parse_url(config('app.url'), PHP_URL_HOST),
    'allowed_origins' => [config('app.url')],
    'user_handle_secret' => config('app.key'),
    'timeout' => 60000,
],
```

> [!NOTE]
> Fortify wraps the `laravel/passkeys` Composer package and configures it for you. If you are using Fortify's passkeys feature, you should configure passkeys using your application's `config/fortify.php` file. You do not need to publish the `laravel/passkeys` configuration file, and any values defined there will be overridden by Fortify.

The `relying_party_id` should match your application's domain. The `allowed_origins` array lists the browser origins that may complete passkey registration and authentication. The `user_handle_secret` is used to derive opaque user identifiers, ensuring the same user is recognized across passkey registrations. The `timeout` option controls how long passkey registration and authentication operations may remain active.

Fortify applies a dedicated passkeys rate limiter to its passkey login, confirmation, and registration routes. If needed, you may customize it using the `fortify.limiters.passkeys` configuration option and a corresponding `RateLimiter::for(...)` definition.

<a name="passkeys-javascript-client"></a>
### JavaScript Client

If you are building a custom frontend, including a Blade application with browser-side scripts, you may use the official [`@laravel/passkeys`](https://www.npmjs.com/package/@laravel/passkeys) package. This package handles browser WebAuthn ceremonies and sends requests to Fortify's passkey endpoints.

Install the package via npm:

```shell
npm install @laravel/passkeys
```

Then, you may initiate passkey registration and verification from your frontend:

```js
import { Passkeys } from "@laravel/passkeys";

await Passkeys.register({ name: "MacBook Pro" });
await Passkeys.verify();
```

If your application uses custom passkey endpoint URIs, you may override the routes on a per-call basis:

```js
await Passkeys.verify({
    routes: {
        options: "/passkeys/confirm/options",
        submit: "/passkeys/confirm",
    },
});

await Passkeys.register({
    name: "MacBook Pro",
    routes: {
        options: "/user/passkeys/options",
        submit: "/user/passkeys",
    },
});
```

The package also provides React, Vue, and Svelte helpers via `@laravel/passkeys/react`, `@laravel/passkeys/vue`, and `@laravel/passkeys/svelte`.

<a name="authenticating-with-passkeys"></a>
### Authenticating With Passkeys

To authenticate a user with a passkey, your application should first make a GET request to the `/passkeys/login/options` endpoint. This endpoint returns the WebAuthn challenge options that your frontend should pass to `navigator.credentials.get(...)`.

After the browser returns a credential, your application should make a POST request to `/passkeys/login` with the credential payload. You may also include a boolean `remember` field.

If the request is successful, Fortify will log the user into the configured guard and return either:

<div class="content-list" markdown="1">

- A redirect response to your intended destination for standard requests.
- A `200` HTTP response containing a JSON payload with a `redirect` key for XHR requests.

</div>

<a name="confirming-password-with-passkeys"></a>
### Confirming Password With Passkeys

For authenticated sessions, Fortify provides passkey confirmation endpoints that satisfy Laravel's password confirmation requirement for the current session.

To confirm with a passkey, your application should first make a GET request to `/passkeys/confirm/options`. This endpoint returns the WebAuthn challenge options that your frontend should pass to `navigator.credentials.get(...)`.

After the browser returns a credential, your application should make a POST request to `/passkeys/confirm` with the credential payload.

If the request is successful, Fortify marks the current session as password confirmed and returns either:

<div class="content-list" markdown="1">

- A redirect response to your intended destination for standard requests.
- A `200` HTTP response containing a JSON payload with a `redirect` key for XHR requests.

</div>

<a name="registering-passkeys"></a>
### Registering Passkeys

To register a passkey for an authenticated user, your application should first make a GET request to `/user/passkeys/options`. This endpoint returns the WebAuthn creation options that your frontend should pass to `navigator.credentials.create(...)`.

After the browser returns a credential, your application should make a POST request to `/user/passkeys` with a `name` field and a `credential` field containing the serialized [`PublicKeyCredential`](https://developer.mozilla.org/en-US/docs/Web/API/PublicKeyCredential) object returned by `navigator.credentials.create(...)`.

If the request is successful, Fortify will return either:

<div class="content-list" markdown="1">

- A redirect back response with a `passkey-registered` status in the session for standard requests.
- A `200` HTTP response with a JSON payload containing a `status` key, along with the newly registered passkey's `id` and `name`.

</div>

<a name="deleting-passkeys"></a>
### Deleting Passkeys

To delete a passkey, your application should make a DELETE request to `/user/passkeys/{passkey}`.

If the request is successful, Fortify will return either:

<div class="content-list" markdown="1">

- A redirect back response with a `passkey-deleted` status in the session for standard requests.
- A `200` HTTP response with a JSON payload containing a `status` key for XHR requests.

</div>

<a name="registration"></a>
## Registration

To begin implementing our application's registration functionality, we need to instruct Fortify how to return our "register" view. Remember, Fortify is a headless authentication library. If you would like a frontend implementation of Laravel's authentication features that are already completed for you, you should use an [application starter kit](/docs/{{version}}/starter-kits).

All of Fortify's view rendering logic may be customized using the appropriate methods available via the `Laravel\Fortify\Fortify` class. Typically, you should call this method from the `boot` method of your `App\Providers\FortifyServiceProvider` class:

```php
use Laravel\Fortify\Fortify;

/**
 * Bootstrap any application services.
 */
public function boot(): void
{
    Fortify::registerView(function () {
        return view('auth.register');
    });

    // ...
}
```

Fortify will take care of defining the `/register` route that returns this view. Your `register` template should include a form that makes a POST request to the `/register` endpoint defined by Fortify.

The `/register` endpoint expects a string `name`, string email address / username, `password`, and `password_confirmation` fields. The name of the email / username field should match the `username` configuration value defined within your application's `fortify` configuration file.

If the registration attempt is successful, Fortify will redirect the user to the URI configured via the `home` configuration option within your application's `fortify` configuration file. If the request was an XHR request, a 201 HTTP response will be returned.

If the request was not successful, the user will be redirected back to the registration screen and the validation errors will be available to you via the shared `$errors` [Blade template variable](/docs/{{version}}/validation#quick-displaying-the-validation-errors). Or, in the case of an XHR request, the validation errors will be returned with a 422 HTTP response.

<a name="customizing-registration"></a>
### Customizing Registration

The user validation and creation process may be customized by modifying the `App\Actions\Fortify\CreateNewUser` action that was generated when you installed Laravel Fortify.

<a name="password-reset"></a>
## Password Reset

<a name="requesting-a-password-reset-link"></a>
### Requesting a Password Reset Link

To begin implementing our application's password reset functionality, we need to instruct Fortify how to return our "forgot password" view. Remember, Fortify is a headless authentication library. If you would like a frontend implementation of Laravel's authentication features that are already completed for you, you should use an [application starter kit](/docs/{{version}}/starter-kits).

All of Fortify's view rendering logic may be customized using the appropriate methods available via the `Laravel\Fortify\Fortify` class. Typically, you should call this method from the `boot` method of your application's `App\Providers\FortifyServiceProvider` class:

```php
use Laravel\Fortify\Fortify;

/**
 * Bootstrap any application services.
 */
public function boot(): void
{
    Fortify::requestPasswordResetLinkView(function () {
        return view('auth.forgot-password');
    });

    // ...
}
```

Fortify will take care of defining the `/forgot-password` endpoint that returns this view. Your `forgot-password` template should include a form that makes a POST request to the `/forgot-password` endpoint.

The `/forgot-password` endpoint expects a string `email` field. The name of this field / database column should match the `email` configuration value within your application's `fortify` configuration file.

<a name="handling-the-password-reset-link-request-response"></a>
#### Handling the Password Reset Link Request Response

If the password reset link request was successful, Fortify will redirect the user back to the `/forgot-password` endpoint and send an email to the user with a secure link they can use to reset their password. If the request was an XHR request, a 200 HTTP response will be returned.

After being redirected back to the `/forgot-password` endpoint after a successful request, the `status` session variable may be used to display the status of the password reset link request attempt.

The value of the `$status` session variable will match one of the translation strings defined within your application's `passwords` [language file](/docs/{{version}}/localization). If you would like to customize this value and have not published Laravel's language files, you may do so via the `lang:publish` Artisan command:

```html
@if (session('status'))
    <div class="mb-4 font-medium text-sm text-green-600">
        {{ session('status') }}
    </div>
@endif
```

If the request was not successful, the user will be redirected back to the request password reset link screen and the validation errors will be available to you via the shared `$errors` [Blade template variable](/docs/{{version}}/validation#quick-displaying-the-validation-errors). Or, in the case of an XHR request, the validation errors will be returned with a 422 HTTP response.

<a name="resetting-the-password"></a>
### Resetting the Password

To finish implementing our application's password reset functionality, we need to instruct Fortify how to return our "reset password" view.

All of Fortify's view rendering logic may be customized using the appropriate methods available via the `Laravel\Fortify\Fortify` class. Typically, you should call this method from the `boot` method of your application's `App\Providers\FortifyServiceProvider` class:

```php
use Laravel\Fortify\Fortify;
use Illuminate\Http\Request;

/**
 * Bootstrap any application services.
 */
public function boot(): void
{
    Fortify::resetPasswordView(function (Request $request) {
        return view('auth.reset-password', ['request' => $request]);
    });

    // ...
}
```

Fortify will take care of defining the route to display this view. Your `reset-password` template should include a form that makes a POST request to `/reset-password`.

The `/reset-password` endpoint expects a string `email` field, a `password` field, a `password_confirmation` field, and a hidden field named `token` that contains the value of `request()->route('token')`. The name of the "email" field / database column should match the `email` configuration value defined within your application's `fortify` configuration file.

<a name="handling-the-password-reset-response"></a>
#### Handling the Password Reset Response

If the password reset request was successful, Fortify will redirect back to the `/login` route so that the user can log in with their new password. In addition, a `status` session variable will be set so that you may display the successful status of the reset on your login screen:

```blade
@if (session('status'))
    <div class="mb-4 font-medium text-sm text-green-600">
        {{ session('status') }}
    </div>
@endif
```

If the request was an XHR request, a 200 HTTP response will be returned.

If the request was not successful, the user will be redirected back to the reset password screen and the validation errors will be available to you via the shared `$errors` [Blade template variable](/docs/{{version}}/validation#quick-displaying-the-validation-errors). Or, in the case of an XHR request, the validation errors will be returned with a 422 HTTP response.

<a name="customizing-password-resets"></a>
### Customizing Password Resets

The password reset process may be customized by modifying the `App\Actions\ResetUserPassword` action that was generated when you installed Laravel Fortify.

<a name="email-verification"></a>
## Email Verification

After registration, you may wish for users to verify their email address before they continue accessing your application. To get started, ensure the `emailVerification` feature is enabled in your `fortify` configuration file's `features` array. Next, you should ensure that your `App\Models\User` class implements the `Illuminate\Contracts\Auth\MustVerifyEmail` interface.

Once these two setup steps have been completed, newly registered users will receive an email prompting them to verify their email address ownership. However, we need to inform Fortify how to display the email verification screen which informs the user that they need to go click the verification link in the email.

All of Fortify's view's rendering logic may be customized using the appropriate methods available via the `Laravel\Fortify\Fortify` class. Typically, you should call this method from the `boot` method of your application's `App\Providers\FortifyServiceProvider` class:

```php
use Laravel\Fortify\Fortify;

/**
 * Bootstrap any application services.
 */
public function boot(): void
{
    Fortify::verifyEmailView(function () {
        return view('auth.verify-email');
    });

    // ...
}
```

Fortify will take care of defining the route that displays this view when a user is redirected to the `/email/verify` endpoint by Laravel's built-in `verified` middleware.

Your `verify-email` template should include an informational message instructing the user to click the email verification link that was sent to their email address.

<a name="resending-email-verification-links"></a>
#### Resending Email Verification Links

If you wish, you may add a button to your application's `verify-email` template that triggers a POST request to the `/email/verification-notification` endpoint. When this endpoint receives a request, a new verification email link will be emailed to the user, allowing the user to get a new verification link if the previous one was accidentally deleted or lost.

If the request to resend the verification link email was successful, Fortify will redirect the user back to the `/email/verify` endpoint with a `status` session variable, allowing you to display an informational message to the user informing them the operation was successful. If the request was an XHR request, a 202 HTTP response will be returned:

```blade
@if (session('status') == 'verification-link-sent')
    <div class="mb-4 font-medium text-sm text-green-600">
        A new email verification link has been emailed to you!
    </div>
@endif
```

<a name="protecting-routes"></a>
### Protecting Routes

To specify that a route or group of routes requires that the user has verified their email address, you should attach Laravel's built-in `verified` middleware to the route. The `verified` middleware alias is automatically registered by Laravel and serves as an alias for the `Illuminate\Auth\Middleware\EnsureEmailIsVerified` middleware:

```php
Route::get('/dashboard', function () {
    // ...
})->middleware(['verified']);
```

<a name="password-confirmation"></a>
## Password Confirmation

While building your application, you may occasionally have actions that should require the user to confirm their password before the action is performed. Typically, these routes are protected by Laravel's built-in `password.confirm` middleware.

To begin implementing password confirmation functionality, we need to instruct Fortify how to return our application's "password confirmation" view. Remember, Fortify is a headless authentication library. If you would like a frontend implementation of Laravel's authentication features that are already completed for you, you should use an [application starter kit](/docs/{{version}}/starter-kits).

All of Fortify's view rendering logic may be customized using the appropriate methods available via the `Laravel\Fortify\Fortify` class. Typically, you should call this method from the `boot` method of your application's `App\Providers\FortifyServiceProvider` class:

```php
use Laravel\Fortify\Fortify;

/**
 * Bootstrap any application services.
 */
public function boot(): void
{
    Fortify::confirmPasswordView(function () {
        return view('auth.confirm-password');
    });

    // ...
}
```

Fortify will take care of defining the `/user/confirm-password` endpoint that returns this view. Your `confirm-password` template should include a form that makes a POST request to the `/user/confirm-password` endpoint. The `/user/confirm-password` endpoint expects a `password` field that contains the user's current password.

If the password matches the user's current password, Fortify will redirect the user to the route they were attempting to access. If the request was an XHR request, a 201 HTTP response will be returned.

If the request was not successful, the user will be redirected back to the confirm password screen and the validation errors will be available to you via the shared `$errors` Blade template variable. Or, in the case of an XHR request, the validation errors will be returned with a 422 HTTP response.


---

# Frontend

*Sección: Laravel | Origen: https://laravel.com/docs/13.x/frontend*

- [Introduction](#introduction)
- [Using PHP](#using-php)
    - [PHP and Blade](#php-and-blade)
    - [Livewire](#livewire)
    - [Starter Kits](#php-starter-kits)
- [Using React, Svelte, or Vue](#using-react-svelte-or-vue)
    - [Inertia](#inertia)
    - [Starter Kits](#inertia-starter-kits)
- [Bundling Assets](#bundling-assets)

<a name="introduction"></a>
## Introduction

Laravel is a backend framework that provides all of the features you need to build modern web applications, such as [routing](/docs/{{version}}/routing), [validation](/docs/{{version}}/validation), [caching](/docs/{{version}}/cache), [queues](/docs/{{version}}/queues), [file storage](/docs/{{version}}/filesystem), and more. However, we believe it's important to offer developers a beautiful full-stack experience, including powerful approaches for building your application's frontend.

There are two primary ways to tackle frontend development when building an application with Laravel, and which approach you choose is determined by whether you would like to build your frontend by leveraging PHP or by using JavaScript frameworks such as React, Svelte, and Vue. We'll discuss both of these options below so that you can make an informed decision regarding the best approach to frontend development for your application.

<a name="using-php"></a>
## Using PHP

<a name="php-and-blade"></a>
### PHP and Blade

In the past, most PHP applications rendered HTML to the browser using simple HTML templates interspersed with PHP `echo` statements which render data that was retrieved from a database during the request:

```blade
<div>
    <?php foreach ($users as $user): ?>
        Hello, <?php echo $user->name; ?> <br />
    <?php endforeach; ?>
</div>
```

In Laravel, this approach to rendering HTML can still be achieved using [views](/docs/{{version}}/views) and [Blade](/docs/{{version}}/blade). Blade is an extremely light-weight templating language that provides convenient, short syntax for displaying data, iterating over data, and more:

```blade
<div>
    @foreach ($users as $user)
        Hello, {{ $user->name }} <br />
    @endforeach
</div>
```

When building applications in this fashion, form submissions and other page interactions typically receive an entirely new HTML document from the server and the entire page is re-rendered by the browser. Even today, many applications may be perfectly suited to having their frontends constructed in this way using simple Blade templates.

<a name="growing-expectations"></a>
#### Growing Expectations

However, as user expectations regarding web applications have matured, many developers have found the need to build more dynamic frontends with interactions that feel more polished. In light of this, some developers choose to begin building their application's frontend using JavaScript frameworks such as React, Svelte, and Vue.

Others, preferring to stick with the backend language they are comfortable with, have developed solutions that allow the construction of modern web application UIs while still primarily utilizing their backend language of choice. For example, in the [Rails](https://rubyonrails.org/) ecosystem, this has spurred the creation of libraries such as [Turbo](https://turbo.hotwired.dev/) [Hotwire](https://hotwired.dev/), and [Stimulus](https://stimulus.hotwired.dev/).

Within the Laravel ecosystem, the need to create modern, dynamic frontends by primarily using PHP has led to the creation of [Laravel Livewire](https://livewire.laravel.com) and [Alpine.js](https://alpinejs.dev/).

<a name="livewire"></a>
### Livewire

[Laravel Livewire](https://livewire.laravel.com) is a framework for building Laravel powered frontends that feel dynamic, modern, and alive just like frontends built with modern JavaScript frameworks like React, Svelte, and Vue.

When using Livewire, you will create Livewire "components" that render a discrete portion of your UI and expose methods and data that can be invoked and interacted with from your application's frontend. For example, a simple "Counter" component might look like the following:

```php
<?php

use Livewire\Component;

new class extends Component
{
    public $count = 0;

    public function increment()
    {
        $this->count++;
    }
};
?>

<div>
    <button wire:click="increment">+</button>
    <h1>{{ $count }}</h1>
</div>

```

As you can see, Livewire enables you to write new HTML attributes such as `wire:click` that connect your Laravel application's frontend and backend. In addition, you can render your component's current state using simple Blade expressions.

For many, Livewire has revolutionized frontend development with Laravel, allowing them to stay within the comfort of Laravel while constructing modern, dynamic web applications. Typically, developers using Livewire will also utilize [Alpine.js](https://alpinejs.dev/) to "sprinkle" JavaScript onto their frontend only where it is needed, such as in order to render a dialog window.

If you're new to Laravel, we recommend getting familiar with the basic usage of [views](/docs/{{version}}/views) and [Blade](/docs/{{version}}/blade). Then, consult the official [Laravel Livewire documentation](https://livewire.laravel.com/docs) to learn how to take your application to the next level with interactive Livewire components.

<a name="php-starter-kits"></a>
### Starter Kits

If you would like to build your frontend using PHP and Livewire, you can leverage our [Livewire starter kit](/docs/{{version}}/starter-kits) to jump-start your application's development.

<a name="using-react-svelte-or-vue"></a>
## Using React, Svelte, or Vue

Although it's possible to build modern frontends using Laravel and Livewire, many developers still prefer to leverage the power of a JavaScript framework like React, Svelte, or Vue. This allows developers to take advantage of the rich ecosystem of JavaScript packages and tools available via NPM.

However, without additional tooling, pairing Laravel with React, Svelte, or Vue would leave us needing to solve a variety of complicated problems such as client-side routing, data hydration, and authentication. Client-side routing is often simplified by using opinionated React / Svelte / Vue frameworks such as [Next](https://nextjs.org/) and [Nuxt](https://nuxt.com/); however, data hydration and authentication remain complicated and cumbersome problems to solve when pairing a backend framework like Laravel with these frontend frameworks.

In addition, developers are left maintaining two separate code repositories, often needing to coordinate maintenance, releases, and deployments across both repositories. While these problems are not insurmountable, we don't believe it's a productive or enjoyable way to develop applications.

<a name="inertia"></a>
### Inertia

Thankfully, Laravel offers the best of both worlds. [Inertia](https://inertiajs.com) bridges the gap between your Laravel application and your modern React, Svelte, or Vue frontend, allowing you to build full-fledged, modern frontends using React, Svelte, or Vue while leveraging Laravel routes and controllers for routing, data hydration, and authentication — all within a single code repository. With this approach, you can enjoy the full power of both Laravel and React / Svelte / Vue without crippling the capabilities of either tool.

After installing Inertia into your Laravel application, you will write routes and controllers like normal. However, instead of returning a Blade template from your controller, you will return an Inertia page:

```php
<?php

namespace App\Http\Controllers;

use App\Models\User;
use Inertia\Inertia;
use Inertia\Response;

class UserController extends Controller
{
    /**
     * Show the profile for a given user.
     */
    public function show(string $id): Response
    {
        return Inertia::render('users/show', [
            'user' => User::findOrFail($id)
        ]);
    }
}
```

An Inertia page corresponds to a React, Svelte, or Vue component, typically stored within the `resources/js/pages` directory of your application. The data given to the page via the `Inertia::render` method will be used to hydrate the "props" of the page component:

```jsx
import Layout from '@/layouts/authenticated';
import { Head } from '@inertiajs/react';

export default function Show({ user }) {
    return (
        <Layout>
            <Head title="Welcome" />
            <h1>Welcome</h1>
            <p>Hello {user.name}, welcome to Inertia.</p>
        </Layout>
    )
}
```

As you can see, Inertia allows you to leverage the full power of React, Svelte, or Vue when building your frontend, while providing a light-weight bridge between your Laravel powered backend and your JavaScript powered frontend.

#### Server-Side Rendering

If you're concerned about diving into Inertia because your application requires server-side rendering, don't worry. Inertia offers [server-side rendering support](https://inertiajs.com/server-side-rendering). And, when deploying your application via [Laravel Cloud](https://cloud.laravel.com) or [Laravel Forge](https://forge.laravel.com), it's a breeze to ensure that Inertia's server-side rendering process is always running.

<a name="inertia-starter-kits"></a>
### Starter Kits

If you would like to build your frontend using Inertia and React / Svelte / Vue, you can leverage our [React, Svelte, or Vue application starter kits](/docs/{{version}}/starter-kits) to jump-start your application's development. All of these starter kits scaffold your application's backend and frontend authentication flow using Inertia, React / Svelte / Vue, [Tailwind](https://tailwindcss.com), and [Vite](https://vitejs.dev) so that you can start building your next big idea.

<a name="bundling-assets"></a>
## Bundling Assets

Regardless of whether you choose to develop your frontend using Blade and Livewire or React / Svelte / Vue and Inertia, you will likely need to bundle your application's CSS into production-ready assets. Of course, if you choose to build your application's frontend with React, Svelte, or Vue, you will also need to bundle your components into browser ready JavaScript assets.

By default, Laravel utilizes [Vite](https://vitejs.dev) to bundle your assets. Vite provides lightning-fast build times and near instantaneous Hot Module Replacement (HMR) during local development. In all new Laravel applications, including those using our [starter kits](/docs/{{version}}/starter-kits), you will find a `vite.config.js` file that loads our light-weight Laravel Vite plugin that makes Vite a joy to use with Laravel applications.

The fastest way to get started with Laravel and Vite is by beginning your application's development using [our application starter kits](/docs/{{version}}/starter-kits), which jump-starts your application by providing frontend and backend authentication scaffolding.

> [!NOTE]
> For more detailed documentation on utilizing Vite with Laravel, please see our [dedicated documentation on bundling and compiling your assets](/docs/{{version}}/vite).


---

# Hashing

*Sección: Laravel | Origen: https://laravel.com/docs/13.x/hashing*

- [Introduction](#introduction)
- [Configuration](#configuration)
- [Basic Usage](#basic-usage)
    - [Hashing Passwords](#hashing-passwords)
    - [Verifying That a Password Matches a Hash](#verifying-that-a-password-matches-a-hash)
    - [Determining if a Password Needs to be Rehashed](#determining-if-a-password-needs-to-be-rehashed)
- [Hash Algorithm Verification](#hash-algorithm-verification)

<a name="introduction"></a>
## Introduction

The Laravel `Hash` [facade](/docs/{{version}}/facades) provides secure Bcrypt and Argon2 hashing for storing user passwords. If you are using one of the [Laravel application starter kits](/docs/{{version}}/starter-kits), Bcrypt will be used for registration and authentication by default.

Bcrypt is a great choice for hashing passwords because its "work factor" is adjustable, which means that the time it takes to generate a hash can be increased as hardware power increases. When hashing passwords, slow is good. The longer an algorithm takes to hash a password, the longer it takes malicious users to generate "rainbow tables" of all possible string hash values that may be used in brute force attacks against applications.

<a name="configuration"></a>
## Configuration

By default, Laravel uses the `bcrypt` hashing driver when hashing data. However, several other hashing drivers are supported, including [argon](https://en.wikipedia.org/wiki/Argon2) and [argon2id](https://en.wikipedia.org/wiki/Argon2).

You may specify your application's hashing driver using the `HASH_DRIVER` environment variable. But, if you want to customize all of Laravel's hashing driver options, you should publish the complete `hashing` configuration file using the `config:publish` Artisan command:

```shell
php artisan config:publish hashing
```

<a name="basic-usage"></a>
## Basic Usage

<a name="hashing-passwords"></a>
### Hashing Passwords

You may hash a password by calling the `make` method on the `Hash` facade:

```php
<?php

namespace App\Http\Controllers;

use Illuminate\Http\RedirectResponse;
use Illuminate\Http\Request;
use Illuminate\Support\Facades\Hash;

class PasswordController extends Controller
{
    /**
     * Update the password for the user.
     */
    public function update(Request $request): RedirectResponse
    {
        // Validate the new password length...

        $request->user()->fill([
            'password' => Hash::make($request->newPassword)
        ])->save();

        return redirect('/profile');
    }
}
```

<a name="adjusting-the-bcrypt-work-factor"></a>
#### Adjusting The Bcrypt Work Factor

If you are using the Bcrypt algorithm, the `make` method allows you to manage the work factor of the algorithm using the `rounds` option; however, the default work factor managed by Laravel is acceptable for most applications:

```php
$hashed = Hash::make('password', [
    'rounds' => 12,
]);
```

<a name="adjusting-the-argon2-work-factor"></a>
#### Adjusting The Argon2 Work Factor

If you are using the Argon2 algorithm, the `make` method allows you to manage the work factor of the algorithm using the `memory`, `time`, and `threads` options; however, the default values managed by Laravel are acceptable for most applications:

```php
$hashed = Hash::make('password', [
    'memory' => 1024,
    'time' => 2,
    'threads' => 2,
]);
```

> [!NOTE]
> For more information on these options, please refer to the [official PHP documentation regarding Argon hashing](https://secure.php.net/manual/en/function.password-hash.php).

<a name="verifying-that-a-password-matches-a-hash"></a>
### Verifying That a Password Matches a Hash

The `check` method provided by the `Hash` facade allows you to verify that a given plain-text string corresponds to a given hash:

```php
if (Hash::check('plain-text', $hashedPassword)) {
    // The passwords match...
}
```

<a name="determining-if-a-password-needs-to-be-rehashed"></a>
### Determining if a Password Needs to be Rehashed

The `needsRehash` method provided by the `Hash` facade allows you to determine if the work factor used by the hasher has changed since the password was hashed. Some applications choose to perform this check during the application's authentication process:

```php
if (Hash::needsRehash($hashed)) {
    $hashed = Hash::make('plain-text');
}
```

<a name="hash-algorithm-verification"></a>
## Hash Algorithm Verification

To prevent hash algorithm manipulation, Laravel's `Hash::check` method will first verify the given hash was generated using the application's selected hashing algorithm. If the algorithms are different, a `RuntimeException` exception will be thrown.

This is the expected behavior for most applications, where the hashing algorithm is not expected to change and different algorithms can be an indication of a malicious attack. However, if you need to support multiple hashing algorithms within your application, such as when migrating from one algorithm to another, you can disable hash algorithm verification by setting the `HASH_VERIFY` environment variable to `false`:

```ini
HASH_VERIFY=false
```


---

# Laravel Head

*Sección: Laravel | Origen: https://laravel.com/docs/13.x/head*

- [Introduction](#introduction)
- [Installation](#installation)
- [Quickstart](#quickstart)
- [Resolution Precedence](#resolution-precedence)
- [Defining Metadata](#defining-metadata)
    - [Defaults](#defaults)
    - [Route Metadata](#route-metadata)
    - [Runtime Metadata](#runtime-metadata)
    - [Error Pages](#error-pages)
- [Open Graph](#open-graph)
    - [X / Twitter Cards](#twitter-cards)
- [Theme Colors](#theme-colors)
- [Application Metadata and Icons](#app-metadata-and-icons)
- [Progressive Web Apps](#progressive-web-apps)
- [Performance and Discovery](#performance-and-discovery)
- [Custom Tags](#custom-tags)
- [Schemas](#schemas)
    - [Breadcrumbs](#breadcrumbs)
    - [FAQs](#faqs)
    - [Custom Schemas](#custom-schemas)
- [Rendering](#rendering)
    - [Blade](#blade)
    - [Livewire](#livewire)
    - [Inertia](#inertia)

<a name="introduction"></a>
## Introduction

[Laravel Head](https://github.com/laravel/head) provides a fluent API for managing your application's document `<head>` element, including title and meta tags, Open Graph metadata, canonical URLs, robots directives, performance hints, and structured data. It works with Blade, Livewire, and Inertia.

<a name="installation"></a>
## Installation

You may install Laravel Head using the Composer package manager:

```shell
composer require laravel/head
```

<a name="quickstart"></a>
## Quickstart

Register site-wide defaults in a service provider:

```php
use Laravel\Head\Facades\Head;
use Laravel\Head\HeadBuilder;

Head::defaults(fn (HeadBuilder $head) => $head
    ->title('Laravel', suffix: ' - Laravel')
    ->description('Build something great.'));
```

Set page-specific metadata at runtime:

```php
Head::title($post->title)
    ->description($post->description);
```

Render the resolved tags in your layout:

```blade
<head>
    @head
</head>
```

<a name="resolution-precedence"></a>
## Resolution Precedence

Page metadata resolves from five layers, listed from lowest to highest priority:

1. Page defaults
2. Route group metadata
3. Route metadata
4. Runtime metadata
5. Error metadata

Higher layers replace lower layers field by field. For example, a runtime title replaces the route title without replacing the route description. The sections that follow describe how to set metadata at each layer. For information about rendering the resolved metadata in Blade, Livewire, and Inertia, see [Rendering](#rendering).

<a name="defining-metadata"></a>
## Defining Metadata

Laravel Head allows you to define metadata using site-wide defaults, route metadata, runtime calls, and error page definitions.

<a name="defaults"></a>
### Defaults

Register page defaults in a service provider:

```php
use Laravel\Head\Enums\OgType;
use Laravel\Head\Facades\Head;
use Laravel\Head\HeadBuilder;

Head::defaults(function (HeadBuilder $head) {
    $head
        ->title('Laravel', suffix: ' - Laravel')
        ->description('Build something great.')
        ->canonical()
        ->og(siteName: 'Laravel', type: OgType::Website)
        ->searchableByRobots()
        ->preconnect('https://fonts.example.com');
});
```

Defaults are the lowest-priority page metadata layer. If no route, runtime, or error metadata sets a title, `Laravel` renders as-is. When a higher layer sets a page title, the inherited suffix is applied, so `Head::title('About')` renders `About - Laravel`. Pass `exact: true` for titles that should ignore an inherited prefix or suffix.

Calling `Head::canonical()` renders a canonical URL using the current request URL. To set an explicit URL, pass a string such as `Head::canonical('/about')`. Canonical URLs are normalized to `https` by default; pass `forceHttps: false` to preserve the request scheme.

Robots directives may be passed as a raw string, as `RobotsRule` enum cases, or as a list mixing both forms. Lists are rendered as comma-separated directives, so `Head::robots([RobotsRule::NoIndex, RobotsRule::NoFollow])` renders `noindex, nofollow`.

For convenience, the `searchableByRobots` method renders `all`, while the `hiddenFromRobots` method renders `none`.

<a name="route-metadata"></a>
### Route Metadata

You may define metadata directly on routes, which is especially useful for semi-static pages whose metadata is known ahead of time.

<a name="routes-and-groups"></a>
#### Routes and Groups

```php
Route::view('/contact', 'contact')
    ->name('contact')
    ->withHead(
        title: 'Contact Us',
        description: 'Get in touch.',
    );
```

Shared route metadata may be applied to a group at any position in the chain:

```php
Route::withHead(robots: 'noindex, nofollow')
    ->prefix('admin')
    ->name('admin.')
    ->group(function () {
        Route::get('/dashboard', DashboardController::class)
            ->name('dashboard')
            ->withHead(title: 'Dashboard');
    });
```

You may also define metadata for resource and singleton routes:

```php
Route::resource('posts', PostController::class)->withHead(
    robots: 'index, follow',
);

Route::singleton('profile', ProfileController::class)->withHead(
    title: 'Your Profile',
);
```

The `withHead` method stores plain arrays through Laravel's native route metadata API. It is equivalent to calling the `metadata` method with the attributes nested under a `head` key, so the metadata remains compatible with cached routes.

The named arguments are intentionally limited to Laravel Head's built-in route properties so editors and static analysis can catch misspelled names. Route attributes registered by custom tag builders may be passed through `extensions`:

```php
Route::get('/article', ArticleController::class)->withHead(
    title: 'Article',
    extensions: ['readingTime' => 4],
);
```

<a name="supported-properties"></a>
#### Supported Properties

The supported route properties map to the same names as the fluent builder methods:

| Category | Properties |
| --- | --- |
| Document | `title`, `description`, `canonical`, `robots` |
| Application metadata | `themeColor`, `applicationName`, `colorScheme`, `referrer`, `viewport`, `appleWebAppTitle`, `webAppCapable`, `appleWebAppStatusBarStyle` |
| Social | `og`, `ogImage`, `ogVideo`, `ogAudio`, `twitter`, `twitterImage` |
| Performance | `preload`, `prefetch`, `preconnect`, `dnsPrefetch` |
| Discovery | `alternates`, `feed`, `icon`, `favicon`, `appleTouchIcon`, `appleTouchStartupImage`, `maskIcon`, `manifest` |
| Structured data | `schema` |
| Custom tags | `meta`, `link` |

Nested option names use the same `camelCase` naming as the fluent API, such as `forceHttps`, `siteName`, and `secureUrl`.

Repeatable properties, such as `ogImage`, `preload`, `feed`, `schema`, `icon`, and `appleTouchStartupImage`, accept either a single value or a list.

<a name="runtime-metadata"></a>
### Runtime Metadata

When a value isn't known until a request arrives, such as the title of a post being viewed, you may set it at runtime:

```php
use Laravel\Head\Facades\Head;

public function __invoke(Post $post): Response
{
    Head::title($post->title);

    // ...
}
```

Runtime calls made via the `Head` facade override route metadata for request-dependent data. Controllers and actions are the most common places to make these calls:

```php
use App\Models\Post;
use Laravel\Head\Facades\Head;

public function show(Post $post)
{
    Head::title($post->title)
        ->description($post->description);

    return view('posts.show', ['post' => $post]);
}
```

Multiple runtime calls are merged in the order they run. For single-value fields such as title, description, canonical URL, and robots directives, the later call takes precedence. Repeatable fields retain multiple entries, but adding the same key again updates the earlier entry. For the `ogImage` method, the URL is the key:

```php
Head::ogImage('/images/cover.jpg', alt: 'Draft cover')
    ->ogImage('/images/gallery.jpg', alt: 'Gallery image')
    ->ogImage('/images/cover.jpg', alt: 'Final cover', width: 1200, height: 630);
```

```html
<meta property="og:image" content="/images/cover.jpg">
<meta property="og:image:width" content="1200">
<meta property="og:image:height" content="630">
<meta property="og:image:alt" content="Final cover">
<meta property="og:image" content="/images/gallery.jpg">
<meta property="og:image:alt" content="Gallery image">
```

Open Graph media inherited from your defaults acts as a fallback. When route, runtime, or error metadata defines its own media of the same type, the default media is replaced instead of merged, so a page's `og:image` takes precedence over a site-wide default image.

You may fluently define conditional metadata using the `when` and `unless` methods:

```php
Head::title($post->title)
    ->when($post->isDraft(), fn ($head) => $head->hiddenFromRobots());
```

<a name="error-pages"></a>
### Error Pages

Typically, you should register error metadata within the `boot` method of your application's `AppServiceProvider` class:

```php
use Laravel\Head\ErrorPages;
use Laravel\Head\Facades\Head;

/**
 * Bootstrap any application services.
 */
public function boot(): void
{
    Head::errors(function (ErrorPages $errors) {
        $errors->defaults(robots: 'noindex, follow');

        $errors->status(
            404,
            title: 'Page Not Found',
            description: 'The page you are looking for could not be found.',
        );
    });
}
```

The `defaults` and `status` methods also accept the same fluent builder callback used by `Head::defaults()`:

```php
use Laravel\Head\ErrorPages;
use Laravel\Head\Facades\Head;
use Laravel\Head\HeadBuilder;

Head::errors(function (ErrorPages $errors) {
    $errors->status(404, fn (HeadBuilder $head) => $head
        ->title('Page Not Found')
        ->description('The page you are looking for could not be found.'));
});
```

When a response is rendered for a registered error status, that metadata takes precedence over every other layer.

Laravel automatically detects the response status when rendering an error view or executing a respond-phase hook such as Inertia's `handleExceptionsUsing()` method. If you render an error response inside an `$exceptions->render()` callback, call `Head::status(404)` before rendering so the error metadata is applied.

<a name="open-graph"></a>
## Open Graph

You may set Open Graph properties using the `og` method. Repeatable media may be added using the top-level methods, which accept named arguments directly:

```php
use Laravel\Head\Enums\ImageType;
use Laravel\Head\Enums\OgType;

Head::og(type: OgType::Article, title: $post->title)
    ->ogImage($post->hero_image_url)
    ->ogImage(
        $post->gallery_image_url,
        alt: $post->gallery_image_alt,
        width: 1200,
        height: 630,
        type: ImageType::Jpeg,
    );
```

The `ogImage`, `ogVideo`, and `ogAudio` methods accept a URL as their first argument, along with optional named arguments such as `alt`, `width`, `height`, `type`, and `secureUrl` where supported by the Open Graph specification.

You may pass image MIME types as `ImageType` enum cases anywhere the API accepts an image `type`, such as `ImageType::Svg`, `ImageType::Png`, `ImageType::Jpeg`, and `ImageType::Webp`.

> [!NOTE]
> Document `title` and `description` automatically fill missing `og:title` and `og:description` values.

For a single Open Graph image with no other attributes, you may pass the `image` named argument to the `og` method:

```php
Head::og(
    type: OgType::Website,
    title: $page->title,
    description: $page->description,
    image: $page->og_image_url,
);
```

The `og(image: ...)` and `ogImage(...)` calls write to the same underlying image list, so you may use whichever is more expressive at the call site. You may use the [`meta`](#custom-tags) method for custom Open Graph extensions such as product or article properties.

<a name="twitter-cards"></a>
### X / Twitter Cards

To render X / Twitter cards from the same title, description, and image used by Open Graph, register `twitter()` in your defaults:

```php
use Laravel\Head\Enums\TwitterCard;
use Laravel\Head\Facades\Head;
use Laravel\Head\HeadBuilder;

Head::defaults(fn (HeadBuilder $head) => $head->twitter(
    card: TwitterCard::SummaryWithLargeImage,
));
```

Then set page-level metadata:

```php
Head::title('Introducing Laravel Head')
    ->description('A fluent API for Laravel document head metadata.')
    ->ogImage('https://example.com/social.jpg', alt: 'Introducing Laravel Head');
```

This renders matching Twitter tags:

```html
<meta name="twitter:card" content="summary_large_image">
<meta name="twitter:title" content="Introducing Laravel Head">
<meta name="twitter:description" content="A fluent API for Laravel document head metadata.">
<meta name="twitter:image" content="https://example.com/social.jpg">
<meta name="twitter:image:alt" content="Introducing Laravel Head">
```

You may customize individual pages with explicit Twitter values:

```php
Head::twitter(title: $post->social_title)
    ->twitterImage($post->social_image_url, alt: $post->title);
```

Route metadata accepts `twitter` and `twitterImage`.

<a name="theme-colors"></a>
## Theme Colors

You may set theme colors globally, per route, or at runtime:

```php
Head::themeColor('#0f172a');
```

This renders a `<meta name="theme-color">` tag. For media-specific theme colors, you may use the `Media` enum:

```php
use Laravel\Head\Enums\Media;

Head::themeColor('#ffffff', media: Media::Light)
    ->themeColor('#111827', media: Media::Dark);
```

The `Media` enum also includes `Portrait` and `Landscape`. The `media` argument also accepts a custom media query string.

Route metadata supports a single theme color through the same `camelCase` key:

```php
Route::view('/dashboard', 'dashboard')->withHead(
    themeColor: '#0f172a',
);
```

<a name="app-metadata-and-icons"></a>
## Application Metadata and Icons

Laravel Head includes methods for common browser and application metadata:

```php
use Laravel\Head\Enums\ImageType;
use Laravel\Head\Enums\Media;

Head::applicationName('Laravel')
    ->colorScheme('light dark')
    ->referrer('strict-origin-when-cross-origin')
    ->viewport('width=device-width, initial-scale=1')
    ->appleWebAppTitle('Laravel')
    ->webAppCapable()
    ->appleWebAppStatusBarStyle('black')
    ->favicon('/favicon.svg', type: ImageType::Svg)
    ->icon('/favicon-32x32.png', type: ImageType::Png, sizes: '32x32')
    ->appleTouchIcon('/apple-touch-icon.png', sizes: '180x180')
    ->appleTouchStartupImage('/launch.png', media: Media::Portrait)
    ->maskIcon('/safari-pinned-tab.svg', color: '#111827')
    ->manifest('/site.webmanifest');
```

The `favicon` method is an alias for the `icon` method and accepts the same `type`, `sizes`, and `media` arguments.

Route metadata uses the same names:

```php
use Laravel\Head\Enums\ImageType;
use Laravel\Head\Enums\Media;

Route::view('/dashboard', 'dashboard')->withHead(
    applicationName: 'Laravel',
    colorScheme: 'light dark',
    appleWebAppTitle: 'Laravel',
    webAppCapable: true,
    appleWebAppStatusBarStyle: 'black',
    favicon: [
        ['href' => '/favicon.svg', 'type' => ImageType::Svg],
        ['href' => '/favicon-32x32.png', 'type' => ImageType::Png, 'sizes' => '32x32'],
    ],
    appleTouchIcon: ['href' => '/apple-touch-icon.png', 'sizes' => '180x180'],
    appleTouchStartupImage: ['href' => '/launch.png', 'media' => Media::Portrait],
    manifest: '/site.webmanifest',
);
```

<a name="progressive-web-apps"></a>
## Progressive Web Apps

The `pwa` method configures the common document `<head>` tags needed for an installable web app:

```php
Head::pwa(
    name: 'Laravel',
    manifest: '/site.webmanifest',
    themeColor: '#0f172a',
    appleTouchIcon: '/apple-touch-icon.png',
    appleWebAppStatusBarStyle: 'black',
);
```

This renders the application name, web application manifest link, and iOS standalone metadata. If provided, the theme color, Apple status bar style, and Apple touch icon are also rendered. Creating the web application manifest and registering a service worker remain your application's responsibility.

You may use the `pwa` method in defaults or runtime metadata. Route metadata supports the individual properties shown above.

<a name="performance-and-discovery"></a>
## Performance and Discovery

Laravel Head renders performance hints, pagination links, locale alternates, and feed discovery:

```php
Head::preload(asset('fonts/inter.woff2'), as: 'font', crossorigin: true)
    ->prefetch(asset('images/next.webp'))
    ->preconnect('https://cdn.example.com')
    ->dnsPrefetch('https://analytics.example.com')
    ->paginate($posts)
    ->alternates([
        'en' => 'https://example.com/en/about',
        'fr' => 'https://example.com/fr/about',
        'x-default' => 'https://example.com/about',
    ])
    ->feed('/feed', title: 'Laravel RSS')
    ->feed('/feed.atom', type: 'atom', title: 'Laravel Atom');
```

For local assets, `preloadAsset()` and `prefetchAsset()` resolve the URL through the `asset()` helper and detect the `as` attribute from the file extension. Font preloads automatically include `crossorigin`, which the preload specification requires even for same-origin fonts:

```php
Head::preloadAsset('fonts/inter.woff2')
    ->prefetchAsset('images/next.webp');
```

```html
<link rel="preload" href="https://example.com/fonts/inter.woff2" as="font" crossorigin>
<link rel="prefetch" href="https://example.com/images/next.webp" as="image">
```

You may pass `as` explicitly to override detection. The `preloadAsset` method will throw an exception when the `as` attribute cannot be detected from the extension because browsers ignore preloads without this attribute; the `prefetchAsset` method will simply omit it.

<a name="custom-tags"></a>
## Custom Tags

For tags without a dedicated method, use `meta()` and `link()`:

```php
Head::meta('format-detection', 'telephone=no')
    ->meta('article:author', $post->author->name)
    ->link('search', '/opensearch.xml', [
        'type' => 'application/opensearchdescription+xml',
        'title' => 'Laravel Search',
    ])
    ->link('me', 'https://social.example.com/@laravel');
```

You may include a media query on a meta tag when the browser should only apply the tag under matching conditions:

```php
use Laravel\Head\Enums\Media;

Head::meta('theme-color', '#ffffff', media: Media::Light)
    ->meta('theme-color', '#111827', media: Media::Dark);
```

The `meta` method uses the `name` attribute for regular meta tags. For keys that typically use the `property` attribute, such as Open Graph (`og:`) or article metadata (`article:`), the method switches automatically:

```php
Head::meta('description', 'About Laravel')
    ->meta('og:title', 'About Laravel');
```

```html
<meta name="description" content="About Laravel">
<meta property="og:title" content="About Laravel">
```

You may pass `property: true` or `property: false` to explicitly select either attribute.

<a name="schemas"></a>
## Schemas

Built-in schema builders cover the common JSON-LD types:

```php
use Laravel\Head\Enums\OfferAvailability;
use Laravel\Head\Facades\Schema;

Head::schema(
    Schema::product()
        ->name($product->name)
        ->offers(
            Schema::offer()
                ->price($product->price)
                ->currency('USD')
                ->availability(OfferAvailability::InStock)
        )
);
```

The built-in factory methods are `article`, `blogPosting`, `product`, `offer`, `brand`, `breadcrumbs`, `faq`, `organization`, `person`, `webPage`, and `webSite`. Unknown factory methods create a generic schema object, so you can still express custom schema.org types.

When JSON-LD schema data is invalid, Laravel Head throws an exception in non-production environments and logs a warning in production.

<a name="breadcrumbs"></a>
### Breadcrumbs

Breadcrumb items may be added one at a time or in bulk. Positions are assigned automatically in the order the items are added:

```php
Head::schema(
    Schema::breadcrumbs()->items([
        'Home' => route('home'),
        'Shop' => route('shop.index'),
        'Shoes' => route('shop.category', 'shoes'),
    ])
);
```

You may use the `item` method to append a single breadcrumb item:

```php
Schema::breadcrumbs()
    ->item('Home', route('home'))
    ->item('Shop', route('shop.index'));
```

<a name="faqs"></a>
### FAQs

FAQ entries follow the same pattern. You may add them one at a time using the `question` method or in bulk using the `questions` method:

```php
Head::schema(
    Schema::faq()->questions([
        'What is Laravel Head?' => 'A fluent API for managing the document head.',
        'Is it free?' => 'Yes, it is open source.',
    ])
);
```

<a name="custom-schemas"></a>
### Custom Schemas

You may explicitly register custom schema types:

```php
use DateTimeInterface;
use Laravel\Head\Facades\Schema;
use Laravel\Head\Schema\SchemaObject;
use Laravel\Head\SchemaType;

#[SchemaType('JobPosting')]
class JobPosting extends SchemaObject
{
    public function title(string $title): static
    {
        return $this->set('title', $title);
    }

    public function datePosted(DateTimeInterface|string $date): static
    {
        return $this->date('datePosted', $date);
    }
}

Schema::register(JobPosting::class);

Head::schema(
    Schema::jobPosting()
        ->title('Senior Laravel Developer')
        ->datePosted(now())
);
```

<a name="rendering"></a>
## Rendering

Laravel Head resolves page metadata into tags for the current response. How these tags are rendered depends on your application stack.

The HTML renderer powers the `@head` directive and the rendered elements that Laravel Head shares with Inertia via the `head` prop. The array renderer powers `Head::toArray()` for applications that need the resolved metadata as structured data.

<a name="blade"></a>
### Blade

Render the accumulated tags in your layout's `<head>` with the `@head` directive:

```blade
<head>
    <meta charset="utf-8">
    @head
</head>
```

The `@head` directive renders synchronously, so you should define page metadata before the layout is rendered.

<a name="livewire"></a>
### Livewire

Livewire applications use the same `@head` directive in their document layout:

```blade
<head>
    @head
</head>

<body>
    {{ $slot }}

    @livewireScripts
</body>
```

No Livewire-specific configuration is required. Laravel Head metadata is resolved per request, and the resolver is request-scoped. Therefore, each `wire:navigate` visit fetches a fresh document whose `@head` output reflects the destination route's metadata. Pages visited using `wire:navigate` receive the appropriate route, runtime, and error metadata without requiring component-level head code.

<a name="inertia"></a>
### Inertia

Use the same `@head` directive in your Inertia root template, alongside Inertia's own components:

```blade
<html>
<head>
    <meta charset="utf-8">
    @head

    @viteReactRefresh
    @vite(['resources/css/app.css', 'resources/js/app.tsx'])
    <x-inertia::head />
</head>
<body>
    <x-inertia::app />
</body>
</html>
```

When Inertia is installed, Laravel Head automatically shares the page-managed head as an array of rendered element strings under a `head` prop on every page object:

```json
{
    "props": {
        "head": [
            "<title data-inertia=\"title\">Dashboard - Laravel</title>",
            "<meta data-inertia=\"description\" name=\"description\" content=\"Your application overview.\">"
        ]
    }
}
```

Enable Inertia's `serverHead` option wherever your application calls `createInertiaApp()`. The option is available in Inertia 3.5 and later:

```js
createInertiaApp({
    // ...
    serverHead: true,
});
```

Each page-managed element has a stable `data-inertia` key. The `@head` directive renders the initial document, after which Inertia adopts those elements and keeps them synchronized during standard visits, [instant visits](https://inertiajs.com/docs/v3/the-basics/instant-visits), and back and forward navigation. The elements are present in the initial HTML response, so crawlers and link-preview bots can read them without executing JavaScript. No client-side `<Head>` component is required.

This works with or without [server-side rendering (SSR)](https://inertiajs.com/docs/v3/advanced/server-side-rendering). If your application has a separate SSR entry point, enable `serverHead` there too. Laravel Head automatically deduplicates page-managed elements between `@head` and `<x-inertia::head />`, regardless of their order, while preserving other head elements produced by JavaScript SSR.

> [!NOTE]
> When adding Laravel Head to an existing Inertia application, remove any title callbacks from `resources/js/app.tsx` and `resources/js/ssr.tsx` so Laravel Head can manage the final document title, and move tags managed by Inertia's [`<Head>` component](https://inertiajs.com/docs/v3/the-basics/title-and-meta) into Laravel Head so the two never define the same element.

The `head` prop is omitted from partial reload responses, so Inertia retains the last full page's head. Instant visits likewise retain the current head until the background response arrives. If your application already uses the `head` prop, change its name in a service provider:

```php
use Laravel\Head\Facades\Head;

public function boot(): void
{
    Head::inertia(prop: '_head');
}
```

Then point Inertia at the same prop with `serverHead: '_head'`.

<a name="static-inertia-tags"></a>
#### Static Inertia Tags

Most tags should live in defaults, route metadata, or runtime metadata so Laravel Head can resolve the right value for each page. Use Inertia globals only for document tags rendered in the first HTML response and left unchanged by Inertia for the rest of the session.

Register them in a service provider with `Head::inertiaGlobals()`:

```php
use Laravel\Head\Facades\Head;
use Laravel\Head\HeadBuilder;

Head::inertiaGlobals(function (HeadBuilder $head) {
    $head
        ->viewport('width=device-width, initial-scale=1')
        ->colorScheme('light dark')
        ->icon('/favicon.svg', type: 'image/svg+xml')
        ->appleTouchIcon('/apple-touch-icon.png', sizes: '180x180')
        ->manifest('/site.webmanifest');
});
```

Inertia globals are excluded from the `head` prop, rendered without `data-inertia` ownership attributes, and never updated after the first response. These globals are suitable for stable browser hints such as viewport, color scheme, favicons, touch icons, and manifests. If a tag is page-specific, SEO-relevant, or may be overridden later, put it in `defaults`, route metadata, or runtime metadata instead.

Applications that need the resolved metadata as structured data instead of rendered tags may call `Head::toArray()`. The returned data includes titles, Open Graph values, JSON-LD schemas, and other resolved metadata.


---

# Helpers

*Sección: Laravel | Origen: https://laravel.com/docs/13.x/helpers*

- [Introduction](#introduction)
- [Available Methods](#available-methods)
- [Other Utilities](#other-utilities)
    - [Benchmarking](#benchmarking)
    - [Dates and Time](#dates)
    - [Deferred Functions](#deferred-functions)
    - [Lottery](#lottery)
    - [Pipeline](#pipeline)
    - [Sleep](#sleep)
    - [Timebox](#timebox)
    - [URI](#uri)

<a name="introduction"></a>
## Introduction

Laravel includes a variety of global "helper" PHP functions. Many of these functions are used by the framework itself; however, you are free to use them in your own applications if you find them convenient.

<a name="available-methods"></a>
## Available Methods

<style>
    .collection-method-list > p {
        columns: 10.8em 3; -moz-columns: 10.8em 3; -webkit-columns: 10.8em 3;
    }

    .collection-method-list a {
        display: block;
        overflow: hidden;
        text-overflow: ellipsis;
        white-space: nowrap;
    }
</style>

<a name="arrays-and-objects-method-list"></a>
### Arrays & Objects

<div class="collection-method-list" markdown="1">

[Arr::accessible](#method-array-accessible)
[Arr::add](#method-array-add)
[Arr::array](#method-array-array)
[Arr::boolean](#method-array-boolean)
[Arr::collapse](#method-array-collapse)
[Arr::crossJoin](#method-array-crossjoin)
[Arr::divide](#method-array-divide)
[Arr::dot](#method-array-dot)
[Arr::every](#method-array-every)
[Arr::except](#method-array-except)
[Arr::exceptValues](#method-array-except-values)
[Arr::exists](#method-array-exists)
[Arr::first](#method-array-first)
[Arr::flatten](#method-array-flatten)
[Arr::float](#method-array-float)
[Arr::forget](#method-array-forget)
[Arr::from](#method-array-from)
[Arr::get](#method-array-get)
[Arr::has](#method-array-has)
[Arr::hasAll](#method-array-hasall)
[Arr::hasAny](#method-array-hasany)
[Arr::integer](#method-array-integer)
[Arr::isAssoc](#method-array-isassoc)
[Arr::isList](#method-array-islist)
[Arr::join](#method-array-join)
[Arr::keyBy](#method-array-keyby)
[Arr::last](#method-array-last)
[Arr::map](#method-array-map)
[Arr::mapSpread](#method-array-map-spread)
[Arr::mapWithKeys](#method-array-map-with-keys)
[Arr::only](#method-array-only)
[Arr::onlyValues](#method-array-only-values)
[Arr::partition](#method-array-partition)
[Arr::pluck](#method-array-pluck)
[Arr::prepend](#method-array-prepend)
[Arr::prependKeysWith](#method-array-prependkeyswith)
[Arr::pull](#method-array-pull)
[Arr::push](#method-array-push)
[Arr::query](#method-array-query)
[Arr::random](#method-array-random)
[Arr::reject](#method-array-reject)
[Arr::select](#method-array-select)
[Arr::set](#method-array-set)
[Arr::shuffle](#method-array-shuffle)
[Arr::sole](#method-array-sole)
[Arr::some](#method-array-some)
[Arr::sort](#method-array-sort)
[Arr::sortDesc](#method-array-sort-desc)
[Arr::sortRecursive](#method-array-sort-recursive)
[Arr::string](#method-array-string)
[Arr::take](#method-array-take)
[Arr::toCssClasses](#method-array-to-css-classes)
[Arr::toCssStyles](#method-array-to-css-styles)
[Arr::undot](#method-array-undot)
[Arr::where](#method-array-where)
[Arr::whereNotNull](#method-array-where-not-null)
[Arr::wrap](#method-array-wrap)
[data_fill](#method-data-fill)
[data_get](#method-data-get)
[data_set](#method-data-set)
[data_forget](#method-data-forget)
[head](#method-head)
[last](#method-last)
</div>

<a name="numbers-method-list"></a>
### Numbers

<div class="collection-method-list" markdown="1">

[Number::abbreviate](#method-number-abbreviate)
[Number::clamp](#method-number-clamp)
[Number::currency](#method-number-currency)
[Number::defaultCurrency](#method-default-currency)
[Number::defaultLocale](#method-default-locale)
[Number::fileSize](#method-number-file-size)
[Number::forHumans](#method-number-for-humans)
[Number::format](#method-number-format)
[Number::ordinal](#method-number-ordinal)
[Number::pairs](#method-number-pairs)
[Number::parse](#method-number-parse)
[Number::parseInt](#method-number-parse-int)
[Number::parseFloat](#method-number-parse-float)
[Number::percentage](#method-number-percentage)
[Number::spell](#method-number-spell)
[Number::spellOrdinal](#method-number-spell-ordinal)
[Number::trim](#method-number-trim)
[Number::useLocale](#method-number-use-locale)
[Number::withLocale](#method-number-with-locale)
[Number::useCurrency](#method-number-use-currency)
[Number::withCurrency](#method-number-with-currency)

</div>

<a name="paths-method-list"></a>
### Paths

<div class="collection-method-list" markdown="1">

[app_path](#method-app-path)
[base_path](#method-base-path)
[config_path](#method-config-path)
[database_path](#method-database-path)
[lang_path](#method-lang-path)
[public_path](#method-public-path)
[resource_path](#method-resource-path)
[storage_path](#method-storage-path)

</div>

<a name="urls-method-list"></a>
### URLs

<div class="collection-method-list" markdown="1">

[action](#method-action)
[asset](#method-asset)
[route](#method-route)
[secure_asset](#method-secure-asset)
[secure_url](#method-secure-url)
[to_action](#method-to-action)
[to_route](#method-to-route)
[uri](#method-uri)
[url](#method-url)

</div>

<a name="miscellaneous-method-list"></a>
### Miscellaneous

<div class="collection-method-list" markdown="1">

[abort](#method-abort)
[abort_if](#method-abort-if)
[abort_unless](#method-abort-unless)
[app](#method-app)
[auth](#method-auth)
[back](#method-back)
[bcrypt](#method-bcrypt)
[blank](#method-blank)
[broadcast](#method-broadcast)
[broadcast_if](#method-broadcast-if)
[broadcast_unless](#method-broadcast-unless)
[cache](#method-cache)
[class_uses_recursive](#method-class-uses-recursive)
[collect](#method-collect)
[config](#method-config)
[context](#method-context)
[cookie](#method-cookie)
[csrf_field](#method-csrf-field)
[csrf_token](#method-csrf-token)
[decrypt](#method-decrypt)
[dd](#method-dd)
[dispatch](#method-dispatch)
[dispatch_sync](#method-dispatch-sync)
[dump](#method-dump)
[encrypt](#method-encrypt)
[env](#method-env)
[event](#method-event)
[fake](#method-fake)
[filled](#method-filled)
[info](#method-info)
[literal](#method-literal)
[logger](#method-logger)
[method_field](#method-method-field)
[now](#method-now)
[old](#method-old)
[once](#method-once)
[optional](#method-optional)
[policy](#method-policy)
[redirect](#method-redirect)
[report](#method-report)
[report_if](#method-report-if)
[report_unless](#method-report-unless)
[request](#method-request)
[rescue](#method-rescue)
[resolve](#method-resolve)
[response](#method-response)
[retry](#method-retry)
[session](#method-session)
[tap](#method-tap)
[throw_if](#method-throw-if)
[throw_unless](#method-throw-unless)
[today](#method-today)
[trait_uses_recursive](#method-trait-uses-recursive)
[transform](#method-transform)
[validator](#method-validator)
[value](#method-value)
[view](#method-view)
[with](#method-with)
[when](#method-when)

</div>

<a name="arrays"></a>
## Arrays & Objects

<a name="method-array-accessible"></a>
#### `Arr::accessible()` {.collection-method .first-collection-method}

The `Arr::accessible` method determines if the given value is array accessible:

```php
use Illuminate\Support\Arr;
use Illuminate\Support\Collection;

$isAccessible = Arr::accessible(['a' => 1, 'b' => 2]);

// true

$isAccessible = Arr::accessible(new Collection);

// true

$isAccessible = Arr::accessible('abc');

// false

$isAccessible = Arr::accessible(new stdClass);

// false
```

<a name="method-array-add"></a>
#### `Arr::add()` {.collection-method}

The `Arr::add` method adds a given key / value pair to an array if the given key doesn't already exist in the array or is set to `null`:

```php
use Illuminate\Support\Arr;

$array = Arr::add(['name' => 'Desk'], 'price', 100);

// ['name' => 'Desk', 'price' => 100]

$array = Arr::add(['name' => 'Desk', 'price' => null], 'price', 100);

// ['name' => 'Desk', 'price' => 100]
```

<a name="method-array-array"></a>
#### `Arr::array()` {.collection-method}

The `Arr::array` method retrieves a value from a deeply nested array using "dot" notation (just as [Arr::get()](#method-array-get) does), but throws an `InvalidArgumentException` if the requested value is not an `array`:

```php
use Illuminate\Support\Arr;

$array = ['name' => 'Joe', 'languages' => ['PHP', 'Ruby']];

$value = Arr::array($array, 'languages');

// ['PHP', 'Ruby']

$value = Arr::array($array, 'name');

// throws InvalidArgumentException
```

<a name="method-array-boolean"></a>
#### `Arr::boolean()` {.collection-method}

The `Arr::boolean` method retrieves a value from a deeply nested array using "dot" notation (just as [Arr::get()](#method-array-get) does), but throws an `InvalidArgumentException` if the requested value is not a `boolean`:

```php
use Illuminate\Support\Arr;

$array = ['name' => 'Joe', 'available' => true];

$value = Arr::boolean($array, 'available');

// true

$value = Arr::boolean($array, 'name');

// throws InvalidArgumentException
```


<a name="method-array-collapse"></a>
#### `Arr::collapse()` {.collection-method}

The `Arr::collapse` method collapses an array of arrays or collections into a single array:

```php
use Illuminate\Support\Arr;

$array = Arr::collapse([[1, 2, 3], [4, 5, 6], [7, 8, 9]]);

// [1, 2, 3, 4, 5, 6, 7, 8, 9]
```

<a name="method-array-crossjoin"></a>
#### `Arr::crossJoin()` {.collection-method}

The `Arr::crossJoin` method cross joins the given arrays, returning a Cartesian product with all possible permutations:

```php
use Illuminate\Support\Arr;

$matrix = Arr::crossJoin([1, 2], ['a', 'b']);

/*
    [
        [1, 'a'],
        [1, 'b'],
        [2, 'a'],
        [2, 'b'],
    ]
*/

$matrix = Arr::crossJoin([1, 2], ['a', 'b'], ['I', 'II']);

/*
    [
        [1, 'a', 'I'],
        [1, 'a', 'II'],
        [1, 'b', 'I'],
        [1, 'b', 'II'],
        [2, 'a', 'I'],
        [2, 'a', 'II'],
        [2, 'b', 'I'],
        [2, 'b', 'II'],
    ]
*/
```

<a name="method-array-divide"></a>
#### `Arr::divide()` {.collection-method}

The `Arr::divide` method returns two arrays: one containing the keys and the other containing the values of the given array:

```php
use Illuminate\Support\Arr;

[$keys, $values] = Arr::divide(['name' => 'Desk']);

// $keys: ['name']

// $values: ['Desk']
```

<a name="method-array-dot"></a>
#### `Arr::dot()` {.collection-method}

The `Arr::dot` method flattens a multi-dimensional array into a single level array that uses "dot" notation to indicate depth:

```php
use Illuminate\Support\Arr;

$array = ['products' => ['desk' => ['price' => 100]]];

$flattened = Arr::dot($array);

// ['products.desk.price' => 100]
```

<a name="method-array-every"></a>
#### `Arr::every()` {.collection-method}

The `Arr::every` method ensures that all values in the array pass a given truth test:

```php
use Illuminate\Support\Arr;

$array = [1, 2, 3];

Arr::every($array, fn ($i) => $i > 0);

// true

Arr::every($array, fn ($i) => $i > 2);

// false
```

<a name="method-array-except"></a>
#### `Arr::except()` {.collection-method}

The `Arr::except` method removes the given key / value pairs from an array:

```php
use Illuminate\Support\Arr;

$array = ['name' => 'Desk', 'price' => 100];

$filtered = Arr::except($array, ['price']);

// ['name' => 'Desk']
```

<a name="method-array-except-values"></a>
#### `Arr::exceptValues()` {.collection-method}

The `Arr::exceptValues` method removes the specified values from an array:

```php
use Illuminate\Support\Arr;

$array = ['foo', 'bar', 'baz', 'qux'];

$filtered = Arr::exceptValues($array, ['foo', 'baz']);

// ['bar', 'qux']
```

You may also pass `true` to the `strict` argument to use strict type comparisons when filtering:

```php
use Illuminate\Support\Arr;

$array = [1, '1', 2, '2'];

$filtered = Arr::exceptValues($array, [1, 2], strict: true);

// ['1', '2']
```

<a name="method-array-exists"></a>
#### `Arr::exists()` {.collection-method}

The `Arr::exists` method checks that the given key exists in the provided array:

```php
use Illuminate\Support\Arr;

$array = ['name' => 'John Doe', 'age' => 17];

$exists = Arr::exists($array, 'name');

// true

$exists = Arr::exists($array, 'salary');

// false
```

<a name="method-array-first"></a>
#### `Arr::first()` {.collection-method}

The `Arr::first` method returns the first element of an array passing a given truth test:

```php
use Illuminate\Support\Arr;

$array = [100, 200, 300];

$first = Arr::first($array, function (int $value, int $key) {
    return $value >= 150;
});

// 200
```

A default value may also be passed as the third parameter to the method. This value will be returned if no value passes the truth test:

```php
use Illuminate\Support\Arr;

$first = Arr::first($array, $callback, $default);
```

<a name="method-array-flatten"></a>
#### `Arr::flatten()` {.collection-method}

The `Arr::flatten` method flattens a multi-dimensional array into a single level array:

```php
use Illuminate\Support\Arr;

$array = ['name' => 'Joe', 'languages' => ['PHP', 'Ruby']];

$flattened = Arr::flatten($array);

// ['Joe', 'PHP', 'Ruby']
```

<a name="method-array-float"></a>
#### `Arr::float()` {.collection-method}

The `Arr::float` method retrieves a value from a deeply nested array using "dot" notation (just as [Arr::get()](#method-array-get) does), but throws an `InvalidArgumentException` if the requested value is not a `float`:

```php
use Illuminate\Support\Arr;

$array = ['name' => 'Joe', 'balance' => 123.45];

$value = Arr::float($array, 'balance');

// 123.45

$value = Arr::float($array, 'name');

// throws InvalidArgumentException
```

<a name="method-array-forget"></a>
#### `Arr::forget()` {.collection-method}

The `Arr::forget` method removes a given key / value pairs from a deeply nested array using "dot" notation:

```php
use Illuminate\Support\Arr;

$array = ['products' => ['desk' => ['price' => 100]]];

Arr::forget($array, 'products.desk');

// ['products' => []]
```

<a name="method-array-from"></a>
#### `Arr::from()` {.collection-method}

The `Arr::from` method converts various input types into a plain PHP array. It supports a range of input types, including arrays, objects, and several common Laravel interfaces, such as `Arrayable`, `Enumerable`, `Jsonable`, and `JsonSerializable`. Additionally, it handles `Traversable` and `WeakMap` instances:

```php
use Illuminate\Support\Arr;

Arr::from((object) ['foo' => 'bar']); // ['foo' => 'bar']

class TestJsonableObject implements Jsonable
{
    public function toJson($options = 0)
    {
        return json_encode(['foo' => 'bar']);
    }
}

Arr::from(new TestJsonableObject); // ['foo' => 'bar']
```

<a name="method-array-get"></a>
#### `Arr::get()` {.collection-method}

The `Arr::get` method retrieves a value from a deeply nested array using "dot" notation:

```php
use Illuminate\Support\Arr;

$array = ['products' => ['desk' => ['price' => 100]]];

$price = Arr::get($array, 'products.desk.price');

// 100
```

The `Arr::get` method also accepts a default value, which will be returned if the specified key is not present in the array:

```php
use Illuminate\Support\Arr;

$discount = Arr::get($array, 'products.desk.discount', 0);

// 0
```

<a name="method-array-has"></a>
#### `Arr::has()` {.collection-method}

The `Arr::has` method checks whether a given item or items exists in an array using "dot" notation:

```php
use Illuminate\Support\Arr;

$array = ['product' => ['name' => 'Desk', 'price' => 100]];

$contains = Arr::has($array, 'product.name');

// true

$contains = Arr::has($array, ['product.price', 'product.discount']);

// false
```

<a name="method-array-hasall"></a>
#### `Arr::hasAll()` {.collection-method}

The `Arr::hasAll` method determines if all of the specified keys exist in the given array using "dot" notation:

```php
use Illuminate\Support\Arr;

$array = ['name' => 'Taylor', 'language' => 'PHP'];

Arr::hasAll($array, ['name']); // true
Arr::hasAll($array, ['name', 'language']); // true
Arr::hasAll($array, ['name', 'IDE']); // false
```

<a name="method-array-hasany"></a>
#### `Arr::hasAny()` {.collection-method}

The `Arr::hasAny` method checks whether any item in a given set exists in an array using "dot" notation:

```php
use Illuminate\Support\Arr;

$array = ['product' => ['name' => 'Desk', 'price' => 100]];

$contains = Arr::hasAny($array, 'product.name');

// true

$contains = Arr::hasAny($array, ['product.name', 'product.discount']);

// true

$contains = Arr::hasAny($array, ['category', 'product.discount']);

// false
```

<a name="method-array-integer"></a>
#### `Arr::integer()` {.collection-method}

The `Arr::integer` method retrieves a value from a deeply nested array using "dot" notation (just as [Arr::get()](#method-array-get) does), but throws an `InvalidArgumentException` if the requested value is not an `int`:

```php
use Illuminate\Support\Arr;

$array = ['name' => 'Joe', 'age' => 42];

$value = Arr::integer($array, 'age');

// 42

$value = Arr::integer($array, 'name');

// throws InvalidArgumentException
```

<a name="method-array-isassoc"></a>
#### `Arr::isAssoc()` {.collection-method}

The `Arr::isAssoc` method returns `true` if the given array is an associative array. An array is considered "associative" if it doesn't have sequential numerical keys beginning with zero:

```php
use Illuminate\Support\Arr;

$isAssoc = Arr::isAssoc(['product' => ['name' => 'Desk', 'price' => 100]]);

// true

$isAssoc = Arr::isAssoc([1, 2, 3]);

// false
```

<a name="method-array-islist"></a>
#### `Arr::isList()` {.collection-method}

The `Arr::isList` method returns `true` if the given array's keys are sequential integers beginning from zero:

```php
use Illuminate\Support\Arr;

$isList = Arr::isList(['foo', 'bar', 'baz']);

// true

$isList = Arr::isList(['product' => ['name' => 'Desk', 'price' => 100]]);

// false
```

<a name="method-array-join"></a>
#### `Arr::join()` {.collection-method}

The `Arr::join` method joins array elements with a string. Using this method's third argument, you may also specify the joining string for the final element of the array:

```php
use Illuminate\Support\Arr;

$array = ['Tailwind', 'Alpine', 'Laravel', 'Livewire'];

$joined = Arr::join($array, ', ');

// Tailwind, Alpine, Laravel, Livewire

$joined = Arr::join($array, ', ', ', and ');

// Tailwind, Alpine, Laravel, and Livewire
```

<a name="method-array-keyby"></a>
#### `Arr::keyBy()` {.collection-method}

The `Arr::keyBy` method keys the array by the given key. If multiple items have the same key, only the last one will appear in the new array:

```php
use Illuminate\Support\Arr;

$array = [
    ['product_id' => 'prod-100', 'name' => 'Desk'],
    ['product_id' => 'prod-200', 'name' => 'Chair'],
];

$keyed = Arr::keyBy($array, 'product_id');

/*
    [
        'prod-100' => ['product_id' => 'prod-100', 'name' => 'Desk'],
        'prod-200' => ['product_id' => 'prod-200', 'name' => 'Chair'],
    ]
*/
```

<a name="method-array-last"></a>
#### `Arr::last()` {.collection-method}

The `Arr::last` method returns the last element of an array passing a given truth test:

```php
use Illuminate\Support\Arr;

$array = [100, 200, 300, 110];

$last = Arr::last($array, function (int $value, int $key) {
    return $value >= 150;
});

// 300
```

A default value may be passed as the third argument to the method. This value will be returned if no value passes the truth test:

```php
use Illuminate\Support\Arr;

$last = Arr::last($array, $callback, $default);
```

<a name="method-array-map"></a>
#### `Arr::map()` {.collection-method}

The `Arr::map` method iterates through the array and passes each value and key to the given callback. The array value is replaced by the value returned by the callback:

```php
use Illuminate\Support\Arr;

$array = ['first' => 'james', 'last' => 'kirk'];

$mapped = Arr::map($array, function (string $value, string $key) {
    return ucfirst($value);
});

// ['first' => 'James', 'last' => 'Kirk']
```

<a name="method-array-map-spread"></a>
#### `Arr::mapSpread()` {.collection-method}

The `Arr::mapSpread` method iterates over the array, passing each nested item value into the given closure. The closure is free to modify the item and return it, thus forming a new array of modified items:

```php
use Illuminate\Support\Arr;

$array = [
    [0, 1],
    [2, 3],
    [4, 5],
    [6, 7],
    [8, 9],
];

$mapped = Arr::mapSpread($array, function (int $even, int $odd) {
    return $even + $odd;
});

/*
    [1, 5, 9, 13, 17]
*/
```

<a name="method-array-map-with-keys"></a>
#### `Arr::mapWithKeys()` {.collection-method}

The `Arr::mapWithKeys` method iterates through the array and passes each value to the given callback. The callback should return an associative array containing a single key / value pair:

```php
use Illuminate\Support\Arr;

$array = [
    [
        'name' => 'John',
        'department' => 'Sales',
        'email' => 'john@example.com',
    ],
    [
        'name' => 'Jane',
        'department' => 'Marketing',
        'email' => 'jane@example.com',
    ]
];

$mapped = Arr::mapWithKeys($array, function (array $item, int $key) {
    return [$item['email'] => $item['name']];
});

/*
    [
        'john@example.com' => 'John',
        'jane@example.com' => 'Jane',
    ]
*/
```

<a name="method-array-only"></a>
#### `Arr::only()` {.collection-method}

The `Arr::only` method returns only the specified key / value pairs from the given array:

```php
use Illuminate\Support\Arr;

$array = ['name' => 'Desk', 'price' => 100, 'orders' => 10];

$slice = Arr::only($array, ['name', 'price']);

// ['name' => 'Desk', 'price' => 100]
```

<a name="method-array-only-values"></a>
#### `Arr::onlyValues()` {.collection-method}

The `Arr::onlyValues` method returns only the specified values from an array:

```php
use Illuminate\Support\Arr;

$array = ['foo', 'bar', 'baz', 'qux'];

$filtered = Arr::onlyValues($array, ['foo', 'baz']);

// ['foo', 'baz']
```

You may also pass `true` to the `strict` argument to use strict type comparisons when filtering:

```php
use Illuminate\Support\Arr;

$array = [1, '1', 2, '2'];

$filtered = Arr::onlyValues($array, [1, 2], strict: true);

// [1, 2]
```

<a name="method-array-partition"></a>
#### `Arr::partition()` {.collection-method}

The `Arr::partition` method may be combined with PHP array destructuring to separate elements that pass a given truth test from those that do not:

```php
<?php

use Illuminate\Support\Arr;

$numbers = [1, 2, 3, 4, 5, 6];

[$underThree, $equalOrAboveThree] = Arr::partition($numbers, function (int $i) {
    return $i < 3;
});

dump($underThree);

// [1, 2]

dump($equalOrAboveThree);

// [3, 4, 5, 6]
```

<a name="method-array-pluck"></a>
#### `Arr::pluck()` {.collection-method}

The `Arr::pluck` method retrieves all of the values for a given key from an array:

```php
use Illuminate\Support\Arr;

$array = [
    ['developer' => ['id' => 1, 'name' => 'Taylor']],
    ['developer' => ['id' => 2, 'name' => 'Abigail']],
];

$names = Arr::pluck($array, 'developer.name');

// ['Taylor', 'Abigail']
```

You may also specify how you wish the resulting list to be keyed:

```php
use Illuminate\Support\Arr;

$names = Arr::pluck($array, 'developer.name', 'developer.id');

// [1 => 'Taylor', 2 => 'Abigail']
```

<a name="method-array-prepend"></a>
#### `Arr::prepend()` {.collection-method}

The `Arr::prepend` method will push an item onto the beginning of an array:

```php
use Illuminate\Support\Arr;

$array = ['one', 'two', 'three', 'four'];

$array = Arr::prepend($array, 'zero');

// ['zero', 'one', 'two', 'three', 'four']
```

If needed, you may specify the key that should be used for the value:

```php
use Illuminate\Support\Arr;

$array = ['price' => 100];

$array = Arr::prepend($array, 'Desk', 'name');

// ['name' => 'Desk', 'price' => 100]
```

<a name="method-array-prependkeyswith"></a>
#### `Arr::prependKeysWith()` {.collection-method}

The `Arr::prependKeysWith` prepends all key names of an associative array with the given prefix:

```php
use Illuminate\Support\Arr;

$array = [
    'name' => 'Desk',
    'price' => 100,
];

$keyed = Arr::prependKeysWith($array, 'product.');

/*
    [
        'product.name' => 'Desk',
        'product.price' => 100,
    ]
*/
```

<a name="method-array-pull"></a>
#### `Arr::pull()` {.collection-method}

The `Arr::pull` method returns and removes a key / value pair from an array:

```php
use Illuminate\Support\Arr;

$array = ['name' => 'Desk', 'price' => 100];

$name = Arr::pull($array, 'name');

// $name: Desk

// $array: ['price' => 100]
```

A default value may be passed as the third argument to the method. This value will be returned if the key doesn't exist:

```php
use Illuminate\Support\Arr;

$value = Arr::pull($array, $key, $default);
```

<a name="method-array-push"></a>
#### `Arr::push()` {.collection-method}

The `Arr::push` method pushes an item into an array using "dot" notation. If an array does not exist at the given key, it will be created:

```php
use Illuminate\Support\Arr;

$array = [];

Arr::push($array, 'office.furniture', 'Desk');

// $array: ['office' => ['furniture' => ['Desk']]]
```

<a name="method-array-query"></a>
#### `Arr::query()` {.collection-method}

The `Arr::query` method converts the array into a query string:

```php
use Illuminate\Support\Arr;

$array = [
    'name' => 'Taylor',
    'order' => [
        'column' => 'created_at',
        'direction' => 'desc'
    ]
];

Arr::query($array);

// name=Taylor&order[column]=created_at&order[direction]=desc
```

<a name="method-array-random"></a>
#### `Arr::random()` {.collection-method}

The `Arr::random` method returns a random value from an array:

```php
use Illuminate\Support\Arr;

$array = [1, 2, 3, 4, 5];

$random = Arr::random($array);

// 4 - (retrieved randomly)
```

You may also specify the number of items to return as an optional second argument. Note that providing this argument will return an array even if only one item is desired:

```php
use Illuminate\Support\Arr;

$items = Arr::random($array, 2);

// [2, 5] - (retrieved randomly)
```

<a name="method-array-reject"></a>
#### `Arr::reject()` {.collection-method}

The `Arr::reject` method removes items from an array using the given closure:

```php
use Illuminate\Support\Arr;

$array = [100, '200', 300, '400', 500];

$filtered = Arr::reject($array, function (string|int $value, int $key) {
    return is_string($value);
});

// [0 => 100, 2 => 300, 4 => 500]
```

<a name="method-array-select"></a>
#### `Arr::select()` {.collection-method}

The `Arr::select` method selects an array of values from an array:

```php
use Illuminate\Support\Arr;

$array = [
    ['id' => 1, 'name' => 'Desk', 'price' => 200],
    ['id' => 2, 'name' => 'Table', 'price' => 150],
    ['id' => 3, 'name' => 'Chair', 'price' => 300],
];

Arr::select($array, ['name', 'price']);

// [['name' => 'Desk', 'price' => 200], ['name' => 'Table', 'price' => 150], ['name' => 'Chair', 'price' => 300]]
```

<a name="method-array-set"></a>
#### `Arr::set()` {.collection-method}

The `Arr::set` method sets a value within a deeply nested array using "dot" notation:

```php
use Illuminate\Support\Arr;

$array = ['products' => ['desk' => ['price' => 100]]];

Arr::set($array, 'products.desk.price', 200);

// ['products' => ['desk' => ['price' => 200]]]
```

<a name="method-array-shuffle"></a>
#### `Arr::shuffle()` {.collection-method}

The `Arr::shuffle` method randomly shuffles the items in the array:

```php
use Illuminate\Support\Arr;

$array = Arr::shuffle([1, 2, 3, 4, 5]);

// [3, 2, 5, 1, 4] - (generated randomly)
```

<a name="method-array-sole"></a>
#### `Arr::sole()` {.collection-method}

The `Arr::sole` method retrieves a single value from an array using the given closure. If more than one value within the array matches the given truth test, an `Illuminate\Support\MultipleItemsFoundException` exception will be thrown. If no values match the truth test, an `Illuminate\Support\ItemNotFoundException` exception will be thrown:

```php
use Illuminate\Support\Arr;

$array = ['Desk', 'Table', 'Chair'];

$value = Arr::sole($array, fn (string $value) => $value === 'Desk');

// 'Desk'
```

<a name="method-array-some"></a>
#### `Arr::some()` {.collection-method}

The `Arr::some` method ensures that at least one of the values in the array passes a given truth test:

```php
use Illuminate\Support\Arr;

$array = [1, 2, 3];

Arr::some($array, fn ($i) => $i > 2);

// true
```

<a name="method-array-sort"></a>
#### `Arr::sort()` {.collection-method}

The `Arr::sort` method sorts an array by its values:

```php
use Illuminate\Support\Arr;

$array = ['Desk', 'Table', 'Chair'];

$sorted = Arr::sort($array);

// ['Chair', 'Desk', 'Table']
```

You may also sort the array by the results of a given closure:

```php
use Illuminate\Support\Arr;

$array = [
    ['name' => 'Desk'],
    ['name' => 'Table'],
    ['name' => 'Chair'],
];

$sorted = array_values(Arr::sort($array, function (array $value) {
    return $value['name'];
}));

/*
    [
        ['name' => 'Chair'],
        ['name' => 'Desk'],
        ['name' => 'Table'],
    ]
*/
```

<a name="method-array-sort-desc"></a>
#### `Arr::sortDesc()` {.collection-method}

The `Arr::sortDesc` method sorts an array in descending order by its values:

```php
use Illuminate\Support\Arr;

$array = ['Desk', 'Table', 'Chair'];

$sorted = Arr::sortDesc($array);

// ['Table', 'Desk', 'Chair']
```

You may also sort the array by the results of a given closure:

```php
use Illuminate\Support\Arr;

$array = [
    ['name' => 'Desk'],
    ['name' => 'Table'],
    ['name' => 'Chair'],
];

$sorted = array_values(Arr::sortDesc($array, function (array $value) {
    return $value['name'];
}));

/*
    [
        ['name' => 'Table'],
        ['name' => 'Desk'],
        ['name' => 'Chair'],
    ]
*/
```

<a name="method-array-sort-recursive"></a>
#### `Arr::sortRecursive()` {.collection-method}

The `Arr::sortRecursive` method recursively sorts an array using the `sort` function for numerically indexed sub-arrays and the `ksort` function for associative sub-arrays:

```php
use Illuminate\Support\Arr;

$array = [
    ['Roman', 'Taylor', 'Li'],
    ['PHP', 'Ruby', 'JavaScript'],
    ['one' => 1, 'two' => 2, 'three' => 3],
];

$sorted = Arr::sortRecursive($array);

/*
    [
        ['JavaScript', 'PHP', 'Ruby'],
        ['one' => 1, 'three' => 3, 'two' => 2],
        ['Li', 'Roman', 'Taylor'],
    ]
*/
```

If you would like the results sorted in descending order, you may use the `Arr::sortRecursiveDesc` method.

```php
$sorted = Arr::sortRecursiveDesc($array);
```

<a name="method-array-string"></a>
#### `Arr::string()` {.collection-method}

The `Arr::string` method retrieves a value from a deeply nested array using "dot" notation (just as [Arr::get()](#method-array-get) does), but throws an `InvalidArgumentException` if the requested value is not a `string`:

```php
use Illuminate\Support\Arr;

$array = ['name' => 'Joe', 'languages' => ['PHP', 'Ruby']];

$value = Arr::string($array, 'name');

// Joe

$value = Arr::string($array, 'languages');

// throws InvalidArgumentException
```

<a name="method-array-take"></a>
#### `Arr::take()` {.collection-method}

The `Arr::take` method returns a new array with the specified number of items:

```php
use Illuminate\Support\Arr;

$array = [0, 1, 2, 3, 4, 5];

$chunk = Arr::take($array, 3);

// [0, 1, 2]
```

You may also pass a negative integer to take the specified number of items from the end of the array:

```php
$array = [0, 1, 2, 3, 4, 5];

$chunk = Arr::take($array, -2);

// [4, 5]
```

<a name="method-array-to-css-classes"></a>
#### `Arr::toCssClasses()` {.collection-method}

The `Arr::toCssClasses` method conditionally compiles a CSS class string. The method accepts an array of classes where the array key contains the class or classes you wish to add, while the value is a boolean expression. If the array element has a numeric key, it will always be included in the rendered class list:

```php
use Illuminate\Support\Arr;

$isActive = false;
$hasError = true;

$array = ['p-4', 'font-bold' => $isActive, 'bg-red' => $hasError];

$classes = Arr::toCssClasses($array);

/*
    'p-4 bg-red'
*/
```

<a name="method-array-to-css-styles"></a>
#### `Arr::toCssStyles()` {.collection-method}

The `Arr::toCssStyles` method conditionally compiles a CSS style string. The method accepts an array of CSS declarations where the array key contains the CSS declaration you wish to add, while the value is a boolean expression. If the array element has a numeric key, it will always be included in the compiled CSS style string:

```php
use Illuminate\Support\Arr;

$hasColor = true;

$array = ['background-color: blue', 'color: blue' => $hasColor];

$classes = Arr::toCssStyles($array);

/*
    'background-color: blue; color: blue;'
*/
```

This method powers Laravel's functionality allowing [merging classes with a Blade component's attribute bag](/docs/{{version}}/blade#conditionally-merge-classes) as well as the `@class` [Blade directive](/docs/{{version}}/blade#conditional-classes).

<a name="method-array-undot"></a>
#### `Arr::undot()` {.collection-method}

The `Arr::undot` method expands a single-dimensional array that uses "dot" notation into a multi-dimensional array:

```php
use Illuminate\Support\Arr;

$array = [
    'user.name' => 'Kevin Malone',
    'user.occupation' => 'Accountant',
];

$array = Arr::undot($array);

// ['user' => ['name' => 'Kevin Malone', 'occupation' => 'Accountant']]
```

<a name="method-array-where"></a>
#### `Arr::where()` {.collection-method}

The `Arr::where` method filters an array using the given closure:

```php
use Illuminate\Support\Arr;

$array = [100, '200', 300, '400', 500];

$filtered = Arr::where($array, function (string|int $value, int $key) {
    return is_string($value);
});

// [1 => '200', 3 => '400']
```

<a name="method-array-where-not-null"></a>
#### `Arr::whereNotNull()` {.collection-method}

The `Arr::whereNotNull` method removes all `null` values from the given array:

```php
use Illuminate\Support\Arr;

$array = [0, null];

$filtered = Arr::whereNotNull($array);

// [0 => 0]
```

<a name="method-array-wrap"></a>
#### `Arr::wrap()` {.collection-method}

The `Arr::wrap` method wraps the given value in an array. If the given value is already an array it will be returned without modification:

```php
use Illuminate\Support\Arr;

$string = 'Laravel';

$array = Arr::wrap($string);

// ['Laravel']
```

If the given value is `null`, an empty array will be returned:

```php
use Illuminate\Support\Arr;

$array = Arr::wrap(null);

// []
```

<a name="method-data-fill"></a>
#### `data_fill()` {.collection-method}

The `data_fill` function sets a missing value within a nested array or object using "dot" notation:

```php
$data = ['products' => ['desk' => ['price' => 100]]];

data_fill($data, 'products.desk.price', 200);

// ['products' => ['desk' => ['price' => 100]]]

data_fill($data, 'products.desk.discount', 10);

// ['products' => ['desk' => ['price' => 100, 'discount' => 10]]]
```

This function also accepts asterisks as wildcards and will fill the target accordingly:

```php
$data = [
    'products' => [
        ['name' => 'Desk 1', 'price' => 100],
        ['name' => 'Desk 2'],
    ],
];

data_fill($data, 'products.*.price', 200);

/*
    [
        'products' => [
            ['name' => 'Desk 1', 'price' => 100],
            ['name' => 'Desk 2', 'price' => 200],
        ],
    ]
*/
```

<a name="method-data-get"></a>
#### `data_get()` {.collection-method}

The `data_get` function retrieves a value from a nested array or object using "dot" notation:

```php
$data = ['products' => ['desk' => ['price' => 100]]];

$price = data_get($data, 'products.desk.price');

// 100
```

The `data_get` function also accepts a default value, which will be returned if the specified key is not found:

```php
$discount = data_get($data, 'products.desk.discount', 0);

// 0
```

The function also accepts wildcards using asterisks, which may target any key of the array or object:

```php
$data = [
    'product-one' => ['name' => 'Desk 1', 'price' => 100],
    'product-two' => ['name' => 'Desk 2', 'price' => 150],
];

data_get($data, '*.name');

// ['Desk 1', 'Desk 2'];
```

The `{first}` and `{last}` placeholders may be used to retrieve the first or last items in an array:

```php
$flight = [
    'segments' => [
        ['from' => 'LHR', 'departure' => '9:00', 'to' => 'IST', 'arrival' => '15:00'],
        ['from' => 'IST', 'departure' => '16:00', 'to' => 'PKX', 'arrival' => '20:00'],
    ],
];

data_get($flight, 'segments.{first}.arrival');

// 15:00
```

<a name="method-data-set"></a>
#### `data_set()` {.collection-method}

The `data_set` function sets a value within a nested array or object using "dot" notation:

```php
$data = ['products' => ['desk' => ['price' => 100]]];

data_set($data, 'products.desk.price', 200);

// ['products' => ['desk' => ['price' => 200]]]
```

This function also accepts wildcards using asterisks and will set values on the target accordingly:

```php
$data = [
    'products' => [
        ['name' => 'Desk 1', 'price' => 100],
        ['name' => 'Desk 2', 'price' => 150],
    ],
];

data_set($data, 'products.*.price', 200);

/*
    [
        'products' => [
            ['name' => 'Desk 1', 'price' => 200],
            ['name' => 'Desk 2', 'price' => 200],
        ],
    ]
*/
```

By default, any existing values are overwritten. If you wish to only set a value if it doesn't exist, you may pass `false` as the fourth argument to the function:

```php
$data = ['products' => ['desk' => ['price' => 100]]];

data_set($data, 'products.desk.price', 200, overwrite: false);

// ['products' => ['desk' => ['price' => 100]]]
```

<a name="method-data-forget"></a>
#### `data_forget()` {.collection-method}

The `data_forget` function removes a value within a nested array or object using "dot" notation:

```php
$data = ['products' => ['desk' => ['price' => 100]]];

data_forget($data, 'products.desk.price');

// ['products' => ['desk' => []]]
```

This function also accepts wildcards using asterisks and will remove values on the target accordingly:

```php
$data = [
    'products' => [
        ['name' => 'Desk 1', 'price' => 100],
        ['name' => 'Desk 2', 'price' => 150],
    ],
];

data_forget($data, 'products.*.price');

/*
    [
        'products' => [
            ['name' => 'Desk 1'],
            ['name' => 'Desk 2'],
        ],
    ]
*/
```

<a name="method-head"></a>
#### `head()` {.collection-method}

The `head` function returns the first element in the given array. If the array is empty, `false` will be returned:

```php
$array = [100, 200, 300];

$first = head($array);

// 100
```

<a name="method-last"></a>
#### `last()` {.collection-method}

The `last` function returns the last element in the given array. If the array is empty, `false` will be returned:

```php
$array = [100, 200, 300];

$last = last($array);

// 300
```

<a name="numbers"></a>
## Numbers

<a name="method-number-abbreviate"></a>
#### `Number::abbreviate()` {.collection-method}

The `Number::abbreviate` method returns the human-readable format of the provided numerical value, with an abbreviation for the units:

```php
use Illuminate\Support\Number;

$number = Number::abbreviate(1000);

// 1K

$number = Number::abbreviate(489939);

// 490K

$number = Number::abbreviate(1230000, precision: 2);

// 1.23M
```

<a name="method-number-clamp"></a>
#### `Number::clamp()` {.collection-method}

The `Number::clamp` method ensures a given number stays within a specified range. If the number is lower than the minimum, the minimum value is returned. If the number is higher than the maximum, the maximum value is returned:

```php
use Illuminate\Support\Number;

$number = Number::clamp(105, min: 10, max: 100);

// 100

$number = Number::clamp(5, min: 10, max: 100);

// 10

$number = Number::clamp(10, min: 10, max: 100);

// 10

$number = Number::clamp(20, min: 10, max: 100);

// 20
```

<a name="method-number-currency"></a>
#### `Number::currency()` {.collection-method}

The `Number::currency` method returns the currency representation of the given value as a string:

```php
use Illuminate\Support\Number;

$currency = Number::currency(1000);

// $1,000.00

$currency = Number::currency(1000, in: 'EUR');

// €1,000.00

$currency = Number::currency(1000, in: 'EUR', locale: 'de');

// 1.000,00 €

$currency = Number::currency(1000, in: 'EUR', locale: 'de', precision: 0);

// 1.000 €
```

<a name="method-default-currency"></a>
#### `Number::defaultCurrency()` {.collection-method}

The `Number::defaultCurrency` method returns the default currency being used by the `Number` class:

```php
use Illuminate\Support\Number;

$currency = Number::defaultCurrency();

// USD
```

<a name="method-default-locale"></a>
#### `Number::defaultLocale()` {.collection-method}

The `Number::defaultLocale` method returns the default locale being used by the `Number` class:

```php
use Illuminate\Support\Number;

$locale = Number::defaultLocale();

// en
```

<a name="method-number-file-size"></a>
#### `Number::fileSize()` {.collection-method}

The `Number::fileSize` method returns the file size representation of the given byte value as a string:

```php
use Illuminate\Support\Number;

$size = Number::fileSize(1024);

// 1 KB

$size = Number::fileSize(1024 * 1024);

// 1 MB

$size = Number::fileSize(1024, precision: 2);

// 1.00 KB
```

<a name="method-number-for-humans"></a>
#### `Number::forHumans()` {.collection-method}

The `Number::forHumans` method returns the human-readable format of the provided numerical value:

```php
use Illuminate\Support\Number;

$number = Number::forHumans(1000);

// 1 thousand

$number = Number::forHumans(489939);

// 490 thousand

$number = Number::forHumans(1230000, precision: 2);

// 1.23 million
```

<a name="method-number-format"></a>
#### `Number::format()` {.collection-method}

The `Number::format` method formats the given number into a locale specific string:

```php
use Illuminate\Support\Number;

$number = Number::format(100000);

// 100,000

$number = Number::format(100000, precision: 2);

// 100,000.00

$number = Number::format(100000.123, maxPrecision: 2);

// 100,000.12

$number = Number::format(100000, locale: 'de');

// 100.000
```

<a name="method-number-ordinal"></a>
#### `Number::ordinal()` {.collection-method}

The `Number::ordinal` method returns a number's ordinal representation:

```php
use Illuminate\Support\Number;

$number = Number::ordinal(1);

// 1st

$number = Number::ordinal(2);

// 2nd

$number = Number::ordinal(21);

// 21st
```

<a name="method-number-pairs"></a>
#### `Number::pairs()` {.collection-method}

The `Number::pairs` method generates an array of number pairs (sub-ranges) based on a specified range and step value. This method can be useful for dividing a larger range of numbers into smaller, manageable sub-ranges for things like pagination or batching tasks. The `pairs` method returns an array of arrays, where each inner array represents a pair (sub-range) of numbers:

```php
use Illuminate\Support\Number;

$result = Number::pairs(25, 10);

// [[0, 9], [10, 19], [20, 25]]

$result = Number::pairs(25, 10, offset: 0);

// [[0, 10], [10, 20], [20, 25]]
```

<a name="method-number-parse"></a>
#### `Number::parse()` {.collection-method}

The `Number::parse` method parses a localized numeric string using PHP's `NumberFormatter`:

```php
use Illuminate\Support\Number;

$result = Number::parse('10,123', locale: 'en');

// 10123.0

$result = Number::parse('10,123', locale: 'fr');

// 10.123
```

<a name="method-number-parse-int"></a>
#### `Number::parseInt()` {.collection-method}

The `Number::parseInt` method parse a string into an integer according to the specified locale:

```php
use Illuminate\Support\Number;

$result = Number::parseInt('10.123');

// (int) 10

$result = Number::parseInt('10,123', locale: 'fr');

// (int) 10
```

<a name="method-number-parse-float"></a>
#### `Number::parseFloat()` {.collection-method}

The `Number::parseFloat` method parse a string into a float according to the specified locale:

```php
use Illuminate\Support\Number;

$result = Number::parseFloat('10');

// (float) 10.0

$result = Number::parseFloat('10', locale: 'fr');

// (float) 10.0
```

<a name="method-number-percentage"></a>
#### `Number::percentage()` {.collection-method}

The `Number::percentage` method returns the percentage representation of the given value as a string:

```php
use Illuminate\Support\Number;

$percentage = Number::percentage(10);

// 10%

$percentage = Number::percentage(10, precision: 2);

// 10.00%

$percentage = Number::percentage(10.123, maxPrecision: 2);

// 10.12%

$percentage = Number::percentage(10, precision: 2, locale: 'de');

// 10,00%
```

<a name="method-number-spell"></a>
#### `Number::spell()` {.collection-method}

The `Number::spell` method transforms the given number into a string of words:

```php
use Illuminate\Support\Number;

$number = Number::spell(102);

// one hundred and two

$number = Number::spell(88, locale: 'fr');

// quatre-vingt-huit
```

The `after` argument allows you to specify a value after which all numbers should be spelled out:

```php
$number = Number::spell(10, after: 10);

// 10

$number = Number::spell(11, after: 10);

// eleven
```

The `until` argument allows you to specify a value before which all numbers should be spelled out:

```php
$number = Number::spell(5, until: 10);

// five

$number = Number::spell(10, until: 10);

// 10
```

<a name="method-number-spell-ordinal"></a>
#### `Number::spellOrdinal()` {.collection-method}

The `Number::spellOrdinal` method returns the number's ordinal representation as a string of words:

```php
use Illuminate\Support\Number;

$number = Number::spellOrdinal(1);

// first

$number = Number::spellOrdinal(2);

// second

$number = Number::spellOrdinal(21);

// twenty-first
```

<a name="method-number-trim"></a>
#### `Number::trim()` {.collection-method}

The `Number::trim` method removes any trailing zero digits after the decimal point of the given number:

```php
use Illuminate\Support\Number;

$number = Number::trim(12.0);

// 12

$number = Number::trim(12.30);

// 12.3
```

<a name="method-number-use-locale"></a>
#### `Number::useLocale()` {.collection-method}

The `Number::useLocale` method sets the default number locale globally, which affects how numbers and currency are formatted by subsequent invocations to the `Number` class's methods:

```php
use Illuminate\Support\Number;

/**
 * Bootstrap any application services.
 */
public function boot(): void
{
    Number::useLocale('de');
}
```

<a name="method-number-with-locale"></a>
#### `Number::withLocale()` {.collection-method}

The `Number::withLocale` method executes the given closure using the specified locale and then restores the original locale after the callback has executed:

```php
use Illuminate\Support\Number;

$number = Number::withLocale('de', function () {
    return Number::format(1500);
});
```

<a name="method-number-use-currency"></a>
#### `Number::useCurrency()` {.collection-method}

The `Number::useCurrency` method sets the default number currency globally, which affects how the currency is formatted by subsequent invocations to the `Number` class's methods:

```php
use Illuminate\Support\Number;

/**
 * Bootstrap any application services.
 */
public function boot(): void
{
    Number::useCurrency('GBP');
}
```

<a name="method-number-with-currency"></a>
#### `Number::withCurrency()` {.collection-method}

The `Number::withCurrency` method executes the given closure using the specified currency and then restores the original currency after the callback has executed:

```php
use Illuminate\Support\Number;

$number = Number::withCurrency('GBP', function () {
    // ...
});
```

<a name="paths"></a>
## Paths

<a name="method-app-path"></a>
#### `app_path()` {.collection-method}

The `app_path` function returns the fully qualified path to your application's `app` directory. You may also use the `app_path` function to generate a fully qualified path to a file relative to the application directory:

```php
$path = app_path();

$path = app_path('Http/Controllers/Controller.php');
```

<a name="method-base-path"></a>
#### `base_path()` {.collection-method}

The `base_path` function returns the fully qualified path to your application's root directory. You may also use the `base_path` function to generate a fully qualified path to a given file relative to the project root directory:

```php
$path = base_path();

$path = base_path('vendor/bin');
```

<a name="method-config-path"></a>
#### `config_path()` {.collection-method}

The `config_path` function returns the fully qualified path to your application's `config` directory. You may also use the `config_path` function to generate a fully qualified path to a given file within the application's configuration directory:

```php
$path = config_path();

$path = config_path('app.php');
```

<a name="method-database-path"></a>
#### `database_path()` {.collection-method}

The `database_path` function returns the fully qualified path to your application's `database` directory. You may also use the `database_path` function to generate a fully qualified path to a given file within the database directory:

```php
$path = database_path();

$path = database_path('factories/UserFactory.php');
```

<a name="method-lang-path"></a>
#### `lang_path()` {.collection-method}

The `lang_path` function returns the fully qualified path to your application's `lang` directory. You may also use the `lang_path` function to generate a fully qualified path to a given file within the directory:

```php
$path = lang_path();

$path = lang_path('en/messages.php');
```

> [!NOTE]
> By default, the Laravel application skeleton does not include the `lang` directory. If you would like to customize Laravel's language files, you may publish them via the `lang:publish` Artisan command.

<a name="method-public-path"></a>
#### `public_path()` {.collection-method}

The `public_path` function returns the fully qualified path to your application's `public` directory. You may also use the `public_path` function to generate a fully qualified path to a given file within the public directory:

```php
$path = public_path();

$path = public_path('css/app.css');
```

<a name="method-resource-path"></a>
#### `resource_path()` {.collection-method}

The `resource_path` function returns the fully qualified path to your application's `resources` directory. You may also use the `resource_path` function to generate a fully qualified path to a given file within the resources directory:

```php
$path = resource_path();

$path = resource_path('sass/app.scss');
```

<a name="method-storage-path"></a>
#### `storage_path()` {.collection-method}

The `storage_path` function returns the fully qualified path to your application's `storage` directory. You may also use the `storage_path` function to generate a fully qualified path to a given file within the storage directory:

```php
$path = storage_path();

$path = storage_path('app/file.txt');
```

<a name="urls"></a>
## URLs

<a name="method-action"></a>
#### `action()` {.collection-method}

The `action` function generates a URL for the given controller action:

```php
use App\Http\Controllers\HomeController;

$url = action([HomeController::class, 'index']);
```

If the method accepts route parameters, you may pass them as the second argument to the method:

```php
$url = action([UserController::class, 'profile'], ['id' => 1]);
```

<a name="method-asset"></a>
#### `asset()` {.collection-method}

The `asset` function generates a URL for an asset using the current scheme of the request (HTTP or HTTPS):

```php
$url = asset('img/photo.jpg');
```

You can configure the asset URL host by setting the `ASSET_URL` variable in your `.env` file. This can be useful if you host your assets on an external service like Amazon S3 or another CDN:

```php
// ASSET_URL=http://example.com/assets

$url = asset('img/photo.jpg'); // http://example.com/assets/img/photo.jpg
```

<a name="method-route"></a>
#### `route()` {.collection-method}

The `route` function generates a URL for a given [named route](/docs/{{version}}/routing#named-routes):

```php
$url = route('route.name');
```

If the route accepts parameters, you may pass them as the second argument to the function:

```php
$url = route('route.name', ['id' => 1]);
```

By default, the `route` function generates an absolute URL. If you wish to generate a relative URL, you may pass `false` as the third argument to the function:

```php
$url = route('route.name', ['id' => 1], false);
```

<a name="method-secure-asset"></a>
#### `secure_asset()` {.collection-method}

The `secure_asset` function generates a URL for an asset using HTTPS:

```php
$url = secure_asset('img/photo.jpg');
```

<a name="method-secure-url"></a>
#### `secure_url()` {.collection-method}

The `secure_url` function generates a fully qualified HTTPS URL to the given path. Additional URL segments may be passed in the function's second argument:

```php
$url = secure_url('user/profile');

$url = secure_url('user/profile', [1]);
```

<a name="method-to-action"></a>
#### `to_action()` {.collection-method}

The `to_action` function generates a [redirect HTTP response](/docs/{{version}}/responses#redirects) for a given controller action:

```php
use App\Http\Controllers\UserController;

return to_action([UserController::class, 'show'], ['user' => 1]);
```

If necessary, you may pass the HTTP status code that should be assigned to the redirect and any additional response headers as the third and fourth arguments to the `to_action` method:

```php
return to_action(
    [UserController::class, 'show'],
    ['user' => 1],
    302,
    ['X-Framework' => 'Laravel']
);
```

<a name="method-to-route"></a>
#### `to_route()` {.collection-method}

The `to_route` function generates a [redirect HTTP response](/docs/{{version}}/responses#redirects) for a given [named route](/docs/{{version}}/routing#named-routes):

```php
return to_route('users.show', ['user' => 1]);
```

If necessary, you may pass the HTTP status code that should be assigned to the redirect and any additional response headers as the third and fourth arguments to the `to_route` method:

```php
return to_route('users.show', ['user' => 1], 302, ['X-Framework' => 'Laravel']);
```

<a name="method-uri"></a>
#### `uri()` {.collection-method}

The `uri` function generates a [fluent URI instance](#uri) for the given URI:

```php
$uri = uri('https://example.com')
    ->withPath('/users')
    ->withQuery(['page' => 1]);
```

If the `uri` function is given an array containing a callable controller and method pair, the function will create a `Uri` instance for the controller method's route path:

```php
use App\Http\Controllers\UserController;

$uri = uri([UserController::class, 'show'], ['user' => $user]);
```

If the controller is invokable, you may simply provide the controller class name:

```php
use App\Http\Controllers\UserIndexController;

$uri = uri(UserIndexController::class);
```

If the value given to the `uri` function matches the name of a [named route](/docs/{{version}}/routing#named-routes), a `Uri` instance will be generated for that route's path:

```php
$uri = uri('users.show', ['user' => $user]);
```

<a name="method-url"></a>
#### `url()` {.collection-method}

The `url` function generates a fully qualified URL to the given path:

```php
$url = url('user/profile');

$url = url('user/profile', [1]);
```

If no path is provided, an `Illuminate\Routing\UrlGenerator` instance is returned:

```php
$current = url()->current();

$full = url()->full();

$previous = url()->previous();
```

For more information on working with the `url` function, consult the [URL generation documentation](/docs/{{version}}/urls#generating-urls).

<a name="miscellaneous"></a>
## Miscellaneous

<a name="method-abort"></a>
#### `abort()` {.collection-method}

The `abort` function throws [an HTTP exception](/docs/{{version}}/errors#http-exceptions) which will be rendered by the [exception handler](/docs/{{version}}/errors#handling-exceptions):

```php
abort(403);
```

You may also provide the exception's message and custom HTTP response headers that should be sent to the browser:

```php
abort(403, 'Unauthorized.', $headers);
```

<a name="method-abort-if"></a>
#### `abort_if()` {.collection-method}

The `abort_if` function throws an HTTP exception if a given boolean expression evaluates to `true`:

```php
abort_if(! Auth::user()->isAdmin(), 403);
```

Like the `abort` method, you may also provide the exception's response text as the third argument and an array of custom response headers as the fourth argument to the function.

<a name="method-abort-unless"></a>
#### `abort_unless()` {.collection-method}

The `abort_unless` function throws an HTTP exception if a given boolean expression evaluates to `false`:

```php
abort_unless(Auth::user()->isAdmin(), 403);
```

Like the `abort` method, you may also provide the exception's response text as the third argument and an array of custom response headers as the fourth argument to the function.

<a name="method-app"></a>
#### `app()` {.collection-method}

The `app` function returns the [service container](/docs/{{version}}/container) instance:

```php
$container = app();
```

You may pass a class or interface name to resolve it from the container:

```php
$api = app('HelpSpot\API');
```

<a name="method-auth"></a>
#### `auth()` {.collection-method}

The `auth` function returns an [authenticator](/docs/{{version}}/authentication) instance. You may use it as an alternative to the `Auth` facade:

```php
$user = auth()->user();
```

If needed, you may specify which guard instance you would like to access:

```php
$user = auth('admin')->user();
```

<a name="method-back"></a>
#### `back()` {.collection-method}

The `back` function generates a [redirect HTTP response](/docs/{{version}}/responses#redirects) to the user's previous location:

```php
return back($status = 302, $headers = [], $fallback = '/');

return back();
```

<a name="method-bcrypt"></a>
#### `bcrypt()` {.collection-method}

The `bcrypt` function [hashes](/docs/{{version}}/hashing) the given value using Bcrypt. You may use this function as an alternative to the `Hash` facade:

```php
$password = bcrypt('my-secret-password');
```

<a name="method-blank"></a>
#### `blank()` {.collection-method}

The `blank` function determines whether the given value is "blank":

```php
blank('');
blank('   ');
blank(null);
blank(collect());

// true

blank(0);
blank(true);
blank(false);

// false
```

For the inverse of `blank`, see the [filled](#method-filled) function.

<a name="method-broadcast"></a>
#### `broadcast()` {.collection-method}

The `broadcast` function [broadcasts](/docs/{{version}}/broadcasting) the given [event](/docs/{{version}}/events) to its listeners:

```php
broadcast(new UserRegistered($user));

broadcast(new UserRegistered($user))->toOthers();
```

<a name="method-broadcast-if"></a>
#### `broadcast_if()` {.collection-method}

The `broadcast_if` function [broadcasts](/docs/{{version}}/broadcasting) the given [event](/docs/{{version}}/events) to its listeners if a given boolean expression evaluates to `true`:

```php
broadcast_if($user->isActive(), new UserRegistered($user));

broadcast_if($user->isActive(), new UserRegistered($user))->toOthers();
```

<a name="method-broadcast-unless"></a>
#### `broadcast_unless()` {.collection-method}

The `broadcast_unless` function [broadcasts](/docs/{{version}}/broadcasting) the given [event](/docs/{{version}}/events) to its listeners if a given boolean expression evaluates to `false`:

```php
broadcast_unless($user->isBanned(), new UserRegistered($user));

broadcast_unless($user->isBanned(), new UserRegistered($user))->toOthers();
```

<a name="method-cache"></a>
#### `cache()` {.collection-method}

The `cache` function may be used to get values from the [cache](/docs/{{version}}/cache). If the given key does not exist in the cache, an optional default value will be returned:

```php
$value = cache('key');

$value = cache('key', 'default');
```

You may add items to the cache by passing an array of key / value pairs to the function. You should also pass the number of seconds or duration the cached value should be considered valid:

```php
cache(['key' => 'value'], 300);

cache(['key' => 'value'], now()->plus(seconds: 10));
```

<a name="method-class-uses-recursive"></a>
#### `class_uses_recursive()` {.collection-method}

The `class_uses_recursive` function returns all traits used by a class, including traits used by all of its parent classes:

```php
$traits = class_uses_recursive(App\Models\User::class);
```

<a name="method-collect"></a>
#### `collect()` {.collection-method}

The `collect` function creates a [collection](/docs/{{version}}/collections) instance from the given value:

```php
$collection = collect(['Taylor', 'Abigail']);
```

<a name="method-config"></a>
#### `config()` {.collection-method}

The `config` function gets the value of a [configuration](/docs/{{version}}/configuration) variable. The configuration values may be accessed using "dot" syntax, which includes the name of the file and the option you wish to access. You may also provide a default value that will be returned if the configuration option does not exist:

```php
$value = config('app.timezone');

$value = config('app.timezone', $default);
```

You may set configuration variables at runtime by passing an array of key / value pairs. However, note that this function only affects the configuration value for the current request and does not update your actual configuration values:

```php
config(['app.debug' => true]);
```

<a name="method-context"></a>
#### `context()` {.collection-method}

The `context` function gets the value from the current [context](/docs/{{version}}/context). You may also provide a default value that will be returned if the context key does not exist:

```php
$value = context('trace_id');

$value = context('trace_id', $default);
```

You may set context values by passing an array of key / value pairs:

```php
use Illuminate\Support\Str;

context(['trace_id' => Str::uuid()->toString()]);
```

<a name="method-cookie"></a>
#### `cookie()` {.collection-method}

The `cookie` function creates a new [cookie](/docs/{{version}}/requests#cookies) instance:

```php
$cookie = cookie('name', 'value', $minutes);
```

<a name="method-csrf-field"></a>
#### `csrf_field()` {.collection-method}

The `csrf_field` function generates an HTML `hidden` input field containing the value of the CSRF token. For example, using [Blade syntax](/docs/{{version}}/blade):

```blade
{{ csrf_field() }}
```

<a name="method-csrf-token"></a>
#### `csrf_token()` {.collection-method}

The `csrf_token` function retrieves the value of the current CSRF token:

```php
$token = csrf_token();
```

<a name="method-decrypt"></a>
#### `decrypt()` {.collection-method}

The `decrypt` function [decrypts](/docs/{{version}}/encryption) the given value. You may use this function as an alternative to the `Crypt` facade:

```php
$password = decrypt($value);
```

For the inverse of `decrypt`, see the [encrypt](#method-encrypt) function.

<a name="method-dd"></a>
#### `dd()` {.collection-method}

The `dd` function dumps the given variables and ends the execution of the script:

```php
dd($value);

dd($value1, $value2, $value3, ...);
```

If you do not want to halt the execution of your script, use the [dump](#method-dump) function instead.

<a name="method-dispatch"></a>
#### `dispatch()` {.collection-method}

The `dispatch` function pushes the given [job](/docs/{{version}}/queues#creating-jobs) onto the Laravel [job queue](/docs/{{version}}/queues):

```php
dispatch(new App\Jobs\SendEmails);
```

<a name="method-dispatch-sync"></a>
#### `dispatch_sync()` {.collection-method}

The `dispatch_sync` function pushes the given job to the [sync](/docs/{{version}}/queues#synchronous-dispatching) queue so that it is processed immediately:

```php
dispatch_sync(new App\Jobs\SendEmails);
```

<a name="method-dump"></a>
#### `dump()` {.collection-method}

The `dump` function dumps the given variables:

```php
dump($value);

dump($value1, $value2, $value3, ...);
```

If you want to stop executing the script after dumping the variables, use the [dd](#method-dd) function instead.

<a name="method-encrypt"></a>
#### `encrypt()` {.collection-method}

The `encrypt` function [encrypts](/docs/{{version}}/encryption) the given value. You may use this function as an alternative to the `Crypt` facade:

```php
$secret = encrypt('my-secret-value');
```

For the inverse of `encrypt`, see the [decrypt](#method-decrypt) function.

<a name="method-env"></a>
#### `env()` {.collection-method}

The `env` function retrieves the value of an [environment variable](/docs/{{version}}/configuration#environment-configuration) or returns a default value:

```php
$env = env('APP_ENV');

$env = env('APP_ENV', 'production');
```

> [!WARNING]
> If you execute the `config:cache` command during your deployment process, you should be sure that you are only calling the `env` function from within your configuration files. Once the configuration has been cached, the `.env` file will not be loaded and all calls to the `env` function will return external environment variables such as server-level or system-level environment variables or `null`.

<a name="method-event"></a>
#### `event()` {.collection-method}

The `event` function dispatches the given [event](/docs/{{version}}/events) to its listeners:

```php
event(new UserRegistered($user));
```

<a name="method-fake"></a>
#### `fake()` {.collection-method}

The `fake` function resolves a [Faker](https://github.com/FakerPHP/Faker) singleton from the container, which can be useful when creating fake data in model factories, database seeding, tests, and prototyping views:

```blade
@for ($i = 0; $i < 10; $i++)
    <dl>
        <dt>Name</dt>
        <dd>{{ fake()->name() }}</dd>

        <dt>Email</dt>
        <dd>{{ fake()->unique()->safeEmail() }}</dd>
    </dl>
@endfor
```

By default, the `fake` function will utilize the `app.faker_locale` configuration option in your `config/app.php` configuration. Typically, this configuration option is set via the `APP_FAKER_LOCALE` environment variable. You may also specify the locale by passing it to the `fake` function. Each locale will resolve an individual singleton:

```php
fake('nl_NL')->name()
```

<a name="method-filled"></a>
#### `filled()` {.collection-method}

The `filled` function determines whether the given value is not "blank":

```php
filled(0);
filled(true);
filled(false);

// true

filled('');
filled('   ');
filled(null);
filled(collect());

// false
```

For the inverse of `filled`, see the [blank](#method-blank) function.

<a name="method-info"></a>
#### `info()` {.collection-method}

The `info` function will write information to your application's [log](/docs/{{version}}/logging):

```php
info('Some helpful information!');
```

An array of contextual data may also be passed to the function:

```php
info('User login attempt failed.', ['id' => $user->id]);
```

<a name="method-literal"></a>
#### `literal()` {.collection-method}

The `literal` function creates a new [stdClass](https://www.php.net/manual/en/class.stdclass.php) instance with the given named arguments as properties:

```php
$obj = literal(
    name: 'Joe',
    languages: ['PHP', 'Ruby'],
);

$obj->name; // 'Joe'
$obj->languages; // ['PHP', 'Ruby']
```

<a name="method-logger"></a>
#### `logger()` {.collection-method}

The `logger` function can be used to write a `debug` level message to the [log](/docs/{{version}}/logging):

```php
logger('Debug message');
```

An array of contextual data may also be passed to the function:

```php
logger('User has logged in.', ['id' => $user->id]);
```

A [logger](/docs/{{version}}/logging) instance will be returned if no value is passed to the function:

```php
logger()->error('You are not allowed here.');
```

<a name="method-method-field"></a>
#### `method_field()` {.collection-method}

The `method_field` function generates an HTML `hidden` input field containing the spoofed value of the form's HTTP verb. For example, using [Blade syntax](/docs/{{version}}/blade):

```blade
<form method="POST">
    {{ method_field('DELETE') }}
</form>
```

<a name="method-now"></a>
#### `now()` {.collection-method}

The `now` function creates a new `Illuminate\Support\Carbon` instance for the current time:

```php
$now = now();
```

<a name="method-old"></a>
#### `old()` {.collection-method}

The `old` function [retrieves](/docs/{{version}}/requests#retrieving-input) an [old input](/docs/{{version}}/requests#old-input) value flashed into the session:

```php
$value = old('value');

$value = old('value', 'default');
```

Since the "default value" provided as the second argument to the `old` function is often an attribute of an Eloquent model, Laravel allows you to simply pass the entire Eloquent model as the second argument to the `old` function. When doing so, Laravel will assume the first argument provided to the `old` function is the name of the Eloquent attribute that should be considered the "default value":

```blade
{{ old('name', $user->name) }}

// Is equivalent to...

{{ old('name', $user) }}
```

<a name="method-once"></a>
#### `once()` {.collection-method}

The `once` function executes the given callback and caches the result in memory for the duration of the request. Any subsequent calls to the `once` function with the same callback will return the previously cached result:

```php
function random(): int
{
    return once(function () {
        return random_int(1, 1000);
    });
}

random(); // 123
random(); // 123 (cached result)
```

When the `once` function is executed from within an object instance, the cached result will be unique to that object instance:

```php
<?php

class NumberService
{
    public function all(): array
    {
        return once(fn () => [1, 2, 3]);
    }
}

$service = new NumberService;

$service->all();
$service->all(); // (cached result)

$secondService = new NumberService;

$secondService->all();
$secondService->all(); // (cached result)
```
<a name="method-optional"></a>
#### `optional()` {.collection-method}

The `optional` function accepts any argument and allows you to access properties or call methods on that object. If the given object is `null`, properties and methods will return `null` instead of causing an error:

```php
return optional($user->address)->street;

{!! old('name', optional($user)->name) !!}
```

The `optional` function also accepts a closure as its second argument. The closure will be invoked if the value provided as the first argument is not null:

```php
return optional(User::find($id), function (User $user) {
    return $user->name;
});
```

<a name="method-policy"></a>
#### `policy()` {.collection-method}

The `policy` method retrieves a [policy](/docs/{{version}}/authorization#creating-policies) instance for a given class:

```php
$policy = policy(App\Models\User::class);
```

<a name="method-redirect"></a>
#### `redirect()` {.collection-method}

The `redirect` function returns a [redirect HTTP response](/docs/{{version}}/responses#redirects), or returns the redirector instance if called with no arguments:

```php
return redirect($to = null, $status = 302, $headers = [], $secure = null);

return redirect('/home');

return redirect()->route('route.name');
```

<a name="method-report"></a>
#### `report()` {.collection-method}

The `report` function will report an exception using your [exception handler](/docs/{{version}}/errors#handling-exceptions):

```php
report($e);
```

The `report` function also accepts a string as an argument. When a string is given to the function, the function will create an exception with the given string as its message:

```php
report('Something went wrong.');
```

<a name="method-report-if"></a>
#### `report_if()` {.collection-method}

The `report_if` function will report an exception using your [exception handler](/docs/{{version}}/errors#handling-exceptions) if a given boolean expression evaluates to `true`:

```php
report_if($shouldReport, $e);

report_if($shouldReport, 'Something went wrong.');
```

<a name="method-report-unless"></a>
#### `report_unless()` {.collection-method}

The `report_unless` function will report an exception using your [exception handler](/docs/{{version}}/errors#handling-exceptions) if a given boolean expression evaluates to `false`:

```php
report_unless($reportingDisabled, $e);

report_unless($reportingDisabled, 'Something went wrong.');
```

<a name="method-request"></a>
#### `request()` {.collection-method}

The `request` function returns the current [request](/docs/{{version}}/requests) instance or obtains an input field's value from the current request:

```php
$request = request();

$value = request('key', $default);
```

<a name="method-rescue"></a>
#### `rescue()` {.collection-method}

The `rescue` function executes the given closure and catches any exceptions that occur during its execution. All exceptions that are caught will be sent to your [exception handler](/docs/{{version}}/errors#handling-exceptions); however, the request will continue processing:

```php
return rescue(function () {
    return $this->method();
});
```

You may also pass a second argument to the `rescue` function. This argument will be the "default" value that should be returned if an exception occurs while executing the closure:

```php
return rescue(function () {
    return $this->method();
}, false);

return rescue(function () {
    return $this->method();
}, function () {
    return $this->failure();
});
```

A `report` argument may be provided to the `rescue` function to determine if the exception should be reported via the `report` function:

```php
return rescue(function () {
    return $this->method();
}, report: function (Throwable $throwable) {
    return $throwable instanceof InvalidArgumentException;
});
```

<a name="method-resolve"></a>
#### `resolve()` {.collection-method}

The `resolve` function resolves a given class or interface name to an instance using the [service container](/docs/{{version}}/container):

```php
$api = resolve('HelpSpot\API');
```

<a name="method-response"></a>
#### `response()` {.collection-method}

The `response` function creates a [response](/docs/{{version}}/responses) instance or obtains an instance of the response factory:

```php
return response('Hello World', 200, $headers);

return response()->json(['foo' => 'bar'], 200, $headers);
```

<a name="method-retry"></a>
#### `retry()` {.collection-method}

The `retry` function attempts to execute the given callback until the given maximum attempt threshold is met. If the callback does not throw an exception, its return value will be returned. If the callback throws an exception, it will automatically be retried. If the maximum attempt count is exceeded, the exception will be thrown:

```php
return retry(5, function () {
    // Attempt 5 times while resting 100ms between attempts...
}, 100);
```

The sleep duration also accepts a `CarbonInterval` instance:

```php
use function Illuminate\Support\seconds;

return retry(5, function () {
    // Attempt 5 times while resting 5 seconds between attempts...
}, seconds(5));
```

If you would like to manually calculate the number of milliseconds to sleep between attempts, you may pass a closure as the third argument to the `retry` function:

```php
use Exception;

return retry(5, function () {
    // ...
}, function (int $attempt, Exception $exception) {
    return $attempt * 100;
});
```

For convenience, you may provide an array as the first argument to the `retry` function. This array will be used to determine how many milliseconds to sleep between subsequent attempts:

```php
return retry([100, 200], function () {
    // Sleep for 100ms on first retry, 200ms on second retry...
});
```

To only retry under specific conditions, you may pass a closure as the fourth argument to the `retry` function:

```php
use App\Exceptions\TemporaryException;
use Exception;

return retry(5, function () {
    // ...
}, 100, function (Exception $exception) {
    return $exception instanceof TemporaryException;
});
```

<a name="method-session"></a>
#### `session()` {.collection-method}

The `session` function may be used to get or set [session](/docs/{{version}}/session) values:

```php
$value = session('key');
```

You may set values by passing an array of key / value pairs to the function:

```php
session(['chairs' => 7, 'instruments' => 3]);
```

The session store will be returned if no value is passed to the function:

```php
$value = session()->get('key');

session()->put('key', $value);
```

<a name="method-tap"></a>
#### `tap()` {.collection-method}

The `tap` function accepts two arguments: an arbitrary `$value` and a closure. The `$value` will be passed to the closure and then be returned by the `tap` function. The return value of the closure is irrelevant:

```php
$user = tap(User::first(), function (User $user) {
    $user->name = 'Taylor';

    $user->save();
});
```

If no closure is passed to the `tap` function, you may call any method on the given `$value`. The return value of the method you call will always be `$value`, regardless of what the method actually returns in its definition. For example, the Eloquent `update` method typically returns an integer. However, we can force the method to return the model itself by chaining the `update` method call through the `tap` function:

```php
$user = tap($user)->update([
    'name' => $name,
    'email' => $email,
]);
```

To add a `tap` method to a class, you may add the `Illuminate\Support\Traits\Tappable` trait to the class. The `tap` method of this trait accepts a Closure as its only argument. The object instance itself will be passed to the Closure and then be returned by the `tap` method:

```php
return $user->tap(function (User $user) {
    // ...
});
```

<a name="method-throw-if"></a>
#### `throw_if()` {.collection-method}

The `throw_if` function throws the given exception if a given boolean expression evaluates to `true`:

```php
throw_if(! Auth::user()->isAdmin(), AuthorizationException::class);

throw_if(
    ! Auth::user()->isAdmin(),
    AuthorizationException::class,
    'You are not allowed to access this page.'
);
```

<a name="method-throw-unless"></a>
#### `throw_unless()` {.collection-method}

The `throw_unless` function throws the given exception if a given boolean expression evaluates to `false`:

```php
throw_unless(Auth::user()->isAdmin(), AuthorizationException::class);

throw_unless(
    Auth::user()->isAdmin(),
    AuthorizationException::class,
    'You are not allowed to access this page.'
);
```

<a name="method-today"></a>
#### `today()` {.collection-method}

The `today` function creates a new `Illuminate\Support\Carbon` instance for the current date:

```php
$today = today();
```

<a name="method-trait-uses-recursive"></a>
#### `trait_uses_recursive()` {.collection-method}

The `trait_uses_recursive` function returns all traits used by a trait:

```php
$traits = trait_uses_recursive(\Illuminate\Notifications\Notifiable::class);
```

<a name="method-transform"></a>
#### `transform()` {.collection-method}

The `transform` function executes a closure on a given value if the value is not [blank](#method-blank) and then returns the return value of the closure:

```php
$callback = function (int $value) {
    return $value * 2;
};

$result = transform(5, $callback);

// 10
```

A default value or closure may be passed as the third argument to the function. This value will be returned if the given value is blank:

```php
$result = transform(null, $callback, 'The value is blank');

// The value is blank
```

<a name="method-validator"></a>
#### `validator()` {.collection-method}

The `validator` function creates a new [validator](/docs/{{version}}/validation) instance with the given arguments. You may use it as an alternative to the `Validator` facade:

```php
$validator = validator($data, $rules, $messages);
```

<a name="method-value"></a>
#### `value()` {.collection-method}

The `value` function returns the value it is given. However, if you pass a closure to the function, the closure will be executed and its returned value will be returned:

```php
$result = value(true);

// true

$result = value(function () {
    return false;
});

// false
```

Additional arguments may be passed to the `value` function. If the first argument is a closure then the additional parameters will be passed to the closure as arguments, otherwise they will be ignored:

```php
$result = value(function (string $name) {
    return $name;
}, 'Taylor');

// 'Taylor'
```

<a name="method-view"></a>
#### `view()` {.collection-method}

The `view` function retrieves a [view](/docs/{{version}}/views) instance:

```php
return view('auth.login');
```

<a name="method-with"></a>
#### `with()` {.collection-method}

The `with` function returns the value it is given. If a closure is passed as the second argument to the function, the closure will be executed and its returned value will be returned:

```php
$callback = function (mixed $value) {
    return is_numeric($value) ? $value * 2 : 0;
};

$result = with(5, $callback);

// 10

$result = with(null, $callback);

// 0

$result = with(5, null);

// 5
```

<a name="method-when"></a>
#### `when()` {.collection-method}

The `when` function returns the value it is given if a given condition evaluates to `true`. Otherwise, `null` is returned. If a closure is passed as the second argument to the function, the closure will be executed and its returned value will be returned:

```php
$value = when(true, 'Hello World');

$value = when(true, fn () => 'Hello World');
```

The `when` function is primarily useful for conditionally rendering HTML attributes:

```blade
<div {!! when($condition, 'wire:poll="calculate"') !!}>
    ...
</div>
```

<a name="other-utilities"></a>
## Other Utilities

<a name="benchmarking"></a>
### Benchmarking

Sometimes you may wish to quickly test the performance of certain parts of your application. On those occasions, you may utilize the `Benchmark` support class to measure the number of milliseconds it takes for the given callbacks to complete:

```php
<?php

use App\Models\User;
use Illuminate\Support\Benchmark;

Benchmark::dd(fn () => User::find(1)); // 0.1 ms

Benchmark::dd([
    'Scenario 1' => fn () => User::count(), // 0.5 ms
    'Scenario 2' => fn () => User::all()->count(), // 20.0 ms
]);
```

By default, the given callbacks will be executed once (one iteration), and their duration will be displayed in the browser / console.

To invoke a callback more than once, you may specify the number of iterations that the callback should be invoked as the second argument to the method. When executing a callback more than once, the `Benchmark` class will return the average number of milliseconds it took to execute the callback across all iterations:

```php
Benchmark::dd(fn () => User::count(), iterations: 10); // 0.5 ms
```

Sometimes, you may want to benchmark the execution of a callback while still obtaining the value returned by the callback. The `value` method will return a tuple containing the value returned by the callback and the number of milliseconds it took to execute the callback:

```php
[$count, $duration] = Benchmark::value(fn () => User::count());
```

<a name="dates"></a>
### Dates and Time

Laravel includes [Carbon](https://carbon.nesbot.com/guide/getting-started/introduction.html), a powerful date and time manipulation library. To create a new `Carbon` instance, you may invoke the `now` function. This function is globally available within your Laravel application:

```php
$now = now();
```

Or, you may create a new `Carbon` instance using the `Illuminate\Support\Carbon` class:

```php
use Illuminate\Support\Carbon;

$now = Carbon::now();
```

Laravel also augments `Carbon` instances with `plus` and `minus` methods, allowing easy manipulation of the instance's date and time:

```php
return now()->plus(minutes: 5);
return now()->plus(hours: 8);
return now()->plus(weeks: 4);

return now()->minus(minutes: 5);
return now()->minus(hours: 8);
return now()->minus(weeks: 4);
```

For a thorough discussion of Carbon and its features, please consult the [official Carbon documentation](https://carbon.nesbot.com/guide/getting-started/introduction.html).

<a name="interval-functions"></a>
#### Interval Functions

Laravel also offers `milliseconds`, `seconds`, `minutes`, `hours`, `days`, `weeks`, `months`, and `years` functions that return `CarbonInterval` instances, which extend PHP's [DateInterval](https://www.php.net/manual/en/class.dateinterval.php) class. These functions may be used anywhere that Laravel accepts a `DateInterval` instance:

```php
use Illuminate\Support\Facades\Cache;

use function Illuminate\Support\{minutes};

Cache::put('metrics', $metrics, minutes(10));
```

<a name="deferred-functions"></a>
### Deferred Functions

While Laravel's [queued jobs](/docs/{{version}}/queues) allow you to queue tasks for background processing, sometimes you may have simple tasks you would like to defer without configuring or maintaining a long-running queue worker.

Deferred functions allow you to defer the execution of a closure until after the HTTP response has been sent to the user, keeping your application feeling fast and responsive. To defer the execution of a closure, simply pass the closure to the `Illuminate\Support\defer` function:

```php
use App\Services\Metrics;
use Illuminate\Http\Request;
use Illuminate\Support\Facades\Route;
use function Illuminate\Support\defer;

Route::post('/orders', function (Request $request) {
    // Create order...

    defer(fn () => Metrics::reportOrder($order));

    return $order;
});
```

By default, deferred functions will only be executed if the HTTP response, Artisan command, or queued job from which `Illuminate\Support\defer` is invoked completes successfully. This means that deferred functions will not be executed if a request results in a `4xx` or `5xx` HTTP response. If you would like a deferred function to always execute, you may chain the `always` method onto your deferred function:

```php
defer(fn () => Metrics::reportOrder($order))->always();
```

> [!WARNING]
> If you have the [Swoole PHP extension](https://www.php.net/manual/en/book.swoole.php) installed, Laravel's `defer` function may conflict with Swoole's own global `defer` function, leading to web server errors. Make sure you call Laravel's `defer` helper by explicitly namespacing it: `use function Illuminate\Support\defer;`

<a name="cancelling-deferred-functions"></a>
#### Cancelling Deferred Functions

If you need to cancel a deferred function before it is executed, you can use the `forget` method to cancel the function by its name. To name a deferred function, provide a second argument to the `Illuminate\Support\defer` function:

```php
defer(fn () => Metrics::report(), 'reportMetrics');

defer()->forget('reportMetrics');
```

<a name="disabling-deferred-functions-in-tests"></a>
#### Disabling Deferred Functions in Tests

When writing tests, it may be useful to disable deferred functions. You may call `withoutDefer` in your test to instruct Laravel to invoke all deferred functions immediately:

```php tab=Pest
test('without defer', function () {
    $this->withoutDefer();

    // ...
});
```

```php tab=PHPUnit
use Tests\TestCase;

class ExampleTest extends TestCase
{
    public function test_without_defer(): void
    {
        $this->withoutDefer();

        // ...
    }
}
```

If you would like to disable deferred functions for all tests within a test case, you may call the `withoutDefer` method from the `setUp` method on your base `TestCase` class:

```php
<?php

namespace Tests;

use Illuminate\Foundation\Testing\TestCase as BaseTestCase;

abstract class TestCase extends BaseTestCase
{
    protected function setUp(): void// [tl! add:start]
    {
        parent::setUp();

        $this->withoutDefer();
    }// [tl! add:end]
}
```

<a name="lottery"></a>
### Lottery

Laravel's lottery class may be used to execute callbacks based on a set of given odds. This can be particularly useful when you only want to execute code for a percentage of your incoming requests:

```php
use Illuminate\Support\Lottery;

Lottery::odds(1, 20)
    ->winner(fn () => $user->won())
    ->loser(fn () => $user->lost())
    ->choose();
```

You may combine Laravel's lottery class with other Laravel features. For example, you may wish to only report a small percentage of slow queries to your exception handler. And, since the lottery class is callable, we may pass an instance of the class into any method that accepts callables:

```php
use Carbon\CarbonInterval;
use Illuminate\Support\Facades\DB;
use Illuminate\Support\Lottery;

DB::whenQueryingForLongerThan(
    CarbonInterval::seconds(2),
    Lottery::odds(1, 100)->winner(fn () => report('Querying > 2 seconds.')),
);
```

<a name="testing-lotteries"></a>
#### Testing Lotteries

Laravel provides some simple methods to allow you to easily test your application's lottery invocations:

```php
// Lottery will always win...
Lottery::alwaysWin();

// Lottery will always lose...
Lottery::alwaysLose();

// Lottery will win then lose, and finally return to normal behavior...
Lottery::fix([true, false]);

// Lottery will return to normal behavior...
Lottery::determineResultsNormally();
```

<a name="pipeline"></a>
### Pipeline

Laravel's `Pipeline` facade provides a convenient way to "pipe" a given input through a series of invokable classes, closures, or callables, giving each class the opportunity to inspect or modify the input and invoke the next callable in the pipeline:

```php
use Closure;
use App\Models\User;
use Illuminate\Support\Facades\Pipeline;

$user = Pipeline::send($user)
    ->through([
        function (User $user, Closure $next) {
            // ...

            return $next($user);
        },
        function (User $user, Closure $next) {
            // ...

            return $next($user);
        },
    ])
    ->then(fn (User $user) => $user);
```

As you can see, each invokable class or closure in the pipeline is provided the input and a `$next` closure. Invoking the `$next` closure will invoke the next callable in the pipeline. As you may have noticed, this is very similar to [middleware](/docs/{{version}}/middleware).

When the last callable in the pipeline invokes the `$next` closure, the callable provided to the `then` method will be invoked. Typically, this callable will simply return the given input. For convenience, if you simply want to return the input after it has been processed, you may use the `thenReturn` method.

Of course, as discussed previously, you are not limited to providing closures to your pipeline. You may also provide invokable classes. If a class name is provided, the class will be instantiated via Laravel's [service container](/docs/{{version}}/container), allowing dependencies to be injected into the invokable class:

```php
$user = Pipeline::send($user)
    ->through([
        GenerateProfilePhoto::class,
        ActivateSubscription::class,
        SendWelcomeEmail::class,
    ])
    ->thenReturn();
```

The `withinTransaction` method may be invoked on the pipeline to automatically wrap all steps of the pipeline within a single database transaction:

```php
$user = Pipeline::send($user)
    ->withinTransaction()
    ->through([
        ProcessOrder::class,
        TransferFunds::class,
        UpdateInventory::class,
    ])
    ->thenReturn();
```

<a name="sleep"></a>
### Sleep

Laravel's `Sleep` class is a light-weight wrapper around PHP's native `sleep` and `usleep` functions, offering greater testability while also exposing a developer friendly API for working with time:

```php
use Illuminate\Support\Sleep;

$waiting = true;

while ($waiting) {
    Sleep::for(1)->second();

    $waiting = /* ... */;
}
```

The `Sleep` class offers a variety of methods that allow you to work with different units of time:

```php
// Return a value after sleeping...
$result = Sleep::for(1)->second()->then(fn () => 1 + 1);

// Sleep while a given value is true...
Sleep::for(1)->second()->while(fn () => shouldKeepSleeping());

// Pause execution for 90 seconds...
Sleep::for(1.5)->minutes();

// Pause execution for 2 seconds...
Sleep::for(2)->seconds();

// Pause execution for 500 milliseconds...
Sleep::for(500)->milliseconds();

// Pause execution for 5,000 microseconds...
Sleep::for(5000)->microseconds();

// Pause execution until a given time...
Sleep::until(now()->plus(minutes: 1));

// Alias of PHP's native "sleep" function...
Sleep::sleep(2);

// Alias of PHP's native "usleep" function...
Sleep::usleep(5000);
```

To easily combine units of time, you may use the `and` method:

```php
Sleep::for(1)->second()->and(10)->milliseconds();
```

<a name="testing-sleep"></a>
#### Testing Sleep

When testing code that utilizes the `Sleep` class or PHP's native sleep functions, your test will pause execution. As you might expect, this makes your test suite significantly slower. For example, imagine you are testing the following code:

```php
$waiting = /* ... */;

$seconds = 1;

while ($waiting) {
    Sleep::for($seconds++)->seconds();

    $waiting = /* ... */;
}
```

Typically, testing this code would take _at least_ one second. Luckily, the `Sleep` class allows us to "fake" sleeping so that our test suite stays fast:

```php tab=Pest
it('waits until ready', function () {
    Sleep::fake();

    // ...
});
```

```php tab=PHPUnit
public function test_it_waits_until_ready()
{
    Sleep::fake();

    // ...
}
```

When faking the `Sleep` class, the actual execution pause is bypassed, leading to a substantially faster test.

Once the `Sleep` class has been faked, it is possible to make assertions against the expected "sleeps" that should have occurred. To illustrate this, let's imagine we are testing code that pauses execution three times, with each pause increasing by a single second. Using the `assertSequence` method, we can assert that our code "slept" for the proper amount of time while keeping our test fast:

```php tab=Pest
it('checks if ready three times', function () {
    Sleep::fake();

    // ...

    Sleep::assertSequence([
        Sleep::for(1)->second(),
        Sleep::for(2)->seconds(),
        Sleep::for(3)->seconds(),
    ]);
}
```

```php tab=PHPUnit
public function test_it_checks_if_ready_three_times()
{
    Sleep::fake();

    // ...

    Sleep::assertSequence([
        Sleep::for(1)->second(),
        Sleep::for(2)->seconds(),
        Sleep::for(3)->seconds(),
    ]);
}
```

Of course, the `Sleep` class offers a variety of other assertions you may use when testing:

```php
use Carbon\CarbonInterval as Duration;
use Illuminate\Support\Sleep;

// Assert that sleep was called 3 times...
Sleep::assertSleptTimes(3);

// Assert against the duration of sleep...
Sleep::assertSlept(function (Duration $duration): bool {
    return /* ... */;
}, times: 1);

// Assert that the Sleep class was never invoked...
Sleep::assertNeverSlept();

// Assert that, even if Sleep was called, no execution paused occurred...
Sleep::assertInsomniac();
```

Sometimes it may be useful to perform an action whenever a fake sleep occurs. To achieve this, you may provide a callback to the `whenFakingSleep` method. In the following example, we use Laravel's [time manipulation helpers](/docs/{{version}}/mocking#interacting-with-time) to instantly progress time by the duration of each sleep:

```php
use Carbon\CarbonInterval as Duration;

$this->freezeTime();

Sleep::fake();

Sleep::whenFakingSleep(function (Duration $duration) {
    // Progress time when faking sleep...
    $this->travel($duration->totalMilliseconds)->milliseconds();
});
```

As progressing time is a common requirement, the `fake` method accepts a `syncWithCarbon` argument to keep Carbon in sync when sleeping within a test:

```php
Sleep::fake(syncWithCarbon: true);

$start = now();

Sleep::for(1)->second();

$start->diffForHumans(); // 1 second ago
```

Laravel uses the `Sleep` class internally whenever it is pausing execution. For example, the [retry](#method-retry) helper uses the `Sleep` class when sleeping, allowing for improved testability when using that helper.

<a name="timebox"></a>
### Timebox

Laravel's `Timebox` class ensures that the given callback always takes a fixed amount of time to execute, even if its actual execution completes sooner. This is particularly useful for cryptographic operations and user authentication checks, where attackers might exploit variations in execution time to infer sensitive information.

If the execution exceeds the fixed duration, `Timebox` has no effect. It is up to the developer to choose a sufficiently long time as the fixed duration to account for worst-case scenarios.

The call method accepts a closure and a time limit in microseconds, and then executes the closure and waits until the time limit is reached:

```php
use Illuminate\Support\Timebox;

(new Timebox)->call(function ($timebox) {
    // ...
}, microseconds: 10000);
```

If an exception is thrown within the closure, this class will respect the defined delay and re-throw the exception after the delay.

<a name="uri"></a>
### URI

Laravel's `Uri` class provides a convenient and fluent interface for creating and manipulating URIs. This class wraps the functionality provided by the underlying League URI package and integrates seamlessly with Laravel's routing system.

You can create a `Uri` instance easily using static methods:

```php
use App\Http\Controllers\UserController;
use App\Http\Controllers\InvokableController;
use Illuminate\Support\Uri;

// Generate a URI instance from the given string...
$uri = Uri::of('https://example.com/path');

// Generate URI instances to paths, named routes, or controller actions...
$uri = Uri::to('/dashboard');
$uri = Uri::route('users.show', ['user' => 1]);
$uri = Uri::signedRoute('users.show', ['user' => 1]);
$uri = Uri::temporarySignedRoute('user.index', now()->plus(minutes: 5));
$uri = Uri::action([UserController::class, 'index']);
$uri = Uri::action(InvokableController::class);

// Generate a URI instance from the current request URL...
$uri = $request->uri();
```

Once you have a URI instance, you can fluently modify it:

```php
$uri = Uri::of('https://example.com')
    ->withScheme('http')
    ->withHost('test.com')
    ->withPort(8000)
    ->withPath('/users')
    ->withQuery(['page' => 2])
    ->withFragment('section-1');
```

<a name="inspecting-uris"></a>
#### Inspecting URIs

The `Uri` class also allows you to easily inspect the various components of the underlying URI:

```php
$scheme = $uri->scheme();
$authority = $uri->authority();
$host = $uri->host();
$port = $uri->port();
$path = $uri->path();
$segments = $uri->pathSegments();
$query = $uri->query();
$fragment = $uri->fragment();
```

<a name="manipulating-query-strings"></a>
#### Manipulating Query Strings

The `Uri` class offers several methods that may be used to manipulate a URI's query string. The `withQuery` method may be used to merge additional query string parameters into the existing query string:

```php
$uri = $uri->withQuery(['sort' => 'name']);
```

The `withQueryIfMissing` method may be used to merge additional query string parameters into the existing query string if the given keys do not already exist in the query string:

```php
$uri = $uri->withQueryIfMissing(['page' => 1]);
```

The `replaceQuery` method may be used to complete replace the existing query string with a new one:

```php
$uri = $uri->replaceQuery(['page' => 1]);
```

The `pushOntoQuery` method may be used to push additional parameters onto a query string parameter that has an array value:

```php
$uri = $uri->pushOntoQuery('filter', ['active', 'pending']);
```

The `withoutQuery` method may be used to remove parameters from the query string:

```php
$uri = $uri->withoutQuery(['page']);
```

<a name="generating-responses-from-uris"></a>
#### Generating Responses From URIs

The `redirect` method may be used to generate a `RedirectResponse` instance to the given URI:

```php
$uri = Uri::of('https://example.com');

return $uri->redirect();
```

Or, you may simply return the `Uri` instance from a route or controller action, which will automatically generate a redirect response to the returned URI:

```php
use Illuminate\Support\Facades\Route;
use Illuminate\Support\Uri;

Route::get('/redirect', function () {
    return Uri::to('/index')
        ->withQuery(['sort' => 'name']);
});
```


---

# Laravel Homestead

*Sección: Laravel | Origen: https://laravel.com/docs/13.x/homestead*

- [Introduction](#introduction)
- [Installation and Setup](#installation-and-setup)
    - [First Steps](#first-steps)
    - [Configuring Homestead](#configuring-homestead)
    - [Configuring Nginx Sites](#configuring-nginx-sites)
    - [Configuring Services](#configuring-services)
    - [Launching the Vagrant Box](#launching-the-vagrant-box)
    - [Per Project Installation](#per-project-installation)
    - [Installing Optional Features](#installing-optional-features)
    - [Aliases](#aliases)
- [Updating Homestead](#updating-homestead)
- [Daily Usage](#daily-usage)
    - [Connecting via SSH](#connecting-via-ssh)
    - [Adding Additional Sites](#adding-additional-sites)
    - [Environment Variables](#environment-variables)
    - [Ports](#ports)
    - [PHP Versions](#php-versions)
    - [Connecting to Databases](#connecting-to-databases)
    - [Database Backups](#database-backups)
    - [Configuring Cron Schedules](#configuring-cron-schedules)
    - [Configuring Mailpit](#configuring-mailpit)
    - [Configuring Minio](#configuring-minio)
    - [Laravel Dusk](#laravel-dusk)
    - [Sharing Your Environment](#sharing-your-environment)
- [Debugging and Profiling](#debugging-and-profiling)
    - [Debugging Web Requests With Xdebug](#debugging-web-requests)
    - [Debugging CLI Applications](#debugging-cli-applications)
    - [Profiling Applications With Blackfire](#profiling-applications-with-blackfire)
- [Network Interfaces](#network-interfaces)
- [Extending Homestead](#extending-homestead)
- [Provider Specific Settings](#provider-specific-settings)
    - [VirtualBox](#provider-specific-virtualbox)

<a name="introduction"></a>
## Introduction

> [!WARNING]
> Laravel Homestead is a legacy package that is no longer actively maintained. [Laravel Sail](/docs/{{version}}/sail) may be used as a modern alternative.

Laravel strives to make the entire PHP development experience delightful, including your local development environment. [Laravel Homestead](https://github.com/laravel/homestead) is an official, pre-packaged Vagrant box that provides you a wonderful development environment without requiring you to install PHP, a web server, or any other server software on your local machine.

[Vagrant](https://www.vagrantup.com) provides a simple, elegant way to manage and provision Virtual Machines. Vagrant boxes are completely disposable. If something goes wrong, you can destroy and re-create the box in minutes!

Homestead runs on any Windows, macOS, or Linux system and includes Nginx, PHP, MySQL, PostgreSQL, Redis, Memcached, Node, and all of the other software you need to develop amazing Laravel applications.

> [!WARNING]
> If you are using Windows, you may need to enable hardware virtualization (VT-x). It can usually be enabled via your BIOS. If you are using Hyper-V on a UEFI system you may additionally need to disable Hyper-V in order to access VT-x.

<a name="included-software"></a>
### Included Software

<style>
    #software-list > ul {
        column-count: 2; -moz-column-count: 2; -webkit-column-count: 2;
        column-gap: 5em; -moz-column-gap: 5em; -webkit-column-gap: 5em;
        line-height: 1.9;
    }
</style>

<div id="software-list" markdown="1">

- Ubuntu 22.04
- Git
- PHP 8.3
- PHP 8.2
- PHP 8.1
- PHP 8.0
- PHP 7.4
- PHP 7.3
- PHP 7.2
- PHP 7.1
- PHP 7.0
- PHP 5.6
- Nginx
- MySQL 8.0
- lmm
- Sqlite3
- PostgreSQL 15
- Composer
- Docker
- Node (With Yarn, Bower, Grunt, and Gulp)
- Redis
- Memcached
- Beanstalkd
- Mailpit
- avahi
- ngrok
- Xdebug
- XHProf / Tideways / XHGui
- wp-cli

</div>

<a name="optional-software"></a>
### Optional Software

<style>
    #software-list > ul {
        column-count: 2; -moz-column-count: 2; -webkit-column-count: 2;
        column-gap: 5em; -moz-column-gap: 5em; -webkit-column-gap: 5em;
        line-height: 1.9;
    }
</style>

<div id="software-list" markdown="1">

- Apache
- Blackfire
- Cassandra
- Chronograf
- CouchDB
- Crystal & Lucky Framework
- Elasticsearch
- EventStoreDB
- Flyway
- Gearman
- Go
- Grafana
- InfluxDB
- Logstash
- MariaDB
- Meilisearch
- MinIO
- MongoDB
- Neo4j
- Oh My Zsh
- Open Resty
- PM2
- Python
- R
- RabbitMQ
- Rust
- RVM (Ruby Version Manager)
- Solr
- TimescaleDB
- Trader <small>(PHP extension)</small>
- Webdriver & Laravel Dusk Utilities

</div>

<a name="installation-and-setup"></a>
## Installation and Setup

<a name="first-steps"></a>
### First Steps

Before launching your Homestead environment, you must install [Vagrant](https://developer.hashicorp.com/vagrant/downloads) as well as one of the following supported providers:

- [VirtualBox 6.1.x](https://www.virtualbox.org/wiki/Download_Old_Builds_6_1)
- [Parallels](https://www.parallels.com/products/desktop/)

All of these software packages provide easy-to-use visual installers for all popular operating systems.

To use the Parallels provider, you will need to install [Parallels Vagrant plug-in](https://github.com/Parallels/vagrant-parallels). It is free of charge.

<a name="installing-homestead"></a>
#### Installing Homestead

You may install Homestead by cloning the Homestead repository onto your host machine. Consider cloning the repository into a `Homestead` folder within your "home" directory, as the Homestead virtual machine will serve as the host to all of your Laravel applications. Throughout this documentation, we will refer to this directory as your "Homestead directory":

```shell
git clone https://github.com/laravel/homestead.git ~/Homestead
```

After cloning the Laravel Homestead repository, you should checkout the `release` branch. This branch always contains the latest stable release of Homestead:

```shell
cd ~/Homestead

git checkout release
```

Next, execute the `bash init.sh` command from the Homestead directory to create the `Homestead.yaml` configuration file. The `Homestead.yaml` file is where you will configure all of the settings for your Homestead installation. This file will be placed in the Homestead directory:

```shell
# macOS / Linux...
bash init.sh

# Windows...
init.bat
```

<a name="configuring-homestead"></a>
### Configuring Homestead

<a name="setting-your-provider"></a>
#### Setting Your Provider

The `provider` key in your `Homestead.yaml` file indicates which Vagrant provider should be used: `virtualbox` or `parallels`:

    provider: virtualbox

> [!WARNING]
> If you are using Apple Silicon the Parallels provider is required.

<a name="configuring-shared-folders"></a>
#### Configuring Shared Folders

The `folders` property of the `Homestead.yaml` file lists all of the folders you wish to share with your Homestead environment. As files within these folders are changed, they will be kept in sync between your local machine and the Homestead virtual environment. You may configure as many shared folders as necessary:

```yaml
folders:
    - map: ~/code/project1
      to: /home/vagrant/project1
```

> [!WARNING]
> Windows users should not use the `~/` path syntax and instead should use the full path to their project, such as `C:\Users\user\Code\project1`.

You should always map individual applications to their own folder mapping instead of mapping a single large directory that contains all of your applications. When you map a folder, the virtual machine must keep track of all disk IO for *every* file in the folder. You may experience reduced performance if you have a large number of files in a folder:

```yaml
folders:
    - map: ~/code/project1
      to: /home/vagrant/project1
    - map: ~/code/project2
      to: /home/vagrant/project2
```

> [!WARNING]
> You should never mount `.` (the current directory) when using Homestead. This causes Vagrant to not map the current folder to `/vagrant` and will break optional features and cause unexpected results while provisioning.

To enable [NFS](https://developer.hashicorp.com/vagrant/docs/synced-folders/nfs), you may add a `type` option to your folder mapping:

```yaml
folders:
    - map: ~/code/project1
      to: /home/vagrant/project1
      type: "nfs"
```

> [!WARNING]
> When using NFS on Windows, you should consider installing the [vagrant-winnfsd](https://github.com/winnfsd/vagrant-winnfsd) plug-in. This plug-in will maintain the correct user / group permissions for files and directories within the Homestead virtual machine.

You may also pass any options supported by Vagrant's [Synced Folders](https://developer.hashicorp.com/vagrant/docs/synced-folders/basic_usage) by listing them under the `options` key:

```yaml
folders:
    - map: ~/code/project1
      to: /home/vagrant/project1
      type: "rsync"
      options:
          rsync__args: ["--verbose", "--archive", "--delete", "-zz"]
          rsync__exclude: ["node_modules"]
```

<a name="configuring-nginx-sites"></a>
### Configuring Nginx Sites

Not familiar with Nginx? No problem. Your `Homestead.yaml` file's `sites` property allows you to easily map a "domain" to a folder on your Homestead environment. A sample site configuration is included in the `Homestead.yaml` file. Again, you may add as many sites to your Homestead environment as necessary. Homestead can serve as a convenient, virtualized environment for every Laravel application you are working on:

```yaml
sites:
    - map: homestead.test
      to: /home/vagrant/project1/public
```

If you change the `sites` property after provisioning the Homestead virtual machine, you should execute the `vagrant reload --provision` command in your terminal to update the Nginx configuration on the virtual machine.

> [!WARNING]
> Homestead scripts are built to be as idempotent as possible. However, if you are experiencing issues while provisioning you should destroy and rebuild the machine by executing the `vagrant destroy && vagrant up` command.

<a name="hostname-resolution"></a>
#### Hostname Resolution

Homestead publishes hostnames using `mDNS` for automatic host resolution. If you set `hostname: homestead` in your `Homestead.yaml` file, the host will be available at `homestead.local`. macOS, iOS, and Linux desktop distributions include `mDNS` support by default. If you are using Windows, you must install [Bonjour Print Services for Windows](https://support.apple.com/kb/DL999?viewlocale=en_US&locale=en_US).

Using automatic hostnames works best for [per project installations](#per-project-installation) of Homestead. If you host multiple sites on a single Homestead instance, you may add the "domains" for your web sites to the `hosts` file on your machine. The `hosts` file will redirect requests for your Homestead sites into your Homestead virtual machine. On macOS and Linux, this file is located at `/etc/hosts`. On Windows, it is located at `C:\Windows\System32\drivers\etc\hosts`. The lines you add to this file will look like the following:

```text
192.168.56.56  homestead.test
```

Make sure the IP address listed is the one set in your `Homestead.yaml` file. Once you have added the domain to your `hosts` file and launched the Vagrant box you will be able to access the site via your web browser:

```shell
http://homestead.test
```

<a name="configuring-services"></a>
### Configuring Services

Homestead starts several services by default; however, you may customize which services are enabled or disabled during provisioning. For example, you may enable PostgreSQL and disable MySQL by modifying the `services` option within your `Homestead.yaml` file:

```yaml
services:
    - enabled:
        - "postgresql"
    - disabled:
        - "mysql"
```

The specified services will be started or stopped based on their order in the `enabled` and `disabled` directives.

<a name="launching-the-vagrant-box"></a>
### Launching the Vagrant Box

Once you have edited the `Homestead.yaml` to your liking, run the `vagrant up` command from your Homestead directory. Vagrant will boot the virtual machine and automatically configure your shared folders and Nginx sites.

To destroy the machine, you may use the `vagrant destroy` command.

<a name="per-project-installation"></a>
### Per Project Installation

Instead of installing Homestead globally and sharing the same Homestead virtual machine across all of your projects, you may instead configure a Homestead instance for each project you manage. Installing Homestead per project may be beneficial if you wish to ship a `Vagrantfile` with your project, allowing others working on the project to `vagrant up` immediately after cloning the project's repository.

You may install Homestead into your project using the Composer package manager:

```shell
composer require laravel/homestead --dev
```

Once Homestead has been installed, invoke Homestead's `make` command to generate the `Vagrantfile` and `Homestead.yaml` file for your project. These files will be placed in the root of your project. The `make` command will automatically configure the `sites` and `folders` directives in the `Homestead.yaml` file:

```shell
# macOS / Linux...
php vendor/bin/homestead make

# Windows...
vendor\\bin\\homestead make
```

Next, run the `vagrant up` command in your terminal and access your project at `http://homestead.test` in your browser. Remember, you will still need to add an `/etc/hosts` file entry for `homestead.test` or the domain of your choice if you are not using automatic [hostname resolution](#hostname-resolution).

<a name="installing-optional-features"></a>
### Installing Optional Features

Optional software is installed using the `features` option within your `Homestead.yaml` file. Most features can be enabled or disabled with a boolean value, while some features allow multiple configuration options:

```yaml
features:
    - blackfire:
        server_id: "server_id"
        server_token: "server_value"
        client_id: "client_id"
        client_token: "client_value"
    - cassandra: true
    - chronograf: true
    - couchdb: true
    - crystal: true
    - dragonflydb: true
    - elasticsearch:
        version: 7.9.0
    - eventstore: true
        version: 21.2.0
    - flyway: true
    - gearman: true
    - golang: true
    - grafana: true
    - influxdb: true
    - logstash: true
    - mariadb: true
    - meilisearch: true
    - minio: true
    - mongodb: true
    - neo4j: true
    - ohmyzsh: true
    - openresty: true
    - pm2: true
    - python: true
    - r-base: true
    - rabbitmq: true
    - rustc: true
    - rvm: true
    - solr: true
    - timescaledb: true
    - trader: true
    - webdriver: true
```

<a name="elasticsearch"></a>
#### Elasticsearch

You may specify a supported version of Elasticsearch, which must be an exact version number (major.minor.patch). The default installation will create a cluster named 'homestead'. You should never give Elasticsearch more than half of the operating system's memory, so make sure your Homestead virtual machine has at least twice the Elasticsearch allocation.

> [!NOTE]
> Check out the [Elasticsearch documentation](https://www.elastic.co/guide/en/elasticsearch/reference/current) to learn how to customize your configuration.

<a name="mariadb"></a>
#### MariaDB

Enabling MariaDB will remove MySQL and install MariaDB. MariaDB typically serves as a drop-in replacement for MySQL, so you should still use the `mysql` database driver in your application's database configuration.

<a name="mongodb"></a>
#### MongoDB

The default MongoDB installation will set the database username to `homestead` and the corresponding password to `secret`.

<a name="neo4j"></a>
#### Neo4j

The default Neo4j installation will set the database username to `homestead` and the corresponding password to `secret`. To access the Neo4j browser, visit `http://homestead.test:7474` via your web browser. The ports `7687` (Bolt), `7474` (HTTP), and `7473` (HTTPS) are ready to serve requests from the Neo4j client.

<a name="aliases"></a>
### Aliases

You may add Bash aliases to your Homestead virtual machine by modifying the `aliases` file within your Homestead directory:

```shell
alias c='clear'
alias ..='cd ..'
```

After you have updated the `aliases` file, you should re-provision the Homestead virtual machine using the `vagrant reload --provision` command. This will ensure that your new aliases are available on the machine.

<a name="updating-homestead"></a>
## Updating Homestead

Before you begin updating Homestead you should ensure you have removed your current virtual machine by running the following command in your Homestead directory:

```shell
vagrant destroy
```

Next, you need to update the Homestead source code. If you cloned the repository, you can execute the following commands at the location you originally cloned the repository:

```shell
git fetch

git pull origin release
```

These commands pull the latest Homestead code from the GitHub repository, fetch the latest tags, and then check out the latest tagged release. You can find the latest stable release version on Homestead's [GitHub releases page](https://github.com/laravel/homestead/releases).

If you have installed Homestead via your project's `composer.json` file, you should ensure your `composer.json` file contains `"laravel/homestead": "^12"` and update your dependencies:

```shell
composer update
```

Next, you should update the Vagrant box using the `vagrant box update` command:

```shell
vagrant box update
```

After updating the Vagrant box, you should run the `bash init.sh` command from the Homestead directory in order to update Homestead's additional configuration files. You will be asked whether you wish to overwrite your existing `Homestead.yaml`, `after.sh`, and `aliases` files:

```shell
# macOS / Linux...
bash init.sh

# Windows...
init.bat
```

Finally, you will need to regenerate your Homestead virtual machine to utilize the latest Vagrant installation:

```shell
vagrant up
```

<a name="daily-usage"></a>
## Daily Usage

<a name="connecting-via-ssh"></a>
### Connecting via SSH

You can SSH into your virtual machine by executing the `vagrant ssh` terminal command from your Homestead directory.

<a name="adding-additional-sites"></a>
### Adding Additional Sites

Once your Homestead environment is provisioned and running, you may want to add additional Nginx sites for your other Laravel projects. You can run as many Laravel projects as you wish on a single Homestead environment. To add an additional site, add the site to your `Homestead.yaml` file.

```yaml
sites:
    - map: homestead.test
      to: /home/vagrant/project1/public
    - map: another.test
      to: /home/vagrant/project2/public
```

> [!WARNING]
> You should ensure that you have configured a [folder mapping](#configuring-shared-folders) for the project's directory before adding the site.

If Vagrant is not automatically managing your "hosts" file, you may need to add the new site to that file as well. On macOS and Linux, this file is located at `/etc/hosts`. On Windows, it is located at `C:\Windows\System32\drivers\etc\hosts`:

```text
192.168.56.56  homestead.test
192.168.56.56  another.test
```

Once the site has been added, execute the `vagrant reload --provision` terminal command from your Homestead directory.

<a name="site-types"></a>
#### Site Types

Homestead supports several "types" of sites which allow you to easily run projects that are not based on Laravel. For example, we may easily add a Statamic application to Homestead using the `statamic` site type:

```yaml
sites:
    - map: statamic.test
      to: /home/vagrant/my-symfony-project/web
      type: "statamic"
```

The available site types are: `apache`, `apache-proxy`, `apigility`, `expressive`, `laravel` (the default), `proxy` (for nginx), `silverstripe`, `statamic`, `symfony2`, `symfony4`, and `zf`.

<a name="site-parameters"></a>
#### Site Parameters

You may add additional Nginx `fastcgi_param` values to your site via the `params` site directive:

```yaml
sites:
    - map: homestead.test
      to: /home/vagrant/project1/public
      params:
          - key: FOO
            value: BAR
```

<a name="environment-variables"></a>
### Environment Variables

You can define global environment variables by adding them to your `Homestead.yaml` file:

```yaml
variables:
    - key: APP_ENV
      value: local
    - key: FOO
      value: bar
```

After updating the `Homestead.yaml` file, be sure to re-provision the machine by executing the `vagrant reload --provision` command. This will update the PHP-FPM configuration for all of the installed PHP versions and also update the environment for the `vagrant` user.

<a name="ports"></a>
### Ports

By default, the following ports are forwarded to your Homestead environment:

<div class="content-list" markdown="1">

- **HTTP:** 8000 &rarr; Forwards To 80
- **HTTPS:** 44300 &rarr; Forwards To 443

</div>

<a name="forwarding-additional-ports"></a>
#### Forwarding Additional Ports

If you wish, you may forward additional ports to the Vagrant box by defining a `ports` configuration entry within your `Homestead.yaml` file. After updating the `Homestead.yaml` file, be sure to re-provision the machine by executing the `vagrant reload --provision` command:

```yaml
ports:
    - send: 50000
      to: 5000
    - send: 7777
      to: 777
      protocol: udp
```

Below is a list of additional Homestead service ports that you may wish to map from your host machine to your Vagrant box:

<div class="content-list" markdown="1">

- **SSH:** 2222 &rarr; To 22
- **ngrok UI:** 4040 &rarr; To 4040
- **MySQL:** 33060 &rarr; To 3306
- **PostgreSQL:** 54320 &rarr; To 5432
- **MongoDB:** 27017 &rarr; To 27017
- **Mailpit:** 8025 &rarr; To 8025
- **Minio:** 9600 &rarr; To 9600

</div>

<a name="php-versions"></a>
### PHP Versions

Homestead supports running multiple versions of PHP on the same virtual machine. You may specify which version of PHP to use for a given site within your `Homestead.yaml` file. The available PHP versions are: "5.6", "7.0", "7.1", "7.2", "7.3", "7.4", "8.0", "8.1", "8.2", and "8.3", (the default):

```yaml
sites:
    - map: homestead.test
      to: /home/vagrant/project1/public
      php: "7.1"
```

[Within your Homestead virtual machine](#connecting-via-ssh), you may use any of the supported PHP versions via the CLI:

```shell
php5.6 artisan list
php7.0 artisan list
php7.1 artisan list
php7.2 artisan list
php7.3 artisan list
php7.4 artisan list
php8.0 artisan list
php8.1 artisan list
php8.2 artisan list
php8.3 artisan list
```

You may change the default version of PHP used by the CLI by issuing the following commands from within your Homestead virtual machine:

```shell
php56
php70
php71
php72
php73
php74
php80
php81
php82
php83
```

<a name="connecting-to-databases"></a>
### Connecting to Databases

A `homestead` database is configured for both MySQL and PostgreSQL out of the box. To connect to your MySQL or PostgreSQL database from your host machine's database client, you should connect to `127.0.0.1` on port `33060` (MySQL) or `54320` (PostgreSQL). The username and password for both databases is `homestead` / `secret`.

> [!WARNING]
> You should only use these non-standard ports when connecting to the databases from your host machine. You will use the default 3306 and 5432 ports in your Laravel application's `database` configuration file since Laravel is running _within_ the virtual machine.

<a name="database-backups"></a>
### Database Backups

Homestead can automatically backup your database when your Homestead virtual machine is destroyed. To utilize this feature, you must be using Vagrant 2.1.0 or greater. Or, if you are using an older version of Vagrant, you must install the `vagrant-triggers` plug-in. To enable automatic database backups, add the following line to your `Homestead.yaml` file:

```yaml
backup: true
```

Once configured, Homestead will export your databases to `.backup/mysql_backup` and `.backup/postgres_backup` directories when the `vagrant destroy` command is executed. These directories can be found in the folder where you installed Homestead or in the root of your project if you are using the [per project installation](#per-project-installation) method.

<a name="configuring-cron-schedules"></a>
### Configuring Cron Schedules

Laravel provides a convenient way to [schedule cron jobs](/docs/{{version}}/scheduling) by scheduling a single `schedule:run` Artisan command to run every minute. The `schedule:run` command will examine the job schedule defined in your `routes/console.php` file to determine which scheduled tasks to run.

If you would like the `schedule:run` command to be run for a Homestead site, you may set the `schedule` option to `true` when defining the site:

```yaml
sites:
    - map: homestead.test
      to: /home/vagrant/project1/public
      schedule: true
```

The cron job for the site will be defined in the `/etc/cron.d` directory of the Homestead virtual machine.

<a name="configuring-mailpit"></a>
### Configuring Mailpit

[Mailpit](https://github.com/axllent/mailpit) allows you to intercept your outgoing email and examine it without actually sending the mail to its recipients. To get started, update your application's `.env` file to use the following mail settings:

```ini
MAIL_MAILER=smtp
MAIL_HOST=localhost
MAIL_PORT=1025
MAIL_USERNAME=null
MAIL_PASSWORD=null
MAIL_ENCRYPTION=null
```

Once Mailpit has been configured, you may access the Mailpit dashboard at `http://localhost:8025`.

<a name="configuring-minio"></a>
### Configuring Minio

[Minio](https://github.com/minio/minio) is an open source object storage server with an Amazon S3 compatible API. To install Minio, update your `Homestead.yaml` file with the following configuration option in the [features](#installing-optional-features) section:

    minio: true

By default, Minio is available on port 9600. You may access the Minio control panel by visiting `http://localhost:9600`. The default access key is `homestead`, while the default secret key is `secretkey`. When accessing Minio, you should always use region `us-east-1`.

In order to use Minio, ensure your `.env` file has the following options:

```ini
AWS_USE_PATH_STYLE_ENDPOINT=true
AWS_ENDPOINT=http://localhost:9600
AWS_ACCESS_KEY_ID=homestead
AWS_SECRET_ACCESS_KEY=secretkey
AWS_DEFAULT_REGION=us-east-1
```

To provision Minio powered "S3" buckets, add a `buckets` directive to your `Homestead.yaml` file. After defining your buckets, you should execute the `vagrant reload --provision` command in your terminal:

```yaml
buckets:
    - name: your-bucket
      policy: public
    - name: your-private-bucket
      policy: none
```

Supported `policy` values include: `none`, `download`, `upload`, and `public`.

<a name="laravel-dusk"></a>
### Laravel Dusk

In order to run [Laravel Dusk](/docs/{{version}}/dusk) tests within Homestead, you should enable the [webdriver feature](#installing-optional-features) in your Homestead configuration:

```yaml
features:
    - webdriver: true
```

After enabling the `webdriver` feature, you should execute the `vagrant reload --provision` command in your terminal.

<a name="sharing-your-environment"></a>
### Sharing Your Environment

Sometimes you may wish to share what you're currently working on with coworkers or a client. Vagrant has built-in support for this via the `vagrant share` command; however, this will not work if you have multiple sites configured in your `Homestead.yaml` file.

To solve this problem, Homestead includes its own `share` command. To get started, [SSH into your Homestead virtual machine](#connecting-via-ssh) via `vagrant ssh` and execute the `share homestead.test` command. This command will share the `homestead.test` site from your `Homestead.yaml` configuration file. You may substitute any of your other configured sites for `homestead.test`:

```shell
share homestead.test
```

After running the command, you will see an Ngrok screen appear which contains the activity log and the publicly accessible URLs for the shared site. If you would like to specify a custom region, subdomain, or other Ngrok runtime option, you may add them to your `share` command:

```shell
share homestead.test -region=eu -subdomain=laravel
```

If you need to share content over HTTPS rather than HTTP, using the `sshare` command instead of `share` will enable you to do so.

> [!WARNING]
> Remember, Vagrant is inherently insecure and you are exposing your virtual machine to the Internet when running the `share` command.

<a name="debugging-and-profiling"></a>
## Debugging and Profiling

<a name="debugging-web-requests"></a>
### Debugging Web Requests With Xdebug

Homestead includes support for step debugging using [Xdebug](https://xdebug.org). For example, you can access a page in your browser and PHP will connect to your IDE to allow inspection and modification of the running code.

By default, Xdebug is already running and ready to accept connections. If you need to enable Xdebug on the CLI, execute the `sudo phpenmod xdebug` command within your Homestead virtual machine. Next, follow your IDE's instructions to enable debugging. Finally, configure your browser to trigger Xdebug with an extension or [bookmarklet](https://www.jetbrains.com/phpstorm/marklets/).

> [!WARNING]
> Xdebug causes PHP to run significantly slower. To disable Xdebug, run `sudo phpdismod xdebug` within your Homestead virtual machine and restart the FPM service.

<a name="autostarting-xdebug"></a>
#### Autostarting Xdebug

When debugging functional tests that make requests to the web server, it is easier to autostart debugging rather than modifying tests to pass through a custom header or cookie to trigger debugging. To force Xdebug to start automatically, modify the `/etc/php/7.x/fpm/conf.d/20-xdebug.ini` file inside your Homestead virtual machine and add the following configuration:

```ini
; If Homestead.yaml contains a different subnet for the IP address, this address may be different...
xdebug.client_host = 192.168.10.1
xdebug.mode = debug
xdebug.start_with_request = yes
```

<a name="debugging-cli-applications"></a>
### Debugging CLI Applications

To debug a PHP CLI application, use the `xphp` shell alias inside your Homestead virtual machine:

```shell
xphp /path/to/script
```

<a name="profiling-applications-with-blackfire"></a>
### Profiling Applications With Blackfire

[Blackfire](https://blackfire.io/docs/introduction) is a service for profiling web requests and CLI applications. It offers an interactive user interface which displays profile data in call-graphs and timelines. It is built for use in development, staging, and production, with no overhead for end users. In addition, Blackfire provides performance, quality, and security checks on code and `php.ini` configuration settings.

The [Blackfire Player](https://blackfire.io/docs/player/index) is an open-source Web Crawling, Web Testing, and Web Scraping application which can work jointly with Blackfire in order to script profiling scenarios.

To enable Blackfire, use the "features" setting in your Homestead configuration file:

```yaml
features:
    - blackfire:
        server_id: "server_id"
        server_token: "server_value"
        client_id: "client_id"
        client_token: "client_value"
```

Blackfire server credentials and client credentials [require a Blackfire account](https://blackfire.io/signup). Blackfire offers various options to profile an application, including a CLI tool and browser extension. Please [review the Blackfire documentation for more details](https://blackfire.io/docs/php/integrations/laravel/index).

<a name="network-interfaces"></a>
## Network Interfaces

The `networks` property of the `Homestead.yaml` file configures network interfaces for your Homestead virtual machine. You may configure as many interfaces as necessary:

```yaml
networks:
    - type: "private_network"
      ip: "192.168.10.20"
```

To enable a [bridged](https://developer.hashicorp.com/vagrant/docs/networking/public_network) interface, configure a `bridge` setting for the network and change the network type to `public_network`:

```yaml
networks:
    - type: "public_network"
      ip: "192.168.10.20"
      bridge: "en1: Wi-Fi (AirPort)"
```

To enable [DHCP](https://developer.hashicorp.com/vagrant/docs/networking/public_network#dhcp), just remove the `ip` option from your configuration:

```yaml
networks:
    - type: "public_network"
      bridge: "en1: Wi-Fi (AirPort)"
```

To update what device the network is using, you may add a `dev` option to the network's configuration. The default `dev` value is `eth0`:

```yaml
networks:
    - type: "public_network"
      ip: "192.168.10.20"
      bridge: "en1: Wi-Fi (AirPort)"
      dev: "enp2s0"
```

<a name="extending-homestead"></a>
## Extending Homestead

You may extend Homestead using the `after.sh` script in the root of your Homestead directory. Within this file, you may add any shell commands that are necessary to properly configure and customize your virtual machine.

When customizing Homestead, Ubuntu may ask you if you would like to keep a package's original configuration or overwrite it with a new configuration file. To avoid this, you should use the following command when installing packages in order to avoid overwriting any configuration previously written by Homestead:

```shell
sudo apt-get -y \
    -o Dpkg::Options::="--force-confdef" \
    -o Dpkg::Options::="--force-confold" \
    install package-name
```

<a name="user-customizations"></a>
### User Customizations

When using Homestead with your team, you may want to tweak Homestead to better fit your personal development style. To accomplish this, you may create a `user-customizations.sh` file in the root of your Homestead directory (the same directory containing your `Homestead.yaml` file). Within this file, you may make any customization you would like; however, the `user-customizations.sh` should not be version controlled.

<a name="provider-specific-settings"></a>
## Provider Specific Settings

<a name="provider-specific-virtualbox"></a>
### VirtualBox

<a name="natdnshostresolver"></a>
#### `natdnshostresolver`

By default, Homestead configures the `natdnshostresolver` setting to `on`. This allows Homestead to use your host operating system's DNS settings. If you would like to override this behavior, add the following configuration options to your `Homestead.yaml` file:

```yaml
provider: virtualbox
natdnshostresolver: 'off'
```


---

# Laravel Horizon

*Sección: Laravel | Origen: https://laravel.com/docs/13.x/horizon*

- [Introduction](#introduction)
- [Installation](#installation)
    - [Configuration](#configuration)
    - [Dashboard Authorization](#dashboard-authorization)
    - [Max Job Attempts](#max-job-attempts)
    - [Job Timeout](#job-timeout)
    - [Job Backoff](#job-backoff)
    - [Other Worker Options](#other-worker-options)
    - [Silenced Jobs](#silenced-jobs)
- [Balancing Strategies](#balancing-strategies)
    - [Auto Balancing](#auto-balancing)
    - [Simple Balancing](#simple-balancing)
    - [No Balancing](#no-balancing)
- [Upgrading Horizon](#upgrading-horizon)
- [Running Horizon](#running-horizon)
    - [Deploying Horizon](#deploying-horizon)
- [Tags](#tags)
- [Notifications](#notifications)
- [Metrics](#metrics)
- [Deleting Failed Jobs](#deleting-failed-jobs)
- [Clearing Jobs From Queues](#clearing-jobs-from-queues)

<a name="introduction"></a>
## Introduction

> [!NOTE]
> Before digging into Laravel Horizon, you should familiarize yourself with Laravel's base [queue services](/docs/{{version}}/queues). Horizon augments Laravel's queue with additional features that may be confusing if you are not already familiar with the basic queue features offered by Laravel.

[Laravel Horizon](https://github.com/laravel/horizon) provides a beautiful dashboard and code-driven configuration for your Laravel powered [Redis queues](/docs/{{version}}/queues). Horizon allows you to easily monitor key metrics of your queue system such as job throughput, runtime, and job failures.

When using Horizon, all of your queue worker configuration is stored in a single, simple configuration file. By defining your application's worker configuration in a version controlled file, you may easily scale or modify your application's queue workers when deploying your application.
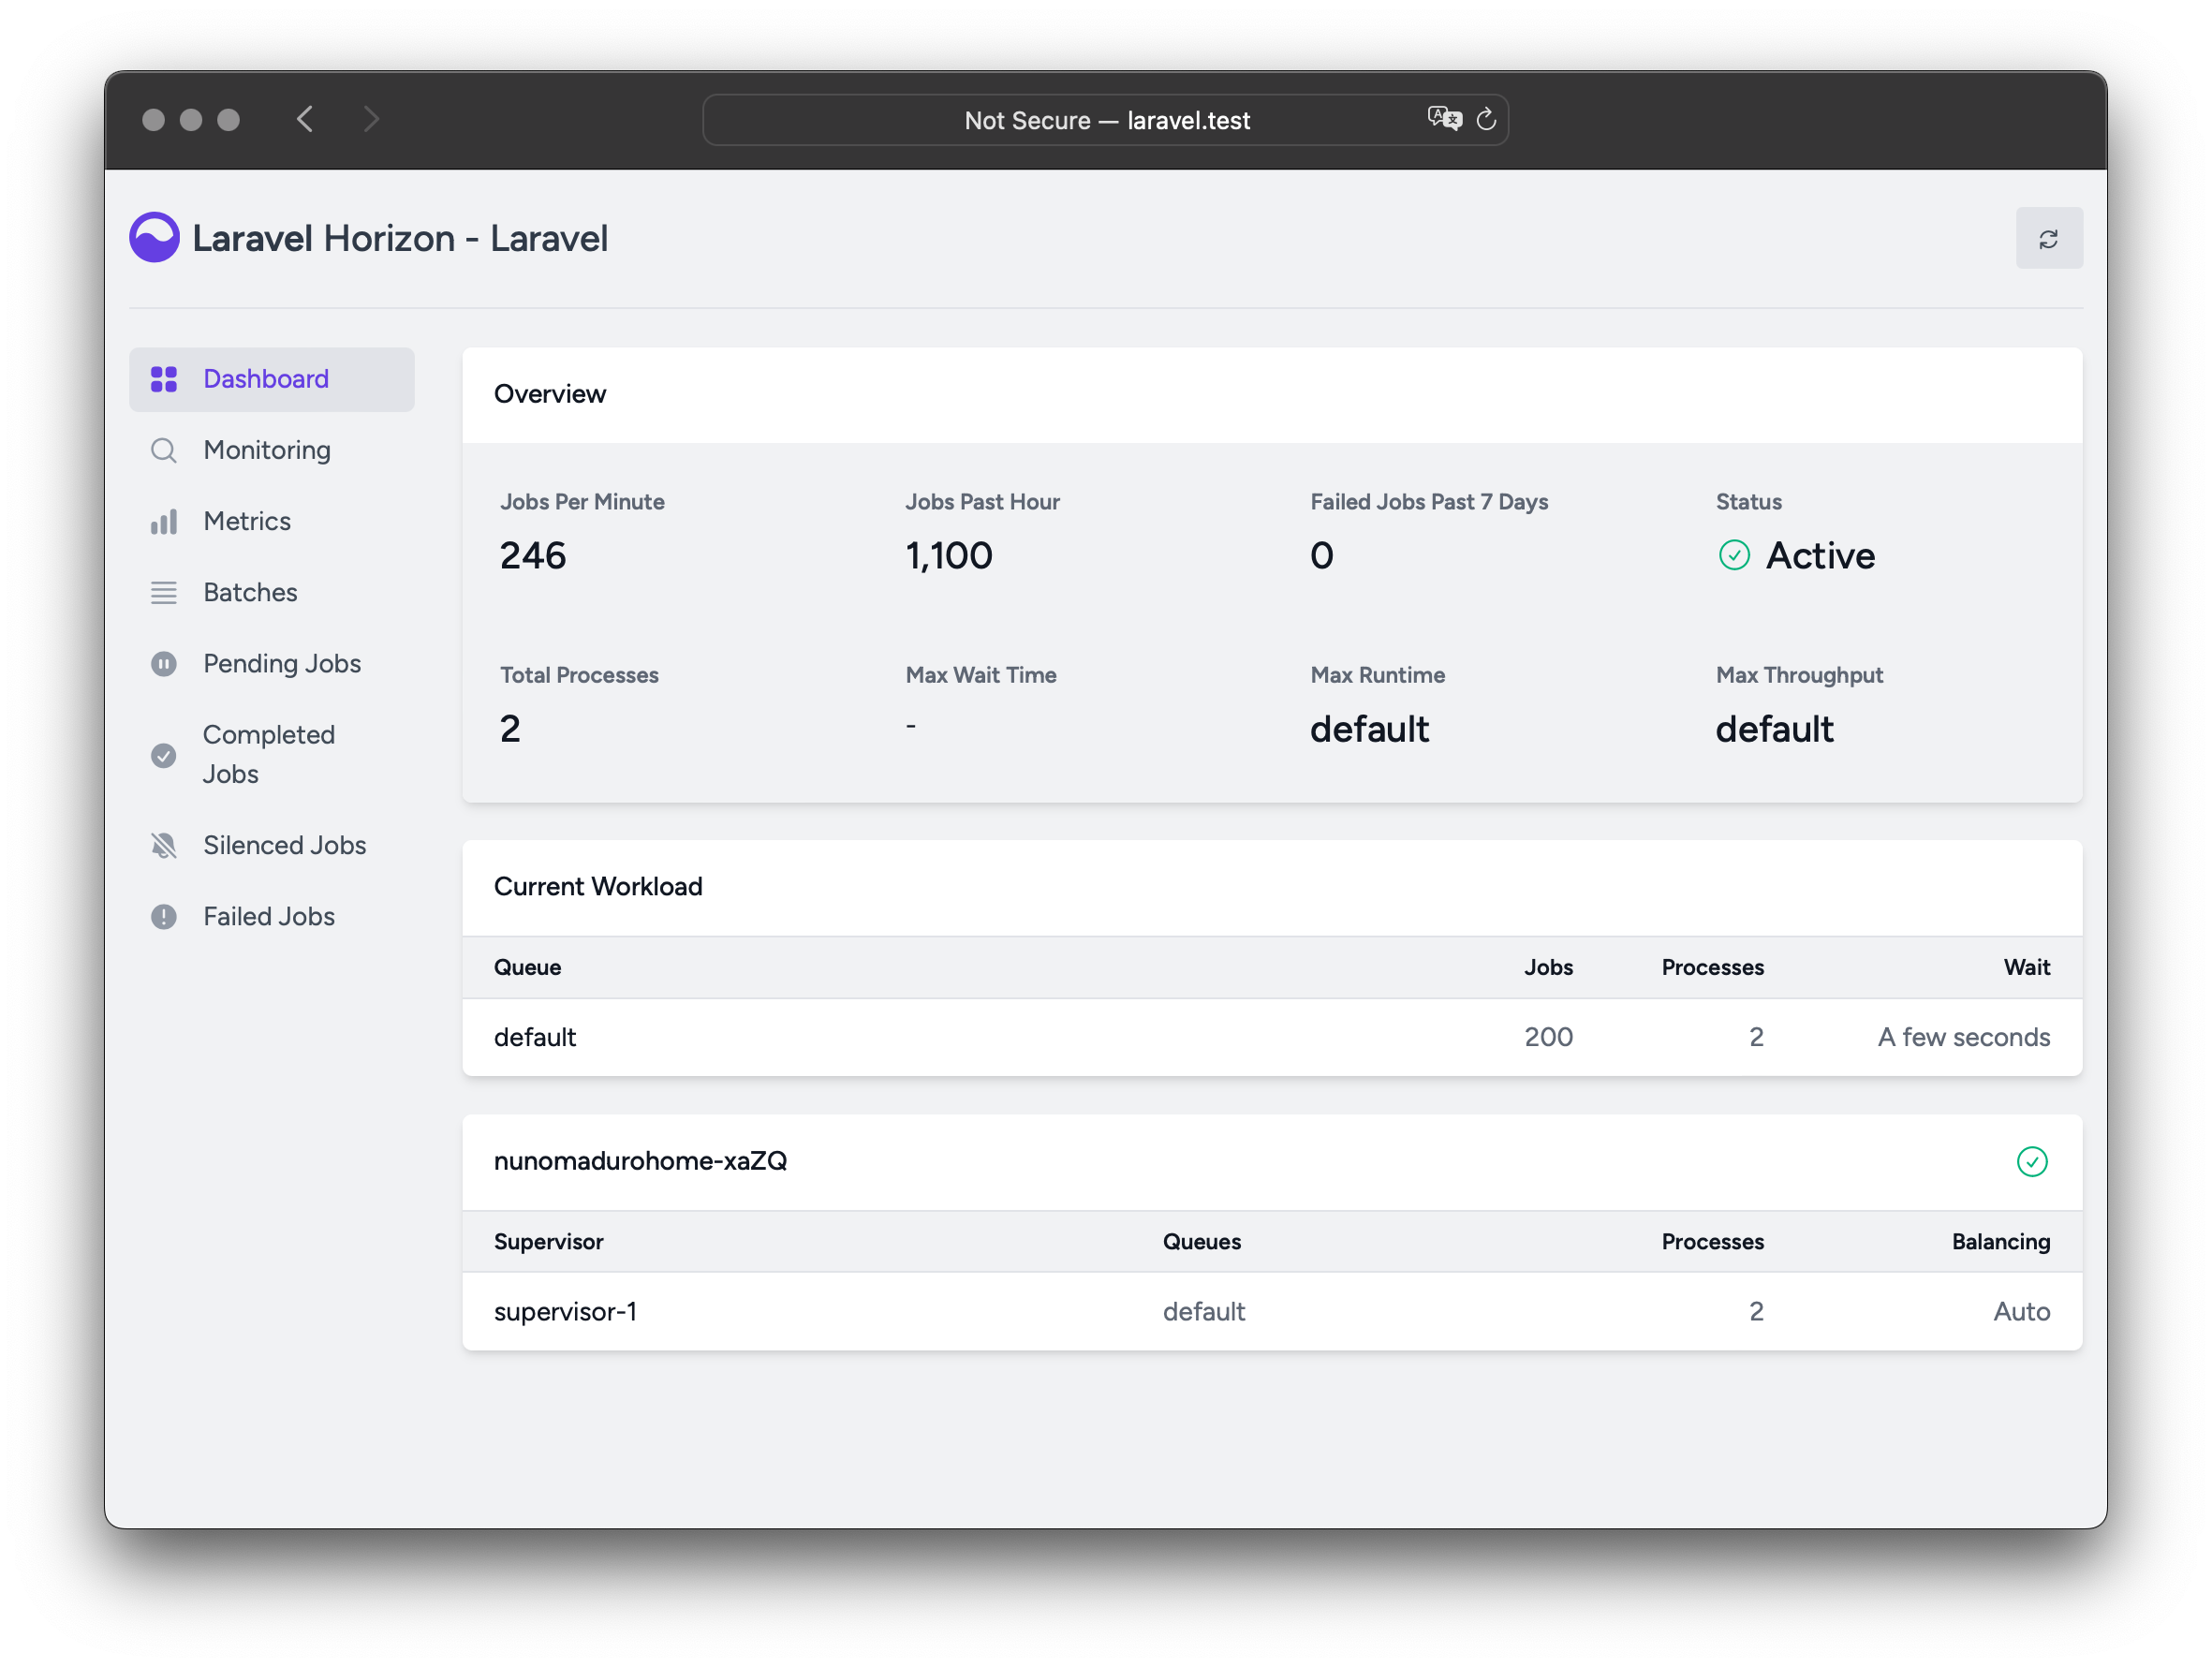
<img src="https://laravel.com/img/docs/horizon-example.png">

<a name="installation"></a>
## Installation

> [!WARNING]
> Laravel Horizon requires that you use [Redis](https://redis.io) to power your queue. Therefore, you should ensure that your queue connection is set to `redis` in your application's `config/queue.php` configuration file. Horizon is not compatible with Redis Cluster at this time.

You may install Horizon into your project using the Composer package manager:

```shell
composer require laravel/horizon
```

After installing Horizon, publish its assets using the `horizon:install` Artisan command:

```shell
php artisan horizon:install
```

<a name="configuration"></a>
### Configuration

After publishing Horizon's assets, its primary configuration file will be located at `config/horizon.php`. This configuration file allows you to configure the queue worker options for your application. Each configuration option includes a description of its purpose, so be sure to thoroughly explore this file.

> [!WARNING]
> Horizon uses a Redis connection named `horizon` internally. This Redis connection name is reserved and should not be assigned to another Redis connection in the `database.php` configuration file or as the value of the `use` option in the `horizon.php` configuration file.

<a name="content-security-policy-csp-nonce"></a>
#### Content Security Policy (CSP) Nonce

If you would like to use a [nonce attribute](https://developer.mozilla.org/en-US/docs/Web/HTML/Reference/Global_attributes/nonce) on the script and style tags used in Horizon views as part of your [Content Security Policy](https://developer.mozilla.org/en-US/docs/Web/HTTP/CSP), you may use the `Horizon::cspNonce` method to specify the nonce to use. This method should typically be invoked within middleware so that a new nonce is assigned for each request:

```php
use Closure;
use Illuminate\Http\Request;
use Laravel\Horizon\Horizon;
use Symfony\Component\HttpFoundation\Response;

public function handle(Request $request, Closure $next): Response
{
    Horizon::cspNonce('csp-nonce');

    return $next($request);
}
```

You may add this middleware to the `middleware` option in your application's `config/horizon.php` configuration file:

```php
'middleware' => [
    'web',
    App\Http\Middleware\AddHorizonCspNonce::class,
],
```

<a name="environments"></a>
#### Environments

After installation, the primary Horizon configuration option that you should familiarize yourself with is the `environments` configuration option. This configuration option is an array of environments that your application runs on and defines the worker process options for each environment. By default, this entry contains a `production` and `local` environment. However, you are free to add more environments as needed:

```php
'environments' => [
    'production' => [
        'supervisor-1' => [
            'maxProcesses' => 10,
            'balanceMaxShift' => 1,
            'balanceCooldown' => 3,
        ],
    ],

    'local' => [
        'supervisor-1' => [
            'maxProcesses' => 3,
        ],
    ],
],
```

You may also define a wildcard environment (`*`) which will be used when no other matching environment is found:

```php
'environments' => [
    // ...

    '*' => [
        'supervisor-1' => [
            'maxProcesses' => 3,
        ],
    ],
],
```

When you start Horizon, it will use the worker process configuration options for the environment that your application is running on. Typically, the environment is determined by the value of the `APP_ENV` [environment variable](/docs/{{version}}/configuration#determining-the-current-environment). For example, the default `local` Horizon environment is configured to start three worker processes and automatically balance the number of worker processes assigned to each queue. The default `production` environment is configured to start a maximum of 10 worker processes and automatically balance the number of worker processes assigned to each queue.

> [!WARNING]
> You should ensure that the `environments` portion of your `horizon` configuration file contains an entry for each [environment](/docs/{{version}}/configuration#environment-configuration) on which you plan to run Horizon.

<a name="supervisors"></a>
#### Supervisors

As you can see in Horizon's default configuration file, each environment can contain one or more "supervisors". By default, the configuration file defines this supervisor as `supervisor-1`; however, you are free to name your supervisors whatever you want. Each supervisor is essentially responsible for "supervising" a group of worker processes and takes care of balancing worker processes across queues.

You may add additional supervisors to a given environment if you would like to define a new group of worker processes that should run in that environment. You may choose to do this if you would like to define a different balancing strategy or worker process count for a given queue used by your application.

<a name="maintenance-mode"></a>
#### Maintenance Mode

While your application is in [maintenance mode](/docs/{{version}}/configuration#maintenance-mode), queued jobs will not be processed by Horizon unless the supervisor's `force` option is defined as `true` within the Horizon configuration file:

```php
'environments' => [
    'production' => [
        'supervisor-1' => [
            // ...
            'force' => true,
        ],
    ],
],
```

<a name="default-values"></a>
#### Default Values

Within Horizon's default configuration file, you will notice a `defaults` configuration option. This configuration option specifies the default values for your application's [supervisors](#supervisors). The supervisor's default configuration values will be merged into the supervisor's configuration for each environment, allowing you to avoid unnecessary repetition when defining your supervisors.

<a name="dashboard-authorization"></a>
### Dashboard Authorization

The Horizon dashboard may be accessed via the `/horizon` route. By default, you will only be able to access this dashboard in the `local` environment. However, within your `app/Providers/HorizonServiceProvider.php` file, there is an [authorization gate](/docs/{{version}}/authorization#gates) definition. This authorization gate controls access to Horizon in **non-local** environments. You are free to modify this gate as needed to restrict access to your Horizon installation:

```php
/**
 * Register the Horizon gate.
 *
 * This gate determines who can access Horizon in non-local environments.
 */
protected function gate(): void
{
    Gate::define('viewHorizon', function (User $user) {
        return in_array($user->email, [
            'taylor@laravel.com',
        ]);
    });
}
```

<a name="alternative-authentication-strategies"></a>
#### Alternative Authentication Strategies

Remember that Laravel automatically injects the authenticated user into the gate closure. If your application is providing Horizon security via another method, such as IP restrictions, then your Horizon users may not need to "login". Therefore, you will need to change `function (User $user)` closure signature above to `function (User $user = null)` in order to force Laravel to not require authentication.

<a name="max-job-attempts"></a>
### Max Job Attempts

> [!NOTE]
> Before refining these options, make sure you are familiar with Laravel's default [queue services](/docs/{{version}}/queues#max-job-attempts-and-timeout) and the concept of 'attempts'.

You can define the maximum number of attempts a job can consume within a supervisor's configuration:

```php
'environments' => [
    'production' => [
        'supervisor-1' => [
            // ...
            'tries' => 10,
        ],
    ],
],
```

> [!NOTE]
> This option is similar to the `--tries` option when using the Artisan command to process queues.

Adjusting the `tries` option is essential when using middlewares such as `WithoutOverlapping` or `RateLimited` because they consume attempts. To handle this, adjust the `tries` configuration value either at the supervisor level or by defining the `$tries` property on the job class.

If you don't set the `tries` option, Horizon defaults to a single attempt, unless the job class defines `$tries`, which takes precedence over the Horizon configuration.

Setting `tries` or `$tries` to 0 allows unlimited attempts, which is ideal when the number of attempts is uncertain. To prevent endless failures, you can limit the number of exceptions allowed by setting the `$maxExceptions` property on the job class.

<a name="job-timeout"></a>
### Job Timeout

Similarly, you can set a `timeout` value at the supervisor level, which specifies how many seconds a worker process can run a job before it's forcefully terminated. Once terminated, the job will either be retried or marked as failed, depending on your queue configuration:

```php
'environments' => [
    'production' => [
        'supervisor-1' => [
            // ...
            'timeout' => 60,
        ],
    ],
],
```

> [!WARNING]
> When using the `auto` balancing strategy, Horizon will consider in-progress workers as "hanging" and force-kill them after the Horizon timeout during scale down. Always ensure the Horizon timeout is greater than any job-level timeout, otherwise jobs may be terminated mid-execution. In addition, the `timeout` value should always be at least a few seconds shorter than the `retry_after` value defined in your `config/queue.php` configuration file. Otherwise, your jobs may be processed twice.

<a name="job-backoff"></a>
### Job Backoff

You can define the `backoff` value at the supervisor level to specify how long Horizon should wait before retrying a job that encounters an unhandled exception:

```php
'environments' => [
    'production' => [
        'supervisor-1' => [
            // ...
            'backoff' => 10,
        ],
    ],
],
```

You may also configure "exponential" backoffs by using an array for the `backoff` value. In this example, the retry delay will be 1 second for the first retry, 5 seconds for the second retry, 10 seconds for the third retry, and 10 seconds for every subsequent retry if there are more attempts remaining:

```php
'environments' => [
    'production' => [
        'supervisor-1' => [
            // ...
            'backoff' => [1, 5, 10],
        ],
    ],
],
```

<a name="other-worker-options"></a>
### Other Worker Options

In addition to `tries`, `timeout`, and `backoff`, each supervisor accepts several other options that control how its worker processes behave and when they are automatically restarted. Periodically restarting workers is a good practice for long-running processes, as it helps guard against memory leaks:

```php
'environments' => [
    'production' => [
        'supervisor-1' => [
            // ...
            'memory' => 128,
            'maxJobs' => 1000,
            'maxTime' => 3600,
            'sleep' => 3,
            'rest' => 0,
            'nice' => 0,
        ],
    ],
],
```

<div class="content-list" markdown="1">

- `memory` defines the maximum amount of memory, in megabytes, that a single worker process may consume before it is restarted. By default, this value is `128`.
- `maxJobs` defines the number of jobs a worker should process before restarting. A value of `0` indicates that workers should not be restarted based on the number of jobs processed. By default, this value is `0`.
- `maxTime` defines the number of seconds a worker should run before restarting. A value of `0` indicates that workers should not be restarted based on time. By default, this value is `0`.
- `sleep` defines the number of seconds a worker should wait when no job is available before polling the queue for new jobs again. By default, this value is `3`.
- `rest` defines the number of seconds to pause between processing each job. By default, this value is `0`.
- `nice` defines the "niceness" (scheduling priority) of the worker processes. A higher value gives the process a lower priority. By default, this value is `0`.

</div>

<a name="silenced-jobs"></a>
### Silenced Jobs

Sometimes, you may not be interested in viewing certain jobs dispatched by your application or third-party packages. Instead of these jobs taking up space in your "Completed Jobs" list, you can silence them. To get started, add the job's class name to the `silenced` configuration option in your application's `horizon` configuration file:

```php
'silenced' => [
    App\Jobs\ProcessPodcast::class,
],
```

In addition to silencing individual job classes, Horizon also supports silencing jobs based on [tags](#tags). This can be useful if you want to hide multiple jobs that share a common tag:

```php
'silenced_tags' => [
    'notifications'
],
```

Alternatively, the job you wish to silence can implement the `Laravel\Horizon\Contracts\Silenced` interface. If a job implements this interface, it will automatically be silenced, even if it is not present in the `silenced` configuration array:

```php
use Laravel\Horizon\Contracts\Silenced;

class ProcessPodcast implements ShouldQueue, Silenced
{
    use Queueable;

    // ...
}
```

<a name="balancing-strategies"></a>
## Balancing Strategies

Each supervisor can process one or more queues but unlike Laravel's default queue system, Horizon allows you to choose from three worker balancing strategies: `auto`, `simple`, and `false`.

<a name="auto-balancing"></a>
### Auto Balancing

The `auto` strategy, which is the default strategy, adjusts the number of worker processes per queue based on the current workload of the queue. For example, if your `notifications` queue has 1,000 pending jobs while your `default` queue is empty, Horizon will allocate more workers to your `notifications` queue until the queue is empty.

When using the `auto` strategy, you may also configure the `minProcesses` and `maxProcesses` configuration options:

<div class="content-list" markdown="1">

- `minProcesses` defines the minimum number of worker processes per queue. This value must be greater than or equal to 1.
- `maxProcesses` defines the maximum total number of worker processes Horizon may scale up to across all queues. This value should typically be greater than the number of queues multiplied by the `minProcesses` value. To prevent the supervisor from spawning any processes, you may set this value to 0.

</div>

For example, you may configure Horizon to maintain at least one process per queue and scale up to a total of 10 worker processes:

```php
'environments' => [
    'production' => [
        'supervisor-1' => [
            'connection' => 'redis',
            'queue' => ['default', 'notifications'],
            'balance' => 'auto',
            'autoScalingStrategy' => 'time',
            'minProcesses' => 1,
            'maxProcesses' => 10,
            'balanceMaxShift' => 1,
            'balanceCooldown' => 3,
        ],
    ],
],
```

The `autoScalingStrategy` configuration option determines how Horizon will assign more worker processes to queues. You can choose between two strategies:

<div class="content-list" markdown="1">

- The `time` strategy will assign workers based on the total estimated amount of time it will take to clear the queue.
- The `size` strategy will assign workers based on the total number of jobs on the queue.

</div>

The `balanceMaxShift` and `balanceCooldown` configuration values determine how quickly Horizon will scale to meet worker demand. In the example above, a maximum of one new process will be created or destroyed every three seconds. You are free to tweak these values as necessary based on your application's needs.

<a name="auto-queue-priorities"></a>
#### Queue Priorities and Auto Balancing

When using the `auto` balancing strategy, Horizon does not enforce strict priority between queues. The order of queues in a supervisor's configuration does not affect how worker processes are assigned. Instead, Horizon relies on the selected `autoScalingStrategy` to dynamically allocate worker processes based on queue load.

For example, in the following configuration, the high queue is not prioritized over the default queue, despite appearing first in the list:

```php
'environments' => [
    'production' => [
        'supervisor-1' => [
            // ...
            'queue' => ['high', 'default'],
            'minProcesses' => 1,
            'maxProcesses' => 10,
        ],
    ],
],
```

If you need to enforce a relative priority between queues, you may define multiple supervisors and explicitly allocate processing resources:

```php
'environments' => [
    'production' => [
        'supervisor-1' => [
            // ...
            'queue' => ['default'],
            'minProcesses' => 1,
            'maxProcesses' => 10,
        ],
        'supervisor-2' => [
            // ...
            'queue' => ['images'],
            'minProcesses' => 1,
            'maxProcesses' => 1,
        ],
    ],
],
```

In this example, the default `queue` can scale up to 10 processes, while the `images` queue is limited to one process. This configuration ensures that your queues can scale independently.

> [!NOTE]
> When dispatching resource-intensive jobs, it's sometimes best to assign them to a dedicated queue with a limited `maxProcesses` value. Otherwise, these jobs could consume excessive CPU resources and overload your system.

<a name="simple-balancing"></a>
### Simple Balancing

The `simple` strategy distributes worker processes evenly across the specified queues. With this strategy, Horizon does not automatically scale the number of worker processes. Rather, it uses a fixed number of processes:

```php
'environments' => [
    'production' => [
        'supervisor-1' => [
            // ...
            'queue' => ['default', 'notifications'],
            'balance' => 'simple',
            'processes' => 10,
        ],
    ],
],
```

In the example above, Horizon will assign 5 processes to each queue, splitting the total of 10 evenly.

If you'd like to control the number of worker processes assigned to each queue individually, you can define multiple supervisors:

```php
'environments' => [
    'production' => [
        'supervisor-1' => [
            // ...
            'queue' => ['default'],
            'balance' => 'simple',
            'processes' => 10,
        ],
        'supervisor-notifications' => [
            // ...
            'queue' => ['notifications'],
            'balance' => 'simple',
            'processes' => 2,
        ],
    ],
],
```

With this configuration, Horizon will assign 10 processes to the `default` queue and 2 processes to the `notifications` queue.

<a name="no-balancing"></a>
### No Balancing

When the `balance` option is set to `false`, Horizon processes queues strictly in the order they're listed, similar to Laravel's default queue system. However, it will still scale the number of worker processes if jobs begin to accumulate:

```php
'environments' => [
    'production' => [
        'supervisor-1' => [
            // ...
            'queue' => ['default', 'notifications'],
            'balance' => false,
            'minProcesses' => 1,
            'maxProcesses' => 10,
        ],
    ],
],
```

In the example above, jobs in the `default` queue are always prioritized over jobs in the `notifications` queue. For instance, if there are 1,000 jobs in `default` and only 10 in `notifications`, Horizon will fully process all `default` jobs before handling any from `notifications`.

You can control Horizon's ability to scale worker processes using the `minProcesses` and `maxProcesses` options:

<div class="content-list" markdown="1">

- `minProcesses` defines the minimum number of worker processes in total. This value must be greater than or equal to 1.
- `maxProcesses` defines the maximum total number of worker processes Horizon may scale up to.

</div>

<a name="upgrading-horizon"></a>
## Upgrading Horizon

When upgrading to a new major version of Horizon, it's important that you carefully review [the upgrade guide](https://github.com/laravel/horizon/blob/master/UPGRADE.md).

<a name="running-horizon"></a>
## Running Horizon

Once you have configured your supervisors and workers in your application's `config/horizon.php` configuration file, you may start Horizon using the `horizon` Artisan command. This single command will start all of the configured worker processes for the current environment:

```shell
php artisan horizon
```

You may pause the Horizon process and instruct it to continue processing jobs using the `horizon:pause` and `horizon:continue` Artisan commands:

```shell
php artisan horizon:pause

php artisan horizon:continue
```

You may also pause and continue specific Horizon [supervisors](#supervisors) using the `horizon:pause-supervisor` and `horizon:continue-supervisor` Artisan commands:

```shell
php artisan horizon:pause-supervisor supervisor-1

php artisan horizon:continue-supervisor supervisor-1
```

You may check the current status of the Horizon process using the `horizon:status` Artisan command:

```shell
php artisan horizon:status
```

You may check the current status of a specific Horizon [supervisor](#supervisors) using the `horizon:supervisor-status` Artisan command:

```shell
php artisan horizon:supervisor-status supervisor-1
```

You may gracefully terminate the Horizon process using the `horizon:terminate` Artisan command. Any jobs that are currently being processed will be completed and then Horizon will stop executing:

```shell
php artisan horizon:terminate
```

<a name="automatically-restarting-horizon"></a>
#### Automatically Restarting Horizon

During local development, you may run the `horizon:listen` command. When using the `horizon:listen` command, you don't have to manually restart Horizon when you want to reload your updated code. Before using this feature, you should ensure that [Node](https://nodejs.org) is installed within your local development environment. In addition, you should install the [Chokidar](https://github.com/paulmillr/chokidar) file-watching library within your project:

```shell
npm install --save-dev chokidar
```

Once Chokidar is installed, you may start Horizon using the `horizon:listen` command:

```shell
php artisan horizon:listen
```

When running within Docker or Vagrant, you should use the `--poll` option:

```shell
php artisan horizon:listen --poll
```

You may configure the directories and files that should be watched using the `watch` configuration option within your application's `config/horizon.php` configuration file:

```php
'watch' => [
    'app',
    'bootstrap',
    'config',
    'database',
    'public/**/*.php',
    'resources/**/*.php',
    'routes',
    'composer.lock',
    '.env',
],
```

<a name="deploying-horizon"></a>
### Deploying Horizon

When you're ready to deploy Horizon to your application's actual server, you should configure a process monitor to monitor the `php artisan horizon` command and restart it if it exits unexpectedly. Don't worry, we'll discuss how to install a process monitor below.

During your application's deployment process, you should instruct the Horizon process to terminate so that it will be restarted by your process monitor and receive your code changes:

```shell
php artisan horizon:terminate
```

<a name="installing-supervisor"></a>
#### Installing Supervisor

Supervisor is a process monitor for the Linux operating system and will automatically restart your `horizon` process if it stops executing. To install Supervisor on Ubuntu, you may use the following command. If you are not using Ubuntu, you can likely install Supervisor using your operating system's package manager:

```shell
sudo apt-get install supervisor
```

> [!NOTE]
> If configuring Supervisor yourself sounds overwhelming, consider using [Laravel Cloud](https://cloud.laravel.com), which can manage background processes for your Laravel applications.

<a name="supervisor-configuration"></a>
#### Supervisor Configuration

Supervisor configuration files are typically stored within your server's `/etc/supervisor/conf.d` directory. Within this directory, you may create any number of configuration files that instruct supervisor how your processes should be monitored. For example, let's create a `horizon.conf` file that starts and monitors a `horizon` process:

```ini
[program:horizon]
process_name=%(program_name)s
command=php /home/forge/example.com/artisan horizon
autostart=true
autorestart=true
user=forge
redirect_stderr=true
stdout_logfile=/home/forge/example.com/horizon.log
stopwaitsecs=3600
```

When defining your Supervisor configuration, you should ensure that the value of `stopwaitsecs` is greater than the number of seconds consumed by your longest running job. Otherwise, Supervisor may kill the job before it is finished processing.

> [!WARNING]
> While the examples above are valid for Ubuntu based servers, the location and file extension expected of Supervisor configuration files may vary between other server operating systems. Please consult your server's documentation for more information.

<a name="starting-supervisor"></a>
#### Starting Supervisor

Once the configuration file has been created, you may update the Supervisor configuration and start the monitored processes using the following commands:

```shell
sudo supervisorctl reread

sudo supervisorctl update

sudo supervisorctl start horizon
```

> [!NOTE]
> For more information on running Supervisor, consult the [Supervisor documentation](http://supervisord.org/index.html).

<a name="tags"></a>
## Tags

Horizon allows you to assign "tags" to jobs, including mailables, broadcast events, notifications, and queued event listeners. In fact, Horizon will intelligently and automatically tag most jobs depending on the Eloquent models that are attached to the job. For example, take a look at the following job:

```php
<?php

namespace App\Jobs;

use App\Models\Video;
use Illuminate\Contracts\Queue\ShouldQueue;
use Illuminate\Foundation\Queue\Queueable;

class RenderVideo implements ShouldQueue
{
    use Queueable;

    /**
     * Create a new job instance.
     */
    public function __construct(
        public Video $video,
    ) {}

    /**
     * Execute the job.
     */
    public function handle(): void
    {
        // ...
    }
}
```

If this job is queued with an `App\Models\Video` instance that has an `id` attribute of `1`, it will automatically receive the tag `App\Models\Video:1`. This is because Horizon will search the job's properties for any Eloquent models. If Eloquent models are found, Horizon will intelligently tag the job using the model's class name and primary key:

```php
use App\Jobs\RenderVideo;
use App\Models\Video;

$video = Video::find(1);

RenderVideo::dispatch($video);
```

<a name="manually-tagging-jobs"></a>
#### Manually Tagging Jobs

If you would like to manually define the tags for one of your queueable objects, you may define a `tags` method on the class:

```php
class RenderVideo implements ShouldQueue
{
    /**
     * Get the tags that should be assigned to the job.
     *
     * @return array<int, string>
     */
    public function tags(): array
    {
        return ['render', 'video:'.$this->video->id];
    }
}
```

<a name="manually-tagging-event-listeners"></a>
#### Manually Tagging Event Listeners

When retrieving the tags for a queued event listener, Horizon will automatically pass the event instance to the `tags` method, allowing you to add event data to the tags:

```php
class SendRenderNotifications implements ShouldQueue
{
    /**
     * Get the tags that should be assigned to the listener.
     *
     * @return array<int, string>
     */
    public function tags(VideoRendered $event): array
    {
        return ['video:'.$event->video->id];
    }
}
```

<a name="notifications"></a>
## Notifications

> [!WARNING]
> When configuring Horizon to send Slack or SMS notifications, you should review the [prerequisites for the relevant notification channel](/docs/{{version}}/notifications).

If you would like to be notified when one of your queues has a long wait time, you may use the `Horizon::routeMailNotificationsTo`, `Horizon::routeSlackNotificationsTo`, and `Horizon::routeSmsNotificationsTo` methods. You may call these methods from the `boot` method of your application's `App\Providers\HorizonServiceProvider`:

```php
/**
 * Bootstrap any application services.
 */
public function boot(): void
{
    parent::boot();

    Horizon::routeSmsNotificationsTo('15556667777');
    Horizon::routeMailNotificationsTo('example@example.com');
    Horizon::routeSlackNotificationsTo('slack-webhook-url', '#channel');
}
```

<a name="configuring-notification-wait-time-thresholds"></a>
#### Configuring Notification Wait Time Thresholds

You may configure how many seconds are considered a "long wait" within your application's `config/horizon.php` configuration file. The `waits` configuration option within this file allows you to control the long wait threshold for each connection / queue combination. Any undefined connection / queue combinations will default to a long wait threshold of 60 seconds:

```php
'waits' => [
    'redis:critical' => 30,
    'redis:default' => 60,
    'redis:batch' => 120,
],
```

Setting a queue's threshold to `0` will disable long wait notifications for that queue.

<a name="metrics"></a>
## Metrics

Horizon includes a metrics dashboard which provides information regarding your job and queue wait times and throughput. In order to populate this dashboard, you should configure Horizon's `snapshot` Artisan command to run every five minutes in your application's `routes/console.php` file:

```php
use Illuminate\Support\Facades\Schedule;

Schedule::command('horizon:snapshot')->everyFiveMinutes();
```

You may configure how many snapshots Horizon retains for its metrics graphs using the `metrics.trim_snapshots` option in your application's `config/horizon.php` configuration file. Because this option limits the number of snapshots rather than their age, the retention period depends on how frequently the `horizon:snapshot` command runs:

```php
'metrics' => [
    'trim_snapshots' => [
        'job' => 24,
        'queue' => 24,
    ],
],
```

If you would like to delete all metric data, you can invoke the `horizon:clear-metrics` Artisan command:

```shell
php artisan horizon:clear-metrics
```

<a name="deleting-failed-jobs"></a>
## Deleting Failed Jobs

If you would like to delete a failed job, you may use the `horizon:forget` command. The `horizon:forget` command accepts the ID or UUID of the failed job as its only argument:

```shell
php artisan horizon:forget 5
```

If you would like to delete all failed jobs, you may provide the `--all` option to the `horizon:forget` command:

```shell
php artisan horizon:forget --all
```

<a name="clearing-jobs-from-queues"></a>
## Clearing Jobs From Queues

If you would like to delete all jobs from your application's default queue, you may do so using the `horizon:clear` Artisan command:

```shell
php artisan horizon:clear
```

You may provide the `queue` option to delete jobs from a specific queue:

```shell
php artisan horizon:clear --queue=emails
```


---

# HTTP Client

*Sección: Laravel | Origen: https://laravel.com/docs/13.x/http-client*

- [Introduction](#introduction)
- [Making Requests](#making-requests)
    - [Request Data](#request-data)
    - [Headers](#headers)
    - [Authentication](#authentication)
    - [Timeout](#timeout)
    - [Retries](#retries)
    - [Error Handling](#error-handling)
    - [Guzzle Middleware](#guzzle-middleware)
    - [Guzzle Options](#guzzle-options)
- [Concurrent Requests](#concurrent-requests)
    - [Request Pooling](#request-pooling)
    - [Request Batching](#request-batching)
- [Macros](#macros)
- [Testing](#testing)
    - [Faking Responses](#faking-responses)
    - [Inspecting Requests](#inspecting-requests)
    - [Preventing Stray Requests](#preventing-stray-requests)
- [Events](#events)

<a name="introduction"></a>
## Introduction

Laravel provides an expressive, minimal API around the [Guzzle HTTP client](http://docs.guzzlephp.org/en/stable/), allowing you to quickly make outgoing HTTP requests to communicate with other web applications. Laravel's wrapper around Guzzle is focused on its most common use cases and a wonderful developer experience.

<a name="making-requests"></a>
## Making Requests

To make requests, you may use the `head`, `get`, `post`, `put`, `patch`, and `delete` methods provided by the `Http` facade. First, let's examine how to make a basic `GET` request to another URL:

```php
use Illuminate\Support\Facades\Http;

$response = Http::get('http://example.com');
```

The `get` method returns an instance of `Illuminate\Http\Client\Response`, which provides a variety of methods that may be used to inspect the response:

```php
$response->body() : string;
$response->json($key = null, $default = null, $flags = null) : mixed;
$response->object() : object;
$response->collect($key = null) : Illuminate\Support\Collection;
$response->resource() : resource;
$response->status() : int;
$response->successful() : bool;
$response->redirect(): bool;
$response->failed() : bool;
$response->clientError() : bool;
$response->header($header) : string;
$response->headers() : array;
```

The `Illuminate\Http\Client\Response` object also implements the PHP `ArrayAccess` interface, allowing you to access JSON response data directly on the response:

```php
return Http::get('http://example.com/users/1')['name'];
```

In addition to the response methods listed above, the following methods may be used to determine if the response has a specific status code:

```php
$response->ok() : bool;                  // 200 OK
$response->created() : bool;             // 201 Created
$response->accepted() : bool;            // 202 Accepted
$response->noContent() : bool;           // 204 No Content
$response->movedPermanently() : bool;    // 301 Moved Permanently
$response->found() : bool;               // 302 Found
$response->badRequest() : bool;          // 400 Bad Request
$response->unauthorized() : bool;        // 401 Unauthorized
$response->paymentRequired() : bool;     // 402 Payment Required
$response->forbidden() : bool;           // 403 Forbidden
$response->notFound() : bool;            // 404 Not Found
$response->requestTimeout() : bool;      // 408 Request Timeout
$response->conflict() : bool;            // 409 Conflict
$response->unprocessableEntity() : bool; // 422 Unprocessable Entity
$response->tooManyRequests() : bool;     // 429 Too Many Requests
$response->serverError() : bool;         // 500 Internal Server Error
```

<a name="uri-templates"></a>
#### URI Templates

The HTTP client also allows you to construct request URLs using the [URI template specification](https://www.rfc-editor.org/rfc/rfc6570). To define the URL parameters that can be expanded by your URI template, you may use the `withUrlParameters` method:

```php
Http::withUrlParameters([
    'endpoint' => 'https://laravel.com',
    'page' => 'docs',
    'version' => '13.x',
    'topic' => 'validation',
])->get('{+endpoint}/{page}/{version}/{topic}');
```

<a name="dumping-requests"></a>
#### Dumping Requests

If you would like to dump the outgoing request instance before it is sent and terminate the script's execution, you may add the `dd` method to the beginning of your request definition:

```php
return Http::dd()->get('http://example.com');
```

<a name="request-data"></a>
### Request Data

Of course, it is common when making `POST`, `PUT`, and `PATCH` requests to send additional data with your request, so these methods accept an array of data as their second argument. By default, data will be sent using the `application/json` content type:

```php
use Illuminate\Support\Facades\Http;

$response = Http::post('http://example.com/users', [
    'name' => 'Steve',
    'role' => 'Network Administrator',
]);
```

<a name="get-request-query-parameters"></a>
#### GET Request Query Parameters

When making `GET` requests, you may either append a query string to the URL directly or pass an array of key / value pairs as the second argument to the `get` method:

```php
$response = Http::get('http://example.com/users', [
    'name' => 'Taylor',
    'page' => 1,
]);
```

Alternatively, the `withQueryParameters` method may be used:

```php
Http::retry(3, 100)->withQueryParameters([
    'name' => 'Taylor',
    'page' => 1,
])->get('http://example.com/users');
```

<a name="sending-form-url-encoded-requests"></a>
#### Sending Form URL Encoded Requests

If you would like to send data using the `application/x-www-form-urlencoded` content type, you should call the `asForm` method before making your request:

```php
$response = Http::asForm()->post('http://example.com/users', [
    'name' => 'Sara',
    'role' => 'Privacy Consultant',
]);
```

<a name="sending-a-raw-request-body"></a>
#### Sending a Raw Request Body

You may use the `withBody` method if you would like to provide a raw request body when making a request. The content type may be provided via the method's second argument:

```php
$response = Http::withBody(
    base64_encode($photo), 'image/jpeg'
)->post('http://example.com/photo');
```

<a name="multi-part-requests"></a>
#### Multi-Part Requests

If you would like to send files as multi-part requests, you should call the `attach` method before making your request. This method accepts the name of the file and its contents. If needed, you may provide a third argument which will be considered the file's filename, while a fourth argument may be used to provide headers associated with the file:

```php
$response = Http::attach(
    'attachment', file_get_contents('photo.jpg'), 'photo.jpg', ['Content-Type' => 'image/jpeg']
)->post('http://example.com/attachments');
```

Instead of passing the raw contents of a file, you may pass a stream resource:

```php
$photo = fopen('photo.jpg', 'r');

$response = Http::attach(
    'attachment', $photo, 'photo.jpg'
)->post('http://example.com/attachments');
```

<a name="headers"></a>
### Headers

Headers may be added to requests using the `withHeaders` method. This `withHeaders` method accepts an array of key / value pairs:

```php
$response = Http::withHeaders([
    'X-First' => 'foo',
    'X-Second' => 'bar'
])->post('http://example.com/users', [
    'name' => 'Taylor',
]);
```

You may use the `accept` method to specify the content type that your application is expecting in response to your request:

```php
$response = Http::accept('application/json')->get('http://example.com/users');
```

For convenience, you may use the `acceptJson` method to quickly specify that your application expects the `application/json` content type in response to your request:

```php
$response = Http::acceptJson()->get('http://example.com/users');
```

The `withHeaders` method merges new headers into the request's existing headers. If needed, you may replace all of the headers entirely using the `replaceHeaders` method:

```php
$response = Http::withHeaders([
    'X-Original' => 'foo',
])->replaceHeaders([
    'X-Replacement' => 'bar',
])->post('http://example.com/users', [
    'name' => 'Taylor',
]);
```

<a name="authentication"></a>
### Authentication

You may specify basic and digest authentication credentials using the `withBasicAuth` and `withDigestAuth` methods, respectively:

```php
// Basic authentication...
$response = Http::withBasicAuth('taylor@laravel.com', 'secret')->post(/* ... */);

// Digest authentication...
$response = Http::withDigestAuth('taylor@laravel.com', 'secret')->post(/* ... */);
```

<a name="bearer-tokens"></a>
#### Bearer Tokens

If you would like to quickly add a bearer token to the request's `Authorization` header, you may use the `withToken` method:

```php
$response = Http::withToken('token')->post(/* ... */);
```

<a name="timeout"></a>
### Timeout

The `timeout` method may be used to specify the maximum number of seconds to wait for a response. By default, the HTTP client will timeout after 30 seconds:

```php
$response = Http::timeout(3)->get(/* ... */);
```

If the given timeout is exceeded, an instance of `Illuminate\Http\Client\ConnectionException` will be thrown.

You may specify the maximum number of seconds to wait while trying to connect to a server using the `connectTimeout` method. The default is 10 seconds:

```php
$response = Http::connectTimeout(3)->get(/* ... */);
```

<a name="retries"></a>
### Retries

If you would like the HTTP client to automatically retry the request if a client or server error occurs, you may use the `retry` method. The `retry` method accepts the maximum number of times the request should be attempted and the number of milliseconds that Laravel should wait in between attempts:

```php
$response = Http::retry(3, 100)->post(/* ... */);
```

If you would like to manually calculate the number of milliseconds to sleep between attempts, you may pass a closure as the second argument to the `retry` method:

```php
use Exception;

$response = Http::retry(3, function (int $attempt, Exception $exception) {
    return $attempt * 100;
})->post(/* ... */);
```

For convenience, you may also provide an array as the first argument to the `retry` method. This array will be used to determine how many milliseconds to sleep between subsequent attempts:

```php
$response = Http::retry([100, 200])->post(/* ... */);
```

If needed, you may pass a third argument to the `retry` method. The third argument should be a callable that determines if the retries should actually be attempted. For example, you may wish to only retry the request if the initial request encounters an `ConnectionException`:

```php
use Illuminate\Http\Client\PendingRequest;
use Throwable;

$response = Http::retry(3, 100, function (Throwable $exception, PendingRequest $request) {
    return $exception instanceof ConnectionException;
})->post(/* ... */);
```

If a request attempt fails, you may wish to make a change to the request before a new attempt is made. You can achieve this by modifying the request argument provided to the callable you provided to the `retry` method. For example, you might want to retry the request with a new authorization token if the first attempt returned an authentication error:

```php
use Illuminate\Http\Client\PendingRequest;
use Illuminate\Http\Client\RequestException;
use Throwable;

$response = Http::withToken($this->getToken())->retry(2, 0, function (Throwable $exception, PendingRequest $request) {
    if (! $exception instanceof RequestException || $exception->response->status() !== 401) {
        return false;
    }

    $request->withToken($this->getNewToken());

    return true;
})->post(/* ... */);
```

If all of the requests fail, an instance of `Illuminate\Http\Client\RequestException` will be thrown. If you would like to disable this behavior, you may provide a `throw` argument with a value of `false`. When disabled, the last response received by the client will be returned after all retries have been attempted:

```php
$response = Http::retry(3, 100, throw: false)->post(/* ... */);
```

> [!WARNING]
> If all of the requests fail because of a connection issue, a `Illuminate\Http\Client\ConnectionException` will still be thrown even when the `throw` argument is set to `false`.

<a name="error-handling"></a>
### Error Handling

Unlike Guzzle's default behavior, Laravel's HTTP client wrapper does not throw exceptions on client or server errors (`400` and `500` level responses from servers). You may determine if one of these errors was returned using the `successful`, `clientError`, or `serverError` methods:

```php
// Determine if the status code is >= 200 and < 300...
$response->successful();

// Determine if the status code is >= 400...
$response->failed();

// Determine if the response has a 400 level status code...
$response->clientError();

// Determine if the response has a 500 level status code...
$response->serverError();

// Immediately execute the given callback if there was a client or server error...
$response->onError(callable $callback);
```

<a name="throwing-exceptions"></a>
#### Throwing Exceptions

If you have a response instance and would like to throw an instance of `Illuminate\Http\Client\RequestException` if the response status code indicates a client or server error, you may use the `throw` or `throwIf` methods:

```php
use Illuminate\Http\Client\Response;

$response = Http::post(/* ... */);

// Throw an exception if a client or server error occurred...
$response->throw();

// Throw an exception if an error occurred and the given condition is true...
$response->throwIf($condition);

// Throw an exception if an error occurred and the given closure resolves to true...
$response->throwIf(fn (Response $response) => true);

// Throw an exception if an error occurred and the given condition is false...
$response->throwUnless($condition);

// Throw an exception if an error occurred and the given closure resolves to false...
$response->throwUnless(fn (Response $response) => false);

// Throw an exception if the response has a specific status code...
$response->throwIfStatus(403);

// Throw an exception unless the response has a specific status code...
$response->throwUnlessStatus(200);

// Throw an exception if a server error occurred (status >500)...
$response->throwIfServerError();

// Throw an exception if a client error occurred (status >400 and <500)...
$response->throwIfClientError();

return $response['user']['id'];
```

The `Illuminate\Http\Client\RequestException` instance has a public `$response` property which will allow you to inspect the returned response.

The `throw` method returns the response instance if no error occurred, allowing you to chain other operations onto the `throw` method:

```php
return Http::post(/* ... */)->throw()->json();
```

If you would like to perform some additional logic before the exception is thrown, you may pass a closure to the `throw` method. The exception will be thrown automatically after the closure is invoked, so you do not need to re-throw the exception from within the closure:

```php
use Illuminate\Http\Client\Response;
use Illuminate\Http\Client\RequestException;

return Http::post(/* ... */)->throw(function (Response $response, RequestException $e) {
    // ...
})->json();
```

By default, `RequestException` messages are truncated to 120 characters when logged or reported. To customize or disable this behavior, you may utilize the `truncateAt` and `dontTruncate` methods when configuring your application's registered behavior in your `bootstrap/app.php` file:

```php
use Illuminate\Http\Client\RequestException;

->registered(function (): void {
    // Truncate request exception messages to 240 characters...
    RequestException::truncateAt(240);

    // Disable request exception message truncation...
    RequestException::dontTruncate();
})
```

Alternatively, you may customize the exception truncation behavior per request using the `truncateExceptionsAt` method:

```php
return Http::truncateExceptionsAt(240)->post(/* ... */);
```

<a name="guzzle-middleware"></a>
### Guzzle Middleware

Since Laravel's HTTP client is powered by Guzzle, you may take advantage of [Guzzle Middleware](https://docs.guzzlephp.org/en/stable/handlers-and-middleware.html) to manipulate the outgoing request or inspect the incoming response. To manipulate the outgoing request, register a Guzzle middleware via the `withRequestMiddleware` method:

```php
use Illuminate\Support\Facades\Http;
use Psr\Http\Message\RequestInterface;

$response = Http::withRequestMiddleware(
    function (RequestInterface $request) {
        return $request->withHeader('X-Example', 'Value');
    }
)->get('http://example.com');
```

Likewise, you can inspect the incoming HTTP response by registering a middleware via the `withResponseMiddleware` method:

```php
use Illuminate\Support\Facades\Http;
use Psr\Http\Message\ResponseInterface;

$response = Http::withResponseMiddleware(
    function (ResponseInterface $response) {
        $header = $response->getHeader('X-Example');

        // ...

        return $response;
    }
)->get('http://example.com');
```

<a name="global-middleware"></a>
#### Global Middleware

Sometimes, you may want to register a middleware that applies to every outgoing request and incoming response. To accomplish this, you may use the `globalRequestMiddleware` and `globalResponseMiddleware` methods. Typically, these methods should be invoked in the `boot` method of your application's `AppServiceProvider`:

```php
use Illuminate\Support\Facades\Http;

Http::globalRequestMiddleware(fn ($request) => $request->withHeader(
    'User-Agent', 'Example Application/1.0'
));

Http::globalResponseMiddleware(fn ($response) => $response->withHeader(
    'X-Finished-At', now()->toDateTimeString()
));
```

<a name="guzzle-options"></a>
### Guzzle Options

You may specify additional [Guzzle request options](http://docs.guzzlephp.org/en/stable/request-options.html) for an outgoing request using the `withOptions` method. The `withOptions` method accepts an array of key / value pairs:

```php
$response = Http::withOptions([
    'debug' => true,
])->get('http://example.com/users');
```

<a name="global-options"></a>
#### Global Options

To configure default options for every outgoing request, you may utilize the `globalOptions` method. Typically, this method should be invoked from the `boot` method of your application's `AppServiceProvider`:

```php
use Illuminate\Support\Facades\Http;

/**
 * Bootstrap any application services.
 */
public function boot(): void
{
    Http::globalOptions([
        'allow_redirects' => false,
    ]);
}
```

<a name="concurrent-requests"></a>
## Concurrent Requests

Sometimes, you may wish to make multiple HTTP requests concurrently. In other words, you want several requests to be dispatched at the same time instead of issuing the requests sequentially. This can lead to substantial performance improvements when interacting with slow HTTP APIs.

<a name="request-pooling"></a>
### Request Pooling

Thankfully, you may accomplish this using the `pool` method. The `pool` method accepts a closure which receives an `Illuminate\Http\Client\Pool` instance, allowing you to easily add requests to the request pool for dispatching:

```php
use Illuminate\Http\Client\Pool;
use Illuminate\Support\Facades\Http;

$responses = Http::pool(fn (Pool $pool) => [
    $pool->get('http://localhost/first'),
    $pool->get('http://localhost/second'),
    $pool->get('http://localhost/third'),
]);

return $responses[0]->ok() &&
       $responses[1]->ok() &&
       $responses[2]->ok();
```

As you can see, each response instance can be accessed based on the order it was added to the pool. If you wish, you can name the requests using the `as` method, which allows you to access the corresponding responses by name:

```php
use Illuminate\Http\Client\Pool;
use Illuminate\Support\Facades\Http;

$responses = Http::pool(fn (Pool $pool) => [
    $pool->as('first')->get('http://localhost/first'),
    $pool->as('second')->get('http://localhost/second'),
    $pool->as('third')->get('http://localhost/third'),
]);

return $responses['first']->ok();
```

The maximum concurrency of the request pool may be controlled by providing the `concurrency` argument to the `pool` method. This value determines the maximum number of HTTP requests that may be concurrently in-flight while processing the request pool:

```php
$responses = Http::pool(fn (Pool $pool) => [
    // ...
], concurrency: 5);
```

If a pooled request fails at the connection level (for example, a timeout or DNS failure), the corresponding entry in the `$responses` array will be an `Illuminate\Http\Client\ConnectionException` instance instead of a `Response` instance:

```php
foreach ($responses as $response) {
    if ($response instanceof Throwable) {
        // The request failed to connect...
    } elseif ($response->failed()) {
        // The request connected but received an error response...
    }
}
```

<a name="customizing-concurrent-requests"></a>
#### Customizing Concurrent Requests

The `pool` method cannot be chained with other HTTP client methods such as the `withHeaders` or `middleware` methods. If you want to apply custom headers or middleware to pooled requests, you should configure those options on each request in the pool:

```php
use Illuminate\Http\Client\Pool;
use Illuminate\Support\Facades\Http;

$headers = [
    'X-Example' => 'example',
];

$responses = Http::pool(fn (Pool $pool) => [
    $pool->withHeaders($headers)->get('http://laravel.test/test'),
    $pool->withHeaders($headers)->get('http://laravel.test/test'),
    $pool->withHeaders($headers)->get('http://laravel.test/test'),
]);
```

<a name="request-batching"></a>
### Request Batching

Another way of working with concurrent requests in Laravel is to use the `batch` method. Like the `pool` method, it accepts a closure which receives an `Illuminate\Http\Client\Batch` instance, allowing you to easily add requests to the request pool for dispatching, but it also allows you to define completion callbacks:

```php
use Illuminate\Http\Client\Batch;
use Illuminate\Http\Client\ConnectionException;
use Illuminate\Http\Client\RequestException;
use Illuminate\Http\Client\Response;
use Illuminate\Support\Facades\Http;

$responses = Http::batch(fn (Batch $batch) => [
    $batch->get('http://localhost/first'),
    $batch->get('http://localhost/second'),
    $batch->get('http://localhost/third'),
])->before(function (Batch $batch) {
    // The batch has been created but no requests have been initialized...
})->progress(function (Batch $batch, int|string $key, Response $response) {
    // An individual request has completed successfully...
})->then(function (Batch $batch, array $results) {
    // All requests completed successfully...
})->catch(function (Batch $batch, int|string $key, Response|RequestException|ConnectionException $response) {
    // Batch request failure detected...
})->finally(function (Batch $batch, array $results) {
    // The batch has finished executing...
})->send();
```

Like the `pool` method, you can use the `as` method to name your requests:

```php
$responses = Http::batch(fn (Batch $batch) => [
    $batch->as('first')->get('http://localhost/first'),
    $batch->as('second')->get('http://localhost/second'),
    $batch->as('third')->get('http://localhost/third'),
])->send();
```

After a `batch` is started by calling the `send` method, you can't add new requests to it. Trying to do so will result in a `Illuminate\Http\Client\BatchInProgressException` exception being thrown.

The maximum concurrency of the request batch may be controlled via the `concurrency` method. This value determines the maximum number of HTTP requests that may be concurrently in-flight while processing the request batch:

```php
$responses = Http::batch(fn (Batch $batch) => [
    // ...
])->concurrency(5)->send();
```

<a name="inspecting-batches"></a>
#### Inspecting Batches

The `Illuminate\Http\Client\Batch` instance that is provided to batch completion callbacks has a variety of properties and methods to assist you in interacting with and inspecting a given batch of requests:

```php
// The number of requests assigned to the batch...
$batch->totalRequests;
 
// The number of requests that have not been processed yet...
$batch->pendingRequests;
 
// The number of requests that have failed...
$batch->failedRequests;

// The number of requests that have been processed thus far...
$batch->processedRequests();

// Indicates if the batch has finished executing...
$batch->finished();

// Indicates if the batch has request failures...
$batch->hasFailures();
```
<a name="deferring-batches"></a>
#### Deferring Batches

When the `defer` method is invoked, the batch of requests is not executed immediately. Instead, Laravel will execute the batch after the current application request's HTTP response has been sent to the user, keeping your application feeling fast and responsive:

```php
use Illuminate\Http\Client\Batch;
use Illuminate\Support\Facades\Http;

$responses = Http::batch(fn (Batch $batch) => [
    $batch->get('http://localhost/first'),
    $batch->get('http://localhost/second'),
    $batch->get('http://localhost/third'),
])->then(function (Batch $batch, array $results) {
    // All requests completed successfully...
})->defer();
```

<a name="macros"></a>
## Macros

The Laravel HTTP client allows you to define "macros", which can serve as a fluent, expressive mechanism to configure common request paths and headers when interacting with services throughout your application. To get started, you may define the macro within the `boot` method of your application's `App\Providers\AppServiceProvider` class:

```php
use Illuminate\Support\Facades\Http;

/**
 * Bootstrap any application services.
 */
public function boot(): void
{
    Http::macro('github', function () {
        return Http::withHeaders([
            'X-Example' => 'example',
        ])->baseUrl('https://github.com');
    });
}
```

Once your macro has been configured, you may invoke it from anywhere in your application to create a pending request with the specified configuration:

```php
$response = Http::github()->get('/');
```

<a name="testing"></a>
## Testing

Many Laravel services provide functionality to help you easily and expressively write tests, and Laravel's HTTP client is no exception. The `Http` facade's `fake` method allows you to instruct the HTTP client to return stubbed / dummy responses when requests are made.

<a name="faking-responses"></a>
### Faking Responses

For example, to instruct the HTTP client to return empty, `200` status code responses for every request, you may call the `fake` method with no arguments:

```php
use Illuminate\Support\Facades\Http;

Http::fake();

$response = Http::post(/* ... */);
```

<a name="faking-specific-urls"></a>
#### Faking Specific URLs

Alternatively, you may pass an array to the `fake` method. The array's keys should represent URL patterns that you wish to fake and their associated responses. The `*` character may be used as a wildcard character. You may use the `Http` facade's `response` method to construct stub / fake responses for these endpoints:

```php
Http::fake([
    // Stub a JSON response for GitHub endpoints...
    'github.com/*' => Http::response(['foo' => 'bar'], 200, $headers),

    // Stub a string response for Google endpoints...
    'google.com/*' => Http::response('Hello World', 200, $headers),
]);
```

Any requests made to URLs that have not been faked will actually be executed. If you would like to specify a fallback URL pattern that will stub all unmatched URLs, you may use a single `*` character:

```php
Http::fake([
    // Stub a JSON response for GitHub endpoints...
    'github.com/*' => Http::response(['foo' => 'bar'], 200, ['Headers']),

    // Stub a string response for all other endpoints...
    '*' => Http::response('Hello World', 200, ['Headers']),
]);
```

For convenience, simple string, JSON, and empty responses may be generated by providing a string, array, or integer as the response:

```php
Http::fake([
    'google.com/*' => 'Hello World',
    'github.com/*' => ['foo' => 'bar'],
    'chatgpt.com/*' => 200,
]);
```

<a name="faking-connection-exceptions"></a>
#### Faking Exceptions

Sometimes you may need to test your application's behavior if the HTTP client encounters an `Illuminate\Http\Client\ConnectionException` when attempting to make a request. You can instruct the HTTP client to throw a connection exception using the `failedConnection` method:

```php
Http::fake([
    'github.com/*' => Http::failedConnection(),
]);
```

To test your application's behavior if a `Illuminate\Http\Client\RequestException` is thrown, you may use the `failedRequest` method:

```php
$this->mock(GithubService::class);
    ->shouldReceive('getUser')
    ->andThrow(
        Http::failedRequest(['code' => 'not_found'], 404)
    );
```

<a name="faking-response-sequences"></a>
#### Faking Response Sequences

Sometimes you may need to specify that a single URL should return a series of fake responses in a specific order. You may accomplish this using the `Http::sequence` method to build the responses:

```php
Http::fake([
    // Stub a series of responses for GitHub endpoints...
    'github.com/*' => Http::sequence()
        ->push('Hello World', 200)
        ->push(['foo' => 'bar'], 200)
        ->pushStatus(404),
]);
```

When all the responses in a response sequence have been consumed, any further requests will cause the response sequence to throw an exception. If you would like to specify a default response that should be returned when a sequence is empty, you may use the `whenEmpty` method:

```php
Http::fake([
    // Stub a series of responses for GitHub endpoints...
    'github.com/*' => Http::sequence()
        ->push('Hello World', 200)
        ->push(['foo' => 'bar'], 200)
        ->whenEmpty(Http::response()),
]);
```

If you would like to fake a sequence of responses but do not need to specify a specific URL pattern that should be faked, you may use the `Http::fakeSequence` method:

```php
Http::fakeSequence()
    ->push('Hello World', 200)
    ->whenEmpty(Http::response());
```

<a name="fake-callback"></a>
#### Fake Callback

If you require more complicated logic to determine what responses to return for certain endpoints, you may pass a closure to the `fake` method. This closure will receive an instance of `Illuminate\Http\Client\Request` and should return a response instance. Within your closure, you may perform whatever logic is necessary to determine what type of response to return:

```php
use Illuminate\Http\Client\Request;

Http::fake(function (Request $request) {
    return Http::response('Hello World', 200);
});
```

<a name="inspecting-requests"></a>
### Inspecting Requests

When faking responses, you may occasionally wish to inspect the requests the client receives in order to make sure your application is sending the correct data or headers. You may accomplish this by calling the `Http::assertSent` method after calling `Http::fake`.

The `assertSent` method accepts a closure which will receive an `Illuminate\Http\Client\Request` instance and should return a boolean value indicating if the request matches your expectations. In order for the test to pass, at least one request must have been issued matching the given expectations:

```php
use Illuminate\Http\Client\Request;
use Illuminate\Support\Facades\Http;

Http::fake();

Http::withHeaders([
    'X-First' => 'foo',
])->post('http://example.com/users', [
    'name' => 'Taylor',
    'role' => 'Developer',
]);

Http::assertSent(function (Request $request) {
    return $request->hasHeader('X-First', 'foo') &&
           $request->url() == 'http://example.com/users' &&
           $request['name'] == 'Taylor' &&
           $request['role'] == 'Developer';
});
```

If needed, you may assert that a specific request was not sent using the `assertNotSent` method:

```php
use Illuminate\Http\Client\Request;
use Illuminate\Support\Facades\Http;

Http::fake();

Http::post('http://example.com/users', [
    'name' => 'Taylor',
    'role' => 'Developer',
]);

Http::assertNotSent(function (Request $request) {
    return $request->url() === 'http://example.com/posts';
});
```

You may use the `assertSentCount` method to assert how many requests were "sent" during the test:

```php
Http::fake();

Http::assertSentCount(5);
```

Or, you may use the `assertNothingSent` method to assert that no requests were sent during the test:

```php
Http::fake();

Http::assertNothingSent();
```

<a name="recording-requests-and-responses"></a>
#### Recording Requests / Responses

You may use the `recorded` method to gather all requests and their corresponding responses. The `recorded` method returns a collection of arrays that contains instances of `Illuminate\Http\Client\Request` and `Illuminate\Http\Client\Response`:

```php
Http::fake([
    'https://laravel.com' => Http::response(status: 500),
    'https://nova.laravel.com/' => Http::response(),
]);

Http::get('https://laravel.com');
Http::get('https://nova.laravel.com/');

$recorded = Http::recorded();

[$request, $response] = $recorded[0];
```

Additionally, the `recorded` method accepts a closure which will receive an instance of `Illuminate\Http\Client\Request` and `Illuminate\Http\Client\Response` and may be used to filter request / response pairs based on your expectations:

```php
use Illuminate\Http\Client\Request;
use Illuminate\Http\Client\Response;

Http::fake([
    'https://laravel.com' => Http::response(status: 500),
    'https://nova.laravel.com/' => Http::response(),
]);

Http::get('https://laravel.com');
Http::get('https://nova.laravel.com/');

$recorded = Http::recorded(function (Request $request, Response $response) {
    return $request->url() !== 'https://laravel.com' &&
           $response->successful();
});
```

<a name="preventing-stray-requests"></a>
### Preventing Stray Requests

If you would like to ensure that all requests sent via the HTTP client have been faked throughout your individual test or complete test suite, you can call the `preventStrayRequests` method. After calling this method, any requests that do not have a corresponding fake response will throw an exception rather than making the actual HTTP request:

```php
use Illuminate\Support\Facades\Http;

Http::preventStrayRequests();

Http::fake([
    'github.com/*' => Http::response('ok'),
]);

// An "ok" response is returned...
Http::get('https://github.com/laravel/framework');

// An exception is thrown...
Http::get('https://laravel.com');
```

Sometimes, you may wish to prevent most stray requests while still allowing specific requests to execute. To accomplish this, you may pass an array of URL patterns to the `allowStrayRequests` method. Any request matching one of the given patterns will be allowed, while all other requests will continue to throw an exception:

```php
use Illuminate\Support\Facades\Http;

Http::preventStrayRequests();

Http::allowStrayRequests([
    'http://127.0.0.1:5000/*',
]);

// This request is executed...
Http::get('http://127.0.0.1:5000/generate');

// An exception is thrown...
Http::get('https://laravel.com');
```

<a name="events"></a>
## Events

Laravel fires three events during the process of sending HTTP requests. The `RequestSending` event is fired prior to a request being sent, while the `ResponseReceived` event is fired after a response is received for a given request. The `ConnectionFailed` event is fired if no response is received for a given request.

The `RequestSending` and `ConnectionFailed` events both contain a public `$request` property that you may use to inspect the `Illuminate\Http\Client\Request` instance. Likewise, the `ResponseReceived` event contains a `$request` property as well as a `$response` property which may be used to inspect the `Illuminate\Http\Client\Response` instance. You may create [event listeners](/docs/{{version}}/events) for these events within your application:

```php
use Illuminate\Http\Client\Events\RequestSending;

class LogRequest
{
    /**
     * Handle the event.
     */
    public function handle(RequestSending $event): void
    {
        // $event->request ...
    }
}
```


---

# HTTP Tests

*Sección: Laravel | Origen: https://laravel.com/docs/13.x/http-tests*

- [Introduction](#introduction)
- [Making Requests](#making-requests)
    - [Customizing Request Headers](#customizing-request-headers)
    - [Cookies](#cookies)
    - [Session / Authentication](#session-and-authentication)
    - [Debugging Responses](#debugging-responses)
    - [Exception Handling](#exception-handling)
- [Testing JSON APIs](#testing-json-apis)
    - [Fluent JSON Testing](#fluent-json-testing)
- [Testing File Uploads](#testing-file-uploads)
- [Testing Views](#testing-views)
    - [Rendering Blade and Components](#rendering-blade-and-components)
- [Caching Routes](#caching-routes)
- [Available Assertions](#available-assertions)
    - [Response Assertions](#response-assertions)
    - [Authentication Assertions](#authentication-assertions)
    - [Validation Assertions](#validation-assertions)

<a name="introduction"></a>
## Introduction

Laravel provides a very fluent API for making HTTP requests to your application and examining the responses. For example, take a look at the feature test defined below:

```php tab=Pest
<?php

test('the application returns a successful response', function () {
    $response = $this->get('/');

    $response->assertStatus(200);
});
```

```php tab=PHPUnit
<?php

namespace Tests\Feature;

use Tests\TestCase;

class ExampleTest extends TestCase
{
    /**
     * A basic test example.
     */
    public function test_the_application_returns_a_successful_response(): void
    {
        $response = $this->get('/');

        $response->assertStatus(200);
    }
}
```

The `get` method makes a `GET` request into the application, while the `assertStatus` method asserts that the returned response should have the given HTTP status code. In addition to this simple assertion, Laravel also contains a variety of assertions for inspecting the response headers, content, JSON structure, and more.

<a name="making-requests"></a>
## Making Requests

To make a request to your application, you may invoke the `get`, `post`, `put`, `patch`, or `delete` methods within your test. These methods do not actually issue a "real" HTTP request to your application. Instead, the entire network request is simulated internally.

Instead of returning an `Illuminate\Http\Response` instance, test request methods return an instance of `Illuminate\Testing\TestResponse`, which provides a [variety of helpful assertions](#available-assertions) that allow you to inspect your application's responses:

```php tab=Pest
<?php

test('basic request', function () {
    $response = $this->get('/');

    $response->assertStatus(200);
});
```

```php tab=PHPUnit
<?php

namespace Tests\Feature;

use Tests\TestCase;

class ExampleTest extends TestCase
{
    /**
     * A basic test example.
     */
    public function test_a_basic_request(): void
    {
        $response = $this->get('/');

        $response->assertStatus(200);
    }
}
```

In general, each of your tests should only make one request to your application. Unexpected behavior may occur if multiple requests are executed within a single test method.

> [!NOTE]
> For convenience, the CSRF middleware is automatically disabled when running tests.

<a name="customizing-request-headers"></a>
### Customizing Request Headers

You may use the `withHeaders` method to customize the request's headers before it is sent to the application. This method allows you to add any custom headers you would like to the request:

```php tab=Pest
<?php

test('interacting with headers', function () {
    $response = $this->withHeaders([
        'X-Header' => 'Value',
    ])->post('/user', ['name' => 'Sally']);

    $response->assertStatus(201);
});
```

```php tab=PHPUnit
<?php

namespace Tests\Feature;

use Tests\TestCase;

class ExampleTest extends TestCase
{
    /**
     * A basic functional test example.
     */
    public function test_interacting_with_headers(): void
    {
        $response = $this->withHeaders([
            'X-Header' => 'Value',
        ])->post('/user', ['name' => 'Sally']);

        $response->assertStatus(201);
    }
}
```

<a name="cookies"></a>
### Cookies

You may use the `withCookie` or `withCookies` methods to set cookie values before making a request. The `withCookie` method accepts a cookie name and value as its two arguments, while the `withCookies` method accepts an array of name / value pairs:

```php tab=Pest
<?php

test('interacting with cookies', function () {
    $response = $this->withCookie('color', 'blue')->get('/');

    $response = $this->withCookies([
        'color' => 'blue',
        'name' => 'Taylor',
    ])->get('/');

    //
});
```

```php tab=PHPUnit
<?php

namespace Tests\Feature;

use Tests\TestCase;

class ExampleTest extends TestCase
{
    public function test_interacting_with_cookies(): void
    {
        $response = $this->withCookie('color', 'blue')->get('/');

        $response = $this->withCookies([
            'color' => 'blue',
            'name' => 'Taylor',
        ])->get('/');

        //
    }
}
```

<a name="session-and-authentication"></a>
### Session / Authentication

Laravel provides several helpers for interacting with the session during HTTP testing. First, you may set the session data to a given array using the `withSession` method. This is useful for loading the session with data before issuing a request to your application:

```php tab=Pest
<?php

test('interacting with the session', function () {
    $response = $this->withSession(['banned' => false])->get('/');

    //
});
```

```php tab=PHPUnit
<?php

namespace Tests\Feature;

use Tests\TestCase;

class ExampleTest extends TestCase
{
    public function test_interacting_with_the_session(): void
    {
        $response = $this->withSession(['banned' => false])->get('/');

        //
    }
}
```

Laravel's session is typically used to maintain state for the currently authenticated user. Therefore, the `actingAs` helper method provides a simple way to authenticate a given user as the current user. For example, we may use a [model factory](/docs/{{version}}/eloquent-factories) to generate and authenticate a user:

```php tab=Pest
<?php

use App\Models\User;

test('an action that requires authentication', function () {
    $user = User::factory()->create();

    $response = $this->actingAs($user)
        ->withSession(['banned' => false])
        ->get('/');

    //
});
```

```php tab=PHPUnit
<?php

namespace Tests\Feature;

use App\Models\User;
use Tests\TestCase;

class ExampleTest extends TestCase
{
    public function test_an_action_that_requires_authentication(): void
    {
        $user = User::factory()->create();

        $response = $this->actingAs($user)
            ->withSession(['banned' => false])
            ->get('/');

        //
    }
}
```

You may also specify which guard should be used to authenticate the given user by passing the guard name as the second argument to the `actingAs` method. The guard that is provided to the `actingAs` method will also become the default guard for the duration of the test:

```php
$this->actingAs($user, 'web');
```

If you would like to ensure the request is unauthenticated, you may use the `actingAsGuest` method:

```php
$this->actingAsGuest();
```

<a name="debugging-responses"></a>
### Debugging Responses

After making a test request to your application, the `dump`, `dumpHeaders`, and `dumpSession` methods may be used to examine and debug the response contents:

```php tab=Pest
<?php

test('basic test', function () {
    $response = $this->get('/');

    $response->dump();
    $response->dumpHeaders();
    $response->dumpSession();
});
```

```php tab=PHPUnit
<?php

namespace Tests\Feature;

use Tests\TestCase;

class ExampleTest extends TestCase
{
    /**
     * A basic test example.
     */
    public function test_basic_test(): void
    {
        $response = $this->get('/');

        $response->dump();
        $response->dumpHeaders();
        $response->dumpSession();
    }
}
```

Alternatively, you may use the `dd`, `ddHeaders`, `ddBody`, `ddJson`, and `ddSession` methods to dump information about the response and then stop execution:

```php tab=Pest
<?php

test('basic test', function () {
    $response = $this->get('/');

    $response->dd();
    $response->ddHeaders();
    $response->ddBody();
    $response->ddJson();
    $response->ddSession();
});
```

```php tab=PHPUnit
<?php

namespace Tests\Feature;

use Tests\TestCase;

class ExampleTest extends TestCase
{
    /**
     * A basic test example.
     */
    public function test_basic_test(): void
    {
        $response = $this->get('/');

        $response->dd();
        $response->ddHeaders();
        $response->ddBody();
        $response->ddJson();
        $response->ddSession();
    }
}
```

<a name="exception-handling"></a>
### Exception Handling

Sometimes you may need to test that your application is throwing a specific exception. To accomplish this, you may "fake" the exception handler via the `Exceptions` facade. Once the exception handler has been faked, you may utilize the `assertReported` and `assertNotReported` methods to make assertions against exceptions that were thrown during the request:

```php tab=Pest
<?php

use App\Exceptions\InvalidOrderException;
use Illuminate\Support\Facades\Exceptions;

test('exception is thrown', function () {
    Exceptions::fake();

    $response = $this->get('/order/1');

    // Assert an exception was thrown...
    Exceptions::assertReported(InvalidOrderException::class);

    // Assert against the exception...
    Exceptions::assertReported(function (InvalidOrderException $e) {
        return $e->getMessage() === 'The order was invalid.';
    });
});
```

```php tab=PHPUnit
<?php

namespace Tests\Feature;

use App\Exceptions\InvalidOrderException;
use Illuminate\Support\Facades\Exceptions;
use Tests\TestCase;

class ExampleTest extends TestCase
{
    /**
     * A basic test example.
     */
    public function test_exception_is_thrown(): void
    {
        Exceptions::fake();

        $response = $this->get('/');

        // Assert an exception was thrown...
        Exceptions::assertReported(InvalidOrderException::class);

        // Assert against the exception...
        Exceptions::assertReported(function (InvalidOrderException $e) {
            return $e->getMessage() === 'The order was invalid.';
        });
    }
}
```

The `assertNotReported` and `assertNothingReported` methods may be used to assert that a given exception was not thrown during the request or that no exceptions were thrown:

```php
Exceptions::assertNotReported(InvalidOrderException::class);

Exceptions::assertNothingReported();
```

You may totally disable exception handling for a given request by invoking the `withoutExceptionHandling` method before making your request:

```php
$response = $this->withoutExceptionHandling()->get('/');
```

In addition, if you would like to ensure that your application is not utilizing features that have been deprecated by the PHP language or the libraries your application is using, you may invoke the `withoutDeprecationHandling` method before making your request. When deprecation handling is disabled, deprecation warnings will be converted to exceptions, thus causing your test to fail:

```php
$response = $this->withoutDeprecationHandling()->get('/');
```

The `assertThrows` method may be used to assert that code within a given closure throws an exception of the specified type:

```php
$this->assertThrows(
    fn () => (new ProcessOrder)->execute(),
    OrderInvalid::class
);
```

If you would like to inspect and make assertions against the exception that is thrown, you may provide a closure as the second argument to the `assertThrows` method:

```php
$this->assertThrows(
    fn () => (new ProcessOrder)->execute(),
    fn (OrderInvalid $e) => $e->orderId() === 123;
);
```

The `assertDoesntThrow` method may be used to assert that the code within a given closure does not throw any exceptions:

```php
$this->assertDoesntThrow(fn () => (new ProcessOrder)->execute());
```

<a name="testing-json-apis"></a>
## Testing JSON APIs

Laravel also provides several helpers for testing JSON APIs and their responses. For example, the `json`, `getJson`, `postJson`, `putJson`, `patchJson`, `deleteJson`, and `optionsJson` methods may be used to issue JSON requests with various HTTP verbs. You may also easily pass data and headers to these methods. To get started, let's write a test to make a `POST` request to `/api/user` and assert that the expected JSON data was returned:

```php tab=Pest
<?php

test('making an api request', function () {
    $response = $this->postJson('/api/user', ['name' => 'Sally']);

    $response
        ->assertStatus(201)
        ->assertJson([
            'created' => true,
        ]);
});
```

```php tab=PHPUnit
<?php

namespace Tests\Feature;

use Tests\TestCase;

class ExampleTest extends TestCase
{
    /**
     * A basic functional test example.
     */
    public function test_making_an_api_request(): void
    {
        $response = $this->postJson('/api/user', ['name' => 'Sally']);

        $response
            ->assertStatus(201)
            ->assertJson([
                'created' => true,
            ]);
    }
}
```

In addition, JSON response data may be accessed as array variables on the response, making it convenient for you to inspect the individual values returned within a JSON response:

```php tab=Pest
expect($response['created'])->toBeTrue();
```

```php tab=PHPUnit
$this->assertTrue($response['created']);
```

> [!NOTE]
> The `assertJson` method converts the response to an array to verify that the given array exists within the JSON response returned by the application. So, if there are other properties in the JSON response, this test will still pass as long as the given fragment is present.

<a name="verifying-exact-match"></a>
#### Asserting Exact JSON Matches

As previously mentioned, the `assertJson` method may be used to assert that a fragment of JSON exists within the JSON response. If you would like to verify that a given array **exactly matches** the JSON returned by your application, you should use the `assertExactJson` method:

```php tab=Pest
<?php

test('asserting an exact json match', function () {
    $response = $this->postJson('/user', ['name' => 'Sally']);

    $response
        ->assertStatus(201)
        ->assertExactJson([
            'created' => true,
        ]);
});
```

```php tab=PHPUnit
<?php

namespace Tests\Feature;

use Tests\TestCase;

class ExampleTest extends TestCase
{
    /**
     * A basic functional test example.
     */
    public function test_asserting_an_exact_json_match(): void
    {
        $response = $this->postJson('/user', ['name' => 'Sally']);

        $response
            ->assertStatus(201)
            ->assertExactJson([
                'created' => true,
            ]);
    }
}
```

<a name="verifying-json-paths"></a>
#### Asserting on JSON Paths

If you would like to verify that the JSON response contains the given data at a specified path, you should use the `assertJsonPath` method:

```php tab=Pest
<?php

test('asserting a json path value', function () {
    $response = $this->postJson('/user', ['name' => 'Sally']);

    $response
        ->assertStatus(201)
        ->assertJsonPath('team.owner.name', 'Darian');
});
```

```php tab=PHPUnit
<?php

namespace Tests\Feature;

use Tests\TestCase;

class ExampleTest extends TestCase
{
    /**
     * A basic functional test example.
     */
    public function test_asserting_a_json_paths_value(): void
    {
        $response = $this->postJson('/user', ['name' => 'Sally']);

        $response
            ->assertStatus(201)
            ->assertJsonPath('team.owner.name', 'Darian');
    }
}
```

The `assertJsonPath` method also accepts a closure, which may be used to dynamically determine if the assertion should pass:

```php
$response->assertJsonPath('team.owner.name', fn (string $name) => strlen($name) >= 3);
```

If you need to assert multiple JSON paths at once, you may use the `assertJsonPaths` method. The expected value for each path may also be a closure:

```php
$response->assertJsonPaths([
    'team.owner.name' => 'Darian',
    'team.owner.email' => fn (string $email) => str($email)->is('*@laravel.com'),
    'team.members.0.name' => 'Sally',
]);
```

You may use the `assertJsonMissingPaths` method to assert that multiple JSON paths are missing from the response:

```php
$response->assertJsonMissingPaths([
    'team.owner.password',
    'team.members.0.api_token',
]);
```

<a name="fluent-json-testing"></a>
### Fluent JSON Testing

Laravel also offers a beautiful way to fluently test your application's JSON responses. To get started, pass a closure to the `assertJson` method. This closure will be invoked with an instance of `Illuminate\Testing\Fluent\AssertableJson` which can be used to make assertions against the JSON that was returned by your application. The `where` method may be used to make assertions against a particular attribute of the JSON, while the `missing` method may be used to assert that a particular attribute is missing from the JSON:

```php tab=Pest
use Illuminate\Testing\Fluent\AssertableJson;

test('fluent json', function () {
    $response = $this->getJson('/users/1');

    $response
        ->assertJson(fn (AssertableJson $json) =>
            $json->where('id', 1)
                ->where('name', 'Victoria Faith')
                ->where('email', fn (string $email) => str($email)->is('victoria@gmail.com'))
                ->whereNot('status', 'pending')
                ->missing('password')
                ->etc()
        );
});
```

```php tab=PHPUnit
use Illuminate\Testing\Fluent\AssertableJson;

/**
 * A basic functional test example.
 */
public function test_fluent_json(): void
{
    $response = $this->getJson('/users/1');

    $response
        ->assertJson(fn (AssertableJson $json) =>
            $json->where('id', 1)
                ->where('name', 'Victoria Faith')
                ->where('email', fn (string $email) => str($email)->is('victoria@gmail.com'))
                ->whereNot('status', 'pending')
                ->missing('password')
                ->etc()
        );
}
```

#### Understanding the `etc` Method

In the example above, you may have noticed we invoked the `etc` method at the end of our assertion chain. This method informs Laravel that there may be other attributes present on the JSON object. If the `etc` method is not used, the test will fail if other attributes that you did not make assertions against exist on the JSON object.

The intention behind this behavior is to protect you from unintentionally exposing sensitive information in your JSON responses by forcing you to either explicitly make an assertion against the attribute or explicitly allow additional attributes via the `etc` method.

However, you should be aware that not including the `etc` method in your assertion chain does not ensure that additional attributes are not being added to arrays that are nested within your JSON object. The `etc` method only ensures that no additional attributes exist at the nesting level in which the `etc` method is invoked.

<a name="asserting-json-attribute-presence-and-absence"></a>
#### Asserting Attribute Presence / Absence

To assert that an attribute is present or absent, you may use the `has` and `missing` methods:

```php
$response->assertJson(fn (AssertableJson $json) =>
    $json->has('data')
        ->missing('message')
);
```

In addition, the `hasAll` and `missingAll` methods allow asserting the presence or absence of multiple attributes simultaneously:

```php
$response->assertJson(fn (AssertableJson $json) =>
    $json->hasAll(['status', 'data'])
        ->missingAll(['message', 'code'])
);
```

You may use the `hasAny` method to determine if at least one of a given list of attributes is present:

```php
$response->assertJson(fn (AssertableJson $json) =>
    $json->has('status')
        ->hasAny('data', 'message', 'code')
);
```

<a name="asserting-against-json-collections"></a>
#### Asserting Against JSON Collections

Often, your route will return a JSON response that contains multiple items, such as multiple users:

```php
Route::get('/users', function () {
    return User::all();
});
```

In these situations, we may use the fluent JSON object's `has` method to make assertions against the users included in the response. For example, let's assert that the JSON response contains three users. Next, we'll make some assertions about the first user in the collection using the `first` method. The `first` method accepts a closure which receives another assertable JSON string that we can use to make assertions about the first object in the JSON collection:

```php
$response
    ->assertJson(fn (AssertableJson $json) =>
        $json->has(3)
            ->first(fn (AssertableJson $json) =>
                $json->where('id', 1)
                    ->where('name', 'Victoria Faith')
                    ->where('email', fn (string $email) => str($email)->is('victoria@gmail.com'))
                    ->missing('password')
                    ->etc()
            )
    );
```

If you would like to make the same assertions against every item in a JSON collection, you may use the `each` method:

```php
$response
  ->assertJson(fn (AssertableJson $json) =>
      $json->has(3)
          ->each(fn (AssertableJson $json) =>
              $json->whereType('id', 'integer')
                  ->whereType('name', 'string')
                  ->whereType('email', 'string')
                  ->missing('password')
                  ->etc()
          )
  );
```

<a name="scoping-json-collection-assertions"></a>
#### Scoping JSON Collection Assertions

Sometimes, your application's routes will return JSON collections that are assigned named keys:

```php
Route::get('/users', function () {
    return [
        'meta' => [...],
        'users' => User::all(),
    ];
})
```

When testing these routes, you may use the `has` method to assert against the number of items in the collection. In addition, you may use the `has` method to scope a chain of assertions:

```php
$response
    ->assertJson(fn (AssertableJson $json) =>
        $json->has('meta')
            ->has('users', 3)
            ->has('users.0', fn (AssertableJson $json) =>
                $json->where('id', 1)
                    ->where('name', 'Victoria Faith')
                    ->where('email', fn (string $email) => str($email)->is('victoria@gmail.com'))
                    ->missing('password')
                    ->etc()
            )
    );
```

However, instead of making two separate calls to the `has` method to assert against the `users` collection, you may make a single call which provides a closure as its third parameter. When doing so, the closure will automatically be invoked and scoped to the first item in the collection:

```php
$response
    ->assertJson(fn (AssertableJson $json) =>
        $json->has('meta')
            ->has('users', 3, fn (AssertableJson $json) =>
                $json->where('id', 1)
                    ->where('name', 'Victoria Faith')
                    ->where('email', fn (string $email) => str($email)->is('victoria@gmail.com'))
                    ->missing('password')
                    ->etc()
            )
    );
```

<a name="asserting-json-types"></a>
#### Asserting JSON Types

You may only want to assert that the properties in the JSON response are of a certain type. The `Illuminate\Testing\Fluent\AssertableJson` class provides the `whereType` and `whereAllType` methods for doing just that:

```php
$response->assertJson(fn (AssertableJson $json) =>
    $json->whereType('id', 'integer')
        ->whereAllType([
            'users.0.name' => 'string',
            'meta' => 'array'
        ])
);
```

You may specify multiple types using the `|` character, or passing an array of types as the second parameter to the `whereType` method. The assertion will be successful if the response value is any of the listed types:

```php
$response->assertJson(fn (AssertableJson $json) =>
    $json->whereType('name', 'string|null')
        ->whereType('id', ['string', 'integer'])
);
```

The `whereType` and `whereAllType` methods recognize the following types: `string`, `integer`, `double`, `boolean`, `array`, and `null`.

<a name="testing-file-uploads"></a>
## Testing File Uploads

The `Illuminate\Http\UploadedFile` class provides a `fake` method which may be used to generate dummy files or images for testing. This, combined with the `Storage` facade's `fake` method, greatly simplifies the testing of file uploads. For example, you may combine these two features to easily test an avatar upload form:

```php tab=Pest
<?php

use Illuminate\Http\UploadedFile;
use Illuminate\Support\Facades\Storage;

test('avatars can be uploaded', function () {
    Storage::fake('avatars');

    $file = UploadedFile::fake()->image('avatar.jpg');

    $response = $this->post('/avatar', [
        'avatar' => $file,
    ]);

    Storage::disk('avatars')->assertExists($file->hashName());
});
```

```php tab=PHPUnit
<?php

namespace Tests\Feature;

use Illuminate\Http\UploadedFile;
use Illuminate\Support\Facades\Storage;
use Tests\TestCase;

class ExampleTest extends TestCase
{
    public function test_avatars_can_be_uploaded(): void
    {
        Storage::fake('avatars');

        $file = UploadedFile::fake()->image('avatar.jpg');

        $response = $this->post('/avatar', [
            'avatar' => $file,
        ]);

        Storage::disk('avatars')->assertExists($file->hashName());
    }
}
```

If you would like to assert that a given file does not exist, you may use the `assertMissing` method provided by the `Storage` facade:

```php
Storage::fake('avatars');

// ...

Storage::disk('avatars')->assertMissing('missing.jpg');
```

<a name="fake-file-customization"></a>
#### Fake File Customization

When creating files using the `fake` method provided by the `UploadedFile` class, you may specify the width, height, and size of the image (in kilobytes) in order to better test your application's validation rules:

```php
UploadedFile::fake()->image('avatar.jpg', $width, $height)->size(100);
```

In addition to creating images, you may create files of any other type using the `create` method:

```php
UploadedFile::fake()->create('document.pdf', $sizeInKilobytes);
```

If needed, you may pass a `$mimeType` argument to the method to explicitly define the MIME type that should be returned by the file:

```php
UploadedFile::fake()->create(
    'document.pdf', $sizeInKilobytes, 'application/pdf'
);
```

<a name="testing-views"></a>
## Testing Views

Laravel also allows you to render a view without making a simulated HTTP request to the application. To accomplish this, you may call the `view` method within your test. The `view` method accepts the view name and an optional array of data. The method returns an instance of `Illuminate\Testing\TestView`, which offers several methods to conveniently make assertions about the view's contents:

```php tab=Pest
<?php

test('a welcome view can be rendered', function () {
    $view = $this->view('welcome', ['name' => 'Taylor']);

    $view->assertSee('Taylor');
});
```

```php tab=PHPUnit
<?php

namespace Tests\Feature;

use Tests\TestCase;

class ExampleTest extends TestCase
{
    public function test_a_welcome_view_can_be_rendered(): void
    {
        $view = $this->view('welcome', ['name' => 'Taylor']);

        $view->assertSee('Taylor');
    }
}
```

The `TestView` class provides the following assertion methods: `assertSee`, `assertSeeInOrder`, `assertSeeText`, `assertSeeTextInOrder`, `assertDontSee`, and `assertDontSeeText`.

If needed, you may get the raw, rendered view contents by casting the `TestView` instance to a string:

```php
$contents = (string) $this->view('welcome');
```

<a name="sharing-errors"></a>
#### Sharing Errors

Some views may depend on errors shared in the [global error bag provided by Laravel](/docs/{{version}}/validation#quick-displaying-the-validation-errors). To hydrate the error bag with error messages, you may use the `withViewErrors` method:

```php
$view = $this->withViewErrors([
    'name' => ['Please provide a valid name.']
])->view('form');

$view->assertSee('Please provide a valid name.');
```

<a name="rendering-blade-and-components"></a>
### Rendering Blade and Components

If necessary, you may use the `blade` method to evaluate and render a raw [Blade](/docs/{{version}}/blade) string. Like the `view` method, the `blade` method returns an instance of `Illuminate\Testing\TestView`:

```php
$view = $this->blade(
    '<x-component :name="$name" />',
    ['name' => 'Taylor']
);

$view->assertSee('Taylor');
```

You may use the `component` method to evaluate and render a [Blade component](/docs/{{version}}/blade#components). The `component` method returns an instance of `Illuminate\Testing\TestComponent`:

```php
$view = $this->component(Profile::class, ['name' => 'Taylor']);

$view->assertSee('Taylor');
```

<a name="caching-routes"></a>
## Caching Routes

Before a test runs, Laravel boots a fresh instance of the application, including collecting all defined routes. If your applications have many route files, you may wish to add the `Illuminate\Foundation\Testing\WithCachedRoutes` trait to your test cases. On tests which use this trait, routes are built once and stored in memory, meaning the route collection process is only run once for all tests in your suite:

```php tab=Pest
<?php

use App\Http\Controllers\UserController;
use Illuminate\Foundation\Testing\WithCachedRoutes;

pest()->use(WithCachedRoutes::class);

test('basic example', function () {
    $this->get(action([UserController::class, 'index']));

    // ...
});
```

```php tab=PHPUnit
<?php

namespace Tests\Feature;

use App\Http\Controllers\UserController;
use Illuminate\Foundation\Testing\WithCachedRoutes;
use Tests\TestCase;

class BasicTest extends TestCase
{
    use WithCachedRoutes;

    /**
     * A basic functional test example.
     */
    public function test_basic_example(): void
    {
        $response = $this->get(action([UserController::class, 'index']));

        // ...
    }
}
```

<a name="available-assertions"></a>
## Available Assertions

<a name="response-assertions"></a>
### Response Assertions

Laravel's `Illuminate\Testing\TestResponse` class provides a variety of custom assertion methods that you may utilize when testing your application. These assertions may be accessed on the response that is returned by the `json`, `get`, `post`, `put`, and `delete` test methods:

<style>
    .collection-method-list > p {
        columns: 14.4em 2; -moz-columns: 14.4em 2; -webkit-columns: 14.4em 2;
    }

    .collection-method-list a {
        display: block;
        overflow: hidden;
        text-overflow: ellipsis;
        white-space: nowrap;
    }
</style>

<div class="collection-method-list" markdown="1">

[assertAccepted](#assert-accepted)
[assertBadRequest](#assert-bad-request)
[assertClientError](#assert-client-error)
[assertConflict](#assert-conflict)
[assertCookie](#assert-cookie)
[assertCookieExpired](#assert-cookie-expired)
[assertCookieNotExpired](#assert-cookie-not-expired)
[assertCookieMissing](#assert-cookie-missing)
[assertCreated](#assert-created)
[assertDontSee](#assert-dont-see)
[assertDontSeeText](#assert-dont-see-text)
[assertDownload](#assert-download)
[assertExactJson](#assert-exact-json)
[assertExactJsonStructure](#assert-exact-json-structure)
[assertFailedDependency](#assert-failed-dependency)
[assertForbidden](#assert-forbidden)
[assertFound](#assert-found)
[assertGone](#assert-gone)
[assertHeader](#assert-header)
[assertHeaderContains](#assert-header-contains)
[assertHeaderMissing](#assert-header-missing)
[assertInternalServerError](#assert-internal-server-error)
[assertJson](#assert-json)
[assertJsonCount](#assert-json-count)
[assertJsonFragment](#assert-json-fragment)
[assertJsonIsArray](#assert-json-is-array)
[assertJsonIsObject](#assert-json-is-object)
[assertJsonMissing](#assert-json-missing)
[assertJsonMissingExact](#assert-json-missing-exact)
[assertJsonMissingValidationErrors](#assert-json-missing-validation-errors)
[assertJsonPath](#assert-json-path)
[assertJsonPaths](#assert-json-paths)
[assertJsonMissingPath](#assert-json-missing-path)
[assertJsonMissingPaths](#assert-json-missing-paths)
[assertJsonStructure](#assert-json-structure)
[assertJsonValidationErrors](#assert-json-validation-errors)
[assertJsonValidationErrorFor](#assert-json-validation-error-for)
[assertLocation](#assert-location)
[assertMethodNotAllowed](#assert-method-not-allowed)
[assertMovedPermanently](#assert-moved-permanently)
[assertContent](#assert-content)
[assertNoContent](#assert-no-content)
[assertStreamed](#assert-streamed)
[assertStreamedContent](#assert-streamed-content)
[assertNotFound](#assert-not-found)
[assertOk](#assert-ok)
[assertPaymentRequired](#assert-payment-required)
[assertPlainCookie](#assert-plain-cookie)
[assertRedirect](#assert-redirect)
[assertRedirectBack](#assert-redirect-back)
[assertRedirectBackWithErrors](#assert-redirect-back-with-errors)
[assertRedirectBackWithoutErrors](#assert-redirect-back-without-errors)
[assertRedirectContains](#assert-redirect-contains)
[assertRedirectToRoute](#assert-redirect-to-route)
[assertRedirectToSignedRoute](#assert-redirect-to-signed-route)
[assertRequestTimeout](#assert-request-timeout)
[assertSee](#assert-see)
[assertSeeInOrder](#assert-see-in-order)
[assertSeeText](#assert-see-text)
[assertSeeTextInOrder](#assert-see-text-in-order)
[assertServerError](#assert-server-error)
[assertServiceUnavailable](#assert-service-unavailable)
[assertSessionHas](#assert-session-has)
[assertSessionHasInput](#assert-session-has-input)
[assertSessionHasAll](#assert-session-has-all)
[assertSessionHasErrors](#assert-session-has-errors)
[assertSessionHasErrorsIn](#assert-session-has-errors-in)
[assertSessionHasNoErrors](#assert-session-has-no-errors)
[assertSessionDoesntHaveErrors](#assert-session-doesnt-have-errors)
[assertSessionMissing](#assert-session-missing)
[assertSessionMissingInput](#assert-session-missing-input)
[assertStatus](#assert-status)
[assertSuccessful](#assert-successful)
[assertTooManyRequests](#assert-too-many-requests)
[assertUnauthorized](#assert-unauthorized)
[assertUnprocessable](#assert-unprocessable)
[assertUnsupportedMediaType](#assert-unsupported-media-type)
[assertValid](#assert-valid)
[assertInvalid](#assert-invalid)
[assertViewHas](#assert-view-has)
[assertViewHasAll](#assert-view-has-all)
[assertViewIs](#assert-view-is)
[assertViewMissing](#assert-view-missing)

</div>

<a name="assert-accepted"></a>
#### assertAccepted

Assert that the response has an accepted (202) HTTP status code:

```php
$response->assertAccepted();
```

<a name="assert-bad-request"></a>
#### assertBadRequest

Assert that the response has a bad request (400) HTTP status code:

```php
$response->assertBadRequest();
```

<a name="assert-client-error"></a>
#### assertClientError

Assert that the response has a client error (>= 400, < 500) HTTP status code:

```php
$response->assertClientError();
```

<a name="assert-conflict"></a>
#### assertConflict

Assert that the response has a conflict (409) HTTP status code:

```php
$response->assertConflict();
```

<a name="assert-cookie"></a>
#### assertCookie

Assert that the response contains the given cookie:

```php
$response->assertCookie($cookieName, $value = null);
```

<a name="assert-cookie-expired"></a>
#### assertCookieExpired

Assert that the response contains the given cookie and it is expired:

```php
$response->assertCookieExpired($cookieName);
```

<a name="assert-cookie-not-expired"></a>
#### assertCookieNotExpired

Assert that the response contains the given cookie and it is not expired:

```php
$response->assertCookieNotExpired($cookieName);
```

<a name="assert-cookie-missing"></a>
#### assertCookieMissing

Assert that the response does not contain the given cookie:

```php
$response->assertCookieMissing($cookieName);
```

<a name="assert-created"></a>
#### assertCreated

Assert that the response has a 201 HTTP status code:

```php
$response->assertCreated();
```

<a name="assert-dont-see"></a>
#### assertDontSee

Assert that the given string is not contained within the response returned by the application. This assertion will automatically escape the given string unless you pass a second argument of `false`:

```php
$response->assertDontSee($value, $escape = true);
```

<a name="assert-dont-see-text"></a>
#### assertDontSeeText

Assert that the given string is not contained within the response text. This assertion will automatically escape the given string unless you pass a second argument of `false`. This method will pass the response content to the `strip_tags` PHP function before making the assertion:

```php
$response->assertDontSeeText($value, $escape = true);
```

<a name="assert-download"></a>
#### assertDownload

Assert that the response is a "download". Typically, this means the invoked route that returned the response returned a `Response::download` response, `BinaryFileResponse`, or `Storage::download` response:

```php
$response->assertDownload();
```

If you wish, you may assert that the downloadable file was assigned a given file name:

```php
$response->assertDownload('image.jpg');
```

<a name="assert-exact-json"></a>
#### assertExactJson

Assert that the response contains an exact match of the given JSON data:

```php
$response->assertExactJson(array $data);
```

<a name="assert-exact-json-structure"></a>
#### assertExactJsonStructure

Assert that the response contains an exact match of the given JSON structure:

```php
$response->assertExactJsonStructure(array $data);
```

This method is a more strict variant of [assertJsonStructure](#assert-json-structure). In contrast with `assertJsonStructure`, this method will fail if the response contains any keys that aren't explicitly included in the expected JSON structure.

<a name="assert-failed-dependency"></a>
#### assertFailedDependency

Assert that the response has a failed dependency (424) HTTP status code:

```php
$response->assertFailedDependency();
```

<a name="assert-forbidden"></a>
#### assertForbidden

Assert that the response has a forbidden (403) HTTP status code:

```php
$response->assertForbidden();
```

<a name="assert-found"></a>
#### assertFound

Assert that the response has a found (302) HTTP status code:

```php
$response->assertFound();
```

<a name="assert-gone"></a>
#### assertGone

Assert that the response has a gone (410) HTTP status code:

```php
$response->assertGone();
```

<a name="assert-header"></a>
#### assertHeader

Assert that the given header and value is present on the response:

```php
$response->assertHeader($headerName, $value = null);
```

<a name="assert-header-contains"></a>
#### assertHeaderContains

Assert that the given header contains a given substring value:

```php
$response->assertHeaderContains($headerName, $value);
```

<a name="assert-header-missing"></a>
#### assertHeaderMissing

Assert that the given header is not present on the response:

```php
$response->assertHeaderMissing($headerName);
```

<a name="assert-internal-server-error"></a>
#### assertInternalServerError

Assert that the response has an "Internal Server Error" (500) HTTP status code:

```php
$response->assertInternalServerError();
```

<a name="assert-json"></a>
#### assertJson

Assert that the response contains the given JSON data:

```php
$response->assertJson(array $data, $strict = false);
```

The `assertJson` method converts the response to an array to verify that the given array exists within the JSON response returned by the application. So, if there are other properties in the JSON response, this test will still pass as long as the given fragment is present.

<a name="assert-json-count"></a>
#### assertJsonCount

Assert that the response JSON has an array with the expected number of items at the given key:

```php
$response->assertJsonCount($count, $key = null);
```

<a name="assert-json-fragment"></a>
#### assertJsonFragment

Assert that the response contains the given JSON data anywhere in the response:

```php
Route::get('/users', function () {
    return [
        'users' => [
            [
                'name' => 'Taylor Otwell',
            ],
        ],
    ];
});

$response->assertJsonFragment(['name' => 'Taylor Otwell']);
```

<a name="assert-json-is-array"></a>
#### assertJsonIsArray

Assert that the response JSON is an array:

```php
$response->assertJsonIsArray();
```

<a name="assert-json-is-object"></a>
#### assertJsonIsObject

Assert that the response JSON is an object:

```php
$response->assertJsonIsObject();
```

<a name="assert-json-missing"></a>
#### assertJsonMissing

Assert that the response does not contain the given JSON data:

```php
$response->assertJsonMissing(array $data);
```

<a name="assert-json-missing-exact"></a>
#### assertJsonMissingExact

Assert that the response does not contain the exact JSON data:

```php
$response->assertJsonMissingExact(array $data);
```

<a name="assert-json-missing-validation-errors"></a>
#### assertJsonMissingValidationErrors

Assert that the response has no JSON validation errors for the given keys:

```php
$response->assertJsonMissingValidationErrors($keys);
```

> [!NOTE]
> The more generic [assertValid](#assert-valid) method may be used to assert that a response does not have validation errors that were returned as JSON **and** that no errors were flashed to session storage.

<a name="assert-json-path"></a>
#### assertJsonPath

Assert that the response contains the given data at the specified path:

```php
$response->assertJsonPath($path, $expectedValue);
```

For example, if the following JSON response is returned by your application:

```json
{
    "user": {
        "name": "Steve Schoger"
    }
}
```

You may assert that the `name` property of the `user` object matches a given value like so:

```php
$response->assertJsonPath('user.name', 'Steve Schoger');
```

<a name="assert-json-paths"></a>
#### assertJsonPaths

Assert that the response contains the given data at the specified paths:

```php
$response->assertJsonPaths(array $paths);
```

For example, you may assert multiple values within the response at once:

```php
$response->assertJsonPaths([
    'user.name' => 'Steve Schoger',
    'user.email' => fn (string $email) => str($email)->endsWith('@laravel.com'),
]);
```

<a name="assert-json-missing-path"></a>
#### assertJsonMissingPath

Assert that the response does not contain the given path:

```php
$response->assertJsonMissingPath($path);
```

For example, if the following JSON response is returned by your application:

```json
{
    "user": {
        "name": "Steve Schoger"
    }
}
```

You may assert that it does not contain the `email` property of the `user` object:

```php
$response->assertJsonMissingPath('user.email');
```

<a name="assert-json-missing-paths"></a>
#### assertJsonMissingPaths

Assert that the response does not contain the given paths:

```php
$response->assertJsonMissingPaths($paths);
```

For example, you may assert that multiple paths are missing from the response:

```php
$response->assertJsonMissingPaths([
    'user.email',
    'user.password',
]);
```

<a name="assert-json-structure"></a>
#### assertJsonStructure

Assert that the response has a given JSON structure:

```php
$response->assertJsonStructure(array $structure);
```

For example, if the JSON response returned by your application contains the following data:

```json
{
    "user": {
        "name": "Steve Schoger"
    }
}
```

You may assert that the JSON structure matches your expectations like so:

```php
$response->assertJsonStructure([
    'user' => [
        'name',
    ]
]);
```

Sometimes, JSON responses returned by your application may contain arrays of objects:

```json
{
    "user": [
        {
            "name": "Steve Schoger",
            "age": 55,
            "location": "Earth"
        },
        {
            "name": "Mary Schoger",
            "age": 60,
            "location": "Earth"
        }
    ]
}
```

In this situation, you may use the `*` character to assert against the structure of all of the objects in the array:

```php
$response->assertJsonStructure([
    'user' => [
        '*' => [
             'name',
             'age',
             'location'
        ]
    ]
]);
```

<a name="assert-json-validation-errors"></a>
#### assertJsonValidationErrors

Assert that the response has the given JSON validation errors for the given keys. This method should be used when asserting against responses where the validation errors are returned as a JSON structure instead of being flashed to the session:

```php
$response->assertJsonValidationErrors(array $data, $responseKey = 'errors');
```

> [!NOTE]
> The more generic [assertInvalid](#assert-invalid) method may be used to assert that a response has validation errors returned as JSON **or** that errors were flashed to session storage.

<a name="assert-json-validation-error-for"></a>
#### assertJsonValidationErrorFor

Assert the response has any JSON validation errors for the given key:

```php
$response->assertJsonValidationErrorFor(string $key, $responseKey = 'errors');
```

<a name="assert-method-not-allowed"></a>
#### assertMethodNotAllowed

Assert that the response has a method not allowed (405) HTTP status code:

```php
$response->assertMethodNotAllowed();
```

<a name="assert-moved-permanently"></a>
#### assertMovedPermanently

Assert that the response has a moved permanently (301) HTTP status code:

```php
$response->assertMovedPermanently();
```

<a name="assert-location"></a>
#### assertLocation

Assert that the response has the given URI value in the `Location` header:

```php
$response->assertLocation($uri);
```

<a name="assert-content"></a>
#### assertContent

Assert that the given string matches the response content:

```php
$response->assertContent($value);
```

<a name="assert-no-content"></a>
#### assertNoContent

Assert that the response has the given HTTP status code and no content:

```php
$response->assertNoContent($status = 204);
```

<a name="assert-streamed"></a>
#### assertStreamed

Assert that the response was a streamed response:

    $response->assertStreamed();

<a name="assert-streamed-content"></a>
#### assertStreamedContent

Assert that the given string matches the streamed response content:

```php
$response->assertStreamedContent($value);
```

<a name="assert-not-found"></a>
#### assertNotFound

Assert that the response has a not found (404) HTTP status code:

```php
$response->assertNotFound();
```

<a name="assert-ok"></a>
#### assertOk

Assert that the response has a 200 HTTP status code:

```php
$response->assertOk();
```

<a name="assert-payment-required"></a>
#### assertPaymentRequired

Assert that the response has a payment required (402) HTTP status code:

```php
$response->assertPaymentRequired();
```

<a name="assert-plain-cookie"></a>
#### assertPlainCookie

Assert that the response contains the given unencrypted cookie:

```php
$response->assertPlainCookie($cookieName, $value = null);
```

<a name="assert-redirect"></a>
#### assertRedirect

Assert that the response is a redirect to the given URI:

```php
$response->assertRedirect($uri = null);
```

<a name="assert-redirect-back"></a>
#### assertRedirectBack

Assert whether the response is redirecting back to the previous page:

```php
$response->assertRedirectBack();
```

<a name="assert-redirect-back-with-errors"></a>
#### assertRedirectBackWithErrors

Assert whether the response is redirecting back to the previous page and the [session has the given errors](#assert-session-has-errors):

```php
$response->assertRedirectBackWithErrors(
    array $keys = [], $format = null, $errorBag = 'default'
);
```

<a name="assert-redirect-back-without-errors"></a>
#### assertRedirectBackWithoutErrors

Assert whether the response is redirecting back to the previous page and the session does not contain any error messages:

```php
$response->assertRedirectBackWithoutErrors();
```

<a name="assert-redirect-contains"></a>
#### assertRedirectContains

Assert whether the response is redirecting to a URI that contains the given string:

```php
$response->assertRedirectContains($string);
```

<a name="assert-redirect-to-route"></a>
#### assertRedirectToRoute

Assert that the response is a redirect to the given [named route](/docs/{{version}}/routing#named-routes):

```php
$response->assertRedirectToRoute($name, $parameters = []);
```

<a name="assert-redirect-to-signed-route"></a>
#### assertRedirectToSignedRoute

Assert that the response is a redirect to the given [signed route](/docs/{{version}}/urls#signed-urls):

```php
$response->assertRedirectToSignedRoute($name = null, $parameters = []);
```

<a name="assert-request-timeout"></a>
#### assertRequestTimeout

Assert that the response has a request timeout (408) HTTP status code:

```php
$response->assertRequestTimeout();
```

<a name="assert-see"></a>
#### assertSee

Assert that the given string is contained within the response. This assertion will automatically escape the given string unless you pass a second argument of `false`:

```php
$response->assertSee($value, $escape = true);
```

<a name="assert-see-in-order"></a>
#### assertSeeInOrder

Assert that the given strings are contained in order within the response. This assertion will automatically escape the given strings unless you pass a second argument of `false`:

```php
$response->assertSeeInOrder(array $values, $escape = true);
```

<a name="assert-see-text"></a>
#### assertSeeText

Assert that the given string is contained within the response text. This assertion will automatically escape the given string unless you pass a second argument of `false`. The response content will be passed to the `strip_tags` PHP function before the assertion is made:

```php
$response->assertSeeText($value, $escape = true);
```

<a name="assert-see-text-in-order"></a>
#### assertSeeTextInOrder

Assert that the given strings are contained in order within the response text. This assertion will automatically escape the given strings unless you pass a second argument of `false`. The response content will be passed to the `strip_tags` PHP function before the assertion is made:

```php
$response->assertSeeTextInOrder(array $values, $escape = true);
```

<a name="assert-server-error"></a>
#### assertServerError

Assert that the response has a server error (>= 500 , < 600) HTTP status code:

```php
$response->assertServerError();
```

<a name="assert-service-unavailable"></a>
#### assertServiceUnavailable

Assert that the response has a "Service Unavailable" (503) HTTP status code:

```php
$response->assertServiceUnavailable();
```

<a name="assert-session-has"></a>
#### assertSessionHas

Assert that the session contains the given piece of data:

```php
$response->assertSessionHas($key, $value = null);
```

If needed, a closure can be provided as the second argument to the `assertSessionHas` method. The assertion will pass if the closure returns `true`:

```php
$response->assertSessionHas($key, function (User $value) {
    return $value->name === 'Taylor Otwell';
});
```

<a name="assert-session-has-input"></a>
#### assertSessionHasInput

Assert that the session has a given value in the [flashed input array](/docs/{{version}}/responses#redirecting-with-flashed-session-data):

```php
$response->assertSessionHasInput($key, $value = null);
```

If needed, a closure can be provided as the second argument to the `assertSessionHasInput` method. The assertion will pass if the closure returns `true`:

```php
use Illuminate\Support\Facades\Crypt;

$response->assertSessionHasInput($key, function (string $value) {
    return Crypt::decryptString($value) === 'secret';
});
```

<a name="assert-session-has-all"></a>
#### assertSessionHasAll

Assert that the session contains a given array of key / value pairs:

```php
$response->assertSessionHasAll(array $data);
```

For example, if your application's session contains `name` and `status` keys, you may assert that both exist and have the specified values like so:

```php
$response->assertSessionHasAll([
    'name' => 'Taylor Otwell',
    'status' => 'active',
]);
```

<a name="assert-session-has-errors"></a>
#### assertSessionHasErrors

Assert that the session contains an error for the given `$keys`. If `$keys` is an associative array, assert that the session contains a specific error message (value) for each field (key). This method should be used when testing routes that flash validation errors to the session instead of returning them as a JSON structure:

```php
$response->assertSessionHasErrors(
    array $keys = [], $format = null, $errorBag = 'default'
);
```

For example, to assert that the `name` and `email` fields have validation error messages that were flashed to the session, you may invoke the `assertSessionHasErrors` method like so:

```php
$response->assertSessionHasErrors(['name', 'email']);
```

Or, you may assert that a given field has a particular validation error message:

```php
$response->assertSessionHasErrors([
    'name' => 'The given name was invalid.'
]);
```

> [!NOTE]
> The more generic [assertInvalid](#assert-invalid) method may be used to assert that a response has validation errors returned as JSON **or** that errors were flashed to session storage.

<a name="assert-session-has-errors-in"></a>
#### assertSessionHasErrorsIn

Assert that the session contains an error for the given `$keys` within a specific [error bag](/docs/{{version}}/validation#named-error-bags). If `$keys` is an associative array, assert that the session contains a specific error message (value) for each field (key), within the error bag:

```php
$response->assertSessionHasErrorsIn($errorBag, $keys = [], $format = null);
```

<a name="assert-session-has-no-errors"></a>
#### assertSessionHasNoErrors

Assert that the session has no validation errors:

```php
$response->assertSessionHasNoErrors();
```

<a name="assert-session-doesnt-have-errors"></a>
#### assertSessionDoesntHaveErrors

Assert that the session has no validation errors for the given keys:

```php
$response->assertSessionDoesntHaveErrors($keys = [], $format = null, $errorBag = 'default');
```

> [!NOTE]
> The more generic [assertValid](#assert-valid) method may be used to assert that a response does not have validation errors that were returned as JSON **and** that no errors were flashed to session storage.

<a name="assert-session-missing"></a>
#### assertSessionMissing

Assert that the session does not contain the given key:

```php
$response->assertSessionMissing($key);
```

<a name="assert-session-missing-input"></a>
#### assertSessionMissingInput

Assert that the session is missing the given input key in the flashed input array:

```php
$response->assertSessionMissingInput($key);
```

<a name="assert-status"></a>
#### assertStatus

Assert that the response has a given HTTP status code:

```php
$response->assertStatus($code);
```

<a name="assert-successful"></a>
#### assertSuccessful

Assert that the response has a successful (>= 200 and < 300) HTTP status code:

```php
$response->assertSuccessful();
```

<a name="assert-too-many-requests"></a>
#### assertTooManyRequests

Assert that the response has a too many requests (429) HTTP status code:

```php
$response->assertTooManyRequests();
```

<a name="assert-unauthorized"></a>
#### assertUnauthorized

Assert that the response has an unauthorized (401) HTTP status code:

```php
$response->assertUnauthorized();
```

<a name="assert-unprocessable"></a>
#### assertUnprocessable

Assert that the response has an unprocessable entity (422) HTTP status code:

```php
$response->assertUnprocessable();
```

<a name="assert-unsupported-media-type"></a>
#### assertUnsupportedMediaType

Assert that the response has an unsupported media type (415) HTTP status code:

```php
$response->assertUnsupportedMediaType();
```

<a name="assert-valid"></a>
#### assertValid

Assert that the response has no validation errors for the given keys. This method may be used for asserting against responses where the validation errors are returned as a JSON structure or where the validation errors have been flashed to the session:

```php
// Assert that no validation errors are present...
$response->assertValid();

// Assert that the given keys do not have validation errors...
$response->assertValid(['name', 'email']);
```

<a name="assert-invalid"></a>
#### assertInvalid

Assert that the response has validation errors for the given keys. This method may be used for asserting against responses where the validation errors are returned as a JSON structure or where the validation errors have been flashed to the session:

```php
$response->assertInvalid(['name', 'email']);
```

You may also assert that a given key has a particular validation error message. When doing so, you may provide the entire message or only a small portion of the message:

```php
$response->assertInvalid([
    'name' => 'The name field is required.',
    'email' => 'valid email address',
]);
```

If you would like to assert that the given fields are the only fields with validation errors, you may use the `assertOnlyInvalid` method:

```php
$response->assertOnlyInvalid(['name', 'email']);
```

<a name="assert-view-has"></a>
#### assertViewHas

Assert that the response view contains a given piece of data:

```php
$response->assertViewHas($key, $value = null);
```

Passing a closure as the second argument to the `assertViewHas` method will allow you to inspect and make assertions against a particular piece of view data:

```php
$response->assertViewHas('user', function (User $user) {
    return $user->name === 'Taylor';
});
```

In addition, view data may be accessed as array variables on the response, allowing you to conveniently inspect it:

```php tab=Pest
expect($response['name'])->toBe('Taylor');
```

```php tab=PHPUnit
$this->assertEquals('Taylor', $response['name']);
```

<a name="assert-view-has-all"></a>
#### assertViewHasAll

Assert that the response view has a given list of data:

```php
$response->assertViewHasAll(array $data);
```

This method may be used to assert that the view simply contains data matching the given keys:

```php
$response->assertViewHasAll([
    'name',
    'email',
]);
```

Or, you may assert that the view data is present and has specific values:

```php
$response->assertViewHasAll([
    'name' => 'Taylor Otwell',
    'email' => 'taylor@example.com,',
]);
```

<a name="assert-view-is"></a>
#### assertViewIs

Assert that the given view was returned by the route:

```php
$response->assertViewIs($value);
```

<a name="assert-view-missing"></a>
#### assertViewMissing

Assert that the given data key was not made available to the view returned in the application's response:

```php
$response->assertViewMissing($key);
```

<a name="authentication-assertions"></a>
### Authentication Assertions

Laravel also provides a variety of authentication related assertions that you may utilize within your application's feature tests. Note that these methods are invoked on the test class itself and not the `Illuminate\Testing\TestResponse` instance returned by methods such as `get` and `post`.

<a name="assert-authenticated"></a>
#### assertAuthenticated

Assert that a user is authenticated:

```php
$this->assertAuthenticated($guard = null);
```

<a name="assert-guest"></a>
#### assertGuest

Assert that a user is not authenticated:

```php
$this->assertGuest($guard = null);
```

<a name="assert-authenticated-as"></a>
#### assertAuthenticatedAs

Assert that a specific user is authenticated:

```php
$this->assertAuthenticatedAs($user, $guard = null);
```

<a name="validation-assertions"></a>
## Validation Assertions

Laravel provides two primary validation related assertions that you may use to ensure the data provided in your request was either valid or invalid.

<a name="validation-assert-valid"></a>
#### assertValid

Assert that the response has no validation errors for the given keys. This method may be used for asserting against responses where the validation errors are returned as a JSON structure or where the validation errors have been flashed to the session:

```php
// Assert that no validation errors are present...
$response->assertValid();

// Assert that the given keys do not have validation errors...
$response->assertValid(['name', 'email']);
```

<a name="validation-assert-invalid"></a>
#### assertInvalid

Assert that the response has validation errors for the given keys. This method may be used for asserting against responses where the validation errors are returned as a JSON structure or where the validation errors have been flashed to the session:

```php
$response->assertInvalid(['name', 'email']);
```

You may also assert that a given key has a particular validation error message. When doing so, you may provide the entire message or only a small portion of the message:

```php
$response->assertInvalid([
    'name' => 'The name field is required.',
    'email' => 'valid email address',
]);
```


---

# Image Manipulation

*Sección: Laravel | Origen: https://laravel.com/docs/13.x/images*

- [Introduction](#introduction)
- [Installation](#installation)
    - [Configuration](#configuration)
- [Reading Images](#reading-images)
    - [Uploaded Files](#uploaded-files)
    - [Storage Files](#storage-files)
    - [Other Sources](#other-sources)
- [Manipulating Images](#manipulating-images)
    - [Resizing Images](#resizing-images)
    - [Other Transformations](#other-transformations)
- [Encoding Images](#encoding-images)
- [Storing Images](#storing-images)
- [Inspecting Images](#inspecting-images)
- [Image Drivers](#image-drivers)
    - [Custom Image Drivers](#custom-image-drivers)
    - [Custom Transformations](#custom-transformations)

<a name="introduction"></a>
## Introduction

Laravel provides a fluent image manipulation API that allows you to resize, crop, encode, and store images using the same expressive conventions found throughout the framework. Laravel's image features are powered by [Intervention Image](https://image.intervention.io/) and support the GD and Imagick PHP extensions.

The image API is useful when working with uploaded files, files stored on Laravel [filesystem disks](/docs/{{version}}/filesystem), local files, remote URLs, or raw image bytes:

```php
use Illuminate\Support\Facades\Image;

$path = Image::fromStorage('avatars/photo.jpg', 'public')
    ->cover(400, 400)
    ->toWebp()
    ->quality(80)
    ->storePublicly('avatars', 'public');
```

> [!WARNING]
> Image manipulation can be CPU and memory-intensive. Consider performing large image processing workloads on a [queued job](/docs/{{version}}/queues) instead of during the HTTP request that receives the upload.

<a name="installation"></a>
## Installation

Before using Laravel's image manipulation features, install the Intervention Image package via Composer:

```shell
composer require intervention/image:^4.0
```

You should also ensure your PHP installation has either the GD or Imagick extension installed, depending on which driver your application will use.

<a name="configuration"></a>
### Configuration

Laravel's image configuration file is located at `config/images.php`. If your application does not have an `images` configuration file, you may publish it using the `config:publish` Artisan command:

```shell
php artisan config:publish images
```

The image configuration file allows you to specify your application's default image driver. You may also specify the default driver using the `IMAGE_DRIVER` environment variable. The supported drivers are `gd` and `imagick`:

```ini
IMAGE_DRIVER=imagick
```

<a name="reading-images"></a>
## Reading Images

The `Image` facade provides several methods for reading images from common sources. Image contents are loaded lazily, so the source is typically not read until the image is processed or its bytes are requested.

<a name="uploaded-files"></a>
### Uploaded Files

You may retrieve an uploaded image from an incoming request using the `image` method. This method returns an `Illuminate\Image\Image` instance for the uploaded file, or `null` if the file is not present:

```php
use Illuminate\Http\Request;

Route::post('/avatar', function (Request $request) {
    $request->validate(['avatar' => ['required', 'image']]);

    $path = $request->image('avatar')
        ->cover(400, 400)
        ->toWebp()
        ->storePublicly('avatars', 'public');

    // ...
});
```

Alternatively, you may create an image instance from an `Illuminate\Http\UploadedFile` instance using the `fromUpload` method:

```php
use Illuminate\Support\Facades\Image;

$image = Image::fromUpload($request->file('avatar'));
```

When an image is created from an uploaded file, you may retrieve the underlying uploaded file using the `file` method:

```php
$file = $image->file();
```

<a name="storage-files"></a>
### Storage Files

You may create an image instance from a file stored on one of your application's [filesystem disks](/docs/{{version}}/filesystem) using the `fromStorage` method. The first argument is the path to the file, while the second argument is the disk name:

```php
use Illuminate\Support\Facades\Image;

$image = Image::fromStorage('avatars/photo.jpg', disk: 'public');
```

You may also create image instances directly from a filesystem disk instance using the `image` method:

```php
use Illuminate\Support\Facades\Storage;

$image = Storage::disk('public')->image('avatars/photo.jpg');
```

<a name="other-sources"></a>
### Other Sources

The `Image` facade also includes methods for creating image instances from raw bytes, local file paths, remote URLs, and Base64 encoded strings:

```php
use Illuminate\Support\Facades\Image;

$image = Image::fromBytes($contents);
$image = Image::fromBase64($base64);
$image = Image::fromPath(storage_path('app/avatars/photo.jpg'));
$image = Image::fromUrl('https://example.com/photo.jpg');
```

<a name="manipulating-images"></a>
## Manipulating Images

Image instances are immutable. Each manipulation method returns a new image instance with the transformation appended to its processing pipeline, allowing methods to be chained fluently:

```php
$image = $request->image('avatar')
    ->orient()
    ->cover(400, 400)
    ->sharpen(10);
```

Transformations are processed in the order they are added to the image pipeline and the image is only encoded once at the end.

<a name="resizing-images"></a>
### Resizing Images

The `resize` method resizes an image to the given dimensions. You may provide both a width and height, or provide only one dimension using named arguments:

```php
$image = $image->resize(800, 600);
$image = $image->resize(width: 800);
$image = $image->resize(height: 600);
```

The `scale` method proportionally scales an image down so that it fits within the given dimensions. This method will never increase the size of an image:

```php
$image = $image->scale(800, 600);
$image = $image->scale(width: 800);
$image = $image->scale(height: 600);
```

The `cover` method resizes and crops an image to completely cover the given dimensions:

```php
$image = $image->cover(400, 400);
```

The `contain` method resizes an image to fit within the given dimensions while preserving the entire image. If necessary, empty space will be filled using the optional background color:

```php
$image = $image->contain(400, 400);
$image = $image->contain(400, 400, '#ffffff');
$image = $image->contain(400, 400, 'dominant');
```

You may specify `dominant` as the background color to fill empty space using the image's dominant color.

You may crop an image using the `crop` method. The first two arguments are the desired width and height, and the optional third and fourth arguments specify the crop's `x` and `y` coordinates:

```php
$image = $image->crop(300, 200);
$image = $image->crop(300, 200, x: 50, y: 25);
```

<a name="other-transformations"></a>
### Other Transformations

Laravel also provides a variety of additional image transformation methods:

```php
$image = $image->orient();
$image = $image->rotate(90);
$image = $image->rotate(90, '#ffffff');
$image = $image->rotate(90, 'dominant');
$image = $image->blur(5);
$image = $image->grayscale();
$image = $image->sharpen(10);
$image = $image->flipVertically();
$image = $image->flipHorizontally();
```

The `orient` method rotates the image according to its EXIF orientation data. The `rotate` method rotates the image clockwise by the given angle and accepts an optional background color. The `blur` and `sharpen` methods accept values between `0` and `100`.

<a name="conditional-transformations"></a>
#### Conditional Transformations

Image instances support Laravel's `Conditionable` trait, allowing you to conditionally apply transformations using the `when` and `unless` methods:

```php
$image = $request->image('avatar')
    ->when($request->boolean('crop'), fn ($image) => $image->cover(400, 400))
    ->unless($request->boolean('preserve_format'), fn ($image) => $image->toWebp());
```

<a name="encoding-images"></a>
## Encoding Images

By default, processed images are encoded using their original format. However, you may convert the image to another supported format before retrieving or storing it:

```php
$image = $image->toWebp();
$image = $image->toJpg();
$image = $image->toJpeg();
$image = $image->toPng();
$image = $image->toGif();
$image = $image->toAvif();
$image = $image->toBmp();
```

You may use the `quality` method to set the output quality. The quality will be clamped between `1` and `100`:

```php
$image = $image->toWebp()->quality(80);
```

The `optimize` method is a convenient shortcut for converting the image to a given format and setting its quality. By default, images are optimized as WebP images with a quality of `70`:

```php
$image = $image->optimize();

$image = $image->optimize(format: 'jpg', quality: 85);
```

You may retrieve the processed image contents as a string of bytes, base64 encoded string, or data URI:

```php
$bytes = $image->toBytes();
$base64 = $image->toBase64();
$dataUri = $image->toDataUri();
```

An image instance may also be cast to a string to retrieve a data URI:

```php
$dataUri = (string) $image;
```

<a name="storing-images"></a>
## Storing Images

The `store` method stores the processed image on one of your application's filesystem disks. Like uploaded files, Laravel will generate a unique filename and return the stored path. The second argument may be used to specify the disk:

```php
$path = $request->image('avatar')
    ->cover(400, 400)
    ->store(path: 'avatars');

$path = $request->image('avatar')
    ->cover(400, 400)
    ->store(path: 'avatars', disk: 's3');
```

You may use the `storeAs` method to specify the stored filename:

```php
$path = $request->image('avatar')
    ->cover(400, 400)
    ->storeAs(path: 'avatars', name: 'avatar.jpg', disk: 'public');
```

The `storePublicly` and `storePubliclyAs` methods store the image with `public` visibility:

```php
$path = $request->image('avatar')
    ->cover(400, 400)
    ->storePublicly(path: 'avatars', disk: 'public');

$path = $request->image('avatar')
    ->cover(400, 400)
    ->storePubliclyAs(path: 'avatars', name: 'avatar.webp', disk: 'public');
```

If the image could not be stored, the storage methods return `false`.

<a name="inspecting-images"></a>
## Inspecting Images

You may retrieve the image's MIME type, extension, dimensions, width, height, and dominant color using the following methods:

```php
$mimeType = $image->mimeType();
$extension = $image->extension();

[$width, $height] = $image->dimensions();
$width = $image->width();
$height = $image->height();

$dominantColor = $image->dominantColor();
```

These methods operate on the processed image. For example, calling `width` after `cover(400, 400)` will return `400`.

<a name="image-drivers"></a>
## Image Drivers

<a name="custom-image-drivers"></a>
### Custom Image Drivers

Laravel's image manager extends Laravel's base `Illuminate\Support\Manager` class. This means you may register custom image drivers using the `extend` method available on the image manager and `Image` facade.

Custom image drivers should implement the `Illuminate\Contracts\Image\Driver` interface. The `process` method receives the original image contents and the ordered `Illuminate\Image\ImagePipeline` that should be applied to the image, and should return the processed image bytes:

```php
<?php

namespace App\Images;

use Illuminate\Contracts\Image\Driver;
use Illuminate\Image\ImagePipeline;

class VipsDriver implements Driver
{
    /**
     * Process the given image contents with the specified pipeline.
     */
    public function process(string $contents, ImagePipeline $pipeline): string
    {
        // Apply the pipeline's transformations and output options...

        return $contents;
    }

    /**
     * Register a transformation handler.
     */
    public function transformUsing(string $transformation, callable $callback): static
    {
        // Store the handler so it may be applied while processing the pipeline...

        return $this;
    }
}
```

> [!NOTE]
> To better understand how to implement a custom image driver, you may review the framework's built-in `Illuminate\Image\Drivers\InterventionDriver` class.

Once you have implemented your custom driver, you may register it using the `Image` facade's `extend` method. Typically, this should be done in the `boot` method of a service provider:

```php
use App\Images\VipsDriver;
use Illuminate\Contracts\Foundation\Application;
use Illuminate\Support\Facades\Image;

/**
 * Bootstrap any application services.
 */
public function boot(): void
{
    Image::extend('vips', function (Application $app) {
        return new VipsDriver;
    });
}
```

After registering the driver, you may use it for a specific image using the `using` method:

```php
$image = $request->image('avatar')
    ->using('vips')
    ->cover(400, 400);
```

You may also configure a custom driver as your application's default image driver using the `default` option in your application's `config/images.php` configuration file or the `IMAGE_DRIVER` environment variable:

```ini
IMAGE_DRIVER=vips
```

<a name="custom-transformations"></a>
### Custom Transformations

Applications and packages may define custom transformations by creating a class that implements the `Illuminate\Contracts\Image\Transformation` contract. Custom transformations can then be added to an image pipeline using the `transform` method:

```php
<?php

namespace App\Images\Transformations;

use Illuminate\Contracts\Image\Transformation;

class Pixelate implements Transformation
{
    public function __construct(
        public readonly int $size,
    ) {
        //
    }
}
```

Next, register a handler for the transformation and driver using the `Image` facade's `transformUsing` method. Typically, this should be done in the `boot` method of a service provider:

```php
use App\Images\Transformations\Pixelate;
use Illuminate\Support\Facades\Image;
use Intervention\Image\Interfaces\ImageInterface;

Image::transformUsing('gd', Pixelate::class, function (ImageInterface $image, Pixelate $transformation) {
    return $image->pixelate($transformation->size);
});
```

Once the transformation handler has been registered, you may apply the transformation to an image:

```php
use App\Images\Transformations\Pixelate;

$image = $request->image('avatar')
    ->transform(new Pixelate(12))
    ->store('avatars');
```


---

# Installation

*Sección: Laravel | Origen: https://laravel.com/docs/13.x/installation*

- [Meet Laravel](#meet-laravel)
    - [Why Laravel?](#why-laravel)
- [Creating a Laravel Application](#creating-a-laravel-project)
    - [Getting Started Using AI](#getting-started-using-ai)
    - [Installing PHP and the Laravel Installer](#installing-php)
    - [Creating an Application](#creating-an-application)
- [Initial Configuration](#initial-configuration)
    - [Environment Based Configuration](#environment-based-configuration)
    - [Databases and Migrations](#databases-and-migrations)
    - [Directory Configuration](#directory-configuration)
- [Installation Using Herd](#installation-using-herd)
    - [Herd on macOS](#herd-on-macos)
    - [Herd on Windows](#herd-on-windows)
- [IDE Support](#ide-support)
- [Laravel and AI](#laravel-and-ai)
    - [Installing Laravel Boost](#installing-laravel-boost)
- [Next Steps](#next-steps)
    - [Laravel the Full Stack Framework](#laravel-the-fullstack-framework)
    - [Laravel the API Backend](#laravel-the-api-backend)

<a name="meet-laravel"></a>
## Meet Laravel

Laravel is a web application framework with expressive, elegant syntax. A web framework provides a structure and starting point for creating your application, allowing you to focus on creating something amazing while we sweat the details.

Laravel strives to provide an amazing developer experience while providing powerful features such as thorough dependency injection, an expressive database abstraction layer, queues and scheduled jobs, unit and integration testing, and more.

Whether you are new to PHP web frameworks or have years of experience, Laravel is a framework that can grow with you. We'll help you take your first steps as a web developer or give you a boost as you take your expertise to the next level. We can't wait to see what you build.

<a name="why-laravel"></a>
### Why Laravel?

There are a variety of tools and frameworks available to you when building a web application. However, we believe Laravel is the best choice for building modern, full-stack web applications.

#### A Progressive Framework

We like to call Laravel a "progressive" framework. By that, we mean that Laravel grows with you. If you're just taking your first steps into web development, Laravel's vast library of documentation, guides, and [video tutorials](https://laracasts.com) will help you learn the ropes without becoming overwhelmed.

If you're a senior developer, Laravel gives you robust tools for [dependency injection](/docs/{{version}}/container), [unit testing](/docs/{{version}}/testing), [queues](/docs/{{version}}/queues), [real-time events](/docs/{{version}}/broadcasting), and more. Laravel is fine-tuned for building professional web applications and ready to handle enterprise workloads.

#### A Scalable Framework

Laravel is incredibly scalable. Thanks to the scaling-friendly nature of PHP and Laravel's built-in support for fast, distributed cache systems like Redis, horizontal scaling with Laravel is a breeze. In fact, Laravel applications have been easily scaled to handle hundreds of millions of requests per month.

Need extreme scaling? Platforms like [Laravel Cloud](https://cloud.laravel.com) allow you to run your Laravel application at nearly limitless scale.

#### An Agent Ready Framework

Laravel's opinionated conventions and well-defined structure make it an ideal framework for [AI assisted development](/docs/{{version}}/ai) using tools like Cursor and Claude Code. When you ask an AI agent to add a controller, it knows exactly where to place it. When you need a new migration, the naming conventions and file locations are predictable. This consistency eliminates the guesswork that often trips up AI tools in more flexible frameworks.

Beyond file organization, Laravel's expressive syntax and comprehensive documentation give AI agents the context they need to generate accurate, idiomatic code. Features like Eloquent relationships, form requests, and middleware follow patterns that agents can reliably understand and replicate. The result is AI-generated code that looks like it was written by a seasoned Laravel developer, not stitched together from generic PHP snippets.

To learn more about why Laravel is the perfect choice for AI assisted development, check out our documentation on [agentic development](/docs/{{version}}/ai).

#### A Community Framework

Laravel combines the best packages in the PHP ecosystem to offer the most robust and developer friendly framework available. In addition, thousands of talented developers from around the world have [contributed to the framework](https://github.com/laravel/framework). Who knows, maybe you'll even become a Laravel contributor.

<a name="creating-a-laravel-project"></a>
## Creating a Laravel Application

<a name="getting-started-using-ai"></a>
### Getting Started Using AI

If you are using an AI coding agent like [Claude Code](https://docs.anthropic.com/en/docs/claude-code) or [OpenCode](https://opencode.ai), you can start with a prompt that gives the agent a Laravel-specific playbook before it touches your project.

The prompt below tells the agent where to find Laravel's installation guidance, what to prioritize, and how to make sensible defaults when you haven't made a choice yet. Paste this into your agent to get started:

```text
I'm building a new Laravel application.

Fetch and follow the instructions from https://laravel.com/for/agents. Treat the returned Markdown as the source of truth for how to install and set up Laravel in this session.
```

After the agent reads the instructions, it should guide you step by step and keep the setup aligned with Laravel's defaults.

<a name="installing-php"></a>
### Installing PHP and the Laravel Installer

Before creating your first Laravel application, make sure that your local machine has [PHP](https://php.net), [Composer](https://getcomposer.org), and [the Laravel installer](https://github.com/laravel/installer) installed. In addition, you should install either [Node and NPM](https://nodejs.org) or [Bun](https://bun.sh/) so that you can compile your application's frontend assets.

If you don't have PHP and Composer installed on your local machine, the following commands will install PHP, Composer, and the Laravel installer on macOS, Windows, or Linux:

```shell tab=macOS
/bin/bash -c "$(curl -fsSL https://php.new/install/mac/8.5)"
```

```shell tab=Windows PowerShell
# Run as administrator...
Set-ExecutionPolicy Bypass -Scope Process -Force; [System.Net.ServicePointManager]::SecurityProtocol = [System.Net.ServicePointManager]::SecurityProtocol -bor 3072; iex ((New-Object System.Net.WebClient).DownloadString('https://php.new/install/windows/8.5'))
```

```shell tab=Linux
/bin/bash -c "$(curl -fsSL https://php.new/install/linux/8.5)"
```

After running one of the commands above, you should restart your terminal session. To update PHP, Composer, and the Laravel installer after installing them via `php.new`, you can re-run the command in your terminal.

If you already have PHP and Composer installed, you may install the Laravel installer via Composer:

```shell
composer global require laravel/installer
```

> [!NOTE]
> For a fully-featured, graphical PHP installation and management experience, check out [Laravel Herd](#installation-using-herd).

<a name="creating-an-application"></a>
### Creating an Application

After you have installed PHP, Composer, and the Laravel installer, you are ready to create a new Laravel application:

```shell
laravel new example-app
```

Once the application has been created, you can start Laravel's local development server, queue worker, and Vite development server using the `dev` Composer script:

```shell
cd example-app
npm install && npm run build
composer run dev
```

Once you have started the development server, you can access your application in your web browser at [http://localhost:8000](http://localhost:8000). Next, you're ready to [start taking your next steps into the Laravel ecosystem](#next-steps). Of course, you may also want to [configure a database](#databases-and-migrations) and run the necessary migrations.

> [!NOTE]
> If you would like a head start when developing your Laravel application, consider using one of our [starter kits](/docs/{{version}}/starter-kits). Laravel's starter kits provide backend and frontend authentication scaffolding for your new Laravel application.

<a name="initial-configuration"></a>
## Initial Configuration

All configuration files for the Laravel framework are stored in the `config` directory. Each option is documented, so feel free to look through the files and get familiar with the options available to you.

Laravel needs almost no additional configuration out of the box. You are free to get started developing! However, you may wish to review the `config/app.php` file and its documentation. It contains several options such as `url` and `locale` that you may wish to change according to your application.

<a name="environment-based-configuration"></a>
### Environment Based Configuration

Since many of Laravel's configuration option values may vary depending on whether your application is running on your local machine or on a production web server, many important configuration values are defined using the `.env` file that exists at the root of your application.

Your `.env` file should not be committed to your application's source control, since each developer / server using your application could require a different environment configuration. Furthermore, this would be a security risk in the event an intruder gains access to your source control repository, since any sensitive credentials would be exposed.

> [!NOTE]
> For more information about the `.env` file and environment based configuration, check out the full [configuration documentation](/docs/{{version}}/configuration#environment-configuration).

<a name="databases-and-migrations"></a>
### Databases and Migrations

Now that you have created your Laravel application, you probably want to store some data in a database. By default, your application's `.env` configuration file specifies that Laravel will be interacting with an SQLite database.

During the creation of the application, Laravel created a `database/database.sqlite` file for you, and ran the necessary migrations to create the application's database tables.

If you prefer to use another database driver such as MySQL or PostgreSQL, you can update your `.env` configuration file to use the appropriate database. For example, if you wish to use MySQL, update your `.env` configuration file's `DB_*` variables like so:

```ini
DB_CONNECTION=mysql
DB_HOST=127.0.0.1
DB_PORT=3306
DB_DATABASE=laravel
DB_USERNAME=root
DB_PASSWORD=
```

If you choose to use a database other than SQLite, you will need to create the database and run your application's [database migrations](/docs/{{version}}/migrations):

```shell
php artisan migrate
```

> [!NOTE]
> If you are developing on macOS or Windows and need to install MySQL, PostgreSQL, or Redis locally, consider using [Herd Pro](https://herd.laravel.com/#plans) or [DBngin](https://dbngin.com/).

<a name="directory-configuration"></a>
### Directory Configuration

Laravel should always be served out of the root of the "web directory" configured for your web server. You should not attempt to serve a Laravel application out of a subdirectory of the "web directory". Attempting to do so could expose sensitive files present within your application.

<a name="installation-using-herd"></a>
## Installation Using Herd

[Laravel Herd](https://herd.laravel.com) is a blazing fast, native Laravel and PHP development environment for macOS and Windows. Herd includes everything you need to get started with Laravel development, including PHP and Nginx.

Once you install Herd, you're ready to start developing with Laravel. Herd includes command line tools for `php`, `composer`, `laravel`, `expose`, `node`, `npm`, and `nvm`.

> [!NOTE]
> [Herd Pro](https://herd.laravel.com/#plans) augments Herd with additional powerful features, such as the ability to create and manage local MySQL, Postgres, and Redis databases, as well as local mail viewing and log monitoring.

<a name="herd-on-macos"></a>
### Herd on macOS

If you develop on macOS, you can download the Herd installer from the [Herd website](https://herd.laravel.com). The installer automatically downloads the latest version of PHP and configures your Mac to always run [Nginx](https://www.nginx.com/) in the background.

Herd for macOS uses [dnsmasq](https://en.wikipedia.org/wiki/Dnsmasq) to support "parked" directories. Any Laravel application in a parked directory will automatically be served by Herd. By default, Herd creates a parked directory at `~/Herd` and you can access any Laravel application in this directory on the `.test` domain using its directory name.

After installing Herd, the fastest way to create a new Laravel application is using the Laravel CLI, which is bundled with Herd:

```shell
cd ~/Herd
laravel new my-app
cd my-app
herd open
```

Of course, you can always manage your parked directories and other PHP settings via Herd's UI, which can be opened from the Herd menu in your system tray.

You can learn more about Herd by checking out the [Herd documentation](https://herd.laravel.com/docs).

<a name="herd-on-windows"></a>
### Herd on Windows

You can download the Windows installer for Herd on the [Herd website](https://herd.laravel.com/windows). After the installation finishes, you can start Herd to complete the onboarding process and access the Herd UI for the first time.

The Herd UI is accessible by left-clicking on Herd's system tray icon. A right-click opens the quick menu with access to all tools that you need on a daily basis.

During installation, Herd creates a "parked" directory in your home directory at `%USERPROFILE%\Herd`. Any Laravel application in a parked directory will automatically be served by Herd, and you can access any Laravel application in this directory on the `.test` domain using its directory name.

After installing Herd, the fastest way to create a new Laravel application is using the Laravel CLI, which is bundled with Herd. To get started, open Powershell and run the following commands:

```shell
cd ~\Herd
laravel new my-app
cd my-app
herd open
```

You can learn more about Herd by checking out the [Herd documentation for Windows](https://herd.laravel.com/docs/windows).

<a name="ide-support"></a>
## IDE Support

You are free to use any code editor you wish when developing Laravel applications. The [Laravel LSP](https://github.com/laravel/lsp) provides framework-aware editor support, including code completions, hover information, diagnostics, document links, go-to definition, and quick fixes for Laravel and Blade code.

To install the Laravel LSP, install it globally via Composer. Ensure that Composer's global vendor bin directory is on your `PATH`:

```shell
composer global require laravel/lsp
```

If you're looking for lightweight and extensible editors, [VS Code](https://code.visualstudio.com) or [Cursor](https://cursor.com) combined with the official [Laravel VS Code Extension](https://marketplace.visualstudio.com/items?itemName=laravel.vscode-laravel) provides syntax highlighting, snippets, Artisan command integration, and automatic Laravel LSP support. Official Laravel extensions are also available for [Sublime Text](https://github.com/laravel/sublime-extension) and [Zed](https://github.com/laravel/zed-extension). Refer to the [Laravel LSP repository](https://github.com/laravel/lsp) for setup instructions for other language-server-compatible editors, including Neovim and OpenCode.

For extensive and robust support of Laravel, take a look at [PhpStorm](https://www.jetbrains.com/phpstorm/laravel/?utm_source=laravel.com&utm_medium=link&utm_campaign=laravel-2025&utm_content=partner&ref=laravel-2025), a JetBrains IDE. PhpStorm's built-in Laravel framework support includes Blade templates, smart autocompletion for Eloquent models, routes, views, translations, and components, along with powerful code generation and navigation across Laravel projects.

For those seeking a cloud-based development experience, [Firebase Studio](https://firebase.studio/) provides instant access to building with Laravel directly in your browser. With zero setup required, Firebase Studio makes it easy to start building Laravel applications from any device.

<a name="laravel-and-ai"></a>
## Laravel and AI

[Laravel Boost](https://github.com/laravel/boost) is a powerful tool that bridges the gap between AI coding agents and Laravel applications. Boost provides AI agents with Laravel-specific context, tools, and guidelines so they can generate more accurate, version-specific code that follows Laravel conventions.

When you install Boost in your Laravel application, AI agents gain access to over 15 specialized tools including the ability to know which packages you are using, query your database, search the Laravel documentation, read browser logs, generate tests, and execute code via Tinker.

In addition, Boost gives AI agents access to over 17,000 pieces of vectorized Laravel ecosystem documentation, specific to your installed package versions. This means agents can provide guidance targeted to the exact versions your project uses.

Boost also includes Laravel-maintained AI guidelines that help agents to follow framework conventions, write appropriate tests, and avoid common pitfalls when generating Laravel code.

<a name="installing-laravel-boost"></a>
### Installing Laravel Boost

Boost can be installed in Laravel 10, 11, 12, and 13 applications running PHP 8.1 or higher. To get started, install Boost as a development dependency:

```shell
composer require laravel/boost --dev
```

Once installed, run the interactive installer:

```shell
php artisan boost:install
```

The installer will auto-detect your IDE and AI agents, allowing you to opt into the features that make sense for your project. Boost respects existing project conventions and doesn't force opinionated style rules by default.

> [!NOTE]
> To learn more about Boost, check out the [Laravel Boost repository on GitHub](https://github.com/laravel/boost).

<a name="adding-custom-ai-guidelines"></a>
#### Adding Custom AI Guidelines

To augment Laravel Boost with your own custom AI guidelines, add `.blade.php` or `.md` files to your application's `.ai/guidelines/*` directory. These files will automatically be included with Laravel Boost's guidelines when you run `boost:install`.

<a name="next-steps"></a>
## Next Steps

Now that you have created your Laravel application, you may be wondering what to learn next. First, we strongly recommend becoming familiar with how Laravel works by reading the following documentation:

<div class="content-list" markdown="1">

- [Request Lifecycle](/docs/{{version}}/lifecycle)
- [Configuration](/docs/{{version}}/configuration)
- [Directory Structure](/docs/{{version}}/structure)
- [Frontend](/docs/{{version}}/frontend)
- [Service Container](/docs/{{version}}/container)
- [Facades](/docs/{{version}}/facades)

</div>

How you want to use Laravel will also dictate the next steps on your journey. There are a variety of ways to use Laravel, and we'll explore two primary use cases for the framework below.

<a name="laravel-the-fullstack-framework"></a>
### Laravel the Full Stack Framework

Laravel may serve as a full stack framework. By "full stack" framework we mean that you are going to use Laravel to route requests to your application and render your frontend via [Blade templates](/docs/{{version}}/blade) or a single-page application hybrid technology like [Inertia](https://inertiajs.com). This is the most common way to use the Laravel framework, and, in our opinion, the most productive way to use Laravel.

If this is how you plan to use Laravel, you may want to check out our documentation on [frontend development](/docs/{{version}}/frontend), [routing](/docs/{{version}}/routing), [views](/docs/{{version}}/views), or the [Eloquent ORM](/docs/{{version}}/eloquent). In addition, you might be interested in learning about community packages like [Livewire](https://livewire.laravel.com) and [Inertia](https://inertiajs.com). These packages allow you to use Laravel as a full-stack framework while enjoying many of the UI benefits provided by single-page JavaScript applications.

If you are using Laravel as a full stack framework, we also strongly encourage you to learn how to compile your application's CSS and JavaScript using [Vite](/docs/{{version}}/vite).

> [!NOTE]
> If you want to get a head start building your application, check out one of our official [application starter kits](/docs/{{version}}/starter-kits).

<a name="laravel-the-api-backend"></a>
### Laravel the API Backend

Laravel may also serve as an API backend to a JavaScript single-page application or mobile application. For example, you might use Laravel as an API backend for your [Next.js](https://nextjs.org) application. In this context, you may use Laravel to provide [authentication](/docs/{{version}}/sanctum) and data storage / retrieval for your application, while also taking advantage of Laravel's powerful services such as queues, emails, notifications, and more.

If this is how you plan to use Laravel, you may want to check out our documentation on [routing](/docs/{{version}}/routing), [Laravel Sanctum](/docs/{{version}}/sanctum), and the [Eloquent ORM](/docs/{{version}}/eloquent).


---

# Request Lifecycle

*Sección: Laravel | Origen: https://laravel.com/docs/13.x/lifecycle*

- [Introduction](#introduction)
- [Lifecycle Overview](#lifecycle-overview)
    - [First Steps](#first-steps)
    - [HTTP / Console Kernels](#http-console-kernels)
    - [Service Providers](#service-providers)
    - [Routing](#routing)
    - [Finishing Up](#finishing-up)
- [Focus on Service Providers](#focus-on-service-providers)

<a name="introduction"></a>
## Introduction

When using any tool in the "real world", you feel more confident if you understand how that tool works. Application development is no different. When you understand how your development tools function, you feel more comfortable and confident using them.

The goal of this document is to give you a good, high-level overview of how the Laravel framework works. By getting to know the overall framework better, everything feels less "magical" and you will be more confident building your applications. If you don't understand all of the terms right away, don't lose heart! Just try to get a basic grasp of what is going on, and your knowledge will grow as you explore other sections of the documentation.

<a name="lifecycle-overview"></a>
## Lifecycle Overview

<a name="first-steps"></a>
### First Steps

The entry point for all requests to a Laravel application is the `public/index.php` file. All requests are directed to this file by your web server (Apache / Nginx) configuration. The `index.php` file doesn't contain much code. Rather, it is a starting point for loading the rest of the framework.

The `index.php` file loads the Composer generated autoloader definition, and then retrieves an instance of the Laravel application from `bootstrap/app.php`. The first action taken by Laravel itself is to create an instance of the application / [service container](/docs/{{version}}/container).

<a name="http-console-kernels"></a>
### HTTP / Console Kernels

Next, the incoming request is sent to either the HTTP kernel or the console kernel, using the `handleRequest` or `handleCommand` methods of the application instance, depending on the type of request entering the application. These two kernels serve as the central location through which all requests flow. For now, let's just focus on the HTTP kernel, which is an instance of `Illuminate\Foundation\Http\Kernel`.

The HTTP kernel defines an array of `bootstrappers` that will be run before the request is executed. These bootstrappers configure error handling, configure logging, [detect the application environment](/docs/{{version}}/configuration#environment-configuration), and perform other tasks that need to be done before the request is actually handled. Typically, these classes handle internal Laravel configuration that you do not need to worry about.

The HTTP kernel is also responsible for passing the request through the application's middleware stack. These middleware handle reading and writing the [HTTP session](/docs/{{version}}/session), determining if the application is in maintenance mode, [verifying the CSRF token](/docs/{{version}}/csrf), and more. We'll talk more about these soon.

The method signature for the HTTP kernel's `handle` method is quite simple: it receives a `Request` and returns a `Response`. Think of the kernel as being a big black box that represents your entire application. Feed it HTTP requests and it will return HTTP responses.

<a name="service-providers"></a>
### Service Providers

One of the most important kernel bootstrapping actions is loading the [service providers](/docs/{{version}}/providers) for your application. Service providers are responsible for bootstrapping all of the framework's various components, such as the database, queue, validation, and routing components.

Laravel will iterate through this list of providers and instantiate each of them. After instantiating the providers, the `register` method will be called on all of the providers. Then, once all of the providers have been registered, the `boot` method will be called on each provider. This is so service providers may depend on every container binding being registered and available by the time their `boot` method is executed.

Essentially every major feature offered by Laravel is bootstrapped and configured by a service provider. Since they bootstrap and configure so many features offered by the framework, service providers are the most important aspect of the entire Laravel bootstrap process.

While the framework internally uses dozens of service providers, you also have the option to create your own. You can find a list of the user-defined or third-party service providers that your application is using in the `bootstrap/providers.php` file.

<a name="routing"></a>
### Routing

Once the application has been bootstrapped and all service providers have been registered, the `Request` will be handed off to the router for dispatching. The router will dispatch the request to a route or controller, as well as run any route specific middleware.

Middleware provide a convenient mechanism for filtering or examining HTTP requests entering your application. For example, Laravel includes a middleware that verifies if the user of your application is authenticated. If the user is not authenticated, the middleware will redirect the user to the login screen. However, if the user is authenticated, the middleware will allow the request to proceed further into the application. Some middleware are assigned to all routes within the application, like `PreventRequestsDuringMaintenance`, while some are only assigned to specific routes or route groups. You can learn more about middleware by reading the complete [middleware documentation](/docs/{{version}}/middleware).

If the request passes through all of the matched route's assigned middleware, the route or controller method will be executed and the response returned by the route or controller method will be sent back through the route's chain of middleware.

<a name="finishing-up"></a>
### Finishing Up

Once the route or controller method returns a response, the response will travel back outward through the route's middleware, giving the application a chance to modify or examine the outgoing response.

Finally, once the response travels back through the middleware, the HTTP kernel's `handle` method returns the response object to the `handleRequest` of the application instance, and this method calls the `send` method on the returned response. The `send` method sends the response content to the user's web browser. We've now completed our journey through the entire Laravel request lifecycle!

<a name="focus-on-service-providers"></a>
## Focus on Service Providers

Service providers are truly the key to bootstrapping a Laravel application. The application instance is created, the service providers are registered, and the request is handed to the bootstrapped application. It's really that simple!

Having a firm grasp of how a Laravel application is built and bootstrapped via service providers is very valuable. Your application's user-defined service providers are stored in the `app/Providers` directory.

By default, the `AppServiceProvider` is fairly empty. This provider is a great place to add your application's own bootstrapping and service container bindings. For large applications, you may wish to create several service providers, each with more granular bootstrapping for specific services used by your application.


---

# Localization

*Sección: Laravel | Origen: https://laravel.com/docs/13.x/localization*

- [Introduction](#introduction)
    - [Publishing the Language Files](#publishing-the-language-files)
    - [Configuring the Locale](#configuring-the-locale)
    - [Pluralization Language](#pluralization-language)
- [Defining Translation Strings](#defining-translation-strings)
    - [Using Short Keys](#using-short-keys)
    - [Using Translation Strings as Keys](#using-translation-strings-as-keys)
- [Retrieving Translation Strings](#retrieving-translation-strings)
    - [Replacing Parameters in Translation Strings](#replacing-parameters-in-translation-strings)
    - [Pluralization](#pluralization)
- [Overriding Package Language Files](#overriding-package-language-files)

<a name="introduction"></a>
## Introduction

> [!NOTE]
> By default, the Laravel application skeleton does not include the `lang` directory. If you would like to customize Laravel's language files, you may publish them via the `lang:publish` Artisan command.

Laravel's localization features provide a convenient way to retrieve strings in various languages, allowing you to easily support multiple languages within your application.

Laravel provides two ways to manage translation strings. First, language strings may be stored in files within the application's `lang` directory. Within this directory, there may be subdirectories for each language supported by the application. This is the approach Laravel uses to manage translation strings for built-in Laravel features such as validation error messages:

```text
/lang
    /en
        messages.php
    /es
        messages.php
```

Or, translation strings may be defined within JSON files that are placed within the `lang` directory. When taking this approach, each language supported by your application would have a corresponding JSON file within this directory. This approach is recommended for applications that have a large number of translatable strings:

```text
/lang
    en.json
    es.json
```

We'll discuss each approach to managing translation strings within this documentation.

<a name="publishing-the-language-files"></a>
### Publishing the Language Files

By default, the Laravel application skeleton does not include the `lang` directory. If you would like to customize Laravel's language files or create your own, you should scaffold the `lang` directory via the `lang:publish` Artisan command. The `lang:publish` command will create the `lang` directory in your application and publish the default set of language files used by Laravel:

```shell
php artisan lang:publish
```

<a name="configuring-the-locale"></a>
### Configuring the Locale

The default language for your application is stored in the `config/app.php` configuration file's `locale` configuration option, which is typically set using the `APP_LOCALE` environment variable. You are free to modify this value to suit the needs of your application.

You may also configure a "fallback language", which will be used when the default language does not contain a given translation string. Like the default language, the fallback language is also configured in the `config/app.php` configuration file, and its value is typically set using the `APP_FALLBACK_LOCALE` environment variable.

You may modify the default language for a single HTTP request at runtime using the `setLocale` method provided by the `App` facade:

```php
use Illuminate\Support\Facades\App;

Route::get('/greeting/{locale}', function (string $locale) {
    if (! in_array($locale, ['en', 'es', 'fr'])) {
        abort(400);
    }

    App::setLocale($locale);

    // ...
});
```

<a name="determining-the-current-locale"></a>
#### Determining the Current Locale

You may use the `currentLocale` and `isLocale` methods on the `App` facade to determine the current locale or check if the locale is a given value:

```php
use Illuminate\Support\Facades\App;

$locale = App::currentLocale();

if (App::isLocale('en')) {
    // ...
}
```

<a name="pluralization-language"></a>
### Pluralization Language

<style>
.code-list-no-flex-break code {
    display: contents !important;
}
</style>

<div class="code-list-no-flex-break">

You may instruct Laravel's "pluralizer", which is used by Eloquent and other portions of the framework to convert singular strings to plural strings, to use a language other than English. This may be accomplished by invoking the `useLanguage` method within the `boot` method of one of your application's service providers. The pluralizer's currently supported languages are: `french`, `norwegian-bokmal`, `portuguese`, `spanish`, and `turkish`:

</div>

```php
use Illuminate\Support\Pluralizer;

/**
 * Bootstrap any application services.
 */
public function boot(): void
{
    Pluralizer::useLanguage('spanish');

    // ...
}
```

> [!WARNING]
> If you customize the pluralizer's language, you should explicitly define your Eloquent model's [table names](/docs/{{version}}/eloquent#table-names).

<a name="defining-translation-strings"></a>
## Defining Translation Strings

<a name="using-short-keys"></a>
### Using Short Keys

Typically, translation strings are stored in files within the `lang` directory. Within this directory, there should be a subdirectory for each language supported by your application. This is the approach Laravel uses to manage translation strings for built-in Laravel features such as validation error messages:

```text
/lang
    /en
        messages.php
    /es
        messages.php
```

All language files return an array of keyed strings. For example:

```php
<?php

// lang/en/messages.php

return [
    'welcome' => 'Welcome to our application!',
];
```

> [!WARNING]
> For languages that differ by territory, you should name the language directories according to the ISO 15897. For example, "en_GB" should be used for British English rather than "en-gb".

<a name="using-translation-strings-as-keys"></a>
### Using Translation Strings as Keys

For applications with a large number of translatable strings, defining every string with a "short key" can become confusing when referencing the keys in your views and it is cumbersome to continually invent keys for every translation string supported by your application.

For this reason, Laravel also provides support for defining translation strings using the "default" translation of the string as the key. Language files that use translation strings as keys are stored as JSON files in the `lang` directory. For example, if your application has a Spanish translation, you should create a `lang/es.json` file:

```json
{
    "I love programming.": "Me encanta programar."
}
```

#### Key / File Conflicts

You should not define translation string keys that conflict with other translation filenames. For example, translating `__('Action')` for the "NL" locale while a `nl/action.php` file exists but a `nl.json` file does not exist will result in the translator returning the entire contents of `nl/action.php`.

<a name="retrieving-translation-strings"></a>
## Retrieving Translation Strings

You may retrieve translation strings from your language files using the `__` helper function. If you are using "short keys" to define your translation strings, you should pass the file that contains the key and the key itself to the `__` function using "dot" syntax. For example, let's retrieve the `welcome` translation string from the `lang/en/messages.php` language file:

```php
echo __('messages.welcome');
```

If the specified translation string does not exist, the `__` function will return the translation string key. So, using the example above, the `__` function would return `messages.welcome` if the translation string does not exist.

If you are using your [default translation strings as your translation keys](#using-translation-strings-as-keys), you should pass the default translation of your string to the `__` function;

```php
echo __('I love programming.');
```

Again, if the translation string does not exist, the `__` function will return the translation string key that it was given.

If you are using the [Blade templating engine](/docs/{{version}}/blade), you may use the `{{ }}` echo syntax to display the translation string:

```blade
{{ __('messages.welcome') }}
```

<a name="replacing-parameters-in-translation-strings"></a>
### Replacing Parameters in Translation Strings

If you wish, you may define placeholders in your translation strings. All placeholders are prefixed with a `:`. For example, you may define a welcome message with a placeholder name:

```php
'welcome' => 'Welcome, :name',
```

To replace the placeholders when retrieving a translation string, you may pass an array of replacements as the second argument to the `__` function:

```php
echo __('messages.welcome', ['name' => 'dayle']);
```

If your placeholder contains all capital letters, or only has its first letter capitalized, the translated value will be capitalized accordingly:

```php
'welcome' => 'Welcome, :NAME', // Welcome, DAYLE
'goodbye' => 'Goodbye, :Name', // Goodbye, Dayle
```

<a name="object-replacement-formatting"></a>
#### Object Replacement Formatting

If you attempt to provide an object as a translation placeholder, the object's `__toString` method will be invoked. The [__toString](https://www.php.net/manual/en/language.oop5.magic.php#object.tostring) method is one of PHP's built-in "magic methods". However, sometimes you may not have control over the `__toString` method of a given class, such as when the class that you are interacting with belongs to a third-party library.

In these cases, Laravel allows you to register a custom formatting handler for that particular type of object. To accomplish this, you should invoke the translator's `stringable` method. The `stringable` method accepts a closure, which should type-hint the type of object that it is responsible for formatting. Typically, the `stringable` method should be invoked within the `boot` method of your application's `AppServiceProvider` class:

```php
use Illuminate\Support\Facades\Lang;
use Money\Money;

/**
 * Bootstrap any application services.
 */
public function boot(): void
{
    Lang::stringable(function (Money $money) {
        return $money->formatTo('en_GB');
    });
}
```

<a name="pluralization"></a>
### Pluralization

Pluralization is a complex problem, as different languages have a variety of complex rules for pluralization; however, Laravel can help you translate strings differently based on pluralization rules that you define. Using a `|` character, you may distinguish singular and plural forms of a string:

```php
'apples' => 'There is one apple|There are many apples',
```

Of course, pluralization is also supported when using [translation strings as keys](#using-translation-strings-as-keys):

```json
{
    "There is one apple|There are many apples": "Hay una manzana|Hay muchas manzanas"
}
```

You may even create more complex pluralization rules which specify translation strings for multiple ranges of values:

```php
'apples' => '{0} There are none|[1,19] There are some|[20,*] There are many',
```

After defining a translation string that has pluralization options, you may use the `trans_choice` function to retrieve the line for a given "count". In this example, since the count is greater than one, the plural form of the translation string is returned:

```php
echo trans_choice('messages.apples', 10);
```

You may also define placeholder attributes in pluralization strings. These placeholders may be replaced by passing an array as the third argument to the `trans_choice` function:

```php
'minutes_ago' => '{1} :value minute ago|[2,*] :value minutes ago',

echo trans_choice('time.minutes_ago', 5, ['value' => 5]);
```

If you would like to display the integer value that was passed to the `trans_choice` function, you may use the built-in `:count` placeholder:

```php
'apples' => '{0} There are none|{1} There is one|[2,*] There are :count',
```

<a name="overriding-package-language-files"></a>
## Overriding Package Language Files

Some packages may ship with their own language files. Instead of changing the package's core files to tweak these lines, you may override them by placing files in the `lang/vendor/{package}/{locale}` directory.

So, for example, if you need to override the English translation strings in `messages.php` for a package named `skyrim/hearthfire`, you should place a language file at: `lang/vendor/hearthfire/en/messages.php`. Within this file, you should only define the translation strings you wish to override. Any translation strings you don't override will still be loaded from the package's original language files.


---

# Logging

*Sección: Laravel | Origen: https://laravel.com/docs/13.x/logging*

- [Introduction](#introduction)
- [Configuration](#configuration)
    - [Available Channel Drivers](#available-channel-drivers)
    - [Channel Prerequisites](#channel-prerequisites)
    - [Logging Deprecation Warnings](#logging-deprecation-warnings)
- [Building Log Stacks](#building-log-stacks)
- [Writing Log Messages](#writing-log-messages)
    - [Contextual Information](#contextual-information)
    - [Writing to Specific Channels](#writing-to-specific-channels)
- [Monolog Channel Customization](#monolog-channel-customization)
    - [Customizing Monolog for Channels](#customizing-monolog-for-channels)
    - [Creating Monolog Handler Channels](#creating-monolog-handler-channels)
    - [Creating Custom Channels via Factories](#creating-custom-channels-via-factories)
- [Tailing Log Messages Using Pail](#tailing-log-messages-using-pail)
    - [Installation](#pail-installation)
    - [Usage](#pail-usage)
    - [Filtering Logs](#pail-filtering-logs)

<a name="introduction"></a>
## Introduction

To help you learn more about what's happening within your application, Laravel provides robust logging services that allow you to log messages to files, the system error log, and even to Slack to notify your entire team.

Laravel logging is based on "channels". Each channel represents a specific way of writing log information. For example, the `single` channel writes log files to a single log file, while the `slack` channel sends log messages to Slack. Log messages may be written to multiple channels based on their severity.

Under the hood, Laravel utilizes the [Monolog](https://github.com/Seldaek/monolog) library, which provides support for a variety of powerful log handlers. Laravel makes it a cinch to configure these handlers, allowing you to mix and match them to customize your application's log handling.

<a name="configuration"></a>
## Configuration

All of the configuration options that control your application's logging behavior are housed in the `config/logging.php` configuration file. This file allows you to configure your application's log channels, so be sure to review each of the available channels and their options. We'll review a few common options below.

By default, Laravel will use the `stack` channel when logging messages. The `stack` channel is used to aggregate multiple log channels into a single channel. For more information on building stacks, check out the [documentation below](#building-log-stacks).

<a name="available-channel-drivers"></a>
### Available Channel Drivers

Each log channel is powered by a "driver". The driver determines how and where the log message is actually recorded. The following log channel drivers are available in every Laravel application. An entry for most of these drivers is already present in your application's `config/logging.php` configuration file, so be sure to review this file to become familiar with its contents:

<div class="overflow-auto">

| Name         | Description                                                          |
| ------------ | -------------------------------------------------------------------- |
| `custom`     | A driver that calls a specified factory to create a channel.         |
| `daily`      | A `RotatingFileHandler` based Monolog driver which rotates daily.    |
| `monthly`    | A `RotatingFileHandler` based Monolog driver which rotates monthly.  |
| `errorlog`   | An `ErrorLogHandler` based Monolog driver.                           |
| `monolog`    | A Monolog factory driver that may use any supported Monolog handler. |
| `papertrail` | A `SyslogUdpHandler` based Monolog driver.                           |
| `single`     | A single file or path based logger channel (`StreamHandler`).        |
| `slack`      | A `SlackWebhookHandler` based Monolog driver.                        |
| `stack`      | A wrapper to facilitate creating "multi-channel" channels.           |
| `syslog`     | A `SyslogHandler` based Monolog driver.                              |

</div>

> [!NOTE]
> Check out the documentation on [advanced channel customization](#monolog-channel-customization) to learn more about the `monolog` and `custom` drivers.

<a name="configuring-the-channel-name"></a>
#### Configuring the Channel Name

By default, Monolog is instantiated with a "channel name" that matches the current environment, such as `production` or `local`. To change this value, you may add a `name` option to your channel's configuration:

```php
'stack' => [
    'driver' => 'stack',
    'name' => 'channel-name',
    'channels' => ['single', 'slack'],
],
```

<a name="channel-prerequisites"></a>
### Channel Prerequisites

<a name="configuring-the-single-daily-and-monthly-channels"></a>
#### Configuring the Single, Daily, and Monthly Channels

The `single`, `daily`, and `monthly` channels have three optional configuration options: `bubble`, `permission`, and `locking`.

<div class="overflow-auto">

| Name         | Description                                                                   | Default |
| ------------ | ----------------------------------------------------------------------------- | ------- |
| `bubble`     | Indicates if messages should bubble up to other channels after being handled. | `true`  |
| `locking`    | Attempt to lock the log file before writing to it.                            | `false` |
| `permission` | The log file's permissions.                                                   | `0644`  |

</div>

Additionally, the retention policy for the `daily` and `monthly` channels can be configured via the `max_files` configuration option. The `LOG_DAILY_DAYS` environment variable may also be used to configure retention for the `daily` channel.

<a name="configuring-the-papertrail-channel"></a>
#### Configuring the Papertrail Channel

The `papertrail` channel requires `host` and `port` configuration options. These may be defined via the `PAPERTRAIL_URL` and `PAPERTRAIL_PORT` environment variables. You can obtain these values from [Papertrail](https://help.papertrailapp.com/kb/configuration/configuring-centralized-logging-from-php-apps/#send-events-from-php-app).

<a name="configuring-the-slack-channel"></a>
#### Configuring the Slack Channel

The `slack` channel requires a `url` configuration option. This value may be defined via the `LOG_SLACK_WEBHOOK_URL` environment variable. This URL should match a URL for an [incoming webhook](https://slack.com/apps/A0F7XDUAZ-incoming-webhooks) that you have configured for your Slack team.

By default, Slack will only receive logs at the `critical` level and above; however, you can adjust this using the `LOG_LEVEL` environment variable or by modifying the `level` configuration option within your Slack log channel's configuration array.

<a name="logging-deprecation-warnings"></a>
### Logging Deprecation Warnings

PHP, Laravel, and other libraries often notify their users that some of their features have been deprecated and will be removed in a future version. If you would like to log these deprecation warnings, you may specify your preferred `deprecations` log channel using the `LOG_DEPRECATIONS_CHANNEL` environment variable, or within your application's `config/logging.php` configuration file:

```php
'deprecations' => [
    'channel' => env('LOG_DEPRECATIONS_CHANNEL', 'null'),
    'trace' => env('LOG_DEPRECATIONS_TRACE', false),
],

'channels' => [
    // ...
]
```

Or, you may define a log channel named `deprecations`. If a log channel with this name exists, it will always be used to log deprecations:

```php
'channels' => [
    'deprecations' => [
        'driver' => 'single',
        'path' => storage_path('logs/php-deprecation-warnings.log'),
    ],
],
```

<a name="building-log-stacks"></a>
## Building Log Stacks

As mentioned previously, the `stack` driver allows you to combine multiple channels into a single log channel for convenience. To illustrate how to use log stacks, let's take a look at an example configuration that you might see in a production application:

```php
'channels' => [
    'stack' => [
        'driver' => 'stack',
        'channels' => ['syslog', 'slack'], // [tl! add]
        'ignore_exceptions' => false,
    ],

    'syslog' => [
        'driver' => 'syslog',
        'level' => env('LOG_LEVEL', 'debug'),
        'facility' => env('LOG_SYSLOG_FACILITY', LOG_USER),
        'replace_placeholders' => true,
    ],

    'slack' => [
        'driver' => 'slack',
        'url' => env('LOG_SLACK_WEBHOOK_URL'),
        'username' => env('LOG_SLACK_USERNAME', 'Laravel Log'),
        'emoji' => env('LOG_SLACK_EMOJI', ':boom:'),
        'level' => env('LOG_LEVEL', 'critical'),
        'replace_placeholders' => true,
    ],
],
```

Let's dissect this configuration. First, notice our `stack` channel aggregates two other channels via its `channels` option: `syslog` and `slack`. So, when logging messages, both of these channels will have the opportunity to log the message. However, as we will see below, whether these channels actually log the message may be determined by the message's severity / "level".

<a name="log-levels"></a>
#### Log Levels

Take note of the `level` configuration option present on the `syslog` and `slack` channel configurations in the example above. This option determines the minimum "level" a message must be in order to be logged by the channel. Monolog, which powers Laravel's logging services, offers all of the log levels defined in the [RFC 5424 specification](https://tools.ietf.org/html/rfc5424). In descending order of severity, these log levels are: **emergency**, **alert**, **critical**, **error**, **warning**, **notice**, **info**, and **debug**.

So, imagine we log a message using the `debug` method:

```php
Log::debug('An informational message.');
```

Given our configuration, the `syslog` channel will write the message to the system log; however, since the error message is not `critical` or above, it will not be sent to Slack. However, if we log an `emergency` message, it will be sent to both the system log and Slack since the `emergency` level is above our minimum level threshold for both channels:

```php
Log::emergency('The system is down!');
```

<a name="writing-log-messages"></a>
## Writing Log Messages

You may write information to the logs using the `Log` [facade](/docs/{{version}}/facades). As previously mentioned, the logger provides the eight logging levels defined in the [RFC 5424 specification](https://tools.ietf.org/html/rfc5424): **emergency**, **alert**, **critical**, **error**, **warning**, **notice**, **info** and **debug**:

```php
use Illuminate\Support\Facades\Log;

Log::emergency($message);
Log::alert($message);
Log::critical($message);
Log::error($message);
Log::warning($message);
Log::notice($message);
Log::info($message);
Log::debug($message);
```

You may call any of these methods to log a message for the corresponding level. By default, the message will be written to the default log channel as configured by your `logging` configuration file:

```php
<?php

namespace App\Http\Controllers;

use App\Models\User;
use Illuminate\Support\Facades\Log;
use Illuminate\View\View;

class UserController extends Controller
{
    /**
     * Show the profile for the given user.
     */
    public function show(string $id): View
    {
        Log::info('Showing the user profile for user: {id}', ['id' => $id]);

        return view('user.profile', [
            'user' => User::findOrFail($id)
        ]);
    }
}
```

<a name="contextual-information"></a>
### Contextual Information

An array of contextual data may be passed to the log methods. This contextual data will be formatted and displayed with the log message:

```php
use Illuminate\Support\Facades\Log;

Log::info('User {id} failed to login.', ['id' => $user->id]);
```

Occasionally, you may wish to specify some contextual information that should be included with all subsequent log entries in a particular channel. For example, you may wish to log a request ID that is associated with each incoming request to your application. To accomplish this, you may call the `Log` facade's `withContext` method:

```php
<?php

namespace App\Http\Middleware;

use Closure;
use Illuminate\Http\Request;
use Illuminate\Support\Facades\Log;
use Illuminate\Support\Str;
use Symfony\Component\HttpFoundation\Response;

class AssignRequestId
{
    /**
     * Handle an incoming request.
     *
     * @param  \Closure(\Illuminate\Http\Request): (\Symfony\Component\HttpFoundation\Response)  $next
     */
    public function handle(Request $request, Closure $next): Response
    {
        $requestId = (string) Str::uuid();

        Log::withContext([
            'request-id' => $requestId
        ]);

        $response = $next($request);

        $response->headers->set('Request-Id', $requestId);

        return $response;
    }
}
```

If you would like to share contextual information across _all_ logging channels, you may invoke the `Log::shareContext()` method. This method will provide the contextual information to all created channels and any channels that are created subsequently:

```php
<?php

namespace App\Http\Middleware;

use Closure;
use Illuminate\Http\Request;
use Illuminate\Support\Facades\Log;
use Illuminate\Support\Str;
use Symfony\Component\HttpFoundation\Response;

class AssignRequestId
{
    /**
     * Handle an incoming request.
     *
     * @param  \Closure(\Illuminate\Http\Request): (\Symfony\Component\HttpFoundation\Response)  $next
     */
    public function handle(Request $request, Closure $next): Response
    {
        $requestId = (string) Str::uuid();

        Log::shareContext([
            'request-id' => $requestId
        ]);

        // ...
    }
}
```

> [!NOTE]
> If you need to share log context while processing queued jobs, you may utilize [job middleware](/docs/{{version}}/queues#job-middleware).

<a name="writing-to-specific-channels"></a>
### Writing to Specific Channels

Sometimes you may wish to log a message to a channel other than your application's default channel. You may use the `channel` method on the `Log` facade to retrieve and log to any channel defined in your configuration file:

```php
use Illuminate\Support\Facades\Log;

Log::channel('slack')->info('Something happened!');
```

If you would like to create an on-demand logging stack consisting of multiple channels, you may use the `stack` method:

```php
Log::stack(['single', 'slack'])->info('Something happened!');
```

<a name="on-demand-channels"></a>
#### On-Demand Channels

It is also possible to create an on-demand channel by providing the configuration at runtime without that configuration being present in your application's `logging` configuration file. To accomplish this, you may pass a configuration array to the `Log` facade's `build` method:

```php
use Illuminate\Support\Facades\Log;

Log::build([
  'driver' => 'single',
  'path' => storage_path('logs/custom.log'),
])->info('Something happened!');
```

You may also wish to include an on-demand channel in an on-demand logging stack. This can be achieved by including your on-demand channel instance in the array passed to the `stack` method:

```php
use Illuminate\Support\Facades\Log;

$channel = Log::build([
  'driver' => 'single',
  'path' => storage_path('logs/custom.log'),
]);

Log::stack(['slack', $channel])->info('Something happened!');
```

<a name="monolog-channel-customization"></a>
## Monolog Channel Customization

<a name="customizing-monolog-for-channels"></a>
### Customizing Monolog for Channels

Sometimes you may need complete control over how Monolog is configured for an existing channel. For example, you may want to configure a custom Monolog `FormatterInterface` implementation for Laravel's built-in `single` channel.

To get started, define a `tap` array on the channel's configuration. The `tap` array should contain a list of classes that should have an opportunity to customize (or "tap" into) the Monolog instance after it is created. There is no conventional location where these classes should be placed, so you are free to create a directory within your application to contain these classes:

```php
'single' => [
    'driver' => 'single',
    'tap' => [App\Logging\CustomizeFormatter::class],
    'path' => storage_path('logs/laravel.log'),
    'level' => env('LOG_LEVEL', 'debug'),
    'replace_placeholders' => true,
],
```

Once you have configured the `tap` option on your channel, you're ready to define the class that will customize your Monolog instance. This class only needs a single method: `__invoke`, which receives an `Illuminate\Log\Logger` instance. The `Illuminate\Log\Logger` instance proxies all method calls to the underlying Monolog instance:

```php
<?php

namespace App\Logging;

use Illuminate\Log\Logger;
use Monolog\Formatter\LineFormatter;

class CustomizeFormatter
{
    /**
     * Customize the given logger instance.
     */
    public function __invoke(Logger $logger): void
    {
        foreach ($logger->getHandlers() as $handler) {
            $handler->setFormatter(new LineFormatter(
                '[%datetime%] %channel%.%level_name%: %message% %context% %extra%'
            ));
        }
    }
}
```

> [!NOTE]
> All of your "tap" classes are resolved by the [service container](/docs/{{version}}/container), so any constructor dependencies they require will automatically be injected.

<a name="creating-monolog-handler-channels"></a>
### Creating Monolog Handler Channels

Monolog has a variety of [available handlers](https://github.com/Seldaek/monolog/tree/main/src/Monolog/Handler) and Laravel does not include a built-in channel for each one. In some cases, you may wish to create a custom channel that is merely an instance of a specific Monolog handler that does not have a corresponding Laravel log driver. These channels can be easily created using the `monolog` driver.

When using the `monolog` driver, the `handler` configuration option is used to specify which handler will be instantiated. Optionally, any constructor parameters the handler needs may be specified using the `handler_with` configuration option:

```php
'logentries' => [
    'driver'  => 'monolog',
    'handler' => Monolog\Handler\SyslogUdpHandler::class,
    'handler_with' => [
        'host' => 'my.logentries.internal.datahubhost.company.com',
        'port' => '10000',
    ],
],
```

<a name="monolog-formatters"></a>
#### Monolog Formatters

When using the `monolog` driver, the Monolog `LineFormatter` will be used as the default formatter. However, you may customize the type of formatter passed to the handler using the `formatter` and `formatter_with` configuration options:

```php
'browser' => [
    'driver' => 'monolog',
    'handler' => Monolog\Handler\BrowserConsoleHandler::class,
    'formatter' => Monolog\Formatter\HtmlFormatter::class,
    'formatter_with' => [
        'dateFormat' => 'Y-m-d',
    ],
],
```

If you are using a Monolog handler that is capable of providing its own formatter, you may set the value of the `formatter` configuration option to `default`:

```php
'newrelic' => [
    'driver' => 'monolog',
    'handler' => Monolog\Handler\NewRelicHandler::class,
    'formatter' => 'default',
],
```

<a name="monolog-processors"></a>
#### Monolog Processors

Monolog can also process messages before logging them. You can create your own processors or use the [existing processors offered by Monolog](https://github.com/Seldaek/monolog/tree/main/src/Monolog/Processor).

If you would like to customize the processors for a `monolog` driver, add a `processors` configuration value to your channel's configuration:

```php
'memory' => [
    'driver' => 'monolog',
    'handler' => Monolog\Handler\StreamHandler::class,
    'handler_with' => [
        'stream' => 'php://stderr',
    ],
    'processors' => [
        // Simple syntax...
        Monolog\Processor\MemoryUsageProcessor::class,

        // With options...
        [
            'processor' => Monolog\Processor\PsrLogMessageProcessor::class,
            'with' => ['removeUsedContextFields' => true],
        ],
    ],
],
```

<a name="creating-custom-channels-via-factories"></a>
### Creating Custom Channels via Factories

If you would like to define an entirely custom channel in which you have full control over Monolog's instantiation and configuration, you may specify a `custom` driver type in your `config/logging.php` configuration file. Your configuration should include a `via` option that contains the name of the factory class which will be invoked to create the Monolog instance:

```php
'channels' => [
    'example-custom-channel' => [
        'driver' => 'custom',
        'via' => App\Logging\CreateCustomLogger::class,
    ],
],
```

Once you have configured the `custom` driver channel, you're ready to define the class that will create your Monolog instance. This class only needs a single `__invoke` method which should return the Monolog logger instance. The method will receive the channels configuration array as its only argument:

```php
<?php

namespace App\Logging;

use Monolog\Logger;

class CreateCustomLogger
{
    /**
     * Create a custom Monolog instance.
     */
    public function __invoke(array $config): Logger
    {
        return new Logger(/* ... */);
    }
}
```

<a name="tailing-log-messages-using-pail"></a>
## Tailing Log Messages Using Pail

Often you may need to tail your application's logs in real time. For example, when debugging an issue or when monitoring your application's logs for specific types of errors.

Laravel Pail is a package that allows you to easily dive into your Laravel application's log files directly from the command line. Unlike the standard `tail` command, Pail is designed to work with any log driver, including [Laravel Nightwatch](https://nightwatch.laravel.com), Sentry, or Flare. In addition, Pail provides a set of useful filters to help you quickly find what you're looking for.
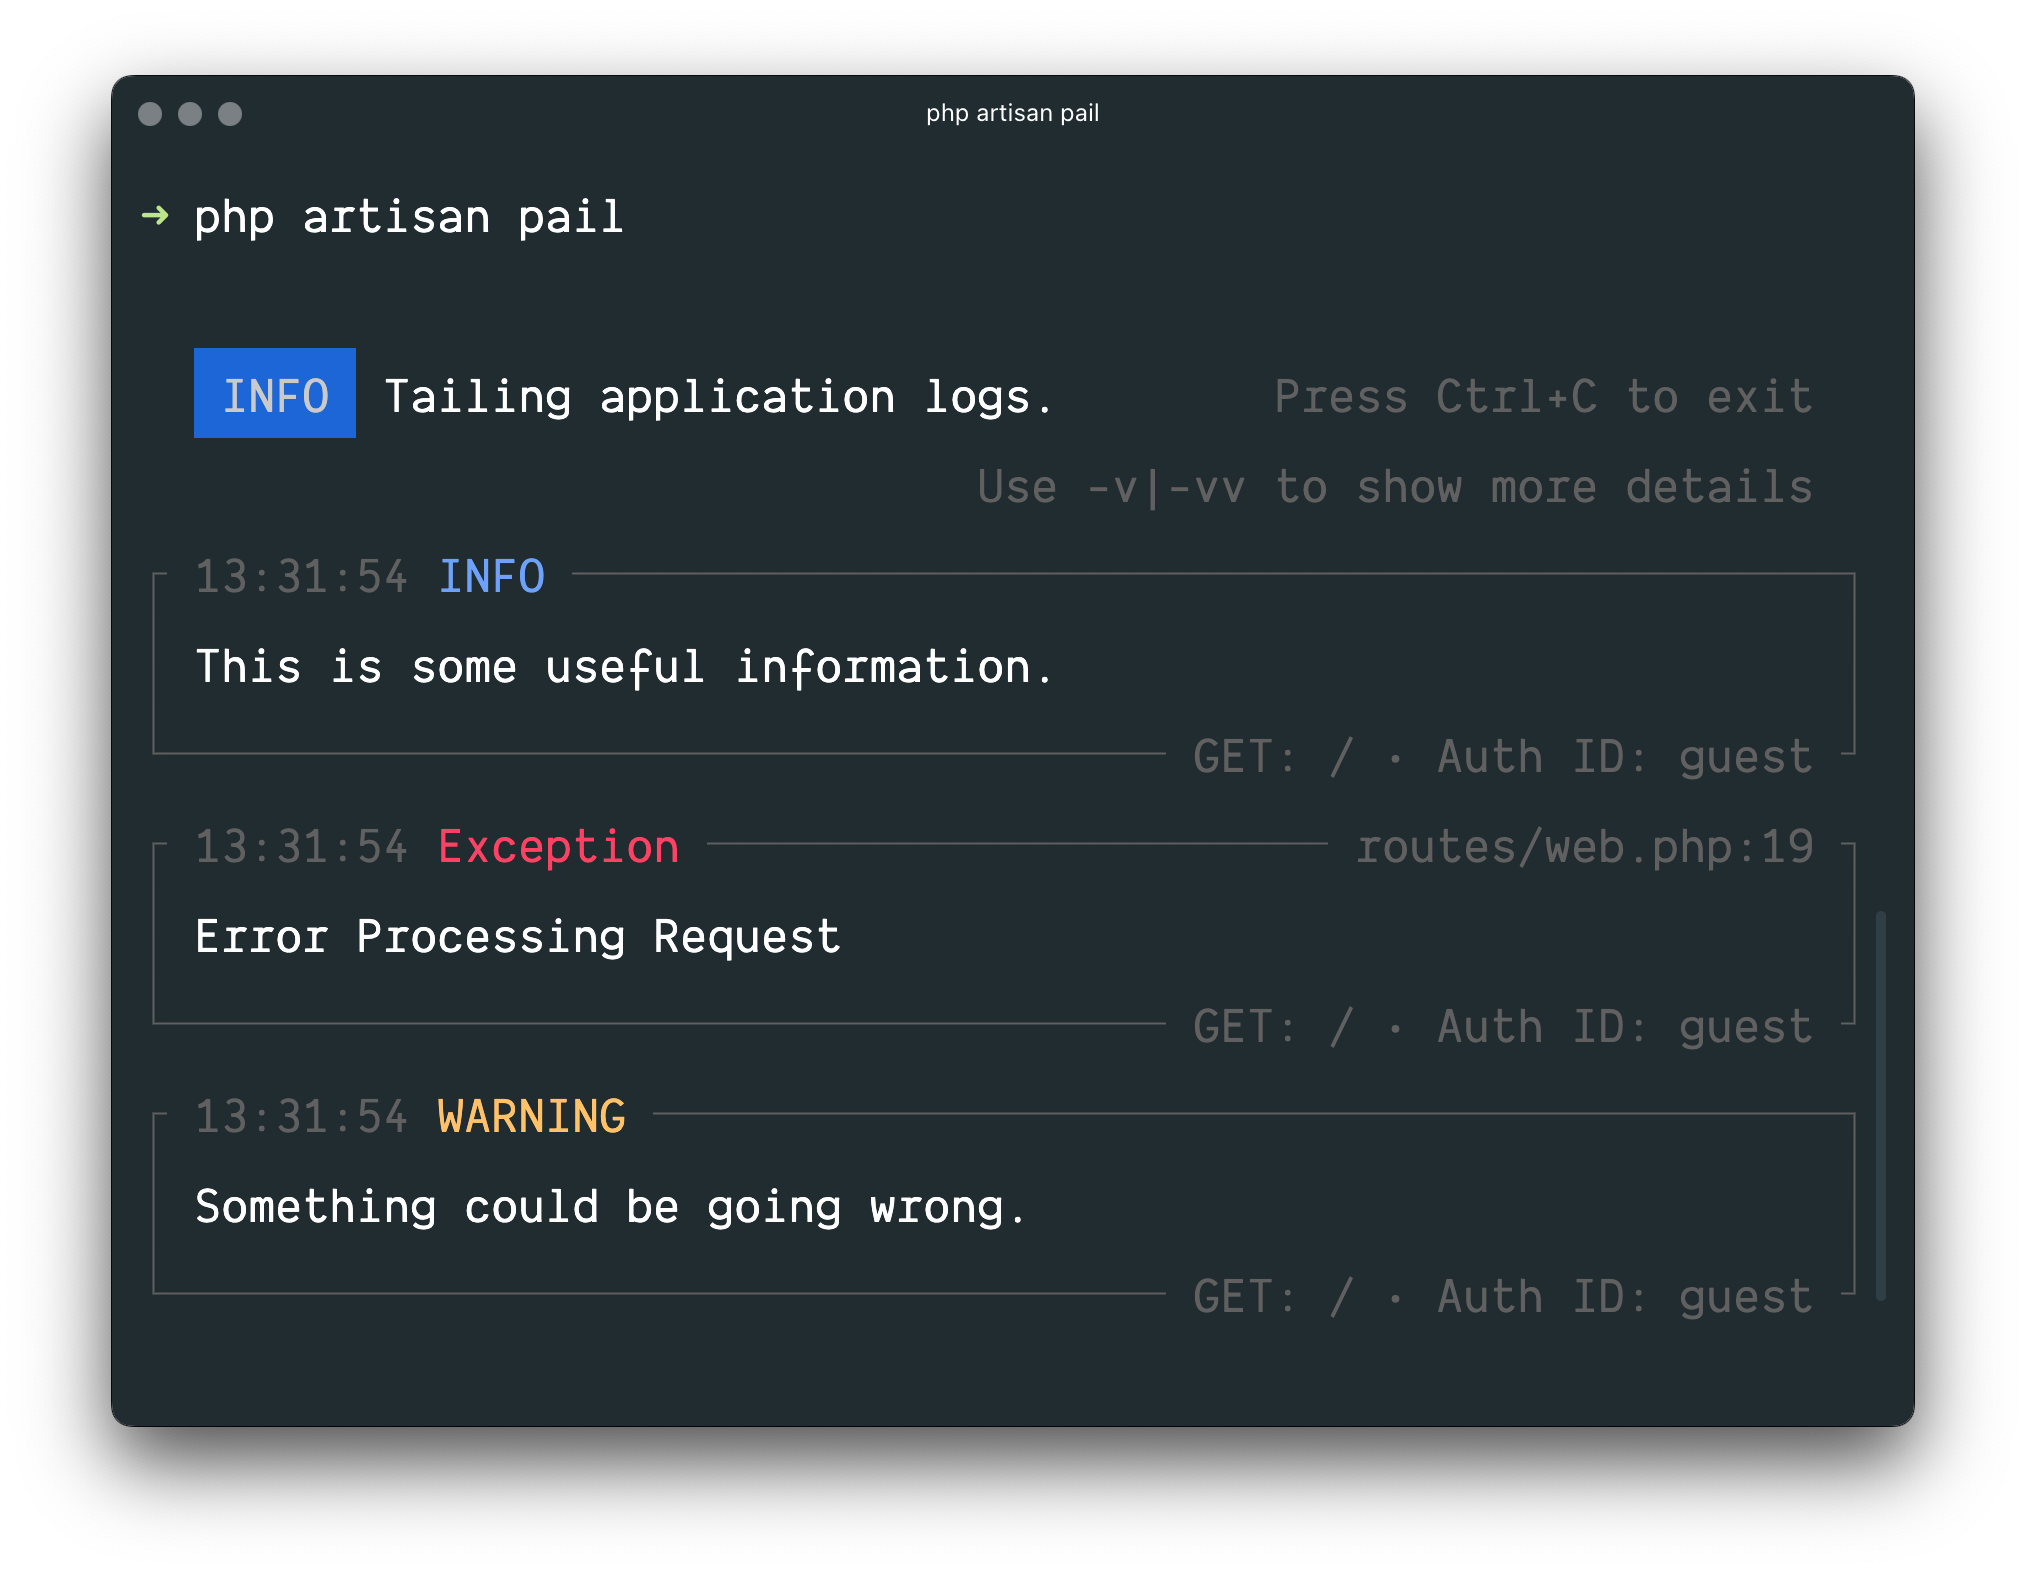
<img src="https://laravel.com/img/docs/pail-example.png">

<a name="pail-installation"></a>
### Installation

> [!WARNING]
> Laravel Pail requires the [PCNTL](https://www.php.net/manual/en/book.pcntl.php) PHP extension.

To get started, install Pail into your project using the Composer package manager:

```shell
composer require --dev laravel/pail
```

<a name="pail-usage"></a>
### Usage

To start tailing logs, run the `pail` command:

```shell
php artisan pail
```

To increase the verbosity of the output and avoid truncation (…), use the `-v` option:

```shell
php artisan pail -v
```

For maximum verbosity and to display exception stack traces, use the `-vv` option:

```shell
php artisan pail -vv
```

To stop tailing logs, press `Ctrl+C` at any time.

<a name="pail-filtering-logs"></a>
### Filtering Logs

<a name="pail-filtering-logs-filter-option"></a>
#### `--filter`

You may use the `--filter` option to filter logs by their type, file, message, and stack trace content:

```shell
php artisan pail --filter="QueryException"
```

<a name="pail-filtering-logs-message-option"></a>
#### `--message`

To filter logs by only their message, you may use the `--message` option:

```shell
php artisan pail --message="User created"
```

<a name="pail-filtering-logs-level-option"></a>
#### `--level`

The `--level` option may be used to filter logs by their [log level](#log-levels):

```shell
php artisan pail --level=error
```

<a name="pail-filtering-logs-user-option"></a>
#### `--user`

To only display logs that were written while a given user was authenticated, you may provide the user's ID to the `--user` option:

```shell
php artisan pail --user=1
```


---

# Mail

*Sección: Laravel | Origen: https://laravel.com/docs/13.x/mail*

- [Introduction](#introduction)
    - [Configuration](#configuration)
    - [Driver Prerequisites](#driver-prerequisites)
    - [Failover Configuration](#failover-configuration)
    - [Round Robin Configuration](#round-robin-configuration)
- [Generating Mailables](#generating-mailables)
- [Writing Mailables](#writing-mailables)
    - [Configuring the Sender](#configuring-the-sender)
    - [Configuring the View](#configuring-the-view)
    - [View Data](#view-data)
    - [Attachments](#attachments)
    - [Inline Attachments](#inline-attachments)
    - [Attachable Objects](#attachable-objects)
    - [Headers](#headers)
    - [Tags and Metadata](#tags-and-metadata)
    - [Customizing the Symfony Message](#customizing-the-symfony-message)
- [Markdown Mailables](#markdown-mailables)
    - [Generating Markdown Mailables](#generating-markdown-mailables)
    - [Writing Markdown Messages](#writing-markdown-messages)
    - [Customizing the Components](#customizing-the-components)
- [Sending Mail](#sending-mail)
    - [Queueing Mail](#queueing-mail)
- [Rendering Mailables](#rendering-mailables)
    - [Previewing Mailables in the Browser](#previewing-mailables-in-the-browser)
- [Localizing Mailables](#localizing-mailables)
- [Testing](#testing-mailables)
    - [Testing Mailable Content](#testing-mailable-content)
    - [Testing Mailable Sending](#testing-mailable-sending)
- [Mail and Local Development](#mail-and-local-development)
- [Events](#events)
- [Custom Transports](#custom-transports)
    - [Additional Symfony Transports](#additional-symfony-transports)

<a name="introduction"></a>
## Introduction

Sending email doesn't have to be complicated. Laravel provides a clean, simple email API powered by the popular [Symfony Mailer](https://symfony.com/doc/current/mailer.html) component. Laravel and Symfony Mailer provide drivers for sending email via SMTP, Cloudflare, Mailgun, Postmark, Resend, Amazon SES, and `sendmail`, allowing you to quickly get started sending mail through a local or cloud-based service of your choice.

<a name="configuration"></a>
### Configuration

Laravel's email services may be configured via your application's `config/mail.php` configuration file. Each mailer configured within this file may have its own unique configuration and even its own unique "transport", allowing your application to use different email services to send certain email messages. For example, your application might use Postmark to send transactional emails while using Amazon SES to send bulk emails.

Within your `mail` configuration file, you will find a `mailers` configuration array. This array contains a sample configuration entry for each of the major mail drivers / transports supported by Laravel, while the `default` configuration value determines which mailer will be used by default when your application needs to send an email message.

<a name="driver-prerequisites"></a>
### Driver / Transport Prerequisites

The API based drivers such as Mailgun, Postmark, and Resend are often simpler and faster than sending mail via SMTP servers. Whenever possible, we recommend that you use one of these drivers.

<a name="cloudflare-driver"></a>
#### Cloudflare Driver

To use the Cloudflare driver, install Symfony's HTTP Client via Composer:

```shell
composer require symfony/http-client
```

Next, you will need to make two changes in your application's `config/mail.php` configuration file. First, set your default mailer to `cloudflare`:

```php
'default' => env('MAIL_MAILER', 'cloudflare'),
```

Second, add the following configuration array to your array of `mailers`:

```php
'cloudflare' => [
    'transport' => 'cloudflare',
],
```

After configuring your application's default mailer, add the following options to your `config/services.php` configuration file:

```php
'cloudflare' => [
    'account_id' => env('CLOUDFLARE_ACCOUNT_ID'),
    'key' => env('CLOUDFLARE_KEY'),
],
```

<a name="mailgun-driver"></a>
#### Mailgun Driver

To use the Mailgun driver, install Symfony's Mailgun Mailer transport via Composer:

```shell
composer require symfony/mailgun-mailer symfony/http-client
```

Next, you will need to make two changes in your application's `config/mail.php` configuration file. First, set your default mailer to `mailgun`:

```php
'default' => env('MAIL_MAILER', 'mailgun'),
```

Second, add the following configuration array to your array of `mailers`:

```php
'mailgun' => [
    'transport' => 'mailgun',
    // 'client' => [
    //     'timeout' => 5,
    // ],
],
```

After configuring your application's default mailer, add the following options to your `config/services.php` configuration file:

```php
'mailgun' => [
    'domain' => env('MAILGUN_DOMAIN'),
    'secret' => env('MAILGUN_SECRET'),
    'endpoint' => env('MAILGUN_ENDPOINT', 'api.mailgun.net'),
    'scheme' => 'https',
],
```

If you are not using the United States [Mailgun region](https://documentation.mailgun.com/docs/mailgun/api-reference/api-overview#mailgun-regions), you may define your region's endpoint in the `services` configuration file:

```php
'mailgun' => [
    'domain' => env('MAILGUN_DOMAIN'),
    'secret' => env('MAILGUN_SECRET'),
    'endpoint' => env('MAILGUN_ENDPOINT', 'api.eu.mailgun.net'),
    'scheme' => 'https',
],
```

<a name="postmark-driver"></a>
#### Postmark Driver

To use the [Postmark](https://postmarkapp.com/) driver, install Symfony's Postmark Mailer transport via Composer:

```shell
composer require symfony/postmark-mailer symfony/http-client
```

Next, set the `default` option in your application's `config/mail.php` configuration file to `postmark`. After configuring your application's default mailer, ensure that your `config/services.php` configuration file contains the following options:

```php
'postmark' => [
    'key' => env('POSTMARK_API_KEY'),
],
```

If you would like to specify the Postmark message stream that should be used by a given mailer, you may add the `message_stream_id` configuration option to the mailer's configuration array. This configuration array can be found in your application's `config/mail.php` configuration file:

```php
'postmark' => [
    'transport' => 'postmark',
    'message_stream_id' => env('POSTMARK_MESSAGE_STREAM_ID'),
    // 'client' => [
    //     'timeout' => 5,
    // ],
],
```

This way you are also able to set up multiple Postmark mailers with different message streams.

<a name="resend-driver"></a>
#### Resend Driver

To use the [Resend](https://resend.com/) driver, install Resend's PHP SDK via Composer:

```shell
composer require resend/resend-php
```

Next, set the `default` option in your application's `config/mail.php` configuration file to `resend`. After configuring your application's default mailer, ensure that your `config/services.php` configuration file contains the following options:

```php
'resend' => [
    'key' => env('RESEND_API_KEY'),
],
```

<a name="ses-driver"></a>
#### SES Driver

To use the Amazon SES driver you must first install the Amazon AWS SDK for PHP. You may install this library via the Composer package manager:

```shell
composer require aws/aws-sdk-php
```

Next, set the `default` option in your `config/mail.php` configuration file to `ses` and verify that your `config/services.php` configuration file contains the following options:

```php
'ses' => [
    'key' => env('AWS_ACCESS_KEY_ID'),
    'secret' => env('AWS_SECRET_ACCESS_KEY'),
    'region' => env('AWS_DEFAULT_REGION', 'us-east-1'),
],
```

To utilize AWS [temporary credentials](https://docs.aws.amazon.com/IAM/latest/UserGuide/id_credentials_temp_use-resources.html) via a session token, you may add a `token` key to your application's SES configuration:

```php
'ses' => [
    'key' => env('AWS_ACCESS_KEY_ID'),
    'secret' => env('AWS_SECRET_ACCESS_KEY'),
    'region' => env('AWS_DEFAULT_REGION', 'us-east-1'),
    'token' => env('AWS_SESSION_TOKEN'),
],
```

To interact with SES's [subscription management features](https://docs.aws.amazon.com/ses/latest/dg/sending-email-subscription-management.html), you may return the `X-Ses-List-Management-Options` header in the array returned by the [headers](#headers) method of a mail message:

```php
/**
 * Get the message headers.
 */
public function headers(): Headers
{
    return new Headers(
        text: [
            'X-Ses-List-Management-Options' => 'contactListName=MyContactList;topicName=MyTopic',
        ],
    );
}
```

To send an email through an SES [tenant](https://docs.aws.amazon.com/ses/latest/dg/tenants.html), you may return the `X-Ses-Tenant-Name` header from the `headers` method. Laravel will pass the header value as the `TenantName` option to SES when sending the message:

```php
public function headers(): Headers
{
    return new Headers(
        text: [
            'X-Ses-Tenant-Name' => 'tenant-id',
        ],
    );
}
```

If you would like to define [additional options](https://docs.aws.amazon.com/aws-sdk-php/v3/api/api-sesv2-2019-09-27.html#sendemail) that Laravel should pass to the AWS SDK's `SendEmail` method when sending an email, you may define an `options` array within your `ses` configuration:

```php
'ses' => [
    'key' => env('AWS_ACCESS_KEY_ID'),
    'secret' => env('AWS_SECRET_ACCESS_KEY'),
    'region' => env('AWS_DEFAULT_REGION', 'us-east-1'),
    'options' => [
        'ConfigurationSetName' => 'MyConfigurationSet',
        'EmailTags' => [
            ['Name' => 'foo', 'Value' => 'bar'],
        ],
    ],
],
```

<a name="failover-configuration"></a>
### Failover Configuration

Sometimes, an external service you have configured to send your application's mail may be down. In these cases, it can be useful to define one or more backup mail delivery configurations that will be used in case your primary delivery driver is down.

To accomplish this, you should define a mailer within your application's `mail` configuration file that uses the `failover` transport. The configuration array for your application's `failover` mailer should contain an array of `mailers` that reference the order in which configured mailers should be chosen for delivery:

```php
'mailers' => [
    'failover' => [
        'transport' => 'failover',
        'mailers' => [
            'postmark',
            'mailgun',
            'sendmail',
        ],
        'retry_after' => 60,
    ],

    // ...
],
```

Once you have configured a mailer that uses the `failover` transport, you will need to set the failover mailer as your default mailer in your application's `.env` file to make use of the failover functionality:

```ini
MAIL_MAILER=failover
```

<a name="round-robin-configuration"></a>
### Round Robin Configuration

The `roundrobin` transport allows you to distribute your mailing workload across multiple mailers. To get started, define a mailer within your application's `mail` configuration file that uses the `roundrobin` transport. The configuration array for your application's `roundrobin` mailer should contain an array of `mailers` that reference which configured mailers should be used for delivery:

```php
'mailers' => [
    'roundrobin' => [
        'transport' => 'roundrobin',
        'mailers' => [
            'ses',
            'postmark',
        ],
        'retry_after' => 60,
    ],

    // ...
],
```

Once your round robin mailer has been defined, you should set this mailer as the default mailer used by your application by specifying its name as the value of the `default` configuration key within your application's `mail` configuration file:

```php
'default' => env('MAIL_MAILER', 'roundrobin'),
```

The round robin transport selects a random mailer from the list of configured mailers and then switches to the next available mailer for each subsequent email. In contrast to `failover` transport, which helps to achieve *[high availability](https://en.wikipedia.org/wiki/High_availability)*, the `roundrobin` transport provides *[load balancing](https://en.wikipedia.org/wiki/Load_balancing_(computing))*.

<a name="generating-mailables"></a>
## Generating Mailables

When building Laravel applications, each type of email sent by your application is represented as a "mailable" class. These classes are stored in the `app/Mail` directory. Don't worry if you don't see this directory in your application, since it will be generated for you when you create your first mailable class using the `make:mail` Artisan command:

```shell
php artisan make:mail OrderShipped
```

<a name="writing-mailables"></a>
## Writing Mailables

Once you have generated a mailable class, open it up so we can explore its contents. Mailable class configuration is done in several methods, including the `envelope`, `content`, and `attachments` methods.

The `envelope` method returns an `Illuminate\Mail\Mailables\Envelope` object that defines the subject and, sometimes, the recipients of the message. The `content` method returns an `Illuminate\Mail\Mailables\Content` object that defines the [Blade template](/docs/{{version}}/blade) that will be used to generate the message content.

<a name="configuring-the-sender"></a>
### Configuring the Sender

<a name="using-the-envelope"></a>
#### Using the Envelope

First, let's explore configuring the sender of the email. Or, in other words, who the email is going to be "from". There are two ways to configure the sender. First, you may specify the "from" address on your message's envelope:

```php
use Illuminate\Mail\Mailables\Address;
use Illuminate\Mail\Mailables\Envelope;

/**
 * Get the message envelope.
 */
public function envelope(): Envelope
{
    return new Envelope(
        from: new Address('jeffrey@example.com', 'Jeffrey Way'),
        subject: 'Order Shipped',
    );
}
```

If you would like, you may also specify a `replyTo` address:

```php
return new Envelope(
    from: new Address('jeffrey@example.com', 'Jeffrey Way'),
    replyTo: [
        new Address('taylor@example.com', 'Taylor Otwell'),
    ],
    subject: 'Order Shipped',
);
```

<a name="using-a-global-from-address"></a>
#### Using a Global `from` Address

However, if your application uses the same "from" address for all of its emails, it can become cumbersome to add it to each mailable class you generate. Instead, you may specify a global "from" address in your `config/mail.php` configuration file. This address will be used if no other "from" address is specified within the mailable class:

```php
'from' => [
    'address' => env('MAIL_FROM_ADDRESS', 'hello@example.com'),
    'name' => env('MAIL_FROM_NAME', 'Example'),
],
```

In addition, you may define a global "reply_to" address within your `config/mail.php` configuration file:

```php
'reply_to' => [
    'address' => 'example@example.com',
    'name' => 'App Name',
],
```

<a name="configuring-the-view"></a>
### Configuring the View

Within a mailable class's `content` method, you may define the `view`, or which template should be used when rendering the email's contents. Since each email typically uses a [Blade template](/docs/{{version}}/blade) to render its contents, you have the full power and convenience of the Blade templating engine when building your email's HTML:

```php
/**
 * Get the message content definition.
 */
public function content(): Content
{
    return new Content(
        view: 'mail.orders.shipped',
    );
}
```

> [!NOTE]
> You may wish to create a `resources/views/mail` directory to house all of your email templates; however, you are free to place them wherever you wish within your `resources/views` directory.

<a name="plain-text-emails"></a>
#### Plain Text Emails

If you would like to define a plain-text version of your email, you may specify the plain-text template when creating the message's `Content` definition. Like the `view` parameter, the `text` parameter should be a template name which will be used to render the contents of the email. You are free to define both an HTML and plain-text version of your message:

```php
/**
 * Get the message content definition.
 */
public function content(): Content
{
    return new Content(
        view: 'mail.orders.shipped',
        text: 'mail.orders.shipped-text'
    );
}
```

For clarity, the `html` parameter may be used as an alias of the `view` parameter:

```php
return new Content(
    html: 'mail.orders.shipped',
    text: 'mail.orders.shipped-text'
);
```

<a name="view-data"></a>
### View Data

<a name="via-public-properties"></a>
#### Via Public Properties

Typically, you will want to pass some data to your view that you can utilize when rendering the email's HTML. There are two ways you may make data available to your view. First, any public property defined on your mailable class will automatically be made available to the view. So, for example, you may pass data into your mailable class's constructor and set that data to public properties defined on the class:

```php
<?php

namespace App\Mail;

use App\Models\Order;
use Illuminate\Bus\Queueable;
use Illuminate\Mail\Mailable;
use Illuminate\Mail\Mailables\Content;
use Illuminate\Queue\SerializesModels;

class OrderShipped extends Mailable
{
    use Queueable, SerializesModels;

    /**
     * Create a new message instance.
     */
    public function __construct(
        public Order $order,
    ) {}

    /**
     * Get the message content definition.
     */
    public function content(): Content
    {
        return new Content(
            view: 'mail.orders.shipped',
        );
    }
}
```

Once the data has been set to a public property, it will automatically be available in your view, so you may access it like you would access any other data in your Blade templates:

```blade
<div>
    Price: {{ $order->price }}
</div>
```

<a name="via-the-with-parameter"></a>
#### Via the `with` Parameter:

If you would like to customize the format of your email's data before it is sent to the template, you may manually pass your data to the view via the `Content` definition's `with` parameter. Typically, you will still pass data via the mailable class's constructor; however, you should set this data to `protected` or `private` properties so the data is not automatically made available to the template:

```php
<?php

namespace App\Mail;

use App\Models\Order;
use Illuminate\Bus\Queueable;
use Illuminate\Mail\Mailable;
use Illuminate\Mail\Mailables\Content;
use Illuminate\Queue\SerializesModels;

class OrderShipped extends Mailable
{
    use Queueable, SerializesModels;

    /**
     * Create a new message instance.
     */
    public function __construct(
        protected Order $order,
    ) {}

    /**
     * Get the message content definition.
     */
    public function content(): Content
    {
        return new Content(
            view: 'mail.orders.shipped',
            with: [
                'orderName' => $this->order->name,
                'orderPrice' => $this->order->price,
            ],
        );
    }
}
```

Once the data has been passed via the `with` parameter, it will automatically be available in your view, so you may access it like you would access any other data in your Blade templates:

```blade
<div>
    Price: {{ $orderPrice }}
</div>
```

<a name="attachments"></a>
### Attachments

To add attachments to an email, you will add attachments to the array returned by the message's `attachments` method. First, you may add an attachment by providing a file path to the `fromPath` method provided by the `Attachment` class:

```php
use Illuminate\Mail\Mailables\Attachment;

/**
 * Get the attachments for the message.
 *
 * @return array<int, \Illuminate\Mail\Mailables\Attachment>
 */
public function attachments(): array
{
    return [
        Attachment::fromPath('/path/to/file'),
    ];
}
```

When attaching files to a message, you may also specify the display name and / or MIME type for the attachment using the `as` and `withMime` methods:

```php
/**
 * Get the attachments for the message.
 *
 * @return array<int, \Illuminate\Mail\Mailables\Attachment>
 */
public function attachments(): array
{
    return [
        Attachment::fromPath('/path/to/file')
            ->as('name.pdf')
            ->withMime('application/pdf'),
    ];
}
```

<a name="attaching-files-from-disk"></a>
#### Attaching Files From Disk

If you have stored a file on one of your [filesystem disks](/docs/{{version}}/filesystem), you may attach it to the email using the `fromStorage` attachment method:

```php
/**
 * Get the attachments for the message.
 *
 * @return array<int, \Illuminate\Mail\Mailables\Attachment>
 */
public function attachments(): array
{
    return [
        Attachment::fromStorage('/path/to/file'),
    ];
}
```

Of course, you may also specify the attachment's name and MIME type:

```php
/**
 * Get the attachments for the message.
 *
 * @return array<int, \Illuminate\Mail\Mailables\Attachment>
 */
public function attachments(): array
{
    return [
        Attachment::fromStorage('/path/to/file')
            ->as('name.pdf')
            ->withMime('application/pdf'),
    ];
}
```

The `fromStorageDisk` method may be used if you need to specify a storage disk other than your default disk:

```php
/**
 * Get the attachments for the message.
 *
 * @return array<int, \Illuminate\Mail\Mailables\Attachment>
 */
public function attachments(): array
{
    return [
        Attachment::fromStorageDisk('s3', '/path/to/file')
            ->as('name.pdf')
            ->withMime('application/pdf'),
    ];
}
```

<a name="raw-data-attachments"></a>
#### Raw Data Attachments

The `fromData` attachment method may be used to attach a raw string of bytes as an attachment. For example, you might use this method if you have generated a PDF in memory and want to attach it to the email without writing it to disk. The `fromData` method accepts a closure which resolves the raw data bytes as well as the name that the attachment should be assigned:

```php
/**
 * Get the attachments for the message.
 *
 * @return array<int, \Illuminate\Mail\Mailables\Attachment>
 */
public function attachments(): array
{
    return [
        Attachment::fromData(fn () => $this->pdf, 'Report.pdf')
            ->withMime('application/pdf'),
    ];
}
```

<a name="inline-attachments"></a>
### Inline Attachments

Embedding inline images into your emails is typically cumbersome; however, Laravel provides a convenient way to attach images to your emails. To embed an inline image, use the `embed` method on the `$message` variable within your email template. Laravel automatically makes the `$message` variable available to all of your email templates, so you don't need to worry about passing it in manually:

```blade
<body>
    Here is an image:

    <img src="{{ $message->embed($pathToImage) }}">
</body>
```

> [!WARNING]
> The `$message` variable is not available in plain-text message templates since plain-text messages do not utilize inline attachments.

<a name="embedding-raw-data-attachments"></a>
#### Embedding Raw Data Attachments

If you already have a raw image data string you wish to embed into an email template, you may call the `embedData` method on the `$message` variable. When calling the `embedData` method, you will need to provide a filename that should be assigned to the embedded image:

```blade
<body>
    Here is an image from raw data:

    <img src="{{ $message->embedData($data, 'example-image.jpg') }}">
</body>
```

<a name="attachable-objects"></a>
### Attachable Objects

While attaching files to messages via simple string paths is often sufficient, in many cases the attachable entities within your application are represented by classes. For example, if your application is attaching a photo to a message, your application may also have a `Photo` model that represents that photo. When that is the case, wouldn't it be convenient to simply pass the `Photo` model to the `attach` method? Attachable objects allow you to do just that.

To get started, implement the `Illuminate\Contracts\Mail\Attachable` interface on the object that will be attachable to messages. This interface dictates that your class defines a `toMailAttachment` method that returns an `Illuminate\Mail\Attachment` instance:

```php
<?php

namespace App\Models;

use Illuminate\Contracts\Mail\Attachable;
use Illuminate\Database\Eloquent\Model;
use Illuminate\Mail\Attachment;

class Photo extends Model implements Attachable
{
    /**
     * Get the attachable representation of the model.
     */
    public function toMailAttachment(): Attachment
    {
        return Attachment::fromPath('/path/to/file');
    }
}
```

Once you have defined your attachable object, you may return an instance of that object from the `attachments` method when building an email message:

```php
/**
 * Get the attachments for the message.
 *
 * @return array<int, \Illuminate\Mail\Mailables\Attachment>
 */
public function attachments(): array
{
    return [$this->photo];
}
```

Of course, attachment data may be stored on a remote file storage service such as Amazon S3. So, Laravel also allows you to generate attachment instances from data that is stored on one of your application's [filesystem disks](/docs/{{version}}/filesystem):

```php
// Create an attachment from a file on your default disk...
return Attachment::fromStorage($this->path);

// Create an attachment from a file on a specific disk...
return Attachment::fromStorageDisk('backblaze', $this->path);
```

In addition, you may create attachment instances via data that you have in memory. To accomplish this, provide a closure to the `fromData` method. The closure should return the raw data that represents the attachment:

```php
return Attachment::fromData(fn () => $this->content, 'Photo Name');
```

Laravel also provides additional methods that you may use to customize your attachments. For example, you may use the `as` and `withMime` methods to customize the file's name and MIME type:

```php
return Attachment::fromPath('/path/to/file')
    ->as('Photo Name')
    ->withMime('image/jpeg');
```

<a name="headers"></a>
### Headers

Sometimes you may need to attach additional headers to the outgoing message. For instance, you may need to set a custom `Message-Id` or other arbitrary text headers.

To accomplish this, define a `headers` method on your mailable. The `headers` method should return an `Illuminate\Mail\Mailables\Headers` instance. This class accepts `messageId`, `references`, and `text` parameters. Of course, you may provide only the parameters you need for your particular message:

```php
use Illuminate\Mail\Mailables\Headers;

/**
 * Get the message headers.
 */
public function headers(): Headers
{
    return new Headers(
        messageId: 'custom-message-id@example.com',
        references: ['previous-message@example.com'],
        text: [
            'X-Custom-Header' => 'Custom Value',
        ],
    );
}
```

<a name="tags-and-metadata"></a>
### Tags and Metadata

Some third-party email providers such as Mailgun and Postmark support message "tags" and "metadata", which may be used to group and track emails sent by your application. You may add tags and metadata to an email message via your `Envelope` definition:

```php
use Illuminate\Mail\Mailables\Envelope;

/**
 * Get the message envelope.
 *
 * @return \Illuminate\Mail\Mailables\Envelope
 */
public function envelope(): Envelope
{
    return new Envelope(
        subject: 'Order Shipped',
        tags: ['shipment'],
        metadata: [
            'order_id' => $this->order->id,
        ],
    );
}
```

If your application is using the Mailgun driver, you may consult Mailgun's documentation for more information on [tags](https://documentation.mailgun.com/docs/mailgun/user-manual/tracking-messages/#tags) and [metadata](https://documentation.mailgun.com/docs/mailgun/user-manual/sending-messages/#attaching-metadata-to-messages). Likewise, the Postmark documentation may also be consulted for more information on their support for [tags](https://postmarkapp.com/blog/tags-support-for-smtp) and [metadata](https://postmarkapp.com/support/article/1125-custom-metadata-faq).

If your application is using Amazon SES to send emails, you should use the `metadata` method to attach [SES "tags"](https://docs.aws.amazon.com/ses/latest/APIReference/API_MessageTag.html) to the message.

<a name="customizing-the-symfony-message"></a>
### Customizing the Symfony Message

Laravel's mail capabilities are powered by Symfony Mailer. Laravel allows you to register custom callbacks that will be invoked with the Symfony Message instance before sending the message. This gives you an opportunity to deeply customize the message before it is sent. To accomplish this, define a `using` parameter on your `Envelope` definition:

```php
use Illuminate\Mail\Mailables\Envelope;
use Symfony\Component\Mime\Email;

/**
 * Get the message envelope.
 */
public function envelope(): Envelope
{
    return new Envelope(
        subject: 'Order Shipped',
        using: [
            function (Email $message) {
                // ...
            },
        ]
    );
}
```

<a name="markdown-mailables"></a>
## Markdown Mailables

Markdown mailable messages allow you to take advantage of the pre-built templates and components of [mail notifications](/docs/{{version}}/notifications#mail-notifications) in your mailables. Since the messages are written in Markdown, Laravel is able to render beautiful, responsive HTML templates for the messages while also automatically generating a plain-text counterpart.

<a name="generating-markdown-mailables"></a>
### Generating Markdown Mailables

To generate a mailable with a corresponding Markdown template, you may use the `--markdown` option of the `make:mail` Artisan command:

```shell
php artisan make:mail OrderShipped --markdown=mail.orders.shipped
```

Then, when configuring the mailable `Content` definition within its `content` method, use the `markdown` parameter instead of the `view` parameter:

```php
use Illuminate\Mail\Mailables\Content;

/**
 * Get the message content definition.
 */
public function content(): Content
{
    return new Content(
        markdown: 'mail.orders.shipped',
        with: [
            'url' => $this->orderUrl,
        ],
    );
}
```

<a name="writing-markdown-messages"></a>
### Writing Markdown Messages

Markdown mailables use a combination of Blade components and Markdown syntax which allow you to easily construct mail messages while leveraging Laravel's pre-built email UI components:

```blade
<x-mail::message>
# Order Shipped

Your order has been shipped!

<x-mail::button :url="$url">
View Order
</x-mail::button>

Thanks,<br>
{{ config('app.name') }}
</x-mail::message>
```

> [!NOTE]
> Do not use excess indentation when writing Markdown emails. Per Markdown standards, Markdown parsers will render indented content as code blocks.

<a name="button-component"></a>
#### Button Component

The button component renders a centered button link. The component accepts two arguments, a `url` and an optional `color`. Supported colors are `primary`, `success`, and `error`. You may add as many button components to a message as you wish:

```blade
<x-mail::button :url="$url" color="success">
View Order
</x-mail::button>
```

<a name="panel-component"></a>
#### Panel Component

The panel component renders the given block of text in a panel that has a slightly different background color than the rest of the message. This allows you to draw attention to a given block of text:

```blade
<x-mail::panel>
This is the panel content.
</x-mail::panel>
```

<a name="table-component"></a>
#### Table Component

The table component allows you to transform a Markdown table into an HTML table. The component accepts the Markdown table as its content. Table column alignment is supported using the default Markdown table alignment syntax:

```blade
<x-mail::table>
| Laravel       | Table         | Example       |
| ------------- | :-----------: | ------------: |
| Col 2 is      | Centered      | $10           |
| Col 3 is      | Right-Aligned | $20           |
</x-mail::table>
```

<a name="customizing-the-components"></a>
### Customizing the Components

You may export all of the Markdown mail components to your own application for customization. To export the components, use the `vendor:publish` Artisan command to publish the `laravel-mail` asset tag:

```shell
php artisan vendor:publish --tag=laravel-mail
```

This command will publish the Markdown mail components to the `resources/views/vendor/mail` directory. The `mail` directory will contain an `html` and a `text` directory, each containing their respective representations of every available component. You are free to customize these components however you like.

<a name="customizing-the-css"></a>
#### Customizing the CSS

After exporting the components, the `resources/views/vendor/mail/html/themes` directory will contain a `default.css` file. You may customize the CSS in this file and your styles will automatically be converted to inline CSS styles within the HTML representations of your Markdown mail messages.

If you would like to build an entirely new theme for Laravel's Markdown components, you may place a CSS file within the `html/themes` directory. After naming and saving your CSS file, update the `theme` option of your application's `config/mail.php` configuration file to match the name of your new theme.

To customize the theme for an individual mailable, you may set the `$theme` property of the mailable class to the name of the theme that should be used when sending that mailable.

<a name="sending-mail"></a>
## Sending Mail

To send a message, use the `to` method on the `Mail` [facade](/docs/{{version}}/facades). The `to` method accepts an email address, a user instance, or a collection of users. If you pass an object or collection of objects, the mailer will automatically use their `email` and `name` properties when determining the email's recipients, so make sure these attributes are available on your objects. Once you have specified your recipients, you may pass an instance of your mailable class to the `send` method:

```php
<?php

namespace App\Http\Controllers;

use App\Mail\OrderShipped;
use App\Models\Order;
use Illuminate\Http\RedirectResponse;
use Illuminate\Http\Request;
use Illuminate\Support\Facades\Mail;

class OrderShipmentController extends Controller
{
    /**
     * Ship the given order.
     */
    public function store(Request $request): RedirectResponse
    {
        $order = Order::findOrFail($request->order_id);

        // Ship the order...

        Mail::to($request->user())->send(new OrderShipped($order));

        return redirect('/orders');
    }
}
```

You are not limited to just specifying the "to" recipients when sending a message. You are free to set "to", "cc", and "bcc" recipients by chaining their respective methods together:

```php
Mail::to($request->user())
    ->cc($moreUsers)
    ->bcc($evenMoreUsers)
    ->send(new OrderShipped($order));
```

<a name="looping-over-recipients"></a>
#### Looping Over Recipients

Occasionally, you may need to send a mailable to a list of recipients by iterating over an array of recipients / email addresses. However, since the `to` method appends email addresses to the mailable's list of recipients, each iteration through the loop will send another email to every previous recipient. Therefore, you should always re-create the mailable instance for each recipient:

```php
foreach (['taylor@example.com', 'dries@example.com'] as $recipient) {
    Mail::to($recipient)->send(new OrderShipped($order));
}
```

<a name="sending-mail-via-a-specific-mailer"></a>
#### Sending Mail via a Specific Mailer

By default, Laravel will send email using the mailer configured as the `default` mailer in your application's `mail` configuration file. However, you may use the `mailer` method to send a message using a specific mailer configuration:

```php
Mail::mailer('postmark')
    ->to($request->user())
    ->send(new OrderShipped($order));
```

<a name="queueing-mail"></a>
### Queueing Mail

<a name="queueing-a-mail-message"></a>
#### Queueing a Mail Message

Since sending email messages can negatively impact the response time of your application, many developers choose to queue email messages for background sending. Laravel makes this easy using its built-in [unified queue API](/docs/{{version}}/queues). To queue a mail message, use the `queue` method on the `Mail` facade after specifying the message's recipients:

```php
Mail::to($request->user())
    ->cc($moreUsers)
    ->bcc($evenMoreUsers)
    ->queue(new OrderShipped($order));
```

This method will automatically take care of pushing a job onto the queue so the message is sent in the background. You will need to [configure your queues](/docs/{{version}}/queues) before using this feature.

<a name="delayed-message-queueing"></a>
#### Delayed Message Queueing

If you wish to delay the delivery of a queued email message, you may use the `later` method. As its first argument, the `later` method accepts a `DateTime` instance indicating when the message should be sent:

```php
Mail::to($request->user())
    ->cc($moreUsers)
    ->bcc($evenMoreUsers)
    ->later(now()->plus(minutes: 10), new OrderShipped($order));
```

<a name="pushing-to-specific-queues"></a>
#### Pushing to Specific Queues

Since all mailable classes generated using the `make:mail` command make use of the `Illuminate\Bus\Queueable` trait, you may call the `onQueue` and `onConnection` methods on any mailable class instance, allowing you to specify the connection and queue name for the message:

```php
$message = (new OrderShipped($order))
    ->onConnection('sqs')
    ->onQueue('emails');

Mail::to($request->user())
    ->cc($moreUsers)
    ->bcc($evenMoreUsers)
    ->queue($message);
```

Alternatively, you may specify the connection and queue using the `Connection` and `Queue` attributes on the mailable class:

```php
use Illuminate\Queue\Attributes\Connection;
use Illuminate\Queue\Attributes\Queue;

#[Connection('sqs')]
#[Queue('emails')]
class OrderShipped extends Mailable
{
    // ...
}
```

<a name="queueing-by-default"></a>
#### Queueing by Default

If you have mailable classes that you want to always be queued, you may implement the `ShouldQueue` contract on the class. Now, even if you call the `send` method when mailing, the mailable will still be queued since it implements the contract:

```php
use Illuminate\Contracts\Queue\ShouldQueue;

class OrderShipped extends Mailable implements ShouldQueue
{
    // ...
}
```

<a name="queued-mailables-and-database-transactions"></a>
#### Queued Mailables and Database Transactions

When queued mailables are dispatched within database transactions, they may be processed by the queue before the database transaction has committed. When this happens, any updates you have made to models or database records during the database transaction may not yet be reflected in the database. In addition, any models or database records created within the transaction may not exist in the database. If your mailable depends on these models, unexpected errors can occur when the job that sends the queued mailable is processed.

If your queue connection's `after_commit` configuration option is set to `false`, you may still indicate that a particular queued mailable should be dispatched after all open database transactions have been committed by calling the `afterCommit` method when sending the mail message:

```php
Mail::to($request->user())->send(
    (new OrderShipped($order))->afterCommit()
);
```

Alternatively, you may call the `afterCommit` method from your mailable's constructor:

```php
<?php

namespace App\Mail;

use Illuminate\Bus\Queueable;
use Illuminate\Contracts\Queue\ShouldQueue;
use Illuminate\Mail\Mailable;
use Illuminate\Queue\SerializesModels;

class OrderShipped extends Mailable implements ShouldQueue
{
    use Queueable, SerializesModels;

    /**
     * Create a new message instance.
     */
    public function __construct()
    {
        $this->afterCommit();
    }
}
```

> [!NOTE]
> To learn more about working around these issues, please review the documentation regarding [queued jobs and database transactions](/docs/{{version}}/queues#jobs-and-database-transactions).

<a name="queued-email-failures"></a>
#### Queued Email Failures

When a queued email fails, the `failed` method on the queued mailable class will be invoked if it has been defined. The `Throwable` instance that caused the queued email to fail will be passed to the `failed` method:

```php
<?php

namespace App\Mail;

use Illuminate\Contracts\Queue\ShouldQueue;
use Illuminate\Mail\Mailable;
use Illuminate\Queue\SerializesModels;
use Throwable;

class OrderDelayed extends Mailable implements ShouldQueue
{
    use SerializesModels;

    /**
     * Handle a queued email's failure.
     */
    public function failed(Throwable $exception): void
    {
        // ...
    }
}
```

<a name="rendering-mailables"></a>
## Rendering Mailables

Sometimes you may wish to capture the HTML content of a mailable without sending it. To accomplish this, you may call the `render` method of the mailable. This method will return the evaluated HTML content of the mailable as a string:

```php
use App\Mail\InvoicePaid;
use App\Models\Invoice;

$invoice = Invoice::find(1);

return (new InvoicePaid($invoice))->render();
```

<a name="previewing-mailables-in-the-browser"></a>
### Previewing Mailables in the Browser

When designing a mailable's template, it is convenient to quickly preview the rendered mailable in your browser like a typical Blade template. For this reason, Laravel allows you to return any mailable directly from a route closure or controller. When a mailable is returned, it will be rendered and displayed in the browser, allowing you to quickly preview its design without needing to send it to an actual email address:

```php
Route::get('/mailable', function () {
    $invoice = App\Models\Invoice::find(1);

    return new App\Mail\InvoicePaid($invoice);
});
```

<a name="localizing-mailables"></a>
## Localizing Mailables

Laravel allows you to send mailables in a locale other than the request's current locale, and will even remember this locale if the mail is queued.

To accomplish this, the `Mail` facade offers a `locale` method to set the desired language. The application will change into this locale when the mailable's template is being evaluated and then revert back to the previous locale when evaluation is complete:

```php
Mail::to($request->user())->locale('es')->send(
    new OrderShipped($order)
);
```

<a name="user-preferred-locales"></a>
#### User Preferred Locales

Sometimes, applications store each user's preferred locale. By implementing the `HasLocalePreference` contract on one or more of your models, you may instruct Laravel to use this stored locale when sending mail:

```php
use Illuminate\Contracts\Translation\HasLocalePreference;

class User extends Model implements HasLocalePreference
{
    /**
     * Get the user's preferred locale.
     */
    public function preferredLocale(): string
    {
        return $this->locale;
    }
}
```

Once you have implemented the interface, Laravel will automatically use the preferred locale when sending mailables and notifications to the model. Therefore, there is no need to call the `locale` method when using this interface:

```php
Mail::to($request->user())->send(new OrderShipped($order));
```

<a name="testing-mailables"></a>
## Testing

<a name="testing-mailable-content"></a>
### Testing Mailable Content

Laravel provides a variety of methods for inspecting your mailable's structure. In addition, Laravel provides several convenient methods for testing that your mailable contains the content that you expect:

```php tab=Pest
use App\Mail\InvoicePaid;
use App\Models\User;

test('mailable content', function () {
    $user = User::factory()->create();

    $mailable = new InvoicePaid($user);

    $mailable->assertFrom('jeffrey@example.com');
    $mailable->assertTo('taylor@example.com');
    $mailable->assertHasCc('abigail@example.com');
    $mailable->assertHasBcc('victoria@example.com');
    $mailable->assertHasReplyTo('tyler@example.com');
    $mailable->assertHasSubject('Invoice Paid');
    $mailable->assertHasTag('example-tag');
    $mailable->assertHasMetadata('key', 'value');

    $mailable->assertSeeInHtml($user->email);
    $mailable->assertDontSeeInHtml('Invoice Not Paid');
    $mailable->assertSeeInOrderInHtml(['Invoice Paid', 'Thanks']);

    $mailable->assertSeeInText($user->email);
    $mailable->assertDontSeeInText('Invoice Not Paid');
    $mailable->assertSeeInOrderInText(['Invoice Paid', 'Thanks']);

    $mailable->assertHasAttachment('/path/to/file');
    $mailable->assertHasAttachment(Attachment::fromPath('/path/to/file'));
    $mailable->assertHasAttachedData($pdfData, 'name.pdf', ['mime' => 'application/pdf']);
    $mailable->assertHasAttachmentFromStorage('/path/to/file', 'name.pdf', ['mime' => 'application/pdf']);
    $mailable->assertHasAttachmentFromStorageDisk('s3', '/path/to/file', 'name.pdf', ['mime' => 'application/pdf']);
});
```

```php tab=PHPUnit
use App\Mail\InvoicePaid;
use App\Models\User;

public function test_mailable_content(): void
{
    $user = User::factory()->create();

    $mailable = new InvoicePaid($user);

    $mailable->assertFrom('jeffrey@example.com');
    $mailable->assertTo('taylor@example.com');
    $mailable->assertHasCc('abigail@example.com');
    $mailable->assertHasBcc('victoria@example.com');
    $mailable->assertHasReplyTo('tyler@example.com');
    $mailable->assertHasSubject('Invoice Paid');
    $mailable->assertHasTag('example-tag');
    $mailable->assertHasMetadata('key', 'value');

    $mailable->assertSeeInHtml($user->email);
    $mailable->assertDontSeeInHtml('Invoice Not Paid');
    $mailable->assertSeeInOrderInHtml(['Invoice Paid', 'Thanks']);

    $mailable->assertSeeInText($user->email);
    $mailable->assertDontSeeInText('Invoice Not Paid');
    $mailable->assertSeeInOrderInText(['Invoice Paid', 'Thanks']);

    $mailable->assertHasAttachment('/path/to/file');
    $mailable->assertHasAttachment(Attachment::fromPath('/path/to/file'));
    $mailable->assertHasAttachedData($pdfData, 'name.pdf', ['mime' => 'application/pdf']);
    $mailable->assertHasAttachmentFromStorage('/path/to/file', 'name.pdf', ['mime' => 'application/pdf']);
    $mailable->assertHasAttachmentFromStorageDisk('s3', '/path/to/file', 'name.pdf', ['mime' => 'application/pdf']);
}
```

As you might expect, the "HTML" assertions assert that the HTML version of your mailable contains a given string, while the "text" assertions assert that the plain-text version of your mailable contains a given string.

<a name="testing-mailable-sending"></a>
### Testing Mailable Sending

We suggest testing the content of your mailables separately from your tests that assert that a given mailable was "sent" to a specific user. Typically, the content of mailables is not relevant to the code you are testing, and it is sufficient to simply assert that Laravel was instructed to send a given mailable.

You may use the `Mail` facade's `fake` method to prevent mail from being sent. After calling the `Mail` facade's `fake` method, you may then assert that mailables were instructed to be sent to users and even inspect the data the mailables received:

```php tab=Pest
<?php

use App\Mail\OrderShipped;
use Illuminate\Support\Facades\Mail;

test('orders can be shipped', function () {
    Mail::fake();

    // Perform order shipping...

    // Assert that no mailables were sent...
    Mail::assertNothingSent();

    // Assert that a mailable was sent...
    Mail::assertSent(OrderShipped::class);

    // Assert a mailable was sent twice...
    Mail::assertSent(OrderShipped::class, 2);

    // Assert a mailable was sent to an email address...
    Mail::assertSent(OrderShipped::class, 'example@laravel.com');

    // Assert a mailable was sent to multiple email addresses...
    Mail::assertSent(OrderShipped::class, ['example@laravel.com', '...']);

    // Assert a mailable was not sent...
    Mail::assertNotSent(AnotherMailable::class);

    // Assert a mailable was sent twice...
    Mail::assertSentTimes(OrderShipped::class, 2);

    // Assert that a mailable was sent exactly once...
    Mail::assertSentOnce(OrderShipped::class);

    // Assert 3 total mailables were sent...
    Mail::assertSentCount(3);
});
```

```php tab=PHPUnit
<?php

namespace Tests\Feature;

use App\Mail\OrderShipped;
use Illuminate\Support\Facades\Mail;
use Tests\TestCase;

class ExampleTest extends TestCase
{
    public function test_orders_can_be_shipped(): void
    {
        Mail::fake();

        // Perform order shipping...

        // Assert that no mailables were sent...
        Mail::assertNothingSent();

        // Assert that a mailable was sent...
        Mail::assertSent(OrderShipped::class);

        // Assert a mailable was sent twice...
        Mail::assertSent(OrderShipped::class, 2);

        // Assert a mailable was sent to an email address...
        Mail::assertSent(OrderShipped::class, 'example@laravel.com');

        // Assert a mailable was sent to multiple email addresses...
        Mail::assertSent(OrderShipped::class, ['example@laravel.com', '...']);

        // Assert a mailable was not sent...
        Mail::assertNotSent(AnotherMailable::class);

        // Assert a mailable was sent twice...
        Mail::assertSentTimes(OrderShipped::class, 2);

        // Assert that a mailable was sent exactly once...
        Mail::assertSentOnce(OrderShipped::class);

        // Assert 3 total mailables were sent...
        Mail::assertSentCount(3);
    }
}
```

If you are queueing mailables for delivery in the background, you should use the `assertQueued` method instead of `assertSent`:

```php
Mail::assertQueued(OrderShipped::class);
Mail::assertQueuedOnce(OrderShipped::class);
Mail::assertNotQueued(OrderShipped::class);
Mail::assertNothingQueued();
Mail::assertQueuedCount(3);
```

You can also assert the total number of mailables that have been sent or queued using the `assertOutgoingCount` method:

```php
Mail::assertOutgoingCount(3);
```

You may pass a closure to the `assertSent`, `assertNotSent`, `assertQueued`, or `assertNotQueued` methods in order to assert that a mailable was sent that passes a given "truth test". If at least one mailable was sent that passes the given truth test then the assertion will be successful:

```php
Mail::assertSent(function (OrderShipped $mail) use ($order) {
    return $mail->order->id === $order->id;
});
```

When calling the `Mail` facade's assertion methods, the mailable instance accepted by the provided closure exposes helpful methods for examining the mailable:

```php
Mail::assertSent(OrderShipped::class, function (OrderShipped $mail) use ($user) {
    return $mail->hasTo($user->email) &&
           $mail->hasCc('...') &&
           $mail->hasBcc('...') &&
           $mail->hasReplyTo('...') &&
           $mail->hasFrom('...') &&
           $mail->hasSubject('...') &&
           $mail->hasMetadata('order_id', $mail->order->id);
           $mail->usesMailer('ses');
});
```

The mailable instance also includes several helpful methods for examining the attachments on a mailable:

```php
use Illuminate\Mail\Mailables\Attachment;

Mail::assertSent(OrderShipped::class, function (OrderShipped $mail) {
    return $mail->hasAttachment(
        Attachment::fromPath('/path/to/file')
            ->as('name.pdf')
            ->withMime('application/pdf')
    );
});

Mail::assertSent(OrderShipped::class, function (OrderShipped $mail) {
    return $mail->hasAttachment(
        Attachment::fromStorageDisk('s3', '/path/to/file')
    );
});

Mail::assertSent(OrderShipped::class, function (OrderShipped $mail) use ($pdfData) {
    return $mail->hasAttachment(
        Attachment::fromData(fn () => $pdfData, 'name.pdf')
    );
});
```

You may have noticed that there are two methods for asserting that mail was not sent: `assertNotSent` and `assertNotQueued`. Sometimes you may wish to assert that no mail was sent **or** queued. To accomplish this, you may use the `assertNothingOutgoing` and `assertNotOutgoing` methods:

```php
Mail::assertNothingOutgoing();

Mail::assertNotOutgoing(function (OrderShipped $mail) use ($order) {
    return $mail->order->id === $order->id;
});
```

<a name="mail-and-local-development"></a>
## Mail and Local Development

When developing an application that sends email, you probably don't want to actually send emails to live email addresses. Laravel provides several ways to "disable" the actual sending of emails during local development.

<a name="log-driver"></a>
#### Log Driver

Instead of sending your emails, the `log` mail driver will write all email messages to your log files for inspection. Typically, this driver would only be used during local development. For more information on configuring your application per environment, check out the [configuration documentation](/docs/{{version}}/configuration#environment-configuration).

<a name="mailtrap"></a>
#### HELO / Mailtrap / Mailpit

Alternatively, you may use a service like [HELO](https://usehelo.com) or [Mailtrap](https://mailtrap.io) and the `smtp` driver to send your email messages to a "dummy" mailbox where you may view them in a true email client. This approach has the benefit of allowing you to actually inspect the final emails in Mailtrap's message viewer.

If you are using [Laravel Sail](/docs/{{version}}/sail), you may preview your messages using [Mailpit](https://github.com/axllent/mailpit). When Sail is running, you may access the Mailpit interface at: `http://localhost:8025`.

<a name="using-a-global-to-address"></a>
#### Using a Global `to` Address

Finally, you may specify a global "to" address by invoking the `alwaysTo` method offered by the `Mail` facade. Typically, this method should be called from the `boot` method of one of your application's service providers:

```php
use Illuminate\Support\Facades\Mail;

/**
 * Bootstrap any application services.
 */
public function boot(): void
{
    if ($this->app->environment('local')) {
        Mail::alwaysTo('taylor@example.com');
    }
}
```

When using the `alwaysTo` method, any additional "cc" or "bcc" addresses on mail messages will be removed.

<a name="events"></a>
## Events

Laravel dispatches two events while sending mail messages. The `MessageSending` event is dispatched prior to a message being sent, while the `MessageSent` event is dispatched after a message has been sent. Remember, these events are dispatched when the mail is being *sent*, not when it is queued. You may create [event listeners](/docs/{{version}}/events) for these events within your application:

```php
use Illuminate\Mail\Events\MessageSending;
// use Illuminate\Mail\Events\MessageSent;

class LogMessage
{
    /**
     * Handle the event.
     */
    public function handle(MessageSending $event): void
    {
        // ...
    }
}
```

<a name="custom-transports"></a>
## Custom Transports

Laravel includes a variety of mail transports; however, you may wish to write your own transports to deliver email via other services that Laravel does not support out of the box. To get started, define a class that extends the `Symfony\Component\Mailer\Transport\AbstractTransport` class. Then, implement the `doSend` and `__toString` methods on your transport:

```php
<?php

namespace App\Mail;

use MailchimpTransactional\ApiClient;
use Symfony\Component\Mailer\SentMessage;
use Symfony\Component\Mailer\Transport\AbstractTransport;
use Symfony\Component\Mime\Address;
use Symfony\Component\Mime\MessageConverter;

class MailchimpTransport extends AbstractTransport
{
    /**
     * Create a new Mailchimp transport instance.
     */
    public function __construct(
        protected ApiClient $client,
    ) {
        parent::__construct();
    }

    /**
     * {@inheritDoc}
     */
    protected function doSend(SentMessage $message): void
    {
        $email = MessageConverter::toEmail($message->getOriginalMessage());

        $this->client->messages->send(['message' => [
            'from_email' => $email->getFrom(),
            'to' => collect($email->getTo())->map(function (Address $email) {
                return ['email' => $email->getAddress(), 'type' => 'to'];
            })->all(),
            'subject' => $email->getSubject(),
            'text' => $email->getTextBody(),
        ]]);
    }

    /**
     * Get the string representation of the transport.
     */
    public function __toString(): string
    {
        return 'mailchimp';
    }
}
```

Once you've defined your custom transport, you may register it via the `extend` method provided by the `Mail` facade. Typically, this should be done within the `boot` method of your application's `AppServiceProvider`. A `$config` argument will be passed to the closure provided to the `extend` method. This argument will contain the configuration array defined for the mailer in the application's `config/mail.php` configuration file:

```php
use App\Mail\MailchimpTransport;
use Illuminate\Support\Facades\Mail;
use MailchimpTransactional\ApiClient;

/**
 * Bootstrap any application services.
 */
public function boot(): void
{
    Mail::extend('mailchimp', function (array $config = []) {
        $client = new ApiClient;

        $client->setApiKey($config['key']);

        return new MailchimpTransport($client);
    });
}
```

Once your custom transport has been defined and registered, you may create a mailer definition within your application's `config/mail.php` configuration file that utilizes the new transport:

```php
'mailchimp' => [
    'transport' => 'mailchimp',
    'key' => env('MAILCHIMP_API_KEY'),
    // ...
],
```

<a name="additional-symfony-transports"></a>
### Additional Symfony Transports

Laravel includes support for some existing Symfony maintained mail transports like Mailgun and Postmark. However, you may wish to extend Laravel with support for additional Symfony maintained transports. You can do so by requiring the necessary Symfony mailer via Composer and registering the transport with Laravel. For example, you may install and register the "Brevo" (formerly "Sendinblue") Symfony mailer:

```shell
composer require symfony/brevo-mailer symfony/http-client
```

Once the Brevo mailer package has been installed, you may add an entry for your Brevo API credentials to your application's `services` configuration file:

```php
'brevo' => [
    'key' => env('BREVO_API_KEY'),
],
```

Next, you may use the `Mail` facade's `extend` method to register the transport with Laravel. Typically, this should be done within the `boot` method of a service provider:

```php
use Illuminate\Support\Facades\Mail;
use Symfony\Component\Mailer\Bridge\Brevo\Transport\BrevoTransportFactory;
use Symfony\Component\Mailer\Transport\Dsn;

/**
 * Bootstrap any application services.
 */
public function boot(): void
{
    Mail::extend('brevo', function () {
        return (new BrevoTransportFactory)->create(
            new Dsn(
                'brevo+api',
                'default',
                config('services.brevo.key')
            )
        );
    });
}
```

Once your transport has been registered, you may create a mailer definition within your application's `config/mail.php` configuration file that utilizes the new transport:

```php
'brevo' => [
    'transport' => 'brevo',
    // ...
],
```


---

# Laravel MCP

*Sección: Laravel | Origen: https://laravel.com/docs/13.x/mcp*

- [Introduction](#introduction)
- [Installation](#installation)
    - [Publishing Routes](#publishing-routes)
- [Creating Servers](#creating-servers)
    - [Server Registration](#server-registration)
    - [Web Servers](#web-servers)
    - [Local Servers](#local-servers)
    - [Cache Hints](#cache-hints)
- [Tools](#tools)
    - [Creating Tools](#creating-tools)
    - [Searchable Tool Catalogs](#searchable-tool-catalogs)
    - [Tool Input Schemas](#tool-input-schemas)
    - [Tool Output Schemas](#tool-output-schemas)
    - [Validating Tool Arguments](#validating-tool-arguments)
    - [Tool Dependency Injection](#tool-dependency-injection)
    - [Tool Annotations](#tool-annotations)
    - [Conditional Tool Registration](#conditional-tool-registration)
    - [Tool Responses](#tool-responses)
- [Prompts](#prompts)
    - [Creating Prompts](#creating-prompts)
    - [Prompt Arguments](#prompt-arguments)
    - [Validating Prompt Arguments](#validating-prompt-arguments)
    - [Prompt Dependency Injection](#prompt-dependency-injection)
    - [Conditional Prompt Registration](#conditional-prompt-registration)
    - [Prompt Responses](#prompt-responses)
- [Resources](#resources)
    - [Creating Resources](#creating-resources)
    - [Resource Templates](#resource-templates)
    - [Resource URI and MIME Type](#resource-uri-and-mime-type)
    - [Resource Request](#resource-request)
    - [Resource Dependency Injection](#resource-dependency-injection)
    - [Resource Annotations](#resource-annotations)
    - [Conditional Resource Registration](#conditional-resource-registration)
    - [Resource Responses](#resource-responses)
- [Apps](#apps)
    - [Creating App Resources](#creating-app-resources)
    - [Rendering Apps From Tools](#rendering-apps-from-tools)
    - [App Tool Visibility](#app-tool-visibility)
    - [App Configuration](#app-configuration)
    - [Building Apps With Boost](#building-apps-with-boost)
- [Metadata](#metadata)
- [Icons](#icons)
- [Authentication](#authentication)
    - [OAuth 2.1](#oauth)
    - [Sanctum](#sanctum)
- [Authorization](#authorization)
- [MCP Client](#client)
    - [Connecting to Servers](#client-connecting)
    - [Named Clients](#named-clients)
    - [Client Authentication](#client-authentication)
    - [Tools](#client-tools)
    - [Prompts](#client-prompts)
    - [Resources](#client-resources)
- [Testing Servers](#testing-servers)
    - [MCP Inspector](#mcp-inspector)
    - [Unit Tests](#unit-tests)

<a name="introduction"></a>
## Introduction

[Laravel MCP](https://github.com/laravel/mcp) provides a simple and elegant way for AI clients to interact with your Laravel application through the [Model Context Protocol](https://modelcontextprotocol.io/docs/getting-started/intro). It offers an expressive, fluent interface for defining servers, tools, resources, and prompts that enable AI-powered interactions with your application.

<a name="installation"></a>
## Installation

To get started, install Laravel MCP into your project using the Composer package manager:

```shell
composer require laravel/mcp
```

<a name="publishing-routes"></a>
### Publishing Routes

After installing Laravel MCP, execute the `vendor:publish` Artisan command to publish the `routes/ai.php` file where you will define your MCP servers:

```shell
php artisan vendor:publish --tag=ai-routes
```

This command creates the `routes/ai.php` file in your application's `routes` directory, which you will use to register your MCP servers.

<a name="creating-servers"></a>
## Creating Servers

You can create an MCP server using the `make:mcp-server` Artisan command. Servers act as the central communication point that exposes MCP capabilities like tools, resources, and prompts to AI clients:

```shell
php artisan make:mcp-server WeatherServer
```

This command will create a new server class in the `app/Mcp/Servers` directory. The generated server class extends Laravel MCP's base `Laravel\Mcp\Server` class and provides attributes and properties for configuring the server and registering tools, resources, and prompts:

```php
<?php

namespace App\Mcp\Servers;

use Laravel\Mcp\Server\Attributes\Instructions;
use Laravel\Mcp\Server\Attributes\Name;
use Laravel\Mcp\Server\Attributes\Version;
use Laravel\Mcp\Server;

#[Name('Weather Server')]
#[Version('1.0.0')]
#[Instructions('This server provides weather information and forecasts.')]
class WeatherServer extends Server
{
    /**
     * The tools registered with this MCP server.
     *
     * @var array<int, class-string<\Laravel\Mcp\Server\Tool>>
     */
    protected array $tools = [
        // GetCurrentWeatherTool::class,
    ];

    /**
     * The resources registered with this MCP server.
     *
     * @var array<int, class-string<\Laravel\Mcp\Server\Resource>>
     */
    protected array $resources = [
        // WeatherGuidelinesResource::class,
    ];

    /**
     * The prompts registered with this MCP server.
     *
     * @var array<int, class-string<\Laravel\Mcp\Server\Prompt>>
     */
    protected array $prompts = [
        // DescribeWeatherPrompt::class,
    ];
}
```

<a name="server-registration"></a>
### Server Registration

Once you've created a server, you must register it in your `routes/ai.php` file to make it accessible. Laravel MCP provides two methods for registering servers: `web` for HTTP-accessible servers and `local` for command-line servers.

<a name="web-servers"></a>
### Web Servers

Web servers are the most common types of servers and are accessible via HTTP POST requests, making them ideal for remote AI clients or web-based integrations. Register a web server using the `web` method:

```php
use App\Mcp\Servers\WeatherServer;
use Laravel\Mcp\Facades\Mcp;

Mcp::web('/mcp/weather', WeatherServer::class);
```

Just like normal routes, you may apply middleware to protect your web servers:

```php
Mcp::web('/mcp/weather', WeatherServer::class)
    ->middleware(['throttle:mcp']);
```

<a name="local-servers"></a>
### Local Servers

Local servers run as Artisan commands, perfect for building local AI assistant integrations like [Laravel Boost](/docs/{{version}}/installation#installing-laravel-boost). Register a local server using the `local` method:

```php
use App\Mcp\Servers\WeatherServer;
use Laravel\Mcp\Facades\Mcp;

Mcp::local('weather', WeatherServer::class);
```

Once registered, you should not typically need to manually run the `mcp:start` Artisan command yourself. Instead, configure your MCP client (AI agent) to start the server or use the [MCP Inspector](#mcp-inspector).

<a name="cache-hints"></a>
### Cache Hints

Laravel MCP includes cache hints with responses that may be cached, such as server discovery, primitive listings, and resource reads. By default, these responses are marked as private with a time to live of zero milliseconds.

You may customize the default cache hint for a server using the `Cacheable` attribute:

```php
use Laravel\Mcp\Enums\CacheScope;
use Laravel\Mcp\Server\Attributes\Cacheable;

#[Cacheable(ttlMs: 60_000, scope: CacheScope::Public)]
class WeatherServer extends Server
{
    /**
     * Get the cache hints for individual MCP methods.
     *
     * @return array<string, \Laravel\Mcp\Server\Attributes\Cacheable>
     */
    protected function cacheHints(): array
    {
        return [
            'tools/list' => new Cacheable(ttlMs: 30_000, scope: CacheScope::Public),
        ];
    }
}
```

The `CacheScope::Private` scope limits cached responses to the same authorization context, while `CacheScope::Public` allows responses to be shared between users. Cache hints are advisory; the MCP client or host determines whether a response is actually cached. Method-specific hints returned by `cacheHints` take precedence over the server's `Cacheable` attribute.

You may override the server's cache hint for an individual resource by applying the `Cacheable` attribute to the resource class:

```php
#[Cacheable(ttlMs: 300_000, scope: CacheScope::Public)]
class WeatherGuidelinesResource extends Resource
{
    // ...
}
```

A resource's `Cacheable` attribute takes precedence over both the method-specific hint and the server's default hint.

<a name="tools"></a>
## Tools

Tools enable your server to expose functionality that AI clients can call. They allow language models to perform actions, run code, or interact with external systems:

```php
<?php

namespace App\Mcp\Tools;

use Illuminate\Contracts\JsonSchema\JsonSchema;
use Laravel\Mcp\Request;
use Laravel\Mcp\Response;
use Laravel\Mcp\Server\Attributes\Description;
use Laravel\Mcp\Server\Tool;

#[Description('Fetches the current weather forecast for a specified location.')]
class CurrentWeatherTool extends Tool
{
    /**
     * Handle the tool request.
     */
    public function handle(Request $request): Response
    {
        $location = $request->get('location');

        // Get weather...

        return Response::text('The weather is...');
    }

    /**
     * Get the tool's input schema.
     *
     * @return array<string, \Illuminate\JsonSchema\Types\Type>
     */
    public function schema(JsonSchema $schema): array
    {
        return [
            'location' => $schema->string()
                ->description('The location to get the weather for.')
                ->required(),
        ];
    }
}
```

<a name="creating-tools"></a>
### Creating Tools

To create a tool, run the `make:mcp-tool` Artisan command:

```shell
php artisan make:mcp-tool CurrentWeatherTool
```

After creating a tool, register it in your server's `$tools` property:

```php
<?php

namespace App\Mcp\Servers;

use App\Mcp\Tools\CurrentWeatherTool;
use Laravel\Mcp\Server;

class WeatherServer extends Server
{
    /**
     * The tools registered with this MCP server.
     *
     * @var array<int, class-string<\Laravel\Mcp\Server\Tool>>
     */
    protected array $tools = [
        CurrentWeatherTool::class,
    ];
}
```

<a name="searchable-tool-catalogs"></a>
### Searchable Tool Catalogs

Servers with many tools can place some tools in a searchable catalog instead of advertising every tool to the AI client. A searchable catalog exposes two tools: `search_tools`, which searches the catalog by tool name, description, and input schema; and `execute_tools`, which invokes one or more tools returned by a search.

To create a searchable catalog, use the `ToolSearch` class as an array key in your server's `$tools` property:

```php
<?php

namespace App\Mcp\Servers;

use App\Mcp\Tools\CurrentWeatherTool;
use App\Mcp\Tools\HistoricalWeatherTool;
use App\Mcp\Tools\WeatherAlertsTool;
use Laravel\Mcp\Server;
use Laravel\Mcp\Server\Tools\ToolSearch;

class WeatherServer extends Server
{
    /**
     * The tools registered with this MCP server.
     *
     * @var array<int|string, \Laravel\Mcp\Server\Tool|class-string<\Laravel\Mcp\Server\Tool>|array<int, \Laravel\Mcp\Server\Tool|class-string<\Laravel\Mcp\Server\Tool>>>
     */
    protected array $tools = [
        CurrentWeatherTool::class,

        ToolSearch::class => [
            HistoricalWeatherTool::class,
            WeatherAlertsTool::class,
        ],
    ];
}
```

In this example, `CurrentWeatherTool` is advertised directly, while the historical weather and weather alert tools are available through the searchable catalog. Conditional tool registration is still respected when catalog tools are searched or executed.

The maximum number of tools that may be executed in one `execute_tools` call and the maximum response size are controlled by the `mcp.tool_search.max_tool_calls` and `mcp.tool_search.max_output_bytes` configuration values.

<a name="tool-name-title-description"></a>
#### Tool Name, Title, and Description

By default, the tool's name and title are derived from the class name. For example, `CurrentWeatherTool` will have a name of `current-weather` and a title of `Current Weather Tool`. You may customize these values using the `Name` and `Title` attributes:

```php
use Laravel\Mcp\Server\Attributes\Name;
use Laravel\Mcp\Server\Attributes\Title;

#[Name('get-optimistic-weather')]
#[Title('Get Optimistic Weather Forecast')]
class CurrentWeatherTool extends Tool
{
    // ...
}
```

Tool descriptions are not automatically generated. You should always provide a meaningful description using the `Description` attribute:

```php
use Laravel\Mcp\Server\Attributes\Description;

#[Description('Fetches the current weather forecast for a specified location.')]
class CurrentWeatherTool extends Tool
{
    //
}
```

> [!NOTE]
> The description is a critical part of the tool's metadata, as it helps AI models understand when and how to use the tool effectively.

<a name="tool-input-schemas"></a>
### Tool Input Schemas

Tools can define input schemas to specify what arguments they accept from AI clients. Use Laravel's `Illuminate\Contracts\JsonSchema\JsonSchema` builder to define your tool's input requirements:

```php
<?php

namespace App\Mcp\Tools;

use Illuminate\Contracts\JsonSchema\JsonSchema;
use Laravel\Mcp\Server\Tool;

class CurrentWeatherTool extends Tool
{
    /**
     * Get the tool's input schema.
     *
     * @return array<string, \Illuminate\JsonSchema\Types\Type>
     */
    public function schema(JsonSchema $schema): array
    {
        return [
            'location' => $schema->string()
                ->description('The location to get the weather for.')
                ->required(),

            'units' => $schema->string()
                ->enum(['celsius', 'fahrenheit'])
                ->description('The temperature units to use.')
                ->default('celsius'),
        ];
    }
}
```

<a name="tool-output-schemas"></a>
### Tool Output Schemas

Tools can define [output schemas](https://modelcontextprotocol.io/specification/2026-07-28/server/tools#output-schema) to specify the structure of their responses. This enables better integration with AI clients that need parseable tool results. Use the `outputSchema` method to define your tool's output structure:

```php
<?php

namespace App\Mcp\Tools;

use Illuminate\Contracts\JsonSchema\JsonSchema;
use Laravel\Mcp\Server\Tool;

class CurrentWeatherTool extends Tool
{
    /**
     * Get the tool's output schema.
     *
     * @return array<string, \Illuminate\JsonSchema\Types\Type>
     */
    public function outputSchema(JsonSchema $schema): array
    {
        return [
            'temperature' => $schema->number()
                ->description('Temperature in Celsius')
                ->required(),

            'conditions' => $schema->string()
                ->description('Weather conditions')
                ->required(),

            'humidity' => $schema->integer()
                ->description('Humidity percentage')
                ->required(),
        ];
    }
}
```

<a name="validating-tool-arguments"></a>
### Validating Tool Arguments

JSON Schema definitions provide a basic structure for tool arguments, but you may also want to enforce more complex validation rules.

Laravel MCP integrates seamlessly with Laravel's [validation features](/docs/{{version}}/validation). You may validate incoming tool arguments within your tool's `handle` method:

```php
<?php

namespace App\Mcp\Tools;

use Laravel\Mcp\Request;
use Laravel\Mcp\Response;
use Laravel\Mcp\Server\Tool;

class CurrentWeatherTool extends Tool
{
    /**
     * Handle the tool request.
     */
    public function handle(Request $request): Response
    {
        $validated = $request->validate([
            'location' => 'required|string|max:100',
            'units' => 'in:celsius,fahrenheit',
        ]);

        // Fetch weather data using the validated arguments...
    }
}
```

On validation failure, AI clients will act based on the error messages you provide. As such, it is critical to provide clear and actionable error messages:

```php
$validated = $request->validate([
    'location' => ['required','string','max:100'],
    'units' => 'in:celsius,fahrenheit',
],[
    'location.required' => 'You must specify a location to get the weather for. For example, "New York City" or "Tokyo".',
    'units.in' => 'You must specify either "celsius" or "fahrenheit" for the units.',
]);
```

<a name="tool-dependency-injection"></a>
#### Tool Dependency Injection

The Laravel [service container](/docs/{{version}}/container) is used to resolve all tools. As a result, you are able to type-hint any dependencies your tool may need in its constructor. The declared dependencies will automatically be resolved and injected into the tool instance:

```php
<?php

namespace App\Mcp\Tools;

use App\Repositories\WeatherRepository;
use Laravel\Mcp\Server\Tool;

class CurrentWeatherTool extends Tool
{
    /**
     * Create a new tool instance.
     */
    public function __construct(
        protected WeatherRepository $weather,
    ) {}

    // ...
}
```

In addition to constructor injection, you may also type-hint dependencies in your tool's `handle()` method. The service container will automatically resolve and inject the dependencies when the method is called:

```php
<?php

namespace App\Mcp\Tools;

use App\Repositories\WeatherRepository;
use Laravel\Mcp\Request;
use Laravel\Mcp\Response;
use Laravel\Mcp\Server\Tool;

class CurrentWeatherTool extends Tool
{
    /**
     * Handle the tool request.
     */
    public function handle(Request $request, WeatherRepository $weather): Response
    {
        $location = $request->get('location');

        $forecast = $weather->getForecastFor($location);

        // ...
    }
}
```

<a name="tool-annotations"></a>
### Tool Annotations

You may enhance your tools with [annotations](https://modelcontextprotocol.io/specification/2026-07-28/schema#toolannotations) to provide additional metadata to AI clients. These annotations help AI models understand the tool's behavior and capabilities. Annotations are added to tools via attributes:

```php
<?php

namespace App\Mcp\Tools;

use Laravel\Mcp\Server\Tools\Annotations\IsIdempotent;
use Laravel\Mcp\Server\Tools\Annotations\IsReadOnly;
use Laravel\Mcp\Server\Tool;

#[IsIdempotent]
#[IsReadOnly]
class CurrentWeatherTool extends Tool
{
    //
}
```

Available annotations include:

<div class="overflow-auto">

| Annotation         | Type    | Description                                                                                  |
| ------------------ | ------- | -------------------------------------------------------------------------------------------- |
| `#[IsReadOnly]`    | boolean | Indicates the tool does not modify its environment.                                          |
| `#[IsDestructive]` | boolean | Indicates the tool may perform destructive updates (only meaningful when not read-only).     |
| `#[IsIdempotent]`  | boolean | Indicates repeated calls with same arguments have no additional effect (when not read-only). |
| `#[IsOpenWorld]`   | boolean | Indicates the tool may interact with external entities.                                      |

</div>

Annotation values can be explicitly set using boolean arguments:

```php
use Laravel\Mcp\Server\Tools\Annotations\IsReadOnly;
use Laravel\Mcp\Server\Tools\Annotations\IsDestructive;
use Laravel\Mcp\Server\Tools\Annotations\IsOpenWorld;
use Laravel\Mcp\Server\Tools\Annotations\IsIdempotent;
use Laravel\Mcp\Server\Tool;

#[IsReadOnly(true)]
#[IsDestructive(false)]
#[IsOpenWorld(false)]
#[IsIdempotent(true)]
class CurrentWeatherTool extends Tool
{
    //
}
```

<a name="conditional-tool-registration"></a>
### Conditional Tool Registration

You may conditionally register tools at runtime by implementing the `shouldRegister` method in your tool class. This method allows you to determine whether a tool should be available based on application state, configuration, or request parameters:

```php
<?php

namespace App\Mcp\Tools;

use Laravel\Mcp\Request;
use Laravel\Mcp\Server\Tool;

class CurrentWeatherTool extends Tool
{
    /**
     * Determine if the tool should be registered.
     */
    public function shouldRegister(Request $request): bool
    {
        return $request?->user()?->subscribed() ?? false;
    }
}
```

When a tool's `shouldRegister` method returns `false`, it will not appear in the list of available tools and cannot be invoked by AI clients.

<a name="tool-responses"></a>
### Tool Responses

Tools must return an instance of `Laravel\Mcp\Response`. The Response class provides several convenient methods for creating different types of responses:

For simple text responses, use the `text` method:

```php
use Laravel\Mcp\Request;
use Laravel\Mcp\Response;

/**
 * Handle the tool request.
 */
public function handle(Request $request): Response
{
    // ...

    return Response::text('Weather Summary: Sunny, 72°F');
}
```

To indicate an error occurred during tool execution, use the `error` method:

```php
return Response::error('Unable to fetch weather data. Please try again.');
```

To return image or audio content, use the `image` and `audio` methods:

```php
return Response::image(file_get_contents(storage_path('weather/radar.png')), 'image/png');

return Response::audio(file_get_contents(storage_path('weather/alert.mp3')), 'audio/mp3');
```

You may also load image and audio content directly from a Laravel filesystem disk using the `fromStorage` method. The MIME type will be automatically detected from the file:

```php
return Response::fromStorage('weather/radar.png');
```

If needed, you may specify a particular disk or override the MIME type:

```php
return Response::fromStorage('weather/radar.png', disk: 's3');

return Response::fromStorage('weather/radar.png', mimeType: 'image/webp');
```

<a name="multiple-content-responses"></a>
#### Multiple Content Responses

Tools can return multiple pieces of content by returning an array of `Response` instances:

```php
use Laravel\Mcp\Request;
use Laravel\Mcp\Response;

/**
 * Handle the tool request.
 *
 * @return array<int, \Laravel\Mcp\Response>
 */
public function handle(Request $request): array
{
    // ...

    return [
        Response::text('Weather Summary: Sunny, 72°F'),
        Response::text("**Detailed Forecast**\n- Morning: 65°F\n- Afternoon: 78°F\n- Evening: 70°F")
    ];
}
```

<a name="structured-responses"></a>
#### Structured Responses

Tools can return [structured content](https://modelcontextprotocol.io/specification/2026-07-28/server/tools#structured-content) using the `structured` method. This provides parseable data for AI clients while maintaining backward compatibility with a JSON-encoded text representation:

```php
return Response::structured([
    'temperature' => 22.5,
    'conditions' => 'Partly cloudy',
    'humidity' => 65,
]);
```

If you need to provide custom text alongside structured content, use the `withStructuredContent` method on the response factory:

```php
return Response::make(
    Response::text('Weather is 22.5°C and sunny')
)->withStructuredContent([
    'temperature' => 22.5,
    'conditions' => 'Sunny',
]);
```

<a name="streaming-responses"></a>
#### Streaming Responses

For long-running operations or real-time data streaming, tools can return a [generator](https://www.php.net/manual/en/language.generators.overview.php) from their `handle` method. This enables sending intermediate updates to the client before the final response:

```php
<?php

namespace App\Mcp\Tools;

use Generator;
use Laravel\Mcp\Request;
use Laravel\Mcp\Response;
use Laravel\Mcp\Server\Tool;

class CurrentWeatherTool extends Tool
{
    /**
     * Handle the tool request.
     *
     * @return \Generator<int, \Laravel\Mcp\Response>
     */
    public function handle(Request $request): Generator
    {
        $locations = $request->array('locations');

        foreach ($locations as $index => $location) {
            yield Response::notification('processing/progress', [
                'current' => $index + 1,
                'total' => count($locations),
                'location' => $location,
            ]);

            yield Response::text($this->forecastFor($location));
        }
    }
}
```

When using web-based servers, streaming responses automatically open an SSE (Server-Sent Events) stream, sending each yielded message as an event to the client.

<a name="prompts"></a>
## Prompts

[Prompts](https://modelcontextprotocol.io/specification/2026-07-28/server/prompts) enable your server to share reusable prompt templates that AI clients can use to interact with language models. They provide a standardized way to structure common queries and interactions.

<a name="creating-prompts"></a>
### Creating Prompts

To create a prompt, run the `make:mcp-prompt` Artisan command:

```shell
php artisan make:mcp-prompt DescribeWeatherPrompt
```

After creating a prompt, register it in your server's `$prompts` property:

```php
<?php

namespace App\Mcp\Servers;

use App\Mcp\Prompts\DescribeWeatherPrompt;
use Laravel\Mcp\Server;

class WeatherServer extends Server
{
    /**
     * The prompts registered with this MCP server.
     *
     * @var array<int, class-string<\Laravel\Mcp\Server\Prompt>>
     */
    protected array $prompts = [
        DescribeWeatherPrompt::class,
    ];
}
```

<a name="prompt-name-title-and-description"></a>
#### Prompt Name, Title, and Description

By default, the prompt's name and title are derived from the class name. For example, `DescribeWeatherPrompt` will have a name of `describe-weather` and a title of `Describe Weather Prompt`. You may customize these values using the `Name` and `Title` attributes:

```php
use Laravel\Mcp\Server\Attributes\Name;
use Laravel\Mcp\Server\Attributes\Title;

#[Name('weather-assistant')]
#[Title('Weather Assistant Prompt')]
class DescribeWeatherPrompt extends Prompt
{
    // ...
}
```

Prompt descriptions are not automatically generated. You should always provide a meaningful description using the `Description` attribute:

```php
use Laravel\Mcp\Server\Attributes\Description;

#[Description('Generates a natural-language explanation of the weather for a given location.')]
class DescribeWeatherPrompt extends Prompt
{
    //
}
```

> [!NOTE]
> The description is a critical part of the prompt's metadata, as it helps AI models understand when and how to get the best use out of the prompt.

<a name="prompt-arguments"></a>
### Prompt Arguments

Prompts can define arguments that allow AI clients to customize the prompt template with specific values. Use the `arguments` method to define what arguments your prompt accepts:

```php
<?php

namespace App\Mcp\Prompts;

use Laravel\Mcp\Server\Prompt;
use Laravel\Mcp\Server\Prompts\Argument;

class DescribeWeatherPrompt extends Prompt
{
    /**
     * Get the prompt's arguments.
     *
     * @return array<int, \Laravel\Mcp\Server\Prompts\Argument>
     */
    public function arguments(): array
    {
        return [
            new Argument(
                name: 'tone',
                description: 'The tone to use in the weather description (e.g., formal, casual, humorous).',
                required: true,
            ),
        ];
    }
}
```

<a name="validating-prompt-arguments"></a>
### Validating Prompt Arguments

Prompt arguments are automatically validated based on their definition, but you may also want to enforce more complex validation rules.

Laravel MCP integrates seamlessly with Laravel's [validation features](/docs/{{version}}/validation). You may validate incoming prompt arguments within your prompt's `handle` method:

```php
<?php

namespace App\Mcp\Prompts;

use Laravel\Mcp\Request;
use Laravel\Mcp\Response;
use Laravel\Mcp\Server\Prompt;

class DescribeWeatherPrompt extends Prompt
{
    /**
     * Handle the prompt request.
     */
    public function handle(Request $request): Response
    {
        $validated = $request->validate([
            'tone' => 'required|string|max:50',
        ]);

        $tone = $validated['tone'];

        // Generate the prompt response using the given tone...
    }
}
```

On validation failure, AI clients will act based on the error messages you provide. As such, it is critical to provide clear and actionable error messages:

```php
$validated = $request->validate([
    'tone' => ['required','string','max:50'],
],[
    'tone.*' => 'You must specify a tone for the weather description. Examples include "formal", "casual", or "humorous".',
]);
```

<a name="prompt-dependency-injection"></a>
### Prompt Dependency Injection

The Laravel [service container](/docs/{{version}}/container) is used to resolve all prompts. As a result, you are able to type-hint any dependencies your prompt may need in its constructor. The declared dependencies will automatically be resolved and injected into the prompt instance:

```php
<?php

namespace App\Mcp\Prompts;

use App\Repositories\WeatherRepository;
use Laravel\Mcp\Server\Prompt;

class DescribeWeatherPrompt extends Prompt
{
    /**
     * Create a new prompt instance.
     */
    public function __construct(
        protected WeatherRepository $weather,
    ) {}

    //
}
```

In addition to constructor injection, you may also type-hint dependencies in your prompt's `handle` method. The service container will automatically resolve and inject the dependencies when the method is called:

```php
<?php

namespace App\Mcp\Prompts;

use App\Repositories\WeatherRepository;
use Laravel\Mcp\Request;
use Laravel\Mcp\Response;
use Laravel\Mcp\Server\Prompt;

class DescribeWeatherPrompt extends Prompt
{
    /**
     * Handle the prompt request.
     */
    public function handle(Request $request, WeatherRepository $weather): Response
    {
        $isAvailable = $weather->isServiceAvailable();

        // ...
    }
}
```

<a name="conditional-prompt-registration"></a>
### Conditional Prompt Registration

You may conditionally register prompts at runtime by implementing the `shouldRegister` method in your prompt class. This method allows you to determine whether a prompt should be available based on application state, configuration, or request parameters:

```php
<?php

namespace App\Mcp\Prompts;

use Laravel\Mcp\Request;
use Laravel\Mcp\Server\Prompt;

class CurrentWeatherPrompt extends Prompt
{
    /**
     * Determine if the prompt should be registered.
     */
    public function shouldRegister(Request $request): bool
    {
        return $request?->user()?->subscribed() ?? false;
    }
}
```

When a prompt's `shouldRegister` method returns `false`, it will not appear in the list of available prompts and cannot be invoked by AI clients.

<a name="prompt-responses"></a>
### Prompt Responses

Prompts may return a single `Laravel\Mcp\Response` or an iterable of `Laravel\Mcp\Response` instances. These responses encapsulate the content that will be sent to the AI client:

```php
<?php

namespace App\Mcp\Prompts;

use Laravel\Mcp\Request;
use Laravel\Mcp\Response;
use Laravel\Mcp\Server\Prompt;

class DescribeWeatherPrompt extends Prompt
{
    /**
     * Handle the prompt request.
     *
     * @return array<int, \Laravel\Mcp\Response>
     */
    public function handle(Request $request): array
    {
        $tone = $request->string('tone');

        $systemMessage = "You are a helpful weather assistant. Please provide a weather description in a {$tone} tone.";

        $userMessage = "What is the current weather like in New York City?";

        return [
            Response::text($systemMessage)->asAssistant(),
            Response::text($userMessage),
        ];
    }
}
```

You can use the `asAssistant()` method to indicate that a response message should be treated as coming from the AI assistant, while regular messages are treated as user input.

<a name="resources"></a>
## Resources

[Resources](https://modelcontextprotocol.io/specification/2026-07-28/server/resources) enable your server to expose data and content that AI clients can read and use as context when interacting with language models. They provide a way to share static or dynamic information like documentation, configuration, or any data that helps inform AI responses.

<a name="creating-resources"></a>
## Creating Resources

To create a resource, run the `make:mcp-resource` Artisan command:

```shell
php artisan make:mcp-resource WeatherGuidelinesResource
```

After creating a resource, register it in your server's `$resources` property:

```php
<?php

namespace App\Mcp\Servers;

use App\Mcp\Resources\WeatherGuidelinesResource;
use Laravel\Mcp\Server;

class WeatherServer extends Server
{
    /**
     * The resources registered with this MCP server.
     *
     * @var array<int, class-string<\Laravel\Mcp\Server\Resource>>
     */
    protected array $resources = [
        WeatherGuidelinesResource::class,
    ];
}
```

<a name="resource-name-title-and-description"></a>
#### Resource Name, Title, and Description

By default, the resource's name and title are derived from the class name. For example, `WeatherGuidelinesResource` will have a name of `weather-guidelines` and a title of `Weather Guidelines Resource`. You may customize these values using the `Name` and `Title` attributes:

```php
use Laravel\Mcp\Server\Attributes\Name;
use Laravel\Mcp\Server\Attributes\Title;

#[Name('weather-api-docs')]
#[Title('Weather API Documentation')]
class WeatherGuidelinesResource extends Resource
{
    // ...
}
```

Resource descriptions are not automatically generated. You should always provide a meaningful description using the `Description` attribute:

```php
use Laravel\Mcp\Server\Attributes\Description;

#[Description('Comprehensive guidelines for using the Weather API.')]
class WeatherGuidelinesResource extends Resource
{
    //
}
```

> [!NOTE]
> The description is a critical part of the resource's metadata, as it helps AI models understand when and how to use the resource effectively.

<a name="resource-templates"></a>
### Resource Templates

[Resource templates](https://modelcontextprotocol.io/specification/2026-07-28/server/resources#resource-templates) enable your server to expose dynamic resources that match URI patterns with variables. Instead of defining a static URI for each resource, you can create a single resource that handles multiple URIs based on a template pattern.

<a name="creating-resource-templates"></a>
#### Creating Resource Templates

To create a resource template, implement the `HasUriTemplate` interface on your resource class and define a `uriTemplate` method that returns a `UriTemplate` instance:

```php
<?php

namespace App\Mcp\Resources;

use Laravel\Mcp\Request;
use Laravel\Mcp\Response;
use Laravel\Mcp\Server\Attributes\Description;
use Laravel\Mcp\Server\Attributes\MimeType;
use Laravel\Mcp\Server\Contracts\HasUriTemplate;
use Laravel\Mcp\Server\Resource;
use Laravel\Mcp\Support\UriTemplate;

#[Description('Access user files by ID')]
#[MimeType('text/plain')]
class UserFileResource extends Resource implements HasUriTemplate
{
    /**
     * Get the URI template for this resource.
     */
    public function uriTemplate(): UriTemplate
    {
        return new UriTemplate('file://users/{userId}/files/{fileId}');
    }

    /**
     * Handle the resource request.
     */
    public function handle(Request $request): Response
    {
        $userId = $request->get('userId');
        $fileId = $request->get('fileId');

        // Fetch and return the file content...

        return Response::text($content);
    }
}
```

When a resource implements the `HasUriTemplate` interface, it will be registered as a resource template rather than a static resource. AI clients can then request resources using URIs that match the template pattern, and the variables from the URI will be automatically extracted and made available in your resource's `handle` method.

<a name="uri-template-syntax"></a>
#### URI Template Syntax

URI templates use placeholders enclosed in curly braces to define variable segments in the URI:

```php
new UriTemplate('file://users/{userId}');
new UriTemplate('file://users/{userId}/files/{fileId}');
new UriTemplate('https://api.example.com/{version}/{resource}/{id}');
```

<a name="accessing-template-variables"></a>
#### Accessing Template Variables

When a URI matches your resource template, the extracted variables are automatically merged into the request and can be accessed using the `get` method:

```php
<?php

namespace App\Mcp\Resources;

use Laravel\Mcp\Request;
use Laravel\Mcp\Response;
use Laravel\Mcp\Server\Contracts\HasUriTemplate;
use Laravel\Mcp\Server\Resource;
use Laravel\Mcp\Support\UriTemplate;

class UserProfileResource extends Resource implements HasUriTemplate
{
    public function uriTemplate(): UriTemplate
    {
        return new UriTemplate('file://users/{userId}/profile');
    }

    public function handle(Request $request): Response
    {
        // Access the extracted variable
        $userId = $request->get('userId');

        // Access the full URI if needed
        $uri = $request->uri();

        // Fetch user profile...

        return Response::text("Profile for user {$userId}");
    }
}
```

The `Request` object provides both the extracted variables and the original URI that was requested, giving you full context for processing the resource request.

<a name="resource-uri-and-mime-type"></a>
### Resource URI and MIME Type

Each resource is identified by a unique URI and has an associated MIME type that helps AI clients understand the resource's format.

By default, the resource's URI is generated based on the resource's name, so `WeatherGuidelinesResource` will have a URI of `weather://resources/weather-guidelines`. The default MIME type is `text/plain`.

You may customize these values using the `Uri` and `MimeType` attributes:

```php
<?php

namespace App\Mcp\Resources;

use Laravel\Mcp\Server\Attributes\MimeType;
use Laravel\Mcp\Server\Attributes\Uri;
use Laravel\Mcp\Server\Resource;

#[Uri('weather://resources/guidelines')]
#[MimeType('application/pdf')]
class WeatherGuidelinesResource extends Resource
{
}
```

The URI and MIME type help AI clients determine how to process and interpret the resource content appropriately.

<a name="resource-request"></a>
### Resource Request

Unlike tools and prompts, resources cannot define input schemas or arguments. However, you can still interact with the request object within your resource's `handle` method:

```php
<?php

namespace App\Mcp\Resources;

use Laravel\Mcp\Request;
use Laravel\Mcp\Response;
use Laravel\Mcp\Server\Resource;

class WeatherGuidelinesResource extends Resource
{
    /**
     * Handle the resource request.
     */
    public function handle(Request $request): Response
    {
        // ...
    }
}
```

<a name="resource-dependency-injection"></a>
### Resource Dependency Injection

The Laravel [service container](/docs/{{version}}/container) is used to resolve all resources. As a result, you are able to type-hint any dependencies your resource may need in its constructor. The declared dependencies will automatically be resolved and injected into the resource instance:

```php
<?php

namespace App\Mcp\Resources;

use App\Repositories\WeatherRepository;
use Laravel\Mcp\Server\Resource;

class WeatherGuidelinesResource extends Resource
{
    /**
     * Create a new resource instance.
     */
    public function __construct(
        protected WeatherRepository $weather,
    ) {}

    // ...
}
```

In addition to constructor injection, you may also type-hint dependencies in your resource's `handle` method. The service container will automatically resolve and inject the dependencies when the method is called:

```php
<?php

namespace App\Mcp\Resources;

use App\Repositories\WeatherRepository;
use Laravel\Mcp\Request;
use Laravel\Mcp\Response;
use Laravel\Mcp\Server\Resource;

class WeatherGuidelinesResource extends Resource
{
    /**
     * Handle the resource request.
     */
    public function handle(WeatherRepository $weather): Response
    {
        $guidelines = $weather->guidelines();

        return Response::text($guidelines);
    }
}
```

<a name="resource-annotations"></a>
### Resource Annotations

You may enhance your resources with [annotations](https://modelcontextprotocol.io/specification/2026-07-28/schema#annotations) to provide additional metadata to AI clients. Annotations are added to resources via attributes:

```php
<?php

namespace App\Mcp\Resources;

use Laravel\Mcp\Enums\Role;
use Laravel\Mcp\Server\Annotations\Audience;
use Laravel\Mcp\Server\Annotations\LastModified;
use Laravel\Mcp\Server\Annotations\Priority;
use Laravel\Mcp\Server\Resource;

#[Audience(Role::User)]
#[LastModified('2025-01-12T15:00:58Z')]
#[Priority(0.9)]
class UserDashboardResource extends Resource
{
    //
}
```

Available annotations include:

<div class="overflow-auto">

| Annotation        | Type          | Description                                                                 |
| ----------------- | ------------- | --------------------------------------------------------------------------- |
| `#[Audience]`     | Role or array | Specifies the intended audience (`Role::User`, `Role::Assistant`, or both). |
| `#[Priority]`     | float         | A numerical score between 0.0 and 1.0 indicating resource importance.       |
| `#[LastModified]` | string        | An ISO 8601 timestamp showing when the resource was last updated.           |

</div>

<a name="conditional-resource-registration"></a>
### Conditional Resource Registration

You may conditionally register resources at runtime by implementing the `shouldRegister` method in your resource class. This method allows you to determine whether a resource should be available based on application state, configuration, or request parameters:

```php
<?php

namespace App\Mcp\Resources;

use Laravel\Mcp\Request;
use Laravel\Mcp\Server\Resource;

class WeatherGuidelinesResource extends Resource
{
    /**
     * Determine if the resource should be registered.
     */
    public function shouldRegister(Request $request): bool
    {
        return $request?->user()?->subscribed() ?? false;
    }
}
```

When a resource's `shouldRegister` method returns `false`, it will not appear in the list of available resources and cannot be accessed by AI clients.

<a name="resource-responses"></a>
### Resource Responses

Resources must return an instance of `Laravel\Mcp\Response`. The Response class provides several convenient methods for creating different types of responses:

For simple text content, use the `text` method:

```php
use Laravel\Mcp\Request;
use Laravel\Mcp\Response;

/**
 * Handle the resource request.
 */
public function handle(Request $request): Response
{
    // ...

    return Response::text($weatherData);
}
```

<a name="resource-link-responses"></a>
#### Resource Link Responses

To return a resource link, use the `resourceLink` method, providing the URI and name. Unlike an embedded resource, a resource link returns a URI pointer that the AI client fetches independently:

```php
return Response::resourceLink(
    uri: 'file:///data/report.json',
    name: 'monthly-report',
    mimeType: 'application/json',
);
```

You may also pass a registered resource class or instance, which will automatically inherit the resource's URI, name, title, description, and MIME type:

```php
return Response::resourceLink(new WeatherForecastResource);
```

<a name="resource-blob-responses"></a>
#### Blob Responses

To return blob content, use the `blob` method, providing the blob content:

```php
return Response::blob(file_get_contents(storage_path('weather/radar.png')));
```

When returning blob content, the MIME type will be determined by your resource's configured MIME type:

```php
<?php

namespace App\Mcp\Resources;

use Laravel\Mcp\Server\Attributes\MimeType;
use Laravel\Mcp\Server\Resource;

#[MimeType('image/png')]
class WeatherGuidelinesResource extends Resource
{
    //
}
```

<a name="resource-error-responses"></a>
#### Error Responses

To indicate an error occurred during resource retrieval, use the `error()` method:

```php
return Response::error('Unable to fetch weather data for the specified location.');
```

<a name="apps"></a>
## Apps

Laravel MCP supports [MCP Apps](https://modelcontextprotocol.io/extensions/apps/overview), an extension of the Model Context Protocol that allows tools to render interactive HTML applications within sandboxed iframes in supported hosts. This allows you to build dashboards, forms, visualizations, and other rich experiences that go beyond plain text responses.

An MCP app consists of two parts working together:

- An **app resource** that returns the self-contained HTML for your application.
- A **tool** that is linked to the app resource using the `#[RendersApp]` attribute. When the tool is called, the host fetches and renders the linked resource.

<a name="creating-app-resources"></a>
### Creating App Resources

You may create an app resource using the `make:mcp-app-resource` Artisan command:

```shell
php artisan make:mcp-app-resource WeatherDashboardApp
```

This command creates two files: a PHP class in `app/Mcp/Resources` and a Blade view in `resources/views/mcp`. The view name is automatically inferred from the class name. For example, `WeatherDashboardApp` maps to `mcp.weather-dashboard-app`:

```php
<?php

namespace App\Mcp\Resources;

use Laravel\Mcp\Request;
use Laravel\Mcp\Response;
use Laravel\Mcp\Server\Attributes\AppMeta;
use Laravel\Mcp\Server\Attributes\Description;
use Laravel\Mcp\Server\AppResource;

#[Description('An interactive weather dashboard.')]
#[AppMeta]
class WeatherDashboardApp extends AppResource
{
    /**
     * Handle the app resource request.
     */
    public function handle(Request $request): Response
    {
        return Response::view('mcp.weather-dashboard-app', [
            'title' => $this->title(),
        ]);
    }
}
```

`AppResource` extends the base `Resource` class and automatically configures the `ui://` URI scheme and the `text/html;profile=mcp-app` MIME type required by the MCP Apps specification. Like any other resource, you must register it in your server's `$resources` array.

The generated Blade view uses the `<x-mcp::app>` component, which renders a complete HTML document with the client-side MCP SDK bundled and ready to use:

```blade
<x-mcp::app :title="$title">
    <x-slot:head>
        <script type="module">
        createMcpApp(async (app) => {
            document.getElementById('run-btn').addEventListener('click', async () => {
                const result = await app.callServerTool('get-weather-data', {});
                document.getElementById('output').textContent = result.content[0]?.text ?? '';
            });
        });
        </script>
    </x-slot:head>

    <div id="app">
        <button id="run-btn">Refresh</button>
        <p id="output"></p>
    </div>
</x-mcp::app>
```

The `createMcpApp` global is provided by the bundled SDK and handles connecting the iframe to the server, applying host theming, and exposing helpers such as `callServerTool`, `sendMessage`, `openLink`, and event callbacks. For the full client-side API, refer to the [MCP Apps specification](https://modelcontextprotocol.io/extensions/apps/overview).

<a name="rendering-apps-from-tools"></a>
### Rendering Apps From Tools

To display an app resource, link a tool to it using the `#[RendersApp]` attribute. When the tool is called, Laravel MCP includes the resource's URI in the tool metadata so the host can render the app in a sandboxed iframe:

```php
<?php

namespace App\Mcp\Tools;

use App\Mcp\Resources\WeatherDashboardApp;
use Laravel\Mcp\Request;
use Laravel\Mcp\Response;
use Laravel\Mcp\Server\Attributes\RendersApp;
use Laravel\Mcp\Server\Tool;

#[RendersApp(resource: WeatherDashboardApp::class)]
class ShowWeatherDashboard extends Tool
{
    /**
     * Handle the tool request.
     */
    public function handle(Request $request): Response
    {
        return Response::text('Weather dashboard loaded.');
    }
}
```

Laravel MCP automatically advertises the `io.modelcontextprotocol/ui` extension within the server's `extensions` capability whenever any `AppResource` is registered, so no additional server configuration is required.

<a name="app-tool-visibility"></a>
### App Tool Visibility

Each `#[RendersApp]` tool can limit who may invoke it via the `visibility` argument. This is useful for exposing private, app-only tools that the UI calls to load or refresh data without making those tools visible to the model:

```php
use Laravel\Mcp\Server\Attributes\RendersApp;
use Laravel\Mcp\Server\Ui\Enums\Visibility;

#[RendersApp(resource: WeatherDashboardApp::class, visibility: [Visibility::App])]
class GetWeatherData extends Tool
{
    // ...
}
```

The `Visibility` enum has two cases, `Model` and `App`, and defaults to both. Use `[Visibility::App]` for backend actions the UI calls directly, or `[Visibility::Model]` to make a tool unavailable to the UI.

<a name="app-configuration"></a>
### App Configuration

The `#[AppMeta]` attribute on your app resource configures the iframe's Content Security Policy, browser permissions, and any library scripts that should be included in the view's `<head>`:

```php
use Laravel\Mcp\Server\Attributes\AppMeta;
use Laravel\Mcp\Server\Ui\Enums\Library;
use Laravel\Mcp\Server\Ui\Enums\Permission;

#[AppMeta(
    connectDomains: ['https://api.weather.com'],
    permissions: [Permission::Geolocation],
    libraries: [Library::Tailwind, Library::Alpine],
)]
class WeatherDashboardApp extends AppResource
{
    // ...
}
```

The `Library` enum includes pre-configured CDN scripts for common front-end libraries, such as `Library::Tailwind` and `Library::Alpine`, and their CDN origins are automatically merged into the CSP. The `Permission` enum covers browser permissions such as `Camera`, `Microphone`, `Geolocation`, and `ClipboardWrite`.

For computed or dynamic configuration, override the `appMeta` method on your resource using the fluent `AppMeta`, `Csp`, and `Permissions` builders from the `Laravel\Mcp\Server\Ui` namespace.

<a name="building-apps-with-boost"></a>
### Building Apps With Boost

Laravel MCP includes a dedicated [Boost](/docs/{{version}}/boost) skill reference for building MCP Apps. If you have [Laravel Boost](/docs/{{version}}/boost) installed, your AI coding agent can invoke the `mcp-development` skill and ask it to scaffold an app resource, Blade view, and linked tool for you.

For the complete protocol reference, including the full client-side API and schema details, see the official [MCP Apps documentation](https://modelcontextprotocol.io/extensions/apps/overview).

<a name="metadata"></a>
## Metadata

Laravel MCP also supports the `_meta` field as defined in the [MCP specification](https://modelcontextprotocol.io/specification/2026-07-28/basic#_meta), which is required by certain MCP clients or integrations. Metadata can be applied to all MCP primitives, including tools, resources, and prompts, as well as their responses.

You can attach metadata to individual response content using the `withMeta` method:

```php
use Laravel\Mcp\Request;
use Laravel\Mcp\Response;

/**
 * Handle the tool request.
 */
public function handle(Request $request): Response
{
    return Response::text('The weather is sunny.')
        ->withMeta(['source' => 'weather-api', 'cached' => true]);
}
```

For result-level metadata that applies to the entire response envelope, wrap your responses with `Response::make` and call `withMeta` on the returned response factory instance:

```php
use Laravel\Mcp\Request;
use Laravel\Mcp\Response;
use Laravel\Mcp\ResponseFactory;

/**
 * Handle the tool request.
 */
public function handle(Request $request): ResponseFactory
{
    return Response::make(
        Response::text('The weather is sunny.')
    )->withMeta(['request_id' => '12345']);
}
```

To attach metadata to a tool, resource, or prompt itself, define a `$meta` property on the class:

```php
use Laravel\Mcp\Server\Attributes\Description;
use Laravel\Mcp\Server\Tool;

#[Description('Fetches the current weather forecast.')]
class CurrentWeatherTool extends Tool
{
    protected ?array $meta = [
        'version' => '2.0',
        'author' => 'Weather Team',
    ];

    // ...
}
```

<a name="icons"></a>
## Icons

MCP clients can display icons for your server and its primitives. You may declare icons on a server, tool, resource, or prompt using the `Icon` attribute:

```php
use Laravel\Mcp\Enums\IconTheme;
use Laravel\Mcp\Server\Attributes\Icon;

#[Icon('mcp/server.png', mimeType: 'image/png', sizes: ['48x48'])]
#[Icon('mcp/server-dark.svg', theme: IconTheme::Dark)]
class WeatherServer extends Server
{
    // ...
}
```

The `Icon` attribute is repeatable, so you may declare multiple icons to provide different sizes or light and dark theme variants.

Alternatively, you may define icons programmatically by overriding the `icons` method, which is useful when an icon depends on runtime conditions:

```php
use Laravel\Mcp\Schema\Icon;

class CurrentWeatherTool extends Tool
{
    /**
     * Get the tool's icons.
     *
     * @return array<int, Icon>
     */
    public function icons(): array
    {
        return [
            Icon::from('mcp/tool.png', mimeType: 'image/png'),
        ];
    }
}
```

Icons defined via the attribute and the `icons` method are combined automatically. Icon paths are resolved as follows:

<div class="content-list" markdown="1">

- Paths with a URI scheme, such as `https:` or `data:`, are used as-is.
- Relative paths are resolved to a URL using Laravel's `asset` helper.

</div>

<a name="authentication"></a>
## Authentication

Just like routes, you can authenticate web MCP servers with middleware. Adding authentication to your MCP server will require a user to authenticate before using any capability of the server.

There are two ways to authenticate access to your MCP server: simple, token based authentication via [Laravel Sanctum](/docs/{{version}}/sanctum) or any token which is passed via the `Authorization` HTTP header. Or, you may authenticate via OAuth using [Laravel Passport](/docs/{{version}}/passport).

<a name="oauth"></a>
### OAuth 2.1

The most robust way to protect your web-based MCP servers is with OAuth using [Laravel Passport](/docs/{{version}}/passport).

When authenticating your MCP server via OAuth, invoke the `Mcp::oauthRoutes` method in your `routes/ai.php` file to register the required OAuth2 discovery and client registration routes. Then, apply Passport's `auth:api` middleware to your `Mcp::web` route in your `routes/ai.php` file:

```php
use App\Mcp\Servers\WeatherExample;
use Laravel\Mcp\Facades\Mcp;

Mcp::oauthRoutes();

Mcp::web('/mcp/weather', WeatherExample::class)
    ->middleware('auth:api');
```

#### New Passport Installation

If your application is not already using Laravel Passport, follow Passport's [installation and deployment guide](/docs/{{version}}/passport#installation) to add Passport to your application. You should have an `OAuthenticatable` model, new authentication guard, and passport keys before moving on.

Next, you should publish Laravel MCP's provided Passport authorization view:

```shell
php artisan vendor:publish --tag=mcp-views
```

Then, instruct Passport to use this view using the `Passport::authorizationView` method. Typically, this method should be invoked in the `boot` method of your application's `AppServiceProvider`:

```php
use Laravel\Passport\Passport;

/**
 * Bootstrap any application services.
 */
public function boot(): void
{
    Passport::authorizationView(function ($parameters) {
        return view('mcp.authorize', $parameters);
    });
}
```

This view will be displayed to the end-user during authentication to reject or approve the AI agent's authentication attempt.

![Authorization screen example](data:image/png;base64,iVBORw0KGgoAAAANSUhEUgAABOAAAAROCAMAAABKc73cAAAA81BMVEX////7+/v4+PgXFxfl5eUKCgr9/f1zc3P29vby8vLs7Ozj4+Pp6env7++RkZF5eXlRUVF9fX2Li4uEhISOjo4bGxt0dHS0tLTd3d12dnbLy8vW1tapqanFxcVMTEygoKDDw8PIyMgODg7BwcGwsLASEhKbm5uBgYFGRkbh4eHf398gICCXl5fS0tLR0dG6urolJSXPz8+Tk5MVFRVbW1va2tq4uLijo6NnZ2eZmZnNzc02NjZWVlaIiIhAQEClpaUuLi6enp6Hh4e2trZsbGzY2NjU1NStra28vLwyMjJjY2MpKSmVlZVfX187Ozu+vr5OTk7PbglOAABlU0lEQVR42uzBgQAAAACAoP2pF6kCAAAAAAAAAAAAAAAAAAAAAAAAAAAAAAAAAAAAAAAAAAAAAAAAAAAAAAAAAAAAAAAAAAAAAAAAAAAAAGB27Ci3QRiIoqiNkGWQvf/tFlNKE5VG+R1yjncwUq5eAAAAAAAAAAAAAAAAAAAAAAAAAAAAAAAAAAAAAAAAAAAAAAAAAAAAwilAKIn325Y8zwv1VO7NuplvEFEqSeNeOeKWgYDKJkncy7zlwwSEkQ8S958zb3Xprc1AIK31peaNb3FXyjCG27LOQEjrMknclZKOvLX9SjW7DwRSct23SdsTp3DPjvlW2zhQTkBAeQyUVhXucr9NfeQtAWGNxPVJ4f7ut2ndLuMmEFrp87wq3IOSfvpmvkF4i8I9OfdbTUB49btwArcrafSt6xvcxFa4rnCP+23x/xRuY/yeFe53wNU29wTcRJ9bFbhzwG3n+PhLwH18sW8HNw4CURQEsYXQgMb5p7uGFQ6iqQrBh9b7jLxNR+pvwL3HdKBCyb7O8Ra4a8CNzzoXIGSuH0eqAQdNJtzpfkL1/1NIef0/pD47cPeFeixAyuFGvRbcexwuVKjZ1+PxN+p2Bm6f/sQANWOdu8C9XsMnOOg5P8KNh3+EuwP35N8AkjaB2+7ALUDMN3APf2XYFoGDKIG73hgEDoq+gXv4M+q2CBxECZwFB1kCZ8FBlsBZcJAlcBYcZAmcBQdZAmfBQZbAWXCQJXAWHGQJnAUHWQJnwUGWwFlwkCVwFhxkCZwFB1kCZ8FBlsBZcJAlcBYcZAmcBQdZAmfBQZbAWXCQJXAWHGQJnAUHWQJnwUGWwFlwkCVwFhxkCZwFB1kCZ8FBlsBZcJAlcBYcZAmcBQdZAmfBQZbAWXCQJXAWHGQJnAUHWQJnwUGWwFlwkCVwFhz8sXcHOWoDURRFLXkDX39e+99mQMhtKRBIRUSCV+eMuxlevbILEUvgLDiIJXAWHMQSOAtuNWP0xiIEzoJby6j9QuIWIXAW3FLGpW4Ktw6Bs+BW0pe2SdxCBM6CW8f1eKpwSxE4C24Z1+Opwq1F4Cy4VVyPpxK3GIGz4NZwPZ4q3HIEzoJbwS1vErccgbPg8t3yJnELEjgLLt1d3uoucRqXSuAsuGgPxltt437F9dgIJHAWXKoxqv50Iu39XolcHoGz4LKMm67aH6lx3Bl5qLp7XGldBoGz4GKM2l/p36/FefuQTeAsuBSvi1Vj7u/3jS8ncBZcitd5m05ibXw3gbPgQvRM3g5twmUTOAsuRM/k7dRP/8+7hi8ncBZciJqs26kFLpbAWXAh5ut2Gl0ewkUSOAsuw3hQp6mru90lcHEEzoLL0GfW6nZd958y2RdV5S1DCIGz4DL0W6/nlodwGQTOgstwJunzPo0JAmfB8SRJ2zsMX9fKIHAWXIZd4BA4Cy7VUaQSOATOgksjcAicBRfrzYFzES6DwFlwGX6K9JEfx98SuM2C48mZUuAQOAsuzLDgEDgLLpaXDAicBRdL4BA4Cy6Wi74InAUXq44kfeBX95khcBYc/ztwvmyfQeAsuAz1kySBQ+AsuDAtcAicBZfqTNLnHXiZIHAWHM9u+n7eO1kmCNxmwfEgcAcvURE4Cy7N+ZZB4BA4Cy7MOwPnh59TCJwFF+J8COcRHAJnwYUZ+8EJ9Rf7dpCbQAwEUXTRF7B63/e/ZqREgEiIgBlW5feWHOCrbDMInAWX5nZGFTgEzoILcw3ccgWHwFlwYeZTXWpXcDEEzoJLMfWhCVdOqDEEzoKLsT6zvFrgcgicBRdj6mIMOATOggtze2Yw4BA4Cy7M1MV4YkDgLLgwtwlnwCFwFlyYOV+nMuCSCJwFl6SuxoBD4Cy4LH3yv3BtwGUROAsuyjq3wMqAyyJwFlyUqas5NwBJIHAWXJYzjerymX0YgbPgwqzDhWsH1DgCZ8GFmTpYuCkH1DgCZ8GlOTjEphxQ8wicBRdnHSpcOaAGEjgLLs4cadVyQE0kcBZcnn67cLMcUCMJnAUX6N3CTelbJoGz4BL1W8VqfUslcBZcpK7XR9wqDwypBM6Cy/RytUbfggmcBRfqrlur/596+hZM4Cy4VOs+XfP4dUHfogmcBRern9Vrlr6FEzgLLlfXvf6bN++n2QTOggvW9Uv3tW4/efP9QjaBs+CSzaoHjZvvnx1PNyBwFly2rkf0bRMCZ8GF63puuX4LJXAWXLyWt20JnAW3gfvEeTzdh8BZcFtol29bEjgLbg/d8rYhgbPgdjHt7m07AmfBbWRa3fYicBbcXqa/6yZvexA4Cw5iCZwFB7EEzoKDWAJnwUEsgbPgIJbAWXAQS+AsOIglcBYcxBI4C44vduuABAAAAEDQ/9f9CB0RsSVwDg62BM7BwZbAOTjYEjgHB1sC5+BgS+AcHGwJnIODLYFzcLAlcA4OtgTOwcGWwDk42BI4BwdbAufgYEvgHBxsCZyDgy2Bc3CwJXAODrYEzsHBlsA5ONgSOAcHWwLn4GBL4BwcbAmcg4MtgXNwsCVwsVu3LQlDYRzGb8t7PaeVUVmtmkIPRlpKBor1IiSh7/95ysUEdVOnFoe76/dWlJ3juPiz4ACzCBwLDjCLwLHgALMIHAsOMIvAseAAswgcCw4wi8Cx4ACzCBwLDjCLwLHgALMIHAsOMIvAseAAswgcCw4wi8Cx4ACzCBwLDjCLwLHgALMIHAsOMIvAseAAswgcCw4wi8Cx4ACzCJyrC67/VOv9/2YJvxSSZcnlQ2VZypN9HzITQxyS/gK9zEDaT29LZ0/Xu2elYy/pWxFPZuGdVpuF68/yVXbSsR7zoYZYQ+BcXXD7+sOXRRU09CBL0tHQrizM10Qb4o689q3Od7CsjLnRgWMZcrXX00jtpDjlsiot/+TckwlWjt5rGmnt3yW+F1UN1cUaAufqgove9CBL4FJzKHD3MmozSAjcZUeHvZWnX1Yll3hVXrOmw266BO6/cXTBFTVSkDlsfRA4NwLny6imxgbutq3jGtvTL6tWlViXPR0THKz8ReAyz9viBgLn6IJb00hL0lp/9bVB4NwIXLAjI9qxgStWNM5haYbLepIYF4HGaWV/PXDdXEW74gYC5+aCyxzqwKOkUnqpqxK4L/bOtC11HAzDL8tbKYK4VRBxoYCDLHPAgiIoouKCiMf//2tmSE3atClQcK7p0dwfZjxasAnN7dNsDYrg8BJ41JJIcM8lFGNk51cWpsGJkkIPRvH/VHDx83dElIILDMFMcGm02PcX3xDxDxPcfs1NkIZRVxPcNfAUUSC4Aotbg5vnbuLp+WaTZbhH7j13apT7175OLXgGDu6RUn5LPyWyt1s9/KSv/peC20KUggsSwUxwLZwyIv+thoIluPtXwsWXCS4DwWZZwZlKKcWAY2Jqhyv6epXKJ81a4mEfTcYxz8qql9EkBTwX+Mmk6R5yaLmvi6dXwlAK7tsRyARnDrSVnpDwECzBUaTg5hTsw1RUEeyEIuRPV8de9BB12WsILJQ3NNmdUVkTJGi8Rc80JOhX3KUxQZO853UhBfftCGSCu/q8uSnjlIkUnG8CIbhd01rAYDeDf3GCO0aTHeDZR0Ik6V1ZyYaoF+4VCSVHyg73kVCWgvs5BDLBmRdi7lN0JVUKzi+BEFzbfGEIbAxxStMuuNAYCZvgIHSEhNSMytoSDKS2dY9u0mgVCRdScD+GICY4s2EYMUjoOOXu6wQXbv86zTVjoopIdIu1y5dHb5uGD4q1NPhDfbq4O72oJ/8rwSXr6atcPqp4n0C9WHvg1j0lm89XFxXF6w2bxdpzNi4QnKC2frdjswQHI5zyYn8dUcwYmOCsAGesg5MKEsYzKusWCfuCAPce8pqD97qQ4GLtwm2tmI2CJ4ls7uplXZGCCzBBTHB/4ZQJu6rLNslohDWw2NcICWhO/1dCE81E4S7k9rCEhMEt8DxuVdmw27EKjKZGKADEbkjvEcCbRngCgBdNxC8ml9N39qa3Mb+CyzQ0wiUwbjRCOQyEZiuCJqVeTgETdoLTg+oT3fz5JEFvEY+QYEyi7jIqxT6a9J9DMwRX2Wmgid56UbwFZ7b2IVjkccoeJ7h372HpHhLOvCsrj65uDFVHQtercxfHLsGZdT0BRqi4qaPJYJdWHjvwfnrEbQ8JRsusysn0J8hdf9uwDFJw3zvBKQ3WrXKMhIolOCR0XDc9GIUsurELLtxBi6MMWByU0Y6RCjtWVPxiE1G5hvEwa1ZWeK+ENiKnfhPcHRIiZ+xkdPP0HmHKyQfa6V04ImsMYhPnr2/37N9RHGWsD9Bi3PUSXHQT7YwPPQXXxSlVBRgpnFKwCy6OJglws4OEnHdl5ZCw556IMgIBZSREnYIrOaa03FXRhj4MA4EeuAVQaCAjcqXQeuL5C5ZACu6bJ7gCTiEJJGk26fuvEFySt1g1DpS7Ejp4bzsEl6miT8FleuhgovoSHLvVKitAUAdIyLGWzbPhEFyyj3YuAfIa2qnxZcxqvOYfxIL7pSGPvuElODAlkAcGKYIWYoKzClIGAXWNkPKurL/c8W9IhywEXGmE9GzBqRPXBZFxCC6no517KbiAEsAE16EOY+t6Bl8guLxTOK+8R3iM31zjTw/Qp+BODHTxHvYlOGa0c66gazDlQkcnpQNOcMkRckSieYfIjXV7Ge8Mp7geRILbQDdrXoJbc8xSq9NPjwmOfVlbakQmPHKPoo4X6wbzFlxigC60DCe4nLPuH6XggknwElzMbGi/7Tklv7rg3Jffb3qhMyKWNbQze+OfoA/B/QKARJVaYjSZjHQqAmGbvc07oW3zqcRaD0DRbsmDEpVma3g9ol+H7AXaRwfsOMa1vYwjdNJQ3YL7zZp0v7M5xk+KQsHRMD5w3HKmOcGVkXC4lOC2kBBRgRFCgq4sKzilzCrgutM3kNW7dWBHQwdlRQoukAQvweXs6xdUA6cMFxGc+vAvz0goPZhwAjM6hWgoU+zRCMevErouViCWrbFJ9WHW+BlGw+AaRuLBBm0WmwpAqIwE/TxGSjGk4W6xtah9tmLcMldCM8VbsfVlYStjxrkGEp4dxta2mqr6d0pHhrGWj4cPdg0k6CFHGV9zj7G/L1lLHToFxyZaVH+Rl1bKtJ9QLLiQxoepnjk8zgluQL/0Lzh1S3evZEggoQHLCu4vNOnESQO5Muy/o4SU3tVjTM2yyq1A9uFfRkjYfiC0wT9ScN88wR1xYadFO+TmC857mohJpAuE0PWnNsg/Gkgw7mj7+ECTXb7xV8+7cQBuVJbjRUfCOAkAp86O+jQSej4FB6+0i0f54JZ1jM0GqXDTZ3GHL3Cj4lzZqzWB0NSR8MiVMUKDWI0243Wn4CZIOEo4FrXviQUHHa4PNUM/G7vgNCSoiwkufUA5Od5q0DRZAYs6Et6XFdwjEgw20P7Z/6onOMG9KkDI60h4kNNEAkngElyUv2MpIqG4uuAMdp+7XjK/odjuMgtAUTaRMFbsjT+lzp44XNGQYNRtMx8OXWuKmj4Fp5qJQO++IWELCPUIIe/od2pxBW5k2C/iFW8JpmgXnM5aJauVc05wbJqFZtkoPKZ/gdyCY27tcf13OU5woQXXuR+hNzlgsJvozWUFt4+EG2CcImHDLrhJyLGz164UXCAJXILbZXYhxCL00ltVcCeuDUHWraGviWAi/Iut8R/NWRkRe0eTWxKQ3G2sotNg6ktwcGCgjXIIxJj5bsQVuO0casQX5xSUDbvghu7pFGWH4Dbcm5DmqCoFgmMdqhXbu+oqJzhFp11mvgUn7uk6QcLRkoILa2Zgt/fqDaimmeCOQgB8eu5IwQWSwCW4kRmYHDdpenxVwRnu+RdtFklK62AjxaTHGn9ljuBe0X6rtoeErrtcA5+C4zfArUZnb7+i20+w4X4PYLy4b8MN+5t30STJC65nnkYMLOLUjkLBQcsSKSSoebhb1CoS4ssKzjgFjkckjJYUXNGmfkdIi1qCK7iWW0yk4AJJ0BJc03krd4GE2mqC41+yzwR3SI0iyAA9m+BgtuBqXMKijXE9auPdqVl22EnUSZx3J0UvgIDEyXHqGk3sJ7jHpyzeriduwZWBYWmnbhMcS1ujqB2aVsWCu6XvzWLjqUNwIyQcLCm4zTOgcMatLim4GyQUozZSSMhaglOAoUrBBZmgJbg9vimygbj3VQV3KhRcjr6foBtQsxp/b7bgDnUkNBJ0OqsnSd9rUWMj/OQGHCSLe/0IMnjB5YTT/b0F1xFt6/nCCS6KnvQ8BJfUrWUKH/SDEk0TKSwhOK18lQAeZmEMLSe4IXpSZAdWQQruDyFgCS5URULEAk0eVxRcViA49sNt4DCQEGONf3+W4NjcCT3PXu/Jk2/BwQGbf8KLb7eHFJHgmi7B3c4U3LZoo7VbTnBZ9EQTCo59fcfWiPbBIbg9JOwsJrhcltKMeiisR425lOA20ZM3duCHFNyfQsASXBq92FpRcH8LBZcSPDiAJbAz1qTPZwku3EeTK3bJe9P1L7gmqwEbSq6BboQnyASXmym4WxD0Q75xgntATwwvwV2ZcmZnsesU3AWNgAIyDULH19YrbOaKgFyDcOwtuHf0ZMM6UAruTyFgCa6FXjQUD8F1VhHchnAnCw0J4cUEN0R2UvMTXMa34JJjZAGRoVwjQx9db32B4HZFCS63aIJreAkuyvb0a9FK5wWn6t7VsI2EDV+C+80uGDcfSGguleCOpeD+PIKV4JIl9KTgIbj3VQT3LNrTP0y7qRcS3DGavMecCTAlIOxLcLzKGknnNhvY33rIhACgtbrghqI+uAInuAR6FuxNIDh+99KYQQc3ecHBkeAz4D/bui/BhQ0kXHhul6Qpc/vgOik3j1Jwfx7BSnCn6E3HQ3C4iuDyomnvBfrNRQTXLdHFq84GbnzJjr7baHGt8LM8RnkgfIngjkSjqI+iUdTNBXf0tddX6/P+9i+34NJI0OseO59iVfElOEjRp9V47UDVmj+K2gUBUnB/HsFKcH1hQkCCEaOC4y6wx5UElxTdHw1ZpJkvuHgDCfqL6P1XF1xBF+2I1HE6dXN1wUXiQGHf01XRPLhGyIfg6P7MYfOcm27Bwbt4B17WubkH/gSXKHlkwrMqEoqegmO6PZWC+x4EKsG1ac82z5bVPkOuWZwdXnBKiYaMhQQHLXckXDeQkF9AcKEyCsYg/0bCZFXBsQHaQbzHdcONnBbH1QWHe+5T+wBecOdIuPMhOHqyaY2kKhAILs0/VIvRoeb1KTjYR6Gl1B6d9egpODaOPw4vJ7htOmYfDKTgApXg/qKrmnnqttZWNQ9h2eUGqeD4FQOLCu43mvxyrUXtwQKCS6FJy6PviKG2Nqdk/QiOPVBPz8JTyVrKDzHnuq/CVwhObzuXH+GleC1qIwaMLinXtSoQHPepDqhEOcHx3YxHKlgoN2z6n1/BsXGZLcVuIvprDj0Fx48fM/ZJGY8XEdwzHZIOBlJwQUpwythjFaHZOPQoUwfrjbpCp+CukfCyoOCUARKMNJjEWmhytYDgcmgyUoV9PT2mDOXVbOUhf4Lbpx5iv/ba1qbeFTB51L5CcKg9gMlxCQl60mM3kZbq2A1gOCPBddGiIBIcJAdoMrhjwemlh0ht6ldwrGMUy+wPV+i0iiathXYT0S6AH0bSK4sIromEckCMIgUXpAR34nUDtIOEDVtk6h+qoJ5MkBecdUD1VAVQunMFx7a70SdNBUC9G9A0ocwX3JOBJsd5Gxlrz0TjWCGNq3tEN2wTCG7t3I3p52d2KtZbbtiHac3d5nYiuJrgGJ3ndugg1+JWsXOCS1S5BzGoFwO6ltdbcNBASjUkFBzUS+yIrdvD9Xpu54hZ9wD8Cw7ukNLbfu5G88epEX7yrnoLjhuh3jPN2t5HlpfnC05Fk+snBSD+vz8RUgouSAmuQ2ODk0frpvEAGYZ5+BovuF9I0Ro6KnMFBxtIKQ2qSGkkYL7gjlBExyYCNPqdvX6JWlnhPTBnyLhtmOUwi1b5LG/WClJYvV6b9A1kqCsIboxORuEZO/pq5b1ODz9JwSzB7XHFEgkODjUUY+SXe8ZiTUcxg/jCO/rqo0nqQ2M7vi8kOOgjfXUjInf0/f8JUIKLRTwnIfSsi3GCPKk7XnBwjRaLCA5e0U3kEBYQXN9bTgXRMxni4Edw6ggJDyyVsG64glMDu0iorCC4LadjSlnRMxl2RWerzBScdbZpL8FBZoAiIi/LPkT2whD77WzJZzJ0YTHBdeWW5YEiQAmONUM3u1ZQUMe83xSn4Coln4KDWknwEKUVBQftHjroJ8GX4CbOBzlsWt1w92hHfy4i4XAFwZ3n+Wqo5sVP1XrQ0MFQgZmCC2nUwzFPwUFyqKOLVnT5p2QflNGF/lcY5gsO1JbLb3VYUHAwlIILEgFKcB9mI1DBTcXWhbP+jozSOYBTcPB74FNw0ORlVNoPw8qCgxjfYo19FXwJ7goJvTBQEhrrhlOGaBEpwBM9zxUEBw8RtOhlQCw4OOPN0agpMFtw0KG+AoHgGAebyDMu+hiREfAwQp5yfd5ie0pN40XbhoUFp67pUnDBITgJLqrTRiCgb1t9E94dIyGylQCX4MgBEWqVOYJjZIcRlt5qSYBVBUeIb7AWpt0nAXwJLquzZwEyntHqhnuiOmjcJwDC5tGvKwkOkmy44uNCmfFk+8dUlfXTXYYA5gkujSY5seAYT9t9y5v7WYDVBAehwv7ANtpQAVhUcBDLMY2XOu2F5sEx6uylu7AEUnDfNMEtjpLPbe8WmzHvA6KHl/e7d4UwLEz48eX4fuM5/7UVcXaY293O5aMKfD3xbO7mvNgNwUrwEo/V0xs3t4eJuepoFy5vNorNJHwxicNibef8+TDzVTWWKeQ2dq7S2aj/+u0W3+6PC5UlKjh2kN7YecudwXJIwX3HBCf5n2CCk3w7pOD+yAQnkYKTSMHJBCeRgvvRSMHJBPfjkYL7vkjByQT345GC+75IwckE9+ORgvu+SMHJBPfjkYL7vkjByQT345GC+75IwckE9+ORgvu+SMHJBPfjeeoRgrIJrUQKTiY4iUQiBScTnETyg5GCkwlOIvm2SMHJBCeRfFuk4GSC+4e9821NHIvC+EkJeUxqDEkkMVbpSEVRasWCioKIFmtfFPr9v82ae73XZE2z3e0fdpzze2Mnc3NyTpn8eK4ahmEuFhYcJziGuVhYcJzgGOZiYcFxgmOYi4UFxwmOYS4WFhwnOIa5WFhwnOAY5mJhwXGCY5iLhQXHCY5hLhYWHCc4hrlYWHCc4BjmYmHBcYJjmIuFBccJjmEuFhYcJziGuVhYcJzgGOZiYcFxgiunYv6dCtGVaRpn/5Kq9LU4pitexLX+FbZo8tPoqcS8qiWBOviJ0fJYacuMgAXHCe7n6ODvLIluAJPyJNjS11LDLR1YAC79O16AJn0ePZWYV7UkUAc/MVoeA/hFjIAFxwmujD9XcO5FC84lhgXHCe6LsQxJDa+GxCq8tzeLFtF3CO5psbDpIwzvE5JMFospfRI91f9EcM1gQQwLjhPcN1HD/Sfv7c9boJwxEvoG/ieCuwcLjgXHCS4LC44F96fDguMEx4JjwV0sLDhOcP9VcE438Pzai0GCbu+FBNPNNvFr4yvKYse1frJdTEhw3etZ1Jgf1j02DRI0e10ylvf9KNxM8xZo9uYkqbzUfX/xZNIRc133veD2WrxT1+sB6B14E/UdEljPaTf1J5dUl02yJotDL7eijD48O67f9I7HR721nKpccEM9hcR46IWHC77YlMP49Rom/ccX4zTa1V3NT1atal5wxRU2erobOnDVfuxH/cf2FTEsOE5w3yO4TgLBys6FkhYkvkkn1Fr0rOPphlpXl6fHqNl1SNZGtmIMnwRVH4JkSSmWqhCNxWetinkmWxnqcHKjpojtGgTRHWme4FuUsgNiEmywlj2UCi7OT0FOAEnfoQzXfUhC/cuqhhBEv7Tg3q+QQNEmIjfML6mF4ZAYFhwnuC8UXBd+q2k+b4BNLm8B+xu78eSjXzktjxDEO7dxC7SPp7cQ3k0H7UdgaxwFF+C1M5i+hcC6SHBuH/3uztn1gDt5HPdvA2dUR2QS7TqdEOgcaJx8ZG2A1sgZtkN4jWPN7hav48bwzkc0IMUAGCg9b0mc6mFSJrjiKRwfUevZOVRXKtOt7yfOIE4wP7ax6KO1NJ9jD+gowb1fodnpQE5XJbK38GY7ZzfzsBVL+sCUGBYcJ7gvFBxCGR/mgJO59zfHW3gCNEnxippx/CFQp/eE/6wYiI+6wpMlNqL3wM254OwVfJfkAc8gMhJ0Saz3sc+9B6d9ZM3hjeSaHryBrAk8UYoZYU0Kq4+xePVxVFkDyVWJ4IqnsGrwbqTSVggMUszgO8cfYMs6qjMzhGdrwRVXyL8HVwmwrcpIu0VQYcGx4DjBfYfgHBIMgVHm3g/QIkG87tARI1iNSNBGYsnTvQoJrDo8QwrukSSuh8W54J6QNEhghak7B6uVS4I57osFNwVmRMqCj7ImuiRZICBNS/71FKtbKcAZFlQmuIIpxJExSZ6BESnWq5gEVaAh6gjNCkbAixZccYW84GZKZ3rA6c0NP+bFguME95WC03awgV+Ze38Or1r6aaQrX2Z0usGfpeB0CukiquQFJ6z2qKvMJpQhxrZYcGv4OgO9IHKkWVR7e/jZxsQl95hNZLUa2qWCK5xinrngFms6wwCaoo5QoyRAXQmuuIIWnNJ7jxQLhMSw4DjBfbngdAK5ygtuECFZPxcFCsNsxh7gyNN3dMSVCSZGpO/sJjDMC054tEvnVIadLtAvFtwq03IDmEjBkUDW1RgensUOtWp46bmVCG6p4AqnWME3FUrIGqs6Gt8CHVmnlgmPiRJcSQUtOFtlPL3lZVhwnOC+XHDDYsHR0gMQvTavKMswrkcQCMGJF4mVCHPFwlLZXW9ecIPzx0uth1YIwTuC87AnhQ3ciZqLQsHRJl3bQEA0T909Qp1KBVc4hYcsWzrhvNwnSFGCm5NiDFSU4EoqKMENpKklS+CaGBYcJ7hv+B5cseDInW2FdBqksTcAvNp6vNeCs0mgNKT2meoefsgLTkhvQjmGAQD/tXVXf09wCVqkcIE3WbNYcM30+vs0HD1gJfaq5YIrnCIBwhOvpLC6CZAEt09NJbhMZ2+ijBBccYW84IbAMtM1BsSw4DjB/ZTgBE5zkyCp0hGjBm9mWkQ01YJT+lNbrhiJRUcmBVtUF4gpi+MjbLvi44f3BLdFnRQjYFkmODuCY/XT7sQeNcR1ueAKp9iiR0V0Ea0bBhFZWnD3pNiLyYXgiivkBecC3VNh3qKy4DjB/bDgBFX/9OeRNsFOC65DAuG8idANtBBniOyzDxl8LLRNTIeoi75NVCq4DRKDSC2CWSY4ekS7IYU4x8xBSOWCK5xig9Cicyr6bTNDC66vF75iRUpwokK54Cwfr5mm/T/3zmXBcYL7ccE1g5qlwkWohaV/7GrBrSyS9JBUpOBaqqKP2vnXRPbwXJIs8ET0iDVJTlvUyDq1l/8u3tUKAZUK7g2bLt6kj1dt7D8iuPwUuQsak4lsV+VWwbUWnF44AGItuOIKgnv1+9+fPqc2E+yJYcFxgvspwZnARLksOLnDs1SUUYLDWKe7tdQNounxDSugcy44M0HdkDEwitxUKT0SmDgKrgnscu0ZdSRDWXOD6KFccFV4flpX7FG32H1EcPkpxAX7rrzgHH7l7DkJmp8EF8qFV49IqlpwxRUELaHQA1X9jIMdwnfSI6bJT6Wy4DjB/cQW9RFe0yKqLD20Ml/RaJkWWTf1BKjK00PMTcOqxhF8W+gm9cvYsYzrHvBqnQuOxsDi2SCr7WEt89qdS2S0/ei4wJQPFli6PfH0wy+HjJu5aLJUcLQCaiRYA57xIcEt/jaFvYU/uSJr0NLbV2nMWsMgMm8jqK/XLeAvbarsVsCMtOCKKwjugJklpht6qB/OtZd1eAN+VIsFxwnuBwVnh4BfDyLI5yS1MeCvPCRLoCFPn66AxAPQHyjdDD3ASwDUbCoQnBUDSIIEaBnpdQMAYRghvFNb01sg2W7XmfbcMF2UQFqkXHCxkiA9A3P6kODc/BTiqVNEq/TIHZ1oAvACH5gFGMs68R0APwLQspTgiipojBDwVv3Uj7sEiLYRkOyIBceC4wT3g4KjyszHAa9rk8Z4S49F9wPLQ+d4ut310mV7V+tGJhz0Xww6E5zg5jWtUm+TwG6lq5O1PQAceeluAmCebc/dezhQW9I/Cq6ByNaJq/kxwRnZKQROS1ywN6QsDyscCJrUw/woOHqu40BddKYFV1xB4GyAYwAcbiIA0WZILDgWHCe4H8ZyGw3HoByGMx3aOT+mx9QyrZsrs+Fa9D72YKjOEKt3uTefRMlB/ggZ1enApu9DTJG/oOiq4HdyPk2us/IKYt6paZGgYu74vxlkwXGC+3+SCYBZwTEMEQuOiBPc7w0LjnkXFhwnuN8dFhzzLiw4TnC/Oyw45l1YcJzgfndYcMy7sOA4wf3u2KNRhfKYoxtiGCIWHCc4hmFYcJzgGObPhgXHCY5hLhYWHCc4hrlYWHB/sXfHrYkjYRzHn0iYX0yNISqjsUorikHRioIVBREt1v5R6Pt/N3edccakpluv3YM79/n+sXdkNU5m8cMTt9vyBMdxVxsDxxMcx11tDBxPcBx3tTFwPMFx3NXGwPEEx3FXGwPHExzHXW0MHE9wHHe1MXA8wXHc1cbA8QTHcVcbA8cTHMddbQwcT3A5Cdct0ql/dXcc1w3o73z1n2z5xwuu6/x68a5PmYruhwsat7uroSCT5x7zBZ3n7dtvw99zoT/4A/H0ZrgOcQwcT3A/ygEmdKqHmP61hkDL/Ei+s3KP3wIufV4RQOxRui2ARzI1yhLvJXXzqBVMYfkwpmydCMDmN13o97I/VXAJBMQxcDzB/dnAoZ05EqeAc+oSkEklBpDMDXDp6oJSzQG5fGrStwv+FeBEkTgGjie4/zxwpeWy+7uBS1CmVPdYSwNcUAbKU4dI+D2JuGGAGzjvee60DCwEnVoiDn7i9yhOXehPgXtaLjVsveiFOAaOJ7j/PHCq3wxcHSjRqRpeLHDL1M2qmyAqKuDSZ2wBYzqVYEs/aPLjvbPApZNg4Bg4nuD+UOCGEepkcyEDA9wUeCPbXOJwBlwhwl2WEgbufxsDxxPcFQI36CERqeWP6AhcIUFZ0KkWYs8AZ3tFhYG7khg4nuAuB050XhNZHa0EHRtu1mFYObiUSTxv12FUPhTVc/sHMt33N0qgejmJd8spqZx+/zkDmXP/Wo2T2YtzAq7QLUfxulX6CJzz0K/GUe2l+BG4G2Bvl5OgaYDrAo0PVj6fAbdAlXSlfr8P4O9fB0SP/brdkL7ipdnvEQ0XuzgZPZDJe6lF0fJJne/JPL3/pi/UbtAujmpPgT1dk8R0mcS7O5coZxcscM3+Ir2qflDYqqXoWv034hg4nuC+B1yhBl3N0/dyC+jkM6XyytCFe0WKtcOJ0COiTgxdX5j3bhq4mwS6atEAV6pCJe+zwPkV6BL/A3BUweKEWFgwwG30ZGdztv3mGXAVzAzgMN0SLTH6MFXWUXZa0N2Jo4kRVPGKiJYwLVJTmGMOx7fmdPViGSrZpZxdsM+tI0qvCiVaIPRId/OuNcfA8QT3PeA2CF+GxfFBoq8eVAZGq5LbrCFukE3MEC/aJbcdoeoQeSF6pBtD+kS3EpX6PmjcAe0c4IIEyWHqD+rxkagylglaK/e5HgKdNHB+BNl69ofdSDGQAa6L2LMDWYsMcDVs6LwscANpV1zsdDrA7u9fg0+A22Dde75ZVYAumeX39v6+rw7sO50q0Pm7xulCxRZojf1hu4qwcTxdb4fXSeP9SuTgbBeywKVX1fFocPpQ8YDqn/s+ZuB4gvshcCLSItEB8NWbDRM9g90hLJGpYeaIOTAlohYih1R9LNUnXGXHfNSVA9wjIp/0/6CojyMcqyNuFWHxBJwoI7zVqqxRcbLAFSXapPJiNAxwIsTTV8C5a8jS+add+cABI0ddRBVV9dprRAHp3wud9Gdw9kLFwlyP10c4OF7icV2uxOZ8F7LAZVdFM8NaIeTP5Rg4nuC+DZwHNPUbc7MZKjhGhhQ9penu16+kS9RJBsCDfpR8l8+prMekaiMW58Bt1nVSlYCGPm5RGgMvJ+BuT4t8BsZZ4GiLsnmZqjDA+UD7E+Dqzfc6T1up2LwQOIM1vQAeET3ZYVZU0cwFbg48ks6LMNOns/u3ROVsF34N3IO59g5i/uJfBo4nuO8CRxFqHtk6yhFdCwmdVzb/RKGvDVDSmBRQwRlwmTU09fHQvmoFtRNwCzUa6nbYfADuASgdV/FEBrgA6OYDlyq5ocuB65yYcZVqM3t5j9Nc4DapZb9A+hq4kr3NjHJ2IR84K+nouKgFcQwcT3DfBe4NiHoNx6IG19SCdChTsO+2oNVpQgYKodQ5HbdZDwH/E+BEaTy5Azr6eDn9VR0n4NaIXJOFxQLnRKgfRyDfAkch6p8Bt3uv8rpoenQ5cBomu6Yi0KNTucCtMUrfzk81cKQygmV34ZfA2b/GcYEhcQwcT3BfJwwEmQFN9CSAcHEr9CdqmQKyee27CCoFnBMp2Rr2DmpYr0mocoHzX0YxVJ2Pg8kE8CxwIdLtPgBHByRC3TTOyABnT5b/GZztcuBikQFuADS/Ai7EIb3Urjrd8gw4swtfA1fQZ+yhQhwDxxPcJVWMNqoRXkk1OCi5yoF6v6Oaqpj57huy2u+1j8BRDztB1DraUtwCCMubySEXONGLgbhy99S0wLXI9AYULXBxZgGvWeAUNnt1A9dJAddC6FAqZ1ed/AS4iDLADYHpV8DFqesJgDdzOgtcdhe+AE4fDD1yIrSJY+B4grukLWp0qoqW3S63OwN2jrJCUE5jYDZWt3mzI3C+xJwKIRrHLy4JH11BRPNc4HqQG3UbLCxwIzIdEAsL3A59Os8Cp78Ubo7YSwHXBMaUag88/HPgBD4BLgDqXwG3Qy29V6sz4LK7cAFwgUSXmggLxDFwPMFdUh2xTyZX4u0DYfdEXcDPH/6WgsgCp2nYUAcV8+SGwSUHOA+YGA8McImgY69YkwVui6r4FXBvCD3aYEEp4ERN4WxrIfQuB85MiTefASciLO0yXD8XuC1iu4InwD0DLrsLFwBHC+zEDAfiGDie4C6qJLFJjXNhQES9ysEatiEqytNct5/e0DFHomPmHHOOZ4Te7HgH9Ygq6Xp5wM0tmzcWODRJNwDqJ+Cmp99wptPgDLiiRKcQ4jYNHA0lWiJNdY8uBW5jVz75DDg66K3SHj7px0pxAi677MIaFcoDLrsL+cBNyDYA3oAScQwcT3CXdYC8J5V4g8bh3n5jtBoO+iFzUrWBod3P0Ix7HQucqKJn7qDezJ2thzzgBsDAjCUWuGqgPZghLp0wcWpIAn3+BSLvDDjqo9xEIjLAUQu4c0j3HCIpXgxcB1I/aCo/Bc6NUXO0+VIGx5vi/Qk4vexY75bYQj7kAJfdhXzgdijTqRlwHC9Lrst3qgwcT3Bf5UVA/9l3Sg+vQNVRcERYN4goeARWx/fnpEhU6kosyDZCNPaIinV5OjwBzB1UA2i5gsRtLQZKZ8A5IcoNh8i9k0BbH18iWhXJ26+VtBYTKu4QTQskBi2lwBlwUyBBj7LAFVpA9HjjOaXxCAhduhg4H6gMSNxM4qifD5y+0uWzQ6IdHnV3gb5HJPSFmn/tcO+Tc7tQB/KAy+5CHnBb5aYQdhLFlN5LgDlxDBxPcF8UvAKABIBt8WhTDCSzKoCtUCPJCECSQM1ENjcEZCWRGB0wMubEJ0E2AKJ1iHgFNM6AoyaAsBIBjxVM9PF6F0AkAbREGhMKEkCuQwBdygHOiQC4KeB008heWc2ly4GjtgTCCIiGm0+BE3UAcSUGWg6p7oB4t9ucLpSCKoBqDOV1LnDZXcgDzpVAVIlKpBIAHAaOgeMJ7vJEtxYCCMtNMvkbxULSdUhVmCQAUFkJSnWzBIDo0XlDQscWmNEx5y0CIEcDEaJzDhw9rNU5m9TH4ggcPdcUR6sUJiq/FQJAf0h5wNEBqNEZcBQcEkXcrCPoQuB0q4oE4lZAnwCnun0FIGttOwv34tN3EzELUMsurygPuLNdyAOO5hXAfu5WeLeSgWPgeIL7Rwl/7gtK5/jzYSAyjxgW6WPeYF9y6NMc86T8RNBo+PSh4mBQzD1Xae8WvnFhw73r0T/Pm1/wasXB0Mleb2NQ+LjsubqeS3ch/2XsA+4h+YdtMXA8wXFXmdhhSxwDxxMcd43d8n0pA8cTHHetLbH+c9/ADBxPcNxVV5LoEsfA8QTHXWMHhB5xDBxPcNw1th83iGPgeILjuD8sBo4nOI672hg4nuA47mpj4HiC47irjYHjCY7jrjYGjic4jrvaGDie4DjuamPgeILjuKuNgeMJjuOutr/YrQMSAAAAAEH/X/cjdEQkcA4OtgTOwcGWwDk42BI4BwdbAufgYEvgHBxsCZyDgy2Bc3CwJXAODrYEzsHBlsA5ONgSOAcHWwLn4GBL4BwcbAmcg4MtgXNwsCVwDg62BM7BwZbAOTjYEjgHB1sC5+BgS+AcHGwJnIODLYFzcLAlcA4OtgTOwcGWwDk42BI4BwdbAufgYEvgHBxsCZyDgy2Bc3CwJXAODrYEzsHBlsA5ONgSOAcHWwLn4GBL4BwcbAmcg4MtgXNwsCVwDg62BM7BwZbAOTjYEjgHB1sC5+BgS+AcHGwJnIODLYFzcLAlcA4OYtcMUhyIYSCIRDNIRv7/d5d1Qg65jo2GUNVPMBQF8s+C4LYW3BU5SgBwixoZF4J7WMHFFABsYgaCe1DBRUmqmeEGADfwyFmSKhDcQwrOhlTTbeGMsRv7x2dJwxDcEwouJOVbbhQcwB0+lktJgeD6Cy6l4etdKDjG7u6jOR9SIrjugpuvfKPgAPYV3CKlieB6Cy6l/GQbBcfYnoJbSykRXGfBxfIbBQewv+BWwwWC6ys4e/UbBcfYrn2fGgzBtRXc0DCj4AB28W25oYHgugouJH+/CFdUxvYXnLkUCK6p4EppFBzAuYKzVCG4noILlZlTcIydKzgrBYJrKbipaRQcwMmCs6mJ4DoK7pKcgmPsbMG5dCG4hoILlVFwAGcLzkqB4BoKLjXXG/APjrGDBTeVCK6h4IaSggM4XXCpgeAaCq4UFBxjhwvOQoXgGgpOcgoO4GzBubmE4BoKTjJzrqiMnS04Q3BNBWcUHMDZgjNHcBQcY78yCo6C+2O3jk0QCoIoirImi/J/ESIIEwn2X5zBilawwTzOfQVMNhwpNYIjOLPcERzBSakRHMGZ5Y7gCE5KjeAIzix3BEdwUmoER3BmuSM4gpNSIziCM8sdwRGclBrBEZxZ7giO4KTUCI7gzHJHcAQnpUZwBGeWO4IjOCk1giM4s9wRHMFJqREcwZnljuAITkqN4AjOLHcE10twl6pz7O6oY/w6q65DahnBNRPcbc7HbtiN93z+b7zmvKOk9RzBNRPcenB7Ww/u23pw0oe9s+tNFIjCcA4heUHRCWD4Kk3XaCSaukaTLdGEbLCx9qJJ//+/WeEgWNfutjdVm/OcC5EZhrl6+9Bx9CoRgxODe8fg9m+i5fJGDE7qOksMTgzupMHJCq7wHRCDE4P7t8Fpspgrdb0lBicGJwYnfFvE4K7f4LSfIze0e36r7m++dhPlxBZtljnxSNawZ9vdB5MGy8f6lGOHbv5UXbXvMzPfGBxNlkuLdgyXfdJW90m4zsdvZ2AMXtwwWcyMamDT79m7Xr9IBFBKuwSFE4O7YoMz7sGEU2ICGyXeKoKikh8hSmw9xohKZh6YITG3VZ9E54CrmAJj2tGF3+lWA7/SARMbjNuigrECE9OOres+kyB8FDG4S+U8BqflwO+5HgxcqA0HTggvjsZzPwyHVcANAPU4nUQpkrQKry3g/gj0eQ7MON8ANVwFP3IkTm1wbwJuu8biYRO82vCCZg6WDTuOrMAPcVdO2UU2aFv9JVAk2x3gi8NJicFdPWcxOC2FmlOBuYQKijMO1BOrlOtxwFkKGQ+/Cj2MqtjKTSp4BvrFwArrNiedh9MGB/hU0PaQUs0jbKs6QKe4K6ATz8PdB5wgfBgxuAvlLAZ3AzwS07Gx4EB6qLOJA24I/CJmWIVXF7ZJTA8OEfnADTExThsctsQs4TRzSNdDKtH5LnOgRQVBmnaIJtOpLgYnJQZ39ZzF4FLYBlXM4FlEv6HqMz0OOBf3VGGGGHEYPVNFVCrXGov6Ht47BqcTs4VNf2OwCraBWJZghctADO6qDY4owwv327EBVkWodeszcRlwJuDzmfKCEYfaYFzRB57IAIb1Zet3DI5qDbTp6E+kPn/IgVvaMQKyWVu+DEXqAkoM7soNTiE+bHslSpDur6dnKNa1W9ozwoiKhjf0Sa+Cs+T+tMEteVAOuAP0h5cQBXybzj12JNsxCcJnEYO7WM5icCFi7sYB90xkI611bQbFD4239aklRmUDVNLws+jTrw1udNrg8pMGp21DIMxyv7/PUW2el4EXG+JwUmJw34WzGJyLHu2ZAxGRgy4xR4+oDD9+9oGADunw0gTjnDa4/KTBbeH9/mUUTQeiaGz8NZCSIHwWMbgL5SwGN0JoUIVfRtEdlNkklaIdCe7rIOMFhAmHUYOmmjgy1EcNbodZJ6PxdkxtC7RF4aQuQOHE4K7W4CKgT4yZwSGiVfXBET5ULHLY1L7FdpZhbRAziaZElCJsEfOKTxjcDWDxEYem1s1u91kqXyQnfBoxuEvlCw2uwegh/MVdR/BWfEZNqWCcVAGn28h0zsOwCq+ojsGJwgMH1R3f07LxCYML6ofdlA0uh2Nw4HpYEbXa7Y54nJQY3NXzVQaXBjVjok4Ge6CT8XQHDLiLCy9etX/6oUqhqGATFlu1xlEKp4vRXtPuLKJWlFQulwLdwKBOX3nd9w2OtCODMxS6G4NonHs8gScPoyKsxzm8luxkED6JGNyl8kUGd4hT5FkCwA3RPJm2FUpU4ENRSeRVF3TqjfQ+ALUGkLVYuO4BhAng9eP6Nxn+t4rK6xVQjgIeHZ7BDPDWCxvAq+xFlRKD+y58kcEdBxxZW4Udvajp5DvK7j12DlRr/DtTyaJvUK/Oqb6DHfbMJEZ7dbHjZUPxv/4Hp3HANawy7Mj6tETKvrhAQW9FshdV+CxicJfKlxgcncLQb4JO070hx4KOsA92NbSCjaXxdfxi8Thvbs1o9cvf7Vprs7HosKPZfppUE5IdDVIkn4P7Dnz5L9sfJxofmAcjZYjLINNbVNEBItLeDM5HR+NodOIdX3fcftTxrwnJlwMLH0YM7nI5xy/bMxoXHzTLmrQCItrx3OzIjxFaTaZxNQZXHxy1UnMDOtFetx6PzC9icFJicNfPhRgc9eBOqGBqY8napvDCT4zPHmb0b4PTxOCEb4MY3LczuD/s1jFKQ0EYhVFmmiEwxEJIDL5CCWhnEZD0Bnzuf0XywiOkyArunO82w7+A4ZT+3Np2ukzb1j57ufZ7aIePeX/+ae1UC8HZKCO4PMGVft61pd28KWvfp3bt6VgLwWmYCC5OcMuxv1+mv69+/3G9vO3n4+tmuRCcjTKCCxRcLY9wtkZwGiiCixRcvW093N4EZyON4MYRXCU4jRbBERzBWewIjuAITrERHMERnMWO4AiO4BQbwREcwVnsCI7gCE6xERzBEZzFjuAIjuAUG8ERHMFZ7AiO4AhOsREcwRGcxY7gCI7gFBvBERzBWewIjuAITrERHMERnMWO4AiO4BQbwREcwVnsCI7gCE6xERzBEZz9s3c2XGkjURg+NzCHhA/RbhEKaiVABSmK4idQoBY/AEH//6/ZubmTmTTNsXp2z9aw952zdZhMZpLUPPuEBLq2hQ2ODY4NjrO2YYNjg2OD47K2hQ2ODY4NjrO2YYNjg2OD47K2hQ2ODY4NjrO2YYNjg2OD47K2hQ2ODY4NjrO2YYNjg2OD47K2hQ2ODY4NjrO2YYNjg/uXDA7Y4Li8u8IGxwbHBsdZ27DBscG9aHDwSoMz+XMGB6yKXEKFDY4N7kWDux+Pn35vcK3Lv1Jny08f686fM7jKeDxOAofDBueHDe63BlcQYg9eNrjswUz46S1rf8rgNuT0++xwXNjg/LDB/d7gEHAvGpyz1SO0LbquV5mm4Y8YHAGOw2GD88MG948N7nwghJgc1BxsaX15lq8WGX8hGxyXf6Owwb2L/C8MLrS8Kpc3bmzQqU2EWOXY4DjvI2xwbHD/wOBKbSGat9hiO0DJrYSYAr8Hx+V9FDa4tTY4eLPBUaINLmx49kCIK/y58ZwQ3QMHLorFUqYtGsnXqBsbHOfXsMG92/x3BgfZ/kU5iYsjsKNfOZXjahbCV4v27XFH2RbWT5zQ9SmkyxcdR7cFDS4wL/13LUQ3B5BsCi/PLfnHD7gR4kAP6dwd77aMyoWhrDb7sFY7tCC8561aNQdesL6bDq6qxi7LxiiDA7tUezp3og4gLrmzg0sAkuWLkzSENwCy1acM1ajOfhi/wgYXO4NLnw4EZvDowanU7vXah+DFWcl6xWPXmDol8nTiQqfX6xUhuVWQje4ZnreH2wmsD0vg5avskIN7D1bu/CRgcFHzYpy2EBcAyQXOM5I9z+SaOci6/irW/Z7AtLdagMnLKfJAuZT1KWD2N13s1BjeAqWLvezrCbauyjjRxsKbuAYYtSvlpbdasxhhcLvzHi7rXZUhlNKnAi4pTM3hzvzVVfvl43TZ640AfniHojvGlp2Rtx/f+UMZMQsbXNwMDqoL4Wdw7p18eJpT95SsfsdKcqY7FfqAOZHVeqcrKIk7eCqoeq+qAZGeChV3HAJceF6cmC5Qr2TvDRtsb90RAkpMAJNsmo248IiIhHwAzLmE6wyBYi2FnvO7nnM7rde9hMOBXz81u/LZFSopKwQ4e9sM+fHnYzhuCJVFXx3gekLoNsXDoQSrlRcqU3D0Np6xxMWrsMHFzeAeXORFc7qHfGp7ZoRk+YiVoqzM1Tv9MrOrsy7iyPapcF3A1q4HopqL9YXXz/EBMcWxBwSB+wDgouddCnEE0JevHz2u4GAHstIUDc+McKLG6mroTeIR7lbCpJvGviO5qKM2XrYt5wNEbcmfMzVC3kxcZLFH5e4M642KvytTfDUgRqd+BpzlaeNMDunSBlGoD2bSbOPadRJXQptswrYHDbgtcyiKm7gZgx7hlhOnsMHFzOCSbTyjkUgOnuN7vhg1TgBwGcHqVC76lMRFc1n77FOhISb1LPju1h4nlZfdm5MfL1jt2gQXp4OAC89Ly7oAIGdY2OCz6gkARmLhc6aZAZnrhhwu6dvmEgAO/M06wk6eED4SnWnOhuhdlwBKK+VhFYAWjpeiXcHMdi2A802huGYA9xcCy7PSGqKxZo7iLhLv5lw2jOUcbRu9FJvmWXTKpsCtVIBzXZHvW5CbCy9XVRucTzgrK1y8ChtcvAwOIfIBKFd0+gJUetLTHNiUDtQBjGTBCrykG0EqLFrgs0S0qWsdLUcD7hOANsBvGnDR8+YkDgFgoNfakmBCBLbFpmLZptqDSwSL3v4x7Ls+zG4kS7LgZSR3ggBnXKrj8W0HMK2GZKHelVGODpLCrQFcyyU4Y25dXKgzMEaHAovD4o5uqOONMJsS4PzdB6drHNGS67s2cGIUNrh4GZyTkJRygFJqqBMSxsimU3MFVXt4qABlRqc4UeEOgLSJXAuTJaciQLT9oWsCEakBFzlvxfvTli++UPsZ9c0h8TzIuh2gWHIrJuDbZqKz8FUTjh4eqobdDcsH3FfAUP3A8Kmtd6UMlLTs4aYDgPuG1+JgxhQt/zCW8U6vBZQh0tJrWvlNWTlUwlGAOzP98EjotzgrrHBxKmxw8TK4ohEp0o+ZPpExV7+slnOpD1EBDNSEDZSGOpk30FpofdIpkdWAi5y3KkQe4FZj1VrQAF88N0ojTcAPXt0lQdkmhlTTAhNnSFMS1M4Nn4VPwGcNuOCzK3m6xibA0cb17ODx2qEq9bzWv+ZHRx2zMg5FF851BbXvAahtAeWDrHeAE6OwwcXL4NDSEnM/+AK0GJEV6Vj9r6m9rtdsqGAAN6HRfwZc3V8XcOwjDbjIeQ899ctpAFyqK+aVmNnKEoNriD5o2yQmaryVLvPDiSsCgHNpKwhwdgTgPuFiPe1pAHCF4Lx0BaoO55BgaempqelWv9zB3qq1EgDcjyDg2ODiVNjg4mVweRGOYloZ63fm77J/VhAqBnB/BQCXggiD6+hpb+SrYw24yHkt13tLrK3e8rprk3htECd/iFA0JpBkA9C/cJnUQqgYwDV96My8vmCFAfeoj1ANCWsA54hw8oAhK3UdAI040j3XVkPRDeFtApxLbQS4NBtcXMMGFy+DC4HG6M2ZIPug2FcC486GW0HA3QQAt02DBwFntMXybkU+aMBFzzsRvRwRYDKufSsgUWvONWEvDDg1HBBFCIkWPV8sMIvn7TYBTs/pA24FEQZ3rVYnwB28BDj6WIUGnMEbNYmcfvmEaqgBZwwuxwYX18IGFy+De8TrscNAWtR+SkCrBkRvcN2x6RSOBlyUwRX1tHMlKwibyHlplq/01jymsS8J5SaE2Mz59z+Hh8EQitPka8PAm2Ttm10Uq60Q4CwNuAiDy+sj9JluSQQvUQuHweQAzP8EqtrgdNOTHuqjf4kaMrgcG1xcwwYXL4NDL/oAJtTHe+wCH+pdpAFTwjujlnKUtxjcRz3kCs9rDZvIeaHkions058ImV4d6h5kU7a+u7EZ8euGz7JM6RoTI3E3SVN16y0GZ4bOE5g14EZ0kyE8r+p57ePNSeIR36KdtgwBi2xw61TY4OJlcE6BHqulpLNZB2SSXbzB8KQfbrgP3HoUbzG4rgPmYq0ZgE30vGf0pFtuJz89RTSVP6TqaVCRJHPvQCWXzRIlvuENBqspha9MW2KoOnqDwSFoqDmdkGM5GnD087s+XtksDmnep9yzgDL3Bj4S8ocDlBbKn8MGt05hg4uXwcF24K22r+qNLRt50aFnMb76rCrrG4NvMDhxEHjQ99HAJnpeyE6kKWajf6k8nxta1FLtqaEf6Anfw4Lw5A9ODOBuxVsMTuwpLE0J6wZwSZe+4wSTnXmczlzKOD896HvSkKBVVF2qncbFKWCDW6fCBhcvg4NsF9+AsnHxGE9z/9rui/+RrT5iBM9aB9H3pfEWg8PVkqg6M1mbOBo2UfMSlOTiNqJDJXmdBwgonHhOenO3pRql0ZHaCmxjxRXHlQ0ZkDleCJnkaw1ONqNLZYaC4G4ABx9x48kPR/TkypMaetdFnrYAoNhWTzX3G0g13LbSMypsFtjg1ilscPEyOAv28Yxsb25vJvB8rABAXV+aHjWIHznvw+TN1LAr3D3Z69UGt4ljjgpCxq1BEHAR82LuRjjTcGP8VK2f5psSIHf6lyqLyOo1U8suDlf3P2LfB8xSQRlnFIPpmQQZAub8dQZHnQujrsB8CH3YfojzrebTGT0kYgCH7MPpNhe41TtaR0VvNFy52FYDNri1KmxwMTM4gP5C+FkgD84TdHPBl5clXQlS3Gv8gKj9WoOrzYVK4hg04KLnVQTe6Ilg2vWAbe7p5kbRh8UpeEl36QsCMm2hMi/iBkQbnAVWCHA33wWG+Bb+uqR88BmRIODgsiFUulWgBL8uqQ/ABrdWYYOLm8FZkN6Y0On46NB1qXk8xGqqd9jLxJbmMSAI7l5rcPv2Z7olmipBGHCheTXinPulj4j2/MI2Gy0rO02iZT7jvx84BJUHQV8I15p6MJ5cwzm+hfhag7uBJ29sd7gf8YWX+8uGt3DZh58BB5WpB+TePKN/5Q+3CLKzjTQAG9x6FTa42BkcprV/v58JdQ51z1bvay3Qie6m6wYQVqt2XHH0/GYtPW/Ev/OQPDq+3y/ZekiTbLn+ULJf3IbcSf24ohtCc4brBnA49o+TXHixqjqdYtF88zpFL6mXvSW6zT5/ut9tRc9q6vxtvjEMG1z8DM6caMF+5oduDLeYRrOyqSvAhVcMt5jhzPqhTi9uqhXehuCq0XOG1yDAhfuY0cODRm9t8F8Ze83M9JP9LV6FDS6OBvfr355uCJPR0MgU00vXtcGFV6RXoXpgVFMN88K0hTuYbYgaP7LNrGEMzrQHF1NVl+Ci8JIwkbH2Yp01LnZhg2OD+8cGR1U2OC7vr7DBscH9SwZnscFx3l3Y4Njg2ODY4Na2sMGxwbHBscGtbdjg2OBUPbO7u5uLhcE5cktbbHBc2OBeDhucqavEwuC8sMFx2OB+Eza4X60kBganChscFza4l8IGxwb3N7t2tNo4DIRhVDZDkIz8/q+70a0ppstayDucbyBQWkIo5OcQQnC5IziCIziCS3sER3AER3BpIziCIziCS3sER3AER3BpIziCIziCS3sER3AER3BpIziCIziCS3sER3AER3BpIziCIziCS3sER3AER3BpIziCIziCS3sER3AER3BpIziCIziCS3sER3AER3BpIziCIziCS3sER3AER3BpIziCIziCS3sER3AER3BpIziCIziCS3sER3AER3BpI7j3CG6/6IDgCM49LrjdwC0RXI9KcASnbaLgxkONbuAWCO6IRnAE52YLrsVh4BYIrsVJcASnbbLgzmgGboHganSCIzg3W3A9qoFbILhPxE5wBKeJghuPER8Dt0Bw5Yxz8z04gnNTBXfGWQzcAsGVGp3gCE5zBdejGrglgis92uYzOIJzEwXXohcDt0RwpUbsBEdwmie4PaIauEWCK0ccm8/gCM5NE9wRRzFwiwRXtohGcASnWYJrEZuBWya4UsfCERzBuSmCaxG1GLhFghu1iEZwBKcJghv71oqBWya40TkWjuAIzj0uuBZxFgO3QHAXwx07wRGcnhXcfgy/GbilghvVGIjzPTiCcw8KrkVELQZuueBK2Y6Ifu4ER3B6BnD72SOOrRi4FwjuW+0xNm78P28Bd/nxVnCXLn91ee4bwd2b6V5wox9e728Ed/dKf3iOX/3q7wW3Edz/ddt4Q451i/7lm4F7heBG9QxJD3XWUgzcawQ3+tR29JD0T/Wj1e8mGbhXCU7SuzJwn2LgpKQZOIKT0mbgCE5Km4EjOCltBo7gpLQZOIKT0mbgCO4Pu3VAAgAAACDo/+t+hI6IYEvgHBxsCZyDgy2Bc3CwJXAODrYEzsHBlsA5ONgSOAcHWwLn4GBL4BwcbAmcg4MtgXNwsCVwDg62BM7BwZbAOTjYEjgHB1sC5+BgS+AcHGwJnIODLYFzcLAlcA4OtgTOwcGWwDk42BI4BwdbAufgIHbrgAQAAABA0P/X/QgdEW0JnIODLYFzcLAlcA4OtgTOwcGWwDk42BI4BwdbAufgYEvgHBxsCZyDgy2Bc3CwJXAODrYEzsHBlsDFfh31pgnFUQA/KCcToxVUqtHWZSqTlnV1wy0uNlSndVGs9ft/ml2UVB5NxMTU/+/J6JF7n04OsuCE+LCk4I5dcPfzWFPXcKzOZHJzYEoIIQV38gW34V5wpeEor2T/wJQQQgru5Atuw6SNIQUnxNmQgkthwQWVSG85IjnSpeCEOBdScCksuBJiXYcc4gj1RuP7gSkhhBTcyRdcsuBQJZ0chBDnQQouzQWHOskmhBDnQQou1QWXIdmBUrgKvLYXfCtiyzLNBjotz3kBTNPMYb4ct8OnBgBjFdj+2jIQuTHNCiKZr25f/b+Xx86jOXayo+FLMqVo/6LvF7MGEucUy2v1xOsidvKWukroTjIQ4tJIwaW64JokfwF49rkT6oi45LRK5QEgadS4s8I8TAYrpAlFD7njT6FoJmO9ZArGmrGB8X7Orc0t7wcib+9XuQdQcxynCiEuhBRcqguuRGYzQJlkf2ANPHJciIunxH3BffHpux5J5zFLhm6bpJmsroAcz/7MxqT/AMAi7ddVaU3ycyJlBFS5QcsmuTDic8oOudj0SY4yAHSbDKzV9ioq0qVKQIgLIQWX4oLTfpK8Bm7b5DAHoPhEjqIPLpXB252hASRtv5aBNnWotOpAYUZS31fXnYoUo7u55CcAYfzi2yMXcSruN+83AO1vm1wC8TlWAdBUhtFvz6QLJW+TXSk4cWGk4P6zb7+9SUNRAMYPyCNUBw63CSoif5yCiJK1yCYMa4Q5QZjf/9OY21tajDVG0nc9v1fLcrKONHly4NIUNjiKxuJ4BPhlkSb0JOAMoGHDE3UFoCXGAuiZ/knpHG7jdH2EphhLz3skUgLXjq08z4mmKtC5kUAFGIfXeWNflg+ndqe8FuOV501E7nzffy1KZYQGLt0nGbZ1kYdAW6wT8MLw5MQC/DBL8aAPn+PALYFJTiIDKJbFiqd8KIqV86EaXie8lZtgmZTXMGqJUtmkgUvxWVT3Z1ClGlALbWBqwzOXELZFNj7kJTBlP3D358Doaa0sVhVwV5P+b4FzgK8SWkDTXmcb/8YE7ugM2J509QxVZZEGLoUNzntr9B2xrmDfwIanKiHgRRS4rSQFTurfMTrHNTHyMwLbH/k4cPbENnQBvr3Oye+Bkw9nGO6lPvygskcDl+YpqnWRGLiKhIBPUeDmyYGT0uPvBC5zYjR6BOaFaGq4H7hKFLjKfuCMwpMBRuedKJUxGri0TlFj34BC7OiAwBnLL6vB3tnEUaPoA81oqgw0JORBLyFwVq59OjsHXohS2aKBS3+DWwJ9iR0SOCt3Cvck1j2H99HUCJ5KaA3FhMDFHA9molS2aODS3+BkCwuxahcXN/8fuO3aL9vCDaAgxfX6NlrUGtFUFc7GEvgCPEsK3Hi9Dov5HHxRKls0cOlvcNKATmP3k/vg/wO3gaoYpXt0SiZfvbwYTehGU30XfPPX5a4DPUnc4EZg49gORrrT6fSlKJURGrh0NzhrBXgvW69XHagc8Ba11YHjynB4NQ+q9GAUfNOj3tiA60RT0gDc2dXJHDh7mBy4x+CuJvXW4xG80ScZVMZo4NLd4Kz8gp3rgz6Dm7AzeCsiw3vs1KIpM3ZOyB9KcuDkkp1eXgOnMkYDl/YGZ31tYhy3DjxkGG46AG6xL8bRI5u4WVuiKWO5cAHW1478LXD3a3OM0akjGjiVMRq4eINLV3l4e+PI4XL1buttLv43C+27cUn+kB/ftR/+4+45z2+fFbJ7h3+xd8c0AAAACMP8u8bHaEUsfHBM4DzbQ5bAebaHLIGz4CBL4Cw4yBI4Cw6yBM6CgyyBs+AgS+AsOMgSOAsOsgTOgoMsgbPgIEvgLDjGbh2cMAwEQRAUwhidUP7xmgM/HMCBRauKjWAfQ5Nl4BQcZBk4BQdZBk7BQZaBU3CQZeAUHGQZOAUHWQZOwUGWgVNwkGXgFBxkGTgFB1kGTsFBloFTcJBl4BQcZBk4BQdZBk7BQZaBU3CQZeAUHGQZOAUHWQZOwUGWgVNwkGXgFBxkGbhVBbeP85rOsW/ALRi4JQX3Htev8dx3wp0YuBUFd1zT63vTsQF/92HvjlvaBsI4jj+px/2SmDY0LVdTM2ppMSi6sqEWBSl1qx0o9P2/mzXLXS7G6iyZMMjzYQztRP8YfPkluW4cuH+w4Dydt4z50CPG2P44cP/bgmvruon8l/6wTbtJITyy9vvBgRBCUpkjhPDJaq3Gm+F1q/TjtMAhxpqGA2cXXJ39Vl1wb284B5iRNUVMH3cP4JjKJgCebWtHMTLhPKCcB0NFi5Pm/jWzZuLA1V1wbhBUF5z+xP2cwM2prF8O3F0IoBuFAOKJDZx1y094WaNw4GouOGnzVhD6E/kJgUsRu2QJqHsTOGcB9CbZn3onXWBjAjdxMq1gNVKI+N4gaxIOXM0F59mL0uTq6eDpKrHXqd4nBG6g8IWsKW4vTOB+AadmobnPUMc6cCdkDIEpMdYcHLiaC85ut58HuZ92z31C4DZLdKggU9yZwLVDLKUNb4pI2sBpt+gSY83Bgau34FpBxvTNFE4EudYnBO4SsOF8ROiYwC3R9ci6A45fBe4G4BN6rEE4cHbB1ToClxxYibkP5308cO5Npxvfj87JOF/ch2G0FtXAOV0MyBghIR24Q+CGStwY01eB+wL4xFhjcODqLTjfXI1eHVhXgeZ/OHCii1yil+EcOfVYCRxNkUobsSMTuDEQUNn0dPAqcFMoPg7HGoQDV2/BFQ8Ung6sp+Iu3EcDJx8QfRHt4al++Ol0gIu7QAz7iI8qgTsEVsUg60kTuCl6VFUNnNtDnxhrDg5cvQVXPGI4KMtf3SNwQs8vGeWZGgAzSVvOCGHwMnAUYU65Dm7IBO4W3/8WOG8JjImx5uDA1V9w4nXgMmKPwF0CbX3nbeESuTEuTJRCTCuBm5ijcAGUXwQuxfyNwHWGf/xKQmBGjDUIB67mgjOql6j7LbgASCQVxsAZaQnSSuA8cxRugO9UBO4ByzcCZ6khMdYkHLh6C87XW636kEFkL+/xkOEUiDbCRg3CSKCcl4EjfRROphjrwJkXdwfuIXPfWW74CSprGA5cvQXn5S2rHBN5799MkiEGpNmB5t1iK10L0rkra1cC9zW/Y7dC6NrADZDKt+7BMdZQHDhJ9Q/6ispBX6NFO0QYkWbzRPJyGWMrcYjoFuiVeJXA6aNwC8xL3+EOOKeyee+UA8cajgNXb8FRkKu8VUvk0aNdluiT1UNCmnP04wFYEFGCUFKVDRytkUpqhViVAucrTKmkFWPNgWMNx4GzC67ONaoov9ne8GiXAWKfDKGwIUtOAUE0Afz3AncGrGiMVJY34BqxIGsIHHPgWMNx4GouOKkvUS074CTtEigsSnMubBPJTjTWvVQYZr/bXbf6dlgNXH4U7hkDKgfOTdF3yfC76PA9ONZ0HLiaC45c2zTzkebSbmso3Ry50W8gHaHvUMZV+JZ/yXXx7tHz14HbIDxUEDZwerNFPuVEhPiIA8eajgNXZ8HZi1RD2Np5byaxC5w++k7w9RnoObS1Ulj6RFIsodpEJJdQM48omCjM6XXgPIUUfSoCl5vEiJMjT7ZXawUM+SkqazwOXI0Fp7WLponSgmvTm9rP2FLYWuoMbgD18L0LYEIZ5wJAmgIYOdXAmYMkJzZwmoiKb9y95GMijHHg6iw4u+EMYffbO+SkHwIIO0Myrp+R6XylXGuWYiu6k7QrcN+A2LOBM5xZhMz9zONzcIxx4GosOMs1WSu49BfSv/YllbXE6tB7+RXnHu3NOzs+4/944Td7d4wCIBAEQVAMhBP//14xOoxNjrbqCRs0ky0I3NcFNx3j/fX5v+eElQjcXHDf7OO8Hufwmg8WIXBzwQExAndsAgdRAmfBQZbAWXCQJXAWHGQJnAUHWQJnwUGWwFlwkCVwFhxkCZwFB1kCZ8FBlsBZcJAlcBYcZAmcBQdZAmfBQZbAWXCQJXAWHGQJnAUHWQJnwUGWwFlwkCVwFhxkCZwFBzd7dpCaMBBAYXiSDMGERKTQfcGlGzeu2h7A+1+o1AuoUMj0+X1HmJA/j0wsgbPgIJbAWXAQS+AsOIglcBYcxBI4Cw5iCZwFB7EEzoKDWAJnwUEsgbPgIJbAWXAQS+AsOIglcBYcxBI4Cw5iCZwFB7EEzoKDWAJnwUEsgbPgIJbAWXAQS+AsOIglcBYcxBI4Cw5iCZwFB7EEzoKDWAJnwUEsgbPgIJbAWXAQS+AsOIglcBYcxBI4Cw5iCZwFB7EEzoKDWAJnwUEsgbPgIJbAWXAQS+AsOIglcBYcxBI4Cw5iCZwFB7EEzoKDWAJnwUEsgfu7BddP81JpwzJPfXnax/fX52mgBafPr+8PgWtlwY2TuLVmmcbyhPntOtCW69sscC0suOn2Pu261z3Htozd7vbFmcrD9qZbi057gdt8wXVzrXNfaEv/+1i68pDLYaBNh4vAbbvg+lqXXaE9u6XWvjzgeB5o1fkocFsuuL7W9XXPr23j+lDhju8D7Xo/Ctx2C66rdS20aq21K3dc7Le2nS8Ct9mCm/WtaWudyx3+v7XuIHBbLbipLq97eP/BuNy7S93/sHcHKw0DURiFZ7w3aRJikaxddOFCDIq4KrSN4qKgSPH9n0bpAwxtKMzc2/M9QkNPf5JpKyjdksDlWXC1Ks8Xytao1iGh43xI+caOwGVZcK12AWXr0hNuEJRvIHBZFlyvnH8r3Y32IYHvL1jwReAyLLjjewelS34KrQQWrAhchgXXahtQuuRV2gks2BG4DAuu4xGDAU3qRulWYMGWwGVYcL3GgNLF1I2EjcCCDYHLsOBUr/eVs6NOXV0OidgwErgMC44fAjYhdZkENhC4mQuOwLlH4BwgcCw4EDi3CBwLDgTOLQLHggOBc4vAseBA4NwicCw4EDi3CBwLDgTOLQLHggOBc4vAseBA4NwicCw4EDi3CBwLDgTOLQLHggOBc4vAseBA4NwicCy4mZ7v334eXsJlPe33xfwfj8XATevvg5xonKaDnGO9WPyKMQSOBTdHHF6ro4/PJlzQY1UtQyEMBm6K/06t1l2Mt3IOjfFdjCFwf+zdb1MSURTH8fvjcGNREApWSAETJDfI2hQRgVYcQQQEff+vpsPd5Z8hkvRgs/uZqbuul21snO+cdWPSE5ywEmJRISFWO3fkVOtQB84vTsF2aDWrQUwHTgfuP5ngElImnp6wxCoXZxw252cmc2zxwdmeDpw/mEGwbZNW2L1FhZgOnA7cfzLBFeRi4RLq4xVO8lK2vKrdtaQ0IzpwvlABrrNAhVZI49WBcyzrn/u/KHTg9AS3WDT1kbXyi3ekHG0JT9qUMqQD5wtHQC4EHNEKTwL31unA6QnOK9x6fWPXUhbPxVRXynxEB84HBgbSZBswbHqODpwO3P83wXmFW6tvrCxlTMwESMquYDjItYrmqF0SSiYePxC4ssr51rAjPMaFZRdH7QsIT2THKefLzteoDtzGYsAHohTwkVyJarVNrstqNU5UrVbBeDmdBC5+lDZKdxWaaCTrEaNU2LVJcarVr2Qn98NXRDvV6pCIMtWZBo3FM/vh8P5VjvxHB05PcNPCrde3CG/5Jubs9npJXr7Z0lW8nFwyFhxJJX8glK2edFkRoVydSdcgqAO3qTowIhoCdXKlgCS5fgA1Ikxl3cCZV3BdkKsWgCviNo831QdpqPveAvCeiLYxYxHR4AGeBPmODpye4GaFe7lv7EFKW/zuS5k75sTaA172vSuGWrw3Po7aWVqwaIMPyxWryKfPBfsg+ajyvsKvbUV04DbjAHu8mFuAQ2xJ4DqdDhgvXTdwGf51d2gA6BNTfYtmuycGEGgTuYErYCFw2Y4LgNHgvpV4b/byMgsgRn6jA6cnOMVt24t9Y6dSOuJ3MU5VmNcAR63vXpA9jjv2Pe/e1IYdzludv2u2R+6eLH+iZozL15SyYejAbeTeC8wBcE9sSeBo8WdwLJ0ziRp88pBY3wAyNh+MvgHh0WRTcNexy17gptoAjnn9DgTjxIZRoEY+owOnJ7hZ4V7uG2tL2RS/i7daN5PrjLxV5ozJS+K8JKUs7omxOh9tCZGb/nnhspQZHbhNmEEYA2KPQNAktkbgSj0aq7nPG8wI0CWlvA1kvE3b6rJPAueEgRtecwAeSTkG9slndOD0BDdhSSZeVFO1et6elDQJ3K1QPkvZ4KUn5a5w7QyHBbHNOw5nea3owG2iAnwnpQQMia0RuBgpIwA2UR8I98jV5mPb3dQmZSFwdgdI26Tmxe/kKocBh/xFB05PcAsTXEK8JKYmtOWi2euPtpTFyfW875CMClyYT1yJOSk+kfIMeYsO3CZSbsJYEkgRWyNwDiktN3D3wB55BgBy7qYGKQuB6wKGRawOZCseAEPyFx04PcHN+matUzgexwgLfxlMsL1QTyrTwFliPnD7aqSbcykXlHXgNjAAUNpXAHWzukbgDJPYNHBdIEMTW0DfDZy7aSFwMUz+MUoQC3bJX3Tg9AQ36xv//nLh0rznu5hTkbIthDGULN9qNmeBiy8E7ht/Pi3mnOrA/T0xLOASLQTuZGngoqS4gVP7uzQRBWrzm+YDZxnTnVs6cG/Qm5vg3L6JtQrXkLIiZgJn6vlAX0ozdAge1J4L3BZf+0jM6fKJ4ExEB24D3wCkPQBOiOYDZ2KdwF0C5+QZAXh8JnB2GujYpNwCO62ZMvmLDpye4GZ9W69wn3hLdeGdW2db4pxPZsXYj+cCJ8pSHgvXSbfbER1+zRf9Vq2/wlGPTj2tAGCRCtwOKbm1AhcCArwobcAYPBO4GyDskKsLXJB/6cDpCW7at3ULV5Oy/EN46kXOlmpYTyjvnw1cTEo7Isai3Dq+wkjd3Cqp09NbHbjX+wrc09Qd8JmXa+CIlKtp4E6AELFlgbPD7uuYfQtUaXngjgG0yVMBjB4pg1gsRD6jA6cnuEnf1i7clslD26UhGE75uBVWT0TzahpLy2cDV+KsWfASabnn85nJjrMtHbhXMyOARVNtIGIS1QBjROwe08ClgAdiywLHmfQaZt4BgTgtDdyjMT+0mbdAYUCsvAckyWd04PQEN+nb+oWrt9RbrmLvm/b4oDT+mvIcsZ93mVBxfOrdksCxH8S7axc7DoetKlif91YOPn3u5zls+hb19YbAPs2Uw0Cfu2UA0fuPB2kEP00CdwwELtq19tLAlU8A3J62M0EAp0TLAmdvA7i+dz0SjcLAdqLSTJ4AJZt8RgdOT3BcImvJiVWMkJzKfRFjP6WreFOUMrIscOzwTLrMBzEWaMuJn/pncBtIAQmak3FvMPsGlKCVmgSunMZYdmngaFCAJ5A0iZYFznn6sDa3Dc95j/xGB05PcIWE9TR5VkG84K6pWpVvHgnXu2tbMutQtKQsLA0c+zHM8yZ7WBKem5wci3/SDxk2MDAQWIhLBTBavA7rBhA+6JEKnNLrrggcmaE6mJGKE1srcDRIBsGCCd/NbzpweoJ7NaNTKJwbYgalwuHLX1n49mFxU/Tk7jYsfOgfCtwKdtwp06Ky08ytaNHAavJL/ojZe3xskR/pwOkJTnvLgfvP6cDpCU7TgXuzdOD0BKf9Yu+OcRSGoSiKvsRfUWw5CCFNj0RJQ0MFLID9b2hE2hkIVP753LOERFyeiFEIXFgEjgUHAhcWgWPBgcCFReBYcCBwYRE4FhwIXFgEjgUHAhcWgWPBgcCFReBYcCBwYRE4FhwIXFgEjgUHAhcWgWPBgcCFReBYcCBwYRE4FhwIXFgEjgUHAhcWgWuy4L73yq3H8Oruenv9J/53JHANFly1TvCus6qnLglrcCFwDRZcsVHwbrSip64Ja3AlcA0WXDaX7yDA+3fplrAGNwLXYMH1VgXvqvV6ap+wBnsC12DBzZ8d+LbwLeTvDaD46y4C12DBKVsRfCuW9cIuwb8dgWuy4AbjMYNz48JZnsJBEf+OhcA1WXDKVr/34q3BUJceBG0SvNuIwDVZcFKxSfBrsqIF2wTftiJwjRacOqNwjk22fBb7fErw7HQmcM0WnHqz6Xuvn2/DZNZr0eEnwa+fgwhcswU3F67ypMGjsc59W3Zgw/l1OojAtVpws66YFc7DedM/bkunt5z5Hc6r7VkEruGCm2Uzq3nsvvc6+jJ0Y65mlvW2DadFPDpuJALXdMHNhlwNvtQ86ANlx38avLnvigicgwX30OdC5LyoJff62P52vTDkfDherre9JALnYsEB8IfADSJwQFAEjgUHhEXgWHBAWASOBQeEReBYcEBYBI4FB4RF4FhwQFgEjgUHhEXgWHBAWASOBQeEReBYcEBYBI4FB4RF4FhwQFgEjgUHhEXgWHBAWASOBQeEReBYcEBYBI4F98u+veU4DkJRFDURQsHA/KfbIXai6keq+pfrtZiBP7aOQwxhCZwFB2EJnAUHYQmcBQdhCZwFB2EJnAUHYQmcBQdhCZwFB2EJnAUHYQmcBQdhCZwFB2EJnAUHYQmcBQdhCZwFB2EJnAUHYQmcBQdhCdx7wV33EUBQReDeCy5tQChJ4OaCSzNw9w0I5T4Dl64duO0ZuJ7rBoRSc7964LZjwe1534BQ9rzPwF25b2fghh/hIJiU8xC4eY1aR/aOCrHUGbhr3zG8r1F77hsQSM/96peor2tUEw6CmQPu8ncMx49wtzp67pd+DBBL6bmPerv4T3Dvbxn2nMcGBDFy3r2hvv8JN7qXVAij5ty9of424XzOAEHcswH3dcLd6lA4COLZt1FvBtyXi9SevaVCADV7Qf1zwp2FG54HLK2Ms28G3KGUL4XrRhwsrHZ9+1y4NhPnu1RYUpp5a/r2qXB7b+24f0keDSykpOO/EK31/eybwJ3Kq3B177m1DCyptdz3qm+fNtwccbNxKgdraQ+5933o24cNdybu2biHBiwiP8y6HXnTt7+8Cnevz8YBi5l1q3d9+6fyStxs3DQcx1nmTLNu8vZJmdLROGA5z7qlom/fjLiSTjdgGelB3n5O3JSABR1107dvEwesa+MHReZgRcbb/yqO4yx1AAAAAH6xBwcCAAAAAED+r42gqqqqqqqqqqqqqqqqqqqqqqqqqqqqqqqqqqqqqqqqqqqqqqqqqqqqqqqqqqqqqqqqqqqqqqqqqqqqqirtwSEBAAAAgKD/r81+AAAAAAAAAAAAAAAAAAAAAAAAAAAAAAAAAAAAAAAAAAAAYALG6vVOk3uGfAAAAABJRU5ErkJggg==)

> [!NOTE]
> In this scenario, we're simply using OAuth as a translation layer to the underlying authenticatable model. We are ignoring many aspects of OAuth, such as scopes.

#### Using an Existing Passport Installation

If your application is already using Laravel Passport, Laravel MCP should work seamlessly within your existing Passport installation, but custom scopes aren't currently supported as OAuth is primarily used as a translation layer to the underlying authenticatable model.

Laravel MCP, via the `Mcp::oauthRoutes` method discussed above, adds, advertises, and uses a single `mcp:use` scope.

#### Passport vs. Sanctum

OAuth2.1 is the documented authentication mechanism in the Model Context Protocol specification, and is the most widely supported among MCP clients. For that reason, we recommend using Passport when possible.

If your application is already using [Sanctum](/docs/{{version}}/sanctum) then adding Passport may be cumbersome. In this instance, we recommend using Sanctum without Passport until you have a clear, necessary requirement to use an MCP client that only supports OAuth.

<a name="sanctum"></a>
### Sanctum

If you would like to protect your MCP server using [Sanctum](/docs/{{version}}/sanctum), simply add Sanctum's authentication middleware to your server in your `routes/ai.php` file. Then, ensure your MCP clients provide an `Authorization: Bearer <token>` header to ensure successful authentication:

```php
use App\Mcp\Servers\WeatherExample;
use Laravel\Mcp\Facades\Mcp;

Mcp::web('/mcp/demo', WeatherExample::class)
    ->middleware('auth:sanctum');
```

<a name="custom-mcp-authentication"></a>
#### Custom MCP Authentication

If your application issues its own custom API tokens, you may authenticate your MCP server by assigning any middleware you wish to your `Mcp::web` routes. Your custom middleware can inspect the `Authorization` header manually to authenticate the incoming MCP request.

<a name="authorization"></a>
## Authorization

You may access the currently authenticated user via the `$request->user()` method, allowing you to perform [authorization checks](/docs/{{version}}/authorization) within your MCP tools and resources:

```php
use Laravel\Mcp\Request;
use Laravel\Mcp\Response;

/**
 * Handle the tool request.
 */
public function handle(Request $request): Response
{
    if (! $request->user()->can('read-weather')) {
        return Response::error('Permission denied.');
    }

    // ...
}
```

<a name="client"></a>
## MCP Client

In addition to building servers, Laravel MCP includes a client for connecting to other MCP servers, whether first-party or third-party. The client lets your application discover and call the tools exposed by an MCP server, which is especially useful for giving your [AI agents](/docs/{{version}}/ai-sdk#mcp-tools) access to capabilities provided by external MCP servers.

<a name="client-connecting"></a>
### Connecting to Servers

You may connect to an HTTP-accessible MCP server using the `Client::web` method, passing the server's URL:

```php
use Laravel\Mcp\Client;

$client = Client::web('https://mcp.example.com');
```

To connect to a local MCP server that runs as a command, use the `Client::local` method, providing the command and any arguments needed to start the server:

```php
use Laravel\Mcp\Client;

$client = Client::local('php', ['artisan', 'mcp:start']);
```

The client connects lazily, automatically establishing the connection the first time you list or call tools. If you need to manage the connection manually, you may use the `connect`, `connected`, and `disconnect` methods:

```php
$client->connect();

if ($client->connected()) {
    $capabilities = $client->capabilities();
    $server = $client->serverInfo();
}

$client->disconnect();
```

You may customize the request timeout using the `withTimeout` method:

```php
$client = Client::web('https://mcp.example.com')->withTimeout(30);
```

<a name="named-clients"></a>
### Named Clients

Instead of constructing a client each time you need it, you may register reusable, named clients. This is typically done in the `boot` method of a service provider using the `Mcp` facade:

```php
use Laravel\Mcp\Client;
use Laravel\Mcp\Facades\Mcp;

Mcp::registerClient('github', fn () => Client::web('https://mcp.example.com'));
```

Once registered, you may resolve the client anywhere in your application by name:

```php
use Laravel\Mcp\Facades\Mcp;

$client = Mcp::client('github');
```

Named clients are resolved once per request and automatically disconnected at the end of the request lifecycle.

<a name="client-authentication"></a>
### Client Authentication

To connect to a web MCP server that is protected by a bearer token, use the `withToken` method. You may pass a token string or a closure that lazily resolves the token:

```php
use Illuminate\Support\Facades\Auth;
use Laravel\Mcp\Client;

$client = Client::web('https://mcp.example.com')->withToken($token);

$client = Client::web('https://mcp.example.com')->withToken(
    fn () => Auth::user()->mcpToken(),
);
```

For servers protected by [OAuth 2.1](#oauth), configure the client using the `withOAuth` method. This is the client-side counterpart to protecting your own servers with OAuth:

```php
use Laravel\Mcp\Client;
use Laravel\Mcp\Facades\Mcp;

Mcp::registerClient('github', fn () => Client::web('https://mcp.example.com')->withOAuth(
    clientId: config('services.github_mcp.client_id'),
    clientSecret: config('services.github_mcp.client_secret'),
));
```

> [!NOTE]
> The `clientId` and `clientSecret` arguments may be omitted. Laravel will use a [Client ID Metadata Document](https://modelcontextprotocol.io/specification/2026-07-28/basic/authorization/client-registration#client-id-metadata-documents) when the authorization server supports them, falling back to [dynamic client registration](https://datatracker.ietf.org/doc/html/rfc7591) for legacy servers.

The authorization server must advertise support for the `S256` PKCE code challenge method in its authorization server metadata. Laravel will reject the authorization attempt if PKCE support is not advertised.

Next, register the OAuth routes for the named client in your `routes/ai.php` file using the `oAuthRoutesFor` method. The closure you provide receives the client name and resulting `TokenSet` after the authorization code has been exchanged for an access token:

```php
use Illuminate\Support\Facades\Auth;
use Laravel\Mcp\Client\OAuth\TokenSet;
use Laravel\Mcp\Facades\Mcp;

Mcp::oAuthRoutesFor('github', function (string $client, TokenSet $token) {
    Auth::user()->update([
        'github_mcp_token' => $token->accessToken,
    ]);

    return redirect('/dashboard');
});
```

This registers three named routes: a connect route (`mcp.oauth.{client}.connect`) that redirects the user to the authorization server, a callback route (`mcp.oauth.{client}.callback`) that exchanges the authorization code and invokes your handler, and a public Client ID Metadata Document route (`mcp.oauth.{client}.client-metadata`). The connect and callback routes use the `web` middleware group by default, which you may override using the `middleware` argument. The metadata route does not use this middleware because the authorization server must be able to retrieve it.

The metadata document describes your application as a public OAuth client and uses your application's `APP_URL` to generate the client ID and callback URL. Therefore, you should ensure the `APP_URL` environment variable is set correctly in production. You may customize the metadata route and provide additional metadata using the `clientMetadataUri` and `clientMetadata` arguments:

```php
use Laravel\Mcp\Client\OAuth\TokenSet;
use Laravel\Mcp\Facades\Mcp;

Mcp::oAuthRoutesFor(
    'github',
    function (string $client, TokenSet $token) {
        // Store the token...

        return redirect('/dashboard');
    },
    clientMetadataUri: 'oauth/github/client.json',
    clientMetadata: [
        'client_name' => 'Acme Weather Dashboard',
        'logo_uri' => 'https://acme.com/logo.png',
    ],
);
```

To begin the authorization flow, redirect the user to the connect route:

```php
return redirect()->route('mcp.oauth.github.connect');
```

<a name="client-tools"></a>
### Tools

You may retrieve the tools exposed by an MCP server using the `tools` method, which returns a collection of tools keyed by name:

```php
use Laravel\Mcp\Facades\Mcp;

$tools = Mcp::client('github')->tools();

foreach ($tools as $tool) {
    $tool->name;
    $tool->title;
    $tool->description;
    $tool->inputSchema;
}
```

The client automatically paginates through all available tools. You may limit the number of tools returned using the `limit` argument:

```php
$tools = Mcp::client('github')->tools(limit: 10);
```

To invoke a tool, use the `callTool` method, passing the tool name and an array of arguments. The returned `ToolResult` instance exposes the tool response:

```php
use Laravel\Mcp\Facades\Mcp;

$result = Mcp::client('github')->callTool('current-weather', [
    'location' => 'New York',
]);

$result->text(); // The text content of the response...
(string) $result; // Equivalent to calling text()...
$result->isError; // Whether the tool reported an error...
$result->structuredContent;  // Structured content, if any...
```

Alternatively, you may call a tool directly from a listed tool instance:

```php
$tools = Mcp::client('github')->tools();

$result = $tools['current-weather']->call([
    'location' => 'New York',
]);
```

If you are building agents with the [Laravel AI SDK](/docs/{{version}}/ai-sdk), you may also provide tools from an MCP client directly to an agent, allowing the model to call them while responding to a prompt. See the [MCP Tools](/docs/{{version}}/ai-sdk#mcp-tools) section of the AI SDK documentation for more information.

<a name="client-prompts"></a>
### Prompts

You may retrieve the prompts exposed by an MCP server using the `prompts` method, which returns a collection of prompts keyed by name:

```php
use Laravel\Mcp\Facades\Mcp;

$prompts = Mcp::client('github')->prompts();

foreach ($prompts as $prompt) {
    $prompt->name;
    $prompt->title;
    $prompt->description;
    $prompt->arguments;
}
```

The client automatically paginates through all available prompts. You may limit the number of prompts returned using the `limit` argument:

```php
$prompts = Mcp::client('github')->prompts(limit: 10);
```

To retrieve a prompt, use the `getPrompt` method, passing the prompt name and an array of arguments. The returned `PromptResult` instance exposes the generated messages:

```php
use Laravel\Mcp\Facades\Mcp;

$result = Mcp::client('github')->getPrompt('describe-weather', [
    'location' => 'New York',
]);

$result->text(); // The text content of the messages...
(string) $result; // Equivalent to calling text()...
$result->messages; // The raw messages returned by the prompt...
$result->description; // The prompt description, if any...
```

<a name="client-resources"></a>
### Resources

You may retrieve the resources exposed by an MCP server using the `resources` method, which returns a collection of resources keyed by URI:

```php
use Laravel\Mcp\Facades\Mcp;

$resources = Mcp::client('github')->resources();

foreach ($resources as $resource) {
    $resource->uri;
    $resource->name;
    $resource->title;
    $resource->description;
    $resource->mimeType;
    $resource->size;
}
```

The client automatically paginates through all available resources. You may limit the number of resources returned using the `limit` argument:

```php
$resources = Mcp::client('github')->resources(limit: 10);
```

To read a resource, use the `readResource` method, passing the resource URI. The returned `ResourceReadResult` instance exposes the resource content:

```php
use Laravel\Mcp\Facades\Mcp;

$result = Mcp::client('github')->readResource('weather://guidelines');

$result->content(); // The content of the resource, decoding base64 blobs as needed...
(string) $result; // Equivalent to calling content()...
$result->mimeType(); // The MIME type of the resource, if any...
$result->contents; // The raw contents returned by the resource...
```

<a name="testing-servers"></a>
## Testing Servers

You may test your MCP servers using the built-in MCP Inspector or by writing unit tests.

<a name="mcp-inspector"></a>
### MCP Inspector

The [MCP Inspector](https://modelcontextprotocol.io/docs/tools/inspector) is an interactive tool for testing and debugging your MCP servers. Use it to connect to your server, verify authentication, and try out tools, resources, and prompts.

You may run the inspector for any registered server:

```shell
# Web server...
php artisan mcp:inspector mcp/weather

# Local server named "weather"...
php artisan mcp:inspector weather
```

This command launches the MCP Inspector and provides the client settings that you may copy into your MCP client to ensure everything is configured correctly. If your web server is protected by an authentication middleware, make sure to include the required headers, such as an `Authorization` bearer token, when connecting.

<a name="unit-tests"></a>
### Unit Tests

You may write unit tests for your MCP servers, tools, resources, and prompts.

To get started, create a new test case and invoke the desired primitive on the server that registers it. For example, to test a tool on the `WeatherServer`:

```php tab=Pest
test('tool', function () {
    $response = WeatherServer::tool(CurrentWeatherTool::class, [
        'location' => 'New York City',
        'units' => 'fahrenheit',
    ]);

    $response
        ->assertOk()
        ->assertSee('The current weather in New York City is 72°F and sunny.');
});
```

```php tab=PHPUnit
/**
 * Test a tool.
 */
public function test_tool(): void
{
    $response = WeatherServer::tool(CurrentWeatherTool::class, [
        'location' => 'New York City',
        'units' => 'fahrenheit',
    ]);

    $response
        ->assertOk()
        ->assertSee('The current weather in New York City is 72°F and sunny.');
}
```

Similarly, you may test prompts and resources:

```php
$response = WeatherServer::prompt(...);
$response = WeatherServer::resource(...);
```

You may also act as an authenticated user by chaining the `actingAs` method before invoking the primitive:

```php
$response = WeatherServer::actingAs($user)->tool(...);
```

Once you receive the response, you may use various assertion methods to verify the content and status of the response.

You may assert that a response is successful using the `assertOk` method. This checks that the response does not have any errors:

```php
$response->assertOk();
```

You may assert that a response contains specific text using the `assertSee` method:

```php
$response->assertSee('The current weather in New York City is 72°F and sunny.');
```

You may assert that a response contains an error using the `assertHasErrors` method:

```php
$response->assertHasErrors();

$response->assertHasErrors([
    'Something went wrong.',
]);
```

You may assert that a response does not contain an error using the `assertHasNoErrors` method:

```php
$response->assertHasNoErrors();
```

You may assert that a response contains specific metadata using the `assertName()`, `assertTitle()`, and `assertDescription()` methods:

```php
$response->assertName('current-weather');
$response->assertTitle('Current Weather Tool');
$response->assertDescription('Fetches the current weather forecast for a specified location.');
```

You may assert that notifications were sent using the `assertSentNotification` and `assertNotificationCount` methods:

```php
$response->assertSentNotification('processing/progress', [
    'step' => 1,
    'total' => 5,
]);

$response->assertSentNotification('processing/progress', [
    'step' => 2,
    'total' => 5,
]);

$response->assertNotificationCount(5);
```

Finally, if you wish to inspect the raw response content, you may use the `dd` or `dump` methods to output the response for debugging purposes:

```php
$response->dd();
$response->dump();
```


---

# Middleware

*Sección: Laravel | Origen: https://laravel.com/docs/13.x/middleware*

- [Introduction](#introduction)
- [Defining Middleware](#defining-middleware)
- [Registering Middleware](#registering-middleware)
    - [Global Middleware](#global-middleware)
    - [Assigning Middleware to Routes](#assigning-middleware-to-routes)
    - [Middleware Groups](#middleware-groups)
    - [Middleware Aliases](#middleware-aliases)
    - [Sorting Middleware](#sorting-middleware)
- [Middleware Parameters](#middleware-parameters)
- [Terminable Middleware](#terminable-middleware)

<a name="introduction"></a>
## Introduction

Middleware provide a convenient mechanism for inspecting and filtering HTTP requests entering your application. For example, Laravel includes a middleware that verifies the user of your application is authenticated. If the user is not authenticated, the middleware will redirect the user to your application's login screen. However, if the user is authenticated, the middleware will allow the request to proceed further into the application.

Additional middleware can be written to perform a variety of tasks besides authentication. For example, a logging middleware might log all incoming requests to your application. A variety of middleware are included in Laravel, including middleware for authentication and CSRF protection; however, all user-defined middleware are typically located in your application's `app/Http/Middleware` directory.

<a name="defining-middleware"></a>
## Defining Middleware

To create a new middleware, use the `make:middleware` Artisan command:

```shell
php artisan make:middleware EnsureTokenIsValid
```

This command will place a new `EnsureTokenIsValid` class within your `app/Http/Middleware` directory. In this middleware, we will only allow access to the route if the supplied `token` input matches a specified value. Otherwise, we will redirect the users back to the `/home` URI:

```php
<?php

namespace App\Http\Middleware;

use Closure;
use Illuminate\Http\Request;
use Symfony\Component\HttpFoundation\Response;

class EnsureTokenIsValid
{
    /**
     * Handle an incoming request.
     *
     * @param  \Closure(\Illuminate\Http\Request): (\Symfony\Component\HttpFoundation\Response)  $next
     */
    public function handle(Request $request, Closure $next): Response
    {
        if ($request->input('token') !== 'my-secret-token') {
            return redirect('/home');
        }

        return $next($request);
    }
}
```

As you can see, if the given `token` does not match our secret token, the middleware will return an HTTP redirect to the client; otherwise, the request will be passed further into the application. To pass the request deeper into the application (allowing the middleware to "pass"), you should call the `$next` callback with the `$request`.

It's best to envision middleware as a series of "layers" HTTP requests must pass through before they hit your application. Each layer can examine the request and even reject it entirely.

> [!NOTE]
> All middleware are resolved via the [service container](/docs/{{version}}/container), so you may type-hint any dependencies you need within a middleware's constructor.

<a name="middleware-and-responses"></a>
#### Middleware and Responses

Of course, a middleware can perform tasks before or after passing the request deeper into the application. For example, the following middleware would perform some task **before** the request is handled by the application:

```php
<?php

namespace App\Http\Middleware;

use Closure;
use Illuminate\Http\Request;
use Symfony\Component\HttpFoundation\Response;

class BeforeMiddleware
{
    public function handle(Request $request, Closure $next): Response
    {
        // Perform action

        return $next($request);
    }
}
```

However, this middleware would perform its task **after** the request is handled by the application:

```php
<?php

namespace App\Http\Middleware;

use Closure;
use Illuminate\Http\Request;
use Symfony\Component\HttpFoundation\Response;

class AfterMiddleware
{
    public function handle(Request $request, Closure $next): Response
    {
        $response = $next($request);

        // Perform action

        return $response;
    }
}
```

<a name="registering-middleware"></a>
## Registering Middleware

<a name="global-middleware"></a>
### Global Middleware

If you want a middleware to run during every HTTP request to your application, you may append it to the global middleware stack in your application's `bootstrap/app.php` file:

```php
use App\Http\Middleware\EnsureTokenIsValid;

->withMiddleware(function (Middleware $middleware): void {
     $middleware->append(EnsureTokenIsValid::class);
})
```

The `$middleware` object provided to the `withMiddleware` closure is an instance of `Illuminate\Foundation\Configuration\Middleware` and is responsible for managing the middleware assigned to your application's routes. The `append` method adds the middleware to the end of the list of global middleware. If you would like to add a middleware to the beginning of the list, you should use the `prepend` method.

<a name="manually-managing-laravels-default-global-middleware"></a>
#### Manually Managing Laravel's Default Global Middleware

If you would like to manage Laravel's global middleware stack manually, you may provide Laravel's default stack of global middleware to the `use` method. Then, you may adjust the default middleware stack as necessary:

```php
->withMiddleware(function (Middleware $middleware): void {
    $middleware->use([
        \Illuminate\Foundation\Http\Middleware\InvokeDeferredCallbacks::class,
        // \Illuminate\Http\Middleware\TrustHosts::class,
        \Illuminate\Http\Middleware\TrustProxies::class,
        \Illuminate\Http\Middleware\HandleCors::class,
        \Illuminate\Foundation\Http\Middleware\PreventRequestsDuringMaintenance::class,
        \Illuminate\Http\Middleware\ValidatePostSize::class,
        \Illuminate\Foundation\Http\Middleware\TrimStrings::class,
        \Illuminate\Foundation\Http\Middleware\ConvertEmptyStringsToNull::class,
    ]);
})
```

<a name="assigning-middleware-to-routes"></a>
### Assigning Middleware to Routes

If you would like to assign middleware to specific routes, you may invoke the `middleware` method when defining the route:

```php
use App\Http\Middleware\EnsureTokenIsValid;

Route::get('/profile', function () {
    // ...
})->middleware(EnsureTokenIsValid::class);
```

You may assign multiple middleware to the route by passing an array of middleware names to the `middleware` method:

```php
Route::get('/', function () {
    // ...
})->middleware([First::class, Second::class]);
```

<a name="excluding-middleware"></a>
#### Excluding Middleware

When assigning middleware to a group of routes, you may occasionally need to prevent the middleware from being applied to an individual route within the group. You may accomplish this using the `withoutMiddleware` method:

```php
use App\Http\Middleware\EnsureTokenIsValid;

Route::middleware([EnsureTokenIsValid::class])->group(function () {
    Route::get('/', function () {
        // ...
    });

    Route::get('/profile', function () {
        // ...
    })->withoutMiddleware([EnsureTokenIsValid::class]);
});
```

You may also exclude a given set of middleware from an entire [group](/docs/{{version}}/routing#route-groups) of route definitions:

```php
use App\Http\Middleware\EnsureTokenIsValid;

Route::withoutMiddleware([EnsureTokenIsValid::class])->group(function () {
    Route::get('/profile', function () {
        // ...
    });
});
```

The `withoutMiddleware` method can only remove route middleware and does not apply to [global middleware](#global-middleware).

<a name="middleware-groups"></a>
### Middleware Groups

Sometimes you may want to group several middleware under a single key to make them easier to assign to routes. You may accomplish this using the `appendToGroup` method within your application's `bootstrap/app.php` file:

```php
use App\Http\Middleware\First;
use App\Http\Middleware\Second;

->withMiddleware(function (Middleware $middleware): void {
    $middleware->appendToGroup('group-name', [
        First::class,
        Second::class,
    ]);

    $middleware->prependToGroup('group-name', [
        First::class,
        Second::class,
    ]);
})
```

Middleware groups may be assigned to routes and controller actions using the same syntax as individual middleware:

```php
Route::get('/', function () {
    // ...
})->middleware('group-name');

Route::middleware(['group-name'])->group(function () {
    // ...
});
```

<a name="laravels-default-middleware-groups"></a>
#### Laravel's Default Middleware Groups

Laravel includes predefined `web` and `api` middleware groups that contain common middleware you may want to apply to your web and API routes. Remember, Laravel automatically applies these middleware groups to the corresponding `routes/web.php` and `routes/api.php` files:

<div class="overflow-auto">

| The `web` Middleware Group                                |
| --------------------------------------------------------- |
| `Illuminate\Cookie\Middleware\EncryptCookies`             |
| `Illuminate\Cookie\Middleware\AddQueuedCookiesToResponse` |
| `Illuminate\Session\Middleware\StartSession`              |
| `Illuminate\View\Middleware\ShareErrorsFromSession`       |
| `Illuminate\Foundation\Http\Middleware\PreventRequestForgery` |
| `Illuminate\Routing\Middleware\SubstituteBindings`        |

</div>

<div class="overflow-auto">

| The `api` Middleware Group                         |
| -------------------------------------------------- |
| `Illuminate\Routing\Middleware\SubstituteBindings` |

</div>

If you would like to append or prepend middleware to these groups, you may use the `web` and `api` methods within your application's `bootstrap/app.php` file. The `web` and `api` methods are convenient alternatives to the `appendToGroup` method:

```php
use App\Http\Middleware\EnsureTokenIsValid;
use App\Http\Middleware\EnsureUserIsSubscribed;

->withMiddleware(function (Middleware $middleware): void {
    $middleware->web(append: [
        EnsureUserIsSubscribed::class,
    ]);

    $middleware->api(prepend: [
        EnsureTokenIsValid::class,
    ]);
})
```

You may even replace one of Laravel's default middleware group entries with a custom middleware of your own:

```php
use App\Http\Middleware\StartCustomSession;
use Illuminate\Session\Middleware\StartSession;

$middleware->web(replace: [
    StartSession::class => StartCustomSession::class,
]);
```

Or, you may remove a middleware entirely:

```php
$middleware->web(remove: [
    StartSession::class,
]);
```

<a name="manually-managing-laravels-default-middleware-groups"></a>
#### Manually Managing Laravel's Default Middleware Groups

If you would like to manually manage all of the middleware within Laravel's default `web` and `api` middleware groups, you may redefine the groups entirely. The example below will define the `web` and `api` middleware groups with their default middleware, allowing you to customize them as necessary:

```php
->withMiddleware(function (Middleware $middleware): void {
    $middleware->group('web', [
        \Illuminate\Cookie\Middleware\EncryptCookies::class,
        \Illuminate\Cookie\Middleware\AddQueuedCookiesToResponse::class,
        \Illuminate\Session\Middleware\StartSession::class,
        \Illuminate\View\Middleware\ShareErrorsFromSession::class,
        \Illuminate\Foundation\Http\Middleware\PreventRequestForgery::class,
        \Illuminate\Routing\Middleware\SubstituteBindings::class,
        // \Illuminate\Session\Middleware\AuthenticateSession::class,
    ]);

    $middleware->group('api', [
        // \Laravel\Sanctum\Http\Middleware\EnsureFrontendRequestsAreStateful::class,
        // 'throttle:api',
        \Illuminate\Routing\Middleware\SubstituteBindings::class,
    ]);
})
```

> [!NOTE]
> By default, the `web` and `api` middleware groups are automatically applied to your application's corresponding `routes/web.php` and `routes/api.php` files by the `bootstrap/app.php` file.

<a name="middleware-aliases"></a>
### Middleware Aliases

You may assign aliases to middleware in your application's `bootstrap/app.php` file. Middleware aliases allow you to define a short alias for a given middleware class, which can be especially useful for middleware with long class names:

```php
use App\Http\Middleware\EnsureUserIsSubscribed;

->withMiddleware(function (Middleware $middleware): void {
    $middleware->alias([
        'subscribed' => EnsureUserIsSubscribed::class
    ]);
})
```

Once the middleware alias has been defined in your application's `bootstrap/app.php` file, you may use the alias when assigning the middleware to routes:

```php
Route::get('/profile', function () {
    // ...
})->middleware('subscribed');
```

For convenience, some of Laravel's built-in middleware are aliased by default. For example, the `auth` middleware is an alias for the `Illuminate\Auth\Middleware\Authenticate` middleware. Below is a list of the default middleware aliases:

<div class="overflow-auto">

| Alias              | Middleware                                                                                                    |
| ------------------ | ------------------------------------------------------------------------------------------------------------- |
| `auth`             | `Illuminate\Auth\Middleware\Authenticate`                                                                     |
| `auth.basic`       | `Illuminate\Auth\Middleware\AuthenticateWithBasicAuth`                                                        |
| `auth.session`     | `Illuminate\Session\Middleware\AuthenticateSession`                                                           |
| `cache.headers`    | `Illuminate\Http\Middleware\SetCacheHeaders`                                                                  |
| `can`              | `Illuminate\Auth\Middleware\Authorize`                                                                        |
| `guest`            | `Illuminate\Auth\Middleware\RedirectIfAuthenticated`                                                          |
| `password.confirm` | `Illuminate\Auth\Middleware\RequirePassword`                                                                  |
| `precognitive`     | `Illuminate\Foundation\Http\Middleware\HandlePrecognitiveRequests`                                            |
| `signed`           | `Illuminate\Routing\Middleware\ValidateSignature`                                                             |
| `subscribed`       | `\Spark\Http\Middleware\VerifyBillableIsSubscribed`                                                           |
| `throttle`         | `Illuminate\Routing\Middleware\ThrottleRequests` or `Illuminate\Routing\Middleware\ThrottleRequestsWithRedis` |
| `verified`         | `Illuminate\Auth\Middleware\EnsureEmailIsVerified`                                                            |

</div>

<a name="sorting-middleware"></a>
### Sorting Middleware

Rarely, you may need your middleware to execute in a specific order but not have control over their order when they are assigned to the route. In these situations, you may specify your middleware priority using the `priority` method in your application's `bootstrap/app.php` file:

```php
->withMiddleware(function (Middleware $middleware): void {
    $middleware->priority([
        \Illuminate\Foundation\Http\Middleware\HandlePrecognitiveRequests::class,
        \Illuminate\Cookie\Middleware\EncryptCookies::class,
        \Illuminate\Cookie\Middleware\AddQueuedCookiesToResponse::class,
        \Illuminate\Session\Middleware\StartSession::class,
        \Illuminate\View\Middleware\ShareErrorsFromSession::class,
        \Illuminate\Foundation\Http\Middleware\PreventRequestForgery::class,
        \Laravel\Sanctum\Http\Middleware\EnsureFrontendRequestsAreStateful::class,
        \Illuminate\Routing\Middleware\ThrottleRequests::class,
        \Illuminate\Routing\Middleware\ThrottleRequestsWithRedis::class,
        \Illuminate\Routing\Middleware\SubstituteBindings::class,
        \Illuminate\Contracts\Auth\Middleware\AuthenticatesRequests::class,
        \Illuminate\Auth\Middleware\Authorize::class,
    ]);
})
```

If you would like to add middleware to the existing priority list without replacing it, you may use the `prependToPriorityList` or `appendToPriorityList` methods. The `prependToPriorityList` method inserts the given middleware before another middleware, while the `appendToPriorityList` method inserts it after another middleware:

```php
->withMiddleware(function (Middleware $middleware): void {
    $middleware->prependToPriorityList(
        before: \Illuminate\Routing\Middleware\SubstituteBindings::class,
        prepend: \App\Http\Middleware\EnsureTokenIsValid::class,
    );

    $middleware->appendToPriorityList(
        after: \Illuminate\Routing\Middleware\SubstituteBindings::class,
        append: \App\Http\Middleware\EnsureUserIsSubscribed::class,
    );
})
```

The `before` and `after` arguments may also be an array of middleware classes.

<a name="middleware-parameters"></a>
## Middleware Parameters

Middleware can also receive additional parameters. For example, if your application needs to verify that the authenticated user has a given "role" before performing a given action, you could create an `EnsureUserHasRole` middleware that receives a role name as an additional argument.

Additional middleware parameters will be passed to the middleware after the `$next` argument:

```php
<?php

namespace App\Http\Middleware;

use Closure;
use Illuminate\Http\Request;
use Symfony\Component\HttpFoundation\Response;

class EnsureUserHasRole
{
    /**
     * Handle an incoming request.
     *
     * @param  \Closure(\Illuminate\Http\Request): (\Symfony\Component\HttpFoundation\Response)  $next
     */
    public function handle(Request $request, Closure $next, string $role): Response
    {
        if (! $request->user()->hasRole($role)) {
            // Redirect...
        }

        return $next($request);
    }
}
```

Middleware parameters may be specified when defining the route by separating the middleware name and parameters with a `:`:

```php
use App\Http\Middleware\EnsureUserHasRole;

Route::put('/post/{id}', function (string $id) {
    // ...
})->middleware(EnsureUserHasRole::class.':editor');
```

Multiple parameters may be delimited by commas:

```php
Route::put('/post/{id}', function (string $id) {
    // ...
})->middleware(EnsureUserHasRole::class.':editor,publisher');
```

<a name="terminable-middleware"></a>
## Terminable Middleware

Sometimes a middleware may need to do some work after the HTTP response has been sent to the browser. If you define a `terminate` method on your middleware and your web server is using [FastCGI](https://www.php.net/manual/en/install.fpm.php), the `terminate` method will automatically be called after the response is sent to the browser:

```php
<?php

namespace Illuminate\Session\Middleware;

use Closure;
use Illuminate\Http\Request;
use Symfony\Component\HttpFoundation\Response;

class TerminatingMiddleware
{
    /**
     * Handle an incoming request.
     *
     * @param  \Closure(\Illuminate\Http\Request): (\Symfony\Component\HttpFoundation\Response)  $next
     */
    public function handle(Request $request, Closure $next): Response
    {
        return $next($request);
    }

    /**
     * Handle tasks after the response has been sent to the browser.
     */
    public function terminate(Request $request, Response $response): void
    {
        // ...
    }
}
```

The `terminate` method should receive both the request and the response. Once you have defined a terminable middleware, you should add it to the list of routes or global middleware in your application's `bootstrap/app.php` file.

When calling the `terminate` method on your middleware, Laravel will resolve a fresh instance of the middleware from the [service container](/docs/{{version}}/container). If you would like to use the same middleware instance when the `handle` and `terminate` methods are called, register the middleware with the container using the container's `singleton` method. Typically this should be done in the `register` method of your `AppServiceProvider`:

```php
use App\Http\Middleware\TerminatingMiddleware;

/**
 * Register any application services.
 */
public function register(): void
{
    $this->app->singleton(TerminatingMiddleware::class);
}
```


---

# Database: Migrations

*Sección: Laravel | Origen: https://laravel.com/docs/13.x/migrations*

- [Introduction](#introduction)
- [Generating Migrations](#generating-migrations)
    - [Squashing Migrations](#squashing-migrations)
- [Migration Structure](#migration-structure)
- [Running Migrations](#running-migrations)
    - [Rolling Back Migrations](#rolling-back-migrations)
- [Tables](#tables)
    - [Creating Tables](#creating-tables)
    - [Updating Tables](#updating-tables)
    - [Renaming / Dropping Tables](#renaming-and-dropping-tables)
- [Columns](#columns)
    - [Creating Columns](#creating-columns)
    - [Available Column Types](#available-column-types)
    - [Column Modifiers](#column-modifiers)
    - [Modifying Columns](#modifying-columns)
    - [Renaming Columns](#renaming-columns)
    - [Dropping Columns](#dropping-columns)
- [Indexes](#indexes)
    - [Creating Indexes](#creating-indexes)
    - [Renaming Indexes](#renaming-indexes)
    - [Dropping Indexes](#dropping-indexes)
    - [Foreign Key Constraints](#foreign-key-constraints)
- [Events](#events)

<a name="introduction"></a>
## Introduction

Migrations are like version control for your database, allowing your team to define and share the application's database schema definition. If you have ever had to tell a teammate to manually add a column to their local database schema after pulling in your changes from source control, you've faced the problem that database migrations solve.

The Laravel `Schema` [facade](/docs/{{version}}/facades) provides database agnostic support for creating and manipulating tables across all of Laravel's supported database systems. Typically, migrations will use this facade to create and modify database tables and columns.

<a name="generating-migrations"></a>
## Generating Migrations

You may use the `make:migration` [Artisan command](/docs/{{version}}/artisan) to generate a database migration. The new migration will be placed in your `database/migrations` directory. Each migration filename contains a timestamp that allows Laravel to determine the order of the migrations:

```shell
php artisan make:migration create_flights_table
```

Laravel will use the name of the migration to attempt to guess the name of the table and whether or not the migration will be creating a new table. If Laravel is able to determine the table name from the migration name, Laravel will pre-fill the generated migration file with the specified table. Otherwise, you may simply specify the table in the migration file manually.

If you would like to specify a custom path for the generated migration, you may use the `--path` option when executing the `make:migration` command. The given path should be relative to your application's base path.

> [!NOTE]
> Migration stubs may be customized using [stub publishing](/docs/{{version}}/artisan#stub-customization).

<a name="squashing-migrations"></a>
### Squashing Migrations

As you build your application, you may accumulate more and more migrations over time. This can lead to your `database/migrations` directory becoming bloated with potentially hundreds of migrations. If you would like, you may "squash" your migrations into a single SQL file. To get started, execute the `schema:dump` command:

```shell
php artisan schema:dump

# Dump the current database schema and prune all existing migrations...
php artisan schema:dump --prune
```

When you execute this command, Laravel will write a "schema" file to your application's `database/schema` directory. The schema file's name will correspond to the database connection. Now, when you attempt to migrate your database and no other migrations have been executed, Laravel will first execute the SQL statements in the schema file of the database connection you are using. After executing the schema file's SQL statements, Laravel will execute any remaining migrations that were not part of the schema dump.

If your application's tests use a different database connection than the one you typically use during local development, you should ensure you have dumped a schema file using that database connection so that your tests are able to build your database. You may wish to do this after dumping the database connection you typically use during local development:

```shell
php artisan schema:dump
php artisan schema:dump --database=testing --prune
```

You should commit your database schema file to source control so that other new developers on your team may quickly create your application's initial database structure.

> [!WARNING]
> Migration squashing is only available for the MariaDB, MySQL, PostgreSQL, and SQLite databases and utilizes the database's command-line client.

<a name="migration-structure"></a>
## Migration Structure

A migration class contains two methods: `up` and `down`. The `up` method is used to add new tables, columns, or indexes to your database, while the `down` method should reverse the operations performed by the `up` method.

Within both of these methods, you may use the Laravel schema builder to expressively create and modify tables. To learn about all of the methods available on the `Schema` builder, [check out its documentation](#creating-tables). For example, the following migration creates a `flights` table:

```php
<?php

use Illuminate\Database\Migrations\Migration;
use Illuminate\Database\Schema\Blueprint;
use Illuminate\Support\Facades\Schema;

return new class extends Migration
{
    /**
     * Run the migrations.
     */
    public function up(): void
    {
        Schema::create('flights', function (Blueprint $table) {
            $table->id();
            $table->string('name');
            $table->string('airline');
            $table->timestamps();
        });
    }

    /**
     * Reverse the migrations.
     */
    public function down(): void
    {
        Schema::drop('flights');
    }
};
```

<a name="setting-the-migration-connection"></a>
#### Setting the Migration Connection

If your migration will be interacting with a database connection other than your application's default database connection, you should set the `$connection` property of your migration:

```php
/**
 * The database connection that should be used by the migration.
 *
 * @var string
 */
protected $connection = 'pgsql';

/**
 * Run the migrations.
 */
public function up(): void
{
    // ...
}
```

<a name="skipping-migrations"></a>
#### Skipping Migrations

Sometimes a migration might be meant to support a feature that is not yet active and you do not want it to run yet. In this case you may define a `shouldRun` method on the migration. If the `shouldRun` method returns `false`, the migration will be skipped:

```php
use App\Models\Flight;
use Laravel\Pennant\Feature;

/**
 * Determine if this migration should run.
 */
public function shouldRun(): bool
{
    return Feature::active(Flight::class);
}
```

<a name="running-migrations"></a>
## Running Migrations

To run all of your outstanding migrations, execute the `migrate` Artisan command:

```shell
php artisan migrate
```

If you would like to see which migrations have already run and which are still pending, you may use the `migrate:status` Artisan command:

```shell
php artisan migrate:status
```

If you provide the `--step` option to the `migrate` command, the command will run each migration as its own batch, allowing you to roll back individual migrations later using the `migrate:rollback` command:

```shell
php artisan migrate --step
```

If you would like to see the SQL statements that will be executed by the migrations without actually running them, you may provide the `--pretend` flag to the `migrate` command:

```shell
php artisan migrate --pretend
```

<a name="isolating-migration-execution"></a>
#### Isolating Migration Execution

If you are deploying your application across multiple servers and running migrations as part of your deployment process, you likely do not want two servers attempting to migrate the database at the same time. To avoid this, you may use the `isolated` option when invoking the `migrate` command.

When the `isolated` option is provided, Laravel will acquire an atomic lock using your application's cache driver before attempting to run your migrations. All other attempts to run the `migrate` command while that lock is held will not execute; however, the command will still exit with a successful exit status code:

```shell
php artisan migrate --isolated
```

> [!WARNING]
> To utilize this feature, your application must be using the `memcached`, `redis`, `dynamodb`, `database`, `file`, or `array` cache driver as your application's default cache driver. In addition, all servers must be communicating with the same central cache server.

<a name="forcing-migrations-to-run-in-production"></a>
#### Forcing Migrations to Run in Production

Some migration operations are destructive, which means they may cause you to lose data. In order to protect you from running these commands against your production database, you will be prompted for confirmation before the commands are executed. To force the commands to run without a prompt, use the `--force` flag:

```shell
php artisan migrate --force
```

<a name="rolling-back-migrations"></a>
### Rolling Back Migrations

To roll back the latest migration operation, you may use the `rollback` Artisan command. This command rolls back the last "batch" of migrations, which may include multiple migration files:

```shell
php artisan migrate:rollback
```

You may roll back a limited number of migrations by providing the `step` option to the `rollback` command. For example, the following command will roll back the last five migrations:

```shell
php artisan migrate:rollback --step=5
```

You may roll back a specific "batch" of migrations by providing the `batch` option to the `rollback` command, where the `batch` option corresponds to a batch value within your application's `migrations` database table. For example, the following command will roll back all migrations in batch three:

```shell
php artisan migrate:rollback --batch=3
```

If you would like to see the SQL statements that will be executed by the migrations without actually running them, you may provide the `--pretend` flag to the `migrate:rollback` command:

```shell
php artisan migrate:rollback --pretend
```

The `migrate:reset` command will roll back all of your application's migrations:

```shell
php artisan migrate:reset
```

<a name="roll-back-migrate-using-a-single-command"></a>
#### Roll Back and Migrate Using a Single Command

The `migrate:refresh` command will roll back all of your migrations and then execute the `migrate` command. This command effectively re-creates your entire database:

```shell
php artisan migrate:refresh

# Refresh the database and run all database seeds...
php artisan migrate:refresh --seed
```

You may roll back and re-migrate a limited number of migrations by providing the `step` option to the `refresh` command. For example, the following command will roll back and re-migrate the last five migrations:

```shell
php artisan migrate:refresh --step=5
```

<a name="drop-all-tables-migrate"></a>
#### Drop All Tables and Migrate

The `migrate:fresh` command will drop all tables from the database and then execute the `migrate` command:

```shell
php artisan migrate:fresh

php artisan migrate:fresh --seed
```

By default, the `migrate:fresh` command only drops tables from the default database connection. However, you may use the `--database` option to specify the database connection that should be migrated. The database connection name should correspond to a connection defined in your application's `database` [configuration file](/docs/{{version}}/configuration):

```shell
php artisan migrate:fresh --database=admin
```

> [!WARNING]
> The `migrate:fresh` command will drop all database tables regardless of their prefix. This command should be used with caution when developing on a database that is shared with other applications.

<a name="tables"></a>
## Tables

<a name="creating-tables"></a>
### Creating Tables

To create a new database table, use the `create` method on the `Schema` facade. The `create` method accepts two arguments: the first is the name of the table, while the second is a closure which receives a `Blueprint` object that may be used to define the new table:

```php
use Illuminate\Database\Schema\Blueprint;
use Illuminate\Support\Facades\Schema;

Schema::create('users', function (Blueprint $table) {
    $table->id();
    $table->string('name');
    $table->string('email');
    $table->timestamps();
});
```

When creating the table, you may use any of the schema builder's [column methods](#creating-columns) to define the table's columns.

<a name="determining-table-column-existence"></a>
#### Determining Table / Column Existence

You may determine the existence of a table, column, or index using the `hasTable`, `hasColumn`, and `hasIndex` methods:

```php
if (Schema::hasTable('users')) {
    // The "users" table exists...
}

if (Schema::hasColumn('users', 'email')) {
    // The "users" table exists and has an "email" column...
}

if (Schema::hasIndex('users', ['email'], 'unique')) {
    // The "users" table exists and has a unique index on the "email" column...
}
```

<a name="database-connection-table-options"></a>
#### Database Connection and Table Options

If you want to perform a schema operation on a database connection that is not your application's default connection, use the `connection` method:

```php
Schema::connection('sqlite')->create('users', function (Blueprint $table) {
    $table->id();
});
```

In addition, a few other properties and methods may be used to define other aspects of the table's creation. The `engine` property may be used to specify the table's storage engine when using MariaDB or MySQL:

```php
Schema::create('users', function (Blueprint $table) {
    $table->engine('InnoDB');

    // ...
});
```

The `charset` and `collation` properties may be used to specify the character set and collation for the created table when using MariaDB or MySQL:

```php
Schema::create('users', function (Blueprint $table) {
    $table->charset('utf8mb4');
    $table->collation('utf8mb4_unicode_ci');

    // ...
});
```

The `temporary` method may be used to indicate that the table should be "temporary". Temporary tables are only visible to the current connection's database session and are dropped automatically when the connection is closed:

```php
Schema::create('calculations', function (Blueprint $table) {
    $table->temporary();

    // ...
});
```

If you would like to add a "comment" to a database table, you may invoke the `comment` method on the table instance. Table comments are currently only supported by MariaDB, MySQL, and PostgreSQL:

```php
Schema::create('calculations', function (Blueprint $table) {
    $table->comment('Business calculations');

    // ...
});
```

<a name="updating-tables"></a>
### Updating Tables

The `table` method on the `Schema` facade may be used to update existing tables. Like the `create` method, the `table` method accepts two arguments: the name of the table and a closure that receives a `Blueprint` instance you may use to add columns or indexes to the table:

```php
use Illuminate\Database\Schema\Blueprint;
use Illuminate\Support\Facades\Schema;

Schema::table('users', function (Blueprint $table) {
    $table->integer('votes');
});
```

<a name="renaming-and-dropping-tables"></a>
### Renaming / Dropping Tables

To rename an existing database table, use the `rename` method:

```php
use Illuminate\Support\Facades\Schema;

Schema::rename($from, $to);
```

To drop an existing table, you may use the `drop` or `dropIfExists` methods:

```php
Schema::drop('users');

Schema::dropIfExists('users');
```

<a name="renaming-tables-with-foreign-keys"></a>
#### Renaming Tables With Foreign Keys

Before renaming a table, you should verify that any foreign key constraints on the table have an explicit name in your migration files instead of letting Laravel assign a convention based name. Otherwise, the foreign key constraint name will refer to the old table name.

<a name="columns"></a>
## Columns

<a name="creating-columns"></a>
### Creating Columns

The `table` method on the `Schema` facade may be used to update existing tables. Like the `create` method, the `table` method accepts two arguments: the name of the table and a closure that receives an `Illuminate\Database\Schema\Blueprint` instance you may use to add columns to the table:

```php
use Illuminate\Database\Schema\Blueprint;
use Illuminate\Support\Facades\Schema;

Schema::table('users', function (Blueprint $table) {
    $table->integer('votes');
});
```

<a name="available-column-types"></a>
### Available Column Types

The schema builder blueprint offers a variety of methods that correspond to the different types of columns you can add to your database tables. Each of the available methods are listed in the table below:

<style>
    .collection-method-list > p {
        columns: 10.8em 3; -moz-columns: 10.8em 3; -webkit-columns: 10.8em 3;
    }

    .collection-method-list a {
        display: block;
        overflow: hidden;
        text-overflow: ellipsis;
        white-space: nowrap;
    }

    .collection-method code {
        font-size: 14px;
    }

    .collection-method:not(.first-collection-method) {
        margin-top: 50px;
    }
</style>

<a name="booleans-method-list"></a>
#### Boolean Types

<div class="collection-method-list" markdown="1">

[boolean](#column-method-boolean)

</div>

<a name="strings-and-texts-method-list"></a>
#### String & Text Types

<div class="collection-method-list" markdown="1">

[char](#column-method-char)
[longText](#column-method-longText)
[mediumText](#column-method-mediumText)
[string](#column-method-string)
[text](#column-method-text)
[tinyText](#column-method-tinyText)

</div>

<a name="numbers--method-list"></a>
#### Numeric Types

<div class="collection-method-list" markdown="1">

[bigIncrements](#column-method-bigIncrements)
[bigInteger](#column-method-bigInteger)
[decimal](#column-method-decimal)
[double](#column-method-double)
[float](#column-method-float)
[id](#column-method-id)
[increments](#column-method-increments)
[integer](#column-method-integer)
[mediumIncrements](#column-method-mediumIncrements)
[mediumInteger](#column-method-mediumInteger)
[smallIncrements](#column-method-smallIncrements)
[smallInteger](#column-method-smallInteger)
[tinyIncrements](#column-method-tinyIncrements)
[tinyInteger](#column-method-tinyInteger)
[unsignedBigInteger](#column-method-unsignedBigInteger)
[unsignedInteger](#column-method-unsignedInteger)
[unsignedMediumInteger](#column-method-unsignedMediumInteger)
[unsignedSmallInteger](#column-method-unsignedSmallInteger)
[unsignedTinyInteger](#column-method-unsignedTinyInteger)

</div>

<a name="dates-and-times-method-list"></a>
#### Date & Time Types

<div class="collection-method-list" markdown="1">

[dateTime](#column-method-dateTime)
[dateTimeTz](#column-method-dateTimeTz)
[date](#column-method-date)
[time](#column-method-time)
[timeTz](#column-method-timeTz)
[timestamp](#column-method-timestamp)
[timestamps](#column-method-timestamps)
[timestampsTz](#column-method-timestampsTz)
[softDeletes](#column-method-softDeletes)
[softDeletesTz](#column-method-softDeletesTz)
[year](#column-method-year)

</div>

<a name="binaries-method-list"></a>
#### Binary Types

<div class="collection-method-list" markdown="1">

[binary](#column-method-binary)

</div>

<a name="object-and-jsons-method-list"></a>
#### Object & Json Types

<div class="collection-method-list" markdown="1">

[json](#column-method-json)
[jsonb](#column-method-jsonb)

</div>

<a name="uuids-and-ulids-method-list"></a>
#### UUID & ULID Types

<div class="collection-method-list" markdown="1">

[ulid](#column-method-ulid)
[ulidMorphs](#column-method-ulidMorphs)
[uuid](#column-method-uuid)
[uuidMorphs](#column-method-uuidMorphs)
[nullableUlidMorphs](#column-method-nullableUlidMorphs)
[nullableUuidMorphs](#column-method-nullableUuidMorphs)

</div>

<a name="spatials-method-list"></a>
#### Spatial Types

<div class="collection-method-list" markdown="1">

[geography](#column-method-geography)
[geometry](#column-method-geometry)

</div>

<a name="relationship-method-list"></a>
#### Relationship Types

<div class="collection-method-list" markdown="1">

[foreignId](#column-method-foreignId)
[foreignIdFor](#column-method-foreignIdFor)
[foreignUlid](#column-method-foreignUlid)
[foreignUuid](#column-method-foreignUuid)
[foreignUuidFor](#column-method-foreignUuidFor)
[morphs](#column-method-morphs)
[nullableMorphs](#column-method-nullableMorphs)

</div>

<a name="specifics-method-list"></a>
#### Specialty Types

<div class="collection-method-list" markdown="1">

[enum](#column-method-enum)
[set](#column-method-set)
[macAddress](#column-method-macAddress)
[ipAddress](#column-method-ipAddress)
[rememberToken](#column-method-rememberToken)
[vector](#column-method-vector)

</div>

<a name="column-method-bigIncrements"></a>
#### `bigIncrements()` {.collection-method .first-collection-method}

The `bigIncrements` method creates an auto-incrementing `UNSIGNED BIGINT` (primary key) equivalent column:

```php
$table->bigIncrements('id');
```

<a name="column-method-bigInteger"></a>
#### `bigInteger()` {.collection-method}

The `bigInteger` method creates a `BIGINT` equivalent column:

```php
$table->bigInteger('votes');
```

<a name="column-method-binary"></a>
#### `binary()` {.collection-method}

The `binary` method creates a `BLOB` equivalent column:

```php
$table->binary('photo');
```

When utilizing MySQL, MariaDB, or SQL Server, you may pass `length` and `fixed` arguments to create `VARBINARY` or `BINARY` equivalent column:

```php
$table->binary('data', length: 16); // VARBINARY(16)

$table->binary('data', length: 16, fixed: true); // BINARY(16)
```

<a name="column-method-boolean"></a>
#### `boolean()` {.collection-method}

The `boolean` method creates a `BOOLEAN` equivalent column:

```php
$table->boolean('confirmed');
```

<a name="column-method-char"></a>
#### `char()` {.collection-method}

The `char` method creates a `CHAR` equivalent column with of a given length:

```php
$table->char('name', length: 100);
```

<a name="column-method-dateTimeTz"></a>
#### `dateTimeTz()` {.collection-method}

The `dateTimeTz` method creates a `DATETIME` (with timezone) equivalent column with an optional fractional seconds precision:

```php
$table->dateTimeTz('created_at', precision: 0);
```

<a name="column-method-dateTime"></a>
#### `dateTime()` {.collection-method}

The `dateTime` method creates a `DATETIME` equivalent column with an optional fractional seconds precision:

```php
$table->dateTime('created_at', precision: 0);
```

<a name="column-method-date"></a>
#### `date()` {.collection-method}

The `date` method creates a `DATE` equivalent column:

```php
$table->date('created_at');
```

<a name="column-method-decimal"></a>
#### `decimal()` {.collection-method}

The `decimal` method creates a `DECIMAL` equivalent column with the given precision (total digits) and scale (decimal digits):

```php
$table->decimal('amount', total: 8, places: 2);
```

<a name="column-method-double"></a>
#### `double()` {.collection-method}

The `double` method creates a `DOUBLE` equivalent column:

```php
$table->double('amount');
```

<a name="column-method-enum"></a>
#### `enum()` {.collection-method}

The `enum` method creates a `ENUM` equivalent column with the given valid values:

```php
$table->enum('difficulty', ['easy', 'hard']);
```

Of course, you may use the `Enum::cases()` method instead of manually defining an array of allowed values:

```php
use App\Enums\Difficulty;

$table->enum('difficulty', Difficulty::cases());
```

<a name="column-method-float"></a>
#### `float()` {.collection-method}

The `float` method creates a `FLOAT` equivalent column with the given precision:

```php
$table->float('amount', precision: 53);
```

<a name="column-method-foreignId"></a>
#### `foreignId()` {.collection-method}

The `foreignId` method creates an `UNSIGNED BIGINT` equivalent column:

```php
$table->foreignId('user_id');
```

<a name="column-method-foreignIdFor"></a>
#### `foreignIdFor()` {.collection-method}

The `foreignIdFor` method adds a `{column}_id` equivalent column for a given model class. The column type will be `UNSIGNED BIGINT`, `CHAR(36)`, or `CHAR(26)` depending on the model key type:

```php
$table->foreignIdFor(User::class);
```

<a name="column-method-foreignUlid"></a>
#### `foreignUlid()` {.collection-method}

The `foreignUlid` method creates a `ULID` equivalent column:

```php
$table->foreignUlid('user_id');
```

<a name="column-method-foreignUuid"></a>
#### `foreignUuid()` {.collection-method}

The `foreignUuid` method creates a `UUID` equivalent column:

```php
$table->foreignUuid('user_id');
```

<a name="column-method-foreignUuidFor"></a>
#### `foreignUuidFor()` {.collection-method}

The `foreignUuidFor` method adds a `{column}_id` UUID equivalent column for a given model class:

```php
$table->foreignUuidFor(User::class);
```

<a name="column-method-geography"></a>
#### `geography()` {.collection-method}

The `geography` method creates a `GEOGRAPHY` equivalent column with the given spatial type and SRID (Spatial Reference System Identifier):

```php
$table->geography('coordinates', subtype: 'point', srid: 4326);
```

> [!NOTE]
> Support for spatial types depends on your database driver. Please refer to your database's documentation. If your application is utilizing a PostgreSQL database, you must install the [PostGIS](https://postgis.net) extension before the `geography` method may be used.

<a name="column-method-geometry"></a>
#### `geometry()` {.collection-method}

The `geometry` method creates a `GEOMETRY` equivalent column with the given spatial type and SRID (Spatial Reference System Identifier):

```php
$table->geometry('positions', subtype: 'point', srid: 0);
```

> [!NOTE]
> Support for spatial types depends on your database driver. Please refer to your database's documentation. If your application is utilizing a PostgreSQL database, you must install the [PostGIS](https://postgis.net) extension before the `geometry` method may be used.

<a name="column-method-id"></a>
#### `id()` {.collection-method}

The `id` method is an alias of the `bigIncrements` method. By default, the method will create an `id` column; however, you may pass a column name if you would like to assign a different name to the column:

```php
$table->id();
```

<a name="column-method-increments"></a>
#### `increments()` {.collection-method}

The `increments` method creates an auto-incrementing `UNSIGNED INTEGER` equivalent column as a primary key:

```php
$table->increments('id');
```

<a name="column-method-integer"></a>
#### `integer()` {.collection-method}

The `integer` method creates an `INTEGER` equivalent column:

```php
$table->integer('votes');
```

<a name="column-method-ipAddress"></a>
#### `ipAddress()` {.collection-method}

The `ipAddress` method creates a `VARCHAR` equivalent column:

```php
$table->ipAddress('visitor');
```

When using PostgreSQL, an `INET` column will be created.

<a name="column-method-json"></a>
#### `json()` {.collection-method}

The `json` method creates a `JSON` equivalent column:

```php
$table->json('options');
```

When using SQLite, a `TEXT` column will be created.

<a name="column-method-jsonb"></a>
#### `jsonb()` {.collection-method}

The `jsonb` method creates a `JSONB` equivalent column:

```php
$table->jsonb('options');
```

When using SQLite, a `TEXT` column will be created.

<a name="column-method-longText"></a>
#### `longText()` {.collection-method}

The `longText` method creates a `LONGTEXT` equivalent column:

```php
$table->longText('description');
```

When utilizing MySQL or MariaDB, you may apply a `binary` character set to the column in order to create a `LONGBLOB` equivalent column:

```php
$table->longText('data')->charset('binary'); // LONGBLOB
```

<a name="column-method-macAddress"></a>
#### `macAddress()` {.collection-method}

The `macAddress` method creates a column that is intended to hold a MAC address. Some database systems, such as PostgreSQL, have a dedicated column type for this type of data. Other database systems will use a string equivalent column:

```php
$table->macAddress('device');
```

<a name="column-method-mediumIncrements"></a>
#### `mediumIncrements()` {.collection-method}

The `mediumIncrements` method creates an auto-incrementing `UNSIGNED MEDIUMINT` equivalent column as a primary key:

```php
$table->mediumIncrements('id');
```

<a name="column-method-mediumInteger"></a>
#### `mediumInteger()` {.collection-method}

The `mediumInteger` method creates a `MEDIUMINT` equivalent column:

```php
$table->mediumInteger('votes');
```

<a name="column-method-mediumText"></a>
#### `mediumText()` {.collection-method}

The `mediumText` method creates a `MEDIUMTEXT` equivalent column:

```php
$table->mediumText('description');
```

When utilizing MySQL or MariaDB, you may apply a `binary` character set to the column in order to create a `MEDIUMBLOB` equivalent column:

```php
$table->mediumText('data')->charset('binary'); // MEDIUMBLOB
```

<a name="column-method-morphs"></a>
#### `morphs()` {.collection-method}

The `morphs` method is a convenience method that adds a `{column}_type` `VARCHAR` equivalent column and a `{column}_id` equivalent column. The column type for the `{column}_id` will be `UNSIGNED BIGINT`, `CHAR(36)`, or `CHAR(26)` depending on the model key type.

This method is intended to be used when defining the columns necessary for a polymorphic [Eloquent relationship](/docs/{{version}}/eloquent-relationships). In the following example, `taggable_type` and `taggable_id` columns would be created:

```php
$table->morphs('taggable');
```

<a name="column-method-nullableMorphs"></a>
#### `nullableMorphs()` {.collection-method}

The method is similar to the [morphs](#column-method-morphs) method; however, the columns that are created will be "nullable":

```php
$table->nullableMorphs('taggable');
```

<a name="column-method-nullableUlidMorphs"></a>
#### `nullableUlidMorphs()` {.collection-method}

The method is similar to the [ulidMorphs](#column-method-ulidMorphs) method; however, the columns that are created will be "nullable":

```php
$table->nullableUlidMorphs('taggable');
```

<a name="column-method-nullableUuidMorphs"></a>
#### `nullableUuidMorphs()` {.collection-method}

The method is similar to the [uuidMorphs](#column-method-uuidMorphs) method; however, the columns that are created will be "nullable":

```php
$table->nullableUuidMorphs('taggable');
```

<a name="column-method-rememberToken"></a>
#### `rememberToken()` {.collection-method}

The `rememberToken` method creates a nullable, `VARCHAR(100)` equivalent column that is intended to store the current "remember me" [authentication token](/docs/{{version}}/authentication#remembering-users):

```php
$table->rememberToken();
```

<a name="column-method-set"></a>
#### `set()` {.collection-method}

The `set` method creates a `SET` equivalent column with the given list of valid values:

```php
$table->set('flavors', ['strawberry', 'vanilla']);
```

<a name="column-method-smallIncrements"></a>
#### `smallIncrements()` {.collection-method}

The `smallIncrements` method creates an auto-incrementing `UNSIGNED SMALLINT` equivalent column as a primary key:

```php
$table->smallIncrements('id');
```

<a name="column-method-smallInteger"></a>
#### `smallInteger()` {.collection-method}

The `smallInteger` method creates a `SMALLINT` equivalent column:

```php
$table->smallInteger('votes');
```

<a name="column-method-softDeletesTz"></a>
#### `softDeletesTz()` {.collection-method}

The `softDeletesTz` method adds a nullable `deleted_at` `TIMESTAMP` (with timezone) equivalent column with an optional fractional seconds precision. This column is intended to store the `deleted_at` timestamp needed for Eloquent's "soft delete" functionality:

```php
$table->softDeletesTz('deleted_at', precision: 0);
```

<a name="column-method-softDeletes"></a>
#### `softDeletes()` {.collection-method}

The `softDeletes` method adds a nullable `deleted_at` `TIMESTAMP` equivalent column with an optional fractional seconds precision. This column is intended to store the `deleted_at` timestamp needed for Eloquent's "soft delete" functionality:

```php
$table->softDeletes('deleted_at', precision: 0);
```

<a name="column-method-string"></a>
#### `string()` {.collection-method}

The `string` method creates a `VARCHAR` equivalent column of the given length:

```php
$table->string('name', length: 100);
```

<a name="column-method-text"></a>
#### `text()` {.collection-method}

The `text` method creates a `TEXT` equivalent column:

```php
$table->text('description');
```

When utilizing MySQL or MariaDB, you may apply a `binary` character set to the column in order to create a `BLOB` equivalent column:

```php
$table->text('data')->charset('binary'); // BLOB
```

<a name="column-method-timeTz"></a>
#### `timeTz()` {.collection-method}

The `timeTz` method creates a `TIME` (with timezone) equivalent column with an optional fractional seconds precision:

```php
$table->timeTz('sunrise', precision: 0);
```

<a name="column-method-time"></a>
#### `time()` {.collection-method}

The `time` method creates a `TIME` equivalent column with an optional fractional seconds precision:

```php
$table->time('sunrise', precision: 0);
```

<a name="column-method-timestampTz"></a>
#### `timestampTz()` {.collection-method}

The `timestampTz` method creates a `TIMESTAMP` (with timezone) equivalent column with an optional fractional seconds precision:

```php
$table->timestampTz('added_at', precision: 0);
```

<a name="column-method-timestamp"></a>
#### `timestamp()` {.collection-method}

The `timestamp` method creates a `TIMESTAMP` equivalent column with an optional fractional seconds precision:

```php
$table->timestamp('added_at', precision: 0);
```

<a name="column-method-timestampsTz"></a>
#### `timestampsTz()` {.collection-method}

The `timestampsTz` method creates `created_at` and `updated_at` `TIMESTAMP` (with timezone) equivalent columns with an optional fractional seconds precision:

```php
$table->timestampsTz(precision: 0);
```

<a name="column-method-timestamps"></a>
#### `timestamps()` {.collection-method}

The `timestamps` method creates `created_at` and `updated_at` `TIMESTAMP` equivalent columns with an optional fractional seconds precision:

```php
$table->timestamps(precision: 0);
```

<a name="column-method-tinyIncrements"></a>
#### `tinyIncrements()` {.collection-method}

The `tinyIncrements` method creates an auto-incrementing `UNSIGNED TINYINT` equivalent column as a primary key:

```php
$table->tinyIncrements('id');
```

<a name="column-method-tinyInteger"></a>
#### `tinyInteger()` {.collection-method}

The `tinyInteger` method creates a `TINYINT` equivalent column:

```php
$table->tinyInteger('votes');
```

<a name="column-method-tinyText"></a>
#### `tinyText()` {.collection-method}

The `tinyText` method creates a `TINYTEXT` equivalent column:

```php
$table->tinyText('notes');
```

When utilizing MySQL or MariaDB, you may apply a `binary` character set to the column in order to create a `TINYBLOB` equivalent column:

```php
$table->tinyText('data')->charset('binary'); // TINYBLOB
```

<a name="column-method-unsignedBigInteger"></a>
#### `unsignedBigInteger()` {.collection-method}

The `unsignedBigInteger` method creates an `UNSIGNED BIGINT` equivalent column:

```php
$table->unsignedBigInteger('votes');
```

<a name="column-method-unsignedInteger"></a>
#### `unsignedInteger()` {.collection-method}

The `unsignedInteger` method creates an `UNSIGNED INTEGER` equivalent column:

```php
$table->unsignedInteger('votes');
```

<a name="column-method-unsignedMediumInteger"></a>
#### `unsignedMediumInteger()` {.collection-method}

The `unsignedMediumInteger` method creates an `UNSIGNED MEDIUMINT` equivalent column:

```php
$table->unsignedMediumInteger('votes');
```

<a name="column-method-unsignedSmallInteger"></a>
#### `unsignedSmallInteger()` {.collection-method}

The `unsignedSmallInteger` method creates an `UNSIGNED SMALLINT` equivalent column:

```php
$table->unsignedSmallInteger('votes');
```

<a name="column-method-unsignedTinyInteger"></a>
#### `unsignedTinyInteger()` {.collection-method}

The `unsignedTinyInteger` method creates an `UNSIGNED TINYINT` equivalent column:

```php
$table->unsignedTinyInteger('votes');
```

<a name="column-method-ulidMorphs"></a>
#### `ulidMorphs()` {.collection-method}

The `ulidMorphs` method is a convenience method that adds a `{column}_type` `VARCHAR` equivalent column and a `{column}_id` `CHAR(26)` equivalent column.

This method is intended to be used when defining the columns necessary for a polymorphic [Eloquent relationship](/docs/{{version}}/eloquent-relationships) that use ULID identifiers. In the following example, `taggable_type` and `taggable_id` columns would be created:

```php
$table->ulidMorphs('taggable');
```

<a name="column-method-uuidMorphs"></a>
#### `uuidMorphs()` {.collection-method}

The `uuidMorphs` method is a convenience method that adds a `{column}_type` `VARCHAR` equivalent column and a `{column}_id` `CHAR(36)` equivalent column.

This method is intended to be used when defining the columns necessary for a [polymorphic Eloquent relationship](/docs/{{version}}/eloquent-relationships#polymorphic-relationships) that use UUID identifiers. In the following example, `taggable_type` and `taggable_id` columns would be created:

```php
$table->uuidMorphs('taggable');
```

<a name="column-method-ulid"></a>
#### `ulid()` {.collection-method}

The `ulid` method creates a `ULID` equivalent column:

```php
$table->ulid('id');
```

<a name="column-method-uuid"></a>
#### `uuid()` {.collection-method}

The `uuid` method creates a `UUID` equivalent column:

```php
$table->uuid('id');
```

<a name="column-method-vector"></a>
#### `vector()` {.collection-method}

The `vector` method creates a `vector` equivalent column:

```php
$table->vector('embedding', dimensions: 100);
```

When utilizing PostgreSQL, the `pgvector` extension must be loaded before `vector` columns can be created:

```php
Schema::ensureVectorExtensionExists();
```

<a name="column-method-year"></a>
#### `year()` {.collection-method}

The `year` method creates a `YEAR` equivalent column:

```php
$table->year('birth_year');
```

<a name="column-modifiers"></a>
### Column Modifiers

In addition to the column types listed above, there are several column "modifiers" you may use when adding a column to a database table. For example, to make the column "nullable", you may use the `nullable` method:

```php
use Illuminate\Database\Schema\Blueprint;
use Illuminate\Support\Facades\Schema;

Schema::table('users', function (Blueprint $table) {
    $table->string('email')->nullable();
});
```

The following table contains all of the available column modifiers. This list does not include [index modifiers](#creating-indexes):

<div class="overflow-auto">

| Modifier                            | Description                                                                                    |
| ----------------------------------- | ---------------------------------------------------------------------------------------------- |
| `->after('column')`                 | Place the column "after" another column (MariaDB / MySQL).                                     |
| `->autoIncrement()`                 | Set `INTEGER` columns as auto-incrementing (primary key).                                      |
| `->charset('utf8mb4')`              | Specify a character set for the column (MariaDB / MySQL).                                      |
| `->collation('utf8mb4_unicode_ci')` | Specify a collation for the column.                                                            |
| `->comment('my comment')`           | Add a comment to a column (MariaDB / MySQL / PostgreSQL).                                      |
| `->default($value)`                 | Specify a "default" value for the column.                                                      |
| `->first()`                         | Place the column "first" in the table (MariaDB / MySQL).                                       |
| `->from($integer)`                  | Set the starting value of an auto-incrementing field (MariaDB / MySQL / PostgreSQL).           |
| `->instant()`                       | Add or modify the column using an instant operation (MySQL).                                   |
| `->invisible()`                     | Make the column "invisible" to `SELECT *` queries (MariaDB / MySQL).                           |
| `->lock($mode)`                     | Specify a lock mode for the column operation (MySQL).                                          |
| `->nullable($value = true)`         | Allow `NULL` values to be inserted into the column.                                            |
| `->storedAs($expression)`           | Create a stored generated column (MariaDB / MySQL / PostgreSQL / SQLite).                      |
| `->unsigned()`                      | Set `INTEGER` columns as `UNSIGNED` (MariaDB / MySQL).                                         |
| `->using($expression)`              | Specify a casting expression when changing the column type (PostgreSQL).                       |
| `->useCurrent()`                    | Set `TIMESTAMP` columns to use `CURRENT_TIMESTAMP` as default value.                           |
| `->useCurrentOnUpdate()`            | Set `TIMESTAMP` columns to use `CURRENT_TIMESTAMP` when a record is updated (MariaDB / MySQL). |
| `->virtualAs($expression)`          | Create a virtual generated column (MariaDB / MySQL / SQLite).                                  |
| `->generatedAs($expression)`        | Create an identity column with specified sequence options (PostgreSQL).                        |
| `->always()`                        | Defines the precedence of sequence values over input for an identity column (PostgreSQL).      |

</div>

<a name="default-expressions"></a>
#### Default Expressions

The `default` modifier accepts a value or an `Illuminate\Database\Query\Expression` instance. Using an `Expression` instance will prevent Laravel from wrapping the value in quotes and allow you to use database specific functions. One situation where this is particularly useful is when you need to assign default values to JSON columns:

```php
<?php

use Illuminate\Support\Facades\Schema;
use Illuminate\Database\Schema\Blueprint;
use Illuminate\Database\Query\Expression;
use Illuminate\Database\Migrations\Migration;

return new class extends Migration
{
    /**
     * Run the migrations.
     */
    public function up(): void
    {
        Schema::create('flights', function (Blueprint $table) {
            $table->id();
            $table->json('movies')->default(new Expression('(JSON_ARRAY())'));
            $table->timestamps();
        });
    }
};
```

> [!WARNING]
> Support for default expressions depends on your database driver, database version, and the field type. Please refer to your database's documentation.

<a name="column-order"></a>
#### Column Order

When using the MariaDB or MySQL database, the `after` method may be used to add columns after an existing column in the schema:

```php
$table->after('password', function (Blueprint $table) {
    $table->string('address_line1');
    $table->string('address_line2');
    $table->string('city');
});
```

<a name="instant-column-operations"></a>
#### Instant Column Operations

When using MySQL, you may chain the `instant` modifier onto a column definition to indicate that the column should be added or modified using MySQL's "instant" algorithm. This algorithm allows certain schema changes to be performed without a full table rebuild, making them nearly instantaneous regardless of table size:

```php
$table->string('name')->nullable()->instant();
```

Instant column additions can only append columns to the end of the table, so the `instant` modifier cannot be combined with the `after` or `first` modifiers. In addition, the algorithm does not support all column types or operations. If the requested operation is incompatible, MySQL will raise an error.

Please refer to [MySQL's documentation](https://dev.mysql.com/doc/refman/8.0/en/innodb-online-ddl-operations.html) to determine which operations are compatible with instant column modifications.

<a name="ddl-locking"></a>
#### DDL Locking

When using MySQL, you may chain the `lock` modifier onto column, index, or foreign key definitions to control table locking during schema operations. MySQL supports several lock modes: `none` allows concurrent reads and writes, `shared` allows concurrent reads but blocks writes, `exclusive` blocks all concurrent access, and `default` lets MySQL choose the most appropriate mode:

```php
$table->string('name')->lock('none');

$table->index('email')->lock('shared');
```

If the requested lock mode is incompatible with the operation, MySQL will raise an error. The `lock` modifier may be combined with the `instant` modifier to further optimize schema changes:

```php
$table->string('name')->instant()->lock('none');
```

<a name="modifying-columns"></a>
### Modifying Columns

The `change` method allows you to modify the type and attributes of existing columns. For example, you may wish to increase the size of a `string` column. To see the `change` method in action, let's increase the size of the `name` column from 25 to 50. To accomplish this, we simply define the new state of the column and then call the `change` method:

```php
Schema::table('users', function (Blueprint $table) {
    $table->string('name', 50)->change();
});
```

When modifying a column, you must explicitly include all the modifiers you want to keep on the column definition - any missing attribute will be dropped. For example, to retain the `unsigned`, `default`, and `comment` attributes, you must call each modifier explicitly when changing the column:

```php
Schema::table('users', function (Blueprint $table) {
    $table->integer('votes')->unsigned()->default(1)->comment('my comment')->change();
});
```

The `change` method does not change the indexes of the column. Therefore, you may use index modifiers to explicitly add or drop an index when modifying the column:

```php
// Add an index...
$table->bigIncrements('id')->primary()->change();

// Drop an index...
$table->char('postal_code', 10)->unique(false)->change();
```

<a name="postgresql-column-modifications"></a>
#### PostgreSQL Column Modifications

When changing a column's type on PostgreSQL, you may use the `using` modifier to specify the expression used to cast the existing values:

```php
Schema::table('users', function (Blueprint $table) {
    $table->date('birthday')->using('birthday::date')->change();
});
```

<a name="renaming-columns"></a>
### Renaming Columns

To rename a column, you may use the `renameColumn` method provided by the schema builder:

```php
Schema::table('users', function (Blueprint $table) {
    $table->renameColumn('from', 'to');
});
```

<a name="dropping-columns"></a>
### Dropping Columns

To drop a column, you may use the `dropColumn` method on the schema builder:

```php
Schema::table('users', function (Blueprint $table) {
    $table->dropColumn('votes');
});
```

You may drop multiple columns from a table by passing an array of column names to the `dropColumn` method:

```php
Schema::table('users', function (Blueprint $table) {
    $table->dropColumn(['votes', 'avatar', 'location']);
});
```

<a name="available-command-aliases"></a>
#### Available Command Aliases

Laravel provides several convenient methods related to dropping common types of columns. Each of these methods is described in the table below:

<div class="overflow-auto">

| Command                             | Description                                           |
| ----------------------------------- | ----------------------------------------------------- |
| `$table->dropMorphs('morphable');`  | Drop the `morphable_type` and `morphable_id` columns. |
| `$table->dropRememberToken();`      | Drop the `remember_token` column.                     |
| `$table->dropSoftDeletes();`        | Drop the `deleted_at` column.                         |
| `$table->dropSoftDeletesTz();`      | Alias of `dropSoftDeletes()` method.                  |
| `$table->dropTimestamps();`         | Drop the `created_at` and `updated_at` columns.       |
| `$table->dropTimestampsTz();`       | Alias of `dropTimestamps()` method.                   |

</div>

<a name="indexes"></a>
## Indexes

<a name="creating-indexes"></a>
### Creating Indexes

The Laravel schema builder supports several types of indexes. The following example creates a new `email` column and specifies that its values should be unique. To create the index, we can chain the `unique` method onto the column definition:

```php
use Illuminate\Database\Schema\Blueprint;
use Illuminate\Support\Facades\Schema;

Schema::table('users', function (Blueprint $table) {
    $table->string('email')->unique();
});
```

Alternatively, you may create the index after defining the column. To do so, you should call the `unique` method on the schema builder blueprint. This method accepts the name of the column that should receive a unique index:

```php
$table->unique('email');
```

You may even pass an array of columns to an index method to create a compound (or composite) index:

```php
$table->index(['account_id', 'created_at']);
```

When creating an index, Laravel will automatically generate an index name based on the table, column names, and the index type, but you may pass a second argument to the method to specify the index name yourself:

```php
$table->unique('email', 'unique_email');
```

<a name="available-index-types"></a>
#### Available Index Types

Laravel's schema builder blueprint class provides methods for creating each type of index supported by Laravel. Each index method accepts an optional second argument to specify the name of the index. If omitted, the name will be derived from the names of the table and column(s) used for the index, as well as the index type. Each of the available index methods is described in the table below:

<div class="overflow-auto">

| Command                                          | Description                                                    |
| ------------------------------------------------ | -------------------------------------------------------------- |
| `$table->primary('id');`                         | Adds a primary key.                                            |
| `$table->primary(['id', 'parent_id']);`          | Adds composite keys.                                           |
| `$table->unique('email');`                       | Adds a unique index.                                           |
| `$table->index('state');`                        | Adds an index.                                                 |
| `$table->fullText('body');`                      | Adds a full text index (MariaDB / MySQL / PostgreSQL).         |
| `$table->fullText('body')->language('english');` | Adds a full text index of the specified language (PostgreSQL). |
| `$table->spatialIndex('location');`              | Adds a spatial index (except SQLite).                          |

</div>

<a name="online-index-creation"></a>
#### Online Index Creation

By default, creating an index on a large table can lock the table and block reads or writes while the index is being built. When using PostgreSQL or SQL Server, you may chain the `online` method onto an index definition to create the index without locking the table, allowing your application to continue reading and writing data during index creation:

```php
$table->string('email')->unique()->online();
```

When using PostgreSQL, this adds the `CONCURRENTLY` option to the index creation statement. When using SQL Server, this adds the `WITH (online = on)` option.

<a name="renaming-indexes"></a>
### Renaming Indexes

To rename an index, you may use the `renameIndex` method provided by the schema builder blueprint. This method accepts the current index name as its first argument and the desired name as its second argument:

```php
$table->renameIndex('from', 'to')
```

<a name="dropping-indexes"></a>
### Dropping Indexes

To drop an index, you must specify the index's name. By default, Laravel automatically assigns an index name based on the table name, the name of the indexed column, and the index type. Here are some examples:

<div class="overflow-auto">

| Command                                                  | Description                                                 |
| -------------------------------------------------------- | ----------------------------------------------------------- |
| `$table->dropPrimary('users_id_primary');`               | Drop a primary key from the "users" table.                  |
| `$table->dropUnique('users_email_unique');`              | Drop a unique index from the "users" table.                 |
| `$table->dropIndex('geo_state_index');`                  | Drop a basic index from the "geo" table.                    |
| `$table->dropFullText('posts_body_fulltext');`           | Drop a full text index from the "posts" table.              |
| `$table->dropSpatialIndex('geo_location_spatialindex');` | Drop a spatial index from the "geo" table  (except SQLite). |

</div>

If you pass an array of columns into a method that drops indexes, the conventional index name will be generated based on the table name, columns, and index type:

```php
Schema::table('geo', function (Blueprint $table) {
    $table->dropIndex(['state']); // Drops index 'geo_state_index'
});
```

<a name="foreign-key-constraints"></a>
### Foreign Key Constraints

Laravel also provides support for creating foreign key constraints, which are used to force referential integrity at the database level. For example, let's define a `user_id` column on the `posts` table that references the `id` column on a `users` table:

```php
use Illuminate\Database\Schema\Blueprint;
use Illuminate\Support\Facades\Schema;

Schema::table('posts', function (Blueprint $table) {
    $table->unsignedBigInteger('user_id');

    $table->foreign('user_id')->references('id')->on('users');
});
```

Since this syntax is rather verbose, Laravel provides additional, terser methods that use conventions to provide a better developer experience. When using the `foreignId` method to create your column, the example above can be rewritten like so:

```php
Schema::table('posts', function (Blueprint $table) {
    $table->foreignId('user_id')->constrained();
});
```

The `foreignId` method creates an `UNSIGNED BIGINT` equivalent column, while the `constrained` method will use conventions to determine the table and column being referenced. If your table name does not match Laravel's conventions, you may manually provide it to the `constrained` method. In addition, the name that should be assigned to the generated index may be specified as well:

```php
Schema::table('posts', function (Blueprint $table) {
    $table->foreignId('user_id')->constrained(
        table: 'users', indexName: 'posts_user_id'
    );
});
```

You may also specify the desired action for the "on delete" and "on update" properties of the constraint:

```php
$table->foreignId('user_id')
    ->constrained()
    ->onUpdate('cascade')
    ->onDelete('cascade');
```

An alternative, expressive syntax is also provided for these actions:

<div class="overflow-auto">

| Method                        | Description                                       |
| ----------------------------- | ------------------------------------------------- |
| `$table->cascadeOnUpdate();`  | Updates should cascade.                           |
| `$table->restrictOnUpdate();` | Updates should be restricted.                     |
| `$table->nullOnUpdate();`     | Updates should set the foreign key value to null. |
| `$table->noActionOnUpdate();` | No action on updates.                             |
| `$table->cascadeOnDelete();`  | Deletes should cascade.                           |
| `$table->restrictOnDelete();` | Deletes should be restricted.                     |
| `$table->nullOnDelete();`     | Deletes should set the foreign key value to null. |
| `$table->noActionOnDelete();` | Prevents deletes if child records exist.          |

</div>

Any additional [column modifiers](#column-modifiers) must be called before the `constrained` method:

```php
$table->foreignId('user_id')
    ->nullable()
    ->constrained();
```

<a name="dropping-foreign-keys"></a>
#### Dropping Foreign Keys

To drop a foreign key, you may use the `dropForeign` method, passing the name of the foreign key constraint to be deleted as an argument. Foreign key constraints use the same naming convention as indexes. In other words, the foreign key constraint name is based on the name of the table and the columns in the constraint, followed by a "\_foreign" suffix:

```php
$table->dropForeign('posts_user_id_foreign');
```

Alternatively, you may pass an array containing the column name that holds the foreign key to the `dropForeign` method. The array will be converted to a foreign key constraint name using Laravel's constraint naming conventions:

```php
$table->dropForeign(['user_id']);
```

<a name="toggling-foreign-key-constraints"></a>
#### Toggling Foreign Key Constraints

You may enable or disable foreign key constraints within your migrations by using the following methods:

```php
Schema::enableForeignKeyConstraints();

Schema::disableForeignKeyConstraints();

Schema::withoutForeignKeyConstraints(function () {
    // Constraints disabled within this closure...
});
```

> [!WARNING]
> SQLite disables foreign key constraints by default. When using SQLite, make sure to [enable foreign key support](/docs/{{version}}/database#configuration) in your database configuration before attempting to create them in your migrations.

<a name="events"></a>
## Events

For convenience, each migration operation will dispatch an [event](/docs/{{version}}/events). All of the following events extend the base `Illuminate\Database\Events\MigrationEvent` class:

<div class="overflow-auto">

| Class                                            | Description                                      |
| ------------------------------------------------ | ------------------------------------------------ |
| `Illuminate\Database\Events\DatabaseRefreshed`   | The `migrate:refresh` command has finished.      |
| `Illuminate\Database\Events\MigrationsStarted`   | A batch of migrations is about to be executed.   |
| `Illuminate\Database\Events\MigrationsEnded`     | A batch of migrations has finished.              |
| `Illuminate\Database\Events\MigrationStarted`    | A single migration is about to be executed.      |
| `Illuminate\Database\Events\MigrationEnded`      | A single migration has finished.                 |
| `Illuminate\Database\Events\NoPendingMigrations` | A migration command found no pending migrations. |
| `Illuminate\Database\Events\SchemaDumped`        | A database schema dump has finished.             |
| `Illuminate\Database\Events\SchemaLoaded`        | An existing database schema dump has loaded.     |

</div>


---

# Laravel Mix

*Sección: Laravel | Origen: https://laravel.com/docs/13.x/mix*

- [Introduction](#introduction)

<a name="introduction"></a>
## Introduction

> [!WARNING]
> Laravel Mix is a legacy package that is no longer actively maintained. [Vite](/docs/{{version}}/vite) may be used as a modern alternative.

[Laravel Mix](https://github.com/laravel-mix/laravel-mix), a package developed by [Laracasts](https://laracasts.com) creator Jeffrey Way, provides a fluent API for defining [webpack](https://webpack.js.org) build steps for your Laravel application using several common CSS and JavaScript pre-processors.

In other words, Mix makes it a cinch to compile and minify your application's CSS and JavaScript files. Through simple method chaining, you can fluently define your asset pipeline. For example:

```js
mix.js('resources/js/app.js', 'public/js')
    .postCss('resources/css/app.css', 'public/css');
```

If you've ever been confused and overwhelmed about getting started with webpack and asset compilation, you will love Laravel Mix. However, you are not required to use it while developing your application; you are free to use any asset pipeline tool you wish, or even none at all.

> [!NOTE]
> Vite has replaced Laravel Mix in new Laravel installations. For Mix documentation, please visit the [official Laravel Mix](https://laravel-mix.com/) website. If you would like to switch to Vite, please see our [Vite migration guide](https://github.com/laravel/vite-plugin/blob/main/UPGRADE.md#migrating-from-laravel-mix-to-vite).


---

# Mocking

*Sección: Laravel | Origen: https://laravel.com/docs/13.x/mocking*

- [Introduction](#introduction)
- [Mocking Objects](#mocking-objects)
- [Mocking Facades](#mocking-facades)
    - [Facade Spies](#facade-spies)
- [Interacting With Time](#interacting-with-time)

<a name="introduction"></a>
## Introduction

When testing Laravel applications, you may wish to "mock" certain aspects of your application so they are not actually executed during a given test. For example, when testing a controller that dispatches an event, you may wish to mock the event listeners so they are not actually executed during the test. This allows you to only test the controller's HTTP response without worrying about the execution of the event listeners since the event listeners can be tested in their own test case.

Laravel provides helpful methods for mocking events, jobs, and other facades out of the box. These helpers primarily provide a convenience layer over Mockery so you do not have to manually make complicated Mockery method calls.

<a name="mocking-objects"></a>
## Mocking Objects

When mocking an object that is going to be injected into your application via Laravel's [service container](/docs/{{version}}/container), you will need to bind your mocked instance into the container as an `instance` binding. This will instruct the container to use your mocked instance of the object instead of constructing the object itself:

```php tab=Pest
use App\Service;
use Mockery;
use Mockery\MockInterface;

test('something can be mocked', function () {
    $this->instance(
        Service::class,
        Mockery::mock(Service::class, function (MockInterface $mock) {
            $mock->expects('process');
        })
    );
});
```

```php tab=PHPUnit
use App\Service;
use Mockery;
use Mockery\MockInterface;

public function test_something_can_be_mocked(): void
{
    $this->instance(
        Service::class,
        Mockery::mock(Service::class, function (MockInterface $mock) {
            $mock->expects('process');
        })
    );
}
```

In order to make this more convenient, you may use the `mock` method that is provided by Laravel's base test case class. For example, the following example is equivalent to the example above:

```php
use App\Service;
use Mockery\MockInterface;

$mock = $this->mock(Service::class, function (MockInterface $mock) {
    $mock->expects('process');
});
```

You may use the `partialMock` method when you only need to mock a few methods of an object. The methods that are not mocked will be executed normally when called:

```php
use App\Service;
use Mockery\MockInterface;

$mock = $this->partialMock(Service::class, function (MockInterface $mock) {
    $mock->expects('process');
});
```

Similarly, if you want to [spy](http://docs.mockery.io/en/latest/reference/spies.html) on an object, Laravel's base test case class offers a `spy` method as a convenient wrapper around the `Mockery::spy` method. Spies are similar to mocks; however, spies record any interaction between the spy and the code being tested, allowing you to make assertions after the code is executed:

```php
use App\Service;

$spy = $this->spy(Service::class);

// ...

$spy->shouldHaveReceived('process');
```

<a name="mocking-facades"></a>
## Mocking Facades

Unlike traditional static method calls, [facades](/docs/{{version}}/facades) (including [real-time facades](/docs/{{version}}/facades#real-time-facades)) may be mocked. This provides a great advantage over traditional static methods and grants you the same testability that you would have if you were using traditional dependency injection. When testing, you may often want to mock a call to a Laravel facade that occurs in one of your controllers. For example, consider the following controller action:

```php
<?php

namespace App\Http\Controllers;

use Illuminate\Support\Facades\Cache;

class UserController extends Controller
{
    /**
     * Retrieve a list of all users of the application.
     */
    public function index(): array
    {
        $value = Cache::get('key');

        return [
            // ...
        ];
    }
}
```

We can mock the call to the `Cache` facade by using the `expects` method, which will return an instance of a [Mockery](https://github.com/padraic/mockery) mock. Since facades are actually resolved and managed by the Laravel [service container](/docs/{{version}}/container), they have much more testability than a typical static class. For example, let's mock our call to the `Cache` facade's `get` method:

```php tab=Pest
<?php

use Illuminate\Support\Facades\Cache;

test('get index', function () {
    Cache::expects('get')
        ->with('key')
        ->andReturn('value');

    $response = $this->get('/users');

    // ...
});
```

```php tab=PHPUnit
<?php

namespace Tests\Feature;

use Illuminate\Support\Facades\Cache;
use Tests\TestCase;

class UserControllerTest extends TestCase
{
    public function test_get_index(): void
    {
        Cache::expects('get')
            ->with('key')
            ->andReturn('value');

        $response = $this->get('/users');

        // ...
    }
}
```

> [!WARNING]
> You should not mock the `Request` facade. Instead, pass the input you desire into the [HTTP testing methods](/docs/{{version}}/http-tests) such as `get` and `post` when running your test. Likewise, instead of mocking the `Config` facade, call the `Config::set` method in your tests.

<a name="facade-spies"></a>
### Facade Spies

If you would like to [spy](http://docs.mockery.io/en/latest/reference/spies.html) on a facade, you may call the `spy` method on the corresponding facade. Spies are similar to mocks; however, spies record any interaction between the spy and the code being tested, allowing you to make assertions after the code is executed:

```php tab=Pest
<?php

use Illuminate\Support\Facades\Cache;

test('values are stored in cache', function () {
    Cache::spy();

    $response = $this->get('/');

    $response->assertStatus(200);

    Cache::shouldHaveReceived('put')->with('name', 'Taylor', 10);
});
```

```php tab=PHPUnit
use Illuminate\Support\Facades\Cache;

public function test_values_are_stored_in_cache(): void
{
    Cache::spy();

    $response = $this->get('/');

    $response->assertStatus(200);

    Cache::shouldHaveReceived('put')->with('name', 'Taylor', 10);
}
```

<a name="interacting-with-time"></a>
## Interacting With Time

When testing, you may occasionally need to modify the time returned by helpers such as `now` or `Illuminate\Support\Carbon::now()`. Thankfully, Laravel's base feature test class includes helpers that allow you to manipulate the current time:

```php tab=Pest
test('time can be manipulated', function () {
    // Travel into the future...
    $this->travel(5)->milliseconds();
    $this->travel(5)->seconds();
    $this->travel(5)->minutes();
    $this->travel(5)->hours();
    $this->travel(5)->days();
    $this->travel(5)->weeks();
    $this->travel(5)->years();

    // Travel into the past...
    $this->travel(-5)->hours();

    // Travel to an explicit time...
    $this->travelTo(now()->minus(hours: 6));

    // Return back to the present time...
    $this->travelBack();
});
```

```php tab=PHPUnit
public function test_time_can_be_manipulated(): void
{
    // Travel into the future...
    $this->travel(5)->milliseconds();
    $this->travel(5)->seconds();
    $this->travel(5)->minutes();
    $this->travel(5)->hours();
    $this->travel(5)->days();
    $this->travel(5)->weeks();
    $this->travel(5)->years();

    // Travel into the past...
    $this->travel(-5)->hours();

    // Travel to an explicit time...
    $this->travelTo(now()->minus(hours: 6));

    // Return back to the present time...
    $this->travelBack();
}
```

You may also provide a closure to the various time travel methods. The closure will be invoked with time frozen at the specified time. Once the closure has executed, time will resume as normal:

```php
$this->travel(5)->days(function () {
    // Test something five days into the future...
});

$this->travelTo(now()->mins(days: 10), function () {
    // Test something during a given moment...
});
```

The `freezeTime` method may be used to freeze the current time. Similarly, the `freezeSecond` method will freeze the current time but at the start of the current second:

```php
use Illuminate\Support\Carbon;

// Freeze time and resume normal time after executing closure...
$this->freezeTime(function (Carbon $time) {
    // ...
});

// Freeze time at the current second and resume normal time after executing closure...
$this->freezeSecond(function (Carbon $time) {
    // ...
})
```

As you would expect, all of the methods discussed above are primarily useful for testing time sensitive application behavior, such as locking inactive posts on a discussion forum:

```php tab=Pest
use App\Models\Thread;

test('forum threads lock after one week of inactivity', function () {
    $thread = Thread::factory()->create();

    $this->travel(1)->week();

    expect($thread->isLockedByInactivity())->toBeTrue();
});
```

```php tab=PHPUnit
use App\Models\Thread;

public function test_forum_threads_lock_after_one_week_of_inactivity()
{
    $thread = Thread::factory()->create();

    $this->travel(1)->week();

    $this->assertTrue($thread->isLockedByInactivity());
}
```


---

# MongoDB

*Sección: Laravel | Origen: https://laravel.com/docs/13.x/mongodb*

- [Introduction](#introduction)
- [Installation](#installation)
    - [MongoDB Driver](#mongodb-driver)
    - [Starting a MongoDB Server](#starting-a-mongodb-server)
    - [Install the Laravel MongoDB Package](#install-the-laravel-mongodb-package)
- [Configuration](#configuration)
- [Features](#features)

<a name="introduction"></a>
## Introduction

[MongoDB](https://www.mongodb.com/resources/products/fundamentals/why-use-mongodb) is one of the most popular NoSQL document-oriented database, used for its high write load (useful for analytics or IoT) and high availability (easy to set replica sets with automatic failover). It can also shard the database easily for horizontal scalability and has a powerful query language for doing aggregation, text search or geospatial queries.

Instead of storing data in tables of rows or columns like SQL databases, each record in a MongoDB database is a document described in BSON, a binary representation of the data. Applications can then retrieve this information in a JSON format. It supports a wide variety of data types, including documents, arrays, embedded documents, and binary data.

Before using MongoDB with Laravel, we recommend installing and using the `mongodb/laravel-mongodb` package via Composer. The `laravel-mongodb` package is officially maintained by MongoDB, and while MongoDB is natively supported by PHP through the MongoDB driver, the [Laravel MongoDB](https://www.mongodb.com/docs/drivers/php/laravel-mongodb/) package provides a richer integration with Eloquent and other Laravel features:

```shell
composer require mongodb/laravel-mongodb
```

<a name="installation"></a>
## Installation

<a name="mongodb-driver"></a>
### MongoDB Driver

To connect to a MongoDB database, the `mongodb` PHP extension is required. If you are developing locally using [Laravel Herd](https://herd.laravel.com) or installed PHP via `php.new`, you already have this extension installed on your system. However, if you need to install the extension manually, you may do so via PECL:

```shell
pecl install mongodb
```

Alternatively, you may install the extension using [PIE](https://github.com/php/pie), the official PHP extension installer:

```shell
pie install mongodb/mongodb-extension
```

For more information on installing the MongoDB PHP extension, check out the [MongoDB PHP extension installation instructions](https://www.php.net/manual/en/mongodb.installation.php).

<a name="starting-a-mongodb-server"></a>
### Starting a MongoDB Server

The MongoDB Community Server can be used to run MongoDB locally and is available for installation on Windows, macOS, Linux, or as a Docker container. To learn how to install MongoDB, please refer to the [official MongoDB Community installation guide](https://docs.mongodb.com/manual/administration/install-community/).

The connection string for the MongoDB server can be set in your `.env` file:

```ini
MONGODB_URI="mongodb://localhost:27017"
MONGODB_DATABASE="laravel_app"
```

For hosting MongoDB in the cloud, consider using [MongoDB Atlas](https://www.mongodb.com/cloud/atlas).
To access a MongoDB Atlas cluster locally from your application, you will need to [add your own IP address in the cluster's network settings](https://www.mongodb.com/docs/atlas/security/add-ip-address-to-list/) to the project's IP Access List.

The connection string for MongoDB Atlas can also be set in your `.env` file:

```ini
MONGODB_URI="mongodb+srv://<username>:<password>@<cluster>.mongodb.net/<dbname>?retryWrites=true&w=majority"
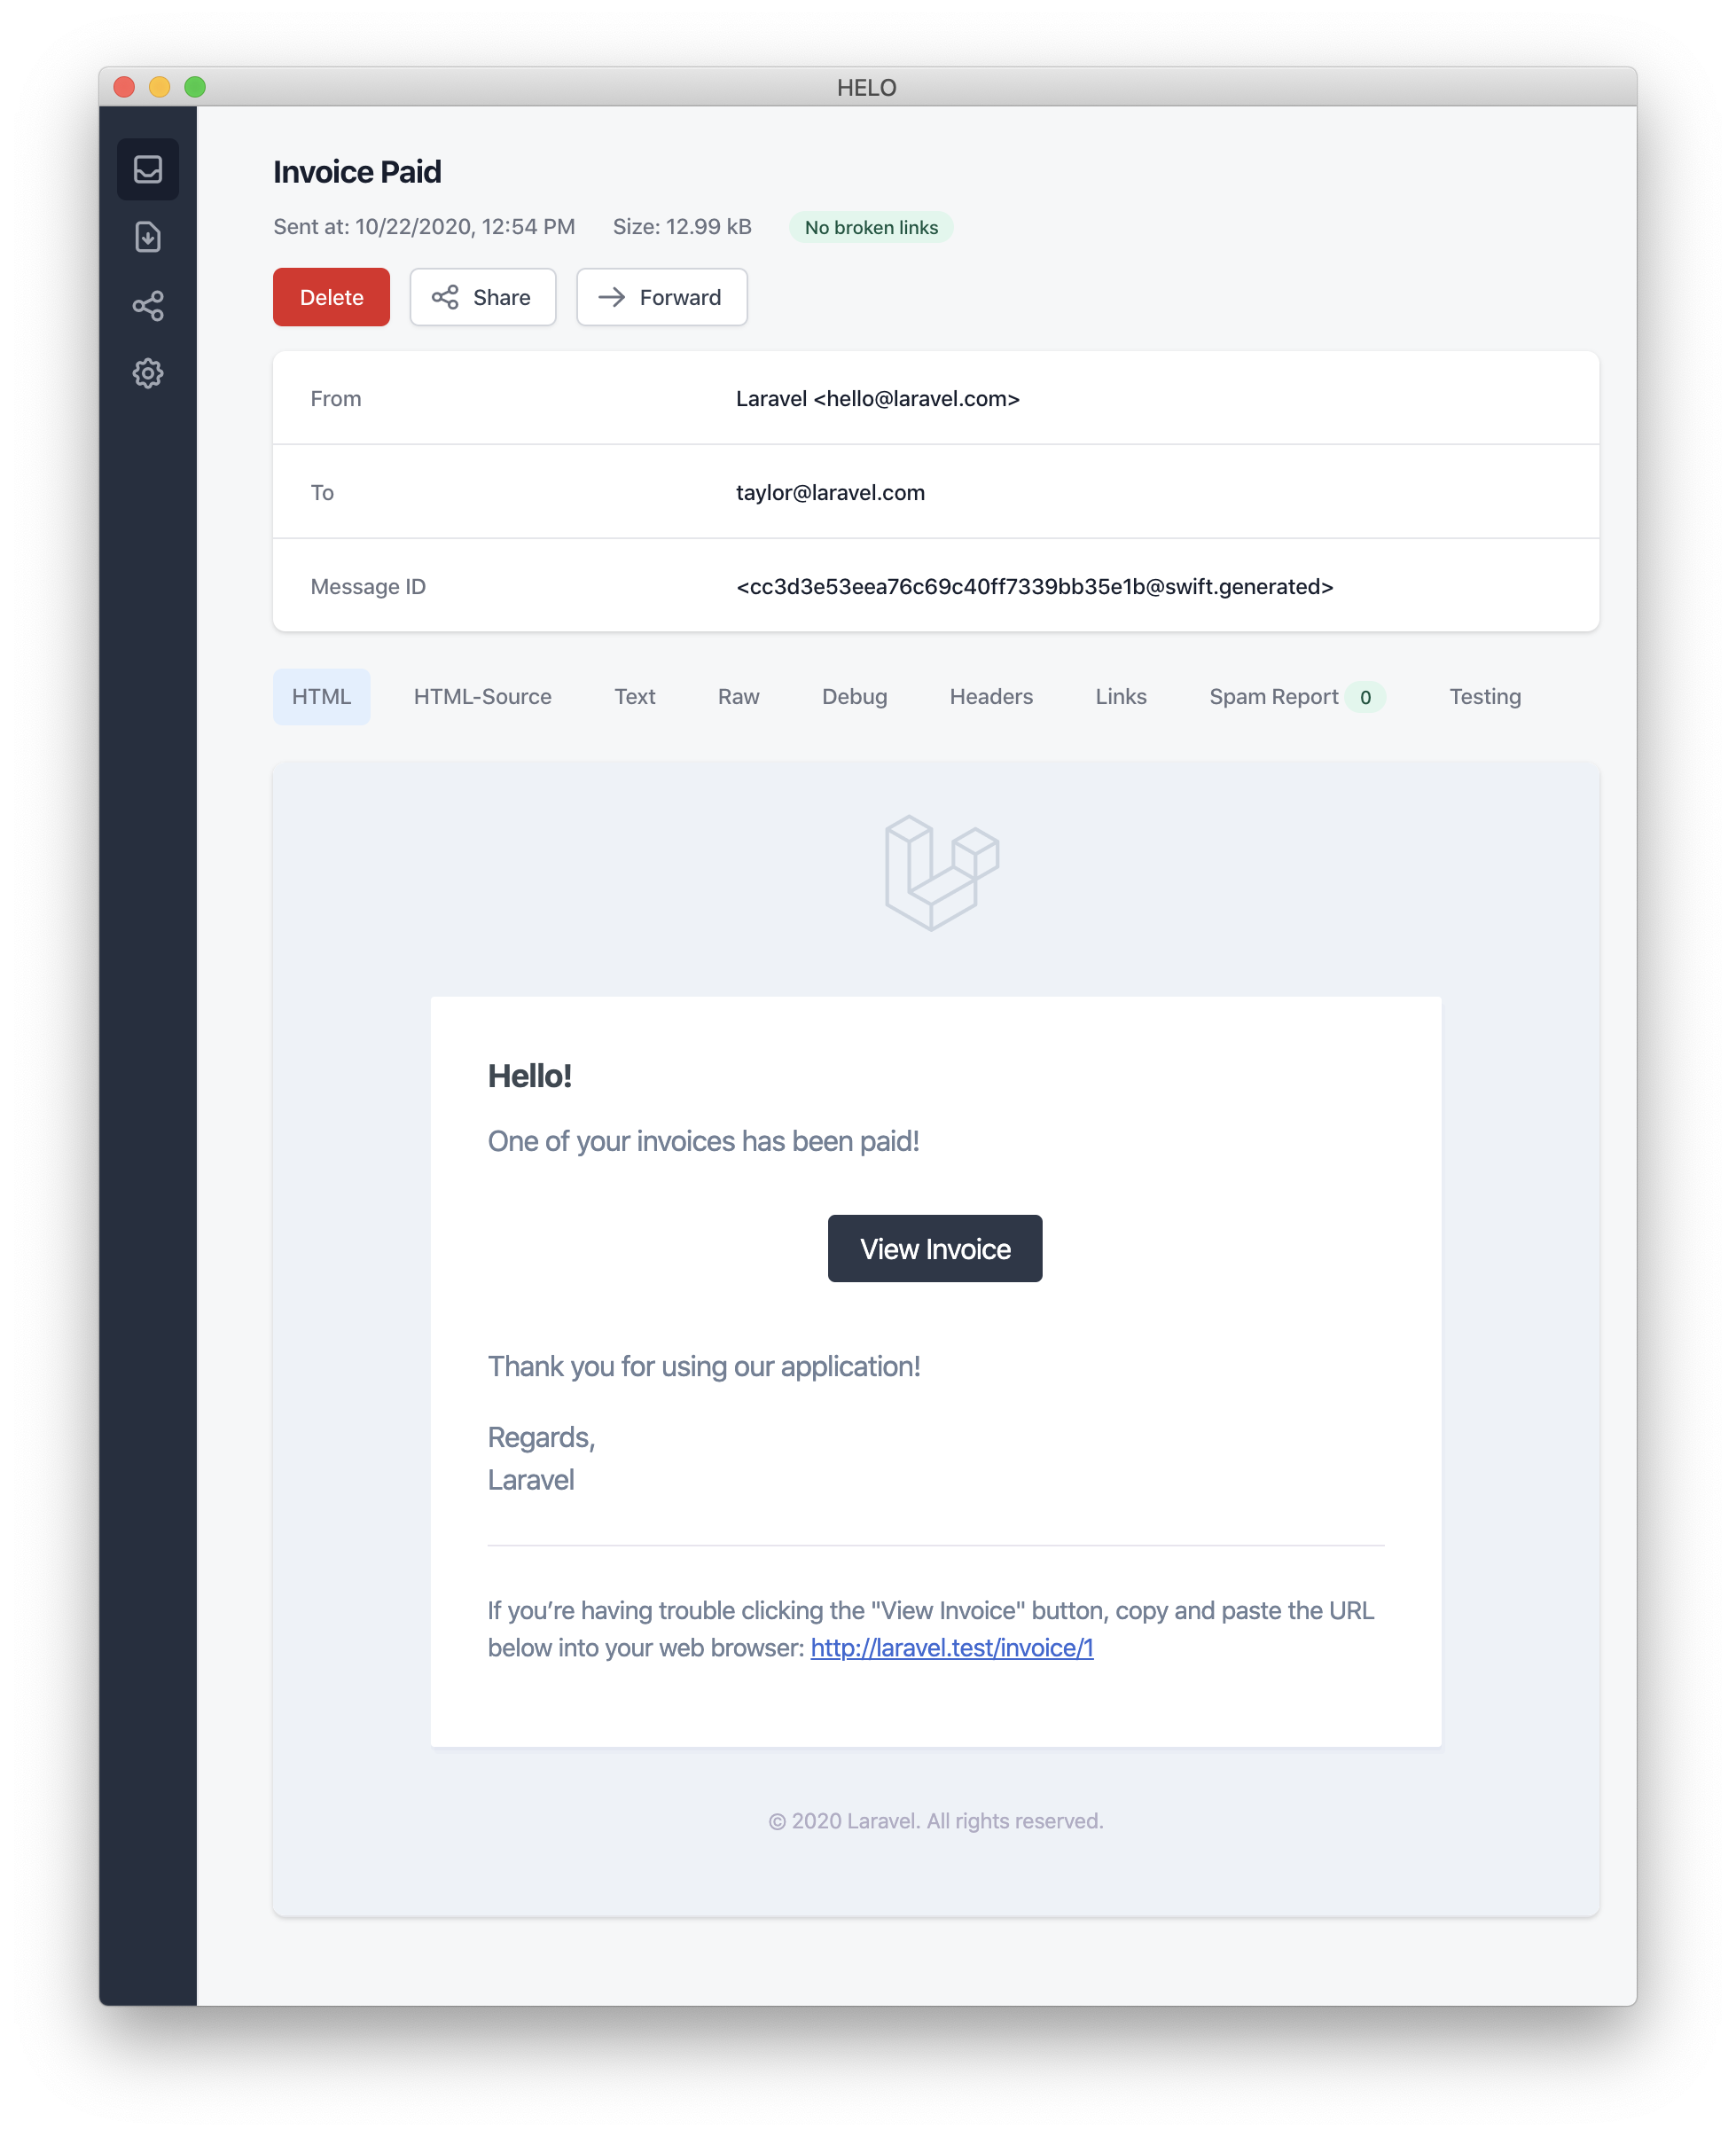
MONGODB_DATABASE="laravel_app"
```

<a name="install-the-laravel-mongodb-package"></a>
### Install the Laravel MongoDB Package

Finally, use Composer to install the Laravel MongoDB package:

```shell
composer require mongodb/laravel-mongodb
```

> [!NOTE]
> This installation of the package will fail if the `mongodb` PHP extension is not installed. The PHP configuration can differ between the CLI and the web server, so ensure the extension is enabled in both configurations.

<a name="configuration"></a>
## Configuration

You may configure your MongoDB connection via your application's `config/database.php` configuration file. Within this file, add a `mongodb` connection that utilizes the `mongodb` driver:

```php
'connections' => [
    'mongodb' => [
        'driver' => 'mongodb',
        'dsn' => env('MONGODB_URI', 'mongodb://localhost:27017'),
        'database' => env('MONGODB_DATABASE', 'laravel_app'),
    ],
],
```

<a name="features"></a>
## Features

Once your configuration is complete, you can use the `mongodb` package and database connection in your application to leverage a variety of powerful features:

- [Using Eloquent](https://www.mongodb.com/docs/drivers/php/laravel-mongodb/current/eloquent-models/), models can be stored in MongoDB collections. In addition to the standard Eloquent features, the Laravel MongoDB package provides additional features such as embedded relationships. The package also provides direct access to the MongoDB driver, which can be used to execute operations such as raw queries and aggregation pipelines.
- [Write complex queries](https://www.mongodb.com/docs/drivers/php/laravel-mongodb/current/query-builder/) using the query builder.
- [Similarity / vector search](https://www.mongodb.com/docs/drivers/php/laravel-mongodb/current/fundamentals/vector-search/) using vector embeddings and the `vectorSearch` Eloquent method.
- The `mongodb` [cache driver](https://www.mongodb.com/docs/drivers/php/laravel-mongodb/current/cache/) is optimized to use MongoDB features such as TTL indexes to automatically clear expired cache entries.
- [Dispatch and process queued jobs](https://www.mongodb.com/docs/drivers/php/laravel-mongodb/current/queues/) with the `mongodb` queue driver.
- [Storing files in GridFS](https://www.mongodb.com/docs/drivers/php/laravel-mongodb/current/filesystems/), via the [GridFS Adapter for Flysystem](https://flysystem.thephpleague.com/docs/adapter/gridfs/).
- [Full-text search](https://www.mongodb.com/docs/drivers/php/laravel-mongodb/current/scout/) using the `mongodb` Scout engine.
- Most third party packages using a database connection or Eloquent can be used with MongoDB.

To continue learning how to use MongoDB and Laravel, refer to MongoDB's [Quick Start guide](https://www.mongodb.com/docs/drivers/php/laravel-mongodb/current/quick-start/).


---

# Notifications

*Sección: Laravel | Origen: https://laravel.com/docs/13.x/notifications*

- [Introduction](#introduction)
- [Generating Notifications](#generating-notifications)
- [Sending Notifications](#sending-notifications)
    - [Using the Notifiable Trait](#using-the-notifiable-trait)
    - [Using the Notification Facade](#using-the-notification-facade)
    - [Specifying Delivery Channels](#specifying-delivery-channels)
    - [Queueing Notifications](#queueing-notifications)
    - [On-Demand Notifications](#on-demand-notifications)
- [Mail Notifications](#mail-notifications)
    - [Formatting Mail Messages](#formatting-mail-messages)
    - [Customizing the Sender](#customizing-the-sender)
    - [Customizing the Recipient](#customizing-the-recipient)
    - [Customizing the Subject](#customizing-the-subject)
    - [Customizing the Mailer](#customizing-the-mailer)
    - [Customizing the Templates](#customizing-the-templates)
    - [Attachments](#mail-attachments)
    - [Adding Tags and Metadata](#adding-tags-metadata)
    - [Customizing the Symfony Message](#customizing-the-symfony-message)
    - [Using Mailables](#using-mailables)
    - [Previewing Mail Notifications](#previewing-mail-notifications)
- [Markdown Mail Notifications](#markdown-mail-notifications)
    - [Generating the Message](#generating-the-message)
    - [Writing the Message](#writing-the-message)
    - [Customizing the Components](#customizing-the-components)
- [Database Notifications](#database-notifications)
    - [Prerequisites](#database-prerequisites)
    - [Formatting Database Notifications](#formatting-database-notifications)
    - [Accessing the Notifications](#accessing-the-notifications)
    - [Marking Notifications as Read](#marking-notifications-as-read)
- [Broadcast Notifications](#broadcast-notifications)
    - [Prerequisites](#broadcast-prerequisites)
    - [Formatting Broadcast Notifications](#formatting-broadcast-notifications)
    - [Listening for Notifications](#listening-for-notifications)
- [SMS Notifications](#sms-notifications)
    - [Prerequisites](#sms-prerequisites)
    - [Formatting SMS Notifications](#formatting-sms-notifications)
    - [Customizing the "From" Number](#customizing-the-from-number)
    - [Adding a Client Reference](#adding-a-client-reference)
    - [Routing SMS Notifications](#routing-sms-notifications)
- [Slack Notifications](#slack-notifications)
    - [Prerequisites](#slack-prerequisites)
    - [Formatting Slack Notifications](#formatting-slack-notifications)
    - [Slack Interactivity](#slack-interactivity)
    - [Routing Slack Notifications](#routing-slack-notifications)
    - [Notifying External Slack Workspaces](#notifying-external-slack-workspaces)
- [Localizing Notifications](#localizing-notifications)
- [Testing](#testing)
- [Notification Events](#notification-events)
- [Custom Channels](#custom-channels)

<a name="introduction"></a>
## Introduction

In addition to support for [sending email](/docs/{{version}}/mail), Laravel provides support for sending notifications across a variety of delivery channels, including email, SMS (via [Vonage](https://www.vonage.com/communications-apis/), formerly known as Nexmo), and [Slack](https://slack.com). In addition, a variety of [community built notification channels](https://laravel-notification-channels.com/about/#suggesting-a-new-channel) have been created to send notifications over dozens of different channels! Notifications may also be stored in a database so they may be displayed in your web interface.

Typically, notifications should be short, informational messages that notify users of something that occurred in your application. For example, if you are writing a billing application, you might send an "Invoice Paid" notification to your users via the email and SMS channels.

<a name="generating-notifications"></a>
## Generating Notifications

In Laravel, each notification is represented by a single class that is typically stored in the `app/Notifications` directory. Don't worry if you don't see this directory in your application - it will be created for you when you run the `make:notification` Artisan command:

```shell
php artisan make:notification InvoicePaid
```

This command will place a fresh notification class in your `app/Notifications` directory. Each notification class contains a `via` method and a variable number of message building methods, such as `toMail` or `toDatabase`, that convert the notification to a message tailored for that particular channel.

<a name="sending-notifications"></a>
## Sending Notifications

<a name="using-the-notifiable-trait"></a>
### Using the Notifiable Trait

Notifications may be sent in two ways: using the `notify` method of the `Notifiable` trait or using the `Notification` [facade](/docs/{{version}}/facades). The `Notifiable` trait is included on your application's `App\Models\User` model by default:

```php
<?php

namespace App\Models;

use Illuminate\Foundation\Auth\User as Authenticatable;
use Illuminate\Notifications\Notifiable;

class User extends Authenticatable
{
    use Notifiable;
}
```

The `notify` method that is provided by this trait expects to receive a notification instance:

```php
use App\Notifications\InvoicePaid;

$user->notify(new InvoicePaid($invoice));
```

> [!NOTE]
> Remember, you may use the `Notifiable` trait on any of your models. You are not limited to only including it on your `User` model.

<a name="using-the-notification-facade"></a>
### Using the Notification Facade

Alternatively, you may send notifications via the `Notification` [facade](/docs/{{version}}/facades). This approach is useful when you need to send a notification to multiple notifiable entities such as a collection of users. To send notifications using the facade, pass all of the notifiable entities and the notification instance to the `send` method:

```php
use Illuminate\Support\Facades\Notification;

Notification::send($users, new InvoicePaid($invoice));
```

You can also send notifications immediately using the `sendNow` method. This method will send the notification immediately even if the notification implements the `ShouldQueue` interface:

```php
Notification::sendNow($developers, new DeploymentCompleted($deployment));
```

<a name="specifying-delivery-channels"></a>
### Specifying Delivery Channels

Every notification class has a `via` method that determines on which channels the notification will be delivered. Notifications may be sent on the `mail`, `database`, `broadcast`, `vonage`, and `slack` channels.

> [!NOTE]
> If you would like to use other delivery channels such as Telegram or Pusher, check out the community driven [Laravel Notification Channels website](http://laravel-notification-channels.com).

The `via` method receives a `$notifiable` instance, which will be an instance of the class to which the notification is being sent. You may use `$notifiable` to determine which channels the notification should be delivered on:

```php
/**
 * Get the notification's delivery channels.
 *
 * @return array<int, string>
 */
public function via(object $notifiable): array
{
    return $notifiable->prefers_sms ? ['vonage'] : ['mail', 'database'];
}
```

<a name="queueing-notifications"></a>
### Queueing Notifications

> [!WARNING]
> Before queueing notifications, you should configure your queue and [start a worker](/docs/{{version}}/queues#running-the-queue-worker).

Sending notifications can take time, especially if the channel needs to make an external API call to deliver the notification. To speed up your application's response time, let your notification be queued by adding the `ShouldQueue` interface and `Queueable` trait to your class. The interface and trait are already imported for all notifications generated using the `make:notification` command, so you may immediately add them to your notification class:

```php
<?php

namespace App\Notifications;

use Illuminate\Bus\Queueable;
use Illuminate\Contracts\Queue\ShouldQueue;
use Illuminate\Notifications\Notification;

class InvoicePaid extends Notification implements ShouldQueue
{
    use Queueable;

    // ...
}
```

Once the `ShouldQueue` interface has been added to your notification, you may send the notification like normal. Laravel will detect the `ShouldQueue` interface on the class and automatically queue the delivery of the notification:

```php
$user->notify(new InvoicePaid($invoice));
```

When queueing notifications, a queued job will be created for each recipient and channel combination. For example, six jobs will be dispatched to the queue if your notification has three recipients and two channels.

<a name="delaying-notifications"></a>
#### Delaying Notifications

If you would like to delay the delivery of the notification, you may chain the `delay` method onto your notification instantiation:

```php
$delay = now()->plus(minutes: 10);

$user->notify((new InvoicePaid($invoice))->delay($delay));
```

You may pass an array to the `delay` method to specify the delay amount for specific channels:

```php
$user->notify((new InvoicePaid($invoice))->delay([
    'mail' => now()->plus(minutes: 5),
    'sms' => now()->plus(minutes: 10),
]));
```

Alternatively, you may define a `withDelay` method on the notification class itself. The `withDelay` method should return an array of channel names and delay values:

```php
/**
 * Determine the notification's delivery delay.
 *
 * @return array<string, \Illuminate\Support\Carbon>
 */
public function withDelay(object $notifiable): array
{
    return [
        'mail' => now()->plus(minutes: 5),
        'sms' => now()->plus(minutes: 10),
    ];
}
```

<a name="customizing-the-notification-queue-connection"></a>
#### Customizing the Notification Queue Connection

By default, queued notifications will be queued using your application's default queue connection. If you would like to specify a different connection that should be used for a particular notification, you may call the `onConnection` method from your notification's constructor:

```php
<?php

namespace App\Notifications;

use Illuminate\Bus\Queueable;
use Illuminate\Contracts\Queue\ShouldQueue;
use Illuminate\Notifications\Notification;

class InvoicePaid extends Notification implements ShouldQueue
{
    use Queueable;

    /**
     * Create a new notification instance.
     */
    public function __construct()
    {
        $this->onConnection('redis');
    }
}
```

Or, if you would like to specify a specific queue connection that should be used for each notification channel supported by the notification, you may define a `viaConnections` method on your notification. This method should return an array of channel name / queue connection name pairs:

```php
/**
 * Determine which connections should be used for each notification channel.
 *
 * @return array<string, string>
 */
public function viaConnections(): array
{
    return [
        'mail' => 'redis',
        'database' => 'sync',
    ];
}
```

<a name="customizing-notification-channel-queues"></a>
#### Customizing Notification Channel Queues

If you would like to specify a specific queue that should be used for each notification channel supported by the notification, you may define a `viaQueues` method on your notification. This method should return an array of channel name / queue name pairs:

```php
/**
 * Determine which queues should be used for each notification channel.
 *
 * @return array<string, string>
 */
public function viaQueues(): array
{
    return [
        'mail' => 'mail-queue',
        'slack' => 'slack-queue',
    ];
}
```

<a name="customizing-queued-notification-job-properties"></a>
#### Customizing Queued Notification Job Attributes

You may customize the behavior of the underlying queued job by defining queue attributes on your notification class. These attributes will be inherited by the queued job that sends the notification:

```php
<?php

namespace App\Notifications;

use Illuminate\Bus\Queueable;
use Illuminate\Contracts\Queue\ShouldQueue;
use Illuminate\Notifications\Notification;
use Illuminate\Queue\Attributes\FailOnTimeout;
use Illuminate\Queue\Attributes\MaxExceptions;
use Illuminate\Queue\Attributes\Timeout;
use Illuminate\Queue\Attributes\Tries;

#[Tries(5)]
#[Timeout(120)]
#[MaxExceptions(3)]
#[FailOnTimeout]
class InvoicePaid extends Notification implements ShouldQueue
{
    use Queueable;

    // ...
}
```

If you would like to ensure the privacy and integrity of a queued notification's data via [encryption](/docs/{{version}}/encryption), add the `ShouldBeEncrypted` interface to your notification class:

```php
<?php

namespace App\Notifications;

use Illuminate\Bus\Queueable;
use Illuminate\Contracts\Queue\ShouldBeEncrypted;
use Illuminate\Contracts\Queue\ShouldQueue;
use Illuminate\Notifications\Notification;

class InvoicePaid extends Notification implements ShouldQueue, ShouldBeEncrypted
{
    use Queueable;

    // ...
}
```

In addition to defining these attributes directly on your notification class, you may also define `backoff` and `retryUntil` methods to specify the backoff strategy and retry timeout for the queued notification job:

```php
use DateTime;

/**
 * Calculate the number of seconds to wait before retrying the notification.
 */
public function backoff(): int
{
    return 3;
}

/**
 * Determine the time at which the notification should timeout.
 */
public function retryUntil(): DateTime
{
    return now()->plus(minutes: 5);
}
```

> [!NOTE]
> For more information on these job attributes and methods, please review the documentation on [queued jobs](/docs/{{version}}/queues#max-job-attempts-and-timeout).

<a name="queued-notification-middleware"></a>
#### Queued Notification Middleware

Queued notifications may define middleware [just like queued jobs](/docs/{{version}}/queues#job-middleware). To get started, define a `middleware` method on your notification class. The `middleware` method will receive `$notifiable` and `$channel` variables, which allow you to customize the returned middleware based on the notification's destination:

```php
use Illuminate\Queue\Middleware\RateLimited;

/**
 * Get the middleware the notification job should pass through.
 *
 * @return array<int, object>
 */
public function middleware(object $notifiable, string $channel)
{
    return match ($channel) {
        'mail' => [new RateLimited('postmark')],
        'slack' => [new RateLimited('slack')],
        default => [],
    };
}
```

<a name="queued-notifications-and-database-transactions"></a>
#### Queued Notifications and Database Transactions

When queued notifications are dispatched within database transactions, they may be processed by the queue before the database transaction has committed. When this happens, any updates you have made to models or database records during the database transaction may not yet be reflected in the database. In addition, any models or database records created within the transaction may not exist in the database. If your notification depends on these models, unexpected errors can occur when the job that sends the queued notification is processed.

If your queue connection's `after_commit` configuration option is set to `false`, you may still indicate that a particular queued notification should be dispatched after all open database transactions have been committed by calling the `afterCommit` method when sending the notification:

```php
use App\Notifications\InvoicePaid;

$user->notify((new InvoicePaid($invoice))->afterCommit());
```

Alternatively, you may call the `afterCommit` method from your notification's constructor:

```php
<?php

namespace App\Notifications;

use Illuminate\Bus\Queueable;
use Illuminate\Contracts\Queue\ShouldQueue;
use Illuminate\Notifications\Notification;

class InvoicePaid extends Notification implements ShouldQueue
{
    use Queueable;

    /**
     * Create a new notification instance.
     */
    public function __construct()
    {
        $this->afterCommit();
    }
}
```

> [!NOTE]
> To learn more about working around these issues, please review the documentation regarding [queued jobs and database transactions](/docs/{{version}}/queues#jobs-and-database-transactions).

<a name="determining-if-the-queued-notification-should-be-sent"></a>
#### Determining if a Queued Notification Should Be Sent

After a queued notification has been dispatched for the queue for background processing, it will typically be accepted by a queue worker and sent to its intended recipient.

However, if you would like to make the final determination on whether the queued notification should be sent after it is being processed by a queue worker, you may define a `shouldSend` method on the notification class. If this method returns `false`, the notification will not be sent:

```php
/**
 * Determine if the notification should be sent.
 */
public function shouldSend(object $notifiable, string $channel): bool
{
    return $this->invoice->isPaid();
}
```

<a name="after-sending-notifications"></a>
#### After Sending Notifications

If you would like to execute code after a notification has been sent, you may define an `afterSending` method on the notification class. This method will receive the notifiable entity, the channel name, and the response from the channel:

```php
/**
 * Handle the notification after it has been sent.
 */
public function afterSending(object $notifiable, string $channel, mixed $response): void
{
    // ...
}
```

<a name="on-demand-notifications"></a>
### On-Demand Notifications

Sometimes you may need to send a notification to someone who is not stored as a "user" of your application. Using the `Notification` facade's `route` method, you may specify ad-hoc notification routing information before sending the notification:

```php
use Illuminate\Broadcasting\Channel;
use Illuminate\Support\Facades\Notification;

Notification::route('mail', 'taylor@example.com')
    ->route('vonage', '5555555555')
    ->route('slack', '#slack-channel')
    ->route('broadcast', [new Channel('channel-name')])
    ->notify(new InvoicePaid($invoice));
```

If you would like to provide the recipient's name when sending an on-demand notification to the `mail` route, you may provide an array that contains the email address as the key and the name as the value of the first element in the array:

```php
Notification::route('mail', [
    'barrett@example.com' => 'Barrett Blair',
])->notify(new InvoicePaid($invoice));
```

Using the `routes` method, you may provide ad-hoc routing information for multiple notification channels at once:

```php
Notification::routes([
    'mail' => ['barrett@example.com' => 'Barrett Blair'],
    'vonage' => '5555555555',
])->notify(new InvoicePaid($invoice));
```

<a name="mail-notifications"></a>
## Mail Notifications

<a name="formatting-mail-messages"></a>
### Formatting Mail Messages

If a notification supports being sent as an email, you should define a `toMail` method on the notification class. This method will receive a `$notifiable` entity and should return an `Illuminate\Notifications\Messages\MailMessage` instance.

The `MailMessage` class contains a few simple methods to help you build transactional email messages. Mail messages may contain lines of text as well as a "call to action". Let's take a look at an example `toMail` method:

```php
/**
 * Get the mail representation of the notification.
 */
public function toMail(object $notifiable): MailMessage
{
    $url = url('/invoice/'.$this->invoice->id);

    return (new MailMessage)
        ->greeting('Hello!')
        ->line('One of your invoices has been paid!')
        ->lineIf($this->amount > 0, "Amount paid: {$this->amount}")
        ->action('View Invoice', $url)
        ->line('Thank you for using our application!');
}
```

> [!NOTE]
> Note we are using `$this->invoice->id` in our `toMail` method. You may pass any data your notification needs to generate its message into the notification's constructor.

In this example, we register a greeting, a line of text, a call to action, and then another line of text. These methods provided by the `MailMessage` object make it simple and fast to format small transactional emails. The mail channel will then translate the message components into a beautiful, responsive HTML email template with a plain-text counterpart. Here is an example of an email generated by the `mail` channel:

<img src="https://laravel.com/img/docs/notification-example-2.png">

> [!NOTE]
> When sending mail notifications, be sure to set the `name` configuration option in your `config/app.php` configuration file. This value will be used in the header and footer of your mail notification messages.

<a name="error-messages"></a>
#### Error Messages

Some notifications inform users of errors, such as a failed invoice payment. You may indicate that a mail message is regarding an error by calling the `error` method when building your message. When using the `error` method on a mail message, the call to action button will be red instead of black:

```php
/**
 * Get the mail representation of the notification.
 */
public function toMail(object $notifiable): MailMessage
{
    return (new MailMessage)
        ->error()
        ->subject('Invoice Payment Failed')
        ->line('...');
}
```

<a name="other-mail-notification-formatting-options"></a>
#### Other Mail Notification Formatting Options

Instead of defining the "lines" of text in the notification class, you may use the `view` method to specify a custom template that should be used to render the notification email:

```php
/**
 * Get the mail representation of the notification.
 */
public function toMail(object $notifiable): MailMessage
{
    return (new MailMessage)->view(
        'mail.invoice.paid', ['invoice' => $this->invoice]
    );
}
```

You may specify a plain-text view for the mail message by passing the view name as the second element of an array that is given to the `view` method:

```php
/**
 * Get the mail representation of the notification.
 */
public function toMail(object $notifiable): MailMessage
{
    return (new MailMessage)->view(
        ['mail.invoice.paid', 'mail.invoice.paid-text'],
        ['invoice' => $this->invoice]
    );
}
```

Or, if your message only has a plain-text view, you may utilize the `text` method:

```php
/**
 * Get the mail representation of the notification.
 */
public function toMail(object $notifiable): MailMessage
{
    return (new MailMessage)->text(
        'mail.invoice.paid-text', ['invoice' => $this->invoice]
    );
}
```

<a name="customizing-the-sender"></a>
### Customizing the Sender

By default, the email's sender / from address is defined in the `config/mail.php` configuration file. However, you may specify the from address for a specific notification using the `from` method:

```php
/**
 * Get the mail representation of the notification.
 */
public function toMail(object $notifiable): MailMessage
{
    return (new MailMessage)
        ->from('barrett@example.com', 'Barrett Blair')
        ->line('...');
}
```

<a name="customizing-the-recipient"></a>
### Customizing the Recipient

When sending notifications via the `mail` channel, the notification system will automatically look for an `email` property on your notifiable entity. You may customize which email address is used to deliver the notification by defining a `routeNotificationForMail` method on the notifiable entity:

```php
<?php

namespace App\Models;

use Illuminate\Foundation\Auth\User as Authenticatable;
use Illuminate\Notifications\Notifiable;
use Illuminate\Notifications\Notification;

class User extends Authenticatable
{
    use Notifiable;

    /**
     * Route notifications for the mail channel.
     *
     * @return  array<string, string>|string
     */
    public function routeNotificationForMail(Notification $notification): array|string
    {
        // Return email address only...
        return $this->email_address;

        // Return email address and name...
        return [$this->email_address => $this->name];
    }
}
```

<a name="customizing-the-subject"></a>
### Customizing the Subject

By default, the email's subject is the class name of the notification formatted to "Title Case". So, if your notification class is named `InvoicePaid`, the email's subject will be `Invoice Paid`. If you would like to specify a different subject for the message, you may call the `subject` method when building your message:

```php
/**
 * Get the mail representation of the notification.
 */
public function toMail(object $notifiable): MailMessage
{
    return (new MailMessage)
        ->subject('Notification Subject')
        ->line('...');
}
```

<a name="customizing-the-mailer"></a>
### Customizing the Mailer

By default, the email notification will be sent using the default mailer defined in the `config/mail.php` configuration file. However, you may specify a different mailer at runtime by calling the `mailer` method when building your message:

```php
/**
 * Get the mail representation of the notification.
 */
public function toMail(object $notifiable): MailMessage
{
    return (new MailMessage)
        ->mailer('postmark')
        ->line('...');
}
```

<a name="customizing-the-templates"></a>
### Customizing the Templates

You can modify the HTML and plain-text template used by mail notifications by publishing the notification package's resources. After running this command, the mail notification templates will be located in the `resources/views/vendor/notifications` directory:

```shell
php artisan vendor:publish --tag=laravel-notifications
```

<a name="mail-attachments"></a>
### Attachments

To add attachments to an email notification, use the `attach` method while building your message. The `attach` method accepts the absolute path to the file as its first argument:

```php
/**
 * Get the mail representation of the notification.
 */
public function toMail(object $notifiable): MailMessage
{
    return (new MailMessage)
        ->greeting('Hello!')
        ->attach('/path/to/file');
}
```

> [!NOTE]
> The `attach` method offered by notification mail messages also accepts [attachable objects](/docs/{{version}}/mail#attachable-objects). Please consult the comprehensive [attachable object documentation](/docs/{{version}}/mail#attachable-objects) to learn more.

When attaching files to a message, you may also specify the display name and / or MIME type by passing an `array` as the second argument to the `attach` method:

```php
/**
 * Get the mail representation of the notification.
 */
public function toMail(object $notifiable): MailMessage
{
    return (new MailMessage)
        ->greeting('Hello!')
        ->attach('/path/to/file', [
            'as' => 'name.pdf',
            'mime' => 'application/pdf',
        ]);
}
```

When necessary, multiple files may be attached to a message using the `attachMany` method:

```php
/**
 * Get the mail representation of the notification.
 */
public function toMail(object $notifiable): MailMessage
{
    return (new MailMessage)
        ->greeting('Hello!')
        ->attachMany([
            '/path/to/forge.svg',
            '/path/to/vapor.svg' => [
                'as' => 'Logo.svg',
                'mime' => 'image/svg+xml',
            ],
        ]);
}
```

You may use the `attachFromStorageDisk` method to attach a file that exists on a specific [filesystem disk](/docs/{{version}}/filesystem). This method accepts the disk name and the path to the file on that disk:

```php
use App\Mail\InvoicePaid as InvoicePaidMailable;

/**
 * Get the mail representation of the notification.
 */
public function toMail(object $notifiable): Mailable
{
    return (new InvoicePaidMailable($this->invoice))
        ->to($notifiable->email)
        ->attachFromStorageDisk('s3', '/path/to/file', 'invoice.pdf', [
            'mime' => 'application/pdf',
        ]);
}
```

<a name="raw-data-attachments"></a>
#### Raw Data Attachments

The `attachData` method may be used to attach a raw string of bytes as an attachment. When calling the `attachData` method, you should provide the filename that should be assigned to the attachment:

```php
/**
 * Get the mail representation of the notification.
 */
public function toMail(object $notifiable): MailMessage
{
    return (new MailMessage)
        ->greeting('Hello!')
        ->attachData($this->pdf, 'name.pdf', [
            'mime' => 'application/pdf',
        ]);
}
```

<a name="adding-tags-metadata"></a>
### Adding Tags and Metadata

Some third-party email providers such as Mailgun and Postmark support message "tags" and "metadata", which may be used to group and track emails sent by your application. You may add tags and metadata to an email message via the `tag` and `metadata` methods:

```php
/**
 * Get the mail representation of the notification.
 */
public function toMail(object $notifiable): MailMessage
{
    return (new MailMessage)
        ->greeting('Comment Upvoted!')
        ->tag('upvote')
        ->metadata('comment_id', $this->comment->id);
}
```

If your application is using the Mailgun driver, you may consult Mailgun's documentation for more information on [tags](https://documentation.mailgun.com/docs/mailgun/user-manual/tracking-messages/#tags) and [metadata](https://documentation.mailgun.com/docs/mailgun/user-manual/sending-messages/#attaching-metadata-to-messages). Likewise, the Postmark documentation may also be consulted for more information on their support for [tags](https://postmarkapp.com/blog/tags-support-for-smtp) and [metadata](https://postmarkapp.com/support/article/1125-custom-metadata-faq).

If your application is using Amazon SES to send emails, you should use the `metadata` method to attach [SES "tags"](https://docs.aws.amazon.com/ses/latest/APIReference/API_MessageTag.html) to the message.

<a name="customizing-the-symfony-message"></a>
### Customizing the Symfony Message

The `withSymfonyMessage` method of the `MailMessage` class allows you to register a closure which will be invoked with the Symfony Message instance before sending the message. This gives you an opportunity to deeply customize the message before it is delivered:

```php
use Symfony\Component\Mime\Email;

/**
 * Get the mail representation of the notification.
 */
public function toMail(object $notifiable): MailMessage
{
    return (new MailMessage)
        ->withSymfonyMessage(function (Email $message) {
            $message->getHeaders()->addTextHeader(
                'Custom-Header', 'Header Value'
            );
        });
}
```

<a name="using-mailables"></a>
### Using Mailables

If needed, you may return a full [mailable object](/docs/{{version}}/mail) from your notification's `toMail` method. When returning a `Mailable` instead of a `MailMessage`, you will need to specify the message recipient using the mailable object's `to` method:

```php
use App\Mail\InvoicePaid as InvoicePaidMailable;
use Illuminate\Mail\Mailable;

/**
 * Get the mail representation of the notification.
 */
public function toMail(object $notifiable): Mailable
{
    return (new InvoicePaidMailable($this->invoice))
        ->to($notifiable->email);
}
```

<a name="mailables-and-on-demand-notifications"></a>
#### Mailables and On-Demand Notifications

If you are sending an [on-demand notification](#on-demand-notifications), the `$notifiable` instance given to the `toMail` method will be an instance of `Illuminate\Notifications\AnonymousNotifiable`, which offers a `routeNotificationFor` method that may be used to retrieve the email address the on-demand notification should be sent to:

```php
use App\Mail\InvoicePaid as InvoicePaidMailable;
use Illuminate\Notifications\AnonymousNotifiable;
use Illuminate\Mail\Mailable;

/**
 * Get the mail representation of the notification.
 */
public function toMail(object $notifiable): Mailable
{
    $address = $notifiable instanceof AnonymousNotifiable
        ? $notifiable->routeNotificationFor('mail')
        : $notifiable->email;

    return (new InvoicePaidMailable($this->invoice))
        ->to($address);
}
```

<a name="previewing-mail-notifications"></a>
### Previewing Mail Notifications

When designing a mail notification template, it is convenient to quickly preview the rendered mail message in your browser like a typical Blade template. For this reason, Laravel allows you to return any mail message generated by a mail notification directly from a route closure or controller. When a `MailMessage` is returned, it will be rendered and displayed in the browser, allowing you to quickly preview its design without needing to send it to an actual email address:

```php
use App\Models\Invoice;
use App\Notifications\InvoicePaid;

Route::get('/notification', function () {
    $invoice = Invoice::find(1);

    return (new InvoicePaid($invoice))
        ->toMail($invoice->user);
});
```

<a name="markdown-mail-notifications"></a>
## Markdown Mail Notifications

Markdown mail notifications allow you to take advantage of the pre-built templates of mail notifications, while giving you more freedom to write longer, customized messages. Since the messages are written in Markdown, Laravel is able to render beautiful, responsive HTML templates for the messages while also automatically generating a plain-text counterpart.

<a name="generating-the-message"></a>
### Generating the Message

To generate a notification with a corresponding Markdown template, you may use the `--markdown` option of the `make:notification` Artisan command:

```shell
php artisan make:notification InvoicePaid --markdown=mail.invoice.paid
```

Like all other mail notifications, notifications that use Markdown templates should define a `toMail` method on their notification class. However, instead of using the `line` and `action` methods to construct the notification, use the `markdown` method to specify the name of the Markdown template that should be used. An array of data you wish to make available to the template may be passed as the method's second argument:

```php
/**
 * Get the mail representation of the notification.
 */
public function toMail(object $notifiable): MailMessage
{
    $url = url('/invoice/'.$this->invoice->id);

    return (new MailMessage)
        ->subject('Invoice Paid')
        ->markdown('mail.invoice.paid', ['url' => $url]);
}
```

<a name="writing-the-message"></a>
### Writing the Message

Markdown mail notifications use a combination of Blade components and Markdown syntax which allow you to easily construct notifications while leveraging Laravel's pre-crafted notification components:

```blade
<x-mail::message>
# Invoice Paid

Your invoice has been paid!

<x-mail::button :url="$url">
View Invoice
</x-mail::button>

Thanks,<br>
{{ config('app.name') }}
</x-mail::message>
```

> [!NOTE]
> Do not use excess indentation when writing Markdown emails. Per Markdown standards, Markdown parsers will render indented content as code blocks.

<a name="button-component"></a>
#### Button Component

The button component renders a centered button link. The component accepts two arguments, a `url` and an optional `color`. Supported colors are `primary`, `green`, and `red`. You may add as many button components to a notification as you wish:

```blade
<x-mail::button :url="$url" color="green">
View Invoice
</x-mail::button>
```

<a name="panel-component"></a>
#### Panel Component

The panel component renders the given block of text in a panel that has a slightly different background color than the rest of the notification. This allows you to draw attention to a given block of text:

```blade
<x-mail::panel>
This is the panel content.
</x-mail::panel>
```

<a name="table-component"></a>
#### Table Component

The table component allows you to transform a Markdown table into an HTML table. The component accepts the Markdown table as its content. Table column alignment is supported using the default Markdown table alignment syntax:

```blade
<x-mail::table>
| Laravel       | Table         | Example       |
| ------------- | :-----------: | ------------: |
| Col 2 is      | Centered      | $10           |
| Col 3 is      | Right-Aligned | $20           |
</x-mail::table>
```

<a name="customizing-the-components"></a>
### Customizing the Components

You may export all of the Markdown notification components to your own application for customization. To export the components, use the `vendor:publish` Artisan command to publish the `laravel-mail` asset tag:

```shell
php artisan vendor:publish --tag=laravel-mail
```

This command will publish the Markdown mail components to the `resources/views/vendor/mail` directory. The `mail` directory will contain an `html` and a `text` directory, each containing their respective representations of every available component. You are free to customize these components however you like.

<a name="customizing-the-css"></a>
#### Customizing the CSS

After exporting the components, the `resources/views/vendor/mail/html/themes` directory will contain a `default.css` file. You may customize the CSS in this file and your styles will automatically be in-lined within the HTML representations of your Markdown notifications.

If you would like to build an entirely new theme for Laravel's Markdown components, you may place a CSS file within the `html/themes` directory. After naming and saving your CSS file, update the `theme` option of the `mail` configuration file to match the name of your new theme.

To customize the theme for an individual notification, you may call the `theme` method while building the notification's mail message. The `theme` method accepts the name of the theme that should be used when sending the notification:

```php
/**
 * Get the mail representation of the notification.
 */
public function toMail(object $notifiable): MailMessage
{
    return (new MailMessage)
        ->theme('invoice')
        ->subject('Invoice Paid')
        ->markdown('mail.invoice.paid', ['url' => $url]);
}
```

<a name="database-notifications"></a>
## Database Notifications

<a name="database-prerequisites"></a>
### Prerequisites

The `database` notification channel stores the notification information in a database table. This table will contain information such as the notification type as well as a JSON data structure that describes the notification.

You can query the table to display the notifications in your application's user interface. But, before you can do that, you will need to create a database table to hold your notifications. You may use the `make:notifications-table` command to generate a [migration](/docs/{{version}}/migrations) with the proper table schema:

```shell
php artisan make:notifications-table

php artisan migrate
```

> [!NOTE]
> If your notifiable models are using [UUID or ULID primary keys](/docs/{{version}}/eloquent#uuid-and-ulid-keys), you should replace the `morphs` method with [uuidMorphs](/docs/{{version}}/migrations#column-method-uuidMorphs) or [ulidMorphs](/docs/{{version}}/migrations#column-method-ulidMorphs) in the notification table migration.

<a name="formatting-database-notifications"></a>
### Formatting Database Notifications

If a notification supports being stored in a database table, you should define a `toDatabase` or `toArray` method on the notification class. This method will receive a `$notifiable` entity and should return a plain PHP array. The returned array will be encoded as JSON and stored in the `data` column of your `notifications` table. Let's take a look at an example `toArray` method:

```php
/**
 * Get the array representation of the notification.
 *
 * @return array<string, mixed>
 */
public function toArray(object $notifiable): array
{
    return [
        'invoice_id' => $this->invoice->id,
        'amount' => $this->invoice->amount,
    ];
}
```

When a notification is stored in your application's database, the `type` column will be set to the notification's class name by default, and the `read_at` column will be `null`. However, you can customize this behavior by defining the `databaseType` and `initialDatabaseReadAtValue` methods in your notification class:

```php
use Illuminate\Support\Carbon;

/**
 * Get the notification's database type.
 */
public function databaseType(object $notifiable): string
{
    return 'invoice-paid';
}

/**
 * Get the initial value for the "read_at" column.
 */
public function initialDatabaseReadAtValue(): ?Carbon
{
    return null;
}
```

<a name="todatabase-vs-toarray"></a>
#### `toDatabase` vs. `toArray`

The `toArray` method is also used by the `broadcast` channel to determine which data to broadcast to your JavaScript powered frontend. If you would like to have two different array representations for the `database` and `broadcast` channels, you should define a `toDatabase` method instead of a `toArray` method.

<a name="accessing-the-notifications"></a>
### Accessing the Notifications

Once notifications are stored in the database, you need a convenient way to access them from your notifiable entities. The `Illuminate\Notifications\Notifiable` trait, which is included on Laravel's default `App\Models\User` model, includes a `notifications` [Eloquent relationship](/docs/{{version}}/eloquent-relationships) that returns the notifications for the entity. To fetch notifications, you may access this method like any other Eloquent relationship. By default, notifications will be sorted by the `created_at` timestamp with the most recent notifications at the beginning of the collection:

```php
$user = App\Models\User::find(1);

foreach ($user->notifications as $notification) {
    echo $notification->type;
}
```

If you want to retrieve only the "unread" notifications, you may use the `unreadNotifications` relationship. Again, these notifications will be sorted by the `created_at` timestamp with the most recent notifications at the beginning of the collection:

```php
$user = App\Models\User::find(1);

foreach ($user->unreadNotifications as $notification) {
    echo $notification->type;
}
```

If you want to retrieve only the "read" notifications, you may use the `readNotifications` relationship:

```php
$user = App\Models\User::find(1);

foreach ($user->readNotifications as $notification) {
    echo $notification->type;
}
```

> [!NOTE]
> To access your notifications from your JavaScript client, you should define a notification controller for your application which returns the notifications for a notifiable entity, such as the current user. You may then make an HTTP request to that controller's URL from your JavaScript client.

<a name="marking-notifications-as-read"></a>
### Marking Notifications as Read

Typically, you will want to mark a notification as "read" when a user views it. The `Illuminate\Notifications\Notifiable` trait provides a `markAsRead` method, which updates the `read_at` column on the notification's database record:

```php
$user = App\Models\User::find(1);

foreach ($user->unreadNotifications as $notification) {
    $notification->markAsRead();
}
```

However, instead of looping through each notification, you may use the `markAsRead` method directly on a collection of notifications:

```php
$user->unreadNotifications->markAsRead();
```

You may also use a mass-update query to mark all of the notifications as read without retrieving them from the database:

```php
$user = App\Models\User::find(1);

$user->unreadNotifications()->update(['read_at' => now()]);
```

You may `delete` the notifications to remove them from the table entirely:

```php
$user->notifications()->delete();
```

<a name="broadcast-notifications"></a>
## Broadcast Notifications

<a name="broadcast-prerequisites"></a>
### Prerequisites

Before broadcasting notifications, you should configure and be familiar with Laravel's [event broadcasting](/docs/{{version}}/broadcasting) services. Event broadcasting provides a way to react to server-side Laravel events from your JavaScript powered frontend.

<a name="formatting-broadcast-notifications"></a>
### Formatting Broadcast Notifications

The `broadcast` channel broadcasts notifications using Laravel's [event broadcasting](/docs/{{version}}/broadcasting) services, allowing your JavaScript powered frontend to catch notifications in realtime. If a notification supports broadcasting, you can define a `toBroadcast` method on the notification class. This method will receive a `$notifiable` entity and should return a `BroadcastMessage` instance. If the `toBroadcast` method does not exist, the `toArray` method will be used to gather the data that should be broadcast. The returned data will be encoded as JSON and broadcast to your JavaScript powered frontend. Let's take a look at an example `toBroadcast` method:

```php
use Illuminate\Notifications\Messages\BroadcastMessage;

/**
 * Get the broadcastable representation of the notification.
 */
public function toBroadcast(object $notifiable): BroadcastMessage
{
    return new BroadcastMessage([
        'invoice_id' => $this->invoice->id,
        'amount' => $this->invoice->amount,
    ]);
}
```

<a name="broadcast-queue-configuration"></a>
#### Broadcast Queue Configuration

All broadcast notifications are queued for broadcasting. If you would like to configure the queue connection or queue name that is used to queue the broadcast operation, you may use the `onConnection` and `onQueue` methods of the `BroadcastMessage`:

```php
return (new BroadcastMessage($data))
    ->onConnection('sqs')
    ->onQueue('broadcasts');
```

<a name="customizing-the-notification-type"></a>
#### Customizing the Notification Type

In addition to the data you specify, all broadcast notifications also have a `type` field containing the full class name of the notification. If you would like to customize the notification `type`, you may define a `broadcastType` method on the notification class:

```php
/**
 * Get the type of the notification being broadcast.
 */
public function broadcastType(): string
{
    return 'broadcast.message';
}
```

<a name="listening-for-notifications"></a>
### Listening for Notifications

Notifications will broadcast on a private channel formatted using a `{notifiable}.{id}` convention. So, if you are sending a notification to an `App\Models\User` instance with an ID of `1`, the notification will be broadcast on the `App.Models.User.1` private channel. When using [Laravel Echo](/docs/{{version}}/broadcasting#client-side-installation), you may easily listen for notifications on a channel using the `notification` method:

```js
Echo.private('App.Models.User.' + userId)
    .notification((notification) => {
        console.log(notification.type);
    });
```

<a name="using-react-or-vue"></a>
#### Using React, Vue, or Svelte

Laravel Echo includes React, Vue, and Svelte hooks that make it painless to listen for notifications. To get started, invoke the `useEchoNotification` hook, which is used to listen for notifications. The `useEchoNotification` hook will automatically leave channels when the consuming component is unmounted:

```js tab=React
import { useEchoNotification } from "@laravel/echo-react";

useEchoNotification(
    `App.Models.User.${userId}`,
    (notification) => {
        console.log(notification.type);
    },
);
```

```vue tab=Vue
<script setup lang="ts">
import { useEchoNotification } from "@laravel/echo-vue";

useEchoNotification(
    `App.Models.User.${userId}`,
    (notification) => {
        console.log(notification.type);
    },
);
</script>
```

```svelte tab=Svelte
<script>
import { useEchoNotification } from "@laravel/echo-svelte";

useEchoNotification(
    `App.Models.User.${userId}`,
    (notification) => {
        console.log(notification.type);
    },
);
</script>
```

By default, the hook listens to all notifications. To specify the notification types you would like to listen to, you can provide either a string or array of types to `useEchoNotification`:

```js tab=React
import { useEchoNotification } from "@laravel/echo-react";

useEchoNotification(
    `App.Models.User.${userId}`,
    (notification) => {
        console.log(notification.type);
    },
    'App.Notifications.InvoicePaid',
);
```

```vue tab=Vue
<script setup lang="ts">
import { useEchoNotification } from "@laravel/echo-vue";

useEchoNotification(
    `App.Models.User.${userId}`,
    (notification) => {
        console.log(notification.type);
    },
    'App.Notifications.InvoicePaid',
);
</script>
```

```svelte tab=Svelte
<script>
import { useEchoNotification } from "@laravel/echo-svelte";

useEchoNotification(
    `App.Models.User.${userId}`,
    (notification) => {
        console.log(notification.type);
    },
    'App.Notifications.InvoicePaid',
);
</script>
```

You may also specify the shape of the notification payload data, providing greater type safety and editing convenience:

```ts
type InvoicePaidNotification = {
    invoice_id: number;
    created_at: string;
};

useEchoNotification<InvoicePaidNotification>(
    `App.Models.User.${userId}`,
    (notification) => {
        console.log(notification.invoice_id);
        console.log(notification.created_at);
        console.log(notification.type);
    },
    'App.Notifications.InvoicePaid',
);
```

<a name="customizing-the-notification-channel"></a>
#### Customizing the Notification Channel

If you would like to customize which channel that an entity's broadcast notifications are broadcast on, you may define a `receivesBroadcastNotificationsOn` method on the notifiable entity:

```php
<?php

namespace App\Models;

use Illuminate\Broadcasting\PrivateChannel;
use Illuminate\Foundation\Auth\User as Authenticatable;
use Illuminate\Notifications\Notifiable;

class User extends Authenticatable
{
    use Notifiable;

    /**
     * The channels the user receives notification broadcasts on.
     */
    public function receivesBroadcastNotificationsOn(): string
    {
        return 'users.'.$this->id;
    }
}
```

<a name="sms-notifications"></a>
## SMS Notifications

<a name="sms-prerequisites"></a>
### Prerequisites

Sending SMS notifications in Laravel is powered by [Vonage](https://www.vonage.com/) (formerly known as Nexmo). Before you can send notifications via Vonage, you need to install the `laravel/vonage-notification-channel` and `guzzlehttp/guzzle` packages:

```shell
composer require laravel/vonage-notification-channel guzzlehttp/guzzle
```

The package includes a [configuration file](https://github.com/laravel/vonage-notification-channel/blob/3.x/config/vonage.php). However, you are not required to export this configuration file to your own application. You can simply use the `VONAGE_KEY` and `VONAGE_SECRET` environment variables to define your Vonage public and secret keys.

After defining your keys, you should set a `VONAGE_SMS_FROM` environment variable that defines the phone number that your SMS messages should be sent from by default. You may generate this phone number within the Vonage control panel:

```ini
VONAGE_SMS_FROM=15556666666
```

<a name="formatting-sms-notifications"></a>
### Formatting SMS Notifications

If a notification supports being sent as an SMS, you should define a `toVonage` method on the notification class. This method will receive a `$notifiable` entity and should return an `Illuminate\Notifications\Messages\VonageMessage` instance:

```php
use Illuminate\Notifications\Messages\VonageMessage;

/**
 * Get the Vonage / SMS representation of the notification.
 */
public function toVonage(object $notifiable): VonageMessage
{
    return (new VonageMessage)
        ->content('Your SMS message content');
}
```

<a name="unicode-content"></a>
#### Unicode Content

If your SMS message will contain unicode characters, you should call the `unicode` method when constructing the `VonageMessage` instance:

```php
use Illuminate\Notifications\Messages\VonageMessage;

/**
 * Get the Vonage / SMS representation of the notification.
 */
public function toVonage(object $notifiable): VonageMessage
{
    return (new VonageMessage)
        ->content('Your unicode message')
        ->unicode();
}
```

<a name="customizing-the-from-number"></a>
### Customizing the "From" Number

If you would like to send some notifications from a phone number that is different from the phone number specified by your `VONAGE_SMS_FROM` environment variable, you may call the `from` method on a `VonageMessage` instance:

```php
use Illuminate\Notifications\Messages\VonageMessage;

/**
 * Get the Vonage / SMS representation of the notification.
 */
public function toVonage(object $notifiable): VonageMessage
{
    return (new VonageMessage)
        ->content('Your SMS message content')
        ->from('15554443333');
}
```

<a name="adding-a-client-reference"></a>
### Adding a Client Reference

If you would like to keep track of costs per user, team, or client, you may add a "client reference" to the notification. Vonage will allow you to generate reports using this client reference so that you can better understand a particular customer's SMS usage. The client reference can be any string up to 40 characters:

```php
use Illuminate\Notifications\Messages\VonageMessage;

/**
 * Get the Vonage / SMS representation of the notification.
 */
public function toVonage(object $notifiable): VonageMessage
{
    return (new VonageMessage)
        ->clientReference((string) $notifiable->id)
        ->content('Your SMS message content');
}
```

<a name="routing-sms-notifications"></a>
### Routing SMS Notifications

To route Vonage notifications to the proper phone number, define a `routeNotificationForVonage` method on your notifiable entity:

```php
<?php

namespace App\Models;

use Illuminate\Foundation\Auth\User as Authenticatable;
use Illuminate\Notifications\Notifiable;
use Illuminate\Notifications\Notification;

class User extends Authenticatable
{
    use Notifiable;

    /**
     * Route notifications for the Vonage channel.
     */
    public function routeNotificationForVonage(Notification $notification): string
    {
        return $this->phone_number;
    }
}
```

<a name="slack-notifications"></a>
## Slack Notifications

<a name="slack-prerequisites"></a>
### Prerequisites

Before sending Slack notifications, you should install the Slack notification channel via Composer:

```shell
composer require laravel/slack-notification-channel
```

Additionally, you must create a [Slack App](https://api.slack.com/apps?new_app=1) for your Slack workspace.

If you only need to send notifications to the same Slack workspace that the App is created in, you should ensure that your App has the `chat:write`, `chat:write.public`, and `chat:write.customize` scopes. These scopes can be added from the "OAuth & Permissions" App management tab within Slack.

Next, copy the App's "Bot User OAuth Token" and place it within a `slack` configuration array in your application's `services.php` configuration file. This token can be found on the "OAuth & Permissions" tab within Slack:

```php
'slack' => [
    'notifications' => [
        'bot_user_oauth_token' => env('SLACK_BOT_USER_OAUTH_TOKEN'),
        'channel' => env('SLACK_BOT_USER_DEFAULT_CHANNEL'),
    ],
],
```

<a name="slack-app-distribution"></a>
#### App Distribution

If your application will be sending notifications to external Slack workspaces that are owned by your application's users, you will need to "distribute" your App via Slack. App distribution can be managed from your App's "Manage Distribution" tab within Slack. Once your App has been distributed, you may use [Socialite](/docs/{{version}}/socialite) to [obtain Slack Bot tokens](/docs/{{version}}/socialite#slack-bot-scopes) on behalf of your application's users.

<a name="formatting-slack-notifications"></a>
### Formatting Slack Notifications

If a notification supports being sent as a Slack message, you should define a `toSlack` method on the notification class. This method will receive a `$notifiable` entity and should return an `Illuminate\Notifications\Slack\SlackMessage` instance. You can construct rich notifications using [Slack's Block Kit API](https://api.slack.com/block-kit). The following example may be previewed in [Slack's Block Kit builder](https://app.slack.com/block-kit-builder/T01KWS6K23Z#%7B%22blocks%22:%5B%7B%22type%22:%22header%22,%22text%22:%7B%22type%22:%22plain_text%22,%22text%22:%22Invoice%20Paid%22%7D%7D,%7B%22type%22:%22context%22,%22elements%22:%5B%7B%22type%22:%22plain_text%22,%22text%22:%22Customer%20%231234%22%7D%5D%7D,%7B%22type%22:%22section%22,%22text%22:%7B%22type%22:%22plain_text%22,%22text%22:%22An%20invoice%20has%20been%20paid.%22%7D,%22fields%22:%5B%7B%22type%22:%22mrkdwn%22,%22text%22:%22*Invoice%20No:*%5Cn1000%22%7D,%7B%22type%22:%22mrkdwn%22,%22text%22:%22*Invoice%20Recipient:*%5Cntaylor@laravel.com%22%7D%5D%7D,%7B%22type%22:%22divider%22%7D,%7B%22type%22:%22section%22,%22text%22:%7B%22type%22:%22plain_text%22,%22text%22:%22Congratulations!%22%7D%7D%5D%7D):

```php
use Illuminate\Notifications\Slack\BlockKit\Blocks\ContextBlock;
use Illuminate\Notifications\Slack\BlockKit\Blocks\SectionBlock;
use Illuminate\Notifications\Slack\SlackMessage;

/**
 * Get the Slack representation of the notification.
 */
public function toSlack(object $notifiable): SlackMessage
{
    return (new SlackMessage)
        ->text('One of your invoices has been paid!')
        ->headerBlock('Invoice Paid')
        ->contextBlock(function (ContextBlock $block) {
            $block->text('Customer #1234');
        })
        ->sectionBlock(function (SectionBlock $block) {
            $block->text('An invoice has been paid.');
            $block->field("*Invoice No:*\n1000")->markdown();
            $block->field("*Invoice Recipient:*\ntaylor@laravel.com")->markdown();
        })
        ->dividerBlock()
        ->sectionBlock(function (SectionBlock $block) {
            $block->text('Congratulations!');
        });
}
```

<a name="using-slacks-block-kit-builder-template"></a>
#### Using Slack's Block Kit Builder Template

Instead of using the fluent message builder methods to construct your Block Kit message, you may provide the raw JSON payload generated by Slack's Block Kit Builder to the `usingBlockKitTemplate` method:

```php
use Illuminate\Notifications\Slack\SlackMessage;
use Illuminate\Support\Str;

/**
 * Get the Slack representation of the notification.
 */
public function toSlack(object $notifiable): SlackMessage
{
    $template = <<<JSON
        {
          "blocks": [
            {
              "type": "header",
              "text": {
                "type": "plain_text",
                "text": "Team Announcement"
              }
            },
            {
              "type": "section",
              "text": {
                "type": "plain_text",
                "text": "We are hiring!"
              }
            }
          ]
        }
    JSON;

    return (new SlackMessage)
        ->usingBlockKitTemplate($template);
}
```

<a name="slack-interactivity"></a>
### Slack Interactivity

Slack's Block Kit notification system provides powerful features to [handle user interaction](https://api.slack.com/interactivity/handling). To utilize these features, your Slack App should have "Interactivity" enabled and a "Request URL" configured that points to a URL served by your application. These settings can be managed from the "Interactivity & Shortcuts" App management tab within Slack.

In the following example, which utilizes the `actionsBlock` method, Slack will send a `POST` request to your "Request URL" with a payload containing the Slack user who clicked the button, the ID of the clicked button, and more. Your application can then determine the action to take based on the payload. You should also [verify the request](https://api.slack.com/authentication/verifying-requests-from-slack) was made by Slack:

```php
use Illuminate\Notifications\Slack\BlockKit\Blocks\ActionsBlock;
use Illuminate\Notifications\Slack\BlockKit\Blocks\ContextBlock;
use Illuminate\Notifications\Slack\BlockKit\Blocks\SectionBlock;
use Illuminate\Notifications\Slack\SlackMessage;

/**
 * Get the Slack representation of the notification.
 */
public function toSlack(object $notifiable): SlackMessage
{
    return (new SlackMessage)
        ->text('One of your invoices has been paid!')
        ->headerBlock('Invoice Paid')
        ->contextBlock(function (ContextBlock $block) {
            $block->text('Customer #1234');
        })
        ->sectionBlock(function (SectionBlock $block) {
            $block->text('An invoice has been paid.');
        })
        ->actionsBlock(function (ActionsBlock $block) {
             // ID defaults to "button_acknowledge_invoice"...
            $block->button('Acknowledge Invoice')->primary();

            // Manually configure the ID...
            $block->button('Deny')->danger()->id('deny_invoice');
        });
}
```

<a name="slack-confirmation-modals"></a>
#### Confirmation Modals

If you would like users to be required to confirm an action before it is performed, you may invoke the `confirm` method when defining your button. The `confirm` method accepts a message and a closure which receives a `ConfirmObject` instance:

```php
use Illuminate\Notifications\Slack\BlockKit\Blocks\ActionsBlock;
use Illuminate\Notifications\Slack\BlockKit\Blocks\ContextBlock;
use Illuminate\Notifications\Slack\BlockKit\Blocks\SectionBlock;
use Illuminate\Notifications\Slack\BlockKit\Composites\ConfirmObject;
use Illuminate\Notifications\Slack\SlackMessage;

/**
 * Get the Slack representation of the notification.
 */
public function toSlack(object $notifiable): SlackMessage
{
    return (new SlackMessage)
        ->text('One of your invoices has been paid!')
        ->headerBlock('Invoice Paid')
        ->contextBlock(function (ContextBlock $block) {
            $block->text('Customer #1234');
        })
        ->sectionBlock(function (SectionBlock $block) {
            $block->text('An invoice has been paid.');
        })
        ->actionsBlock(function (ActionsBlock $block) {
            $block->button('Acknowledge Invoice')
                ->primary()
                ->confirm(
                    'Acknowledge the payment and send a thank you email?',
                    function (ConfirmObject $dialog) {
                        $dialog->confirm('Yes');
                        $dialog->deny('No');
                    }
                );
        });
}
```

<a name="inspecting-slack-blocks"></a>
#### Inspecting Slack Blocks

If you would like to quickly inspect the blocks you've been building, you can invoke the `dd` method on the `SlackMessage` instance. The `dd` method will generate and dump a URL to Slack's [Block Kit Builder](https://app.slack.com/block-kit-builder/), which displays a preview of the payload and notification in your browser. You may pass `true` to the `dd` method to dump the raw payload:

```php
return (new SlackMessage)
    ->text('One of your invoices has been paid!')
    ->headerBlock('Invoice Paid')
    ->dd();
```

<a name="routing-slack-notifications"></a>
### Routing Slack Notifications

To direct Slack notifications to the appropriate Slack team and channel, define a `routeNotificationForSlack` method on your notifiable model. This method can return one of three values:

- `null` - which defers routing to the channel configured in the notification itself. You may use the `to` method when building your `SlackMessage` to configure the channel within the notification.
- A string specifying the Slack channel to send the notification to, e.g. `#support-channel`.
- A `SlackRoute` instance, which allows you to specify an OAuth token and channel name, e.g. `SlackRoute::make($this->slack_channel, $this->slack_token)`. This method should be used to send notifications to external workspaces.

For instance, returning `#support-channel` from the `routeNotificationForSlack` method will send the notification to the `#support-channel` channel in the workspace associated with the Bot User OAuth token located in your application's `services.php` configuration file:

```php
<?php

namespace App\Models;

use Illuminate\Foundation\Auth\User as Authenticatable;
use Illuminate\Notifications\Notifiable;
use Illuminate\Notifications\Notification;

class User extends Authenticatable
{
    use Notifiable;

    /**
     * Route notifications for the Slack channel.
     */
    public function routeNotificationForSlack(Notification $notification): mixed
    {
        return '#support-channel';
    }
}
```

<a name="notifying-external-slack-workspaces"></a>
### Notifying External Slack Workspaces

> [!NOTE]
> Before sending notifications to external Slack workspaces, your Slack App must be [distributed](#slack-app-distribution).

Of course, you will often want to send notifications to the Slack workspaces owned by your application's users. To do so, you will first need to obtain a Slack OAuth token for the user. Thankfully, [Laravel Socialite](/docs/{{version}}/socialite) includes a Slack driver that will allow you to easily authenticate your application's users with Slack and [obtain a bot token](/docs/{{version}}/socialite#slack-bot-scopes).

Once you have obtained the bot token and stored it within your application's database, you may utilize the `SlackRoute::make` method to route a notification to the user's workspace. In addition, your application will likely need to offer an opportunity for the user to specify which channel notifications should be sent to:

```php
<?php

namespace App\Models;

use Illuminate\Foundation\Auth\User as Authenticatable;
use Illuminate\Notifications\Notifiable;
use Illuminate\Notifications\Notification;
use Illuminate\Notifications\Slack\SlackRoute;

class User extends Authenticatable
{
    use Notifiable;

    /**
     * Route notifications for the Slack channel.
     */
    public function routeNotificationForSlack(Notification $notification): mixed
    {
        return SlackRoute::make($this->slack_channel, $this->slack_token);
    }
}
```

<a name="localizing-notifications"></a>
## Localizing Notifications

Laravel allows you to send notifications in a locale other than the HTTP request's current locale, and will even remember this locale if the notification is queued.

To accomplish this, the `Illuminate\Notifications\Notification` class offers a `locale` method to set the desired language. The application will change into this locale when the notification is being evaluated and then revert back to the previous locale when evaluation is complete:

```php
$user->notify((new InvoicePaid($invoice))->locale('es'));
```

Localization of multiple notifiable entries may also be achieved via the `Notification` facade:

```php
Notification::locale('es')->send(
    $users, new InvoicePaid($invoice)
);
```

<a name="user-preferred-locales"></a>
#### User Preferred Locales

Sometimes, applications store each user's preferred locale. By implementing the `HasLocalePreference` contract on your notifiable model, you may instruct Laravel to use this stored locale when sending a notification:

```php
use Illuminate\Contracts\Translation\HasLocalePreference;

class User extends Model implements HasLocalePreference
{
    /**
     * Get the user's preferred locale.
     */
    public function preferredLocale(): string
    {
        return $this->locale;
    }
}
```

Once you have implemented the interface, Laravel will automatically use the preferred locale when sending notifications and mailables to the model. Therefore, there is no need to call the `locale` method when using this interface:

```php
$user->notify(new InvoicePaid($invoice));
```

<a name="testing"></a>
## Testing

You may use the `Notification` facade's `fake` method to prevent notifications from being sent. Typically, sending notifications is unrelated to the code you are actually testing. Most likely, it is sufficient to simply assert that Laravel was instructed to send a given notification.

After calling the `Notification` facade's `fake` method, you may then assert that notifications were instructed to be sent to users and even inspect the data the notifications received:

```php tab=Pest
<?php

use App\Notifications\OrderShipped;
use Illuminate\Support\Facades\Notification;

test('orders can be shipped', function () {
    Notification::fake();

    // Perform order shipping...

    // Assert that no notifications were sent...
    Notification::assertNothingSent();

    // Assert a notification was sent to the given users...
    Notification::assertSentTo(
        [$user], OrderShipped::class
    );

    // Assert a notification was not sent...
    Notification::assertNotSentTo(
        [$user], AnotherNotification::class
    );

    // Assert a notification was sent twice...
    Notification::assertSentTimes(WeeklyReminder::class, 2);

    // Assert that a notification was sent to a user exactly once...
    Notification::assertSentToOnce($user, OrderShipped::class);

    // Assert that a given number of notifications were sent...
    Notification::assertCount(3);
});
```

```php tab=PHPUnit
<?php

namespace Tests\Feature;

use App\Notifications\OrderShipped;
use Illuminate\Support\Facades\Notification;
use Tests\TestCase;

class ExampleTest extends TestCase
{
    public function test_orders_can_be_shipped(): void
    {
        Notification::fake();

        // Perform order shipping...

        // Assert that no notifications were sent...
        Notification::assertNothingSent();

        // Assert a notification was sent to the given users...
        Notification::assertSentTo(
            [$user], OrderShipped::class
        );

        // Assert a notification was not sent...
        Notification::assertNotSentTo(
            [$user], AnotherNotification::class
        );

        // Assert a notification was sent twice...
        Notification::assertSentTimes(WeeklyReminder::class, 2);

        // Assert that a notification was sent to a user exactly once...
        Notification::assertSentToOnce($user, OrderShipped::class);

        // Assert that a given number of notifications were sent...
        Notification::assertCount(3);
    }
}
```

You may pass a closure to the `assertSentTo` or `assertNotSentTo` methods in order to assert that a notification was sent that passes a given "truth test". If at least one notification was sent that passes the given truth test then the assertion will be successful:

```php
Notification::assertSentTo(
    $user,
    function (OrderShipped $notification, array $channels) use ($order) {
        return $notification->order->id === $order->id;
    }
);
```

<a name="testing-on-demand-notifications"></a>
#### On-Demand Notifications

If the code you are testing sends [on-demand notifications](#on-demand-notifications), you can test that the on-demand notification was sent via the `assertSentOnDemand` method:

```php
Notification::assertSentOnDemand(OrderShipped::class);
Notification::assertSentOnDemandOnce(OrderShipped::class);
```

By passing a closure as the second argument to the `assertSentOnDemand` method, you may determine if an on-demand notification was sent to the correct "route" address:

```php
Notification::assertSentOnDemand(
    OrderShipped::class,
    function (OrderShipped $notification, array $channels, object $notifiable) use ($user) {
        return $notifiable->routes['mail'] === $user->email;
    }
);
```

<a name="notification-events"></a>
## Notification Events

<a name="notification-sending-event"></a>
#### Notification Sending Event

When a notification is sending, the `Illuminate\Notifications\Events\NotificationSending` event is dispatched by the notification system. This contains the "notifiable" entity and the notification instance itself. You may create [event listeners](/docs/{{version}}/events) for this event within your application:

```php
use Illuminate\Notifications\Events\NotificationSending;

class CheckNotificationStatus
{
    /**
     * Handle the event.
     */
    public function handle(NotificationSending $event): void
    {
        // ...
    }
}
```

The notification will not be sent if an event listener for the `NotificationSending` event returns `false` from its `handle` method:

```php
/**
 * Handle the event.
 */
public function handle(NotificationSending $event): bool
{
    return false;
}
```

Within an event listener, you may access the `notifiable`, `notification`, and `channel` properties on the event to learn more about the notification recipient or the notification itself:

```php
/**
 * Handle the event.
 */
public function handle(NotificationSending $event): void
{
    // $event->channel
    // $event->notifiable
    // $event->notification
}
```

<a name="notification-sent-event"></a>
#### Notification Sent Event

When a notification is sent, the `Illuminate\Notifications\Events\NotificationSent` [event](/docs/{{version}}/events) is dispatched by the notification system. This contains the "notifiable" entity and the notification instance itself. You may create [event listeners](/docs/{{version}}/events) for this event within your application:

```php
use Illuminate\Notifications\Events\NotificationSent;

class LogNotification
{
    /**
     * Handle the event.
     */
    public function handle(NotificationSent $event): void
    {
        // ...
    }
}
```

Within an event listener, you may access the `notifiable`, `notification`, `channel`, and `response` properties on the event to learn more about the notification recipient or the notification itself:

```php
/**
 * Handle the event.
 */
public function handle(NotificationSent $event): void
{
    // $event->channel
    // $event->notifiable
    // $event->notification
    // $event->response
}
```

<a name="custom-channels"></a>
## Custom Channels

Laravel ships with a handful of notification channels, but you may want to write your own drivers to deliver notifications via other channels. Laravel makes it simple. To get started, define a class that contains a `send` method. The method should receive two arguments: a `$notifiable` and a `$notification`.

Within the `send` method, you may call methods on the notification to retrieve a message object understood by your channel and then send the notification to the `$notifiable` instance however you wish:

```php
<?php

namespace App\Notifications;

use Illuminate\Notifications\Notification;

class VoiceChannel
{
    /**
     * Send the given notification.
     */
    public function send(object $notifiable, Notification $notification): void
    {
        $message = $notification->toVoice($notifiable);

        // Send notification to the $notifiable instance...
    }
}
```

Once your notification channel class has been defined, you may return the class name from the `via` method of any of your notifications. In this example, the `toVoice` method of your notification can return whatever object you choose to represent voice messages. For example, you might define your own `VoiceMessage` class to represent these messages:

```php
<?php

namespace App\Notifications;

use App\Notifications\Messages\VoiceMessage;
use App\Notifications\VoiceChannel;
use Illuminate\Bus\Queueable;
use Illuminate\Contracts\Queue\ShouldQueue;
use Illuminate\Notifications\Notification;

class InvoicePaid extends Notification
{
    use Queueable;

    /**
     * Get the notification channels.
     */
    public function via(object $notifiable): string
    {
        return VoiceChannel::class;
    }

    /**
     * Get the voice representation of the notification.
     */
    public function toVoice(object $notifiable): VoiceMessage
    {
        // ...
    }
}
```


---

# Laravel Octane

*Sección: Laravel | Origen: https://laravel.com/docs/13.x/octane*

- [Introduction](#introduction)
- [Installation](#installation)
- [Server Prerequisites](#server-prerequisites)
    - [FrankenPHP](#frankenphp)
    - [RoadRunner](#roadrunner)
    - [Swoole](#swoole)
- [Serving Your Application](#serving-your-application)
    - [Serving Your Application via HTTPS](#serving-your-application-via-https)
    - [Serving Your Application via Nginx](#serving-your-application-via-nginx)
    - [Watching for File Changes](#watching-for-file-changes)
    - [Specifying the Worker Count](#specifying-the-worker-count)
    - [Specifying the Max Request Count](#specifying-the-max-request-count)
    - [Specifying the Max Execution Time](#specifying-the-max-execution-time)
    - [Reloading the Workers](#reloading-the-workers)
    - [Stopping the Server](#stopping-the-server)
- [Dependency Injection and Octane](#dependency-injection-and-octane)
    - [Container Injection](#container-injection)
    - [Request Injection](#request-injection)
    - [Configuration Repository Injection](#configuration-repository-injection)
- [Managing Memory Leaks](#managing-memory-leaks)
- [Concurrent Tasks](#concurrent-tasks)
- [Ticks and Intervals](#ticks-and-intervals)
- [The Octane Cache](#the-octane-cache)
    - [Cache Intervals](#cache-intervals)
- [Tables](#tables)

<a name="introduction"></a>
## Introduction

[Laravel Octane](https://github.com/laravel/octane) supercharges your application's performance by serving your application using high-powered application servers, including [FrankenPHP](https://frankenphp.dev/), [Open Swoole](https://openswoole.com/), [Swoole](https://github.com/swoole/swoole-src), and [RoadRunner](https://roadrunner.dev). Octane boots your application once, keeps it in memory, and then feeds it requests at supersonic speeds.

<a name="installation"></a>
## Installation

Octane may be installed via the Composer package manager:

```shell
composer require laravel/octane
```

After installing Octane, you may execute the `octane:install` Artisan command, which will install Octane's configuration file into your application:

```shell
php artisan octane:install
```

<a name="server-prerequisites"></a>
## Server Prerequisites

<a name="frankenphp"></a>
### FrankenPHP

[FrankenPHP](https://frankenphp.dev) is a PHP application server, written in Go, that supports modern web features like early hints, Brotli, and Zstandard compression. When you install Octane and choose FrankenPHP as your server, Octane will automatically download and install the FrankenPHP binary for you.

<a name="frankenphp-via-laravel-sail"></a>
#### FrankenPHP via Laravel Sail

If you plan to develop your application using [Laravel Sail](/docs/{{version}}/sail), you should run the following commands to install Octane and FrankenPHP:

```shell
./vendor/bin/sail up

./vendor/bin/sail composer require laravel/octane
```

Next, you should use the `octane:install` Artisan command to install the FrankenPHP binary:

```shell
./vendor/bin/sail artisan octane:install --server=frankenphp
```

Finally, add a `SUPERVISOR_PHP_COMMAND` environment variable to the `laravel.test` service definition in your application's `docker-compose.yml` file. This environment variable will contain the command that Sail will use to serve your application using Octane instead of the PHP development server:

```yaml
services:
  laravel.test:
    environment:
      SUPERVISOR_PHP_COMMAND: "/usr/bin/php -d variables_order=EGPCS /var/www/html/artisan octane:start --server=frankenphp --host=0.0.0.0 --admin-port=2019 --port='${APP_PORT:-80}'" # [tl! add]
      XDG_CONFIG_HOME:  /var/www/html/config # [tl! add]
      XDG_DATA_HOME:  /var/www/html/data # [tl! add]
```

To enable HTTPS, HTTP/2, and HTTP/3, apply these modifications instead:

```yaml
services:
  laravel.test:
    ports:
        - '${APP_PORT:-80}:80'
        - '${VITE_PORT:-5173}:${VITE_PORT:-5173}'
        - '443:443' # [tl! add]
        - '443:443/udp' # [tl! add]
    environment:
      SUPERVISOR_PHP_COMMAND: "/usr/bin/php -d variables_order=EGPCS /var/www/html/artisan octane:start --host=localhost --port=443 --admin-port=2019 --https" # [tl! add]
      XDG_CONFIG_HOME:  /var/www/html/config # [tl! add]
      XDG_DATA_HOME:  /var/www/html/data # [tl! add]
```

Typically, you should access your FrankenPHP Sail application via `https://localhost`, as using `https://127.0.0.1` requires additional configuration and is [discouraged](https://frankenphp.dev/docs/known-issues/#using-https127001-with-docker).

<a name="frankenphp-via-docker"></a>
#### FrankenPHP via Docker

Using FrankenPHP's official Docker images can offer improved performance and the use of additional extensions not included with static installations of FrankenPHP. In addition, the official Docker images provide support for running FrankenPHP on platforms it doesn't natively support, such as Windows. FrankenPHP's official Docker images are suitable for both local development and production usage.

You may use the following Dockerfile as a starting point for containerizing your FrankenPHP powered Laravel application:

```dockerfile
FROM dunglas/frankenphp

RUN install-php-extensions \
    pcntl
    # Add other PHP extensions here...

COPY . /app

ENTRYPOINT ["php", "artisan", "octane:frankenphp"]
```

Then, during development, you may utilize the following Docker Compose file to run your application:

```yaml
# compose.yaml
services:
  frankenphp:
    build:
      context: .
    entrypoint: php artisan octane:frankenphp --workers=1 --max-requests=1
    ports:
      - "8000:8000"
    volumes:
      - .:/app
```

If the `--log-level` option is explicitly passed to the `php artisan octane:start` command, Octane will use FrankenPHP's native logger and, unless configured differently, will produce structured JSON logs.

You may consult [the official FrankenPHP documentation](https://frankenphp.dev/docs/docker/) for more information on running FrankenPHP with Docker.

<a name="frankenphp-caddyfile"></a>
#### Custom Caddyfile Configuration

When using FrankenPHP, you may specify a custom Caddyfile using the `--caddyfile` option when starting Octane:

```shell
php artisan octane:start --server=frankenphp --caddyfile=/path/to/your/Caddyfile
```

This allows you to customize FrankenPHP's configuration beyond the default settings, such as adding custom middleware, configuring advanced routing, or setting up custom directives. You may consult the [official Caddy documentation](https://caddyserver.com/docs/caddyfile) for more information on Caddyfile syntax and configuration options.

<a name="roadrunner"></a>
### RoadRunner

[RoadRunner](https://roadrunner.dev) is powered by the RoadRunner binary, which is built using Go. The first time you start a RoadRunner based Octane server, Octane will offer to download and install the RoadRunner binary for you.

<a name="roadrunner-via-laravel-sail"></a>
#### RoadRunner via Laravel Sail

If you plan to develop your application using [Laravel Sail](/docs/{{version}}/sail), you should run the following commands to install Octane and RoadRunner:

```shell
./vendor/bin/sail up

./vendor/bin/sail composer require laravel/octane spiral/roadrunner-cli spiral/roadrunner-http
```

Next, you should start a Sail shell and use the `rr` executable to retrieve the latest Linux based build of the RoadRunner binary:

```shell
./vendor/bin/sail shell

# Within the Sail shell...
./vendor/bin/rr get-binary
```

Then, add a `SUPERVISOR_PHP_COMMAND` environment variable to the `laravel.test` service definition in your application's `docker-compose.yml` file. This environment variable will contain the command that Sail will use to serve your application using Octane instead of the PHP development server:

```yaml
services:
  laravel.test:
    environment:
      SUPERVISOR_PHP_COMMAND: "/usr/bin/php -d variables_order=EGPCS /var/www/html/artisan octane:start --server=roadrunner --host=0.0.0.0 --rpc-port=6001 --port='${APP_PORT:-80}'" # [tl! add]
```

Finally, ensure the `rr` binary is executable and build your Sail images:

```shell
chmod +x ./rr

./vendor/bin/sail build --no-cache
```

<a name="swoole"></a>
### Swoole

If you plan to use the Swoole application server to serve your Laravel Octane application, you must install the Swoole PHP extension. Typically, this can be done via PECL:

```shell
pecl install swoole
```

<a name="openswoole"></a>
#### Open Swoole

If you want to use the Open Swoole application server to serve your Laravel Octane application, you must install the Open Swoole PHP extension. Typically, this can be done via PECL:

```shell
pecl install openswoole
```

Using Laravel Octane with Open Swoole grants the same functionality provided by Swoole, such as concurrent tasks, ticks, and intervals.

<a name="swoole-via-laravel-sail"></a>
#### Swoole via Laravel Sail

> [!WARNING]
> Before serving an Octane application via Sail, ensure you have the latest version of Laravel Sail and execute `./vendor/bin/sail build --no-cache` within your application's root directory.

Alternatively, you may develop your Swoole based Octane application using [Laravel Sail](/docs/{{version}}/sail), the official Docker based development environment for Laravel. Laravel Sail includes the Swoole extension by default. However, you will still need to adjust the `docker-compose.yml` file used by Sail.

To get started, add a `SUPERVISOR_PHP_COMMAND` environment variable to the `laravel.test` service definition in your application's `docker-compose.yml` file. This environment variable will contain the command that Sail will use to serve your application using Octane instead of the PHP development server:

```yaml
services:
  laravel.test:
    environment:
      SUPERVISOR_PHP_COMMAND: "/usr/bin/php -d variables_order=EGPCS /var/www/html/artisan octane:start --server=swoole --host=0.0.0.0 --port='${APP_PORT:-80}'" # [tl! add]
```

Finally, build your Sail images:

```shell
./vendor/bin/sail build --no-cache
```

<a name="swoole-configuration"></a>
#### Swoole Configuration

Swoole supports a few additional configuration options that you may add to your `octane` configuration file if necessary. Because they rarely need to be modified, these options are not included in the default configuration file:

```php
'swoole' => [
    'options' => [
        'log_file' => storage_path('logs/swoole_http.log'),
        'package_max_length' => 10 * 1024 * 1024,
    ],
],
```

<a name="serving-your-application"></a>
## Serving Your Application

The Octane server can be started via the `octane:start` Artisan command. By default, this command will utilize the server specified by the `server` configuration option of your application's `octane` configuration file:

```shell
php artisan octane:start
```

By default, Octane will start the server on port 8000, so you may access your application in a web browser via `http://localhost:8000`.

<a name="keeping-octane-running-in-production"></a>
#### Keeping Octane Running in Production

If you are deploying your Octane application to production, you should use a process monitor such as Supervisor to ensure the Octane server stays running. A sample Supervisor configuration file for Octane might look like the following:

```ini
[program:octane]
process_name=%(program_name)s_%(process_num)02d
command=php /home/forge/example.com/artisan octane:start --server=frankenphp --host=127.0.0.1 --port=8000
autostart=true
autorestart=true
user=forge
redirect_stderr=true
stdout_logfile=/home/forge/example.com/storage/logs/octane.log
stopwaitsecs=3600
```

<a name="serving-your-application-via-https"></a>
### Serving Your Application via HTTPS

By default, applications running via Octane generate links prefixed with `http://`. The `OCTANE_HTTPS` environment variable, used within your application's `config/octane.php` configuration file, can be set to `true` when serving your application via HTTPS. When this configuration value is set to `true`, Octane will instruct Laravel to prefix all generated links with `https://`:

```php
'https' => env('OCTANE_HTTPS', false),
```

<a name="serving-your-application-via-nginx"></a>
### Serving Your Application via Nginx

> [!NOTE]
> If you aren't quite ready to manage your own server configuration or aren't comfortable configuring all of the various services needed to run a robust Laravel Octane application, check out [Laravel Cloud](https://cloud.laravel.com), which offers fully-managed Laravel Octane support.

In production environments, you should serve your Octane application behind a traditional web server such as Nginx or Apache. Doing so will allow the web server to serve your static assets such as images and stylesheets, as well as manage your SSL certificate termination.

In the Nginx configuration example below, Nginx will serve the site's static assets and proxy requests to the Octane server that is running on port 8000:

```nginx
map $http_upgrade $connection_upgrade {
    default upgrade;
    ''      close;
}

server {
    listen 80;
    listen [::]:80;
    server_name domain.com;
    server_tokens off;
    root /home/forge/domain.com/public;

    index index.php;

    charset utf-8;

    location /index.php {
        try_files /not_exists @octane;
    }

    location / {
        try_files $uri $uri/ @octane;
    }

    location = /favicon.ico { access_log off; log_not_found off; }
    location = /robots.txt  { access_log off; log_not_found off; }

    access_log off;
    error_log  /var/log/nginx/domain.com-error.log error;

    error_page 404 /index.php;

    location @octane {
        set $suffix "";

        if ($uri = /index.php) {
            set $suffix ?$query_string;
        }

        proxy_http_version 1.1;
        proxy_set_header Host $http_host;
        proxy_set_header Scheme $scheme;
        proxy_set_header SERVER_PORT $server_port;
        proxy_set_header REMOTE_ADDR $remote_addr;
        proxy_set_header X-Forwarded-For $proxy_add_x_forwarded_for;
        proxy_set_header Upgrade $http_upgrade;
        proxy_set_header Connection $connection_upgrade;

        proxy_pass http://127.0.0.1:8000$suffix;
    }
}
```

<a name="watching-for-file-changes"></a>
### Watching for File Changes

Since your application is loaded in memory once when the Octane server starts, any changes to your application's files will not be reflected when you refresh your browser. For example, route definitions added to your `routes/web.php` file will not be reflected until the server is restarted. For convenience, you may use the `--watch` flag to instruct Octane to automatically restart the server on any file changes within your application:

```shell
php artisan octane:start --watch
```

Before using this feature, you should ensure that [Node](https://nodejs.org) is installed within your local development environment. In addition, you should install the [Chokidar](https://github.com/paulmillr/chokidar) file-watching library within your project:

```shell
npm install --save-dev chokidar
```

You may configure the directories and files that should be watched using the `watch` configuration option within your application's `config/octane.php` configuration file.

<a name="specifying-the-worker-count"></a>
### Specifying the Worker Count

By default, Octane will start an application request worker for each CPU core provided by your machine. These workers will then be used to serve incoming HTTP requests as they enter your application. You may manually specify how many workers you would like to start using the `--workers` option when invoking the `octane:start` command:

```shell
php artisan octane:start --workers=4
```

If you are using the Swoole application server, you may also specify how many ["task workers"](#concurrent-tasks) you wish to start:

```shell
php artisan octane:start --workers=4 --task-workers=6
```

<a name="specifying-the-max-request-count"></a>
### Specifying the Max Request Count

To help prevent stray memory leaks, Octane gracefully restarts any worker once it has handled 500 requests. To adjust this number, you may use the `--max-requests` option:

```shell
php artisan octane:start --max-requests=250
```

<a name="specifying-the-max-execution-time"></a>
### Specifying the Max Execution Time

By default, Laravel Octane sets a maximum execution time of 30 seconds for incoming requests via the `max_execution_time` option in your application's `config/octane.php` configuration file:

```php
'max_execution_time' => 30,
```

This setting defines the maximum number of seconds that an incoming request is allowed to execute before being terminated. Setting this value to `0` will disable the execution time limit entirely. This configuration option is particularly useful for applications that handle long-running requests, such as file uploads, data processing, or API calls to external services.

> [!WARNING]
> When you modify the `max_execution_time` configuration, you must restart the Octane server for the changes to take effect.

<a name="reloading-the-workers"></a>
### Reloading the Workers

You may gracefully restart the Octane server's application workers using the `octane:reload` command. Typically, this should be done after deployment so that your newly deployed code is loaded into memory and is used to serve to subsequent requests:

```shell
php artisan octane:reload
```

<a name="stopping-the-server"></a>
### Stopping the Server

You may stop the Octane server using the `octane:stop` Artisan command:

```shell
php artisan octane:stop
```

<a name="checking-the-server-status"></a>
#### Checking the Server Status

You may check the current status of the Octane server using the `octane:status` Artisan command:

```shell
php artisan octane:status
```

<a name="dependency-injection-and-octane"></a>
## Dependency Injection and Octane

Since Octane boots your application once and keeps it in memory while serving requests, there are a few caveats you should consider while building your application. For example, the `register` and `boot` methods of your application's service providers will only be executed once when the request worker initially boots. On subsequent requests, the same application instance will be reused.

In light of this, you should take special care when injecting the application service container or request into any object's constructor. By doing so, that object may have a stale version of the container or request on subsequent requests.

Octane will automatically handle resetting any first-party framework state between requests. However, Octane does not always know how to reset the global state created by your application. Therefore, you should be aware of how to build your application in a way that is Octane friendly. Below, we will discuss the most common situations that may cause problems while using Octane.

<a name="container-injection"></a>
### Container Injection

In general, you should avoid injecting the application service container or HTTP request instance into the constructors of other objects. For example, the following binding injects the entire application service container into an object that is bound as a singleton:

```php
use App\Service;
use Illuminate\Contracts\Foundation\Application;

/**
 * Register any application services.
 */
public function register(): void
{
    $this->app->singleton(Service::class, function (Application $app) {
        return new Service($app);
    });
}
```

In this example, if the `Service` instance is resolved during the application boot process, the container will be injected into the service and that same container will be held by the `Service` instance on subsequent requests. This **may** not be a problem for your particular application; however, it can lead to the container unexpectedly missing bindings that were added later in the boot cycle or by a subsequent request.

As a work-around, you could either stop registering the binding as a singleton, or you could inject a container resolver closure into the service that always resolves the current container instance:

```php
use App\Service;
use Illuminate\Container\Container;
use Illuminate\Contracts\Foundation\Application;

$this->app->bind(Service::class, function (Application $app) {
    return new Service($app);
});

$this->app->singleton(Service::class, function () {
    return new Service(fn () => Container::getInstance());
});
```

The global `app` helper and the `Container::getInstance()` method will always return the latest version of the application container.

<a name="request-injection"></a>
### Request Injection

In general, you should avoid injecting the application service container or HTTP request instance into the constructors of other objects. For example, the following binding injects the entire request instance into an object that is bound as a singleton:

```php
use App\Service;
use Illuminate\Contracts\Foundation\Application;

/**
 * Register any application services.
 */
public function register(): void
{
    $this->app->singleton(Service::class, function (Application $app) {
        return new Service($app['request']);
    });
}
```

In this example, if the `Service` instance is resolved during the application boot process, the HTTP request will be injected into the service and that same request will be held by the `Service` instance on subsequent requests. Therefore, all headers, input, and query string data will be incorrect, as well as all other request data.

As a work-around, you could either stop registering the binding as a singleton, or you could inject a request resolver closure into the service that always resolves the current request instance. Or, the most recommended approach is simply to pass the specific request information your object needs to one of the object's methods at runtime:

```php
use App\Service;
use Illuminate\Contracts\Foundation\Application;

$this->app->bind(Service::class, function (Application $app) {
    return new Service($app['request']);
});

$this->app->singleton(Service::class, function (Application $app) {
    return new Service(fn () => $app['request']);
});

// Or...

$service->method($request->input('name'));
```

The global `request` helper will always return the request the application is currently handling and is therefore safe to use within your application.

> [!WARNING]
> It is acceptable to type-hint the `Illuminate\Http\Request` instance on your controller methods and route closures.

<a name="configuration-repository-injection"></a>
### Configuration Repository Injection

In general, you should avoid injecting the configuration repository instance into the constructors of other objects. For example, the following binding injects the configuration repository into an object that is bound as a singleton:

```php
use App\Service;
use Illuminate\Contracts\Foundation\Application;

/**
 * Register any application services.
 */
public function register(): void
{
    $this->app->singleton(Service::class, function (Application $app) {
        return new Service($app->make('config'));
    });
}
```

In this example, if the configuration values change between requests, that service will not have access to the new values because it's depending on the original repository instance.

As a work-around, you could either stop registering the binding as a singleton, or you could inject a configuration repository resolver closure to the class:

```php
use App\Service;
use Illuminate\Container\Container;
use Illuminate\Contracts\Foundation\Application;

$this->app->bind(Service::class, function (Application $app) {
    return new Service($app->make('config'));
});

$this->app->singleton(Service::class, function () {
    return new Service(fn () => Container::getInstance()->make('config'));
});
```

The global `config` will always return the latest version of the configuration repository and is therefore safe to use within your application.

<a name="managing-memory-leaks"></a>
### Managing Memory Leaks

Remember, Octane keeps your application in memory between requests; therefore, adding data to a statically maintained array will result in a memory leak. For example, the following controller has a memory leak since each request to the application will continue to add data to the static `$data` array:

```php
use App\Service;
use Illuminate\Http\Request;
use Illuminate\Support\Str;

/**
 * Handle an incoming request.
 */
public function index(Request $request): array
{
    Service::$data[] = Str::random(10);

    return [
        // ...
    ];
}
```

While building your application, you should take special care to avoid creating these types of memory leaks. It is recommended that you monitor your application's memory usage during local development to ensure you are not introducing new memory leaks into your application.

<a name="concurrent-tasks"></a>
## Concurrent Tasks

> [!WARNING]
> This feature requires [Swoole](#swoole).

When using Swoole, you may execute operations concurrently via light-weight background tasks. You may accomplish this using Octane's `concurrently` method. You may combine this method with PHP array destructuring to retrieve the results of each operation:

```php
use App\Models\User;
use App\Models\Server;
use Laravel\Octane\Facades\Octane;

[$users, $servers] = Octane::concurrently([
    fn () => User::all(),
    fn () => Server::all(),
]);
```

Concurrent tasks processed by Octane utilize Swoole's "task workers", and execute within an entirely different process than the incoming request. The amount of workers available to process concurrent tasks is determined by the `--task-workers` directive on the `octane:start` command:

```shell
php artisan octane:start --workers=4 --task-workers=6
```

When invoking the `concurrently` method, you should not provide more than 1024 tasks due to limitations imposed by Swoole's task system.

<a name="ticks-and-intervals"></a>
## Ticks and Intervals

> [!WARNING]
> This feature requires [Swoole](#swoole).

When using Swoole, you may register "tick" operations that will be executed every specified number of seconds. You may register "tick" callbacks via the `tick` method. The first argument provided to the `tick` method should be a string that represents the name of the ticker. The second argument should be a callable that will be invoked at the specified interval.

In this example, we will register a closure to be invoked every 10 seconds. Typically, the `tick` method should be called within the `boot` method of one of your application's service providers:

```php
Octane::tick('simple-ticker', fn () => ray('Ticking...'))
    ->seconds(10);
```

Using the `immediate` method, you may instruct Octane to immediately invoke the tick callback when the Octane server initially boots, and every N seconds thereafter:

```php
Octane::tick('simple-ticker', fn () => ray('Ticking...'))
    ->seconds(10)
    ->immediate();
```

<a name="the-octane-cache"></a>
## The Octane Cache

> [!WARNING]
> This feature requires [Swoole](#swoole).

When using Swoole, you may leverage the Octane cache driver, which provides read and write speeds of up to 2 million operations per second. Therefore, this cache driver is an excellent choice for applications that need extreme read / write speeds from their caching layer.

This cache driver is powered by [Swoole tables](https://www.swoole.co.uk/docs/modules/swoole-table). All data stored in the cache is available to all workers on the server. However, the cached data will be flushed when the server is restarted:

```php
Cache::store('octane')->put('framework', 'Laravel', 30);
```

> [!NOTE]
> The maximum number of entries allowed in the Octane cache may be defined in your application's `octane` configuration file.

<a name="cache-intervals"></a>
### Cache Intervals

In addition to the typical methods provided by Laravel's cache system, the Octane cache driver features interval based caches. These caches are automatically refreshed at the specified interval and should be registered within the `boot` method of one of your application's service providers. For example, the following cache will be refreshed every five seconds:

```php
use Illuminate\Support\Str;

Cache::store('octane')->interval('random', function () {
    return Str::random(10);
}, seconds: 5);
```

<a name="tables"></a>
## Tables

> [!WARNING]
> This feature requires [Swoole](#swoole).

When using Swoole, you may define and interact with your own arbitrary [Swoole tables](https://www.swoole.co.uk/docs/modules/swoole-table). Swoole tables provide extreme performance throughput and the data in these tables can be accessed by all workers on the server. However, the data within them will be lost when the server is restarted.

Tables should be defined within the `tables` configuration array of your application's `octane` configuration file. An example table that allows a maximum of 1000 rows is already configured for you. The maximum size of string columns may be configured by specifying the column size after the column type as seen below:

```php
'tables' => [
    'example:1000' => [
        'name' => 'string:1000',
        'votes' => 'int',
    ],
],
```

To access a table, you may use the `Octane::table` method:

```php
use Laravel\Octane\Facades\Octane;

Octane::table('example')->set('uuid', [
    'name' => 'Nuno Maduro',
    'votes' => 1000,
]);

return Octane::table('example')->get('uuid');
```

> [!WARNING]
> The column types supported by Swoole tables are: `string`, `int`, and `float`.


---

# Package Development

*Sección: Laravel | Origen: https://laravel.com/docs/13.x/packages*

- [Introduction](#introduction)
    - [Creating a Package](#creating-a-package)
    - [A Note on Facades](#a-note-on-facades)
- [Package Discovery](#package-discovery)
- [Service Providers](#service-providers)
- [Resources](#resources)
    - [Configuration](#configuration)
    - [Routes](#routes)
    - [Migrations](#migrations)
    - [Language Files](#language-files)
    - [Views](#views)
    - [View Components](#view-components)
    - ["About" Artisan Command](#about-artisan-command)
- [Commands](#commands)
    - [Optimize Commands](#optimize-commands)
    - [Reload Commands](#reload-commands)
- [Public Assets](#public-assets)
- [Publishing File Groups](#publishing-file-groups)

<a name="introduction"></a>
## Introduction

Packages are the primary way of adding functionality to Laravel. Packages might be anything from a great way to work with dates like [Carbon](https://github.com/briannesbitt/Carbon) or a package that allows you to associate files with Eloquent models like Spatie's [Laravel Media Library](https://github.com/spatie/laravel-medialibrary).

There are different types of packages. Some packages are stand-alone, meaning they work with any PHP framework. Carbon and Pest are examples of stand-alone packages. Any of these packages may be used with Laravel by requiring them in your `composer.json` file.

On the other hand, other packages are specifically intended for use with Laravel. These packages may have routes, controllers, views, and configuration specifically intended to enhance a Laravel application. This guide primarily covers the development of those packages that are Laravel specific.

<a name="creating-a-package"></a>
### Creating a Package

The easiest way to start building a new Laravel package is the official [Laravel package skeleton](https://github.com/laravel/package-skeleton). The skeleton provides everything you need to build a Laravel package, including a service provider, testing via Pest, static analysis via Larastan, code formatting via Pint, and a workbench application for end-to-end package development. You can create a new package using the `package` command of the [Laravel installer CLI](/docs/{{version}}/installation#creating-a-laravel-project):

```shell
laravel package my-package
```

An interactive configuration script will personalize the skeleton for your package, setting up your namespace, service provider, and only the features you need, such as configuration files, routes, views, translations, migrations, assets, commands, and a facade.

<a name="a-note-on-facades"></a>
### A Note on Facades

When writing a Laravel application, it generally does not matter if you use contracts or facades since both provide essentially equal levels of testability. However, when writing packages, your package will not typically have access to all of Laravel's testing helpers. If you would like to be able to write your package tests as if the package were installed inside a typical Laravel application, you may use the [Orchestral Testbench](https://github.com/orchestral/testbench) package.

<a name="package-discovery"></a>
## Package Discovery

A Laravel application's `bootstrap/providers.php` file contains the list of service providers that should be loaded by Laravel. However, instead of requiring users to manually add your service provider to the list, you may define the provider in the `extra` section of your package's `composer.json` file so that it is automatically loaded by Laravel. In addition to service providers, you may also list any [facades](/docs/{{version}}/facades) you would like to be registered:

```json
"extra": {
    "laravel": {
        "providers": [
            "Barryvdh\\Debugbar\\ServiceProvider"
        ],
        "aliases": {
            "Debugbar": "Barryvdh\\Debugbar\\Facade"
        }
    }
},
```

Once your package has been configured for discovery, Laravel will automatically register its service providers and facades when it is installed, creating a convenient installation experience for your package's users.

<a name="opting-out-of-package-discovery"></a>
#### Opting Out of Package Discovery

If you are the consumer of a package and would like to disable package discovery for a package, you may list the package name in the `extra` section of your application's `composer.json` file:

```json
"extra": {
    "laravel": {
        "dont-discover": [
            "barryvdh/laravel-debugbar"
        ]
    }
},
```

You may disable package discovery for all packages using the `*` character inside of your application's `dont-discover` directive:

```json
"extra": {
    "laravel": {
        "dont-discover": [
            "*"
        ]
    }
},
```

<a name="service-providers"></a>
## Service Providers

[Service providers](/docs/{{version}}/providers) are the connection point between your package and Laravel. A service provider is responsible for binding things into Laravel's [service container](/docs/{{version}}/container) and informing Laravel where to load package resources such as views, configuration, and language files.

A service provider extends the `Illuminate\Support\ServiceProvider` class and contains two methods: `register` and `boot`. The base `ServiceProvider` class is located in the `illuminate/support` Composer package, which you should add to your own package's dependencies. To learn more about the structure and purpose of service providers, check out [their documentation](/docs/{{version}}/providers).

<a name="resources"></a>
## Resources

<a name="configuration"></a>
### Configuration

Typically, you will need to publish your package's configuration file to the application's `config` directory. This will allow users of your package to easily override your default configuration options. To allow your configuration files to be published, call the `publishes` method from the `boot` method of your service provider:

```php
/**
 * Bootstrap any package services.
 */
public function boot(): void
{
    $this->publishes([
        __DIR__.'/../config/courier.php' => config_path('courier.php'),
    ]);
}
```

Now, when users of your package execute Laravel's `vendor:publish` command, your file will be copied to the specified publish location. Once your configuration has been published, its values may be accessed like any other configuration file:

```php
$value = config('courier.option');
```

> [!WARNING]
> You should not define closures in your configuration files. They cannot be serialized correctly when users execute the `config:cache` Artisan command.

<a name="default-package-configuration"></a>
#### Default Package Configuration

You may also merge your own package configuration file with the application's published copy. This will allow your users to define only the options they actually want to override in the published copy of the configuration file. To merge the configuration file values, use the `mergeConfigFrom` method within your service provider's `register` method.

The `mergeConfigFrom` method accepts the path to your package's configuration file as its first argument and the name of the application's copy of the configuration file as its second argument:

```php
/**
 * Register any package services.
 */
public function register(): void
{
    $this->mergeConfigFrom(
        __DIR__.'/../config/courier.php', 'courier'
    );
}
```

> [!WARNING]
> This method only merges the first level of the configuration array. If your users partially define a multi-dimensional configuration array, the missing options will not be merged.

<a name="routes"></a>
### Routes

If your package contains routes, you may load them using the `loadRoutesFrom` method. This method will automatically determine if the application's routes are cached and will not load your routes file if the routes have already been cached:

```php
/**
 * Bootstrap any package services.
 */
public function boot(): void
{
    $this->loadRoutesFrom(__DIR__.'/../routes/web.php');
}
```

<a name="migrations"></a>
### Migrations

If your package contains [database migrations](/docs/{{version}}/migrations), you may use the `publishesMigrations` method to inform Laravel that the given directory or file contains migrations. When Laravel publishes the migrations, it will automatically update the timestamp within their filename to reflect the current date and time:

```php
/**
 * Bootstrap any package services.
 */
public function boot(): void
{
    $this->publishesMigrations([
        __DIR__.'/../database/migrations' => database_path('migrations'),
    ]);
}
```

<a name="language-files"></a>
### Language Files

If your package contains [language files](/docs/{{version}}/localization), you may use the `loadTranslationsFrom` method to inform Laravel how to load them. For example, if your package is named `courier`, you should add the following to your service provider's `boot` method:

```php
/**
 * Bootstrap any package services.
 */
public function boot(): void
{
    $this->loadTranslationsFrom(__DIR__.'/../lang', 'courier');
}
```

Package translation lines are referenced using the `package::file.line` syntax convention. So, you may load the `courier` package's `welcome` line from the `messages` file like so:

```php
echo trans('courier::messages.welcome');
```

You can register JSON translation files for your package using the `loadJsonTranslationsFrom` method. This method accepts the path to the directory that contains your package's JSON translation files:

```php
/**
 * Bootstrap any package services.
 */
public function boot(): void
{
    $this->loadJsonTranslationsFrom(__DIR__.'/../lang');
}
```

<a name="publishing-language-files"></a>
#### Publishing Language Files

If you would like to publish your package's language files to the application's `lang/vendor` directory, you may use the service provider's `publishes` method. The `publishes` method accepts an array of package paths and their desired publish locations. For example, to publish the language files for the `courier` package, you may do the following:

```php
/**
 * Bootstrap any package services.
 */
public function boot(): void
{
    $this->loadTranslationsFrom(__DIR__.'/../lang', 'courier');

    $this->publishes([
        __DIR__.'/../lang' => $this->app->langPath('vendor/courier'),
    ]);
}
```

Now, when users of your package execute Laravel's `vendor:publish` Artisan command, your package's language files will be published to the specified publish location.

<a name="views"></a>
### Views

To register your package's [views](/docs/{{version}}/views) with Laravel, you need to tell Laravel where the views are located. You may do this using the service provider's `loadViewsFrom` method. The `loadViewsFrom` method accepts two arguments: the path to your view templates and your package's name. For example, if your package's name is `courier`, you would add the following to your service provider's `boot` method:

```php
/**
 * Bootstrap any package services.
 */
public function boot(): void
{
    $this->loadViewsFrom(__DIR__.'/../resources/views', 'courier');
}
```

Package views are referenced using the `package::view` syntax convention. So, once your view path is registered in a service provider, you may load the `dashboard` view from the `courier` package like so:

```php
Route::get('/dashboard', function () {
    return view('courier::dashboard');
});
```

<a name="overriding-package-views"></a>
#### Overriding Package Views

When you use the `loadViewsFrom` method, Laravel actually registers two locations for your views: the application's `resources/views/vendor` directory and the directory you specify. So, using the `courier` package as an example, Laravel will first check if a custom version of the view has been placed in the `resources/views/vendor/courier` directory by the developer. Then, if the view has not been customized, Laravel will search the package view directory you specified in your call to `loadViewsFrom`. This makes it easy for package users to customize / override your package's views.

<a name="publishing-views"></a>
#### Publishing Views

If you would like to make your views available for publishing to the application's `resources/views/vendor` directory, you may use the service provider's `publishes` method. The `publishes` method accepts an array of package view paths and their desired publish locations:

```php
/**
 * Bootstrap the package services.
 */
public function boot(): void
{
    $this->loadViewsFrom(__DIR__.'/../resources/views', 'courier');

    $this->publishes([
        __DIR__.'/../resources/views' => resource_path('views/vendor/courier'),
    ]);
}
```

Now, when users of your package execute Laravel's `vendor:publish` Artisan command, your package's views will be copied to the specified publish location.

<a name="view-components"></a>
### View Components

If you are building a package that utilizes Blade components or placing components in non-conventional directories, you will need to manually register your component class and its HTML tag alias so that Laravel knows where to find the component. You should typically register your components in the `boot` method of your package's service provider:

```php
use Illuminate\Support\Facades\Blade;
use VendorPackage\View\Components\AlertComponent;

/**
 * Bootstrap your package's services.
 */
public function boot(): void
{
    Blade::component('package-alert', AlertComponent::class);
}
```

Once your component has been registered, it may be rendered using its tag alias:

```blade
<x-package-alert/>
```

<a name="autoloading-package-components"></a>
#### Autoloading Package Components

Alternatively, you may use the `componentNamespace` method to autoload component classes by convention. For example, a `Nightshade` package might have `Calendar` and `ColorPicker` components that reside within the `Nightshade\Views\Components` namespace:

```php
use Illuminate\Support\Facades\Blade;

/**
 * Bootstrap your package's services.
 */
public function boot(): void
{
    Blade::componentNamespace('Nightshade\\Views\\Components', 'nightshade');
}
```

This will allow the usage of package components by their vendor namespace using the `package-name::` syntax:

```blade
<x-nightshade::calendar />
<x-nightshade::color-picker />
```

Blade will automatically detect the class that's linked to this component by pascal-casing the component name. Subdirectories are also supported using "dot" notation.

<a name="anonymous-components"></a>
#### Anonymous Components

If your package contains anonymous components, they must be placed within a `components` directory of your package's "views" directory (as specified by the [loadViewsFrom method](#views)). Then, you may render them by prefixing the component name with the package's view namespace:

```blade
<x-courier::alert />
```

<a name="about-artisan-command"></a>
### "About" Artisan Command

Laravel's built-in `about` Artisan command provides a synopsis of the application's environment and configuration. Packages may push additional information to this command's output via the `AboutCommand` class. Typically, this information may be added from your package service provider's `boot` method:

```php
use Illuminate\Foundation\Console\AboutCommand;

/**
 * Bootstrap any package services.
 */
public function boot(): void
{
    AboutCommand::add('My Package', fn () => ['Version' => '1.0.0']);
}
```

<a name="commands"></a>
## Commands

To register your package's Artisan commands with Laravel, you may use the `commands` method. This method expects an array of command class names. Once the commands have been registered, you may execute them using the [Artisan CLI](/docs/{{version}}/artisan):

```php
use Courier\Console\Commands\InstallCommand;
use Courier\Console\Commands\NetworkCommand;

/**
 * Bootstrap any package services.
 */
public function boot(): void
{
    if ($this->app->runningInConsole()) {
        $this->commands([
            InstallCommand::class,
            NetworkCommand::class,
        ]);
    }
}
```

<a name="optimize-commands"></a>
### Optimize Commands

Laravel's [optimize command](/docs/{{version}}/deployment#optimization) caches the application's configuration, events, routes, and views. Using the `optimizes` method, you may register your package's own Artisan commands that should be invoked when the `optimize` and `optimize:clear` commands are executed:

```php
/**
 * Bootstrap any package services.
 */
public function boot(): void
{
    if ($this->app->runningInConsole()) {
        $this->optimizes(
            optimize: 'package:optimize',
            clear: 'package:clear-optimizations',
        );
    }
}
```

<a name="reload-commands"></a>
### Reload Commands

Laravel's [reload command](/docs/{{version}}/deployment#reloading-services) terminates any running services so they can be automatically restarted by a system process monitor. Using the `reloads` method, you may register your package's own Artisan commands that should be invoked when the `reload` command is executed:

```php
/**
 * Bootstrap any package services.
 */
public function boot(): void
{
    if ($this->app->runningInConsole()) {
        $this->reloads('package:reload');
    }
}
```

<a name="public-assets"></a>
## Public Assets

Your package may have assets such as JavaScript, CSS, and images. To publish these assets to the application's `public` directory, use the service provider's `publishes` method. In this example, we will also add a `public` asset group tag, which may be used to easily publish groups of related assets:

```php
/**
 * Bootstrap any package services.
 */
public function boot(): void
{
    $this->publishes([
        __DIR__.'/../public' => public_path('vendor/courier'),
    ], 'public');
}
```

Now, when your package's users execute the `vendor:publish` command, your assets will be copied to the specified publish location. Since users will typically need to overwrite the assets every time the package is updated, they may use the `--force` flag:

```shell
php artisan vendor:publish --tag=public --force
```

<a name="publishing-file-groups"></a>
## Publishing File Groups

You may want to publish groups of package assets and resources separately. For instance, you might want to allow your users to publish your package's configuration files without being forced to publish your package's assets. You may do this by "tagging" them when calling the `publishes` method from a package's service provider. For example, let's use tags to define two publish groups for the `courier` package (`courier-config` and `courier-migrations`) in the `boot` method of the package's service provider:

```php
/**
 * Bootstrap any package services.
 */
public function boot(): void
{
    $this->publishes([
        __DIR__.'/../config/package.php' => config_path('package.php')
    ], 'courier-config');

    $this->publishesMigrations([
        __DIR__.'/../database/migrations/' => database_path('migrations')
    ], 'courier-migrations');
}
```

Now your users may publish these groups separately by referencing their tag when executing the `vendor:publish` command:

```shell
php artisan vendor:publish --tag=courier-config
```

Your users can also publish all publishable files defined by your package's service provider using the `--provider` flag:

```shell
php artisan vendor:publish --provider="Your\Package\ServiceProvider"
```


---

# Database: Pagination

*Sección: Laravel | Origen: https://laravel.com/docs/13.x/pagination*

- [Introduction](#introduction)
- [Basic Usage](#basic-usage)
    - [Paginating Query Builder Results](#paginating-query-builder-results)
    - [Paginating Eloquent Results](#paginating-eloquent-results)
    - [Cursor Pagination](#cursor-pagination)
    - [Manually Creating a Paginator](#manually-creating-a-paginator)
    - [Customizing Pagination URLs](#customizing-pagination-urls)
- [Displaying Pagination Results](#displaying-pagination-results)
    - [Adjusting the Pagination Link Window](#adjusting-the-pagination-link-window)
    - [Converting Results to JSON](#converting-results-to-json)
- [Customizing the Pagination View](#customizing-the-pagination-view)
    - [Using Bootstrap](#using-bootstrap)
- [Paginator and LengthAwarePaginator Instance Methods](#paginator-instance-methods)
- [Cursor Paginator Instance Methods](#cursor-paginator-instance-methods)

<a name="introduction"></a>
## Introduction

In other frameworks, pagination can be very painful. We hope Laravel's approach to pagination will be a breath of fresh air. Laravel's paginator is integrated with the [query builder](/docs/{{version}}/queries) and [Eloquent ORM](/docs/{{version}}/eloquent) and provides convenient, easy-to-use pagination of database records with zero configuration.

By default, the HTML generated by the paginator is compatible with the [Tailwind CSS framework](https://tailwindcss.com/); however, Bootstrap pagination support is also available.

<a name="tailwind"></a>
#### Tailwind

If you are using Laravel's default Tailwind pagination views with Tailwind 4.x, your application's `resources/css/app.css` file will already be properly configured to `@source` Laravel's pagination views:

```css
@import 'tailwindcss';

@source '../../vendor/laravel/framework/src/Illuminate/Pagination/resources/views/*.blade.php';
```

<a name="basic-usage"></a>
## Basic Usage

<a name="paginating-query-builder-results"></a>
### Paginating Query Builder Results

There are several ways to paginate items. The simplest is by using the `paginate` method on the [query builder](/docs/{{version}}/queries) or an [Eloquent query](/docs/{{version}}/eloquent). The `paginate` method automatically takes care of setting the query's "limit" and "offset" based on the current page being viewed by the user. By default, the current page is detected by the value of the `page` query string argument on the HTTP request. This value is automatically detected by Laravel, and is also automatically inserted into links generated by the paginator.

In this example, the only argument passed to the `paginate` method is the number of items you would like displayed "per page". In this case, let's specify that we would like to display `15` items per page:

```php
<?php

namespace App\Http\Controllers;

use Illuminate\Support\Facades\DB;
use Illuminate\View\View;

class UserController extends Controller
{
    /**
     * Show all application users.
     */
    public function index(): View
    {
        return view('user.index', [
            'users' => DB::table('users')->paginate(15)
        ]);
    }
}
```

<a name="simple-pagination"></a>
#### Simple Pagination

The `paginate` method counts the total number of records matched by the query before retrieving the records from the database. This is done so that the paginator knows how many pages of records there are in total. However, if you do not plan to show the total number of pages in your application's UI then the record count query is unnecessary.

Therefore, if you only need to display simple "Next" and "Previous" links in your application's UI, you may use the `simplePaginate` method to perform a single, efficient query:

```php
$users = DB::table('users')->simplePaginate(15);
```

<a name="paginating-eloquent-results"></a>
### Paginating Eloquent Results

You may also paginate [Eloquent](/docs/{{version}}/eloquent) queries. In this example, we will paginate the `App\Models\User` model and indicate that we plan to display 15 records per page. As you can see, the syntax is nearly identical to paginating query builder results:

```php
use App\Models\User;

$users = User::paginate(15);
```

Of course, you may call the `paginate` method after setting other constraints on the query, such as `where` clauses:

```php
$users = User::where('votes', '>', 100)->paginate(15);
```

You may also use the `simplePaginate` method when paginating Eloquent models:

```php
$users = User::where('votes', '>', 100)->simplePaginate(15);
```

Similarly, you may use the `cursorPaginate` method to cursor paginate Eloquent models:

```php
$users = User::where('votes', '>', 100)->cursorPaginate(15);
```

<a name="multiple-paginator-instances-per-page"></a>
#### Multiple Paginator Instances per Page

Sometimes you may need to render two separate paginators on a single screen that is rendered by your application. However, if both paginator instances use the `page` query string parameter to store the current page, the two paginators will conflict. To resolve this conflict, you may pass the name of the query string parameter you wish to use to store the paginator's current page via the third argument provided to the `paginate`, `simplePaginate`, and `cursorPaginate` methods:

```php
use App\Models\User;

$users = User::where('votes', '>', 100)->paginate(
    $perPage = 15, $columns = ['*'], $pageName = 'users'
);
```

<a name="cursor-pagination"></a>
### Cursor Pagination

While `paginate` and `simplePaginate` create queries using the SQL "offset" clause, cursor pagination works by constructing "where" clauses that compare the values of the ordered columns contained in the query, providing the most efficient database performance available amongst all of Laravel's pagination methods. This method of pagination is particularly well-suited for large data-sets and "infinite" scrolling user interfaces.

Unlike offset based pagination, which includes a page number in the query string of the URLs generated by the paginator, cursor-based pagination places a "cursor" string in the query string. The cursor is an encoded string containing the location that the next paginated query should start paginating and the direction that it should paginate:

```text
http://localhost/users?cursor=eyJpZCI6MTUsIl9wb2ludHNUb05leHRJdGVtcyI6dHJ1ZX0
```

You may create a cursor-based paginator instance via the `cursorPaginate` method offered by the query builder. This method returns an instance of `Illuminate\Pagination\CursorPaginator`:

```php
$users = DB::table('users')->orderBy('id')->cursorPaginate(15);
```

Once you have retrieved a cursor paginator instance, you may [display the pagination results](#displaying-pagination-results) as you typically would when using the `paginate` and `simplePaginate` methods. For more information on the instance methods offered by the cursor paginator, please consult the [cursor paginator instance method documentation](#cursor-paginator-instance-methods).

> [!WARNING]
> Your query must contain an "order by" clause in order to take advantage of cursor pagination. In addition, the columns that the query are ordered by must belong to the table you are paginating.

<a name="cursor-vs-offset-pagination"></a>
#### Cursor vs. Offset Pagination

To illustrate the differences between offset pagination and cursor pagination, let's examine some example SQL queries. Both of the following queries will both display the "second page" of results for a `users` table ordered by `id`:

```sql
# Offset Pagination...
select * from users order by id asc limit 15 offset 15;

# Cursor Pagination...
select * from users where id > 15 order by id asc limit 15;
```

The cursor pagination query offers the following advantages over offset pagination:

- For large data-sets, cursor pagination will offer better performance if the "order by" columns are indexed. This is because the "offset" clause scans through all previously matched data.
- For data-sets with frequent writes, offset pagination may skip records or show duplicates if results have been recently added to or deleted from the page a user is currently viewing.

However, cursor pagination has the following limitations:

- Like `simplePaginate`, cursor pagination can only be used to display "Next" and "Previous" links and does not support generating links with page numbers.
- It requires that the ordering is based on at least one unique column or a combination of columns that are unique. Columns with `null` values are not supported.
- Query expressions in "order by" clauses are supported only if they are aliased and added to the "select" clause as well.
- Query expressions with parameters are not supported.

<a name="manually-creating-a-paginator"></a>
### Manually Creating a Paginator

Sometimes you may wish to create a pagination instance manually, passing it an array of items that you already have in memory. You may do so by creating either an `Illuminate\Pagination\Paginator`, `Illuminate\Pagination\LengthAwarePaginator` or `Illuminate\Pagination\CursorPaginator` instance, depending on your needs.

The `Paginator` and `CursorPaginator` classes do not need to know the total number of items in the result set; however, because of this, these classes do not have methods for retrieving the index of the last page. The `LengthAwarePaginator` accepts almost the same arguments as the `Paginator`; however, it requires a count of the total number of items in the result set.

In other words, the `Paginator` corresponds to the `simplePaginate` method on the query builder, the `CursorPaginator` corresponds to the `cursorPaginate` method, and the `LengthAwarePaginator` corresponds to the `paginate` method.

> [!WARNING]
> When manually creating a paginator instance, you should manually "slice" the array of results you pass to the paginator. If you're unsure how to do this, check out the [array_slice](https://secure.php.net/manual/en/function.array-slice.php) PHP function.

<a name="customizing-pagination-urls"></a>
### Customizing Pagination URLs

By default, links generated by the paginator will match the current request's URI. However, the paginator's `withPath` method allows you to customize the URI used by the paginator when generating links. For example, if you want the paginator to generate links like `http://example.com/admin/users?page=N`, you should pass `/admin/users` to the `withPath` method:

```php
use App\Models\User;

Route::get('/users', function () {
    $users = User::paginate(15);

    $users->withPath('/admin/users');

    // ...
});
```

<a name="appending-query-string-values"></a>
#### Appending Query String Values

You may append to the query string of pagination links using the `appends` method. For example, to append `sort=votes` to each pagination link, you should make the following call to `appends`:

```php
use App\Models\User;

Route::get('/users', function () {
    $users = User::paginate(15);

    $users->appends(['sort' => 'votes']);

    // ...
});
```

You may use the `withQueryString` method if you would like to append all of the current request's query string values to the pagination links:

```php
$users = User::paginate(15)->withQueryString();
```

<a name="appending-hash-fragments"></a>
#### Appending Hash Fragments

If you need to append a "hash fragment" to URLs generated by the paginator, you may use the `fragment` method. For example, to append `#users` to the end of each pagination link, you should invoke the `fragment` method like so:

```php
$users = User::paginate(15)->fragment('users');
```

<a name="displaying-pagination-results"></a>
## Displaying Pagination Results

When calling the `paginate` method, you will receive an instance of `Illuminate\Pagination\LengthAwarePaginator`, while calling the `simplePaginate` method returns an instance of `Illuminate\Pagination\Paginator`. And, finally, calling the `cursorPaginate` method returns an instance of `Illuminate\Pagination\CursorPaginator`.

These objects provide several methods that describe the result set. In addition to these helper methods, the paginator instances are iterators and may be looped as an array. So, once you have retrieved the results, you may display the results and render the page links using [Blade](/docs/{{version}}/blade):

```blade
<div class="container">
    @foreach ($users as $user)
        {{ $user->name }}
    @endforeach
</div>

{{ $users->links() }}
```

The `links` method will render the links to the rest of the pages in the result set. Each of these links will already contain the proper `page` query string variable. Remember, the HTML generated by the `links` method is compatible with the [Tailwind CSS framework](https://tailwindcss.com).

<a name="adjusting-the-pagination-link-window"></a>
### Adjusting the Pagination Link Window

When the paginator displays pagination links, the current page number is displayed as well as links for the three pages before and after the current page. Using the `onEachSide` method, you may control how many additional links are displayed on each side of the current page within the middle, sliding window of links generated by the paginator:

```blade
{{ $users->onEachSide(5)->links() }}
```

<a name="converting-results-to-json"></a>
### Converting Results to JSON

The Laravel paginator classes implement the `Illuminate\Contracts\Support\Jsonable` Interface contract and expose the `toJson` method, so it's very easy to convert your pagination results to JSON. You may also convert a paginator instance to JSON by returning it from a route or controller action:

```php
use App\Models\User;

Route::get('/users', function () {
    return User::paginate();
});
```

The JSON from the paginator will include meta information such as `total`, `current_page`, `last_page`, and more. The result records are available via the `data` key in the JSON array. Here is an example of the JSON created by returning a paginator instance from a route:

```json
{
   "total": 50,
   "per_page": 15,
   "current_page": 1,
   "last_page": 4,
   "current_page_url": "http://laravel.app?page=1",
   "first_page_url": "http://laravel.app?page=1",
   "last_page_url": "http://laravel.app?page=4",
   "next_page_url": "http://laravel.app?page=2",
   "prev_page_url": null,
   "path": "http://laravel.app",
   "from": 1,
   "to": 15,
   "data":[
        {
            // Record...
        },
        {
            // Record...
        }
   ]
}
```

<a name="customizing-the-pagination-view"></a>
## Customizing the Pagination View

By default, the views rendered to display the pagination links are compatible with the [Tailwind CSS](https://tailwindcss.com) framework. However, if you are not using Tailwind, you are free to define your own views to render these links. When calling the `links` method on a paginator instance, you may pass the view name as the first argument to the method:

```blade
{{ $paginator->links('view.name') }}

<!-- Passing additional data to the view... -->
{{ $paginator->links('view.name', ['foo' => 'bar']) }}
```

However, the easiest way to customize the pagination views is by exporting them to your `resources/views/vendor` directory using the `vendor:publish` command:

```shell
php artisan vendor:publish --tag=laravel-pagination
```

This command will place the views in your application's `resources/views/vendor/pagination` directory. The `tailwind.blade.php` file within this directory corresponds to the default pagination view. You may edit this file to modify the pagination HTML.

If you would like to designate a different file as the default pagination view, you may invoke the paginator's `defaultView` and `defaultSimpleView` methods within the `boot` method of your `App\Providers\AppServiceProvider` class:

```php
<?php

namespace App\Providers;

use Illuminate\Pagination\Paginator;
use Illuminate\Support\ServiceProvider;

class AppServiceProvider extends ServiceProvider
{
    /**
     * Bootstrap any application services.
     */
    public function boot(): void
    {
        Paginator::defaultView('view-name');

        Paginator::defaultSimpleView('view-name');
    }
}
```

<a name="using-bootstrap"></a>
### Using Bootstrap

Laravel includes pagination views built using [Bootstrap CSS](https://getbootstrap.com/). To use these views instead of the default Tailwind views, you may call the paginator's `useBootstrapFour` or `useBootstrapFive` methods within the `boot` method of your `App\Providers\AppServiceProvider` class:

```php
use Illuminate\Pagination\Paginator;

/**
 * Bootstrap any application services.
 */
public function boot(): void
{
    Paginator::useBootstrapFive();
    Paginator::useBootstrapFour();
}
```

<a name="paginator-instance-methods"></a>
## Paginator / LengthAwarePaginator Instance Methods

Each paginator instance provides additional pagination information via the following methods:

<div class="overflow-auto">

| Method                                  | Description                                                                                                  |
| --------------------------------------- | ------------------------------------------------------------------------------------------------------------ |
| `$paginator->count()`                   | Get the number of items for the current page.                                                                |
| `$paginator->currentPage()`             | Get the current page number.                                                                                 |
| `$paginator->firstItem()`               | Get the result number of the first item in the results.                                                      |
| `$paginator->getOptions()`              | Get the paginator options.                                                                                   |
| `$paginator->getUrlRange($start, $end)` | Create a range of pagination URLs.                                                                           |
| `$paginator->hasPages()`                | Determine if there are enough items to split into multiple pages.                                            |
| `$paginator->hasMorePages()`            | Determine if there are more items in the data store.                                                         |
| `$paginator->items()`                   | Get the items for the current page.                                                                          |
| `$paginator->lastItem()`                | Get the result number of the last item in the results.                                                       |
| `$paginator->lastPage()`                | Get the page number of the last available page. (Not available when using `simplePaginate`).                 |
| `$paginator->nextPageUrl()`             | Get the URL for the next page.                                                                               |
| `$paginator->onFirstPage()`             | Determine if the paginator is on the first page.                                                             |
| `$paginator->onLastPage()`              | Determine if the paginator is on the last page.                                                              |
| `$paginator->perPage()`                 | The number of items to be shown per page.                                                                    |
| `$paginator->previousPageUrl()`         | Get the URL for the previous page.                                                                           |
| `$paginator->total()`                   | Determine the total number of matching items in the data store. (Not available when using `simplePaginate`). |
| `$paginator->url($page)`                | Get the URL for a given page number.                                                                         |
| `$paginator->getPageName()`             | Get the query string variable used to store the page.                                                        |
| `$paginator->setPageName($name)`        | Set the query string variable used to store the page.                                                        |
| `$paginator->through($callback)`        | Transform each item using a callback.                                                                        |

</div>

<a name="cursor-paginator-instance-methods"></a>
## Cursor Paginator Instance Methods

Each cursor paginator instance provides additional pagination information via the following methods:

<div class="overflow-auto">

| Method                          | Description                                                       |
| ------------------------------- | ----------------------------------------------------------------- |
| `$paginator->count()`           | Get the number of items for the current page.                     |
| `$paginator->cursor()`          | Get the current cursor instance.                                  |
| `$paginator->getOptions()`      | Get the paginator options.                                        |
| `$paginator->hasPages()`        | Determine if there are enough items to split into multiple pages. |
| `$paginator->hasMorePages()`    | Determine if there are more items in the data store.              |
| `$paginator->getCursorName()`   | Get the query string variable used to store the cursor.           |
| `$paginator->items()`           | Get the items for the current page.                               |
| `$paginator->nextCursor()`      | Get the cursor instance for the next set of items.                |
| `$paginator->nextPageUrl()`     | Get the URL for the next page.                                    |
| `$paginator->onFirstPage()`     | Determine if the paginator is on the first page.                  |
| `$paginator->onLastPage()`      | Determine if the paginator is on the last page.                   |
| `$paginator->perPage()`         | The number of items to be shown per page.                         |
| `$paginator->previousCursor()`  | Get the cursor instance for the previous set of items.            |
| `$paginator->previousPageUrl()` | Get the URL for the previous page.                                |
| `$paginator->setCursorName()`   | Set the query string variable used to store the cursor.           |
| `$paginator->url($cursor)`      | Get the URL for a given cursor instance.                          |

</div>


---

# Laravel Passport

*Sección: Laravel | Origen: https://laravel.com/docs/13.x/passport*

- [Introduction](#introduction)
    - [Passport or Sanctum?](#passport-or-sanctum)
- [Installation](#installation)
    - [Deploying Passport](#deploying-passport)
    - [Upgrading Passport](#upgrading-passport)
- [Configuration](#configuration)
    - [Token Lifetimes](#token-lifetimes)
    - [Overriding Default Models](#overriding-default-models)
    - [Overriding Routes](#overriding-routes)
- [Authorization Code Grant](#authorization-code-grant)
    - [Managing Clients](#managing-clients)
    - [Requesting Tokens](#requesting-tokens)
    - [Managing Tokens](#managing-tokens)
    - [Refreshing Tokens](#refreshing-tokens)
    - [Revoking Tokens](#revoking-tokens)
    - [Purging Tokens](#purging-tokens)
- [Authorization Code Grant With PKCE](#code-grant-pkce)
    - [Creating the Client](#creating-a-auth-pkce-grant-client)
    - [Requesting Tokens](#requesting-auth-pkce-grant-tokens)
- [Device Authorization Grant](#device-authorization-grant)
    - [Creating a Device Authorization Grant Client](#creating-a-device-authorization-grant-client)
    - [Requesting Tokens](#requesting-device-authorization-grant-tokens)
- [Password Grant](#password-grant)
    - [Creating a Password Grant Client](#creating-a-password-grant-client)
    - [Requesting Tokens](#requesting-password-grant-tokens)
    - [Requesting All Scopes](#requesting-all-scopes)
    - [Customizing the User Provider](#customizing-the-user-provider)
    - [Customizing the Username Field](#customizing-the-username-field)
    - [Customizing the Password Validation](#customizing-the-password-validation)
- [Implicit Grant](#implicit-grant)
- [Client Credentials Grant](#client-credentials-grant)
    - [Retrieving Tokens](#retrieving-tokens)
- [Personal Access Tokens](#personal-access-tokens)
    - [Creating a Personal Access Client](#creating-a-personal-access-client)
    - [Customizing the User Provider](#customizing-the-user-provider-for-pat)
    - [Managing Personal Access Tokens](#managing-personal-access-tokens)
- [Protecting Routes](#protecting-routes)
    - [Via Middleware](#via-middleware)
    - [Passing the Access Token](#passing-the-access-token)
- [Token Scopes](#token-scopes)
    - [Defining Scopes](#defining-scopes)
    - [Default Scope](#default-scope)
    - [Assigning Scopes to Tokens](#assigning-scopes-to-tokens)
    - [Checking Scopes](#checking-scopes)
- [SPA Authentication](#spa-authentication)
- [Events](#events)
- [Testing](#testing)

<a name="introduction"></a>
## Introduction

[Laravel Passport](https://github.com/laravel/passport) provides a full OAuth2 server implementation for your Laravel application in a matter of minutes. Passport is built on top of the [League OAuth2 server](https://github.com/thephpleague/oauth2-server) that is maintained by Andy Millington and Simon Hamp.

> [!NOTE]
> This documentation assumes you are already familiar with OAuth2. If you do not know anything about OAuth2, consider familiarizing yourself with the general [terminology](https://oauth2.thephpleague.com/terminology/) and features of OAuth2 before continuing.

<a name="passport-or-sanctum"></a>
### Passport or Sanctum?

Before getting started, you may wish to determine if your application would be better served by Laravel Passport or [Laravel Sanctum](/docs/{{version}}/sanctum). If your application absolutely needs to support OAuth2, then you should use Laravel Passport.

However, if you are attempting to authenticate a single-page application, mobile application, or issue API tokens, you should use [Laravel Sanctum](/docs/{{version}}/sanctum). Laravel Sanctum does not support OAuth2; however, it provides a much simpler API authentication development experience.

<a name="installation"></a>
## Installation

You may install Laravel Passport via the `install:api` Artisan command:

```shell
php artisan install:api --passport
```

This command will publish and run the database migrations necessary for creating the tables your application needs to store OAuth2 clients and access tokens. The command will also create the encryption keys required to generate secure access tokens.

After running the `install:api` command, add the `Laravel\Passport\HasApiTokens` trait and `Laravel\Passport\Contracts\OAuthenticatable` interface to your `App\Models\User` model. This trait will provide a few helper methods to your model which allow you to inspect the authenticated user's token and scopes:

```php
<?php

namespace App\Models;

use Illuminate\Database\Eloquent\Factories\HasFactory;
use Illuminate\Foundation\Auth\User as Authenticatable;
use Illuminate\Notifications\Notifiable;
use Laravel\Passport\Contracts\OAuthenticatable;
use Laravel\Passport\HasApiTokens;

class User extends Authenticatable implements OAuthenticatable
{
    use HasApiTokens, HasFactory, Notifiable;
}
```

Finally, in your application's `config/auth.php` configuration file, you should define an `api` authentication guard and set the `driver` option to `passport`. This will instruct your application to use Passport's `TokenGuard` when authenticating incoming API requests:

```php
'guards' => [
    'web' => [
        'driver' => 'session',
        'provider' => 'users',
    ],

    'api' => [
        'driver' => 'passport',
        'provider' => 'users',
    ],
],
```

<a name="deploying-passport"></a>
### Deploying Passport

When deploying Passport to your application's servers for the first time, you will likely need to run the `passport:keys` command. This command generates the encryption keys Passport needs in order to generate access tokens. The generated keys are not typically kept in source control:

```shell
php artisan passport:keys
```

If necessary, you may define the path where Passport's keys should be loaded from. You may use the `Passport::loadKeysFrom` method to accomplish this. Typically, this method should be called from the `boot` method of your application's `App\Providers\AppServiceProvider` class:

```php
/**
 * Bootstrap any application services.
 */
public function boot(): void
{
    Passport::loadKeysFrom(__DIR__.'/../secrets/oauth');
}
```

<a name="loading-keys-from-the-environment"></a>
#### Loading Keys From the Environment

Alternatively, you may publish Passport's configuration file using the `vendor:publish` Artisan command:

```shell
php artisan vendor:publish --tag=passport-config
```

After the configuration file has been published, you may load your application's encryption keys by defining them as environment variables:

```ini
PASSPORT_PRIVATE_KEY="-----BEGIN RSA PRIVATE KEY-----
<private key here>
-----END RSA PRIVATE KEY-----"

PASSPORT_PUBLIC_KEY="-----BEGIN PUBLIC KEY-----
<public key here>
-----END PUBLIC KEY-----"
```

<a name="upgrading-passport"></a>
### Upgrading Passport

When upgrading to a new major version of Passport, it's important that you carefully review [the upgrade guide](https://github.com/laravel/passport/blob/master/UPGRADE.md).

<a name="configuration"></a>
## Configuration

<a name="token-lifetimes"></a>
### Token Lifetimes

By default, Passport issues long-lived access tokens that expire after one year. If you would like to configure a longer / shorter token lifetime, you may use the `tokensExpireIn`, `refreshTokensExpireIn`, and `personalAccessTokensExpireIn` methods. These methods should be called from the `boot` method of your application's `App\Providers\AppServiceProvider` class:

```php
use Carbon\CarbonInterval;

/**
 * Bootstrap any application services.
 */
public function boot(): void
{
    Passport::tokensExpireIn(CarbonInterval::days(15));
    Passport::refreshTokensExpireIn(CarbonInterval::days(30));
    Passport::personalAccessTokensExpireIn(CarbonInterval::months(6));
}
```

> [!WARNING]
> The `expires_at` columns on Passport's database tables are read-only and for display purposes only. When issuing tokens, Passport stores the expiration information within the signed and encrypted tokens. If you need to invalidate a token you should [revoke it](#revoking-tokens).

<a name="overriding-default-models"></a>
### Overriding Default Models

You are free to extend the models used internally by Passport by defining your own model and extending the corresponding Passport model:

```php
use Laravel\Passport\Client as PassportClient;

class Client extends PassportClient
{
    // ...
}
```

After defining your model, you may instruct Passport to use your custom model via the `Laravel\Passport\Passport` class. Typically, you should inform Passport about your custom models in the `boot` method of your application's `App\Providers\AppServiceProvider` class:

```php
use App\Models\Passport\AuthCode;
use App\Models\Passport\Client;
use App\Models\Passport\DeviceCode;
use App\Models\Passport\RefreshToken;
use App\Models\Passport\Token;
use Laravel\Passport\Passport;

/**
 * Bootstrap any application services.
 */
public function boot(): void
{
    Passport::useTokenModel(Token::class);
    Passport::useRefreshTokenModel(RefreshToken::class);
    Passport::useAuthCodeModel(AuthCode::class);
    Passport::useClientModel(Client::class);
    Passport::useDeviceCodeModel(DeviceCode::class);
}
```

<a name="overriding-routes"></a>
### Overriding Routes

Sometimes you may wish to customize the routes defined by Passport. To achieve this, you first need to ignore the routes registered by Passport by adding `Passport::ignoreRoutes` to the `register` method of your application's `AppServiceProvider`:

```php
use Laravel\Passport\Passport;

/**
 * Register any application services.
 */
public function register(): void
{
    Passport::ignoreRoutes();
}
```

Then, you may copy the routes defined by Passport in [its routes file](https://github.com/laravel/passport/blob/master/routes/web.php) to your application's `routes/web.php` file and modify them to your liking:

```php
Route::group([
    'as' => 'passport.',
    'prefix' => config('passport.path', 'oauth'),
    'namespace' => '\Laravel\Passport\Http\Controllers',
], function () {
    // Passport routes...
});
```

<a name="authorization-code-grant"></a>
## Authorization Code Grant

Using OAuth2 via authorization codes is how most developers are familiar with OAuth2. When using authorization codes, a client application will redirect a user to your server where they will either approve or deny the request to issue an access token to the client.

To get started, we need to instruct Passport how to return our "authorization" view.

All the authorization view's rendering logic may be customized using the appropriate methods available via the `Laravel\Passport\Passport` class. Typically, you should call this method from the `boot` method of your application's `App\Providers\AppServiceProvider` class:

```php
use Inertia\Inertia;
use Laravel\Passport\Passport;

/**
 * Bootstrap any application services.
 */
public function boot(): void
{
    // By providing a view name...
    Passport::authorizationView('auth.oauth.authorize');

    // By providing a closure...
    Passport::authorizationView(
        fn ($parameters) => Inertia::render('Auth/OAuth/Authorize', [
            'request' => $parameters['request'],
            'authToken' => $parameters['authToken'],
            'client' => $parameters['client'],
            'user' => $parameters['user'],
            'scopes' => $parameters['scopes'],
        ])
    );
}
```

Passport will automatically define the `/oauth/authorize` route that returns this view. Your `auth.oauth.authorize` template should include a form that makes a POST request to the `passport.authorizations.approve` route to approve the authorization and a form that makes a DELETE request to the `passport.authorizations.deny` route to deny the authorization. The `passport.authorizations.approve` and `passport.authorizations.deny` routes expect `state`, `client_id`, and `auth_token` fields.

<a name="managing-clients"></a>
### Managing Clients

Developers building applications that need to interact with your application's API will need to register their application with yours by creating a "client". Typically, this consists of providing the name of their application and a URI that your application can redirect to after users approve their request for authorization.

<a name="managing-first-party-clients"></a>
#### First-Party Clients

The simplest way to create a client is using the `passport:client` Artisan command. This command may be used to create first-party clients or testing your OAuth2 functionality. When you run the `passport:client` command, Passport will prompt you for more information about your client and will provide you with a client ID and secret:

```shell
php artisan passport:client
```

If you would like to allow multiple redirect URIs for your client, you may specify them using a comma-delimited list when prompted for the URI by the `passport:client` command. Any URIs which contain commas should be URI encoded:

```shell
https://third-party-app.com/callback,https://example.com/oauth/redirect
```

<a name="managing-third-party-clients"></a>
#### Third-Party Clients

Since your application's users will not be able to utilize the `passport:client` command, you may use `createAuthorizationCodeGrantClient` method of the `Laravel\Passport\ClientRepository` class to register a client for a given user:

```php
use App\Models\User;
use Laravel\Passport\ClientRepository;

$user = User::find($userId);

// Creating an OAuth app client that belongs to the given user...
$client = app(ClientRepository::class)->createAuthorizationCodeGrantClient(
    user: $user,
    name: 'Example App',
    redirectUris: ['https://third-party-app.com/callback'],
    confidential: false,
    enableDeviceFlow: true
);

// Retrieving all the OAuth app clients that belong to the user...
$clients = $user->oauthApps()->get();
```

The `createAuthorizationCodeGrantClient` method returns an instance of `Laravel\Passport\Client`. You may display the `$client->id` as the client ID and `$client->plainSecret` as the client secret to the user.

<a name="requesting-tokens"></a>
### Requesting Tokens

<a name="requesting-tokens-redirecting-for-authorization"></a>
#### Redirecting for Authorization

Once a client has been created, developers may use their client ID and secret to request an authorization code and access token from your application. First, the consuming application should make a redirect request to your application's `/oauth/authorize` route like so:

```php
use Illuminate\Http\Request;
use Illuminate\Support\Str;

Route::get('/redirect', function (Request $request) {
    $request->session()->put('state', $state = Str::random(40));

    $query = http_build_query([
        'client_id' => 'your-client-id',
        'redirect_uri' => 'https://third-party-app.com/callback',
        'response_type' => 'code',
        'scope' => 'user:read orders:create',
        'state' => $state,
        // 'prompt' => '', // "none", "consent", or "login"
    ]);

    return redirect('https://passport-app.test/oauth/authorize?'.$query);
});
```

The `prompt` parameter may be used to specify the authentication behavior of the Passport application.

If the `prompt` value is `none`, Passport will always throw an authentication error if the user is not already authenticated with the Passport application. If the value is `consent`, Passport will always display the authorization approval screen, even if all scopes were previously granted to the consuming application. When the value is `login`, the Passport application will always prompt the user to re-login to the application, even if they already have an existing session.

If no `prompt` value is provided, the user will be prompted for authorization only if they have not previously authorized access to the consuming application for the requested scopes.

> [!NOTE]
> Remember, the `/oauth/authorize` route is already defined by Passport. You do not need to manually define this route.

<a name="approving-the-request"></a>
#### Approving the Request

When receiving authorization requests, Passport will automatically respond based on the value of `prompt` parameter (if present) and may display a template to the user allowing them to approve or deny the authorization request. If they approve the request, they will be redirected back to the `redirect_uri` that was specified by the consuming application. The `redirect_uri` must match the `redirect` URL that was specified when the client was created.

Sometimes you may wish to skip the authorization prompt, such as when authorizing a first-party client. You may accomplish this by [extending the `Client` model](#overriding-default-models) and defining a `skipsAuthorization` method. If `skipsAuthorization` returns `true` the client will be approved and the user will be redirected back to the `redirect_uri` immediately, unless the consuming application has explicitly set the `prompt` parameter when redirecting for authorization:

```php
<?php

namespace App\Models\Passport;

use Illuminate\Contracts\Auth\Authenticatable;
use Laravel\Passport\Client as BaseClient;

class Client extends BaseClient
{
    /**
     * Determine if the client should skip the authorization prompt.
     *
     * @param  \Laravel\Passport\Scope[]  $scopes
     */
    public function skipsAuthorization(Authenticatable $user, array $scopes): bool
    {
        return $this->firstParty();
    }
}
```

<a name="requesting-tokens-converting-authorization-codes-to-access-tokens"></a>
#### Converting Authorization Codes to Access Tokens

If the user approves the authorization request, they will be redirected back to the consuming application. The consumer should first verify the `state` parameter against the value that was stored prior to the redirect. If the state parameter matches then the consumer should issue a `POST` request to your application to request an access token. The request should include the authorization code that was issued by your application when the user approved the authorization request:

```php
use Illuminate\Http\Request;
use Illuminate\Support\Facades\Http;

Route::get('/callback', function (Request $request) {
    $state = $request->session()->pull('state');

    throw_unless(
        strlen($state) > 0 && $state === $request->state,
        InvalidArgumentException::class,
        'Invalid state value.'
    );

    $response = Http::asForm()->post('https://passport-app.test/oauth/token', [
        'grant_type' => 'authorization_code',
        'client_id' => 'your-client-id',
        'client_secret' => 'your-client-secret',
        'redirect_uri' => 'https://third-party-app.com/callback',
        'code' => $request->code,
    ]);

    return $response->json();
});
```

This `/oauth/token` route will return a JSON response containing `access_token`, `refresh_token`, and `expires_in` attributes. The `expires_in` attribute contains the number of seconds until the access token expires.

> [!NOTE]
> Like the `/oauth/authorize` route, the `/oauth/token` route is defined for you by Passport. There is no need to manually define this route.

<a name="managing-tokens"></a>
### Managing Tokens

You may retrieve user's authorized tokens using the `tokens` method of the `Laravel\Passport\HasApiTokens` trait. For example, this may be used to offer your users a dashboard to keep track of their connections with third-party applications:

```php
use App\Models\User;
use Illuminate\Database\Eloquent\Collection;
use Illuminate\Support\Facades\Date;
use Laravel\Passport\Token;

$user = User::find($userId);

// Retrieving all of the valid tokens for the user...
$tokens = $user->tokens()
    ->where('revoked', false)
    ->where('expires_at', '>', Date::now())
    ->get();

// Retrieving all the user's connections to third-party OAuth app clients...
$connections = $tokens->load('client')
    ->reject(fn (Token $token) => $token->client->firstParty())
    ->groupBy('client_id')
    ->map(fn (Collection $tokens) => [
        'client' => $tokens->first()->client,
        'scopes' => $tokens->pluck('scopes')->flatten()->unique()->values()->all(),
        'tokens_count' => $tokens->count(),
    ])
    ->values();
```

<a name="refreshing-tokens"></a>
### Refreshing Tokens

If your application issues short-lived access tokens, users will need to refresh their access tokens via the refresh token that was provided to them when the access token was issued:

```php
use Illuminate\Support\Facades\Http;

$response = Http::asForm()->post('https://passport-app.test/oauth/token', [
    'grant_type' => 'refresh_token',
    'refresh_token' => 'the-refresh-token',
    'client_id' => 'your-client-id',
    'client_secret' => 'your-client-secret', // Required for confidential clients only...
    'scope' => 'user:read orders:create',
]);

return $response->json();
```

This `/oauth/token` route will return a JSON response containing `access_token`, `refresh_token`, and `expires_in` attributes. The `expires_in` attribute contains the number of seconds until the access token expires.

<a name="revoking-tokens"></a>
### Revoking Tokens

You may revoke a token by using the `revoke` method on the `Laravel\Passport\Token` model. You may revoke a token's refresh token using the `revoke` method on the `Laravel\Passport\RefreshToken` model:

```php
use Laravel\Passport\Passport;
use Laravel\Passport\Token;

$token = Passport::token()->find($tokenId);

// Revoke an access token...
$token->revoke();

// Revoke the token's refresh token...
$token->refreshToken?->revoke();

// Revoke all of the user's tokens...
User::find($userId)->tokens()->each(function (Token $token) {
    $token->revoke();
    $token->refreshToken?->revoke();
});
```

<a name="purging-tokens"></a>
### Purging Tokens

When tokens have been revoked or expired, you might want to purge them from the database. Passport's included `passport:purge` Artisan command can do this for you:

```shell
# Purge revoked and expired tokens, auth codes, and device codes...
php artisan passport:purge

# Only purge tokens expired for more than 6 hours...
php artisan passport:purge --hours=6

# Only purge revoked tokens, auth codes, and device codes...
php artisan passport:purge --revoked

# Only purge expired tokens, auth codes, and device codes...
php artisan passport:purge --expired
```

You may also configure a [scheduled job](/docs/{{version}}/scheduling) in your application's `routes/console.php` file to automatically prune your tokens on a schedule:

```php
use Illuminate\Support\Facades\Schedule;

Schedule::command('passport:purge')->hourly();
```

<a name="code-grant-pkce"></a>
## Authorization Code Grant With PKCE

The Authorization Code grant with "Proof Key for Code Exchange" (PKCE) is a secure way to authenticate single page applications or mobile applications to access your API. This grant should be used when you can't guarantee that the client secret will be stored confidentially or in order to mitigate the threat of having the authorization code intercepted by an attacker. A combination of a "code verifier" and a "code challenge" replaces the client secret when exchanging the authorization code for an access token.

<a name="creating-a-auth-pkce-grant-client"></a>
### Creating the Client

Before your application can issue tokens via the authorization code grant with PKCE, you will need to create a PKCE-enabled client. You may do this using the `passport:client` Artisan command with the `--public` option:

```shell
php artisan passport:client --public
```

<a name="requesting-auth-pkce-grant-tokens"></a>
### Requesting Tokens

<a name="code-verifier-code-challenge"></a>
#### Code Verifier and Code Challenge

As this authorization grant does not provide a client secret, developers will need to generate a combination of a code verifier and a code challenge in order to request a token.

The code verifier should be a random string of between 43 and 128 characters containing letters, numbers, and `"-"`, `"."`, `"_"`, `"~"` characters, as defined in the [RFC 7636 specification](https://tools.ietf.org/html/rfc7636).

The code challenge should be a Base64 encoded string with URL and filename-safe characters. The trailing `'='` characters should be removed and no line breaks, whitespace, or other additional characters should be present.

```php
$encoded = base64_encode(hash('sha256', $codeVerifier, true));

$codeChallenge = strtr(rtrim($encoded, '='), '+/', '-_');
```

<a name="code-grant-pkce-redirecting-for-authorization"></a>
#### Redirecting for Authorization

Once a client has been created, you may use the client ID and the generated code verifier and code challenge to request an authorization code and access token from your application. First, the consuming application should make a redirect request to your application's `/oauth/authorize` route:

```php
use Illuminate\Http\Request;
use Illuminate\Support\Str;

Route::get('/redirect', function (Request $request) {
    $request->session()->put('state', $state = Str::random(40));

    $request->session()->put(
        'code_verifier', $codeVerifier = Str::random(128)
    );

    $codeChallenge = strtr(rtrim(
        base64_encode(hash('sha256', $codeVerifier, true))
    , '='), '+/', '-_');

    $query = http_build_query([
        'client_id' => 'your-client-id',
        'redirect_uri' => 'https://third-party-app.com/callback',
        'response_type' => 'code',
        'scope' => 'user:read orders:create',
        'state' => $state,
        'code_challenge' => $codeChallenge,
        'code_challenge_method' => 'S256',
        // 'prompt' => '', // "none", "consent", or "login"
    ]);

    return redirect('https://passport-app.test/oauth/authorize?'.$query);
});
```

<a name="code-grant-pkce-converting-authorization-codes-to-access-tokens"></a>
#### Converting Authorization Codes to Access Tokens

If the user approves the authorization request, they will be redirected back to the consuming application. The consumer should verify the `state` parameter against the value that was stored prior to the redirect, as in the standard Authorization Code Grant.

If the state parameter matches, the consumer should issue a `POST` request to your application to request an access token. The request should include the authorization code that was issued by your application when the user approved the authorization request along with the originally generated code verifier:

```php
use Illuminate\Http\Request;
use Illuminate\Support\Facades\Http;

Route::get('/callback', function (Request $request) {
    $state = $request->session()->pull('state');

    $codeVerifier = $request->session()->pull('code_verifier');

    throw_unless(
        strlen($state) > 0 && $state === $request->state,
        InvalidArgumentException::class
    );

    $response = Http::asForm()->post('https://passport-app.test/oauth/token', [
        'grant_type' => 'authorization_code',
        'client_id' => 'your-client-id',
        'redirect_uri' => 'https://third-party-app.com/callback',
        'code_verifier' => $codeVerifier,
        'code' => $request->code,
    ]);

    return $response->json();
});
```

<a name="device-authorization-grant"></a>
## Device Authorization Grant

The OAuth2 device authorization grant allows browserless or limited input devices, such as TVs and game consoles, to obtain an access token by exchanging a "device code". When using device flow, the device client will instruct the user to use a secondary device, such as a computer or a smartphone and connect to your server where they will enter the provided "user code" and either approve or deny the access request.

To get started, we need to instruct Passport how to return our "user code" and "authorization" views.

All the authorization view's rendering logic may be customized using the appropriate methods available via the `Laravel\Passport\Passport` class. Typically, you should call this method from the `boot` method of your application's `App\Providers\AppServiceProvider` class.

```php
use Inertia\Inertia;
use Laravel\Passport\Passport;

/**
 * Bootstrap any application services.
 */
public function boot(): void
{
    // By providing a view name...
    Passport::deviceUserCodeView('auth.oauth.device.user-code');
    Passport::deviceAuthorizationView('auth.oauth.device.authorize');

    // By providing a closure...
    Passport::deviceUserCodeView(
        fn ($parameters) => Inertia::render('Auth/OAuth/Device/UserCode')
    );

    Passport::deviceAuthorizationView(
        fn ($parameters) => Inertia::render('Auth/OAuth/Device/Authorize', [
            'request' => $parameters['request'],
            'authToken' => $parameters['authToken'],
            'client' => $parameters['client'],
            'user' => $parameters['user'],
            'scopes' => $parameters['scopes'],
        ])
    );

    // ...
}
```

Passport will automatically define routes that return these views. Your `auth.oauth.device.user-code` template should include a form that makes a GET request to the `passport.device.authorizations.authorize` route. The `passport.device.authorizations.authorize` route expects a `user_code` query parameter.

Your `auth.oauth.device.authorize` template should include a form that makes a POST request to the `passport.device.authorizations.approve` route to approve the authorization and a form that makes a DELETE request to the `passport.device.authorizations.deny` route to deny the authorization. The `passport.device.authorizations.approve` and `passport.device.authorizations.deny` routes expect `state`, `client_id`, and `auth_token` fields.

<a name="creating-a-device-authorization-grant-client"></a>
### Creating a Device Authorization Grant Client

Before your application can issue tokens via the device authorization grant, you will need to create a device flow enabled client. You may do this using the `passport:client` Artisan command with the `--device` option. This command will create a first-party device flow enabled client and provide you with a client ID and secret:

```shell
php artisan passport:client --device
```

Additionally, you may use `createDeviceAuthorizationGrantClient` method on the `ClientRepository` class to register a third-party client that belongs to the given user:

```php
use App\Models\User;
use Laravel\Passport\ClientRepository;

$user = User::find($userId);

$client = app(ClientRepository::class)->createDeviceAuthorizationGrantClient(
    user: $user,
    name: 'Example Device',
    confidential: false,
);
```

<a name="requesting-device-authorization-grant-tokens"></a>
### Requesting Tokens

<a name="device-code"></a>
#### Requesting a Device Code

Once a client has been created, developers may use their client ID to request a device code from your application. First, the consuming device should make a `POST` request to your application's `/oauth/device/code` route to request a device code:

```php
use Illuminate\Support\Facades\Http;

$response = Http::asForm()->post('https://passport-app.test/oauth/device/code', [
    'client_id' => 'your-client-id',
    'scope' => 'user:read orders:create',
]);

return $response->json();
```

This will return a JSON response containing `device_code`, `user_code`, `verification_uri`, `interval`, and `expires_in` attributes. The `expires_in` attribute contains the number of seconds until the device code expires. The `interval` attribute contains the number of seconds the consuming device should wait between requests when polling `/oauth/token` route to avoid rate limit errors.

> [!NOTE]
> Remember, the `/oauth/device/code` route is already defined by Passport. You do not need to manually define this route.

<a name="user-code"></a>
#### Displaying the Verification URI and User Code

Once a device code request has been obtained, the consuming device should instruct the user to use another device and visit the provided `verification_uri` and enter the `user_code` in order to approve the authorization request.

<a name="polling-token-request"></a>
#### Polling Token Request

Since the user will be using a separate device to grant (or deny) access, the consuming device should poll your application's `/oauth/token` route to determine when the user has responded to the request. The consuming device should use the minimum polling `interval` provided in the JSON response when requesting device code to avoid rate limit errors:

```php
use Illuminate\Support\Facades\Http;
use Illuminate\Support\Sleep;

$interval = 5;

do {
    Sleep::for($interval)->seconds();

    $response = Http::asForm()->post('https://passport-app.test/oauth/token', [
        'grant_type' => 'urn:ietf:params:oauth:grant-type:device_code',
        'client_id' => 'your-client-id',
        'client_secret' => 'your-client-secret', // Required for confidential clients only...
        'device_code' => 'the-device-code',
    ]);

    if ($response->json('error') === 'slow_down') {
        $interval += 5;
    }
} while (in_array($response->json('error'), ['authorization_pending', 'slow_down']));

return $response->json();
```

If the user has approved the authorization request, this will return a JSON response containing `access_token`, `refresh_token`, and `expires_in` attributes. The `expires_in` attribute contains the number of seconds until the access token expires.

<a name="password-grant"></a>
## Password Grant

> [!WARNING]
> We no longer recommend using password grant tokens. Instead, you should choose [a grant type that is currently recommended by OAuth2 Server](https://oauth2.thephpleague.com/authorization-server/which-grant/).

The OAuth2 password grant allows your other first-party clients, such as a mobile application, to obtain an access token using an email address / username and password. This allows you to issue access tokens securely to your first-party clients without requiring your users to go through the entire OAuth2 authorization code redirect flow.

To enable the password grant, call the `enablePasswordGrant` method in the `boot` method of your application's `App\Providers\AppServiceProvider` class:

```php
/**
 * Bootstrap any application services.
 */
public function boot(): void
{
    Passport::enablePasswordGrant();
}
```

<a name="creating-a-password-grant-client"></a>
### Creating a Password Grant Client

Before your application can issue tokens via the password grant, you will need to create a password grant client. You may do this using the `passport:client` Artisan command with the `--password` option.

```shell
php artisan passport:client --password
```

<a name="requesting-password-grant-tokens"></a>
### Requesting Tokens

Once you have enabled the grant and have created a password grant client, you may request an access token by issuing a `POST` request to the `/oauth/token` route with the user's email address and password. Remember, this route is already registered by Passport so there is no need to define it manually. If the request is successful, you will receive an `access_token` and `refresh_token` in the JSON response from the server:

```php
use Illuminate\Support\Facades\Http;

$response = Http::asForm()->post('https://passport-app.test/oauth/token', [
    'grant_type' => 'password',
    'client_id' => 'your-client-id',
    'client_secret' => 'your-client-secret', // Required for confidential clients only...
    'username' => 'taylor@laravel.com',
    'password' => 'my-password',
    'scope' => 'user:read orders:create',
]);

return $response->json();
```

> [!NOTE]
> Remember, access tokens are long-lived by default. However, you are free to [configure your maximum access token lifetime](#configuration) if needed.

<a name="requesting-all-scopes"></a>
### Requesting All Scopes

When using the password grant or client credentials grant, you may wish to authorize the token for all of the scopes supported by your application. You can do this by requesting the `*` scope. If you request the `*` scope, the `can` method on the token instance will always return `true`. This scope may only be assigned to a token that is issued using the `password` or `client_credentials` grant:

```php
use Illuminate\Support\Facades\Http;

$response = Http::asForm()->post('https://passport-app.test/oauth/token', [
    'grant_type' => 'password',
    'client_id' => 'your-client-id',
    'client_secret' => 'your-client-secret', // Required for confidential clients only...
    'username' => 'taylor@laravel.com',
    'password' => 'my-password',
    'scope' => '*',
]);
```

<a name="customizing-the-user-provider"></a>
### Customizing the User Provider

If your application uses more than one [authentication user provider](/docs/{{version}}/authentication#introduction), you may specify which user provider the password grant client uses by providing a `--provider` option when creating the client via the `artisan passport:client --password` command. The given provider name should match a valid provider defined in your application's `config/auth.php` configuration file. You can then [protect your route using middleware](#multiple-authentication-guards) to ensure that only users from the guard's specified provider are authorized.

<a name="customizing-the-username-field"></a>
### Customizing the Username Field

When authenticating using the password grant, Passport will use the `email` attribute of your authenticatable model as the "username". However, you may customize this behavior by defining a `findForPassport` method on your model:

```php
<?php

namespace App\Models;

use Illuminate\Foundation\Auth\User as Authenticatable;
use Illuminate\Notifications\Notifiable;
use Laravel\Passport\Bridge\Client;
use Laravel\Passport\Contracts\OAuthenticatable;
use Laravel\Passport\HasApiTokens;

class User extends Authenticatable implements OAuthenticatable
{
    use HasApiTokens, Notifiable;

    /**
     * Find the user instance for the given username.
     */
    public function findForPassport(string $username, Client $client): User
    {
        return $this->where('username', $username)->first();
    }
}
```

<a name="customizing-the-password-validation"></a>
### Customizing the Password Validation

When authenticating using the password grant, Passport will use the `password` attribute of your model to validate the given password. If your model does not have a `password` attribute or you wish to customize the password validation logic, you can define a `validateForPassportPasswordGrant` method on your model:

```php
<?php

namespace App\Models;

use Illuminate\Foundation\Auth\User as Authenticatable;
use Illuminate\Notifications\Notifiable;
use Illuminate\Support\Facades\Hash;
use Laravel\Passport\Contracts\OAuthenticatable;
use Laravel\Passport\HasApiTokens;

class User extends Authenticatable implements OAuthenticatable
{
    use HasApiTokens, Notifiable;

    /**
     * Validate the password of the user for the Passport password grant.
     */
    public function validateForPassportPasswordGrant(string $password): bool
    {
        return Hash::check($password, $this->password);
    }
}
```

<a name="implicit-grant"></a>
## Implicit Grant

> [!WARNING]
> We no longer recommend using implicit grant tokens. Instead, you should choose [a grant type that is currently recommended by OAuth2 Server](https://oauth2.thephpleague.com/authorization-server/which-grant/).

The implicit grant is similar to the authorization code grant; however, the token is returned to the client without exchanging an authorization code. This grant is most commonly used for JavaScript or mobile applications where the client credentials can't be securely stored. To enable the grant, call the `enableImplicitGrant` method in the `boot` method of your application's `App\Providers\AppServiceProvider` class:

```php
/**
 * Bootstrap any application services.
 */
public function boot(): void
{
    Passport::enableImplicitGrant();
}
```

Before your application can issue tokens via the implicit grant, you will need to create an implicit grant client. You may do this using the `passport:client` Artisan command with the `--implicit` option.

```shell
php artisan passport:client --implicit
```

Once the grant has been enabled and an implicit client has been created, developers may use their client ID to request an access token from your application. The consuming application should make a redirect request to your application's `/oauth/authorize` route like so:

```php
use Illuminate\Http\Request;

Route::get('/redirect', function (Request $request) {
    $request->session()->put('state', $state = Str::random(40));

    $query = http_build_query([
        'client_id' => 'your-client-id',
        'redirect_uri' => 'https://third-party-app.com/callback',
        'response_type' => 'token',
        'scope' => 'user:read orders:create',
        'state' => $state,
        // 'prompt' => '', // "none", "consent", or "login"
    ]);

    return redirect('https://passport-app.test/oauth/authorize?'.$query);
});
```

> [!NOTE]
> Remember, the `/oauth/authorize` route is already defined by Passport. You do not need to manually define this route.

<a name="client-credentials-grant"></a>
## Client Credentials Grant

The client credentials grant is suitable for machine-to-machine authentication. For example, you might use this grant in a scheduled job which is performing maintenance tasks over an API.

Before your application can issue tokens via the client credentials grant, you will need to create a client credentials grant client. You may do this using the `--client` option of the `passport:client` Artisan command:

```shell
php artisan passport:client --client
```

Next, assign the `Laravel\Passport\Http\Middleware\EnsureClientIsResourceOwner` middleware to a route:

```php
use Laravel\Passport\Http\Middleware\EnsureClientIsResourceOwner;

Route::get('/orders', function (Request $request) {
    // Access token is valid and the client is resource owner...
})->middleware(EnsureClientIsResourceOwner::class);
```

To restrict access to the route to specific scopes, you may provide a list of the required scopes to the `using` method`:

```php
Route::get('/orders', function (Request $request) {
    // Access token is valid, the client is resource owner, and has both "servers:read" and "servers:create" scopes...
})->middleware(EnsureClientIsResourceOwner::using('servers:read', 'servers:create'));
```

> [!WARNING]
> The [underlying OAuth2 server](https://oauth2.thephpleague.com/database-setup/#:~:text=Please%20note%20that,the%20bearer%20token.) sets the token's `sub` claim to the client's identifier for client credentials tokens. By default, Passport uses UUIDs for clients, so this cannot collide with a user's integer primary key. However, if you have set `Passport::$clientUuids` to `false`, a client credentials token may inadvertently resolve a user whose ID matches the client's ID. In such cases, using this middleware cannot guarantee that the incoming token is a client credentials token.

<a name="retrieving-tokens"></a>
### Retrieving Tokens

To retrieve a token using this grant type, make a request to the `oauth/token` endpoint:

```php
use Illuminate\Support\Facades\Http;

$response = Http::asForm()->post('https://passport-app.test/oauth/token', [
    'grant_type' => 'client_credentials',
    'client_id' => 'your-client-id',
    'client_secret' => 'your-client-secret',
    'scope' => 'servers:read servers:create',
]);

return $response->json()['access_token'];
```

<a name="personal-access-tokens"></a>
## Personal Access Tokens

Sometimes, your users may want to issue access tokens to themselves without going through the typical authorization code redirect flow. Allowing users to issue tokens to themselves via your application's UI can be useful for allowing users to experiment with your API or may serve as a simpler approach to issuing access tokens in general.

> [!NOTE]
> If your application is using Passport primarily to issue personal access tokens, consider using [Laravel Sanctum](/docs/{{version}}/sanctum), Laravel's light-weight first-party library for issuing API access tokens.

<a name="creating-a-personal-access-client"></a>
### Creating a Personal Access Client

Before your application can issue personal access tokens, you will need to create a personal access client. You may do this by executing the `passport:client` Artisan command with the `--personal` option. If you have already run the `passport:install` command, you do not need to run this command:

```shell
php artisan passport:client --personal
```

<a name="customizing-the-user-provider-for-pat"></a>
### Customizing the User Provider

If your application uses more than one [authentication user provider](/docs/{{version}}/authentication#introduction), you may specify which user provider the personal access grant client uses by providing a `--provider` option when creating the client via the `artisan passport:client --personal` command. The given provider name should match a valid provider defined in your application's `config/auth.php` configuration file. You can then [protect your route using middleware](#multiple-authentication-guards) to ensure that only users from the guard's specified provider are authorized.

<a name="managing-personal-access-tokens"></a>
### Managing Personal Access Tokens

Once you have created a personal access client, you may issue tokens for a given user using the `createToken` method on the `App\Models\User` model instance. The `createToken` method accepts the name of the token as its first argument and an optional array of [scopes](#token-scopes) as its second argument:

```php
use App\Models\User;
use Illuminate\Support\Facades\Date;
use Laravel\Passport\Token;

$user = User::find($userId);

// Creating a token without scopes...
$token = $user->createToken('My Token')->accessToken;

// Creating a token with scopes...
$token = $user->createToken('My Token', ['user:read', 'orders:create'])->accessToken;

// Creating a token with all scopes...
$token = $user->createToken('My Token', ['*'])->accessToken;

// Retrieving all the valid personal access tokens that belong to the user...
$tokens = $user->tokens()
    ->with('client')
    ->where('revoked', false)
    ->where('expires_at', '>', Date::now())
    ->get()
    ->filter(fn (Token $token) => $token->client->hasGrantType('personal_access'));
```

<a name="protecting-routes"></a>
## Protecting Routes

<a name="via-middleware"></a>
### Via Middleware

Passport includes an [authentication guard](/docs/{{version}}/authentication#adding-custom-guards) that will validate access tokens on incoming requests. Once you have configured the `api` guard to use the `passport` driver, you only need to specify the `auth:api` middleware on any routes that should require a valid access token:

```php
Route::get('/user', function () {
    // Only API authenticated users may access this route...
})->middleware('auth:api');
```

> [!WARNING]
> If you are using the [client credentials grant](#client-credentials-grant), you should use [the `Laravel\Passport\Http\Middleware\EnsureClientIsResourceOwner` middleware](#client-credentials-grant) to protect your routes instead of the `auth:api` middleware.

<a name="multiple-authentication-guards"></a>
#### Multiple Authentication Guards

If your application authenticates different types of users that perhaps use entirely different Eloquent models, you will likely need to define a guard configuration for each user provider type in your application. This allows you to protect requests intended for specific user providers. For example, given the following guard configuration the `config/auth.php` configuration file:

```php
'guards' => [
    'api' => [
        'driver' => 'passport',
        'provider' => 'users',
    ],

    'api-customers' => [
        'driver' => 'passport',
        'provider' => 'customers',
    ],
],
```

The following route will utilize the `api-customers` guard, which uses the `customers` user provider, to authenticate incoming requests:

```php
Route::get('/customer', function () {
    // ...
})->middleware('auth:api-customers');
```

> [!NOTE]
> For more information on using multiple user providers with Passport, please consult the [personal access tokens documentation](#customizing-the-user-provider-for-pat) and [password grant documentation](#customizing-the-user-provider).

<a name="passing-the-access-token"></a>
### Passing the Access Token

When calling routes that are protected by Passport, your application's API consumers should specify their access token as a `Bearer` token in the `Authorization` header of their request. For example, when using the `Http` Facade:

```php
use Illuminate\Support\Facades\Http;

$response = Http::withHeaders([
    'Accept' => 'application/json',
    'Authorization' => "Bearer $accessToken",
])->get('https://passport-app.test/api/user');

return $response->json();
```

<a name="token-scopes"></a>
## Token Scopes

Scopes allow your API clients to request a specific set of permissions when requesting authorization to access an account. For example, if you are building an e-commerce application, not all API consumers will need the ability to place orders. Instead, you may allow the consumers to only request authorization to access order shipment statuses. In other words, scopes allow your application's users to limit the actions a third-party application can perform on their behalf.

<a name="defining-scopes"></a>
### Defining Scopes

You may define your API's scopes using the `Passport::tokensCan` method in the `boot` method of your application's `App\Providers\AppServiceProvider` class. The `tokensCan` method accepts an array of scope names and scope descriptions. The scope description may be anything you wish and will be displayed to users on the authorization approval screen:

```php
/**
 * Bootstrap any application services.
 */
public function boot(): void
{
    Passport::tokensCan([
        'user:read' => 'Retrieve the user info',
        'orders:create' => 'Place orders',
        'orders:read:status' => 'Check order status',
    ]);
}
```

<a name="default-scope"></a>
### Default Scope

If a client does not request any specific scopes, you may configure your Passport server to attach default scopes to the token using the `defaultScopes` method. Typically, you should call this method from the `boot` method of your application's `App\Providers\AppServiceProvider` class:

```php
use Laravel\Passport\Passport;

Passport::tokensCan([
    'user:read' => 'Retrieve the user info',
    'orders:create' => 'Place orders',
    'orders:read:status' => 'Check order status',
]);

Passport::defaultScopes([
    'user:read',
    'orders:create',
]);
```

<a name="assigning-scopes-to-tokens"></a>
### Assigning Scopes to Tokens

<a name="when-requesting-authorization-codes"></a>
#### When Requesting Authorization Codes

When requesting an access token using the authorization code grant, consumers should specify their desired scopes as the `scope` query string parameter. The `scope` parameter should be a space-delimited list of scopes:

```php
Route::get('/redirect', function () {
    $query = http_build_query([
        'client_id' => 'your-client-id',
        'redirect_uri' => 'https://third-party-app.com/callback',
        'response_type' => 'code',
        'scope' => 'user:read orders:create',
    ]);

    return redirect('https://passport-app.test/oauth/authorize?'.$query);
});
```

<a name="when-issuing-personal-access-tokens"></a>
#### When Issuing Personal Access Tokens

If you are issuing personal access tokens using the `App\Models\User` model's `createToken` method, you may pass the array of desired scopes as the second argument to the method:

```php
$token = $user->createToken('My Token', ['orders:create'])->accessToken;
```

<a name="checking-scopes"></a>
### Checking Scopes

Passport includes two middleware that may be used to verify that an incoming request is authenticated with a token that has been granted a given scope.

<a name="check-for-all-scopes"></a>
#### Check For All Scopes

The `Laravel\Passport\Http\Middleware\CheckToken` middleware may be assigned to a route to verify that the incoming request's access token has all the listed scopes:

```php
use Laravel\Passport\Http\Middleware\CheckToken;

Route::get('/orders', function () {
    // Access token has both "orders:read" and "orders:create" scopes...
})->middleware(['auth:api', CheckToken::using('orders:read', 'orders:create')]);
```

<a name="check-for-any-scopes"></a>
#### Check for Any Scopes

The `Laravel\Passport\Http\Middleware\CheckTokenForAnyScope` middleware may be assigned to a route to verify that the incoming request's access token has *at least one* of the listed scopes:

```php
use Laravel\Passport\Http\Middleware\CheckTokenForAnyScope;

Route::get('/orders', function () {
    // Access token has either "orders:read" or "orders:create" scope...
})->middleware(['auth:api', CheckTokenForAnyScope::using('orders:read', 'orders:create')]);
```

<a name="scope-attributes"></a>
#### Scope Attributes

If your application uses [controller middleware attributes](/docs/{{version}}/controllers#middleware-attributes), you may use the `Laravel\Passport\Attributes\AuthorizeToken` attribute as a convenient shortcut for Passport's scope middleware:

```php
<?php

namespace App\Http\Controllers;

use Laravel\Passport\Attributes\AuthorizeToken;

#[AuthorizeToken('orders:read')]
#[AuthorizeToken('orders:create', only: ['store'])]
class OrderController
{
    #[AuthorizeToken(['orders:read', 'orders:create'], anyScope: true)]
    public function index()
    {
        // Access token has either "orders:read" or "orders:create" scope...
    }

    public function store()
    {
        // Access token has both "orders:read" and "orders:create" scopes...
    }
}
```

By default, the `AuthorizeToken` attribute requires all given scopes. If you pass `anyScope: true`, the request is authorized when the token has at least one of the given scopes.

<a name="checking-scopes-on-a-token-instance"></a>
#### Checking Scopes on a Token Instance

Once an access token authenticated request has entered your application, you may still check if the token has a given scope using the `tokenCan` method on the authenticated `App\Models\User` instance:

```php
use Illuminate\Http\Request;

Route::get('/orders', function (Request $request) {
    if ($request->user()->tokenCan('orders:create')) {
        // ...
    }
});
```

<a name="additional-scope-methods"></a>
#### Additional Scope Methods

The `scopeIds` method will return an array of all defined IDs / names:

```php
use Laravel\Passport\Passport;

Passport::scopeIds();
```

The `scopes` method will return an array of all defined scopes as instances of `Laravel\Passport\Scope`:

```php
Passport::scopes();
```

The `scopesFor` method will return an array of `Laravel\Passport\Scope` instances matching the given IDs / names:

```php
Passport::scopesFor(['user:read', 'orders:create']);
```

You may determine if a given scope has been defined using the `hasScope` method:

```php
Passport::hasScope('orders:create');
```

<a name="spa-authentication"></a>
## SPA Authentication

When building an API, it can be extremely useful to be able to consume your own API from your JavaScript application. This approach to API development allows your own application to consume the same API that you are sharing with the world. The same API may be consumed by your web application, mobile applications, third-party applications, and any SDKs that you may publish on various package managers.

Typically, if you want to consume your API from your JavaScript application, you would need to manually send an access token to the application and pass it with each request to your application. However, Passport includes a middleware that can handle this for you. All you need to do is append the `CreateFreshApiToken` middleware to the `web` middleware group in your application's `bootstrap/app.php` file:

```php
use Laravel\Passport\Http\Middleware\CreateFreshApiToken;

->withMiddleware(function (Middleware $middleware): void {
    $middleware->web(append: [
        CreateFreshApiToken::class,
    ]);
})
```

> [!WARNING]
> You should ensure that the `CreateFreshApiToken` middleware is the last middleware listed in your middleware stack.

This middleware will attach a `laravel_token` cookie to your outgoing responses. This cookie contains an encrypted JWT that Passport will use to authenticate API requests from your JavaScript application. The JWT has a lifetime equal to your `session.lifetime` configuration value. Now, since the browser will automatically send the cookie with all subsequent requests, you may make requests to your application's API without explicitly passing an access token:

```js
axios.get('/api/user')
    .then(response => {
        console.log(response.data);
    });
```

<a name="customizing-the-cookie-name"></a>
#### Customizing the Cookie Name

If needed, you can customize the `laravel_token` cookie's name using the `Passport::cookie` method. Typically, this method should be called from the `boot` method of your application's `App\Providers\AppServiceProvider` class:

```php
/**
 * Bootstrap any application services.
 */
public function boot(): void
{
    Passport::cookie('custom_name');
}
```

<a name="csrf-protection"></a>
#### CSRF Protection

When using this method of authentication, you will need to ensure a valid CSRF token header is included in your requests. The default Laravel JavaScript scaffolding included with the skeleton application and all starter kits includes an [Axios](https://github.com/axios/axios) instance, which will automatically use the encrypted `XSRF-TOKEN` cookie value to send an `X-XSRF-TOKEN` header on same-origin requests.

> [!NOTE]
> If you choose to send the `X-CSRF-TOKEN` header instead of `X-XSRF-TOKEN`, you will need to use the unencrypted token provided by `csrf_token()`.

<a name="events"></a>
## Events

Passport raises events when issuing access tokens and refresh tokens. You may [listen for these events](/docs/{{version}}/events) to prune or revoke other access tokens in your database:

<div class="overflow-auto">

| Event Name                                    |
| --------------------------------------------- |
| `Laravel\Passport\Events\AccessTokenCreated`  |
| `Laravel\Passport\Events\AccessTokenRevoked`  |
| `Laravel\Passport\Events\RefreshTokenCreated` |

</div>

<a name="testing"></a>
## Testing

Passport's `actingAs` method may be used to specify the currently authenticated user as well as its scopes. The first argument given to the `actingAs` method is the user instance and the second is an array of scopes that should be granted to the user's token:

```php tab=Pest
use App\Models\User;
use Laravel\Passport\Passport;

test('orders can be created', function () {
    Passport::actingAs(
        User::factory()->create(),
        ['orders:create']
    );

    $response = $this->post('/api/orders');

    $response->assertStatus(201);
});
```

```php tab=PHPUnit
use App\Models\User;
use Laravel\Passport\Passport;

public function test_orders_can_be_created(): void
{
    Passport::actingAs(
        User::factory()->create(),
        ['orders:create']
    );

    $response = $this->post('/api/orders');

    $response->assertStatus(201);
}
```

Passport's `actingAsClient` method may be used to specify the currently authenticated client as well as its scopes. The first argument given to the `actingAsClient` method is the client instance and the second is an array of scopes that should be granted to the client's token:

```php tab=Pest
use Laravel\Passport\Client;
use Laravel\Passport\Passport;

test('servers can be retrieved', function () {
    Passport::actingAsClient(
        Client::factory()->create(),
        ['servers:read']
    );

    $response = $this->get('/api/servers');

    $response->assertStatus(200);
});
```

```php tab=PHPUnit
use Laravel\Passport\Client;
use Laravel\Passport\Passport;

public function test_servers_can_be_retrieved(): void
{
    Passport::actingAsClient(
        Client::factory()->create(),
        ['servers:read']
    );

    $response = $this->get('/api/servers');

    $response->assertStatus(200);
}
```


---

# Resetting Passwords

*Sección: Laravel | Origen: https://laravel.com/docs/13.x/passwords*

- [Introduction](#introduction)
    - [Configuration](#configuration)
    - [Driver Prerequisites](#driver-prerequisites)
    - [Model Preparation](#model-preparation)
    - [Configuring Trusted Hosts](#configuring-trusted-hosts)
- [Routing](#routing)
    - [Requesting the Password Reset Link](#requesting-the-password-reset-link)
    - [Resetting the Password](#resetting-the-password)
- [Deleting Expired Tokens](#deleting-expired-tokens)
- [Customization](#password-customization)

<a name="introduction"></a>
## Introduction

Most web applications provide a way for users to reset their forgotten passwords. Rather than forcing you to re-implement this by hand for every application you create, Laravel provides convenient services for sending password reset links and secure resetting passwords.

> [!NOTE]
> Want to get started fast? Install a Laravel [application starter kit](/docs/{{version}}/starter-kits) in a fresh Laravel application. Laravel's starter kits will take care of scaffolding your entire authentication system, including resetting forgotten passwords.

<a name="configuration"></a>
### Configuration

Your application's password reset configuration file is stored at `config/auth.php`. Be sure to review the options available to you in this file. By default, Laravel is configured to use the `database` password reset driver.

The password reset `driver` configuration option defines where password reset data will be stored. Laravel includes two drivers:

<div class="content-list" markdown="1">

- `database` - password reset data is stored in a relational database.
- `cache` - password reset data is stored in one of your cache-based stores.

</div>

<a name="driver-prerequisites"></a>
### Driver Prerequisites

<a name="database"></a>
#### Database

When using the default `database` driver, a table must be created to store your application's password reset tokens. Typically, this is included in Laravel's default `0001_01_01_000000_create_users_table.php` database migration.

<a name="cache"></a>
#### Cache

There is also a cache driver available for handling password resets, which does not require a dedicated database table. Entries are keyed by the user's email address, so ensure you are not using email addresses as a cache key elsewhere in your application:

```php
'passwords' => [
    'users' => [
        'driver' => 'cache',
        'provider' => 'users',
        'store' => 'passwords', // Optional...
        'expire' => 60,
        'throttle' => 60,
    ],
],
```

To prevent a call to `artisan cache:clear` from flushing your password reset data, you can optionally specify a separate cache store with the `store` configuration key. The value should correspond to a store configured in your `config/cache.php` configuration value.

<a name="model-preparation"></a>
### Model Preparation

Before using the password reset features of Laravel, your application's `App\Models\User` model must use the `Illuminate\Notifications\Notifiable` trait. Typically, this trait is already included on the default `App\Models\User` model that is created with new Laravel applications.

Next, verify that your `App\Models\User` model implements the `Illuminate\Contracts\Auth\CanResetPassword` contract. The `App\Models\User` model included with the framework already implements this interface, and uses the `Illuminate\Auth\Passwords\CanResetPassword` trait to include the methods needed to implement the interface.

<a name="configuring-trusted-hosts"></a>
### Configuring Trusted Hosts

By default, Laravel will respond to all requests it receives regardless of the content of the HTTP request's `Host` header. In addition, the `Host` header's value will be used when generating absolute URLs to your application during a web request.

Typically, you should configure your web server, such as Nginx or Apache, to only send requests to your application that match a given hostname. However, if you do not have the ability to customize your web server directly and need to instruct Laravel to only respond to certain hostnames, you may do so by using the `trustHosts` middleware method in your application's `bootstrap/app.php` file. This is particularly important when your application offers password reset functionality.

To learn more about this middleware method, please consult the [TrustHosts middleware documentation](/docs/{{version}}/requests#configuring-trusted-hosts).

<a name="routing"></a>
## Routing

To properly implement support for allowing users to reset their passwords, we will need to define several routes. First, we will need a pair of routes to handle allowing the user to request a password reset link via their email address. Second, we will need a pair of routes to handle actually resetting the password once the user visits the password reset link that is emailed to them and completes the password reset form.

<a name="requesting-the-password-reset-link"></a>
### Requesting the Password Reset Link

<a name="the-password-reset-link-request-form"></a>
#### The Password Reset Link Request Form

First, we will define the routes that are needed to request password reset links. To get started, we will define a route that returns a view with the password reset link request form:

```php
Route::get('/forgot-password', function () {
    return view('auth.forgot-password');
})->middleware('guest')->name('password.request');
```

The view that is returned by this route should have a form containing an `email` field, which will allow the user to request a password reset link for a given email address.

<a name="password-reset-link-handling-the-form-submission"></a>
#### Handling the Form Submission

Next, we will define a route that handles the form submission request from the "forgot password" view. This route will be responsible for validating the email address and sending the password reset request to the corresponding user:

```php
use Illuminate\Http\Request;
use Illuminate\Support\Facades\Password;

Route::post('/forgot-password', function (Request $request) {
    $request->validate(['email' => 'required|email']);

    $status = Password::sendResetLink(
        $request->only('email')
    );

    return $status === Password::ResetLinkSent
        ? back()->with(['status' => __($status)])
        : back()->withErrors(['email' => __($status)]);
})->middleware('guest')->name('password.email');
```

Before moving on, let's examine this route in more detail. First, the request's `email` attribute is validated. Next, we will use Laravel's built-in "password broker" (via the `Password` facade) to send a password reset link to the user. The password broker will take care of retrieving the user by the given field (in this case, the email address) and sending the user a password reset link via Laravel's built-in [notification system](/docs/{{version}}/notifications).

The `sendResetLink` method returns a "status" slug. This status may be translated using Laravel's [localization](/docs/{{version}}/localization) helpers in order to display a user-friendly message to the user regarding the status of their request. The translation of the password reset status is determined by your application's `lang/{lang}/passwords.php` language file. An entry for each possible value of the status slug is located within the `passwords` language file.

> [!NOTE]
> By default, the Laravel application skeleton does not include the `lang` directory. If you would like to customize Laravel's language files, you may publish them via the `lang:publish` Artisan command.

You may be wondering how Laravel knows how to retrieve the user record from your application's database when calling the `Password` facade's `sendResetLink` method. The Laravel password broker utilizes your authentication system's "user providers" to retrieve database records. The user provider used by the password broker is configured within the `passwords` configuration array of your `config/auth.php` configuration file. To learn more about writing custom user providers, consult the [authentication documentation](/docs/{{version}}/authentication#adding-custom-user-providers).

> [!NOTE]
> When manually implementing password resets, you are required to define the contents of the views and routes yourself. If you would like scaffolding that includes all necessary authentication and verification logic, check out the [Laravel application starter kits](/docs/{{version}}/starter-kits).

<a name="resetting-the-password"></a>
### Resetting the Password

<a name="the-password-reset-form"></a>
#### The Password Reset Form

Next, we will define the routes necessary to actually reset the password once the user clicks on the password reset link that has been emailed to them and provides a new password. First, let's define the route that will display the reset password form that is displayed when the user clicks the reset password link. This route will receive a `token` parameter that we will use later to verify the password reset request:

```php
Route::get('/reset-password/{token}', function (string $token) {
    return view('auth.reset-password', ['token' => $token]);
})->middleware('guest')->name('password.reset');
```

The view that is returned by this route should display a form containing an `email` field, a `password` field, a `password_confirmation` field, and a hidden `token` field, which should contain the value of the secret `$token` received by our route.

<a name="password-reset-handling-the-form-submission"></a>
#### Handling the Form Submission

Of course, we need to define a route to actually handle the password reset form submission. This route will be responsible for validating the incoming request and updating the user's password in the database:

```php
use App\Models\User;
use Illuminate\Auth\Events\PasswordReset;
use Illuminate\Http\Request;
use Illuminate\Support\Facades\Hash;
use Illuminate\Support\Facades\Password;
use Illuminate\Support\Str;

Route::post('/reset-password', function (Request $request) {
    $request->validate([
        'token' => 'required',
        'email' => 'required|email',
        'password' => 'required|min:8|confirmed',
    ]);

    $status = Password::reset(
        $request->only('email', 'password', 'password_confirmation', 'token'),
        function (User $user, string $password) {
            $user->forceFill([
                'password' => Hash::make($password)
            ])->setRememberToken(Str::random(60));

            $user->save();

            event(new PasswordReset($user));
        }
    );

    return $status === Password::PasswordReset
        ? redirect()->route('login')->with('status', __($status))
        : back()->withErrors(['email' => [__($status)]]);
})->middleware('guest')->name('password.update');
```

Before moving on, let's examine this route in more detail. First, the request's `token`, `email`, and `password` attributes are validated. Next, we will use Laravel's built-in "password broker" (via the `Password` facade) to validate the password reset request credentials.

If the token, email address, and password given to the password broker are valid, the closure passed to the `reset` method will be invoked. Within this closure, which receives the user instance and the plain-text password provided to the password reset form, we may update the user's password in the database.

The `reset` method returns a "status" slug. This status may be translated using Laravel's [localization](/docs/{{version}}/localization) helpers in order to display a user-friendly message to the user regarding the status of their request. The translation of the password reset status is determined by your application's `lang/{lang}/passwords.php` language file. An entry for each possible value of the status slug is located within the `passwords` language file. If your application does not contain a `lang` directory, you may create it using the `lang:publish` Artisan command.

Before moving on, you may be wondering how Laravel knows how to retrieve the user record from your application's database when calling the `Password` facade's `reset` method. The Laravel password broker utilizes your authentication system's "user providers" to retrieve database records. The user provider used by the password broker is configured within the `passwords` configuration array of your `config/auth.php` configuration file. To learn more about writing custom user providers, consult the [authentication documentation](/docs/{{version}}/authentication#adding-custom-user-providers).

<a name="deleting-expired-tokens"></a>
## Deleting Expired Tokens

If you are using the `database` driver, password reset tokens that have expired will still be present within your database. However, you may easily delete these records using the `auth:clear-resets` Artisan command:

```shell
php artisan auth:clear-resets
```

If you would like to automate this process, consider adding the command to your application's [scheduler](/docs/{{version}}/scheduling):

```php
use Illuminate\Support\Facades\Schedule;

Schedule::command('auth:clear-resets')->everyFifteenMinutes();
```

<a name="password-customization"></a>
## Customization

<a name="reset-link-customization"></a>
#### Reset Link Customization

You may customize the password reset link URL using the `createUrlUsing` method provided by the `ResetPassword` notification class. This method accepts a closure which receives the user instance that is receiving the notification as well as the password reset link token. Typically, you should call this method from the `boot` method of your application's `AppServiceProvider`:

```php
use App\Models\User;
use Illuminate\Auth\Notifications\ResetPassword;

/**
 * Bootstrap any application services.
 */
public function boot(): void
{
    ResetPassword::createUrlUsing(function (User $user, string $token) {
        return 'https://example.com/reset-password?token='.$token;
    });
}
```

<a name="reset-email-customization"></a>
#### Reset Email Customization

You may easily modify the notification class used to send the password reset link to the user. To get started, override the `sendPasswordResetNotification` method on your `App\Models\User` model. Within this method, you may send the notification using any [notification class](/docs/{{version}}/notifications) of your own creation. The password reset `$token` is the first argument received by the method. You may use this `$token` to build the password reset URL of your choice and send your notification to the user:

```php
use App\Notifications\ResetPasswordNotification;

/**
 * Send a password reset notification to the user.
 *
 * @param  string  $token
 */
public function sendPasswordResetNotification($token): void
{
    $url = 'https://example.com/reset-password?token='.$token;

    $this->notify(new ResetPasswordNotification($url));
}
```


---

# Laravel Pennant

*Sección: Laravel | Origen: https://laravel.com/docs/13.x/pennant*

- [Introduction](#introduction)
- [Installation](#installation)
- [Configuration](#configuration)
- [Defining Features](#defining-features)
    - [Class Based Features](#class-based-features)
- [Checking Features](#checking-features)
    - [Conditional Execution](#conditional-execution)
    - [The `HasFeatures` Trait](#the-has-features-trait)
    - [Blade Directive](#blade-directive)
    - [Middleware](#middleware)
    - [Intercepting Feature Checks](#intercepting-feature-checks)
    - [In-Memory Cache](#in-memory-cache)
- [Scope](#scope)
    - [Specifying the Scope](#specifying-the-scope)
    - [Global Scope](#global-scope)
    - [Default Scope](#default-scope)
    - [Nullable Scope](#nullable-scope)
    - [Identifying Scope](#identifying-scope)
    - [Serializing Scope](#serializing-scope)
- [Rich Feature Values](#rich-feature-values)
- [Retrieving Multiple Features](#retrieving-multiple-features)
- [Eager Loading](#eager-loading)
- [Updating Values](#updating-values)
    - [Bulk Updates](#bulk-updates)
    - [Purging Features](#purging-features)
- [Testing](#testing)
- [Adding Custom Pennant Drivers](#adding-custom-pennant-drivers)
    - [Implementing the Driver](#implementing-the-driver)
    - [Registering the Driver](#registering-the-driver)
    - [Defining Features Externally](#defining-features-externally)
- [Events](#events)

<a name="introduction"></a>
## Introduction

[Laravel Pennant](https://github.com/laravel/pennant) is a simple and light-weight feature flag package - without the cruft. Feature flags enable you to incrementally roll out new application features with confidence, A/B test new interface designs, complement a trunk-based development strategy, and much more.

<a name="installation"></a>
## Installation

First, install Pennant into your project using the Composer package manager:

```shell
composer require laravel/pennant
```

Next, you should publish the Pennant configuration and migration files using the `vendor:publish` Artisan command:

```shell
php artisan vendor:publish --provider="Laravel\Pennant\PennantServiceProvider"
```

Finally, you should run your application's database migrations. This will create a `features` table that Pennant uses to power its `database` driver:

```shell
php artisan migrate
```

<a name="configuration"></a>
## Configuration

After publishing Pennant's assets, its configuration file will be located at `config/pennant.php`. This configuration file allows you to specify the default storage mechanism that will be used by Pennant to store resolved feature flag values.

Pennant includes support for storing resolved feature flag values in an in-memory array via the `array` driver. Or, Pennant can store resolved feature flag values persistently in a relational database via the `database` driver, which is the default storage mechanism used by Pennant.

<a name="defining-features"></a>
## Defining Features

To define a feature, you may use the `define` method offered by the `Feature` facade. You will need to provide a name for the feature, as well as a closure that will be invoked to resolve the feature's initial value.

Typically, features are defined in a service provider using the `Feature` facade. The closure will receive the "scope" for the feature check. Most commonly, the scope is the currently authenticated user. In this example, we will define a feature for incrementally rolling out a new API to our application's users:

```php
<?php

namespace App\Providers;

use App\Models\User;
use Illuminate\Support\Lottery;
use Illuminate\Support\ServiceProvider;
use Laravel\Pennant\Feature;

class AppServiceProvider extends ServiceProvider
{
    /**
     * Bootstrap any application services.
     */
    public function boot(): void
    {
        Feature::define('new-api', fn (User $user) => match (true) {
            $user->isInternalTeamMember() => true,
            $user->isHighTrafficCustomer() => false,
            default => Lottery::odds(1 / 100),
        });
    }
}
```

As you can see, we have the following rules for our feature:

- All internal team members should be using the new API.
- Any high traffic customers should not be using the new API.
- Otherwise, the feature should be randomly assigned to users with a 1 in 100 chance of being active.

The first time the `new-api` feature is checked for a given user, the result of the closure will be stored by the storage driver. The next time the feature is checked against the same user, the value will be retrieved from storage and the closure will not be invoked.

For convenience, if a feature definition only returns a lottery, you may omit the closure completely:

    Feature::define('site-redesign', Lottery::odds(1, 1000));

<a name="class-based-features"></a>
### Class Based Features

Pennant also allows you to define class-based features. Unlike closure-based feature definitions, there is no need to register a class-based feature in a service provider. To create a class-based feature, you may invoke the `pennant:feature` Artisan command. By default, the feature class will be placed in your application's `app/Features` directory:

```shell
php artisan pennant:feature NewApi
```

When writing a feature class, you only need to define a `resolve` method, which will be invoked to resolve the feature's initial value for a given scope. Again, the scope will typically be the currently authenticated user:

```php
<?php

namespace App\Features;

use App\Models\User;
use Illuminate\Support\Lottery;

class NewApi
{
    /**
     * Resolve the feature's initial value.
     */
    public function resolve(User $user): mixed
    {
        return match (true) {
            $user->isInternalTeamMember() => true,
            $user->isHighTrafficCustomer() => false,
            default => Lottery::odds(1 / 100),
        };
    }
}
```

If you would like to manually resolve an instance of a class-based feature, you may invoke the `instance` method on the `Feature` facade:

```php
use Illuminate\Support\Facades\Feature;

$instance = Feature::instance(NewApi::class);
```

> [!NOTE]
> Feature classes are resolved via the [container](/docs/{{version}}/container), so you may inject dependencies into the feature class's constructor when needed.

#### Customizing the Stored Feature Name

By default, Pennant will store the feature class's fully qualified class name. If you would like to decouple the stored feature name from the application's internal structure, you may add the `Name` attribute on the feature class. The value of this attribute will be stored in place of the class name:

```php
<?php

namespace App\Features;

use Laravel\Pennant\Attributes\Name;

#[Name('new-api')]
class NewApi
{
    // ...
}
```

<a name="checking-features"></a>
## Checking Features

To determine if a feature is active, you may use the `active` method on the `Feature` facade. By default, features are checked against the currently authenticated user:

```php
<?php

namespace App\Http\Controllers;

use Illuminate\Http\Request;
use Illuminate\Http\Response;
use Laravel\Pennant\Feature;

class PodcastController
{
    /**
     * Display a listing of the resource.
     */
    public function index(Request $request): Response
    {
        return Feature::active('new-api')
            ? $this->resolveNewApiResponse($request)
            : $this->resolveLegacyApiResponse($request);
    }

    // ...
}
```

Although features are checked against the currently authenticated user by default, you may easily check the feature against another user or [scope](#scope). To accomplish this, use the `for` method offered by the `Feature` facade:

```php
return Feature::for($user)->active('new-api')
    ? $this->resolveNewApiResponse($request)
    : $this->resolveLegacyApiResponse($request);
```

Pennant also offers some additional convenience methods that may prove useful when determining if a feature is active or not:

```php
// Determine if all of the given features are active...
Feature::allAreActive(['new-api', 'site-redesign']);

// Determine if any of the given features are active...
Feature::someAreActive(['new-api', 'site-redesign']);

// Determine if a feature is inactive...
Feature::inactive('new-api');

// Determine if all of the given features are inactive...
Feature::allAreInactive(['new-api', 'site-redesign']);

// Determine if any of the given features are inactive...
Feature::someAreInactive(['new-api', 'site-redesign']);
```

> [!NOTE]
> When using Pennant outside of an HTTP context, such as in an Artisan command or a queued job, you should typically [explicitly specify the feature's scope](#specifying-the-scope). Alternatively, you may define a [default scope](#default-scope) that accounts for both authenticated HTTP contexts and unauthenticated contexts.

<a name="checking-class-based-features"></a>
#### Checking Class Based Features

For class-based features, you should provide the class name when checking the feature:

```php
<?php

namespace App\Http\Controllers;

use App\Features\NewApi;
use Illuminate\Http\Request;
use Illuminate\Http\Response;
use Laravel\Pennant\Feature;

class PodcastController
{
    /**
     * Display a listing of the resource.
     */
    public function index(Request $request): Response
    {
        return Feature::active(NewApi::class)
            ? $this->resolveNewApiResponse($request)
            : $this->resolveLegacyApiResponse($request);
    }

    // ...
}
```

<a name="conditional-execution"></a>
### Conditional Execution

The `when` method may be used to fluently execute a given closure if a feature is active. Additionally, a second closure may be provided and will be executed if the feature is inactive:

```php
<?php

namespace App\Http\Controllers;

use App\Features\NewApi;
use Illuminate\Http\Request;
use Illuminate\Http\Response;
use Laravel\Pennant\Feature;

class PodcastController
{
    /**
     * Display a listing of the resource.
     */
    public function index(Request $request): Response
    {
        return Feature::when(NewApi::class,
            fn () => $this->resolveNewApiResponse($request),
            fn () => $this->resolveLegacyApiResponse($request),
        );
    }

    // ...
}
```

The `unless` method serves as the inverse of the `when` method, executing the first closure if the feature is inactive:

```php
return Feature::unless(NewApi::class,
    fn () => $this->resolveLegacyApiResponse($request),
    fn () => $this->resolveNewApiResponse($request),
);
```

<a name="the-has-features-trait"></a>
### The `HasFeatures` Trait

Pennant's `HasFeatures` trait may be added to your application's `User` model (or any other model that has features) to provide a fluent, convenient way to check features directly from the model:

```php
<?php

namespace App\Models;

use Illuminate\Foundation\Auth\User as Authenticatable;
use Laravel\Pennant\Concerns\HasFeatures;

class User extends Authenticatable
{
    use HasFeatures;

    // ...
}
```

Once the trait has been added to your model, you may easily check features by invoking the `features` method:

```php
if ($user->features()->active('new-api')) {
    // ...
}
```

Of course, the `features` method provides access to many other convenient methods for interacting with features:

```php
// Values...
$value = $user->features()->value('purchase-button')
$values = $user->features()->values(['new-api', 'purchase-button']);

// State...
$user->features()->active('new-api');
$user->features()->allAreActive(['new-api', 'server-api']);
$user->features()->someAreActive(['new-api', 'server-api']);

$user->features()->inactive('new-api');
$user->features()->allAreInactive(['new-api', 'server-api']);
$user->features()->someAreInactive(['new-api', 'server-api']);

// Conditional execution...
$user->features()->when('new-api',
    fn () => /* ... */,
    fn () => /* ... */,
);

$user->features()->unless('new-api',
    fn () => /* ... */,
    fn () => /* ... */,
);
```

<a name="blade-directive"></a>
### Blade Directive

To make checking features in Blade a seamless experience, Pennant offers the `@feature` and `@featureany` directive:

```blade
@feature('site-redesign')
    <!-- 'site-redesign' is active -->
@else
    <!-- 'site-redesign' is inactive -->
@endfeature

@featureany(['site-redesign', 'beta'])
    <!-- 'site-redesign' or `beta` is active -->
@endfeatureany
```

<a name="middleware"></a>
### Middleware

Pennant also includes a [middleware](/docs/{{version}}/middleware) that may be used to verify the currently authenticated user has access to a feature before a route is even invoked. You may assign the middleware to a route and specify the features that are required to access the route. If any of the specified features are inactive for the currently authenticated user, a `400 Bad Request` HTTP response will be returned by the route. Multiple features may be passed to the static `using` method.

```php
use Illuminate\Support\Facades\Route;
use Laravel\Pennant\Middleware\EnsureFeaturesAreActive;

Route::get('/api/servers', function () {
    // ...
})->middleware(EnsureFeaturesAreActive::using('new-api', 'servers-api'));
```

<a name="customizing-the-response"></a>
#### Customizing the Response

If you would like to customize the response that is returned by the middleware when one of the listed features is inactive, you may use the `whenInactive` method provided by the `EnsureFeaturesAreActive` middleware. Typically, this method should be invoked within the `boot` method of one of your application's service providers:

```php
use Illuminate\Http\Request;
use Illuminate\Http\Response;
use Laravel\Pennant\Middleware\EnsureFeaturesAreActive;

/**
 * Bootstrap any application services.
 */
public function boot(): void
{
    EnsureFeaturesAreActive::whenInactive(
        function (Request $request, array $features) {
            return new Response(status: 403);
        }
    );

    // ...
}
```

<a name="intercepting-feature-checks"></a>
### Intercepting Feature Checks

Sometimes it can be useful to perform some in-memory checks before retrieving the stored value of a given feature. Imagine you are developing a new API behind a feature flag and want the ability to disable the new API without losing any of the resolved feature values in storage. If you notice a bug in the new API, you could easily disable it for everyone except internal team members, fix the bug, and then re-enable the new API for the users that previously had access to the feature.

You can achieve this with a [class-based feature's](#class-based-features) `before` method. When present, the `before` method is always run in-memory before retrieving the value from storage. If a non-`null` value is returned from the method, it will be used in place of the feature's stored value for the duration of the request:

```php
<?php

namespace App\Features;

use App\Models\User;
use Illuminate\Support\Facades\Config;
use Illuminate\Support\Lottery;

class NewApi
{
    /**
     * Run an always-in-memory check before the stored value is retrieved.
     */
    public function before(User $user): mixed
    {
        if (Config::get('features.new-api.disabled')) {
            return $user->isInternalTeamMember();
        }
    }

    /**
     * Resolve the feature's initial value.
     */
    public function resolve(User $user): mixed
    {
        return match (true) {
            $user->isInternalTeamMember() => true,
            $user->isHighTrafficCustomer() => false,
            default => Lottery::odds(1 / 100),
        };
    }
}
```

You could also use this feature to schedule the global rollout of a feature that was previously behind a feature flag:

```php
<?php

namespace App\Features;

use Illuminate\Support\Carbon;
use Illuminate\Support\Facades\Config;

class NewApi
{
    /**
     * Run an always-in-memory check before the stored value is retrieved.
     */
    public function before(User $user): mixed
    {
        if (Config::get('features.new-api.disabled')) {
            return $user->isInternalTeamMember();
        }

        if (Carbon::parse(Config::get('features.new-api.rollout-date'))->isPast()) {
            return true;
        }
    }

    // ...
}
```

<a name="in-memory-cache"></a>
### In-Memory Cache

When checking a feature, Pennant will create an in-memory cache of the result. If you are using the `database` driver, this means that re-checking the same feature flag within a single request will not trigger additional database queries. This also ensures that the feature has a consistent result for the duration of the request.

If you need to manually flush the in-memory cache, you may use the `flushCache` method offered by the `Feature` facade:

```php
Feature::flushCache();
```

<a name="scope"></a>
## Scope

<a name="specifying-the-scope"></a>
### Specifying the Scope

As discussed, features are typically checked against the currently authenticated user. However, this may not always suit your needs. Therefore, it is possible to specify the scope you would like to check a given feature against via the `Feature` facade's `for` method:

```php
return Feature::for($user)->active('new-api')
    ? $this->resolveNewApiResponse($request)
    : $this->resolveLegacyApiResponse($request);
```

Of course, feature scopes are not limited to "users". Imagine you have built a new billing experience that you are rolling out to entire teams rather than individual users. Perhaps you would like the oldest teams to have a slower rollout than the newer teams. Your feature resolution closure might look something like the following:

```php
use App\Models\Team;
use Illuminate\Support\Carbon;
use Illuminate\Support\Lottery;
use Laravel\Pennant\Feature;

Feature::define('billing-v2', function (Team $team) {
    if ($team->created_at->isAfter(new Carbon('1st Jan, 2023'))) {
        return true;
    }

    if ($team->created_at->isAfter(new Carbon('1st Jan, 2019'))) {
        return Lottery::odds(1 / 100);
    }

    return Lottery::odds(1 / 1000);
});
```

You will notice that the closure we have defined is not expecting a `User`, but is instead expecting a `Team` model. To determine if this feature is active for a user's team, you should pass the team to the `for` method offered by the `Feature` facade:

```php
if (Feature::for($user->team)->active('billing-v2')) {
    return redirect('/billing/v2');
}

// ...
```

<a name="global-scope"></a>
### Global Scope

To check or interact with a feature using a global scope, regardless of the configured default scope resolver, use the `globally` method. This is useful for application-wide feature flags, such as temporarily enabling maintenance behavior or rolling out a feature to every user:

```php
Feature::globally()->active('new-api');

Feature::globally()->activate('new-api');
```

<a name="default-scope"></a>
### Default Scope

It is also possible to customize the default scope Pennant uses to check features. For example, maybe all of your features are checked against the currently authenticated user's team instead of the user. Instead of having to call `Feature::for($user->team)` every time you check a feature, you may instead specify the team as the default scope. Typically, this should be done in one of your application's service providers:

```php
<?php

namespace App\Providers;

use Illuminate\Support\Facades\Auth;
use Illuminate\Support\ServiceProvider;
use Laravel\Pennant\Feature;

class AppServiceProvider extends ServiceProvider
{
    /**
     * Bootstrap any application services.
     */
    public function boot(): void
    {
        Feature::resolveScopeUsing(fn ($driver) => Auth::user()?->team);

        // ...
    }
}
```

If no scope is explicitly provided via the `for` method, the feature check will now use the currently authenticated user's team as the default scope:

```php
Feature::active('billing-v2');

// Is now equivalent to...

Feature::for($user->team)->active('billing-v2');
```

<a name="nullable-scope"></a>
### Nullable Scope

If the scope you provide when checking a feature is `null` and the feature's definition does not support `null` via a nullable type or by including `null` in a union type, Pennant will automatically return `false` as the feature's result value.

So, if the scope you are passing to a feature is potentially `null` and you want the feature's value resolver to be invoked, you should account for that in your feature's definition. A `null` scope may occur if you check a feature within an Artisan command, queued job, or unauthenticated route. Since there is usually not an authenticated user in these contexts, the default scope will be `null`.

If you do not always [explicitly specify your feature scope](#specifying-the-scope) then you should ensure the scope's type is "nullable" and handle the `null` scope value within your feature definition logic:

```php
use App\Models\User;
use Illuminate\Support\Lottery;
use Laravel\Pennant\Feature;

Feature::define('new-api', fn (User $user) => match (true) {// [tl! remove]
Feature::define('new-api', fn (User|null $user) => match (true) {// [tl! add]
    $user === null => true,// [tl! add]
    $user->isInternalTeamMember() => true,
    $user->isHighTrafficCustomer() => false,
    default => Lottery::odds(1 / 100),
});
```

<a name="identifying-scope"></a>
### Identifying Scope

Pennant's built-in `array` and `database` storage drivers know how to properly store scope identifiers for all PHP data types as well as Eloquent models. However, if your application utilizes a third-party Pennant driver, that driver may not know how to properly store an identifier for an Eloquent model or other custom types in your application.

In light of this, Pennant allows you to format scope values for storage by implementing the `FeatureScopeable` contract on the objects in your application that are used as Pennant scopes.

For example, imagine you are using two different feature drivers in a single application: the built-in `database` driver and a third-party "Flag Rocket" driver. The "Flag Rocket" driver does not know how to properly store an Eloquent model. Instead, it requires a `FlagRocketUser` instance. By implementing the `toFeatureIdentifier` defined by the `FeatureScopeable` contract, we can customize the storable scope value provided to each driver used by our application:

```php
<?php

namespace App\Models;

use FlagRocket\FlagRocketUser;
use Illuminate\Database\Eloquent\Model;
use Laravel\Pennant\Contracts\FeatureScopeable;

class User extends Model implements FeatureScopeable
{
    /**
     * Cast the object to a feature scope identifier for the given driver.
     */
    public function toFeatureIdentifier(string $driver): mixed
    {
        return match($driver) {
            'database' => $this,
            'flag-rocket' => FlagRocketUser::fromId($this->flag_rocket_id),
        };
    }
}
```

<a name="serializing-scope"></a>
### Serializing Scope

By default, Pennant will use a fully qualified class name when storing a feature associated with an Eloquent model. If you are already using an [Eloquent morph map](/docs/{{version}}/eloquent-relationships#custom-polymorphic-types), you may choose to have Pennant also use the morph map to decouple the stored feature from your application structure.

To achieve this, after defining your Eloquent morph map in a service provider, you may invoke the `Feature` facade's `useMorphMap` method:

```php
use Illuminate\Database\Eloquent\Relations\Relation;
use Laravel\Pennant\Feature;

Relation::enforceMorphMap([
    'post' => 'App\Models\Post',
    'video' => 'App\Models\Video',
]);

Feature::useMorphMap();
```

<a name="rich-feature-values"></a>
## Rich Feature Values

Until now, we have primarily shown features as being in a binary state, meaning they are either "active" or "inactive", but Pennant also allows you to store rich values as well.

For example, imagine you are testing three new colors for the "Buy now" button of your application. Instead of returning `true` or `false` from the feature definition, you may instead return a string:

```php
use Illuminate\Support\Arr;
use Laravel\Pennant\Feature;

Feature::define('purchase-button', fn (User $user) => Arr::random([
    'blue-sapphire',
    'seafoam-green',
    'tart-orange',
]));
```

You may retrieve the value of the `purchase-button` feature using the `value` method:

```php
$color = Feature::value('purchase-button');
```

Pennant's included Blade directive also makes it easy to conditionally render content based on the current value of the feature:

```blade
@feature('purchase-button', 'blue-sapphire')
    <!-- 'blue-sapphire' is active -->
@elsefeature('purchase-button', 'seafoam-green')
    <!-- 'seafoam-green' is active -->
@elsefeature('purchase-button', 'tart-orange')
    <!-- 'tart-orange' is active -->
@endfeature
```

> [!NOTE]
> When using rich values, it is important to know that a feature is considered "active" when it has any value other than `false`.

When calling the [conditional `when`](#conditional-execution) method, the feature's rich value will be provided to the first closure:

```php
Feature::when('purchase-button',
    fn ($color) => /* ... */,
    fn () => /* ... */,
);
```

Likewise, when calling the conditional `unless` method, the feature's rich value will be provided to the optional second closure:

```php
Feature::unless('purchase-button',
    fn () => /* ... */,
    fn ($color) => /* ... */,
);
```

<a name="retrieving-multiple-features"></a>
## Retrieving Multiple Features

The `values` method allows the retrieval of multiple features for a given scope:

```php
Feature::values(['billing-v2', 'purchase-button']);

// [
//     'billing-v2' => false,
//     'purchase-button' => 'blue-sapphire',
// ]
```

Or, you may use the `all` method to retrieve the values of all defined features for a given scope:

```php
Feature::all();

// [
//     'billing-v2' => false,
//     'purchase-button' => 'blue-sapphire',
//     'site-redesign' => true,
// ]
```

However, class-based features are dynamically registered and are not known by Pennant until they are explicitly checked. This means your application's class-based features may not appear in the results returned by the `all` method if they have not already been checked during the current request.

If you would like to ensure that feature classes are always included when using the `all` method, you may use Pennant's feature discovery capabilities. To get started, invoke the `discover` method in one of your application's service providers:

```php
<?php

namespace App\Providers;

use Illuminate\Support\ServiceProvider;
use Laravel\Pennant\Feature;

class AppServiceProvider extends ServiceProvider
{
    /**
     * Bootstrap any application services.
     */
    public function boot(): void
    {
        Feature::discover();

        // ...
    }
}
```

The `discover` method will register all of the feature classes in your application's `app/Features` directory. The `all` method will now include these classes in its results, regardless of whether they have been checked during the current request:

```php
Feature::all();

// [
//     'App\Features\NewApi' => true,
//     'billing-v2' => false,
//     'purchase-button' => 'blue-sapphire',
//     'site-redesign' => true,
// ]
```

<a name="eager-loading"></a>
## Eager Loading

Although Pennant keeps an in-memory cache of all resolved features for a single request, it is still possible to encounter performance issues. To alleviate this, Pennant offers the ability to eager load feature values.

To illustrate this, imagine that we are checking if a feature is active within a loop:

```php
use Laravel\Pennant\Feature;

foreach ($users as $user) {
    if (Feature::for($user)->active('notifications-beta')) {
        $user->notify(new RegistrationSuccess);
    }
}
```

Assuming we are using the database driver, this code will execute a database query for every user in the loop - executing potentially hundreds of queries. However, using Pennant's `load` method, we can remove this potential performance bottleneck by eager loading the feature values for a collection of users or scopes:

```php
Feature::for($users)->load(['notifications-beta']);

foreach ($users as $user) {
    if (Feature::for($user)->active('notifications-beta')) {
        $user->notify(new RegistrationSuccess);
    }
}
```

To load feature values only when they have not already been loaded, you may use the `loadMissing` method:

```php
Feature::for($users)->loadMissing([
    'new-api',
    'purchase-button',
    'notifications-beta',
]);
```

You may load all defined features using the `loadAll` method:

```php
Feature::for($users)->loadAll();
```

<a name="updating-values"></a>
## Updating Values

When a feature's value is resolved for the first time, the underlying driver will store the result in storage. This is often necessary to ensure a consistent experience for your users across requests. However, at times, you may want to manually update the feature's stored value.

To accomplish this, you may use the `activate` and `deactivate` methods to toggle a feature "on" or "off":

```php
use Laravel\Pennant\Feature;

// Activate the feature for the default scope...
Feature::activate('new-api');

// Deactivate the feature for the given scope...
Feature::for($user->team)->deactivate('billing-v2');
```

It is also possible to manually set a rich value for a feature by providing a second argument to the `activate` method:

```php
Feature::activate('purchase-button', 'seafoam-green');
```

To instruct Pennant to forget the stored value for a feature, you may use the `forget` method. When the feature is checked again, Pennant will resolve the feature's value from its feature definition:

```php
Feature::forget('purchase-button');
```

<a name="bulk-updates"></a>
### Bulk Updates

To update stored feature values in bulk, you may use the `activateForEveryone` and `deactivateForEveryone` methods.

For example, imagine you are now confident in the `new-api` feature's stability and have landed on the best `'purchase-button'` color for your checkout flow - you can update the stored value for all users accordingly:

```php
use Laravel\Pennant\Feature;

Feature::activateForEveryone('new-api');

Feature::activateForEveryone('purchase-button', 'seafoam-green');
```

Alternatively, you may deactivate the feature for all users:

```php
Feature::deactivateForEveryone('new-api');
```

> [!NOTE]
> This will only update the resolved feature values that have been stored by Pennant's storage driver. You will also need to update the feature definition in your application.

<a name="purging-features"></a>
### Purging Features

Sometimes, it can be useful to purge an entire feature from storage. This is typically necessary if you have removed the feature from your application or you have made adjustments to the feature's definition that you would like to rollout to all users.

You may remove all stored values for a feature using the `purge` method:

```php
// Purging a single feature...
Feature::purge('new-api');

// Purging multiple features...
Feature::purge(['new-api', 'purchase-button']);
```

If you would like to purge _all_ features from storage, you may invoke the `purge` method without any arguments:

```php
Feature::purge();
```

As it can be useful to purge features as part of your application's deployment pipeline, Pennant includes a `pennant:purge` Artisan command which will purge the provided features from storage:

```shell
php artisan pennant:purge new-api

php artisan pennant:purge new-api purchase-button
```

It is also possible to purge all features _except_ those in a given feature list. For example, imagine you wanted to purge all features but keep the values for the "new-api" and "purchase-button" features in storage. To accomplish this, you can pass those feature names to the `--except` option:

```shell
php artisan pennant:purge --except=new-api --except=purchase-button
```

For convenience, the `pennant:purge` command also supports an `--except-registered` flag. This flag indicates that all features except those explicitly registered in a service provider should be purged:

```shell
php artisan pennant:purge --except-registered
```

<a name="testing"></a>
## Testing

When testing code that interacts with feature flags, the easiest way to control the feature flag's returned value in your tests is to simply re-define the feature. For example, imagine you have the following feature defined in one of your application's service provider:

```php
use Illuminate\Support\Arr;
use Laravel\Pennant\Feature;

Feature::define('purchase-button', fn () => Arr::random([
    'blue-sapphire',
    'seafoam-green',
    'tart-orange',
]));
```

To modify the feature's returned value in your tests, you may re-define the feature at the beginning of the test. The following test will always pass, even though the `Arr::random()` implementation is still present in the service provider:

```php tab=Pest
use Laravel\Pennant\Feature;

test('it can control feature values', function () {
    Feature::define('purchase-button', 'seafoam-green');

    expect(Feature::value('purchase-button'))->toBe('seafoam-green');
});
```

```php tab=PHPUnit
use Laravel\Pennant\Feature;

public function test_it_can_control_feature_values()
{
    Feature::define('purchase-button', 'seafoam-green');

    $this->assertSame('seafoam-green', Feature::value('purchase-button'));
}
```

The same approach may be used for class-based features:

```php tab=Pest
use Laravel\Pennant\Feature;

test('it can control feature values', function () {
    Feature::define(NewApi::class, true);

    expect(Feature::value(NewApi::class))->toBeTrue();
});
```

```php tab=PHPUnit
use App\Features\NewApi;
use Laravel\Pennant\Feature;

public function test_it_can_control_feature_values()
{
    Feature::define(NewApi::class, true);

    $this->assertTrue(Feature::value(NewApi::class));
}
```

If your feature is returning a `Lottery` instance, there are a handful of useful [testing helpers available](/docs/{{version}}/helpers#testing-lotteries).

<a name="store-configuration"></a>
#### Store Configuration

You may configure the store that Pennant will use during testing by defining the `PENNANT_STORE` environment variable in your application's `phpunit.xml` file:

```xml
<?xml version="1.0" encoding="UTF-8"?>
<phpunit colors="true">
    <!-- ... -->
    <php>
        <env name="PENNANT_STORE" value="array"/>
        <!-- ... -->
    </php>
</phpunit>
```

<a name="adding-custom-pennant-drivers"></a>
## Adding Custom Pennant Drivers

<a name="implementing-the-driver"></a>
#### Implementing the Driver

If none of Pennant's existing storage drivers fit your application's needs, you may write your own storage driver. Your custom driver should implement the `Laravel\Pennant\Contracts\Driver` interface:

```php
<?php

namespace App\Extensions;

use Laravel\Pennant\Contracts\Driver;

class RedisFeatureDriver implements Driver
{
    public function define(string $feature, callable $resolver): void {}
    public function defined(): array {}
    public function getAll(array $features): array {}
    public function get(string $feature, mixed $scope): mixed {}
    public function set(string $feature, mixed $scope, mixed $value): void {}
    public function setForAllScopes(string $feature, mixed $value): void {}
    public function delete(string $feature, mixed $scope): void {}
    public function purge(array|null $features): void {}
}
```

Now, we just need to implement each of these methods using a Redis connection. For an example of how to implement each of these methods, take a look at the `Laravel\Pennant\Drivers\DatabaseDriver` in the [Pennant source code](https://github.com/laravel/pennant/blob/1.x/src/Drivers/DatabaseDriver.php)

> [!NOTE]
> Laravel does not ship with a directory to contain your extensions. You are free to place them anywhere you like. In this example, we have created an `Extensions` directory to house the `RedisFeatureDriver`.

<a name="registering-the-driver"></a>
#### Registering the Driver

Once your driver has been implemented, you are ready to register it with Laravel. To add additional drivers to Pennant, you may use the `extend` method provided by the `Feature` facade. You should call the `extend` method from the `boot` method of one of your application's [service provider](/docs/{{version}}/providers):

```php
<?php

namespace App\Providers;

use App\Extensions\RedisFeatureDriver;
use Illuminate\Contracts\Foundation\Application;
use Illuminate\Support\ServiceProvider;
use Laravel\Pennant\Feature;

class AppServiceProvider extends ServiceProvider
{
    /**
     * Register any application services.
     */
    public function register(): void
    {
        // ...
    }

    /**
     * Bootstrap any application services.
     */
    public function boot(): void
    {
        Feature::extend('redis', function (Application $app) {
            return new RedisFeatureDriver($app->make('redis'), $app->make('events'), []);
        });
    }
}
```

Once the driver has been registered, you may use the `redis` driver in your application's `config/pennant.php` configuration file:

```php
'stores' => [

    'redis' => [
        'driver' => 'redis',
        'connection' => null,
    ],

    // ...

],
```

<a name="defining-features-externally"></a>
### Defining Features Externally

If your driver is a wrapper around a third-party feature flag platform, you will likely define features on the platform rather than using Pennant's `Feature::define` method. If that is the case, your custom driver should also implement the `Laravel\Pennant\Contracts\DefinesFeaturesExternally` interface:

```php
<?php

namespace App\Extensions;

use Laravel\Pennant\Contracts\Driver;
use Laravel\Pennant\Contracts\DefinesFeaturesExternally;

class FeatureFlagServiceDriver implements Driver, DefinesFeaturesExternally
{
    /**
     * Get the features defined for the given scope.
     */
    public function definedFeaturesForScope(mixed $scope): array {}

    /* ... */
}
```

The `definedFeaturesForScope` method should return a list of feature names defined for the provided scope.

<a name="events"></a>
## Events

Pennant dispatches a variety of events that can be useful when tracking feature flags throughout your application.

### `Laravel\Pennant\Events\FeatureRetrieved`

This event is dispatched whenever a [feature is checked](#checking-features). This event may be useful for creating and tracking metrics against a feature flag's usage throughout your application.

### `Laravel\Pennant\Events\FeatureResolved`

This event is dispatched the first time a feature's value is resolved for a specific scope.

### `Laravel\Pennant\Events\UnknownFeatureResolved`

This event is dispatched the first time an unknown feature is resolved for a specific scope. Listening to this event may be useful if you have intended to remove a feature flag but have accidentally left stray references to it throughout your application:

```php
<?php

namespace App\Providers;

use Illuminate\Support\ServiceProvider;
use Illuminate\Support\Facades\Event;
use Illuminate\Support\Facades\Log;
use Laravel\Pennant\Events\UnknownFeatureResolved;

class AppServiceProvider extends ServiceProvider
{
    /**
     * Bootstrap any application services.
     */
    public function boot(): void
    {
        Event::listen(function (UnknownFeatureResolved $event) {
            Log::error("Resolving unknown feature [{$event->feature}].");
        });
    }
}
```

### `Laravel\Pennant\Events\DynamicallyRegisteringFeatureClass`

This event is dispatched when a [class-based feature](#class-based-features) is dynamically checked for the first time during a request.

### `Laravel\Pennant\Events\UnexpectedNullScopeEncountered`

This event is dispatched when a `null` scope is passed to a feature definition that [doesn't support null](#nullable-scope).

This situation is handled gracefully and the feature will return `false`. However, if you would like to opt out of this feature's default graceful behavior, you may register a listener for this event in the `boot` method of your application's `AppServiceProvider`:

```php
use Illuminate\Support\Facades\Log;
use Laravel\Pennant\Events\UnexpectedNullScopeEncountered;

/**
 * Bootstrap any application services.
 */
public function boot(): void
{
    Event::listen(UnexpectedNullScopeEncountered::class, fn () => abort(500));
}
```

### `Laravel\Pennant\Events\FeatureUpdated`

This event is dispatched when updating a feature for a scope, usually by calling `activate` or `deactivate`.

### `Laravel\Pennant\Events\FeatureUpdatedForAllScopes`

This event is dispatched when updating a feature for all scopes, usually by calling `activateForEveryone` or `deactivateForEveryone`.

### `Laravel\Pennant\Events\FeatureDeleted`

This event is dispatched when deleting a feature for a scope, usually by calling `forget`.

### `Laravel\Pennant\Events\FeaturesPurged`

This event is dispatched when purging specific features.

### `Laravel\Pennant\Events\AllFeaturesPurged`

This event is dispatched when purging all features.


---

# Laravel Pint

*Sección: Laravel | Origen: https://laravel.com/docs/13.x/pint*

- [Introduction](#introduction)
- [Installation](#installation)
- [Running Pint](#running-pint)
- [Configuring Pint](#configuring-pint)
    - [Presets](#presets)
    - [Rules](#rules)
    - [Excluding Files / Folders](#excluding-files-or-folders)
- [Continuous Integration](#continuous-integration)
    - [GitHub Actions](#running-tests-on-github-actions)

<a name="introduction"></a>
## Introduction

[Laravel Pint](https://github.com/laravel/pint) is an opinionated PHP code style fixer for minimalists. Pint is built on top of [PHP CS Fixer](https://github.com/FriendsOfPHP/PHP-CS-Fixer) and makes it simple to ensure that your code style stays clean and consistent.

Pint is automatically installed with all new Laravel applications so you may start using it immediately. By default, Pint does not require any configuration and will fix code style issues in your code by following the opinionated coding style of Laravel.

<a name="installation"></a>
## Installation

Pint is included in recent releases of the Laravel framework, so installation is typically unnecessary. However, for older applications, you may install Laravel Pint via Composer:

```shell
composer require laravel/pint --dev
```

<a name="running-pint"></a>
## Running Pint

You can instruct Pint to fix code style issues by invoking the `pint` binary that is available in your project's `vendor/bin` directory:

```shell
./vendor/bin/pint
```

If you would like Pint to run in parallel mode (experimental) for improved performance, you may use the `--parallel` option:

```shell
./vendor/bin/pint --parallel
```

Parallel mode also allows you to specify the maximum number of processes to run via the `--max-processes` option. If this option is not provided, Pint will use every available core on your machine:

```shell
./vendor/bin/pint --parallel --max-processes=4
```

You may also run Pint on specific files or directories:

```shell
./vendor/bin/pint app/Models

./vendor/bin/pint app/Models/User.php
```

By default, Pint does not format Blade templates. If you would like to format your `.blade.php` files as well, you may use the `--blade` option, which enables the [`Pint/laravel_blade`](#laravel-blade) rule for the current run without modifying your `pint.json` file:

```shell
./vendor/bin/pint --blade
```

Pint will display a thorough list of all of the files that it updates. You can view even more detail about Pint's changes by providing the `-v` option when invoking Pint:

```shell
./vendor/bin/pint -v
```

If you would like Pint to simply inspect your code for style errors without actually changing the files, you may use the `--test` option. Pint will return a non-zero exit code if any code style errors are found:

```shell
./vendor/bin/pint --test
```

If you would like Pint to only modify the files that differ from the provided branch according to Git, you may use the `--diff=[branch]` option. This can be effectively used in your CI environment (like GitHub actions) to save time by only inspecting new or modified files:

```shell
./vendor/bin/pint --diff=main
```

If you would like Pint to only modify the files that have uncommitted changes according to Git, you may use the `--dirty` option:

```shell
./vendor/bin/pint --dirty
```

If you would like Pint to fix any files with code style errors but also exit with a non-zero exit code if any errors were fixed, you may use the `--repair` option:

```shell
./vendor/bin/pint --repair
```

<a name="configuring-pint"></a>
## Configuring Pint

As previously mentioned, Pint does not require any configuration. However, if you wish to customize the presets, rules, or inspected folders, you may do so by creating a `pint.json` file in your project's root directory:

```json
{
    "preset": "laravel"
}
```

In addition, if you wish to use a `pint.json` from a specific directory, you may provide the `--config` option when invoking Pint:

```shell
./vendor/bin/pint --config vendor/my-company/coding-style/pint.json
```

<a name="presets"></a>
### Presets

Presets define a set of rules that can be used to fix code style issues in your code. By default, Pint uses the `laravel` preset, which fixes issues by following the opinionated coding style of Laravel. However, you may specify a different preset by providing the `--preset` option to Pint:

```shell
./vendor/bin/pint --preset psr12
```

If you wish, you may also set the preset in your project's `pint.json` file:

```json
{
    "preset": "psr12"
}
```

Pint's currently supported presets are: `laravel`, `per`, `psr12`, `symfony`, and `empty`.

<a name="rules"></a>
### Rules

Rules are style guidelines that Pint will use to fix code style issues in your code. As mentioned above, presets are predefined groups of rules that should be perfect for most PHP projects, so you typically will not need to worry about the individual rules they contain.

However, if you wish, you may enable or disable specific rules in your `pint.json` file or use the `empty` preset and define the rules from scratch:

```json
{
    "preset": "laravel",
    "rules": {
        "simplified_null_return": true,
        "array_indentation": false,
        "new_with_parentheses": {
            "anonymous_class": true,
            "named_class": true
        }
    }
}
```

Pint is built on top of [PHP CS Fixer](https://github.com/FriendsOfPHP/PHP-CS-Fixer). Therefore, you may use any of its rules to fix code style issues in your project: [PHP CS Fixer Configurator](https://mlocati.github.io/php-cs-fixer-configurator).

<a name="custom-rules"></a>
#### Custom Rules

In addition to PHP CS Fixer rules, Pint provides custom rules prefixed with `Pint/`. These rules are not enabled by default, but you may enable them in your `pint.json` file.

<a name="laravel-blade"></a>
##### `Pint/laravel_blade`

This rule formats your Blade templates, applying consistent indentation, spacing, and attribute formatting to your `.blade.php` files. By default, Pint does not format Blade files, so you must enable this rule in your `pint.json` file to opt in:

```json
{
    "preset": "laravel",
    "rules": {
        "Pint/laravel_blade": true
    }
}
```

Once enabled, Pint will format your Blade templates in addition to your PHP files whenever it runs:

```shell
./vendor/bin/pint
```

Alternatively, if you would like to enable this rule for a single run without modifying your `pint.json` file, you may use the `--blade` option:

```shell
./vendor/bin/pint --blade
```

Under the hood, this rule uses [Prettier](https://prettier.io) along with the `prettier-plugin-blade` and `prettier-plugin-tailwindcss` plugins, so [Node.js](https://nodejs.org) must be installed on your machine. The first time you run Pint with this rule enabled, Pint will detect any missing Prettier dependencies and prompt you to install them.

> [!NOTE]
> This rule automatically skips files that typically rely on their own formatting, such as [Laravel Boost](https://github.com/laravel/boost) guidelines and email views located in the `resources/views/emails` and `resources/views/mail` directories.

<a name="phpdoc-type-annotations-only"></a>
##### `Pint/phpdoc_type_annotations_only`

This rule removes all comments and docblock prose from your code, keeping only lines that contain `@` annotations such as `@param`, `@return`, `@var`, `@phpstan-type`, etc:

```php
/**
 * Get the posts for the user. [tl! remove]
 * [tl! remove]
 * @return HasMany<Post, $this>
 */
public function posts(): HasMany
```

Single-line comments and block comments without `@` annotations are removed entirely. If you would like to keep a specific comment, you may prefix it with `@note`, `@warning`, or `@todo`:

```php
// @note This comment will be preserved.
```

To enable this rule, add it to your `pint.json` file:

```json
{
    "preset": "laravel",
    "rules": {
        "Pint/phpdoc_type_annotations_only": true
    }
}
```

> [!NOTE]
> This rule automatically skips files in the `config` directory, as configuration files typically rely on comments for documentation.

<a name="excluding-files-or-folders"></a>
### Excluding Files / Folders

By default, Pint will inspect all `.php` files in your project except those in the `vendor` directory. If you wish to exclude more folders, you may do so using the `exclude` configuration option:

```json
{
    "exclude": [
        "my-specific/folder"
    ]
}
```

If you wish to exclude all files that contain a given name pattern, you may do so using the `notName` configuration option:

```json
{
    "notName": [
        "*-my-file.php"
    ]
}
```

If you would like to exclude a file by providing an exact path to the file, you may do so using the `notPath` configuration option:

```json
{
    "notPath": [
        "path/to/excluded-file.php"
    ]
}
```

<a name="continuous-integration"></a>
## Continuous Integration

<a name="running-tests-on-github-actions"></a>
### GitHub Actions

To automate linting your project with Laravel Pint, you can configure [GitHub Actions](https://github.com/features/actions) to run Pint whenever new code is pushed to GitHub. First, be sure to grant "Read and write permissions" to workflows within GitHub at **Settings > Actions > General > Workflow permissions**. Then, create a `.github/workflows/lint.yml` file with the following content:

```yaml
name: Fix Code Style

on: [push]

jobs:
  lint:
    runs-on: ubuntu-latest
    strategy:
      fail-fast: true
      matrix:
        php: [8.4]

    steps:
      - name: Checkout code
        uses: actions/checkout@v5

      - name: Setup PHP
        uses: shivammathur/setup-php@v2
        with:
          php-version: ${{ matrix.php }}
          tools: pint

      - name: Run Pint
        run: pint

      - name: Commit linted files
        uses: stefanzweifel/git-auto-commit-action@v6
```


---

# Precognition

*Sección: Laravel | Origen: https://laravel.com/docs/13.x/precognition*

- [Introduction](#introduction)
- [Live Validation](#live-validation)
    - [Using Vue](#using-vue)
    - [Using React](#using-react)
    - [Using Alpine and Blade](#using-alpine)
    - [Configuring Axios](#configuring-axios)
- [Validating Arrays](#validating-arrays)
- [Customizing Validation Rules](#customizing-validation-rules)
- [Handling File Uploads](#handling-file-uploads)
- [Managing Side-Effects](#managing-side-effects)
- [Testing](#testing)

<a name="introduction"></a>
## Introduction

Laravel Precognition allows you to anticipate the outcome of a future HTTP request. One of the primary use cases of Precognition is the ability to provide "live" validation for your frontend JavaScript application without having to duplicate your application's backend validation rules.

When Laravel receives a "precognitive request", it will execute all of the route's middleware and resolve the route's controller dependencies, including validating [form requests](/docs/{{version}}/validation#form-request-validation) - but it will not actually execute the route's controller method.

> [!NOTE]
> As of Inertia 2.3, Precognition support is built-in. Please consult the [Inertia Forms documentation](https://inertiajs.com/forms) for more information. Earlier Inertia versions require Precognition 0.x.

<a name="live-validation"></a>
## Live Validation

<a name="using-vue"></a>
### Using Vue

Using Laravel Precognition, you can offer live validation experiences to your users without having to duplicate your validation rules in your frontend Vue application. To illustrate how it works, let's build a form for creating new users within our application.

First, to enable Precognition for a route, the `HandlePrecognitiveRequests` middleware should be added to the route definition. You should also create a [form request](/docs/{{version}}/validation#form-request-validation) to house the route's validation rules:

```php
use App\Http\Requests\StoreUserRequest;
use Illuminate\Foundation\Http\Middleware\HandlePrecognitiveRequests;

Route::post('/users', function (StoreUserRequest $request) {
    // ...
})->middleware([HandlePrecognitiveRequests::class]);
```

Next, you should install the Laravel Precognition frontend helpers for Vue via NPM:

```shell
npm install laravel-precognition-vue
```

With the Laravel Precognition package installed, you can now create a form object using Precognition's `useForm` function, providing the HTTP method (`post`), the target URL (`/users`), and the initial form data.

Then, to enable live validation, invoke the form's `validate` method on each input's `change` event, providing the input's name:

```vue
<script setup>
import { useForm } from 'laravel-precognition-vue';

const form = useForm('post', '/users', {
    name: '',
    email: '',
});

const submit = () => form.submit();
</script>

<template>
    <form @submit.prevent="submit">
        <label for="name">Name</label>
        <input
            id="name"
            v-model="form.name"
            @change="form.validate('name')"
        />
        <div v-if="form.invalid('name')">
            {{ form.errors.name }}
        </div>

        <label for="email">Email</label>
        <input
            id="email"
            type="email"
            v-model="form.email"
            @change="form.validate('email')"
        />
        <div v-if="form.invalid('email')">
            {{ form.errors.email }}
        </div>

        <button :disabled="form.processing">
            Create User
        </button>
    </form>
</template>
```

Now, as the form is filled by the user, Precognition will provide live validation output powered by the validation rules in the route's form request. When the form's inputs are changed, a debounced "precognitive" validation request will be sent to your Laravel application. You may configure the debounce timeout by calling the form's `setValidationTimeout` function:

```js
form.setValidationTimeout(3000);
```

When a validation request is in-flight, the form's `validating` property will be `true`:

```html
<div v-if="form.validating">
    Validating...
</div>
```

Any validation errors returned during a validation request or a form submission will automatically populate the form's `errors` object:

```html
<div v-if="form.invalid('email')">
    {{ form.errors.email }}
</div>
```

You can determine if the form has any errors using the form's `hasErrors` property:

```html
<div v-if="form.hasErrors">
    <!-- ... -->
</div>
```

You may also determine if an input has passed or failed validation by passing the input's name to the form's `valid` and `invalid` functions, respectively:

```html
<span v-if="form.valid('email')">
    ✅
</span>

<span v-else-if="form.invalid('email')">
    ❌
</span>
```

> [!WARNING]
> A form input will only appear as valid or invalid once it has changed and a validation response has been received.

If you are validating a subset of a form's inputs with Precognition, it can be useful to manually clear errors. You may use the form's `forgetError` function to achieve this:

```html
<input
    id="avatar"
    type="file"
    @change="(e) => {
        form.avatar = e.target.files[0]

        form.forgetError('avatar')
    }"
>
```

As we have seen, you can hook into an input's `change` event and validate individual inputs as the user interacts with them; however, you may need to validate inputs that the user has not yet interacted with. This is common when building a "wizard", where you want to validate all visible inputs, whether the user has interacted with them or not, before moving to the next step.

To do this with Precognition, you should call the `validate` method passing the field names you wish to validate to the `only` configuration key. You may handle the validation result with `onSuccess` or `onValidationError` callbacks:

```html
<button
    type="button"
    @click="form.validate({
        only: ['name', 'email', 'phone'],
        onSuccess: (response) => nextStep(),
        onValidationError: (response) => /* ... */,
    })"
>Next Step</button>
```

Of course, you may also execute code in reaction to the response to the form submission. The form's `submit` function returns an Axios request promise. This provides a convenient way to access the response payload, reset the form inputs on successful submission, or handle a failed request:

```js
const submit = () => form.submit()
    .then(response => {
        form.reset();

        alert('User created.');
    })
    .catch(error => {
        alert('An error occurred.');
    });
```

You may determine if a form submission request is in-flight by inspecting the form's `processing` property:

```html
<button :disabled="form.processing">
    Submit
</button>
```

<a name="using-react"></a>
### Using React

Using Laravel Precognition, you can offer live validation experiences to your users without having to duplicate your validation rules in your frontend React application. To illustrate how it works, let's build a form for creating new users within our application.

First, to enable Precognition for a route, the `HandlePrecognitiveRequests` middleware should be added to the route definition. You should also create a [form request](/docs/{{version}}/validation#form-request-validation) to house the route's validation rules:

```php
use App\Http\Requests\StoreUserRequest;
use Illuminate\Foundation\Http\Middleware\HandlePrecognitiveRequests;

Route::post('/users', function (StoreUserRequest $request) {
    // ...
})->middleware([HandlePrecognitiveRequests::class]);
```

Next, you should install the Laravel Precognition frontend helpers for React via NPM:

```shell
npm install laravel-precognition-react
```

With the Laravel Precognition package installed, you can now create a form object using Precognition's `useForm` function, providing the HTTP method (`post`), the target URL (`/users`), and the initial form data.

To enable live validation, you should listen to each input's `change` and `blur` event. In the `change` event handler, you should set the form's data with the `setData` function, passing the input's name and new value. Then, in the `blur` event handler invoke the form's `validate` method, providing the input's name:

```jsx
import { useForm } from 'laravel-precognition-react';

export default function Form() {
    const form = useForm('post', '/users', {
        name: '',
        email: '',
    });

    const submit = (e) => {
        e.preventDefault();

        form.submit();
    };

    return (
        <form onSubmit={submit}>
            <label htmlFor="name">Name</label>
            <input
                id="name"
                value={form.data.name}
                onChange={(e) => form.setData('name', e.target.value)}
                onBlur={() => form.validate('name')}
            />
            {form.invalid('name') && <div>{form.errors.name}</div>}

            <label htmlFor="email">Email</label>
            <input
                id="email"
                value={form.data.email}
                onChange={(e) => form.setData('email', e.target.value)}
                onBlur={() => form.validate('email')}
            />
            {form.invalid('email') && <div>{form.errors.email}</div>}

            <button disabled={form.processing}>
                Create User
            </button>
        </form>
    );
};
```

Now, as the form is filled by the user, Precognition will provide live validation output powered by the validation rules in the route's form request. When the form's inputs are changed, a debounced "precognitive" validation request will be sent to your Laravel application. You may configure the debounce timeout by calling the form's `setValidationTimeout` function:

```js
form.setValidationTimeout(3000);
```

When a validation request is in-flight, the form's `validating` property will be `true`:

```jsx
{form.validating && <div>Validating...</div>}
```

Any validation errors returned during a validation request or a form submission will automatically populate the form's `errors` object:

```jsx
{form.invalid('email') && <div>{form.errors.email}</div>}
```

You can determine if the form has any errors using the form's `hasErrors` property:

```jsx
{form.hasErrors && <div><!-- ... --></div>}
```

You may also determine if an input has passed or failed validation by passing the input's name to the form's `valid` and `invalid` functions, respectively:

```jsx
{form.valid('email') && <span>✅</span>}

{form.invalid('email') && <span>❌</span>}
```

> [!WARNING]
> A form input will only appear as valid or invalid once it has changed and a validation response has been received.

If you are validating a subset of a form's inputs with Precognition, it can be useful to manually clear errors. You may use the form's `forgetError` function to achieve this:

```jsx
<input
    id="avatar"
    type="file"
    onChange={(e) => {
        form.setData('avatar', e.target.files[0]);

        form.forgetError('avatar');
    }}
>
```

As we have seen, you can hook into an input's `blur` event and validate individual inputs as the user interacts with them; however, you may need to validate inputs that the user has not yet interacted with. This is common when building a "wizard", where you want to validate all visible inputs, whether the user has interacted with them or not, before moving to the next step.

To do this with Precognition, you should call the `validate` method passing the field names you wish to validate to the `only` configuration key. You may handle the validation result with `onSuccess` or `onValidationError` callbacks:

```jsx
<button
    type="button"
    onClick={() => form.validate({
        only: ['name', 'email', 'phone'],
        onSuccess: (response) => nextStep(),
        onValidationError: (response) => /* ... */,
    })}
>Next Step</button>
```

Of course, you may also execute code in reaction to the response to the form submission. The form's `submit` function returns an Axios request promise. This provides a convenient way to access the response payload, reset the form's inputs on a successful form submission, or handle a failed request:

```js
const submit = (e) => {
    e.preventDefault();

    form.submit()
        .then(response => {
            form.reset();

            alert('User created.');
        })
        .catch(error => {
            alert('An error occurred.');
        });
};
```

You may determine if a form submission request is in-flight by inspecting the form's `processing` property:

```html
<button disabled={form.processing}>
    Submit
</button>
```

<a name="using-alpine"></a>
### Using Alpine and Blade

Using Laravel Precognition, you can offer live validation experiences to your users without having to duplicate your validation rules in your frontend Alpine application. To illustrate how it works, let's build a form for creating new users within our application.

First, to enable Precognition for a route, the `HandlePrecognitiveRequests` middleware should be added to the route definition. You should also create a [form request](/docs/{{version}}/validation#form-request-validation) to house the route's validation rules:

```php
use App\Http\Requests\CreateUserRequest;
use Illuminate\Foundation\Http\Middleware\HandlePrecognitiveRequests;

Route::post('/users', function (CreateUserRequest $request) {
    // ...
})->middleware([HandlePrecognitiveRequests::class]);
```

Next, you should install the Laravel Precognition frontend helpers for Alpine via NPM:

```shell
npm install laravel-precognition-alpine
```

Then, register the Precognition plugin with Alpine in your `resources/js/app.js` file:

```js
import Alpine from 'alpinejs';
import Precognition from 'laravel-precognition-alpine';

window.Alpine = Alpine;

Alpine.plugin(Precognition);
Alpine.start();
```

With the Laravel Precognition package installed and registered, you can now create a form object using Precognition's `$form` "magic", providing the HTTP method (`post`), the target URL (`/users`), and the initial form data.

To enable live validation, you should bind the form's data to its relevant input and then listen to each input's `change` event. In the `change` event handler, you should invoke the form's `validate` method, providing the input's name:

```html
<form x-data="{
    form: $form('post', '/register', {
        name: '',
        email: '',
    }),
}">
    @csrf
    <label for="name">Name</label>
    <input
        id="name"
        name="name"
        x-model="form.name"
        @change="form.validate('name')"
    />
    <template x-if="form.invalid('name')">
        <div x-text="form.errors.name"></div>
    </template>

    <label for="email">Email</label>
    <input
        id="email"
        name="email"
        x-model="form.email"
        @change="form.validate('email')"
    />
    <template x-if="form.invalid('email')">
        <div x-text="form.errors.email"></div>
    </template>

    <button :disabled="form.processing">
        Create User
    </button>
</form>
```

Now, as the form is filled by the user, Precognition will provide live validation output powered by the validation rules in the route's form request. When the form's inputs are changed, a debounced "precognitive" validation request will be sent to your Laravel application. You may configure the debounce timeout by calling the form's `setValidationTimeout` function:

```js
form.setValidationTimeout(3000);
```

When a validation request is in-flight, the form's `validating` property will be `true`:

```html
<template x-if="form.validating">
    <div>Validating...</div>
</template>
```

Any validation errors returned during a validation request or a form submission will automatically populate the form's `errors` object:

```html
<template x-if="form.invalid('email')">
    <div x-text="form.errors.email"></div>
</template>
```

You can determine if the form has any errors using the form's `hasErrors` property:

```html
<template x-if="form.hasErrors">
    <div><!-- ... --></div>
</template>
```

You may also determine if an input has passed or failed validation by passing the input's name to the form's `valid` and `invalid` functions, respectively:

```html
<template x-if="form.valid('email')">
    <span>✅</span>
</template>

<template x-if="form.invalid('email')">
    <span>❌</span>
</template>
```

> [!WARNING]
> A form input will only appear as valid or invalid once it has changed and a validation response has been received.

As we have seen, you can hook into an input's `change` event and validate individual inputs as the user interacts with them; however, you may need to validate inputs that the user has not yet interacted with. This is common when building a "wizard", where you want to validate all visible inputs, whether the user has interacted with them or not, before moving to the next step.

To do this with Precognition, you should call the `validate` method passing the field names you wish to validate to the `only` configuration key. You may handle the validation result with `onSuccess` or `onValidationError` callbacks:

```html
<button
    type="button"
    @click="form.validate({
        only: ['name', 'email', 'phone'],
        onSuccess: (response) => nextStep(),
        onValidationError: (response) => /* ... */,
    })"
>Next Step</button>
```

You may determine if a form submission request is in-flight by inspecting the form's `processing` property:

```html
<button :disabled="form.processing">
    Submit
</button>
```

<a name="repopulating-old-form-data"></a>
#### Repopulating Old Form Data

In the user creation example discussed above, we are using Precognition to perform live validation; however, we are performing a traditional server-side form submission to submit the form. So, the form should be populated with any "old" input and validation errors returned from the server-side form submission:

```html
<form x-data="{
    form: $form('post', '/register', {
        name: '{{ old('name') }}',
        email: '{{ old('email') }}',
    }).setErrors({{ Js::from($errors->messages()) }}),
}">
```

Alternatively, if you would like to submit the form via XHR you may use the form's `submit` function, which returns an Axios request promise:

```html
<form
    x-data="{
        form: $form('post', '/register', {
            name: '',
            email: '',
        }),
        submit() {
            this.form.submit()
                .then(response => {
                    this.form.reset();

                    alert('User created.')
                })
                .catch(error => {
                    alert('An error occurred.');
                });
        },
    }"
    @submit.prevent="submit"
>
```

<a name="configuring-axios"></a>
### Configuring Axios

The Precognition validation libraries use the [Axios](https://github.com/axios/axios) HTTP client to send requests to your application's backend. For convenience, the Axios instance may be customized if required by your application. For example, when using the `laravel-precognition-vue` library, you may add additional request headers to each outgoing request in your application's `resources/js/app.js` file:

```js
import { client } from 'laravel-precognition-vue';

client.axios().defaults.headers.common['Authorization'] = authToken;
```

Or, if you already have a configured Axios instance for your application, you may tell Precognition to use that instance instead:

```js
import Axios from 'axios';
import { client } from 'laravel-precognition-vue';

window.axios = Axios.create()
window.axios.defaults.headers.common['Authorization'] = authToken;

client.use(window.axios)
```

<a name="validating-arrays"></a>
## Validating Arrays

You may use wildcards to validate fields within arrays or nested objects. Each `*` matches a single path segment:

```js
// Validate email for all users in an array...
form.validate('users.*.email');

// Validate all fields in a profile object...
form.validate('profile.*');

// Validate all fields for all users...
form.validate('users.*.*');
```

<a name="customizing-validation-rules"></a>
## Customizing Validation Rules

It is possible to customize the validation rules executed during a precognitive request by using the request's `isPrecognitive` method.

For example, on a user creation form, we may want to validate that a password is "uncompromised" only on the final form submission. For precognitive validation requests, we will simply validate that the password is required and has a minimum of 8 characters. Using the `isPrecognitive` method, we can customize the rules defined by our form request:

```php
<?php

namespace App\Http\Requests;

use Illuminate\Foundation\Http\FormRequest;
use Illuminate\Validation\Rules\Password;

class StoreUserRequest extends FormRequest
{
    /**
     * Get the validation rules that apply to the request.
     *
     * @return array
     */
    protected function rules()
    {
        return [
            'password' => [
                'required',
                $this->isPrecognitive()
                    ? Password::min(8)
                    : Password::min(8)->uncompromised(),
            ],
            // ...
        ];
    }
}
```

<a name="handling-file-uploads"></a>
## Handling File Uploads

By default, Laravel Precognition does not upload or validate files during a precognitive validation request. This ensure that large files are not unnecessarily uploaded multiple times.

Because of this behavior, you should ensure that your application [customizes the corresponding form request's validation rules](#customizing-validation-rules) to specify the field is only required for full form submissions:

```php
/**
 * Get the validation rules that apply to the request.
 *
 * @return array
 */
protected function rules()
{
    return [
        'avatar' => [
            ...$this->isPrecognitive() ? [] : ['required'],
            'image',
            'mimes:jpg,png',
            'dimensions:ratio=3/2',
        ],
        // ...
    ];
}
```

If you would like to include files in every validation request, you may invoke the `validateFiles` function on your client-side form instance:

```js
form.validateFiles();
```

<a name="managing-side-effects"></a>
## Managing Side-Effects

When adding the `HandlePrecognitiveRequests` middleware to a route, you should consider if there are any side-effects in _other_ middleware that should be skipped during a precognitive request.

For example, you may have a middleware that increments the total number of "interactions" each user has with your application, but you may not want precognitive requests to be counted as an interaction. To accomplish this, we may check the request's `isPrecognitive` method before incrementing the interaction count:

```php
<?php

namespace App\Http\Middleware;

use App\Facades\Interaction;
use Closure;
use Illuminate\Http\Request;

class InteractionMiddleware
{
    /**
     * Handle an incoming request.
     */
    public function handle(Request $request, Closure $next): mixed
    {
        if (! $request->isPrecognitive()) {
            Interaction::incrementFor($request->user());
        }

        return $next($request);
    }
}
```

<a name="testing"></a>
## Testing

If you would like to make precognitive requests in your tests, Laravel's `TestCase` includes a `withPrecognition` helper which will add the `Precognition` request header.

Additionally, if you would like to assert that a precognitive request was successful, e.g., did not return any validation errors, you may use the `assertSuccessfulPrecognition` method on the response:

```php tab=Pest
it('validates registration form with precognition', function () {
    $response = $this->withPrecognition()
        ->post('/register', [
            'name' => 'Taylor Otwell',
        ]);

    $response->assertSuccessfulPrecognition();

    expect(User::count())->toBe(0);
});
```

```php tab=PHPUnit
public function test_it_validates_registration_form_with_precognition()
{
    $response = $this->withPrecognition()
        ->post('/register', [
            'name' => 'Taylor Otwell',
        ]);

    $response->assertSuccessfulPrecognition();
    $this->assertSame(0, User::count());
}
```


---

# Processes

*Sección: Laravel | Origen: https://laravel.com/docs/13.x/processes*

- [Introduction](#introduction)
- [Invoking Processes](#invoking-processes)
    - [Process Options](#process-options)
    - [Process Output](#process-output)
    - [Pipelines](#process-pipelines)
- [Asynchronous Processes](#asynchronous-processes)
    - [Process IDs and Signals](#process-ids-and-signals)
    - [Asynchronous Process Output](#asynchronous-process-output)
    - [Asynchronous Process Timeouts](#asynchronous-process-timeouts)
- [Concurrent Processes](#concurrent-processes)
    - [Naming Pool Processes](#naming-pool-processes)
    - [Pool Process IDs and Signals](#pool-process-ids-and-signals)
- [Testing](#testing)
    - [Faking Processes](#faking-processes)
    - [Faking Specific Processes](#faking-specific-processes)
    - [Faking Process Sequences](#faking-process-sequences)
    - [Faking Asynchronous Process Lifecycles](#faking-asynchronous-process-lifecycles)
    - [Available Assertions](#available-assertions)
    - [Preventing Stray Processes](#preventing-stray-processes)

<a name="introduction"></a>
## Introduction

Laravel provides an expressive, minimal API around the [Symfony Process component](https://symfony.com/doc/current/components/process.html), allowing you to conveniently invoke external processes from your Laravel application. Laravel's process features are focused on the most common use cases and a wonderful developer experience.

<a name="invoking-processes"></a>
## Invoking Processes

To invoke a process, you may use the `run` and `start` methods offered by the `Process` facade. The `run` method will invoke a process and wait for the process to finish executing, while the `start` method is used for asynchronous process execution. We'll examine both approaches within this documentation. First, let's examine how to invoke a basic, synchronous process and inspect its result:

```php
use Illuminate\Support\Facades\Process;

$result = Process::run('ls -la');

return $result->output();
```

Of course, the `Illuminate\Contracts\Process\ProcessResult` instance returned by the `run` method offers a variety of helpful methods that may be used to inspect the process result:

```php
$result = Process::run('ls -la');

$result->command();
$result->successful();
$result->failed();
$result->output();
$result->errorOutput();
$result->exitCode();
```

<a name="throwing-exceptions"></a>
#### Throwing Exceptions

If you have a process result and would like to throw an instance of `Illuminate\Process\Exceptions\ProcessFailedException` if the exit code is greater than zero (thus indicating failure), you may use the `throw` and `throwIf` methods. If the process did not fail, the `ProcessResult` instance will be returned:

```php
$result = Process::run('ls -la')->throw();

$result = Process::run('ls -la')->throwIf($condition);
```

<a name="process-options"></a>
### Process Options

Of course, you may need to customize the behavior of a process before invoking it. Thankfully, Laravel allows you to tweak a variety of process features, such as the working directory, timeout, and environment variables.

<a name="working-directory-path"></a>
#### Working Directory Path

You may use the `path` method to specify the working directory of the process. If this method is not invoked, the process will inherit the working directory of the currently executing PHP script:

```php
$result = Process::path(__DIR__)->run('ls -la');
```

<a name="input"></a>
#### Input

You may provide input via the "standard input" of the process using the `input` method:

```php
$result = Process::input('Hello World')->run('cat');
```

<a name="timeouts"></a>
#### Timeouts

By default, processes will throw an instance of `Illuminate\Process\Exceptions\ProcessTimedOutException` after executing for more than 60 seconds. However, you can customize this behavior via the `timeout` method:

```php
$result = Process::timeout(120)->run('bash import.sh');
```

The `timeout` and `idleTimeout` methods also accept `CarbonInterval` instances:

```php
use function Illuminate\Support\minutes;

$result = Process::timeout(minutes(2))->run('bash import.sh');
```

Or, if you would like to disable the process timeout entirely, you may invoke the `forever` method:

```php
$result = Process::forever()->run('bash import.sh');
```

The `idleTimeout` method may be used to specify the maximum number of seconds the process may run without returning any output:

```php
$result = Process::timeout(60)->idleTimeout(30)->run('bash import.sh');
```

<a name="environment-variables"></a>
#### Environment Variables

Environment variables may be provided to the process via the `env` method. The invoked process will also inherit all of the environment variables defined by your system:

```php
$result = Process::forever()
    ->env(['IMPORT_PATH' => __DIR__])
    ->run('bash import.sh');
```

If you wish to remove an inherited environment variable from the invoked process, you may provide that environment variable with a value of `false`:

```php
$result = Process::forever()
    ->env(['LOAD_PATH' => false])
    ->run('bash import.sh');
```

<a name="tty-mode"></a>
#### TTY Mode

The `tty` method may be used to enable TTY mode for your process. TTY mode connects the input and output of the process to the input and output of your program, allowing your process to open an editor like Vim or Nano as a process:

```php
Process::forever()->tty()->run('vim');
```

> [!WARNING]
> TTY mode is not supported on Windows.

<a name="process-output"></a>
### Process Output

As previously discussed, process output may be accessed using the `output` (stdout) and `errorOutput` (stderr) methods on a process result:

```php
use Illuminate\Support\Facades\Process;

$result = Process::run('ls -la');

echo $result->output();
echo $result->errorOutput();
```

However, output may also be gathered in real-time by passing a closure as the second argument to the `run` method. The closure will receive two arguments: the "type" of output (`stdout` or `stderr`) and the output string itself:

```php
$result = Process::run('ls -la', function (string $type, string $output) {
    echo $output;
});
```

Laravel also offers the `seeInOutput` and `seeInErrorOutput` methods, which provide a convenient way to determine if a given string was contained in the process' output:

```php
if (Process::run('ls -la')->seeInOutput('laravel')) {
    // ...
}
```

<a name="disabling-process-output"></a>
#### Disabling Process Output

If your process is writing a significant amount of output that you are not interested in, you can conserve memory by disabling output retrieval entirely. To accomplish this, invoke the `quietly` method while building the process:

```php
use Illuminate\Support\Facades\Process;

$result = Process::quietly()->run('bash import.sh');
```

<a name="process-pipelines"></a>
### Pipelines

Sometimes you may want to make the output of one process the input of another process. This is often referred to as "piping" the output of a process into another. The `pipe` method provided by the `Process` facades makes this easy to accomplish. The `pipe` method will execute the piped processes synchronously and return the process result for the last process in the pipeline:

```php
use Illuminate\Process\Pipe;
use Illuminate\Support\Facades\Process;

$result = Process::pipe(function (Pipe $pipe) {
    $pipe->command('cat example.txt');
    $pipe->command('grep -i "laravel"');
});

if ($result->successful()) {
    // ...
}
```

If you do not need to customize the individual processes that make up the pipeline, you may simply pass an array of command strings to the `pipe` method:

```php
$result = Process::pipe([
    'cat example.txt',
    'grep -i "laravel"',
]);
```

The process output may be gathered in real-time by passing a closure as the second argument to the `pipe` method. The closure will receive two arguments: the "type" of output (`stdout` or `stderr`) and the output string itself:

```php
$result = Process::pipe(function (Pipe $pipe) {
    $pipe->command('cat example.txt');
    $pipe->command('grep -i "laravel"');
}, function (string $type, string $output) {
    echo $output;
});
```

Laravel also allows you to assign string keys to each process within a pipeline via the `as` method. This key will also be passed to the output closure provided to the `pipe` method, allowing you to determine which process the output belongs to:

```php
$result = Process::pipe(function (Pipe $pipe) {
    $pipe->as('first')->command('cat example.txt');
    $pipe->as('second')->command('grep -i "laravel"');
}, function (string $type, string $output, string $key) {
    // ...
});
```

<a name="asynchronous-processes"></a>
## Asynchronous Processes

While the `run` method invokes processes synchronously, the `start` method may be used to invoke a process asynchronously. This allows your application to continue performing other tasks while the process runs in the background. Once the process has been invoked, you may utilize the `running` method to determine if the process is still running:

```php
$process = Process::timeout(120)->start('bash import.sh');

while ($process->running()) {
    // ...
}

$result = $process->wait();
```

As you may have noticed, you may invoke the `wait` method to wait until the process is finished executing and retrieve the `ProcessResult` instance:

```php
$process = Process::timeout(120)->start('bash import.sh');

// ...

$result = $process->wait();
```

<a name="process-ids-and-signals"></a>
### Process IDs and Signals

The `id` method may be used to retrieve the operating system assigned process ID of the running process:

```php
$process = Process::start('bash import.sh');

return $process->id();
```

You may use the `signal` method to send a "signal" to the running process. A list of predefined signal constants can be found within the [PHP documentation](https://www.php.net/manual/en/pcntl.constants.php):

```php
$process->signal(SIGUSR2);
```

<a name="asynchronous-process-output"></a>
### Asynchronous Process Output

While an asynchronous process is running, you may access its entire current output using the `output` and `errorOutput` methods; however, you may utilize the `latestOutput` and `latestErrorOutput` to access the output from the process that has occurred since the output was last retrieved:

```php
$process = Process::timeout(120)->start('bash import.sh');

while ($process->running()) {
    echo $process->latestOutput();
    echo $process->latestErrorOutput();

    sleep(1);
}
```

Like the `run` method, output may also be gathered in real-time from asynchronous processes by passing a closure as the second argument to the `start` method. The closure will receive two arguments: the "type" of output (`stdout` or `stderr`) and the output string itself:

```php
$process = Process::start('bash import.sh', function (string $type, string $output) {
    echo $output;
});

$result = $process->wait();
```

Instead of waiting until the process has finished, you may use the `waitUntil` method to stop waiting based on the output of the process. Laravel will stop waiting for the process to finish when the closure given to the `waitUntil` method returns `true`:

```php
$process = Process::start('bash import.sh');

$process->waitUntil(function (string $type, string $output) {
    return $output === 'Ready...';
});
```

<a name="asynchronous-process-timeouts"></a>
### Asynchronous Process Timeouts

While an asynchronous process is running, you may verify that the process has not timed out using the `ensureNotTimedOut` method. This method will throw a [timeout exception](#timeouts) if the process has timed out:

```php
$process = Process::timeout(120)->start('bash import.sh');

while ($process->running()) {
    $process->ensureNotTimedOut();

    // ...

    sleep(1);
}
```

<a name="concurrent-processes"></a>
## Concurrent Processes

Laravel also makes it a breeze to manage a pool of concurrent, asynchronous processes, allowing you to easily execute many tasks simultaneously. To get started, invoke the `pool` method, which accepts a closure that receives an instance of `Illuminate\Process\Pool`.

Within this closure, you may define the processes that belong to the pool. Once a process pool is started via the `start` method, you may access the [collection](/docs/{{version}}/collections) of running processes via the `running` method:

```php
use Illuminate\Process\Pool;
use Illuminate\Support\Facades\Process;

$pool = Process::pool(function (Pool $pool) {
    $pool->path(__DIR__)->command('bash import-1.sh');
    $pool->path(__DIR__)->command('bash import-2.sh');
    $pool->path(__DIR__)->command('bash import-3.sh');
})->start(function (string $type, string $output, int $key) {
    // ...
});

while ($pool->running()->isNotEmpty()) {
    // ...
}

$results = $pool->wait();
```

As you can see, you may wait for all of the pool processes to finish executing and resolve their results via the `wait` method. The `wait` method returns an array accessible object that allows you to access the `ProcessResult` instance of each process in the pool by its key:

```php
$results = $pool->wait();

echo $results[0]->output();
```

Or, for convenience, the `concurrently` method may be used to start an asynchronous process pool and immediately wait on its results. This can provide particularly expressive syntax when combined with PHP's array destructuring capabilities:

```php
[$first, $second, $third] = Process::concurrently(function (Pool $pool) {
    $pool->path(__DIR__)->command('ls -la');
    $pool->path(app_path())->command('ls -la');
    $pool->path(storage_path())->command('ls -la');
});

echo $first->output();
```

<a name="naming-pool-processes"></a>
### Naming Pool Processes

Accessing process pool results via a numeric key is not very expressive; therefore, Laravel allows you to assign string keys to each process within a pool via the `as` method. This key will also be passed to the closure provided to the `start` method, allowing you to determine which process the output belongs to:

```php
$pool = Process::pool(function (Pool $pool) {
    $pool->as('first')->command('bash import-1.sh');
    $pool->as('second')->command('bash import-2.sh');
    $pool->as('third')->command('bash import-3.sh');
})->start(function (string $type, string $output, string $key) {
    // ...
});

$results = $pool->wait();

return $results['first']->output();
```

<a name="pool-process-ids-and-signals"></a>
### Pool Process IDs and Signals

Since the process pool's `running` method provides a collection of all invoked processes within the pool, you may easily access the underlying pool process IDs:

```php
$processIds = $pool->running()->each->id();
```

And, for convenience, you may invoke the `signal` method on a process pool to send a signal to every process within the pool:

```php
$pool->signal(SIGUSR2);
```

<a name="testing"></a>
## Testing

Many Laravel services provide functionality to help you easily and expressively write tests, and Laravel's process service is no exception. The `Process` facade's `fake` method allows you to instruct Laravel to return stubbed / dummy results when processes are invoked.

<a name="faking-processes"></a>
### Faking Processes

To explore Laravel's ability to fake processes, let's imagine a route that invokes a process:

```php
use Illuminate\Support\Facades\Process;
use Illuminate\Support\Facades\Route;

Route::get('/import', function () {
    Process::run('bash import.sh');

    return 'Import complete!';
});
```

When testing this route, we can instruct Laravel to return a fake, successful process result for every invoked process by calling the `fake` method on the `Process` facade with no arguments. In addition, we can even [assert](#available-assertions) that a given process was "run":

```php tab=Pest
<?php

use Illuminate\Contracts\Process\ProcessResult;
use Illuminate\Process\PendingProcess;
use Illuminate\Support\Facades\Process;

test('process is invoked', function () {
    Process::fake();

    $response = $this->get('/import');

    // Simple process assertion...
    Process::assertRan('bash import.sh');

    // Or, inspecting the process configuration...
    Process::assertRan(function (PendingProcess $process, ProcessResult $result) {
        return $process->command === 'bash import.sh' &&
               $process->timeout === 60;
    });
});
```

```php tab=PHPUnit
<?php

namespace Tests\Feature;

use Illuminate\Contracts\Process\ProcessResult;
use Illuminate\Process\PendingProcess;
use Illuminate\Support\Facades\Process;
use Tests\TestCase;

class ExampleTest extends TestCase
{
    public function test_process_is_invoked(): void
    {
        Process::fake();

        $response = $this->get('/import');

        // Simple process assertion...
        Process::assertRan('bash import.sh');

        // Or, inspecting the process configuration...
        Process::assertRan(function (PendingProcess $process, ProcessResult $result) {
            return $process->command === 'bash import.sh' &&
                   $process->timeout === 60;
        });
    }
}
```

As discussed, invoking the `fake` method on the `Process` facade will instruct Laravel to always return a successful process result with no output. However, you may easily specify the output and exit code for faked processes using the `Process` facade's `result` method:

```php
Process::fake([
    '*' => Process::result(
        output: 'Test output',
        errorOutput: 'Test error output',
        exitCode: 1,
    ),
]);
```

<a name="faking-specific-processes"></a>
### Faking Specific Processes

As you may have noticed in a previous example, the `Process` facade allows you to specify different fake results per process by passing an array to the `fake` method.

The array's keys should represent command patterns that you wish to fake and their associated results. The `*` character may be used as a wildcard character. Any process commands that have not been faked will actually be invoked. You may use the `Process` facade's `result` method to construct stub / fake results for these commands:

```php
Process::fake([
    'cat *' => Process::result(
        output: 'Test "cat" output',
    ),
    'ls *' => Process::result(
        output: 'Test "ls" output',
    ),
]);
```

If you do not need to customize the exit code or error output of a faked process, you may find it more convenient to specify the fake process results as simple strings:

```php
Process::fake([
    'cat *' => 'Test "cat" output',
    'ls *' => 'Test "ls" output',
]);
```

<a name="faking-process-sequences"></a>
### Faking Process Sequences

If the code you are testing invokes multiple processes with the same command, you may wish to assign a different fake process result to each process invocation. You may accomplish this via the `Process` facade's `sequence` method:

```php
Process::fake([
    'ls *' => Process::sequence()
        ->push(Process::result('First invocation'))
        ->push(Process::result('Second invocation')),
]);
```

<a name="faking-asynchronous-process-lifecycles"></a>
### Faking Asynchronous Process Lifecycles

Thus far, we have primarily discussed faking processes which are invoked synchronously using the `run` method. However, if you are attempting to test code that interacts with asynchronous processes invoked via `start`, you may need a more sophisticated approach to describing your fake processes.

For example, let's imagine the following route which interacts with an asynchronous process:

```php
use Illuminate\Support\Facades\Log;
use Illuminate\Support\Facades\Route;

Route::get('/import', function () {
    $process = Process::start('bash import.sh');

    while ($process->running()) {
        Log::info($process->latestOutput());
        Log::info($process->latestErrorOutput());
    }

    return 'Done';
});
```

To properly fake this process, we need to be able to describe how many times the `running` method should return `true`. In addition, we may want to specify multiple lines of output that should be returned in sequence. To accomplish this, we can use the `Process` facade's `describe` method:

```php
Process::fake([
    'bash import.sh' => Process::describe()
        ->output('First line of standard output')
        ->errorOutput('First line of error output')
        ->output('Second line of standard output')
        ->exitCode(0)
        ->iterations(3),
]);
```

Let's dig into the example above. Using the `output` and `errorOutput` methods, we may specify multiple lines of output that will be returned in sequence. The `exitCode` method may be used to specify the final exit code of the fake process. Finally, the `iterations` method may be used to specify how many times the `running` method should return `true`.

<a name="available-assertions"></a>
### Available Assertions

As [previously discussed](#faking-processes), Laravel provides several process assertions for your feature tests. We'll discuss each of these assertions below.

<a name="assert-process-ran"></a>
#### assertRan

Assert that a given process was invoked:

```php
use Illuminate\Support\Facades\Process;

Process::assertRan('ls -la');
```

When the process was invoked with an array of arguments, you may pass the same array to the assertion:

```php
Process::assertRan(['php', 'artisan', 'migrate']);
```

The `assertRanTimes` and `assertDidntRun` methods also accept array commands.

The `assertRan` method also accepts a closure, which will receive an instance of a process and a process result, allowing you to inspect the process' configured options. If this closure returns `true`, the assertion will "pass":

```php
Process::assertRan(fn ($process, $result) =>
    $process->command === 'ls -la' &&
    $process->path === __DIR__ &&
    $process->timeout === 60
);
```

The `$process` passed to the `assertRan` closure is an instance of `Illuminate\Process\PendingProcess`, while the `$result` is an instance of `Illuminate\Contracts\Process\ProcessResult`.

<a name="assert-process-didnt-run"></a>
#### assertDidntRun

Assert that a given process was not invoked:

```php
use Illuminate\Support\Facades\Process;

Process::assertDidntRun('ls -la');
```

Like the `assertRan` method, the `assertDidntRun` method also accepts a closure, which will receive an instance of a process and a process result, allowing you to inspect the process' configured options. If this closure returns `true`, the assertion will "fail":

```php
Process::assertDidntRun(fn (PendingProcess $process, ProcessResult $result) =>
    $process->command === 'ls -la'
);
```

<a name="assert-process-ran-times"></a>
#### assertRanTimes

Assert that a given process was invoked a given number of times:

```php
use Illuminate\Support\Facades\Process;

Process::assertRanTimes('ls -la', times: 3);
```

The `assertRanTimes` method also accepts a closure, which will receive an instance of `PendingProcess` and `ProcessResult`, allowing you to inspect the process' configured options. If this closure returns `true` and the process was invoked the specified number of times, the assertion will "pass":

```php
Process::assertRanTimes(function (PendingProcess $process, ProcessResult $result) {
    return $process->command === 'ls -la';
}, times: 3);
```

<a name="assert-processes-ran-in-order"></a>
#### assertRanInOrder

Assert that processes were invoked in a given order:

```php
Process::assertRanInOrder([
    'git fetch',
    'composer install',
]);
```

The `assertRanInOrder` method accepts command strings, arrays of command arguments, or closures like the other process assertions.

<a name="preventing-stray-processes"></a>
### Preventing Stray Processes

If you would like to ensure that all invoked processes have been faked throughout your individual test or complete test suite, you can call the `preventStrayProcesses` method. After calling this method, any processes that do not have a corresponding fake result will throw an exception rather than starting an actual process:

```php
use Illuminate\Support\Facades\Process;

Process::preventStrayProcesses();

Process::fake([
    'ls *' => 'Test output...',
]);

// Fake response is returned...
Process::run('ls -la');

// An exception is thrown...
Process::run('bash import.sh');
```


---

# Prompts

*Sección: Laravel | Origen: https://laravel.com/docs/13.x/prompts*

- [Introduction](#introduction)
- [Installation](#installation)
- [Available Prompts](#available-prompts)
    - [Text](#text)
    - [Textarea](#textarea)
    - [Number](#number)
    - [Password](#password)
    - [Confirm](#confirm)
    - [Select](#select)
    - [Multi-select](#multiselect)
    - [Suggest](#suggest)
    - [Search](#search)
    - [Multi-search](#multisearch)
    - [Pause](#pause)
    - [Autocomplete](#autocomplete)
- [Transforming Input Before Validation](#transforming-input-before-validation)
- [Forms](#forms)
- [Informational Messages](#informational-messages)
- [Callouts](#callouts)
- [Tables](#tables)
- [Spin](#spin)
- [Progress Bar](#progress)
- [Task](#task)
- [Stream](#stream)
- [Terminal Title](#terminal-title)
- [Clearing the Terminal](#clear)
- [Terminal Considerations](#terminal-considerations)
- [Unsupported Environments and Fallbacks](#fallbacks)
- [Testing](#testing)

<a name="introduction"></a>
## Introduction

[Laravel Prompts](https://github.com/laravel/prompts) is a PHP package for adding beautiful and user-friendly forms to your command-line applications, with browser-like features including placeholder text and validation.

<img src="https://laravel.com/img/docs/prompts-example.png">

Laravel Prompts is perfect for accepting user input in your [Artisan console commands](/docs/{{version}}/artisan#writing-commands), but it may also be used in any command-line PHP project.

> [!NOTE]
> Laravel Prompts supports macOS, Linux, and Windows with WSL. For more information, please see our documentation on [unsupported environments & fallbacks](#fallbacks).

<a name="installation"></a>
## Installation

Laravel Prompts is already included with the latest release of Laravel.

Laravel Prompts may also be installed in your other PHP projects by using the Composer package manager:

```shell
composer require laravel/prompts
```

<a name="available-prompts"></a>
## Available Prompts

<a name="text"></a>
### Text

The `text` function will prompt the user with the given question, accept their input, and then return it:

```php
use function Laravel\Prompts\text;

$name = text('What is your name?');
```

You may also include placeholder text, a default value, and an informational hint:

```php
$name = text(
    label: 'What is your name?',
    placeholder: 'E.g. Taylor Otwell',
    default: $user?->name,
    hint: 'This will be displayed on your profile.'
);
```

<a name="text-required"></a>
#### Required Values

If you require a value to be entered, you may pass the `required` argument:

```php
$name = text(
    label: 'What is your name?',
    required: true
);
```

If you would like to customize the validation message, you may also pass a string:

```php
$name = text(
    label: 'What is your name?',
    required: 'Your name is required.'
);
```

<a name="text-validation"></a>
#### Additional Validation

Finally, if you would like to perform additional validation logic, you may pass a closure to the `validate` argument:

```php
$name = text(
    label: 'What is your name?',
    validate: fn (string $value) => match (true) {
        strlen($value) < 3 => 'The name must be at least 3 characters.',
        strlen($value) > 255 => 'The name must not exceed 255 characters.',
        default => null
    }
);
```

The closure will receive the value that has been entered and may return an error message, or `null` if the validation passes.

Alternatively, you may leverage the power of Laravel's [validator](/docs/{{version}}/validation). To do so, provide an array containing the name of the attribute and the desired validation rules to the `validate` argument:

```php
$name = text(
    label: 'What is your name?',
    validate: ['name' => 'required|max:255|unique:users']
);
```

<a name="textarea"></a>
### Textarea

The `textarea` function will prompt the user with the given question, accept their input via a multi-line textarea, and then return it:

```php
use function Laravel\Prompts\textarea;

$story = textarea('Tell me a story.');
```

You may also include placeholder text, a default value, and an informational hint:

```php
$story = textarea(
    label: 'Tell me a story.',
    placeholder: 'This is a story about...',
    hint: 'This will be displayed on your profile.'
);
```

<a name="textarea-required"></a>
#### Required Values

If you require a value to be entered, you may pass the `required` argument:

```php
$story = textarea(
    label: 'Tell me a story.',
    required: true
);
```

If you would like to customize the validation message, you may also pass a string:

```php
$story = textarea(
    label: 'Tell me a story.',
    required: 'A story is required.'
);
```

<a name="textarea-validation"></a>
#### Additional Validation

Finally, if you would like to perform additional validation logic, you may pass a closure to the `validate` argument:

```php
$story = textarea(
    label: 'Tell me a story.',
    validate: fn (string $value) => match (true) {
        strlen($value) < 250 => 'The story must be at least 250 characters.',
        strlen($value) > 10000 => 'The story must not exceed 10,000 characters.',
        default => null
    }
);
```

The closure will receive the value that has been entered and may return an error message, or `null` if the validation passes.

Alternatively, you may leverage the power of Laravel's [validator](/docs/{{version}}/validation). To do so, provide an array containing the name of the attribute and the desired validation rules to the `validate` argument:

```php
$story = textarea(
    label: 'Tell me a story.',
    validate: ['story' => 'required|max:10000']
);
```

<a name="number"></a>
### Number

The `number` function will prompt the user with the given question, accept their numeric input, and then return it. The `number` function allows the user to use the up and down arrow keys to manipulate the number:

```php
use function Laravel\Prompts\number;

$number = number('How many copies would you like?');
```

You may also include placeholder text, a default value, and an informational hint:

```php
$name = number(
    label: 'How many copies would you like?',
    placeholder: '5',
    default: 1,
    hint: 'This will be determine how many copies to create.'
);
```

<a name="number-required"></a>
#### Required Values

If you require a value to be entered, you may pass the `required` argument:

```php
$copies = number(
    label: 'How many copies would you like?',
    required: true
);
```

If you would like to customize the validation message, you may also pass a string:

```php
$copies = number(
    label: 'How many copies would you like?',
    required: 'A number of copies is required.'
);
```

<a name="number-validation"></a>
#### Additional Validation

Finally, if you would like to perform additional validation logic, you may pass a closure to the `validate` argument:

```php
$copies = number(
    label: 'How many copies would you like?',
    validate: fn (?int $value) => match (true) {
        $value < 1 => 'At least one copy is required.',
        $value > 100 => 'You may not create more than 100 copies.',
        default => null
    }
);
```

The closure will receive the value that has been entered and may return an error message, or `null` if the validation passes.

Alternatively, you may leverage the power of Laravel's [validator](/docs/{{version}}/validation). To do so, provide an array containing the name of the attribute and the desired validation rules to the `validate` argument:

```php
$copies = number(
    label: 'How many copies would you like?',
    validate: ['copies' => 'required|integer|min:1|max:100']
);
```

<a name="password"></a>
### Password

The `password` function is similar to the `text` function, but the user's input will be masked as they type in the console. This is useful when asking for sensitive information such as passwords:

```php
use function Laravel\Prompts\password;

$password = password('What is your password?');
```

You may also include placeholder text and an informational hint:

```php
$password = password(
    label: 'What is your password?',
    placeholder: 'password',
    hint: 'Minimum 8 characters.'
);
```

<a name="password-required"></a>
#### Required Values

If you require a value to be entered, you may pass the `required` argument:

```php
$password = password(
    label: 'What is your password?',
    required: true
);
```

If you would like to customize the validation message, you may also pass a string:

```php
$password = password(
    label: 'What is your password?',
    required: 'The password is required.'
);
```

<a name="password-validation"></a>
#### Additional Validation

Finally, if you would like to perform additional validation logic, you may pass a closure to the `validate` argument:

```php
$password = password(
    label: 'What is your password?',
    validate: fn (string $value) => match (true) {
        strlen($value) < 8 => 'The password must be at least 8 characters.',
        default => null
    }
);
```

The closure will receive the value that has been entered and may return an error message, or `null` if the validation passes.

Alternatively, you may leverage the power of Laravel's [validator](/docs/{{version}}/validation). To do so, provide an array containing the name of the attribute and the desired validation rules to the `validate` argument:

```php
$password = password(
    label: 'What is your password?',
    validate: ['password' => 'min:8']
);
```

<a name="confirm"></a>
### Confirm

If you need to ask the user for a "yes or no" confirmation, you may use the `confirm` function. Users may use the arrow keys or press `y` or `n` to select their response. This function will return either `true` or `false`.

```php
use function Laravel\Prompts\confirm;

$confirmed = confirm('Do you accept the terms?');
```

You may also include a default value, customized wording for the "Yes" and "No" labels, and an informational hint:

```php
$confirmed = confirm(
    label: 'Do you accept the terms?',
    default: false,
    yes: 'I accept',
    no: 'I decline',
    hint: 'The terms must be accepted to continue.'
);
```

<a name="confirm-required"></a>
#### Requiring "Yes"

If necessary, you may require your users to select "Yes" by passing the `required` argument:

```php
$confirmed = confirm(
    label: 'Do you accept the terms?',
    required: true
);
```

If you would like to customize the validation message, you may also pass a string:

```php
$confirmed = confirm(
    label: 'Do you accept the terms?',
    required: 'You must accept the terms to continue.'
);
```

<a name="select"></a>
### Select

If you need the user to select from a predefined set of choices, you may use the `select` function:

```php
use function Laravel\Prompts\select;

$role = select(
    label: 'What role should the user have?',
    options: ['Member', 'Contributor', 'Owner']
);
```

You may also specify the default choice and an informational hint:

```php
$role = select(
    label: 'What role should the user have?',
    options: ['Member', 'Contributor', 'Owner'],
    default: 'Owner',
    hint: 'The role may be changed at any time.'
);
```

You may also pass an associative array to the `options` argument to have the selected key returned instead of its value:

```php
$role = select(
    label: 'What role should the user have?',
    options: [
        'member' => 'Member',
        'contributor' => 'Contributor',
        'owner' => 'Owner',
    ],
    default: 'owner'
);
```

Up to five options will be displayed before the list begins to scroll. You may customize this by passing the `scroll` argument:

```php
$role = select(
    label: 'Which category would you like to assign?',
    options: Category::pluck('name', 'id'),
    scroll: 10
);
```

<a name="select-info"></a>
#### Secondary Information

The `info` argument may be used to display additional information about the currently highlighted option. When a closure is provided, it will receive the value of the currently highlighted option and should return a string or `null`:

```php
$role = select(
    label: 'What role should the user have?',
    options: [
        'member' => 'Member',
        'contributor' => 'Contributor',
        'owner' => 'Owner',
    ],
    info: fn (string $value) => match ($value) {
        'member' => 'Can view and comment.',
        'contributor' => 'Can view, comment, and edit.',
        'owner' => 'Full access to all resources.',
        default => null,
    }
);
```

You may also pass a static string to the `info` argument if the information does not depend on the highlighted option:

```php
$role = select(
    label: 'What role should the user have?',
    options: ['Member', 'Contributor', 'Owner'],
    info: 'The role may be changed at any time.'
);
```

<a name="select-validation"></a>
#### Additional Validation

Unlike other prompt functions, the `select` function doesn't accept the `required` argument because it is not possible to select nothing. However, you may pass a closure to the `validate` argument if you need to present an option but prevent it from being selected:

```php
$role = select(
    label: 'What role should the user have?',
    options: [
        'member' => 'Member',
        'contributor' => 'Contributor',
        'owner' => 'Owner',
    ],
    validate: fn (string $value) =>
        $value === 'owner' && User::where('role', 'owner')->exists()
            ? 'An owner already exists.'
            : null
);
```

If the `options` argument is an associative array, then the closure will receive the selected key, otherwise it will receive the selected value. The closure may return an error message, or `null` if the validation passes.

<a name="multiselect"></a>
### Multi-select

If you need the user to be able to select multiple options, you may use the `multiselect` function:

```php
use function Laravel\Prompts\multiselect;

$permissions = multiselect(
    label: 'What permissions should be assigned?',
    options: ['Read', 'Create', 'Update', 'Delete']
);
```

You may also specify default choices and an informational hint:

```php
use function Laravel\Prompts\multiselect;

$permissions = multiselect(
    label: 'What permissions should be assigned?',
    options: ['Read', 'Create', 'Update', 'Delete'],
    default: ['Read', 'Create'],
    hint: 'Permissions may be updated at any time.'
);
```

You may also pass an associative array to the `options` argument to return the selected options' keys instead of their values:

```php
$permissions = multiselect(
    label: 'What permissions should be assigned?',
    options: [
        'read' => 'Read',
        'create' => 'Create',
        'update' => 'Update',
        'delete' => 'Delete',
    ],
    default: ['read', 'create']
);
```

Up to five options will be displayed before the list begins to scroll. You may customize this by passing the `scroll` argument:

```php
$categories = multiselect(
    label: 'What categories should be assigned?',
    options: Category::pluck('name', 'id'),
    scroll: 10
);
```

<a name="multiselect-info"></a>
#### Secondary Information

The `info` argument may be used to display additional information about the currently highlighted option. When a closure is provided, it will receive the value of the currently highlighted option and should return a string or `null`:

```php
$permissions = multiselect(
    label: 'What permissions should be assigned?',
    options: [
        'read' => 'Read',
        'create' => 'Create',
        'update' => 'Update',
        'delete' => 'Delete',
    ],
    info: fn (string $value) => match ($value) {
        'read' => 'View resources and their properties.',
        'create' => 'Create new resources.',
        'update' => 'Modify existing resources.',
        'delete' => 'Permanently remove resources.',
        default => null,
    }
);
```

<a name="multiselect-required"></a>
#### Requiring a Value

By default, the user may select zero or more options. You may pass the `required` argument to enforce one or more options instead:

```php
$categories = multiselect(
    label: 'What categories should be assigned?',
    options: Category::pluck('name', 'id'),
    required: true
);
```

If you would like to customize the validation message, you may provide a string to the `required` argument:

```php
$categories = multiselect(
    label: 'What categories should be assigned?',
    options: Category::pluck('name', 'id'),
    required: 'You must select at least one category'
);
```

<a name="multiselect-validation"></a>
#### Additional Validation

You may pass a closure to the `validate` argument if you need to present an option but prevent it from being selected:

```php
$permissions = multiselect(
    label: 'What permissions should the user have?',
    options: [
        'read' => 'Read',
        'create' => 'Create',
        'update' => 'Update',
        'delete' => 'Delete',
    ],
    validate: fn (array $values) => ! in_array('read', $values)
        ? 'All users require the read permission.'
        : null
);
```

If the `options` argument is an associative array then the closure will receive the selected keys, otherwise it will receive the selected values. The closure may return an error message, or `null` if the validation passes.

<a name="suggest"></a>
### Suggest

The `suggest` function can be used to provide auto-completion for possible choices. The user can still provide any answer, regardless of the auto-completion hints:

```php
use function Laravel\Prompts\suggest;

$name = suggest('What is your name?', ['Taylor', 'Dayle']);
```

Alternatively, you may pass a closure as the second argument to the `suggest` function. The closure will be called each time the user types an input character. The closure should accept a string parameter containing the user's input so far and return an array of options for auto-completion:

```php
$name = suggest(
    label: 'What is your name?',
    options: fn ($value) => collect(['Taylor', 'Dayle'])
        ->filter(fn ($name) => Str::contains($name, $value, ignoreCase: true))
)
```

You may also include placeholder text, a default value, and an informational hint:

```php
$name = suggest(
    label: 'What is your name?',
    options: ['Taylor', 'Dayle'],
    placeholder: 'E.g. Taylor',
    default: $user?->name,
    hint: 'This will be displayed on your profile.'
);
```

<a name="suggest-info"></a>
#### Secondary Information

The `info` argument may be used to display additional information about the currently highlighted option. When a closure is provided, it will receive the value of the currently highlighted option and should return a string or `null`:

```php
$name = suggest(
    label: 'What is your name?',
    options: ['Taylor', 'Dayle'],
    info: fn (string $value) => match ($value) {
        'Taylor' => 'Administrator',
        'Dayle' => 'Contributor',
        default => null,
    }
);
```

<a name="suggest-required"></a>
#### Required Values

If you require a value to be entered, you may pass the `required` argument:

```php
$name = suggest(
    label: 'What is your name?',
    options: ['Taylor', 'Dayle'],
    required: true
);
```

If you would like to customize the validation message, you may also pass a string:

```php
$name = suggest(
    label: 'What is your name?',
    options: ['Taylor', 'Dayle'],
    required: 'Your name is required.'
);
```

<a name="suggest-validation"></a>
#### Additional Validation

Finally, if you would like to perform additional validation logic, you may pass a closure to the `validate` argument:

```php
$name = suggest(
    label: 'What is your name?',
    options: ['Taylor', 'Dayle'],
    validate: fn (string $value) => match (true) {
        strlen($value) < 3 => 'The name must be at least 3 characters.',
        strlen($value) > 255 => 'The name must not exceed 255 characters.',
        default => null
    }
);
```

The closure will receive the value that has been entered and may return an error message, or `null` if the validation passes.

Alternatively, you may leverage the power of Laravel's [validator](/docs/{{version}}/validation). To do so, provide an array containing the name of the attribute and the desired validation rules to the `validate` argument:

```php
$name = suggest(
    label: 'What is your name?',
    options: ['Taylor', 'Dayle'],
    validate: ['name' => 'required|min:3|max:255']
);
```

<a name="search"></a>
### Search

If you have a lot of options for the user to select from, the `search` function allows the user to type a search query to filter the results before using the arrow keys to select an option:

```php
use function Laravel\Prompts\search;

$id = search(
    label: 'Search for the user that should receive the mail',
    options: fn (string $value) => strlen($value) > 0
        ? User::whereLike('name', "%{$value}%")->pluck('name', 'id')->all()
        : []
);
```

The closure will receive the text that has been typed by the user so far and must return an array of options. If you return an associative array then the selected option's key will be returned, otherwise its value will be returned instead.

When filtering an array where you intend to return the value, you should use the `array_values` function or the `values` Collection method to ensure the array doesn't become associative:

```php
$names = collect(['Taylor', 'Abigail']);

$selected = search(
    label: 'Search for the user that should receive the mail',
    options: fn (string $value) => $names
        ->filter(fn ($name) => Str::contains($name, $value, ignoreCase: true))
        ->values()
        ->all(),
);
```

You may also include placeholder text and an informational hint:

```php
$id = search(
    label: 'Search for the user that should receive the mail',
    placeholder: 'E.g. Taylor Otwell',
    options: fn (string $value) => strlen($value) > 0
        ? User::whereLike('name', "%{$value}%")->pluck('name', 'id')->all()
        : [],
    hint: 'The user will receive an email immediately.'
);
```

Up to five options will be displayed before the list begins to scroll. You may customize this by passing the `scroll` argument:

```php
$id = search(
    label: 'Search for the user that should receive the mail',
    options: fn (string $value) => strlen($value) > 0
        ? User::whereLike('name', "%{$value}%")->pluck('name', 'id')->all()
        : [],
    scroll: 10
);
```

<a name="search-info"></a>
#### Secondary Information

The `info` argument may be used to display additional information about the currently highlighted option. When a closure is provided, it will receive the value of the currently highlighted option and should return a string or `null`:

```php
$id = search(
    label: 'Search for the user that should receive the mail',
    options: fn (string $value) => strlen($value) > 0
        ? User::whereLike('name', "%{$value}%")->pluck('name', 'id')->all()
        : [],
    info: fn (int $userId) => User::find($userId)?->email
);
```

<a name="search-validation"></a>
#### Additional Validation

If you would like to perform additional validation logic, you may pass a closure to the `validate` argument:

```php
$id = search(
    label: 'Search for the user that should receive the mail',
    options: fn (string $value) => strlen($value) > 0
        ? User::whereLike('name', "%{$value}%")->pluck('name', 'id')->all()
        : [],
    validate: function (int|string $value) {
        $user = User::findOrFail($value);

        if ($user->opted_out) {
            return 'This user has opted-out of receiving mail.';
        }
    }
);
```

If the `options` closure returns an associative array, then the closure will receive the selected key, otherwise, it will receive the selected value. The closure may return an error message, or `null` if the validation passes.

<a name="multisearch"></a>
### Multi-search

If you have a lot of searchable options and need the user to be able to select multiple items, the `multisearch` function allows the user to type a search query to filter the results before using the arrow keys and space-bar to select options:

```php
use function Laravel\Prompts\multisearch;

$ids = multisearch(
    'Search for users who should receive the mail',
    fn (string $value) => strlen($value) > 0
        ? User::whereLike('name', "%{$value}%")->pluck('name', 'id')->all()
        : []
);
```

The closure will receive the text that has been typed by the user so far and must return an array of options. If you return an associative array then the selected options' keys will be returned; otherwise, their values will be returned instead.

When filtering an array where you intend to return the value, you should use the `array_values` function or the `values` Collection method to ensure the array doesn't become associative:

```php
$names = collect(['Taylor', 'Abigail']);

$selected = multisearch(
    label: 'Search for users who should receive the mail',
    options: fn (string $value) => $names
        ->filter(fn ($name) => Str::contains($name, $value, ignoreCase: true))
        ->values()
        ->all(),
);
```

You may also include placeholder text and an informational hint:

```php
$ids = multisearch(
    label: 'Search for users who should receive the mail',
    placeholder: 'E.g. Taylor Otwell',
    options: fn (string $value) => strlen($value) > 0
        ? User::whereLike('name', "%{$value}%")->pluck('name', 'id')->all()
        : [],
    hint: 'The user will receive an email immediately.'
);
```

Up to five options will be displayed before the list begins to scroll. You may customize this by providing the `scroll` argument:

```php
$ids = multisearch(
    label: 'Search for the users that should receive the mail',
    options: fn (string $value) => strlen($value) > 0
        ? User::whereLike('name', "%{$value}%")->pluck('name', 'id')->all()
        : [],
    scroll: 10
);
```

<a name="multisearch-info"></a>
#### Secondary Information

The `info` argument may be used to display additional information about the currently highlighted option. When a closure is provided, it will receive the value of the currently highlighted option and should return a string or `null`:

```php
$ids = multisearch(
    label: 'Search for the users that should receive the mail',
    options: fn (string $value) => strlen($value) > 0
        ? User::whereLike('name', "%{$value}%")->pluck('name', 'id')->all()
        : [],
    info: fn (int $userId) => User::find($userId)?->email
);
```

<a name="multisearch-required"></a>
#### Requiring a Value

By default, the user may select zero or more options. You may pass the `required` argument to enforce one or more options instead:

```php
$ids = multisearch(
    label: 'Search for the users that should receive the mail',
    options: fn (string $value) => strlen($value) > 0
        ? User::whereLike('name', "%{$value}%")->pluck('name', 'id')->all()
        : [],
    required: true
);
```

If you would like to customize the validation message, you may also provide a string to the `required` argument:

```php
$ids = multisearch(
    label: 'Search for the users that should receive the mail',
    options: fn (string $value) => strlen($value) > 0
        ? User::whereLike('name', "%{$value}%")->pluck('name', 'id')->all()
        : [],
    required: 'You must select at least one user.'
);
```

<a name="multisearch-validation"></a>
#### Additional Validation

If you would like to perform additional validation logic, you may pass a closure to the `validate` argument:

```php
$ids = multisearch(
    label: 'Search for the users that should receive the mail',
    options: fn (string $value) => strlen($value) > 0
        ? User::whereLike('name', "%{$value}%")->pluck('name', 'id')->all()
        : [],
    validate: function (array $values) {
        $optedOut = User::whereLike('name', '%a%')->findMany($values);

        if ($optedOut->isNotEmpty()) {
            return $optedOut->pluck('name')->join(', ', ', and ').' have opted out.';
        }
    }
);
```

If the `options` closure returns an associative array, then the closure will receive the selected keys; otherwise, it will receive the selected values. The closure may return an error message, or `null` if the validation passes.

<a name="pause"></a>
### Pause

The `pause` function may be used to display informational text to the user and wait for them to confirm their desire to proceed by pressing the Enter / Return key:

```php
use function Laravel\Prompts\pause;

pause('Press ENTER to continue.');
```

<a name="autocomplete"></a>
### Autocomplete

The `autocomplete` function can be used to provide inline auto-completion for possible choices. As the user types, suggestions that match their input will appear as ghost text that can be accepted by pressing `Tab` or the right arrow key:

```php
use function Laravel\Prompts\autocomplete;

$name = autocomplete(
    label: 'What is your name?',
    options: ['Taylor', 'Dayle', 'Jess', 'Nuno', 'Tim']
);
```

You may also include placeholder text, a default value, and an informational hint:

```php
$name = autocomplete(
    label: 'What is your name?',
    options: ['Taylor', 'Dayle', 'Jess', 'Nuno', 'Tim'],
    placeholder: 'E.g. Taylor',
    default: $user?->name,
    hint: 'Use tab to accept, up/down to cycle.'
);
```

<a name="autocomplete-closure"></a>
#### Dynamic Options

You may also pass a closure to dynamically generate options based on the user's input. The closure will be called each time the user types a character and should return an array of options for auto-completion:

```php
$file = autocomplete(
    label: 'Which file?',
    options: fn (string $value) => collect($files)
        ->filter(fn ($file) => str_starts_with(strtolower($file), strtolower($value)))
        ->values()
        ->all(),
);
```

<a name="autocomplete-required"></a>
#### Required Values

If you require a value to be entered, you may pass the `required` argument:

```php
$name = autocomplete(
    label: 'What is your name?',
    options: ['Taylor', 'Dayle', 'Jess', 'Nuno', 'Tim'],
    required: true
);
```

If you would like to customize the validation message, you may also pass a string:

```php
$name = autocomplete(
    label: 'What is your name?',
    options: ['Taylor', 'Dayle', 'Jess', 'Nuno', 'Tim'],
    required: 'Your name is required.'
);
```

<a name="autocomplete-validation"></a>
#### Additional Validation

Finally, if you would like to perform additional validation logic, you may pass a closure to the `validate` argument:

```php
$name = autocomplete(
    label: 'What is your name?',
    options: ['Taylor', 'Dayle', 'Jess', 'Nuno', 'Tim'],
    validate: fn (string $value) => match (true) {
        strlen($value) < 3 => 'The name must be at least 3 characters.',
        strlen($value) > 255 => 'The name must not exceed 255 characters.',
        default => null
    }
);
```

The closure will receive the value that has been entered and may return an error message, or `null` if the validation passes.

<a name="transforming-input-before-validation"></a>
## Transforming Input Before Validation

Sometimes you may want to transform the prompt input before validation takes place. For example, you may wish to remove white space from any provided strings. To accomplish this, many of the prompt functions provide a `transform` argument, which accepts a closure:

```php
$name = text(
    label: 'What is your name?',
    transform: fn (string $value) => trim($value),
    validate: fn (string $value) => match (true) {
        strlen($value) < 3 => 'The name must be at least 3 characters.',
        strlen($value) > 255 => 'The name must not exceed 255 characters.',
        default => null
    }
);
```

<a name="forms"></a>
## Forms

Often, you will have multiple prompts that will be displayed in sequence to collect information before performing additional actions. You may use the `form` function to create a grouped set of prompts for the user to complete:

```php
use function Laravel\Prompts\form;

$responses = form()
    ->text('What is your name?', required: true)
    ->password('What is your password?', validate: ['password' => 'min:8'])
    ->confirm('Do you accept the terms?')
    ->submit();
```

The `submit` method will return a numerically indexed array containing all of the responses from the form's prompts. However, you may provide a name for each prompt via the `name` argument. When a name is provided, the named prompt's response may be accessed via that name:

```php
use App\Models\User;
use function Laravel\Prompts\form;

$responses = form()
    ->text('What is your name?', required: true, name: 'name')
    ->password(
        label: 'What is your password?',
        validate: ['password' => 'min:8'],
        name: 'password'
    )
    ->confirm('Do you accept the terms?')
    ->submit();

User::create([
    'name' => $responses['name'],
    'password' => $responses['password'],
]);
```

The primary benefit of using the `form` function is the ability for the user to return to previous prompts in the form using `CTRL + U`. This allows the user to fix mistakes or alter selections without needing to cancel and restart the entire form.

If you need more granular control over a prompt in a form, you may invoke the `add` method instead of calling one of the prompt functions directly. The `add` method is passed all previous responses provided by the user:

```php
use function Laravel\Prompts\form;
use function Laravel\Prompts\outro;
use function Laravel\Prompts\text;

$responses = form()
    ->text('What is your name?', required: true, name: 'name')
    ->add(function ($responses) {
        return text("How old are you, {$responses['name']}?");
    }, name: 'age')
    ->submit();

outro("Your name is {$responses['name']} and you are {$responses['age']} years old.");
```

<a name="informational-messages"></a>
## Informational Messages

The `note`, `info`, `warning`, `error`, and `alert` functions may be used to display informational messages:

```php
use function Laravel\Prompts\info;

info('Package installed successfully.');
```

<a name="callouts"></a>
## Callouts

The `callout` function displays a boxed message with a label and content. Callouts are useful for displaying important information that should stand out, such as deployment summaries, error details, or status updates:

```php
use function Laravel\Prompts\callout;

callout(
    label: 'Environment Configured',
    content: 'Your application is running in production mode with 4 workers.',
);
```

You may pass `warning` or `error` as the `type` argument to change the callout's visual style:

```php
callout(
    label: 'Deprecation Notice',
    content: 'The `--prefer-stable` flag will be removed in v4.0. Use `--stability=stable` instead.',
    type: 'warning',
);

callout(
    label: 'Database Connection Failed',
    content: 'Could not connect to MySQL on 127.0.0.1:3306.',
    type: 'error',
);
```

The `info` argument adds a footer line to the callout, which is useful for displaying metadata like IDs or timestamps:

```php
callout(
    label: 'Deployment Summary',
    content: 'Your application was deployed to production.',
    info: 'deploy-id: d4f8a2c',
);
```

<a name="callout-rich-content"></a>
#### Rich Content

Instead of passing a string, you may pass an array of strings and elements to build rich, structured callouts. The `Element` class provides factory methods for creating headings, bulleted lists, numbered lists, key-value lists, and links:

```php
use Laravel\Prompts\Elements\Element;

use function Laravel\Prompts\callout;

callout('Deployment Summary', [
    'Your application was deployed to production at 2024-03-15 14:32 UTC.',
    Element::heading('What Changed'),
    Element::bulletedList([
        'Migrated 3 pending database migrations',
        'Cleared and rebuilt route cache',
        'Restarted 4 queue workers',
    ]),
    Element::heading('Next Steps'),
    Element::numberedList([
        'Verify the health check endpoint at /up',
        'Monitor error rates for the next 15 minutes',
        'Confirm background jobs are processing',
    ]),
]);
```

You may also use `Element::keyValueList` to display labeled data:

```php
callout('Database Connection Failed', [
    'Could not connect to the database server.',
    Element::keyValueList([
        'Host' => '127.0.0.1',
        'Port' => '3306',
        'Database' => 'forge',
        'Status' => 'Connection refused',
    ]),
], type: 'error');
```

The `Element::link` method creates a clickable hyperlink in terminals that support [OSC 8](https://gist.github.com/egmontkob/eb114294efbcd5adb1944c9f3cb5feda). You may provide a URL alone, or a URL with a custom label:

```php
callout('Server Health Check', [
    'Multiple services are reporting degraded performance.',
    Element::heading('Affected Services'),
    'Look here: '.Element::link('https://example.com/health', 'Health Dashboard'),
    Element::link('https://example.com/health'),
]);
```

If no label is provided, the URL itself will be displayed as the link text.

<a name="tables"></a>
## Tables

The `table` function makes it easy to display multiple rows and columns of data. All you need to do is provide the column names and the data for the table:

```php
use function Laravel\Prompts\table;

table(
    headers: ['Name', 'Email'],
    rows: User::all(['name', 'email'])->toArray()
);
```

<a name="spin"></a>
## Spin

The `spin` function displays a spinner along with an optional message while executing a specified callback. It serves to indicate ongoing processes and returns the callback's results upon completion:

```php
use function Laravel\Prompts\spin;

$response = spin(
    callback: fn () => Http::get('http://example.com'),
    message: 'Fetching response...'
);
```

> [!WARNING]
> The `spin` function requires the [PCNTL](https://www.php.net/manual/en/book.pcntl.php) PHP extension to animate the spinner. When this extension is not available, a static version of the spinner will appear instead.

<a name="progress"></a>
## Progress Bars

For long running tasks, it can be helpful to show a progress bar that informs users how complete the task is. Using the `progress` function, Laravel will display a progress bar and advance its progress for each iteration over a given iterable value:

```php
use function Laravel\Prompts\progress;

$users = progress(
    label: 'Updating users',
    steps: User::all(),
    callback: fn ($user) => $this->performTask($user)
);
```

The `progress` function acts like a map function and will return an array containing the return value of each iteration of your callback.

The callback may also accept the `Laravel\Prompts\Progress` instance, allowing you to modify the label and hint on each iteration:

```php
$users = progress(
    label: 'Updating users',
    steps: User::all(),
    callback: function ($user, $progress) {
        $progress
            ->label("Updating {$user->name}")
            ->hint("Created on {$user->created_at}");

        return $this->performTask($user);
    },
    hint: 'This may take some time.'
);
```

Sometimes, you may need more manual control over how a progress bar is advanced. First, define the total number of steps the process will iterate through. Then, advance the progress bar via the `advance` method after processing each item:

```php
$progress = progress(label: 'Updating users', steps: 10);

$users = User::all();

$progress->start();

foreach ($users as $user) {
    $this->performTask($user);

    $progress->advance();
}

$progress->finish();
```

<a name="task"></a>
## Task

The `task` function displays a labeled task with a spinner and a scrolling live output area while a given callback is executing. It is ideal for wrapping long-running processes such as dependency installation or deployment scripts, providing real-time visibility into what is happening:

```php
use function Laravel\Prompts\task;

task(
    label: 'Installing dependencies',
    callback: function ($logger) {
        // Long-running process...
    }
);
```

The callback receives a `Logger` instance that you may use to display log lines, status messages, and streamed text in the task's output area.

> [!WARNING]
> The `task` function requires the [PCNTL](https://www.php.net/manual/en/book.pcntl.php) PHP extension to animate the spinner. When this extension is not available, a static version of the task will appear instead.

<a name="task-logging"></a>
#### Logging Lines

The `line` method writes a single log line to the task's scrolling output area:

```php
task(
    label: 'Installing dependencies',
    callback: function ($logger) {
        $logger->line('Resolving packages...');
        // ...
        $logger->line('Downloading laravel/framework');
        // ...
    }
);
```

<a name="task-status-messages"></a>
#### Status Messages

You may use the `success`, `warning`, and `error` methods to display status messages. These appear as stable, highlighted messages above the scrolling log area:

```php
task(
    label: 'Deploying application',
    callback: function ($logger) {
        $logger->line('Pulling latest changes...');
        // ...
        $logger->success('Changes pulled!');

        $logger->line('Running migrations...');
        // ...
        $logger->warning('No new migrations to run.');

        $logger->line('Clearing cache...');
        // ...
        $logger->success('Cache cleared!');
    }
);
```

<a name="task-label"></a>
#### Updating the Label

The `label` method allows you to update the task's label while it is running:

```php
task(
    label: 'Starting deployment...',
    callback: function ($logger) {
        $logger->label('Pulling latest changes...');
        // ...
        $logger->label('Running migrations...');
        // ...
        $logger->label('Clearing cache...');
        // ...
    }
);
```

<a name="task-sub-label"></a>
#### Displaying a Sub-Label

The `subLabel` method displays a dim line beneath the task's main label, which is useful for communicating ephemeral status such as the step currently in progress. Pass an empty string to clear the sub-label:

```php
task(
    label: 'Deploying',
    callback: function ($logger) {
        $logger->subLabel('Building assets...');
        // ...
        $logger->subLabel('Running migrations...');
        // ...
        $logger->subLabel('');
    }
);
```

You may also provide an initial sub-label via the `subLabel` argument:

```php
task(
    label: 'Deploying',
    callback: function ($logger) {
        // ...
    },
    subLabel: 'Preparing...'
);
```

<a name="task-streaming"></a>
#### Streaming Text

For processes that produce output incrementally, such as AI-generated responses, the `partial` method allows you to stream text word-by-word or chunk-by-chunk. Once the stream is complete, call `commitPartial` to finalize the output:

```php
task(
    label: 'Generating response...',
    callback: function ($logger) {
        foreach ($words as $word) {
            $logger->partial($word . ' ');
        }

        $logger->commitPartial();
    }
);
```

<a name="task-limit"></a>
#### Customizing the Output Limit

By default, the task displays up to 10 lines of scrolling output. You may customize this via the `limit` argument:

```php
task(
    label: 'Installing dependencies',
    callback: function ($logger) {
        // ...
    },
    limit: 20
);
```

<a name="task-keep-summary"></a>
#### Keeping the Summary

By default, the task's output is erased once the callback finishes. If you would like to keep the status messages on screen after the task has completed, you may pass the `keepSummary` argument:

```php
task(
    label: 'Deploying',
    callback: function ($logger) {
        $logger->success('Assets built');
        // ...
        $logger->success('Migrations complete');
    },
    keepSummary: true,
);
```

<a name="stream"></a>
## Stream

The `stream` function displays text that streams into the terminal, ideal for displaying AI-generated content or any text that arrives incrementally:

```php
use function Laravel\Prompts\stream;

$stream = stream();

foreach ($words as $word) {
    $stream->append($word . ' ');
    usleep(25_000); // Simulate delay between chunks...
}

$stream->close();
```

The `append` method adds text to the stream, rendering it with a gradual fade-in effect. When all content has been streamed, call the `close` method to finalize the output and restore the cursor.

<a name="terminal-title"></a>
## Terminal Title

The `title` function updates the title of the user's terminal window or tab:

```php
use function Laravel\Prompts\title;

title('Installing Dependencies');
```

To reset the terminal title back to its default, pass an empty string:

```php
title('');
```

<a name="clear"></a>
## Clearing the Terminal

The `clear` function may be used to clear the user's terminal:

```php
use function Laravel\Prompts\clear;

clear();
```

<a name="terminal-considerations"></a>
## Terminal Considerations

<a name="terminal-width"></a>
#### Terminal Width

If the length of any label, option, or validation message exceeds the number of "columns" in the user's terminal, it will be automatically truncated to fit. Consider minimizing the length of these strings if your users may be using narrower terminals. A typically safe maximum length is 74 characters to support an 80-character terminal.

<a name="terminal-height"></a>
#### Terminal Height

For any prompts that accept the `scroll` argument, the configured value will automatically be reduced to fit the height of the user's terminal, including space for a validation message.

<a name="fallbacks"></a>
## Unsupported Environments and Fallbacks

Laravel Prompts supports macOS, Linux, and Windows with WSL. Due to limitations in the Windows version of PHP, it is not currently possible to use Laravel Prompts on Windows outside of WSL.

For this reason, Laravel Prompts supports falling back to an alternative implementation such as the [Symfony Console Question Helper](https://symfony.com/doc/current/components/console/helpers/questionhelper.html).

> [!NOTE]
> When using Laravel Prompts with the Laravel framework, fallbacks for each prompt have been configured for you and will be automatically enabled in unsupported environments.

<a name="fallback-conditions"></a>
#### Fallback Conditions

If you are not using Laravel or need to customize when the fallback behavior is used, you may pass a boolean to the `fallbackWhen` static method on the `Prompt` class:

```php
use Laravel\Prompts\Prompt;

Prompt::fallbackWhen(
    ! $input->isInteractive() || windows_os() || app()->runningUnitTests()
);
```

<a name="fallback-behavior"></a>
#### Fallback Behavior

If you are not using Laravel or need to customize the fallback behavior, you may pass a closure to the `fallbackUsing` static method on each prompt class:

```php
use Laravel\Prompts\TextPrompt;
use Symfony\Component\Console\Question\Question;
use Symfony\Component\Console\Style\SymfonyStyle;

TextPrompt::fallbackUsing(function (TextPrompt $prompt) use ($input, $output) {
    $question = (new Question($prompt->label, $prompt->default ?: null))
        ->setValidator(function ($answer) use ($prompt) {
            if ($prompt->required && $answer === null) {
                throw new \RuntimeException(
                    is_string($prompt->required) ? $prompt->required : 'Required.'
                );
            }

            if ($prompt->validate) {
                $error = ($prompt->validate)($answer ?? '');

                if ($error) {
                    throw new \RuntimeException($error);
                }
            }

            return $answer;
        });

    return (new SymfonyStyle($input, $output))
        ->askQuestion($question);
});
```

Fallbacks must be configured individually for each prompt class. The closure will receive an instance of the prompt class and must return an appropriate type for the prompt.

<a name="testing"></a>
## Testing

Laravel provides a variety of methods for testing that your command displays the expected Prompt messages:

```php tab=Pest
test('report generation', function () {
    $this->artisan('report:generate')
        ->expectsPromptsInfo('Welcome to the application!')
        ->expectsPromptsWarning('This action cannot be undone')
        ->expectsPromptsError('Something went wrong')
        ->expectsPromptsAlert('Important notice!')
        ->expectsPromptsIntro('Starting process...')
        ->expectsPromptsOutro('Process completed!')
        ->expectsPromptsTable(
            headers: ['Name', 'Email'],
            rows: [
                ['Taylor Otwell', 'taylor@example.com'],
                ['Jason Beggs', 'jason@example.com'],
            ]
        )
        ->assertExitCode(0);
});
```

```php tab=PHPUnit
public function test_report_generation(): void
{
    $this->artisan('report:generate')
        ->expectsPromptsInfo('Welcome to the application!')
        ->expectsPromptsWarning('This action cannot be undone')
        ->expectsPromptsError('Something went wrong')
        ->expectsPromptsAlert('Important notice!')
        ->expectsPromptsIntro('Starting process...')
        ->expectsPromptsOutro('Process completed!')
        ->expectsPromptsTable(
            headers: ['Name', 'Email'],
            rows: [
                ['Taylor Otwell', 'taylor@example.com'],
                ['Jason Beggs', 'jason@example.com'],
            ]
        )
        ->assertExitCode(0);
}
```


---

# Service Providers

*Sección: Laravel | Origen: https://laravel.com/docs/13.x/providers*

- [Introduction](#introduction)
- [Writing Service Providers](#writing-service-providers)
    - [The Register Method](#the-register-method)
    - [The Boot Method](#the-boot-method)
- [Registering Providers](#registering-providers)
- [Deferred Providers](#deferred-providers)

<a name="introduction"></a>
## Introduction

Service providers are the central place of all Laravel application bootstrapping. Your own application, as well as all of Laravel's core services, are bootstrapped via service providers.

But, what do we mean by "bootstrapped"? In general, we mean **registering** things, including registering service container bindings, event listeners, middleware, and even routes. Service providers are the central place to configure your application.

Laravel uses dozens of service providers internally to bootstrap its core services, such as the mailer, queue, cache, and others. Many of these providers are "deferred" providers, meaning they will not be loaded on every request, but only when the services they provide are actually needed.

All user-defined service providers are registered in the `bootstrap/providers.php` file. In the following documentation, you will learn how to write your own service providers and register them with your Laravel application.

> [!NOTE]
> If you would like to learn more about how Laravel handles requests and works internally, check out our documentation on the Laravel [request lifecycle](/docs/{{version}}/lifecycle).

<a name="writing-service-providers"></a>
## Writing Service Providers

All service providers extend the `Illuminate\Support\ServiceProvider` class. Most service providers contain a `register` and a `boot` method. Within the `register` method, you should **only bind things into the [service container](/docs/{{version}}/container)**. You should never attempt to register any event listeners, routes, or any other piece of functionality within the `register` method.

The Artisan CLI can generate a new provider via the `make:provider` command. Laravel will automatically register your new provider in your application's `bootstrap/providers.php` file:

```shell
php artisan make:provider RiakServiceProvider
```

<a name="the-register-method"></a>
### The Register Method

As mentioned previously, within the `register` method, you should only bind things into the [service container](/docs/{{version}}/container). You should never attempt to register any event listeners, routes, or any other piece of functionality within the `register` method. Otherwise, you may accidentally use a service that is provided by a service provider which has not loaded yet.

Let's take a look at a basic service provider. Within any of your service provider methods, you always have access to the `$app` property which provides access to the service container:

```php
<?php

namespace App\Providers;

use App\Services\Riak\Connection;
use Illuminate\Contracts\Foundation\Application;
use Illuminate\Support\ServiceProvider;

class RiakServiceProvider extends ServiceProvider
{
    /**
     * Register any application services.
     */
    public function register(): void
    {
        $this->app->singleton(Connection::class, function (Application $app) {
            return new Connection(config('riak'));
        });
    }
}
```

This service provider only defines a `register` method, and uses that method to define an implementation of `App\Services\Riak\Connection` in the service container. If you're not yet familiar with Laravel's service container, check out [its documentation](/docs/{{version}}/container).

<a name="the-bindings-and-singletons-properties"></a>
#### The `bindings` and `singletons` Properties

If your service provider registers many simple bindings, you may wish to use the `bindings` and `singletons` properties instead of manually registering each container binding. When the service provider is loaded by the framework, it will automatically check for these properties and register their bindings:

```php
<?php

namespace App\Providers;

use App\Contracts\DowntimeNotifier;
use App\Contracts\ServerProvider;
use App\Services\DigitalOceanServerProvider;
use App\Services\PingdomDowntimeNotifier;
use App\Services\ServerToolsProvider;
use Illuminate\Support\ServiceProvider;

class AppServiceProvider extends ServiceProvider
{
    /**
     * All of the container bindings that should be registered.
     *
     * @var array
     */
    public $bindings = [
        ServerProvider::class => DigitalOceanServerProvider::class,
    ];

    /**
     * All of the container singletons that should be registered.
     *
     * @var array
     */
    public $singletons = [
        DowntimeNotifier::class => PingdomDowntimeNotifier::class,
        ServerProvider::class => ServerToolsProvider::class,
    ];
}
```

<a name="the-boot-method"></a>
### The Boot Method

So, what if we need to register a [view composer](/docs/{{version}}/views#view-composers) within our service provider? This should be done within the `boot` method. **This method is called after all other service providers have been registered**, meaning you have access to all other services that have been registered by the framework:

```php
<?php

namespace App\Providers;

use Illuminate\Support\Facades\View;
use Illuminate\Support\ServiceProvider;

class ComposerServiceProvider extends ServiceProvider
{
    /**
     * Bootstrap any application services.
     */
    public function boot(): void
    {
        View::composer('view', function () {
            // ...
        });
    }
}
```

<a name="boot-method-dependency-injection"></a>
#### Boot Method Dependency Injection

You may type-hint dependencies for your service provider's `boot` method. The [service container](/docs/{{version}}/container) will automatically inject any dependencies you need:

```php
use Illuminate\Contracts\Routing\ResponseFactory;

/**
 * Bootstrap any application services.
 */
public function boot(ResponseFactory $response): void
{
    $response->macro('serialized', function (mixed $value) {
        // ...
    });
}
```

<a name="registering-providers"></a>
## Registering Providers

All service providers are registered in the `bootstrap/providers.php` configuration file. This file returns an array that contains the class names of your application's service providers:

```php
<?php

return [
    App\Providers\AppServiceProvider::class,
];
```

When you invoke the `make:provider` Artisan command, Laravel will automatically add the generated provider to the `bootstrap/providers.php` file. However, if you have manually created the provider class, you should manually add the provider class to the array:

```php
<?php

return [
    App\Providers\AppServiceProvider::class,
    App\Providers\ComposerServiceProvider::class, // [tl! add]
];
```

<a name="deferred-providers"></a>
## Deferred Providers

If your provider is **only** registering bindings in the [service container](/docs/{{version}}/container), you may choose to defer its registration until one of the registered bindings is actually needed. Deferring the loading of such a provider will improve the performance of your application, since it is not loaded from the filesystem on every request.

Laravel compiles and stores a list of all of the services supplied by deferred service providers, along with the name of its service provider class. Then, only when you attempt to resolve one of these services does Laravel load the service provider.

To defer the loading of a provider, implement the `\Illuminate\Contracts\Support\DeferrableProvider` interface and define a `provides` method. The `provides` method should return the service container bindings registered by the provider:

```php
<?php

namespace App\Providers;

use App\Services\Riak\Connection;
use Illuminate\Contracts\Foundation\Application;
use Illuminate\Contracts\Support\DeferrableProvider;
use Illuminate\Support\ServiceProvider;

class RiakServiceProvider extends ServiceProvider implements DeferrableProvider
{
    /**
     * Register any application services.
     */
    public function register(): void
    {
        $this->app->singleton(Connection::class, function (Application $app) {
            return new Connection($app['config']['riak']);
        });
    }

    /**
     * Get the services provided by the provider.
     *
     * @return array<int, string>
     */
    public function provides(): array
    {
        return [Connection::class];
    }
}
```


---

# Laravel Pulse

*Sección: Laravel | Origen: https://laravel.com/docs/13.x/pulse*

- [Introduction](#introduction)
- [Installation](#installation)
    - [Configuration](#configuration)
- [Dashboard](#dashboard)
    - [Authorization](#dashboard-authorization)
    - [Customization](#dashboard-customization)
    - [Resolving Users](#dashboard-resolving-users)
    - [Cards](#dashboard-cards)
- [Capturing Entries](#capturing-entries)
    - [Recorders](#recorders)
    - [Filtering](#filtering)
- [Performance](#performance)
    - [Using a Different Database](#using-a-different-database)
    - [Redis Ingest](#ingest)
    - [Sampling](#sampling)
    - [Trimming](#trimming)
    - [Handling Pulse Exceptions](#pulse-exceptions)
- [Custom Cards](#custom-cards)
    - [Card Components](#custom-card-components)
    - [Styling](#custom-card-styling)
    - [Data Capture and Aggregation](#custom-card-data)

<a name="introduction"></a>
## Introduction

[Laravel Pulse](https://github.com/laravel/pulse) delivers at-a-glance insights into your application's performance and usage. With Pulse, you can track down bottlenecks like slow jobs and endpoints, find your most active users, and more.

For in-depth debugging of individual events, check out [Laravel Telescope](/docs/{{version}}/telescope).

<a name="installation"></a>
## Installation

> [!WARNING]
> Pulse's first-party storage implementation currently requires a MySQL, MariaDB, or PostgreSQL database. If you are using a different database engine, you will need a separate MySQL, MariaDB, or PostgreSQL database for your Pulse data.

You may install Pulse using the Composer package manager:

```shell
composer require laravel/pulse
```

Next, you should publish the Pulse configuration and migration files using the `vendor:publish` Artisan command:

```shell
php artisan vendor:publish --provider="Laravel\Pulse\PulseServiceProvider"
```

Finally, you should run the `migrate` command in order to create the tables needed to store Pulse's data:

```shell
php artisan migrate
```

Once Pulse's database migrations have been run, you may access the Pulse dashboard via the `/pulse` route.

> [!NOTE]
> If you do not want to store Pulse data in your application's primary database, you may [specify a dedicated database connection](#using-a-different-database).

<a name="configuration"></a>
### Configuration

Many of Pulse's configuration options can be controlled using environment variables. To see the available options, register new recorders, or configure advanced options, you may publish the `config/pulse.php` configuration file:

```shell
php artisan vendor:publish --tag=pulse-config
```

<a name="dashboard"></a>
## Dashboard

<a name="dashboard-authorization"></a>
### Authorization

The Pulse dashboard may be accessed via the `/pulse` route. By default, you will only be able to access this dashboard in the `local` environment, so you will need to configure authorization for your production environments by customizing the `'viewPulse'` authorization gate. You can accomplish this within your application's `app/Providers/AppServiceProvider.php` file:

```php
use App\Models\User;
use Illuminate\Support\Facades\Gate;

/**
 * Bootstrap any application services.
 */
public function boot(): void
{
    Gate::define('viewPulse', function (User $user) {
        return $user->isAdmin();
    });

    // ...
}
```

<a name="dashboard-customization"></a>
### Customization

The Pulse dashboard cards and layout may be configured by publishing the dashboard view. The dashboard view will be published to `resources/views/vendor/pulse/dashboard.blade.php`:

```shell
php artisan vendor:publish --tag=pulse-dashboard
```

The dashboard is powered by [Livewire](https://livewire.laravel.com/), and allows you to customize the cards and layout without needing to rebuild any JavaScript assets.

Within this file, the `<x-pulse>` component is responsible for rendering the dashboard and provides a grid layout for the cards. If you would like the dashboard to span the full width of the screen, you may provide the `full-width` prop to the component:

```blade
<x-pulse full-width>
    ...
</x-pulse>
```

By default, the `<x-pulse>` component will create a 12 column grid, but you may customize this using the `cols` prop:

```blade
<x-pulse cols="16">
    ...
</x-pulse>
```

Each card accepts a `cols` and `rows` prop to control the space and positioning:

```blade
<livewire:pulse.usage cols="4" rows="2" />
```

Most cards also accept an `expand` prop to show the full card instead of scrolling:

```blade
<livewire:pulse.slow-queries expand />
```

<a name="dashboard-resolving-users"></a>
### Resolving Users

For cards that display information about your users, such as the Application Usage card, Pulse will only record the user's ID. When rendering the dashboard, Pulse will resolve the `name` and `email` fields from your default `Authenticatable` model and display avatars using the Gravatar web service.

You may customize the fields and avatar by invoking the `Pulse::user` method within your application's `App\Providers\AppServiceProvider` class.

The `user` method accepts a closure which will receive the `Authenticatable` model to be displayed and should return an array containing `name`, `extra`, and `avatar` information for the user:

```php
use Laravel\Pulse\Facades\Pulse;

/**
 * Bootstrap any application services.
 */
public function boot(): void
{
    Pulse::user(fn ($user) => [
        'name' => $user->name,
        'extra' => $user->email,
        'avatar' => $user->avatar_url,
    ]);

    // ...
}
```

> [!NOTE]
> You may completely customize how the authenticated user is captured and retrieved by implementing the `Laravel\Pulse\Contracts\ResolvesUsers` contract and binding it in Laravel's [service container](/docs/{{version}}/container#binding-a-singleton).

<a name="dashboard-cards"></a>
### Cards

<a name="servers-card"></a>
#### Servers

The `<livewire:pulse.servers />` card displays system resource usage for all servers running the `pulse:check` command. Please refer to the documentation regarding the [servers recorder](#servers-recorder) for more information on system resource reporting.

If you replace a server in your infrastructure, you may wish to stop displaying the inactive server in the Pulse dashboard after a given duration. You may accomplish this using the `ignore-after` prop, which accepts the number of seconds after which inactive servers should be removed from the Pulse dashboard. Alternatively, you may provide a relative time formatted string, such as `1 hour` or `3 days and 1 hour`:

```blade
<livewire:pulse.servers ignore-after="3 hours" />
```

<a name="application-usage-card"></a>
#### Application Usage

The `<livewire:pulse.usage />` card displays the top 10 users making requests to your application, dispatching jobs, and experiencing slow requests.

If you wish to view all usage metrics on screen at the same time, you may include the card multiple times and specify the `type` attribute:

```blade
<livewire:pulse.usage type="requests" />
<livewire:pulse.usage type="slow_requests" />
<livewire:pulse.usage type="jobs" />
```

To learn how to customize how Pulse retrieves and displays user information, consult our documentation on [resolving users](#dashboard-resolving-users).

> [!NOTE]
> If your application receives a lot of requests or dispatches a lot of jobs, you may wish to enable [sampling](#sampling). See the [user requests recorder](#user-requests-recorder), [user jobs recorder](#user-jobs-recorder), and [slow jobs recorder](#slow-jobs-recorder) documentation for more information.

<a name="exceptions-card"></a>
#### Exceptions

The `<livewire:pulse.exceptions />` card shows the frequency and recency of exceptions occurring in your application. By default, exceptions are grouped based on the exception class and location where it occurred. See the [exceptions recorder](#exceptions-recorder) documentation for more information.

<a name="queues-card"></a>
#### Queues

The `<livewire:pulse.queues />` card shows the throughput of the queues in your application, including the number of jobs queued, processing, processed, released, and failed. See the [queues recorder](#queues-recorder) documentation for more information.

<a name="slow-requests-card"></a>
#### Slow Requests

The `<livewire:pulse.slow-requests />` card shows incoming requests to your application that exceed the configured threshold, which is 1,000ms by default. See the [slow requests recorder](#slow-requests-recorder) documentation for more information.

<a name="slow-jobs-card"></a>
#### Slow Jobs

The `<livewire:pulse.slow-jobs />` card shows the queued jobs in your application that exceed the configured threshold, which is 1,000ms by default. See the [slow jobs recorder](#slow-jobs-recorder) documentation for more information.

<a name="slow-queries-card"></a>
#### Slow Queries

The `<livewire:pulse.slow-queries />` card shows the database queries in your application that exceed the configured threshold, which is 1,000ms by default.

By default, slow queries are grouped based on the SQL query (without bindings) and the location where it occurred, but you may choose to not capture the location if you wish to group solely on the SQL query.

If you encounter rendering performance issues due to extremely large SQL queries receiving syntax highlighting, you may disable highlighting by adding the `without-highlighting` prop:

```blade
<livewire:pulse.slow-queries without-highlighting />
```

See the [slow queries recorder](#slow-queries-recorder) documentation for more information.

<a name="slow-outgoing-requests-card"></a>
#### Slow Outgoing Requests

The `<livewire:pulse.slow-outgoing-requests />` card shows outgoing requests made using Laravel's [HTTP client](/docs/{{version}}/http-client) that exceed the configured threshold, which is 1,000ms by default.

By default, entries will be grouped by the full URL. However, you may wish to normalize or group similar outgoing requests using regular expressions. See the [slow outgoing requests recorder](#slow-outgoing-requests-recorder) documentation for more information.

<a name="cache-card"></a>
#### Cache

The `<livewire:pulse.cache />` card shows the cache hit and miss statistics for your application, both globally and for individual keys.

By default, entries will be grouped by key. However, you may wish to normalize or group similar keys using regular expressions. See the [cache interactions recorder](#cache-interactions-recorder) documentation for more information.

<a name="capturing-entries"></a>
## Capturing Entries

Most Pulse recorders will automatically capture entries based on framework events dispatched by Laravel. However, the [servers recorder](#servers-recorder) and some third-party cards must poll for information regularly. To use these cards, you must run the `pulse:check` daemon on all of your individual application servers:

```php
php artisan pulse:check
```

> [!NOTE]
> To keep the `pulse:check` process running permanently in the background, you should use a process monitor such as Supervisor to ensure that the command does not stop running.

As the `pulse:check` command is a long-lived process, it will not see changes to your codebase without being restarted. You should gracefully restart the command by calling the `pulse:restart` command during your application's deployment process:

```shell
php artisan pulse:restart
```

> [!NOTE]
> Pulse uses the [cache](/docs/{{version}}/cache) to store restart signals, so you should verify that a cache driver is properly configured for your application before using this feature.

<a name="recorders"></a>
### Recorders

Recorders are responsible for capturing entries from your application to be recorded in the Pulse database. Recorders are registered and configured in the `recorders` section of the [Pulse configuration file](#configuration).

<a name="cache-interactions-recorder"></a>
#### Cache Interactions

The `CacheInteractions` recorder captures information about the [cache](/docs/{{version}}/cache) hits and misses occurring in your application for display on the [Cache](#cache-card) card.

You may optionally adjust the [sample rate](#sampling) and ignored key patterns.

You may also configure key grouping so that similar keys are grouped as a single entry. For example, you may wish to remove unique IDs from keys caching the same type of information. Groups are configured using a regular expression to "find and replace" parts of the key. An example is included in the configuration file:

```php
Recorders\CacheInteractions::class => [
    // ...
    'groups' => [
        // '/:\d+/' => ':*',
    ],
],
```

The first pattern that matches will be used. If no patterns match, then the key will be captured as-is.

<a name="exceptions-recorder"></a>
#### Exceptions

The `Exceptions` recorder captures information about reportable exceptions occurring in your application for display on the [Exceptions](#exceptions-card) card.

You may optionally adjust the [sample rate](#sampling) and ignored exception patterns. You may also configure whether to capture the location that the exception originated from. The captured location will be displayed on the Pulse dashboard which can help to track down the exception origin; however, if the same exception occurs in multiple locations then it will appear multiple times for each unique location.

<a name="queues-recorder"></a>
#### Queues

The `Queues` recorder captures information about your application's queues for display on the [Queues](#queues-card).

You may optionally adjust the [sample rate](#sampling) and ignored jobs patterns.

<a name="slow-jobs-recorder"></a>
#### Slow Jobs

The `SlowJobs` recorder captures information about slow jobs occurring in your application for display on the [Slow Jobs](#slow-jobs-recorder) card.

You may optionally adjust the slow job threshold, [sample rate](#sampling), and ignored job patterns.

You may have some jobs that you expect to take longer than others. In those cases, you may configure per-job thresholds:

```php
Recorders\SlowJobs::class => [
    // ...
    'threshold' => [
        '#^App\\Jobs\\GenerateYearlyReports$#' => 5000,
        'default' => env('PULSE_SLOW_JOBS_THRESHOLD', 1000),
    ],
],
```

If no regular expression patterns match the job's classname, then the `'default'` value will be used.

<a name="slow-outgoing-requests-recorder"></a>
#### Slow Outgoing Requests

The `SlowOutgoingRequests` recorder captures information about outgoing HTTP requests made using Laravel's [HTTP client](/docs/{{version}}/http-client) that exceed the configured threshold for display on the [Slow Outgoing Requests](#slow-outgoing-requests-card) card.

You may optionally adjust the slow outgoing request threshold, [sample rate](#sampling), and ignored URL patterns.

You may have some outgoing requests that you expect to take longer than others. In those cases, you may configure per-request thresholds:

```php
Recorders\SlowOutgoingRequests::class => [
    // ...
    'threshold' => [
        '#backup.zip$#' => 5000,
        'default' => env('PULSE_SLOW_OUTGOING_REQUESTS_THRESHOLD', 1000),
    ],
],
```

If no regular expression patterns match the request's URL, then the `'default'` value will be used.

You may also configure URL grouping so that similar URLs are grouped as a single entry. For example, you may wish to remove unique IDs from URL paths or group by domain only. Groups are configured using a regular expression to "find and replace" parts of the URL. Some examples are included in the configuration file:

```php
Recorders\SlowOutgoingRequests::class => [
    // ...
    'groups' => [
        // '#^https://api\.github\.com/repos/.*$#' => 'api.github.com/repos/*',
        // '#^https?://([^/]*).*$#' => '\1',
        // '#/\d+#' => '/*',
    ],
],
```

The first pattern that matches will be used. If no patterns match, then the URL will be captured as-is.

<a name="slow-queries-recorder"></a>
#### Slow Queries

The `SlowQueries` recorder captures any database queries in your application that exceed the configured threshold for display on the [Slow Queries](#slow-queries-card) card.

You may optionally adjust the slow query threshold, [sample rate](#sampling), and ignored query patterns. You may also configure whether to capture the query location. The captured location will be displayed on the Pulse dashboard which can help to track down the query origin; however, if the same query is made in multiple locations then it will appear multiple times for each unique location.

You may have some queries that you expect to take longer than others. In those cases, you may configure per-query thresholds:

```php
Recorders\SlowQueries::class => [
    // ...
    'threshold' => [
        '#^insert into `yearly_reports`#' => 5000,
        'default' => env('PULSE_SLOW_QUERIES_THRESHOLD', 1000),
    ],
],
```

If no regular expression patterns match the query's SQL, then the `'default'` value will be used.

<a name="slow-requests-recorder"></a>
#### Slow Requests

The `Requests` recorder captures information about requests made to your application for display on the [Slow Requests](#slow-requests-card) and [Application Usage](#application-usage-card) cards.

You may optionally adjust the slow route threshold, [sample rate](#sampling), and ignored paths.

You may have some requests that you expect to take longer than others. In those cases, you may configure per-request thresholds:

```php
Recorders\SlowRequests::class => [
    // ...
    'threshold' => [
        '#^/admin/#' => 5000,
        'default' => env('PULSE_SLOW_REQUESTS_THRESHOLD', 1000),
    ],
],
```

If no regular expression patterns match the request's URL, then the `'default'` value will be used.

<a name="servers-recorder"></a>
#### Servers

The `Servers` recorder captures CPU, memory, and storage usage of the servers that power your application for display on the [Servers](#servers-card) card. This recorder requires the [pulse:check command](#capturing-entries) to be running on each of the servers you wish to monitor.

Each reporting server must have a unique name. By default, Pulse will use the value returned by PHP's `gethostname` function. If you wish to customize this, you may set the `PULSE_SERVER_NAME` environment variable:

```env
PULSE_SERVER_NAME=load-balancer
```

The Pulse configuration file also allows you to customize the directories that are monitored.

<a name="user-jobs-recorder"></a>
#### User Jobs

The `UserJobs` recorder captures information about the users dispatching jobs in your application for display on the [Application Usage](#application-usage-card) card.

You may optionally adjust the [sample rate](#sampling) and ignored job patterns.

<a name="user-requests-recorder"></a>
#### User Requests

The `UserRequests` recorder captures information about the users making requests to your application for display on the [Application Usage](#application-usage-card) card.

You may optionally adjust the [sample rate](#sampling) and ignored URL patterns.

<a name="filtering"></a>
### Filtering

As we have seen, many [recorders](#recorders) offer the ability to, via configuration, "ignore" incoming entries based on their value, such as a request's URL. But, sometimes it may be useful to filter out records based on other factors, such as the currently authenticated user. To filter out these records, you may pass a closure to Pulse's `filter` method. Typically, the `filter` method should be invoked within the `boot` method of your application's `AppServiceProvider`:

```php
use Illuminate\Support\Facades\Auth;
use Laravel\Pulse\Entry;
use Laravel\Pulse\Facades\Pulse;
use Laravel\Pulse\Value;

/**
 * Bootstrap any application services.
 */
public function boot(): void
{
    Pulse::filter(function (Entry|Value $entry) {
        return Auth::user()->isNotAdmin();
    });

    // ...
}
```

<a name="performance"></a>
## Performance

Pulse has been designed to drop into an existing application without requiring any additional infrastructure. However, for high-traffic applications, there are several ways of removing any impact Pulse may have on your application's performance.

<a name="using-a-different-database"></a>
### Using a Different Database

For high-traffic applications, you may prefer to use a dedicated database connection for Pulse to avoid impacting your application database.

You may customize the [database connection](/docs/{{version}}/database#configuration) used by Pulse by setting the `PULSE_DB_CONNECTION` environment variable.

```env
PULSE_DB_CONNECTION=pulse
```

<a name="ingest"></a>
### Redis Ingest

> [!WARNING]
> The Redis Ingest requires Redis 6.2 or greater and `phpredis` or `predis` as the application's configured Redis client driver.

By default, Pulse will store entries directly to the [configured database connection](#using-a-different-database) after the HTTP response has been sent to the client or a job has been processed; however, you may use Pulse's Redis ingest driver to send entries to a Redis stream instead. This can be enabled by configuring the `PULSE_INGEST_DRIVER` environment variable:

```ini
PULSE_INGEST_DRIVER=redis
```

Pulse will use your default [Redis connection](/docs/{{version}}/redis#configuration) by default, but you may customize this via the `PULSE_REDIS_CONNECTION` environment variable:

```ini
PULSE_REDIS_CONNECTION=pulse
```

> [!WARNING]
> When using the Redis ingest driver, your Pulse installation should always use a different Redis connection than your Redis powered queue, if applicable.

When using the Redis ingest, you will need to run the `pulse:work` command to monitor the stream and move entries from Redis into Pulse's database tables.

```php
php artisan pulse:work
```

> [!NOTE]
> To keep the `pulse:work` process running permanently in the background, you should use a process monitor such as Supervisor to ensure that the Pulse worker does not stop running.

As the `pulse:work` command is a long-lived process, it will not see changes to your codebase without being restarted. You should gracefully restart the command by calling the `pulse:restart` command during your application's deployment process:

```shell
php artisan pulse:restart
```

> [!NOTE]
> Pulse uses the [cache](/docs/{{version}}/cache) to store restart signals, so you should verify that a cache driver is properly configured for your application before using this feature.

<a name="sampling"></a>
### Sampling

By default, Pulse will capture every relevant event that occurs in your application. For high-traffic applications, this can result in needing to aggregate millions of database rows in the dashboard, especially for longer time periods.

You may instead choose to enable "sampling" on certain Pulse data recorders. For example, setting the sample rate to `0.1` on the [User Requests](#user-requests-recorder) recorder will mean that you only record approximately 10% of the requests to your application. In the dashboard, the values will be scaled up and prefixed with a `~` to indicate that they are an approximation.

In general, the more entries you have for a particular metric, the lower you can safely set the sample rate without sacrificing too much accuracy.

<a name="trimming"></a>
### Trimming

Pulse will automatically trim its stored entries once they are outside of the dashboard window. Trimming occurs when ingesting data using a lottery system which may be customized in the Pulse [configuration file](#configuration).

<a name="pulse-exceptions"></a>
### Handling Pulse Exceptions

If an exception occurs while capturing Pulse data, such as being unable to connect to the storage database, Pulse will silently fail to avoid impacting your application.

If you wish to customize how these exceptions are handled, you may provide a closure to the `handleExceptionsUsing` method:

```php
use Laravel\Pulse\Facades\Pulse;
use Illuminate\Support\Facades\Log;

Pulse::handleExceptionsUsing(function ($e) {
    Log::debug('An exception happened in Pulse', [
        'message' => $e->getMessage(),
        'stack' => $e->getTraceAsString(),
    ]);
});
```

<a name="custom-cards"></a>
## Custom Cards

Pulse allows you to build custom cards to display data relevant to your application's specific needs. Pulse uses [Livewire](https://livewire.laravel.com), so you may want to [review its documentation](https://livewire.laravel.com/docs) before building your first custom card.

<a name="custom-card-components"></a>
### Card Components

Creating a custom card in Laravel Pulse starts with extending the base `Card` Livewire component and defining a corresponding view:

```php
namespace App\Livewire\Pulse;

use Laravel\Pulse\Livewire\Card;
use Livewire\Attributes\Lazy;

#[Lazy]
class TopSellers extends Card
{
    public function render()
    {
        return view('livewire.pulse.top-sellers');
    }
}
```

When using Livewire's [lazy loading](https://livewire.laravel.com/docs/lazy) feature, The `Card` component will automatically provide a placeholder that respects the `cols` and `rows` attributes passed to your component.

When writing your Pulse card's corresponding view, you may leverage Pulse's Blade components for a consistent look and feel:

```blade
<x-pulse::card :cols="$cols" :rows="$rows" :class="$class" wire:poll.5s="">
    <x-pulse::card-header name="Top Sellers">
        <x-slot:icon>
            ...
        </x-slot:icon>
    </x-pulse::card-header>

    <x-pulse::scroll :expand="$expand">
        ...
    </x-pulse::scroll>
</x-pulse::card>
```

The `$cols`, `$rows`, `$class`, and `$expand` variables should be passed to their respective Blade components so the card layout may be customized from the dashboard view. You may also wish to include the `wire:poll.5s=""` attribute in your view to have the card automatically update.

Once you have defined your Livewire component and template, the card may be included in your [dashboard view](#dashboard-customization):

```blade
<x-pulse>
    ...

    <livewire:pulse.top-sellers cols="4" />
</x-pulse>
```

> [!NOTE]
> If your card is included in a package, you will need to register the component with Livewire using the `Livewire::component` method.

<a name="custom-card-styling"></a>
### Styling

If your card requires additional styling beyond the classes and components included with Pulse, there are a few options for including custom CSS for your cards.

<a name="custom-card-styling-vite"></a>
#### Laravel Vite Integration

If your custom card lives within your application's code base and you are using Laravel's [Vite integration](/docs/{{version}}/vite), you may update your `vite.config.js` file to include a dedicated CSS entry point for your card:

```js
laravel({
    input: [
        'resources/css/pulse/top-sellers.css',
        // ...
    ],
}),
```

You may then use the `@vite` Blade directive in your [dashboard view](#dashboard-customization), specifying the CSS entrypoint for your card:

```blade
<x-pulse>
    @vite('resources/css/pulse/top-sellers.css')

    ...
</x-pulse>
```

<a name="custom-card-styling-css"></a>
#### CSS Files

For other use cases, including Pulse cards contained within a package, you may instruct Pulse to load additional stylesheets by defining a `css` method on your Livewire component that returns the file path to your CSS file:

```php
class TopSellers extends Card
{
    // ...

    protected function css()
    {
        return __DIR__.'/../../dist/top-sellers.css';
    }
}
```

When this card is included on the dashboard, Pulse will automatically include the contents of this file within a `<style>` tag so it does not need to be published to the `public` directory.

<a name="custom-card-styling-tailwind"></a>
#### Tailwind CSS

When using Tailwind CSS, you should create a dedicated CSS entrypoint. The following example excludes Tailwind's [Preflight](https://tailwindcss.com/docs/preflight) base styles which are already included by Pulse, and scopes Tailwind using a CSS selector to avoid conflicts with Pulse's Tailwind classes:

```css
@import "tailwindcss/theme.css";

@custom-variant dark (&:where(.dark, .dark *));
@source "./../../views/livewire/pulse/top-sellers.blade.php";

@theme {
  /* ... */
}

#top-sellers {
  @import "tailwindcss/utilities.css" source(none);
}
```

You will also need to include an `id` or `class` attribute in your card's view that matches the CSS selector in your entrypoint:

```blade
<x-pulse::card id="top-sellers" :cols="$cols" :rows="$rows" class="$class">
    ...
</x-pulse::card>
```

<a name="custom-card-data"></a>
### Data Capture and Aggregation

Custom cards may fetch and display data from anywhere; however, you may wish to leverage Pulse's powerful and efficient data recording and aggregation system.

<a name="custom-card-data-capture"></a>
#### Capturing Entries

Pulse allows you to record "entries" using the `Pulse::record` method:

```php
use Laravel\Pulse\Facades\Pulse;

Pulse::record('user_sale', $user->id, $sale->amount)
    ->sum()
    ->count();
```

The first argument provided to the `record` method is the `type` for the entry you are recording, while the second argument is the `key` that determines how the aggregated data should be grouped. For most aggregation methods you will also need to specify a `value` to be aggregated. In the example above, the value being aggregated is `$sale->amount`. You may then invoke one or more aggregation methods (such as `sum`) so that Pulse may capture pre-aggregated values into "buckets" for efficient retrieval later.

The available aggregation methods are:

* `avg`
* `count`
* `max`
* `min`
* `sum`

> [!NOTE]
> When building a card package that captures the currently authenticated user ID, you should use the `Pulse::resolveAuthenticatedUserId()` method, which respects any [user resolver customizations](#dashboard-resolving-users) made to the application.

<a name="custom-card-data-retrieval"></a>
#### Retrieving Aggregate Data

When extending Pulse's `Card` Livewire component, you may use the `aggregate` method to retrieve aggregated data for the period being viewed in the dashboard:

```php
class TopSellers extends Card
{
    public function render()
    {
        return view('livewire.pulse.top-sellers', [
            'topSellers' => $this->aggregate('user_sale', ['sum', 'count'])
        ]);
    }
}
```

The `aggregate` method returns a collection of PHP `stdClass` objects. Each object will contain the `key` property captured earlier, along with keys for each of the requested aggregates:

```blade
@foreach ($topSellers as $seller)
    {{ $seller->key }}
    {{ $seller->sum }}
    {{ $seller->count }}
@endforeach
```

Pulse will primarily retrieve data from the pre-aggregated buckets; therefore, the specified aggregates must have been captured up-front using the `Pulse::record` method. The oldest bucket will typically fall partially outside the period, so Pulse will aggregate the oldest entries to fill the gap and give an accurate value for the entire period, without needing to aggregate the entire period on each poll request.

You may also retrieve a total value for a given type by using the `aggregateTotal` method. For example, the following method would retrieve the total of all user sales instead of grouping them by user.

```php
$total = $this->aggregateTotal('user_sale', 'sum');
```

<a name="custom-card-displaying-users"></a>
#### Displaying Users

When working with aggregates that record a user ID as the key, you may resolve the keys to user records using the `Pulse::resolveUsers` method:

```php
$aggregates = $this->aggregate('user_sale', ['sum', 'count']);

$users = Pulse::resolveUsers($aggregates->pluck('key'));

return view('livewire.pulse.top-sellers', [
    'sellers' => $aggregates->map(fn ($aggregate) => (object) [
        'user' => $users->find($aggregate->key),
        'sum' => $aggregate->sum,
        'count' => $aggregate->count,
    ])
]);
```

The `find` method returns an object containing `name`, `extra`, and `avatar` keys, which you may optionally pass directly to the `<x-pulse::user-card>` Blade component:

```blade
<x-pulse::user-card :user="{{ $seller->user }}" :stats="{{ $seller->sum }}" />
```

<a name="custom-recorders"></a>
#### Custom Recorders

Package authors may wish to provide recorder classes to allow users to configure the capturing of data.

Recorders are registered in the `recorders` section of the application's `config/pulse.php` configuration file:

```php
[
    // ...
    'recorders' => [
        Acme\Recorders\Deployments::class => [
            // ...
        ],

        // ...
    ],
]
```

Recorders may listen to events by specifying a `$listen` property. Pulse will automatically register the listeners and call the recorders `record` method:

```php
<?php

namespace Acme\Recorders;

use Acme\Events\Deployment;
use Illuminate\Support\Facades\Config;
use Laravel\Pulse\Facades\Pulse;

class Deployments
{
    /**
     * The events to listen for.
     *
     * @var array<int, class-string>
     */
    public array $listen = [
        Deployment::class,
    ];

    /**
     * Record the deployment.
     */
    public function record(Deployment $event): void
    {
        $config = Config::get('pulse.recorders.'.static::class);

        Pulse::record(
            // ...
        );
    }
}
```


---

# Database: Query Builder

*Sección: Laravel | Origen: https://laravel.com/docs/13.x/queries*

- [Introduction](#introduction)
- [Running Database Queries](#running-database-queries)
    - [Chunking Results](#chunking-results)
    - [Streaming Results Lazily](#streaming-results-lazily)
    - [Aggregates](#aggregates)
- [Select Statements](#select-statements)
- [Raw Expressions](#raw-expressions)
- [Joins](#joins)
- [Unions](#unions)
- [Basic Where Clauses](#basic-where-clauses)
    - [Where Clauses](#where-clauses)
    - [Or Where Clauses](#or-where-clauses)
    - [Where Not Clauses](#where-not-clauses)
    - [Where Any / All / None Clauses](#where-any-all-none-clauses)
    - [JSON Where Clauses](#json-where-clauses)
    - [Additional Where Clauses](#additional-where-clauses)
    - [Logical Grouping](#logical-grouping)
- [Advanced Where Clauses](#advanced-where-clauses)
    - [Where Exists Clauses](#where-exists-clauses)
    - [Subquery Where Clauses](#subquery-where-clauses)
    - [Full Text Where Clauses](#full-text-where-clauses)
    - [Vector Similarity Clauses](#vector-similarity-clauses)
- [Ordering, Grouping, Limit and Offset](#ordering-grouping-limit-and-offset)
    - [Ordering](#ordering)
    - [Grouping](#grouping)
    - [Limit and Offset](#limit-and-offset)
- [Conditional Clauses](#conditional-clauses)
- [Insert Statements](#insert-statements)
    - [Upserts](#upserts)
- [Update Statements](#update-statements)
    - [Updating JSON Columns](#updating-json-columns)
    - [Increment and Decrement](#increment-and-decrement)
- [Delete Statements](#delete-statements)
- [Pessimistic Locking](#pessimistic-locking)
- [Reusable Query Components](#reusable-query-components)
- [Debugging](#debugging)

<a name="introduction"></a>
## Introduction

Laravel's database query builder provides a convenient, fluent interface to creating and running database queries. It can be used to perform most database operations in your application and works perfectly with all of Laravel's supported database systems.

The Laravel query builder uses PDO parameter binding to protect your application against SQL injection attacks. There is no need to clean or sanitize strings passed to the query builder as query bindings.

> [!WARNING]
> PDO does not support binding column names. Therefore, you should never allow user input to dictate the column names referenced by your queries, including "order by" columns.

<a name="running-database-queries"></a>
## Running Database Queries

<a name="retrieving-all-rows-from-a-table"></a>
#### Retrieving All Rows From a Table

You may use the `table` method provided by the `DB` facade to begin a query. The `table` method returns a fluent query builder instance for the given table, allowing you to chain more constraints onto the query and then finally retrieve the results of the query using the `get` method:

```php
<?php

namespace App\Http\Controllers;

use Illuminate\Support\Facades\DB;
use Illuminate\View\View;

class UserController extends Controller
{
    /**
     * Show a list of all of the application's users.
     */
    public function index(): View
    {
        $users = DB::table('users')->get();

        return view('user.index', ['users' => $users]);
    }
}
```

The `get` method returns an `Illuminate\Support\Collection` instance containing the results of the query where each result is an instance of the PHP `stdClass` object. You may access each column's value by accessing the column as a property of the object:

```php
use Illuminate\Support\Facades\DB;

$users = DB::table('users')->get();

foreach ($users as $user) {
    echo $user->name;
}
```

> [!NOTE]
> Laravel collections provide a variety of extremely powerful methods for mapping and reducing data. For more information on Laravel collections, check out the [collection documentation](/docs/{{version}}/collections).

<a name="retrieving-a-single-row-column-from-a-table"></a>
#### Retrieving a Single Row / Column From a Table

If you just need to retrieve a single row from a database table, you may use the `DB` facade's `first` method. This method will return a single `stdClass` object:

```php
$user = DB::table('users')->where('name', 'John')->first();

return $user->email;
```

If you would like to retrieve a single row from a database table, but throw an `Illuminate\Database\RecordNotFoundException` if no matching row is found, you may use the `firstOrFail` method. If the `RecordNotFoundException` is not caught, a 404 HTTP response is automatically sent back to the client:

```php
$user = DB::table('users')->where('name', 'John')->firstOrFail();
```

If you don't need an entire row, you may extract a single value from a record using the `value` method. This method will return the value of the column directly:

```php
$email = DB::table('users')->where('name', 'John')->value('email');
```

To retrieve a single row by its `id` column value, use the `find` method:

```php
$user = DB::table('users')->find(3);
```

<a name="retrieving-a-list-of-column-values"></a>
#### Retrieving a List of Column Values

If you would like to retrieve an `Illuminate\Support\Collection` instance containing the values of a single column, you may use the `pluck` method. In this example, we'll retrieve a collection of user titles:

```php
use Illuminate\Support\Facades\DB;

$titles = DB::table('users')->pluck('title');

foreach ($titles as $title) {
    echo $title;
}
```

You may specify the column that the resulting collection should use as its keys by providing a second argument to the `pluck` method:

```php
$titles = DB::table('users')->pluck('title', 'name');

foreach ($titles as $name => $title) {
    echo $title;
}
```

<a name="chunking-results"></a>
### Chunking Results

If you need to work with thousands of database records, consider using the `chunk` method provided by the `DB` facade. This method retrieves a small chunk of results at a time and feeds each chunk into a closure for processing. For example, let's retrieve the entire `users` table in chunks of 100 records at a time:

```php
use Illuminate\Support\Collection;
use Illuminate\Support\Facades\DB;

DB::table('users')->orderBy('id')->chunk(100, function (Collection $users) {
    foreach ($users as $user) {
        // ...
    }
});
```

You may stop further chunks from being processed by returning `false` from the closure:

```php
DB::table('users')->orderBy('id')->chunk(100, function (Collection $users) {
    // Process the records...

    return false;
});
```

If you are updating database records while chunking results, your chunk results could change in unexpected ways. If you plan to update the retrieved records while chunking, it is always best to use the `chunkById` method instead. This method will automatically paginate the results based on the record's primary key:

```php
DB::table('users')->where('active', false)
    ->chunkById(100, function (Collection $users) {
        foreach ($users as $user) {
            DB::table('users')
                ->where('id', $user->id)
                ->update(['active' => true]);
        }
    });
```

Since the `chunkById` and `lazyById` methods add their own "where" conditions to the query being executed, you should typically [logically group](#logical-grouping) your own conditions within a closure:

```php
DB::table('users')->where(function ($query) {
    $query->where('credits', 1)->orWhere('credits', 2);
})->chunkById(100, function (Collection $users) {
    foreach ($users as $user) {
        DB::table('users')
            ->where('id', $user->id)
            ->update(['credits' => 3]);
    }
});
```

> [!WARNING]
> When updating or deleting records inside the chunk callback, any changes to the primary key or foreign keys could affect the chunk query. This could potentially result in records not being included in the chunked results.

<a name="streaming-results-lazily"></a>
### Streaming Results Lazily

The `lazy` method works similarly to [the chunk method](#chunking-results) in the sense that it executes the query in chunks. However, instead of passing each chunk into a callback, the `lazy()` method returns a [LazyCollection](/docs/{{version}}/collections#lazy-collections), which lets you interact with the results as a single stream:

```php
use Illuminate\Support\Facades\DB;

DB::table('users')->orderBy('id')->lazy()->each(function (object $user) {
    // ...
});
```

Once again, if you plan to update the retrieved records while iterating over them, it is best to use the `lazyById` or `lazyByIdDesc` methods instead. These methods will automatically paginate the results based on the record's primary key:

```php
DB::table('users')->where('active', false)
    ->lazyById()->each(function (object $user) {
        DB::table('users')
            ->where('id', $user->id)
            ->update(['active' => true]);
    });
```

> [!WARNING]
> When updating or deleting records while iterating over them, any changes to the primary key or foreign keys could affect the chunk query. This could potentially result in records not being included in the results.

<a name="aggregates"></a>
### Aggregates

The query builder also provides a variety of methods for retrieving aggregate values like `count`, `max`, `min`, `avg`, and `sum`. You may call any of these methods after constructing your query:

```php
use Illuminate\Support\Facades\DB;

$users = DB::table('users')->count();

$price = DB::table('orders')->max('price');
```

Of course, you may combine these methods with other clauses to fine-tune how your aggregate value is calculated:

```php
$price = DB::table('orders')
    ->where('finalized', 1)
    ->avg('price');
```

<a name="determining-if-records-exist"></a>
#### Determining if Records Exist

Instead of using the `count` method to determine if any records exist that match your query's constraints, you may use the `exists` and `doesntExist` methods:

```php
if (DB::table('orders')->where('finalized', 1)->exists()) {
    // ...
}

if (DB::table('orders')->where('finalized', 1)->doesntExist()) {
    // ...
}
```

<a name="select-statements"></a>
## Select Statements

<a name="specifying-a-select-clause"></a>
#### Specifying a Select Clause

You may not always want to select all columns from a database table. Using the `select` method, you can specify a custom "select" clause for the query:

```php
use Illuminate\Support\Facades\DB;

$users = DB::table('users')
    ->select('name', 'email as user_email')
    ->get();
```

The `distinct` method allows you to force the query to return distinct results:

```php
$users = DB::table('users')->distinct()->get();
```

If you already have a query builder instance and you wish to add a column to its existing select clause, you may use the `addSelect` method:

```php
$query = DB::table('users')->select('name');

$users = $query->addSelect('age')->get();
```

<a name="raw-expressions"></a>
## Raw Expressions

Sometimes you may need to insert an arbitrary string into a query. To create a raw string expression, you may use the `raw` method provided by the `DB` facade:

```php
$users = DB::table('users')
    ->select(DB::raw('count(*) as user_count, status'))
    ->where('status', '<>', 1)
    ->groupBy('status')
    ->get();
```

> [!WARNING]
> Raw statements will be injected into the query as strings, so you should be extremely careful to avoid creating SQL injection vulnerabilities.

<a name="raw-methods"></a>
### Raw Methods

Instead of using the `DB::raw` method, you may also use the following methods to insert a raw expression into various parts of your query. **Remember, Laravel cannot guarantee that any query using raw expressions is protected against SQL injection vulnerabilities.**

<a name="selectraw"></a>
#### `selectRaw`

The `selectRaw` method can be used in place of `addSelect(DB::raw(/* ... */))`. This method accepts an optional array of bindings as its second argument:

```php
$orders = DB::table('orders')
    ->selectRaw('price * ? as price_with_tax', [1.0825])
    ->get();
```

<a name="whereraw-orwhereraw"></a>
#### `whereRaw / orWhereRaw`

The `whereRaw` and `orWhereRaw` methods can be used to inject a raw "where" clause into your query. These methods accept an optional array of bindings as their second argument:

```php
$orders = DB::table('orders')
    ->whereRaw('price > IF(state = "TX", ?, 100)', [200])
    ->get();
```

<a name="havingraw-orhavingraw"></a>
#### `havingRaw / orHavingRaw`

The `havingRaw` and `orHavingRaw` methods may be used to provide a raw string as the value of the "having" clause. These methods accept an optional array of bindings as their second argument:

```php
$orders = DB::table('orders')
    ->select('department', DB::raw('SUM(price) as total_sales'))
    ->groupBy('department')
    ->havingRaw('SUM(price) > ?', [2500])
    ->get();
```

<a name="orderbyraw"></a>
#### `orderByRaw`

The `orderByRaw` method may be used to provide a raw string as the value of the "order by" clause:

```php
$orders = DB::table('orders')
    ->orderByRaw('updated_at - created_at DESC')
    ->get();
```

<a name="groupbyraw"></a>
#### `groupByRaw`

The `groupByRaw` method may be used to provide a raw string as the value of the `group by` clause:

```php
$orders = DB::table('orders')
    ->select('city', 'state')
    ->groupByRaw('city, state')
    ->get();
```

<a name="joins"></a>
## Joins

<a name="inner-join-clause"></a>
#### Inner Join Clause

The query builder may also be used to add join clauses to your queries. To perform a basic "inner join", you may use the `join` method on a query builder instance. The first argument passed to the `join` method is the name of the table you need to join to, while the remaining arguments specify the column constraints for the join. You may even join multiple tables in a single query:

```php
use Illuminate\Support\Facades\DB;

$users = DB::table('users')
    ->join('contacts', 'users.id', '=', 'contacts.user_id')
    ->join('orders', 'users.id', '=', 'orders.user_id')
    ->select('users.*', 'contacts.phone', 'orders.price')
    ->get();
```

<a name="left-join-right-join-clause"></a>
#### Left Join / Right Join Clause

If you would like to perform a "left join" or "right join" instead of an "inner join", use the `leftJoin` or `rightJoin` methods. These methods have the same signature as the `join` method:

```php
$users = DB::table('users')
    ->leftJoin('posts', 'users.id', '=', 'posts.user_id')
    ->get();

$users = DB::table('users')
    ->rightJoin('posts', 'users.id', '=', 'posts.user_id')
    ->get();
```

<a name="cross-join-clause"></a>
#### Cross Join Clause

You may use the `crossJoin` method to perform a "cross join". Cross joins generate a cartesian product between the first table and the joined table:

```php
$sizes = DB::table('sizes')
    ->crossJoin('colors')
    ->get();
```

<a name="advanced-join-clauses"></a>
#### Advanced Join Clauses

You may also specify more advanced join clauses. To get started, pass a closure as the second argument to the `join` method. The closure will receive a `Illuminate\Database\Query\JoinClause` instance which allows you to specify constraints on the "join" clause:

```php
DB::table('users')
    ->join('contacts', function (JoinClause $join) {
        $join->on('users.id', '=', 'contacts.user_id')->orOn(/* ... */);
    })
    ->get();
```

If you would like to use a "where" clause on your joins, you may use the `where` and `orWhere` methods provided by the `JoinClause` instance. Instead of comparing two columns, these methods will compare the column against a value:

```php
DB::table('users')
    ->join('contacts', function (JoinClause $join) {
        $join->on('users.id', '=', 'contacts.user_id')
            ->where('contacts.user_id', '>', 5);
    })
    ->get();
```

<a name="subquery-joins"></a>
#### Subquery Joins

You may use the `joinSub`, `leftJoinSub`, and `rightJoinSub` methods to join a query to a subquery. Each of these methods receives three arguments: the subquery, its table alias, and a closure that defines the related columns. In this example, we will retrieve a collection of users where each user record also contains the `created_at` timestamp of the user's most recently published blog post:

```php
$latestPosts = DB::table('posts')
    ->select('user_id', DB::raw('MAX(created_at) as last_post_created_at'))
    ->where('is_published', true)
    ->groupBy('user_id');

$users = DB::table('users')
    ->joinSub($latestPosts, 'latest_posts', function (JoinClause $join) {
        $join->on('users.id', '=', 'latest_posts.user_id');
    })->get();
```

<a name="lateral-joins"></a>
#### Lateral Joins

> [!WARNING]
> Lateral joins are currently supported by PostgreSQL, MySQL >= 8.0.14, and SQL Server.

You may use the `joinLateral` and `leftJoinLateral` methods to perform a "lateral join" with a subquery. Each of these methods receives two arguments: the subquery and its table alias. The join condition(s) should be specified within the `where` clause of the given subquery. Lateral joins are evaluated for each row and can reference columns outside the subquery.

In this example, we will retrieve a collection of users as well as the user's three most recent blog posts. Each user can produce up to three rows in the result set: one for each of their most recent blog posts. The join condition is specified with a `whereColumn` clause within the subquery, referencing the current user row:

```php
$latestPosts = DB::table('posts')
    ->select('id as post_id', 'title as post_title', 'created_at as post_created_at')
    ->whereColumn('user_id', 'users.id')
    ->orderBy('created_at', 'desc')
    ->limit(3);

$users = DB::table('users')
    ->joinLateral($latestPosts, 'latest_posts')
    ->get();
```

<a name="unions"></a>
## Unions

The query builder also provides a convenient method to "union" two or more queries together. For example, you may create an initial query and use the `union` method to union it with more queries:

```php
use Illuminate\Support\Facades\DB;

$usersWithoutFirstName = DB::table('users')
    ->whereNull('first_name');

$users = DB::table('users')
    ->whereNull('last_name')
    ->union($usersWithoutFirstName)
    ->get();
```

In addition to the `union` method, the query builder provides a `unionAll` method. Queries that are combined using the `unionAll` method will not have their duplicate results removed. The `unionAll` method has the same method signature as the `union` method.

<a name="basic-where-clauses"></a>
## Basic Where Clauses

<a name="where-clauses"></a>
### Where Clauses

You may use the query builder's `where` method to add "where" clauses to the query. The most basic call to the `where` method requires three arguments. The first argument is the name of the column. The second argument is an operator, which can be any of the database's supported operators. The third argument is the value to compare against the column's value.

For example, the following query retrieves users where the value of the `votes` column is equal to `100` and the value of the `age` column is greater than `35`:

```php
$users = DB::table('users')
    ->where('votes', '=', 100)
    ->where('age', '>', 35)
    ->get();
```

For convenience, if you want to verify that a column is `=` to a given value, you may pass the value as the second argument to the `where` method. Laravel will assume you would like to use the `=` operator:

```php
$users = DB::table('users')->where('votes', 100)->get();
```

You may also provide an associative array to the `where` method to quickly query against multiple columns:

```php
$users = DB::table('users')->where([
    'first_name' => 'Jane',
    'last_name' => 'Doe',
])->get();
```

As previously mentioned, you may use any operator that is supported by your database system:

```php
$users = DB::table('users')
    ->where('votes', '>=', 100)
    ->get();

$users = DB::table('users')
    ->where('votes', '<>', 100)
    ->get();

$users = DB::table('users')
    ->where('name', 'like', 'T%')
    ->get();
```

You may also pass an array of conditions to the `where` function. Each element of the array should be an array containing the three arguments typically passed to the `where` method:

```php
$users = DB::table('users')->where([
    ['status', '=', '1'],
    ['subscribed', '<>', '1'],
])->get();
```

> [!WARNING]
> PDO does not support binding column names. Therefore, you should never allow user input to dictate the column names referenced by your queries, including "order by" columns.

> [!WARNING]
> MySQL and MariaDB automatically typecast strings to integers in string-number comparisons. In this process, non-numeric strings are converted to `0`, which can lead to unexpected results. For example, if your table has a `secret` column with a value of `aaa` and you run `User::where('secret', 0)`, that row will be returned. To avoid this, ensure all values are typecast to their appropriate types before using them in queries.

<a name="or-where-clauses"></a>
### Or Where Clauses

When chaining together calls to the query builder's `where` method, the "where" clauses will be joined together using the `and` operator. However, you may use the `orWhere` method to join a clause to the query using the `or` operator. The `orWhere` method accepts the same arguments as the `where` method:

```php
$users = DB::table('users')
    ->where('votes', '>', 100)
    ->orWhere('name', 'John')
    ->get();
```

If you need to group an "or" condition within parentheses, you may pass a closure as the first argument to the `orWhere` method:

```php
use Illuminate\Database\Query\Builder;

$users = DB::table('users')
    ->where('votes', '>', 100)
    ->orWhere(function (Builder $query) {
        $query->where('name', 'Abigail')
            ->where('votes', '>', 50);
        })
    ->get();
```

The example above will produce the following SQL:

```sql
select * from users where votes > 100 or (name = 'Abigail' and votes > 50)
```

> [!WARNING]
> You should always group `orWhere` calls in order to avoid unexpected behavior when global scopes are applied.

<a name="where-not-clauses"></a>
### Where Not Clauses

The `whereNot` and `orWhereNot` methods may be used to negate a given group of query constraints. For example, the following query excludes products that are on clearance or which have a price that is less than ten:

```php
$products = DB::table('products')
    ->whereNot(function (Builder $query) {
        $query->where('clearance', true)
            ->orWhere('price', '<', 10);
        })
    ->get();
```

<a name="where-any-all-none-clauses"></a>
### Where Any / All / None Clauses

Sometimes you may need to apply the same query constraints to multiple columns. For example, you may want to retrieve all records where any columns in a given list are `LIKE` a given value. You may accomplish this using the `whereAny` method:

```php
$users = DB::table('users')
    ->where('active', true)
    ->whereAny([
        'name',
        'email',
        'phone',
    ], 'like', 'Example%')
    ->get();
```

The query above will result in the following SQL:

```sql
SELECT *
FROM users
WHERE active = true AND (
    name LIKE 'Example%' OR
    email LIKE 'Example%' OR
    phone LIKE 'Example%'
)
```

Similarly, the `whereAll` method may be used to retrieve records where all of the given columns match a given constraint:

```php
$posts = DB::table('posts')
    ->where('published', true)
    ->whereAll([
        'title',
        'content',
    ], 'like', '%Laravel%')
    ->get();
```

The query above will result in the following SQL:

```sql
SELECT *
FROM posts
WHERE published = true AND (
    title LIKE '%Laravel%' AND
    content LIKE '%Laravel%'
)
```

The `whereNone` method may be used to retrieve records where none of the given columns match a given constraint:

```php
$albums = DB::table('albums')
    ->where('published', true)
    ->whereNone([
        'title',
        'lyrics',
        'tags',
    ], 'like', '%explicit%')
    ->get();
```

The query above will result in the following SQL:

```sql
SELECT *
FROM albums
WHERE published = true AND NOT (
    title LIKE '%explicit%' OR
    lyrics LIKE '%explicit%' OR
    tags LIKE '%explicit%'
)
```

<a name="json-where-clauses"></a>
### JSON Where Clauses

Laravel also supports querying JSON column types on databases that provide support for JSON column types. Currently, this includes MariaDB 10.3+, MySQL 8.0+, PostgreSQL 12.0+, SQL Server 2017+, and SQLite 3.39.0+. To query a JSON column, use the `->` operator:

```php
$users = DB::table('users')
    ->where('preferences->dining->meal', 'salad')
    ->get();

$users = DB::table('users')
    ->whereIn('preferences->dining->meal', ['pasta', 'salad', 'sandwiches'])
    ->get();
```

You may use the `whereJsonContains` and `whereJsonDoesntContain` methods to query JSON arrays:

```php
$users = DB::table('users')
    ->whereJsonContains('options->languages', 'en')
    ->get();

$users = DB::table('users')
    ->whereJsonDoesntContain('options->languages', 'en')
    ->get();
```

If your application uses the MariaDB, MySQL, or PostgreSQL databases, you may pass an array of values to the `whereJsonContains` and `whereJsonDoesntContain` methods:

```php
$users = DB::table('users')
    ->whereJsonContains('options->languages', ['en', 'de'])
    ->get();

$users = DB::table('users')
    ->whereJsonDoesntContain('options->languages', ['en', 'de'])
    ->get();
```

In addition, you may use the `whereJsonContainsKey` or `whereJsonDoesntContainKey` methods to retrieve the results that include or do not include a JSON key:

```php
$users = DB::table('users')
    ->whereJsonContainsKey('preferences->dietary_requirements')
    ->get();

$users = DB::table('users')
    ->whereJsonDoesntContainKey('preferences->dietary_requirements')
    ->get();
```

Finally, you may use `whereJsonLength` method to query JSON arrays by their length:

```php
$users = DB::table('users')
    ->whereJsonLength('options->languages', 0)
    ->get();

$users = DB::table('users')
    ->whereJsonLength('options->languages', '>', 1)
    ->get();
```

<a name="additional-where-clauses"></a>
### Additional Where Clauses

**whereLike / orWhereLike / whereNotLike / orWhereNotLike**

The `whereLike` method allows you to add "LIKE" clauses to your query for pattern matching. These methods provide a database-agnostic way of performing string matching queries, with the ability to toggle case-sensitivity. By default, string matching is case-insensitive:

```php
$users = DB::table('users')
    ->whereLike('name', '%John%')
    ->get();
```

You can enable a case-sensitive search via the `caseSensitive` argument:

```php
$users = DB::table('users')
    ->whereLike('name', '%John%', caseSensitive: true)
    ->get();
```

The `orWhereLike` method allows you to add an "or" clause with a LIKE condition:

```php
$users = DB::table('users')
    ->where('votes', '>', 100)
    ->orWhereLike('name', '%John%')
    ->get();
```

The `whereNotLike` method allows you to add "NOT LIKE" clauses to your query:

```php
$users = DB::table('users')
    ->whereNotLike('name', '%John%')
    ->get();
```

Similarly, you can use `orWhereNotLike` to add an "or" clause with a NOT LIKE condition:

```php
$users = DB::table('users')
    ->where('votes', '>', 100)
    ->orWhereNotLike('name', '%John%')
    ->get();
```

> [!WARNING]
> The `whereLike` case-sensitive search option is currently not supported on SQL Server.

**whereIn / whereNotIn / orWhereIn / orWhereNotIn**

The `whereIn` method verifies that a given column's value is contained within the given array:

```php
$users = DB::table('users')
    ->whereIn('id', [1, 2, 3])
    ->get();
```

The `whereNotIn` method verifies that the given column's value is not contained in the given array:

```php
$users = DB::table('users')
    ->whereNotIn('id', [1, 2, 3])
    ->get();
```

You may also provide a query object as the `whereIn` method's second argument:

```php
$activeUsers = DB::table('users')->select('id')->where('is_active', 1);

$comments = DB::table('comments')
    ->whereIn('user_id', $activeUsers)
    ->get();
```

The example above will produce the following SQL:

```sql
select * from comments where user_id in (
    select id
    from users
    where is_active = 1
)
```

> [!WARNING]
> If you are adding a large array of integer bindings to your query, the `whereIntegerInRaw` or `whereIntegerNotInRaw` methods may be used to greatly reduce your memory usage.

**whereBetween / orWhereBetween**

The `whereBetween` method verifies that a column's value is between two values:

```php
$users = DB::table('users')
    ->whereBetween('votes', [1, 100])
    ->get();
```

**whereNotBetween / orWhereNotBetween**

The `whereNotBetween` method verifies that a column's value lies outside of two values:

```php
$users = DB::table('users')
    ->whereNotBetween('votes', [1, 100])
    ->get();
```

**whereBetweenColumns / whereNotBetweenColumns / orWhereBetweenColumns / orWhereNotBetweenColumns**

The `whereBetweenColumns` method verifies that a column's value is between the two values of two columns in the same table row:

```php
$patients = DB::table('patients')
    ->whereBetweenColumns('weight', ['minimum_allowed_weight', 'maximum_allowed_weight'])
    ->get();
```

The `whereNotBetweenColumns` method verifies that a column's value lies outside the two values of two columns in the same table row:

```php
$patients = DB::table('patients')
    ->whereNotBetweenColumns('weight', ['minimum_allowed_weight', 'maximum_allowed_weight'])
    ->get();
```

**whereValueBetween / whereValueNotBetween / orWhereValueBetween / orWhereValueNotBetween**

The `whereValueBetween` method verifies that a given value is between the values of two columns of the same type in the same table row:

```php
$products = DB::table('products')
    ->whereValueBetween(100, ['min_price', 'max_price'])
    ->get();
```

The `whereValueNotBetween` method verifies that a value lies outside the values of two columns in the same table row:

```php
$products = DB::table('products')
    ->whereValueNotBetween(100, ['min_price', 'max_price'])
    ->get();
```

**whereNull / whereNotNull / orWhereNull / orWhereNotNull**

The `whereNull` method verifies that the value of the given column is `NULL`:

```php
$users = DB::table('users')
    ->whereNull('updated_at')
    ->get();
```

The `whereNotNull` method verifies that the column's value is not `NULL`:

```php
$users = DB::table('users')
    ->whereNotNull('updated_at')
    ->get();
```

**whereNullSafeEquals / orWhereNullSafeEquals**

The `whereNullSafeEquals` and `orWhereNullSafeEquals` methods may be used to compare a column's value against a given value while treating two `NULL` values as equal:

```php
$lastLoginIp = $request->input('last_login_ip');

$users = DB::table('users')
    ->whereNullSafeEquals('last_login_ip', $lastLoginIp)
    ->get();
```

**whereDate / whereMonth / whereDay / whereYear / whereTime**

The `whereDate` method may be used to compare a column's value against a date:

```php
$users = DB::table('users')
    ->whereDate('created_at', '2016-12-31')
    ->get();
```

The `whereMonth` method may be used to compare a column's value against a specific month:

```php
$users = DB::table('users')
    ->whereMonth('created_at', '12')
    ->get();
```

The `whereDay` method may be used to compare a column's value against a specific day of the month:

```php
$users = DB::table('users')
    ->whereDay('created_at', '31')
    ->get();
```

The `whereYear` method may be used to compare a column's value against a specific year:

```php
$users = DB::table('users')
    ->whereYear('created_at', '2016')
    ->get();
```

The `whereTime` method may be used to compare a column's value against a specific time:

```php
$users = DB::table('users')
    ->whereTime('created_at', '=', '11:20:45')
    ->get();
```

**wherePast / whereFuture / whereToday / whereBeforeToday / whereAfterToday**

The `wherePast` and `whereFuture` methods may be used to determine if a column's value is in the past or future:

```php
$invoices = DB::table('invoices')
    ->wherePast('due_at')
    ->get();

$invoices = DB::table('invoices')
    ->whereFuture('due_at')
    ->get();
```

The `whereNowOrPast` and `whereNowOrFuture` methods may be used to determine if a column's value is in the past or future, inclusive of the current date and time:

```php
$invoices = DB::table('invoices')
    ->whereNowOrPast('due_at')
    ->get();

$invoices = DB::table('invoices')
    ->whereNowOrFuture('due_at')
    ->get();
```

The `whereToday`, `whereBeforeToday`, and `whereAfterToday` methods may be used to determine if a column's value is today, before today, or after today, respectively:

```php
$invoices = DB::table('invoices')
    ->whereToday('due_at')
    ->get();

$invoices = DB::table('invoices')
    ->whereBeforeToday('due_at')
    ->get();

$invoices = DB::table('invoices')
    ->whereAfterToday('due_at')
    ->get();
```

Similarly, the `whereTodayOrBefore` and `whereTodayOrAfter` methods may be used to determine if a column's value is before today or after today, inclusive of today's date:

```php
$invoices = DB::table('invoices')
    ->whereTodayOrBefore('due_at')
    ->get();

$invoices = DB::table('invoices')
    ->whereTodayOrAfter('due_at')
    ->get();
```

**whereColumn / orWhereColumn**

The `whereColumn` method may be used to verify that two columns are equal:

```php
$users = DB::table('users')
    ->whereColumn('first_name', 'last_name')
    ->get();
```

You may also pass a comparison operator to the `whereColumn` method:

```php
$users = DB::table('users')
    ->whereColumn('updated_at', '>', 'created_at')
    ->get();
```

You may also pass an array of column comparisons to the `whereColumn` method. These conditions will be joined using the `and` operator:

```php
$users = DB::table('users')
    ->whereColumn([
        ['first_name', '=', 'last_name'],
        ['updated_at', '>', 'created_at'],
    ])->get();
```

<a name="logical-grouping"></a>
### Logical Grouping

Sometimes you may need to group several "where" clauses within parentheses in order to achieve your query's desired logical grouping. In fact, you should generally always group calls to the `orWhere` method in parentheses in order to avoid unexpected query behavior. To accomplish this, you may pass a closure to the `where` method:

```php
$users = DB::table('users')
    ->where('name', '=', 'John')
    ->where(function (Builder $query) {
        $query->where('votes', '>', 100)
            ->orWhere('title', '=', 'Admin');
    })
    ->get();
```

As you can see, passing a closure into the `where` method instructs the query builder to begin a constraint group. The closure will receive a query builder instance which you can use to set the constraints that should be contained within the parenthesis group. The example above will produce the following SQL:

```sql
select * from users where name = 'John' and (votes > 100 or title = 'Admin')
```

> [!WARNING]
> You should always group `orWhere` calls in order to avoid unexpected behavior when global scopes are applied.

<a name="advanced-where-clauses"></a>
## Advanced Where Clauses

<a name="where-exists-clauses"></a>
### Where Exists Clauses

The `whereExists` method allows you to write "where exists" SQL clauses. The `whereExists` method accepts a closure which will receive a query builder instance, allowing you to define the query that should be placed inside of the "exists" clause:

```php
$users = DB::table('users')
    ->whereExists(function (Builder $query) {
        $query->select(DB::raw(1))
            ->from('orders')
            ->whereColumn('orders.user_id', 'users.id');
    })
    ->get();
```

Alternatively, you may provide a query object to the `whereExists` method instead of a closure:

```php
$orders = DB::table('orders')
    ->select(DB::raw(1))
    ->whereColumn('orders.user_id', 'users.id');

$users = DB::table('users')
    ->whereExists($orders)
    ->get();
```

Both of the examples above will produce the following SQL:

```sql
select * from users
where exists (
    select 1
    from orders
    where orders.user_id = users.id
)
```

<a name="subquery-where-clauses"></a>
### Subquery Where Clauses

Sometimes you may need to construct a "where" clause that compares the results of a subquery to a given value. You may accomplish this by passing a closure and a value to the `where` method. For example, the following query will retrieve all users who have a recent "membership" of a given type;

```php
use App\Models\User;
use Illuminate\Database\Query\Builder;

$users = User::where(function (Builder $query) {
    $query->select('type')
        ->from('membership')
        ->whereColumn('membership.user_id', 'users.id')
        ->orderByDesc('membership.start_date')
        ->limit(1);
}, 'Pro')->get();
```

Or, you may need to construct a "where" clause that compares a column to the results of a subquery. You may accomplish this by passing a column, operator, and closure to the `where` method. For example, the following query will retrieve all income records where the amount is less than average;

```php
use App\Models\Income;
use Illuminate\Database\Query\Builder;

$incomes = Income::where('amount', '<', function (Builder $query) {
    $query->selectRaw('avg(i.amount)')->from('incomes as i');
})->get();
```

<a name="full-text-where-clauses"></a>
### Full Text Where Clauses

> [!WARNING]
> Full text where clauses are currently supported by MariaDB, MySQL, and PostgreSQL.

The `whereFullText` and `orWhereFullText` methods may be used to add full text "where" clauses to a query for columns that have [full text indexes](/docs/{{version}}/migrations#available-index-types). These methods will be transformed into the appropriate SQL for the underlying database system by Laravel. For example, a `MATCH AGAINST` clause will be generated for applications utilizing MariaDB or MySQL:

```php
$users = DB::table('users')
    ->whereFullText('bio', 'web developer')
    ->get();
```

<a name="vector-similarity-clauses"></a>
### Vector Similarity Clauses

> [!NOTE]
> Vector similarity clauses are currently supported on PostgreSQL connections using the `pgvector` extension and MariaDB 11.7 or later. For information on defining vector columns and indexes, consult the [migration documentation](/docs/{{version}}/migrations#available-column-types).

The `whereVectorSimilarTo` method filters results by cosine similarity to a given vector and orders the results by relevance. The `minSimilarity` threshold should be a value between `0.0` and `1.0`, where `1.0` is identical:

```php
$documents = DB::table('documents')
    ->whereVectorSimilarTo('embedding', $queryEmbedding, minSimilarity: 0.4)
    ->limit(10)
    ->get();
```

When a plain string is given as the vector argument, Laravel will automatically generate embeddings for it using the [Laravel AI SDK](/docs/{{version}}/ai-sdk#embeddings):

```php
$documents = DB::table('documents')
    ->whereVectorSimilarTo('embedding', 'Best wineries in Napa Valley')
    ->limit(10)
    ->get();
```

By default, `whereVectorSimilarTo` also orders results by distance (most similar first). You may disable this ordering by passing `false` as the `order` argument:

```php
$documents = DB::table('documents')
    ->whereVectorSimilarTo('embedding', $queryEmbedding, minSimilarity: 0.4, order: false)
    ->orderBy('created_at', 'desc')
    ->limit(10)
    ->get();
```

If you need more control, you may use the `selectVectorDistance`, `whereVectorDistanceLessThan`, and `orderByVectorDistance` methods independently:

```php
$documents = DB::table('documents')
    ->select('*')
    ->selectVectorDistance('embedding', $queryEmbedding, as: 'distance')
    ->whereVectorDistanceLessThan('embedding', $queryEmbedding, maxDistance: 0.3)
    ->orderByVectorDistance('embedding', $queryEmbedding)
    ->limit(10)
    ->get();
```

When utilizing PostgreSQL, the `pgvector` extension must be loaded before `vector` columns can be created:

```php
Schema::ensureVectorExtensionExists();
```

<a name="ordering-grouping-limit-and-offset"></a>
## Ordering, Grouping, Limit and Offset

<a name="ordering"></a>
### Ordering

<a name="orderby"></a>
#### The `orderBy` Method

The `orderBy` method allows you to sort the results of the query by a given column. The first argument accepted by the `orderBy` method should be the column you wish to sort by, while the second argument determines the direction of the sort and may be either `asc` or `desc`:

```php
$users = DB::table('users')
    ->orderBy('name', 'desc')
    ->get();
```

To sort by multiple columns, you may simply invoke `orderBy` as many times as necessary:

```php
$users = DB::table('users')
    ->orderBy('name', 'desc')
    ->orderBy('email', 'asc')
    ->get();
```

The sort direction is optional, and is ascending by default. If you want to sort in descending order, you can specify the second parameter for the `orderBy` method, or just use `orderByDesc`:

```php
$users = DB::table('users')
    ->orderByDesc('verified_at')
    ->get();
```

Finally, using the `->` operator, the results can be sorted by a value within a JSON column:

```php
$corporations = DB::table('corporations')
    ->where('country', 'US')
    ->orderBy('location->state')
    ->get();
```

<a name="latest-oldest"></a>
#### The `latest` and `oldest` Methods

The `latest` and `oldest` methods allow you to easily order results by date. By default, the result will be ordered by the table's `created_at` column. Or, you may pass the column name that you wish to sort by:

```php
$user = DB::table('users')
    ->latest()
    ->first();
```

<a name="random-ordering"></a>
#### Random Ordering

The `inRandomOrder` method may be used to sort the query results randomly. For example, you may use this method to fetch a random user:

```php
$randomUser = DB::table('users')
    ->inRandomOrder()
    ->first();
```

<a name="removing-existing-orderings"></a>
#### Removing Existing Orderings

The `reorder` method removes all of the "order by" clauses that have previously been applied to the query:

```php
$query = DB::table('users')->orderBy('name');

$unorderedUsers = $query->reorder()->get();
```

You may pass a column and direction when calling the `reorder` method in order to remove all existing "order by" clauses and apply an entirely new order to the query:

```php
$query = DB::table('users')->orderBy('name');

$usersOrderedByEmail = $query->reorder('email', 'desc')->get();
```

For convenience, you may use the `reorderDesc` method to reorder the query results in descending order:

```php
$query = DB::table('users')->orderBy('name');

$usersOrderedByEmail = $query->reorderDesc('email')->get();
```

<a name="grouping"></a>
### Grouping

<a name="groupby-having"></a>
#### The `groupBy` and `having` Methods

As you might expect, the `groupBy` and `having` methods may be used to group the query results. The `having` method's signature is similar to that of the `where` method:

```php
$users = DB::table('users')
    ->groupBy('account_id')
    ->having('account_id', '>', 100)
    ->get();
```

You can use the `havingBetween` method to filter the results within a given range:

```php
$report = DB::table('orders')
    ->selectRaw('count(id) as number_of_orders, customer_id')
    ->groupBy('customer_id')
    ->havingBetween('number_of_orders', [5, 15])
    ->get();
```

You may pass multiple arguments to the `groupBy` method to group by multiple columns:

```php
$users = DB::table('users')
    ->groupBy('first_name', 'status')
    ->having('account_id', '>', 100)
    ->get();
```

To build more advanced `having` statements, see the [havingRaw](#raw-methods) method.

<a name="limit-and-offset"></a>
### Limit and Offset

You may use the `limit` and `offset` methods to limit the number of results returned from the query or to skip a given number of results in the query:

```php
$users = DB::table('users')
    ->offset(10)
    ->limit(5)
    ->get();
```

<a name="conditional-clauses"></a>
## Conditional Clauses

Sometimes you may want certain query clauses to apply to a query based on another condition. For instance, you may only want to apply a `where` statement if a given input value is present on the incoming HTTP request. You may accomplish this using the `when` method:

```php
$role = $request->input('role');

$users = DB::table('users')
    ->when($role, function (Builder $query, string $role) {
        $query->where('role_id', $role);
    })
    ->get();
```

The `when` method only executes the given closure when the first argument is `true`. If the first argument is `false`, the closure will not be executed. So, in the example above, the closure given to the `when` method will only be invoked if the `role` field is present on the incoming request and evaluates to `true`.

You may pass another closure as the third argument to the `when` method. This closure will only execute if the first argument evaluates as `false`. To illustrate how this feature may be used, we will use it to configure the default ordering of a query:

```php
$sortByVotes = $request->boolean('sort_by_votes');

$users = DB::table('users')
    ->when($sortByVotes, function (Builder $query, bool $sortByVotes) {
        $query->orderBy('votes');
    }, function (Builder $query) {
        $query->orderBy('name');
    })
    ->get();
```

<a name="insert-statements"></a>
## Insert Statements

The query builder also provides an `insert` method that may be used to insert records into the database table. The `insert` method accepts an array of column names and values:

```php
DB::table('users')->insert([
    'email' => 'kayla@example.com',
    'votes' => 0
]);
```

You may insert several records at once by passing an array of arrays. Each array represents a record that should be inserted into the table:

```php
DB::table('users')->insert([
    ['email' => 'picard@example.com', 'votes' => 0],
    ['email' => 'janeway@example.com', 'votes' => 0],
]);
```

The `insertOrIgnore` method will ignore errors while inserting records into the database. When using this method, you should be aware that duplicate record errors will be ignored and other types of errors may also be ignored depending on the database engine. For example, `insertOrIgnore` will [bypass MySQL's strict mode](https://dev.mysql.com/doc/refman/en/sql-mode.html#ignore-effect-on-execution):

```php
DB::table('users')->insertOrIgnore([
    ['id' => 1, 'email' => 'sisko@example.com'],
    ['id' => 2, 'email' => 'archer@example.com'],
]);
```

The `insertUsing` method will insert new records into the table while using a subquery to determine the data that should be inserted:

```php
DB::table('pruned_users')->insertUsing([
    'id', 'name', 'email', 'email_verified_at'
], DB::table('users')->select(
    'id', 'name', 'email', 'email_verified_at'
)->where('updated_at', '<=', now()->minus(months: 1)));
```

<a name="auto-incrementing-ids"></a>
#### Auto-Incrementing IDs

If the table has an auto-incrementing id, use the `insertGetId` method to insert a record and then retrieve the ID:

```php
$id = DB::table('users')->insertGetId(
    ['email' => 'john@example.com', 'votes' => 0]
);
```

> [!WARNING]
> When using PostgreSQL the `insertGetId` method expects the auto-incrementing column to be named `id`. If you would like to retrieve the ID from a different "sequence", you may pass the column name as the second parameter to the `insertGetId` method.

<a name="upserts"></a>
### Upserts

The `upsert` method will insert records that do not exist and update the records that already exist with new values that you may specify. The method's first argument consists of the values to insert or update, while the second argument lists the column(s) that uniquely identify records within the associated table. The method's third and final argument is an array of columns that should be updated if a matching record already exists in the database:

```php
DB::table('flights')->upsert(
    [
        ['departure' => 'Oakland', 'destination' => 'San Diego', 'price' => 99],
        ['departure' => 'Chicago', 'destination' => 'New York', 'price' => 150]
    ],
    ['departure', 'destination'],
    ['price']
);
```

In the example above, Laravel will attempt to insert two records. If a record already exists with the same `departure` and `destination` column values, Laravel will update that record's `price` column.

> [!WARNING]
> All databases except SQL Server require the columns in the second argument of the `upsert` method to have a "primary" or "unique" index. In addition, the MariaDB and MySQL database drivers ignore the second argument of the `upsert` method and always use the "primary" and "unique" indexes of the table to detect existing records.

<a name="update-statements"></a>
## Update Statements

In addition to inserting records into the database, the query builder can also update existing records using the `update` method. The `update` method, like the `insert` method, accepts an array of column and value pairs indicating the columns to be updated. The `update` method returns the number of affected rows. You may constrain the `update` query using `where` clauses:

```php
$affected = DB::table('users')
    ->where('id', 1)
    ->update(['votes' => 1]);
```

<a name="update-or-insert"></a>
#### Update or Insert

Sometimes you may want to update an existing record in the database or create it if no matching record exists. In this scenario, the `updateOrInsert` method may be used. The `updateOrInsert` method accepts two arguments: an array of conditions by which to find the record, and an array of column and value pairs indicating the columns to be updated.

The `updateOrInsert` method will attempt to locate a matching database record using the first argument's column and value pairs. If the record exists, it will be updated with the values in the second argument. If the record cannot be found, a new record will be inserted with the merged attributes of both arguments:

```php
DB::table('users')
    ->updateOrInsert(
        ['email' => 'john@example.com', 'name' => 'John'],
        ['votes' => '2']
    );
```

You may provide a closure to the `updateOrInsert` method to customize the attributes that are updated or inserted into the database based on the existence of a matching record:

```php
DB::table('users')->updateOrInsert(
    ['user_id' => $user_id],
    fn ($exists) => $exists ? [
        'name' => $data['name'],
        'email' => $data['email'],
    ] : [
        'name' => $data['name'],
        'email' => $data['email'],
        'marketable' => true,
    ],
);
```

<a name="updating-json-columns"></a>
### Updating JSON Columns

When updating a JSON column, you should use `->` syntax to update the appropriate key in the JSON object. This operation is supported on MariaDB 10.3+, MySQL 5.7+, and PostgreSQL 9.5+:

```php
$affected = DB::table('users')
    ->where('id', 1)
    ->update(['options->enabled' => true]);
```

<a name="increment-and-decrement"></a>
### Increment and Decrement

The query builder also provides convenient methods for incrementing or decrementing the value of a given column. Both of these methods accept at least one argument: the column to modify. A second argument may be provided to specify the amount by which the column should be incremented or decremented:

```php
DB::table('users')->increment('votes');

DB::table('users')->increment('votes', 5);

DB::table('users')->decrement('votes');

DB::table('users')->decrement('votes', 5);
```

If needed, you may also specify additional columns to update during the increment or decrement operation:

```php
DB::table('users')->increment('votes', 1, ['name' => 'John']);
```

In addition, you may increment or decrement multiple columns at once using the `incrementEach` and `decrementEach` methods:

```php
DB::table('users')->incrementEach([
    'votes' => 5,
    'balance' => 100,
]);
```

<a name="delete-statements"></a>
## Delete Statements

The query builder's `delete` method may be used to delete records from the table. The `delete` method returns the number of affected rows. You may constrain `delete` statements by adding "where" clauses before calling the `delete` method:

```php
$deleted = DB::table('users')->delete();

$deleted = DB::table('users')->where('votes', '>', 100)->delete();
```

<a name="pessimistic-locking"></a>
## Pessimistic Locking

The query builder also includes a few functions to help you achieve "pessimistic locking" when executing your `select` statements. To execute a statement with a "shared lock", you may call the `sharedLock` method. A shared lock prevents the selected rows from being modified until your transaction is committed:

```php
DB::table('users')
    ->where('votes', '>', 100)
    ->sharedLock()
    ->get();
```

Alternatively, you may use the `lockForUpdate` method. A "for update" lock prevents the selected records from being modified or from being selected with another shared lock:

```php
DB::table('users')
    ->where('votes', '>', 100)
    ->lockForUpdate()
    ->get();
```

While not obligatory, it is recommended to wrap pessimistic locks within a [transaction](/docs/{{version}}/database#database-transactions). This ensures that the data retrieved remains unaltered in the database until the entire operation completes. In case of a failure, the transaction will roll back any changes and release the locks automatically:

```php
DB::transaction(function () {
    $sender = DB::table('users')
        ->lockForUpdate()
        ->find(1);

    $receiver = DB::table('users')
        ->lockForUpdate()
        ->find(2);

    if ($sender->balance < 100) {
        throw new RuntimeException('Balance too low.');
    }

    DB::table('users')
        ->where('id', $sender->id)
        ->update([
            'balance' => $sender->balance - 100
        ]);

    DB::table('users')
        ->where('id', $receiver->id)
        ->update([
            'balance' => $receiver->balance + 100
        ]);
});
```

<a name="reusable-query-components"></a>
## Reusable Query Components

If you have repeated query logic throughout your application, you may extract the logic into reusable objects using the query builder's `tap` and `pipe` methods. Imagine you have these two different queries in your application:

```php
use Illuminate\Database\Query\Builder;
use Illuminate\Support\Facades\DB;

$destination = $request->query('destination');

DB::table('flights')
    ->when($destination, function (Builder $query, string $destination) {
        $query->where('destination', $destination);
    })
    ->orderByDesc('price')
    ->get();

// ...

$destination = $request->query('destination');

DB::table('flights')
    ->when($destination, function (Builder $query, string $destination) {
        $query->where('destination', $destination);
    })
    ->where('user', $request->user()->id)
    ->orderBy('destination')
    ->get();
```

You may like to extract the destination filtering that is common between the queries into a reusable object:

```php
<?php

namespace App\Scopes;

use Illuminate\Database\Query\Builder;

class DestinationFilter
{
    public function __construct(
        private ?string $destination,
    ) {
        //
    }

    public function __invoke(Builder $query): void
    {
        $query->when($this->destination, function (Builder $query) {
            $query->where('destination', $this->destination);
        });
    }
}
```

Then, you can use the query builder's `tap` method to apply the object's logic to the query:

```php
use App\Scopes\DestinationFilter;
use Illuminate\Database\Query\Builder;
use Illuminate\Support\Facades\DB;

DB::table('flights')
    ->when($destination, function (Builder $query, string $destination) { // [tl! remove]
        $query->where('destination', $destination); // [tl! remove]
    }) // [tl! remove]
    ->tap(new DestinationFilter($destination)) // [tl! add]
    ->orderByDesc('price')
    ->get();

// ...

DB::table('flights')
    ->when($destination, function (Builder $query, string $destination) { // [tl! remove]
        $query->where('destination', $destination); // [tl! remove]
    }) // [tl! remove]
    ->tap(new DestinationFilter($destination)) // [tl! add]
    ->where('user', $request->user()->id)
    ->orderBy('destination')
    ->get();
```

<a name="query-pipes"></a>
#### Query Pipes

The `tap` method will always return the query builder. If you would like to extract an object that executes the query and returns another value, you may use the `pipe` method instead.

Consider the following query object that contains shared [pagination](/docs/{{version}}/pagination) logic used throughout an application. Unlike the `DestinationFilter`, which applies query conditions to the query, the `Paginate` object executes the query and returns a paginator instance:

```php
<?php

namespace App\Scopes;

use Illuminate\Contracts\Pagination\LengthAwarePaginator;
use Illuminate\Database\Query\Builder;

class Paginate
{
    public function __construct(
        private string $sortBy = 'timestamp',
        private string $sortDirection = 'desc',
        private int $perPage = 25,
    ) {
        //
    }

    public function __invoke(Builder $query): LengthAwarePaginator
    {
        return $query->orderBy($this->sortBy, $this->sortDirection)
            ->paginate($this->perPage, pageName: 'p');
    }
}
```

Using the query builder's `pipe` method, we can leverage this object to apply our shared pagination logic:

```php
$flights = DB::table('flights')
    ->tap(new DestinationFilter($destination))
    ->pipe(new Paginate);
```

<a name="debugging"></a>
## Debugging

You may use the `dd` and `dump` methods while building a query to dump the current query bindings and SQL. The `dd` method will display the debug information and then stop executing the request. The `dump` method will display the debug information but allow the request to continue executing:

```php
DB::table('users')->where('votes', '>', 100)->dd();

DB::table('users')->where('votes', '>', 100)->dump();
```

The `dumpRawSql` and `ddRawSql` methods may be invoked on a query to dump the query's SQL with all parameter bindings properly substituted:

```php
DB::table('users')->where('votes', '>', 100)->dumpRawSql();

DB::table('users')->where('votes', '>', 100)->ddRawSql();
```


---

# Queues

*Sección: Laravel | Origen: https://laravel.com/docs/13.x/queues*

- [Introduction](#introduction)
    - [Connections vs. Queues](#connections-vs-queues)
    - [Driver Notes and Prerequisites](#driver-prerequisites)
- [Creating Jobs](#creating-jobs)
    - [Generating Job Classes](#generating-job-classes)
    - [Class Structure](#class-structure)
    - [Unique Jobs](#unique-jobs)
    - [Debounced Jobs](#debounced-jobs)
    - [Encrypted Jobs](#encrypted-jobs)
- [Job Middleware](#job-middleware)
    - [Rate Limiting](#rate-limiting)
    - [Preventing Job Overlaps](#preventing-job-overlaps)
    - [Throttling Exceptions](#throttling-exceptions)
    - [Releasing Jobs](#releasing-jobs)
    - [Skipping Jobs](#skipping-jobs)
- [Dispatching Jobs](#dispatching-jobs)
    - [Delayed Dispatching](#delayed-dispatching)
    - [Synchronous Dispatching](#synchronous-dispatching)
    - [Bulk Dispatching](#bulk-dispatching)
    - [Preparing Jobs Before Dispatch](#preparing-jobs-before-dispatch)
    - [Jobs & Database Transactions](#jobs-and-database-transactions)
    - [Job Chaining](#job-chaining)
    - [Customizing The Queue and Connection](#customizing-the-queue-and-connection)
    - [Specifying Max Job Attempts / Timeout Values](#max-job-attempts-and-timeout)
    - [SQS FIFO and Fair Queues](#sqs-fifo-and-fair-queues)
    - [Queue Failover](#queue-failover)
    - [Error Handling](#error-handling)
- [Job Batching](#job-batching)
    - [Defining Batchable Jobs](#defining-batchable-jobs)
    - [Dispatching Batches](#dispatching-batches)
    - [Chains and Batches](#chains-and-batches)
    - [Adding Jobs to Batches](#adding-jobs-to-batches)
    - [Inspecting Batches](#inspecting-batches)
    - [Cancelling Batches](#cancelling-batches)
    - [Batch Failures](#batch-failures)
    - [Pruning Batches](#pruning-batches)
    - [Storing Batches in DynamoDB](#storing-batches-in-dynamodb)
- [Queueing Closures](#queueing-closures)
- [Running the Queue Worker](#running-the-queue-worker)
    - [The `queue:work` Command](#the-queue-work-command)
    - [Queue Priorities](#queue-priorities)
    - [Queue Workers and Deployment](#queue-workers-and-deployment)
    - [Reacting to Worker Signals](#reacting-to-worker-signals)
    - [Job Expirations and Timeouts](#job-expirations-and-timeouts)
    - [Pausing and Resuming Queue Workers](#pausing-and-resuming-queue-workers)
- [Supervisor Configuration](#supervisor-configuration)
- [Dealing With Failed Jobs](#dealing-with-failed-jobs)
    - [Cleaning Up After Failed Jobs](#cleaning-up-after-failed-jobs)
    - [Retrying Failed Jobs](#retrying-failed-jobs)
    - [Ignoring Missing Models](#ignoring-missing-models)
    - [Pruning Failed Jobs](#pruning-failed-jobs)
    - [Storing Failed Jobs in DynamoDB](#storing-failed-jobs-in-dynamodb)
    - [Disabling Failed Job Storage](#disabling-failed-job-storage)
    - [Failed Job Events](#failed-job-events)
- [Clearing Jobs From Queues](#clearing-jobs-from-queues)
- [Monitoring Your Queues](#monitoring-your-queues)
- [Testing](#testing)
    - [Faking a Subset of Jobs](#faking-a-subset-of-jobs)
    - [Testing Job Chains](#testing-job-chains)
    - [Testing Job Batches](#testing-job-batches)
    - [Testing Job / Queue Interactions](#testing-job-queue-interactions)
- [Job Events](#job-events)

<a name="introduction"></a>
## Introduction

While building your web application, you may have some tasks, such as parsing and storing an uploaded CSV file, that take too long to perform during a typical web request. Thankfully, Laravel allows you to easily create queued jobs that may be processed in the background. By moving time intensive tasks to a queue, your application can respond to web requests with blazing speed and provide a better user experience to your customers.

Laravel queues provide a unified queueing API across a variety of different queue backends, such as [Amazon SQS](https://aws.amazon.com/sqs/), [Redis](https://redis.io), or even a relational database.

Laravel's queue configuration options are stored in your application's `config/queue.php` configuration file. In this file, you will find connection configurations for each of the queue drivers that are included with the framework, including the database, [Amazon SQS](https://aws.amazon.com/sqs/), [Redis](https://redis.io), and [Beanstalkd](https://beanstalkd.github.io/) drivers, as well as a synchronous driver that will execute jobs immediately (for use during development or testing). A `null` queue driver is also included which discards queued jobs.

> [!NOTE]
> Laravel Horizon is a beautiful dashboard and configuration system for your Redis powered queues. Check out the full [Horizon documentation](/docs/{{version}}/horizon) for more information.

<a name="connections-vs-queues"></a>
### Connections vs. Queues

Before getting started with Laravel queues, it is important to understand the distinction between "connections" and "queues". In your `config/queue.php` configuration file, there is a `connections` configuration array. This option defines the connections to backend queue services such as Amazon SQS, Beanstalk, or Redis. However, any given queue connection may have multiple "queues" which may be thought of as different stacks or piles of queued jobs.

Note that each connection configuration example in the `queue` configuration file contains a `queue` attribute. This is the default queue that jobs will be dispatched to when they are sent to a given connection. In other words, if you dispatch a job without explicitly defining which queue it should be dispatched to, the job will be placed on the queue that is defined in the `queue` attribute of the connection configuration:

```php
use App\Jobs\ProcessPodcast;

// This job is sent to the default connection's default queue...
ProcessPodcast::dispatch();

// This job is sent to the default connection's "emails" queue...
ProcessPodcast::dispatch()->onQueue('emails');
```

Some applications may not need to ever push jobs onto multiple queues, instead preferring to have one simple queue. However, pushing jobs to multiple queues can be especially useful for applications that wish to prioritize or segment how jobs are processed, since the Laravel queue worker allows you to specify which queues it should process by priority. For example, if you push jobs to a `high` queue, you may run a worker that gives them higher processing priority:

```shell
php artisan queue:work --queue=high,default
```

<a name="driver-prerequisites"></a>
### Driver Notes and Prerequisites

<a name="database"></a>
#### Database

In order to use the `database` queue driver, you will need a database table to hold the jobs. Typically, this is included in Laravel's default `0001_01_01_000002_create_jobs_table.php` [database migration](/docs/{{version}}/migrations); however, if your application does not contain this migration, you may use the `make:queue-table` Artisan command to create it:

```shell
php artisan make:queue-table

php artisan migrate
```

<a name="redis"></a>
#### Redis

In order to use the `redis` queue driver, you should configure a Redis database connection in your `config/database.php` configuration file.

> [!WARNING]
> The `serializer` and `compression` Redis options are not supported by the `redis` queue driver.

<a name="redis-cluster"></a>
##### Redis Cluster

If your Redis queue connection uses a [Redis Cluster](https://redis.io/docs/latest/operate/rs/databases/durability-ha/clustering), your queue names must contain a [key hash tag](https://redis.io/docs/latest/develop/using-commands/keyspace/#hashtags). This is required in order to ensure all of the Redis keys for a given queue are placed into the same hash slot:

```php
'redis' => [
    'driver' => 'redis',
    'connection' => env('REDIS_QUEUE_CONNECTION', 'default'),
    'queue' => env('REDIS_QUEUE', '{default}'),
    'retry_after' => env('REDIS_QUEUE_RETRY_AFTER', 90),
    'block_for' => null,
    'after_commit' => false,
],
```

<a name="blocking"></a>
##### Blocking

When using the Redis queue, you may use the `block_for` configuration option to specify how long the driver should wait for a job to become available before iterating through the worker loop and re-polling the Redis database.

Adjusting this value based on your queue load can be more efficient than continually polling the Redis database for new jobs. For instance, you may set the value to `5` to indicate that the driver should block for five seconds while waiting for a job to become available:

```php
'redis' => [
    'driver' => 'redis',
    'connection' => env('REDIS_QUEUE_CONNECTION', 'default'),
    'queue' => env('REDIS_QUEUE', 'default'),
    'retry_after' => env('REDIS_QUEUE_RETRY_AFTER', 90),
    'block_for' => 5,
    'after_commit' => false,
],
```

> [!WARNING]
> Setting `block_for` to `0` will cause queue workers to block indefinitely until a job is available. This will also prevent signals such as `SIGTERM` from being handled until the next job has been processed.

<a name="sqs-overflow-storage"></a>
#### SQS Overflow Storage

Amazon SQS limits the maximum size of a queued message payload. If you need to dispatch jobs with payloads that may exceed this limit, you may configure Laravel to store oversized SQS payloads in a cache store and send a pointer through SQS instead. To enable this feature, add an `overflow` array to your SQS queue connection configuration:

```php
'sqs' => [
    'driver' => 'sqs',
    'key' => env('AWS_ACCESS_KEY_ID'),
    'secret' => env('AWS_SECRET_ACCESS_KEY'),
    'prefix' => env('SQS_PREFIX', 'https://sqs.us-east-1.amazonaws.com/your-account-id'),
    'queue' => env('SQS_QUEUE', 'default'),
    'suffix' => env('SQS_SUFFIX'),
    'region' => env('AWS_DEFAULT_REGION', 'us-east-1'),
    'after_commit' => false,
    'overflow' => [
        'enabled' => env('SQS_OVERFLOW_ENABLED', false),
        'store' => env('SQS_OVERFLOW_STORE'),
        'always' => false,
        'delete_after_processing' => true,
        'flush_on_clear' => env('SQS_OVERFLOW_FLUSH_ON_CLEAR', false),
    ],
],
```

When overflow storage is enabled, Laravel will store payloads that are at least 1 MB in the configured cache store. If the `always` option is `true`, every SQS payload will be stored in the cache store regardless of its size. Since queued jobs will need to retrieve their payloads from the cache store when they are processed, you should choose a store that can retain the payloads until your workers process them. By default, stored payloads are deleted after their jobs have been successfully processed and deleted from SQS.

If the `flush_on_clear` option is `true`, the configured overflow cache store will be flushed when the `queue:clear` command clears the SQS queue. Since flushing a cache store may remove all items from that store, you should configure SQS overflow storage to use a dedicated cache store when enabling this option.

<a name="other-driver-prerequisites"></a>
#### Other Driver Prerequisites

The following dependencies are needed for the listed queue drivers. These dependencies may be installed via the Composer package manager:

<div class="content-list" markdown="1">

- Amazon SQS: `aws/aws-sdk-php ~3.0`
- Beanstalkd: `pda/pheanstalk ~5.0`
- Redis: `predis/predis ~3.0` or phpredis PHP extension
- [MongoDB](https://www.mongodb.com/docs/drivers/php/laravel-mongodb/current/queues/): `mongodb/laravel-mongodb`

</div>

<a name="creating-jobs"></a>
## Creating Jobs

<a name="generating-job-classes"></a>
### Generating Job Classes

By default, all of the queueable jobs for your application are stored in the `app/Jobs` directory. If the `app/Jobs` directory doesn't exist, it will be created when you run the `make:job` Artisan command:

```shell
php artisan make:job ProcessPodcast
```

The generated class will implement the `Illuminate\Contracts\Queue\ShouldQueue` interface, indicating to Laravel that the job should be pushed onto the queue to run asynchronously.

> [!NOTE]
> Job stubs may be customized using [stub publishing](/docs/{{version}}/artisan#stub-customization).

<a name="class-structure"></a>
### Class Structure

Job classes are very simple, normally containing only a `handle` method that is invoked when the job is processed by the queue. To get started, let's take a look at an example job class. In this example, we'll pretend we manage a podcast publishing service and need to process the uploaded podcast files before they are published:

```php
<?php

namespace App\Jobs;

use App\Models\Podcast;
use App\Services\AudioProcessor;
use Illuminate\Contracts\Queue\ShouldQueue;
use Illuminate\Foundation\Queue\Queueable;

class ProcessPodcast implements ShouldQueue
{
    use Queueable;

    /**
     * Create a new job instance.
     */
    public function __construct(
        public Podcast $podcast,
    ) {}

    /**
     * Execute the job.
     */
    public function handle(AudioProcessor $processor): void
    {
        // Process uploaded podcast...
    }
}
```

In this example, note that we were able to pass an [Eloquent model](/docs/{{version}}/eloquent) directly into the queued job's constructor. Because of the `Queueable` trait that the job is using, Eloquent models and their loaded relationships will be gracefully serialized and unserialized when the job is processing.

If your queued job accepts an Eloquent model in its constructor, only the identifier for the model will be serialized onto the queue. When the job is actually handled, the queue system will automatically re-retrieve the full model instance and its loaded relationships from the database. This approach to model serialization allows for much smaller job payloads to be sent to your queue driver.

<a name="handle-method-dependency-injection"></a>
#### `handle` Method Dependency Injection

The `handle` method is invoked when the job is processed by the queue. Note that we are able to type-hint dependencies on the `handle` method of the job. The Laravel [service container](/docs/{{version}}/container) automatically injects these dependencies.

If you would like to take total control over how the container injects dependencies into the `handle` method, you may use the container's `bindMethod` method. The `bindMethod` method accepts a callback which receives the job and the container. Within the callback, you are free to invoke the `handle` method however you wish. Typically, you should call this method from the `boot` method of your `App\Providers\AppServiceProvider` [service provider](/docs/{{version}}/providers):

```php
use App\Jobs\ProcessPodcast;
use App\Services\AudioProcessor;
use Illuminate\Contracts\Foundation\Application;

$this->app->bindMethod([ProcessPodcast::class, 'handle'], function (ProcessPodcast $job, Application $app) {
    return $job->handle($app->make(AudioProcessor::class));
});
```

> [!WARNING]
> Binary data, such as raw image contents, should be passed through the `base64_encode` function before being passed to a queued job. Otherwise, the job may not properly serialize to JSON when being placed on the queue.

<a name="handling-relationships"></a>
#### Queued Relationships

Because all loaded Eloquent model relationships also get serialized when a job is queued, the serialized job string can sometimes become quite large. Furthermore, when a job is deserialized and model relationships are re-retrieved from the database, they will be retrieved in their entirety. Any previous relationship constraints that were applied before the model was serialized during the job queueing process will not be applied when the job is deserialized. Therefore, if you wish to work with a subset of a given relationship, you should re-constrain that relationship within your queued job.

Or, to prevent relations from being serialized, you can call the `withoutRelations` method on the model when setting a property value. This method will return an instance of the model without its loaded relationships:

```php
/**
 * Create a new job instance.
 */
public function __construct(
    Podcast $podcast,
) {
    $this->podcast = $podcast->withoutRelations();
}
```

If you only need to remove specific relations while keeping the rest, you may use the `withoutRelation` method:

```php
$this->podcast = $podcast->withoutRelation('comments');
```

If you are using [PHP constructor property promotion](https://www.php.net/manual/en/language.oop5.decon.php#language.oop5.decon.constructor.promotion) and would like to indicate that an Eloquent model should not have its relations serialized, you may use the `WithoutRelations` attribute:

```php
use Illuminate\Queue\Attributes\WithoutRelations;

/**
 * Create a new job instance.
 */
public function __construct(
    #[WithoutRelations]
    public Podcast $podcast,
) {}
```

For convenience, if you wish to serialize all models without relationships, you may apply the `WithoutRelations` attribute to the entire class instead of applying the attribute to each model:

```php
<?php

namespace App\Jobs;

use App\Models\DistributionPlatform;
use App\Models\Podcast;
use Illuminate\Contracts\Queue\ShouldQueue;
use Illuminate\Foundation\Queue\Queueable;
use Illuminate\Queue\Attributes\WithoutRelations;

#[WithoutRelations]
class ProcessPodcast implements ShouldQueue
{
    use Queueable;

    /**
     * Create a new job instance.
     */
    public function __construct(
        public Podcast $podcast,
        public DistributionPlatform $platform,
    ) {}
}
```

If a job receives a collection or array of Eloquent models instead of a single model, the models within that collection will not have their relationships restored when the job is deserialized and executed. This is to prevent excessive resource usage on jobs that deal with large numbers of models.

<a name="unique-jobs"></a>
### Unique Jobs

> [!WARNING]
> Unique jobs require a cache driver that supports [locks](/docs/{{version}}/cache#atomic-locks). Currently, the `memcached`, `redis`, `dynamodb`, `database`, `file`, and `array` cache drivers support atomic locks.

> [!WARNING]
> Unique job constraints do not apply to jobs within batches.

Sometimes, you may want to ensure that only one instance of a specific job is on the queue at any point in time. You may do so by implementing the `ShouldBeUnique` interface on your job class. This interface does not require you to define any additional methods on your class:

```php
<?php

use Illuminate\Contracts\Queue\ShouldQueue;
use Illuminate\Contracts\Queue\ShouldBeUnique;

class UpdateSearchIndex implements ShouldQueue, ShouldBeUnique
{
    // ...
}
```

In the example above, the `UpdateSearchIndex` job is unique. So, the job will not be dispatched if another instance of the job is already on the queue and has not finished processing.

In certain cases, you may want to define a specific "key" that makes the job unique or you may want to specify a timeout beyond which the job no longer stays unique. To accomplish this, you may use the `UniqueFor` attribute and define a `uniqueId` method on your job class:

```php
<?php

namespace App\Jobs;

use Illuminate\Contracts\Queue\ShouldQueue;
use Illuminate\Contracts\Queue\ShouldBeUnique;
use Illuminate\Queue\Attributes\UniqueFor;

#[UniqueFor(3600)]
class UpdateSearchIndex implements ShouldQueue, ShouldBeUnique
{
    /**
     * The product instance.
     *
     * @var \App\Models\Product
     */
    public $product;

    /**
     * Get the unique ID for the job.
     */
    public function uniqueId(): string
    {
        return $this->product->id;
    }
}
```
In the example above, the `UpdateSearchIndex` job is unique by a product ID. So, any new dispatches of the job with the same product ID will be ignored until the existing job has completed processing. In addition, if the existing job is not processed within one hour, the unique lock will be released and another job with the same unique key can be dispatched to the queue.

> [!WARNING]
> If your application dispatches jobs from multiple web servers or containers, you should ensure that all of your servers are communicating with the same central cache server so that Laravel can accurately determine if a job is unique.

<a name="keeping-jobs-unique-until-processing-begins"></a>
#### Keeping Jobs Unique Until Processing Begins

By default, unique jobs are "unlocked" after a job completes processing or fails all of its retry attempts. However, there may be situations where you would like your job to unlock immediately before it is processed. To accomplish this, your job should implement the `ShouldBeUniqueUntilProcessing` contract instead of the `ShouldBeUnique` contract:

```php
<?php

use Illuminate\Contracts\Queue\ShouldQueue;
use Illuminate\Contracts\Queue\ShouldBeUniqueUntilProcessing;

class UpdateSearchIndex implements ShouldQueue, ShouldBeUniqueUntilProcessing
{
    // ...
}
```

<a name="unique-job-locks"></a>
#### Unique Job Locks

Behind the scenes, when a `ShouldBeUnique` job is dispatched, Laravel attempts to acquire a [lock](/docs/{{version}}/cache#atomic-locks) with the `uniqueId` key. If the lock is already held, the job is not dispatched. This lock is released when the job completes processing or fails all of its retry attempts. By default, Laravel will use the default cache driver to obtain this lock. However, if you wish to use another driver for acquiring the lock, you may define a `uniqueVia` method that returns the cache driver that should be used:

```php
use Illuminate\Contracts\Cache\Repository;
use Illuminate\Support\Facades\Cache;

class UpdateSearchIndex implements ShouldQueue, ShouldBeUnique
{
    // ...

    /**
     * Get the cache driver for the unique job lock.
     */
    public function uniqueVia(): Repository
    {
        return Cache::driver('redis');
    }
}
```

> [!NOTE]
> If you only need to limit the concurrent processing of a job, use the [WithoutOverlapping](/docs/{{version}}/queues#preventing-job-overlaps) job middleware instead.

<a name="debounced-jobs"></a>
### Debounced Jobs

Sometimes, you may want to ensure that when the same job is dispatched many times in a short window, only the latest dispatch actually executes. You may do so by adding the `DebounceFor` attribute to your job:

```php
<?php

namespace App\Jobs;

use Illuminate\Contracts\Queue\ShouldQueue;
use Illuminate\Foundation\Queue\Queueable;
use Illuminate\Queue\Attributes\DebounceFor;

#[DebounceFor(30)]
class UpdateSearchIndex implements ShouldQueue
{
    use Queueable;

    /**
     * Create a new job instance.
     */
    public function __construct(public int $productId)
    {
    }

    /**
     * Get the debounce ID for the job.
     */
    public function debounceId(): string
    {
        return (string) $this->productId;
    }
}
```

In the example above, repeatedly dispatching `UpdateSearchIndex` for the same product within `30` seconds will debounce the job so that only the latest dispatch runs.

If you would like to cap how long a frequently re-dispatched job can be deferred, you may provide the `maxWait` argument to the `DebounceFor` attribute:

```php
#[DebounceFor(30, maxWait: 120)]
class UpdateSearchIndex implements ShouldQueue
{
    use Queueable;

    // ...
}
```

You may customize the cache store used for debounce tracking by defining a `debounceVia` method on your job:

```php
use Illuminate\Contracts\Cache\Repository;
use Illuminate\Support\Facades\Cache;

public function debounceVia(): Repository
{
    return Cache::driver('redis');
}
```

If a debounced job is superseded by a newer dispatch, Laravel will dispatch the `Illuminate\Queue\Events\JobDebounced` event and remove the superseded job from the queue.

> [!WARNING]
> Debounced jobs and unique jobs are mutually exclusive. A job using the `DebounceFor` attribute should not implement `ShouldBeUnique`.

> [!WARNING]
> If your application dispatches debounced jobs from multiple web servers or containers, you should ensure that all of your servers are communicating with the same central cache server.

<a name="encrypted-jobs"></a>
### Encrypted Jobs

Laravel allows you to ensure the privacy and integrity of a job's data via [encryption](/docs/{{version}}/encryption). To get started, simply add the `ShouldBeEncrypted` interface to the job class. Once this interface has been added to the class, Laravel will automatically encrypt your job before pushing it onto a queue:

```php
<?php

use Illuminate\Contracts\Queue\ShouldBeEncrypted;
use Illuminate\Contracts\Queue\ShouldQueue;

class UpdateSearchIndex implements ShouldQueue, ShouldBeEncrypted
{
    // ...
}
```

<a name="job-middleware"></a>
## Job Middleware

Job middleware allow you to wrap custom logic around the execution of queued jobs, reducing boilerplate in the jobs themselves. For example, consider the following `handle` method which leverages Laravel's Redis rate limiting features to allow only one job to process every five seconds:

```php
use Illuminate\Support\Facades\Redis;

/**
 * Execute the job.
 */
public function handle(): void
{
    Redis::throttle('key')->block(0)->allow(1)->every(5)->then(function () {
        info('Lock obtained...');

        // Handle job...
    }, function () {
        // Could not obtain lock...

        return $this->release(5);
    });
}
```

While this code is valid, the implementation of the `handle` method becomes noisy since it is cluttered with Redis rate limiting logic. In addition, this rate limiting logic must be duplicated for any other jobs that we want to rate limit. Instead of rate limiting in the handle method, we could define a job middleware that handles rate limiting:

```php
<?php

namespace App\Jobs\Middleware;

use Closure;
use Illuminate\Support\Facades\Redis;

class RateLimited
{
    /**
     * Process the queued job.
     *
     * @param  \Closure(object): void  $next
     */
    public function handle(object $job, Closure $next): void
    {
        Redis::throttle('key')
            ->block(0)->allow(1)->every(5)
            ->then(function () use ($job, $next) {
                // Lock obtained...

                $next($job);
            }, function () use ($job) {
                // Could not obtain lock...

                $job->release(5);
            });
    }
}
```

As you can see, like [route middleware](/docs/{{version}}/middleware), job middleware receive the job being processed and a callback that should be invoked to continue processing the job.

You can generate a new job middleware class using the `make:job-middleware` Artisan command. After creating job middleware, they may be attached to a job by returning them from the job's `middleware` method. This method does not exist on jobs scaffolded by the `make:job` Artisan command, so you will need to manually add it to your job class:

```php
use App\Jobs\Middleware\RateLimited;

/**
 * Get the middleware the job should pass through.
 *
 * @return array<int, object>
 */
public function middleware(): array
{
    return [new RateLimited];
}
```

> [!NOTE]
> Job middleware can also be assigned to [queueable event listeners](/docs/{{version}}/events#queued-event-listeners), [mailables](/docs/{{version}}/mail#queueing-mail), and [notifications](/docs/{{version}}/notifications#queueing-notifications).

<a name="rate-limiting"></a>
### Rate Limiting

Although we just demonstrated how to write your own rate limiting job middleware, Laravel actually includes a rate limiting middleware that you may utilize to rate limit jobs. Like [route rate limiters](/docs/{{version}}/routing#defining-rate-limiters), job rate limiters are defined using the `RateLimiter` facade's `for` method.

For example, you may wish to allow users to backup their data once per hour while imposing no such limit on premium customers. To accomplish this, you may define a `RateLimiter` in the `boot` method of your `AppServiceProvider`:

```php
use Illuminate\Cache\RateLimiting\Limit;
use Illuminate\Support\Facades\RateLimiter;

/**
 * Bootstrap any application services.
 */
public function boot(): void
{
    RateLimiter::for('backups', function (object $job) {
        return $job->user->vipCustomer()
            ? Limit::none()
            : Limit::perHour(1)->by($job->user->id);
    });
}
```

In the example above, we defined an hourly rate limit; however, you may easily define a rate limit based on minutes using the `perMinute` method. In addition, you may pass any value you wish to the `by` method of the rate limit; however, this value is most often used to segment rate limits by customer:

```php
return Limit::perMinute(50)->by($job->user->id);
```

Once you have defined your rate limit, you may attach the rate limiter to your job using the `Illuminate\Queue\Middleware\RateLimited` middleware. Each time the job exceeds the rate limit, this middleware will release the job back to the queue with an appropriate delay based on the rate limit duration:

```php
use Illuminate\Queue\Middleware\RateLimited;

/**
 * Get the middleware the job should pass through.
 *
 * @return array<int, object>
 */
public function middleware(): array
{
    return [new RateLimited('backups')];
}
```

Releasing a rate limited job back onto the queue will still increment the job's total number of `attempts`. You may wish to tune your `Tries` and `MaxExceptions` attributes on your job class accordingly. Or, you may wish to use the [retryUntil method](#time-based-attempts) to define the amount of time until the job should no longer be attempted.

Using the `releaseAfter` method, you may also specify the number of seconds that must elapse before the released job will be attempted again:

```php
/**
 * Get the middleware the job should pass through.
 *
 * @return array<int, object>
 */
public function middleware(): array
{
    return [(new RateLimited('backups'))->releaseAfter(60)];
}
```

If you do not want a job to be retried when it is rate limited, you may use the `dontRelease` method:

```php
/**
 * Get the middleware the job should pass through.
 *
 * @return array<int, object>
 */
public function middleware(): array
{
    return [(new RateLimited('backups'))->dontRelease()];
}
```

<a name="rate-limiting-with-redis"></a>
#### Rate Limiting With Redis

If you are using Redis, you may use the `Illuminate\Queue\Middleware\RateLimitedWithRedis` middleware, which is fine-tuned for Redis and more efficient than the basic rate limiting middleware:

```php
use Illuminate\Queue\Middleware\RateLimitedWithRedis;

public function middleware(): array
{
    return [new RateLimitedWithRedis('backups')];
}
```

The `connection` method may be used to specify which Redis connection the middleware should use:

```php
return [(new RateLimitedWithRedis('backups'))->connection('limiter')];
```

<a name="preventing-job-overlaps"></a>
### Preventing Job Overlaps

Laravel includes an `Illuminate\Queue\Middleware\WithoutOverlapping` middleware that allows you to prevent job overlaps based on an arbitrary key. This can be helpful when a queued job is modifying a resource that should only be modified by one job at a time.

For example, let's imagine you have a queued job that updates a user's credit score and you want to prevent credit score update job overlaps for the same user ID. To accomplish this, you can return the `WithoutOverlapping` middleware from your job's `middleware` method:

```php
use Illuminate\Queue\Middleware\WithoutOverlapping;

/**
 * Get the middleware the job should pass through.
 *
 * @return array<int, object>
 */
public function middleware(): array
{
    return [new WithoutOverlapping($this->user->id)];
}
```

Releasing an overlapping job back onto the queue will still increment the job's total number of attempts. You may wish to tune your `Tries` and `MaxExceptions` attributes on your job class accordingly. For example, leaving `Tries` to 1 as it is by default would prevent any overlapping job from being retried later.

Any overlapping jobs of the same type will be released back to the queue. You may also specify the number of seconds that must elapse before the released job will be attempted again:

```php
/**
 * Get the middleware the job should pass through.
 *
 * @return array<int, object>
 */
public function middleware(): array
{
    return [(new WithoutOverlapping($this->order->id))->releaseAfter(60)];
}
```

If you wish to immediately delete any overlapping jobs so that they will not be retried, you may use the `dontRelease` method:

```php
/**
 * Get the middleware the job should pass through.
 *
 * @return array<int, object>
 */
public function middleware(): array
{
    return [(new WithoutOverlapping($this->order->id))->dontRelease()];
}
```

The `WithoutOverlapping` middleware is powered by Laravel's atomic lock feature. Sometimes, your job may unexpectedly fail or timeout in such a way that the lock is not released. Therefore, you may explicitly define a lock expiration time using the `expireAfter` method. For example, the example below will instruct Laravel to release the `WithoutOverlapping` lock three minutes after the job has started processing:

```php
/**
 * Get the middleware the job should pass through.
 *
 * @return array<int, object>
 */
public function middleware(): array
{
    return [(new WithoutOverlapping($this->order->id))->expireAfter(180)];
}
```

> [!WARNING]
> The `WithoutOverlapping` middleware requires a cache driver that supports [locks](/docs/{{version}}/cache#atomic-locks). Currently, the `memcached`, `redis`, `dynamodb`, `database`, `file`, and `array` cache drivers support atomic locks.

<a name="sharing-lock-keys"></a>
#### Sharing Lock Keys Across Job Classes

By default, the `WithoutOverlapping` middleware will only prevent overlapping jobs of the same class. So, although two different job classes may use the same lock key, they will not be prevented from overlapping. However, you can instruct Laravel to apply the key across job classes using the `shared` method:

```php
use Illuminate\Queue\Middleware\WithoutOverlapping;

class ProviderIsDown
{
    // ...

    public function middleware(): array
    {
        return [
            (new WithoutOverlapping("status:{$this->provider}"))->shared(),
        ];
    }
}

class ProviderIsUp
{
    // ...

    public function middleware(): array
    {
        return [
            (new WithoutOverlapping("status:{$this->provider}"))->shared(),
        ];
    }
}
```

<a name="throttling-exceptions"></a>
### Throttling Exceptions

Laravel includes a `Illuminate\Queue\Middleware\ThrottlesExceptions` middleware that allows you to throttle exceptions. Once the job throws a given number of exceptions, all further attempts to execute the job are delayed until a specified time interval lapses. This middleware is particularly useful for jobs that interact with third-party services that are unstable.

For example, let's imagine a queued job that interacts with a third-party API that begins throwing exceptions. To throttle exceptions, you can return the `ThrottlesExceptions` middleware from your job's `middleware` method. Typically, this middleware should be paired with a job that implements [time based attempts](#time-based-attempts):

```php
use DateTime;
use Illuminate\Queue\Middleware\ThrottlesExceptions;

/**
 * Get the middleware the job should pass through.
 *
 * @return array<int, object>
 */
public function middleware(): array
{
    return [new ThrottlesExceptions(10, 5 * 60)];
}

/**
 * Determine the time at which the job should timeout.
 */
public function retryUntil(): DateTime
{
    return now()->plus(minutes: 30);
}
```

The first constructor argument accepted by the middleware is the number of exceptions the job can throw before being throttled, while the second constructor argument is the number of seconds that should elapse before the job is attempted again once it has been throttled. In the code example above, if the job throws 10 consecutive exceptions, we will wait 5 minutes before attempting the job again, constrained by the 30-minute time limit.

When a job throws an exception but the exception threshold has not yet been reached, the job will typically be retried immediately. However, you may specify the number of minutes such a job should be delayed by calling the `backoff` method when attaching the middleware to the job:

```php
use Illuminate\Queue\Middleware\ThrottlesExceptions;

/**
 * Get the middleware the job should pass through.
 *
 * @return array<int, object>
 */
public function middleware(): array
{
    return [(new ThrottlesExceptions(10, 5 * 60))->backoff(5)];
}
```

The `backoff` method also accepts a closure that receives the thrown exception, allowing the delay to be determined dynamically:

```php
use App\Exceptions\RateLimitedException;
use Illuminate\Queue\Middleware\ThrottlesExceptions;
use Throwable;

/**
 * Get the middleware the job should pass through.
 *
 * @return array<int, object>
 */
public function middleware(): array
{
    return [(new ThrottlesExceptions(10, 5 * 60))->backoff(
        fn (Throwable $throwable) => $throwable instanceof RateLimitedException
            ? $throwable->retryAfterMinutes()
            : 5
    )];
}
```

Internally, this middleware uses Laravel's cache system to implement rate limiting, and the job's class name is utilized as the cache "key". You may override this key by calling the `by` method when attaching the middleware to your job. This may be useful if you have multiple jobs interacting with the same third-party service and you would like them to share a common throttling "bucket" ensuring they respect a single shared limit:

```php
use Illuminate\Queue\Middleware\ThrottlesExceptions;

/**
 * Get the middleware the job should pass through.
 *
 * @return array<int, object>
 */
public function middleware(): array
{
    return [(new ThrottlesExceptions(10, 10 * 60))->by('key')];
}
```

By default, this middleware will throttle every exception. You can modify this behavior by invoking the `when` method when attaching the middleware to your job. The exception will then only be throttled if the closure provided to the `when` method returns `true`:

```php
use Illuminate\Http\Client\HttpClientException;
use Illuminate\Queue\Middleware\ThrottlesExceptions;

/**
 * Get the middleware the job should pass through.
 *
 * @return array<int, object>
 */
public function middleware(): array
{
    return [(new ThrottlesExceptions(10, 10 * 60))->when(
        fn (Throwable $throwable) => $throwable instanceof HttpClientException
    )];
}
```

Unlike the `when` method, which releases the job back onto the queue or throws an exception, the `deleteWhen` method allows you to delete the job entirely when a given exception occurs:

```php
use App\Exceptions\CustomerDeletedException;
use Illuminate\Queue\Middleware\ThrottlesExceptions;

/**
 * Get the middleware the job should pass through.
 *
 * @return array<int, object>
 */
public function middleware(): array
{
    return [(new ThrottlesExceptions(2, 10 * 60))->deleteWhen(CustomerDeletedException::class)];
}
```

If you would like to have the throttled exceptions reported to your application's exception handler, you can do so by invoking the `report` method when attaching the middleware to your job. Optionally, you may provide a closure to the `report` method and the exception will only be reported if the given closure returns `true`:

```php
use Illuminate\Http\Client\HttpClientException;
use Illuminate\Queue\Middleware\ThrottlesExceptions;

/**
 * Get the middleware the job should pass through.
 *
 * @return array<int, object>
 */
public function middleware(): array
{
    return [(new ThrottlesExceptions(10, 10 * 60))->report(
        fn (Throwable $throwable) => $throwable instanceof HttpClientException
    )];
}
```

<a name="throttling-exceptions-with-redis"></a>
#### Throttling Exceptions With Redis

If you are using Redis, you may use the `Illuminate\Queue\Middleware\ThrottlesExceptionsWithRedis` middleware, which is fine-tuned for Redis and more efficient than the basic exception throttling middleware:

```php
use Illuminate\Queue\Middleware\ThrottlesExceptionsWithRedis;

public function middleware(): array
{
    return [new ThrottlesExceptionsWithRedis(10, 10 * 60)];
}
```

The `connection` method may be used to specify which Redis connection the middleware should use:

```php
return [(new ThrottlesExceptionsWithRedis(10, 10 * 60))->connection('limiter')];
```

<a name="releasing-jobs"></a>
### Releasing Jobs

The `Release` middleware allows you to release a job back onto the queue without executing it. The `Release::when` method will release the job if the given condition evaluates to `true`, while the `Release::unless` method will release the job if the condition evaluates to `false`:

```php
use Illuminate\Queue\Middleware\Release;

/**
 * Get the middleware the job should pass through.
 */
public function middleware(): array
{
    return [
        Release::when($condition, releaseAfter: 60),
    ];
}
```

Releasing a job back onto the queue will still increment the job's total number of attempts. You may wish to tune your `Tries` and `MaxExceptions` attributes on your job class accordingly.

You can also pass a `Closure` to the `when` and `unless` methods for more complex conditional evaluation:

```php
use Illuminate\Queue\Middleware\Release;

/**
 * Get the middleware the job should pass through.
 */
public function middleware(): array
{
    return [
        Release::when(function (): bool {
            return ! $this->order->isPaid();
        }, releaseAfter: 60),
    ];
}
```

<a name="skipping-jobs"></a>
### Skipping Jobs

The `Skip` middleware allows you to specify that a job should be skipped / deleted without needing to modify the job's logic. The `Skip::when` method will delete the job if the given condition evaluates to `true`, while the `Skip::unless` method will delete the job if the condition evaluates to `false`:

```php
use Illuminate\Queue\Middleware\Skip;

/**
 * Get the middleware the job should pass through.
 */
public function middleware(): array
{
    return [
        Skip::when($condition),
    ];
}
```

You can also pass a `Closure` to the `when` and `unless` methods for more complex conditional evaluation:

```php
use Illuminate\Queue\Middleware\Skip;

/**
 * Get the middleware the job should pass through.
 */
public function middleware(): array
{
    return [
        Skip::when(function (): bool {
            return $this->shouldSkip();
        }),
    ];
}
```

<a name="dispatching-jobs"></a>
## Dispatching Jobs

Once you have written your job class, you may dispatch it using the `dispatch` method on the job itself. The arguments passed to the `dispatch` method will be given to the job's constructor:

```php
<?php

namespace App\Http\Controllers;

use App\Jobs\ProcessPodcast;
use App\Models\Podcast;
use Illuminate\Http\RedirectResponse;
use Illuminate\Http\Request;

class PodcastController extends Controller
{
    /**
     * Store a new podcast.
     */
    public function store(Request $request): RedirectResponse
    {
        $podcast = Podcast::create(/* ... */);

        // ...

        ProcessPodcast::dispatch($podcast);

        return redirect('/podcasts');
    }
}
```

If you would like to conditionally dispatch a job, you may use the `dispatchIf` and `dispatchUnless` methods:

```php
ProcessPodcast::dispatchIf($accountActive, $podcast);

ProcessPodcast::dispatchUnless($accountSuspended, $podcast);
```

In new Laravel applications, the `database` connection is defined as the default queue. You may specify a different default queue connection by changing the `QUEUE_CONNECTION` environment variable in your application's `.env` file.

<a name="delayed-dispatching"></a>
### Delayed Dispatching

If you would like to specify that a job should not be immediately available for processing by a queue worker, you may use the `delay` method when dispatching the job. For example, let's specify that a job should not be available for processing until 10 minutes after it has been dispatched:

```php
<?php

namespace App\Http\Controllers;

use App\Jobs\ProcessPodcast;
use App\Models\Podcast;
use Illuminate\Http\RedirectResponse;
use Illuminate\Http\Request;

class PodcastController extends Controller
{
    /**
     * Store a new podcast.
     */
    public function store(Request $request): RedirectResponse
    {
        $podcast = Podcast::create(/* ... */);

        // ...

        ProcessPodcast::dispatch($podcast)
            ->delay(now()->plus(minutes: 10));

        return redirect('/podcasts');
    }
}
```

In some cases, jobs may have a default delay configured. If you need to bypass this delay and dispatch a job for immediate processing, you may use the `withoutDelay` method:

```php
ProcessPodcast::dispatch($podcast)->withoutDelay();
```

> [!WARNING]
> The Amazon SQS queue service has a maximum delay time of 15 minutes.

<a name="synchronous-dispatching"></a>
### Synchronous Dispatching

If you would like to dispatch a job immediately (synchronously), you may use the `dispatchSync` method. When using this method, the job will not be queued and will be executed immediately within the current process:

```php
<?php

namespace App\Http\Controllers;

use App\Jobs\ProcessPodcast;
use App\Models\Podcast;
use Illuminate\Http\RedirectResponse;
use Illuminate\Http\Request;

class PodcastController extends Controller
{
    /**
     * Store a new podcast.
     */
    public function store(Request $request): RedirectResponse
    {
        $podcast = Podcast::create(/* ... */);

        // Create podcast...

        ProcessPodcast::dispatchSync($podcast);

        return redirect('/podcasts');
    }
}
```

<a name="deferred-dispatching"></a>
#### Deferred Dispatching

Using deferred synchronous dispatching, you can dispatch a job to be processed during the current process, but after the HTTP response has been sent to the user. This allows you to process "queued" jobs synchronously without slowing down your user's application experience. To defer the execution of a synchronous job, dispatch the job to the `deferred` connection:

```php
RecordDelivery::dispatch($order)->onConnection('deferred');
```

The `deferred` connection also serves as the default [failover queue](#queue-failover).

Similarly, the `background` connection processes jobs after the HTTP response has been sent to the user; however, the job is processed in a separately spawned PHP process, allowing the PHP-FPM / application worker to be available to handle another incoming HTTP request:

```php
RecordDelivery::dispatch($order)->onConnection('background');
```

<a name="bulk-dispatching"></a>
### Bulk Dispatching

If you need to dispatch many independent jobs at once and do not need [batch](#job-batching) tracking or callbacks, you may use the `bulk` method of the `Bus` facade. Laravel will group the jobs by their configured queue connection and queue name and push each group to the appropriate queue in bulk:

```php
use App\Jobs\ProcessUser;
use Illuminate\Support\Facades\Bus;

Bus::bulk(
    $users->map(fn ($user) => new ProcessUser($user))
);
```

<a name="preparing-jobs-before-dispatch"></a>
### Preparing Jobs Before Dispatch

If a job needs to prepare or inspect its state before it is pushed onto the queue, the job may implement the `Illuminate\Contracts\Queue\PreparesForDispatch` interface. Laravel will invoke the job's `prepareForDispatch` method before dispatching the job. If this method returns `false`, the job will not be dispatched:

```php
<?php

namespace App\Jobs;

use Illuminate\Contracts\Queue\PreparesForDispatch;
use Illuminate\Contracts\Queue\ShouldQueue;
use Illuminate\Foundation\Queue\Queueable;
use Illuminate\Support\Facades\Cache;

class SyncPodcasts implements PreparesForDispatch, ShouldQueue
{
    use Queueable;

    /**
     * Create a new job instance.
     */
    public function __construct(
        public array $podcastIds,
    ) {}

    /**
     * Prepare the job before dispatching.
     */
    public function prepareForDispatch(): bool
    {
        return collect($this->podcastIds)
            ->reject(fn (int $id) => Cache::has("podcast-syncing:{$id}"))
            ->isNotEmpty();
    }
}
```

<a name="jobs-and-database-transactions"></a>
### Jobs & Database Transactions

While it is perfectly fine to dispatch jobs within database transactions, you should take special care to ensure that your job will actually be able to execute successfully. When dispatching a job within a transaction, it is possible that the job will be processed by a worker before the parent transaction has committed. When this happens, any updates you have made to models or database records during the database transaction(s) may not yet be reflected in the database. In addition, any models or database records created within the transaction(s) may not exist in the database.

Thankfully, Laravel provides several methods of working around this problem. First, you may set the `after_commit` connection option in your queue connection's configuration array:

```php
'redis' => [
    'driver' => 'redis',
    // ...
    'after_commit' => true,
],
```

When the `after_commit` option is `true`, you may dispatch jobs within database transactions; however, Laravel will wait until the open parent database transactions have been committed before actually dispatching the job. Of course, if no database transactions are currently open, the job will be dispatched immediately.

If a transaction is rolled back due to an exception that occurs during the transaction, the jobs that were dispatched during that transaction will be discarded.

> [!NOTE]
> Setting the `after_commit` configuration option to `true` will also cause any queued event listeners, mailables, notifications, and broadcast events to be dispatched after all open database transactions have been committed.

<a name="specifying-commit-dispatch-behavior-inline"></a>
#### Specifying Commit Dispatch Behavior Inline

If you do not set the `after_commit` queue connection configuration option to `true`, you may still indicate that a specific job should be dispatched after all open database transactions have been committed. To accomplish this, you may chain the `afterCommit` method onto your dispatch operation:

```php
use App\Jobs\ProcessPodcast;

ProcessPodcast::dispatch($podcast)->afterCommit();
```

Likewise, if the `after_commit` configuration option is set to `true`, you may indicate that a specific job should be dispatched immediately without waiting for any open database transactions to commit:

```php
ProcessPodcast::dispatch($podcast)->beforeCommit();
```

<a name="job-chaining"></a>
### Job Chaining

Job chaining allows you to specify a list of queued jobs that should be run in sequence after the primary job has executed successfully. If one job in the sequence fails, the rest of the jobs will not be run. To execute a queued job chain, you may use the `chain` method provided by the `Bus` facade. Laravel's command bus is a lower-level component that queued job dispatching is built on top of:

```php
use App\Jobs\OptimizePodcast;
use App\Jobs\ProcessPodcast;
use App\Jobs\ReleasePodcast;
use Illuminate\Support\Facades\Bus;

Bus::chain([
    new ProcessPodcast,
    new OptimizePodcast,
    new ReleasePodcast,
])->dispatch();
```

In addition to chaining job class instances, you may also chain closures:

```php
Bus::chain([
    new ProcessPodcast,
    new OptimizePodcast,
    function () {
        Podcast::update(/* ... */);
    },
])->dispatch();
```

> [!WARNING]
> Deleting jobs using the `$this->delete()` method within the job will not prevent chained jobs from being processed. The chain will only stop executing if a job in the chain fails.

<a name="chain-connection-queue"></a>
#### Chain Connection and Queue

If you would like to specify the connection and queue that should be used for the chained jobs, you may use the `onConnection` and `onQueue` methods. These methods specify the queue connection and queue name that should be used unless the queued job is explicitly assigned a different connection / queue:

```php
Bus::chain([
    new ProcessPodcast,
    new OptimizePodcast,
    new ReleasePodcast,
])->onConnection('redis')->onQueue('podcasts')->dispatch();
```

<a name="adding-jobs-to-the-chain"></a>
#### Adding Jobs to the Chain

Occasionally, you may need to prepend or append a job to an existing job chain from within another job in that chain. You may accomplish this using the `prependToChain` and `appendToChain` methods:

```php
/**
 * Execute the job.
 */
public function handle(): void
{
    // ...

    // Prepend to the current chain, run job immediately after current job...
    $this->prependToChain(new TranscribePodcast);

    // Append to the current chain, run job at end of chain...
    $this->appendToChain(new TranscribePodcast);
}
```

<a name="chain-failures"></a>
#### Chain Failures

When chaining jobs, you may use the `catch` method to specify a closure that should be invoked if a job within the chain fails. The given callback will receive the `Throwable` instance that caused the job failure:

```php
use Illuminate\Support\Facades\Bus;
use Throwable;

Bus::chain([
    new ProcessPodcast,
    new OptimizePodcast,
    new ReleasePodcast,
])->catch(function (Throwable $e) {
    // A job within the chain has failed...
})->dispatch();
```

> [!WARNING]
> Since chain callbacks are serialized and executed at a later time by the Laravel queue, you should not use the `$this` variable within chain callbacks.

<a name="customizing-the-queue-and-connection"></a>
### Customizing the Queue and Connection

<a name="dispatching-to-a-particular-queue"></a>
#### Dispatching to a Particular Queue

By pushing jobs to different queues, you may "categorize" your queued jobs and even prioritize how many workers you assign to various queues. Keep in mind, this does not push jobs to different queue "connections" as defined by your queue configuration file, but only to specific queues within a single connection. To specify the queue, use the `onQueue` method when dispatching the job:

```php
<?php

namespace App\Http\Controllers;

use App\Jobs\ProcessPodcast;
use App\Models\Podcast;
use Illuminate\Http\RedirectResponse;
use Illuminate\Http\Request;

class PodcastController extends Controller
{
    /**
     * Store a new podcast.
     */
    public function store(Request $request): RedirectResponse
    {
        $podcast = Podcast::create(/* ... */);

        // Create podcast...

        ProcessPodcast::dispatch($podcast)->onQueue('processing');

        return redirect('/podcasts');
    }
}
```

Alternatively, you may specify the job's queue by calling the `onQueue` method within the job's constructor:

```php
<?php

namespace App\Jobs;

use Illuminate\Contracts\Queue\ShouldQueue;
use Illuminate\Foundation\Queue\Queueable;

class ProcessPodcast implements ShouldQueue
{
    use Queueable;

    /**
     * Create a new job instance.
     */
    public function __construct()
    {
        $this->onQueue('processing');
    }
}
```

<a name="dispatching-to-a-particular-connection"></a>
#### Dispatching to a Particular Connection

If your application interacts with multiple queue connections, you may specify which connection to push a job to using the `onConnection` method:

```php
<?php

namespace App\Http\Controllers;

use App\Jobs\ProcessPodcast;
use App\Models\Podcast;
use Illuminate\Http\RedirectResponse;
use Illuminate\Http\Request;

class PodcastController extends Controller
{
    /**
     * Store a new podcast.
     */
    public function store(Request $request): RedirectResponse
    {
        $podcast = Podcast::create(/* ... */);

        // Create podcast...

        ProcessPodcast::dispatch($podcast)->onConnection('sqs');

        return redirect('/podcasts');
    }
}
```

You may chain the `onConnection` and `onQueue` methods together to specify the connection and the queue for a job:

```php
ProcessPodcast::dispatch($podcast)
    ->onConnection('sqs')
    ->onQueue('processing');
```

Alternatively, you may specify the job's connection by calling the `onConnection` method within the job's constructor:

```php
<?php

namespace App\Jobs;

use Illuminate\Contracts\Queue\ShouldQueue;
use Illuminate\Foundation\Queue\Queueable;

class ProcessPodcast implements ShouldQueue
{
    use Queueable;

    /**
     * Create a new job instance.
     */
    public function __construct()
    {
        $this->onConnection('sqs');
    }
}
```

<a name="queue-routing"></a>
#### Queue Routing

You may use the `Queue` facade's `route` method to define a default connection and queue for specific job classes. This is useful when you want to ensure certain jobs always use specific queues without needing to specify the connection or queue on the job.

In addition to routing specific job classes, you may also pass an interface, trait, or parent class to the `route` method. When you do this, any job that implements the interface, uses the trait, or extends the parent class will automatically use the configured connection and queue.

Typically, you should call the `route` method from the `boot` method of a service provider:

```php
use App\Concerns\RequiresVideo;
use App\Jobs\ProcessPodcast;
use App\Jobs\ProcessVideo;
use Illuminate\Support\Facades\Queue;

/**
 * Bootstrap any application services.
 */
public function boot(): void
{
    Queue::route(ProcessPodcast::class, connection: 'redis', queue: 'podcasts');
    Queue::route(RequiresVideo::class, queue: 'video');
}
```

When a connection is specified without a queue, the job will be sent to the default queue:

```php
Queue::route(ProcessPodcast::class, connection: 'redis');
```

You may also route multiple job classes at once by passing an array to the `route` method:

```php
Queue::route([
    ProcessPodcast::class => ['redis', 'podcasts'], // Connection and queue
    ProcessVideo::class => 'videos', // Queue only (uses default connection)
]);
```

> [!NOTE]
> Queue routing can still be overridden by the job on a per-job basis.

You may use the `forward` method to forward jobs from one queue to another queue and / or connection. This is useful when you need to change queue infrastructure without modifying individual jobs or dispatch locations:

```php
Queue::forward('reports', 'reports.fifo', 'sqs');
Queue::forward('payments', connection: 'sqs');
Queue::forward('updates', 'notifications');
```

You may also forward multiple queues at once by passing an array:

```php
Queue::forward([
    'reports' => 'reports.fifo',
    'emails' => 'emails.fifo',
], connection: 'sqs');
```

An explicit connection configured on a job takes precedence over a forwarded connection.

<a name="max-job-attempts-and-timeout"></a>
### Specifying Max Job Attempts / Timeout Values

<a name="max-attempts"></a>
#### Max Attempts

Job attempts are a core concept of Laravel's queue system and power many advanced features. While they may seem confusing at first, it's important to understand how they work before modifying the default configuration.

When a job is dispatched, it is pushed onto the queue. A worker then picks it up and attempts to execute it. This is a job attempt.

However, an attempt does not necessarily mean the job's `handle` method was executed. Attempts can also be "consumed" in several ways:

<div class="content-list" markdown="1">

- The job encounters an unhandled exception during execution.
- The job is manually released back to the queue using `$this->release()`.
- Middleware such as `WithoutOverlapping` or `RateLimited` fails to acquire a lock and releases the job.
- The job timed out.
- The job's `handle` method runs and completes without throwing an exception.

</div>

You likely do not want to keep attempting a job indefinitely. Therefore, Laravel provides various ways to specify how many times or for how long a job may be attempted.

> [!NOTE]
> By default, Laravel will only attempt a job once. If your job uses middleware like `WithoutOverlapping` or `RateLimited`, or if you're manually releasing jobs, you will likely need to increase the number of allowed attempts via the `tries` option.

One approach to specifying the maximum number of times a job may be attempted is via the `--tries` switch on the Artisan command line. This will apply to all jobs processed by the worker unless the job being processed specifies the number of times it may be attempted:

```shell
php artisan queue:work --tries=3
```

If a job exceeds its maximum number of attempts, it will be considered a "failed" job. For more information on handling failed jobs, consult the [failed job documentation](#dealing-with-failed-jobs). If `--tries=0` is provided to the `queue:work` command, the job will be retried indefinitely.

You may take a more granular approach by defining the maximum number of times a job may be attempted on the job class itself using the `Tries` attribute. If the maximum number of attempts is specified on the job, it will take precedence over the `--tries` value provided on the command line:

```php
<?php

namespace App\Jobs;

use Illuminate\Queue\Attributes\Tries;

#[Tries(5)]
class ProcessPodcast implements ShouldQueue
{
    // ...
}
```

If you need dynamic control over a particular job's maximum attempts, you may define a `tries` method on the job:

```php
/**
 * Determine number of times the job may be attempted.
 */
public function tries(): int
{
    return 5;
}
```

<a name="time-based-attempts"></a>
#### Time Based Attempts

As an alternative to defining how many times a job may be attempted before it fails, you may define a time at which the job should no longer be attempted. This allows a job to be attempted any number of times within a given time frame. To define the time at which a job should no longer be attempted, add a `retryUntil` method to your job class. This method should return a `DateTime` instance:

```php
use DateTime;

/**
 * Determine the time at which the job should timeout.
 */
public function retryUntil(): DateTime
{
    return now()->plus(minutes: 10);
}
```

If both `retryUntil` and `tries` are defined, Laravel gives precedence to the `retryUntil` method.

> [!NOTE]
> You may also define a `Tries` attribute or `retryUntil` method on your [queued event listeners](/docs/{{version}}/events#queued-event-listeners) and [queued notifications](/docs/{{version}}/notifications#queueing-notifications).

<a name="max-exceptions"></a>
#### Max Exceptions

Sometimes you may wish to specify that a job may be attempted many times, but should fail if the retries are triggered by a given number of unhandled exceptions (as opposed to being released by the `release` method directly). To accomplish this, you may use the `Tries` and `MaxExceptions` attributes on your job class:

```php
<?php

namespace App\Jobs;

use Illuminate\Contracts\Queue\ShouldQueue;
use Illuminate\Foundation\Queue\Queueable;
use Illuminate\Queue\Attributes\MaxExceptions;
use Illuminate\Queue\Attributes\Tries;
use Illuminate\Support\Facades\Redis;

#[Tries(25)]
#[MaxExceptions(3)]
class ProcessPodcast implements ShouldQueue
{
    use Queueable;

    /**
     * Execute the job.
     */
    public function handle(): void
    {
        Redis::throttle('key')->allow(10)->every(60)->then(function () {
            // Lock obtained, process the podcast...
        }, function () {
            // Unable to obtain lock...
            return $this->release(10);
        });
    }
}
```

In this example, the job is released for ten seconds if the application is unable to obtain a Redis lock and will continue to be retried up to 25 times. However, the job will fail if three unhandled exceptions are thrown by the job.

<a name="stopping-retries-by-exception"></a>
#### Stopping Retries by Exception

Sometimes an exception indicates that a queued job should fail immediately instead of being released for another attempt. You may configure exception types that should stop job retries using the `dontRetry` exception method in your application's `bootstrap/app.php` file:

```php
use App\Exceptions\InvalidPodcastSourceException;
use Illuminate\Foundation\Configuration\Exceptions;

->withExceptions(function (Exceptions $exceptions): void {
    $exceptions->dontRetry([
        InvalidPodcastSourceException::class,
    ]);
})
```

If you need more control over when retries should stop, you may provide a closure to the `dontRetryWhen` method. When the closure returns `true`, the job will be marked as failed and will not be retried:

```php
use App\Exceptions\PodcastProcessingException;
use Illuminate\Foundation\Configuration\Exceptions;

->withExceptions(function (Exceptions $exceptions): void {
    $exceptions->dontRetryWhen(function (PodcastProcessingException $e) {
        return $e->reason() === 'Subscription expired';
    });
})
```

<a name="timeout"></a>
#### Timeout

Often, you know roughly how long you expect your queued jobs to take. For this reason, Laravel allows you to specify a "timeout" value. By default, the timeout value is 60 seconds. If a job is processing for longer than the number of seconds specified by the timeout value, the worker processing the job will exit with an error. Typically, the worker will be restarted automatically by a [process manager configured on your server](#supervisor-configuration).

The maximum number of seconds that jobs can run may be specified using the `--timeout` switch on the Artisan command line:

```shell
php artisan queue:work --timeout=30
```

If the job exceeds its maximum attempts by continually timing out, it will be marked as failed.

You may also define the maximum number of seconds a job should be allowed to run using the `Timeout` attribute on the job class. If the timeout is specified on the job, it will take precedence over any timeout specified on the command line:

```php
<?php

namespace App\Jobs;

use Illuminate\Queue\Attributes\Timeout;

#[Timeout(120)]
class ProcessPodcast implements ShouldQueue
{
    // ...
}
```

Sometimes, IO blocking processes such as sockets or outgoing HTTP connections may not respect your specified timeout. Therefore, when using these features, you should always attempt to specify a timeout using their APIs as well. For example, when using [Guzzle](https://docs.guzzlephp.org), you should always specify a connection and request timeout value.

> [!WARNING]
> The [PCNTL](https://www.php.net/manual/en/book.pcntl.php) PHP extension must be installed in order to specify job timeouts. In addition, a job's "timeout" value should always be less than its ["retry after"](#job-expiration) value. Otherwise, the job may be re-attempted before it has actually finished executing or timed out. The `--timeout` option has no effect when the `queue:work` command is invoked with the `--once` option.

<a name="failing-on-timeout"></a>
#### Failing on Timeout

If you would like to indicate that a job should be marked as [failed](#dealing-with-failed-jobs) on timeout, you may use the `FailOnTimeout` attribute on the job class:

```php
<?php

namespace App\Jobs;

use Illuminate\Queue\Attributes\FailOnTimeout;

#[FailOnTimeout]
class ProcessPodcast implements ShouldQueue
{
    // ...
}
```

> [!NOTE]
> By default, when a job times out, it consumes one attempt and is released back to the queue (if retries are allowed). However, if you configure the job to fail on timeout, it will not be retried, regardless of the value set for tries.

<a name="sqs-fifo-and-fair-queues"></a>
### SQS FIFO and Fair Queues

Laravel supports [Amazon SQS FIFO (First-In-First-Out)](https://docs.aws.amazon.com/AWSSimpleQueueService/latest/SQSDeveloperGuide/sqs-fifo-queues.html) and [fair](https://docs.aws.amazon.com/AWSSimpleQueueService/latest/SQSDeveloperGuide/sqs-fair-queues.html) queues. FIFO queues allow you to process jobs in the exact order they were sent while ensuring exactly-once processing through message deduplication.

FIFO queues require a message group ID to determine which jobs can be processed in parallel. Jobs with the same group ID are processed sequentially, while messages with different group IDs can be processed concurrently.

Laravel provides a fluent `onGroup` method to specify the message group ID when dispatching jobs:

```php
ProcessOrder::dispatch($order)
    ->onGroup("customer-{$order->customer_id}");
```

SQS FIFO queues support message deduplication to ensure exactly-once processing. Implement a `deduplicationId` method in your job class to provide a custom deduplication ID:

```php
<?php

namespace App\Jobs;

use Illuminate\Contracts\Queue\ShouldQueue;
use Illuminate\Foundation\Queue\Queueable;

class ProcessSubscriptionRenewal implements ShouldQueue
{
    use Queueable;

    // ...

    /**
     * Get the job's deduplication ID.
     */
    public function deduplicationId(): string
    {
        return "renewal-{$this->subscription->id}";
    }
}
```

<a name="fair-queues"></a>
#### Fair Queues

If you are using an SQS standard queue, setting a message group enables fair queueing. In other words, once you assign groups, SQS will use them to maintain fair delivery across tenants / workloads. No additional Laravel configuration is required.

Instead of calling `onGroup` at dispatch time, you may also define a `messageGroup` method directly on the job:

```php
<?php

namespace App\Jobs;

use Illuminate\Contracts\Queue\ShouldQueue;
use Illuminate\Foundation\Queue\Queueable;

class ProcessOrder implements ShouldQueue
{
    use Queueable;

    // ...

    /**
     * Get the job's message group.
     */
    public function messageGroup(): string
    {
        return "customer-{$this->order->customer_id}";
    }
}
```

<a name="fifo-listeners-mail-and-notifications"></a>
#### FIFO Listeners, Mail, and Notifications

When utilizing FIFO queues, you will also need to define message groups on listeners, mail, and notifications. Alternatively, you can dispatch queued instances of these objects to a non-FIFO queue.

To define the message group for a [queued event listener](/docs/{{version}}/events#queued-event-listeners), define a `messageGroup` method on the listener. You may also optionally define a `deduplicationId` method:

```php
<?php

namespace App\Listeners;

class SendShipmentNotification
{
    // ...

    /**
     * Get the job's message group.
     */
    public function messageGroup(): string
    {
        return 'shipments';
    }

    /**
     * Get the job's deduplication ID.
     */
    public function deduplicationId(): string
    {
        return "shipment-notification-{$this->shipment->id}";
    }
}
```

When sending a [mail message](/docs/{{version}}/mail) that is going to be queued on a FIFO queue, you should invoke the `onGroup` method and optionally the `withDeduplicator` method when sending the notification:

```php
use App\Mail\InvoicePaid;
use Illuminate\Support\Facades\Mail;

$invoicePaid = (new InvoicePaid($invoice))
    ->onGroup('invoices')
    ->withDeduplicator(fn () => 'invoices-'.$invoice->id);

Mail::to($request->user())->send($invoicePaid);
```

When sending a [notification](/docs/{{version}}/notifications) that is going to be queued on a FIFO queue, you should invoke the `onGroup` method and optionally the `withDeduplicator` method when sending the notification:

```php
use App\Notifications\InvoicePaid;

$invoicePaid = (new InvoicePaid($invoice))
    ->onGroup('invoices')
    ->withDeduplicator(fn () => 'invoices-'.$invoice->id);

$user->notify($invoicePaid);
```

<a name="queue-failover"></a>
### Queue Failover

The `failover` queue driver provides automatic failover functionality when pushing jobs to the queue. If the primary queue connection of the `failover` configuration fails for any reason, Laravel will automatically attempt to push the job to the next configured connection in the list. This is particularly useful for ensuring high availability in production environments where queue reliability is critical.

To configure a failover queue connection, specify the `failover` driver and provide an array of connection names to attempt in order. By default, Laravel includes an example failover configuration in your application's `config/queue.php` configuration file:

```php
'failover' => [
    'driver' => 'failover',
    'connections' => [
        'redis',
        'database',
        'sync',
    ],
],
```

Once you have configured a connection that uses the `failover` driver, you will need to set the failover connection as your default queue connection in your application's `.env` file to make use of the failover functionality:

```ini
QUEUE_CONNECTION=failover
```

Next, start at least one worker for each connection in your failover connection list:

```bash
php artisan queue:work redis
php artisan queue:work database
```

> [!NOTE]
> You do not need to run a worker for connections using the `sync`, `background`, or `deferred` queue drivers since those drivers process jobs within the current PHP process.

When a queue connection operation fails and failover is activated, Laravel will dispatch the `Illuminate\Queue\Events\QueueFailedOver` event, allowing you to report or log that a queue connection has failed.

> [!NOTE]
> If you use Laravel Horizon, remember that Horizon manages Redis queues only. If your failover list includes `database`, you should run a regular `php artisan queue:work database` process alongside Horizon.

<a name="error-handling"></a>
### Error Handling

If an exception is thrown while the job is being processed, the job will automatically be released back onto the queue so it may be attempted again. The job will continue to be released until it has been attempted the maximum number of times allowed by your application. The maximum number of attempts is defined by the `--tries` switch used on the `queue:work` Artisan command. Alternatively, the maximum number of attempts may be defined on the job class itself. More information on running the queue worker [can be found below](#running-the-queue-worker).

<a name="manually-releasing-a-job"></a>
#### Manually Releasing a Job

Sometimes you may wish to manually release a job back onto the queue so that it can be attempted again at a later time. You may accomplish this by calling the `release` method:

```php
/**
 * Execute the job.
 */
public function handle(): void
{
    // ...

    $this->release();
}
```

By default, the `release` method will release the job back onto the queue for immediate processing. However, you may instruct the queue to not make the job available for processing until a given number of seconds has elapsed by passing an integer or date instance to the `release` method:

```php
$this->release(10);

$this->release(now()->plus(seconds: 10));
```

<a name="manually-failing-a-job"></a>
#### Manually Failing a Job

Occasionally you may need to manually mark a job as "failed". To do so, you may call the `fail` method:

```php
/**
 * Execute the job.
 */
public function handle(): void
{
    // ...

    $this->fail();
}
```

If you would like to mark your job as failed because of an exception that you have caught, you may pass the exception to the `fail` method. Or, for convenience, you may pass a string error message which will be converted to an exception for you:

```php
$this->fail($exception);

$this->fail('Something went wrong.');
```

> [!NOTE]
> For more information on failed jobs, check out the [documentation on dealing with job failures](#dealing-with-failed-jobs).

<a name="fail-jobs-on-exceptions"></a>
#### Failing Jobs on Specific Exceptions

The `FailOnException` [job middleware](#job-middleware) allows you to short-circuit retries when specific exceptions are thrown. This allows retrying on transient exceptions such as external API errors, but failing the job permanently on persistent exceptions, such as a user's permissions being revoked:

```php
<?php

namespace App\Jobs;

use App\Models\User;
use Illuminate\Auth\Access\AuthorizationException;
use Illuminate\Contracts\Queue\ShouldQueue;
use Illuminate\Foundation\Queue\Queueable;
use Illuminate\Queue\Attributes\Tries;
use Illuminate\Queue\Middleware\FailOnException;
use Illuminate\Support\Facades\Http;

#[Tries(3)]
class SyncChatHistory implements ShouldQueue
{
    use Queueable;

    /**
     * Create a new job instance.
     */
    public function __construct(
        public User $user,
    ) {}

    /**
     * Execute the job.
     */
    public function handle(): void
    {
        $this->user->authorize('sync-chat-history');

        $response = Http::throw()->get(
            "https://chat.laravel.test/?user={$this->user->uuid}"
        );

        // ...
    }

    /**
     * Get the middleware the job should pass through.
     */
    public function middleware(): array
    {
        return [
            new FailOnException([AuthorizationException::class])
        ];
    }
}
```

<a name="job-batching"></a>
## Job Batching

Laravel's job batching feature allows you to easily execute a group of jobs in parallel and then perform some action when the batch of jobs has completed executing.

Before getting started, you should create a database migration to build a table which will contain meta information about your job batches, such as their completion percentage. This migration may be generated using the `make:queue-batches-table` Artisan command:

```shell
php artisan make:queue-batches-table

php artisan migrate
```

<a name="defining-batchable-jobs"></a>
### Defining Batchable Jobs

To define a batchable job, you should [create a queueable job](#creating-jobs) as normal; however, you should add the `Illuminate\Bus\Batchable` trait to the job class. This trait provides access to a `batch` method which may be used to retrieve the current batch that the job is executing within:

```php
<?php

namespace App\Jobs;

use Illuminate\Bus\Batchable;
use Illuminate\Contracts\Queue\ShouldQueue;
use Illuminate\Foundation\Queue\Queueable;

class ImportCsv implements ShouldQueue
{
    use Batchable, Queueable;

    /**
     * Execute the job.
     */
    public function handle(): void
    {
        if ($this->batch()->cancelled()) {
            // Determine if the batch has been cancelled...

            return;
        }

        // Import a portion of the CSV file...
    }
}
```

<a name="dispatching-batches"></a>
### Dispatching Batches

To dispatch a batch of jobs, you should use the `batch` method of the `Bus` facade. Of course, batching is primarily useful when combined with completion callbacks. So, you may use the `then`, `catch`, and `finally` methods to define completion callbacks for the batch. Each of these callbacks will receive an `Illuminate\Bus\Batch` instance when they are invoked.

When running multiple queue workers, the jobs in the batch will be processed in parallel. Therefore, the order in which the jobs complete may not be the same as the order in which they were added to the batch. Consult our documentation on [job chains and batches](#chains-and-batches) for information on how to run a series of jobs in sequence.

In this example, we will imagine we are queueing a batch of jobs that each process a given number of rows from a CSV file:

```php
use App\Jobs\ImportCsv;
use Illuminate\Bus\Batch;
use Illuminate\Support\Facades\Bus;
use Throwable;

$batch = Bus::batch([
    new ImportCsv(1, 100),
    new ImportCsv(101, 200),
    new ImportCsv(201, 300),
    new ImportCsv(301, 400),
    new ImportCsv(401, 500),
])->before(function (Batch $batch) {
    // The batch has been created but no jobs have been added...
})->progress(function (Batch $batch) {
    // A single job has completed successfully...
})->then(function (Batch $batch) {
    // All jobs completed successfully...
})->catch(function (Batch $batch, Throwable $e) {
    // Batch job failure detected...
})->finally(function (Batch $batch) {
    // The batch has finished executing...
})->dispatch();

return $batch->id;
```

The batch's ID, which may be accessed via the `$batch->id` property, may be used to [query the Laravel command bus](#inspecting-batches) for information about the batch after it has been dispatched.

> [!WARNING]
> Since batch callbacks are serialized and executed at a later time by the Laravel queue, you should not use the `$this` variable within the callbacks. In addition, since batched jobs are wrapped within database transactions, database statements that trigger implicit commits should not be executed within the jobs.

<a name="naming-batches"></a>
#### Naming Batches

Some tools such as [Laravel Horizon](/docs/{{version}}/horizon) and [Laravel Telescope](/docs/{{version}}/telescope) may provide more user-friendly debug information for batches if batches are named. To assign an arbitrary name to a batch, you may call the `name` method while defining the batch:

```php
$batch = Bus::batch([
    // ...
])->then(function (Batch $batch) {
    // All jobs completed successfully...
})->name('Import CSV')->dispatch();
```

<a name="batch-connection-queue"></a>
#### Batch Connection and Queue

If you would like to specify the connection and queue that should be used for the batched jobs, you may use the `onConnection` and `onQueue` methods. All batched jobs must execute within the same connection and queue:

```php
$batch = Bus::batch([
    // ...
])->then(function (Batch $batch) {
    // All jobs completed successfully...
})->onConnection('redis')->onQueue('imports')->dispatch();
```

<a name="chains-and-batches"></a>
### Chains and Batches

You may define a set of [chained jobs](#job-chaining) within a batch by placing the chained jobs within an array. For example, we may execute two job chains in parallel and execute a callback when both job chains have finished processing:

```php
use App\Jobs\ReleasePodcast;
use App\Jobs\SendPodcastReleaseNotification;
use Illuminate\Bus\Batch;
use Illuminate\Support\Facades\Bus;

Bus::batch([
    [
        new ReleasePodcast(1),
        new SendPodcastReleaseNotification(1),
    ],
    [
        new ReleasePodcast(2),
        new SendPodcastReleaseNotification(2),
    ],
])->then(function (Batch $batch) {
    // All jobs completed successfully...
})->dispatch();
```

Conversely, you may run batches of jobs within a [chain](#job-chaining) by defining batches within the chain. For example, you could first run a batch of jobs to release multiple podcasts then a batch of jobs to send the release notifications:

```php
use App\Jobs\FlushPodcastCache;
use App\Jobs\ReleasePodcast;
use App\Jobs\SendPodcastReleaseNotification;
use Illuminate\Support\Facades\Bus;

Bus::chain([
    new FlushPodcastCache,
    Bus::batch([
        new ReleasePodcast(1),
        new ReleasePodcast(2),
    ]),
    Bus::batch([
        new SendPodcastReleaseNotification(1),
        new SendPodcastReleaseNotification(2),
    ]),
])->dispatch();
```

<a name="adding-jobs-to-batches"></a>
### Adding Jobs to Batches

Sometimes it may be useful to add additional jobs to a batch from within a batched job. This pattern can be useful when you need to batch thousands of jobs which may take too long to dispatch during a web request. So, instead, you may wish to dispatch an initial batch of "loader" jobs that hydrate the batch with even more jobs:

```php
$batch = Bus::batch([
    new LoadImportBatch,
    new LoadImportBatch,
    new LoadImportBatch,
])->then(function (Batch $batch) {
    // All jobs completed successfully...
})->name('Import Contacts')->dispatch();
```

In this example, we will use the `LoadImportBatch` job to hydrate the batch with additional jobs. To accomplish this, we may use the `add` method on the batch instance that may be accessed via the job's `batch` method:

```php
use App\Jobs\ImportContacts;
use Illuminate\Support\Collection;

/**
 * Execute the job.
 */
public function handle(): void
{
    if ($this->batch()->cancelled()) {
        return;
    }

    $this->batch()->add(Collection::times(1000, function () {
        return new ImportContacts;
    }));
}
```

> [!WARNING]
> You may only add jobs to a batch from within a job that belongs to the same batch.

<a name="inspecting-batches"></a>
### Inspecting Batches

The `Illuminate\Bus\Batch` instance that is provided to batch completion callbacks has a variety of properties and methods to assist you in interacting with and inspecting a given batch of jobs:

```php
// The UUID of the batch...
$batch->id;

// The name of the batch (if applicable)...
$batch->name;

// The number of jobs assigned to the batch...
$batch->totalJobs;

// The number of jobs that have not been processed by the queue...
$batch->pendingJobs;

// The number of jobs that have failed...
$batch->failedJobs;

// The number of jobs that have been processed thus far...
$batch->processedJobs();

// The completion percentage of the batch (0-100)...
$batch->progress();

// Indicates if the batch has finished executing...
$batch->finished();

// Cancel the execution of the batch...
$batch->cancel();

// Indicates if the batch has been cancelled...
$batch->cancelled();
```

<a name="returning-batches-from-routes"></a>
#### Returning Batches From Routes

All `Illuminate\Bus\Batch` instances are JSON serializable, meaning you can return them directly from one of your application's routes to retrieve a JSON payload containing information about the batch, including its completion progress. This makes it convenient to display information about the batch's completion progress in your application's UI.

To retrieve a batch by its ID, you may use the `Bus` facade's `findBatch` method:

```php
use Illuminate\Support\Facades\Bus;
use Illuminate\Support\Facades\Route;

Route::get('/batch/{batchId}', function (string $batchId) {
    return Bus::findBatch($batchId);
});
```

<a name="cancelling-batches"></a>
### Cancelling Batches

Sometimes you may need to cancel a given batch's execution. This can be accomplished by calling the `cancel` method on the `Illuminate\Bus\Batch` instance:

```php
/**
 * Execute the job.
 */
public function handle(): void
{
    if ($this->user->exceedsImportLimit()) {
        $this->batch()->cancel();

        return;
    }

    if ($this->batch()->cancelled()) {
        return;
    }
}
```

As you may have noticed in the previous examples, batched jobs should typically determine if their corresponding batch has been cancelled before continuing execution. However, for convenience, you may assign the `SkipIfBatchCancelled` [middleware](#job-middleware) to the job instead. As its name indicates, this middleware will instruct Laravel to not process the job if its corresponding batch has been cancelled:

```php
use Illuminate\Queue\Middleware\SkipIfBatchCancelled;

/**
 * Get the middleware the job should pass through.
 */
public function middleware(): array
{
    return [new SkipIfBatchCancelled];
}
```

<a name="batch-failures"></a>
### Batch Failures

When a batched job fails, the `catch` callback (if assigned) will be invoked. This callback is only invoked for the first job that fails within the batch.

<a name="allowing-failures"></a>
#### Allowing Failures

When a job within a batch fails, Laravel will automatically mark the batch as "cancelled". If you wish, you may disable this behavior so that a job failure does not automatically mark the batch as cancelled. This may be accomplished by calling the `allowFailures` method while dispatching the batch:

```php
$batch = Bus::batch([
    // ...
])->then(function (Batch $batch) {
    // All jobs completed successfully...
})->allowFailures()->dispatch();
```

You may optionally provide a closure to the `allowFailures` method, which will be executed on each job failure:

```php
$batch = Bus::batch([
    // ...
])->allowFailures(function (Batch $batch, $exception) {
    // Handle individual job failures...
})->dispatch();
```

<a name="retrying-failed-batch-jobs"></a>
#### Retrying Failed Batch Jobs

For convenience, Laravel provides a `queue:retry-batch` Artisan command that allows you to easily retry all of the failed jobs for a given batch. This command accepts the UUID of the batch whose failed jobs should be retried:

```shell
php artisan queue:retry-batch 32dbc76c-4f82-4749-b610-a639fe0099b5
```

<a name="pruning-batches"></a>
### Pruning Batches

Without pruning, the `job_batches` table can accumulate records very quickly. To mitigate this, you should [schedule](/docs/{{version}}/scheduling) the `queue:prune-batches` Artisan command to run daily:

```php
use Illuminate\Support\Facades\Schedule;

Schedule::command('queue:prune-batches')->daily();
```

By default, all finished batches that are more than 24 hours old will be pruned. You may use the `hours` option when calling the command to determine how long to retain batch data. For example, the following command will delete all batches that finished over 48 hours ago:

```php
use Illuminate\Support\Facades\Schedule;

Schedule::command('queue:prune-batches --hours=48')->daily();
```

Sometimes, your `job_batches` table may accumulate batch records for batches that never completed successfully, such as batches where a job failed and that job was never retried successfully. You may instruct the `queue:prune-batches` command to prune these unfinished batch records using the `unfinished` option:

```php
use Illuminate\Support\Facades\Schedule;

Schedule::command('queue:prune-batches --hours=48 --unfinished=72')->daily();
```

Likewise, your `job_batches` table may also accumulate batch records for cancelled batches. You may instruct the `queue:prune-batches` command to prune these cancelled batch records using the `cancelled` option:

```php
use Illuminate\Support\Facades\Schedule;

Schedule::command('queue:prune-batches --hours=48 --cancelled=72')->daily();
```

<a name="storing-batches-in-dynamodb"></a>
### Storing Batches in DynamoDB

Laravel also provides support for storing batch meta information in [DynamoDB](https://aws.amazon.com/dynamodb) instead of a relational database. However, you will need to manually create a DynamoDB table to store all of the batch records.

Typically, this table should be named `job_batches`, but you should name the table based on the value of the `queue.batching.table` configuration value within your application's `queue` configuration file.

<a name="dynamodb-batch-table-configuration"></a>
#### DynamoDB Batch Table Configuration

The `job_batches` table should have a string primary partition key named `application` and a string primary sort key named `id`. The `application` portion of the key will contain your application's name as defined by the `name` configuration value within your application's `app` configuration file. Since the application name is part of the DynamoDB table's key, you can use the same table to store job batches for multiple Laravel applications.

In addition, you may define `ttl` attribute for your table if you would like to take advantage of [automatic batch pruning](#pruning-batches-in-dynamodb).

<a name="dynamodb-configuration"></a>
#### DynamoDB Configuration

Next, install the AWS SDK so that your Laravel application can communicate with Amazon DynamoDB:

```shell
composer require aws/aws-sdk-php
```

Then, set the `queue.batching.driver` configuration option's value to `dynamodb`. In addition, you should define `key`, `secret`, and `region` configuration options within the `batching` configuration array. These options will be used to authenticate with AWS. When using the `dynamodb` driver, the `queue.batching.database` configuration option is unnecessary:

```php
'batching' => [
    'driver' => env('QUEUE_BATCHING_DRIVER', 'dynamodb'),
    'key' => env('AWS_ACCESS_KEY_ID'),
    'secret' => env('AWS_SECRET_ACCESS_KEY'),
    'region' => env('AWS_DEFAULT_REGION', 'us-east-1'),
    'table' => 'job_batches',
],
```

<a name="pruning-batches-in-dynamodb"></a>
#### Pruning Batches in DynamoDB

When utilizing [DynamoDB](https://aws.amazon.com/dynamodb) to store job batch information, the typical pruning commands used to prune batches stored in a relational database will not work. Instead, you may utilize [DynamoDB's native TTL functionality](https://docs.aws.amazon.com/amazondynamodb/latest/developerguide/TTL.html) to automatically remove records for old batches.

If you defined your DynamoDB table with a `ttl` attribute, you may define configuration parameters to instruct Laravel how to prune batch records. The `queue.batching.ttl_attribute` configuration value defines the name of the attribute holding the TTL, while the `queue.batching.ttl` configuration value defines the number of seconds after which a batch record can be removed from the DynamoDB table, relative to the last time the record was updated:

```php
'batching' => [
    'driver' => env('QUEUE_FAILED_DRIVER', 'dynamodb'),
    'key' => env('AWS_ACCESS_KEY_ID'),
    'secret' => env('AWS_SECRET_ACCESS_KEY'),
    'region' => env('AWS_DEFAULT_REGION', 'us-east-1'),
    'table' => 'job_batches',
    'ttl_attribute' => 'ttl',
    'ttl' => 60 * 60 * 24 * 7, // 7 days...
],
```

<a name="queueing-closures"></a>
## Queueing Closures

Instead of dispatching a job class to the queue, you may also dispatch a closure. This is great for quick, simple tasks that need to be executed outside of the current request cycle. When dispatching closures to the queue, the closure's code content is cryptographically signed so that it cannot be modified in transit:

```php
use App\Models\Podcast;

$podcast = Podcast::find(1);

dispatch(function () use ($podcast) {
    $podcast->publish();
});
```

To assign a name to the queued closure which may be used by queue reporting dashboards, as well as be displayed by the `queue:work` command, you may use the `name` method:

```php
dispatch(function () {
    // ...
})->name('Publish Podcast');
```

Using the `catch` method, you may provide a closure that should be executed if the queued closure fails to complete successfully after exhausting all of your queue's [configured retry attempts](#max-job-attempts-and-timeout):

```php
use Throwable;

dispatch(function () use ($podcast) {
    $podcast->publish();
})->catch(function (Throwable $e) {
    // This job has failed...
});
```

> [!WARNING]
> Since `catch` callbacks are serialized and executed at a later time by the Laravel queue, you should not use the `$this` variable within `catch` callbacks.

<a name="running-the-queue-worker"></a>
## Running the Queue Worker

<a name="the-queue-work-command"></a>
### The `queue:work` Command

Laravel includes an Artisan command that will start a queue worker and process new jobs as they are pushed onto the queue. You may run the worker using the `queue:work` Artisan command. Note that once the `queue:work` command has started, it will continue to run until it is manually stopped or you close your terminal:

```shell
php artisan queue:work
```

> [!NOTE]
> To keep the `queue:work` process running permanently in the background, you should use a process monitor such as [Supervisor](#supervisor-configuration) to ensure that the queue worker does not stop running.

You may include the `-v` flag when invoking the `queue:work` command if you would like the processed job IDs, connection names, and queue names to be included in the command's output:

```shell
php artisan queue:work -v
```

Remember, queue workers are long-lived processes and store the booted application state in memory. As a result, they will not notice changes in your code base after they have been started. So, during your deployment process, be sure to [restart your queue workers](#queue-workers-and-deployment). In addition, remember that any static state created or modified by your application will not be automatically reset between jobs.

Alternatively, you may run the `queue:listen` command. When using the `queue:listen` command, you don't have to manually restart the worker when you want to reload your updated code or reset the application state; however, this command is significantly less efficient than the `queue:work` command:

```shell
php artisan queue:listen
```

<a name="running-multiple-queue-workers"></a>
#### Running Multiple Queue Workers

To assign multiple workers to a queue and process jobs concurrently, you should simply start multiple `queue:work` processes. This can either be done locally via multiple tabs in your terminal or in production using your process manager's configuration settings. [When using Supervisor](#supervisor-configuration), you may use the `numprocs` configuration value.

<a name="specifying-the-connection-queue"></a>
#### Specifying the Connection and Queue

You may also specify which queue connection the worker should utilize. The connection name passed to the `work` command should correspond to one of the connections defined in your `config/queue.php` configuration file:

```shell
php artisan queue:work redis
```

By default, the `queue:work` command only processes jobs for the default queue on a given connection. However, you may customize your queue worker even further by only processing particular queues for a given connection. For example, if all of your emails are processed in an `emails` queue on your `redis` queue connection, you may issue the following command to start a worker that only processes that queue:

```shell
php artisan queue:work redis --queue=emails
```

<a name="processing-a-specified-number-of-jobs"></a>
#### Processing a Specified Number of Jobs

The `--once` option may be used to instruct the worker to only process a single job from the queue:

```shell
php artisan queue:work --once
```

The `--max-jobs` option may be used to instruct the worker to process the given number of jobs and then exit. This option may be useful when combined with [Supervisor](#supervisor-configuration) so that your workers are automatically restarted after processing a given number of jobs, releasing any memory they may have accumulated:

```shell
php artisan queue:work --max-jobs=1000
```

<a name="processing-all-queued-jobs-then-exiting"></a>
#### Processing All Queued Jobs and Then Exiting

The `--stop-when-empty` option may be used to instruct the worker to process all jobs and then exit gracefully. This option can be useful when processing Laravel queues within a Docker container if you wish to shutdown the container after the queue is empty:

```shell
php artisan queue:work --stop-when-empty
```

<a name="processing-jobs-for-a-given-number-of-seconds"></a>
#### Processing Jobs for a Given Number of Seconds

The `--max-time` option may be used to instruct the worker to process jobs for the given number of seconds and then exit. This option may be useful when combined with [Supervisor](#supervisor-configuration) so that your workers are automatically restarted after processing jobs for a given amount of time, releasing any memory they may have accumulated:

```shell
# Process jobs for one hour and then exit...
php artisan queue:work --max-time=3600
```

<a name="worker-sleep-duration"></a>
#### Worker Sleep Duration

When jobs are available on the queue, the worker will keep processing jobs with no delay in between jobs. However, the `sleep` option determines how many seconds the worker will "sleep" if there are no jobs available. Of course, while sleeping, the worker will not process any new jobs:

```shell
php artisan queue:work --sleep=3
```

<a name="maintenance-mode-queues"></a>
#### Maintenance Mode and Queues

While your application is in [maintenance mode](/docs/{{version}}/configuration#maintenance-mode), no queued jobs will be handled. The jobs will continue to be handled as normal once the application is out of maintenance mode.

To force your queue workers to process jobs even if maintenance mode is enabled, you may use `--force` option:

```shell
php artisan queue:work --force
```

<a name="resource-considerations"></a>
#### Resource Considerations

Daemon queue workers do not "reboot" the framework before processing each job. Therefore, you should release any heavy resources after each job completes. For example, if you are doing [image manipulation](/docs/{{version}}/images) with the [GD library](https://www.php.net/manual/en/book.image.php), you should free the memory with `imagedestroy` when you are done processing the image.

<a name="queue-priorities"></a>
### Queue Priorities

Sometimes you may wish to prioritize how your queues are processed. For example, in your `config/queue.php` configuration file, you may set the default `queue` for your `redis` connection to `low`. However, occasionally you may wish to push a job to a `high` priority queue like so:

```php
dispatch((new Job)->onQueue('high'));
```

To start a worker that verifies that all of the `high` queue jobs are processed before continuing to any jobs on the `low` queue, pass a comma-delimited list of queue names to the `work` command:

```shell
php artisan queue:work --queue=high,low
```

<a name="queue-workers-and-deployment"></a>
### Queue Workers and Deployment

Since queue workers are long-lived processes, they will not notice changes to your code without being restarted. So, the simplest way to deploy an application using queue workers is to restart the workers during your deployment process. You may gracefully restart all of the workers by issuing the `queue:restart` command:

```shell
php artisan queue:restart
```

This command will instruct all queue workers to gracefully exit after they finish processing their current job so that no existing jobs are lost. Since the queue workers will exit when the `queue:restart` command is executed, you should be running a process manager such as [Supervisor](#supervisor-configuration) to automatically restart the queue workers.

> [!NOTE]
> The queue uses the [cache](/docs/{{version}}/cache) to store restart signals, so you should verify that a cache driver is properly configured for your application before using this feature.

<a name="reacting-to-worker-signals"></a>
### Reacting to Worker Signals

When a queue worker receives a termination signal such as `SIGQUIT`, `SIGTERM`, or `SIGINT` while processing a job, the worker will finish its current job before exiting. However, your job may need to react to the signal before the process is stopped by your server or container orchestrator. For example, a long-running import job may need to stop pulling new records and save its current progress.

To react to worker signals from within a job, implement the `Illuminate\Contracts\Queue\Interruptible` interface and define an `interrupted` method on your job. The signal number received by the worker will be passed to the `interrupted` method:

```php
<?php

namespace App\Jobs;

use App\Models\Import;
use Illuminate\Contracts\Queue\Interruptible;
use Illuminate\Contracts\Queue\ShouldQueue;
use Illuminate\Foundation\Queue\Queueable;

class ImportProducts implements ShouldQueue, Interruptible
{
    use Queueable;

    protected bool $shouldStop = false;

    /**
     * Create a new job instance.
     */
    public function __construct(
        public Import $import,
    ) {}

    /**
     * Execute the job.
     */
    public function handle(): void
    {
        foreach ($this->import->pendingRows() as $row) {
            if ($this->shouldStop) {
                break;
            }

            // Import the product row...
        }

        $this->import->saveProgress();
    }

    /**
     * Handle a signal received by the queue worker.
     */
    public function interrupted(int $signal): void
    {
        $this->shouldStop = true;
    }
}
```

The `interrupted` method is only invoked when the worker receives a process signal while the job is currently running. It is not a replacement for [timeouts](#worker-timeouts) or the job's [`failed` method](#cleaning-up-after-failed-jobs).

<a name="job-expirations-and-timeouts"></a>
### Job Expirations and Timeouts

<a name="job-expiration"></a>
#### Job Expiration

In your `config/queue.php` configuration file, each queue connection defines a `retry_after` option. This option specifies how many seconds the queue connection should wait before retrying a job that is being processed. For example, if the value of `retry_after` is set to `90`, the job will be released back onto the queue if it has been processing for 90 seconds without being released or deleted. Typically, you should set the `retry_after` value to the maximum number of seconds your jobs should reasonably take to complete processing.

> [!WARNING]
> The only queue connection which does not contain a `retry_after` value is Amazon SQS. SQS will retry the job based on the [Default Visibility Timeout](https://docs.aws.amazon.com/AWSSimpleQueueService/latest/SQSDeveloperGuide/AboutVT.html) which is managed within the AWS console.

<a name="worker-timeouts"></a>
#### Worker Timeouts

The `queue:work` Artisan command exposes a `--timeout` option. By default, the `--timeout` value is 60 seconds. If a job is processing for longer than the number of seconds specified by the timeout value, the worker processing the job will exit with an error. Typically, the worker will be restarted automatically by a [process manager configured on your server](#supervisor-configuration):

```shell
php artisan queue:work --timeout=60
```

The `retry_after` configuration option and the `--timeout` CLI option are different, but work together to ensure that jobs are not lost and that jobs are only successfully processed once.

> [!WARNING]
> The `--timeout` value should always be at least several seconds shorter than your `retry_after` configuration value. This will ensure that a worker processing a frozen job is always terminated before the job is retried. If your `--timeout` option is longer than your `retry_after` configuration value, your jobs may be processed twice.

<a name="pausing-and-resuming-queue-workers"></a>
### Pausing and Resuming Queue Workers

Sometimes you may need to temporarily prevent a queue worker from processing new jobs without stopping the worker entirely. For example, you may want to pause job processing during system maintenance. Laravel provides the `queue:pause` and `queue:continue` Artisan commands to pause and resume queue workers.

To pause a specific queue, provide the queue connection name and the queue name:

```shell
php artisan queue:pause database:default
```

In this example, `database` is the queue connection name and `default` is the queue name. Once a queue is paused, any workers processing jobs from that queue will continue to finish their current job, but will not pick up any new jobs until the queue is resumed.

To pause job processing for every queue on every connection, use the `--all` option:

```shell
php artisan queue:pause --all
```

To resume processing jobs on a paused queue, use the `queue:continue` command:

```shell
php artisan queue:continue database:default
```

To resume job processing for every queue on every connection, use the `--all` option with the `queue:resume` command:

```shell
php artisan queue:resume --all
```

After resuming a queue, workers will begin processing new jobs from that queue immediately. Resuming all queues does not resume queues that were paused individually. Note that pausing a queue does not stop the worker process itself - it only prevents the worker from processing new jobs from the specified queue.

<a name="worker-restart-and-pause-signals"></a>
#### Worker Restart and Pause Signals

By default, queue workers poll the cache driver for restart and pause signals on each job iteration. While this polling is essential for responding to `queue:restart` and `queue:pause` commands, it does introduce a small performance overhead.

If you need to optimize performance and don't require these interruption features, you may disable this polling globally by calling the `withoutInterruptionPolling` method on the `Queue` facade. This should typically be done in the `boot` method of your `AppServiceProvider`:

```php
use Illuminate\Support\Facades\Queue;

/**
 * Bootstrap any application services.
 */
public function boot(): void
{
    Queue::withoutInterruptionPolling();
}
```

Alternatively, you may disable restart or pause polling individually by setting the static `$restartable` or `$pausable` properties on the `Illuminate\Queue\Worker` class:

```php
use Illuminate\Queue\Worker;

/**
 * Bootstrap any application services.
 */
public function boot(): void
{
    Worker::$restartable = false;
    Worker::$pausable = false;
}
```

> [!WARNING]
> When interruption polling is disabled, workers will not respond to `queue:restart` or `queue:pause` commands (depending on which features are disabled).

<a name="supervisor-configuration"></a>
## Supervisor Configuration

In production, you need a way to keep your `queue:work` processes running. A `queue:work` process may stop running for a variety of reasons, such as an exceeded worker timeout or the execution of the `queue:restart` command.

For this reason, you need to configure a process monitor that can detect when your `queue:work` processes exit and automatically restart them. In addition, process monitors can allow you to specify how many `queue:work` processes you would like to run concurrently. Supervisor is a process monitor commonly used in Linux environments and we will discuss how to configure it in the following documentation.

<a name="installing-supervisor"></a>
#### Installing Supervisor

Supervisor is a process monitor for the Linux operating system, and will automatically restart your `queue:work` processes if they fail. To install Supervisor on Ubuntu, you may use the following command:

```shell
sudo apt-get install supervisor
```

> [!NOTE]
> If configuring and managing Supervisor yourself sounds overwhelming, consider using [Laravel Cloud](https://cloud.laravel.com), which provides a fully-managed platform for running Laravel queue workers.

<a name="configuring-supervisor"></a>
#### Configuring Supervisor

Supervisor configuration files are typically stored in the `/etc/supervisor/conf.d` directory. Within this directory, you may create any number of configuration files that instruct supervisor how your processes should be monitored. For example, let's create a `laravel-worker.conf` file that starts and monitors `queue:work` processes:

```ini
[program:laravel-worker]
process_name=%(program_name)s_%(process_num)02d
command=php /home/forge/app.com/artisan queue:work --sleep=3 --tries=3 --max-time=3600
autostart=true
autorestart=true
stopasgroup=true
killasgroup=true
user=forge
numprocs=8
redirect_stderr=true
stdout_logfile=/home/forge/app.com/worker.log
stopwaitsecs=3600
```

In this example, the `numprocs` directive will instruct Supervisor to run eight `queue:work` processes and monitor all of them, automatically restarting them if they fail. You should change the `command` directive of the configuration to reflect your desired queue connection and worker options.

> [!WARNING]
> You should ensure that the value of `stopwaitsecs` is greater than the number of seconds consumed by your longest running job. Otherwise, Supervisor may kill the job before it is finished processing.

<a name="starting-supervisor"></a>
#### Starting Supervisor

Once the configuration file has been created, you may update the Supervisor configuration and start the processes using the following commands:

```shell
sudo supervisorctl reread

sudo supervisorctl update

sudo supervisorctl start "laravel-worker:*"
```

For more information on Supervisor, consult the [Supervisor documentation](http://supervisord.org/index.html).

<a name="dealing-with-failed-jobs"></a>
## Dealing With Failed Jobs

Sometimes your queued jobs will fail. Don't worry, things don't always go as planned! Laravel includes a convenient way to [specify the maximum number of times a job should be attempted](#max-job-attempts-and-timeout). After an asynchronous job has exceeded this number of attempts, it will be inserted into the `failed_jobs` database table. [Synchronously dispatched jobs](/docs/{{version}}/queues#synchronous-dispatching) that fail are not stored in this table and their exceptions are immediately handled by the application.

A migration to create the `failed_jobs` table is typically already present in new Laravel applications. However, if your application does not contain a migration for this table, you may use the `make:queue-failed-table` command to create the migration:

```shell
php artisan make:queue-failed-table

php artisan migrate
```

When running a [queue worker](#running-the-queue-worker) process, you may specify the maximum number of times a job should be attempted using the `--tries` switch on the `queue:work` command. If you do not specify a value for the `--tries` option, jobs will only be attempted once or as many times as specified by the job class' `Tries` attribute:

```shell
php artisan queue:work redis --tries=3
```

Using the `--backoff` option, you may specify how many seconds Laravel should wait before retrying a job that has encountered an exception. By default, a job is immediately released back onto the queue so that it may be attempted again:

```shell
php artisan queue:work redis --tries=3 --backoff=3
```

If you would like to configure how many seconds Laravel should wait before retrying a job that has encountered an exception on a per-job basis, you may use the `Backoff` attribute on your job class:

```php
<?php

namespace App\Jobs;

use Illuminate\Queue\Attributes\Backoff;

#[Backoff(3)]
class ProcessPodcast implements ShouldQueue
{
    // ...
}
```

If you require more complex logic for determining the job's backoff time, you may define a `backoff` method on your job class:

```php
/**
 * Calculate the number of seconds to wait before retrying the job.
 */
public function backoff(): int
{
    return 3;
}
```

You may easily configure "exponential" backoffs by defining an array of backoff values. In this example, the retry delay will be 1 second for the first retry, 5 seconds for the second retry, 10 seconds for the third retry, and 10 seconds for every subsequent retry if there are more attempts remaining:

```php
<?php

namespace App\Jobs;

use Illuminate\Queue\Attributes\Backoff;

#[Backoff([1, 5, 10])]
class ProcessPodcast implements ShouldQueue
{
    // ...
}
```

<a name="cleaning-up-after-failed-jobs"></a>
### Cleaning Up After Failed Jobs

When a particular job fails, you may want to send an alert to your users or revert any actions that were partially completed by the job. To accomplish this, you may define a `failed` method on your job class. The `Throwable` instance that caused the job to fail will be passed to the `failed` method:

```php
<?php

namespace App\Jobs;

use App\Models\Podcast;
use App\Services\AudioProcessor;
use Illuminate\Contracts\Queue\ShouldQueue;
use Illuminate\Foundation\Queue\Queueable;
use Throwable;

class ProcessPodcast implements ShouldQueue
{
    use Queueable;

    /**
     * Create a new job instance.
     */
    public function __construct(
        public Podcast $podcast,
    ) {}

    /**
     * Execute the job.
     */
    public function handle(AudioProcessor $processor): void
    {
        // Process uploaded podcast...
    }

    /**
     * Handle a job failure.
     */
    public function failed(?Throwable $exception): void
    {
        // Send user notification of failure, etc...
    }
}
```

> [!WARNING]
> A new instance of the job is instantiated before invoking the `failed` method; therefore, any class property modifications that may have occurred within the `handle` method will be lost.

A failed job is not necessarily one that encountered an unhandled exception. A job may also be considered failed when it has exhausted all of its allowed attempts. These attempts can be consumed in several ways:

<div class="content-list" markdown="1">

- The job timed out.
- The job encounters an unhandled exception during execution.
- The job is released back to the queue either manually or by a middleware.

</div>

If the final attempt fails due to an exception thrown during job execution, that exception will be passed to the job's `failed` method. However, if the job fails because it has reached the maximum number of allowed attempts, the `$exception` will be an instance of `Illuminate\Queue\MaxAttemptsExceededException`. Similarly, if the job fails due to exceeding the configured timeout, the `$exception` will be an instance of `Illuminate\Queue\TimeoutExceededException`.

<a name="retrying-failed-jobs"></a>
### Retrying Failed Jobs

To view all of the failed jobs that have been inserted into your `failed_jobs` database table, you may use the `queue:failed` Artisan command:

```shell
php artisan queue:failed
```

The `queue:failed` command will list the job ID, connection, queue, failure time, and other information about the job. The job ID may be used to retry the failed job. For instance, to retry a failed job that has an ID of `ce7bb17c-cdd8-41f0-a8ec-7b4fef4e5ece`, issue the following command:

```shell
php artisan queue:retry ce7bb17c-cdd8-41f0-a8ec-7b4fef4e5ece
```

If necessary, you may pass multiple IDs to the command:

```shell
php artisan queue:retry ce7bb17c-cdd8-41f0-a8ec-7b4fef4e5ece 91401d2c-0784-4f43-824c-34f94a33c24d
```

You may also retry all of the failed jobs for a particular queue:

```shell
php artisan queue:retry --queue=name
```

To retry all of your failed jobs, execute the `queue:retry` command and pass `all` as the ID:

```shell
php artisan queue:retry all
```

If you would like to delete a failed job, you may use the `queue:forget` command:

```shell
php artisan queue:forget 91401d2c-0784-4f43-824c-34f94a33c24d
```

> [!NOTE]
> When using [Horizon](/docs/{{version}}/horizon), you should use the `horizon:forget` command to delete a failed job instead of the `queue:forget` command.

To delete all of your failed jobs from the `failed_jobs` table, you may use the `queue:flush` command:

```shell
php artisan queue:flush
```

The `queue:flush` command removes all failed job records from your queue, no matter how old the failed job is. You may use the `--hours` option to only delete jobs that failed a certain number of hours ago or earlier:

```shell
php artisan queue:flush --hours=48
```

<a name="ignoring-missing-models"></a>
### Ignoring Missing Models

When injecting an Eloquent model into a job, the model is automatically serialized before being placed on the queue and re-retrieved from the database when the job is processed. However, if the model has been deleted while the job was waiting to be processed by a worker, your job may fail with a `ModelNotFoundException`.

For convenience, you may choose to automatically delete jobs with missing models using the `DeleteWhenMissingModels` attribute on your job class. When this attribute is present, Laravel will quietly discard the job without raising an exception:

```php
<?php

namespace App\Jobs;

use Illuminate\Queue\Attributes\DeleteWhenMissingModels;

#[DeleteWhenMissingModels]
class ProcessPodcast implements ShouldQueue
{
    // ...
}
```

<a name="pruning-failed-jobs"></a>
### Pruning Failed Jobs

You may prune the records in your application's `failed_jobs` table by invoking the `queue:prune-failed` Artisan command:

```shell
php artisan queue:prune-failed
```

By default, all the failed job records that are more than 24 hours old will be pruned. If you provide the `--hours` option to the command, only the failed job records that were inserted within the last N number of hours will be retained. For example, the following command will delete all the failed job records that were inserted more than 48 hours ago:

```shell
php artisan queue:prune-failed --hours=48
```

<a name="storing-failed-jobs-in-dynamodb"></a>
### Storing Failed Jobs in DynamoDB

Laravel also provides support for storing your failed job records in [DynamoDB](https://aws.amazon.com/dynamodb) instead of a relational database table. However, you must manually create a DynamoDB table to store all of the failed job records. Typically, this table should be named `failed_jobs`, but you should name the table based on the value of the `queue.failed.table` configuration value within your application's `queue` configuration file.

The `failed_jobs` table should have a string primary partition key named `application` and a string primary sort key named `uuid`. The `application` portion of the key will contain your application's name as defined by the `name` configuration value within your application's `app` configuration file. Since the application name is part of the DynamoDB table's key, you can use the same table to store failed jobs for multiple Laravel applications.

In addition, ensure that you install the AWS SDK so that your Laravel application can communicate with Amazon DynamoDB:

```shell
composer require aws/aws-sdk-php
```

Next, set the `queue.failed.driver` configuration option's value to `dynamodb`. In addition, you should define `key`, `secret`, and `region` configuration options within the failed job configuration array. These options will be used to authenticate with AWS. When using the `dynamodb` driver, the `queue.failed.database` configuration option is unnecessary:

```php
'failed' => [
    'driver' => env('QUEUE_FAILED_DRIVER', 'dynamodb'),
    'key' => env('AWS_ACCESS_KEY_ID'),
    'secret' => env('AWS_SECRET_ACCESS_KEY'),
    'region' => env('AWS_DEFAULT_REGION', 'us-east-1'),
    'table' => 'failed_jobs',
],
```

<a name="disabling-failed-job-storage"></a>
### Disabling Failed Job Storage

You may instruct Laravel to discard failed jobs without storing them by setting the `queue.failed.driver` configuration option's value to `null`. Typically, this may be accomplished via the `QUEUE_FAILED_DRIVER` environment variable:

```ini
QUEUE_FAILED_DRIVER=null
```

<a name="failed-job-events"></a>
### Failed Job Events

If you would like to register an event listener that will be invoked when a job fails, you may use the `Queue` facade's `failing` method. For example, we may attach a closure to this event from the `boot` method of the `AppServiceProvider` that is included with Laravel:

```php
<?php

namespace App\Providers;

use Illuminate\Support\Facades\Queue;
use Illuminate\Support\ServiceProvider;
use Illuminate\Queue\Events\JobFailed;

class AppServiceProvider extends ServiceProvider
{
    /**
     * Register any application services.
     */
    public function register(): void
    {
        // ...
    }

    /**
     * Bootstrap any application services.
     */
    public function boot(): void
    {
        Queue::failing(function (JobFailed $event) {
            // $event->connectionName
            // $event->job
            // $event->exception
        });
    }
}
```

<a name="clearing-jobs-from-queues"></a>
## Clearing Jobs From Queues

> [!NOTE]
> When using [Horizon](/docs/{{version}}/horizon), you should use the `horizon:clear` command to clear jobs from the queue instead of the `queue:clear` command.

If you would like to delete all jobs from the default queue of the default connection, you may do so using the `queue:clear` Artisan command:

```shell
php artisan queue:clear
```

You may also provide the `connection` argument and `queue` option to delete jobs from a specific connection and queue:

```shell
php artisan queue:clear redis --queue=emails
```

> [!WARNING]
> Clearing jobs from queues is only available for the SQS, Redis, and database queue drivers. In addition, the SQS message deletion process takes up to 60 seconds, so jobs sent to the SQS queue up to 60 seconds after you clear the queue might also be deleted.

<a name="monitoring-your-queues"></a>
## Monitoring Your Queues

If your queue receives a sudden influx of jobs, it could become overwhelmed, leading to a long wait time for jobs to complete. If you wish, Laravel can alert you when your queue job count exceeds a specified threshold.

To get started, you should schedule the `queue:monitor` command to [run every minute](/docs/{{version}}/scheduling). The command accepts the names of the queues you wish to monitor as well as your desired job count threshold:

```shell
php artisan queue:monitor redis:default,redis:deployments --max=100
```

Scheduling this command alone is not enough to trigger a notification alerting you of the queue's overwhelmed status. When the command encounters a queue that has a job count exceeding your threshold, an `Illuminate\Queue\Events\QueueBusy` event will be dispatched. You may listen for this event within your application's `AppServiceProvider` in order to send a notification to you or your development team:

```php
use App\Notifications\QueueHasLongWaitTime;
use Illuminate\Queue\Events\QueueBusy;
use Illuminate\Support\Facades\Event;
use Illuminate\Support\Facades\Notification;

/**
 * Bootstrap any application services.
 */
public function boot(): void
{
    Event::listen(function (QueueBusy $event) {
        Notification::route('mail', 'dev@example.com')
            ->notify(new QueueHasLongWaitTime(
                $event->connectionName,
                $event->queue,
                $event->size
            ));
    });
}
```

<a name="testing"></a>
## Testing

When testing code that dispatches jobs, you may wish to instruct Laravel to not actually execute the job itself, since the job's code can be tested directly and separately of the code that dispatches it. Of course, to test the job itself, you may instantiate a job instance and invoke the `handle` method directly in your test.

You may use the `Queue` facade's `fake` method to prevent queued jobs from actually being pushed to the queue. After calling the `Queue` facade's `fake` method, you may then assert that the application attempted to push jobs to the queue:

```php tab=Pest
<?php

use App\Jobs\AnotherJob;
use App\Jobs\ShipOrder;
use Illuminate\Support\Facades\Queue;

test('orders can be shipped', function () {
    Queue::fake();

    // Perform order shipping...

    // Assert that no jobs were pushed...
    Queue::assertNothingPushed();

    // Assert a job was pushed to a given queue...
    Queue::assertPushedOn('queue-name', ShipOrder::class);

    // Assert a job was pushed
    Queue::assertPushed(ShipOrder::class);

    // Assert a job was pushed exactly once...
    Queue::assertPushedOnce(ShipOrder::class);

    // Assert a job was pushed twice...
    Queue::assertPushedTimes(ShipOrder::class, 2);

    // Assert a job was not pushed...
    Queue::assertNotPushed(AnotherJob::class);

    // Assert that a closure was pushed to the queue...
    Queue::assertClosurePushed();

    // Assert that a closure was not pushed...
    Queue::assertClosureNotPushed();

    // Assert the total number of jobs that were pushed...
    Queue::assertCount(3);
});
```

```php tab=PHPUnit
<?php

namespace Tests\Feature;

use App\Jobs\AnotherJob;
use App\Jobs\ShipOrder;
use Illuminate\Support\Facades\Queue;
use Tests\TestCase;

class ExampleTest extends TestCase
{
    public function test_orders_can_be_shipped(): void
    {
        Queue::fake();

        // Perform order shipping...

        // Assert that no jobs were pushed...
        Queue::assertNothingPushed();

        // Assert a job was pushed to a given queue...
        Queue::assertPushedOn('queue-name', ShipOrder::class);

        // Assert a job was pushed
        Queue::assertPushed(ShipOrder::class);

        // Assert a job was pushed exactly once...
        Queue::assertPushedOnce(ShipOrder::class);

        // Assert a job was pushed twice...
        Queue::assertPushedTimes(ShipOrder::class, 2);

        // Assert a job was not pushed...
        Queue::assertNotPushed(AnotherJob::class);

        // Assert that a closure was pushed to the queue...
        Queue::assertClosurePushed();

        // Assert that a closure was not pushed...
        Queue::assertClosureNotPushed();

        // Assert the total number of jobs that were pushed...
        Queue::assertCount(3);
    }
}
```

You may pass a closure to the `assertPushed`, `assertNotPushed`, `assertClosurePushed`, or `assertClosureNotPushed` methods in order to assert that a job was pushed that passes a given "truth test". If at least one job was pushed that passes the given truth test then the assertion will be successful:

```php
use Illuminate\Queue\CallQueuedClosure;

Queue::assertPushed(function (ShipOrder $job) use ($order) {
    return $job->order->id === $order->id;
});

Queue::assertClosurePushed(function (CallQueuedClosure $job) {
    return $job->name === 'validate-order';
});
```

<a name="faking-a-subset-of-jobs"></a>
### Faking a Subset of Jobs

If you only need to fake specific jobs while allowing your other jobs to execute normally, you may pass the class names of the jobs that should be faked to the `fake` method:

```php tab=Pest
test('orders can be shipped', function () {
    Queue::fake([
        ShipOrder::class,
    ]);

    // Perform order shipping...

    // Assert a job was pushed twice...
    Queue::assertPushedTimes(ShipOrder::class, 2);
});
```

```php tab=PHPUnit
public function test_orders_can_be_shipped(): void
{
    Queue::fake([
        ShipOrder::class,
    ]);

    // Perform order shipping...

    // Assert a job was pushed twice...
    Queue::assertPushedTimes(ShipOrder::class, 2);
}
```

You may fake all jobs except for a set of specified jobs using the `except` method:

```php
Queue::fake()->except([
    ShipOrder::class,
]);
```

<a name="testing-job-chains"></a>
### Testing Job Chains

To test job chains, you will need to utilize the `Bus` facade's faking capabilities. The `Bus` facade's `assertChained` method may be used to assert that a [chain of jobs](/docs/{{version}}/queues#job-chaining) was dispatched. The `assertChained` method accepts an array of chained jobs as its first argument:

```php
use App\Jobs\RecordShipment;
use App\Jobs\ShipOrder;
use App\Jobs\UpdateInventory;
use Illuminate\Support\Facades\Bus;

Bus::fake();

// ...

Bus::assertChained([
    ShipOrder::class,
    RecordShipment::class,
    UpdateInventory::class
]);
```

As you can see in the example above, the array of chained jobs may be an array of the job's class names. However, you may also provide an array of actual job instances. When doing so, Laravel will ensure that the job instances are of the same class and have the same property values of the chained jobs dispatched by your application:

```php
Bus::assertChained([
    new ShipOrder,
    new RecordShipment,
    new UpdateInventory,
]);
```

You may use the `assertDispatchedWithoutChain` method to assert that a job was pushed without a chain of jobs:

```php
Bus::assertDispatchedWithoutChain(ShipOrder::class);
```

<a name="testing-chain-modifications"></a>
#### Testing Chain Modifications

If a chained job [prepends or appends jobs to an existing chain](#adding-jobs-to-the-chain), you may use the job's `assertHasChain` method to assert that the job has the expected chain of remaining jobs:

```php
$job = new ProcessPodcast;

$job->handle();

$job->assertHasChain([
    new TranscribePodcast,
    new OptimizePodcast,
    new ReleasePodcast,
]);
```

The `assertDoesntHaveChain` method may be used to assert that the job's remaining chain is empty:

```php
$job->assertDoesntHaveChain();
```

<a name="testing-chained-batches"></a>
#### Testing Chained Batches

If your job chain [contains a batch of jobs](#chains-and-batches), you may assert that the chained batch matches your expectations by inserting a `Bus::chainedBatch` definition within your chain assertion:

```php
use App\Jobs\ShipOrder;
use App\Jobs\UpdateInventory;
use Illuminate\Bus\PendingBatch;
use Illuminate\Support\Facades\Bus;

Bus::assertChained([
    new ShipOrder,
    Bus::chainedBatch(function (PendingBatch $batch) {
        return $batch->jobs->count() === 3;
    }),
    new UpdateInventory,
]);
```

<a name="testing-job-batches"></a>
### Testing Job Batches

The `Bus` facade's `assertBatched` method may be used to assert that a [batch of jobs](/docs/{{version}}/queues#job-batching) was dispatched. The closure given to the `assertBatched` method receives an instance of `Illuminate\Bus\PendingBatch`, which may be used to inspect the jobs within the batch:

```php
use Illuminate\Bus\PendingBatch;
use Illuminate\Support\Facades\Bus;

Bus::fake();

// ...

Bus::assertBatched(function (PendingBatch $batch) {
    return $batch->name == 'Import CSV' &&
           $batch->jobs->count() === 10;
});
```

The `hasJobs` method may be used on the pending batch to verify that the batch contains the expected jobs. The method accepts an array of job instances, class names, or closures:

```php
Bus::assertBatched(function (PendingBatch $batch) {
    return $batch->hasJobs([
        new ProcessCsvRow(row: 1),
        new ProcessCsvRow(row: 2),
        new ProcessCsvRow(row: 3),
    ]);
});
```

When using closures, the closure will receive the job instance. The expected job type will be inferred from the closure's type hint:

```php
Bus::assertBatched(function (PendingBatch $batch) {
    return $batch->hasJobs([
        fn (ProcessCsvRow $job) => $job->row === 1,
        fn (ProcessCsvRow $job) => $job->row === 2,
        fn (ProcessCsvRow $job) => $job->row === 3,
    ]);
});
```

You may use the `assertBatchCount` method to assert that a given number of batches were dispatched:

```php
Bus::assertBatchCount(3);
```

You may use `assertNothingBatched` to assert that no batches were dispatched:

```php
Bus::assertNothingBatched();
```

<a name="testing-job-batch-interaction"></a>
#### Testing Job / Batch Interaction

In addition, you may occasionally need to test an individual job's interaction with its underlying batch. For example, you may need to test if a job cancelled further processing for its batch. To accomplish this, you need to assign a fake batch to the job via the `withFakeBatch` method. The `withFakeBatch` method returns a tuple containing the job instance and the fake batch:

```php
[$job, $batch] = (new ShipOrder)->withFakeBatch();

$job->handle();

$this->assertTrue($batch->cancelled());
$this->assertEmpty($batch->added);
```

<a name="testing-job-queue-interactions"></a>
### Testing Job / Queue Interactions

Sometimes, you may need to test that a queued job [releases itself back onto the queue](#manually-releasing-a-job). Or, you may need to test that the job deleted itself. You may test these queue interactions by instantiating the job and invoking the `withFakeQueueInteractions` method.

Once the job's queue interactions have been faked, you may invoke the `handle` method on the job. After invoking the job, various assertion methods are available to verify the job's queue interactions:

```php
use App\Exceptions\CorruptedAudioException;
use App\Jobs\ProcessPodcast;

$job = (new ProcessPodcast)->withFakeQueueInteractions();

$job->handle();

$job->assertReleased(delay: 30);
$job->assertDeleted();
$job->assertNotDeleted();
$job->assertFailed();
$job->assertFailedWith(CorruptedAudioException::class);
$job->assertNotFailed();
```

<a name="job-events"></a>
## Job Events

Using the `before` and `after` methods on the `Queue` [facade](/docs/{{version}}/facades), you may specify callbacks to be executed before or after a queued job is processed. These callbacks are a great opportunity to perform additional logging or increment statistics for a dashboard. Typically, you should call these methods from the `boot` method of a [service provider](/docs/{{version}}/providers). For example, we may use the `AppServiceProvider` that is included with Laravel:

```php
<?php

namespace App\Providers;

use Illuminate\Support\Facades\Queue;
use Illuminate\Support\ServiceProvider;
use Illuminate\Queue\Events\JobProcessed;
use Illuminate\Queue\Events\JobProcessing;

class AppServiceProvider extends ServiceProvider
{
    /**
     * Register any application services.
     */
    public function register(): void
    {
        // ...
    }

    /**
     * Bootstrap any application services.
     */
    public function boot(): void
    {
        Queue::before(function (JobProcessing $event) {
            // $event->connectionName
            // $event->job
            // $event->job->payload()
        });

        Queue::after(function (JobProcessed $event) {
            // $event->connectionName
            // $event->job
            // $event->job->payload()
        });
    }
}
```

Using the `looping` method on the `Queue` [facade](/docs/{{version}}/facades), you may specify callbacks that execute before the worker attempts to fetch a job from a queue. For example, you might register a closure to rollback any transactions that were left open by a previously failed job:

```php
use Illuminate\Support\Facades\DB;
use Illuminate\Support\Facades\Queue;

Queue::looping(function () {
    while (DB::transactionLevel() > 0) {
        DB::rollBack();
    }
});
```

Laravel also dispatches an `Illuminate\Queue\Events\WorkerIdle` event when a queue worker is unable to retrieve a job from the queue:

```php
use Illuminate\Queue\Events\WorkerIdle;
use Illuminate\Support\Facades\Event;

Event::listen(function (WorkerIdle $event) {
    // $event->connectionName
    // $event->queue
    // $event->workerOptions
});
```


---

# Rate Limiting

*Sección: Laravel | Origen: https://laravel.com/docs/13.x/rate-limiting*

- [Introduction](#introduction)
    - [Cache Configuration](#cache-configuration)
- [Basic Usage](#basic-usage)
    - [Manually Incrementing Attempts](#manually-incrementing-attempts)
    - [Clearing Attempts](#clearing-attempts)

<a name="introduction"></a>
## Introduction

Laravel includes a simple to use rate limiting abstraction which, in conjunction with your application's [cache](cache), provides an easy way to limit any action during a specified window of time.

> [!NOTE]
> If you are interested in rate limiting incoming HTTP requests, please consult the [rate limiter middleware documentation](/docs/{{version}}/routing#rate-limiting).

<a name="cache-configuration"></a>
### Cache Configuration

Typically, the rate limiter utilizes your default application cache as defined by the `default` key within your application's `cache` configuration file. However, you may specify which cache driver the rate limiter should use by defining a `limiter` key within your application's `cache` configuration file:

```php
'default' => env('CACHE_STORE', 'database'),

'limiter' => 'redis', // [tl! add]
```

<a name="basic-usage"></a>
## Basic Usage

The `Illuminate\Support\Facades\RateLimiter` facade may be used to interact with the rate limiter. The simplest method offered by the rate limiter is the `attempt` method, which rate limits a given callback for a given number of seconds.

The `attempt` method returns `false` when the callback has no remaining attempts available; otherwise, the `attempt` method will return the callback's result or `true`. The first argument accepted by the `attempt` method is a rate limiter "key", which may be any string of your choosing that represents the action being rate limited:

```php
use Illuminate\Support\Facades\RateLimiter;

$executed = RateLimiter::attempt(
    'send-message:'.$user->id,
    $perMinute = 5,
    function() {
        // Send message...
    }
);

if (! $executed) {
    return 'Too many messages sent!';
}
```

If necessary, you may provide a fourth argument to the `attempt` method, which is the "decay rate", or the number of seconds until the available attempts are reset. For example, we can modify the example above to allow five attempts every two minutes:

```php
$executed = RateLimiter::attempt(
    'send-message:'.$user->id,
    $perTwoMinutes = 5,
    function() {
        // Send message...
    },
    $decayRate = 120,
);
```

<a name="manually-incrementing-attempts"></a>
### Manually Incrementing Attempts

If you would like to manually interact with the rate limiter, a variety of other methods are available. For example, you may invoke the `tooManyAttempts` method to determine if a given rate limiter key has exceeded its maximum number of allowed attempts per minute:

```php
use Illuminate\Support\Facades\RateLimiter;

if (RateLimiter::tooManyAttempts('send-message:'.$user->id, $perMinute = 5)) {
    return 'Too many attempts!';
}

RateLimiter::increment('send-message:'.$user->id);

// Send message...
```

When rate limiting an endpoint that may receive many simultaneous requests, you may wish to check the value returned by the `increment` method instead of using `tooManyAttempts` and `increment` as separate operations. When using the `redis`, `memcached`, or `database` cache stores, this value is incremented atomically, ensuring each concurrent request receives a unique count:

```php
use Illuminate\Support\Facades\RateLimiter;

$perMinute = 5;

if (RateLimiter::increment('send-message:'.$user->id) > $perMinute) {
    return 'Too many attempts!';
}

// Send message...
```

Alternatively, you may use the `remaining` method to retrieve the number of attempts remaining for a given key. If a given key has retries remaining, you may invoke the `increment` method to increment the number of total attempts:

```php
use Illuminate\Support\Facades\RateLimiter;

if (RateLimiter::remaining('send-message:'.$user->id, $perMinute = 5)) {
    RateLimiter::increment('send-message:'.$user->id);

    // Send message...
}
```

If you would like to increment the value for a given rate limiter key by more than one, you may provide the desired amount to the `increment` method:

```php
RateLimiter::increment('send-message:'.$user->id, amount: 5);
```

<a name="determining-limiter-availability"></a>
#### Determining Limiter Availability

When a key has no more attempts left, the `availableIn` method returns the number of seconds remaining until more attempts will be available:

```php
use Illuminate\Support\Facades\RateLimiter;

if (RateLimiter::tooManyAttempts('send-message:'.$user->id, $perMinute = 5)) {
    $seconds = RateLimiter::availableIn('send-message:'.$user->id);

    return 'You may try again in '.$seconds.' seconds.';
}

RateLimiter::increment('send-message:'.$user->id);

// Send message...
```

<a name="clearing-attempts"></a>
### Clearing Attempts

You may reset the number of attempts for a given rate limiter key using the `clear` method. For example, you may reset the number of attempts when a given message is read by the receiver:

```php
use App\Models\Message;
use Illuminate\Support\Facades\RateLimiter;

/**
 * Mark the message as read.
 */
public function read(Message $message): Message
{
    $message->markAsRead();

    RateLimiter::clear('send-message:'.$message->user_id);

    return $message;
}
```


---

# Redis

*Sección: Laravel | Origen: https://laravel.com/docs/13.x/redis*

- [Introduction](#introduction)
- [Configuration](#configuration)
    - [Clusters](#clusters)
    - [Predis](#predis)
    - [PhpRedis](#phpredis)
- [Interacting With Redis](#interacting-with-redis)
    - [Transactions](#transactions)
    - [Pipelining Commands](#pipelining-commands)
- [Pub / Sub](#pubsub)

<a name="introduction"></a>
## Introduction

[Redis](https://redis.io) is an open source, advanced key-value store. It is often referred to as a data structure server since keys can contain [strings](https://redis.io/docs/latest/develop/data-types/strings/), [hashes](https://redis.io/docs/latest/develop/data-types/hashes/), [lists](https://redis.io/docs/latest/develop/data-types/lists/), [sets](https://redis.io/docs/latest/develop/data-types/sets/), and [sorted sets](https://redis.io/docs/latest/develop/data-types/sorted-sets/).

Before using Redis with Laravel, we encourage you to install and use the [PhpRedis](https://github.com/phpredis/phpredis) PHP extension via PECL. The extension is more complex to install compared to "user-land" PHP packages but may yield better performance for applications that make heavy use of Redis. If you are using [Laravel Sail](/docs/{{version}}/sail), this extension is already installed in your application's Docker container.

If you are unable to install the PhpRedis extension, you may install the `predis/predis` package via Composer. Predis is a Redis client written entirely in PHP and does not require any additional extensions:

```shell
composer require predis/predis
```

<a name="configuration"></a>
## Configuration

You may configure your application's Redis settings via the `config/database.php` configuration file. Within this file, you will see a `redis` array containing the Redis servers utilized by your application:

```php
'redis' => [

    'client' => env('REDIS_CLIENT', 'phpredis'),

    'options' => [
        'cluster' => env('REDIS_CLUSTER', 'redis'),
        'prefix' => env('REDIS_PREFIX', Str::slug(env('APP_NAME', 'laravel'), '_').'_database_'),
    ],

    'default' => [
        'url' => env('REDIS_URL'),
        'host' => env('REDIS_HOST', '127.0.0.1'),
        'username' => env('REDIS_USERNAME'),
        'password' => env('REDIS_PASSWORD'),
        'port' => env('REDIS_PORT', '6379'),
        'database' => env('REDIS_DB', '0'),
    ],

    'cache' => [
        'url' => env('REDIS_URL'),
        'host' => env('REDIS_HOST', '127.0.0.1'),
        'username' => env('REDIS_USERNAME'),
        'password' => env('REDIS_PASSWORD'),
        'port' => env('REDIS_PORT', '6379'),
        'database' => env('REDIS_CACHE_DB', '1'),
    ],

],
```

Each Redis server defined in your configuration file is required to have a name, host, and a port unless you define a single URL to represent the Redis connection:

```php
'redis' => [

    'client' => env('REDIS_CLIENT', 'phpredis'),

    'options' => [
        'cluster' => env('REDIS_CLUSTER', 'redis'),
        'prefix' => env('REDIS_PREFIX', Str::slug(env('APP_NAME', 'laravel'), '_').'_database_'),
    ],

    'default' => [
        'url' => 'tcp://127.0.0.1:6379?database=0',
    ],

    'cache' => [
        'url' => 'tls://user:password@127.0.0.1:6380?database=1',
    ],

],
```

<a name="configuring-the-connection-scheme"></a>
#### Configuring the Connection Scheme

By default, Redis clients will use the `tcp` scheme when connecting to your Redis servers; however, you may use TLS / SSL encryption by specifying a `scheme` configuration option in your Redis server's configuration array:

```php
'default' => [
    'scheme' => 'tls',
    'url' => env('REDIS_URL'),
    'host' => env('REDIS_HOST', '127.0.0.1'),
    'username' => env('REDIS_USERNAME'),
    'password' => env('REDIS_PASSWORD'),
    'port' => env('REDIS_PORT', '6379'),
    'database' => env('REDIS_DB', '0'),
],
```

<a name="clusters"></a>
### Clusters

If your application is utilizing a cluster of Redis servers, you should define these clusters within a `clusters` key of your Redis configuration. This configuration key does not exist by default so you will need to create it within your application's `config/database.php` configuration file:

```php
'redis' => [

    'client' => env('REDIS_CLIENT', 'phpredis'),

    'options' => [
        'cluster' => env('REDIS_CLUSTER', 'redis'),
        'prefix' => env('REDIS_PREFIX', Str::slug(env('APP_NAME', 'laravel'), '_').'_database_'),
    ],

    'clusters' => [
        'default' => [
            [
                'url' => env('REDIS_URL'),
                'host' => env('REDIS_HOST', '127.0.0.1'),
                'username' => env('REDIS_USERNAME'),
                'password' => env('REDIS_PASSWORD'),
                'port' => env('REDIS_PORT', '6379'),
                'database' => env('REDIS_DB', '0'),
            ],
        ],
    ],

    // ...
],
```

By default, Laravel will use native Redis clustering since the `options.cluster` configuration value is set to `redis`. Redis clustering is a great default option, as it gracefully handles failover.

Laravel also supports client-side sharding when using Predis. However, client-side sharding does not handle failover; therefore, it is primarily suited for transient cached data that is available from another primary data store.

If you would like to use client-side sharding instead of native Redis clustering, you may remove the `options.cluster` configuration value within your application's `config/database.php` configuration file:

```php
'redis' => [

    'client' => env('REDIS_CLIENT', 'phpredis'),

    'clusters' => [
        // ...
    ],

    // ...
],
```

<a name="predis"></a>
### Predis

If you would like your application to interact with Redis via the Predis package, you should ensure the `REDIS_CLIENT` environment variable's value is `predis`:

```php
'redis' => [

    'client' => env('REDIS_CLIENT', 'predis'),

    // ...
],
```

In addition to the default configuration options, Predis supports additional [connection parameters](https://github.com/nrk/predis/wiki/Connection-Parameters) that may be defined for each of your Redis servers. To utilize these additional configuration options, add them to your Redis server configuration in your application's `config/database.php` configuration file:

```php
'default' => [
    'url' => env('REDIS_URL'),
    'host' => env('REDIS_HOST', '127.0.0.1'),
    'username' => env('REDIS_USERNAME'),
    'password' => env('REDIS_PASSWORD'),
    'port' => env('REDIS_PORT', '6379'),
    'database' => env('REDIS_DB', '0'),
    'read_write_timeout' => 60,
],
```

<a name="phpredis"></a>
### PhpRedis

By default, Laravel will use the PhpRedis extension to communicate with Redis. The client that Laravel will use to communicate with Redis is dictated by the value of the `redis.client` configuration option, which typically reflects the value of the `REDIS_CLIENT` environment variable:

```php
'redis' => [

    'client' => env('REDIS_CLIENT', 'phpredis'),

    // ...
],
```

In addition to the default configuration options, PhpRedis supports the following additional connection parameters: `name`, `persistent`, `persistent_id`, `prefix`, `read_timeout`, `retry_interval`, `max_retries`, `backoff_algorithm`, `backoff_base`, `backoff_cap`, `timeout`, and `context`. You may add any of these options to your Redis server configuration in the `config/database.php` configuration file:

```php
'default' => [
    'url' => env('REDIS_URL'),
    'host' => env('REDIS_HOST', '127.0.0.1'),
    'username' => env('REDIS_USERNAME'),
    'password' => env('REDIS_PASSWORD'),
    'port' => env('REDIS_PORT', '6379'),
    'database' => env('REDIS_DB', '0'),
    'read_timeout' => 60,
    'context' => [
        // 'auth' => ['username', 'secret'],
        // 'stream' => ['verify_peer' => false],
    ],
],
```

<a name="retry-and-backoff-configuration"></a>
#### Retry and Backoff Configuration

The `retry_interval`, `max_retries`, `backoff_algorithm`, `backoff_base`, and `backoff_cap` options may be used to configure how the PhpRedis client should attempt to reconnect to a Redis server. The following backoff algorithms are supported: `default`, `decorrelated_jitter`, `equal_jitter`, `exponential`, `uniform`, and `constant`:

```php
'default' => [
    'url' => env('REDIS_URL'),
    'host' => env('REDIS_HOST', '127.0.0.1'),
    'username' => env('REDIS_USERNAME'),
    'password' => env('REDIS_PASSWORD'),
    'port' => env('REDIS_PORT', '6379'),
    'database' => env('REDIS_DB', '0'),
    'max_retries' => env('REDIS_MAX_RETRIES', 3),
    'backoff_algorithm' => env('REDIS_BACKOFF_ALGORITHM', 'decorrelated_jitter'),
    'backoff_base' => env('REDIS_BACKOFF_BASE', 100),
    'backoff_cap' => env('REDIS_BACKOFF_CAP', 1000),
],
```

Laravel automatically retries safe read commands once after a transient connection failure. You may use the `command_retries` option to configure the number of retries for all Redis commands:

```php
'default' => [
    // ...
    'command_retries' => env('REDIS_COMMAND_RETRIES', 0),
],
```

Predis 3.4.0 and later supports built-in retry and backoff configuration via the `Retry` class. You may configure retries using the `max_retries` option and configure the backoff strategy using the `retry` option. The `retry` option should be an array keyed by one of the following strategy classes: `NoBackoff`, `EqualBackoff`, or `ExponentialBackoff`:

```php
use Predis\Retry\Strategy\ExponentialBackoff;

'default' => [
    'url' => env('REDIS_URL'),
    // ...
    'retry' => [
        ExponentialBackoff::class => [
            env('REDIS_BACKOFF_BASE', 100),
            env('REDIS_BACKOFF_CAP', 1000),
            true, // Enable jitter...
        ],
    ],
    'max_retries' => env('REDIS_MAX_RETRIES', 3),
],
```

When using Predis with a Redis cluster, you may define retry configuration in the `parameters` option of your cluster configuration:

```php
use Predis\Retry\Strategy\NoBackoff;

'clusters' => [
    'default' => [
        // ...
    ],
],

'options' => [
    'cluster' => env('REDIS_CLUSTER', 'redis'),
    'parameters' => [
        'retry' => [
            NoBackoff::class => [],
        ],
        'max_retries' => env('REDIS_MAX_RETRIES', 3),
    ],
],
```

<a name="unix-socket-connections"></a>
#### Unix Socket Connections

Redis connections can also be configured to use Unix sockets instead of TCP. This can offer improved performance by eliminating TCP overhead for connections to Redis instances on the same server as your application. To configure Redis to use a Unix socket, set your `REDIS_HOST` environment variable to the path of the Redis socket and the `REDIS_PORT` environment variable to `0`:

```env
REDIS_HOST=/run/redis/redis.sock
REDIS_PORT=0
```

<a name="phpredis-serialization"></a>
#### PhpRedis Serialization and Compression

The PhpRedis extension may also be configured to use a variety of serializers and compression algorithms. These algorithms can be configured via the `options` array of your Redis configuration:

```php
'redis' => [

    'client' => env('REDIS_CLIENT', 'phpredis'),

    'options' => [
        'cluster' => env('REDIS_CLUSTER', 'redis'),
        'prefix' => env('REDIS_PREFIX', Str::slug(env('APP_NAME', 'laravel'), '_').'_database_'),
        'serializer' => Redis::SERIALIZER_MSGPACK,
        'compression' => Redis::COMPRESSION_LZ4,
    ],

    // ...
],
```

Currently supported serializers include: `Redis::SERIALIZER_NONE` (default), `Redis::SERIALIZER_PHP`, `Redis::SERIALIZER_JSON`, `Redis::SERIALIZER_IGBINARY`, and `Redis::SERIALIZER_MSGPACK`.

Supported compression algorithms include: `Redis::COMPRESSION_NONE` (default), `Redis::COMPRESSION_LZF`, `Redis::COMPRESSION_ZSTD`, and `Redis::COMPRESSION_LZ4`.

<a name="interacting-with-redis"></a>
## Interacting With Redis

You may interact with Redis by calling various methods on the `Redis` [facade](/docs/{{version}}/facades). The `Redis` facade supports dynamic methods, meaning you may call any [Redis command](https://redis.io/commands) on the facade and the command will be passed directly to Redis. In this example, we will call the Redis `GET` command by calling the `get` method on the `Redis` facade:

```php
<?php

namespace App\Http\Controllers;

use Illuminate\Support\Facades\Redis;
use Illuminate\View\View;

class UserController extends Controller
{
    /**
     * Show the profile for the given user.
     */
    public function show(string $id): View
    {
        return view('user.profile', [
            'user' => Redis::get('user:profile:'.$id)
        ]);
    }
}
```

As mentioned above, you may call any of Redis' commands on the `Redis` facade. Laravel uses magic methods to pass the commands to the Redis server. If a Redis command expects arguments, you should pass those to the facade's corresponding method:

```php
use Illuminate\Support\Facades\Redis;

Redis::set('name', 'Taylor');

$values = Redis::lrange('names', 5, 10);
```

Alternatively, you may pass commands to the server using the `Redis` facade's `command` method, which accepts the name of the command as its first argument and an array of values as its second argument:

```php
$values = Redis::command('lrange', ['name', 5, 10]);
```

<a name="using-multiple-redis-connections"></a>
#### Using Multiple Redis Connections

Your application's `config/database.php` configuration file allows you to define multiple Redis connections / servers. You may obtain a connection to a specific Redis connection using the `Redis` facade's `connection` method:

```php
$redis = Redis::connection('connection-name');
```

To obtain an instance of the default Redis connection, you may call the `connection` method without any additional arguments:

```php
$redis = Redis::connection();
```

<a name="transactions"></a>
### Transactions

The `Redis` facade's `transaction` method provides a convenient wrapper around Redis' native `MULTI` and `EXEC` commands. The `transaction` method accepts a closure as its only argument. This closure will receive a Redis connection instance and may issue any commands it would like to this instance. All of the Redis commands issued within the closure will be executed in a single, atomic transaction:

```php
use Redis;
use Illuminate\Support\Facades;

Facades\Redis::transaction(function (Redis $redis) {
    $redis->incr('user_visits', 1);
    $redis->incr('total_visits', 1);
});
```

> [!WARNING]
> When defining a Redis transaction, you may not retrieve any values from the Redis connection. Remember, your transaction is executed as a single, atomic operation and that operation is not executed until your entire closure has finished executing its commands.

#### Lua Scripts

The `eval` method provides another method of executing multiple Redis commands in a single, atomic operation. However, the `eval` method has the benefit of being able to interact with and inspect Redis key values during that operation. Redis scripts are written in the [Lua programming language](https://www.lua.org).

The `eval` method can be a bit scary at first, but we'll explore a basic example to break the ice. The `eval` method expects several arguments. First, you should pass the Lua script (as a string) to the method. Secondly, you should pass the number of keys (as an integer) that the script interacts with. Thirdly, you should pass the names of those keys. Finally, you may pass any other additional arguments that you need to access within your script.

In this example, we will increment a counter, inspect its new value, and increment a second counter if the first counter's value is greater than five. Finally, we will return the value of the first counter:

```php
$value = Redis::eval(<<<'LUA'
    local counter = redis.call("incr", KEYS[1])

    if counter > 5 then
        redis.call("incr", KEYS[2])
    end

    return counter
LUA, 2, 'first-counter', 'second-counter');
```

> [!WARNING]
> Please consult the [Redis documentation](https://redis.io/commands/eval) for more information on Redis scripting.

<a name="pipelining-commands"></a>
### Pipelining Commands

Sometimes you may need to execute dozens of Redis commands. Instead of making a network trip to your Redis server for each command, you may use the `pipeline` method. The `pipeline` method accepts one argument: a closure that receives a Redis instance. You may issue all of your commands to this Redis instance and they will all be sent to the Redis server at the same time to reduce network trips to the server. The commands will still be executed in the order they were issued:

```php
use Redis;
use Illuminate\Support\Facades;

Facades\Redis::pipeline(function (Redis $pipe) {
    for ($i = 0; $i < 1000; $i++) {
        $pipe->set("key:$i", $i);
    }
});
```

<a name="pubsub"></a>
## Pub / Sub

Laravel provides a convenient interface to the Redis `publish` and `subscribe` commands. These Redis commands allow you to listen for messages on a given "channel". You may publish messages to the channel from another application, or even using another programming language, allowing easy communication between applications and processes.

First, let's set up a channel listener using the `subscribe` method. We'll place this method call within an [Artisan command](/docs/{{version}}/artisan) since calling the `subscribe` method begins a long-running process:

```php
<?php

namespace App\Console\Commands;

use Illuminate\Console\Command;
use Illuminate\Support\Facades\Redis;

class RedisSubscribe extends Command
{
    /**
     * The name and signature of the console command.
     *
     * @var string
     */
    protected $signature = 'redis:subscribe';

    /**
     * The console command description.
     *
     * @var string
     */
    protected $description = 'Subscribe to a Redis channel';

    /**
     * Execute the console command.
     */
    public function handle(): void
    {
        Redis::subscribe(['test-channel'], function (string $message) {
            echo $message;
        });
    }
}
```

Now we may publish messages to the channel using the `publish` method:

```php
use Illuminate\Support\Facades\Redis;

Route::get('/publish', function () {
    // ...

    Redis::publish('test-channel', json_encode([
        'name' => 'Adam Wathan'
    ]));
});
```

<a name="wildcard-subscriptions"></a>
#### Wildcard Subscriptions

Using the `psubscribe` method, you may subscribe to a wildcard channel, which may be useful for catching all messages on all channels. The channel name will be passed as the second argument to the provided closure:

```php
Redis::psubscribe(['*'], function (string $message, string $channel) {
    echo $message;
});

Redis::psubscribe(['users.*'], function (string $message, string $channel) {
    echo $message;
});
```


---

# Release Notes

*Sección: Laravel | Origen: https://laravel.com/docs/13.x/releases*

- [Versioning Scheme](#versioning-scheme)
- [Support Policy](#support-policy)
- [Laravel 13](#laravel-13)

<a name="versioning-scheme"></a>
## Versioning Scheme

Laravel and its other first-party packages follow [Semantic Versioning](https://semver.org). Major framework releases are released every year (~Q1), while minor and patch releases may be released as often as every week. Minor and patch releases should **never** contain breaking changes.

When referencing the Laravel framework or its components from your application or package, you should always use a version constraint such as `^13.0`, since major releases of Laravel do include breaking changes. However, we strive to always ensure you may update to a new major release in one day or less.

<a name="named-arguments"></a>
#### Named Arguments

[Named arguments](https://www.php.net/manual/en/functions.arguments.php#functions.named-arguments) are not covered by Laravel's backwards compatibility guidelines. We may choose to rename function arguments when necessary in order to improve the Laravel codebase. Therefore, using named arguments when calling Laravel methods should be done cautiously and with the understanding that the parameter names may change in the future.

<a name="support-policy"></a>
## Support Policy

For all Laravel releases, bug fixes are provided for 18 months and security fixes are provided for 2 years. For all additional libraries, only the latest major release receives bug fixes. In addition, please review the database versions [supported by Laravel](/docs/{{version}}/database#introduction).

<div class="overflow-auto">

| Version | PHP (*)   | Release             | Bug Fixes Until     | Security Fixes Until |
| ------- |-----------| ------------------- | ------------------- | -------------------- |
| 10      | 8.1 - 8.3 | February 14th, 2023 | August 6th, 2024    | February 4th, 2025   |
| 11      | 8.2 - 8.4 | March 12th, 2024    | September 3rd, 2025 | March 12th, 2026     |
| 12      | 8.2 - 8.5 | February 24th, 2025 | August 13th, 2026   | February 24th, 2027  |
| 13      | 8.3 - 8.5 | March 17th, 2026    | Q3 2027             | March 17th, 2028     |

</div>

<div class="version-colors">
    <div class="end-of-life">
        <div class="color-box"></div>
        <div>End of life</div>
    </div>
    <div class="security-fixes">
        <div class="color-box"></div>
        <div>Security fixes only</div>
    </div>
</div>

(*) Supported PHP versions

<a name="laravel-13"></a>
## Laravel 13

Laravel 13 continues Laravel's annual release cadence with a focus on AI-native workflows, stronger defaults, and more expressive developer APIs. This release includes first-party AI primitives, JSON:API resources, semantic / vector search capabilities, and incremental improvements across queues, cache, and security.

<a name="minimal-breaking-changes"></a>
### Minimal Breaking Changes

Much of our focus during this release cycle has been minimizing breaking changes. Instead, we have dedicated ourselves to shipping continuous quality-of-life improvements throughout the year that do not break existing applications.

Therefore, the Laravel 13 release is a relatively minor upgrade in terms of effort, while still delivering substantial new capabilities. In light of this, most Laravel applications may upgrade to Laravel 13 without changing much application code.

<a name="php-8"></a>
### PHP 8.3

Laravel 13.x requires a minimum PHP version of 8.3.

<a name="ai-sdk"></a>
### Laravel AI SDK

Laravel 13 introduces the first-party [Laravel AI SDK](https://laravel.com/ai), providing a unified API for text generation, tool-calling agents, embeddings, audio, images, and vector-store integrations.

With the AI SDK, you can build provider-agnostic AI features while keeping a consistent, Laravel-native developer experience.

For example, a basic agent can be prompted with a single call:

```php
use App\Ai\Agents\SalesCoach;

$response = SalesCoach::make()->prompt('Analyze this sales transcript...');

return (string) $response;
```

The Laravel AI SDK can also generate images, audio, and embeddings:

For visual generation use cases, the SDK offers a clean API for creating images from plain-language prompts:

```php
use Laravel\Ai\Image;

$image = Image::of('A donut sitting on the kitchen counter')->generate();

$rawContent = (string) $image;
```

For voice experiences, you can synthesize natural-sounding audio from text for assistants, narrations, and accessibility features:

```php
use Laravel\Ai\Audio;

$audio = Audio::of('I love coding with Laravel.')->generate();

$rawContent = (string) $audio;
```

And for semantic search and retrieval workflows, you can generate embeddings directly from strings:

```php
use Illuminate\Support\Str;

$embeddings = Str::of('Napa Valley has great wine.')->toEmbeddings();
```

<a name="json-api"></a>
### JSON:API Resources

Laravel now includes first-party [JSON:API resources](/docs/{{version}}/eloquent-resources#jsonapi-resources), making it straightforward to return responses compliant with the JSON:API specification.

JSON:API resources handle resource object serialization, relationship inclusion, sparse fieldsets, links, and JSON:API-compliant response headers.

<a name="request-forgery-protection"></a>
### Request Forgery Protection

For security, Laravel's [request forgery protection](/docs/{{version}}/csrf#preventing-csrf-requests) middleware has been enhanced and formalized as `PreventRequestForgery`, adding origin-aware request verification while preserving compatibility with token-based CSRF protection.

<a name="queue-routing"></a>
### Queue Routing

Laravel 13 adds [queue routing by class](/docs/{{version}}/queues#queue-routing) via `Queue::route(...)`, allowing you to define default queue / connection routing rules for specific jobs in a central place:

```php
Queue::route(ProcessPodcast::class, connection: 'redis', queue: 'podcasts');
```

<a name="php-attributes"></a>
### Expanded PHP Attributes

Laravel 13 continues to expand first-party PHP attribute support across the framework, making common configuration and behavioral concerns more declarative and colocated with your classes and methods.

Notable additions include controller and authorization attributes like [`#[Middleware]`](/docs/{{version}}/controllers#controller-middleware) and [`#[Authorize]`](/docs/{{version}}/controllers#authorization-attributes), as well as queue-oriented job controls like [`#[Tries]`](/docs/{{version}}/queues#max-job-attempts-and-timeout), [`#[Backoff]`](/docs/{{version}}/queues#dealing-with-failed-jobs), [`#[Timeout]`](/docs/{{version}}/queues#max-job-attempts-and-timeout), and [`#[FailOnTimeout]`](/docs/{{version}}/queues#failing-on-timeout).

For example, controller middleware and policy checks can now be declared directly on classes and methods:

```php
<?php

namespace App\Http\Controllers;

use App\Models\Comment;
use App\Models\Post;
use Illuminate\Routing\Attributes\Controllers\Authorize;
use Illuminate\Routing\Attributes\Controllers\Middleware;

#[Middleware('auth')]
class CommentController
{
    #[Middleware('subscribed')]
    #[Authorize('create', [Comment::class, 'post'])]
    public function store(Post $post)
    {
        // ...
    }
}
```

Additional attributes have also been introduced across Eloquent, events, notifications, validation, testing, and resource serialization APIs, giving you a consistent attribute-first option in more areas of the framework.

<a name="cache-touch"></a>
### Cache TTL Extension

Laravel now includes [`Cache::touch(...)`](/docs/{{version}}/cache), which lets you extend an existing cache item's TTL without retrieving and re-storing its value.

<a name="semantic-search"></a>
### Semantic / Vector Search

Laravel 13 deepens its semantic search story with native vector query support, embedding workflows, and related APIs documented across [search](/docs/{{version}}/search#semantic-vector-search), [queries](/docs/{{version}}/queries#vector-similarity-clauses), and the [AI SDK](/docs/{{version}}/ai-sdk#embeddings).

These features make it straightforward to build AI-powered search experiences using PostgreSQL + `pgvector`, including similarity search against embeddings generated directly from strings.

For example, you may run semantic similarity searches directly from the query builder:

```php
$documents = DB::table('documents')
    ->whereVectorSimilarTo('embedding', 'Best wineries in Napa Valley')
    ->limit(10)
    ->get();
```


---

# HTTP Requests

*Sección: Laravel | Origen: https://laravel.com/docs/13.x/requests*

- [Introduction](#introduction)
- [Interacting With The Request](#interacting-with-the-request)
    - [Accessing the Request](#accessing-the-request)
    - [Request Path, Host, and Method](#request-path-and-method)
    - [Request Headers](#request-headers)
    - [Request IP Address](#request-ip-address)
    - [Content Negotiation](#content-negotiation)
    - [PSR-7 Requests](#psr7-requests)
- [Input](#input)
    - [Retrieving Input](#retrieving-input)
    - [Input Presence](#input-presence)
    - [Merging Additional Input](#merging-additional-input)
    - [Old Input](#old-input)
    - [Cookies](#cookies)
    - [Input Trimming and Normalization](#input-trimming-and-normalization)
- [Files](#files)
    - [Retrieving Uploaded Files](#retrieving-uploaded-files)
    - [Storing Uploaded Files](#storing-uploaded-files)
- [Configuring Trusted Proxies](#configuring-trusted-proxies)
- [Configuring Trusted Hosts](#configuring-trusted-hosts)

<a name="introduction"></a>
## Introduction

Laravel's `Illuminate\Http\Request` class provides an object-oriented way to interact with the current HTTP request being handled by your application as well as retrieve the input, cookies, and files that were submitted with the request.

<a name="interacting-with-the-request"></a>
## Interacting With The Request

<a name="accessing-the-request"></a>
### Accessing the Request

To obtain an instance of the current HTTP request via dependency injection, you should type-hint the `Illuminate\Http\Request` class on your route closure or controller method. The incoming request instance will automatically be injected by the Laravel [service container](/docs/{{version}}/container):

```php
<?php

namespace App\Http\Controllers;

use Illuminate\Http\RedirectResponse;
use Illuminate\Http\Request;

class UserController extends Controller
{
    /**
     * Store a new user.
     */
    public function store(Request $request): RedirectResponse
    {
        $name = $request->input('name');

        // Store the user...

        return redirect('/users');
    }
}
```

As mentioned, you may also type-hint the `Illuminate\Http\Request` class on a route closure. The service container will automatically inject the incoming request into the closure when it is executed:

```php
use Illuminate\Http\Request;

Route::get('/', function (Request $request) {
    // ...
});
```

<a name="dependency-injection-route-parameters"></a>
#### Dependency Injection and Route Parameters

If your controller method is also expecting input from a route parameter you should list your route parameters after your other dependencies. For example, if your route is defined like so:

```php
use App\Http\Controllers\UserController;

Route::put('/user/{id}', [UserController::class, 'update']);
```

You may still type-hint the `Illuminate\Http\Request` and access your `id` route parameter by defining your controller method as follows:

```php
<?php

namespace App\Http\Controllers;

use Illuminate\Http\RedirectResponse;
use Illuminate\Http\Request;

class UserController extends Controller
{
    /**
     * Update the specified user.
     */
    public function update(Request $request, string $id): RedirectResponse
    {
        // Update the user...

        return redirect('/users');
    }
}
```

<a name="request-path-and-method"></a>
### Request Path, Host, and Method

The `Illuminate\Http\Request` instance provides a variety of methods for examining the incoming HTTP request and extends the `Symfony\Component\HttpFoundation\Request` class. We will discuss a few of the most important methods below.

<a name="retrieving-the-request-path"></a>
#### Retrieving the Request Path

The `path` method returns the request's path information. So, if the incoming request is targeted at `http://example.com/foo/bar`, the `path` method will return `foo/bar`:

```php
$uri = $request->path();
```

<a name="inspecting-the-request-path"></a>
#### Inspecting the Request Path / Route

The `is` method allows you to verify that the incoming request path matches a given pattern. You may use the `*` character as a wildcard when utilizing this method:

```php
if ($request->is('admin/*')) {
    // ...
}
```

Using the `routeIs` method, you may determine if the incoming request has matched a [named route](/docs/{{version}}/routing#named-routes):

```php
if ($request->routeIs('admin.*')) {
    // ...
}
```

<a name="retrieving-the-request-url"></a>
#### Retrieving the Request URL

To retrieve the full URL for the incoming request you may use the `url` or `fullUrl` methods. The `url` method will return the URL without the query string, while the `fullUrl` method includes the query string:

```php
$url = $request->url();

$urlWithQueryString = $request->fullUrl();
```

If you would like to append query string data to the current URL, you may call the `fullUrlWithQuery` method. This method merges the given array of query string variables with the current query string:

```php
$request->fullUrlWithQuery(['type' => 'phone']);
```

If you would like to get the current URL without a given query string parameter, you may utilize the `fullUrlWithoutQuery` method:

```php
$request->fullUrlWithoutQuery(['type']);
```

<a name="retrieving-the-request-host"></a>
#### Retrieving the Request Host

You may retrieve the "host" of the incoming request via the `host`, `httpHost`, and `schemeAndHttpHost` methods:

```php
// http://localhost:8000
$request->host(); // localhost
$request->httpHost(); // localhost:8000
$request->schemeAndHttpHost(); // http://localhost:8000
```

<a name="retrieving-the-request-method"></a>
#### Retrieving the Request Method

The `method` method will return the HTTP verb for the request. You may use the `isMethod` method to verify that the HTTP verb matches a given string:

```php
$method = $request->method();

if ($request->isMethod('post')) {
    // ...
}
```

<a name="request-headers"></a>
### Request Headers

You may retrieve a request header from the `Illuminate\Http\Request` instance using the `header` method. If the header is not present on the request, `null` will be returned. However, the `header` method accepts an optional second argument that will be returned if the header is not present on the request:

```php
$value = $request->header('X-Header-Name');

$value = $request->header('X-Header-Name', 'default');
```

The `hasHeader` method may be used to determine if the request contains a given header:

```php
if ($request->hasHeader('X-Header-Name')) {
    // ...
}
```

For convenience, the `bearerToken` method may be used to retrieve a bearer token from the `Authorization` header. If no such header is present, an empty string will be returned:

```php
$token = $request->bearerToken();
```

<a name="request-ip-address"></a>
### Request IP Address

The `ip` method may be used to retrieve the IP address of the client that made the request to your application:

```php
$ipAddress = $request->ip();
```

If you would like to retrieve an array of IP addresses, including all of the client IP addresses that were forwarded by proxies, you may use the `ips` method. The "original" client IP address will be at the end of the array:

```php
$ipAddresses = $request->ips();
```

In general, IP addresses should be considered untrusted, user-controlled input and be used for informational purposes only.

<a name="content-negotiation"></a>
### Content Negotiation

Laravel provides several methods for inspecting the incoming request's requested content types via the `Accept` header. First, the `getAcceptableContentTypes` method will return an array containing all of the content types accepted by the request:

```php
$contentTypes = $request->getAcceptableContentTypes();
```

The `accepts` method accepts an array of content types and returns `true` if any of the content types are accepted by the request. Otherwise, `false` will be returned:

```php
if ($request->accepts(['text/html', 'application/json'])) {
    // ...
}
```

You may use the `prefers` method to determine which content type out of a given array of content types is most preferred by the request. If none of the provided content types are accepted by the request, `null` will be returned:

```php
$preferred = $request->prefers(['text/html', 'application/json']);
```

Since many applications only serve HTML or JSON, you may use the `expectsJson` method to quickly determine if the incoming request expects a JSON response:

```php
if ($request->expectsJson()) {
    // ...
}
```

If you need to determine whether the request specifically prefers Markdown or will accept Markdown among other content types, such as when serving AI agents or other clients that consume Markdown responses, you may use the `wantsMarkdown` and `acceptsMarkdown` methods:

```php
if ($request->wantsMarkdown()) {
    // The client's most preferred content type is text/markdown...
}

if ($request->acceptsMarkdown()) {
    // The client accepts Markdown responses...
}
```

<a name="psr7-requests"></a>
### PSR-7 Requests

The [PSR-7 standard](https://www.php-fig.org/psr/psr-7/) specifies interfaces for HTTP messages, including requests and responses. If you would like to obtain an instance of a PSR-7 request instead of a Laravel request, you will first need to install a few libraries. Laravel uses the *Symfony HTTP Message Bridge* component to convert typical Laravel requests and responses into PSR-7 compatible implementations:

```shell
composer require symfony/psr-http-message-bridge
composer require nyholm/psr7
```

Once you have installed these libraries, you may obtain a PSR-7 request by type-hinting the request interface on your route closure or controller method:

```php
use Psr\Http\Message\ServerRequestInterface;

Route::get('/', function (ServerRequestInterface $request) {
    // ...
});
```

> [!NOTE]
> If you return a PSR-7 response instance from a route or controller, it will automatically be converted back to a Laravel response instance and be displayed by the framework.

<a name="input"></a>
## Input

<a name="retrieving-input"></a>
### Retrieving Input

<a name="retrieving-all-input-data"></a>
#### Retrieving All Input Data

You may retrieve all of the incoming request's input data as an `array` using the `all` method. This method may be used regardless of whether the incoming request is from an HTML form or is an XHR request:

```php
$input = $request->all();
```

Using the `collect` method, you may retrieve all of the incoming request's input data as a [collection](/docs/{{version}}/collections):

```php
$input = $request->collect();
```

The `collect` method also allows you to retrieve a subset of the incoming request's input as a collection:

```php
$request->collect('users')->each(function (string $user) {
    // ...
});
```

<a name="retrieving-an-input-value"></a>
#### Retrieving an Input Value

Using a few simple methods, you may access all of the user input from your `Illuminate\Http\Request` instance without worrying about which HTTP verb was used for the request. Regardless of the HTTP verb, the `input` method may be used to retrieve user input:

```php
$name = $request->input('name');
```

You may pass a default value as the second argument to the `input` method. This value will be returned if the requested input value is not present on the request:

```php
$name = $request->input('name', 'Sally');
```

When working with forms that contain array inputs, use "dot" notation to access the arrays:

```php
$name = $request->input('products.0.name');

$names = $request->input('products.*.name');
```

You may call the `input` method without any arguments in order to retrieve all of the input values as an associative array:

```php
$input = $request->input();
```

<a name="retrieving-input-from-the-query-string"></a>
#### Retrieving Input From the Query String

While the `input` method retrieves values from the entire request payload (including the query string), the `query` method will only retrieve values from the query string:

```php
$name = $request->query('name');
```

If the requested query string value data is not present, the second argument to this method will be returned:

```php
$name = $request->query('name', 'Helen');
```

You may call the `query` method without any arguments in order to retrieve all of the query string values as an associative array:

```php
$query = $request->query();
```

<a name="retrieving-json-input-values"></a>
#### Retrieving JSON Input Values

When sending JSON requests to your application, you may access the JSON data via the `input` method as long as the `Content-Type` header of the request is properly set to `application/json`. You may even use "dot" syntax to retrieve values that are nested within JSON arrays / objects:

```php
$name = $request->input('user.name');
```

<a name="retrieving-stringable-input-values"></a>
#### Retrieving Stringable Input Values

Instead of retrieving the request's input data as a primitive `string`, you may use the `string` method to retrieve the request data as an instance of [Illuminate\Support\Stringable](/docs/{{version}}/strings):

```php
$name = $request->string('name')->trim();
```

<a name="retrieving-integer-input-values"></a>
#### Retrieving Integer Input Values

To retrieve input values as integers, you may use the `integer` method. This method will attempt to cast the input value to an integer. If the input is not present or the cast fails, it will return the default value you specify. This is particularly useful for pagination or other numeric inputs:

```php
$perPage = $request->integer('per_page');
```

<a name="retrieving-boolean-input-values"></a>
#### Retrieving Boolean Input Values

When dealing with HTML elements like checkboxes, your application may receive "truthy" values that are actually strings. For example, "true" or "on". For convenience, you may use the `boolean` method to retrieve these values as booleans. The `boolean` method returns `true` for 1, "1", true, "true", "on", and "yes". All other values will return `false`:

```php
$archived = $request->boolean('archived');
```

<a name="retrieving-array-input-values"></a>
#### Retrieving Array Input Values

Input values containing arrays may be retrieved using the `array` method. This method will always cast the input value to an array. If the request does not contain an input value with the given name, an empty array will be returned:

```php
$versions = $request->array('versions');
```

<a name="retrieving-date-input-values"></a>
#### Retrieving Date Input Values

For convenience, input values containing dates / times may be retrieved as Carbon instances using the `date` method. If the request does not contain an input value with the given name, `null` will be returned:

```php
$birthday = $request->date('birthday');
```

The second and third arguments accepted by the `date` method may be used to specify the date's format and timezone, respectively:

```php
$elapsed = $request->date('elapsed', '!H:i', 'Europe/Madrid');
```

If the input value is present but has an invalid format, an `InvalidArgumentException` will be thrown; therefore, it is recommended that you validate the input before invoking the `date` method.

<a name="retrieving-interval-input-values"></a>
#### Retrieving Interval Input Values

Input values containing durations may be retrieved as `CarbonInterval` instances using the `interval` method. If the request does not contain an input value with the given name, `null` will be returned:

```php
$duration = $request->interval('duration');
```

If the input value is numeric, you may provide a unit as the second argument. The unit may be a string such as `second`, `minute`, or `day`, or a `Carbon\Unit` enum instance:

```php
use Carbon\Unit;

$timeout = $request->interval('timeout', 'second');

$delay = $request->interval('delay', Unit::Minute);
```

If the input value is present but has an invalid format, an `InvalidArgumentException` will be thrown; therefore, it is recommended that you validate the input before invoking the `interval` method.

<a name="retrieving-enum-input-values"></a>
#### Retrieving Enum Input Values

Input values that correspond to [PHP enums](https://www.php.net/manual/en/language.types.enumerations.php) may also be retrieved from the request. If the request does not contain an input value with the given name or the enum does not have a backing value that matches the input value, `null` will be returned. The `enum` method accepts the name of the input value and the enum class as its first and second arguments:

```php
use App\Enums\Status;

$status = $request->enum('status', Status::class);
```

You may also provide a default value that will be returned if the value is missing or invalid:

```php
$status = $request->enum('status', Status::class, Status::Pending);
```

If the input value is an array of values that correspond to a PHP enum, you may use the `enums` method to retrieve the array of values as enum instances:

```php
use App\Enums\Product;

$products = $request->enums('products', Product::class);
```

<a name="retrieving-input-via-dynamic-properties"></a>
#### Retrieving Input via Dynamic Properties

You may also access user input using dynamic properties on the `Illuminate\Http\Request` instance. For example, if one of your application's forms contains a `name` field, you may access the value of the field like so:

```php
$name = $request->name;
```

When using dynamic properties, Laravel will first look for the parameter's value in the request payload. If it is not present, Laravel will search for the field in the matched route's parameters.

<a name="retrieving-a-portion-of-the-input-data"></a>
#### Retrieving a Portion of the Input Data

If you need to retrieve a subset of the input data, you may use the `only` and `except` methods. Both of these methods accept a single `array` or a dynamic list of arguments:

```php
$input = $request->only(['username', 'password']);

$input = $request->only('username', 'password');

$input = $request->except(['credit_card']);

$input = $request->except('credit_card');
```

> [!WARNING]
> The `only` method returns all of the key / value pairs that you request; however, it will not return key / value pairs that are not present on the request.

<a name="input-presence"></a>
### Input Presence

You may use the `has` method to determine if a value is present on the request. The `has` method returns `true` if the value is present on the request:

```php
if ($request->has('name')) {
    // ...
}
```

When given an array, the `has` method will determine if all of the specified values are present:

```php
if ($request->has(['name', 'email'])) {
    // ...
}
```

The `hasAny` method returns `true` if any of the specified values are present:

```php
if ($request->hasAny(['name', 'email'])) {
    // ...
}
```

The `whenHas` method will execute the given closure if a value is present on the request:

```php
$request->whenHas('name', function (string $input) {
    // ...
});
```

A second closure may be passed to the `whenHas` method that will be executed if the specified value is not present on the request:

```php
$request->whenHas('name', function (string $input) {
    // The "name" value is present...
}, function () {
    // The "name" value is not present...
});
```

If you would like to determine if a value is present on the request and is not an empty string, you may use the `filled` method:

```php
if ($request->filled('name')) {
    // ...
}
```

If you would like to determine if a value is missing from the request or is an empty string, you may use the `isNotFilled` method:

```php
if ($request->isNotFilled('name')) {
    // ...
}
```

When given an array, the `isNotFilled` method will determine if all of the specified values are missing or empty:

```php
if ($request->isNotFilled(['name', 'email'])) {
    // ...
}
```

The `anyFilled` method returns `true` if any of the specified values is not an empty string:

```php
if ($request->anyFilled(['name', 'email'])) {
    // ...
}
```

The `whenFilled` method will execute the given closure if a value is present on the request and is not an empty string:

```php
$request->whenFilled('name', function (string $input) {
    // ...
});
```

A second closure may be passed to the `whenFilled` method that will be executed if the specified value is not "filled":

```php
$request->whenFilled('name', function (string $input) {
    // The "name" value is filled...
}, function () {
    // The "name" value is not filled...
});
```

To determine if a given key is absent from the request, you may use the `missing` and `whenMissing` methods:

```php
if ($request->missing('name')) {
    // ...
}

$request->whenMissing('name', function () {
    // The "name" value is missing...
}, function () {
    // The "name" value is present...
});
```

<a name="merging-additional-input"></a>
### Merging Additional Input

Sometimes you may need to manually merge additional input into the request's existing input data. To accomplish this, you may use the `merge` method. If a given input key already exists on the request, it will be overwritten by the data provided to the `merge` method:

```php
$request->merge(['votes' => 0]);
```

The `mergeIfMissing` method may be used to merge input into the request if the corresponding keys do not already exist within the request's input data:

```php
$request->mergeIfMissing(['votes' => 0]);
```

<a name="old-input"></a>
### Old Input

Laravel allows you to keep input from one request during the next request. This feature is particularly useful for re-populating forms after detecting validation errors. However, if you are using Laravel's included [validation features](/docs/{{version}}/validation), it is possible that you will not need to manually use these session input flashing methods directly, as some of Laravel's built-in validation facilities will call them automatically.

<a name="flashing-input-to-the-session"></a>
#### Flashing Input to the Session

The `flash` method on the `Illuminate\Http\Request` class will flash the current input to the [session](/docs/{{version}}/session) so that it is available during the user's next request to the application:

```php
$request->flash();
```

You may also use the `flashOnly` and `flashExcept` methods to flash a subset of the request data to the session. These methods are useful for keeping sensitive information such as passwords out of the session:

```php
$request->flashOnly(['username', 'email']);

$request->flashExcept('password');
```

<a name="flashing-input-then-redirecting"></a>
#### Flashing Input Then Redirecting

Since you often will want to flash input to the session and then redirect to the previous page, you may easily chain input flashing onto a redirect using the `withInput` method:

```php
return redirect('/form')->withInput();

return redirect()->route('user.create')->withInput();

return redirect('/form')->withInput(
    $request->except('password')
);
```

<a name="retrieving-old-input"></a>
#### Retrieving Old Input

To retrieve flashed input from the previous request, invoke the `old` method on an instance of `Illuminate\Http\Request`. The `old` method will pull the previously flashed input data from the [session](/docs/{{version}}/session):

```php
$username = $request->old('username');
```

Laravel also provides a global `old` helper. If you are displaying old input within a [Blade template](/docs/{{version}}/blade), it is more convenient to use the `old` helper to repopulate the form. If no old input exists for the given field, `null` will be returned:

```blade
<input type="text" name="username" value="{{ old('username') }}">
```

<a name="cookies"></a>
### Cookies

<a name="retrieving-cookies-from-requests"></a>
#### Retrieving Cookies From Requests

All cookies created by the Laravel framework are encrypted and signed with an authentication code, meaning they will be considered invalid if they have been changed by the client. To retrieve a cookie value from the request, use the `cookie` method on an `Illuminate\Http\Request` instance:

```php
$value = $request->cookie('name');
```

<a name="input-trimming-and-normalization"></a>
## Input Trimming and Normalization

By default, Laravel includes the `Illuminate\Foundation\Http\Middleware\TrimStrings` and `Illuminate\Foundation\Http\Middleware\ConvertEmptyStringsToNull` middleware in your application's global middleware stack. These middleware will automatically trim all incoming string fields on the request, as well as convert any empty string fields to `null`. This allows you to not have to worry about these normalization concerns in your routes and controllers.

#### Disabling Input Normalization

If you would like to disable this behavior for all requests, you may remove the two middleware from your application's middleware stack by invoking the `$middleware->remove` method in your application's `bootstrap/app.php` file:

```php
use Illuminate\Foundation\Http\Middleware\ConvertEmptyStringsToNull;
use Illuminate\Foundation\Http\Middleware\TrimStrings;

->withMiddleware(function (Middleware $middleware): void {
    $middleware->remove([
        ConvertEmptyStringsToNull::class,
        TrimStrings::class,
    ]);
})
```

If you would like to disable string trimming and empty string conversion for a subset of requests to your application, you may use the `trimStrings` and `convertEmptyStringsToNull` middleware methods within your application's `bootstrap/app.php` file. Both methods accept an array of closures, which should return `true` or `false` to indicate whether input normalization should be skipped:

```php
->withMiddleware(function (Middleware $middleware): void {
    $middleware->convertEmptyStringsToNull(except: [
        fn (Request $request) => $request->is('admin/*'),
    ]);

    $middleware->trimStrings(except: [
        fn (Request $request) => $request->is('admin/*'),
    ]);
})
```

<a name="files"></a>
## Files

<a name="retrieving-uploaded-files"></a>
### Retrieving Uploaded Files

You may retrieve uploaded files from an `Illuminate\Http\Request` instance using the `file` method or using dynamic properties. The `file` method returns an instance of the `Illuminate\Http\UploadedFile` class, which extends the PHP `SplFileInfo` class and provides a variety of methods for interacting with the file:

```php
$file = $request->file('photo');

$file = $request->photo;
```

You may determine if a file is present on the request using the `hasFile` method:

```php
if ($request->hasFile('photo')) {
    // ...
}
```

If the uploaded file is an image that you need to manipulate before storing, you may use the `image` method to retrieve an `Illuminate\Image\Image` instance, or `null` if the file is not present:

```php
$image = $request->image('photo');
```

For more information on manipulating images, please consult the complete [image manipulation documentation](/docs/{{version}}/images).

<a name="validating-successful-uploads"></a>
#### Validating Successful Uploads

In addition to checking if the file is present, you may verify that there were no problems uploading the file via the `isValid` method:

```php
if ($request->file('photo')->isValid()) {
    // ...
}
```

<a name="file-paths-extensions"></a>
#### File Paths and Extensions

The `UploadedFile` class also contains methods for accessing the file's fully-qualified path and its extension. The `extension` method will attempt to guess the file's extension based on its contents. This extension may be different from the extension that was supplied by the client:

```php
$path = $request->photo->path();

$extension = $request->photo->extension();
```

<a name="other-file-methods"></a>
#### Other File Methods

There are a variety of other methods available on `UploadedFile` instances. Check out the [API documentation for the class](https://github.com/symfony/symfony/blob/6.0/src/Symfony/Component/HttpFoundation/File/UploadedFile.php) for more information regarding these methods.

<a name="storing-uploaded-files"></a>
### Storing Uploaded Files

To store an uploaded file, you will typically use one of your configured [filesystems](/docs/{{version}}/filesystem). The `UploadedFile` class has a `store` method that will move an uploaded file to one of your disks, which may be a location on your local filesystem or a cloud storage location like Amazon S3.

The `store` method accepts the path where the file should be stored relative to the filesystem's configured root directory. This path should not contain a filename, since a unique ID will automatically be generated to serve as the filename.

The `store` method also accepts an optional second argument for the name of the disk that should be used to store the file. The method will return the path of the file relative to the disk's root:

```php
$path = $request->photo->store('images');

$path = $request->photo->store('images', 's3');
```

If you do not want a filename to be automatically generated, you may use the `storeAs` method, which accepts the path, filename, and disk name as its arguments:

```php
$path = $request->photo->storeAs('images', 'filename.jpg');

$path = $request->photo->storeAs('images', 'filename.jpg', 's3');
```

> [!NOTE]
> For more information about file storage in Laravel, check out the complete [file storage documentation](/docs/{{version}}/filesystem).

<a name="configuring-trusted-proxies"></a>
## Configuring Trusted Proxies

When running your applications behind a load balancer that terminates TLS / SSL certificates, you may notice your application sometimes does not generate HTTPS links when using the `url` helper. Typically this is because your application is being forwarded traffic from your load balancer on port 80 and does not know it should generate secure links.

To solve this, you may enable the `Illuminate\Http\Middleware\TrustProxies` middleware that is included in your Laravel application, which allows you to quickly customize the load balancers or proxies that should be trusted by your application. Your trusted proxies should be specified using the `trustProxies` middleware method in your application's `bootstrap/app.php` file:

```php
->withMiddleware(function (Middleware $middleware): void {
    $middleware->trustProxies(at: [
        '192.168.1.1',
        '10.0.0.0/8',
    ]);
})
```

In addition to configuring the trusted proxies, you may also configure the proxy headers that should be trusted:

```php
->withMiddleware(function (Middleware $middleware): void {
    $middleware->trustProxies(headers: Request::HEADER_X_FORWARDED_FOR |
        Request::HEADER_X_FORWARDED_HOST |
        Request::HEADER_X_FORWARDED_PORT |
        Request::HEADER_X_FORWARDED_PROTO |
        Request::HEADER_X_FORWARDED_AWS_ELB
    );
})
```

> [!NOTE]
> If you are using AWS Elastic Load Balancing, the `headers` value should be `Request::HEADER_X_FORWARDED_AWS_ELB`. If your load balancer uses the standard `Forwarded` header from [RFC 7239](https://www.rfc-editor.org/rfc/rfc7239#section-4), the `headers` value should be `Request::HEADER_FORWARDED`. For more information on the constants that may be used in the `headers` value, check out Symfony's documentation on [trusting proxies](https://symfony.com/doc/current/deployment/proxies.html).

<a name="trusting-all-proxies"></a>
#### Trusting All Proxies

If you are using Amazon AWS or another "cloud" load balancer provider, you may not know the IP addresses of your actual balancers. In this case, you may use `*` to trust all proxies:

```php
->withMiddleware(function (Middleware $middleware): void {
    $middleware->trustProxies(at: '*');
})
```

<a name="configuring-trusted-hosts"></a>
## Configuring Trusted Hosts

By default, Laravel will respond to all requests it receives regardless of the content of the HTTP request's `Host` header. In addition, the `Host` header's value will be used when generating absolute URLs to your application during a web request.

Typically, you should configure your web server, such as Nginx or Apache, to only send requests to your application that match a given hostname. However, if you do not have the ability to customize your web server directly and need to instruct Laravel to only respond to certain hostnames, you may do so by enabling the `Illuminate\Http\Middleware\TrustHosts` middleware for your application.

To enable the `TrustHosts` middleware, you should invoke the `trustHosts` middleware method in your application's `bootstrap/app.php` file. Using the `at` argument of this method, you may specify the hostnames that your application should respond to. The hostname string is treated as a regular expression. Incoming requests with other `Host` headers will be rejected:

```php
->withMiddleware(function (Middleware $middleware): void {
    $middleware->trustHosts(at: ['^laravel\.test$']);
})
```

By default, requests coming from subdomains of the application's URL are also automatically trusted. If you would like to disable this behavior, you may use the `subdomains` argument:

```php
->withMiddleware(function (Middleware $middleware): void {
    $middleware->trustHosts(at: ['^laravel\.test$'], subdomains: false);
})
```

If you need to access your application's configuration files or database to determine your trusted hosts, you may provide a closure to the `at` argument:

```php
->withMiddleware(function (Middleware $middleware): void {
    $middleware->trustHosts(at: fn () => config('app.trusted_hosts'));
})
```


---

# HTTP Responses

*Sección: Laravel | Origen: https://laravel.com/docs/13.x/responses*

- [Creating Responses](#creating-responses)
    - [Attaching Headers to Responses](#attaching-headers-to-responses)
    - [Attaching Cookies to Responses](#attaching-cookies-to-responses)
    - [Cookies and Encryption](#cookies-and-encryption)
- [Redirects](#redirects)
    - [Redirecting to Named Routes](#redirecting-named-routes)
    - [Redirecting to Controller Actions](#redirecting-controller-actions)
    - [Redirecting to External Domains](#redirecting-external-domains)
    - [Redirecting With Flashed Session Data](#redirecting-with-flashed-session-data)
- [Other Response Types](#other-response-types)
    - [View Responses](#view-responses)
    - [JSON Responses](#json-responses)
    - [File Downloads](#file-downloads)
    - [File Responses](#file-responses)
- [Streamed Responses](#streamed-responses)
    - [Consuming Streamed Responses](#consuming-streamed-responses)
    - [Streamed JSON Responses](#streamed-json-responses)
    - [Event Streams (SSE)](#event-streams)
    - [Streamed Downloads](#streamed-downloads)
- [Response Macros](#response-macros)

<a name="creating-responses"></a>
## Creating Responses

<a name="strings-arrays"></a>
#### Strings and Arrays

All routes and controllers should return a response to be sent back to the user's browser. Laravel provides several different ways to return responses. The most basic response is returning a string from a route or controller. The framework will automatically convert the string into a full HTTP response:

```php
Route::get('/', function () {
    return 'Hello World';
});
```

In addition to returning strings from your routes and controllers, you may also return arrays. The framework will automatically convert the array into a JSON response:

```php
Route::get('/', function () {
    return [1, 2, 3];
});
```

> [!NOTE]
> Did you know you can also return [Eloquent collections](/docs/{{version}}/eloquent-collections) from your routes or controllers? They will automatically be converted to JSON. Give it a shot!

<a name="response-objects"></a>
#### Response Objects

Typically, you won't just be returning simple strings or arrays from your route actions. Instead, you will be returning full `Illuminate\Http\Response` instances or [views](/docs/{{version}}/views).

Returning a full `Response` instance allows you to customize the response's HTTP status code and headers. A `Response` instance inherits from the `Symfony\Component\HttpFoundation\Response` class, which provides a variety of methods for building HTTP responses:

```php
Route::get('/home', function () {
    return response('Hello World', 200)
        ->header('Content-Type', 'text/plain');
});
```

<a name="eloquent-models-and-collections"></a>
#### Eloquent Models and Collections

You may also return [Eloquent ORM](/docs/{{version}}/eloquent) models and collections directly from your routes and controllers. When you do, Laravel will automatically convert the models and collections to JSON responses while respecting the model's [hidden attributes](/docs/{{version}}/eloquent-serialization#hiding-attributes-from-json):

```php
use App\Models\User;

Route::get('/user/{user}', function (User $user) {
    return $user;
});
```

<a name="attaching-headers-to-responses"></a>
### Attaching Headers to Responses

Keep in mind that most response methods are chainable, allowing for the fluent construction of response instances. For example, you may use the `header` method to add a series of headers to the response before sending it back to the user:

```php
return response($content)
    ->header('Content-Type', $type)
    ->header('X-Header-One', 'Header Value')
    ->header('X-Header-Two', 'Header Value');
```

Or, you may use the `withHeaders` method to specify an array of headers to be added to the response:

```php
return response($content)
    ->withHeaders([
        'Content-Type' => $type,
        'X-Header-One' => 'Header Value',
        'X-Header-Two' => 'Header Value',
    ]);
```

You can remove specific headers from an outgoing response using the `withoutHeader` method:

```php
return response($content)->withoutHeader('X-Debug');

return response($content)->withoutHeader(['X-Debug', 'X-Powered-By']);
```

<a name="cache-control-middleware"></a>
#### Cache Control Middleware

Laravel includes a `cache.headers` middleware, which may be used to quickly set the `Cache-Control` header for a group of routes. Directives should be provided using the "snake case" equivalent of the corresponding cache-control directive and should be separated by a semicolon. If `etag` is specified in the list of directives, an MD5 hash of the response content will automatically be set as the ETag identifier:

```php
Route::middleware('cache.headers:public;max_age=30;s_maxage=300;stale_while_revalidate=600;etag')->group(function () {
    Route::get('/privacy', function () {
        // ...
    });

    Route::get('/terms', function () {
        // ...
    });
});
```

<a name="attaching-cookies-to-responses"></a>
### Attaching Cookies to Responses

You may attach a cookie to an outgoing `Illuminate\Http\Response` instance using the `cookie` method. You should pass the name, value, and the number of minutes the cookie should be considered valid to this method:

```php
return response('Hello World')->cookie(
    'name', 'value', $minutes
);
```

The `cookie` method also accepts a few more arguments which are used less frequently. Generally, these arguments have the same purpose and meaning as the arguments that would be given to PHP's native [setcookie](https://secure.php.net/manual/en/function.setcookie.php) method:

```php
return response('Hello World')->cookie(
    'name', 'value', $minutes, $path, $domain, $secure, $httpOnly
);
```

If you would like to ensure that a cookie is sent with the outgoing response but you do not yet have an instance of that response, you can use the `Cookie` facade to "queue" cookies for attachment to the response when it is sent. The `queue` method accepts the arguments needed to create a cookie instance. These cookies will be attached to the outgoing response before it is sent to the browser:

```php
use Illuminate\Support\Facades\Cookie;

Cookie::queue('name', 'value', $minutes);
```

<a name="generating-cookie-instances"></a>
#### Generating Cookie Instances

If you would like to generate a `Symfony\Component\HttpFoundation\Cookie` instance that can be attached to a response instance at a later time, you may use the global `cookie` helper. This cookie will not be sent back to the client unless it is attached to a response instance:

```php
$cookie = cookie('name', 'value', $minutes);

return response('Hello World')->cookie($cookie);
```

<a name="expiring-cookies-early"></a>
#### Expiring Cookies Early

You may remove a cookie by expiring it via the `withoutCookie` or `withoutCookies` method of an outgoing response:

```php
return response('Hello World')->withoutCookie('name');

return response('Hello World')->withoutCookies([
    'name',
    'email',
    'preferences',
]);
```

If you do not yet have an instance of the outgoing response, you may use the `Cookie` facade's `expire` method to expire a cookie:

```php
Cookie::expire('name');
```

<a name="cookies-and-encryption"></a>
### Cookies and Encryption

By default, thanks to the `Illuminate\Cookie\Middleware\EncryptCookies` middleware, all cookies generated by Laravel are encrypted and signed so that they can't be modified or read by the client. If you would like to disable encryption for a subset of cookies generated by your application, you may use the `encryptCookies` method in your application's `bootstrap/app.php` file:

```php
->withMiddleware(function (Middleware $middleware): void {
    $middleware->encryptCookies(except: [
        'cookie_name',
    ]);
})
```

> [!NOTE]
> In general, cookie encryption should never be disabled, as this exposes your cookies to potential client-side data exposure and tampering.

<a name="redirects"></a>
## Redirects

Redirect responses are instances of the `Illuminate\Http\RedirectResponse` class, and contain the proper headers needed to redirect the user to another URL. There are several ways to generate a `RedirectResponse` instance. The simplest method is to use the global `redirect` helper:

```php
Route::get('/dashboard', function () {
    return redirect('/home/dashboard');
});
```

Sometimes you may wish to redirect the user to their previous location, such as when a submitted form is invalid. You may do so by using the global `back` helper function. Since this feature utilizes the [session](/docs/{{version}}/session), make sure the route calling the `back` function is using the `web` middleware group:

```php
Route::post('/user/profile', function () {
    // Validate the request...

    return back()->withInput();
});
```

<a name="redirecting-named-routes"></a>
### Redirecting to Named Routes

When you call the `redirect` helper with no parameters, an instance of `Illuminate\Routing\Redirector` is returned, allowing you to call any method on the `Redirector` instance. For example, to generate a `RedirectResponse` to a named route, you may use the `route` method:

```php
return redirect()->route('login');
```

If your route has parameters, you may pass them as the second argument to the `route` method:

```php
// For a route with the following URI: /profile/{id}

return redirect()->route('profile', ['id' => 1]);
```

<a name="populating-parameters-via-eloquent-models"></a>
#### Populating Parameters via Eloquent Models

If you are redirecting to a route with an "ID" parameter that is being populated from an Eloquent model, you may pass the model itself. The ID will be extracted automatically:

```php
// For a route with the following URI: /profile/{id}

return redirect()->route('profile', [$user]);
```

If you would like to customize the value that is placed in the route parameter, you can specify the column in the route parameter definition (`/profile/{id:slug}`) or you can override the `getRouteKey` method on your Eloquent model:

```php
/**
 * Get the value of the model's route key.
 */
public function getRouteKey(): mixed
{
    return $this->slug;
}
```

<a name="redirecting-controller-actions"></a>
### Redirecting to Controller Actions

You may also generate redirects to [controller actions](/docs/{{version}}/controllers). To do so, pass the controller and action name to the `action` method:

```php
use App\Http\Controllers\UserController;

return redirect()->action([UserController::class, 'index']);
```

If your controller route requires parameters, you may pass them as the second argument to the `action` method:

```php
return redirect()->action(
    [UserController::class, 'profile'], ['id' => 1]
);
```

<a name="redirecting-external-domains"></a>
### Redirecting to External Domains

Sometimes you may need to redirect to a domain outside of your application. You may do so by calling the `away` method, which creates a `RedirectResponse` without any additional URL encoding, validation, or verification:

```php
return redirect()->away('https://www.google.com');
```

<a name="redirecting-with-flashed-session-data"></a>
### Redirecting With Flashed Session Data

Redirecting to a new URL and [flashing data to the session](/docs/{{version}}/session#flash-data) are usually done at the same time. Typically, this is done after successfully performing an action when you flash a success message to the session. For convenience, you may create a `RedirectResponse` instance and flash data to the session in a single, fluent method chain:

```php
Route::post('/user/profile', function () {
    // ...

    return redirect('/dashboard')->with('status', 'Profile updated!');
});
```

After the user is redirected, you may display the flashed message from the [session](/docs/{{version}}/session). For example, using [Blade syntax](/docs/{{version}}/blade):

```blade
@if (session('status'))
    <div class="alert alert-success">
        {{ session('status') }}
    </div>
@endif
```

<a name="redirecting-with-input"></a>
#### Redirecting With Input

You may use the `withInput` method provided by the `RedirectResponse` instance to flash the current request's input data to the session before redirecting the user to a new location. This is typically done if the user has encountered a validation error. Once the input has been flashed to the session, you may easily [retrieve it](/docs/{{version}}/requests#retrieving-old-input) during the next request to repopulate the form:

```php
return back()->withInput();
```

<a name="other-response-types"></a>
## Other Response Types

The `response` helper may be used to generate other types of response instances. When the `response` helper is called without arguments, an implementation of the `Illuminate\Contracts\Routing\ResponseFactory` [contract](/docs/{{version}}/contracts) is returned. This contract provides several helpful methods for generating responses.

<a name="view-responses"></a>
### View Responses

If you need control over the response's status and headers but also need to return a [view](/docs/{{version}}/views) as the response's content, you should use the `view` method:

```php
return response()
    ->view('hello', $data, 200)
    ->header('Content-Type', $type);
```

Of course, if you do not need to pass a custom HTTP status code or custom headers, you may use the global `view` helper function.

<a name="json-responses"></a>
### JSON Responses

The `json` method will automatically set the `Content-Type` header to `application/json`, as well as convert the given array to JSON using the `json_encode` PHP function:

```php
return response()->json([
    'name' => 'Abigail',
    'state' => 'CA',
]);
```

If you would like to create a JSONP response, you may use the `json` method in combination with the `withCallback` method:

```php
return response()
    ->json(['name' => 'Abigail', 'state' => 'CA'])
    ->withCallback($request->input('callback'));
```

<a name="file-downloads"></a>
### File Downloads

The `download` method may be used to generate a response that forces the user's browser to download the file at the given path. The `download` method accepts a filename as the second argument to the method, which will determine the filename that is seen by the user downloading the file. Finally, you may pass an array of HTTP headers as the third argument to the method:

```php
return response()->download($pathToFile);

return response()->download($pathToFile, $name, $headers);
```

> [!WARNING]
> Symfony HttpFoundation, which manages file downloads, requires the file being downloaded to have an ASCII filename.

<a name="file-responses"></a>
### File Responses

The `file` method may be used to display a file, such as an image or PDF, directly in the user's browser instead of initiating a download. This method accepts the absolute path to the file as its first argument and an array of headers as its second argument:

```php
return response()->file($pathToFile);

return response()->file($pathToFile, $headers);
```

<a name="streamed-responses"></a>
## Streamed Responses

By streaming data to the client as it is generated, you can significantly reduce memory usage and improve performance, especially for very large responses. Streamed responses allow the client to begin processing data before the server has finished sending it:

```php
Route::get('/stream', function () {
    return response()->stream(function (): void {
        foreach (['developer', 'admin'] as $string) {
            echo $string;
            ob_flush();
            flush();
            sleep(2); // Simulate delay between chunks...
        }
    }, 200, ['X-Accel-Buffering' => 'no']);
});
```

For convenience, if the closure you provide to the `stream` method returns a [Generator](https://www.php.net/manual/en/language.generators.overview.php), Laravel will automatically flush the output buffer between strings returned by the generator, as well as disable Nginx output buffering:

```php
Route::post('/chat', function () {
    return response()->stream(function (): Generator {
        $stream = OpenAI::client()->chat()->createStreamed(...);

        foreach ($stream as $response) {
            yield $response->choices[0];
        }
    });
});
```

<a name="consuming-streamed-responses"></a>
### Consuming Streamed Responses

Streamed responses may be consumed using Laravel's `stream` npm package, which provides a convenient API for interacting with Laravel response and event streams. To get started, install the `@laravel/stream-react`, `@laravel/stream-vue`, or `@laravel/stream-svelte` package:

```shell tab=React
npm install @laravel/stream-react
```

```shell tab=Vue
npm install @laravel/stream-vue
```

```shell tab=Svelte
npm install @laravel/stream-svelte
```

Then, `useStream` may be used to consume the event stream. After providing your stream URL, the hook will automatically update the `data` with the concatenated response as content is returned from your Laravel application:

```tsx tab=React
import { useStream } from "@laravel/stream-react";

function App() {
    const { data, isFetching, isStreaming, send } = useStream("chat");

    const sendMessage = () => {
        send({
            message: `Current timestamp: ${Date.now()}`,
        });
    };

    return (
        <div>
            <div>{data}</div>
            {isFetching && <div>Connecting...</div>}
            {isStreaming && <div>Generating...</div>}
            <button onClick={sendMessage}>Send Message</button>
        </div>
    );
}
```

```vue tab=Vue
<script setup lang="ts">
import { useStream } from "@laravel/stream-vue";

const { data, isFetching, isStreaming, send } = useStream("chat");

const sendMessage = () => {
    send({
        message: `Current timestamp: ${Date.now()}`,
    });
};
</script>

<template>
    <div>
        <div>{{ data }}</div>
        <div v-if="isFetching">Connecting...</div>
        <div v-if="isStreaming">Generating...</div>
        <button @click="sendMessage">Send Message</button>
    </div>
</template>
```

```svelte tab=Svelte
<script>
import { useStream } from "@laravel/stream-svelte";

const stream = useStream("chat");

const sendMessage = () => {
    stream.send({
        message: `Current timestamp: ${Date.now()}`,
    });
};
</script>

<div>
    <div>{$stream.data}</div>
    {#if $stream.isFetching}
        <div>Connecting...</div>
    {/if}
    {#if $stream.isStreaming}
        <div>Generating...</div>
    {/if}
    <button onclick={sendMessage}>Send Message</button>
</div>
```

When sending data back to the stream via `send`, the active connection to the stream is canceled before sending the new data. All requests are sent as JSON `POST` requests.

> [!WARNING]
> Since the `useStream` hook makes a `POST` request to your application, a valid CSRF token is required. The easiest way to provide the CSRF token is to [include it via a meta tag in your application layout's head](/docs/{{version}}/csrf#csrf-x-csrf-token).

The second argument given to `useStream` is an options object that you may use to customize the stream consumption behavior. The default values for this object are shown below:

```tsx tab=React
import { useStream } from "@laravel/stream-react";

function App() {
    const { data } = useStream("chat", {
        id: undefined,
        initialInput: undefined,
        headers: undefined,
        csrfToken: undefined,
        onResponse: (response: Response) => void,
        onData: (data: string) => void,
        onCancel: () => void,
        onFinish: () => void,
        onError: (error: Error) => void,
    });

    return <div>{data}</div>;
}
```

```vue tab=Vue
<script setup lang="ts">
import { useStream } from "@laravel/stream-vue";

const { data } = useStream("chat", {
    id: undefined,
    initialInput: undefined,
    headers: undefined,
    csrfToken: undefined,
    onResponse: (response: Response) => void,
    onData: (data: string) => void,
    onCancel: () => void,
    onFinish: () => void,
    onError: (error: Error) => void,
});
</script>

<template>
    <div>{{ data }}</div>
</template>
```

```svelte tab=Svelte
<script>
import { useStream } from "@laravel/stream-svelte";

const stream = useStream("chat", {
    id: undefined,
    initialInput: undefined,
    headers: undefined,
    csrfToken: undefined,
    onResponse: (response) => {},
    onData: (data) => {},
    onCancel: () => {},
    onFinish: () => {},
    onError: (error) => {},
});
</script>

<div>{$stream.data}</div>
```

`onResponse` is triggered after a successful initial response from the stream and the raw [Response](https://developer.mozilla.org/en-US/docs/Web/API/Response) is passed to the callback. `onData` is called as each chunk is received - the current chunk is passed to the callback. `onFinish` is called when a stream has finished and when an error is thrown during the fetch / read cycle.

By default, a request is not made to the stream on initialization. You may pass an initial payload to the stream by using the `initialInput` option:

```tsx tab=React
import { useStream } from "@laravel/stream-react";

function App() {
    const { data } = useStream("chat", {
        initialInput: {
            message: "Introduce yourself.",
        },
    });

    return <div>{data}</div>;
}
```

```vue tab=Vue
<script setup lang="ts">
import { useStream } from "@laravel/stream-vue";

const { data } = useStream("chat", {
    initialInput: {
        message: "Introduce yourself.",
    },
});
</script>

<template>
    <div>{{ data }}</div>
</template>
```

```svelte tab=Svelte
<script>
import { useStream } from "@laravel/stream-svelte";

const stream = useStream("chat", {
    initialInput: {
        message: "Introduce yourself.",
    },
});
</script>

<div>{$stream.data}</div>
```

To cancel a stream manually, you may use the `cancel` method returned from the hook:

```tsx tab=React
import { useStream } from "@laravel/stream-react";

function App() {
    const { data, cancel } = useStream("chat");

    return (
        <div>
            <div>{data}</div>
            <button onClick={cancel}>Cancel</button>
        </div>
    );
}
```

```vue tab=Vue
<script setup lang="ts">
import { useStream } from "@laravel/stream-vue";

const { data, cancel } = useStream("chat");
</script>

<template>
    <div>
        <div>{{ data }}</div>
        <button @click="cancel">Cancel</button>
    </div>
</template>
```

```svelte tab=Svelte
<script>
import { useStream } from "@laravel/stream-svelte";

const stream = useStream("chat");
</script>

<div>
    <div>{$stream.data}</div>
    <button onclick={() => stream.cancel()}>Cancel</button>
</div>
```

Each time the `useStream` hook is used, a random `id` is generated to identify the stream. This is sent back to the server with each request in the `X-STREAM-ID` header. When consuming the same stream from multiple components, you can read and write to the stream by providing your own `id`:

```tsx tab=React
// App.tsx
import { useStream } from "@laravel/stream-react";

function App() {
    const { data, id } = useStream("chat");

    return (
        <div>
            <div>{data}</div>
            <StreamStatus id={id} />
        </div>
    );
}

// StreamStatus.tsx
import { useStream } from "@laravel/stream-react";

function StreamStatus({ id }) {
    const { isFetching, isStreaming } = useStream("chat", { id });

    return (
        <div>
            {isFetching && <div>Connecting...</div>}
            {isStreaming && <div>Generating...</div>}
        </div>
    );
}
```

```vue tab=Vue
<!-- App.vue -->
<script setup lang="ts">
import { useStream } from "@laravel/stream-vue";
import StreamStatus from "./StreamStatus.vue";

const { data, id } = useStream("chat");
</script>

<template>
    <div>
        <div>{{ data }}</div>
        <StreamStatus :id="id" />
    </div>
</template>

<!-- StreamStatus.vue -->
<script setup lang="ts">
import { useStream } from "@laravel/stream-vue";

const props = defineProps<{
    id: string;
}>();

const { isFetching, isStreaming } = useStream("chat", { id: props.id });
</script>

<template>
    <div>
        <div v-if="isFetching">Connecting...</div>
        <div v-if="isStreaming">Generating...</div>
    </div>
</template>
```

```svelte tab=Svelte
<!-- App.svelte -->
<script>
import { useStream } from "@laravel/stream-svelte";
import StreamStatus from "./StreamStatus.svelte";

const stream = useStream("chat");
</script>

<div>
    <div>{$stream.data}</div>
    <StreamStatus id={stream.id} />
</div>

<!-- StreamStatus.svelte -->
<script>
import { useStream } from "@laravel/stream-svelte";

let { id } = $props();

const stream = useStream("chat", { id });
</script>

<div>
    {#if $stream.isFetching}
        <div>Connecting...</div>
    {/if}
    {#if $stream.isStreaming}
        <div>Generating...</div>
    {/if}
</div>
```

<a name="streamed-json-responses"></a>
### Streamed JSON Responses

If you need to stream JSON data incrementally, you may utilize the `streamJson` method. This method is especially useful for large datasets that need to be sent progressively to the browser in a format that can be easily parsed by JavaScript:

```php
use App\Models\User;

Route::get('/users.json', function () {
    return response()->streamJson([
        'users' => User::cursor(),
    ]);
});
```

The `useJsonStream` hook is identical to the [useStream hook](#consuming-streamed-responses) except that it will attempt to parse the data as JSON once it has finished streaming:

```tsx tab=React
import { useJsonStream } from "@laravel/stream-react";

type User = {
    id: number;
    name: string;
    email: string;
};

function App() {
    const { data, send } = useJsonStream<{ users: User[] }>("users");

    const loadUsers = () => {
        send({
            query: "taylor",
        });
    };

    return (
        <div>
            <ul>
                {data?.users.map((user) => (
                    <li>
                        {user.id}: {user.name}
                    </li>
                ))}
            </ul>
            <button onClick={loadUsers}>Load Users</button>
        </div>
    );
}
```

```vue tab=Vue
<script setup lang="ts">
import { useJsonStream } from "@laravel/stream-vue";

type User = {
    id: number;
    name: string;
    email: string;
};

const { data, send } = useJsonStream<{ users: User[] }>("users");

const loadUsers = () => {
    send({
        query: "taylor",
    });
};
</script>

<template>
    <div>
        <ul>
            <li v-for="user in data?.users" :key="user.id">
                {{ user.id }}: {{ user.name }}
            </li>
        </ul>
        <button @click="loadUsers">Load Users</button>
    </div>
</template>
```

```svelte tab=Svelte
<script>
import { useJsonStream } from "@laravel/stream-svelte";

const stream = useJsonStream("users");

const loadUsers = () => {
    stream.send({
        query: "taylor",
    });
};
</script>

<div>
    <ul>
        {#if $stream.data?.users}
            {#each $stream.data.users as user (user.id)}
                <li>{user.id}: {user.name}</li>
            {/each}
        {/if}
    </ul>
    <button onclick={loadUsers}>Load Users</button>
</div>
```

<a name="event-streams"></a>
### Event Streams (SSE)

The `eventStream` method may be used to return a server-sent events (SSE) streamed response using the `text/event-stream` content type. The `eventStream` method accepts a closure which should [yield](https://www.php.net/manual/en/language.generators.overview.php) responses to the stream as the responses become available:

```php
Route::get('/chat', function () {
    return response()->eventStream(function () {
        $stream = OpenAI::client()->chat()->createStreamed(...);

        foreach ($stream as $response) {
            yield $response->choices[0];
        }
    });
});
```

If you would like to customize the name of the event, you may yield an instance of the `StreamedEvent` class:

```php
use Illuminate\Http\StreamedEvent;

yield new StreamedEvent(
    event: 'update',
    data: $response->choices[0],
);
```

<a name="consuming-event-streams"></a>
#### Consuming Event Streams

Event streams may be consumed using Laravel's `stream` npm package, which provides a convenient API for interacting with Laravel event streams. To get started, install the `@laravel/stream-react`, `@laravel/stream-vue`, or `@laravel/stream-svelte` package:

```shell tab=React
npm install @laravel/stream-react
```

```shell tab=Vue
npm install @laravel/stream-vue
```

```shell tab=Svelte
npm install @laravel/stream-svelte
```

Then, `useEventStream` may be used to consume the event stream. After providing your stream URL, the hook will automatically update the `message` with the concatenated response as messages are returned from your Laravel application:

```jsx tab=React
import { useEventStream } from "@laravel/stream-react";

function App() {
  const { message } = useEventStream("/chat");

  return <div>{message}</div>;
}
```

```vue tab=Vue
<script setup lang="ts">
import { useEventStream } from "@laravel/stream-vue";

const { message } = useEventStream("/chat");
</script>

<template>
  <div>{{ message }}</div>
</template>
```

```svelte tab=Svelte
<script>
import { useEventStream } from "@laravel/stream-svelte";

const eventStream = useEventStream("/chat");
</script>

<div>{$eventStream.message}</div>
```

The second argument given to `useEventStream` is an options object that you may use to customize the stream consumption behavior. The default values for this object are shown below:

```jsx tab=React
import { useEventStream } from "@laravel/stream-react";

function App() {
  const { message } = useEventStream("/stream", {
    eventName: "update",
    onMessage: (message) => {
      //
    },
    onError: (error) => {
      //
    },
    onComplete: () => {
      //
    },
    endSignal: "</stream>",
    glue: " ",
  });

  return <div>{message}</div>;
}
```

```vue tab=Vue
<script setup lang="ts">
import { useEventStream } from "@laravel/stream-vue";

const { message } = useEventStream("/chat", {
  eventName: "update",
  onMessage: (message) => {
    // ...
  },
  onError: (error) => {
    // ...
  },
  onComplete: () => {
    // ...
  },
  endSignal: "</stream>",
  glue: " ",
});
</script>
```

```svelte tab=Svelte
<script>
import { useEventStream } from "@laravel/stream-svelte";

const eventStream = useEventStream("/chat", {
    eventName: "update",
    onMessage: (event) => {
        //
    },
    onError: (error) => {
        //
    },
    onComplete: () => {
        //
    },
    endSignal: "</stream>",
    glue: " ",
    replace: false,
});
</script>
```

Event streams may also be manually consumed via an [EventSource](https://developer.mozilla.org/en-US/docs/Web/API/EventSource) object by your application's frontend. The `eventStream` method will automatically send a `</stream>` update to the event stream when the stream is complete:

```js
const source = new EventSource('/chat');

source.addEventListener('update', (event) => {
    if (event.data === '</stream>') {
        source.close();

        return;
    }

    console.log(event.data);
});
```

To customize the final event that is sent to the event stream, you may provide a `StreamedEvent` instance to the `eventStream` method's `endStreamWith` argument:

```php
return response()->eventStream(function () {
    // ...
}, endStreamWith: new StreamedEvent(event: 'update', data: '</stream>'));
```

<a name="streamed-downloads"></a>
### Streamed Downloads

Sometimes you may wish to turn the string response of a given operation into a downloadable response without having to write the contents of the operation to disk. You may use the `streamDownload` method in this scenario. This method accepts a callback, filename, and an optional array of headers as its arguments:

```php
use App\Services\GitHub;

return response()->streamDownload(function () {
    echo GitHub::api('repo')
        ->contents()
        ->readme('laravel', 'laravel')['contents'];
}, 'laravel-readme.md');
```

<a name="response-macros"></a>
## Response Macros

If you would like to define a custom response that you can re-use in a variety of your routes and controllers, you may use the `macro` method on the `Response` facade. Typically, you should call this method from the `boot` method of one of your application's [service providers](/docs/{{version}}/providers), such as the `App\Providers\AppServiceProvider` service provider:

```php
<?php

namespace App\Providers;

use Illuminate\Support\Facades\Response;
use Illuminate\Support\ServiceProvider;

class AppServiceProvider extends ServiceProvider
{
    /**
     * Bootstrap any application services.
     */
    public function boot(): void
    {
        Response::macro('caps', function (string $value) {
            return Response::make(strtoupper($value));
        });
    }
}
```

The `macro` function accepts a name as its first argument and a closure as its second argument. The macro's closure will be executed when calling the macro name from a `ResponseFactory` implementation or the `response` helper:

```php
return response()->caps('foo');
```


---

# Laravel Reverb

*Sección: Laravel | Origen: https://laravel.com/docs/13.x/reverb*

- [Introduction](#introduction)
- [Installation](#installation)
- [Configuration](#configuration)
    - [Application Credentials](#application-credentials)
    - [Allowed Origins](#allowed-origins)
    - [Additional Applications](#additional-applications)
    - [SSL](#ssl)
- [Running the Server](#running-server)
    - [Debugging](#debugging)
    - [Restarting](#restarting)
- [Monitoring](#monitoring)
- [Running Reverb in Production](#production)
    - [Open Files](#open-files)
    - [Event Loop](#event-loop)
    - [Web Server](#web-server)
    - [Ports](#ports)
    - [Process Management](#process-management)
    - [Scaling](#scaling)
- [Events](#events)

<a name="introduction"></a>
## Introduction

[Laravel Reverb](https://github.com/laravel/reverb) brings blazing-fast and scalable real-time WebSocket communication directly to your Laravel application, and provides seamless integration with Laravel's existing suite of [event broadcasting tools](/docs/{{version}}/broadcasting).

<a name="installation"></a>
## Installation

You may install Reverb using the `install:broadcasting` Artisan command:

```shell
php artisan install:broadcasting
```

<a name="configuration"></a>
## Configuration

Behind the scenes, the `install:broadcasting` Artisan command will run the `reverb:install` command, which will install Reverb with a sensible set of default configuration options. If you would like to make any configuration changes, you may do so by updating Reverb's environment variables or by updating the `config/reverb.php` configuration file.

<a name="application-credentials"></a>
### Application Credentials

In order to establish a connection to Reverb, a set of Reverb "application" credentials must be exchanged between the client and server. These credentials are configured on the server and are used to verify the request from the client. You may define these credentials using the following environment variables:

```ini
REVERB_APP_ID=my-app-id
REVERB_APP_KEY=my-app-key
REVERB_APP_SECRET=my-app-secret
```

<a name="allowed-origins"></a>
### Allowed Origins

You may also define the origins from which client requests may originate by updating the value of the `allowed_origins` configuration value within the `apps` section of the `config/reverb.php` configuration file. Any requests from an origin not listed in your allowed origins will be rejected. You may allow all origins using `*`:

```php
'apps' => [
    [
        'app_id' => 'my-app-id',
        'allowed_origins' => ['laravel.com'],
        // ...
    ]
]
```

<a name="additional-applications"></a>
### Additional Applications

Typically, Reverb provides a WebSocket server for the application in which it is installed. However, it is possible to serve more than one application using a single Reverb installation.

For example, you may wish to maintain a single Laravel application which, via Reverb, provides WebSocket connectivity for multiple applications. This can be achieved by defining multiple `apps` in your application's `config/reverb.php` configuration file:

```php
'apps' => [
    [
        'app_id' => 'my-app-one',
        // ...
    ],
    [
        'app_id' => 'my-app-two',
        // ...
    ],
],
```

<a name="ssl"></a>
### SSL

In most cases, secure WebSocket connections are handled by the upstream web server (Nginx, etc.) before the request is proxied to your Reverb server.

However, it can sometimes be useful, such as during local development, for the Reverb server to handle secure connections directly. If you are using [Laravel Herd's](https://herd.laravel.com) secure site feature or you are using [Laravel Valet](/docs/{{version}}/valet) and have run the [secure command](/docs/{{version}}/valet#securing-sites) against your application, you may use the Herd / Valet certificate generated for your site to secure your Reverb connections. To do so, set the `REVERB_HOST` environment variable to your site's hostname or explicitly pass the hostname option when starting the Reverb server:

```shell
php artisan reverb:start --host="0.0.0.0" --port=8080 --hostname="laravel.test"
```

Since Herd and Valet domains resolve to `localhost`, running the command above will result in your Reverb server being accessible via the secure WebSocket protocol (`wss`) at `wss://laravel.test:8080`.

You may also manually choose a certificate by defining `tls` options in your application's `config/reverb.php` configuration file. Within the array of `tls` options, you may provide any of the options supported by [PHP's SSL context options](https://www.php.net/manual/en/context.ssl.php):

```php
'options' => [
    'tls' => [
        'local_cert' => '/path/to/cert.pem'
    ],
],
```

<a name="running-server"></a>
## Running the Server

The Reverb server can be started using the `reverb:start` Artisan command:

```shell
php artisan reverb:start
```

By default, the Reverb server will be started at `0.0.0.0:8080`, making it accessible from all network interfaces.

If you need to specify a custom host or port, you may do so via the `--host` and `--port` options when starting the server:

```shell
php artisan reverb:start --host=127.0.0.1 --port=9000
```

Alternatively, you may define `REVERB_SERVER_HOST` and `REVERB_SERVER_PORT` environment variables in your application's `.env` configuration file.

The `REVERB_SERVER_HOST` and `REVERB_SERVER_PORT` environment variables should not be confused with `REVERB_HOST` and `REVERB_PORT`. The former specify the host and port on which to run the Reverb server itself, while the latter pair instruct Laravel where to send broadcast messages. For example, in a production environment, you may route requests from your public Reverb hostname on port `443` to a Reverb server operating on `0.0.0.0:8080`. In this scenario, your environment variables would be defined as follows:

```ini
REVERB_SERVER_HOST=0.0.0.0
REVERB_SERVER_PORT=8080

REVERB_HOST=ws.laravel.com
REVERB_PORT=443
```

<a name="debugging"></a>
### Debugging

To improve performance, Reverb does not output any debug information by default. If you would like to see the stream of data passing through your Reverb server, you may provide the `--debug` option to the `reverb:start` command:

```shell
php artisan reverb:start --debug
```

<a name="restarting"></a>
### Restarting

Since Reverb is a long-running process, changes to your code will not be reflected without restarting the server via the `reverb:restart` Artisan command.

The `reverb:restart` command ensures all connections are gracefully terminated before stopping the server. If you are running Reverb with a process manager such as Supervisor, the server will be automatically restarted by the process manager after all connections have been terminated:

```shell
php artisan reverb:restart
```

<a name="monitoring"></a>
## Monitoring

Reverb may be monitored via an integration with [Laravel Pulse](/docs/{{version}}/pulse). By enabling Reverb's Pulse integration, you may track the number of connections and messages being handled by your server.

To enable the integration, you should first ensure you have [installed Pulse](/docs/{{version}}/pulse#installation). Then, add any of Reverb's recorders to your application's `config/pulse.php` configuration file:

```php
use Laravel\Reverb\Pulse\Recorders\ReverbConnections;
use Laravel\Reverb\Pulse\Recorders\ReverbMessages;

'recorders' => [
    ReverbConnections::class => [
        'sample_rate' => 1,
    ],

    ReverbMessages::class => [
        'sample_rate' => 1,
    ],

    // ...
],
```

Next, add the Pulse cards for each recorder to your [Pulse dashboard](/docs/{{version}}/pulse#dashboard-customization):

```blade
<x-pulse>
    <livewire:reverb.connections cols="full" />
    <livewire:reverb.messages cols="full" />
    ...
</x-pulse>
```

Connection activity is recorded by polling for new updates on a periodic basis. To ensure this information is rendered correctly on the Pulse dashboard, you must run the `pulse:check` daemon on your Reverb server. If you are running Reverb in a [horizontally scaled](#scaling) configuration, you should only run this daemon on one of your servers.

<a name="production"></a>
## Running Reverb in Production

Due to the long-running nature of WebSocket servers, you may need to make some optimizations to your server and hosting environment to ensure your Reverb server can effectively handle the optimal number of connections for the resources available on your server.

> [!NOTE]
> [Laravel Cloud](https://cloud.laravel.com) offers fully managed WebSocket infrastructure powered by Laravel Reverb clusters, allowing you to scale and ship Reverb enabled applications without managing infrastructure.

<a name="open-files"></a>
### Open Files

Each WebSocket connection is held in memory until either the client or server disconnects. In Unix and Unix-like environments, each connection is represented by a file. However, there are often limits on the number of allowed open files at both the operating system and application level.

<a name="operating-system"></a>
#### Operating System

On a Unix based operating system, you may determine the allowed number of open files using the `ulimit` command:

```shell
ulimit -n
```

This command will display the open file limits allowed for different users. You may update these values by editing the `/etc/security/limits.conf` file. For example, updating the maximum number of open files to 10,000 for the `forge` user would look like the following:

```ini
# /etc/security/limits.conf
forge        soft  nofile  10000
forge        hard  nofile  10000
```

<a name="event-loop"></a>
### Event Loop

Under the hood, Reverb uses a ReactPHP event loop to manage WebSocket connections on the server. By default, this event loop is powered by `stream_select`, which doesn't require any additional extensions. However, `stream_select` is typically limited to 1,024 open files. As such, if you plan to handle more than 1,000 concurrent connections, you will need to use an alternative event loop not bound to the same restrictions.

Reverb will automatically switch to an `ext-uv` powered loop when available. This PHP extension is available for install via PECL:

```shell
pecl install uv
```

<a name="web-server"></a>
### Web Server

In most cases, Reverb runs on a non web-facing port on your server. So, in order to route traffic to Reverb, you should configure a reverse proxy. Assuming Reverb is running on host `0.0.0.0` and port `8080` and your server utilizes the Nginx web server, a reverse proxy can be defined for your Reverb server using the following Nginx site configuration:

```nginx
server {
    ...

    location / {
        proxy_http_version 1.1;
        proxy_set_header Host $http_host;
        proxy_set_header Scheme $scheme;
        proxy_set_header SERVER_PORT $server_port;
        proxy_set_header REMOTE_ADDR $remote_addr;
        proxy_set_header X-Forwarded-For $proxy_add_x_forwarded_for;
        proxy_set_header Upgrade $http_upgrade;
        proxy_set_header Connection "Upgrade";

        proxy_pass http://0.0.0.0:8080;
    }

    ...
}
```

> [!WARNING]
> Reverb listens for WebSocket connections at `/app` and handles API requests at `/apps`. You should ensure the web server handling Reverb requests can serve both of these URIs. If you are using [Laravel Forge](https://forge.laravel.com) to manage your servers, your Reverb server will be correctly configured by default.

Typically, web servers are configured to limit the number of allowed connections in order to prevent overloading the server. To increase the number of allowed connections on an Nginx web server to 10,000, the `worker_rlimit_nofile` and `worker_connections` values of the `nginx.conf` file should be updated:

```nginx
user forge;
worker_processes auto;
pid /run/nginx.pid;
include /etc/nginx/modules-enabled/*.conf;
worker_rlimit_nofile 10000;

events {
  worker_connections 10000;
  multi_accept on;
}
```

The configuration above will allow up to 10,000 Nginx workers per process to be spawned. In addition, this configuration sets Nginx's open file limit to 10,000.

<a name="ports"></a>
### Ports

Unix-based operating systems typically limit the number of ports which can be opened on the server. You may see the current allowed range via the following command:

```shell
cat /proc/sys/net/ipv4/ip_local_port_range
# 32768	60999
```

The output above shows the server can handle a maximum of 28,231 (60,999 - 32,768) connections since each connection requires a free port. Although we recommend [horizontal scaling](#scaling) to increase the number of allowed connections, you may increase the number of available open ports by updating the allowed port range in your server's `/etc/sysctl.conf` configuration file.

<a name="process-management"></a>
### Process Management

In most cases, you should use a process manager such as Supervisor to ensure the Reverb server is continually running. If you are using Supervisor to run Reverb, you should update the `minfds` setting of your server's `supervisor.conf` file to ensure Supervisor is able to open the files required to handle connections to your Reverb server:

```ini
[supervisord]
...
minfds=10000
```

<a name="scaling"></a>
### Scaling

If you need to handle more connections than a single server will allow, you may scale your Reverb server horizontally. Utilizing the publish / subscribe capabilities of Redis, Reverb is able to manage connections across multiple servers. When a message is received by one of your application's Reverb servers, the server will use Redis to publish the incoming message to all other servers.

To enable horizontal scaling, you should set the `REVERB_SCALING_ENABLED` environment variable to `true` in your application's `.env` configuration file:

```env
REVERB_SCALING_ENABLED=true
```

Next, you should have a dedicated, central Redis server to which all of the Reverb servers will communicate. Reverb will use the [default Redis connection configured for your application](/docs/{{version}}/redis#configuration) to publish messages to all of your Reverb servers.

Once you have enabled Reverb's scaling option and configured a Redis server, you may simply invoke the `reverb:start` command on multiple servers that are able to communicate with your Redis server. These Reverb servers should be placed behind a load balancer that distributes incoming requests evenly among the servers.

<a name="events"></a>
## Events

Reverb dispatches internal events during the lifecycle of a connection and message handling. You may [listen for these events](/docs/{{version}}/events) to perform actions when connections are managed or messages are exchanged.

The following events are dispatched by Reverb:

#### `Laravel\Reverb\Events\ChannelCreated`

Dispatched when a channel is created. This typically occurs when the first connection subscribes to a specific channel. The event receives the `Laravel\Reverb\Protocols\Pusher\Channel` instance.

#### `Laravel\Reverb\Events\ChannelRemoved`

Dispatched when a channel is removed. This typically occurs when the last connection unsubscribes from a channel. The event receives the `Laravel\Reverb\Protocols\Pusher\Channel` instance.

#### `Laravel\Reverb\Events\ConnectionPruned`

Dispatched when a stale connection is pruned by the server. The event receives the `Laravel\Reverb\Contracts\Connection` instance.

#### `Laravel\Reverb\Events\MessageReceived`

Dispatched when a message is received from a client connection. The event receives the `Laravel\Reverb\Contracts\Connection` instance and the raw string `$message`.

#### `Laravel\Reverb\Events\MessageSent`

Dispatched when a message is sent to a client connection. The event receives the `Laravel\Reverb\Contracts\Connection` instance and the raw string `$message`.


---

# Routing

*Sección: Laravel | Origen: https://laravel.com/docs/13.x/routing*

- [Basic Routing](#basic-routing)
    - [The Default Route Files](#the-default-route-files)
    - [Redirect Routes](#redirect-routes)
    - [View Routes](#view-routes)
    - [Listing Your Routes](#listing-your-routes)
    - [Routing Customization](#routing-customization)
- [Route Parameters](#route-parameters)
    - [Required Parameters](#required-parameters)
    - [Optional Parameters](#parameters-optional-parameters)
    - [Regular Expression Constraints](#parameters-regular-expression-constraints)
- [Named Routes](#named-routes)
- [Route Groups](#route-groups)
    - [Middleware](#route-group-middleware)
    - [Controllers](#route-group-controllers)
    - [Subdomain Routing](#route-group-subdomain-routing)
    - [Route Prefixes](#route-group-prefixes)
    - [Route Name Prefixes](#route-group-name-prefixes)
- [Route Model Binding](#route-model-binding)
    - [Implicit Binding](#implicit-binding)
    - [Implicit Enum Binding](#implicit-enum-binding)
    - [Explicit Binding](#explicit-binding)
- [Fallback Routes](#fallback-routes)
- [Rate Limiting](#rate-limiting)
    - [Defining Rate Limiters](#defining-rate-limiters)
    - [Attaching Rate Limiters to Routes](#attaching-rate-limiters-to-routes)
- [Form Method Spoofing](#form-method-spoofing)
- [Accessing the Current Route](#accessing-the-current-route)
- [Cross-Origin Resource Sharing (CORS)](#cors)
- [Route Caching](#route-caching)

<a name="basic-routing"></a>
## Basic Routing

The most basic Laravel routes accept a URI and a closure, providing a very simple and expressive method of defining routes and behavior without complicated routing configuration files:

```php
use Illuminate\Support\Facades\Route;

Route::get('/greeting', function () {
    return 'Hello World';
});
```

<a name="the-default-route-files"></a>
### The Default Route Files

All Laravel routes are defined in your route files, which are located in the `routes` directory. These files are automatically loaded by Laravel using the configuration specified in your application's `bootstrap/app.php` file. The `routes/web.php` file defines routes that are for your web interface. These routes are assigned the `web` [middleware group](/docs/{{version}}/middleware#laravels-default-middleware-groups), which provides features like session state and CSRF protection.

For most applications, you will begin by defining routes in your `routes/web.php` file. The routes defined in `routes/web.php` may be accessed by entering the defined route's URL in your browser. For example, you may access the following route by navigating to `http://example.com/user` in your browser:

```php
use App\Http\Controllers\UserController;

Route::get('/user', [UserController::class, 'index']);
```

<a name="api-routes"></a>
#### API Routes

If your application will also offer a stateless API, you may enable API routing using the `install:api` Artisan command:

```shell
php artisan install:api
```

The `install:api` command installs [Laravel Sanctum](/docs/{{version}}/sanctum), which provides a robust, yet simple API token authentication guard which can be used to authenticate third-party API consumers, SPAs, or mobile applications. In addition, the `install:api` command creates the `routes/api.php` file:

```php
Route::get('/user', function (Request $request) {
    return $request->user();
})->middleware('auth:sanctum');
```

Of course, you are free to omit the `auth:sanctum` middleware on routes that should be publicly accessible.

The routes in `routes/api.php` are stateless and are assigned to the `api` [middleware group](/docs/{{version}}/middleware#laravels-default-middleware-groups). Additionally, the `/api` URI prefix is automatically applied to these routes, so you do not need to manually apply it to every route in the file. You may change the prefix by modifying your application's `bootstrap/app.php` file:

```php
->withRouting(
    api: __DIR__.'/../routes/api.php',
    apiPrefix: 'api/admin',
    // ...
)
```

<a name="available-router-methods"></a>
#### Available Router Methods

The router allows you to register routes that respond to any HTTP verb:

```php
Route::get($uri, $callback);
Route::post($uri, $callback);
Route::put($uri, $callback);
Route::patch($uri, $callback);
Route::delete($uri, $callback);
Route::options($uri, $callback);
```

Sometimes you may need to register a route that responds to multiple HTTP verbs. You may do so using the `match` method. Or, you may even register a route that responds to all HTTP verbs using the `any` method:

```php
Route::match(['get', 'post'], '/', function () {
    // ...
});

Route::any('/', function () {
    // ...
});
```

> [!NOTE]
> When defining multiple routes that share the same URI, routes using the `get`, `post`, `put`, `patch`, `delete`, and `options` methods should be defined before routes using the `any`, `match`, and `redirect` methods. This ensures the incoming request is matched with the correct route.

<a name="dependency-injection"></a>
#### Dependency Injection

You may type-hint any dependencies required by your route in your route's callback signature. The declared dependencies will automatically be resolved and injected into the callback by the Laravel [service container](/docs/{{version}}/container). For example, you may type-hint the `Illuminate\Http\Request` class to have the current HTTP request automatically injected into your route callback:

```php
use Illuminate\Http\Request;

Route::get('/users', function (Request $request) {
    // ...
});
```

<a name="csrf-protection"></a>
#### CSRF Protection

Remember, any HTML forms pointing to `POST`, `PUT`, `PATCH`, or `DELETE` routes that are defined in the `web` routes file should include a CSRF token field. Otherwise, the request will be rejected. You can read more about CSRF protection in the [CSRF documentation](/docs/{{version}}/csrf):

```blade
<form method="POST" action="/profile">
    @csrf
    ...
</form>
```

<a name="redirect-routes"></a>
### Redirect Routes

If you are defining a route that redirects to another URI, you may use the `Route::redirect` method. This method provides a convenient shortcut so that you do not have to define a full route or controller for performing a simple redirect:

```php
Route::redirect('/here', '/there');
```

By default, `Route::redirect` returns a `302` status code. You may customize the status code using the optional third parameter:

```php
Route::redirect('/here', '/there', 301);
```

Or, you may use the `Route::permanentRedirect` method to return a `301` status code:

```php
Route::permanentRedirect('/here', '/there');
```

> [!WARNING]
> When using route parameters in redirect routes, the following parameters are reserved by Laravel and cannot be used: `destination` and `status`.

<a name="view-routes"></a>
### View Routes

If your route only needs to return a [view](/docs/{{version}}/views), you may use the `Route::view` method. Like the `redirect` method, this method provides a simple shortcut so that you do not have to define a full route or controller. The `view` method accepts a URI as its first argument and a view name as its second argument. In addition, you may provide an array of data to pass to the view as an optional third argument:

```php
Route::view('/welcome', 'welcome');

Route::view('/welcome', 'welcome', ['name' => 'Taylor']);
```

> [!WARNING]
> When using route parameters in view routes, the following parameters are reserved by Laravel and cannot be used: `view`, `data`, `status`, and `headers`.

<a name="listing-your-routes"></a>
### Listing Your Routes

The `route:list` Artisan command can easily provide an overview of all of the routes that are defined by your application:

```shell
php artisan route:list
```

By default, the route middleware that are assigned to each route will not be displayed in the `route:list` output; however, you can instruct Laravel to display the route middleware and middleware group names by adding the `-v` option to the command:

```shell
php artisan route:list -v

# Expand middleware groups...
php artisan route:list -vv
```

You may also instruct Laravel to only show routes that begin with a given URI:

```shell
php artisan route:list --path=api
```

In addition, you may instruct Laravel to hide any routes that are defined by third-party packages by providing the `--except-vendor` option when executing the `route:list` command:

```shell
php artisan route:list --except-vendor
```

Likewise, you may also instruct Laravel to only show routes that are defined by third-party packages by providing the `--only-vendor` option when executing the `route:list` command:

```shell
php artisan route:list --only-vendor
```

<a name="routing-customization"></a>
### Routing Customization

By default, your application's routes are configured and loaded by the `bootstrap/app.php` file:

```php
<?php

use Illuminate\Foundation\Application;

return Application::configure(basePath: dirname(__DIR__))
    ->withRouting(
        web: __DIR__.'/../routes/web.php',
        commands: __DIR__.'/../routes/console.php',
        health: '/up',
    )->create();
```

However, sometimes you may want to define an entirely new file to contain a subset of your application's routes. To accomplish this, you may provide a `then` closure to the `withRouting` method. Within this closure, you may register any additional routes that are necessary for your application:

```php
use Illuminate\Support\Facades\Route;

->withRouting(
    web: __DIR__.'/../routes/web.php',
    commands: __DIR__.'/../routes/console.php',
    health: '/up',
    then: function () {
        Route::middleware('api')
            ->prefix('webhooks')
            ->name('webhooks.')
            ->group(base_path('routes/webhooks.php'));
    },
)
```

Or, you may even take complete control over route registration by providing a `using` closure to the `withRouting` method. When this argument is passed, no HTTP routes will be registered by the framework and you are responsible for manually registering all routes:

```php
use Illuminate\Support\Facades\Route;

->withRouting(
    commands: __DIR__.'/../routes/console.php',
    using: function () {
        Route::middleware('api')
            ->prefix('api')
            ->group(base_path('routes/api.php'));

        Route::middleware('web')
            ->group(base_path('routes/web.php'));
    },
)
```

<a name="route-parameters"></a>
## Route Parameters

<a name="required-parameters"></a>
### Required Parameters

Sometimes you will need to capture segments of the URI within your route. For example, you may need to capture a user's ID from the URL. You may do so by defining route parameters:

```php
Route::get('/user/{id}', function (string $id) {
    return 'User '.$id;
});
```

You may define as many route parameters as required by your route:

```php
Route::get('/posts/{post}/comments/{comment}', function (string $postId, string $commentId) {
    // ...
});
```

Route parameters are always encased within `{}` braces and should consist of alphabetic characters. Underscores (`_`) are also acceptable within route parameter names. Route parameters are injected into route callbacks / controllers based on their order - the names of the route callback / controller arguments do not matter.

<a name="parameters-and-dependency-injection"></a>
#### Parameters and Dependency Injection

If your route has dependencies that you would like the Laravel service container to automatically inject into your route's callback, you should list your route parameters after your dependencies:

```php
use Illuminate\Http\Request;

Route::get('/user/{id}', function (Request $request, string $id) {
    return 'User '.$id;
});
```

<a name="parameters-optional-parameters"></a>
### Optional Parameters

Occasionally you may need to specify a route parameter that may not always be present in the URI. You may do so by placing a `?` mark after the parameter name. Make sure to give the route's corresponding variable a default value:

```php
Route::get('/user/{name?}', function (?string $name = null) {
    return $name;
});

Route::get('/user/{name?}', function (?string $name = 'John') {
    return $name;
});
```

<a name="parameters-regular-expression-constraints"></a>
### Regular Expression Constraints

You may constrain the format of your route parameters using the `where` method on a route instance. The `where` method accepts the name of the parameter and a regular expression defining how the parameter should be constrained:

```php
Route::get('/user/{name}', function (string $name) {
    // ...
})->where('name', '[A-Za-z]+');

Route::get('/user/{id}', function (string $id) {
    // ...
})->where('id', '[0-9]+');

Route::get('/user/{id}/{name}', function (string $id, string $name) {
    // ...
})->where(['id' => '[0-9]+', 'name' => '[a-z]+']);
```

For convenience, some commonly used regular expression patterns have helper methods that allow you to quickly add pattern constraints to your routes:

```php
Route::get('/user/{id}/{name}', function (string $id, string $name) {
    // ...
})->whereNumber('id')->whereAlpha('name');

Route::get('/user/{name}', function (string $name) {
    // ...
})->whereAlphaNumeric('name');

Route::get('/user/{id}', function (string $id) {
    // ...
})->whereUuid('id');

Route::get('/user/{id}', function (string $id) {
    // ...
})->whereUlid('id');

Route::get('/category/{category}', function (string $category) {
    // ...
})->whereIn('category', ['movie', 'song', 'painting']);

Route::get('/category/{category}', function (string $category) {
    // ...
})->whereIn('category', CategoryEnum::cases());
```

If the incoming request does not match the route pattern constraints, a 404 HTTP response will be returned.

<a name="parameters-global-constraints"></a>
#### Global Constraints

If you would like a route parameter to always be constrained by a given regular expression, you may use the `pattern` method. You should define these patterns in the `boot` method of your application's `App\Providers\AppServiceProvider` class:

```php
use Illuminate\Support\Facades\Route;

/**
 * Bootstrap any application services.
 */
public function boot(): void
{
    Route::pattern('id', '[0-9]+');
}
```

Once the pattern has been defined, it is automatically applied to all routes using that parameter name:

```php
Route::get('/user/{id}', function (string $id) {
    // Only executed if {id} is numeric...
});
```

<a name="parameters-encoded-forward-slashes"></a>
#### Encoded Forward Slashes

The Laravel routing component allows all characters except `/` to be present within route parameter values. You must explicitly allow `/` to be part of your placeholder using a `where` condition regular expression:

```php
Route::get('/search/{search}', function (string $search) {
    return $search;
})->where('search', '.*');
```

> [!WARNING]
> Encoded forward slashes are only supported within the last route segment.

<a name="named-routes"></a>
## Named Routes

Named routes allow the convenient generation of URLs or redirects for specific routes. You may specify a name for a route by chaining the `name` method onto the route definition:

```php
Route::get('/user/profile', function () {
    // ...
})->name('profile');
```

You may also specify route names for controller actions:

```php
Route::get(
    '/user/profile',
    [UserProfileController::class, 'show']
)->name('profile');
```

> [!WARNING]
> Route names should always be unique.

<a name="generating-urls-to-named-routes"></a>
#### Generating URLs to Named Routes

Once you have assigned a name to a given route, you may use the route's name when generating URLs or redirects via Laravel's `route` and `redirect` helper functions:

```php
// Generating URLs...
$url = route('profile');

// Generating Redirects...
return redirect()->route('profile');

return to_route('profile');
```

If the named route defines parameters, you may pass the parameters as the second argument to the `route` function. The given parameters will automatically be inserted into the generated URL in their correct positions:

```php
Route::get('/user/{id}/profile', function (string $id) {
    // ...
})->name('profile');

$url = route('profile', ['id' => 1]);
```

If you pass additional parameters in the array, those key / value pairs will automatically be added to the generated URL's query string:

```php
Route::get('/user/{id}/profile', function (string $id) {
    // ...
})->name('profile');

$url = route('profile', ['id' => 1, 'photos' => 'yes']);

// http://example.com/user/1/profile?photos=yes
```

> [!NOTE]
> Sometimes, you may wish to specify request-wide default values for URL parameters, such as the current locale. To accomplish this, you may use the [URL::defaults method](/docs/{{version}}/urls#default-values).

<a name="inspecting-the-current-route"></a>
#### Inspecting the Current Route

If you would like to determine if the current request was routed to a given named route, you may use the `named` method on a Route instance. For example, you may check the current route name from a route middleware:

```php
use Closure;
use Illuminate\Http\Request;
use Symfony\Component\HttpFoundation\Response;

/**
 * Handle an incoming request.
 *
 * @param  \Closure(\Illuminate\Http\Request): (\Symfony\Component\HttpFoundation\Response)  $next
 */
public function handle(Request $request, Closure $next): Response
{
    if ($request->route()->named('profile')) {
        // ...
    }

    return $next($request);
}
```

<a name="route-groups"></a>
## Route Groups

Route groups allow you to share route attributes, such as middleware, across a large number of routes without needing to define those attributes on each individual route.

Nested groups attempt to intelligently "merge" attributes with their parent group. Middleware and `where` conditions are merged while names and prefixes are appended. Namespace delimiters and slashes in URI prefixes are automatically added where appropriate.

<a name="route-group-middleware"></a>
### Middleware

To assign [middleware](/docs/{{version}}/middleware) to all routes within a group, you may use the `middleware` method before defining the group. Middleware are executed in the order they are listed in the array:

```php
Route::middleware(['first', 'second'])->group(function () {
    Route::get('/', function () {
        // Uses first & second middleware...
    });

    Route::get('/user/profile', function () {
        // Uses first & second middleware...
    });
});
```

<a name="route-group-controllers"></a>
### Controllers

If a group of routes all utilize the same [controller](/docs/{{version}}/controllers), you may use the `controller` method to define the common controller for all of the routes within the group. Then, when defining the routes, you only need to provide the controller method that they invoke:

```php
use App\Http\Controllers\OrderController;

Route::controller(OrderController::class)->group(function () {
    Route::get('/orders/{id}', 'show');
    Route::post('/orders', 'store');
});
```

<a name="route-group-subdomain-routing"></a>
### Subdomain Routing

Route groups may also be used to handle subdomain routing. Subdomains may be assigned route parameters just like route URIs, allowing you to capture a portion of the subdomain for usage in your route or controller. The subdomain may be specified by calling the `domain` method before defining the group:

```php
Route::domain('{account}.example.com')->group(function () {
    Route::get('/user/{id}', function (string $account, string $id) {
        // ...
    });
});
```

<a name="route-group-prefixes"></a>
### Route Prefixes

The `prefix` method may be used to prefix each route in the group with a given URI. For example, you may want to prefix all route URIs within the group with `admin`:

```php
Route::prefix('admin')->group(function () {
    Route::get('/users', function () {
        // Matches The "/admin/users" URL
    });
});
```

<a name="route-group-name-prefixes"></a>
### Route Name Prefixes

The `name` method may be used to prefix each route name in the group with a given string. For example, you may want to prefix the names of all of the routes in the group with `admin`. The given string is prefixed to the route name exactly as it is specified, so we will be sure to provide the trailing `.` character in the prefix:

```php
Route::name('admin.')->group(function () {
    Route::get('/users', function () {
        // Route assigned name "admin.users"...
    })->name('users');
});
```

<a name="route-model-binding"></a>
## Route Model Binding

When injecting a model ID to a route or controller action, you will often query the database to retrieve the model that corresponds to that ID. Laravel route model binding provides a convenient way to automatically inject the model instances directly into your routes. For example, instead of injecting a user's ID, you can inject the entire `User` model instance that matches the given ID.

<a name="implicit-binding"></a>
### Implicit Binding

Laravel automatically resolves Eloquent models defined in routes or controller actions whose type-hinted variable names match a route segment name. For example:

```php
use App\Models\User;

Route::get('/users/{user}', function (User $user) {
    return $user->email;
});
```

Since the `$user` variable is type-hinted as the `App\Models\User` Eloquent model and the variable name matches the `{user}` URI segment, Laravel will automatically inject the model instance that has an ID matching the corresponding value from the request URI. If a matching model instance is not found in the database, a 404 HTTP response will automatically be generated.

Of course, implicit binding is also possible when using controller methods. Again, note the `{user}` URI segment matches the `$user` variable in the controller which contains an `App\Models\User` type-hint:

```php
use App\Http\Controllers\UserController;
use App\Models\User;

// Route definition...
Route::get('/users/{user}', [UserController::class, 'show']);

// Controller method definition...
public function show(User $user)
{
    return view('user.profile', ['user' => $user]);
}
```

<a name="implicit-soft-deleted-models"></a>
#### Soft Deleted Models

Typically, implicit model binding will not retrieve models that have been [soft deleted](/docs/{{version}}/eloquent#soft-deleting). However, you may instruct the implicit binding to retrieve these models by chaining the `withTrashed` method onto your route's definition:

```php
use App\Models\User;

Route::get('/users/{user}', function (User $user) {
    return $user->email;
})->withTrashed();
```

<a name="customizing-the-default-key-name"></a>
#### Customizing the Key

Sometimes you may wish to resolve Eloquent models using a column other than `id`. To do so, you may specify the column in the route parameter definition:

```php
use App\Models\Post;

Route::get('/posts/{post:slug}', function (Post $post) {
    return $post;
});
```

If you would like model binding to always use a database column other than `id` when retrieving a given model class, you may apply the `RouteKey` attribute to the Eloquent model:

```php
use Illuminate\Database\Eloquent\Attributes\RouteKey;
use Illuminate\Database\Eloquent\Model;

#[RouteKey('slug')]
class Post extends Model
{
    // ...
}
```

<a name="implicit-model-binding-scoping"></a>
#### Custom Keys and Scoping

When implicitly binding multiple Eloquent models in a single route definition, you may wish to scope the second Eloquent model such that it must be a child of the previous Eloquent model. For example, consider this route definition that retrieves a blog post by slug for a specific user:

```php
use App\Models\Post;
use App\Models\User;

Route::get('/users/{user}/posts/{post:slug}', function (User $user, Post $post) {
    return $post;
});
```

When using a custom keyed implicit binding as a nested route parameter, Laravel will automatically scope the query to retrieve the nested model by its parent using conventions to guess the relationship name on the parent. In this case, it will be assumed that the `User` model has a relationship named `posts` (the plural form of the route parameter name) which can be used to retrieve the `Post` model.

If you wish, you may instruct Laravel to scope "child" bindings even when a custom key is not provided. To do so, you may invoke the `scopeBindings` method when defining your route:

```php
use App\Models\Post;
use App\Models\User;

Route::get('/users/{user}/posts/{post}', function (User $user, Post $post) {
    return $post;
})->scopeBindings();
```

Or, you may instruct an entire group of route definitions to use scoped bindings:

```php
Route::scopeBindings()->group(function () {
    Route::get('/users/{user}/posts/{post}', function (User $user, Post $post) {
        return $post;
    });
});
```

Similarly, you may explicitly instruct Laravel to not scope bindings by invoking the `withoutScopedBindings` method:

```php
Route::get('/users/{user}/posts/{post:slug}', function (User $user, Post $post) {
    return $post;
})->withoutScopedBindings();
```

<a name="customizing-missing-model-behavior"></a>
#### Customizing Missing Model Behavior

Typically, a 404 HTTP response will be generated if an implicitly bound model is not found. However, you may customize this behavior by calling the `missing` method when defining your route. The `missing` method accepts a closure that will be invoked if an implicitly bound model cannot be found:

```php
use App\Http\Controllers\LocationsController;
use Illuminate\Http\Request;
use Illuminate\Support\Facades\Redirect;

Route::get('/locations/{location:slug}', [LocationsController::class, 'show'])
    ->name('locations.view')
    ->missing(function (Request $request) {
        return Redirect::route('locations.index');
    });
```

<a name="implicit-enum-binding"></a>
### Implicit Enum Binding

PHP 8.1 introduced support for [Enums](https://www.php.net/manual/en/language.enumerations.backed.php). To complement this feature, Laravel allows you to type-hint a [string-backed Enum](https://www.php.net/manual/en/language.enumerations.backed.php) on your route definition and Laravel will only invoke the route if that route segment corresponds to a valid Enum value. Otherwise, a 404 HTTP response will be returned automatically. For example, given the following Enum:

```php
<?php

namespace App\Enums;

enum Category: string
{
    case Fruits = 'fruits';
    case People = 'people';
}
```

You may define a route that will only be invoked if the `{category}` route segment is `fruits` or `people`. Otherwise, Laravel will return a 404 HTTP response:

```php
use App\Enums\Category;
use Illuminate\Support\Facades\Route;

Route::get('/categories/{category}', function (Category $category) {
    return $category->value;
});
```

<a name="explicit-binding"></a>
### Explicit Binding

You are not required to use Laravel's implicit, convention based model resolution in order to use model binding. You can also explicitly define how route parameters correspond to models. To register an explicit binding, use the router's `model` method to specify the class for a given parameter. You should define your explicit model bindings at the beginning of the `boot` method of your `AppServiceProvider` class:

```php
use App\Models\User;
use Illuminate\Support\Facades\Route;

/**
 * Bootstrap any application services.
 */
public function boot(): void
{
    Route::model('user', User::class);
}
```

Next, define a route that contains a `{user}` parameter:

```php
use App\Models\User;

Route::get('/users/{user}', function (User $user) {
    // ...
});
```

Since we have bound all `{user}` parameters to the `App\Models\User` model, an instance of that class will be injected into the route. So, for example, a request to `users/1` will inject the `User` instance from the database which has an ID of `1`.

If a matching model instance is not found in the database, a 404 HTTP response will be automatically generated.

<a name="customizing-the-resolution-logic"></a>
#### Customizing the Resolution Logic

If you wish to define your own model binding resolution logic, you may use the `Route::bind` method. The closure you pass to the `bind` method will receive the value of the URI segment and should return the instance of the class that should be injected into the route. Again, this customization should take place in the `boot` method of your application's `AppServiceProvider`:

```php
use App\Models\User;
use Illuminate\Support\Facades\Route;

/**
 * Bootstrap any application services.
 */
public function boot(): void
{
    Route::bind('user', function (string $value) {
        return User::where('name', $value)->firstOrFail();
    });
}
```

Alternatively, you may override the `resolveRouteBinding` method on your Eloquent model. This method will receive the value of the URI segment and should return the instance of the class that should be injected into the route:

```php
/**
 * Retrieve the model for a bound value.
 *
 * @param  mixed  $value
 * @param  string|null  $field
 * @return \Illuminate\Database\Eloquent\Model|null
 */
public function resolveRouteBinding($value, $field = null)
{
    return $this->where('name', $value)->firstOrFail();
}
```

If a route is utilizing [implicit binding scoping](#implicit-model-binding-scoping), the `resolveChildRouteBinding` method will be used to resolve the child binding of the parent model:

```php
/**
 * Retrieve the child model for a bound value.
 *
 * @param  string  $childType
 * @param  mixed  $value
 * @param  string|null  $field
 * @return \Illuminate\Database\Eloquent\Model|null
 */
public function resolveChildRouteBinding($childType, $value, $field)
{
    return parent::resolveChildRouteBinding($childType, $value, $field);
}
```

<a name="fallback-routes"></a>
## Fallback Routes

Using the `Route::fallback` method, you may define a route that will be executed when no other route matches the incoming request. Typically, unhandled requests will automatically render a "404" page via your application's exception handler. However, since you would typically define the `fallback` route within your `routes/web.php` file, all middleware in the `web` middleware group will apply to the route. You are free to add additional middleware to this route as needed:

```php
Route::fallback(function () {
    // ...
});
```

<a name="rate-limiting"></a>
## Rate Limiting

<a name="defining-rate-limiters"></a>
### Defining Rate Limiters

Laravel includes powerful and customizable rate limiting services that you may utilize to restrict the amount of traffic for a given route or group of routes. To get started, you should define rate limiter configurations that meet your application's needs.

Rate limiters may be defined within the `boot` method of your application's `App\Providers\AppServiceProvider` class:

```php
use Illuminate\Cache\RateLimiting\Limit;
use Illuminate\Http\Request;
use Illuminate\Support\Facades\RateLimiter;

/**
 * Bootstrap any application services.
 */
public function boot(): void
{
    RateLimiter::for('api', function (Request $request) {
        return Limit::perMinute(60)->by($request->user()?->id ?: $request->ip());
    });
}
```

Rate limiters are defined using the `RateLimiter` facade's `for` method. The `for` method accepts a rate limiter name and a closure that returns the limit configuration that should apply to routes that are assigned to the rate limiter. Limit configuration are instances of the `Illuminate\Cache\RateLimiting\Limit` class. This class contains helpful "builder" methods so that you can quickly define your limit. The rate limiter name may be any string you wish:

```php
use Illuminate\Cache\RateLimiting\Limit;
use Illuminate\Http\Request;
use Illuminate\Support\Facades\RateLimiter;

/**
 * Bootstrap any application services.
 */
public function boot(): void
{
    RateLimiter::for('global', function (Request $request) {
        return Limit::perMinute(1000);
    });
}
```

If the incoming request exceeds the specified rate limit, a response with a 429 HTTP status code will automatically be returned by Laravel. If you would like to define your own response that should be returned by a rate limit, you may use the `response` method:

```php
RateLimiter::for('global', function (Request $request) {
    return Limit::perMinute(1000)->response(function (Request $request, array $headers) {
        return response('Custom response...', 429, $headers);
    });
});
```

Since rate limiter callbacks receive the incoming HTTP request instance, you may build the appropriate rate limit dynamically based on the incoming request or authenticated user:

```php
RateLimiter::for('uploads', function (Request $request) {
    return $request->user()?->vipCustomer()
        ? Limit::none()
        : Limit::perHour(10);
});
```

<a name="segmenting-rate-limits"></a>
#### Segmenting Rate Limits

Sometimes you may wish to segment rate limits by some arbitrary value. For example, you may wish to allow users to access a given route 100 times per minute per IP address. To accomplish this, you may use the `by` method when building your rate limit:

```php
RateLimiter::for('uploads', function (Request $request) {
    return $request->user()->vipCustomer()
        ? Limit::none()
        : Limit::perMinute(100)->by($request->ip());
});
```

To illustrate this feature using another example, we can limit access to the route to 100 times per minute per authenticated user ID or 10 times per minute per IP address for guests:

```php
RateLimiter::for('uploads', function (Request $request) {
    return $request->user()
        ? Limit::perMinute(100)->by($request->user()->id)
        : Limit::perMinute(10)->by($request->ip());
});
```

<a name="multiple-rate-limits"></a>
#### Multiple Rate Limits

If needed, you may return an array of rate limits for a given rate limiter configuration. Each rate limit will be evaluated for the route based on the order they are placed within the array:

```php
RateLimiter::for('login', function (Request $request) {
    return [
        Limit::perMinute(500),
        Limit::perMinute(3)->by($request->input('email')),
    ];
});
```

If you're assigning multiple rate limits segmented by identical `by` values, you should ensure that each `by` value is unique. The easiest way to achieve this is to prefix the values given to the `by` method:

```php
RateLimiter::for('uploads', function (Request $request) {
    return [
        Limit::perMinute(10)->by('minute:'.$request->user()->id),
        Limit::perDay(1000)->by('day:'.$request->user()->id),
    ];
});
```

<a name="response-base-rate-limiting"></a>
#### Response-Based Rate Limiting

In addition to rate limiting incoming requests, Laravel allows you to rate limit based on the response using the `after` method. This is useful when you only want to count certain responses toward the rate limit, such as validation errors, 404 responses, or other specific HTTP status codes.

The `after` method accepts a closure that receives the response and should return `true` if the response should be counted toward the rate limit, or `false` if it should be ignored. This is particularly useful for preventing enumeration attacks by limiting consecutive 404 responses, or allowing users to retry requests that fail validation without exhausting their rate limit on an endpoint that should only throttle successful operations:

```php
use Illuminate\Cache\RateLimiting\Limit;
use Illuminate\Http\Request;
use Illuminate\Support\Facades\RateLimiter;
use Symfony\Component\HttpFoundation\Response;

RateLimiter::for('resource-not-found', function (Request $request) {
    return Limit::perMinute(10)
        ->by($request->user()?->id ?: $request->ip())
        ->after(function (Response $response) {
            // Only count 404 responses toward the rate limit to prevent enumeration...
            return $response->status() === 404;
        });
});
```

<a name="attaching-rate-limiters-to-routes"></a>
### Attaching Rate Limiters to Routes

Rate limiters may be attached to routes or route groups using the `throttle` [middleware](/docs/{{version}}/middleware). The throttle middleware accepts the name of the rate limiter you wish to assign to the route:

```php
Route::middleware(['throttle:uploads'])->group(function () {
    Route::post('/audio', function () {
        // ...
    });

    Route::post('/video', function () {
        // ...
    });
});
```

<a name="throttling-with-redis"></a>
#### Throttling With Redis

By default, the `throttle` middleware is mapped to the `Illuminate\Routing\Middleware\ThrottleRequests` class. However, if you are using Redis as your application's cache driver, you may wish to instruct Laravel to use Redis to manage rate limiting. To do so, you should use the `throttleWithRedis` method in your application's `bootstrap/app.php` file. This method maps the `throttle` middleware to the `Illuminate\Routing\Middleware\ThrottleRequestsWithRedis` middleware class:

```php
->withMiddleware(function (Middleware $middleware): void {
    $middleware->throttleWithRedis();
    // ...
})
```

<a name="form-method-spoofing"></a>
## Form Method Spoofing

HTML forms do not support `PUT`, `PATCH`, or `DELETE` actions. So, when defining `PUT`, `PATCH`, or `DELETE` routes that are called from an HTML form, you will need to add a hidden `_method` field to the form. The value sent with the `_method` field will be used as the HTTP request method:

```blade
<form action="/example" method="POST">
    <input type="hidden" name="_method" value="PUT">
    <input type="hidden" name="_token" value="{{ csrf_token() }}">
</form>
```

For convenience, you may use the `@method` [Blade directive](/docs/{{version}}/blade) to generate the `_method` input field:

```blade
<form action="/example" method="POST">
    @method('PUT')
    @csrf
</form>
```

<a name="accessing-the-current-route"></a>
## Accessing the Current Route

You may use the `current`, `currentRouteName`, and `currentRouteAction` methods on the `Route` facade to access information about the route handling the incoming request:

```php
use Illuminate\Support\Facades\Route;

$route = Route::current(); // Illuminate\Routing\Route
$name = Route::currentRouteName(); // string
$action = Route::currentRouteAction(); // string
```

You may refer to the API documentation for both the [underlying class of the Route facade](https://api.laravel.com/docs/{{version}}/Illuminate/Routing/Router.html) and [Route instance](https://api.laravel.com/docs/{{version}}/Illuminate/Routing/Route.html) to review all of the methods that are available on the router and route classes.

<a name="cors"></a>
## Cross-Origin Resource Sharing (CORS)

Laravel can automatically respond to CORS `OPTIONS` HTTP requests with values that you configure. The `OPTIONS` requests will automatically be handled by the `HandleCors` [middleware](/docs/{{version}}/middleware) that is automatically included in your application's global middleware stack.

Sometimes, you may need to customize the CORS configuration values for your application. You may do so by publishing the `cors` configuration file using the `config:publish` Artisan command:

```shell
php artisan config:publish cors
```

This command will place a `cors.php` configuration file within your application's `config` directory.

> [!NOTE]
> For more information on CORS and CORS headers, please consult the [MDN web documentation on CORS](https://developer.mozilla.org/en-US/docs/Web/HTTP/CORS#The_HTTP_response_headers).

<a name="route-caching"></a>
## Route Caching

When deploying your application to production, you should take advantage of Laravel's route cache. Using the route cache will drastically decrease the amount of time it takes to register all of your application's routes. To generate a route cache, execute the `route:cache` Artisan command:

```shell
php artisan route:cache
```

After running this command, your cached routes file will be loaded on every request. Remember, if you add any new routes you will need to generate a fresh route cache. Because of this, you should only run the `route:cache` command during your project's deployment.

You may use the `route:clear` command to clear the route cache:

```shell
php artisan route:clear
```


---

# Laravel Sail

*Sección: Laravel | Origen: https://laravel.com/docs/13.x/sail*

- [Introduction](#introduction)
- [Installation and Setup](#installation)
    - [Rebuilding Sail Images](#rebuilding-sail-images)
    - [Configuring A Shell Alias](#configuring-a-shell-alias)
- [Starting and Stopping Sail](#starting-and-stopping-sail)
- [Executing Commands](#executing-sail-commands)
    - [Executing PHP Commands](#executing-php-commands)
    - [Executing Composer Commands](#executing-composer-commands)
    - [Executing Artisan Commands](#executing-artisan-commands)
    - [Executing Node / NPM Commands](#executing-node-npm-commands)
- [Interacting With Databases](#interacting-with-sail-databases)
    - [MySQL](#mysql)
    - [MongoDB](#mongodb)
    - [Redis](#redis)
    - [Valkey](#valkey)
    - [Meilisearch](#meilisearch)
    - [Typesense](#typesense)
- [File Storage](#file-storage)
- [Running Tests](#running-tests)
    - [Laravel Dusk](#laravel-dusk)
- [Previewing Emails](#previewing-emails)
- [Container CLI](#sail-container-cli)
- [PHP Versions](#sail-php-versions)
    - [Additional PHP Extensions](#sail-php-extensions)
- [Node Versions](#sail-node-versions)
- [Sharing Your Site](#sharing-your-site)
- [Debugging With Xdebug](#debugging-with-xdebug)
    - [Xdebug CLI Usage](#xdebug-cli-usage)
    - [Xdebug Browser Usage](#xdebug-browser-usage)
- [Customization](#sail-customization)

<a name="introduction"></a>
## Introduction

[Laravel Sail](https://github.com/laravel/sail) is a light-weight command-line interface for interacting with Laravel's default Docker development environment. Sail provides a great starting point for building a Laravel application using PHP, MySQL, and Redis without requiring prior Docker experience.

At its heart, Sail is the `compose.yaml` file and the `sail` script that is stored at the root of your project. The `sail` script provides a CLI with convenient methods for interacting with the Docker containers defined by the `compose.yaml` file.

Laravel Sail is supported on macOS, Linux, and Windows (via [WSL2](https://docs.microsoft.com/en-us/windows/wsl/about)).

<a name="installation"></a>
## Installation and Setup

You may install Sail using the Composer package manager:

```shell
composer require laravel/sail --dev
```

After Sail has been installed, you may run the `sail:install` Artisan command. This command will publish Sail's `compose.yaml` file to the root of your application and modify your `.env` file with the required environment variables in order to connect to the Docker services:

```shell
php artisan sail:install
```

Finally, you may start Sail. To continue learning how to use Sail, please continue reading the remainder of this documentation:

```shell
./vendor/bin/sail up
```

> [!WARNING]
> If you are using Docker Desktop for Linux, you should use the `default` Docker context by executing the following command: `docker context use default`. In addition, if you encounter file permission errors within containers, you may need to set the `SUPERVISOR_PHP_USER` environment variable to `root`.

<a name="adding-additional-services"></a>
#### Adding Additional Services

If you would like to add an additional service to your existing Sail installation, you may run the `sail:add` Artisan command:

```shell
php artisan sail:add
```

<a name="using-devcontainers"></a>
#### Using Devcontainers

If you would like to develop within a [Devcontainer](https://code.visualstudio.com/docs/remote/containers), you may provide the `--devcontainer` option to the `sail:install` command. The `--devcontainer` option will instruct the `sail:install` command to publish a default `.devcontainer/devcontainer.json ` file to the root of your application:

```shell
php artisan sail:install --devcontainer
```

<a name="rebuilding-sail-images"></a>
### Rebuilding Sail Images

Sometimes you may want to completely rebuild your Sail images to ensure all of the image's packages and software are up to date. You may accomplish this using the `build` command:

```shell
docker compose down -v

sail build --no-cache

sail up
```

<a name="configuring-a-shell-alias"></a>
### Configuring A Shell Alias

By default, Sail commands are invoked using the `vendor/bin/sail` script that is included with all new Laravel applications:

```shell
./vendor/bin/sail up
```

However, instead of repeatedly typing `vendor/bin/sail` to execute Sail commands, you may wish to configure a shell alias that allows you to execute Sail's commands more easily:

```shell
alias sail='sh $([ -f sail ] && echo sail || echo vendor/bin/sail)'
```

To make sure this is always available, you may add this to your shell configuration file in your home directory, such as `~/.zshrc` or `~/.bashrc`, and then restart your shell.

Once the shell alias has been configured, you may execute Sail commands by simply typing `sail`. The remainder of this documentation's examples will assume that you have configured this alias:

```shell
sail up
```

<a name="starting-and-stopping-sail"></a>
## Starting and Stopping Sail

Laravel Sail's `compose.yaml` file defines a variety of Docker containers that work together to help you build Laravel applications. Each of these containers is an entry within the `services` configuration of your `compose.yaml` file. The `laravel.test` container is the primary application container that will be serving your application.

Before starting Sail, you should ensure that no other web servers or databases are running on your local computer. To start all of the Docker containers defined in your application's `compose.yaml` file, you should execute the `up` command:

```shell
sail up
```

To start all of the Docker containers in the background, you may start Sail in "detached" mode:

```shell
sail up -d
```

Once the application's containers have been started, you may access the project in your web browser at: http://localhost.

To stop all of the containers, you may simply press Control + C to stop the container's execution. Or, if the containers are running in the background, you may use the `stop` command:

```shell
sail stop
```

<a name="executing-sail-commands"></a>
## Executing Commands

When using Laravel Sail, your application is executing within a Docker container and is isolated from your local computer. However, Sail provides a convenient way to run various commands against your application such as arbitrary PHP commands, Artisan commands, Composer commands, and Node / NPM commands.

**When reading the Laravel documentation, you will often see references to Composer, Artisan, and Node / NPM commands that do not reference Sail.** Those examples assume that these tools are installed on your local computer. If you are using Sail for your local Laravel development environment, you should execute those commands using Sail:

```shell
# Running Artisan commands locally...
php artisan queue:work

# Running Artisan commands within Laravel Sail...
sail artisan queue:work
```

<a name="executing-php-commands"></a>
### Executing PHP Commands

PHP commands may be executed using the `php` command. Of course, these commands will execute using the PHP version that is configured for your application. To learn more about the PHP versions available to Laravel Sail, consult the [PHP version documentation](#sail-php-versions):

```shell
sail php --version

sail php script.php
```

<a name="executing-composer-commands"></a>
### Executing Composer Commands

Composer commands may be executed using the `composer` command. Laravel Sail's application container includes a Composer installation:

```shell
sail composer require laravel/sanctum
```

<a name="executing-artisan-commands"></a>
### Executing Artisan Commands

Laravel Artisan commands may be executed using the `artisan` command:

```shell
sail artisan queue:work
```

<a name="executing-node-npm-commands"></a>
### Executing Node / NPM Commands

Node commands may be executed using the `node` command while NPM commands may be executed using the `npm` command:

```shell
sail node --version

sail npm run dev
```

If you wish, you may use Yarn instead of NPM:

```shell
sail yarn
```

<a name="interacting-with-sail-databases"></a>
## Interacting With Databases

<a name="mysql"></a>
### MySQL

As you may have noticed, your application's `compose.yaml` file contains an entry for a MySQL container. This container uses a [Docker volume](https://docs.docker.com/storage/volumes/) so that the data stored in your database is persisted even when stopping and restarting your containers.

In addition, the first time the MySQL container starts, it will create two databases for you. The first database is named using the value of your `DB_DATABASE` environment variable and is for your local development. The second is a dedicated testing database named `testing` and will ensure that your tests do not interfere with your development data.

Once you have started your containers, you may connect to the MySQL instance within your application by setting your `DB_HOST` environment variable within your application's `.env` file to `mysql`.

To connect to your application's MySQL database from your local machine, you may use a graphical database management application such as [TablePlus](https://tableplus.com). By default, the MySQL database is accessible at `localhost` port 3306 and the access credentials correspond to the values of your `DB_USERNAME` and `DB_PASSWORD` environment variables. Or, you may connect as the `root` user, which also utilizes the value of your `DB_PASSWORD` environment variable as its password.

<a name="mongodb"></a>
### MongoDB

If you chose to install the [MongoDB](https://www.mongodb.com/) service when installing Sail, your application's `compose.yaml` file contains an entry for a [MongoDB Atlas Local](https://www.mongodb.com/docs/atlas/cli/current/atlas-cli-local-cloud/) container which provides the MongoDB document database with Atlas features like [Search Indexes](https://www.mongodb.com/docs/atlas/atlas-search/). This container uses a [Docker volume](https://docs.docker.com/storage/volumes/) so that the data stored in your database is persisted even when stopping and restarting your containers.

Once you have started your containers, you may connect to the MongoDB instance within your application by setting your `MONGODB_URI` environment variable within your application's `.env` file to `mongodb://mongodb:27017`. Authentication is disabled by default, but you can set the `MONGODB_USERNAME` and `MONGODB_PASSWORD` environment variables to enable authentication before starting the `mongodb` container. Then, add the credentials to the connection string:

```ini
MONGODB_USERNAME=user
MONGODB_PASSWORD=laravel
MONGODB_URI=mongodb://${MONGODB_USERNAME}:${MONGODB_PASSWORD}@mongodb:27017
```

For seamless integration of MongoDB with your application, you can install the [official package maintained by MongoDB](https://www.mongodb.com/docs/drivers/php/laravel-mongodb/).

To connect to your application's MongoDB database from your local machine, you may use a graphical interface such as [Compass](https://www.mongodb.com/products/tools/compass). By default, the MongoDB database is accessible at `localhost` port `27017`.

<a name="redis"></a>
### Redis

Your application's `compose.yaml` file also contains an entry for a [Redis](https://redis.io) container. This container uses a [Docker volume](https://docs.docker.com/storage/volumes/) so that the data stored in your Redis instance is persisted even when stopping and restarting your containers. Once you have started your containers, you may connect to the Redis instance within your application by setting your `REDIS_HOST` environment variable within your application's `.env` file to `redis`.

To connect to your application's Redis database from your local machine, you may use a graphical database management application such as [TablePlus](https://tableplus.com). By default, the Redis database is accessible at `localhost` port 6379.

<a name="valkey"></a>
### Valkey

If you choose to install Valkey service when installing Sail, your application's `compose.yaml` file will contain an entry for [Valkey](https://valkey.io/). This container uses a [Docker volume](https://docs.docker.com/storage/volumes/) so that the data stored in your Valkey instance is persisted even when stopping and restarting your containers. You can connect to this container in your application by setting your `REDIS_HOST` environment variable within your application's `.env` file to `valkey`.

To connect to your application's Valkey database from your local machine, you may use a graphical database management application such as [TablePlus](https://tableplus.com). By default, the Valkey database is accessible at `localhost` port 6379.

<a name="meilisearch"></a>
### Meilisearch

If you chose to install the [Meilisearch](https://www.meilisearch.com) service when installing Sail, your application's `compose.yaml` file will contain an entry for this powerful search engine that is integrated with [Laravel Scout](/docs/{{version}}/scout). Once you have started your containers, you may connect to the Meilisearch instance within your application by setting your `MEILISEARCH_HOST` environment variable to `http://meilisearch:7700`.

From your local machine, you may access Meilisearch's web based administration panel by navigating to `http://localhost:7700` in your web browser.

<a name="typesense"></a>
### Typesense

If you chose to install the [Typesense](https://typesense.org) service when installing Sail, your application's `compose.yaml` file will contain an entry for this lightning fast, open-source search engine that is natively integrated with [Laravel Scout](/docs/{{version}}/scout#typesense). Once you have started your containers, you may connect to the Typesense instance within your application by setting the following environment variables:

```ini
TYPESENSE_HOST=typesense
TYPESENSE_PORT=8108
TYPESENSE_PROTOCOL=http
TYPESENSE_API_KEY=xyz
```

From your local machine, you may access Typesense's API via `http://localhost:8108`.

<a name="file-storage"></a>
## File Storage

If you plan to use Amazon S3 to store files while running your application in its production environment, you may wish to install the [RustFS](https://rustfs.com) service when installing Sail. RustFS provides an S3 compatible API that you may use to develop locally using Laravel's `s3` file storage driver without creating "test" storage buckets in your production S3 environment. If you choose to install RustFS while installing Sail, a RustFS configuration section will be added to your application's `compose.yaml` file.

By default, your application's `filesystems` configuration file already contains a disk configuration for the `s3` disk. In addition to using this disk to interact with Amazon S3, you may use it to interact with any S3 compatible file storage service such as RustFS by simply modifying the associated environment variables that control its configuration. For example, when using RustFS, your filesystem environment variable configuration should be defined as follows:

```ini
FILESYSTEM_DISK=s3
AWS_ACCESS_KEY_ID=sail
AWS_SECRET_ACCESS_KEY=password
AWS_DEFAULT_REGION=us-east-1
AWS_BUCKET=local
AWS_ENDPOINT=http://rustfs:9000
AWS_USE_PATH_STYLE_ENDPOINT=true
```

<a name="running-tests"></a>
## Running Tests

Laravel provides amazing testing support out of the box, and you may use Sail's `test` command to run your applications [feature and unit tests](/docs/{{version}}/testing). Any CLI options that are accepted by Pest / PHPUnit may also be passed to the `test` command:

```shell
sail test

sail test --group orders
```

The Sail `test` command is equivalent to running the `test` Artisan command:

```shell
sail artisan test
```

By default, Sail will create a dedicated `testing` database so that your tests do not interfere with the current state of your database. In a default Laravel installation, Sail will also configure your `phpunit.xml` file to use this database when executing your tests:

```xml
<env name="DB_DATABASE" value="testing"/>
```

<a name="laravel-dusk"></a>
### Laravel Dusk

[Laravel Dusk](/docs/{{version}}/dusk) provides an expressive, easy-to-use browser automation and testing API. Thanks to Sail, you may run these tests without ever installing Selenium or other tools on your local computer. To get started, uncomment the Selenium service in your application's `compose.yaml` file:

```yaml
selenium:
    image: 'selenium/standalone-chrome'
    extra_hosts:
      - 'host.docker.internal:host-gateway'
    volumes:
        - '/dev/shm:/dev/shm'
    networks:
        - sail
```

Next, ensure that the `laravel.test` service in your application's `compose.yaml` file has a `depends_on` entry for `selenium`:

```yaml
depends_on:
    - mysql
    - redis
    - selenium
```

Finally, you may run your Dusk test suite by starting Sail and running the `dusk` command:

```shell
sail dusk
```

<a name="selenium-on-apple-silicon"></a>
#### Selenium on Apple Silicon

If your local machine contains an Apple Silicon chip, your `selenium` service must use the `selenium/standalone-chromium` image:

```yaml
selenium:
    image: 'selenium/standalone-chromium'
    extra_hosts:
        - 'host.docker.internal:host-gateway'
    volumes:
        - '/dev/shm:/dev/shm'
    networks:
        - sail
```

<a name="previewing-emails"></a>
## Previewing Emails

Laravel Sail's default `compose.yaml` file contains a service entry for [Mailpit](https://github.com/axllent/mailpit). Mailpit intercepts emails sent by your application during local development and provides a convenient web interface so that you can preview your email messages in your browser. When using Sail, Mailpit's default host is `mailpit` and is available via port 1025:

```ini
MAIL_HOST=mailpit
MAIL_PORT=1025
MAIL_ENCRYPTION=null
```

When Sail is running, you may access the Mailpit web interface at: http://localhost:8025

<a name="sail-container-cli"></a>
## Container CLI

Sometimes you may wish to start a Bash session within your application's container. You may use the `shell` command to connect to your application's container, allowing you to inspect its files and installed services as well as execute arbitrary shell commands within the container:

```shell
sail shell

sail root-shell
```

To start a new [Laravel Tinker](https://github.com/laravel/tinker) session, you may execute the `tinker` command:

```shell
sail tinker
```

<a name="sail-php-versions"></a>
## PHP Versions

Sail currently supports serving your application via PHP 8.5, 8.4, 8.3, 8.2, 8.1, or PHP 8.0. The default PHP version used by Sail is currently PHP 8.5. To change the PHP version that is used to serve your application, you should update the `build` definition of the `laravel.test` container in your application's `compose.yaml` file:

```yaml
# PHP 8.5
context: ./vendor/laravel/sail/runtimes/8.5

# PHP 8.4
context: ./vendor/laravel/sail/runtimes/8.4

# PHP 8.3
context: ./vendor/laravel/sail/runtimes/8.3

# PHP 8.2
context: ./vendor/laravel/sail/runtimes/8.2

# PHP 8.1
context: ./vendor/laravel/sail/runtimes/8.1

# PHP 8.0
context: ./vendor/laravel/sail/runtimes/8.0
```

In addition, you may wish to update your `image` name to reflect the version of PHP being used by your application. This option is also defined in your application's `compose.yaml` file:

```yaml
image: sail-8.2/app
```

After updating your application's `compose.yaml` file, you should rebuild your container images:

```shell
sail build --no-cache

sail up
```

<a name="sail-php-extensions"></a>
### Additional PHP Extensions

Sail's runtime images include a common set of PHP extensions. If your application requires additional extensions, you may install them when building the image by adding a space-separated `PHP_EXTENSIONS` build argument to the `laravel.test` service in your application's `compose.yaml` file:

```yaml
build:
    args:
        WWWGROUP: '${WWWGROUP}'
        PHP_EXTENSIONS: 'gmp imagick'
```

After updating your application's `compose.yaml` file, you should rebuild your container images.

<a name="sail-node-versions"></a>
## Node Versions

Sail installs Node 24 by default. To change the Node version that is installed when building your images, you may update the `build.args` definition of the `laravel.test` service in your application's `compose.yaml` file:

```yaml
build:
    args:
        WWWGROUP: '${WWWGROUP}'
        NODE_VERSION: '18'
```

After updating your application's `compose.yaml` file, you should rebuild your container images:

```shell
sail build --no-cache

sail up
```

<a name="sharing-your-site"></a>
## Sharing Your Site

Sometimes you may need to share your site publicly in order to preview your site for a colleague or to test webhook integrations with your application. To share your site, you may use the `share` command. After executing this command, you will be issued a random `laravel-sail.site` URL that you may use to access your application:

```shell
sail share
```

When sharing your site via the `share` command, you should configure your application's trusted proxies using the `trustProxies` middleware method in your application's `bootstrap/app.php` file. Otherwise, URL generation helpers such as `url` and `route` will be unable to determine the correct HTTP host that should be used during URL generation:

```php
->withMiddleware(function (Middleware $middleware): void {
    $middleware->trustProxies(at: '*');
})
```

If you would like to choose the subdomain for your shared site, you may provide the `subdomain` option when executing the `share` command:

```shell
sail share --subdomain=my-sail-site
```

> [!NOTE]
> The `share` command is powered by [Expose](https://github.com/beyondcode/expose), an open source tunneling service by [BeyondCode](https://beyondco.de).

<a name="debugging-with-xdebug"></a>
## Debugging With Xdebug

Laravel Sail's Docker configuration includes support for [Xdebug](https://xdebug.org/), a popular and powerful debugger for PHP. To enable Xdebug, ensure you have [published your Sail configuration](#sail-customization). Then, add the following variables to your application's `.env` file to configure Xdebug:

```ini
SAIL_XDEBUG_MODE=develop,debug,coverage
```

Next, ensure that your published `php.ini` file includes the following configuration so that Xdebug is activated in the specified modes:

```ini
[xdebug]
xdebug.mode=${XDEBUG_MODE}
```

After modifying the `php.ini` file, remember to rebuild your Docker images so that your changes to the `php.ini` file take effect:

```shell
sail build --no-cache
```

#### Linux Host IP Configuration

Internally, the `XDEBUG_CONFIG` environment variable is defined as `client_host=host.docker.internal` so that Xdebug will be properly configured for Mac and Windows (WSL2). If your local machine is running Linux and you're using Docker 20.10+, `host.docker.internal` is available, and no manual configuration is required.

For Docker versions older than 20.10, `host.docker.internal` is not supported on Linux, and you will need to manually define the host IP. To do this, configure a static IP for your container by defining a custom network in your `compose.yaml` file:

```yaml
networks:
  custom_network:
    ipam:
      config:
        - subnet: 172.20.0.0/16

services:
  laravel.test:
    networks:
      custom_network:
        ipv4_address: 172.20.0.2
```

Once you have set the static IP, define the SAIL_XDEBUG_CONFIG variable within your application's .env file:

```ini
SAIL_XDEBUG_CONFIG="client_host=172.20.0.2"
```

<a name="xdebug-cli-usage"></a>
### Xdebug CLI Usage

A `sail debug` command may be used to start a debugging session when running an Artisan command:

```shell
# Run an Artisan command without Xdebug...
sail artisan migrate

# Run an Artisan command with Xdebug...
sail debug migrate
```

<a name="xdebug-browser-usage"></a>
### Xdebug Browser Usage

To debug your application while interacting with the application via a web browser, follow the [instructions provided by Xdebug](https://xdebug.org/docs/step_debug#web-application) for initiating an Xdebug session from the web browser.

If you're using PhpStorm, please review JetBrains' documentation regarding [zero-configuration debugging](https://www.jetbrains.com/help/phpstorm/zero-configuration-debugging.html).

> [!WARNING]
> Laravel Sail relies on `artisan serve` to serve your application. The `artisan serve` command only accepts the `XDEBUG_CONFIG` and `XDEBUG_MODE` variables as of Laravel version 8.53.0. Older versions of Laravel (8.52.0 and below) do not support these variables and will not accept debug connections.

<a name="sail-customization"></a>
## Customization

Since Sail is just Docker, you are free to customize nearly everything about it. To publish Sail's own Dockerfiles, you may execute the `sail:publish` command:

```shell
sail artisan sail:publish
```

After running this command, the Dockerfiles and other configuration files used by Laravel Sail will be placed within a `docker` directory in your application's root directory. After customizing your Sail installation, you may wish to change the image name for the application container in your application's `compose.yaml` file. After doing so, rebuild your application's containers using the `build` command. Assigning a unique name to the application image is particularly important if you are using Sail to develop multiple Laravel applications on a single machine:

```shell
sail build --no-cache
```


---

# Laravel Sanctum

*Sección: Laravel | Origen: https://laravel.com/docs/13.x/sanctum*

- [Introduction](#introduction)
    - [How it Works](#how-it-works)
- [Installation](#installation)
- [Configuration](#configuration)
    - [Overriding Default Models](#overriding-default-models)
- [API Token Authentication](#api-token-authentication)
    - [Issuing API Tokens](#issuing-api-tokens)
    - [Token Abilities](#token-abilities)
    - [Protecting Routes](#protecting-routes)
    - [Revoking Tokens](#revoking-tokens)
    - [Token Expiration](#token-expiration)
- [SPA Authentication](#spa-authentication)
    - [Configuration](#spa-configuration)
    - [Authenticating](#spa-authenticating)
    - [Protecting Routes](#protecting-spa-routes)
    - [Authorizing Private Broadcast Channels](#authorizing-private-broadcast-channels)
- [Mobile Application Authentication](#mobile-application-authentication)
    - [Issuing API Tokens](#issuing-mobile-api-tokens)
    - [Protecting Routes](#protecting-mobile-api-routes)
    - [Revoking Tokens](#revoking-mobile-api-tokens)
- [Testing](#testing)

<a name="introduction"></a>
## Introduction

[Laravel Sanctum](https://github.com/laravel/sanctum) provides a featherweight authentication system for SPAs (single page applications), mobile applications, and simple, token based APIs. Sanctum allows each user of your application to generate multiple API tokens for their account. These tokens may be granted abilities / scopes which specify which actions the tokens are allowed to perform.

<a name="how-it-works"></a>
### How it Works

Laravel Sanctum exists to solve two separate problems. Let's discuss each before digging deeper into the library.

<a name="how-it-works-api-tokens"></a>
#### API Tokens

First, Sanctum is a simple package you may use to issue API tokens to your users without the complication of OAuth. This feature is inspired by GitHub and other applications which issue "personal access tokens". For example, imagine the "account settings" of your application has a screen where a user may generate an API token for their account. You may use Sanctum to generate and manage those tokens. These tokens typically have a very long expiration time (years), but may be manually revoked by the user anytime.

Laravel Sanctum offers this feature by storing user API tokens in a single database table and authenticating incoming HTTP requests via the `Authorization` header which should contain a valid API token.

<a name="how-it-works-spa-authentication"></a>
#### SPA Authentication

Second, Sanctum exists to offer a simple way to authenticate single page applications (SPAs) that need to communicate with a Laravel powered API. These SPAs might exist in the same repository as your Laravel application or might be an entirely separate repository, such as an SPA created using Next.js or Nuxt.

For this feature, Sanctum does not use tokens of any kind. Instead, Sanctum uses Laravel's built-in cookie based session authentication services. Typically, Sanctum utilizes Laravel's `web` authentication guard to accomplish this. This provides the benefits of CSRF protection, session authentication, as well as protects against leakage of the authentication credentials via XSS.

Sanctum will only attempt to authenticate using cookies when the incoming request originates from your own SPA frontend. When Sanctum examines an incoming HTTP request, it will first check for an authentication cookie and, if none is present, Sanctum will then examine the `Authorization` header for a valid API token.

> [!NOTE]
> It is perfectly fine to use Sanctum only for API token authentication or only for SPA authentication. Just because you use Sanctum does not mean you are required to use both features it offers.

<a name="installation"></a>
## Installation

You may install Laravel Sanctum via the `install:api` Artisan command:

```shell
php artisan install:api
```

Next, if you plan to utilize Sanctum to authenticate an SPA, please refer to the [SPA Authentication](#spa-authentication) section of this documentation.

<a name="configuration"></a>
## Configuration

<a name="overriding-default-models"></a>
### Overriding Default Models

Although not typically required, you are free to extend the `PersonalAccessToken` model used internally by Sanctum:

```php
use Laravel\Sanctum\PersonalAccessToken as SanctumPersonalAccessToken;

class PersonalAccessToken extends SanctumPersonalAccessToken
{
    // ...
}
```

Then, you may instruct Sanctum to use your custom model via the `usePersonalAccessTokenModel` method provided by Sanctum. Typically, you should call this method in the `boot` method of your application's `AppServiceProvider` file:

```php
use App\Models\Sanctum\PersonalAccessToken;
use Laravel\Sanctum\Sanctum;

/**
 * Bootstrap any application services.
 */
public function boot(): void
{
    Sanctum::usePersonalAccessTokenModel(PersonalAccessToken::class);
}
```

<a name="api-token-authentication"></a>
## API Token Authentication

> [!NOTE]
> You should not use API tokens to authenticate your own first-party SPA. Instead, use Sanctum's built-in [SPA authentication features](#spa-authentication).

<a name="issuing-api-tokens"></a>
### Issuing API Tokens

Sanctum allows you to issue API tokens / personal access tokens that may be used to authenticate API requests to your application. When making requests using API tokens, the token should be included in the `Authorization` header as a `Bearer` token.

To begin issuing tokens for users, your User model should use the `Laravel\Sanctum\HasApiTokens` trait:

```php
use Laravel\Sanctum\HasApiTokens;

class User extends Authenticatable
{
    use HasApiTokens, HasFactory, Notifiable;
}
```

To issue a token, you may use the `createToken` method. The `createToken` method returns a `Laravel\Sanctum\NewAccessToken` instance. API tokens are hashed using SHA-256 hashing before being stored in your database, but you may access the plain-text value of the token using the `plainTextToken` property of the `NewAccessToken` instance. You should display this value to the user immediately after the token has been created:

```php
use Illuminate\Http\Request;

Route::post('/tokens/create', function (Request $request) {
    $token = $request->user()->createToken($request->token_name);

    return ['token' => $token->plainTextToken];
});
```

You may access all of the user's tokens using the `tokens` Eloquent relationship provided by the `HasApiTokens` trait:

```php
foreach ($user->tokens as $token) {
    // ...
}
```

<a name="token-abilities"></a>
### Token Abilities

Sanctum allows you to assign "abilities" to tokens. Abilities serve a similar purpose as OAuth's "scopes". You may pass an array of string abilities as the second argument to the `createToken` method:

```php
return $user->createToken('token-name', ['server:update'])->plainTextToken;
```

When handling an incoming request authenticated by Sanctum, you may determine if the token has a given ability using the `tokenCan` or `tokenCant` methods:

```php
if ($user->tokenCan('server:update')) {
    // ...
}

if ($user->tokenCant('server:update')) {
    // ...
}
```

<a name="token-ability-middleware"></a>
#### Token Ability Middleware

Sanctum also includes two middleware that may be used to verify that an incoming request is authenticated with a token that has been granted a given ability. To get started, define the following middleware aliases in your application's `bootstrap/app.php` file:

```php
use Laravel\Sanctum\Http\Middleware\CheckAbilities;
use Laravel\Sanctum\Http\Middleware\CheckForAnyAbility;

->withMiddleware(function (Middleware $middleware): void {
    $middleware->alias([
        'abilities' => CheckAbilities::class,
        'ability' => CheckForAnyAbility::class,
    ]);
})
```

The `abilities` middleware may be assigned to a route to verify that the incoming request's token has all of the listed abilities:

```php
Route::get('/orders', function () {
    // Token has both "check-status" and "place-orders" abilities...
})->middleware(['auth:sanctum', 'abilities:check-status,place-orders']);
```

The `ability` middleware may be assigned to a route to verify that the incoming request's token has *at least one* of the listed abilities:

```php
Route::get('/orders', function () {
    // Token has the "check-status" or "place-orders" ability...
})->middleware(['auth:sanctum', 'ability:check-status,place-orders']);
```

<a name="first-party-ui-initiated-requests"></a>
#### First-Party UI Initiated Requests

For convenience, the `tokenCan` method will always return `true` if the incoming authenticated request was from your first-party SPA and you are using Sanctum's built-in [SPA authentication](#spa-authentication).

However, this does not necessarily mean that your application has to allow the user to perform the action. Typically, your application's [authorization policies](/docs/{{version}}/authorization#creating-policies) will determine if the token has been granted the permission to perform the abilities as well as check that the user instance itself should be allowed to perform the action.

For example, if we imagine an application that manages servers, this might mean checking that the token is authorized to update servers **and** that the server belongs to the user:

```php
return $request->user()->id === $server->user_id &&
       $request->user()->tokenCan('server:update')
```

At first, allowing the `tokenCan` method to be called and always return `true` for first-party UI initiated requests may seem strange; however, it is convenient to be able to always assume an API token is available and can be inspected via the `tokenCan` method. By taking this approach, you may always call the `tokenCan` method within your application's authorization policies without worrying about whether the request was triggered from your application's UI or was initiated by one of your API's third-party consumers.

<a name="protecting-routes"></a>
### Protecting Routes

To protect routes so that all incoming requests must be authenticated, you should attach the `sanctum` authentication guard to your protected routes within your `routes/web.php` and `routes/api.php` route files. This guard will ensure that incoming requests are authenticated as either stateful, cookie authenticated requests or contain a valid API token header if the request is from a third party.

You may be wondering why we suggest that you authenticate the routes within your application's `routes/web.php` file using the `sanctum` guard. Remember, Sanctum will first attempt to authenticate incoming requests using Laravel's typical session authentication cookie. If that cookie is not present then Sanctum will attempt to authenticate the request using a token in the request's `Authorization` header. In addition, authenticating all requests using Sanctum ensures that we may always call the `tokenCan` method on the currently authenticated user instance:

```php
use Illuminate\Http\Request;

Route::get('/user', function (Request $request) {
    return $request->user();
})->middleware('auth:sanctum');
```

<a name="revoking-tokens"></a>
### Revoking Tokens

You may "revoke" tokens by deleting them from your database using the `tokens` relationship that is provided by the `Laravel\Sanctum\HasApiTokens` trait:

```php
// Revoke all tokens...
$user->tokens()->delete();

// Revoke the token that was used to authenticate the current request...
$request->user()->currentAccessToken()->delete();

// Revoke a specific token...
$user->tokens()->where('id', $tokenId)->delete();
```

<a name="token-expiration"></a>
### Token Expiration

By default, Sanctum tokens never expire and may only be invalidated by [revoking the token](#revoking-tokens). However, if you would like to configure an expiration time for your application's API tokens, you may do so via the `expiration` configuration option defined in your application's `sanctum` configuration file. This configuration option defines the number of minutes until an issued token will be considered expired:

```php
'expiration' => 525600,
```

If you would like to specify the expiration time of each token independently, you may do so by providing the expiration time as the third argument to the `createToken` method:

```php
return $user->createToken(
    'token-name', ['*'], now()->plus(weeks: 1)
)->plainTextToken;
```

If you have configured a token expiration time for your application, you may also wish to [schedule a task](/docs/{{version}}/scheduling) to prune your application's expired tokens. Thankfully, Sanctum includes a `sanctum:prune-expired` Artisan command that you may use to accomplish this. For example, you may configure a scheduled task to delete all expired token database records that have been expired for at least 24 hours:

```php
use Illuminate\Support\Facades\Schedule;

Schedule::command('sanctum:prune-expired --hours=24')->daily();
```

<a name="spa-authentication"></a>
## SPA Authentication

Sanctum also exists to provide a simple method of authenticating single page applications (SPAs) that need to communicate with a Laravel powered API. These SPAs might exist in the same repository as your Laravel application or might be an entirely separate repository.

For this feature, Sanctum does not use tokens of any kind. Instead, Sanctum uses Laravel's built-in cookie based session authentication services. This approach to authentication provides the benefits of CSRF protection, session authentication, as well as protects against leakage of the authentication credentials via XSS.

> [!WARNING]
> In order to authenticate, your SPA and API must share the same top-level domain. However, they may be placed on different subdomains. Additionally, you should ensure that you send the `Accept: application/json` header and either the `Referer` or `Origin` header with your request.

<a name="spa-configuration"></a>
### Configuration

<a name="configuring-your-first-party-domains"></a>
#### Configuring Your First-Party Domains

First, you should configure which domains your SPA will be making requests from. You may configure these domains using the `stateful` configuration option in your `sanctum` configuration file. This configuration setting determines which domains will maintain "stateful" authentication using Laravel session cookies when making requests to your API.

To assist you in setting up your first-party stateful domains, Sanctum provides two helper functions that you can include in the configuration. First, `Sanctum::currentApplicationUrlWithPort()` will return the current application URL from the `APP_URL` environment variable, and `Sanctum::currentRequestHost()` will inject a placeholder into the stateful domain list which, at runtime, will be replaced by the host from the current request so that all requests with the same domain are considered stateful.

> [!WARNING]
> If you are accessing your application via a URL that includes a port (`127.0.0.1:8000`), you should ensure that you include the port number with the domain.

<a name="sanctum-middleware"></a>
#### Sanctum Middleware

Next, you should instruct Laravel that incoming requests from your SPA can authenticate using Laravel's session cookies, while still allowing requests from third parties or mobile applications to authenticate using API tokens. This can be easily accomplished by invoking the `statefulApi` middleware method in your application's `bootstrap/app.php` file:

```php
->withMiddleware(function (Middleware $middleware): void {
    $middleware->statefulApi();
})
```

<a name="cors-and-cookies"></a>
#### CORS and Cookies

If you are having trouble authenticating with your application from an SPA that executes on a separate subdomain, you have likely misconfigured your CORS (Cross-Origin Resource Sharing) or session cookie settings.

The `config/cors.php` configuration file is not published by default. If you need to customize Laravel's CORS options, you should publish the complete `cors` configuration file using the `config:publish` Artisan command:

```shell
php artisan config:publish cors
```

Next, you should ensure that your application's CORS configuration is returning the `Access-Control-Allow-Credentials` header with a value of `True`. This may be accomplished by setting the `supports_credentials` option within your application's `config/cors.php` configuration file to `true`.

In addition, you should enable the `withCredentials` and `withXSRFToken` options on your application's global `axios` instance. This can be performed in your `resources/js/app.js` file. If you are not using Axios to make HTTP requests from your frontend, you should perform the equivalent configuration on your own HTTP client:

```js
axios.defaults.withCredentials = true;
axios.defaults.withXSRFToken = true;
```

Finally, you should ensure your application's session cookie domain configuration supports any subdomain of your root domain. You may accomplish this by prefixing the domain with a leading `.` within your application's `config/session.php` configuration file:

```php
'domain' => '.domain.com',
```

<a name="spa-authenticating"></a>
### Authenticating

<a name="csrf-protection"></a>
#### CSRF Protection

To authenticate your SPA, your SPA's "login" page should first make a request to the `/sanctum/csrf-cookie` endpoint to initialize CSRF protection for the application:

```js
axios.get('/sanctum/csrf-cookie').then(response => {
    // Login...
});
```

During this request, Laravel will set an `XSRF-TOKEN` cookie containing the current CSRF token. This token should then be URL decoded and passed in an `X-XSRF-TOKEN` header on subsequent requests, which some HTTP client libraries like Axios and the Angular HttpClient will do automatically for you. If your JavaScript HTTP library does not set the value for you, you will need to manually set the `X-XSRF-TOKEN` header to match the URL decoded value of the `XSRF-TOKEN` cookie that is set by this route.

<a name="logging-in"></a>
#### Logging In

Once CSRF protection has been initialized, you should make a `POST` request to your Laravel application's `/login` route. This `/login` route may be [implemented manually](/docs/{{version}}/authentication#authenticating-users) or using a headless authentication package like [Laravel Fortify](/docs/{{version}}/fortify).

If the login request is successful, you will be authenticated and subsequent requests to your application's routes will automatically be authenticated via the session cookie that the Laravel application issued to your client. In addition, since your application already made a request to the `/sanctum/csrf-cookie` route, subsequent requests should automatically receive CSRF protection as long as your JavaScript HTTP client sends the value of the `XSRF-TOKEN` cookie in the `X-XSRF-TOKEN` header.

Of course, if your user's session expires due to lack of activity, subsequent requests to the Laravel application may receive a 401 or 419 HTTP error response. In this case, you should redirect the user to your SPA's login page.

Since this approach to SPA authentication is session based, you may use Laravel's standard authentication services, including ["remember me"](/docs/{{version}}/authentication#remembering-users) functionality.

> [!WARNING]
> You are free to write your own `/login` endpoint; however, you should ensure that it authenticates the user using the standard, [session based authentication services that Laravel provides](/docs/{{version}}/authentication#authenticating-users). Typically, this means using the `web` authentication guard.

<a name="protecting-spa-routes"></a>
### Protecting Routes

To protect routes so that all incoming requests must be authenticated, you should attach the `sanctum` authentication guard to your API routes within your `routes/api.php` file. This guard will ensure that incoming requests are authenticated as either stateful authenticated requests from your SPA or contain a valid API token header if the request is from a third party:

```php
use Illuminate\Http\Request;

Route::get('/user', function (Request $request) {
    return $request->user();
})->middleware('auth:sanctum');
```

<a name="authorizing-private-broadcast-channels"></a>
### Authorizing Private Broadcast Channels

If your SPA needs to authenticate with [private / presence broadcast channels](/docs/{{version}}/broadcasting#authorizing-channels), you should remove the `channels` entry from the `withRouting` method contained in your application's `bootstrap/app.php` file. Instead, you should invoke the `withBroadcasting` method so that you may specify the correct middleware for your application's broadcasting routes:

```php
return Application::configure(basePath: dirname(__DIR__))
    ->withRouting(
        web: __DIR__.'/../routes/web.php',
        // ...
    )
    ->withBroadcasting(
        __DIR__.'/../routes/channels.php',
        ['prefix' => 'api', 'middleware' => ['api', 'auth:sanctum']],
    )
```

Next, in order for Pusher's authorization requests to succeed, you will need to provide a custom Pusher `authorizer` when initializing [Laravel Echo](/docs/{{version}}/broadcasting#client-side-installation). This allows your application to configure Pusher to use the `axios` instance that is [properly configured for cross-domain requests](#cors-and-cookies):

```js
window.Echo = new Echo({
    broadcaster: "pusher",
    cluster: import.meta.env.VITE_PUSHER_APP_CLUSTER,
    encrypted: true,
    key: import.meta.env.VITE_PUSHER_APP_KEY,
    authorizer: (channel, options) => {
        return {
            authorize: (socketId, callback) => {
                axios.post('/api/broadcasting/auth', {
                    socket_id: socketId,
                    channel_name: channel.name
                })
                .then(response => {
                    callback(false, response.data);
                })
                .catch(error => {
                    callback(true, error);
                });
            }
        };
    },
})
```

<a name="mobile-application-authentication"></a>
## Mobile Application Authentication

You may also use Sanctum tokens to authenticate your mobile application's requests to your API. The process for authenticating mobile application requests is similar to authenticating third-party API requests; however, there are small differences in how you will issue the API tokens.

<a name="issuing-mobile-api-tokens"></a>
### Issuing API Tokens

To get started, create a route that accepts the user's email / username, password, and device name, then exchanges those credentials for a new Sanctum token. The "device name" given to this endpoint is for informational purposes and may be any value you wish. In general, the device name value should be a name the user would recognize, such as "Nuno's iPhone 17".

Typically, you will make a request to the token endpoint from your mobile application's "login" screen. The endpoint will return the plain-text API token which may then be stored on the mobile device and used to make additional API requests:

```php
use App\Models\User;
use Illuminate\Http\Request;
use Illuminate\Support\Facades\Hash;
use Illuminate\Validation\ValidationException;

Route::post('/sanctum/token', function (Request $request) {
    $request->validate([
        'email' => 'required|email',
        'password' => 'required',
        'device_name' => 'required',
    ]);

    $user = User::where('email', $request->email)->first();

    if (! $user || ! Hash::check($request->password, $user->password)) {
        throw ValidationException::withMessages([
            'email' => ['The provided credentials are incorrect.'],
        ]);
    }

    return $user->createToken($request->device_name)->plainTextToken;
});
```

When the mobile application uses the token to make an API request to your application, it should pass the token in the `Authorization` header as a `Bearer` token.

> [!NOTE]
> When issuing tokens for a mobile application, you are also free to specify [token abilities](#token-abilities).

<a name="protecting-mobile-api-routes"></a>
### Protecting Routes

As previously documented, you may protect routes so that all incoming requests must be authenticated by attaching the `sanctum` authentication guard to the routes:

```php
Route::get('/user', function (Request $request) {
    return $request->user();
})->middleware('auth:sanctum');
```

<a name="revoking-mobile-api-tokens"></a>
### Revoking Tokens

To allow users to revoke API tokens issued to mobile devices, you may list them by name, along with a "Revoke" button, within an "account settings" portion of your web application's UI. When the user clicks the "Revoke" button, you can delete the token from the database. Remember, you can access a user's API tokens via the `tokens` relationship provided by the `Laravel\Sanctum\HasApiTokens` trait:

```php
// Revoke all tokens...
$user->tokens()->delete();

// Revoke a specific token...
$user->tokens()->where('id', $tokenId)->delete();
```

<a name="testing"></a>
## Testing

While testing, the `Sanctum::actingAs` method may be used to authenticate a user and specify which abilities should be granted to their token:

```php tab=Pest
use App\Models\User;
use Laravel\Sanctum\Sanctum;

test('task list can be retrieved', function () {
    Sanctum::actingAs(
        User::factory()->create(),
        ['view-tasks']
    );

    $response = $this->get('/api/task');

    $response->assertOk();
});
```

```php tab=PHPUnit
use App\Models\User;
use Laravel\Sanctum\Sanctum;

public function test_task_list_can_be_retrieved(): void
{
    Sanctum::actingAs(
        User::factory()->create(),
        ['view-tasks']
    );

    $response = $this->get('/api/task');

    $response->assertOk();
}
```

If you would like to grant all abilities to the token, you should include `*` in the ability list provided to the `actingAs` method:

```php
Sanctum::actingAs(
    User::factory()->create(),
    ['*']
);
```


---

# Task Scheduling

*Sección: Laravel | Origen: https://laravel.com/docs/13.x/scheduling*

- [Introduction](#introduction)
- [Defining Schedules](#defining-schedules)
    - [Scheduling Artisan Commands](#scheduling-artisan-commands)
    - [Scheduling Queued Jobs](#scheduling-queued-jobs)
    - [Scheduling Shell Commands](#scheduling-shell-commands)
    - [Schedule Frequency Options](#schedule-frequency-options)
    - [Timezones](#timezones)
    - [Preventing Task Overlaps](#preventing-task-overlaps)
    - [Running Tasks on One Server](#running-tasks-on-one-server)
    - [Background Tasks](#background-tasks)
    - [Maintenance Mode](#maintenance-mode)
    - [Pausing Scheduled Tasks](#pausing-scheduled-tasks)
    - [Schedule Groups](#schedule-groups)
- [Running the Scheduler](#running-the-scheduler)
    - [Sub-Minute Scheduled Tasks](#sub-minute-scheduled-tasks)
    - [Running the Scheduler Locally](#running-the-scheduler-locally)
- [Task Output](#task-output)
- [Task Hooks](#task-hooks)
- [Events](#events)

<a name="introduction"></a>
## Introduction

In the past, you may have written a cron configuration entry for each task you needed to schedule on your server. However, this can quickly become a pain because your task schedule is no longer in source control and you must SSH into your server to view your existing cron entries or add additional entries.

Laravel's command scheduler offers a fresh approach to managing scheduled tasks on your server. The scheduler allows you to fluently and expressively define your command schedule within your Laravel application itself. When using the scheduler, only a single cron entry is needed on your server. Your task schedule is typically defined in your application's `routes/console.php` file.

<a name="defining-schedules"></a>
## Defining Schedules

You may define all of your scheduled tasks in your application's `routes/console.php` file. To get started, let's take a look at an example. In this example, we will schedule a closure to be called every day at midnight. Within the closure we will execute a database query to clear a table:

```php
<?php

use Illuminate\Support\Facades\DB;
use Illuminate\Support\Facades\Schedule;

Schedule::call(function () {
    DB::table('recent_users')->delete();
})->daily();
```

In addition to scheduling using closures, you may also schedule [invokable objects](https://secure.php.net/manual/en/language.oop5.magic.php#object.invoke). Invokable objects are simple PHP classes that contain an `__invoke` method:

```php
Schedule::call(new DeleteRecentUsers)->daily();
```

If you prefer to reserve your `routes/console.php` file for command definitions only, you may use the `withSchedule` method in your application's `bootstrap/app.php` file to define your scheduled tasks. This method accepts a closure that receives an instance of the scheduler:

```php
use Illuminate\Console\Scheduling\Schedule;

->withSchedule(function (Schedule $schedule) {
    $schedule->call(new DeleteRecentUsers)->daily();
})
```

If you would like to view an overview of your scheduled tasks and the next time they are scheduled to run, you may use the `schedule:list` Artisan command:

```shell
php artisan schedule:list
```

<a name="scheduling-artisan-commands"></a>
### Scheduling Artisan Commands

In addition to scheduling closures, you may also schedule [Artisan commands](/docs/{{version}}/artisan) and system commands. For example, you may use the `command` method to schedule an Artisan command using either the command's name or class.

When scheduling Artisan commands using the command's class name, you may pass an array of additional command-line arguments that should be provided to the command when it is invoked:

```php
use App\Console\Commands\SendEmailsCommand;
use Illuminate\Support\Facades\Schedule;

Schedule::command('emails:send Taylor --force')->daily();

Schedule::command(SendEmailsCommand::class, ['Taylor', '--force'])->daily();
```

<a name="scheduling-artisan-closure-commands"></a>
#### Scheduling Artisan Closure Commands

If you want to schedule an Artisan command defined by a closure, you may chain the scheduling related methods after the command's definition:

```php
Artisan::command('delete:recent-users', function () {
    DB::table('recent_users')->delete();
})->purpose('Delete recent users')->daily();
```

If you need to pass arguments to the closure command, you may provide them to the `schedule` method:

```php
Artisan::command('emails:send {user} {--force}', function ($user) {
    // ...
})->purpose('Send emails to the specified user')->schedule(['Taylor', '--force'])->daily();
```

<a name="scheduling-queued-jobs"></a>
### Scheduling Queued Jobs

The `job` method may be used to schedule a [queued job](/docs/{{version}}/queues). This method provides a convenient way to schedule queued jobs without using the `call` method to define closures to queue the job:

```php
use App\Jobs\Heartbeat;
use Illuminate\Support\Facades\Schedule;

Schedule::job(new Heartbeat)->everyFiveMinutes();
```

Optional second and third arguments may be provided to the `job` method which specifies the queue name and queue connection that should be used to queue the job:

```php
use App\Jobs\Heartbeat;
use Illuminate\Support\Facades\Schedule;

// Dispatch the job to the "heartbeats" queue on the "sqs" connection...
Schedule::job(new Heartbeat, 'heartbeats', 'sqs')->everyFiveMinutes();
```

<a name="scheduling-shell-commands"></a>
### Scheduling Shell Commands

The `exec` method may be used to issue a command to the operating system:

```php
use Illuminate\Support\Facades\Schedule;

Schedule::exec('node /home/forge/script.js')->daily();
```

<a name="schedule-frequency-options"></a>
### Schedule Frequency Options

We've already seen a few examples of how you may configure a task to run at specified intervals. However, there are many more task schedule frequencies that you may assign to a task:

<div class="overflow-auto">

| Method                             | Description                                              |
| ---------------------------------- | -------------------------------------------------------- |
| `->cron('* * * * *');`             | Run the task on a custom cron schedule.                  |
| `->everySecond();`                 | Run the task every second.                               |
| `->everyTwoSeconds();`             | Run the task every two seconds.                          |
| `->everyFiveSeconds();`            | Run the task every five seconds.                         |
| `->everyTenSeconds();`             | Run the task every ten seconds.                          |
| `->everyFifteenSeconds();`         | Run the task every fifteen seconds.                      |
| `->everyTwentySeconds();`          | Run the task every twenty seconds.                       |
| `->everyThirtySeconds();`          | Run the task every thirty seconds.                       |
| `->everyMinute();`                 | Run the task every minute.                               |
| `->everyTwoMinutes();`             | Run the task every two minutes.                          |
| `->everyThreeMinutes();`           | Run the task every three minutes.                        |
| `->everyFourMinutes();`            | Run the task every four minutes.                         |
| `->everyFiveMinutes();`            | Run the task every five minutes.                         |
| `->everyTenMinutes();`             | Run the task every ten minutes.                          |
| `->everyFifteenMinutes();`         | Run the task every fifteen minutes.                      |
| `->everyThirtyMinutes();`          | Run the task every thirty minutes.                       |
| `->hourly();`                      | Run the task every hour.                                 |
| `->hourlyAt(17);`                  | Run the task every hour at 17 minutes past the hour.     |
| `->everyOddHour($minutes = 0);`    | Run the task every odd hour.                             |
| `->everyTwoHours($minutes = 0);`   | Run the task every two hours.                            |
| `->everyThreeHours($minutes = 0);` | Run the task every three hours.                          |
| `->everyFourHours($minutes = 0);`  | Run the task every four hours.                           |
| `->everySixHours($minutes = 0);`   | Run the task every six hours.                            |
| `->daily();`                       | Run the task every day at midnight.                      |
| `->dailyAt('13:00');`              | Run the task every day at 13:00.                         |
| `->twiceDaily(1, 13);`             | Run the task daily at 1:00 & 13:00.                      |
| `->twiceDailyAt(1, 13, 15);`       | Run the task daily at 1:15 & 13:15.                      |
| `->daysOfMonth([1, 10, 20]);`      | Run the task on specific days of the month.              |
| `->weekly();`                      | Run the task every Sunday at 00:00.                      |
| `->weeklyOn(1, '8:00');`           | Run the task every week on Monday at 8:00.               |
| `->monthly();`                     | Run the task on the first day of every month at 00:00.   |
| `->monthlyOn(4, '15:00');`         | Run the task every month on the 4th at 15:00.            |
| `->twiceMonthly(1, 16, '13:00');`  | Run the task monthly on the 1st and 16th at 13:00.       |
| `->lastDayOfMonth('15:00');`       | Run the task on the last day of the month at 15:00.      |
| `->quarterly();`                   | Run the task on the first day of every quarter at 00:00. |
| `->quarterlyOn(4, '14:00');`       | Run the task every quarter on the 4th at 14:00.          |
| `->yearly();`                      | Run the task on the first day of every year at 00:00.    |
| `->yearlyOn(6, 1, '17:00');`       | Run the task every year on June 1st at 17:00.            |
| `->timezone('America/New_York');`  | Set the timezone for the task.                           |

</div>

These methods may be combined with additional constraints to create even more finely tuned schedules that only run on certain days of the week. For example, you may schedule a command to run weekly on Monday:

```php
use Illuminate\Support\Facades\Schedule;

// Run once per week on Monday at 1 PM...
Schedule::call(function () {
    // ...
})->weekly()->mondays()->at('13:00');

// Run hourly from 8 AM to 5 PM on weekdays...
Schedule::command('foo')
    ->weekdays()
    ->hourly()
    ->timezone('America/Chicago')
    ->between('8:00', '17:00');
```

A list of additional schedule constraints may be found below:

<div class="overflow-auto">

| Method                                   | Description                                            |
| ---------------------------------------- | ------------------------------------------------------ |
| `->weekdays();`                          | Limit the task to weekdays.                            |
| `->weekends();`                          | Limit the task to weekends.                            |
| `->sundays();`                           | Limit the task to Sunday.                              |
| `->mondays();`                           | Limit the task to Monday.                              |
| `->tuesdays();`                          | Limit the task to Tuesday.                             |
| `->wednesdays();`                        | Limit the task to Wednesday.                           |
| `->thursdays();`                         | Limit the task to Thursday.                            |
| `->fridays();`                           | Limit the task to Friday.                              |
| `->saturdays();`                         | Limit the task to Saturday.                            |
| `->days(array\|mixed);`                  | Limit the task to specific days.                       |
| `->between($startTime, $endTime);`       | Limit the task to run between start and end times.     |
| `->unlessBetween($startTime, $endTime);` | Limit the task to not run between start and end times. |
| `->when(Closure);`                       | Limit the task based on a truth test.                  |
| `->environments($env);`                  | Limit the task to specific environments.               |

</div>

<a name="day-constraints"></a>
#### Day Constraints

The `days` method may be used to limit the execution of a task to specific days of the week. For example, you may schedule a command to run hourly on Sundays and Wednesdays:

```php
use Illuminate\Support\Facades\Schedule;

Schedule::command('emails:send')
    ->hourly()
    ->days([0, 3]);
```

Alternatively, you may use the constants available on the `Illuminate\Console\Scheduling\Schedule` class when defining the days on which a task should run:

```php
use Illuminate\Support\Facades;
use Illuminate\Console\Scheduling\Schedule;

Facades\Schedule::command('emails:send')
    ->hourly()
    ->days([Schedule::SUNDAY, Schedule::WEDNESDAY]);
```

<a name="between-time-constraints"></a>
#### Between Time Constraints

The `between` method may be used to limit the execution of a task based on the time of day:

```php
Schedule::command('emails:send')
    ->hourly()
    ->between('7:00', '22:00');
```

Similarly, the `unlessBetween` method can be used to exclude the execution of a task for a period of time:

```php
Schedule::command('emails:send')
    ->hourly()
    ->unlessBetween('23:00', '4:00');
```

<a name="truth-test-constraints"></a>
#### Truth Test Constraints

The `when` method may be used to limit the execution of a task based on the result of a given truth test. In other words, if the given closure returns `true`, the task will execute as long as no other constraining conditions prevent the task from running:

```php
Schedule::command('emails:send')->daily()->when(function () {
    return true;
});
```

The `skip` method may be seen as the inverse of `when`. If the `skip` method returns `true`, the scheduled task will not be executed:

```php
Schedule::command('emails:send')->daily()->skip(function () {
    return true;
});
```

When using chained `when` methods, the scheduled command will only execute if all `when` conditions return `true`.

<a name="environment-constraints"></a>
#### Environment Constraints

The `environments` method may be used to execute tasks only on the given environments (as defined by the `APP_ENV` [environment variable](/docs/{{version}}/configuration#environment-configuration)):

```php
Schedule::command('emails:send')
    ->daily()
    ->environments(['staging', 'production']);
```

<a name="timezones"></a>
### Timezones

Using the `timezone` method, you may specify that a scheduled task's time should be interpreted within a given timezone:

```php
use Illuminate\Support\Facades\Schedule;

Schedule::command('report:generate')
    ->timezone('America/New_York')
    ->at('2:00')
```

If you are repeatedly assigning the same timezone to all of your scheduled tasks, you can specify which timezone should be assigned to all schedules by defining a `schedule_timezone` option within your application's `app` configuration file:

```php
'timezone' => 'UTC',

'schedule_timezone' => 'America/Chicago',
```

> [!WARNING]
> Remember that some timezones utilize daylight saving time. When daylight saving time changes occur, your scheduled task may run twice or even not run at all. For this reason, we recommend avoiding timezone scheduling when possible.

<a name="preventing-task-overlaps"></a>
### Preventing Task Overlaps

By default, scheduled tasks will be run even if the previous instance of the task is still running. To prevent this, you may use the `withoutOverlapping` method:

```php
use Illuminate\Support\Facades\Schedule;

Schedule::command('emails:send')->withoutOverlapping();
```

In this example, the `emails:send` [Artisan command](/docs/{{version}}/artisan) will be run every minute if it is not already running. The `withoutOverlapping` method is especially useful if you have tasks that vary drastically in their execution time, preventing you from predicting exactly how long a given task will take.

If needed, you may specify how many minutes must pass before the "without overlapping" lock expires. By default, the lock will expire after 24 hours:

```php
Schedule::command('emails:send')->withoutOverlapping(10);
```

Behind the scenes, the `withoutOverlapping` method utilizes your application's [cache](/docs/{{version}}/cache) to obtain locks. If necessary, you can clear these cache locks using the `schedule:clear-cache` Artisan command. This is typically only necessary if a task becomes stuck due to an unexpected server problem.

<a name="running-tasks-on-one-server"></a>
### Running Tasks on One Server

> [!WARNING]
> To utilize this feature, your application must be using the `database`, `memcached`, `dynamodb`, or `redis` cache driver as your application's default cache driver. In addition, all servers must be communicating with the same central cache server.

If your application's scheduler is running on multiple servers, you may limit a scheduled job to only execute on a single server. For instance, assume you have a scheduled task that generates a new report every Friday night. If the task scheduler is running on three worker servers, the scheduled task will run on all three servers and generate the report three times. Not good!

To indicate that the task should run on only one server, use the `onOneServer` method when defining the scheduled task. The first server to obtain the task will secure an atomic lock on the job to prevent other servers from running the same task at the same time:

```php
use Illuminate\Support\Facades\Schedule;

Schedule::command('report:generate')
    ->fridays()
    ->at('17:00')
    ->onOneServer();
```

You may use the `useCache` method to customize the cache store used by the scheduler to obtain the atomic locks necessary for single-server tasks:

```php
Schedule::useCache('database');
```

<a name="naming-unique-jobs"></a>
#### Naming Single Server Jobs

Sometimes you may need to schedule the same job to be dispatched with different parameters, while still instructing Laravel to run each permutation of the job on a single server. To accomplish this, you may assign each schedule definition a unique name via the `name` method:

```php
Schedule::job(new CheckUptime('https://laravel.com'))
    ->name('check_uptime:laravel.com')
    ->everyFiveMinutes()
    ->onOneServer();

Schedule::job(new CheckUptime('https://vapor.laravel.com'))
    ->name('check_uptime:vapor.laravel.com')
    ->everyFiveMinutes()
    ->onOneServer();
```

Similarly, scheduled closures must be assigned a name if they are intended to be run on one server:

```php
Schedule::call(fn () => User::resetApiRequestCount())
    ->name('reset-api-request-count')
    ->daily()
    ->onOneServer();
```

<a name="background-tasks"></a>
### Background Tasks

By default, multiple tasks scheduled at the same time will execute sequentially based on the order they are defined in your `schedule` method. If you have long-running tasks, this may cause subsequent tasks to start much later than anticipated. If you would like to run tasks in the background so that they may all run simultaneously, you may use the `runInBackground` method:

```php
use Illuminate\Support\Facades\Schedule;

Schedule::command('analytics:report')
    ->daily()
    ->runInBackground();
```

> [!WARNING]
> The `runInBackground` method may only be used when scheduling tasks via the `command` and `exec` methods.

<a name="maintenance-mode"></a>
### Maintenance Mode

Your application's scheduled tasks will not run when the application is in [maintenance mode](/docs/{{version}}/configuration#maintenance-mode), since we don't want your tasks to interfere with any unfinished maintenance you may be performing on your server. However, if you would like to force a task to run even in maintenance mode, you may call the `evenInMaintenanceMode` method when defining the task:

```php
Schedule::command('emails:send')->evenInMaintenanceMode();
```

<a name="pausing-scheduled-tasks"></a>
### Pausing Scheduled Tasks

You may temporarily pause scheduled task processing without changing your deployed code by using the `schedule:pause` Artisan command:

```shell
php artisan schedule:pause
```

While the scheduler is paused, no scheduled tasks will run. You may resume scheduled task processing using the `schedule:continue` command:

```shell
php artisan schedule:continue
```

If a task should still run while the scheduler is paused, you may mark it with the `evenWhenPaused` method:

```php
Schedule::command('emails:send')->evenWhenPaused();
```

<a name="schedule-groups"></a>
### Schedule Groups

When defining multiple scheduled tasks with similar configurations, you can use Laravel's task grouping feature to avoid repeating the same settings for each task. Grouping tasks simplifies your code and ensures consistency across related tasks.

To create a group of scheduled tasks, invoke the desired task configuration methods, followed by the `group` method. The `group` method accepts a closure that is responsible for defining the tasks that share the specified configuration:

```php
use Illuminate\Support\Facades\Schedule;

Schedule::daily()
    ->onOneServer()
    ->timezone('America/New_York')
    ->group(function () {
        Schedule::command('emails:send --force');
        Schedule::command('emails:prune');
    });
```

<a name="running-the-scheduler"></a>
## Running the Scheduler

Now that we have learned how to define scheduled tasks, let's discuss how to actually run them on our server. The `schedule:run` Artisan command will evaluate all of your scheduled tasks and determine if they need to run based on the server's current time.

So, when using Laravel's scheduler, we only need to add a single cron configuration entry to our server that runs the `schedule:run` command every minute. If you do not know how to add cron entries to your server, consider using a managed platform such as [Laravel Cloud](https://cloud.laravel.com) which can manage the scheduled task execution for you:

```shell
* * * * * cd /path-to-your-project && php artisan schedule:run >> /dev/null 2>&1
```

<a name="sub-minute-scheduled-tasks"></a>
### Sub-Minute Scheduled Tasks

On most operating systems, cron jobs are limited to running a maximum of once per minute. However, Laravel's scheduler allows you to schedule tasks to run at more frequent intervals, even as often as once per second:

```php
use Illuminate\Support\Facades\Schedule;

Schedule::call(function () {
    DB::table('recent_users')->delete();
})->everySecond();
```

When sub-minute tasks are defined within your application, the `schedule:run` command will continue running until the end of the current minute instead of exiting immediately. This allows the command to invoke all required sub-minute tasks throughout the minute.

Since sub-minute tasks that take longer than expected to run could delay the execution of later sub-minute tasks, it is recommended that all sub-minute tasks dispatch queued jobs or background commands to handle the actual task processing:

```php
use App\Jobs\DeleteRecentUsers;

Schedule::job(new DeleteRecentUsers)->everyTenSeconds();

Schedule::command('users:delete')->everyTenSeconds()->runInBackground();
```

<a name="interrupting-sub-minute-tasks"></a>
#### Interrupting Sub-Minute Tasks

As the `schedule:run` command runs for the entire minute of invocation when sub-minute tasks are defined, you may sometimes need to interrupt the command when deploying your application. Otherwise, an instance of the `schedule:run` command that is already running would continue using your application's previously deployed code until the current minute ends.

To interrupt in-progress `schedule:run` invocations, you may add the `schedule:interrupt` command to your application's deployment script. This command should be invoked after your application is finished deploying:

```shell
php artisan schedule:interrupt
```

<a name="running-the-scheduler-locally"></a>
### Running the Scheduler Locally

Typically, you would not add a scheduler cron entry to your local development machine. Instead, you may use the `schedule:work` Artisan command. This command will run in the foreground and invoke the scheduler every minute until you terminate the command. When sub-minute tasks are defined, the scheduler will continue running within each minute to process those tasks:

```shell
php artisan schedule:work
```

<a name="task-output"></a>
## Task Output

The Laravel scheduler provides several convenient methods for working with the output generated by scheduled tasks. First, using the `sendOutputTo` method, you may send the output to a file for later inspection:

```php
use Illuminate\Support\Facades\Schedule;

Schedule::command('emails:send')
    ->daily()
    ->sendOutputTo($filePath);
```

If you would like to append the output to a given file, you may use the `appendOutputTo` method:

```php
Schedule::command('emails:send')
    ->daily()
    ->appendOutputTo($filePath);
```

Using the `emailOutputTo` method, you may email the output to an email address of your choice. Before emailing the output of a task, you should configure Laravel's [email services](/docs/{{version}}/mail):

```php
Schedule::command('report:generate')
    ->daily()
    ->sendOutputTo($filePath)
    ->emailOutputTo('taylor@example.com');
```

If you only want to email the output if the scheduled Artisan or system command terminates with a non-zero exit code, use the `emailOutputOnFailure` method:

```php
Schedule::command('report:generate')
    ->daily()
    ->emailOutputOnFailure('taylor@example.com');
```

> [!WARNING]
> The `emailOutputTo`, `emailOutputOnFailure`, `sendOutputTo`, and `appendOutputTo` methods are exclusive to the `command` and `exec` methods.

<a name="task-hooks"></a>
## Task Hooks

Using the `before` and `after` methods, you may specify code to be executed before and after the scheduled task is executed:

```php
use Illuminate\Support\Facades\Schedule;

Schedule::command('emails:send')
    ->daily()
    ->before(function () {
        // The task is about to execute...
    })
    ->after(function () {
        // The task has executed...
    });
```

The `onSuccess` and `onFailure` methods allow you to specify code to be executed if the scheduled task succeeds or fails. A failure indicates that the scheduled Artisan or system command terminated with a non-zero exit code:

```php
Schedule::command('emails:send')
    ->daily()
    ->onSuccess(function () {
        // The task succeeded...
    })
    ->onFailure(function () {
        // The task failed...
    });
```

If output is available from your command, you may access it in your `after`, `onSuccess` or `onFailure` hooks by type-hinting an `Illuminate\Support\Stringable` instance as the `$output` argument of your hook's closure definition:

```php
use Illuminate\Support\Stringable;

Schedule::command('emails:send')
    ->daily()
    ->onSuccess(function (Stringable $output) {
        // The task succeeded...
    })
    ->onFailure(function (Stringable $output) {
        // The task failed...
    });
```

<a name="pinging-urls"></a>
#### Pinging URLs

Using the `pingBefore` and `thenPing` methods, the scheduler can automatically ping a given URL before or after a task is executed. This method is useful for notifying an external service, such as [Envoyer](https://envoyer.io), that your scheduled task is beginning or has finished execution:

```php
Schedule::command('emails:send')
    ->daily()
    ->pingBefore($url)
    ->thenPing($url);
```

The `pingOnSuccess` and `pingOnFailure` methods may be used to ping a given URL only if the task succeeds or fails. A failure indicates that the scheduled Artisan or system command terminated with a non-zero exit code:

```php
Schedule::command('emails:send')
    ->daily()
    ->pingOnSuccess($successUrl)
    ->pingOnFailure($failureUrl);
```

The `pingBeforeIf`,`thenPingIf`,`pingOnSuccessIf`, and `pingOnFailureIf` methods may be used to ping a given URL only if a given condition is `true`:

```php
Schedule::command('emails:send')
    ->daily()
    ->pingBeforeIf($condition, $url)
    ->thenPingIf($condition, $url);

Schedule::command('emails:send')
    ->daily()
    ->pingOnSuccessIf($condition, $successUrl)
    ->pingOnFailureIf($condition, $failureUrl);
```

<a name="events"></a>
## Events

Laravel dispatches a variety of [events](/docs/{{version}}/events) during the scheduling process. You may [define listeners](/docs/{{version}}/events) for any of the following events:

<div class="overflow-auto">

| Event Name                                                  |
| ----------------------------------------------------------- |
| `Illuminate\Console\Events\ScheduledTaskStarting`           |
| `Illuminate\Console\Events\ScheduledTaskFinished`           |
| `Illuminate\Console\Events\ScheduledBackgroundTaskFinished` |
| `Illuminate\Console\Events\ScheduledTaskSkipped`            |
| `Illuminate\Console\Events\ScheduledTaskFailed`             |

</div>


---

# Laravel Scout

*Sección: Laravel | Origen: https://laravel.com/docs/13.x/scout*

- [Introduction](#introduction)
- [Installation](#installation)
    - [Queueing](#queueing)
- [Driver Prerequisites](#driver-prerequisites)
    - [Algolia](#algolia)
    - [Meilisearch](#meilisearch)
    - [Typesense](#typesense)
    - [Turbopuffer](#turbopuffer)
- [Configuration](#configuration)
    - [Configuring Searchable Data](#configuring-searchable-data)
- [Database / Collection Engines](#database-and-collection-engines)
    - [Database Engine](#database-engine)
    - [Collection Engine](#collection-engine)
- [Third-Party Engine Configuration](#third-party-engine-configuration)
    - [Configuring Model Indexes](#configuring-model-indexes)
    - [Algolia](#algolia-configuration)
    - [Meilisearch](#meilisearch-configuration)
    - [Typesense](#typesense-configuration)
    - [Turbopuffer](#turbopuffer-configuration)
- [Third-Party Engine Indexing](#indexing)
    - [Batch Import](#batch-import)
    - [Adding Records](#adding-records)
    - [Updating Records](#updating-records)
    - [Removing Records](#removing-records)
    - [Pausing Indexing](#pausing-indexing)
    - [Conditionally Searchable Model Instances](#conditionally-searchable-model-instances)
- [Searching](#searching)
    - [Where Clauses](#where-clauses)
    - [Semantic Search](#semantic-search)
    - [Pagination](#pagination)
    - [Soft Deleting](#soft-deleting)
    - [Customizing Engine Searches](#customizing-engine-searches)
- [Custom Engines](#custom-engines)

<a name="introduction"></a>
## Introduction

[Laravel Scout](https://github.com/laravel/scout) provides a simple, driver-based solution for adding full-text search to your [Eloquent models](/docs/{{version}}/eloquent). Using model observers, Scout will automatically keep your search indexes in sync with your Eloquent records.

Scout ships with a built-in `database` engine that uses MySQL / PostgreSQL full-text indexes and `LIKE` clauses to search your existing database — no external service required. For most applications, this is all you need. For an overview of all search options available in Laravel, consult the [search documentation](/docs/{{version}}/search).

Scout also includes drivers for [Algolia](https://www.algolia.com/), [Meilisearch](https://www.meilisearch.com), [Typesense](https://typesense.org), and [Turbopuffer](https://turbopuffer.com) when you need features like typo tolerance, faceted filtering, vector search, or geo-search at massive scale. A "collection" driver is also available for local development, and you are free to write [custom engines](#custom-engines) as well.

<a name="installation"></a>
## Installation

First, install Scout via the Composer package manager:

```shell
composer require laravel/scout
```

After installing Scout, you should publish the Scout configuration file using the `vendor:publish` Artisan command. This command will publish the `scout.php` configuration file to your application's `config` directory:

```shell
php artisan vendor:publish --provider="Laravel\Scout\ScoutServiceProvider"
```

Finally, add the `Laravel\Scout\Searchable` trait to the model you would like to make searchable. This trait will register a model observer that will automatically keep the model in sync with your search driver:

```php
<?php

namespace App\Models;

use Illuminate\Database\Eloquent\Model;
use Laravel\Scout\Searchable;

class Post extends Model
{
    use Searchable;
}
```

<a name="queueing"></a>
### Queueing

When using an engine that is not the `database` or `collection` engine, you should strongly consider configuring a [queue driver](/docs/{{version}}/queues) before using the library. Running a queue worker will allow Scout to queue all operations that sync your model information to your search indexes, providing much better response times for your application's web interface.

Once you have configured a queue driver, set the value of the `queue` option in your `config/scout.php` configuration file to `true`:

```php
'queue' => true,
```

Even when the `queue` option is set to `false`, it's important to remember that some Scout drivers like Algolia and Meilisearch always index records asynchronously. In other words, even though the index operation has completed within your Laravel application, the search engine itself may not reflect the new and updated records immediately.

To specify the connection and queue that your Scout jobs utilize, you may define the `queue` configuration option as an array:

```php
'queue' => [
    'connection' => 'redis',
    'queue' => 'scout'
],
```

Of course, if you customize the connection and queue that Scout jobs utilize, you should run a queue worker to process jobs on that connection and queue:

```shell
php artisan queue:work redis --queue=scout
```

<a name="unique-jobs"></a>
#### Unique Jobs

In write-heavy applications, you may wish to prevent Scout from queueing duplicate jobs for the same model records. You may opt into unique indexing jobs by registering the `MakeSearchableUniquely` and `RemoveFromSearchUniquely` job classes, typically within the `boot` method of a service provider:

```php
use Laravel\Scout\Jobs\MakeSearchableUniquely;
use Laravel\Scout\Jobs\RemoveFromSearchUniquely;
use Laravel\Scout\Scout;

Scout::makeSearchableUsing(MakeSearchableUniquely::class);
Scout::removeFromSearchUsing(RemoveFromSearchUniquely::class);
```

These jobs use Laravel's [unique job locks](/docs/{{version}}/queues#unique-jobs) to avoid dispatching duplicate queued indexing operations for the same searchable model records while a matching job is already queued.

<a name="driver-prerequisites"></a>
## Driver Prerequisites

<a name="algolia"></a>
### Algolia

When using the Algolia driver, you should configure your Algolia `id` and `secret` credentials in your `config/scout.php` configuration file. Once your credentials have been configured, you will also need to install the Algolia PHP SDK via the Composer package manager:

```shell
composer require algolia/algoliasearch-client-php
```

<a name="meilisearch"></a>
### Meilisearch

[Meilisearch](https://www.meilisearch.com) is a fast, open source search engine. If you aren't sure how to install Meilisearch on your local machine, you may use [Laravel Sail](/docs/{{version}}/sail#meilisearch), Laravel's officially supported Docker development environment.

When using the Meilisearch driver you will need to install the Meilisearch PHP SDK via the Composer package manager:

```shell
composer require meilisearch/meilisearch-php http-interop/http-factory-guzzle
```

Then, set the `SCOUT_DRIVER` environment variable as well as your Meilisearch `host` and `key` credentials within your application's `.env` file:

```ini
SCOUT_DRIVER=meilisearch
MEILISEARCH_HOST=http://127.0.0.1:7700
MEILISEARCH_KEY=masterKey
```

For more information regarding Meilisearch, please consult the [Meilisearch documentation](https://docs.meilisearch.com/learn/getting_started/quick_start.html).

In addition, you should ensure that you install a version of `meilisearch/meilisearch-php` that is compatible with your Meilisearch binary version by reviewing [Meilisearch's documentation regarding binary compatibility](https://github.com/meilisearch/meilisearch-php#-compatibility-with-meilisearch).

> [!WARNING]
> When upgrading Scout on an application that utilizes Meilisearch, you should always [review any additional breaking changes](https://github.com/meilisearch/Meilisearch/releases) to the Meilisearch service itself.

<a name="typesense"></a>
### Typesense

[Typesense](https://typesense.org) is a lightning-fast, open source search engine and supports keyword search, semantic search, geo search, and vector search.

You can [self-host](https://typesense.org/docs/guide/install-typesense.html#option-2-local-machine-self-hosting) Typesense or use [Typesense Cloud](https://cloud.typesense.org).

To get started using Typesense with Scout, install the Typesense PHP SDK via the Composer package manager:

```shell
composer require typesense/typesense-php
```

Then, set the `SCOUT_DRIVER` environment variable as well as your Typesense host and API key credentials within your application's .env file:

```ini
SCOUT_DRIVER=typesense
TYPESENSE_API_KEY=masterKey
TYPESENSE_HOST=localhost
```

If you are using [Laravel Sail](/docs/{{version}}/sail), you may need to adjust the `TYPESENSE_HOST` environment variable to match the Docker container name. You may also optionally specify your installation's port, path, and protocol:

```ini
TYPESENSE_PORT=8108
TYPESENSE_PATH=
TYPESENSE_PROTOCOL=http
```

Additional settings and schema definitions for your Typesense collections can be found within your application's `config/scout.php` configuration file. For more information regarding Typesense, please consult the [Typesense documentation](https://typesense.org/docs/guide/#quick-start).

<a name="turbopuffer"></a>
### Turbopuffer

[Turbopuffer](https://turbopuffer.com) is a search engine that supports full-text, semantic, and hybrid search. To use the Turbopuffer driver, set the `SCOUT_DRIVER` environment variable and provide your Turbopuffer API key:

```ini
SCOUT_DRIVER=turbopuffer
TURBOPUFFER_API_KEY=tpuf_...
TURBOPUFFER_REGION=gcp-us-central1
```

The `TURBOPUFFER_REGION` environment variable is optional and defaults to `gcp-us-central1`.

<a name="configuration"></a>
## Configuration

<a name="configuring-searchable-data"></a>
### Configuring Searchable Data

By default, the entire `toArray` form of a given model will be persisted to its search index. If you would like to customize the data that is synchronized to the search index, you may override the `toSearchableArray` method on the model:

```php
<?php

namespace App\Models;

use Illuminate\Database\Eloquent\Model;
use Laravel\Scout\Searchable;

class Post extends Model
{
    use Searchable;

    /**
     * Get the indexable data array for the model.
     *
     * @return array<string, mixed>
     */
    public function toSearchableArray(): array
    {
        $array = $this->toArray();

        // Customize the data array...

        return $array;
    }
}
```

<a name="configuring-search-engines-per-model"></a>
#### Configuring Model Engines

When searching, Scout will typically use the default search engine specified in your application's `scout` configuration file. However, the search engine for a particular model can be changed by overriding the `searchableUsing` method on the model:

```php
<?php

namespace App\Models;

use Illuminate\Database\Eloquent\Model;
use Laravel\Scout\Engines\Engine;
use Laravel\Scout\Scout;
use Laravel\Scout\Searchable;

class User extends Model
{
    use Searchable;

    /**
     * Get the engine used to index the model.
     */
    public function searchableUsing(): Engine
    {
        return Scout::engine('meilisearch');
    }
}
```

<a name="database-and-collection-engines"></a>
## Database / Collection Engines

<a name="database-engine"></a>
### Database Engine

> [!WARNING]
> The database engine currently supports MySQL and PostgreSQL, both of which provide support for fast, full-text column indexing.

The `database` engine uses MySQL / PostgreSQL full-text indexes and `LIKE` clauses to search your existing database directly. For many applications, this is the simplest and most practical way to add search — no external service or additional infrastructure required.

To use the database engine, set the `SCOUT_DRIVER` environment variable to `database`:

```ini
SCOUT_DRIVER=database
```

Once configured, you may [define your searchable data](#configuring-searchable-data) and start [executing search queries](#searching) against your models. Unlike third-party engines, the database engine requires no separate indexing step — it searches your database tables directly.

<a name="database-semantic-and-hybrid-search"></a>
#### Semantic and Hybrid Search

The database engine supports semantic and hybrid search when using PostgreSQL with the `pgvector` extension. To get started, add a nullable vector column and a full-text index to your model's table. The vector column must be nullable because Scout stores the embedding after the model has been persisted:

```php
Schema::ensureVectorExtensionExists();

Schema::table('articles', function (Blueprint $table) {
    // ...

    $table->vector('embedding', dimensions: 1536)->nullable();
    $table->vectorIndex('embedding');
    $table->fullText(['title', 'body']);
});
```

Next, define a `toSearchableEmbedding` method on the model. This method may return the source text that Scout should embed or a precomputed embedding array. Scout stores embeddings in the `embedding` column by default; to use another column, define a `searchableEmbeddingColumn` method on the model.

#### Customizing Database Searching Strategies

By default, the database engine will execute a `LIKE` query against every model attribute that you have [configured as searchable](#configuring-searchable-data). However, you can assign more efficient search strategies to specific columns. The `SearchUsingFullText` attribute will use your database's full-text index for that column, while `SearchUsingPrefix` will only match the beginning of strings (`example%`) instead of searching within the entire string (`%example%`).

To define this behavior, assign PHP attributes to your model's `toSearchableArray` method. Any columns without an attribute will continue to use the default `LIKE` strategy:

```php
use Laravel\Scout\Attributes\SearchUsingFullText;
use Laravel\Scout\Attributes\SearchUsingPrefix;

/**
 * Get the indexable data array for the model.
 *
 * @return array<string, mixed>
 */
#[SearchUsingPrefix(['id', 'email'])]
#[SearchUsingFullText(['bio'])]
public function toSearchableArray(): array
{
    return [
        'id' => $this->id,
        'name' => $this->name,
        'email' => $this->email,
        'bio' => $this->bio,
    ];
}
```

> [!WARNING]
> Before specifying that a column should use full text query constraints, ensure that the column has been assigned a [full text index](/docs/{{version}}/migrations#available-index-types).

<a name="collection-engine"></a>
### Collection Engine

The "collection" engine is intended for quick prototypes, extremely small datasets (a few hundred records), or running tests. It retrieves all possible records from your database and uses Laravel's `Str::is` helper to filter them in PHP, so it does not require any indexing or database-specific features. For anything beyond trivial use cases, you should use the [database engine](#database-engine) instead.

To use the collection engine, you may simply set the value of the `SCOUT_DRIVER` environment variable to `collection`, or specify the `collection` driver directly in your application's `scout` configuration file:

```ini
SCOUT_DRIVER=collection
```

Once you have specified the collection driver as your preferred driver, you may start [executing search queries](#searching) against your models. Search engine indexing, such as the indexing needed to seed Algolia, Meilisearch, or Typesense indexes, is unnecessary when using the collection engine.

#### Differences From Database Engine

While the database engine uses full-text indexes and `LIKE` clauses to find matching records efficiently, the collection engine pulls all records and filters them in PHP. The collection engine is the most portable option as it works across all relational databases supported by Laravel (including SQLite and SQL Server); however, it is significantly less efficient than the database engine and should not be used with large datasets.

<a name="third-party-engine-configuration"></a>
## Third-Party Engine Configuration

The following configuration options are only relevant when using a third-party search engine such as Algolia, Meilisearch, or Typesense. If you are using the [database engine](#database-engine), you may skip this section.

<a name="configuring-model-indexes"></a>
### Configuring Model Indexes

When using a third-party engine, each Eloquent model is synced with a given search "index", which contains all of the searchable records for that model. By default, each model will be persisted to an index matching the model's typical "table" name. Typically, this is the plural form of the model name; however, you are free to customize the model's index by overriding the `searchableAs` method on the model:

```php
<?php

namespace App\Models;

use Illuminate\Database\Eloquent\Model;
use Laravel\Scout\Searchable;

class Post extends Model
{
    use Searchable;

    /**
     * Get the name of the index associated with the model.
     */
    public function searchableAs(): string
    {
        return 'posts_index';
    }
}
```

> [!NOTE]
> The `searchableAs` method has no effect when using the database engine, which always searches the model's database table directly.

<a name="configuring-the-model-id"></a>
#### Configuring the Model ID

By default, Scout will use the primary key of the model as the model's unique ID / key that is stored in the search index. If you need to customize this behavior when using a third-party engine, you may override the `getScoutKey` and the `getScoutKeyName` methods on the model:

```php
<?php

namespace App\Models;

use Illuminate\Database\Eloquent\Model;
use Laravel\Scout\Searchable;

class User extends Model
{
    use Searchable;

    /**
     * Get the value used to index the model.
     */
    public function getScoutKey(): mixed
    {
        return $this->email;
    }

    /**
     * Get the key name used to index the model.
     */
    public function getScoutKeyName(): mixed
    {
        return 'email';
    }
}
```

> [!NOTE]
> The `getScoutKey` and `getScoutKeyName` methods have no effect when using the database engine, which always uses the model's primary key.

<a name="algolia-configuration"></a>
### Algolia

<a name="algolia-index-settings"></a>
#### Index Settings

Sometimes you may want to configure additional settings on your Algolia indexes. While you can manage these settings via the Algolia UI, it is sometimes more efficient to manage the desired state of your index configuration directly from your application's `config/scout.php` configuration file.

This approach allows you to deploy these settings through your application's automated deployment pipeline, avoiding manual configuration and ensuring consistency across multiple environments. You may configure filterable attributes, ranking, faceting, or [any other supported settings](https://www.algolia.com/doc/rest-api/search/#tag/Indices/operation/setSettings).

To get started, add settings for each index in your application's `config/scout.php` configuration file:

```php
use App\Models\User;
use App\Models\Flight;

'algolia' => [
    'id' => env('ALGOLIA_APP_ID', ''),
    'secret' => env('ALGOLIA_SECRET', ''),
    'index-settings' => [
        User::class => [
            'searchableAttributes' => ['id', 'name', 'email'],
            'attributesForFaceting'=> ['filterOnly(email)'],
            // Other settings fields...
        ],
        Flight::class => [
            'searchableAttributes'=> ['id', 'destination'],
        ],
    ],
],
```

If the model underlying a given index is soft deletable and is included in the `index-settings` array, Scout will automatically include support for faceting on soft deleted models on that index. If you have no other faceting attributes to define for a soft deletable model index, you may simply add an empty entry to the `index-settings` array for that model:

```php
'index-settings' => [
    Flight::class => []
],
```

After configuring your application's index settings, you must invoke the `scout:sync-index-settings` Artisan command. This command will inform Algolia of your currently configured index settings. For convenience, you may wish to make this command part of your deployment process:

```shell
php artisan scout:sync-index-settings
```

<a name="algolia-identifying-users"></a>
#### Identifying Users

Scout allows you to auto identify users when using Algolia. Associating the authenticated user with search operations may be helpful when viewing your search analytics within Algolia's dashboard. You can enable user identification by defining a `SCOUT_IDENTIFY` environment variable as `true` in your application's `.env` file:

```ini
SCOUT_IDENTIFY=true
```

Enabling this feature will also pass the request's IP address and your authenticated user's primary identifier to Algolia so this data is associated with any search request that is made by the user.

<a name="meilisearch-configuration"></a>
### Meilisearch

<a name="meilisearch-index-settings"></a>
#### Index Settings

Meilisearch requires you to pre-define index search settings such as filterable attributes, sortable attributes, and [other supported settings fields](https://docs.meilisearch.com/reference/api/settings.html).

Filterable attributes are any attributes you plan to filter on when invoking Scout's `where` method, while sortable attributes are any attributes you plan to sort by when invoking Scout's `orderBy` method. To define your index settings, adjust the `index-settings` portion of your `meilisearch` configuration entry in your application's `scout` configuration file:

```php
use App\Models\User;
use App\Models\Flight;

'meilisearch' => [
    'host' => env('MEILISEARCH_HOST', 'http://localhost:7700'),
    'key' => env('MEILISEARCH_KEY', null),
    'index-settings' => [
        User::class => [
            'filterableAttributes'=> ['id', 'name', 'email'],
            'sortableAttributes' => ['created_at'],
            // Other settings fields...
        ],
        Flight::class => [
            'filterableAttributes'=> ['id', 'destination'],
            'sortableAttributes' => ['updated_at'],
        ],
    ],
],
```

If the model underlying a given index is soft deletable and is included in the `index-settings` array, Scout will automatically include support for filtering on soft deleted models on that index. If you have no other filterable or sortable attributes to define for a soft deletable model index, you may simply add an empty entry to the `index-settings` array for that model:

```php
'index-settings' => [
    Flight::class => []
],
```

After configuring your application's index settings, you must invoke the `scout:sync-index-settings` Artisan command. This command will inform Meilisearch of your currently configured index settings. For convenience, you may wish to make this command part of your deployment process:

```shell
php artisan scout:sync-index-settings
```

<a name="meilisearch-semantic-and-hybrid-search"></a>
#### Semantic and Hybrid Search

To use semantic or hybrid search with Meilisearch, configure an embedder in the index settings and embedding settings for each searchable model:

```php
'meilisearch' => [
    // ...
    'index-settings' => [
        Article::class => [
            'embedders' => [
                'default' => [
                    'source' => 'userProvided',
                    'dimensions' => 1536,
                ],
            ],
        ],
    ],
    'model-settings' => [
        Article::class => [
            'embedding' => [
                'embedder' => 'default',
                'dimensions' => 1536,
            ],
        ],
    ],
],
```

The model's `toSearchableEmbedding` method may return source text, which Scout embeds using the [Laravel AI SDK](/docs/{{version}}/ai-sdk), or a precomputed embedding array. After updating the configuration, run the `scout:sync-index-settings` command.

<a name="meilisearch-data-types"></a>
#### Searchable Data Types

Meilisearch will only perform filter operations (`>`, `<`, etc.) on data of the correct type. When customizing your searchable data, you should ensure that numeric values are cast to their correct type:

```php
public function toSearchableArray()
{
    return [
        'id' => (int) $this->id,
        'name' => $this->name,
        'price' => (float) $this->price,
    ];
}
```

<a name="typesense-configuration"></a>
### Typesense

<a name="typesense-searchable-data"></a>
#### Preparing Searchable Data

When utilizing Typesense, your searchable models must define a `toSearchableArray` method that casts your model's primary key to a string and creation date to a UNIX timestamp:

```php
/**
 * Get the indexable data array for the model.
 *
 * @return array<string, mixed>
 */
public function toSearchableArray(): array
{
    return array_merge($this->toArray(),[
        'id' => (string) $this->id,
        'created_at' => $this->created_at->timestamp,
    ]);
}
```

You should also define your Typesense collection schemas in your application's `config/scout.php` file. A collection schema describes the data types of each field that is searchable via Typesense. For more information on all available schema options, please consult the [Typesense documentation](https://typesense.org/docs/latest/api/collections.html#schema-parameters).

If you need to change your Typesense collection's schema after it has been defined, you may either run `scout:flush` and `scout:import`, which will delete all existing indexed data and recreate the schema. Or, you may use Typesense's API to modify the collection's schema without removing any indexed data.

If your searchable model is soft deletable, you should define a `__soft_deleted` field in the model's corresponding Typesense schema within your application's `config/scout.php` configuration file:

```php
User::class => [
    'collection-schema' => [
        'fields' => [
            // ...
            [
                'name' => '__soft_deleted',
                'type' => 'int32',
                'optional' => true,
            ],
        ],
    ],
],
```

<a name="typesense-embeddings"></a>
#### Embeddings

To enable semantic and hybrid search, define an `embedding` setting and vector field in the model's Typesense configuration. By default, Scout uses the [Laravel AI SDK](/docs/{{version}}/ai-sdk) to generate embeddings:

```php
use App\Models\Article;

'model-settings' => [
    Article::class => [
        'collection-schema' => [
            'fields' => [
                ['name' => 'title', 'type' => 'string'],
                ['name' => 'embedding', 'type' => 'float[]', 'num_dim' => 1536],
            ],
        ],
        'search-parameters' => ['query_by' => 'title'],
        'embedding' => [
            'attribute' => 'embedding',
            'dimensions' => 1536,
        ],
    ],
],
```

Your model's `toSearchableEmbedding` method should return the source text that Scout should embed or a precomputed embedding array:

```php
public function toSearchableEmbedding(): string|array
{
    return $this->title.' '.$this->body;
}
```

<a name="typesense-dynamic-search-parameters"></a>
#### Dynamic Search Parameters

Typesense allows you to modify your [search parameters](https://typesense.org/docs/latest/api/search.html#search-parameters) dynamically when performing a search operation via the `options` method:

```php
use App\Models\Todo;

Todo::search('Groceries')->options([
    'query_by' => 'title, description'
])->get();
```

<a name="turbopuffer-configuration"></a>
### Turbopuffer

Turbopuffer requires a schema and searchable attributes for each model. Define them in the `model-settings` array of your `turbopuffer` configuration within the `scout` configuration file:

```php
use App\Models\Article;

'turbopuffer' => [
    // ...
    'model-settings' => [
        Article::class => [
            'searchable-attributes' => [
                'title' => 3,
                'body' => 1,
            ],
            'schema' => [
                'title' => ['type' => 'string', 'full_text_search' => true],
                'body' => ['type' => 'string', 'full_text_search' => true],
                'status' => ['type' => 'string'],
            ],
        ],
    ],
],
```

The numeric values assigned to `searchable-attributes` are relative BM25 weights. In the example above, matches in the article title contribute three times the score of matches in the body.

To enable semantic and hybrid search, add an `embedding` setting and vector schema to the model's configuration:

```php
'turbopuffer' => [
    // ...
    'model-settings' => [
        Article::class => [
            'searchable-attributes' => [
                'title' => 3,
                'body' => 1,
            ],
            'embedding' => [
                'attribute' => 'embedding',
                'dimensions' => 1536,
            ],
            'schema' => [
                'title' => ['type' => 'string', 'full_text_search' => true],
                'body' => ['type' => 'string', 'full_text_search' => true],
                'embedding' => ['type' => '[1536]f32', 'ann' => true],
            ],
        ],
    ],
],
```

Your model's `toSearchableEmbedding` method should return the source text that Scout should embed or a precomputed embedding array. Scout generates source-text embeddings using the [Laravel AI SDK](/docs/{{version}}/ai-sdk).

Alternatively, you may use Turbopuffer's native embeddings without installing the Laravel AI SDK or defining a `toSearchableEmbedding` method. Set the embedding driver to `turbopuffer` and configure an `embed` schema on the searchable source attribute:

```php
'embedding' => [
    'driver' => 'turbopuffer',
    'attribute' => 'embedding_text',
],

'schema' => [
    // ...
    'embedding_text' => [
        'type' => 'string',
        'embed' => [
            'model' => 'voyage/voyage-4',
            'dimensions' => 1024,
            'attribute' => 'embedding',
        ],
    ],
],
```

The source attribute must be included in the model's `toSearchableArray` output.

<a name="indexing"></a>
## Third-Party Engine Indexing

> [!NOTE]
> The indexing features described in this section are primarily relevant when using a third-party engine (Algolia, Meilisearch, Typesense, or Turbopuffer). The database engine searches your database tables directly, so it does not require manual index management.

<a name="batch-import"></a>
### Batch Import

If you are installing Scout into an existing project, you may already have database records you need to import into your indexes. Scout provides a `scout:import` Artisan command that you may use to import all of your existing records into your search indexes:

```shell
php artisan scout:import "App\Models\Post"
```

The `scout:queue-import` command may be used to import all of your existing records using [queued jobs](/docs/{{version}}/queues):

```shell
php artisan scout:queue-import "App\Models\Post" --chunk=500
```

The `flush` command may be used to remove all of a model's records from your search indexes:

```shell
php artisan scout:flush "App\Models\Post"
```

<a name="modifying-the-import-query"></a>
#### Modifying the Import Query

If you would like to modify the query that is used to retrieve all of your models for batch importing, you may define a `makeAllSearchableUsing` method on your model. This is a great place to add any eager relationship loading that may be necessary before importing your models:

```php
use Illuminate\Database\Eloquent\Builder;

/**
 * Modify the query used to retrieve models when making all of the models searchable.
 */
protected function makeAllSearchableUsing(Builder $query): Builder
{
    return $query->with('author');
}
```

> [!WARNING]
> The `makeAllSearchableUsing` method may not be applicable when using a queue to batch import models. Relationships are [not restored](/docs/{{version}}/queues#handling-relationships) when model collections are processed by jobs.

<a name="adding-records"></a>
### Adding Records

Once you have added the `Laravel\Scout\Searchable` trait to a model, all you need to do is `save` or `create` a model instance and it will automatically be added to your search index. If you have configured Scout to [use queues](#queueing) this operation will be performed in the background by your queue worker:

```php
use App\Models\Order;

$order = new Order;

// ...

$order->save();
```

<a name="adding-records-via-query"></a>
#### Adding Records via Query

If you would like to add a collection of models to your search index via an Eloquent query, you may chain the `searchable` method onto the Eloquent query. The `searchable` method will [chunk the results](/docs/{{version}}/eloquent#chunking-results) of the query and add the records to your search index. Again, if you have configured Scout to use queues, all of the chunks will be imported in the background by your queue workers:

```php
use App\Models\Order;

Order::where('price', '>', 100)->searchable();
```

You may also call the `searchable` method on an Eloquent relationship instance:

```php
$user->orders()->searchable();
```

Or, if you already have a collection of Eloquent models in memory, you may call the `searchable` method on the collection instance to add the model instances to their corresponding index:

```php
$orders->searchable();
```

> [!NOTE]
> The `searchable` method can be considered an "upsert" operation. In other words, if the model record is already in your index, it will be updated. If it does not exist in the search index, it will be added to the index.

<a name="updating-records"></a>
### Updating Records

To update a searchable model, you only need to update the model instance's properties and `save` the model to your database. Scout will automatically persist the changes to your search index:

```php
use App\Models\Order;

$order = Order::find(1);

// Update the order...

$order->save();
```

You may also invoke the `searchable` method on an Eloquent query instance to update a collection of models. If the models do not exist in your search index, they will be created:

```php
Order::where('price', '>', 100)->searchable();
```

If you would like to update the search index records for all of the models in a relationship, you may invoke the `searchable` on the relationship instance:

```php
$user->orders()->searchable();
```

Or, if you already have a collection of Eloquent models in memory, you may call the `searchable` method on the collection instance to update the model instances in their corresponding index:

```php
$orders->searchable();
```

<a name="modifying-records-before-importing"></a>
#### Modifying Records Before Importing

Sometimes you may need to prepare the collection of models before they are made searchable. For instance, you may want to eager load a relationship so that the relationship data can be efficiently added to your search index. To accomplish this, define a `makeSearchableUsing` method on the corresponding model:

```php
use Illuminate\Database\Eloquent\Collection;

/**
 * Modify the collection of models being made searchable.
 */
public function makeSearchableUsing(Collection $models): Collection
{
    return $models->load('author');
}
```

<a name="conditionally-updating-the-search-index"></a>
#### Conditionally Updating the Search Index

By default, Scout will reindex an updated model regardless of which attributes were modified. If you would like to customize this behavior, you may define a `searchIndexShouldBeUpdated` method on your model:

```php
/**
 * Determine if the search index should be updated.
 */
public function searchIndexShouldBeUpdated(): bool
{
    return $this->wasRecentlyCreated || $this->wasChanged(['title', 'body']);
}
```

<a name="removing-records"></a>
### Removing Records

To remove a record from your index you may simply `delete` the model from the database. This may be done even if you are using [soft deleted](/docs/{{version}}/eloquent#soft-deleting) models:

```php
use App\Models\Order;

$order = Order::find(1);

$order->delete();
```

If you do not want to retrieve the model before deleting the record, you may use the `unsearchable` method on an Eloquent query instance:

```php
Order::where('price', '>', 100)->unsearchable();
```

If you would like to remove the search index records for all of the models in a relationship, you may invoke the `unsearchable` on the relationship instance:

```php
$user->orders()->unsearchable();
```

Or, if you already have a collection of Eloquent models in memory, you may call the `unsearchable` method on the collection instance to remove the model instances from their corresponding index:

```php
$orders->unsearchable();
```

To remove all of the model records from their corresponding index, you may invoke the `removeAllFromSearch` method:

```php
Order::removeAllFromSearch();
```

<a name="pausing-indexing"></a>
### Pausing Indexing

Sometimes you may need to perform a batch of Eloquent operations on a model without syncing the model data to your search index. You may do this using the `withoutSyncingToSearch` method. This method accepts a single closure which will be immediately executed. Any model operations that occur within the closure will not be synced to the model's index:

```php
use App\Models\Order;

Order::withoutSyncingToSearch(function () {
    // Perform model actions...
});
```

<a name="conditionally-searchable-model-instances"></a>
### Conditionally Searchable Model Instances

Sometimes you may need to only make a model searchable under certain conditions. For example, imagine you have `App\Models\Post` model that may be in one of two states: "draft" and "published". You may only want to allow "published" posts to be searchable. To accomplish this, you may define a `shouldBeSearchable` method on your model:

```php
/**
 * Determine if the model should be searchable.
 */
public function shouldBeSearchable(): bool
{
    return $this->isPublished();
}
```

The `shouldBeSearchable` method is only applied when manipulating models through the `save` and `create` methods, queries, or relationships. Directly making models or collections searchable using the `searchable` method will override the result of the `shouldBeSearchable` method.

> [!WARNING]
> The `shouldBeSearchable` method is not applicable when using Scout's "database" engine, as all searchable data is always stored in the database. To achieve similar behavior when using the database engine, you should use [where clauses](#where-clauses) instead.

<a name="searching"></a>
## Searching

You may begin searching a model using the `search` method. The search method accepts a single string that will be used to search your models. You should then chain the `get` method onto the search query to retrieve the Eloquent models that match the given search query:

```php
use App\Models\Order;

$orders = Order::search('Star Trek')->get();
```

Since Scout searches return a collection of Eloquent models, you may even return the results directly from a route or controller and they will automatically be converted to JSON:

```php
use App\Models\Order;
use Illuminate\Http\Request;

Route::get('/search', function (Request $request) {
    return Order::search($request->search)->get();
});
```

If you would like to get the raw search results before they are converted to Eloquent models, you may use the `raw` method:

```php
$orders = Order::search('Star Trek')->raw();
```

<a name="semantic-search"></a>
### Semantic Search

The database, Meilisearch, Typesense, and Turbopuffer engines support semantic search, which matches records based on the meaning of a query. When Scout generates embeddings, semantic and hybrid searches require the [Laravel AI SDK](/docs/{{version}}/ai-sdk). [Typesense's native embeddings](#typesense-embeddings), [Turbopuffer's native embeddings](#turbopuffer-configuration), and precomputed query vectors do not require the Laravel AI SDK.

After configuring embeddings for the selected engine, invoke the `semantic` method on a search query:

```php
$articles = Article::search('staying cool in the summer')
    ->semantic()
    ->get();
```

You may provide a minimum similarity threshold when supported by the selected engine:

```php
$articles = Article::search('renewable energy storage')
    ->semantic(minSimilarity: 0.6)
    ->get();
```

To combine full-text and semantic search, use the `hybrid` method. Its first two arguments control the relative weights of text and semantic results:

```php
$articles = Article::search('renewable energy storage')
    ->hybrid(textWeight: 1, semanticWeight: 2)
    ->get();
```

<a name="custom-indexes"></a>
#### Custom Indexes

When searching using third-party engines, search queries will typically be performed on the index specified by the model's [searchableAs](#configuring-model-indexes) method. However, you may use the `within` method to specify a custom index that should be searched instead:

```php
$orders = Order::search('Star Trek')
    ->within('tv_shows_popularity_desc')
    ->get();
```

<a name="where-clauses"></a>
### Where Clauses

Scout allows you to add "where" clauses to your search queries. For example, basic equality checks are useful for scoping search queries by an owner ID:

```php
use App\Models\Order;

$orders = Order::search('Star Trek')->where('user_id', 1)->get();
```

You may also use the `=`, `!=`, `<`, `>`, `>=`, `<=` comparison operators to build more advanced queries:

```php
Order::search('Star Trek')
  ->where('status', '=', 'completed')
  ->where('is_refunded', '!=', true)
  ->where('total_price', '>', 100)
  ->where('shipping_cost', '<', 20)
  ->where('discount_percent', '>=', 10)
  ->where('item_count', '<=', 5)
  ->get();
```

In addition, the `whereIn` method may be used to verify that a given column's value is contained within the given array:

```php
$orders = Order::search('Star Trek')->whereIn(
    'status', ['open', 'paid']
)->get();
```

The `whereNotIn` method verifies that the given column's value is not contained in the given array:

```php
$orders = Order::search('Star Trek')->whereNotIn(
    'status', ['closed']
)->get();
```

> [!WARNING]
> If your application is using Meilisearch, you must configure your application's [filterable attributes](#meilisearch-index-settings) before utilizing Scout's "where" clauses.

<a name="customizing-the-eloquent-results-query"></a>
#### Customizing the Eloquent Results Query

After Scout retrieves a list of matching Eloquent models from your application's search engine, Eloquent is used to retrieve all of the matching models by their primary keys. You may customize this query by invoking the `query` method. The `query` method accepts a closure that will receive the Eloquent query builder instance as an argument:

```php
use App\Models\Order;
use Illuminate\Database\Eloquent\Builder;

$orders = Order::search('Star Trek')
    ->query(fn (Builder $query) => $query->with('invoices'))
    ->get();
```

When using a third-party engine, this callback is invoked after the relevant models have already been retrieved from the search engine, so it should not be used for "filtering" results — use [Scout where clauses](#where-clauses) instead. However, when using the database engine, the `query` method's constraints are applied directly to the database query, so you may use it for filtering as well.

<a name="pagination"></a>
### Pagination

In addition to retrieving a collection of models, you may paginate your search results using the `paginate` method. This method will return an `Illuminate\Pagination\LengthAwarePaginator` instance just as if you had [paginated a traditional Eloquent query](/docs/{{version}}/pagination):

```php
use App\Models\Order;

$orders = Order::search('Star Trek')->paginate();
```

You may specify how many models to retrieve per page by passing the amount as the first argument to the `paginate` method:

```php
$orders = Order::search('Star Trek')->paginate(15);
```

When using the database engine, you may also use the `simplePaginate` method. Unlike `paginate`, which retrieves the total number of matching records so it can display page numbers, `simplePaginate` only determines whether there are more results beyond the current page — making it more efficient for large datasets where you only need "previous" and "next" links:

```php
$orders = Order::search('Star Trek')->simplePaginate(15);
```

Once you have retrieved the results, you may display the results and render the page links using [Blade](/docs/{{version}}/blade) just as if you had paginated a traditional Eloquent query:

```html
<div class="container">
    @foreach ($orders as $order)
        {{ $order->price }}
    @endforeach
</div>

{{ $orders->links() }}
```

Of course, if you would like to retrieve the pagination results as JSON, you may return the paginator instance directly from a route or controller:

```php
use App\Models\Order;
use Illuminate\Http\Request;

Route::get('/orders', function (Request $request) {
    return Order::search($request->input('query'))->paginate(15);
});
```

> [!WARNING]
> Since search engines are not aware of your Eloquent model's global scope definitions, you should not utilize global scopes in applications that utilize Scout pagination. Or, you should recreate the global scope's constraints when searching via Scout.

<a name="soft-deleting"></a>
### Soft Deleting

If your indexed models are [soft deleting](/docs/{{version}}/eloquent#soft-deleting) and you need to search your soft deleted models, set the `soft_delete` option of the `config/scout.php` configuration file to `true`:

```php
'soft_delete' => true,
```

When this configuration option is `true`, Scout will not remove soft deleted models from the search index. Instead, it will set a hidden `__soft_deleted` attribute on the indexed record. Then, you may use the `withTrashed` or `onlyTrashed` methods to retrieve the soft deleted records when searching:

```php
use App\Models\Order;

// Include trashed records when retrieving results...
$orders = Order::search('Star Trek')->withTrashed()->get();

// Only include trashed records when retrieving results...
$orders = Order::search('Star Trek')->onlyTrashed()->get();
```

> [!NOTE]
> When a soft deleted model is permanently deleted using `forceDelete`, Scout will remove it from the search index automatically.

<a name="customizing-engine-searches"></a>
### Customizing Engine Searches

If you need to perform advanced customization of the search behavior of an engine you may pass a closure as the second argument to the `search` method. For example, you could use this callback to add geo-location data to your search options before the search query is passed to Algolia:

```php
use Algolia\AlgoliaSearch\SearchIndex;
use App\Models\Order;

Order::search(
    'Star Trek',
    function (SearchIndex $algolia, string $query, array $options) {
        $options['body']['query']['bool']['filter']['geo_distance'] = [
            'distance' => '1000km',
            'location' => ['lat' => 36, 'lon' => 111],
        ];

        return $algolia->search($query, $options);
    }
)->get();
```

<a name="custom-engines"></a>
## Custom Engines

<a name="writing-the-engine"></a>
#### Writing the Engine

If one of the built-in Scout search engines doesn't fit your needs, you may write your own custom engine and register it with Scout. Your engine should extend the `Laravel\Scout\Engines\Engine` abstract class. This abstract class contains eight methods your custom engine must implement:

```php
use Laravel\Scout\Builder;

abstract public function update($models);
abstract public function delete($models);
abstract public function search(Builder $builder);
abstract public function paginate(Builder $builder, $perPage, $page);
abstract public function mapIds($results);
abstract public function map(Builder $builder, $results, $model);
abstract public function getTotalCount($results);
abstract public function flush($model);
```

You may find it helpful to review the implementations of these methods on the `Laravel\Scout\Engines\AlgoliaEngine` class. This class will provide you with a good starting point for learning how to implement each of these methods in your own engine.

<a name="registering-the-engine"></a>
#### Registering the Engine

Once you have written your custom engine, you may register it with Scout using the `extend` method of the Scout engine manager. Scout's engine manager may be resolved from the Laravel service container. You should call the `extend` method from the `boot` method of your `App\Providers\AppServiceProvider` class or any other service provider used by your application:

```php
use App\ScoutExtensions\MySqlSearchEngine;
use Laravel\Scout\EngineManager;

/**
 * Bootstrap any application services.
 */
public function boot(): void
{
    resolve(EngineManager::class)->extend('mysql', function () {
        return new MySqlSearchEngine;
    });
}
```

Once your engine has been registered, you may specify it as your default Scout `driver` in your application's `config/scout.php` configuration file:

```php
'driver' => 'mysql',
```


---

# Search

*Sección: Laravel | Origen: https://laravel.com/docs/13.x/search*

- [Introduction](#introduction)
    - [Full-Text Search](#introduction-full-text-search)
    - [Semantic / Vector Search](#introduction-semantic-vector-search)
    - [Reranking](#introduction-reranking)
    - [Scout Search Engines](#introduction-scout-search-engines)
- [Full-Text Search](#full-text-search)
    - [Adding Full-Text Indexes](#adding-full-text-indexes)
    - [Running Full-Text Queries](#running-full-text-queries)
- [Semantic / Vector Search](#semantic-vector-search)
    - [Generating Embeddings](#generating-embeddings)
    - [Storing and Indexing Vectors](#storing-and-indexing-vectors)
    - [Querying by Similarity](#querying-by-similarity)
- [Reranking Results](#reranking-results)
- [Laravel Scout](#laravel-scout)
    - [Database Engine](#database-engine)
    - [Third-Party Engines](#third-party-engines)
- [Combining Techniques](#combining-techniques)

<a name="introduction"></a>
## Introduction

Almost every application needs search. Whether your users are searching a knowledge base for relevant articles, exploring a product catalog, or asking natural-language questions against a corpus of documents, Laravel provides built-in tools to handle each of these scenarios — and you often don't need any external services to get there.

Most applications will find that the built-in database-powered options provided by Laravel are more than sufficient — external search services are only necessary when you need features like typo tolerance, faceted filtering, or geo-search at massive scale.

<a name="introduction-full-text-search"></a>
#### Full-Text Search

When you need keyword relevance ranking — where the database scores and sorts results based on how well they match the search terms — Laravel's `whereFullText` query builder method leverages native full-text indexes on MariaDB, MySQL, and PostgreSQL. Full-text search understands word boundaries and stemming, so a search for "running" can match records containing "run". No external service is required.

<a name="introduction-semantic-vector-search"></a>
#### Semantic / Vector Search

For AI-powered semantic search that matches results by *meaning* rather than exact keywords, the `whereVectorSimilarTo` query builder method uses vector embeddings stored in PostgreSQL with the `pgvector` extension or MariaDB. For example, a search for "best wineries in Napa Valley" can surface an article titled "Top Vineyards to Visit" — even though the words don't overlap. Vector search requires PostgreSQL with the `pgvector` extension or MariaDB 11.7 or later, as well as the [Laravel AI SDK](/docs/{{version}}/ai-sdk).

<a name="introduction-reranking"></a>
#### Reranking

Laravel's [AI SDK](/docs/{{version}}/ai-sdk) provides reranking capabilities that use AI models to reorder any set of results by semantic relevance to a query. Reranking is especially powerful as a second stage after a fast initial retrieval step like full-text search — giving you both speed and semantic accuracy.

<a name="introduction-scout-search-engines"></a>
#### Laravel Scout Search

For applications that want a `Searchable` trait that automatically keeps search indexes in sync with Eloquent models, [Laravel Scout](/docs/{{version}}/scout) offers both a built-in database engine and drivers for third-party services like Algolia, Meilisearch, Typesense, and Turbopuffer.

<a name="full-text-search"></a>
## Full-Text Search

While `LIKE` queries work well for simple substring matching, they don't understand language. A `LIKE` search for "running" won't find a record containing "run", and results aren't ranked by relevance — they're simply returned in whatever order the database finds them. Full-text search solves both of these problems by using specialized indexes that understand word boundaries, stemming, and relevance scoring, allowing the database to return the most relevant results first.

Fast full-text search is built into MariaDB, MySQL, and PostgreSQL — no external search service is required. You only need to add a full-text index to the columns you want to search, and then use the `whereFullText` query builder method to search against them.

> [!WARNING]
> Full-text search is currently supported by MariaDB, MySQL, and PostgreSQL.

<a name="adding-full-text-indexes"></a>
### Adding Full-Text Indexes

To use full-text search, first add a full-text index to the columns you want to search. You may add the index to a single column, or pass an array of columns to create a composite index that searches across multiple fields at once:

```php
Schema::create('articles', function (Blueprint $table) {
    $table->id();
    $table->string('title');
    $table->text('body');
    $table->timestamps();

    $table->fullText(['title', 'body']);
});
```

On PostgreSQL, you may specify a language configuration for the index, which controls how words are stemmed:

```php
$table->fullText('body')->language('english');
```

For more information on creating indexes, consult the [migration documentation](/docs/{{version}}/migrations#available-index-types).

<a name="running-full-text-queries"></a>
### Running Full-Text Queries

Once the index is in place, use the `whereFullText` query builder method to search against it. Laravel will generate the appropriate SQL for your database driver — for example, `MATCH(...) AGAINST(...)` on MariaDB and MySQL, and `to_tsvector(...) @@ plainto_tsquery(...)` on PostgreSQL:

```php
$articles = Article::whereFullText('body', 'web developer')->get();
```

When using MariaDB and MySQL, results are automatically ordered by relevance score. On PostgreSQL, `whereFullText` filters matching records but does not order them by relevance — if you need automatic relevance ordering on PostgreSQL, consider using [Scout's database engine](#database-engine), which handles this for you.

If you created a composite full-text index across multiple columns, you may search against all of them by passing the same array of columns to `whereFullText`:

```php
$articles = Article::whereFullText(
    ['title', 'body'], 'web developer'
)->get();
```

The `orWhereFullText` method may be used to add a full-text search clause as an "or" condition. For complete details, consult the [query builder documentation](/docs/{{version}}/queries#full-text-where-clauses).

<a name="semantic-vector-search"></a>
## Semantic / Vector Search

Full-text search relies on matching keywords — the words in the query must appear (in some form) in the data. Semantic search takes a fundamentally different approach: it uses AI-generated vector embeddings to represent the *meaning* of text as arrays of numbers, and then finds results whose meaning is most similar to the query. For example, a search for "best wineries in Napa Valley" can surface an article titled "Top Vineyards to Visit" — even though the words don't overlap at all.

The basic workflow for vector search is: generate an embedding (a numeric array) for each piece of content and store it alongside your data, then at search time, generate an embedding for the user's query and find the stored embeddings that are closest to it in vector space.

> [!NOTE]
> Vector search requires the [Laravel AI SDK](/docs/{{version}}/ai-sdk) and is supported by PostgreSQL (requires the `pgvector` extension), MariaDB 11.7 or later, and MongoDB (requires the [Laravel MongoDB package](https://laravel.com/docs/13.x/mongodb)). All Postgres databases on [Laravel Cloud](https://laravel.com/cloud) already have `pgvector` installed.

<a name="generating-embeddings"></a>
### Generating Embeddings

An embedding is a high-dimensional numeric array (typically hundreds or thousands of numbers) that represents the semantic meaning of a piece of text. You may generate embeddings for a string using the `toEmbeddings` method available on Laravel's `Stringable` class:

```php
use Illuminate\Support\Str;

$embedding = Str::of('Napa Valley has great wine.')->toEmbeddings();
```

To generate embeddings for multiple inputs at once — which is more efficient than generating them one at a time since it requires only a single API call to the embedding provider — use the `Embeddings` class:

```php
use Laravel\Ai\Embeddings;

$response = Embeddings::for([
    'Napa Valley has great wine.',
    'Laravel is a PHP framework.',
])->generate();

$response->embeddings; // [[0.123, 0.456, ...], [0.789, 0.012, ...]]
```

For more details on configuring embedding providers, customizing dimensions, and caching, consult the [AI SDK documentation](/docs/{{version}}/ai-sdk#embeddings).

<a name="storing-and-indexing-vectors"></a>
### Storing and Indexing Vectors

To store vector embeddings, define a `vector` column in your migration, specifying the number of dimensions that matches your embedding provider's output (for example, 1536 for OpenAI's `text-embedding-3-small` model). You should also call `index` on the column to create an HNSW (Hierarchical Navigable Small World) index, which dramatically speeds up similarity searches on large datasets:

```php
Schema::ensureVectorExtensionExists();

Schema::create('documents', function (Blueprint $table) {
    $table->id();
    $table->string('title');
    $table->text('content');
    $table->vector('embedding', dimensions: 1536)->index();
    $table->timestamps();
});
```

The `Schema::ensureVectorExtensionExists` method ensures the `pgvector` extension is enabled on your PostgreSQL database before creating the table.

On your Eloquent model, use the `AsVector` cast so that Laravel automatically handles the conversion between PHP arrays and the database's vector format:

```php
use Illuminate\Database\Eloquent\Casts\AsVector;

protected function casts(): array
{
    return [
        'embedding' => AsVector::class,
    ];
}
```

For more details on vector columns and indexes, consult the [migration documentation](/docs/{{version}}/migrations#available-column-types).

<a name="querying-by-similarity"></a>
### Querying by Similarity

Once you have stored embeddings for your content, you can search for similar records using the `whereVectorSimilarTo` method. This method compares the given embedding against the stored vectors using cosine similarity, filters out results below the `minSimilarity` threshold, and automatically orders the results by relevance — with the most similar records first. The threshold should be a value between `0.0` and `1.0`, where `1.0` means the vectors are identical:

```php
$documents = Document::query()
    ->whereVectorSimilarTo('embedding', $queryEmbedding, minSimilarity: 0.4)
    ->limit(10)
    ->get();
```

As a convenience, when a plain string is given instead of an embedding array, Laravel will automatically generate the embedding for you using your configured embedding provider. This means you can pass the user's search query directly without manually converting it to an embedding first:

```php
$documents = Document::query()
    ->whereVectorSimilarTo('embedding', 'best wineries in Napa Valley')
    ->limit(10)
    ->get();
```

For lower-level control over vector queries, the `whereVectorDistanceLessThan`, `selectVectorDistance`, and `orderByVectorDistance` methods are also available. These methods let you work directly with distance values rather than similarity scores, select the computed distance as a column in your results, or manually control the ordering. For complete details, consult the [query builder documentation](/docs/{{version}}/queries#vector-similarity-clauses) and the [AI SDK documentation](/docs/{{version}}/ai-sdk#querying-embeddings).

<a name="reranking-results"></a>
## Reranking Results

Reranking is a technique where an AI model reorders a set of results by how semantically relevant each result is to a given query. Unlike vector search, which requires you to pre-compute and store embeddings, reranking works on any collection of text — it takes the raw content and the query as input and returns the items sorted by relevance.

Reranking is especially powerful as a second stage after a fast initial retrieval step. For example, you might use full-text search to quickly narrow thousands of records down to the top 50 candidates, and then use reranking to put the most relevant results at the top. This "retrieve then rerank" pattern gives you both speed and semantic accuracy.

You may rerank an array of strings using the `Reranking` class:

```php
use Laravel\Ai\Reranking;

$response = Reranking::of([
    'Django is a Python web framework.',
    'Laravel is a PHP web application framework.',
    'React is a JavaScript library for building user interfaces.',
])->rerank('PHP frameworks');

$response->first()->document; // "Laravel is a PHP web application framework."
```

Laravel collections also have a `rerank` macro that accepts a field name (or closure) and a query, making it easy to rerank Eloquent results:

```php
$articles = Article::all()
    ->rerank('body', 'Laravel tutorials');
```

For complete details on configuring reranking providers and available options, consult the [AI SDK documentation](/docs/{{version}}/ai-sdk#reranking).

<a name="laravel-scout"></a>
## Laravel Scout

The search techniques described above are all query builder methods that you call directly in your code. [Laravel Scout](/docs/{{version}}/scout) takes a different approach: it provides a `Searchable` trait that you add to your Eloquent models, and Scout automatically keeps your search indexes in sync as records are created, updated, and deleted. This is particularly convenient when you want your models to always be searchable without manually managing index updates.

<a name="database-engine"></a>
### Database Engine

Scout's built-in database engine performs full-text and `LIKE` searches against your existing database — no external service or extra infrastructure required. Simply add the `Searchable` trait to your model and define a `toSearchableArray` method that returns the columns you want to be searchable.

You may use PHP attributes to control the search strategy for each column. `SearchUsingFullText` will use your database's full-text index, `SearchUsingPrefix` will only match from the beginning of the string (`example%`), and any columns without an attribute use a default `LIKE` strategy with wildcards on both sides (`%example%`):

```php
<?php

namespace App\Models;

use Illuminate\Database\Eloquent\Model;
use Laravel\Scout\Attributes\SearchUsingFullText;
use Laravel\Scout\Attributes\SearchUsingPrefix;
use Laravel\Scout\Searchable;

class Article extends Model
{
    use Searchable;

    #[SearchUsingPrefix(['id'])]
    #[SearchUsingFullText(['title', 'body'])]
    public function toSearchableArray(): array
    {
        return [
            'id' => $this->id,
            'title' => $this->title,
            'body' => $this->body,
        ];
    }
}
```

> [!WARNING]
> Before specifying that a column should use full-text query constraints, ensure that the column has been assigned a [full-text index](/docs/{{version}}/migrations#available-index-types).

Once the trait is added, you may search your model using Scout's `search` method. Scout's database engine will automatically order results by relevance, even on PostgreSQL:

```php
$articles = Article::search('Laravel')->get();
```

The database engine is a great choice when your search needs are moderate and you want the convenience of Scout's automatic index syncing without deploying an external service. It handles the most common search use cases well, including filtering, pagination, and soft-deleted record handling. For complete details, consult the [Scout documentation](/docs/{{version}}/scout#database-engine).

<a name="third-party-engines"></a>
### Third-Party Engines

Scout also supports third-party search engines such as [Algolia](https://www.algolia.com/), [Meilisearch](https://www.meilisearch.com), and [Typesense](https://typesense.org). These dedicated search services offer advanced features like typo tolerance, faceted filtering, geo-search, and custom ranking rules — features that become important at very large scale or when you need a highly polished search-as-you-type experience.

Since Scout provides a unified API across all of its drivers, switching from the database engine to a third-party engine later requires minimal code changes. You may start with the database engine and migrate to a third-party service only if your application's needs outgrow what the database can provide.

For complete details on configuring third-party engines, consult the [Scout documentation](/docs/{{version}}/scout).

> [!NOTE]
> Many applications never need an external search engine. The built-in techniques described on this page cover the vast majority of use cases.

<a name="combining-techniques"></a>
## Combining Techniques

The search techniques described on this page are not mutually exclusive — combining them often produces the best results. Here are two common patterns that demonstrate how these tools work together.

**Full-Text Retrieval + Reranking**

Use full-text search to quickly narrow a large dataset down to a candidate set, then apply reranking to sort those candidates by semantic relevance. This gives you the speed of database-native full-text search with the accuracy of AI-powered relevance scoring:

```php
$articles = Article::query()
    ->whereFullText('body', $request->input('query'))
    ->limit(50)
    ->get()
    ->rerank('body', $request->input('query'), limit: 10);
```

**Vector Search + Traditional Filters**

Combine vector similarity with standard `where` clauses to scope semantic search to a subset of records. This is useful when you want meaning-based search but need to restrict results by ownership, category, or any other attribute:

```php
$documents = Document::query()
    ->where('team_id', $user->team_id)
    ->whereVectorSimilarTo('embedding', $request->input('query'))
    ->limit(10)
    ->get();
```


---

# Database: Seeding

*Sección: Laravel | Origen: https://laravel.com/docs/13.x/seeding*

- [Introduction](#introduction)
- [Writing Seeders](#writing-seeders)
    - [Using Model Factories](#using-model-factories)
    - [Calling Additional Seeders](#calling-additional-seeders)
    - [Muting Model Events](#muting-model-events)
- [Running Seeders](#running-seeders)

<a name="introduction"></a>
## Introduction

Laravel includes the ability to seed your database with data using seed classes. All seed classes are stored in the `database/seeders` directory. By default, a `DatabaseSeeder` class is defined for you. From this class, you may use the `call` method to run other seed classes, allowing you to control the seeding order.

> [!NOTE]
> [Mass assignment protection](/docs/{{version}}/eloquent#mass-assignment) is automatically disabled during database seeding.

<a name="writing-seeders"></a>
## Writing Seeders

To generate a seeder, execute the `make:seeder` [Artisan command](/docs/{{version}}/artisan). All seeders generated by the framework will be placed in the `database/seeders` directory:

```shell
php artisan make:seeder UserSeeder
```

A seeder class only contains one method by default: `run`. This method is called when the `db:seed` [Artisan command](/docs/{{version}}/artisan) is executed. Within the `run` method, you may insert data into your database however you wish. You may use the [query builder](/docs/{{version}}/queries) to manually insert data or you may use [Eloquent model factories](/docs/{{version}}/eloquent-factories).

As an example, let's modify the default `DatabaseSeeder` class and add a database insert statement to the `run` method:

```php
<?php

namespace Database\Seeders;

use Illuminate\Database\Seeder;
use Illuminate\Support\Facades\DB;
use Illuminate\Support\Facades\Hash;
use Illuminate\Support\Str;

class DatabaseSeeder extends Seeder
{
    /**
     * Run the database seeders.
     */
    public function run(): void
    {
        DB::table('users')->insert([
            'name' => Str::random(10),
            'email' => Str::random(10).'@example.com',
            'password' => Hash::make('password'),
        ]);
    }
}
```

> [!NOTE]
> You may type-hint any dependencies you need within the `run` method's signature. They will automatically be resolved via the Laravel [service container](/docs/{{version}}/container).

<a name="using-model-factories"></a>
### Using Model Factories

Of course, manually specifying the attributes for each model seed is cumbersome. Instead, you can use [model factories](/docs/{{version}}/eloquent-factories) to conveniently generate large amounts of database records. First, review the [model factory documentation](/docs/{{version}}/eloquent-factories) to learn how to define your factories.

For example, let's create 50 users that each has one related post:

```php
use App\Models\User;

/**
 * Run the database seeders.
 */
public function run(): void
{
    User::factory()
        ->count(50)
        ->hasPosts(1)
        ->create();
}
```

<a name="calling-additional-seeders"></a>
### Calling Additional Seeders

Within the `DatabaseSeeder` class, you may use the `call` method to execute additional seed classes. Using the `call` method allows you to break up your database seeding into multiple files so that no single seeder class becomes too large. The `call` method accepts an array of seeder classes that should be executed:

```php
/**
 * Run the database seeders.
 */
public function run(): void
{
    $this->call([
        UserSeeder::class,
        PostSeeder::class,
        CommentSeeder::class,
    ]);
}
```

<a name="muting-model-events"></a>
### Muting Model Events

While running seeds, you may want to prevent models from dispatching events. You may achieve this using the `WithoutModelEvents` trait. When used, the `WithoutModelEvents` trait ensures no model events are dispatched, even if additional seed classes are executed via the `call` method:

```php
<?php

namespace Database\Seeders;

use Illuminate\Database\Seeder;
use Illuminate\Database\Console\Seeds\WithoutModelEvents;

class DatabaseSeeder extends Seeder
{
    use WithoutModelEvents;

    /**
     * Run the database seeders.
     */
    public function run(): void
    {
        $this->call([
            UserSeeder::class,
        ]);
    }
}
```

<a name="running-seeders"></a>
## Running Seeders

You may execute the `db:seed` Artisan command to seed your database. By default, the `db:seed` command runs the `Database\Seeders\DatabaseSeeder` class, which may in turn invoke other seed classes. However, you may use the `--class` option to specify a specific seeder class to run individually:

```shell
php artisan db:seed

php artisan db:seed --class=UserSeeder
```

You may also seed your database using the `migrate:fresh` command in combination with the `--seed` option, which will drop all tables and re-run all of your migrations. This command is useful for completely re-building your database. The `--seeder` option may be used to specify a specific seeder to run:

```shell
php artisan migrate:fresh --seed

php artisan migrate:fresh --seed --seeder=UserSeeder
```

<a name="forcing-seeding-production"></a>
#### Forcing Seeders to Run in Production

Some seeding operations may cause you to alter or lose data. In order to protect you from running seeding commands against your production database, you will be prompted for confirmation before the seeders are executed in the `production` environment. To force the seeders to run without a prompt, use the `--force` flag:

```shell
php artisan db:seed --force
```


---

# HTTP Session

*Sección: Laravel | Origen: https://laravel.com/docs/13.x/session*

- [Introduction](#introduction)
    - [Configuration](#configuration)
    - [Driver Prerequisites](#driver-prerequisites)
- [Interacting With the Session](#interacting-with-the-session)
    - [Retrieving Data](#retrieving-data)
    - [Storing Data](#storing-data)
    - [Flash Data](#flash-data)
    - [Deleting Data](#deleting-data)
    - [Regenerating the Session ID](#regenerating-the-session-id)
- [Session Cache](#session-cache)
- [Session Blocking](#session-blocking)
- [Adding Custom Session Drivers](#adding-custom-session-drivers)
    - [Implementing the Driver](#implementing-the-driver)
    - [Registering the Driver](#registering-the-driver)

<a name="introduction"></a>
## Introduction

Since HTTP driven applications are stateless, sessions provide a way to store information about the user across multiple requests. That user information is typically placed in a persistent store / backend that can be accessed from subsequent requests.

Laravel ships with a variety of session backends that are accessed through an expressive, unified API. Support for popular backends such as [Memcached](https://memcached.org), [Redis](https://redis.io), and databases is included.

<a name="configuration"></a>
### Configuration

Your application's session configuration file is stored at `config/session.php`. Be sure to review the options available to you in this file. By default, Laravel is configured to use the `database` session driver.

The session `driver` configuration option defines where session data will be stored for each request. Laravel includes a variety of drivers:

<div class="content-list" markdown="1">

- `file` - sessions are stored in `storage/framework/sessions`.
- `cookie` - sessions are stored in secure, encrypted cookies.
- `database` - sessions are stored in a relational database.
- `memcached` / `redis` - sessions are stored in one of these fast, cache-based stores.
- `dynamodb` - sessions are stored in AWS DynamoDB.
- `array` - sessions are stored in a PHP array and will not be persisted.

</div>

> [!NOTE]
> The array driver is primarily used during [testing](/docs/{{version}}/testing) and prevents the data stored in the session from being persisted.

<a name="driver-prerequisites"></a>
### Driver Prerequisites

<a name="database"></a>
#### Database

When using the `database` session driver, you will need to ensure that you have a database table to contain the session data. Typically, this is included in Laravel's default `0001_01_01_000000_create_users_table.php` [database migration](/docs/{{version}}/migrations); however, if for any reason you do not have a `sessions` table, you may use the `make:session-table` Artisan command to generate this migration:

```shell
php artisan make:session-table

php artisan migrate
```

<a name="redis"></a>
#### Redis

Before using Redis sessions with Laravel, you will need to either install the PhpRedis PHP extension via PECL or install the `predis/predis` package via Composer. For more information on configuring Redis, consult Laravel's [Redis documentation](/docs/{{version}}/redis#configuration).

> [!NOTE]
> The `SESSION_CONNECTION` environment variable, or the `connection` option in the `session.php` configuration file, may be used to specify which Redis connection is used for session storage.

<a name="interacting-with-the-session"></a>
## Interacting With the Session

<a name="retrieving-data"></a>
### Retrieving Data

There are two primary ways of working with session data in Laravel: the global `session` helper and via a `Request` instance. First, let's look at accessing the session via a `Request` instance, which can be type-hinted on a route closure or controller method. Remember, controller method dependencies are automatically injected via the Laravel [service container](/docs/{{version}}/container):

```php
<?php

namespace App\Http\Controllers;

use Illuminate\Http\Request;
use Illuminate\View\View;

class UserController extends Controller
{
    /**
     * Show the profile for the given user.
     */
    public function show(Request $request, string $id): View
    {
        $value = $request->session()->get('key');

        // ...

        $user = $this->users->find($id);

        return view('user.profile', ['user' => $user]);
    }
}
```

When you retrieve an item from the session, you may also pass a default value as the second argument to the `get` method. This default value will be returned if the specified key does not exist in the session. If you pass a closure as the default value to the `get` method and the requested key does not exist, the closure will be executed and its result returned:

```php
$value = $request->session()->get('key', 'default');

$value = $request->session()->get('key', function () {
    return 'default';
});
```

<a name="the-global-session-helper"></a>
#### The Global Session Helper

You may also use the global `session` PHP function to retrieve and store data in the session. When the `session` helper is called with a single, string argument, it will return the value of that session key. When the helper is called with an array of key / value pairs, those values will be stored in the session:

```php
Route::get('/home', function () {
    // Retrieve a piece of data from the session...
    $value = session('key');

    // Specifying a default value...
    $value = session('key', 'default');

    // Store a piece of data in the session...
    session(['key' => 'value']);
});
```

> [!NOTE]
> There is little practical difference between using the session via an HTTP request instance versus using the global `session` helper. Both methods are [testable](/docs/{{version}}/testing) via the `assertSessionHas` method which is available in all of your test cases.

<a name="retrieving-all-session-data"></a>
#### Retrieving All Session Data

If you would like to retrieve all the data in the session, you may use the `all` method:

```php
$data = $request->session()->all();
```

<a name="retrieving-a-portion-of-the-session-data"></a>
#### Retrieving a Portion of the Session Data

The `only` and `except` methods may be used to retrieve a subset of the session data:

```php
$data = $request->session()->only(['username', 'email']);

$data = $request->session()->except(['username', 'email']);
```

<a name="determining-if-an-item-exists-in-the-session"></a>
#### Determining if an Item Exists in the Session

To determine if an item is present in the session, you may use the `has` method. The `has` method returns `true` if the item is present and is not `null`:

```php
if ($request->session()->has('users')) {
    // ...
}
```

To determine if an item is present in the session, even if its value is `null`, you may use the `exists` method:

```php
if ($request->session()->exists('users')) {
    // ...
}
```

To determine if an item is not present in the session, you may use the `missing` method. The `missing` method returns `true` if the item is not present:

```php
if ($request->session()->missing('users')) {
    // ...
}
```

<a name="storing-data"></a>
### Storing Data

To store data in the session, you will typically use the request instance's `put` method or the global `session` helper:

```php
// Via a request instance...
$request->session()->put('key', 'value');

// Via the global "session" helper...
session(['key' => 'value']);
```

<a name="pushing-to-array-session-values"></a>
#### Pushing to Array Session Values

The `push` method may be used to push a new value onto a session value that is an array. For example, if the `user.teams` key contains an array of team names, you may push a new value onto the array like so:

```php
$request->session()->push('user.teams', 'developers');
```

<a name="retrieving-deleting-an-item"></a>
#### Retrieving and Deleting an Item

The `pull` method will retrieve and delete an item from the session in a single statement:

```php
$value = $request->session()->pull('key', 'default');
```

<a name="incrementing-and-decrementing-session-values"></a>
#### Incrementing and Decrementing Session Values

If your session data contains an integer you wish to increment or decrement, you may use the `increment` and `decrement` methods:

```php
$request->session()->increment('count');

$request->session()->increment('count', $incrementBy = 2);

$request->session()->decrement('count');

$request->session()->decrement('count', $decrementBy = 2);
```

<a name="flash-data"></a>
### Flash Data

Sometimes you may wish to store items in the session for the next request. You may do so using the `flash` method. Data stored in the session using this method will be available immediately and during the subsequent HTTP request. After the subsequent HTTP request, the flashed data will be deleted. Flash data is primarily useful for short-lived status messages:

```php
$request->session()->flash('status', 'Task was successful!');
```

If you need to persist your flash data for several requests, you may use the `reflash` method, which will keep all of the flash data for an additional request. If you only need to keep specific flash data, you may use the `keep` method:

```php
$request->session()->reflash();

$request->session()->keep(['username', 'email']);
```

To persist your flash data only for the current request, you may use the `now` method:

```php
$request->session()->now('status', 'Task was successful!');
```

<a name="deleting-data"></a>
### Deleting Data

The `forget` method will remove a piece of data from the session. If you would like to remove all data from the session, you may use the `flush` method:

```php
// Forget a single key...
$request->session()->forget('name');

// Forget multiple keys...
$request->session()->forget(['name', 'status']);

$request->session()->flush();
```

<a name="regenerating-the-session-id"></a>
### Regenerating the Session ID

Regenerating the session ID is often done in order to prevent malicious users from exploiting a [session fixation](https://owasp.org/www-community/attacks/Session_fixation) attack on your application.

Laravel automatically regenerates the session ID during authentication if you are using one of the Laravel [application starter kits](/docs/{{version}}/starter-kits) or [Laravel Fortify](/docs/{{version}}/fortify); however, if you need to manually regenerate the session ID, you may use the `regenerate` method:

```php
$request->session()->regenerate();
```

If you need to regenerate the session ID and remove all data from the session in a single statement, you may use the `invalidate` method:

```php
$request->session()->invalidate();
```

<a name="session-cache"></a>
## Session Cache

Laravel's session cache provides a convenient way to cache data that is scoped to an individual user session. Unlike the global application cache, session cache data is automatically isolated per session and is cleaned up when the session expires or is destroyed. The session cache supports all the familiar [Laravel cache methods](/docs/{{version}}/cache) like `get`, `put`, `remember`, `forget`, and more, but scoped to the current session.

The session cache is perfect for storing temporary, user-specific data that you want to persist across multiple requests within the same session, but don't need to store permanently. This includes things like form data, temporary calculations, API responses, or any other ephemeral data that should be tied to a specific user's session.

You can access the session cache through the `cache` method on the session:

```php
$discount = $request->session()->cache()->get('discount');

$request->session()->cache()->put(
    'discount', 10, now()->plus(minutes: 5)
);
```

For more information on Laravel's cache methods, consult the [cache documentation](/docs/{{version}}/cache).

<a name="session-blocking"></a>
## Session Blocking

> [!WARNING]
> To utilize session blocking, your application must be using a cache driver that supports [atomic locks](/docs/{{version}}/cache#atomic-locks). Currently, those cache drivers include the `memcached`, `dynamodb`, `redis`, `mongodb` (included in the official `mongodb/laravel-mongodb` package), `database`, `file`, and `array` drivers. In addition, you may not use the `cookie` session driver.

By default, Laravel allows requests using the same session to execute concurrently. So, for example, if you use a JavaScript HTTP library to make two HTTP requests to your application, they will both execute at the same time. For many applications, this is not a problem; however, session data loss can occur in a small subset of applications that make concurrent requests to two different application endpoints which both write data to the session.

To mitigate this, Laravel provides functionality that allows you to limit concurrent requests for a given session. To get started, you may simply chain the `block` method onto your route definition. In this example, an incoming request to the `/profile` endpoint would acquire a session lock. While this lock is being held, any incoming requests to the `/profile` or `/order` endpoints which share the same session ID will wait for the first request to finish executing before continuing their execution:

```php
Route::post('/profile', function () {
    // ...
})->block($lockSeconds = 10, $waitSeconds = 10);

Route::post('/order', function () {
    // ...
})->block($lockSeconds = 10, $waitSeconds = 10);
```

The `block` method accepts two optional arguments. The first argument accepted by the `block` method is the maximum number of seconds the session lock should be held for before it is released. Of course, if the request finishes executing before this time the lock will be released earlier.

The second argument accepted by the `block` method is the number of seconds a request should wait while attempting to obtain a session lock. An `Illuminate\Contracts\Cache\LockTimeoutException` will be thrown if the request is unable to obtain a session lock within the given number of seconds.

If neither of these arguments is passed, the lock will be obtained for a maximum of 10 seconds and requests will wait a maximum of 10 seconds while attempting to obtain a lock:

```php
Route::post('/profile', function () {
    // ...
})->block();
```

<a name="adding-custom-session-drivers"></a>
## Adding Custom Session Drivers

<a name="implementing-the-driver"></a>
### Implementing the Driver

If none of the existing session drivers fit your application's needs, Laravel makes it possible to write your own session handler. Your custom session driver should implement PHP's built-in `SessionHandlerInterface`. This interface contains just a few simple methods. A stubbed MongoDB implementation looks like the following:

```php
<?php

namespace App\Extensions;

class MongoSessionHandler implements \SessionHandlerInterface
{
    public function open($savePath, $sessionName) {}
    public function close() {}
    public function read($sessionId) {}
    public function write($sessionId, $data) {}
    public function destroy($sessionId) {}
    public function gc($lifetime) {}
}
```

Since Laravel does not include a default directory to house your extensions. You are free to place them anywhere you like. In this example, we have created an `Extensions` directory to house the `MongoSessionHandler`.

Since the purpose of these methods is not readily understandable, here is an overview of the purpose of each method:

<div class="content-list" markdown="1">

- The `open` method would typically be used in file based session store systems. Since Laravel ships with a `file` session driver, you will rarely need to put anything in this method. You can simply leave this method empty.
- The `close` method, like the `open` method, can also usually be disregarded. For most drivers, it is not needed.
- The `read` method should return the string version of the session data associated with the given `$sessionId`. There is no need to do any serialization or other encoding when retrieving or storing session data in your driver, as Laravel will perform the serialization for you.
- The `write` method should write the given `$data` string associated with the `$sessionId` to some persistent storage system, such as MongoDB or another storage system of your choice. Again, you should not perform any serialization - Laravel will have already handled that for you.
- The `destroy` method should remove the data associated with the `$sessionId` from persistent storage.
- The `gc` method should destroy all session data that is older than the given `$lifetime`, which is a UNIX timestamp. For self-expiring systems like Memcached and Redis, this method may be left empty.

</div>

<a name="registering-the-driver"></a>
### Registering the Driver

Once your driver has been implemented, you are ready to register it with Laravel. To add additional drivers to Laravel's session backend, you may use the `extend` method provided by the `Session` [facade](/docs/{{version}}/facades). You should call the `extend` method from the `boot` method of a [service provider](/docs/{{version}}/providers). You may do this from the existing `App\Providers\AppServiceProvider` or create an entirely new provider:

```php
<?php

namespace App\Providers;

use App\Extensions\MongoSessionHandler;
use Illuminate\Contracts\Foundation\Application;
use Illuminate\Support\Facades\Session;
use Illuminate\Support\ServiceProvider;

class SessionServiceProvider extends ServiceProvider
{
    /**
     * Register any application services.
     */
    public function register(): void
    {
        // ...
    }

    /**
     * Bootstrap any application services.
     */
    public function boot(): void
    {
        Session::extend('mongo', function (Application $app) {
            // Return an implementation of SessionHandlerInterface...
            return new MongoSessionHandler;
        });
    }
}
```

Once the session driver has been registered, you may specify the `mongo` driver as your application's session driver using the `SESSION_DRIVER` environment variable or within the application's `config/session.php` configuration file.


---

# Laravel Socialite

*Sección: Laravel | Origen: https://laravel.com/docs/13.x/socialite*

- [Introduction](#introduction)
- [Installation](#installation)
- [Upgrading Socialite](#upgrading-socialite)
- [Configuration](#configuration)
- [Authentication](#authentication)
    - [Routing](#routing)
    - [Authentication and Storage](#authentication-and-storage)
    - [Access Scopes](#access-scopes)
    - [Slack Bot Scopes](#slack-bot-scopes)
    - [Optional Parameters](#optional-parameters)
- [Retrieving User Details](#retrieving-user-details)
- [Testing](#testing)

<a name="introduction"></a>
## Introduction

In addition to typical, form based authentication, Laravel also provides a simple, convenient way to authenticate with OAuth providers using [Laravel Socialite](https://github.com/laravel/socialite). Socialite currently supports authentication via Facebook, X, LinkedIn, Google, GitHub, GitLab, Bitbucket, and Slack.

> [!NOTE]
> Adapters for other platforms are available via the community driven [Socialite Providers](https://socialiteproviders.com/) website.

<a name="installation"></a>
## Installation

To get started with Socialite, use the Composer package manager to add the package to your project's dependencies:

```shell
composer require laravel/socialite
```

<a name="upgrading-socialite"></a>
## Upgrading Socialite

When upgrading to a new major version of Socialite, it's important that you carefully review [the upgrade guide](https://github.com/laravel/socialite/blob/master/UPGRADE.md).

<a name="configuration"></a>
## Configuration

Before using Socialite, you will need to add credentials for the OAuth providers your application utilizes. Typically, these credentials may be retrieved by creating a "developer application" within the dashboard of the service you will be authenticating with.

These credentials should be placed in your application's `config/services.php` configuration file, and should use the key `facebook`, `x`, `linkedin-openid`, `google`, `github`, `gitlab`, `bitbucket`, `slack`, or `slack-openid`, depending on the providers your application requires:

```php
'github' => [
    'client_id' => env('GITHUB_CLIENT_ID'),
    'client_secret' => env('GITHUB_CLIENT_SECRET'),
    'redirect' => 'http://example.com/callback-url',
],
```

> [!NOTE]
> If the `redirect` option contains a relative path, it will automatically be resolved to a fully qualified URL.

<a name="authentication"></a>
## Authentication

<a name="routing"></a>
### Routing

To authenticate users using an OAuth provider, you will need two routes: one for redirecting the user to the OAuth provider, and another for receiving the callback from the provider after authentication. The example routes below demonstrate the implementation of both routes:

```php
use Laravel\Socialite\Socialite;

Route::get('/auth/redirect', function () {
    return Socialite::driver('github')->redirect();
});

Route::get('/auth/callback', function () {
    $user = Socialite::driver('github')->user();

    // $user->token
});
```

The `redirect` method provided by the `Socialite` facade takes care of redirecting the user to the OAuth provider, while the `user` method will examine the incoming request and retrieve the user's information from the provider after they have approved the authentication request.

<a name="authentication-and-storage"></a>
### Authentication and Storage

Once the user has been retrieved from the OAuth provider, you may determine if the user exists in your application's database and [authenticate the user](/docs/{{version}}/authentication#authenticate-a-user-instance). If the user does not exist in your application's database, you will typically create a new record in your database to represent the user:

```php
use App\Models\User;
use Illuminate\Support\Facades\Auth;
use Laravel\Socialite\Socialite;

Route::get('/auth/callback', function () {
    $githubUser = Socialite::driver('github')->user();

    $user = User::updateOrCreate([
        'github_id' => $githubUser->id,
    ], [
        'name' => $githubUser->name,
        'email' => $githubUser->email,
        'github_token' => $githubUser->token,
        'github_refresh_token' => $githubUser->refreshToken,
    ]);

    Auth::login($user);

    return redirect('/dashboard');
});
```

> [!NOTE]
> For more information regarding what user information is available from specific OAuth providers, please consult the documentation on [retrieving user details](#retrieving-user-details).

<a name="access-scopes"></a>
### Access Scopes

Before redirecting the user, you may use the `scopes` method to specify the "scopes" that should be included in the authentication request. This method will merge all previously specified scopes with the scopes that you specify:

```php
use Laravel\Socialite\Socialite;

return Socialite::driver('github')
    ->scopes(['read:user', 'public_repo'])
    ->redirect();
```

You can overwrite all existing scopes on the authentication request using the `setScopes` method:

```php
return Socialite::driver('github')
    ->setScopes(['read:user', 'public_repo'])
    ->redirect();
```

<a name="slack-bot-scopes"></a>
### Slack Bot Scopes

Slack's API provides [different types of access tokens](https://api.slack.com/authentication/token-types), each with their own set of [permission scopes](https://api.slack.com/scopes). Socialite is compatible with both of the following Slack access tokens types:

<div class="content-list" markdown="1">

- Bot (prefixed with `xoxb-`)
- User (prefixed with `xoxp-`)

</div>

By default, the `slack` driver will generate a `user` token and invoking the driver's `user` method will return the user's details.

Bot tokens are primarily useful if your application will be sending notifications to external Slack workspaces that are owned by your application's users. To generate a bot token, invoke the `asBotUser` method before redirecting the user to Slack for authentication:

```php
return Socialite::driver('slack')
    ->asBotUser()
    ->setScopes(['chat:write', 'chat:write.public', 'chat:write.customize'])
    ->redirect();
```

In addition, you must invoke the `asBotUser` method before invoking the `user` method after Slack redirects the user back to your application after authentication:

```php
$user = Socialite::driver('slack')->asBotUser()->user();
```

When generating a bot token, the `user` method will still return a `Laravel\Socialite\Two\User` instance; however, only the `token` property will be hydrated. This token may be stored in order to [send notifications to the authenticated user's Slack workspaces](/docs/{{version}}/notifications#notifying-external-slack-workspaces).

<a name="optional-parameters"></a>
### Optional Parameters

A number of OAuth providers support other optional parameters on the redirect request. To include any optional parameters in the request, call the `with` method with an associative array:

```php
use Laravel\Socialite\Socialite;

return Socialite::driver('google')
    ->with(['hd' => 'example.com'])
    ->redirect();
```

> [!WARNING]
> When using the `with` method, be careful not to pass any reserved keywords such as `state` or `response_type`.

<a name="retrieving-user-details"></a>
## Retrieving User Details

After the user is redirected back to your application's authentication callback route, you may retrieve the user's details using Socialite's `user` method. The user object returned by the `user` method provides a variety of properties and methods you may use to store information about the user in your own database.

Differing properties and methods may be available on this object depending on whether the OAuth provider you are authenticating with supports OAuth 1.0 or OAuth 2.0:

```php
use Laravel\Socialite\Socialite;

Route::get('/auth/callback', function () {
    $user = Socialite::driver('github')->user();

    // OAuth 2.0 providers...
    $token = $user->token;
    $refreshToken = $user->refreshToken;
    $expiresIn = $user->expiresIn;

    // OAuth 1.0 providers...
    $token = $user->token;
    $tokenSecret = $user->tokenSecret;

    // All providers...
    $user->getId();
    $user->getNickname();
    $user->getName();
    $user->getEmail();
    $user->getAvatar();
});
```

<a name="retrieving-user-details-from-a-token-oauth2"></a>
#### Retrieving User Details From a Token

If you already have a valid access token for a user, you can retrieve their user details using Socialite's `userFromToken` method:

```php
use Laravel\Socialite\Socialite;

$user = Socialite::driver('github')->userFromToken($token);
```

If you are using Facebook Limited Login via an iOS application, Facebook will return an OIDC token instead of an access token. To retrieve user details from the OIDC token, provide the nonce used to initiate the login to the `userFromToken` method:

```php
$user = Socialite::driver('facebook')->userFromToken($token, $nonce);
```

<a name="stateless-authentication"></a>
#### Stateless Authentication

The `stateless` method may be used to disable session state verification. This is useful when adding social authentication to a stateless API that does not utilize cookie based sessions:

```php
use Laravel\Socialite\Socialite;

return Socialite::driver('google')->stateless()->user();
```

<a name="testing"></a>
## Testing

Laravel Socialite provides a convenient way to test OAuth authentication flows without making actual requests to OAuth providers. The `fake` method allows you to mock the OAuth provider's behavior and define the user data that should be returned.

<a name="faking-the-redirect"></a>
#### Faking the Redirect

To test that your application correctly redirects users to an OAuth provider, you may invoke the `fake` method before making a request to your redirect route. This will cause Socialite to return a redirect to a fake authorization URL instead of redirecting to the actual OAuth provider:

```php
use Laravel\Socialite\Socialite;

test('user is redirected to github', function () {
    Socialite::fake('github');

    $response = $this->get('/auth/github/redirect');

    $response->assertRedirect();
});
```

<a name="faking-the-callback"></a>
#### Faking the Callback

To test your application's callback route, you may invoke the `fake` method and provide a `User` instance that should be returned when your application requests the user's details from the provider. The `User` instance may be created using the `fake` method:

```php
use Laravel\Socialite\Socialite;
use Laravel\Socialite\Two\User;

test('user can login with github', function () {
    Socialite::fake('github', User::fake([
        'id' => 'github-123',
        'name' => 'Jason Beggs',
        'email' => 'jason@example.com',
    ]));

    $response = $this->get('/auth/github/callback');

    $response->assertRedirect('/dashboard');

    $this->assertDatabaseHas('users', [
        'name' => 'Jason Beggs',
        'email' => 'jason@example.com',
        'github_id' => 'github-123',
    ]);
});
```

By default, the `User` instance will include fake OAuth token values. If needed, you may override these values by passing additional attributes to the `fake` method:

```php
$fakeUser = User::fake([
    'id' => 'github-123',
    'name' => 'Jason Beggs',
    'email' => 'jason@example.com',
    'token' => 'fake-token',
    'refreshToken' => 'fake-refresh-token',
    'expiresIn' => 3600,
    'approvedScopes' => ['read', 'write'],
]);
```

OAuth 1 users may be faked using the `Laravel\Socialite\One\User` class.


---

# Starter Kits

*Sección: Laravel | Origen: https://laravel.com/docs/13.x/starter-kits*

- [Introduction](#introduction)
- [Creating an Application Using a Starter Kit](#creating-an-application)
- [Available Starter Kits](#available-starter-kits)
    - [React](#react)
    - [Svelte](#svelte)
    - [Vue](#vue)
    - [Livewire](#livewire)
- [Starter Kit Customization](#starter-kit-customization)
    - [React](#react-customization)
    - [Svelte](#svelte-customization)
    - [Vue](#vue-customization)
    - [Livewire](#livewire-customization)
- [Authentication](#authentication)
    - [Enabling and Disabling Features](#enabling-and-disabling-features)
    - [Customizing User Creation and Password Reset](#customizing-actions)
    - [Two-Factor Authentication](#two-factor-authentication)
    - [Rate Limiting](#rate-limiting)
- [Teams](#teams)
- [WorkOS AuthKit Authentication](#workos)
    - [Configuring Your WorkOS Starter Kit](#configuring-your-workos-starter-kit)
- [Inertia SSR](#inertia-ssr)
- [Community Maintained Starter Kits](#community-maintained-starter-kits)
- [Frequently Asked Questions](#faqs)

<a name="introduction"></a>
## Introduction

To give you a head start building your new Laravel application, we are happy to offer [application starter kits](https://laravel.com/starter-kits). These starter kits give you a head start on building your next Laravel application, and include the routes, controllers, and views you need to register and authenticate your application's users. The starter kits use [Laravel Fortify](/docs/{{version}}/fortify) to provide authentication.

While you are welcome to use these starter kits, they are not required. You are free to build your own application from the ground up by simply installing a fresh copy of Laravel. Either way, we know you will build something great!

<a name="creating-an-application"></a>
## Creating an Application Using a Starter Kit

To create a new Laravel application using one of our starter kits, you should first [install PHP and the Laravel CLI tool](/docs/{{version}}/installation#installing-php). If you already have PHP and Composer installed, you may install the Laravel installer CLI tool via Composer:

```shell
composer global require laravel/installer
```

Then, create a new Laravel application using the Laravel installer CLI. The Laravel installer will prompt you to select your preferred starter kit:

```shell
laravel new my-app
```

After creating your Laravel application, you only need to install its frontend dependencies via NPM and start the Laravel development server:

```shell
cd my-app
npm install && npm run build
composer run dev
```

Once you have started the Laravel development server, your application will be accessible in your web browser at [http://localhost:8000](http://localhost:8000).

<a name="available-starter-kits"></a>
## Available Starter Kits

<a name="react"></a>
### React

Our React starter kit provides a robust, modern starting point for building Laravel applications with a React frontend using [Inertia](https://inertiajs.com).

Inertia allows you to build modern, single-page React applications using classic server-side routing and controllers. This lets you enjoy the frontend power of React combined with the incredible backend productivity of Laravel and lightning-fast Vite compilation.

The React starter kit utilizes React 19, TypeScript, Tailwind, and the [shadcn/ui](https://ui.shadcn.com) component library.

<a name="svelte"></a>
### Svelte

Our Svelte starter kit provides a robust, modern starting point for building Laravel applications with a Svelte frontend using [Inertia](https://inertiajs.com).

Inertia allows you to build modern, single-page Svelte applications using classic server-side routing and controllers. This lets you enjoy the frontend power of Svelte combined with the incredible backend productivity of Laravel and lightning-fast Vite compilation.

The Svelte starter kit utilizes Svelte 5, TypeScript, Tailwind, and the [shadcn-svelte](https://www.shadcn-svelte.com/) component library.

<a name="vue"></a>
### Vue

Our Vue starter kit provides a great starting point for building Laravel applications with a Vue frontend using [Inertia](https://inertiajs.com).

Inertia allows you to build modern, single-page Vue applications using classic server-side routing and controllers. This lets you enjoy the frontend power of Vue combined with the incredible backend productivity of Laravel and lightning-fast Vite compilation.

The Vue starter kit utilizes the Vue Composition API, TypeScript, Tailwind, and the [shadcn-vue](https://www.shadcn-vue.com/) component library.

<a name="livewire"></a>
### Livewire

Our Livewire starter kit provides the perfect starting point for building Laravel applications with a [Laravel Livewire](https://livewire.laravel.com) frontend.

Livewire is a powerful way of building dynamic, reactive, frontend UIs using just PHP. It's a great fit for teams that primarily use Blade templates and are looking for a simpler alternative to JavaScript-driven SPA frameworks like React, Svelte, and Vue.

The Livewire starter kit utilizes Livewire, Tailwind, and the [Flux UI](https://fluxui.dev) component library.

<a name="starter-kit-customization"></a>
## Starter Kit Customization

<a name="react-customization"></a>
### React

Our React starter kit is built with Inertia 3, React 19, Tailwind 4, and [shadcn/ui](https://ui.shadcn.com). As with all of our starter kits, all of the backend and frontend code exists within your application to allow for full customization.

The majority of the frontend code is located in the `resources/js` directory. You are free to modify any of the code to customize the appearance and behavior of your application:

```text
resources/js/
├── components/    # Reusable React components
├── hooks/         # React hooks
├── layouts/       # Application layouts
├── lib/           # Utility functions and configuration
├── pages/         # Page components
└── types/         # TypeScript definitions
```

To publish additional shadcn components, first [find the component you want to publish](https://ui.shadcn.com). Then, publish the component using `npx`:

```shell
npx shadcn@latest add switch
```

In this example, the command will publish the Switch component to `resources/js/components/ui/switch.tsx`. Once the component has been published, you can use it in any of your pages:

```jsx
import { Switch } from "@/components/ui/switch"

const MyPage = () => {
  return (
    <div>
      <Switch />
    </div>
  );
};

export default MyPage;
```

<a name="react-available-layouts"></a>
#### Available Layouts

The React starter kit includes two different primary layouts for you to choose from: a "sidebar" layout and a "header" layout. The sidebar layout is the default, but you can switch to the header layout by modifying the layout that is imported at the top of your application's `resources/js/layouts/app-layout.tsx` file:

```js
import AppLayoutTemplate from '@/layouts/app/app-sidebar-layout'; // [tl! remove]
import AppLayoutTemplate from '@/layouts/app/app-header-layout'; // [tl! add]
```

<a name="react-sidebar-variants"></a>
#### Sidebar Variants

The sidebar layout includes three different variants: the default sidebar variant, the "inset" variant, and the "floating" variant. You may choose the variant you like best by modifying the `resources/js/components/app-sidebar.tsx` component:

```text
<Sidebar collapsible="icon" variant="sidebar"> [tl! remove]
<Sidebar collapsible="icon" variant="inset"> [tl! add]
```

<a name="react-authentication-page-layout-variants"></a>
#### Authentication Page Layout Variants

The authentication pages included with the React starter kit, such as the login page and registration page, also offer three different layout variants: "simple", "card", and "split".

To change your authentication layout, modify the layout that is imported at the top of your application's `resources/js/layouts/auth-layout.tsx` file:

```js
import AuthLayoutTemplate from '@/layouts/auth/auth-simple-layout'; // [tl! remove]
import AuthLayoutTemplate from '@/layouts/auth/auth-split-layout'; // [tl! add]
```

<a name="svelte-customization"></a>
### Svelte

Our Svelte starter kit is built with Inertia 3, Svelte 5, Tailwind, and [shadcn-svelte](https://www.shadcn-svelte.com/). As with all of our starter kits, all of the backend and frontend code exists within your application to allow for full customization.

The majority of the frontend code is located in the `resources/js` directory. You are free to modify any of the code to customize the appearance and behavior of your application:

```text
resources/js/
├── components/    # Reusable Svelte components
├── layouts/       # Application layouts
├── lib/           # Utility functions and configuration and Svelte rune modules
├── pages/         # Page components
└── types/         # TypeScript definitions
```

To publish additional shadcn-svelte components, first [find the component you want to publish](https://www.shadcn-svelte.com). Then, publish the component using `npx`:

```shell
npx shadcn-svelte@latest add switch
```

In this example, the command will publish the Switch component to `resources/js/components/ui/switch/switch.svelte`. Once the component has been published, you can use it in any of your pages:

```svelte
<script lang="ts">
    import { Switch } from '@/components/ui/switch'
</script>

<div>
    <Switch />
</div>
```

<a name="svelte-available-layouts"></a>
#### Available Layouts

The Svelte starter kit includes two different primary layouts for you to choose from: a "sidebar" layout and a "header" layout. The sidebar layout is the default, but you can switch to the header layout by modifying the layout that is imported at the top of your application's `resources/js/layouts/AppLayout.svelte` file:

```js
import AppLayout from '@/layouts/app/AppSidebarLayout.svelte'; // [tl! remove]
import AppLayout from '@/layouts/app/AppHeaderLayout.svelte'; // [tl! add]
```

<a name="svelte-sidebar-variants"></a>
#### Sidebar Variants

The sidebar layout includes three different variants: the default sidebar variant, the "inset" variant, and the "floating" variant. You may choose the variant you like best by modifying the `resources/js/components/AppSidebar.svelte` component:

```text
<Sidebar collapsible="icon" variant="sidebar"> [tl! remove]
<Sidebar collapsible="icon" variant="inset"> [tl! add]
```

<a name="svelte-authentication-page-layout-variants"></a>
#### Authentication Page Layout Variants

The authentication pages included with the Svelte starter kit, such as the login page and registration page, also offer three different layout variants: "simple", "card", and "split".

To change your authentication layout, modify the layout that is imported at the top of your application's `resources/js/layouts/AuthLayout.svelte` file:

```js
import AuthLayout from '@/layouts/auth/AuthSimpleLayout.svelte'; // [tl! remove]
import AuthLayout from '@/layouts/auth/AuthSplitLayout.svelte'; // [tl! add]
```

<a name="vue-customization"></a>
### Vue

Our Vue starter kit is built with Inertia 3, Vue 3 Composition API, Tailwind, and [shadcn-vue](https://www.shadcn-vue.com/). As with all of our starter kits, all of the backend and frontend code exists within your application to allow for full customization.

The majority of the frontend code is located in the `resources/js` directory. You are free to modify any of the code to customize the appearance and behavior of your application:

```text
resources/js/
├── components/    # Reusable Vue components
├── composables/   # Vue composables / hooks
├── layouts/       # Application layouts
├── lib/           # Utility functions and configuration
├── pages/         # Page components
└── types/         # TypeScript definitions
```

To publish additional shadcn-vue components, first [find the component you want to publish](https://www.shadcn-vue.com). Then, publish the component using `npx`:

```shell
npx shadcn-vue@latest add switch
```

In this example, the command will publish the Switch component to `resources/js/components/ui/Switch.vue`. Once the component has been published, you can use it in any of your pages:

```vue
<script setup lang="ts">
import { Switch } from '@/components/ui/switch'
</script>

<template>
    <div>
        <Switch />
    </div>
</template>
```

<a name="vue-available-layouts"></a>
#### Available Layouts

The Vue starter kit includes two different primary layouts for you to choose from: a "sidebar" layout and a "header" layout. The sidebar layout is the default, but you can switch to the header layout by modifying the layout that is imported at the top of your application's `resources/js/layouts/AppLayout.vue` file:

```js
import AppLayout from '@/layouts/app/AppSidebarLayout.vue'; // [tl! remove]
import AppLayout from '@/layouts/app/AppHeaderLayout.vue'; // [tl! add]
```

<a name="vue-sidebar-variants"></a>
#### Sidebar Variants

The sidebar layout includes three different variants: the default sidebar variant, the "inset" variant, and the "floating" variant. You may choose the variant you like best by modifying the `resources/js/components/AppSidebar.vue` component:

```text
<Sidebar collapsible="icon" variant="sidebar"> [tl! remove]
<Sidebar collapsible="icon" variant="inset"> [tl! add]
```

<a name="vue-authentication-page-layout-variants"></a>
#### Authentication Page Layout Variants

The authentication pages included with the Vue starter kit, such as the login page and registration page, also offer three different layout variants: "simple", "card", and "split".

To change your authentication layout, modify the layout that is imported at the top of your application's `resources/js/layouts/AuthLayout.vue` file:

```js
import AuthLayout from '@/layouts/auth/AuthSimpleLayout.vue'; // [tl! remove]
import AuthLayout from '@/layouts/auth/AuthSplitLayout.vue'; // [tl! add]
```

<a name="livewire-customization"></a>
### Livewire

Our Livewire starter kit is built with Livewire 4, Tailwind, and [Flux UI](https://fluxui.dev/). As with all of our starter kits, all of the backend and frontend code exists within your application to allow for full customization.

The majority of the frontend code is located in the `resources/views` directory. You are free to modify any of the code to customize the appearance and behavior of your application:

```text
resources/views
├── components            # Reusable components
├── flux                  # Customized Flux components
├── layouts               # Application layouts
├── pages                 # Livewire pages
├── partials              # Reusable Blade partials
├── dashboard.blade.php   # Authenticated user dashboard
├── welcome.blade.php     # Guest user welcome page
```

<a name="livewire-available-layouts"></a>
#### Available Layouts

The Livewire starter kit includes two different primary layouts for you to choose from: a "sidebar" layout and a "header" layout. The sidebar layout is the default, but you can switch to the header layout by modifying the layout that is used by your application's `resources/views/layouts/app.blade.php` file. In addition, you should add the `container` attribute to the main Flux component:

```blade
<x-layouts::app.header>
    <flux:main container>
        {{ $slot }}
    </flux:main>
</x-layouts::app.header>
```

<a name="livewire-authentication-page-layout-variants"></a>
#### Authentication Page Layout Variants

The authentication pages included with the Livewire starter kit, such as the login page and registration page, also offer three different layout variants: "simple", "card", and "split".

To change your authentication layout, modify the layout that is used by your application's `resources/views/layouts/auth.blade.php` file:

```blade
<x-layouts::auth.split>
    {{ $slot }}
</x-layouts::auth.split>
```

<a name="authentication"></a>
## Authentication

All starter kits use [Laravel Fortify](/docs/{{version}}/fortify) to handle authentication. Fortify provides routes, controllers, and logic for login, registration, password reset, email verification, and more.

Fortify automatically registers the following authentication routes based on the features that are enabled in your application's `config/fortify.php` configuration file:

<div class="overflow-auto">

| Route                              | Method | Description                         |
| ---------------------------------- | ------ | ----------------------------------- |
| `/login`                           | `GET`    | Display login form                  |
| `/login`                           | `POST`   | Authenticate user                   |
| `/logout`                          | `POST`   | Log user out                        |
| `/register`                        | `GET`    | Display registration form           |
| `/register`                        | `POST`   | Create new user                     |
| `/forgot-password`                 | `GET`    | Display password reset request form |
| `/forgot-password`                 | `POST`   | Send password reset link            |
| `/reset-password/{token}`          | `GET`    | Display password reset form         |
| `/reset-password`                  | `POST`   | Update password                     |
| `/email/verify`                    | `GET`    | Display email verification notice   |
| `/email/verify/{id}/{hash}`        | `GET`    | Verify email address                |
| `/email/verification-notification` | `POST`   | Resend verification email           |
| `/user/confirm-password`           | `GET`    | Display password confirmation form  |
| `/user/confirm-password`           | `POST`   | Confirm password                    |
| `/two-factor-challenge`            | `GET`    | Display 2FA challenge form          |
| `/two-factor-challenge`            | `POST`   | Verify 2FA code                     |

</div>

The `php artisan route:list` Artisan command can be used to display all of the routes in your application.

<a name="enabling-and-disabling-features"></a>
### Enabling and Disabling Features

You can control which Fortify features are enabled in your application's `config/fortify.php` configuration file:

```php
use Laravel\Fortify\Features;

'features' => [
    Features::registration(),
    Features::resetPasswords(),
    Features::emailVerification(),
    Features::twoFactorAuthentication([
        'confirm' => true,
        'confirmPassword' => true,
    ]),
],
```

To disable a feature, comment out or remove that feature entry from the `features` array. For example, remove `Features::registration()` to disable public registration.

When using the [React](#react), [Svelte](#svelte) or [Vue](#vue) starter kits, you will also need to remove any references to the disabled feature's routes in your frontend code. For example, if you disable email verification, you should remove the imports and references to the `verification` routes in your React, Svelte, or Vue components. This is necessary because these starter kits use Wayfinder for type-safe routing, which generates route definitions at build time. If you reference routes that no longer exist, your application will fail to build.

<a name="customizing-actions"></a>
### Customizing User Creation and Password Reset

When a user registers or resets their password, Fortify invokes action classes located in your application's `app/Actions/Fortify` directory:

<div class="overflow-auto">

| File                          | Description                           |
| ----------------------------- | ------------------------------------- |
| `CreateNewUser.php`           | Validates and creates new users       |
| `ResetUserPassword.php`       | Validates and updates user passwords  |
| `PasswordValidationRules.php` | Defines password validation rules     |

</div>

For example, to customize your application's registration logic, you should edit the `CreateNewUser` action:

```php
public function create(array $input): User
{
    Validator::make($input, [
        'name' => ['required', 'string', 'max:255'],
        'email' => ['required', 'email', 'max:255', 'unique:users'],
        'phone' => ['required', 'string', 'max:20'], // [tl! add]
        'password' => $this->passwordRules(),
    ])->validate();

    return User::create([
        'name' => $input['name'],
        'email' => $input['email'],
        'phone' => $input['phone'], // [tl! add]
        'password' => Hash::make($input['password']),
    ]);
}
```

<a name="two-factor-authentication"></a>
### Two-Factor Authentication

Starter kits include built-in two-factor authentication (2FA), allowing users to secure their accounts using any TOTP-compatible authenticator app. 2FA is enabled by default via `Features::twoFactorAuthentication()` in your application's `config/fortify.php` configuration file.

The `confirm` option requires users to verify a code before 2FA is fully enabled, while `confirmPassword` requires password confirmation before enabling or disabling 2FA. For more details, see [Fortify's two-factor authentication documentation](/docs/{{version}}/fortify#two-factor-authentication).

<a name="rate-limiting"></a>
### Rate Limiting

Rate limiting prevents brute-forcing and repeated login attempts from overwhelming your authentication endpoints. You can customize Fortify's rate limiting behavior in your application's `FortifyServiceProvider`:

```php
use Illuminate\Support\Facades\RateLimiter;
use Illuminate\Cache\RateLimiting\Limit;

RateLimiter::for('login', function ($request) {
    return Limit::perMinute(5)->by($request->email.$request->ip());
});
```

<a name="teams"></a>
## Teams

The React, Svelte, Vue, and Livewire starter kits may also be generated with team support. When the teams feature is enabled, each user belongs to one or more teams and has a current team. During registration, new users are automatically given a personal team. The starter kits also include team management screens for creating teams, switching between teams, inviting members, and updating team details.

When a route is scoped to the current team, the current team's slug is included in the URL. For example, the dashboard route becomes `/{current_team}/dashboard`, while team management pages use routes such as `settings/teams/{team}`. When using the `{current_team}` and `{team}` route parameters, the starter kits automatically ensure that the authenticated user belongs to the requested team before allowing access to the route.

To make generating team-aware URLs more convenient, the starter kits register URL defaults for the authenticated user's current team. This allows calls to helpers such as `route('dashboard')` to automatically include the current team's slug. When a user signs in, registers, or switches teams, the starter kits update the current team and refresh these URL defaults so generated links continue to use the correct team context.

When creating or renaming a team, the starter kits also prevent users from choosing reserved names that could produce unsafe or conflicting route segments. For example, names that would collide with route prefixes such as `settings`, `login`, or `dashboard` may not be used.

<a name="workos"></a>
## WorkOS AuthKit Authentication

By default, the React, Svelte, Vue, and Livewire starter kits all utilize Laravel's built-in authentication system to offer login, registration, password reset, email verification, and more. In addition, we also offer a [WorkOS AuthKit](https://authkit.com) powered variant of each starter kit that offers:

<div class="content-list" markdown="1">

- Social authentication (Google, Microsoft, GitHub, and Apple)
- Passkey authentication
- Email based "Magic Auth"
- SSO

</div>

Using WorkOS as your authentication provider [requires a WorkOS account](https://workos.com). WorkOS offers free authentication for applications up to 1 million monthly active users.

To use WorkOS AuthKit as your application's authentication provider, select the WorkOS option when creating your new starter kit powered application via `laravel new`.

<a name="configuring-your-workos-starter-kit"></a>
### Configuring Your WorkOS Starter Kit

After creating a new application using a WorkOS powered starter kit, you should set the `WORKOS_CLIENT_ID`, `WORKOS_API_KEY`, and `WORKOS_REDIRECT_URL` environment variables in your application's `.env` file. These variables should match the values provided to you in the WorkOS dashboard for your application:

```ini
WORKOS_CLIENT_ID=your-client-id
WORKOS_API_KEY=your-api-key
WORKOS_REDIRECT_URL="${APP_URL}/authenticate"
```

Additionally, you should configure the application homepage URL in your WorkOS dashboard. This URL is where users will be redirected after they log out of your application.

<a name="configuring-authkit-authentication-methods"></a>
#### Configuring AuthKit Authentication Methods

When using a WorkOS powered starter kit, we recommend that you disable "Email + Password" authentication within your application's WorkOS AuthKit configuration settings, allowing users to only authenticate via social authentication providers, passkeys, "Magic Auth", and SSO. This allows your application to totally avoid handling user passwords.

<a name="configuring-authkit-session-timeouts"></a>
#### Configuring AuthKit Session Timeouts

In addition, we recommend that you configure your WorkOS AuthKit session inactivity timeout to match your Laravel application's configured session timeout threshold, which is typically two hours.

<a name="inertia-ssr"></a>
### Inertia SSR

The React, Svelte, and Vue starter kits are compatible with Inertia's [server-side rendering](https://inertiajs.com/server-side-rendering) capabilities. To build an Inertia SSR compatible bundle for your application, run the `build:ssr` command:

```shell
npm run build:ssr
```

For convenience, a `composer dev:ssr` command is also available. This command will start the Laravel development server and Inertia SSR server after building an SSR compatible bundle for your application, allowing you to test your application locally using Inertia's server-side rendering engine:

```shell
composer dev:ssr
```

<a name="community-maintained-starter-kits"></a>
### Community Maintained Starter Kits

When creating a new Laravel application using the Laravel installer, you may provide any community maintained starter kit available on Packagist to the `--using` flag:

```shell
laravel new my-app --using=example/starter-kit
```

<a name="creating-starter-kits"></a>
#### Creating Starter Kits

To ensure your starter kit is available to others, you will need to publish it to [Packagist](https://packagist.org). Your starter kit should define its required environment variables in its `.env.example` file, and any necessary post-installation commands should be listed in the `post-create-project-cmd` array of the starter kit's `composer.json` file.

<a name="faqs"></a>
### Frequently Asked Questions

<a name="faq-upgrade"></a>
#### How do I upgrade?

Every starter kit gives you a solid starting point for your next application. With full ownership of the code, you can tweak, customize, and build your application exactly as you envision. However, there is no need to update the starter kit itself.

<a name="faq-enable-email-verification"></a>
#### How do I enable email verification?

Email verification can be added by uncommenting the `MustVerifyEmail` import in your `App/Models/User.php` model and ensuring the model implements the `MustVerifyEmail` interface:

```php
<?php

namespace App\Models;

use Illuminate\Contracts\Auth\MustVerifyEmail;
// ...

class User extends Authenticatable implements MustVerifyEmail
{
    // ...
}
```

After registration, users will receive a verification email. To restrict access to certain routes until the user's email address is verified, add the `verified` middleware to the routes:

```php
Route::middleware(['auth', 'verified'])->group(function () {
    Route::get('dashboard', function () {
        return Inertia::render('dashboard');
    })->name('dashboard');
});
```

> [!NOTE]
> Email verification is not required when using the [WorkOS](#workos) variant of the starter kits.

<a name="faq-modify-email-template"></a>
#### How do I modify the default email template?

You may want to customize the default email template to better align with your application's branding. To modify this template, you should publish the email views to your application with the following command:

```shell
php artisan vendor:publish --tag=laravel-mail
```

This will generate several files in `resources/views/vendor/mail`. You can modify any of these files as well as the `resources/views/vendor/mail/themes/default.css` file to change the look and appearance of the default email template.


---

# Strings

*Sección: Laravel | Origen: https://laravel.com/docs/13.x/strings*

- [Introduction](#introduction)
- [Available Methods](#available-methods)

<a name="introduction"></a>
## Introduction

Laravel includes a variety of functions for manipulating string values. Many of these functions are used by the framework itself; however, you are free to use them in your own applications if you find them convenient.

<a name="available-methods"></a>
## Available Methods

<style>
    .collection-method-list > p {
        columns: 10.8em 3; -moz-columns: 10.8em 3; -webkit-columns: 10.8em 3;
    }

    .collection-method-list a {
        display: block;
        overflow: hidden;
        text-overflow: ellipsis;
        white-space: nowrap;
    }
</style>

<a name="strings-method-list"></a>
### Strings

<div class="collection-method-list" markdown="1">

[\__](#method-__)
[class_basename](#method-class-basename)
[e](#method-e)
[preg_replace_array](#method-preg-replace-array)
[Str::after](#method-str-after)
[Str::afterLast](#method-str-after-last)
[Str::apa](#method-str-apa)
[Str::ascii](#method-str-ascii)
[Str::before](#method-str-before)
[Str::beforeLast](#method-str-before-last)
[Str::between](#method-str-between)
[Str::betweenFirst](#method-str-between-first)
[Str::camel](#method-camel-case)
[Str::charAt](#method-char-at)
[Str::chopStart](#method-str-chop-start)
[Str::chopEnd](#method-str-chop-end)
[Str::contains](#method-str-contains)
[Str::containsAll](#method-str-contains-all)
[Str::counted](#method-str-counted)
[Str::doesntContain](#method-str-doesnt-contain)
[Str::doesntEndWith](#method-str-doesnt-end-with)
[Str::doesntStartWith](#method-str-doesnt-start-with)
[Str::deduplicate](#method-deduplicate)
[Str::endsWith](#method-ends-with)
[Str::excerpt](#method-excerpt)
[Str::finish](#method-str-finish)
[Str::fromBase64](#method-str-from-base64)
[Str::headline](#method-str-headline)
[Str::initials](#method-str-initials)
[Str::inlineMarkdown](#method-str-inline-markdown)
[Str::is](#method-str-is)
[Str::isAscii](#method-str-is-ascii)
[Str::isJson](#method-str-is-json)
[Str::isUlid](#method-str-is-ulid)
[Str::isUrl](#method-str-is-url)
[Str::isUuid](#method-str-is-uuid)
[Str::kebab](#method-kebab-case)
[Str::lcfirst](#method-str-lcfirst)
[Str::length](#method-str-length)
[Str::limit](#method-str-limit)
[Str::lower](#method-str-lower)
[Str::markdown](#method-str-markdown)
[Str::mask](#method-str-mask)
[Str::match](#method-str-match)
[Str::matchAll](#method-str-match-all)
[Str::isMatch](#method-str-is-match)
[Str::orderedUuid](#method-str-ordered-uuid)
[Str::padBoth](#method-str-padboth)
[Str::padLeft](#method-str-padleft)
[Str::padRight](#method-str-padright)
[Str::password](#method-str-password)
[Str::plural](#method-str-plural)
[Str::pluralStudly](#method-str-plural-studly)
[Str::position](#method-str-position)
[Str::random](#method-str-random)
[Str::remove](#method-str-remove)
[Str::repeat](#method-str-repeat)
[Str::replace](#method-str-replace)
[Str::replaceArray](#method-str-replace-array)
[Str::replaceFirst](#method-str-replace-first)
[Str::replaceLast](#method-str-replace-last)
[Str::replaceMatches](#method-str-replace-matches)
[Str::replaceStart](#method-str-replace-start)
[Str::replaceEnd](#method-str-replace-end)
[Str::reverse](#method-str-reverse)
[Str::singular](#method-str-singular)
[Str::slug](#method-str-slug)
[Str::snake](#method-snake-case)
[Str::squish](#method-str-squish)
[Str::start](#method-str-start)
[Str::startsWith](#method-starts-with)
[Str::studly](#method-studly-case)
[Str::substr](#method-str-substr)
[Str::substrCount](#method-str-substrcount)
[Str::substrReplace](#method-str-substrreplace)
[Str::swap](#method-str-swap)
[Str::take](#method-take)
[Str::title](#method-title-case)
[Str::toBase64](#method-str-to-base64)
[Str::transliterate](#method-str-transliterate)
[Str::trim](#method-str-trim)
[Str::ltrim](#method-str-ltrim)
[Str::rtrim](#method-str-rtrim)
[Str::ucfirst](#method-str-ucfirst)
[Str::ucsplit](#method-str-ucsplit)
[Str::ucwords](#method-str-ucwords)
[Str::upper](#method-str-upper)
[Str::ulid](#method-str-ulid)
[Str::unwrap](#method-str-unwrap)
[Str::uuid](#method-str-uuid)
[Str::uuid7](#method-str-uuid7)
[Str::wordCount](#method-str-word-count)
[Str::wordWrap](#method-str-word-wrap)
[Str::words](#method-str-words)
[Str::wrap](#method-str-wrap)
[str](#method-str)
[trans](#method-trans)
[trans_choice](#method-trans-choice)

</div>

<a name="fluent-strings-method-list"></a>
### Fluent Strings

<div class="collection-method-list" markdown="1">

[after](#method-fluent-str-after)
[afterLast](#method-fluent-str-after-last)
[apa](#method-fluent-str-apa)
[append](#method-fluent-str-append)
[ascii](#method-fluent-str-ascii)
[basename](#method-fluent-str-basename)
[before](#method-fluent-str-before)
[beforeLast](#method-fluent-str-before-last)
[between](#method-fluent-str-between)
[betweenFirst](#method-fluent-str-between-first)
[camel](#method-fluent-str-camel)
[charAt](#method-fluent-str-char-at)
[classBasename](#method-fluent-str-class-basename)
[chopStart](#method-fluent-str-chop-start)
[chopEnd](#method-fluent-str-chop-end)
[contains](#method-fluent-str-contains)
[containsAll](#method-fluent-str-contains-all)
[counted](#method-fluent-str-counted)
[decrypt](#method-fluent-str-decrypt)
[deduplicate](#method-fluent-str-deduplicate)
[dirname](#method-fluent-str-dirname)
[doesntContain](#method-fluent-str-doesnt-contain)
[doesntEndWith](#method-fluent-str-doesnt-end-with)
[doesntStartWith](#method-fluent-str-doesnt-start-with)
[encrypt](#method-fluent-str-encrypt)
[endsWith](#method-fluent-str-ends-with)
[exactly](#method-fluent-str-exactly)
[excerpt](#method-fluent-str-excerpt)
[explode](#method-fluent-str-explode)
[finish](#method-fluent-str-finish)
[fromBase64](#method-fluent-str-from-base64)
[hash](#method-fluent-str-hash)
[headline](#method-fluent-str-headline)
[initials](#method-fluent-str-initials)
[inlineMarkdown](#method-fluent-str-inline-markdown)
[is](#method-fluent-str-is)
[isAscii](#method-fluent-str-is-ascii)
[isEmpty](#method-fluent-str-is-empty)
[isNotEmpty](#method-fluent-str-is-not-empty)
[isJson](#method-fluent-str-is-json)
[isUlid](#method-fluent-str-is-ulid)
[isUrl](#method-fluent-str-is-url)
[isUuid](#method-fluent-str-is-uuid)
[kebab](#method-fluent-str-kebab)
[lcfirst](#method-fluent-str-lcfirst)
[length](#method-fluent-str-length)
[limit](#method-fluent-str-limit)
[lower](#method-fluent-str-lower)
[markdown](#method-fluent-str-markdown)
[mask](#method-fluent-str-mask)
[match](#method-fluent-str-match)
[matchAll](#method-fluent-str-match-all)
[isMatch](#method-fluent-str-is-match)
[newLine](#method-fluent-str-new-line)
[padBoth](#method-fluent-str-padboth)
[padLeft](#method-fluent-str-padleft)
[padRight](#method-fluent-str-padright)
[pipe](#method-fluent-str-pipe)
[plural](#method-fluent-str-plural)
[position](#method-fluent-str-position)
[prepend](#method-fluent-str-prepend)
[remove](#method-fluent-str-remove)
[repeat](#method-fluent-str-repeat)
[replace](#method-fluent-str-replace)
[replaceArray](#method-fluent-str-replace-array)
[replaceFirst](#method-fluent-str-replace-first)
[replaceLast](#method-fluent-str-replace-last)
[replaceMatches](#method-fluent-str-replace-matches)
[replaceStart](#method-fluent-str-replace-start)
[replaceEnd](#method-fluent-str-replace-end)
[scan](#method-fluent-str-scan)
[singular](#method-fluent-str-singular)
[slug](#method-fluent-str-slug)
[snake](#method-fluent-str-snake)
[split](#method-fluent-str-split)
[squish](#method-fluent-str-squish)
[start](#method-fluent-str-start)
[startsWith](#method-fluent-str-starts-with)
[stripTags](#method-fluent-str-strip-tags)
[studly](#method-fluent-str-studly)
[substr](#method-fluent-str-substr)
[substrReplace](#method-fluent-str-substrreplace)
[swap](#method-fluent-str-swap)
[take](#method-fluent-str-take)
[tap](#method-fluent-str-tap)
[test](#method-fluent-str-test)
[title](#method-fluent-str-title)
[toBase64](#method-fluent-str-to-base64)
[toHtmlString](#method-fluent-str-to-html-string)
[toUri](#method-fluent-str-to-uri)
[transliterate](#method-fluent-str-transliterate)
[trim](#method-fluent-str-trim)
[ltrim](#method-fluent-str-ltrim)
[rtrim](#method-fluent-str-rtrim)
[ucfirst](#method-fluent-str-ucfirst)
[ucsplit](#method-fluent-str-ucsplit)
[ucwords](#method-fluent-str-ucwords)
[unwrap](#method-fluent-str-unwrap)
[upper](#method-fluent-str-upper)
[when](#method-fluent-str-when)
[whenContains](#method-fluent-str-when-contains)
[whenContainsAll](#method-fluent-str-when-contains-all)
[whenDoesntEndWith](#method-fluent-str-when-doesnt-end-with)
[whenDoesntStartWith](#method-fluent-str-when-doesnt-start-with)
[whenEmpty](#method-fluent-str-when-empty)
[whenNotEmpty](#method-fluent-str-when-not-empty)
[whenStartsWith](#method-fluent-str-when-starts-with)
[whenEndsWith](#method-fluent-str-when-ends-with)
[whenExactly](#method-fluent-str-when-exactly)
[whenNotExactly](#method-fluent-str-when-not-exactly)
[whenIs](#method-fluent-str-when-is)
[whenIsAscii](#method-fluent-str-when-is-ascii)
[whenIsUlid](#method-fluent-str-when-is-ulid)
[whenIsUuid](#method-fluent-str-when-is-uuid)
[whenTest](#method-fluent-str-when-test)
[wordCount](#method-fluent-str-word-count)
[words](#method-fluent-str-words)
[wrap](#method-fluent-str-wrap)

</div>

<a name="strings"></a>
## Strings

<a name="method-__"></a>
#### `__()` {.collection-method}

The `__` function translates the given translation string or translation key using your [language files](/docs/{{version}}/localization):

```php
echo __('Welcome to our application');

echo __('messages.welcome');
```

If the specified translation string or key does not exist, the `__` function will return the given value. So, using the example above, the `__` function would return `messages.welcome` if that translation key does not exist.

<a name="method-class-basename"></a>
#### `class_basename()` {.collection-method}

The `class_basename` function returns the class name of the given class with the class's namespace removed:

```php
$class = class_basename('Foo\Bar\Baz');

// Baz
```

<a name="method-e"></a>
#### `e()` {.collection-method}

The `e` function runs PHP's `htmlspecialchars` function with the `double_encode` option set to `true` by default:

```php
echo e('<html>foo</html>');

// &lt;html&gt;foo&lt;/html&gt;
```

<a name="method-preg-replace-array"></a>
#### `preg_replace_array()` {.collection-method}

The `preg_replace_array` function replaces a given pattern in the string sequentially using an array:

```php
$string = 'The event will take place between :start and :end';

$replaced = preg_replace_array('/:[a-z_]+/', ['8:30', '9:00'], $string);

// The event will take place between 8:30 and 9:00
```

<a name="method-str-after"></a>
#### `Str::after()` {.collection-method}

The `Str::after` method returns everything after the given value in a string. The entire string will be returned if the value does not exist within the string:

```php
use Illuminate\Support\Str;

$slice = Str::after('This is my name', 'This is');

// ' my name'
```

<a name="method-str-after-last"></a>
#### `Str::afterLast()` {.collection-method}

The `Str::afterLast` method returns everything after the last occurrence of the given value in a string. The entire string will be returned if the value does not exist within the string:

```php
use Illuminate\Support\Str;

$slice = Str::afterLast('App\Http\Controllers\Controller', '\\');

// 'Controller'
```

<a name="method-str-apa"></a>
#### `Str::apa()` {.collection-method}

The `Str::apa` method converts the given string to title case following the [APA guidelines](https://apastyle.apa.org/style-grammar-guidelines/capitalization/title-case):

```php
use Illuminate\Support\Str;

$title = Str::apa('Creating A Project');

// 'Creating a Project'
```

<a name="method-str-ascii"></a>
#### `Str::ascii()` {.collection-method}

The `Str::ascii` method will attempt to transliterate the string into an ASCII value:

```php
use Illuminate\Support\Str;

$slice = Str::ascii('û');

// 'u'
```

<a name="method-str-before"></a>
#### `Str::before()` {.collection-method}

The `Str::before` method returns everything before the given value in a string:

```php
use Illuminate\Support\Str;

$slice = Str::before('This is my name', 'my name');

// 'This is '
```

<a name="method-str-before-last"></a>
#### `Str::beforeLast()` {.collection-method}

The `Str::beforeLast` method returns everything before the last occurrence of the given value in a string:

```php
use Illuminate\Support\Str;

$slice = Str::beforeLast('This is my name', 'is');

// 'This '
```

<a name="method-str-between"></a>
#### `Str::between()` {.collection-method}

The `Str::between` method returns the portion of a string between two values:

```php
use Illuminate\Support\Str;

$slice = Str::between('This is my name', 'This', 'name');

// ' is my '
```

<a name="method-str-between-first"></a>
#### `Str::betweenFirst()` {.collection-method}

The `Str::betweenFirst` method returns the smallest possible portion of a string between two values:

```php
use Illuminate\Support\Str;

$slice = Str::betweenFirst('[a] bc [d]', '[', ']');

// 'a'
```

<a name="method-camel-case"></a>
#### `Str::camel()` {.collection-method}

The `Str::camel` method converts the given string to `camelCase`:

```php
use Illuminate\Support\Str;

$converted = Str::camel('foo_bar');

// 'fooBar'
```

<a name="method-char-at"></a>
#### `Str::charAt()` {.collection-method}

The `Str::charAt` method returns the character at the specified index. If the index is out of bounds, `false` is returned:

```php
use Illuminate\Support\Str;

$character = Str::charAt('This is my name.', 6);

// 's'
```

<a name="method-str-chop-start"></a>
#### `Str::chopStart()` {.collection-method}

The `Str::chopStart` method removes the first occurrence of the given value only if the value appears at the start of the string:

```php
use Illuminate\Support\Str;

$url = Str::chopStart('https://laravel.com', 'https://');

// 'laravel.com'
```

You may also pass an array as the second argument. If the string starts with any of the values in the array then that value will be removed from string:

```php
use Illuminate\Support\Str;

$url = Str::chopStart('http://laravel.com', ['https://', 'http://']);

// 'laravel.com'
```

<a name="method-str-chop-end"></a>
#### `Str::chopEnd()` {.collection-method}

The `Str::chopEnd` method removes the last occurrence of the given value only if the value appears at the end of the string:

```php
use Illuminate\Support\Str;

$url = Str::chopEnd('app/Models/Photograph.php', '.php');

// 'app/Models/Photograph'
```

You may also pass an array as the second argument. If the string ends with any of the values in the array then that value will be removed from string:

```php
use Illuminate\Support\Str;

$url = Str::chopEnd('laravel.com/index.php', ['/index.html', '/index.php']);

// 'laravel.com'
```

<a name="method-str-contains"></a>
#### `Str::contains()` {.collection-method}

The `Str::contains` method determines if the given string contains the given value. By default, this method is case sensitive:

```php
use Illuminate\Support\Str;

$contains = Str::contains('This is my name', 'my');

// true
```

You may also pass an array of values to determine if the given string contains any of the values in the array:

```php
use Illuminate\Support\Str;

$contains = Str::contains('This is my name', ['my', 'foo']);

// true
```

You may disable case sensitivity by setting the `ignoreCase` argument to `true`:

```php
use Illuminate\Support\Str;

$contains = Str::contains('This is my name', 'MY', ignoreCase: true);

// true
```

<a name="method-str-contains-all"></a>
#### `Str::containsAll()` {.collection-method}

The `Str::containsAll` method determines if the given string contains all of the values in a given array:

```php
use Illuminate\Support\Str;

$containsAll = Str::containsAll('This is my name', ['my', 'name']);

// true
```

You may disable case sensitivity by setting the `ignoreCase` argument to `true`:

```php
use Illuminate\Support\Str;

$containsAll = Str::containsAll('This is my name', ['MY', 'NAME'], ignoreCase: true);

// true
```

<a name="method-str-doesnt-contain"></a>
#### `Str::doesntContain()` {.collection-method}

The `Str::doesntContain` method determines if the given string doesn't contain the given value. By default, this method is case sensitive:

```php
use Illuminate\Support\Str;

$doesntContain = Str::doesntContain('This is name', 'my');

// true
```

You may also pass an array of values to determine if the given string doesn't contain any of the values in the array:

```php
use Illuminate\Support\Str;

$doesntContain = Str::doesntContain('This is name', ['my', 'framework']);

// true
```

You may disable case sensitivity by setting the `ignoreCase` argument to `true`:

```php
use Illuminate\Support\Str;

$doesntContain = Str::doesntContain('This is name', 'MY', ignoreCase: true);

// true
```

<a name="method-deduplicate"></a>
#### `Str::deduplicate()` {.collection-method}

The `Str::deduplicate` method replaces consecutive instances of a character with a single instance of that character in the given string. By default, the method deduplicates spaces:

```php
use Illuminate\Support\Str;

$result = Str::deduplicate('The   Laravel   Framework');

// The Laravel Framework
```

You may specify a different character to deduplicate by passing it in as the second argument to the method:

```php
use Illuminate\Support\Str;

$result = Str::deduplicate('The---Laravel---Framework', '-');

// The-Laravel-Framework
```

<a name="method-str-doesnt-end-with"></a>
#### `Str::doesntEndWith()` {.collection-method}

The `Str::doesntEndWith` method determines if the given string doesn't end with the given value:

```php
use Illuminate\Support\Str;

$result = Str::doesntEndWith('This is my name', 'dog');

// true
```

You may also pass an array of values to determine if the given string doesn't end with any of the values in the array:

```php
use Illuminate\Support\Str;

$result = Str::doesntEndWith('This is my name', ['this', 'foo']);

// true

$result = Str::doesntEndWith('This is my name', ['name', 'foo']);

// false
```

<a name="method-str-doesnt-start-with"></a>
#### `Str::doesntStartWith()` {.collection-method}

The `Str::doesntStartWith` method determines if the given string doesn't begin with the given value:

```php
use Illuminate\Support\Str;

$result = Str::doesntStartWith('This is my name', 'That');

// true
```

If an array of possible values is passed, the `doesntStartWith` method will return `true` if the string doesn't begin with any of the given values:

```php
$result = Str::doesntStartWith('This is my name', ['What', 'That', 'There']);

// true
```

<a name="method-ends-with"></a>
#### `Str::endsWith()` {.collection-method}

The `Str::endsWith` method determines if the given string ends with the given value:

```php
use Illuminate\Support\Str;

$result = Str::endsWith('This is my name', 'name');

// true
```

You may also pass an array of values to determine if the given string ends with any of the values in the array:

```php
use Illuminate\Support\Str;

$result = Str::endsWith('This is my name', ['name', 'foo']);

// true

$result = Str::endsWith('This is my name', ['this', 'foo']);

// false
```

<a name="method-excerpt"></a>
#### `Str::excerpt()` {.collection-method}

The `Str::excerpt` method extracts an excerpt from a given string that matches the first instance of a phrase within that string:

```php
use Illuminate\Support\Str;

$excerpt = Str::excerpt('This is my name', 'my', [
    'radius' => 3
]);

// '...is my na...'
```

The `radius` option, which defaults to `100`, allows you to define the number of characters that should appear on each side of the truncated string.

In addition, you may use the `omission` option to define the string that will be prepended and appended to the truncated string:

```php
use Illuminate\Support\Str;

$excerpt = Str::excerpt('This is my name', 'name', [
    'radius' => 3,
    'omission' => '(...) '
]);

// '(...) my name'
```

<a name="method-str-finish"></a>
#### `Str::finish()` {.collection-method}

The `Str::finish` method adds a single instance of the given value to a string if it does not already end with that value:

```php
use Illuminate\Support\Str;

$adjusted = Str::finish('this/string', '/');

// this/string/

$adjusted = Str::finish('this/string/', '/');

// this/string/
```

<a name="method-str-from-base64"></a>
#### `Str::fromBase64()` {.collection-method}

The `Str::fromBase64` method decodes the given Base64 string:

```php
use Illuminate\Support\Str;

$decoded = Str::fromBase64('TGFyYXZlbA==');

// Laravel
```

<a name="method-str-headline"></a>
#### `Str::headline()` {.collection-method}

The `Str::headline` method will convert strings delimited by casing, hyphens, or underscores into a space delimited string with each word's first letter capitalized:

```php
use Illuminate\Support\Str;

$headline = Str::headline('steve_jobs');

// Steve Jobs

$headline = Str::headline('EmailNotificationSent');

// Email Notification Sent
```

<a name="method-str-initials"></a>
#### `Str::initials()` {.collection-method}

The `Str::initials` method will return the initials of a given string, optionally capitalizing them:

```php
use Illuminate\Support\Str;

$initials = Str::initials('taylor otwell');

// to

$initials = Str::initials('taylor otwell', capitalize: true);

// TO
```

<a name="method-str-inline-markdown"></a>
#### `Str::inlineMarkdown()` {.collection-method}

The `Str::inlineMarkdown` method converts GitHub flavored Markdown into inline HTML using [CommonMark](https://commonmark.thephpleague.com/). However, unlike the `markdown` method, it does not wrap all generated HTML in a block-level element:

```php
use Illuminate\Support\Str;

$html = Str::inlineMarkdown('**Laravel**');

// <strong>Laravel</strong>
```

#### Markdown Security

By default, Markdown supports raw HTML, which will expose Cross-Site Scripting (XSS) vulnerabilities when used with raw user input. As per the [CommonMark Security documentation](https://commonmark.thephpleague.com/security/), you may use the `html_input` option to either escape or strip raw HTML, and the `allow_unsafe_links` option to specify whether to allow unsafe links. If you need to allow some raw HTML, you should pass your compiled Markdown through an HTML Purifier:

```php
use Illuminate\Support\Str;

Str::inlineMarkdown('Inject: <script>alert("Hello XSS!");</script>', [
    'html_input' => 'strip',
    'allow_unsafe_links' => false,
]);

// Inject: alert(&quot;Hello XSS!&quot;);
```

<a name="method-str-is"></a>
#### `Str::is()` {.collection-method}

The `Str::is` method determines if a given string matches a given pattern. Asterisks may be used as wildcard values:

```php
use Illuminate\Support\Str;

$matches = Str::is('foo*', 'foobar');

// true

$matches = Str::is('baz*', 'foobar');

// false
```

You may disable case sensitivity by setting the `ignoreCase` argument to `true`:

```php
use Illuminate\Support\Str;

$matches = Str::is('*.jpg', 'photo.JPG', ignoreCase: true);

// true
```

<a name="method-str-is-ascii"></a>
#### `Str::isAscii()` {.collection-method}

The `Str::isAscii` method determines if a given string is 7-bit ASCII:

```php
use Illuminate\Support\Str;

$isAscii = Str::isAscii('Taylor');

// true

$isAscii = Str::isAscii('ü');

// false
```

<a name="method-str-is-json"></a>
#### `Str::isJson()` {.collection-method}

The `Str::isJson` method determines if the given string is valid JSON:

```php
use Illuminate\Support\Str;

$result = Str::isJson('[1,2,3]');

// true

$result = Str::isJson('{"first": "John", "last": "Doe"}');

// true

$result = Str::isJson('{first: "John", last: "Doe"}');

// false
```

<a name="method-str-is-url"></a>
#### `Str::isUrl()` {.collection-method}

The `Str::isUrl` method determines if the given string is a valid URL:

```php
use Illuminate\Support\Str;

$isUrl = Str::isUrl('http://example.com');

// true

$isUrl = Str::isUrl('laravel');

// false
```

The `isUrl` method considers a wide range of protocols as valid. However, you may specify the protocols that should be considered valid by providing them to the `isUrl` method:

```php
$isUrl = Str::isUrl('http://example.com', ['http', 'https']);
```

<a name="method-str-is-ulid"></a>
#### `Str::isUlid()` {.collection-method}

The `Str::isUlid` method determines if the given string is a valid ULID:

```php
use Illuminate\Support\Str;

$isUlid = Str::isUlid('01gd6r360bp37zj17nxb55yv40');

// true

$isUlid = Str::isUlid('laravel');

// false
```

<a name="method-str-is-uuid"></a>
#### `Str::isUuid()` {.collection-method}

The `Str::isUuid` method determines if the given string is a valid UUID:

```php
use Illuminate\Support\Str;

$isUuid = Str::isUuid('a0a2a2d2-0b87-4a18-83f2-2529882be2de');

// true

$isUuid = Str::isUuid('laravel');

// false
```

You may also validate that the given UUID matches a UUID specification by version (1, 3, 4, 5, 6, 7, or 8):

```php
use Illuminate\Support\Str;

$isUuid = Str::isUuid('a0a2a2d2-0b87-4a18-83f2-2529882be2de', version: 4);

// true

$isUuid = Str::isUuid('a0a2a2d2-0b87-4a18-83f2-2529882be2de', version: 1);

// false
```

<a name="method-kebab-case"></a>
#### `Str::kebab()` {.collection-method}

The `Str::kebab` method converts the given string to `kebab-case`:

```php
use Illuminate\Support\Str;

$converted = Str::kebab('fooBar');

// foo-bar
```

<a name="method-str-lcfirst"></a>
#### `Str::lcfirst()` {.collection-method}

The `Str::lcfirst` method returns the given string with the first character lowercased:

```php
use Illuminate\Support\Str;

$string = Str::lcfirst('Foo Bar');

// foo Bar
```

<a name="method-str-length"></a>
#### `Str::length()` {.collection-method}

The `Str::length` method returns the length of the given string:

```php
use Illuminate\Support\Str;

$length = Str::length('Laravel');

// 7
```

<a name="method-str-limit"></a>
#### `Str::limit()` {.collection-method}

The `Str::limit` method truncates the given string to the specified length:

```php
use Illuminate\Support\Str;

$truncated = Str::limit('The quick brown fox jumps over the lazy dog', 20);

// The quick brown fox...
```

You may pass a third argument to the method to change the string that will be appended to the end of the truncated string:

```php
$truncated = Str::limit('The quick brown fox jumps over the lazy dog', 20, ' (...)');

// The quick brown fox (...)
```

If you would like to preserve complete words when truncating the string, you may utilize the `preserveWords` argument. When this argument is `true`, the string will be truncated to the nearest complete word boundary:

```php
$truncated = Str::limit('The quick brown fox', 12, preserveWords: true);

// The quick...
```

<a name="method-str-lower"></a>
#### `Str::lower()` {.collection-method}

The `Str::lower` method converts the given string to lowercase:

```php
use Illuminate\Support\Str;

$converted = Str::lower('LARAVEL');

// laravel
```

<a name="method-str-markdown"></a>
#### `Str::markdown()` {.collection-method}

The `Str::markdown` method converts GitHub flavored Markdown into HTML using [CommonMark](https://commonmark.thephpleague.com/):

```php
use Illuminate\Support\Str;

$html = Str::markdown('# Laravel');

// <h1>Laravel</h1>

$html = Str::markdown('# Taylor <b>Otwell</b>', [
    'html_input' => 'strip',
]);

// <h1>Taylor Otwell</h1>
```

#### Markdown Security

By default, Markdown supports raw HTML, which will expose Cross-Site Scripting (XSS) vulnerabilities when used with raw user input. As per the [CommonMark Security documentation](https://commonmark.thephpleague.com/security/), you may use the `html_input` option to either escape or strip raw HTML, and the `allow_unsafe_links` option to specify whether to allow unsafe links. If you need to allow some raw HTML, you should pass your compiled Markdown through an HTML Purifier:

```php
use Illuminate\Support\Str;

Str::markdown('Inject: <script>alert("Hello XSS!");</script>', [
    'html_input' => 'strip',
    'allow_unsafe_links' => false,
]);

// <p>Inject: alert(&quot;Hello XSS!&quot;);</p>
```

<a name="method-str-mask"></a>
#### `Str::mask()` {.collection-method}

The `Str::mask` method masks a portion of a string with a repeated character, and may be used to obfuscate segments of strings such as email addresses and phone numbers:

```php
use Illuminate\Support\Str;

$string = Str::mask('taylor@example.com', '*', 3);

// tay***************
```

If needed, you may provide a negative number as the third argument to the `mask` method, which will instruct the method to begin masking at the given distance from the end of the string:

```php
$string = Str::mask('taylor@example.com', '*', -15, 3);

// tay***@example.com
```

<a name="method-str-match"></a>
#### `Str::match()` {.collection-method}

The `Str::match` method will return the portion of a string that matches a given regular expression pattern:

```php
use Illuminate\Support\Str;

$result = Str::match('/bar/', 'foo bar');

// 'bar'

$result = Str::match('/foo (.*)/', 'foo bar');

// 'bar'
```

<a name="method-str-match-all"></a>
#### `Str::matchAll()` {.collection-method}

The `Str::matchAll` method will return a collection containing the portions of a string that match a given regular expression pattern:

```php
use Illuminate\Support\Str;

$result = Str::matchAll('/bar/', 'bar foo bar');

// collect(['bar', 'bar'])
```

If you specify a matching group within the expression, Laravel will return a collection of the first matching group's matches:

```php
use Illuminate\Support\Str;

$result = Str::matchAll('/f(\w*)/', 'bar fun bar fly');

// collect(['un', 'ly']);
```

If no matches are found, an empty collection will be returned.

<a name="method-str-is-match"></a>
#### `Str::isMatch()` {.collection-method}

The `Str::isMatch` method will return `true` if the string matches a given regular expression:

```php
use Illuminate\Support\Str;

$result = Str::isMatch('/foo (.*)/', 'foo bar');

// true

$result = Str::isMatch('/foo (.*)/', 'laravel');

// false
```

<a name="method-str-ordered-uuid"></a>
#### `Str::orderedUuid()` {.collection-method}

The `Str::orderedUuid` method generates a "timestamp first" UUID that may be efficiently stored in an indexed database column. Each UUID that is generated using this method will be sorted after UUIDs previously generated using the method:

```php
use Illuminate\Support\Str;

return (string) Str::orderedUuid();
```

<a name="method-str-padboth"></a>
#### `Str::padBoth()` {.collection-method}

The `Str::padBoth` method wraps PHP's `str_pad` function, padding both sides of a string with another string until the final string reaches a desired length:

```php
use Illuminate\Support\Str;

$padded = Str::padBoth('James', 10, '_');

// '__James___'

$padded = Str::padBoth('James', 10);

// '  James   '
```

<a name="method-str-padleft"></a>
#### `Str::padLeft()` {.collection-method}

The `Str::padLeft` method wraps PHP's `str_pad` function, padding the left side of a string with another string until the final string reaches a desired length:

```php
use Illuminate\Support\Str;

$padded = Str::padLeft('James', 10, '-=');

// '-=-=-James'

$padded = Str::padLeft('James', 10);

// '     James'
```

<a name="method-str-padright"></a>
#### `Str::padRight()` {.collection-method}

The `Str::padRight` method wraps PHP's `str_pad` function, padding the right side of a string with another string until the final string reaches a desired length:

```php
use Illuminate\Support\Str;

$padded = Str::padRight('James', 10, '-');

// 'James-----'

$padded = Str::padRight('James', 10);

// 'James     '
```

<a name="method-str-password"></a>
#### `Str::password()` {.collection-method}

The `Str::password` method may be used to generate a secure, random password of a given length. The password will consist of a combination of letters, numbers, symbols, and spaces. By default, passwords are 32 characters long:

```php
use Illuminate\Support\Str;

$password = Str::password();

// 'EbJo2vE-AS:U,$%_gkrV4n,q~1xy/-_4'

$password = Str::password(12);

// 'qwuar>#V|i]N'
```

<a name="method-str-counted"></a>
#### `Str::counted()` {.collection-method}

The `Str::counted` method converts a singular word string to its singular or plural form based on the given count and prefixes the result with the formatted count:

```php
use Illuminate\Support\Str;

$label = Str::counted('order', 1);

// 1 order

$label = Str::counted('order', 1000);

// 1,000 orders
```

<a name="method-str-plural"></a>
#### `Str::plural()` {.collection-method}

The `Str::plural` method converts a singular word string to its plural form. This function supports [any of the languages supported by Laravel's pluralizer](/docs/{{version}}/localization#pluralization-language):

```php
use Illuminate\Support\Str;

$plural = Str::plural('car');

// cars

$plural = Str::plural('child');

// children
```

You may provide an integer as a second argument to the function to retrieve the singular or plural form of the string:

```php
use Illuminate\Support\Str;

$plural = Str::plural('child', 2);

// children

$singular = Str::plural('child', 1);

// child
```

The `prependCount` argument may be provided to prefix the pluralized string with the formatted `$count`:

```php
use Illuminate\Support\Str;

$label = Str::plural('car', 1000, prependCount: true);

// 1,000 cars
```

<a name="method-str-plural-studly"></a>
#### `Str::pluralStudly()` {.collection-method}

The `Str::pluralStudly` method converts a singular word string formatted in studly caps case to its plural form. This function supports [any of the languages supported by Laravel's pluralizer](/docs/{{version}}/localization#pluralization-language):

```php
use Illuminate\Support\Str;

$plural = Str::pluralStudly('VerifiedHuman');

// VerifiedHumans

$plural = Str::pluralStudly('UserFeedback');

// UserFeedback
```

You may provide an integer as a second argument to the function to retrieve the singular or plural form of the string:

```php
use Illuminate\Support\Str;

$plural = Str::pluralStudly('VerifiedHuman', 2);

// VerifiedHumans

$singular = Str::pluralStudly('VerifiedHuman', 1);

// VerifiedHuman
```

<a name="method-str-position"></a>
#### `Str::position()` {.collection-method}

The `Str::position` method returns the position of the first occurrence of a substring in a string. If the substring does not exist in the given string, `false` is returned:

```php
use Illuminate\Support\Str;

$position = Str::position('Hello, World!', 'Hello');

// 0

$position = Str::position('Hello, World!', 'W');

// 7
```

<a name="method-str-random"></a>
#### `Str::random()` {.collection-method}

The `Str::random` method generates a random string of the specified length. This function uses PHP's `random_bytes` function:

```php
use Illuminate\Support\Str;

$random = Str::random(40);
```

During testing, it may be useful to "fake" the value that is returned by the `Str::random` method. To accomplish this, you may use the `createRandomStringsUsing` method:

```php
Str::createRandomStringsUsing(function () {
    return 'fake-random-string';
});
```

To instruct the `random` method to return to generating random strings normally, you may invoke the `createRandomStringsNormally` method:

```php
Str::createRandomStringsNormally();
```

<a name="method-str-remove"></a>
#### `Str::remove()` {.collection-method}

The `Str::remove` method removes the given value or array of values from the string:

```php
use Illuminate\Support\Str;

$string = 'Peter Piper picked a peck of pickled peppers.';

$removed = Str::remove('e', $string);

// Ptr Pipr pickd a pck of pickld ppprs.
```

You may also pass `false` as a third argument to the `remove` method to ignore case when removing strings.

<a name="method-str-repeat"></a>
#### `Str::repeat()` {.collection-method}

The `Str::repeat` method repeats the given string:

```php
use Illuminate\Support\Str;

$string = 'a';

$repeat = Str::repeat($string, 5);

// aaaaa
```

<a name="method-str-replace"></a>
#### `Str::replace()` {.collection-method}

The `Str::replace` method replaces a given string within the string:

```php
use Illuminate\Support\Str;

$string = 'Laravel 11.x';

$replaced = Str::replace('11.x', '12.x', $string);

// Laravel 12.x
```

The `replace` method also accepts a `caseSensitive` argument. By default, the `replace` method is case sensitive:

```php
$replaced = Str::replace(
    'php',
    'Laravel',
    'PHP Framework for Web Artisans',
    caseSensitive: false
);

// Laravel Framework for Web Artisans
```

<a name="method-str-replace-array"></a>
#### `Str::replaceArray()` {.collection-method}

The `Str::replaceArray` method replaces a given value in the string sequentially using an array:

```php
use Illuminate\Support\Str;

$string = 'The event will take place between ? and ?';

$replaced = Str::replaceArray('?', ['8:30', '9:00'], $string);

// The event will take place between 8:30 and 9:00
```

<a name="method-str-replace-first"></a>
#### `Str::replaceFirst()` {.collection-method}

The `Str::replaceFirst` method replaces the first occurrence of a given value in a string:

```php
use Illuminate\Support\Str;

$replaced = Str::replaceFirst('the', 'a', 'the quick brown fox jumps over the lazy dog');

// a quick brown fox jumps over the lazy dog
```

<a name="method-str-replace-last"></a>
#### `Str::replaceLast()` {.collection-method}

The `Str::replaceLast` method replaces the last occurrence of a given value in a string:

```php
use Illuminate\Support\Str;

$replaced = Str::replaceLast('the', 'a', 'the quick brown fox jumps over the lazy dog');

// the quick brown fox jumps over a lazy dog
```

<a name="method-str-replace-matches"></a>
#### `Str::replaceMatches()` {.collection-method}

The `Str::replaceMatches` method replaces all portions of a string matching a pattern with the given replacement string:

```php
use Illuminate\Support\Str;

$replaced = Str::replaceMatches(
    pattern: '/[^A-Za-z0-9]++/',
    replace: '',
    subject: '(+1) 501-555-1000'
)

// '15015551000'
```

The `replaceMatches` method also accepts a closure that will be invoked with each portion of the string matching the given pattern, allowing you to perform the replacement logic within the closure and return the replaced value:

```php
use Illuminate\Support\Str;

$replaced = Str::replaceMatches('/\d/', function (array $matches) {
    return '['.$matches[0].']';
}, '123');

// '[1][2][3]'
```

<a name="method-str-replace-start"></a>
#### `Str::replaceStart()` {.collection-method}

The `Str::replaceStart` method replaces the first occurrence of the given value only if the value appears at the start of the string:

```php
use Illuminate\Support\Str;

$replaced = Str::replaceStart('Hello', 'Laravel', 'Hello World');

// Laravel World

$replaced = Str::replaceStart('World', 'Laravel', 'Hello World');

// Hello World
```

<a name="method-str-replace-end"></a>
#### `Str::replaceEnd()` {.collection-method}

The `Str::replaceEnd` method replaces the last occurrence of the given value only if the value appears at the end of the string:

```php
use Illuminate\Support\Str;

$replaced = Str::replaceEnd('World', 'Laravel', 'Hello World');

// Hello Laravel

$replaced = Str::replaceEnd('Hello', 'Laravel', 'Hello World');

// Hello World
```

<a name="method-str-reverse"></a>
#### `Str::reverse()` {.collection-method}

The `Str::reverse` method reverses the given string:

```php
use Illuminate\Support\Str;

$reversed = Str::reverse('Hello World');

// dlroW olleH
```

<a name="method-str-singular"></a>
#### `Str::singular()` {.collection-method}

The `Str::singular` method converts a string to its singular form. This function supports [any of the languages supported by Laravel's pluralizer](/docs/{{version}}/localization#pluralization-language):

```php
use Illuminate\Support\Str;

$singular = Str::singular('cars');

// car

$singular = Str::singular('children');

// child
```

<a name="method-str-slug"></a>
#### `Str::slug()` {.collection-method}

The `Str::slug` method generates a URL-friendly "slug" from the given string:

```php
use Illuminate\Support\Str;

$slug = Str::slug('Laravel 5 Framework', '-');

// laravel-5-framework
```

<a name="method-snake-case"></a>
#### `Str::snake()` {.collection-method}

The `Str::snake` method converts the given string to `snake_case`:

```php
use Illuminate\Support\Str;

$converted = Str::snake('fooBar');

// foo_bar

$converted = Str::snake('fooBar', '-');

// foo-bar
```

<a name="method-str-squish"></a>
#### `Str::squish()` {.collection-method}

The `Str::squish` method removes all extraneous white space from a string, including extraneous white space between words:

```php
use Illuminate\Support\Str;

$string = Str::squish('    laravel    framework    ');

// laravel framework
```

<a name="method-str-start"></a>
#### `Str::start()` {.collection-method}

The `Str::start` method adds a single instance of the given value to a string if it does not already start with that value:

```php
use Illuminate\Support\Str;

$adjusted = Str::start('this/string', '/');

// /this/string

$adjusted = Str::start('/this/string', '/');

// /this/string
```

<a name="method-starts-with"></a>
#### `Str::startsWith()` {.collection-method}

The `Str::startsWith` method determines if the given string begins with the given value:

```php
use Illuminate\Support\Str;

$result = Str::startsWith('This is my name', 'This');

// true
```

If an array of possible values is passed, the `startsWith` method will return `true` if the string begins with any of the given values:

```php
$result = Str::startsWith('This is my name', ['This', 'That', 'There']);

// true
```

<a name="method-studly-case"></a>
#### `Str::studly()` {.collection-method}

The `Str::studly` method converts the given string to `StudlyCase`:

```php
use Illuminate\Support\Str;

$converted = Str::studly('foo_bar');

// FooBar
```

<a name="method-str-substr"></a>
#### `Str::substr()` {.collection-method}

The `Str::substr` method returns the portion of string specified by the start and length parameters:

```php
use Illuminate\Support\Str;

$converted = Str::substr('The Laravel Framework', 4, 7);

// Laravel
```

<a name="method-str-substrcount"></a>
#### `Str::substrCount()` {.collection-method}

The `Str::substrCount` method returns the number of occurrences of a given value in the given string:

```php
use Illuminate\Support\Str;

$count = Str::substrCount('If you like ice cream, you will like snow cones.', 'like');

// 2
```

<a name="method-str-substrreplace"></a>
#### `Str::substrReplace()` {.collection-method}

The `Str::substrReplace` method replaces text within a portion of a string, starting at the position specified by the third argument and replacing the number of characters specified by the fourth argument. Passing `0` to the method's fourth argument will insert the string at the specified position without replacing any of the existing characters in the string:

```php
use Illuminate\Support\Str;

$result = Str::substrReplace('1300', ':', 2);
// 13:

$result = Str::substrReplace('1300', ':', 2, 0);
// 13:00
```

<a name="method-str-swap"></a>
#### `Str::swap()` {.collection-method}

The `Str::swap` method replaces multiple values in the given string using PHP's `strtr` function:

```php
use Illuminate\Support\Str;

$string = Str::swap([
    'Tacos' => 'Burritos',
    'great' => 'fantastic',
], 'Tacos are great!');

// Burritos are fantastic!
```

<a name="method-take"></a>
#### `Str::take()` {.collection-method}

The `Str::take` method returns a specified number of characters from the beginning of a string:

```php
use Illuminate\Support\Str;

$taken = Str::take('Build something amazing!', 5);

// Build
```

<a name="method-title-case"></a>
#### `Str::title()` {.collection-method}

The `Str::title` method converts the given string to `Title Case`:

```php
use Illuminate\Support\Str;

$converted = Str::title('a nice title uses the correct case');

// A Nice Title Uses The Correct Case
```

<a name="method-str-to-base64"></a>
#### `Str::toBase64()` {.collection-method}

The `Str::toBase64` method converts the given string to Base64:

```php
use Illuminate\Support\Str;

$base64 = Str::toBase64('Laravel');

// TGFyYXZlbA==
```

<a name="method-str-transliterate"></a>
#### `Str::transliterate()` {.collection-method}

The `Str::transliterate` method will attempt to convert a given string into its closest ASCII representation:

```php
use Illuminate\Support\Str;

$email = Str::transliterate('ⓣⓔⓢⓣ@ⓛⓐⓡⓐⓥⓔⓛ.ⓒⓞⓜ');

// 'test@laravel.com'
```

<a name="method-str-trim"></a>
#### `Str::trim()` {.collection-method}

The `Str::trim` method strips whitespace (or other characters) from the beginning and end of the given string. Unlike PHP's native `trim` function, the `Str::trim` method also removes unicode whitespace characters:

```php
use Illuminate\Support\Str;

$string = Str::trim(' foo bar ');

// 'foo bar'
```

<a name="method-str-ltrim"></a>
#### `Str::ltrim()` {.collection-method}

The `Str::ltrim` method strips whitespace (or other characters) from the beginning of the given string. Unlike PHP's native `ltrim` function, the `Str::ltrim` method also removes unicode whitespace characters:

```php
use Illuminate\Support\Str;

$string = Str::ltrim('  foo bar  ');

// 'foo bar  '
```

<a name="method-str-rtrim"></a>
#### `Str::rtrim()` {.collection-method}

The `Str::rtrim` method strips whitespace (or other characters) from the end of the given string. Unlike PHP's native `rtrim` function, the `Str::rtrim` method also removes unicode whitespace characters:

```php
use Illuminate\Support\Str;

$string = Str::rtrim('  foo bar  ');

// '  foo bar'
```

<a name="method-str-ucfirst"></a>
#### `Str::ucfirst()` {.collection-method}

The `Str::ucfirst` method returns the given string with the first character capitalized:

```php
use Illuminate\Support\Str;

$string = Str::ucfirst('foo bar');

// Foo bar
```

<a name="method-str-ucsplit"></a>
#### `Str::ucsplit()` {.collection-method}

The `Str::ucsplit` method splits the given string into an array by uppercase characters:

```php
use Illuminate\Support\Str;

$segments = Str::ucsplit('FooBar');

// [0 => 'Foo', 1 => 'Bar']
```

<a name="method-str-ucwords"></a>
#### `Str::ucwords()` {.collection-method}

The `Str::ucwords` method converts the first character of each word in the given string to uppercase:

```php
use Illuminate\Support\Str;

$string = Str::ucwords('laravel framework');

// Laravel Framework
```

<a name="method-str-upper"></a>
#### `Str::upper()` {.collection-method}

The `Str::upper` method converts the given string to uppercase:

```php
use Illuminate\Support\Str;

$string = Str::upper('laravel');

// LARAVEL
```

<a name="method-str-ulid"></a>
#### `Str::ulid()` {.collection-method}

The `Str::ulid` method generates a ULID, which is a compact, time-ordered unique identifier:

```php
use Illuminate\Support\Str;

return (string) Str::ulid();

// 01gd6r360bp37zj17nxb55yv40
```

If you would like to retrieve a `Illuminate\Support\Carbon` date instance representing the date and time that a given ULID was created, you may use the `createFromId` method provided by Laravel's Carbon integration:

```php
use Illuminate\Support\Carbon;
use Illuminate\Support\Str;

$date = Carbon::createFromId((string) Str::ulid());
```

During testing, it may be useful to "fake" the value that is returned by the `Str::ulid` method. To accomplish this, you may use the `createUlidsUsing` method:

```php
use Symfony\Component\Uid\Ulid;

Str::createUlidsUsing(function () {
    return new Ulid('01HRDBNHHCKNW2AK4Z29SN82T9');
});
```

To instruct the `ulid` method to return to generating ULIDs normally, you may invoke the `createUlidsNormally` method:

```php
Str::createUlidsNormally();
```

<a name="method-str-unwrap"></a>
#### `Str::unwrap()` {.collection-method}

The `Str::unwrap` method removes the specified strings from the beginning and end of a given string:

```php
use Illuminate\Support\Str;

Str::unwrap('-Laravel-', '-');

// Laravel

Str::unwrap('{framework: "Laravel"}', '{', '}');

// framework: "Laravel"
```

<a name="method-str-uuid"></a>
#### `Str::uuid()` {.collection-method}

The `Str::uuid` method generates a UUID (version 4):

```php
use Illuminate\Support\Str;

return (string) Str::uuid();
```

During testing, it may be useful to "fake" the value that is returned by the `Str::uuid` method. To accomplish this, you may use the `createUuidsUsing` method:

```php
use Ramsey\Uuid\Uuid;

Str::createUuidsUsing(function () {
    return Uuid::fromString('eadbfeac-5258-45c2-bab7-ccb9b5ef74f9');
});
```

To instruct the `uuid` method to return to generating UUIDs normally, you may invoke the `createUuidsNormally` method:

```php
Str::createUuidsNormally();
```

<a name="method-str-uuid7"></a>
#### `Str::uuid7()` {.collection-method}

The `Str::uuid7` method generates a UUID (version 7):

```php
use Illuminate\Support\Str;

return (string) Str::uuid7();
```

A `DateTimeInterface` may be passed as an optional parameter which will be used to generate the ordered UUID:

```php
return (string) Str::uuid7(time: now());
```

<a name="method-str-word-count"></a>
#### `Str::wordCount()` {.collection-method}

The `Str::wordCount` method returns the number of words that a string contains:

```php
use Illuminate\Support\Str;

Str::wordCount('Hello, world!'); // 2
```

<a name="method-str-word-wrap"></a>
#### `Str::wordWrap()` {.collection-method}

The `Str::wordWrap` method wraps a string to a given number of characters:

```php
use Illuminate\Support\Str;

$text = "The quick brown fox jumped over the lazy dog."

Str::wordWrap($text, characters: 20, break: "<br />\n");

/*
The quick brown fox<br />
jumped over the lazy<br />
dog.
*/
```

<a name="method-str-words"></a>
#### `Str::words()` {.collection-method}

The `Str::words` method limits the number of words in a string. An additional string may be passed to this method via its third argument to specify which string should be appended to the end of the truncated string:

```php
use Illuminate\Support\Str;

return Str::words('Perfectly balanced, as all things should be.', 3, ' >>>');

// Perfectly balanced, as >>>
```

<a name="method-str-wrap"></a>
#### `Str::wrap()` {.collection-method}

The `Str::wrap` method wraps the given string with an additional string or pair of strings:

```php
use Illuminate\Support\Str;

Str::wrap('Laravel', '"');

// "Laravel"

Str::wrap('is', before: 'This ', after: ' Laravel!');

// This is Laravel!
```

<a name="method-str"></a>
#### `str()` {.collection-method}

The `str` function returns a new `Illuminate\Support\Stringable` instance of the given string. This function is equivalent to the `Str::of` method:

```php
$string = str('Taylor')->append(' Otwell');

// 'Taylor Otwell'
```

If no argument is provided to the `str` function, the function returns an instance of `Illuminate\Support\Str`:

```php
$snake = str()->snake('FooBar');

// 'foo_bar'
```

<a name="method-trans"></a>
#### `trans()` {.collection-method}

The `trans` function translates the given translation key using your [language files](/docs/{{version}}/localization):

```php
echo trans('messages.welcome');
```

If the specified translation key does not exist, the `trans` function will return the given key. So, using the example above, the `trans` function would return `messages.welcome` if the translation key does not exist.

<a name="method-trans-choice"></a>
#### `trans_choice()` {.collection-method}

The `trans_choice` function translates the given translation key with inflection:

```php
echo trans_choice('messages.notifications', $unreadCount);
```

If the specified translation key does not exist, the `trans_choice` function will return the given key. So, using the example above, the `trans_choice` function would return `messages.notifications` if the translation key does not exist.

<a name="fluent-strings"></a>
## Fluent Strings

Fluent strings provide a more fluent, object-oriented interface for working with string values, allowing you to chain multiple string operations together using a more readable syntax compared to traditional string operations.

<a name="method-fluent-str-after"></a>
#### `after` {.collection-method}

The `after` method returns everything after the given value in a string. The entire string will be returned if the value does not exist within the string:

```php
use Illuminate\Support\Str;

$slice = Str::of('This is my name')->after('This is');

// ' my name'
```

<a name="method-fluent-str-after-last"></a>
#### `afterLast` {.collection-method}

The `afterLast` method returns everything after the last occurrence of the given value in a string. The entire string will be returned if the value does not exist within the string:

```php
use Illuminate\Support\Str;

$slice = Str::of('App\Http\Controllers\Controller')->afterLast('\\');

// 'Controller'
```

<a name="method-fluent-str-apa"></a>
#### `apa` {.collection-method}

The `apa` method converts the given string to title case following the [APA guidelines](https://apastyle.apa.org/style-grammar-guidelines/capitalization/title-case):

```php
use Illuminate\Support\Str;

$converted = Str::of('a nice title uses the correct case')->apa();

// A Nice Title Uses the Correct Case
```

<a name="method-fluent-str-append"></a>
#### `append` {.collection-method}

The `append` method appends the given values to the string:

```php
use Illuminate\Support\Str;

$string = Str::of('Taylor')->append(' Otwell');

// 'Taylor Otwell'
```

<a name="method-fluent-str-ascii"></a>
#### `ascii` {.collection-method}

The `ascii` method will attempt to transliterate the string into an ASCII value:

```php
use Illuminate\Support\Str;

$string = Str::of('ü')->ascii();

// 'u'
```

<a name="method-fluent-str-basename"></a>
#### `basename` {.collection-method}

The `basename` method will return the trailing name component of the given string:

```php
use Illuminate\Support\Str;

$string = Str::of('/foo/bar/baz')->basename();

// 'baz'
```

If needed, you may provide an "extension" that will be removed from the trailing component:

```php
use Illuminate\Support\Str;

$string = Str::of('/foo/bar/baz.jpg')->basename('.jpg');

// 'baz'
```

<a name="method-fluent-str-before"></a>
#### `before` {.collection-method}

The `before` method returns everything before the given value in a string:

```php
use Illuminate\Support\Str;

$slice = Str::of('This is my name')->before('my name');

// 'This is '
```

<a name="method-fluent-str-before-last"></a>
#### `beforeLast` {.collection-method}

The `beforeLast` method returns everything before the last occurrence of the given value in a string:

```php
use Illuminate\Support\Str;

$slice = Str::of('This is my name')->beforeLast('is');

// 'This '
```

<a name="method-fluent-str-between"></a>
#### `between` {.collection-method}

The `between` method returns the portion of a string between two values:

```php
use Illuminate\Support\Str;

$converted = Str::of('This is my name')->between('This', 'name');

// ' is my '
```

<a name="method-fluent-str-between-first"></a>
#### `betweenFirst` {.collection-method}

The `betweenFirst` method returns the smallest possible portion of a string between two values:

```php
use Illuminate\Support\Str;

$converted = Str::of('[a] bc [d]')->betweenFirst('[', ']');

// 'a'
```

<a name="method-fluent-str-camel"></a>
#### `camel` {.collection-method}

The `camel` method converts the given string to `camelCase`:

```php
use Illuminate\Support\Str;

$converted = Str::of('foo_bar')->camel();

// 'fooBar'
```

<a name="method-fluent-str-char-at"></a>
#### `charAt` {.collection-method}

The `charAt` method returns the character at the specified index. If the index is out of bounds, `false` is returned:

```php
use Illuminate\Support\Str;

$character = Str::of('This is my name.')->charAt(6);

// 's'
```

<a name="method-fluent-str-class-basename"></a>
#### `classBasename` {.collection-method}

The `classBasename` method returns the class name of the given class with the class's namespace removed:

```php
use Illuminate\Support\Str;

$class = Str::of('Foo\Bar\Baz')->classBasename();

// 'Baz'
```

<a name="method-fluent-str-chop-start"></a>
#### `chopStart` {.collection-method}

The `chopStart` method removes the first occurrence of the given value only if the value appears at the start of the string:

```php
use Illuminate\Support\Str;

$url = Str::of('https://laravel.com')->chopStart('https://');

// 'laravel.com'
```

You may also pass an array. If the string starts with any of the values in the array then that value will be removed from string:

```php
use Illuminate\Support\Str;

$url = Str::of('http://laravel.com')->chopStart(['https://', 'http://']);

// 'laravel.com'
```

<a name="method-fluent-str-chop-end"></a>
#### `chopEnd` {.collection-method}

The `chopEnd` method removes the last occurrence of the given value only if the value appears at the end of the string:

```php
use Illuminate\Support\Str;

$url = Str::of('https://laravel.com')->chopEnd('.com');

// 'https://laravel'
```

You may also pass an array. If the string ends with any of the values in the array then that value will be removed from string:

```php
use Illuminate\Support\Str;

$url = Str::of('http://laravel.com')->chopEnd(['.com', '.io']);

// 'http://laravel'
```

<a name="method-fluent-str-contains"></a>
#### `contains` {.collection-method}

The `contains` method determines if the given string contains the given value. By default, this method is case sensitive:

```php
use Illuminate\Support\Str;

$contains = Str::of('This is my name')->contains('my');

// true
```

You may also pass an array of values to determine if the given string contains any of the values in the array:

```php
use Illuminate\Support\Str;

$contains = Str::of('This is my name')->contains(['my', 'foo']);

// true
```

You can disable case sensitivity by setting the `ignoreCase` argument to `true`:

```php
use Illuminate\Support\Str;

$contains = Str::of('This is my name')->contains('MY', ignoreCase: true);

// true
```

<a name="method-fluent-str-contains-all"></a>
#### `containsAll` {.collection-method}

The `containsAll` method determines if the given string contains all of the values in the given array:

```php
use Illuminate\Support\Str;

$containsAll = Str::of('This is my name')->containsAll(['my', 'name']);

// true
```

You can disable case sensitivity by setting the `ignoreCase` argument to `true`:

```php
use Illuminate\Support\Str;

$containsAll = Str::of('This is my name')->containsAll(['MY', 'NAME'], ignoreCase: true);

// true
```

<a name="method-fluent-str-decrypt"></a>
#### `decrypt` {.collection-method}

The `decrypt` method [decrypts](/docs/{{version}}/encryption) the encrypted string:

```php
use Illuminate\Support\Str;

$decrypted = $encrypted->decrypt();

// 'secret'
```

For the inverse of `decrypt`, see the [encrypt](#method-fluent-str-encrypt) method.

<a name="method-fluent-str-deduplicate"></a>
#### `deduplicate` {.collection-method}

The `deduplicate` method replaces consecutive instances of a character with a single instance of that character in the given string. By default, the method deduplicates spaces:

```php
use Illuminate\Support\Str;

$result = Str::of('The   Laravel   Framework')->deduplicate();

// The Laravel Framework
```

You may specify a different character to deduplicate by passing it in as the second argument to the method:

```php
use Illuminate\Support\Str;

$result = Str::of('The---Laravel---Framework')->deduplicate('-');

// The-Laravel-Framework
```

<a name="method-fluent-str-dirname"></a>
#### `dirname` {.collection-method}

The `dirname` method returns the parent directory portion of the given string:

```php
use Illuminate\Support\Str;

$string = Str::of('/foo/bar/baz')->dirname();

// '/foo/bar'
```

If necessary, you may specify how many directory levels you wish to trim from the string:

```php
use Illuminate\Support\Str;

$string = Str::of('/foo/bar/baz')->dirname(2);

// '/foo'
```

<a name="method-fluent-str-doesnt-contain"></a>
#### `doesntContain()` {.collection-method}

The `doesntContain` method determines if the given string does not contain the given value. This method is the inverse of the [contains](#method-fluent-str-contains) method. By default, this method is case sensitive:

```php
use Illuminate\Support\Str;

$doesntContain = Str::of('This is name')->doesntContain('my');

// true
```

You may also pass an array of values to determine if the given string does not contain any of the values in the array:

```php
use Illuminate\Support\Str;

$doesntContain = Str::of('This is name')->doesntContain(['my', 'framework']);

// true
```

You may disable case sensitivity by setting the `ignoreCase` argument to `true`:

```php
use Illuminate\Support\Str;

$doesntContain = Str::of('This is my name')->doesntContain('MY', ignoreCase: true);

// false
```

<a name="method-fluent-str-doesnt-end-with"></a>
#### `doesntEndWith` {.collection-method}

The `doesntEndWith` method determines if the given string doesn't end with the given value:

```php
use Illuminate\Support\Str;

$result = Str::of('This is my name')->doesntEndWith('dog');

// true
```

You may also pass an array of values to determine if the given string doesn't end with any of the values in the array:

```php
use Illuminate\Support\Str;

$result = Str::of('This is my name')->doesntEndWith(['this', 'foo']);

// true

$result = Str::of('This is my name')->doesntEndWith(['name', 'foo']);

// false
```

<a name="method-fluent-str-doesnt-start-with"></a>
#### `doesntStartWith` {.collection-method}

The `doesntStartWith` method determines if the given string doesn't begin with the given value:

```php
use Illuminate\Support\Str;

$result = Str::of('This is my name')->doesntStartWith('That');

// true
```

You may also pass an array of values to determine if the given string doesn't start with any of the values in the array:

```php
use Illuminate\Support\Str;

$result = Str::of('This is my name')->doesntStartWith(['What', 'That', 'There']);

// true
```

<a name="method-fluent-str-encrypt"></a>
#### `encrypt` {.collection-method}

The `encrypt` method [encrypts](/docs/{{version}}/encryption) the string:

```php
use Illuminate\Support\Str;

$encrypted = Str::of('secret')->encrypt();
```

For the inverse of `encrypt`, see the [decrypt](#method-fluent-str-decrypt) method.

<a name="method-fluent-str-ends-with"></a>
#### `endsWith` {.collection-method}

The `endsWith` method determines if the given string ends with the given value:

```php
use Illuminate\Support\Str;

$result = Str::of('This is my name')->endsWith('name');

// true
```

You may also pass an array of values to determine if the given string ends with any of the values in the array:

```php
use Illuminate\Support\Str;

$result = Str::of('This is my name')->endsWith(['name', 'foo']);

// true

$result = Str::of('This is my name')->endsWith(['this', 'foo']);

// false
```

<a name="method-fluent-str-exactly"></a>
#### `exactly` {.collection-method}

The `exactly` method determines if the given string is an exact match with another string:

```php
use Illuminate\Support\Str;

$result = Str::of('Laravel')->exactly('Laravel');

// true
```

<a name="method-fluent-str-excerpt"></a>
#### `excerpt` {.collection-method}

The `excerpt` method extracts an excerpt from the string that matches the first instance of a phrase within that string:

```php
use Illuminate\Support\Str;

$excerpt = Str::of('This is my name')->excerpt('my', [
    'radius' => 3
]);

// '...is my na...'
```

The `radius` option, which defaults to `100`, allows you to define the number of characters that should appear on each side of the truncated string.

In addition, you may use the `omission` option to change the string that will be prepended and appended to the truncated string:

```php
use Illuminate\Support\Str;

$excerpt = Str::of('This is my name')->excerpt('name', [
    'radius' => 3,
    'omission' => '(...) '
]);

// '(...) my name'
```

<a name="method-fluent-str-explode"></a>
#### `explode` {.collection-method}

The `explode` method splits the string by the given delimiter and returns a collection containing each section of the split string:

```php
use Illuminate\Support\Str;

$collection = Str::of('foo bar baz')->explode(' ');

// collect(['foo', 'bar', 'baz'])
```

<a name="method-fluent-str-finish"></a>
#### `finish` {.collection-method}

The `finish` method adds a single instance of the given value to a string if it does not already end with that value:

```php
use Illuminate\Support\Str;

$adjusted = Str::of('this/string')->finish('/');

// this/string/

$adjusted = Str::of('this/string/')->finish('/');

// this/string/
```

<a name="method-fluent-str-from-base64"></a>
#### `fromBase64` {.collection-method}

The `fromBase64` method decodes the given Base64 string:

```php
use Illuminate\Support\Str;

$decoded = Str::of('TGFyYXZlbA==')->fromBase64();

// Laravel
```

<a name="method-fluent-str-hash"></a>
#### `hash` {.collection-method}

The `hash` method hashes the string using the given [algorithm](https://www.php.net/manual/en/function.hash-algos.php):

```php
use Illuminate\Support\Str;

$hashed = Str::of('secret')->hash(algorithm: 'sha256');

// '2bb80d537b1da3e38bd30361aa855686bde0eacd7162fef6a25fe97bf527a25b'
```

<a name="method-fluent-str-headline"></a>
#### `headline` {.collection-method}

The `headline` method will convert strings delimited by casing, hyphens, or underscores into a space delimited string with each word's first letter capitalized:

```php
use Illuminate\Support\Str;

$headline = Str::of('taylor_otwell')->headline();

// Taylor Otwell

$headline = Str::of('EmailNotificationSent')->headline();

// Email Notification Sent
```

<a name="method-fluent-str-initials"></a>
#### `initials` {.collection-method}

The `initials` method will convert the string to its initials:

```php
use Illuminate\Support\Str;

$initials = Str::of('Taylor Otwell')->initials()->upper();

// TO
```

<a name="method-fluent-str-inline-markdown"></a>
#### `inlineMarkdown` {.collection-method}

The `inlineMarkdown` method converts GitHub flavored Markdown into inline HTML using [CommonMark](https://commonmark.thephpleague.com/). However, unlike the `markdown` method, it does not wrap all generated HTML in a block-level element:

```php
use Illuminate\Support\Str;

$html = Str::of('**Laravel**')->inlineMarkdown();

// <strong>Laravel</strong>
```

#### Markdown Security

By default, Markdown supports raw HTML, which will expose Cross-Site Scripting (XSS) vulnerabilities when used with raw user input. As per the [CommonMark Security documentation](https://commonmark.thephpleague.com/security/), you may use the `html_input` option to either escape or strip raw HTML, and the `allow_unsafe_links` option to specify whether to allow unsafe links. If you need to allow some raw HTML, you should pass your compiled Markdown through an HTML Purifier:

```php
use Illuminate\Support\Str;

Str::of('Inject: <script>alert("Hello XSS!");</script>')->inlineMarkdown([
    'html_input' => 'strip',
    'allow_unsafe_links' => false,
]);

// Inject: alert(&quot;Hello XSS!&quot;);
```

<a name="method-fluent-str-is"></a>
#### `is` {.collection-method}

The `is` method determines if a given string matches a given pattern. Asterisks may be used as wildcard values

```php
use Illuminate\Support\Str;

$matches = Str::of('foobar')->is('foo*');

// true

$matches = Str::of('foobar')->is('baz*');

// false
```

<a name="method-fluent-str-is-ascii"></a>
#### `isAscii` {.collection-method}

The `isAscii` method determines if a given string is an ASCII string:

```php
use Illuminate\Support\Str;

$result = Str::of('Taylor')->isAscii();

// true

$result = Str::of('ü')->isAscii();

// false
```

<a name="method-fluent-str-is-empty"></a>
#### `isEmpty` {.collection-method}

The `isEmpty` method determines if the given string is empty:

```php
use Illuminate\Support\Str;

$result = Str::of('  ')->trim()->isEmpty();

// true

$result = Str::of('Laravel')->trim()->isEmpty();

// false
```

<a name="method-fluent-str-is-not-empty"></a>
#### `isNotEmpty` {.collection-method}

The `isNotEmpty` method determines if the given string is not empty:

```php
use Illuminate\Support\Str;

$result = Str::of('  ')->trim()->isNotEmpty();

// false

$result = Str::of('Laravel')->trim()->isNotEmpty();

// true
```

<a name="method-fluent-str-is-json"></a>
#### `isJson` {.collection-method}

The `isJson` method determines if a given string is valid JSON:

```php
use Illuminate\Support\Str;

$result = Str::of('[1,2,3]')->isJson();

// true

$result = Str::of('{"first": "John", "last": "Doe"}')->isJson();

// true

$result = Str::of('{first: "John", last: "Doe"}')->isJson();

// false
```

<a name="method-fluent-str-is-ulid"></a>
#### `isUlid` {.collection-method}

The `isUlid` method determines if a given string is a ULID:

```php
use Illuminate\Support\Str;

$result = Str::of('01gd6r360bp37zj17nxb55yv40')->isUlid();

// true

$result = Str::of('Taylor')->isUlid();

// false
```

<a name="method-fluent-str-is-url"></a>
#### `isUrl` {.collection-method}

The `isUrl` method determines if a given string is a URL:

```php
use Illuminate\Support\Str;

$result = Str::of('http://example.com')->isUrl();

// true

$result = Str::of('Taylor')->isUrl();

// false
```

The `isUrl` method considers a wide range of protocols as valid. However, you may specify the protocols that should be considered valid by providing them to the `isUrl` method:

```php
$result = Str::of('http://example.com')->isUrl(['http', 'https']);
```

<a name="method-fluent-str-is-uuid"></a>
#### `isUuid` {.collection-method}

The `isUuid` method determines if a given string is a UUID:

```php
use Illuminate\Support\Str;

$result = Str::of('5ace9ab9-e9cf-4ec6-a19d-5881212a452c')->isUuid();

// true

$result = Str::of('Taylor')->isUuid();

// false
```

You may also validate that the given UUID matches a UUID specification by version (1, 3, 4, 5, 6, 7, or 8):

```php
use Illuminate\Support\Str;

$isUuid = Str::of('a0a2a2d2-0b87-4a18-83f2-2529882be2de')->isUuid(version: 4);

// true

$isUuid = Str::of('a0a2a2d2-0b87-4a18-83f2-2529882be2de')->isUuid(version: 1);

// false
```

<a name="method-fluent-str-kebab"></a>
#### `kebab` {.collection-method}

The `kebab` method converts the given string to `kebab-case`:

```php
use Illuminate\Support\Str;

$converted = Str::of('fooBar')->kebab();

// foo-bar
```

<a name="method-fluent-str-lcfirst"></a>
#### `lcfirst` {.collection-method}

The `lcfirst` method returns the given string with the first character lowercased:

```php
use Illuminate\Support\Str;

$string = Str::of('Foo Bar')->lcfirst();

// foo Bar
```

<a name="method-fluent-str-length"></a>
#### `length` {.collection-method}

The `length` method returns the length of the given string:

```php
use Illuminate\Support\Str;

$length = Str::of('Laravel')->length();

// 7
```

<a name="method-fluent-str-limit"></a>
#### `limit` {.collection-method}

The `limit` method truncates the given string to the specified length:

```php
use Illuminate\Support\Str;

$truncated = Str::of('The quick brown fox jumps over the lazy dog')->limit(20);

// The quick brown fox...
```

You may also pass a second argument to change the string that will be appended to the end of the truncated string:

```php
$truncated = Str::of('The quick brown fox jumps over the lazy dog')->limit(20, ' (...)');

// The quick brown fox (...)
```

If you would like to preserve complete words when truncating the string, you may utilize the `preserveWords` argument. When this argument is `true`, the string will be truncated to the nearest complete word boundary:

```php
$truncated = Str::of('The quick brown fox')->limit(12, preserveWords: true);

// The quick...
```

<a name="method-fluent-str-lower"></a>
#### `lower` {.collection-method}

The `lower` method converts the given string to lowercase:

```php
use Illuminate\Support\Str;

$result = Str::of('LARAVEL')->lower();

// 'laravel'
```

<a name="method-fluent-str-markdown"></a>
#### `markdown` {.collection-method}

The `markdown` method converts GitHub flavored Markdown into HTML:

```php
use Illuminate\Support\Str;

$html = Str::of('# Laravel')->markdown();

// <h1>Laravel</h1>

$html = Str::of('# Taylor <b>Otwell</b>')->markdown([
    'html_input' => 'strip',
]);

// <h1>Taylor Otwell</h1>
```

#### Markdown Security

By default, Markdown supports raw HTML, which will expose Cross-Site Scripting (XSS) vulnerabilities when used with raw user input. As per the [CommonMark Security documentation](https://commonmark.thephpleague.com/security/), you may use the `html_input` option to either escape or strip raw HTML, and the `allow_unsafe_links` option to specify whether to allow unsafe links. If you need to allow some raw HTML, you should pass your compiled Markdown through an HTML Purifier:

```php
use Illuminate\Support\Str;

Str::of('Inject: <script>alert("Hello XSS!");</script>')->markdown([
    'html_input' => 'strip',
    'allow_unsafe_links' => false,
]);

// <p>Inject: alert(&quot;Hello XSS!&quot;);</p>
```

<a name="method-fluent-str-mask"></a>
#### `mask` {.collection-method}

The `mask` method masks a portion of a string with a repeated character, and may be used to obfuscate segments of strings such as email addresses and phone numbers:

```php
use Illuminate\Support\Str;

$string = Str::of('taylor@example.com')->mask('*', 3);

// tay***************
```

If needed, you may provide negative numbers as the third or fourth argument to the `mask` method, which will instruct the method to begin masking at the given distance from the end of the string:

```php
$string = Str::of('taylor@example.com')->mask('*', -15, 3);

// tay***@example.com

$string = Str::of('taylor@example.com')->mask('*', 4, -4);

// tayl**********.com
```

<a name="method-fluent-str-match"></a>
#### `match` {.collection-method}

The `match` method will return the portion of a string that matches a given regular expression pattern:

```php
use Illuminate\Support\Str;

$result = Str::of('foo bar')->match('/bar/');

// 'bar'

$result = Str::of('foo bar')->match('/foo (.*)/');

// 'bar'
```

<a name="method-fluent-str-match-all"></a>
#### `matchAll` {.collection-method}

The `matchAll` method will return a collection containing the portions of a string that match a given regular expression pattern:

```php
use Illuminate\Support\Str;

$result = Str::of('bar foo bar')->matchAll('/bar/');

// collect(['bar', 'bar'])
```

If you specify a matching group within the expression, Laravel will return a collection of the first matching group's matches:

```php
use Illuminate\Support\Str;

$result = Str::of('bar fun bar fly')->matchAll('/f(\w*)/');

// collect(['un', 'ly']);
```

If no matches are found, an empty collection will be returned.

<a name="method-fluent-str-is-match"></a>
#### `isMatch` {.collection-method}

The `isMatch` method will return `true` if the string matches a given regular expression:

```php
use Illuminate\Support\Str;

$result = Str::of('foo bar')->isMatch('/foo (.*)/');

// true

$result = Str::of('laravel')->isMatch('/foo (.*)/');

// false
```

<a name="method-fluent-str-new-line"></a>
#### `newLine` {.collection-method}

The `newLine` method appends an "end of line" character to a string:

```php
use Illuminate\Support\Str;

$padded = Str::of('Laravel')->newLine()->append('Framework');

// 'Laravel
//  Framework'
```

<a name="method-fluent-str-padboth"></a>
#### `padBoth` {.collection-method}

The `padBoth` method wraps PHP's `str_pad` function, padding both sides of a string with another string until the final string reaches the desired length:

```php
use Illuminate\Support\Str;

$padded = Str::of('James')->padBoth(10, '_');

// '__James___'

$padded = Str::of('James')->padBoth(10);

// '  James   '
```

<a name="method-fluent-str-padleft"></a>
#### `padLeft` {.collection-method}

The `padLeft` method wraps PHP's `str_pad` function, padding the left side of a string with another string until the final string reaches the desired length:

```php
use Illuminate\Support\Str;

$padded = Str::of('James')->padLeft(10, '-=');

// '-=-=-James'

$padded = Str::of('James')->padLeft(10);

// '     James'
```

<a name="method-fluent-str-padright"></a>
#### `padRight` {.collection-method}

The `padRight` method wraps PHP's `str_pad` function, padding the right side of a string with another string until the final string reaches the desired length:

```php
use Illuminate\Support\Str;

$padded = Str::of('James')->padRight(10, '-');

// 'James-----'

$padded = Str::of('James')->padRight(10);

// 'James     '
```

<a name="method-fluent-str-pipe"></a>
#### `pipe` {.collection-method}

The `pipe` method allows you to transform the string by passing its current value to the given callable:

```php
use Illuminate\Support\Str;
use Illuminate\Support\Stringable;

$hash = Str::of('Laravel')->pipe('md5')->prepend('Checksum: ');

// 'Checksum: a5c95b86291ea299fcbe64458ed12702'

$closure = Str::of('foo')->pipe(function (Stringable $str) {
    return 'bar';
});

// 'bar'
```

<a name="method-fluent-str-counted"></a>
#### `counted` {.collection-method}

The `counted` method converts a singular word string to its singular or plural form based on the given count and prefixes the result with the formatted count:

```php
use Illuminate\Support\Str;

$label = Str::of('order')->counted(1);

// 1 order

$label = Str::of('order')->counted(1000);

// 1,000 orders
```

<a name="method-fluent-str-plural"></a>
#### `plural` {.collection-method}

The `plural` method converts a singular word string to its plural form. This function supports [any of the languages supported by Laravel's pluralizer](/docs/{{version}}/localization#pluralization-language):

```php
use Illuminate\Support\Str;

$plural = Str::of('car')->plural();

// cars

$plural = Str::of('child')->plural();

// children
```

You may provide an integer argument to the function to retrieve the singular or plural form of the string:

```php
use Illuminate\Support\Str;

$plural = Str::of('child')->plural(2);

// children

$plural = Str::of('child')->plural(1);

// child
```

You may provide the `prependCount` argument to prefix the pluralized string with the formatted `$count`:

```php
use Illuminate\Support\Str;

$label = Str::of('car')->plural(1000, prependCount: true);

// 1,000 cars
```

<a name="method-fluent-str-position"></a>
#### `position` {.collection-method}

The `position` method returns the position of the first occurrence of a substring in a string. If the substring does not exist within the string, `false` is returned:

```php
use Illuminate\Support\Str;

$position = Str::of('Hello, World!')->position('Hello');

// 0

$position = Str::of('Hello, World!')->position('W');

// 7
```

<a name="method-fluent-str-prepend"></a>
#### `prepend` {.collection-method}

The `prepend` method prepends the given values onto the string:

```php
use Illuminate\Support\Str;

$string = Str::of('Framework')->prepend('Laravel ');

// Laravel Framework
```

<a name="method-fluent-str-remove"></a>
#### `remove` {.collection-method}

The `remove` method removes the given value or array of values from the string:

```php
use Illuminate\Support\Str;

$string = Str::of('Arkansas is quite beautiful!')->remove('quite ');

// Arkansas is beautiful!
```

You may also pass `false` as a second parameter to ignore case when removing strings.

<a name="method-fluent-str-repeat"></a>
#### `repeat` {.collection-method}

The `repeat` method repeats the given string:

```php
use Illuminate\Support\Str;

$repeated = Str::of('a')->repeat(5);

// aaaaa
```

<a name="method-fluent-str-replace"></a>
#### `replace` {.collection-method}

The `replace` method replaces a given string within the string:

```php
use Illuminate\Support\Str;

$replaced = Str::of('Laravel 6.x')->replace('6.x', '7.x');

// Laravel 7.x
```

The `replace` method also accepts a `caseSensitive` argument. By default, the `replace` method is case sensitive:

```php
$replaced = Str::of('macOS 13.x')->replace(
    'macOS', 'iOS', caseSensitive: false
);
```

<a name="method-fluent-str-replace-array"></a>
#### `replaceArray` {.collection-method}

The `replaceArray` method replaces a given value in the string sequentially using an array:

```php
use Illuminate\Support\Str;

$string = 'The event will take place between ? and ?';

$replaced = Str::of($string)->replaceArray('?', ['8:30', '9:00']);

// The event will take place between 8:30 and 9:00
```

<a name="method-fluent-str-replace-first"></a>
#### `replaceFirst` {.collection-method}

The `replaceFirst` method replaces the first occurrence of a given value in a string:

```php
use Illuminate\Support\Str;

$replaced = Str::of('the quick brown fox jumps over the lazy dog')->replaceFirst('the', 'a');

// a quick brown fox jumps over the lazy dog
```

<a name="method-fluent-str-replace-last"></a>
#### `replaceLast` {.collection-method}

The `replaceLast` method replaces the last occurrence of a given value in a string:

```php
use Illuminate\Support\Str;

$replaced = Str::of('the quick brown fox jumps over the lazy dog')->replaceLast('the', 'a');

// the quick brown fox jumps over a lazy dog
```

<a name="method-fluent-str-replace-matches"></a>
#### `replaceMatches` {.collection-method}

The `replaceMatches` method replaces all portions of a string matching a pattern with the given replacement string:

```php
use Illuminate\Support\Str;

$replaced = Str::of('(+1) 501-555-1000')->replaceMatches('/[^A-Za-z0-9]++/', '')

// '15015551000'
```

The `replaceMatches` method also accepts a closure that will be invoked with each portion of the string matching the given pattern, allowing you to perform the replacement logic within the closure and return the replaced value:

```php
use Illuminate\Support\Str;

$replaced = Str::of('123')->replaceMatches('/\d/', function (array $matches) {
    return '['.$matches[0].']';
});

// '[1][2][3]'
```

<a name="method-fluent-str-replace-start"></a>
#### `replaceStart` {.collection-method}

The `replaceStart` method replaces the first occurrence of the given value only if the value appears at the start of the string:

```php
use Illuminate\Support\Str;

$replaced = Str::of('Hello World')->replaceStart('Hello', 'Laravel');

// Laravel World

$replaced = Str::of('Hello World')->replaceStart('World', 'Laravel');

// Hello World
```

<a name="method-fluent-str-replace-end"></a>
#### `replaceEnd` {.collection-method}

The `replaceEnd` method replaces the last occurrence of the given value only if the value appears at the end of the string:

```php
use Illuminate\Support\Str;

$replaced = Str::of('Hello World')->replaceEnd('World', 'Laravel');

// Hello Laravel

$replaced = Str::of('Hello World')->replaceEnd('Hello', 'Laravel');

// Hello World
```

<a name="method-fluent-str-scan"></a>
#### `scan` {.collection-method}

The `scan` method parses input from a string into a collection according to a format supported by the [`sscanf` PHP function](https://www.php.net/manual/en/function.sscanf.php):

```php
use Illuminate\Support\Str;

$collection = Str::of('filename.jpg')->scan('%[^.].%s');

// collect(['filename', 'jpg'])
```

<a name="method-fluent-str-singular"></a>
#### `singular` {.collection-method}

The `singular` method converts a string to its singular form. This function supports [any of the languages supported by Laravel's pluralizer](/docs/{{version}}/localization#pluralization-language):

```php
use Illuminate\Support\Str;

$singular = Str::of('cars')->singular();

// car

$singular = Str::of('children')->singular();

// child
```

<a name="method-fluent-str-slug"></a>
#### `slug` {.collection-method}

The `slug` method generates a URL-friendly "slug" from the given string:

```php
use Illuminate\Support\Str;

$slug = Str::of('Laravel Framework')->slug('-');

// laravel-framework
```

<a name="method-fluent-str-snake"></a>
#### `snake` {.collection-method}

The `snake` method converts the given string to `snake_case`:

```php
use Illuminate\Support\Str;

$converted = Str::of('fooBar')->snake();

// foo_bar
```

<a name="method-fluent-str-split"></a>
#### `split` {.collection-method}

The `split` method splits a string into a collection using a regular expression:

```php
use Illuminate\Support\Str;

$segments = Str::of('one, two, three')->split('/[\s,]+/');

// collect(["one", "two", "three"])
```

<a name="method-fluent-str-squish"></a>
#### `squish` {.collection-method}

The `squish` method removes all extraneous white space from a string, including extraneous white space between words:

```php
use Illuminate\Support\Str;

$string = Str::of('    laravel    framework    ')->squish();

// laravel framework
```

<a name="method-fluent-str-start"></a>
#### `start` {.collection-method}

The `start` method adds a single instance of the given value to a string if it does not already start with that value:

```php
use Illuminate\Support\Str;

$adjusted = Str::of('this/string')->start('/');

// /this/string

$adjusted = Str::of('/this/string')->start('/');

// /this/string
```

<a name="method-fluent-str-starts-with"></a>
#### `startsWith` {.collection-method}

The `startsWith` method determines if the given string begins with the given value:

```php
use Illuminate\Support\Str;

$result = Str::of('This is my name')->startsWith('This');

// true
```

You may also pass an array of values to determine if the given string starts with any of the values in the array:

```php
use Illuminate\Support\Str;

$result = Str::of('This is my name')->startsWith(['This', 'That']);

// true
```

<a name="method-fluent-str-strip-tags"></a>
#### `stripTags` {.collection-method}

The `stripTags` method removes all HTML and PHP tags from a string:

```php
use Illuminate\Support\Str;

$result = Str::of('<a href="https://laravel.com">Taylor <b>Otwell</b></a>')->stripTags();

// Taylor Otwell

$result = Str::of('<a href="https://laravel.com">Taylor <b>Otwell</b></a>')->stripTags('<b>');

// Taylor <b>Otwell</b>
```

<a name="method-fluent-str-studly"></a>
#### `studly` {.collection-method}

The `studly` method converts the given string to `StudlyCase`:

```php
use Illuminate\Support\Str;

$converted = Str::of('foo_bar')->studly();

// FooBar
```

<a name="method-fluent-str-substr"></a>
#### `substr` {.collection-method}

The `substr` method returns the portion of the string specified by the given start and length parameters:

```php
use Illuminate\Support\Str;

$string = Str::of('Laravel Framework')->substr(8);

// Framework

$string = Str::of('Laravel Framework')->substr(8, 5);

// Frame
```

<a name="method-fluent-str-substrreplace"></a>
#### `substrReplace` {.collection-method}

The `substrReplace` method replaces text within a portion of a string, starting at the position specified by the second argument and replacing the number of characters specified by the third argument. Passing `0` to the method's third argument will insert the string at the specified position without replacing any of the existing characters in the string:

```php
use Illuminate\Support\Str;

$string = Str::of('1300')->substrReplace(':', 2);

// 13:

$string = Str::of('The Framework')->substrReplace(' Laravel', 3, 0);

// The Laravel Framework
```

<a name="method-fluent-str-swap"></a>
#### `swap` {.collection-method}

The `swap` method replaces multiple values in the string using PHP's `strtr` function:

```php
use Illuminate\Support\Str;

$string = Str::of('Tacos are great!')
    ->swap([
        'Tacos' => 'Burritos',
        'great' => 'fantastic',
    ]);

// Burritos are fantastic!
```

<a name="method-fluent-str-take"></a>
#### `take` {.collection-method}

The `take` method returns a specified number of characters from the beginning of the string:

```php
use Illuminate\Support\Str;

$taken = Str::of('Build something amazing!')->take(5);

// Build
```

<a name="method-fluent-str-tap"></a>
#### `tap` {.collection-method}

The `tap` method passes the string to the given closure, allowing you to examine and interact with the string while not affecting the string itself. The original string is returned by the `tap` method regardless of what is returned by the closure:

```php
use Illuminate\Support\Str;
use Illuminate\Support\Stringable;

$string = Str::of('Laravel')
    ->append(' Framework')
    ->tap(function (Stringable $string) {
        dump('String after append: '.$string);
    })
    ->upper();

// LARAVEL FRAMEWORK
```

<a name="method-fluent-str-test"></a>
#### `test` {.collection-method}

The `test` method determines if a string matches the given regular expression pattern:

```php
use Illuminate\Support\Str;

$result = Str::of('Laravel Framework')->test('/Laravel/');

// true
```

<a name="method-fluent-str-title"></a>
#### `title` {.collection-method}

The `title` method converts the given string to `Title Case`:

```php
use Illuminate\Support\Str;

$converted = Str::of('a nice title uses the correct case')->title();

// A Nice Title Uses The Correct Case
```

<a name="method-fluent-str-to-base64"></a>
#### `toBase64` {.collection-method}

The `toBase64` method converts the given string to Base64:

```php
use Illuminate\Support\Str;

$base64 = Str::of('Laravel')->toBase64();

// TGFyYXZlbA==
```

<a name="method-fluent-str-to-html-string"></a>
#### `toHtmlString` {.collection-method}

The `toHtmlString` method converts the given string to an instance of `Illuminate\Support\HtmlString`, which will not be escaped when rendered in Blade templates:

```php
use Illuminate\Support\Str;

$htmlString = Str::of('Nuno Maduro')->toHtmlString();
```

<a name="method-fluent-str-to-uri"></a>
#### `toUri` {.collection-method}

The `toUri` method converts the given string to an instance of [Illuminate\Support\Uri](/docs/{{version}}/helpers#uri):

```php
use Illuminate\Support\Str;

$uri = Str::of('https://example.com')->toUri();
```

<a name="method-fluent-str-transliterate"></a>
#### `transliterate` {.collection-method}

The `transliterate` method will attempt to convert a given string into its closest ASCII representation:

```php
use Illuminate\Support\Str;

$email = Str::of('ⓣⓔⓢⓣ@ⓛⓐⓡⓐⓥⓔⓛ.ⓒⓞⓜ')->transliterate()

// 'test@laravel.com'
```

<a name="method-fluent-str-trim"></a>
#### `trim` {.collection-method}

The `trim` method trims the given string. Unlike PHP's native `trim` function, Laravel's `trim` method also removes unicode whitespace characters:

```php
use Illuminate\Support\Str;

$string = Str::of('  Laravel  ')->trim();

// 'Laravel'

$string = Str::of('/Laravel/')->trim('/');

// 'Laravel'
```

<a name="method-fluent-str-ltrim"></a>
#### `ltrim` {.collection-method}

The `ltrim` method trims the left side of the string. Unlike PHP's native `ltrim` function, Laravel's `ltrim` method also removes unicode whitespace characters:

```php
use Illuminate\Support\Str;

$string = Str::of('  Laravel  ')->ltrim();

// 'Laravel  '

$string = Str::of('/Laravel/')->ltrim('/');

// 'Laravel/'
```

<a name="method-fluent-str-rtrim"></a>
#### `rtrim` {.collection-method}

The `rtrim` method trims the right side of the given string. Unlike PHP's native `rtrim` function, Laravel's `rtrim` method also removes unicode whitespace characters:

```php
use Illuminate\Support\Str;

$string = Str::of('  Laravel  ')->rtrim();

// '  Laravel'

$string = Str::of('/Laravel/')->rtrim('/');

// '/Laravel'
```

<a name="method-fluent-str-ucfirst"></a>
#### `ucfirst` {.collection-method}

The `ucfirst` method returns the given string with the first character capitalized:

```php
use Illuminate\Support\Str;

$string = Str::of('foo bar')->ucfirst();

// Foo bar
```

<a name="method-fluent-str-ucsplit"></a>
#### `ucsplit` {.collection-method}

The `ucsplit` method splits the given string into a collection by uppercase characters:

```php
use Illuminate\Support\Str;

$string = Str::of('Foo Bar')->ucsplit();

// collect(['Foo ', 'Bar'])
```

<a name="method-fluent-str-ucwords"></a>
#### `ucwords` {.collection-method}

The `ucwords` method converts the first character of each word in the given string to uppercase:

```php
use Illuminate\Support\Str;

$string = Str::of('laravel framework')->ucwords();

// Laravel Framework
```

<a name="method-fluent-str-unwrap"></a>
#### `unwrap` {.collection-method}

The `unwrap` method removes the specified strings from the beginning and end of a given string:

```php
use Illuminate\Support\Str;

Str::of('-Laravel-')->unwrap('-');

// Laravel

Str::of('{framework: "Laravel"}')->unwrap('{', '}');

// framework: "Laravel"
```

<a name="method-fluent-str-upper"></a>
#### `upper` {.collection-method}

The `upper` method converts the given string to uppercase:

```php
use Illuminate\Support\Str;

$adjusted = Str::of('laravel')->upper();

// LARAVEL
```

<a name="method-fluent-str-when"></a>
#### `when` {.collection-method}

The `when` method invokes the given closure if a given condition is `true`. The closure will receive the fluent string instance:

```php
use Illuminate\Support\Str;
use Illuminate\Support\Stringable;

$string = Str::of('Taylor')
    ->when(true, function (Stringable $string) {
        return $string->append(' Otwell');
    });

// 'Taylor Otwell'
```

If necessary, you may pass another closure as the third parameter to the `when` method. This closure will execute if the condition parameter evaluates to `false`.

<a name="method-fluent-str-when-contains"></a>
#### `whenContains` {.collection-method}

The `whenContains` method invokes the given closure if the string contains the given value. The closure will receive the fluent string instance:

```php
use Illuminate\Support\Str;
use Illuminate\Support\Stringable;

$string = Str::of('tony stark')
    ->whenContains('tony', function (Stringable $string) {
        return $string->title();
    });

// 'Tony Stark'
```

If necessary, you may pass another closure as the third parameter. The closure will be invoked if the string does not contain the given value.

You may also pass an array of values to determine if the given string contains any of the values in the array:

```php
use Illuminate\Support\Str;
use Illuminate\Support\Stringable;

$string = Str::of('tony stark')
    ->whenContains(['tony', 'hulk'], function (Stringable $string) {
        return $string->title();
    });

// Tony Stark
```

<a name="method-fluent-str-when-contains-all"></a>
#### `whenContainsAll` {.collection-method}

The `whenContainsAll` method invokes the given closure if the string contains all of the given sub-strings. The closure will receive the fluent string instance:

```php
use Illuminate\Support\Str;
use Illuminate\Support\Stringable;

$string = Str::of('tony stark')
    ->whenContainsAll(['tony', 'stark'], function (Stringable $string) {
        return $string->title();
    });

// 'Tony Stark'
```

If necessary, you may pass another closure as the third parameter. The closure will be invoked if the condition parameter evaluates to `false`.

<a name="method-fluent-str-when-doesnt-end-with"></a>
#### `whenDoesntEndWith` {.collection-method}

The `whenDoesntEndWith` method invokes the given closure if the string doesn't end with the given sub-string. The closure will receive the fluent string instance:

```php
use Illuminate\Support\Str;
use Illuminate\Support\Stringable;

$string = Str::of('disney world')->whenDoesntEndWith('land', function (Stringable $string) {
    return $string->title();
});

// 'Disney World'
```

<a name="method-fluent-str-when-doesnt-start-with"></a>
#### `whenDoesntStartWith` {.collection-method}

The `whenDoesntStartWith` method invokes the given closure if the string doesn't start with the given sub-string. The closure will receive the fluent string instance:

```php
use Illuminate\Support\Str;
use Illuminate\Support\Stringable;

$string = Str::of('disney world')->whenDoesntStartWith('sea', function (Stringable $string) {
    return $string->title();
});

// 'Disney World'
```

<a name="method-fluent-str-when-empty"></a>
#### `whenEmpty` {.collection-method}

The `whenEmpty` method invokes the given closure if the string is empty. If the closure returns a value, that value will also be returned by the `whenEmpty` method. If the closure does not return a value, the fluent string instance will be returned:

```php
use Illuminate\Support\Str;
use Illuminate\Support\Stringable;

$string = Str::of('  ')->trim()->whenEmpty(function (Stringable $string) {
    return $string->prepend('Laravel');
});

// 'Laravel'
```

<a name="method-fluent-str-when-not-empty"></a>
#### `whenNotEmpty` {.collection-method}

The `whenNotEmpty` method invokes the given closure if the string is not empty. If the closure returns a value, that value will also be returned by the `whenNotEmpty` method. If the closure does not return a value, the fluent string instance will be returned:

```php
use Illuminate\Support\Str;
use Illuminate\Support\Stringable;

$string = Str::of('Framework')->whenNotEmpty(function (Stringable $string) {
    return $string->prepend('Laravel ');
});

// 'Laravel Framework'
```

<a name="method-fluent-str-when-starts-with"></a>
#### `whenStartsWith` {.collection-method}

The `whenStartsWith` method invokes the given closure if the string starts with the given sub-string. The closure will receive the fluent string instance:

```php
use Illuminate\Support\Str;
use Illuminate\Support\Stringable;

$string = Str::of('disney world')->whenStartsWith('disney', function (Stringable $string) {
    return $string->title();
});

// 'Disney World'
```

<a name="method-fluent-str-when-ends-with"></a>
#### `whenEndsWith` {.collection-method}

The `whenEndsWith` method invokes the given closure if the string ends with the given sub-string. The closure will receive the fluent string instance:

```php
use Illuminate\Support\Str;
use Illuminate\Support\Stringable;

$string = Str::of('disney world')->whenEndsWith('world', function (Stringable $string) {
    return $string->title();
});

// 'Disney World'
```

<a name="method-fluent-str-when-exactly"></a>
#### `whenExactly` {.collection-method}

The `whenExactly` method invokes the given closure if the string exactly matches the given string. The closure will receive the fluent string instance:

```php
use Illuminate\Support\Str;
use Illuminate\Support\Stringable;

$string = Str::of('laravel')->whenExactly('laravel', function (Stringable $string) {
    return $string->title();
});

// 'Laravel'
```

<a name="method-fluent-str-when-not-exactly"></a>
#### `whenNotExactly` {.collection-method}

The `whenNotExactly` method invokes the given closure if the string does not exactly match the given string. The closure will receive the fluent string instance:

```php
use Illuminate\Support\Str;
use Illuminate\Support\Stringable;

$string = Str::of('framework')->whenNotExactly('laravel', function (Stringable $string) {
    return $string->title();
});

// 'Framework'
```

<a name="method-fluent-str-when-is"></a>
#### `whenIs` {.collection-method}

The `whenIs` method invokes the given closure if the string matches a given pattern. Asterisks may be used as wildcard values. The closure will receive the fluent string instance:

```php
use Illuminate\Support\Str;
use Illuminate\Support\Stringable;

$string = Str::of('foo/bar')->whenIs('foo/*', function (Stringable $string) {
    return $string->append('/baz');
});

// 'foo/bar/baz'
```

<a name="method-fluent-str-when-is-ascii"></a>
#### `whenIsAscii` {.collection-method}

The `whenIsAscii` method invokes the given closure if the string is 7-bit ASCII. The closure will receive the fluent string instance:

```php
use Illuminate\Support\Str;
use Illuminate\Support\Stringable;

$string = Str::of('laravel')->whenIsAscii(function (Stringable $string) {
    return $string->title();
});

// 'Laravel'
```

<a name="method-fluent-str-when-is-ulid"></a>
#### `whenIsUlid` {.collection-method}

The `whenIsUlid` method invokes the given closure if the string is a valid ULID. The closure will receive the fluent string instance:

```php
use Illuminate\Support\Str;

$string = Str::of('01gd6r360bp37zj17nxb55yv40')->whenIsUlid(function (Stringable $string) {
    return $string->substr(0, 8);
});

// '01gd6r36'
```

<a name="method-fluent-str-when-is-uuid"></a>
#### `whenIsUuid` {.collection-method}

The `whenIsUuid` method invokes the given closure if the string is a valid UUID. The closure will receive the fluent string instance:

```php
use Illuminate\Support\Str;
use Illuminate\Support\Stringable;

$string = Str::of('a0a2a2d2-0b87-4a18-83f2-2529882be2de')->whenIsUuid(function (Stringable $string) {
    return $string->substr(0, 8);
});

// 'a0a2a2d2'
```

<a name="method-fluent-str-when-test"></a>
#### `whenTest` {.collection-method}

The `whenTest` method invokes the given closure if the string matches the given regular expression. The closure will receive the fluent string instance:

```php
use Illuminate\Support\Str;
use Illuminate\Support\Stringable;

$string = Str::of('laravel framework')->whenTest('/laravel/', function (Stringable $string) {
    return $string->title();
});

// 'Laravel Framework'
```

<a name="method-fluent-str-word-count"></a>
#### `wordCount` {.collection-method}

The `wordCount` method returns the number of words that a string contains:

```php
use Illuminate\Support\Str;

Str::of('Hello, world!')->wordCount(); // 2
```

<a name="method-fluent-str-words"></a>
#### `words` {.collection-method}

The `words` method limits the number of words in a string. If necessary, you may specify an additional string that will be appended to the truncated string:

```php
use Illuminate\Support\Str;

$string = Str::of('Perfectly balanced, as all things should be.')->words(3, ' >>>');

// Perfectly balanced, as >>>
```

<a name="method-fluent-str-wrap"></a>
#### `wrap` {.collection-method}

The `wrap` method wraps the given string with an additional string or pair of strings:

```php
use Illuminate\Support\Str;

Str::of('Laravel')->wrap('"');

// "Laravel"

Str::is('is')->wrap(before: 'This ', after: ' Laravel!');

// This is Laravel!
```


---

# Directory Structure

*Sección: Laravel | Origen: https://laravel.com/docs/13.x/structure*

- [Introduction](#introduction)
- [The Root Directory](#the-root-directory)
    - [The `app` Directory](#the-root-app-directory)
    - [The `bootstrap` Directory](#the-bootstrap-directory)
    - [The `config` Directory](#the-config-directory)
    - [The `database` Directory](#the-database-directory)
    - [The `public` Directory](#the-public-directory)
    - [The `resources` Directory](#the-resources-directory)
    - [The `routes` Directory](#the-routes-directory)
    - [The `storage` Directory](#the-storage-directory)
    - [The `tests` Directory](#the-tests-directory)
    - [The `vendor` Directory](#the-vendor-directory)
- [The App Directory](#the-app-directory)
    - [The `Broadcasting` Directory](#the-broadcasting-directory)
    - [The `Console` Directory](#the-console-directory)
    - [The `Events` Directory](#the-events-directory)
    - [The `Exceptions` Directory](#the-exceptions-directory)
    - [The `Http` Directory](#the-http-directory)
    - [The `Jobs` Directory](#the-jobs-directory)
    - [The `Listeners` Directory](#the-listeners-directory)
    - [The `Mail` Directory](#the-mail-directory)
    - [The `Models` Directory](#the-models-directory)
    - [The `Notifications` Directory](#the-notifications-directory)
    - [The `Policies` Directory](#the-policies-directory)
    - [The `Providers` Directory](#the-providers-directory)
    - [The `Rules` Directory](#the-rules-directory)

<a name="introduction"></a>
## Introduction

The default Laravel application structure is intended to provide a great starting point for both large and small applications. But you are free to organize your application however you like. Laravel imposes almost no restrictions on where any given class is located - as long as Composer can autoload the class.

<a name="the-root-directory"></a>
## The Root Directory

<a name="the-root-app-directory"></a>
### The App Directory

The `app` directory contains the core code of your application. We'll explore this directory in more detail soon; however, almost all of the classes in your application will be in this directory.

<a name="the-bootstrap-directory"></a>
### The Bootstrap Directory

The `bootstrap` directory contains the `app.php` file which bootstraps the framework. This directory also houses a `cache` directory which contains framework generated files for performance optimization such as the route and services cache files.

<a name="the-config-directory"></a>
### The Config Directory

The `config` directory, as the name implies, contains all of your application's configuration files. It's a great idea to read through all of these files and familiarize yourself with all of the options available to you.

<a name="the-database-directory"></a>
### The Database Directory

The `database` directory contains your database migrations, model factories, and seeds. If you wish, you may also use this directory to hold an SQLite database.

<a name="the-public-directory"></a>
### The Public Directory

The `public` directory contains the `index.php` file, which is the entry point for all requests entering your application and configures autoloading. This directory also houses your assets such as images, JavaScript, and CSS.

<a name="the-resources-directory"></a>
### The Resources Directory

The `resources` directory contains your [views](/docs/{{version}}/views) as well as your raw, un-compiled assets such as CSS or JavaScript.

<a name="the-routes-directory"></a>
### The Routes Directory

The `routes` directory contains all of the route definitions for your application. By default, two route files are included with Laravel: `web.php` and `console.php`.

The `web.php` file contains routes that Laravel places in the `web` middleware group, which provides session state, CSRF protection, and cookie encryption. If your application does not offer a stateless, RESTful API then all your routes will most likely be defined in the `web.php` file.

The `console.php` file is where you may define all of your closure-based console commands. Each closure is bound to a command instance allowing a simple approach to interacting with each command's IO methods. Even though this file does not define HTTP routes, it defines console based entry points (routes) into your application. You may also [schedule](/docs/{{version}}/scheduling) tasks in the `console.php` file.

Optionally, you may install additional route files for API routes (`api.php`) and broadcasting channels (`channels.php`), via the `install:api` and `install:broadcasting` Artisan commands.

The `api.php` file contains routes that are intended to be stateless, so requests entering the application through these routes are intended to be authenticated [via tokens](/docs/{{version}}/sanctum) and will not have access to session state.

The `channels.php` file is where you may register all of the [event broadcasting](/docs/{{version}}/broadcasting) channels that your application supports.

<a name="the-storage-directory"></a>
### The Storage Directory

The `storage` directory contains your logs, compiled Blade templates, file based sessions, file caches, and other files generated by the framework. This directory is segregated into `app`, `framework`, and `logs` directories. The `app` directory may be used to store any files generated by your application. The `framework` directory is used to store framework generated files and caches. Finally, the `logs` directory contains your application's log files.

The `storage/app/public` directory may be used to store user-generated files, such as profile avatars, that should be publicly accessible. You should create a symbolic link at `public/storage` which points to this directory. You may create the link using the `php artisan storage:link` Artisan command.

<a name="the-tests-directory"></a>
### The Tests Directory

The `tests` directory contains your automated tests. Example [Pest](https://pestphp.com) or [PHPUnit](https://phpunit.de/) unit tests and feature tests are provided out of the box. Each test class should be suffixed with the word `Test`. You may run your tests using the `/vendor/bin/pest` or `/vendor/bin/phpunit` commands. Or, if you would like a more detailed and beautiful representation of your test results, you may run your tests using the `php artisan test` Artisan command.

<a name="the-vendor-directory"></a>
### The Vendor Directory

The `vendor` directory contains your [Composer](https://getcomposer.org) dependencies.

<a name="the-app-directory"></a>
## The App Directory

The majority of your application is housed in the `app` directory. By default, this directory is namespaced under `App` and is autoloaded by Composer using the [PSR-4 autoloading standard](https://www.php-fig.org/psr/psr-4/).

By default, the `app` directory contains the `Http`, `Models`, and `Providers` directories. However, over time, a variety of other directories will be generated inside the app directory as you use the make Artisan commands to generate classes. For example, the `app/Console` directory will not exist until you execute the `make:command` Artisan command to generate a command class.

Both the `Console` and `Http` directories are further explained in their respective sections below, but think of the `Console` and `Http` directories as providing an API into the core of your application. The HTTP protocol and CLI are both mechanisms to interact with your application, but do not actually contain application logic. In other words, they are two ways of issuing commands to your application. The `Console` directory contains all of your Artisan commands, while the `Http` directory contains your controllers, middleware, and requests.

> [!NOTE]
> Many of the classes in the `app` directory can be generated by Artisan via commands. To review the available commands, run the `php artisan list make` command in your terminal.

<a name="the-broadcasting-directory"></a>
### The Broadcasting Directory

The `Broadcasting` directory contains all of the broadcast channel classes for your application. These classes are generated using the `make:channel` command. This directory does not exist by default, but will be created for you when you create your first channel. To learn more about channels, check out the documentation on [event broadcasting](/docs/{{version}}/broadcasting).

<a name="the-console-directory"></a>
### The Console Directory

The `Console` directory contains all of the custom Artisan commands for your application. These commands may be generated using the `make:command` command.

<a name="the-events-directory"></a>
### The Events Directory

This directory does not exist by default, but will be created for you by the `event:generate` and `make:event` Artisan commands. The `Events` directory houses [event classes](/docs/{{version}}/events). Events may be used to alert other parts of your application that a given action has occurred, providing a great deal of flexibility and decoupling.

<a name="the-exceptions-directory"></a>
### The Exceptions Directory

The `Exceptions` directory contains all of the custom exceptions for your application. These exceptions may be generated using the `make:exception` command.

<a name="the-http-directory"></a>
### The Http Directory

The `Http` directory contains your controllers, middleware, and form requests. Almost all of the logic to handle requests entering your application will be placed in this directory.

<a name="the-jobs-directory"></a>
### The Jobs Directory

This directory does not exist by default, but will be created for you if you execute the `make:job` Artisan command. The `Jobs` directory houses the [queueable jobs](/docs/{{version}}/queues) for your application. Jobs may be queued by your application or run synchronously within the current request lifecycle. Jobs that run synchronously during the current request are sometimes referred to as "commands" since they are an implementation of the [command pattern](https://en.wikipedia.org/wiki/Command_pattern).

<a name="the-listeners-directory"></a>
### The Listeners Directory

This directory does not exist by default, but will be created for you if you execute the `event:generate` or `make:listener` Artisan commands. The `Listeners` directory contains the classes that handle your [events](/docs/{{version}}/events). Event listeners receive an event instance and perform logic in response to the event being fired. For example, a `UserRegistered` event might be handled by a `SendWelcomeEmail` listener.

<a name="the-mail-directory"></a>
### The Mail Directory

This directory does not exist by default, but will be created for you if you execute the `make:mail` Artisan command. The `Mail` directory contains all of your [classes that represent emails](/docs/{{version}}/mail) sent by your application. Mail objects allow you to encapsulate all of the logic of building an email in a single, simple class that may be sent using the `Mail::send` method.

<a name="the-models-directory"></a>
### The Models Directory

The `Models` directory contains all of your [Eloquent model classes](/docs/{{version}}/eloquent). The Eloquent ORM included with Laravel provides a beautiful, simple ActiveRecord implementation for working with your database. Each database table has a corresponding "Model" which is used to interact with that table. Models allow you to query for data in your tables, as well as insert new records into the table.

<a name="the-notifications-directory"></a>
### The Notifications Directory

This directory does not exist by default, but will be created for you if you execute the `make:notification` Artisan command. The `Notifications` directory contains all of the "transactional" [notifications](/docs/{{version}}/notifications) that are sent by your application, such as simple notifications about events that happen within your application. Laravel's notification feature abstracts sending notifications over a variety of drivers such as email, Slack, SMS, or stored in a database.

<a name="the-policies-directory"></a>
### The Policies Directory

This directory does not exist by default, but will be created for you if you execute the `make:policy` Artisan command. The `Policies` directory contains the [authorization policy classes](/docs/{{version}}/authorization) for your application. Policies are used to determine if a user can perform a given action against a resource.

<a name="the-providers-directory"></a>
### The Providers Directory

The `Providers` directory contains all of the [service providers](/docs/{{version}}/providers) for your application. Service providers bootstrap your application by binding services in the service container, registering events, or performing any other tasks to prepare your application for incoming requests.

In a fresh Laravel application, this directory will already contain the `AppServiceProvider`. You are free to add your own providers to this directory as needed.

<a name="the-rules-directory"></a>
### The Rules Directory

This directory does not exist by default, but will be created for you if you execute the `make:rule` Artisan command. The `Rules` directory contains the custom validation rule objects for your application. Rules are used to encapsulate complicated validation logic in a simple object. For more information, check out the [validation documentation](/docs/{{version}}/validation).


---

# Laravel Telescope

*Sección: Laravel | Origen: https://laravel.com/docs/13.x/telescope*

- [Introduction](#introduction)
- [Installation](#installation)
    - [Local Only Installation](#local-only-installation)
    - [Configuration](#configuration)
    - [Data Pruning](#data-pruning)
    - [Dashboard Authorization](#dashboard-authorization)
- [Upgrading Telescope](#upgrading-telescope)
- [Filtering](#filtering)
    - [Entries](#filtering-entries)
    - [Batches](#filtering-batches)
- [Tagging](#tagging)
- [Available Watchers](#available-watchers)
    - [Batch Watcher](#batch-watcher)
    - [Cache Watcher](#cache-watcher)
    - [Command Watcher](#command-watcher)
    - [Dump Watcher](#dump-watcher)
    - [Event Watcher](#event-watcher)
    - [Exception Watcher](#exception-watcher)
    - [Gate Watcher](#gate-watcher)
    - [HTTP Client Watcher](#http-client-watcher)
    - [Job Watcher](#job-watcher)
    - [Log Watcher](#log-watcher)
    - [Mail Watcher](#mail-watcher)
    - [Model Watcher](#model-watcher)
    - [Notification Watcher](#notification-watcher)
    - [Query Watcher](#query-watcher)
    - [Redis Watcher](#redis-watcher)
    - [Request Watcher](#request-watcher)
    - [Schedule Watcher](#schedule-watcher)
    - [View Watcher](#view-watcher)
- [Displaying User Avatars](#displaying-user-avatars)

<a name="introduction"></a>
## Introduction

[Laravel Telescope](https://github.com/laravel/telescope) makes a wonderful companion to your local Laravel development environment. Telescope provides insight into the requests coming into your application, exceptions, log entries, database queries, queued jobs, mail, notifications, cache operations, scheduled tasks, variable dumps, and more.

<img src="https://laravel.com/img/docs/telescope-example.png">

<a name="installation"></a>
## Installation

You may use the Composer package manager to install Telescope into your Laravel project:

```shell
composer require laravel/telescope
```

After installing Telescope, publish its assets and migrations using the `telescope:install` Artisan command. After installing Telescope, you should also run the `migrate` command in order to create the tables needed to store Telescope's data:

```shell
php artisan telescope:install

php artisan migrate
```

Finally, you may access the Telescope dashboard via the `/telescope` route.

<a name="local-only-installation"></a>
### Local Only Installation

If you plan to only use Telescope to assist your local development, you may install Telescope using the `--dev` flag:

```shell
composer require laravel/telescope --dev

php artisan telescope:install

php artisan migrate
```

After running `telescope:install`, you should remove the `TelescopeServiceProvider` service provider registration from your application's `bootstrap/providers.php` configuration file. Instead, manually register Telescope's service providers in the `register` method of your `App\Providers\AppServiceProvider` class. We will ensure the current environment is `local` before registering the providers:

```php
/**
 * Register any application services.
 */
public function register(): void
{
    if ($this->app->environment('local') && class_exists(\Laravel\Telescope\TelescopeServiceProvider::class)) {
        $this->app->register(\Laravel\Telescope\TelescopeServiceProvider::class);
        $this->app->register(TelescopeServiceProvider::class);
    }
}
```

Finally, you should also prevent the Telescope package from being [auto-discovered](/docs/{{version}}/packages#package-discovery) by adding the following to your `composer.json` file:

```json
"extra": {
    "laravel": {
        "dont-discover": [
            "laravel/telescope"
        ]
    }
},
```

<a name="configuration"></a>
### Configuration

After publishing Telescope's assets, its primary configuration file will be located at `config/telescope.php`. This configuration file allows you to configure your [watcher options](#available-watchers). Each configuration option includes a description of its purpose, so be sure to thoroughly explore this file.

If desired, you may disable Telescope's data collection entirely using the `enabled` configuration option:

```php
'enabled' => env('TELESCOPE_ENABLED', true),
```

<a name="content-security-policy-csp-nonce"></a>
#### Content Security Policy (CSP) Nonce

If you would like to use a [nonce attribute](https://developer.mozilla.org/en-US/docs/Web/HTML/Reference/Global_attributes/nonce) on the script and style tags used in Telescope views as part of your [Content Security Policy](https://developer.mozilla.org/en-US/docs/Web/HTTP/CSP), you may use the `Telescope::cspNonce` method to specify the nonce to use. This method should typically be invoked within middleware so that a new nonce is assigned for each request:

```php
use Closure;
use Illuminate\Http\Request;
use Laravel\Telescope\Telescope;
use Symfony\Component\HttpFoundation\Response;

public function handle(Request $request, Closure $next): Response
{
    Telescope::cspNonce('csp-nonce');

    return $next($request);
}
```

You may add this middleware to the `middleware` option in your application's `config/telescope.php` configuration file:

```php
'middleware' => [
    'web',
    App\Http\Middleware\AddTelescopeCspNonce::class,
    Authorize::class,
],
```

<a name="data-pruning"></a>
### Data Pruning

Without pruning, the `telescope_entries` table can accumulate records very quickly. To mitigate this, you should [schedule](/docs/{{version}}/scheduling) the `telescope:prune` Artisan command to run daily:

```php
use Illuminate\Support\Facades\Schedule;

Schedule::command('telescope:prune')->daily();
```

By default, all entries older than 24 hours will be pruned. You may use the `hours` option when calling the command to determine how long to retain Telescope data. For example, the following command will delete all records created over 48 hours ago:

```php
use Illuminate\Support\Facades\Schedule;

Schedule::command('telescope:prune --hours=48')->daily();
```

<a name="dashboard-authorization"></a>
### Dashboard Authorization

The Telescope dashboard may be accessed via the `/telescope` route. By default, you will only be able to access this dashboard in the `local` environment. Within your `app/Providers/TelescopeServiceProvider.php` file, there is an [authorization gate](/docs/{{version}}/authorization#gates) definition. This authorization gate controls access to Telescope in **non-local** environments. You are free to modify this gate as needed to restrict access to your Telescope installation:

```php
use App\Models\User;

/**
 * Register the Telescope gate.
 *
 * This gate determines who can access Telescope in non-local environments.
 */
protected function gate(): void
{
    Gate::define('viewTelescope', function (User $user) {
        return in_array($user->email, [
            'taylor@laravel.com',
        ]);
    });
}
```

> [!WARNING]
> You should ensure you change your `APP_ENV` environment variable to `production` in your production environment. Otherwise, your Telescope installation will be publicly available.

<a name="upgrading-telescope"></a>
## Upgrading Telescope

When upgrading to a new major version of Telescope, it's important that you carefully review [the upgrade guide](https://github.com/laravel/telescope/blob/master/UPGRADE.md).

In addition, when upgrading to any new Telescope version, you should re-publish Telescope's assets:

```shell
php artisan telescope:publish
```

To keep the assets up-to-date and avoid issues in future updates, you may add the `vendor:publish --tag=laravel-assets` command to the `post-update-cmd` scripts in your application's `composer.json` file:

```json
{
    "scripts": {
        "post-update-cmd": [
            "@php artisan vendor:publish --tag=laravel-assets --ansi --force"
        ]
    }
}
```

<a name="filtering"></a>
## Filtering

<a name="filtering-entries"></a>
### Entries

You may filter the data that is recorded by Telescope via the `filter` closure that is defined in your `App\Providers\TelescopeServiceProvider` class. By default, this closure records all data in the `local` environment and exceptions, failed jobs, scheduled tasks, and data with monitored tags in all other environments:

```php
use Laravel\Telescope\IncomingEntry;
use Laravel\Telescope\Telescope;

/**
 * Register any application services.
 */
public function register(): void
{
    $this->hideSensitiveRequestDetails();

    Telescope::filter(function (IncomingEntry $entry) {
        if ($this->app->environment('local')) {
            return true;
        }

        return $entry->isReportableException() ||
            $entry->isFailedJob() ||
            $entry->isScheduledTask() ||
            $entry->isSlowQuery() ||
            $entry->hasMonitoredTag();
    });
}
```

<a name="filtering-batches"></a>
### Batches

While the `filter` closure filters data for individual entries, you may use the `filterBatch` method to register a closure that filters all data for a given request or console command. If the closure returns `true`, all of the entries are recorded by Telescope:

```php
use Illuminate\Support\Collection;
use Laravel\Telescope\IncomingEntry;
use Laravel\Telescope\Telescope;

/**
 * Register any application services.
 */
public function register(): void
{
    $this->hideSensitiveRequestDetails();

    Telescope::filterBatch(function (Collection $entries) {
        if ($this->app->environment('local')) {
            return true;
        }

        return $entries->contains(function (IncomingEntry $entry) {
            return $entry->isReportableException() ||
                $entry->isFailedJob() ||
                $entry->isScheduledTask() ||
                $entry->isSlowQuery() ||
                $entry->hasMonitoredTag();
            });
    });
}
```

<a name="tagging"></a>
## Tagging

Telescope allows you to search entries by "tag". Often, tags are Eloquent model class names or authenticated user IDs which Telescope automatically adds to entries. Occasionally, you may want to attach your own custom tags to entries. To accomplish this, you may use the `Telescope::tag` method. The `tag` method accepts a closure which should return an array of tags. The tags returned by the closure will be merged with any tags Telescope would automatically attach to the entry. Typically, you should call the `tag` method within the `register` method of your `App\Providers\TelescopeServiceProvider` class:

```php
use Laravel\Telescope\EntryType;
use Laravel\Telescope\IncomingEntry;
use Laravel\Telescope\Telescope;

/**
 * Register any application services.
 */
public function register(): void
{
    $this->hideSensitiveRequestDetails();

    Telescope::tag(function (IncomingEntry $entry) {
        return $entry->type === EntryType::REQUEST
            ? ['status:'.$entry->content['response_status']]
            : [];
    });
}
```

<a name="available-watchers"></a>
## Available Watchers

Telescope "watchers" gather application data when a request or console command is executed. You may customize the list of watchers that you would like to enable within your `config/telescope.php` configuration file:

```php
'watchers' => [
    Watchers\CacheWatcher::class => true,
    Watchers\CommandWatcher::class => true,
    // ...
],
```

Some watchers also allow you to provide additional customization options:

```php
'watchers' => [
    Watchers\QueryWatcher::class => [
        'enabled' => env('TELESCOPE_QUERY_WATCHER', true),
        'slow' => 100,
    ],
    // ...
],
```

<a name="batch-watcher"></a>
### Batch Watcher

The batch watcher records information about queued [batches](/docs/{{version}}/queues#job-batching), including the job and connection information.

<a name="cache-watcher"></a>
### Cache Watcher

The cache watcher records data when a cache key is hit, missed, updated and forgotten.

<a name="command-watcher"></a>
### Command Watcher

The command watcher records the arguments, options, exit code, and output whenever an Artisan command is executed. If you would like to exclude certain commands from being recorded by the watcher, you may specify the command in the `ignore` option within your `config/telescope.php` file:

```php
'watchers' => [
    Watchers\CommandWatcher::class => [
        'enabled' => env('TELESCOPE_COMMAND_WATCHER', true),
        'ignore' => ['key:generate'],
    ],
    // ...
],
```

<a name="dump-watcher"></a>
### Dump Watcher

The dump watcher records and displays your variable dumps in Telescope. When using Laravel, variables may be dumped using the global `dump` function. The dump watcher tab must be open in a browser for the dump to be recorded, otherwise, the dumps will be ignored by the watcher.

<a name="event-watcher"></a>
### Event Watcher

The event watcher records the payload, listeners, and broadcast data for any [events](/docs/{{version}}/events) dispatched by your application. The Laravel framework's internal events are ignored by the Event watcher.

<a name="exception-watcher"></a>
### Exception Watcher

The exception watcher records the data and stack trace for any reportable exceptions that are thrown by your application.

<a name="gate-watcher"></a>
### Gate Watcher

The gate watcher records the data and result of [gate and policy](/docs/{{version}}/authorization) checks by your application. If you would like to exclude certain abilities from being recorded by the watcher, you may specify those in the `ignore_abilities` option in your `config/telescope.php` file:

```php
'watchers' => [
    Watchers\GateWatcher::class => [
        'enabled' => env('TELESCOPE_GATE_WATCHER', true),
        'ignore_abilities' => ['viewNova'],
    ],
    // ...
],
```

<a name="http-client-watcher"></a>
### HTTP Client Watcher

The HTTP client watcher records outgoing [HTTP client requests](/docs/{{version}}/http-client) made by your application.

<a name="job-watcher"></a>
### Job Watcher

The job watcher records the data and status of any [jobs](/docs/{{version}}/queues) dispatched by your application.

<a name="log-watcher"></a>
### Log Watcher

The log watcher records the [log data](/docs/{{version}}/logging) for any logs written by your application.

By default, Telescope will only record logs at the `error` level and above. However, you can modify the `level` option in your application's `config/telescope.php` configuration file to modify this behavior:

```php
'watchers' => [
    Watchers\LogWatcher::class => [
        'enabled' => env('TELESCOPE_LOG_WATCHER', true),
        'level' => 'debug',
    ],

    // ...
],
```

<a name="mail-watcher"></a>
### Mail Watcher

The mail watcher allows you to view an in-browser preview of [emails](/docs/{{version}}/mail) sent by your application along with their associated data. You may also download the email as an `.eml` file.

<a name="model-watcher"></a>
### Model Watcher

The model watcher records model changes whenever an Eloquent [model event](/docs/{{version}}/eloquent#events) is dispatched. You may specify which model events should be recorded via the watcher's `events` option:

```php
'watchers' => [
    Watchers\ModelWatcher::class => [
        'enabled' => env('TELESCOPE_MODEL_WATCHER', true),
        'events' => ['eloquent.created*', 'eloquent.updated*'],
    ],
    // ...
],
```

If you would like to record the number of models hydrated during a given request, enable the `hydrations` option:

```php
'watchers' => [
    Watchers\ModelWatcher::class => [
        'enabled' => env('TELESCOPE_MODEL_WATCHER', true),
        'events' => ['eloquent.created*', 'eloquent.updated*'],
        'hydrations' => true,
    ],
    // ...
],
```

<a name="notification-watcher"></a>
### Notification Watcher

The notification watcher records all [notifications](/docs/{{version}}/notifications) sent by your application. If the notification triggers an email and you have the mail watcher enabled, the email will also be available for preview on the mail watcher screen.

<a name="query-watcher"></a>
### Query Watcher

The query watcher records the raw SQL, bindings, and execution time for all queries that are executed by your application. The watcher also tags any queries slower than 100 milliseconds as `slow`. You may customize the slow query threshold using the watcher's `slow` option:

```php
'watchers' => [
    Watchers\QueryWatcher::class => [
        'enabled' => env('TELESCOPE_QUERY_WATCHER', true),
        'slow' => 50,
    ],
    // ...
],
```

<a name="redis-watcher"></a>
### Redis Watcher

The Redis watcher records all [Redis](/docs/{{version}}/redis) commands executed by your application. If you are using Redis for caching, cache commands will also be recorded by the Redis watcher.

<a name="request-watcher"></a>
### Request Watcher

The request watcher records the request, headers, session, and response data associated with any requests handled by the application. You may limit your recorded response data via the `size_limit` (in kilobytes) option:

```php
'watchers' => [
    Watchers\RequestWatcher::class => [
        'enabled' => env('TELESCOPE_REQUEST_WATCHER', true),
        'size_limit' => env('TELESCOPE_RESPONSE_SIZE_LIMIT', 64),
    ],
    // ...
],
```

<a name="schedule-watcher"></a>
### Schedule Watcher

The schedule watcher records the command and output of any [scheduled tasks](/docs/{{version}}/scheduling) run by your application.

<a name="view-watcher"></a>
### View Watcher

The view watcher records the [view](/docs/{{version}}/views) name, path, data, and "composers" used when rendering views.

<a name="displaying-user-avatars"></a>
## Displaying User Avatars

The Telescope dashboard displays the user avatar for the user that was authenticated when a given entry was saved. By default, Telescope will retrieve avatars using the Gravatar web service. However, you may customize the avatar URL by registering a callback in your `App\Providers\TelescopeServiceProvider` class. The callback will receive the user's ID and email address and should return the user's avatar image URL:

```php
use App\Models\User;
use Laravel\Telescope\Telescope;

/**
 * Register any application services.
 */
public function register(): void
{
    // ...

    Telescope::avatar(function (?string $id, ?string $email) {
        return ! is_null($id)
            ? '/avatars/'.User::find($id)->avatar_path
            : '/generic-avatar.jpg';
    });
}
```


---

# Testing: Getting Started

*Sección: Laravel | Origen: https://laravel.com/docs/13.x/testing*

- [Introduction](#introduction)
- [Environment](#environment)
- [Creating Tests](#creating-tests)
- [Running Tests](#running-tests)
    - [Running Tests in Parallel](#running-tests-in-parallel)
    - [Reporting Test Coverage](#reporting-test-coverage)
    - [Profiling Tests](#profiling-tests)
- [Configuration Caching](#configuration-caching)

<a name="introduction"></a>
## Introduction

Laravel is built with testing in mind. In fact, support for testing with [Pest](https://pestphp.com) and [PHPUnit](https://phpunit.de) is included out of the box and a `phpunit.xml` file is already set up for your application. The framework also ships with convenient helper methods that allow you to expressively test your applications.

By default, your application's `tests` directory contains two directories: `Feature` and `Unit`. Unit tests are tests that focus on a very small, isolated portion of your code. In fact, most unit tests probably focus on a single method. Tests within your "Unit" test directory do not boot your Laravel application and therefore are unable to access your application's database or other framework services.

Feature tests may test a larger portion of your code, including how several objects interact with each other or even a full HTTP request to a JSON endpoint. **Generally, most of your tests should be feature tests. These types of tests provide the most confidence that your system as a whole is functioning as intended.**

An `ExampleTest.php` file is provided in both the `Feature` and `Unit` test directories. After installing a new Laravel application, execute the `vendor/bin/pest`, `vendor/bin/phpunit`, or `php artisan test` commands to run your tests.

<a name="environment"></a>
## Environment

When running tests, Laravel will automatically set the [configuration environment](/docs/{{version}}/configuration#environment-configuration) to `testing` because of the environment variables defined in the `phpunit.xml` file. Laravel also automatically configures the session and cache to the `array` driver so that no session or cache data will be persisted while testing.

You are free to define other testing environment configuration values as necessary. The `testing` environment variables may be configured in your application's `phpunit.xml` file, but make sure to clear your configuration cache using the `config:clear` Artisan command before running your tests!

<a name="the-env-testing-environment-file"></a>
#### The `.env.testing` Environment File

In addition, you may create a `.env.testing` file in the root of your project. This file will be used instead of the `.env` file when running Pest and PHPUnit tests or executing Artisan commands with the `--env=testing` option.

<a name="creating-tests"></a>
## Creating Tests

To create a new test case, use the `make:test` Artisan command. By default, tests will be placed in the `tests/Feature` directory:

```shell
php artisan make:test UserTest
```

If you would like to create a test within the `tests/Unit` directory, you may use the `--unit` option when executing the `make:test` command:

```shell
php artisan make:test UserTest --unit
```

If you have a test class that mostly relies on Laravel's testing features, but a specific test method does not need the framework booted, you may apply the `#[UnitTest]` attribute to that method to skip booting the application for just that test.

```php tab=PHPUnit
<?php

namespace Tests\Feature;

use Illuminate\Foundation\Testing\Attributes\UnitTest;
use Tests\TestCase;

class LocationServiceTest extends TestCase
{
    public function test_get_coordinates_resolves_address(): void
    {
        // This test uses Laravel's testing features...
    }

    #[UnitTest]
    public function test_get_state_returns_state_from_abbreviation(): void
    {
        // This test runs without booting the application...
    }
}
```

> [!NOTE]
> Test stubs may be customized using [stub publishing](/docs/{{version}}/artisan#stub-customization).

Once the test has been generated, you may define test as you normally would using Pest or PHPUnit. To run your tests, execute the `vendor/bin/pest`, `vendor/bin/phpunit`, or `php artisan test` command from your terminal:

```php tab=Pest
<?php

test('basic', function () {
    expect(true)->toBeTrue();
});
```

```php tab=PHPUnit
<?php

namespace Tests\Unit;

use PHPUnit\Framework\TestCase;

class ExampleTest extends TestCase
{
    /**
     * A basic test example.
     */
    public function test_basic_test(): void
    {
        $this->assertTrue(true);
    }
}
```

> [!WARNING]
> If you define your own `setUp` / `tearDown` methods within a test class, be sure to call the respective `parent::setUp()` / `parent::tearDown()` methods on the parent class. Typically, you should invoke `parent::setUp()` at the start of your own `setUp` method, and `parent::tearDown()` at the end of your `tearDown` method.

<a name="running-tests"></a>
## Running Tests

As mentioned previously, once you've written tests, you may run them using `pest` or `phpunit`:

```shell tab=Pest
./vendor/bin/pest
```

```shell tab=PHPUnit
./vendor/bin/phpunit
```

In addition to the `pest` or `phpunit` commands, you may use the `test` Artisan command to run your tests. The Artisan test runner provides verbose test reports in order to ease development and debugging:

```shell
php artisan test
```

Any arguments that can be passed to the `pest` or `phpunit` commands may also be passed to the Artisan `test` command:

```shell
php artisan test --testsuite=Feature --stop-on-failure
```

<a name="running-tests-in-parallel"></a>
### Running Tests in Parallel

By default, Laravel and Pest / PHPUnit execute your tests sequentially within a single process. However, you may greatly reduce the amount of time it takes to run your tests by running tests simultaneously across multiple processes. To get started, you should install the `brianium/paratest` Composer package as a "dev" dependency. Then, include the `--parallel` option when executing the `test` Artisan command:

```shell
composer require brianium/paratest --dev

php artisan test --parallel
```

By default, Laravel will create as many processes as there are available CPU cores on your machine. However, you may adjust the number of processes using the `--processes` option:

```shell
php artisan test --parallel --processes=4
```

> [!WARNING]
> When running tests in parallel, some Pest / PHPUnit options (such as `--do-not-cache-result`) may not be available.

<a name="parallel-testing-and-databases"></a>
#### Parallel Testing and Databases

As long as you have configured a primary database connection, Laravel automatically handles creating and migrating a test database for each parallel process that is running your tests. The test databases will be suffixed with a process token which is unique per process. For example, if you have two parallel test processes, Laravel will create and use `your_db_test_1` and `your_db_test_2` test databases.

By default, test databases persist between calls to the `test` Artisan command so that they can be used again by subsequent `test` invocations. However, you may re-create them using the `--recreate-databases` option:

```shell
php artisan test --parallel --recreate-databases
```

<a name="parallel-testing-hooks"></a>
#### Parallel Testing Hooks

Occasionally, you may need to prepare certain resources used by your application's tests so they may be safely used by multiple test processes.

Using the `ParallelTesting` facade, you may specify code to be executed on the `setUp` and `tearDown` of a process or test case. The given closures receive the `$token` and `$testCase` variables that contain the process token and the current test case, respectively:

```php
<?php

namespace App\Providers;

use Illuminate\Support\Facades\Artisan;
use Illuminate\Support\Facades\ParallelTesting;
use Illuminate\Support\ServiceProvider;
use PHPUnit\Framework\TestCase;

class AppServiceProvider extends ServiceProvider
{
    /**
     * Bootstrap any application services.
     */
    public function boot(): void
    {
        ParallelTesting::setUpProcess(function (int $token) {
            // ...
        });

        ParallelTesting::setUpTestCase(function (int $token, TestCase $testCase) {
            // ...
        });

        // Executed when a test database is created...
        ParallelTesting::setUpTestDatabase(function (string $database, int $token) {
            Artisan::call('db:seed');
        });

        ParallelTesting::tearDownTestCase(function (int $token, TestCase $testCase) {
            // ...
        });

        ParallelTesting::tearDownProcess(function (int $token) {
            // ...
        });
    }
}
```

<a name="accessing-the-parallel-testing-token"></a>
#### Accessing the Parallel Testing Token

If you would like to access the current parallel process "token" from any other location in your application's test code, you may use the `token` method. This token is a unique, string identifier for an individual test process and may be used to segment resources across parallel test processes. For example, Laravel automatically appends this token to the end of the test databases created by each parallel testing process:

    $token = ParallelTesting::token();

<a name="reporting-test-coverage"></a>
### Reporting Test Coverage

> [!WARNING]
> This feature requires [Xdebug](https://xdebug.org) or [PCOV](https://pecl.php.net/package/pcov).

When running your application tests, you may want to determine whether your test cases are actually covering the application code and how much application code is used when running your tests. To accomplish this, you may provide the `--coverage` option when invoking the `test` command:

```shell
php artisan test --coverage
```

<a name="enforcing-a-minimum-coverage-threshold"></a>
#### Enforcing a Minimum Coverage Threshold

You may use the `--min` option to define a minimum test coverage threshold for your application. The test suite will fail if this threshold is not met:

```shell
php artisan test --coverage --min=80.3
```

<a name="profiling-tests"></a>
### Profiling Tests

The Artisan test runner also includes a convenient mechanism for listing your application's slowest tests. Invoke the `test` command with the `--profile` option to be presented with a list of your ten slowest tests, allowing you to easily investigate which tests can be improved to speed up your test suite:

```shell
php artisan test --profile
```

<a name="configuration-caching"></a>
## Configuration Caching

When running tests, Laravel boots the application for each individual test method. Without a cached configuration file, each configuration file in your application must be loaded at the start of a test. To build the configuration once and re-use it for all tests in a single run, you may use the `Illuminate\Foundation\Testing\WithCachedConfig` trait:

```php tab=Pest
<?php

use Illuminate\Foundation\Testing\WithCachedConfig;

pest()->use(WithCachedConfig::class);

// ...
```

```php tab=PHPUnit
<?php

namespace Tests\Feature;

use Illuminate\Foundation\Testing\WithCachedConfig;
use Tests\TestCase;

class ConfigTest extends TestCase
{
    use WithCachedConfig;

    // ...
}
```


---

# Upgrade Guide

*Sección: Laravel | Origen: https://laravel.com/docs/13.x/upgrade*

- [Upgrading To 13.0 From 12.x](#upgrade-13.0)
    - [Upgrading Using AI](#upgrading-using-ai)

<a name="high-impact-changes"></a>
## High Impact Changes

<div class="content-list" markdown="1">

- [Updating Dependencies](#updating-dependencies)
- [Updating the Laravel Installer](#updating-the-laravel-installer)
- [Request Forgery Protection](#request-forgery-protection)

</div>

<a name="medium-impact-changes"></a>
## Medium Impact Changes

<div class="content-list" markdown="1">

- [Cache `serializable_classes` Configuration](#cache-serializable_classes-configuration)
- [Database `upsert` With MySQL or MariaDB](#database-upsert-mariadb-mysql)

</div>

<a name="low-impact-changes"></a>
## Low Impact Changes

<div class="content-list" markdown="1">

- [Cache Prefixes and Session Cookie Names](#cache-prefixes-and-session-cookie-names)
- [Collection Model Serialization Restores Eager-Loaded Relations](#collection-model-serialization-restores-eager-loaded-relations)
- [`Container::call` and Nullable Class Defaults](#containercall-and-nullable-class-defaults)
- [Domain Route Registration Precedence](#domain-route-registration-precedence)
- [`JobAttempted` Event Exception Payload](#jobattempted-event-exception-payload)
- [Manager `extend` Callback Binding](#manager-extend-callback-binding)
- [MySQL `DELETE` Queries With `JOIN`, `ORDER BY`, and `LIMIT`](#mysql-delete-queries-with-join-order-by-and-limit)
- [Pagination Bootstrap View Names](#pagination-bootstrap-view-names)
- [Polymorphic Pivot Table Name Generation](#polymorphic-pivot-table-name-generation)
- [`QueueBusy` Event Property Rename](#queuebusy-event-property-rename)
- [Session `serialization` Configuration](#session-serialization-configuration)
- [`Str` Factories Reset Between Tests](#str-factories-reset-between-tests)

</div>

<a name="upgrade-13.0"></a>
## Upgrading To 13.0 From 12.x

#### Estimated Upgrade Time: 10 Minutes

> [!NOTE]
> We attempt to document every possible breaking change. Since some of these breaking changes are in obscure parts of the framework only a portion of these changes may actually affect your application. To save time, you may use [Shift](https://laravelshift.com). Shift is a community-maintained service that automates Laravel upgrades.

<a name="upgrading-using-ai"></a>
### Upgrading Using AI

You can automate your upgrade using [Laravel Boost](https://github.com/laravel/boost). Boost is a first-party MCP server that provides your AI assistant with guided upgrade prompts — once installed in any Laravel 12 application, use the `/upgrade-laravel-v13` slash command in Claude Code, Cursor, OpenCode, Gemini, or VS Code to begin the upgrade to Laravel 13. This command requires Laravel Boost `^2.0`.

<a name="updating-dependencies"></a>
### Updating Dependencies

**Likelihood Of Impact: High**

You should update the following dependencies in your application's `composer.json` file:

<div class="content-list" markdown="1">

- `laravel/framework` to `^13.0`
- `laravel/boost` to `^2.0`
- `laravel/tinker` to `^3.0`
- `phpunit/phpunit` to `^12.0`
- `pestphp/pest` to `^4.0`

</div>

<a name="updating-the-laravel-installer"></a>
### Updating the Laravel Installer

If you are using the Laravel installer CLI tool to create new Laravel applications, you should update your installer installation for Laravel 13.x compatibility.

If you installed the Laravel installer via `composer global require`, you may update the installer using `composer global update`:

```shell
composer global update laravel/installer
```

Or, if you are using [Laravel Herd's](https://herd.laravel.com) bundled copy of the Laravel installer, you should update your Herd installation to the latest release.

<a name="cache"></a>
### Cache

<a name="cache-prefixes-and-session-cookie-names"></a>
#### Cache Prefixes and Session Cookie Names

**Likelihood Of Impact: Low**

Laravel's default cache and Redis key prefixes now use hyphenated suffixes.

In most applications, this change will not apply because application-level configuration files already define these values. This primarily affects applications that rely on framework-level fallback configuration when corresponding application config values are not present.

If your application relies on these generated defaults, cache keys and session cookie names may change after upgrading:

```php
// Laravel <= 12.x
Str::slug((string) env('APP_NAME', 'laravel'), '_').'_cache_';
Str::slug((string) env('APP_NAME', 'laravel'), '_').'_database_';
Str::slug((string) env('APP_NAME', 'laravel'), '_').'_session';

// Laravel >= 13.x
Str::slug((string) env('APP_NAME', 'laravel')).'-cache-';
Str::slug((string) env('APP_NAME', 'laravel')).'-database-';
Str::slug((string) env('APP_NAME', 'laravel')).'-session';
```

To retain previous behavior, explicitly configure `CACHE_PREFIX`, `REDIS_PREFIX`, and `SESSION_COOKIE` in your environment.

<a name="store-and-repository-contracts-touch"></a>
#### `Store` and `Repository` Contracts: `touch`

**Likelihood Of Impact: Very Low**

The cache contracts now include a `touch` method for extending item TTLs. If you maintain custom cache store implementations, you should add this method:

```php
// Illuminate\Contracts\Cache\Store
public function touch($key, $seconds);
```

<a name="cache-serializable_classes-configuration"></a>
#### Cache `serializable_classes` Configuration

**Likelihood Of Impact: Medium**

The default application `cache` configuration now includes a `serializable_classes` option set to `false`. This hardens cache unserialization behavior to help prevent PHP deserialization gadget chain attacks if your application's `APP_KEY` is leaked. If your application intentionally stores PHP objects in cache, you should explicitly list the classes that may be unserialized:

```php
'serializable_classes' => [
    App\Data\CachedDashboardStats::class,
    App\Support\CachedPricingSnapshot::class,
],
```

If your application previously relied on unserializing arbitrary cached objects, you will need to migrate that usage to explicit class allow-lists or to non-object cache payloads (such as arrays).

<a name="container"></a>
### Container

<a name="containercall-and-nullable-class-defaults"></a>
#### `Container::call` and Nullable Class Defaults

**Likelihood Of Impact: Low**

`Container::call` now respects nullable class parameter defaults when no binding exists, matching constructor injection behavior introduced in Laravel 12:

```php
$container->call(function (?Carbon $date = null) {
    return $date;
});

// Laravel <= 12.x: Carbon instance
// Laravel >= 13.x: null
```

If your method-call injection logic depended on the previous behavior, you may need to update it.

<a name="contracts"></a>
### Contracts

<a name="dispatcher-contract-dispatchafterresponse"></a>
#### `Dispatcher` Contract: `dispatchAfterResponse`

**Likelihood Of Impact: Very Low**

The `Illuminate\Contracts\Bus\Dispatcher` contract now includes the `dispatchAfterResponse($command, $handler = null)` method.

If you maintain a custom dispatcher implementation, add this method to your class.

<a name="responsefactory-contract-eventstream"></a>
#### `ResponseFactory` Contract: `eventStream`

**Likelihood Of Impact: Very Low**

The `Illuminate\Contracts\Routing\ResponseFactory` contract now includes an `eventStream` signature.

If you maintain a custom implementation of this contract, you should add this method.

<a name="mustverifyemail-contract-markemailasunverified"></a>
#### `MustVerifyEmail` Contract: `markEmailAsUnverified`

**Likelihood Of Impact: Very Low**

The `Illuminate\Contracts\Auth\MustVerifyEmail` contract now includes `markEmailAsUnverified()`.

If you provide a custom implementation of this contract, add this method to remain compatible.

<a name="database"></a>
### Database

<a name="database-upsert-mariadb-mysql"></a>
#### Database `upsert` With MySQL or MariaDB

**Likelihood Of Impact: Medium**

Laravel now validates that the caller provides a non-empty value for `uniqueBy`, and will throw an `InvalidArgumentException` instead of generating invalid SQL.

Although the MariaDB and MySQL database drivers ignore the `uniqueBy` value and always use the table's primary and unique indexes to detect existing records, the validation still applies. An `InvalidArgumentException` will be thrown if `uniqueBy` is empty.

<a name="mysql-delete-queries-with-join-order-by-and-limit"></a>
#### MySQL `DELETE` Queries With `JOIN`, `ORDER BY`, and `LIMIT`

**Likelihood Of Impact: Low**

Laravel now compiles full `DELETE ... JOIN` queries including `ORDER BY` and `LIMIT` for MySQL grammar.

In previous versions, `ORDER BY` / `LIMIT` clauses could be silently ignored on joined deletes. In Laravel 13, these clauses are included in the generated SQL. As a result, database engines that do not support this syntax (such as standard MySQL / MariaDB variants) may now throw a `QueryException` instead of executing an unbounded delete.

<a name="eloquent"></a>
### Eloquent

<a name="model-booting-and-nested-instantiation"></a>
#### Model Booting and Nested Instantiation

**Likelihood Of Impact: Very Low**

Creating a new model instance while that model is still booting is now disallowed and throws a `LogicException`.

This affects code that instantiates models from inside model `boot` methods or trait `boot*` methods:

```php
protected static function boot()
{
    parent::boot();

    // No longer allowed during booting...
    (new static())->getTable();
}
```

Move this logic outside the boot cycle to avoid nested booting.

<a name="polymorphic-pivot-table-name-generation"></a>
#### Polymorphic Pivot Table Name Generation

**Likelihood Of Impact: Low**

When table names are inferred for polymorphic pivot models using custom pivot model classes, Laravel now generates pluralized names.

If your application depended on the previous singular inferred names for morph pivot tables and used custom pivot classes, you should explicitly define the table name on your pivot model.

<a name="collection-model-serialization-restores-eager-loaded-relations"></a>
#### Collection Model Serialization Restores Eager-Loaded Relations

**Likelihood Of Impact: Low**

When Eloquent model collections are serialized and restored (such as in queued jobs), eager-loaded relations are now restored for the collection's models.

If your code depended on relations not being present after deserialization, you may need to adjust that logic.

<a name="http-client"></a>
### HTTP Client

<a name="http-client-response-throw-and-throwif-signatures"></a>
#### HTTP Client `Response::throw` and `throwIf` Signatures

**Likelihood Of Impact: Very Low**

The HTTP client response methods now declare their callback parameters in the method signatures:

```php
public function throw($callback = null);
public function throwIf($condition, $callback = null);
```

If you override these methods in custom response classes, ensure your method signatures are compatible.

<a name="notifications"></a>
### Notifications

<a name="default-password-reset-subject"></a>
#### Default Password Reset Subject

**Likelihood Of Impact: Very Low**

Laravel's default password reset mail subject has changed:

```text
// Laravel <= 12.x
Reset Password Notification

// Laravel >= 13.x
Reset your password
```

If your tests, assertions, or translation overrides depend on the previous default string, update them accordingly.

<a name="queued-notifications-and-missing-models"></a>
#### Queued Notifications and Missing Models

**Likelihood Of Impact: Very Low**

Queued notifications now respect the `#[DeleteWhenMissingModels]` attribute and `$deleteWhenMissingModels` property defined on the notification class.

In previous versions, missing models could still cause queued notification jobs to fail in cases where you expected them to be deleted.

<a name="queue"></a>
### Queue

<a name="jobattempted-event-exception-payload"></a>
#### `JobAttempted` Event Exception Payload

**Likelihood Of Impact: Low**

The `Illuminate\Queue\Events\JobAttempted` event now exposes the exception object (or `null`) via `$exception`, replacing the previous boolean `$exceptionOccurred` property:

```php
// Laravel <= 12.x
$event->exceptionOccurred;

// Laravel >= 13.x
$event->exception;
```

If you listen for this event, update your listener code accordingly.

<a name="queuebusy-event-property-rename"></a>
#### `QueueBusy` Event Property Rename

**Likelihood Of Impact: Low**

The `Illuminate\Queue\Events\QueueBusy` event property `$connection` has been renamed to `$connectionName` for consistency with other queue events.

If your listeners reference `$connection`, update them to `$connectionName`.

<a name="queue-contract-method-additions"></a>
#### `Queue` Contract Method Additions

**Likelihood Of Impact: Very Low**

The `Illuminate\Contracts\Queue\Queue` contract now includes queue size inspection methods that were previously only declared in docblocks.

If you maintain custom queue driver implementations of this contract, add implementations for:

<div class="content-list" markdown="1">

- `pendingSize`
- `delayedSize`
- `reservedSize`
- `creationTimeOfOldestPendingJob`

</div>

<a name="routing"></a>
### Routing

<a name="domain-route-registration-precedence"></a>
#### Domain Route Registration Precedence

**Likelihood Of Impact: Low**

Routes with an explicit domain are now prioritized before non-domain routes in route matching.

This allows catch-all subdomain routes to behave consistently even when non-domain routes are registered earlier. If your application relied on previous registration precedence between domain and non-domain routes, review route matching behavior.

<a name="session"></a>
### Session

<a name="session-serialization-configuration"></a>
#### Session `serialization` Configuration

**Likelihood Of Impact: Low**

To help prevent PHP deserialization gadget chain attacks, the default application skeleton now sets the session `serialization` option to `json` in the `config/session.php` file.

If you are upgrading an existing application and syncing your configuration files with the Laravel 13 skeleton, updating this value from `php` to `json` will invalidate all active user sessions.

If you wish to seamlessly maintain active sessions during your upgrade, you should ensure this value remains set to `php`. However, if your application does not store PHP objects in the session and you are comfortable requiring your users to re-authenticate, we recommend updating this value to `json` for improved security.

<a name="scheduling"></a>
### Scheduling

<a name="withscheduling-registration-timing"></a>
#### `withScheduling` Registration Timing

**Likelihood Of Impact: Very Low**

Schedules registered via `ApplicationBuilder::withScheduling()` are now deferred until `Schedule` is resolved.

If your application relied on immediate schedule registration timing during bootstrap, you may need to adjust that logic.

<a name="security"></a>
### Security

<a name="request-forgery-protection"></a>
#### Request Forgery Protection

**Likelihood Of Impact: High**

Laravel's CSRF middleware has been renamed from `VerifyCsrfToken` to `PreventRequestForgery`, and now includes request-origin verification using the `Sec-Fetch-Site` header.

`VerifyCsrfToken` and `ValidateCsrfToken` remain as deprecated aliases, but direct references should be updated to `PreventRequestForgery`, especially when excluding middleware in tests or route definitions:

```php
use Illuminate\Foundation\Http\Middleware\PreventRequestForgery;
use Illuminate\Foundation\Http\Middleware\VerifyCsrfToken;

// Laravel <= 12.x
->withoutMiddleware([VerifyCsrfToken::class]);

// Laravel >= 13.x
->withoutMiddleware([PreventRequestForgery::class]);
```

The middleware configuration API now also provides `preventRequestForgery(...)`.

<a name="support"></a>
### Support

<a name="manager-extend-callback-binding"></a>
#### Manager `extend` Callback Binding

**Likelihood Of Impact: Low**

Custom driver closures registered via manager `extend` methods are now bound to the manager instance.

If you previously relied on another bound object (such as a service provider instance) as `$this` inside these callbacks, you should move those values into closure captures using `use (...)`.

<a name="str-factories-reset-between-tests"></a>
#### `Str` Factories Reset Between Tests

**Likelihood Of Impact: Low**

Laravel now resets custom `Str` factories during test teardown.

If your tests depended on custom UUID / ULID / random string factories persisting between test methods, you should set them in each relevant test or setup hook.

<a name="jsfrom-uses-unescaped-unicode-by-default"></a>
#### `Js::from` Uses Unescaped Unicode By Default

**Likelihood Of Impact: Very Low**

`Illuminate\Support\Js::from` now uses `JSON_UNESCAPED_UNICODE` by default.

If your tests or frontend output comparisons depended on escaped Unicode sequences (for example `\u00e8`), update your expectations.

<a name="utilities"></a>
### Utilities

<a name="symfony-polyfill"></a>
#### Symfony PHP 8.5 Polyfill and Global Function Conflicts

**Likelihood Of Impact: Low**

Laravel 13 introduces a dependency on `symfony/polyfill-php85`. On PHP versions below 8.5, this polyfill defines global functions such as `array_first()` and `array_last()` unless they have already been defined earlier during bootstrap.

These functions may conflict with legacy helper packages like `laravel/helpers` or custom global helpers using the same names. For example, the historical `array_first()` helper accepted a callback to return the first matching element, while the polyfilled version only returns the first element of the array.

To avoid conflicts and ensure consistent behavior across PHP versions, you should prefer the `Illuminate\Support\Arr` methods:

```php
use Illuminate\Support\Arr;

Arr::first($array, function ($value) {
  return /* condition */;
});
```

<a name="views"></a>
### Views

<a name="pagination-bootstrap-view-names"></a>
#### Pagination Bootstrap View Names

**Likelihood Of Impact: Low**

The internal pagination view names for Bootstrap 3 defaults are now explicit:

```nothing
// Laravel <= 12.x
pagination::default
pagination::simple-default

// Laravel >= 13.x
pagination::bootstrap-3
pagination::simple-bootstrap-3
```

If your application references the old pagination view names directly, update those references.

<a name="miscellaneous"></a>
### Miscellaneous

We also encourage you to view the changes in the `laravel/laravel` [GitHub repository](https://github.com/laravel/laravel). While many of these changes are not required, you may wish to keep these files in sync with your application. Some of these changes will be covered in this upgrade guide, but others, such as changes to configuration files or comments, will not be. You can easily view the changes with the [GitHub comparison tool](https://github.com/laravel/laravel/compare/12.x...13.x) and choose which updates are important to you.


---

# URL Generation

*Sección: Laravel | Origen: https://laravel.com/docs/13.x/urls*

- [Introduction](#introduction)
- [The Basics](#the-basics)
    - [Generating URLs](#generating-urls)
    - [Accessing the Current URL](#accessing-the-current-url)
- [URLs for Named Routes](#urls-for-named-routes)
    - [Signed URLs](#signed-urls)
- [URLs for Controller Actions](#urls-for-controller-actions)
- [Fluent URI Objects](#fluent-uri-objects)
- [Default Values](#default-values)

<a name="introduction"></a>
## Introduction

Laravel provides several helpers to assist you in generating URLs for your application. These helpers are primarily helpful when building links in your templates and API responses, or when generating redirect responses to another part of your application.

<a name="the-basics"></a>
## The Basics

<a name="generating-urls"></a>
### Generating URLs

The `url` helper may be used to generate arbitrary URLs for your application. The generated URL will automatically use the scheme (HTTP or HTTPS) and host from the current request being handled by the application:

```php
$post = App\Models\Post::find(1);

echo url("/posts/{$post->id}");

// http://example.com/posts/1
```

To generate a URL with query string parameters, you may use the `query` method:

```php
echo url()->query('/posts', ['search' => 'Laravel']);

// https://example.com/posts?search=Laravel

echo url()->query('/posts?sort=latest', ['search' => 'Laravel']);

// http://example.com/posts?sort=latest&search=Laravel
```

Providing query string parameters that already exist in the path will overwrite their existing value:

```php
echo url()->query('/posts?sort=latest', ['sort' => 'oldest']);

// http://example.com/posts?sort=oldest
```

Arrays of values may also be passed as query parameters. These values will be properly keyed and encoded in the generated URL:

```php
echo $url = url()->query('/posts', ['columns' => ['title', 'body']]);

// http://example.com/posts?columns%5B0%5D=title&columns%5B1%5D=body

echo urldecode($url);

// http://example.com/posts?columns[0]=title&columns[1]=body
```

<a name="accessing-the-current-url"></a>
### Accessing the Current URL

If no path is provided to the `url` helper, an `Illuminate\Routing\UrlGenerator` instance is returned, allowing you to access information about the current URL:

```php
// Get the current URL without the query string...
echo url()->current();

// Get the current URL including the query string...
echo url()->full();
```

Each of these methods may also be accessed via the `URL` [facade](/docs/{{version}}/facades):

```php
use Illuminate\Support\Facades\URL;

echo URL::current();
```

<a name="accessing-the-previous-url"></a>
#### Accessing the Previous URL

Sometimes it is helpful to know the previous URL that the user is visiting from. You can access the previous URL via the `url` helper's `previous` and `previousPath` methods:

```php
// Get the full URL for the previous request...
echo url()->previous();

// Get the path for the previous request...
echo url()->previousPath();
```

Or, via the [session](/docs/{{version}}/session), you may access the previous URL as a [fluent URI](#fluent-uri-objects) instance:

```php
use Illuminate\Http\Request;

Route::post('/users', function (Request $request) {
    $previousUri = $request->session()->previousUri();

    // ...
});
```

It is also possible to retrieve the route name for the previously visited URL via the session:

```php
$previousRoute = $request->session()->previousRoute();
```

<a name="urls-for-named-routes"></a>
## URLs for Named Routes

The `route` helper may be used to generate URLs to [named routes](/docs/{{version}}/routing#named-routes). Named routes allow you to generate URLs without being coupled to the actual URL defined on the route. Therefore, if the route's URL changes, no changes need to be made to your calls to the `route` function. For example, imagine your application contains a route defined like the following:

```php
Route::get('/post/{post}', function (Post $post) {
    // ...
})->name('post.show');
```

To generate a URL to this route, you may use the `route` helper like so:

```php
echo route('post.show', ['post' => 1]);

// http://example.com/post/1
```

Of course, the `route` helper may also be used to generate URLs for routes with multiple parameters:

```php
Route::get('/post/{post}/comment/{comment}', function (Post $post, Comment $comment) {
    // ...
})->name('comment.show');

echo route('comment.show', ['post' => 1, 'comment' => 3]);

// http://example.com/post/1/comment/3
```

Any additional array elements that do not correspond to the route's definition parameters will be added to the URL's query string:

```php
echo route('post.show', ['post' => 1, 'search' => 'rocket']);

// http://example.com/post/1?search=rocket
```

<a name="eloquent-models"></a>
#### Eloquent Models

You will often be generating URLs using the route key (typically the primary key) of [Eloquent models](/docs/{{version}}/eloquent). For this reason, you may pass Eloquent models as parameter values. The `route` helper will automatically extract the model's route key:

```php
echo route('post.show', ['post' => $post]);
```

<a name="signed-urls"></a>
### Signed URLs

Laravel allows you to easily create "signed" URLs to named routes. These URLs have a "signature" hash appended to the query string which allows Laravel to verify that the URL has not been modified since it was created. Signed URLs are especially useful for routes that are publicly accessible yet need a layer of protection against URL manipulation.

For example, you might use signed URLs to implement a public "unsubscribe" link that is emailed to your customers. To create a signed URL to a named route, use the `signedRoute` method of the `URL` facade:

```php
use Illuminate\Support\Facades\URL;

return URL::signedRoute('unsubscribe', ['user' => 1]);
```

You may exclude the domain from the signed URL hash by providing the `absolute` argument to the `signedRoute` method:

```php
return URL::signedRoute('unsubscribe', ['user' => 1], absolute: false);
```

If you would like to generate a temporary signed route URL that expires after a specified amount of time, you may use the `temporarySignedRoute` method. When Laravel validates a temporary signed route URL, it will ensure that the expiration timestamp that is encoded into the signed URL has not elapsed:

```php
use Illuminate\Support\Facades\URL;

return URL::temporarySignedRoute(
    'unsubscribe', now()->plus(minutes: 30), ['user' => 1]
);
```

<a name="validating-signed-route-requests"></a>
#### Validating Signed Route Requests

To verify that an incoming request has a valid signature, you should call the `hasValidSignature` method on the incoming `Illuminate\Http\Request` instance:

```php
use Illuminate\Http\Request;

Route::get('/unsubscribe/{user}', function (Request $request) {
    if (! $request->hasValidSignature()) {
        abort(401);
    }

    // ...
})->name('unsubscribe');
```

Sometimes, you may need to allow your application's frontend to append data to a signed URL, such as when performing client-side pagination. Therefore, you can specify request query parameters that should be ignored when validating a signed URL using the `hasValidSignatureWhileIgnoring` method. Remember, ignoring parameters allows anyone to modify those parameters on the request:

```php
if (! $request->hasValidSignatureWhileIgnoring(['page', 'order'])) {
    abort(401);
}
```

Instead of validating signed URLs using the incoming request instance, you may assign the `signed` (`Illuminate\Routing\Middleware\ValidateSignature`) [middleware](/docs/{{version}}/middleware) to the route. If the incoming request does not have a valid signature, the middleware will automatically return a `403` HTTP response:

```php
Route::post('/unsubscribe/{user}', function (Request $request) {
    // ...
})->name('unsubscribe')->middleware('signed');
```

If your signed URLs do not include the domain in the URL hash, you should provide the `relative` argument to the middleware:

```php
Route::post('/unsubscribe/{user}', function (Request $request) {
    // ...
})->name('unsubscribe')->middleware('signed:relative');
```

<a name="responding-to-invalid-signed-routes"></a>
#### Responding to Invalid Signed Routes

When someone visits a signed URL that has expired, they will receive a generic error page for the `403` HTTP status code. However, you can customize this behavior by defining a custom "render" closure for the `InvalidSignatureException` exception in your application's `bootstrap/app.php` file:

```php
use Illuminate\Routing\Exceptions\InvalidSignatureException;

->withExceptions(function (Exceptions $exceptions): void {
    $exceptions->render(function (InvalidSignatureException $e) {
        return response()->view('errors.link-expired', status: 403);
    });
})
```

<a name="urls-for-controller-actions"></a>
## URLs for Controller Actions

The `action` function generates a URL for the given controller action:

```php
use App\Http\Controllers\HomeController;

$url = action([HomeController::class, 'index']);
```

If the controller method accepts route parameters, you may pass an associative array of route parameters as the second argument to the function:

```php
$url = action([UserController::class, 'profile'], ['id' => 1]);
```

<a name="fluent-uri-objects"></a>
## Fluent URI Objects

Laravel's `Uri` class provides a convenient and fluent interface for creating and manipulating URIs via objects. This class wraps the functionality provided by the underlying League URI package and integrates seamlessly with Laravel's routing system.

You can create a `Uri` instance easily using static methods:

```php
use App\Http\Controllers\UserController;
use App\Http\Controllers\InvokableController;
use Illuminate\Support\Uri;

// Generate a URI instance from the given string...
$uri = Uri::of('https://example.com/path');

// Generate URI instances to paths, named routes, or controller actions...
$uri = Uri::to('/dashboard');
$uri = Uri::route('users.show', ['user' => 1]);
$uri = Uri::signedRoute('users.show', ['user' => 1]);
$uri = Uri::temporarySignedRoute('user.index', now()->plus(minutes: 5));
$uri = Uri::action([UserController::class, 'index']);
$uri = Uri::action(InvokableController::class);

// Generate a URI instance from the current request URL...
$uri = $request->uri();

// Generate a URI instance from the previous request URL...
$uri = $request->session()->previousUri();
```

Once you have a URI instance, you can fluently modify it:

```php
$uri = Uri::of('https://example.com')
    ->withScheme('http')
    ->withHost('test.com')
    ->withPort(8000)
    ->withPath('/users')
    ->withQuery(['page' => 2])
    ->withFragment('section-1');
```

For more information on working with fluent URI objects, consult the [URI documentation](/docs/{{version}}/helpers#uri).

<a name="default-values"></a>
## Default Values

For some applications, you may wish to specify request-wide default values for certain URL parameters. For example, imagine many of your routes define a `{locale}` parameter:

```php
Route::get('/{locale}/posts', function () {
    // ...
})->name('post.index');
```

It is cumbersome to always pass the `locale` every time you call the `route` helper. So, you may use the `URL::defaults` method to define a default value for this parameter that will always be applied during the current request. You may wish to call this method from a [route middleware](/docs/{{version}}/middleware#assigning-middleware-to-routes) so that you have access to the current request:

```php
<?php

namespace App\Http\Middleware;

use Closure;
use Illuminate\Http\Request;
use Illuminate\Support\Facades\URL;
use Symfony\Component\HttpFoundation\Response;

class SetDefaultLocaleForUrls
{
    /**
     * Handle an incoming request.
     *
     * @param  \Closure(\Illuminate\Http\Request): (\Symfony\Component\HttpFoundation\Response)  $next
     */
    public function handle(Request $request, Closure $next): Response
    {
        URL::defaults(['locale' => $request->user()->locale]);

        return $next($request);
    }
}
```

Once the default value for the `locale` parameter has been set, you are no longer required to pass its value when generating URLs via the `route` helper.

<a name="url-defaults-middleware-priority"></a>
#### URL Defaults and Middleware Priority

Setting URL default values can interfere with Laravel's handling of implicit model bindings. Therefore, you should [prioritize your middleware](/docs/{{version}}/middleware#sorting-middleware) that set URL defaults to be executed before Laravel's own `SubstituteBindings` middleware. You can accomplish this using the `priority` middleware method in your application's `bootstrap/app.php` file:

```php
->withMiddleware(function (Middleware $middleware): void {
    $middleware->prependToPriorityList(
        before: \Illuminate\Routing\Middleware\SubstituteBindings::class,
        prepend: \App\Http\Middleware\SetDefaultLocaleForUrls::class,
    );
})
```


---

# Laravel Valet

*Sección: Laravel | Origen: https://laravel.com/docs/13.x/valet*

- [Introduction](#introduction)
- [Installation](#installation)
    - [Upgrading Valet](#upgrading-valet)
- [Serving Sites](#serving-sites)
    - [The "Park" Command](#the-park-command)
    - [The "Link" Command](#the-link-command)
    - [Securing Sites With TLS](#securing-sites)
    - [Serving a Default Site](#serving-a-default-site)
    - [Per-Site PHP Versions](#per-site-php-versions)
- [Sharing Sites](#sharing-sites)
    - [Sharing Sites on Your Local Network](#sharing-sites-on-your-local-network)
- [Site Specific Environment Variables](#site-specific-environment-variables)
- [Proxying Services](#proxying-services)
- [Custom Valet Drivers](#custom-valet-drivers)
    - [Local Drivers](#local-drivers)
- [Other Valet Commands](#other-valet-commands)
- [Valet Directories and Files](#valet-directories-and-files)
    - [Disk Access](#disk-access)

<a name="introduction"></a>
## Introduction

> [!NOTE]
> Looking for an even easier way to develop Laravel applications on macOS or Windows? Check out [Laravel Herd](https://herd.laravel.com). Herd includes everything you need to get started with Laravel development, including Valet, PHP, and Composer.

[Laravel Valet](https://github.com/laravel/valet) is a development environment for macOS minimalists. Laravel Valet configures your Mac to always run [Nginx](https://www.nginx.com/) in the background when your machine starts. Then, using [DnsMasq](https://en.wikipedia.org/wiki/Dnsmasq), Valet proxies all requests on the `*.test` domain to point to sites installed on your local machine.

In other words, Valet is a blazing fast Laravel development environment that uses roughly 7 MB of RAM. Valet isn't a complete replacement for [Sail](/docs/{{version}}/sail) or [Homestead](/docs/{{version}}/homestead), but provides a great alternative if you want flexible basics, prefer extreme speed, or are working on a machine with a limited amount of RAM.

Out of the box, Valet support includes, but is not limited to:

<style>
    #valet-support > ul {
        column-count: 3; -moz-column-count: 3; -webkit-column-count: 3;
        line-height: 1.9;
    }
</style>

<div id="valet-support" markdown="1">

- [Laravel](https://laravel.com)
- [Bedrock](https://roots.io/bedrock/)
- [CakePHP 3](https://cakephp.org)
- [ConcreteCMS](https://www.concretecms.com/)
- [Contao](https://contao.org/en/)
- [Craft](https://craftcms.com)
- [Drupal](https://www.drupal.org/)
- [ExpressionEngine](https://www.expressionengine.com/)
- [Jigsaw](https://jigsaw.tighten.co)
- [Joomla](https://www.joomla.org/)
- [Katana](https://github.com/themsaid/katana)
- [Kirby](https://getkirby.com/)
- [Magento](https://magento.com/)
- [OctoberCMS](https://octobercms.com/)
- [Sculpin](https://sculpin.io/)
- [Slim](https://www.slimframework.com)
- [Statamic](https://statamic.com)
- Static HTML
- [Symfony](https://symfony.com)
- [WordPress](https://wordpress.org)
- [Zend](https://framework.zend.com)

</div>

However, you may extend Valet with your own [custom drivers](#custom-valet-drivers).

<a name="installation"></a>
## Installation

> [!WARNING]
> Valet requires macOS and [Homebrew](https://brew.sh/). Before installation, you should make sure that no other programs such as Apache or Nginx are binding to your local machine's port 80.

To get started, you first need to ensure that Homebrew is up to date using the `update` command:

```shell
brew update
```

Next, you should use Homebrew to install PHP:

```shell
brew install php
```

After installing PHP, you are ready to install the [Composer package manager](https://getcomposer.org). In addition, you should make sure the `$HOME/.composer/vendor/bin` directory is in your system's "PATH". After Composer has been installed, you may install Laravel Valet as a global Composer package:

```shell
composer global require laravel/valet
```

Finally, you may execute Valet's `install` command. This will configure and install Valet and DnsMasq. In addition, the daemons Valet depends on will be configured to launch when your system starts:

```shell
valet install
```

Once Valet is installed, try pinging any `*.test` domain on your terminal using a command such as `ping foobar.test`. If Valet is installed correctly you should see this domain responding on `127.0.0.1`.

Valet will automatically start its required services each time your machine boots.

<a name="php-versions"></a>
#### PHP Versions

> [!NOTE]
> Instead of modifying your global PHP version, you can instruct Valet to use per-site PHP versions via the `isolate` [command](#per-site-php-versions).

Valet allows you to switch PHP versions using the `valet use php@version` command. Valet will install the specified PHP version via Homebrew if it is not already installed:

```shell
valet use php@8.2

valet use php
```

You may also create a `.valetrc` file in the root of your project. The `.valetrc` file should contain the PHP version the site should use:

```shell
php=php@8.2
```

Once this file has been created, you may simply execute the `valet use` command and the command will determine the site's preferred PHP version by reading the file.

> [!WARNING]
> Valet only serves one PHP version at a time, even if you have multiple PHP versions installed.

<a name="database"></a>
#### Database

If your application needs a database, check out [DBngin](https://dbngin.com), which provides a free, all-in-one database management tool that includes MySQL, PostgreSQL, and Redis. After DBngin has been installed, you can connect to your database at `127.0.0.1` using the `root` username and an empty string for the password.

<a name="resetting-your-installation"></a>
#### Resetting Your Installation

If you are having trouble getting your Valet installation to run properly, executing the `composer global require laravel/valet` command followed by `valet install` will reset your installation and can solve a variety of problems. In rare cases, it may be necessary to "hard reset" Valet by executing `valet uninstall --force` followed by `valet install`.

<a name="upgrading-valet"></a>
### Upgrading Valet

You may update your Valet installation by executing the `composer global require laravel/valet` command in your terminal. After upgrading, it is good practice to run the `valet install` command so Valet can make additional upgrades to your configuration files if necessary.

<a name="upgrading-to-valet-4"></a>
#### Upgrading to Valet 4

If you're upgrading from Valet 3 to Valet 4, take the following steps to properly upgrade your Valet installation:

<div class="content-list" markdown="1">

- If you've added `.valetphprc` files to customize your site's PHP version, rename each `.valetphprc` file to `.valetrc`. Then, prepend `php=` to the existing content of the `.valetrc` file.
- Update any custom drivers to match the namespace, extension, type-hints, and return type-hints of the new driver system. You may consult Valet's [SampleValetDriver](https://github.com/laravel/valet/blob/d7787c025e60abc24a5195dc7d4c5c6f2d984339/cli/stubs/SampleValetDriver.php) as an example.
- If you use PHP 7.1 - 7.4 to serve your sites, make sure you still use Homebrew to install a version of PHP that's 8.0 or higher, as Valet will use this version, even if it's not your primary linked version, to run some of its scripts.

</div>

<a name="serving-sites"></a>
## Serving Sites

Once Valet is installed, you're ready to start serving your Laravel applications. Valet provides two commands to help you serve your applications: `park` and `link`.

<a name="the-park-command"></a>
### The `park` Command

The `park` command registers a directory on your machine that contains your applications. Once the directory has been "parked" with Valet, all of the directories within that directory will be accessible in your web browser at `http://<directory-name>.test`:

```shell
cd ~/Sites

valet park
```

That's all there is to it. Now, any application you create within your "parked" directory will automatically be served using the `http://<directory-name>.test` convention. So, if your parked directory contains a directory named "laravel", the application within that directory will be accessible at `http://laravel.test`. In addition, Valet automatically allows you to access the site using wildcard subdomains (`http://foo.laravel.test`).

<a name="the-link-command"></a>
### The `link` Command

The `link` command can also be used to serve your Laravel applications. This command is useful if you want to serve a single site in a directory and not the entire directory:

```shell
cd ~/Sites/laravel

valet link
```

Once an application has been linked to Valet using the `link` command, you may access the application using its directory name. So, the site that was linked in the example above may be accessed at `http://laravel.test`. In addition, Valet automatically allows you to access the site using wildcard sub-domains (`http://foo.laravel.test`).

If you would like to serve the application at a different hostname, you may pass the hostname to the `link` command. For example, you may run the following command to make an application available at `http://application.test`:

```shell
cd ~/Sites/laravel

valet link application
```

Of course, you may also serve applications on subdomains using the `link` command:

```shell
valet link api.application
```

You may execute the `links` command to display a list of all of your linked directories:

```shell
valet links
```

The `unlink` command may be used to destroy the symbolic link for a site:

```shell
cd ~/Sites/laravel

valet unlink
```

<a name="securing-sites"></a>
### Securing Sites With TLS

By default, Valet serves sites over HTTP. However, if you would like to serve a site over encrypted TLS using HTTP/2, you may use the `secure` command. For example, if your site is being served by Valet on the `laravel.test` domain, you should run the following command to secure it:

```shell
valet secure laravel
```

To "unsecure" a site and revert back to serving its traffic over plain HTTP, use the `unsecure` command. Like the `secure` command, this command accepts the hostname that you wish to unsecure:

```shell
valet unsecure laravel
```

<a name="serving-a-default-site"></a>
### Serving a Default Site

Sometimes, you may wish to configure Valet to serve a "default" site instead of a `404` when visiting an unknown `test` domain. To accomplish this, you may add a `default` option to your `~/.config/valet/config.json` configuration file containing the path to the site that should serve as your default site:

    "default": "/Users/Sally/Sites/example-site",

<a name="per-site-php-versions"></a>
### Per-Site PHP Versions

By default, Valet uses your global PHP installation to serve your sites. However, if you need to support multiple PHP versions across various sites, you may use the `isolate` command to specify which PHP version a particular site should use. The `isolate` command configures Valet to use the specified PHP version for the site located in your current working directory:

```shell
cd ~/Sites/example-site

valet isolate php@8.0
```

If your site name does not match the name of the directory that contains it, you may specify the site name using the `--site` option:

```shell
valet isolate php@8.0 --site="site-name"
```

For convenience, you may use the `valet php`, `composer`, and `which-php` commands to proxy calls to the appropriate PHP CLI or tool based on the site's configured PHP version:

```shell
valet php
valet composer
valet which-php
```

You may execute the `isolated` command to display a list of all of your isolated sites and their PHP versions:

```shell
valet isolated
```

To revert a site back to Valet's globally installed PHP version, you may invoke the `unisolate` command from the site's root directory:

```shell
valet unisolate
```

<a name="sharing-sites"></a>
## Sharing Sites

Valet includes a command to share your local sites with the world, providing an easy way to test your site on mobile devices or share it with team members and clients.

Out of the box, Valet supports sharing your sites via ngrok or Expose. Before sharing a site, you should update your Valet configuration using the `share-tool` command, specifying `ngrok`, `expose`, or `cloudflared`:

```shell
valet share-tool ngrok
```

If you choose a tool and don't have it installed via Homebrew (for ngrok and cloudflared) or Composer (for Expose), Valet will automatically prompt you to install it. Of course, both tools require you to authenticate your ngrok or Expose account before you can start sharing sites.

To share a site, navigate to the site's directory in your terminal and run Valet's `share` command. A publicly accessible URL will be placed into your clipboard and is ready to paste directly into your browser or to be shared with your team:

```shell
cd ~/Sites/laravel

valet share
```

To stop sharing your site, you may press `Control + C`.

> [!WARNING]
> If you're using a custom DNS server (like `1.1.1.1`), ngrok sharing may not work correctly. If this is the case on your machine, open your Mac's system settings, go to the Network settings, open the Advanced settings, then go the DNS tab and add `127.0.0.1` as your first DNS server.

<a name="sharing-sites-via-ngrok"></a>
#### Sharing Sites via Ngrok

Sharing your site using ngrok requires you to [create an ngrok account](https://dashboard.ngrok.com/signup) and [set up an authentication token](https://dashboard.ngrok.com/get-started/your-authtoken). Once you have an authentication token, you can update your Valet configuration with that token:

```shell
valet set-ngrok-token YOUR_TOKEN_HERE
```

> [!NOTE]
> You may pass additional ngrok parameters to the share command, such as `valet share --region=eu`. For more information, consult the [ngrok documentation](https://ngrok.com/docs).

<a name="sharing-sites-via-expose"></a>
#### Sharing Sites via Expose

Sharing your site using Expose requires you to [create an Expose account](https://expose.dev/register) and [authenticate with Expose via your authentication token](https://expose.dev/docs/getting-started/getting-your-token).

You may consult the [Expose documentation](https://expose.dev/docs) for information regarding the additional command-line parameters it supports.

<a name="sharing-sites-on-your-local-network"></a>
### Sharing Sites on Your Local Network

Valet restricts incoming traffic to the internal `127.0.0.1` interface by default so that your development machine isn't exposed to security risks from the Internet.

If you wish to allow other devices on your local network to access the Valet sites on your machine via your machine's IP address (eg: `192.168.1.10/application.test`), you will need to manually edit the appropriate Nginx configuration file for that site to remove the restriction on the `listen` directive. You should remove the `127.0.0.1:` prefix on the `listen` directive for ports 80 and 443.

If you have not run `valet secure` on the project, you can open up network access for all non-HTTPS sites by editing the `/usr/local/etc/nginx/valet/valet.conf` file. However, if you're serving the project site over HTTPS (you have run `valet secure` for the site) then you should edit the `~/.config/valet/Nginx/app-name.test` file.

Once you have updated your Nginx configuration, run the `valet restart` command to apply the configuration changes.

<a name="site-specific-environment-variables"></a>
## Site Specific Environment Variables

Some applications using other frameworks may depend on server environment variables but do not provide a way for those variables to be configured within your project. Valet allows you to configure site specific environment variables by adding a `.valet-env.php` file within the root of your project. This file should return an array of site / environment variable pairs which will be added to the global `$_SERVER` array for each site specified in the array:

```php
<?php

return [
    // Set $_SERVER['key'] to "value" for the laravel.test site...
    'laravel' => [
        'key' => 'value',
    ],

    // Set $_SERVER['key'] to "value" for all sites...
    '*' => [
        'key' => 'value',
    ],
];
```

<a name="proxying-services"></a>
## Proxying Services

Sometimes you may wish to proxy a Valet domain to another service on your local machine. For example, you may occasionally need to run Valet while also running a separate site in Docker; however, Valet and Docker can't both bind to port 80 at the same time.

To solve this, you may use the `proxy` command to generate a proxy. For example, you may proxy all traffic from `http://elasticsearch.test` to `http://127.0.0.1:9200`:

```shell
# Proxy over HTTP...
valet proxy elasticsearch http://127.0.0.1:9200

# Proxy over TLS + HTTP/2...
valet proxy elasticsearch http://127.0.0.1:9200 --secure
```

You may remove a proxy using the `unproxy` command:

```shell
valet unproxy elasticsearch
```

You may use the `proxies` command to list all site configurations that are proxied:

```shell
valet proxies
```

<a name="custom-valet-drivers"></a>
## Custom Valet Drivers

You can write your own Valet "driver" to serve PHP applications running on a framework or CMS that is not natively supported by Valet. When you install Valet, a `~/.config/valet/Drivers` directory is created which contains a `SampleValetDriver.php` file. This file contains a sample driver implementation to demonstrate how to write a custom driver. Writing a driver only requires you to implement three methods: `serves`, `isStaticFile`, and `frontControllerPath`.

All three methods receive the `$sitePath`, `$siteName`, and `$uri` values as their arguments. The `$sitePath` is the fully qualified path to the site being served on your machine, such as `/Users/Lisa/Sites/my-project`. The `$siteName` is the "host" / "site name" portion of the domain (`my-project`). The `$uri` is the incoming request URI (`/foo/bar`).

Once you have completed your custom Valet driver, place it in the `~/.config/valet/Drivers` directory using the `FrameworkValetDriver.php` naming convention. For example, if you are writing a custom valet driver for WordPress, your filename should be `WordPressValetDriver.php`.

Let's take a look at a sample implementation of each method your custom Valet driver should implement.

<a name="the-serves-method"></a>
#### The `serves` Method

The `serves` method should return `true` if your driver should handle the incoming request. Otherwise, the method should return `false`. So, within this method, you should attempt to determine if the given `$sitePath` contains a project of the type you are trying to serve.

For example, let's imagine we are writing a `WordPressValetDriver`. Our `serves` method might look something like this:

```php
/**
 * Determine if the driver serves the request.
 */
public function serves(string $sitePath, string $siteName, string $uri): bool
{
    return is_dir($sitePath.'/wp-admin');
}
```

<a name="the-isstaticfile-method"></a>
#### The `isStaticFile` Method

The `isStaticFile` should determine if the incoming request is for a file that is "static", such as an image or a stylesheet. If the file is static, the method should return the fully qualified path to the static file on disk. If the incoming request is not for a static file, the method should return `false`:

```php
/**
 * Determine if the incoming request is for a static file.
 *
 * @return string|false
 */
public function isStaticFile(string $sitePath, string $siteName, string $uri)
{
    if (file_exists($staticFilePath = $sitePath.'/public/'.$uri)) {
        return $staticFilePath;
    }

    return false;
}
```

> [!WARNING]
> The `isStaticFile` method will only be called if the `serves` method returns `true` for the incoming request and the request URI is not `/`.

<a name="the-frontcontrollerpath-method"></a>
#### The `frontControllerPath` Method

The `frontControllerPath` method should return the fully qualified path to your application's "front controller", which is typically an "index.php" file or equivalent:

```php
/**
 * Get the fully resolved path to the application's front controller.
 */
public function frontControllerPath(string $sitePath, string $siteName, string $uri): string
{
    return $sitePath.'/public/index.php';
}
```

<a name="local-drivers"></a>
### Local Drivers

If you would like to define a custom Valet driver for a single application, create a `LocalValetDriver.php` file in the application's root directory. Your custom driver may extend the base `ValetDriver` class or extend an existing application specific driver such as the `LaravelValetDriver`:

```php
use Valet\Drivers\LaravelValetDriver;

class LocalValetDriver extends LaravelValetDriver
{
    /**
     * Determine if the driver serves the request.
     */
    public function serves(string $sitePath, string $siteName, string $uri): bool
    {
        return true;
    }

    /**
     * Get the fully resolved path to the application's front controller.
     */
    public function frontControllerPath(string $sitePath, string $siteName, string $uri): string
    {
        return $sitePath.'/public_html/index.php';
    }
}
```

<a name="other-valet-commands"></a>
## Other Valet Commands

<div class="overflow-auto">

| Command | Description |
| --- | --- |
| `valet list` | Display a list of all Valet commands. |
| `valet diagnose` | Output diagnostics to aid in debugging Valet. |
| `valet directory-listing` | Determine directory-listing behavior. Default is "off", which renders a 404 page for directories. |
| `valet forget` | Run this command from a "parked" directory to remove it from the parked directory list. |
| `valet log` | View a list of logs which are written by Valet's services. |
| `valet paths` | View all of your "parked" paths. |
| `valet restart` | Restart the Valet daemons. |
| `valet start` | Start the Valet daemons. |
| `valet stop` | Stop the Valet daemons. |
| `valet trust` | Add sudoers files for Brew and Valet to allow Valet commands to be run without prompting for your password. |
| `valet uninstall` | Uninstall Valet: shows instructions for manual uninstall. Pass the `--force` option to aggressively delete all of Valet's resources. |

</div>

<a name="valet-directories-and-files"></a>
## Valet Directories and Files

You may find the following directory and file information helpful while troubleshooting issues with your Valet environment:

#### `~/.config/valet`

Contains all of Valet's configuration. You may wish to maintain a backup of this directory.

#### `~/.config/valet/dnsmasq.d/`

This directory contains DNSMasq's configuration.

#### `~/.config/valet/Drivers/`

This directory contains Valet's drivers. Drivers determine how a particular framework / CMS is served.

#### `~/.config/valet/Nginx/`

This directory contains all of Valet's Nginx site configurations. These files are rebuilt when running the `install` and `secure` commands.

#### `~/.config/valet/Sites/`

This directory contains all of the symbolic links for your [linked projects](#the-link-command).

#### `~/.config/valet/config.json`

This file is Valet's master configuration file.

#### `~/.config/valet/valet.sock`

This file is the PHP-FPM socket used by Valet's Nginx installation. This will only exist if PHP is running properly.

#### `~/.config/valet/Log/fpm-php.www.log`

This file is the user log for PHP errors.

#### `~/.config/valet/Log/nginx-error.log`

This file is the user log for Nginx errors.

#### `/usr/local/var/log/php-fpm.log`

This file is the system log for PHP-FPM errors.

#### `/usr/local/var/log/nginx`

This directory contains the Nginx access and error logs.

#### `/usr/local/etc/php/X.X/conf.d`

This directory contains the `*.ini` files for various PHP configuration settings.

#### `/usr/local/etc/php/X.X/php-fpm.d/valet-fpm.conf`

This file is the PHP-FPM pool configuration file.

#### `~/.composer/vendor/laravel/valet/cli/stubs/secure.valet.conf`

This file is the default Nginx configuration used for building SSL certificates for your sites.

<a name="disk-access"></a>
### Disk Access

Since macOS 10.14, [access to some files and directories is restricted by default](https://manuals.info.apple.com/MANUALS/1000/MA1902/en_US/apple-platform-security-guide.pdf). These restrictions include the Desktop, Documents, and Downloads directories. In addition, network volume and removable volume access is restricted. Therefore, Valet recommends your site folders are located outside of these protected locations.

However, if you wish to serve sites from within one of those locations, you will need to give Nginx "Full Disk Access". Otherwise, you may encounter server errors or other unpredictable behavior from Nginx, especially when serving static assets. Typically, macOS will automatically prompt you to grant Nginx full access to these locations. Or, you may do so manually via `System Preferences` > `Security & Privacy` > `Privacy` and selecting `Full Disk Access`. Next, enable any `nginx` entries in the main window pane.


---

# Validation

*Sección: Laravel | Origen: https://laravel.com/docs/13.x/validation*

- [Introduction](#introduction)
- [Validation Quickstart](#validation-quickstart)
    - [Defining the Routes](#quick-defining-the-routes)
    - [Creating the Controller](#quick-creating-the-controller)
    - [Writing the Validation Logic](#quick-writing-the-validation-logic)
    - [Displaying the Validation Errors](#quick-displaying-the-validation-errors)
    - [Repopulating Forms](#repopulating-forms)
    - [A Note on Optional Fields](#a-note-on-optional-fields)
    - [Validation Error Response Format](#validation-error-response-format)
- [Form Request Validation](#form-request-validation)
    - [Creating Form Requests](#creating-form-requests)
    - [Authorizing Form Requests](#authorizing-form-requests)
    - [Customizing the Error Messages](#customizing-the-error-messages)
    - [Preparing Input for Validation](#preparing-input-for-validation)
- [Manually Creating Validators](#manually-creating-validators)
    - [Automatic Redirection](#automatic-redirection)
    - [Named Error Bags](#named-error-bags)
    - [Customizing the Error Messages](#manual-customizing-the-error-messages)
    - [Performing Additional Validation](#performing-additional-validation)
- [Working With Validated Input](#working-with-validated-input)
- [Working With Error Messages](#working-with-error-messages)
    - [Specifying Custom Messages in Language Files](#specifying-custom-messages-in-language-files)
    - [Specifying Attributes in Language Files](#specifying-attribute-in-language-files)
    - [Specifying Values in Language Files](#specifying-values-in-language-files)
- [Available Validation Rules](#available-validation-rules)
- [Conditionally Adding Rules](#conditionally-adding-rules)
- [Validating Arrays](#validating-arrays)
    - [Validating Nested Array Input](#validating-nested-array-input)
    - [Error Message Indexes and Positions](#error-message-indexes-and-positions)
- [Validating Files](#validating-files)
- [Validating Passwords](#validating-passwords)
- [Custom Validation Rules](#custom-validation-rules)
    - [Using Rule Objects](#using-rule-objects)
    - [Using Closures](#using-closures)
    - [Implicit Rules](#implicit-rules)

<a name="introduction"></a>
## Introduction

Laravel provides several different approaches to validate your application's incoming data. It is most common to use the `validate` method available on all incoming HTTP requests. However, we will discuss other approaches to validation as well.

Laravel includes a wide variety of convenient validation rules that you may apply to data, even providing the ability to validate if values are unique in a given database table. We'll cover each of these validation rules in detail so that you are familiar with all of Laravel's validation features.

<a name="validation-quickstart"></a>
## Validation Quickstart

To learn about Laravel's powerful validation features, let's look at a complete example of validating a form and displaying the error messages back to the user. By reading this high-level overview, you'll be able to gain a good general understanding of how to validate incoming request data using Laravel:

<a name="quick-defining-the-routes"></a>
### Defining the Routes

First, let's assume we have the following routes defined in our `routes/web.php` file:

```php
use App\Http\Controllers\PostController;

Route::get('/post/create', [PostController::class, 'create']);
Route::post('/post', [PostController::class, 'store']);
```

The `GET` route will display a form for the user to create a new blog post, while the `POST` route will store the new blog post in the database.

<a name="quick-creating-the-controller"></a>
### Creating the Controller

Next, let's take a look at a simple controller that handles incoming requests to these routes. We'll leave the `store` method empty for now:

```php
<?php

namespace App\Http\Controllers;

use Illuminate\Http\RedirectResponse;
use Illuminate\Http\Request;
use Illuminate\View\View;

class PostController extends Controller
{
    /**
     * Show the form to create a new blog post.
     */
    public function create(): View
    {
        return view('post.create');
    }

    /**
     * Store a new blog post.
     */
    public function store(Request $request): RedirectResponse
    {
        // Validate and store the blog post...

        $post = /** ... */

        return to_route('post.show', ['post' => $post->id]);
    }
}
```

<a name="quick-writing-the-validation-logic"></a>
### Writing the Validation Logic

Now we are ready to fill in our `store` method with the logic to validate the new blog post. To do this, we will use the `validate` method provided by the `Illuminate\Http\Request` object. If the validation rules pass, your code will keep executing normally; however, if validation fails, an `Illuminate\Validation\ValidationException` exception will be thrown and the proper error response will automatically be sent back to the user.

If validation fails during a traditional HTTP request, a redirect response to the previous URL will be generated. If the incoming request is an XHR request, a [JSON response containing the validation error messages](#validation-error-response-format) will be returned.

To get a better understanding of the `validate` method, let's jump back into the `store` method:

```php
/**
 * Store a new blog post.
 */
public function store(Request $request): RedirectResponse
{
    $validated = $request->validate([
        'title' => ['required', 'unique:posts', 'max:255'],
        'body' => ['required'],
    ]);

    // The blog post is valid...

    return redirect('/posts');
}
```

As you can see, the validation rules are passed into the `validate` method. Don't worry - all available validation rules are [documented](#available-validation-rules). Again, if the validation fails, the proper response will automatically be generated. If the validation passes, our controller will continue executing normally.

In addition, you may use the `validateWithBag` method to validate a request and store any error messages within a [named error bag](#named-error-bags):

```php
$validated = $request->validateWithBag('post', [
    'title' => ['required', 'unique:posts', 'max:255'],
    'body' => ['required'],
]);
```

<a name="stopping-on-first-validation-failure"></a>
#### Stopping on First Validation Failure

Sometimes you may wish to stop running validation rules on an attribute after the first validation failure. To do so, assign the `bail` rule to the attribute:

```php
$request->validate([
    'title' => ['bail', 'required', 'unique:posts', 'max:255'],
    'body' => ['required'],
]);
```

In this example, if the `unique` rule on the `title` attribute fails, the `max` rule will not be checked. Rules will be validated in the order they are assigned.

<a name="a-note-on-nested-attributes"></a>
#### A Note on Nested Attributes

If the incoming HTTP request contains "nested" field data, you may specify these fields in your validation rules using "dot" syntax:

```php
$request->validate([
    'title' => ['required', 'unique:posts', 'max:255'],
    'author.name' => ['required'],
    'author.description' => ['required'],
]);
```

On the other hand, if your field name contains a literal period, you can explicitly prevent this from being interpreted as "dot" syntax by escaping the period with a backslash:

```php
$request->validate([
    'title' => ['required', 'unique:posts', 'max:255'],
    'v1\.0' => ['required'],
]);
```

<a name="quick-displaying-the-validation-errors"></a>
### Displaying the Validation Errors

So, what if the incoming request fields do not pass the given validation rules? As mentioned previously, Laravel will automatically redirect the user back to their previous location. In addition, all of the validation errors and [request input](/docs/{{version}}/requests#retrieving-old-input) will automatically be [flashed to the session](/docs/{{version}}/session#flash-data).

An `$errors` variable is shared with all of your application's views by the `Illuminate\View\Middleware\ShareErrorsFromSession` middleware, which is provided by the `web` middleware group. When this middleware is applied an `$errors` variable will always be available in your views, allowing you to conveniently assume the `$errors` variable is always defined and can be safely used. The `$errors` variable will be an instance of `Illuminate\Support\MessageBag`. For more information on working with this object, [check out its documentation](#working-with-error-messages).

So, in our example, the user will be redirected to our controller's `create` method when validation fails, allowing us to display the error messages in the view:

```blade
<!-- /resources/views/post/create.blade.php -->

<h1>Create Post</h1>

@if ($errors->any())
    <div class="alert alert-danger">
        <ul>
            @foreach ($errors->all() as $error)
                <li>{{ $error }}</li>
            @endforeach
        </ul>
    </div>
@endif

<!-- Create Post Form -->
```

<a name="quick-customizing-the-error-messages"></a>
#### Customizing the Error Messages

Laravel's built-in validation rules each have an error message that is located in your application's `lang/en/validation.php` file. If your application does not have a `lang` directory, you may instruct Laravel to create it using the `lang:publish` Artisan command.

Within the `lang/en/validation.php` file, you will find a translation entry for each validation rule. You are free to change or modify these messages based on the needs of your application.

In addition, you may copy this file to another language directory to translate the messages for your application's language. To learn more about Laravel localization, check out the complete [localization documentation](/docs/{{version}}/localization).

> [!WARNING]
> By default, the Laravel application skeleton does not include the `lang` directory. If you would like to customize Laravel's language files, you may publish them via the `lang:publish` Artisan command.

<a name="quick-xhr-requests-and-validation"></a>
#### XHR Requests and Validation

In this example, we used a traditional form to send data to the application. However, many applications receive XHR requests from a JavaScript powered frontend. When using the `validate` method during an XHR request, Laravel will not generate a redirect response. Instead, Laravel generates a [JSON response containing all of the validation errors](#validation-error-response-format). This JSON response will be sent with a 422 HTTP status code.

<a name="the-at-error-directive"></a>
#### The `@error` Directive

You may use the `@error` [Blade](/docs/{{version}}/blade) directive to quickly determine if validation error messages exist for a given attribute. Within an `@error` directive, you may echo the `$message` variable to display the error message:

```blade
<!-- /resources/views/post/create.blade.php -->

<label for="title">Post Title</label>

<input
    id="title"
    type="text"
    name="title"
    class="@error('title') is-invalid @enderror"
/>

@error('title')
    <div class="alert alert-danger">{{ $message }}</div>
@enderror
```

If you are using [named error bags](#named-error-bags), you may pass the name of the error bag as the second argument to the `@error` directive:

```blade
<input ... class="@error('title', 'post') is-invalid @enderror">
```

<a name="repopulating-forms"></a>
### Repopulating Forms

When Laravel generates a redirect response due to a validation error, the framework will automatically [flash all of the request's input to the session](/docs/{{version}}/session#flash-data). This is done so that you may conveniently access the input during the next request and repopulate the form that the user attempted to submit.

To retrieve flashed input from the previous request, invoke the `old` method on an instance of `Illuminate\Http\Request`. The `old` method will pull the previously flashed input data from the [session](/docs/{{version}}/session):

```php
$title = $request->old('title');
```

Laravel also provides a global `old` helper. If you are displaying old input within a [Blade template](/docs/{{version}}/blade), it is more convenient to use the `old` helper to repopulate the form. If no old input exists for the given field, `null` will be returned:

```blade
<input type="text" name="title" value="{{ old('title') }}">
```

<a name="a-note-on-optional-fields"></a>
### A Note on Optional Fields

By default, Laravel includes the `TrimStrings` and `ConvertEmptyStringsToNull` middleware in your application's global middleware stack. Because of this, you will often need to mark your "optional" request fields as `nullable` if you do not want the validator to consider `null` values as invalid. For example:

```php
$request->validate([
    'title' => ['required', 'unique:posts', 'max:255'],
    'body' => ['required'],
    'publish_at' => ['nullable', 'date'],
]);
```

In this example, we are specifying that the `publish_at` field may be either `null` or a valid date representation. If the `nullable` modifier is not added to the rule definition, the validator would consider `null` an invalid date.

<a name="validation-error-response-format"></a>
### Validation Error Response Format

When your application throws a `Illuminate\Validation\ValidationException` exception and the incoming HTTP request is expecting a JSON response, Laravel will automatically format the error messages for you and return a `422 Unprocessable Entity` HTTP response.

Below, you can review an example of the JSON response format for validation errors. Note that nested error keys are flattened into "dot" notation format:

```json
{
    "message": "The team name must be a string. (and 4 more errors)",
    "errors": {
        "team_name": [
            "The team name must be a string.",
            "The team name must be at least 1 characters."
        ],
        "authorization.role": [
            "The selected authorization.role is invalid."
        ],
        "users.0.email": [
            "The users.0.email field is required."
        ],
        "users.2.email": [
            "The users.2.email must be a valid email address."
        ]
    }
}
```

<a name="form-request-validation"></a>
## Form Request Validation

<a name="creating-form-requests"></a>
### Creating Form Requests

For more complex validation scenarios, you may wish to create a "form request". Form requests are custom request classes that encapsulate their own validation and authorization logic. To create a form request class, you may use the `make:request` Artisan CLI command:

```shell
php artisan make:request StorePostRequest
```

The generated form request class will be placed in the `app/Http/Requests` directory. If this directory does not exist, it will be created when you run the `make:request` command. Each form request generated by Laravel has two methods: `authorize` and `rules`.

As you might have guessed, the `authorize` method is responsible for determining if the currently authenticated user can perform the action represented by the request, while the `rules` method returns the validation rules that should apply to the request's data:

```php
/**
 * Get the validation rules that apply to the request.
 *
 * @return array<string, \Illuminate\Contracts\Validation\ValidationRule|array<mixed>|string>
 */
public function rules(): array
{
    return [
        'title' => ['required', 'unique:posts', 'max:255'],
        'body' => ['required'],
    ];
}
```

> [!NOTE]
> You may type-hint any dependencies you require within the `rules` method's signature. They will automatically be resolved via the Laravel [service container](/docs/{{version}}/container).

So, how are the validation rules evaluated? All you need to do is type-hint the request on your controller method. The incoming form request is validated before the controller method is called, meaning you do not need to clutter your controller with any validation logic:

```php
/**
 * Store a new blog post.
 */
public function store(StorePostRequest $request): RedirectResponse
{
    // The incoming request is valid...

    // Retrieve the validated input data...
    $validated = $request->validated();

    // Retrieve a portion of the validated input data...
    $validated = $request->safe()->only(['name', 'email']);
    $validated = $request->safe()->except(['name', 'email']);

    // Store the blog post...

    return redirect('/posts');
}
```

If validation fails, a redirect response will be generated to send the user back to their previous location. The errors will also be flashed to the session so they are available for display. If the request was an XHR request, an HTTP response with a 422 status code will be returned to the user including a [JSON representation of the validation errors](#validation-error-response-format).

> [!NOTE]
> Need to add real-time form request validation to your Inertia powered Laravel frontend? Check out [Laravel Precognition](/docs/{{version}}/precognition).

<a name="performing-additional-validation-on-form-requests"></a>
#### Performing Additional Validation

Sometimes you need to perform additional validation after your initial validation is complete. You can accomplish this using the form request's `after` method.

The `after` method should return an array of callables or closures which will be invoked after validation is complete. The given callables will receive an `Illuminate\Validation\Validator` instance, allowing you to raise additional error messages if necessary:

```php
use Illuminate\Validation\Validator;

/**
 * Get the "after" validation callables for the request.
 */
public function after(): array
{
    return [
        function (Validator $validator) {
            if ($this->somethingElseIsInvalid()) {
                $validator->errors()->add(
                    'field',
                    'Something is wrong with this field!'
                );
            }
        }
    ];
}
```

As noted, the array returned by the `after` method may also contain invokable classes. The `__invoke` method of these classes will receive an `Illuminate\Validation\Validator` instance:

```php
use App\Validation\ValidateShippingTime;
use App\Validation\ValidateUserStatus;
use Illuminate\Validation\Validator;

/**
 * Get the "after" validation callables for the request.
 */
public function after(): array
{
    return [
        new ValidateUserStatus,
        new ValidateShippingTime,
        function (Validator $validator) {
            //
        }
    ];
}
```

<a name="request-stopping-on-first-validation-rule-failure"></a>
#### Stopping on the First Validation Failure

By adding the `StopOnFirstFailure` attribute to your request class, you may inform the validator that it should stop validating all attributes once a single validation failure has occurred:

```php
<?php

namespace App\Http\Requests;

use Illuminate\Foundation\Http\Attributes\StopOnFirstFailure;
use Illuminate\Foundation\Http\FormRequest;

#[StopOnFirstFailure]
class StorePostRequest extends FormRequest
{
    // ...
}
```

<a name="request-failing-on-unknown-fields"></a>
#### Failing on Unknown Fields

By adding the `FailOnUnknownFields` attribute to your request class, you may instruct Laravel to reject any incoming fields that are not defined by your request's validation rules:

```php
<?php

namespace App\Http\Requests;

use Illuminate\Foundation\Http\Attributes\FailOnUnknownFields;
use Illuminate\Foundation\Http\FormRequest;

#[FailOnUnknownFields]
class StorePostRequest extends FormRequest
{
    public function rules(): array
    {
        return [
            'title' => ['required', 'string'],
            'body' => ['required', 'string'],
        ];
    }
}
```

You may also enable this behavior globally for all form requests from your `AppServiceProvider`:

```php
use Illuminate\Foundation\Http\FormRequest;

/**
 * Bootstrap any application services.
 */
public function boot(): void
{
    FormRequest::failOnUnknownFields();
}
```

If needed, you may disable this behavior for a specific request by passing `false` to the attribute:

```php
#[FailOnUnknownFields(false)]
class PublicWebhookRequest extends FormRequest
{
    // ...
}
```

Rejecting unknown fields can provide additional protection against mass-assignment style issues by preventing unexpected input keys from flowing deeper into your application. However, you should still configure your model's `$fillable` / `$guarded` properties and only persist trusted, validated input.

<a name="customizing-the-redirect-location"></a>
#### Customizing the Redirect Location

When form request validation fails, a redirect response will be generated to send the user back to their previous location. However, you are free to customize this behavior. To do so, you may use the `RedirectTo` attribute on your form request:

```php
<?php

namespace App\Http\Requests;

use Illuminate\Foundation\Http\Attributes\RedirectTo;
use Illuminate\Foundation\Http\FormRequest;

#[RedirectTo('/dashboard')]
class StorePostRequest extends FormRequest
{
    // ...
}
```

Or, if you would like to redirect users to a named route, you may use the `RedirectToRoute` attribute instead:

```php
<?php

namespace App\Http\Requests;

use Illuminate\Foundation\Http\Attributes\RedirectToRoute;
use Illuminate\Foundation\Http\FormRequest;

#[RedirectToRoute('dashboard')]
class StorePostRequest extends FormRequest
{
    // ...
}
```

<a name="customizing-the-error-bag"></a>
#### Customizing the Error Bag

When form request validation fails, the errors are flashed to the `default` error bag. If you need to store the errors in a different [named error bag](#named-error-bags), you may use the `ErrorBag` attribute on your form request:

```php
<?php

namespace App\Http\Requests;

use Illuminate\Foundation\Http\Attributes\ErrorBag;
use Illuminate\Foundation\Http\FormRequest;

#[ErrorBag('login')]
class LoginRequest extends FormRequest
{
    // ...
}
```

<a name="authorizing-form-requests"></a>
### Authorizing Form Requests

The form request class also contains an `authorize` method. Within this method, you may determine if the authenticated user actually has the authority to update a given resource. For example, you may determine if a user actually owns a blog comment they are attempting to update. Most likely, you will interact with your [authorization gates and policies](/docs/{{version}}/authorization) within this method:

```php
use App\Models\Comment;

/**
 * Determine if the user is authorized to make this request.
 */
public function authorize(): bool
{
    $comment = Comment::find($this->route('comment'));

    return $comment && $this->user()->can('update', $comment);
}
```

Since all form requests extend the base Laravel request class, we may use the `user` method to access the currently authenticated user. Also, note the call to the `route` method in the example above. This method grants you access to the URI parameters defined on the route being called, such as the `{comment}` parameter in the example below:

```php
Route::post('/comment/{comment}');
```

Therefore, if your application is taking advantage of [route model binding](/docs/{{version}}/routing#route-model-binding), your code may be made even more succinct by accessing the resolved model as a property of the request:

```php
return $this->user()->can('update', $this->comment);
```

If the `authorize` method returns `false`, an HTTP response with a 403 status code will automatically be returned and your controller method will not execute.

If you plan to handle authorization logic for the request in another part of your application, you may remove the `authorize` method completely, or simply return `true`:

```php
/**
 * Determine if the user is authorized to make this request.
 */
public function authorize(): bool
{
    return true;
}
```

> [!NOTE]
> You may type-hint any dependencies you need within the `authorize` method's signature. They will automatically be resolved via the Laravel [service container](/docs/{{version}}/container).

<a name="customizing-the-error-messages"></a>
### Customizing the Error Messages

You may customize the error messages used by the form request by overriding the `messages` method. This method should return an array of attribute / rule pairs and their corresponding error messages:

```php
/**
 * Get the error messages for the defined validation rules.
 *
 * @return array<string, string>
 */
public function messages(): array
{
    return [
        'title.required' => 'A title is required',
        'body.required' => 'A message is required',
    ];
}
```

<a name="customizing-the-validation-attributes"></a>
#### Customizing the Validation Attributes

Many of Laravel's built-in validation rule error messages contain an `:attribute` placeholder. If you would like the `:attribute` placeholder of your validation message to be replaced with a custom attribute name, you may specify the custom names by overriding the `attributes` method. This method should return an array of attribute / name pairs:

```php
/**
 * Get custom attributes for validator errors.
 *
 * @return array<string, string>
 */
public function attributes(): array
{
    return [
        'email' => 'email address',
    ];
}
```

<a name="preparing-input-for-validation"></a>
### Preparing Input for Validation

If you need to prepare or sanitize any data from the request before you apply your validation rules, you may use the `prepareForValidation` method:

```php
use Illuminate\Support\Str;

/**
 * Prepare the data for validation.
 */
protected function prepareForValidation(): void
{
    $this->merge([
        'slug' => Str::slug($this->slug),
    ]);
}
```

Likewise, if you need to normalize any request data after validation is complete, you may use the `passedValidation` method:

```php
/**
 * Handle a passed validation attempt.
 */
protected function passedValidation(): void
{
    $this->replace(['name' => 'Taylor']);
}
```

<a name="manually-creating-validators"></a>
## Manually Creating Validators

If you do not want to use the `validate` method on the request, you may create a validator instance manually using the `Validator` [facade](/docs/{{version}}/facades). The `make` method on the facade generates a new validator instance:

```php
<?php

namespace App\Http\Controllers;

use Illuminate\Http\RedirectResponse;
use Illuminate\Http\Request;
use Illuminate\Support\Facades\Validator;

class PostController extends Controller
{
    /**
     * Store a new blog post.
     */
    public function store(Request $request): RedirectResponse
    {
        $validator = Validator::make($request->all(), [
            'title' => ['required', 'unique:posts', 'max:255'],
            'body' => ['required'],
        ]);

        if ($validator->fails()) {
            return redirect('/post/create')
                ->withErrors($validator)
                ->withInput();
        }

        // Retrieve the validated input...
        $validated = $validator->validated();

        // Retrieve a portion of the validated input...
        $validated = $validator->safe()->only(['name', 'email']);
        $validated = $validator->safe()->except(['name', 'email']);

        // Store the blog post...

        return redirect('/posts');
    }
}
```

The first argument passed to the `make` method is the data under validation. The second argument is an array of the validation rules that should be applied to the data.

After determining whether the request validation failed, you may use the `withErrors` method to flash the error messages to the session. When using this method, the `$errors` variable will automatically be shared with your views after redirection, allowing you to easily display them back to the user. The `withErrors` method accepts a validator, a `MessageBag`, or a PHP `array`.

#### Stopping on First Validation Failure

The `stopOnFirstFailure` method will inform the validator that it should stop validating all attributes once a single validation failure has occurred:

```php
if ($validator->stopOnFirstFailure()->fails()) {
    // ...
}
```

<a name="automatic-redirection"></a>
### Automatic Redirection

If you would like to create a validator instance manually but still take advantage of the automatic redirection offered by the HTTP request's `validate` method, you may call the `validate` method on an existing validator instance. If validation fails, the user will automatically be redirected or, in the case of an XHR request, a [JSON response will be returned](#validation-error-response-format):

```php
Validator::make($request->all(), [
    'title' => ['required', 'unique:posts', 'max:255'],
    'body' => ['required'],
])->validate();
```

You may use the `validateWithBag` method to store the error messages in a [named error bag](#named-error-bags) if validation fails:

```php
Validator::make($request->all(), [
    'title' => ['required', 'unique:posts', 'max:255'],
    'body' => ['required'],
])->validateWithBag('post');
```

<a name="named-error-bags"></a>
### Named Error Bags

If you have multiple forms on a single page, you may wish to name the `MessageBag` containing the validation errors, allowing you to retrieve the error messages for a specific form. To achieve this, pass a name as the second argument to `withErrors`:

```php
return redirect('/register')->withErrors($validator, 'login');
```

You may then access the named `MessageBag` instance from the `$errors` variable:

```blade
{{ $errors->login->first('email') }}
```

<a name="manual-customizing-the-error-messages"></a>
### Customizing the Error Messages

If needed, you may provide custom error messages that a validator instance should use instead of the default error messages provided by Laravel. There are several ways to specify custom messages. First, you may pass the custom messages as the third argument to the `Validator::make` method:

```php
$validator = Validator::make($input, $rules, $messages = [
    'required' => 'The :attribute field is required.',
]);
```

In this example, the `:attribute` placeholder will be replaced by the actual name of the field under validation. You may also utilize other placeholders in validation messages. For example:

```php
$messages = [
    'same' => 'The :attribute and :other must match.',
    'size' => 'The :attribute must be exactly :size.',
    'between' => 'The :attribute value :input is not between :min - :max.',
    'in' => 'The :attribute must be one of the following types: :values',
];
```

<a name="specifying-a-custom-message-for-a-given-attribute"></a>
#### Specifying a Custom Message for a Given Attribute

Sometimes you may wish to specify a custom error message only for a specific attribute. You may do so using "dot" notation. Specify the attribute's name first, followed by the rule:

```php
$messages = [
    'email.required' => 'We need to know your email address!',
];
```

<a name="specifying-custom-attribute-values"></a>
#### Specifying Custom Attribute Values

Many of Laravel's built-in error messages include an `:attribute` placeholder that is replaced with the name of the field or attribute under validation. To customize the values used to replace these placeholders for specific fields, you may pass an array of custom attributes as the fourth argument to the `Validator::make` method:

```php
$validator = Validator::make($input, $rules, $messages, [
    'email' => 'email address',
]);
```

<a name="performing-additional-validation"></a>
### Performing Additional Validation

Sometimes you need to perform additional validation after your initial validation is complete. You can accomplish this using the validator's `after` method. The `after` method accepts a closure or an array of callables which will be invoked after validation is complete. The given callables will receive an `Illuminate\Validation\Validator` instance, allowing you to raise additional error messages if necessary:

```php
use Illuminate\Support\Facades\Validator;

$validator = Validator::make(/* ... */);

$validator->after(function ($validator) {
    if ($this->somethingElseIsInvalid()) {
        $validator->errors()->add(
            'field', 'Something is wrong with this field!'
        );
    }
});

if ($validator->fails()) {
    // ...
}
```

As noted, the `after` method also accepts an array of callables, which is particularly convenient if your "after validation" logic is encapsulated in invokable classes, which will receive an `Illuminate\Validation\Validator` instance via their `__invoke` method:

```php
use App\Validation\ValidateShippingTime;
use App\Validation\ValidateUserStatus;

$validator->after([
    new ValidateUserStatus,
    new ValidateShippingTime,
    function ($validator) {
        // ...
    },
]);
```

<a name="working-with-validated-input"></a>
## Working With Validated Input

After validating incoming request data using a form request or a manually created validator instance, you may wish to retrieve the incoming request data that actually underwent validation. This can be accomplished in several ways. First, you may call the `validated` method on a form request or validator instance. This method returns an array of the data that was validated:

```php
$validated = $request->validated();

$validated = $validator->validated();
```

Alternatively, you may call the `safe` method on a form request or validator instance. This method returns an instance of `Illuminate\Support\ValidatedInput`. This object exposes `only`, `except`, and `all` methods to retrieve a subset of the validated data or the entire array of validated data:

```php
$validated = $request->safe()->only(['name', 'email']);

$validated = $request->safe()->except(['name', 'email']);

$validated = $request->safe()->all();
```

In addition, the `Illuminate\Support\ValidatedInput` instance may be iterated over and accessed like an array:

```php
// Validated data may be iterated...
foreach ($request->safe() as $key => $value) {
    // ...
}

// Validated data may be accessed as an array...
$validated = $request->safe();

$email = $validated['email'];
```

If you would like to add additional fields to the validated data, you may call the `merge` method:

```php
$validated = $request->safe()->merge(['name' => 'Taylor Otwell']);
```

If you would like to retrieve the validated data as a [collection](/docs/{{version}}/collections) instance, you may call the `collect` method:

```php
$collection = $request->safe()->collect();
```

<a name="working-with-error-messages"></a>
## Working With Error Messages

After calling the `errors` method on a `Validator` instance, you will receive an `Illuminate\Support\MessageBag` instance, which has a variety of convenient methods for working with error messages. The `$errors` variable that is automatically made available to all views is also an instance of the `MessageBag` class.

<a name="retrieving-the-first-error-message-for-a-field"></a>
#### Retrieving the First Error Message for a Field

To retrieve the first error message for a given field, use the `first` method:

```php
$errors = $validator->errors();

echo $errors->first('email');
```

<a name="retrieving-all-error-messages-for-a-field"></a>
#### Retrieving All Error Messages for a Field

If you need to retrieve an array of all the messages for a given field, use the `get` method:

```php
foreach ($errors->get('email') as $message) {
    // ...
}
```

If you are validating an array form field, you may retrieve all of the messages for each of the array elements using the `*` character:

```php
foreach ($errors->get('attachments.*') as $message) {
    // ...
}
```

<a name="retrieving-all-error-messages-for-all-fields"></a>
#### Retrieving All Error Messages for All Fields

To retrieve an array of all messages for all fields, use the `all` method:

```php
foreach ($errors->all() as $message) {
    // ...
}
```

<a name="determining-if-messages-exist-for-a-field"></a>
#### Determining if Messages Exist for a Field

The `has` method may be used to determine if any error messages exist for a given field:

```php
if ($errors->has('email')) {
    // ...
}
```

<a name="specifying-custom-messages-in-language-files"></a>
### Specifying Custom Messages in Language Files

Laravel's built-in validation rules each have an error message that is located in your application's `lang/en/validation.php` file. If your application does not have a `lang` directory, you may instruct Laravel to create it using the `lang:publish` Artisan command.

Within the `lang/en/validation.php` file, you will find a translation entry for each validation rule. You are free to change or modify these messages based on the needs of your application.

In addition, you may copy this file to another language directory to translate the messages for your application's language. To learn more about Laravel localization, check out the complete [localization documentation](/docs/{{version}}/localization).

> [!WARNING]
> By default, the Laravel application skeleton does not include the `lang` directory. If you would like to customize Laravel's language files, you may publish them via the `lang:publish` Artisan command.

<a name="custom-messages-for-specific-attributes"></a>
#### Custom Messages for Specific Attributes

You may customize the error messages used for specified attribute and rule combinations within your application's validation language files. To do so, add your message customizations to the `custom` array of your application's `lang/xx/validation.php` language file:

```php
'custom' => [
    'email' => [
        'required' => 'We need to know your email address!',
        'max' => 'Your email address is too long!'
    ],
],
```

<a name="specifying-attribute-in-language-files"></a>
### Specifying Attributes in Language Files

Many of Laravel's built-in error messages include an `:attribute` placeholder that is replaced with the name of the field or attribute under validation. If you would like the `:attribute` portion of your validation message to be replaced with a custom value, you may specify the custom attribute name in the `attributes` array of your `lang/xx/validation.php` language file:

```php
'attributes' => [
    'email' => 'email address',
],
```

> [!WARNING]
> By default, the Laravel application skeleton does not include the `lang` directory. If you would like to customize Laravel's language files, you may publish them via the `lang:publish` Artisan command.

<a name="specifying-values-in-language-files"></a>
### Specifying Values in Language Files

Some of Laravel's built-in validation rule error messages contain a `:value` placeholder that is replaced with the current value of the request attribute. However, you may occasionally need the `:value` portion of your validation message to be replaced with a custom representation of the value. For example, consider the following rule that specifies that a credit card number is required if the `payment_type` has a value of `cc`:

```php
Validator::make($request->all(), [
    'credit_card_number' => ['required_if:payment_type,cc']
]);
```

If this validation rule fails, it will produce the following error message:

```text
The credit card number field is required when payment type is cc.
```

Instead of displaying `cc` as the payment type value, you may specify a more user-friendly value representation in your `lang/xx/validation.php` language file by defining a `values` array:

```php
'values' => [
    'payment_type' => [
        'cc' => 'credit card'
    ],
],
```

> [!WARNING]
> By default, the Laravel application skeleton does not include the `lang` directory. If you would like to customize Laravel's language files, you may publish them via the `lang:publish` Artisan command.

After defining this value, the validation rule will produce the following error message:

```text
The credit card number field is required when payment type is credit card.
```

<a name="available-validation-rules"></a>
## Available Validation Rules

Below is a list of all available validation rules and their function:

<style>
    .collection-method-list > p {
        columns: 10.8em 3; -moz-columns: 10.8em 3; -webkit-columns: 10.8em 3;
    }

    .collection-method-list a {
        display: block;
        overflow: hidden;
        text-overflow: ellipsis;
        white-space: nowrap;
    }
</style>

#### Booleans

<div class="collection-method-list" markdown="1">

[Accepted](#rule-accepted)
[Accepted If](#rule-accepted-if)
[Boolean](#rule-boolean)
[Declined](#rule-declined)
[Declined If](#rule-declined-if)

</div>

#### Strings

<div class="collection-method-list" markdown="1">

[Active URL](#rule-active-url)
[Alpha](#rule-alpha)
[Alpha Dash](#rule-alpha-dash)
[Alpha Numeric](#rule-alpha-num)
[Ascii](#rule-ascii)
[Confirmed](#rule-confirmed)
[Current Password](#rule-current-password)
[Different](#rule-different)
[Doesnt Start With](#rule-doesnt-start-with)
[Doesnt End With](#rule-doesnt-end-with)
[Email](#rule-email)
[Ends With](#rule-ends-with)
[Enum](#rule-enum)
[Hex Color](#rule-hex-color)
[In](#rule-in)
[IP Address](#rule-ip)
[JSON](#rule-json)
[Lowercase](#rule-lowercase)
[MAC Address](#rule-mac)
[Max](#rule-max)
[Min](#rule-min)
[Not In](#rule-not-in)
[Regular Expression](#rule-regex)
[Not Regular Expression](#rule-not-regex)
[Same](#rule-same)
[Size](#rule-size)
[Starts With](#rule-starts-with)
[String](#rule-string)
[Uppercase](#rule-uppercase)
[URL](#rule-url)
[ULID](#rule-ulid)
[UUID](#rule-uuid)

</div>

#### Numbers

<div class="collection-method-list" markdown="1">

[Between](#rule-between)
[Decimal](#rule-decimal)
[Different](#rule-different)
[Digits](#rule-digits)
[Digits Between](#rule-digits-between)
[Greater Than](#rule-gt)
[Greater Than Or Equal](#rule-gte)
[Integer](#rule-integer)
[Less Than](#rule-lt)
[Less Than Or Equal](#rule-lte)
[Max](#rule-max)
[Max Digits](#rule-max-digits)
[Min](#rule-min)
[Min Digits](#rule-min-digits)
[Multiple Of](#rule-multiple-of)
[Numeric](#rule-numeric)
[Same](#rule-same)
[Size](#rule-size)

</div>

#### Arrays

<div class="collection-method-list" markdown="1">

[Array](#rule-array)
[Array Keys](#rule-array-keys)
[Between](#rule-between)
[Contains](#rule-contains)
[Doesnt Contain](#rule-doesnt-contain)
[Distinct](#rule-distinct)
[In Array](#rule-in-array)
[In Array Keys](#rule-in-array-keys)
[List](#rule-list)
[Max](#rule-max)
[Min](#rule-min)
[Size](#rule-size)

</div>

#### Dates

<div class="collection-method-list" markdown="1">

[After](#rule-after)
[After Or Equal](#rule-after-or-equal)
[Before](#rule-before)
[Before Or Equal](#rule-before-or-equal)
[Date](#rule-date)
[Date Equals](#rule-date-equals)
[Date Format](#rule-date-format)
[Different](#rule-different)
[Timezone](#rule-timezone)

</div>

#### Files

<div class="collection-method-list" markdown="1">

[Between](#rule-between)
[Dimensions](#rule-dimensions)
[Encoding](#rule-encoding)
[Extensions](#rule-extensions)
[File](#rule-file)
[Image](#rule-image)
[Max](#rule-max)
[Min](#rule-min)
[MIME Types](#rule-mimetypes)
[MIME Type By File Extension](#rule-mimes)
[Size](#rule-size)

</div>

#### Database

<div class="collection-method-list" markdown="1">

[Exists](#rule-exists)
[Unique](#rule-unique)

</div>

#### Utilities

<div class="collection-method-list" markdown="1">

[Any Of](#rule-anyof)
[Bail](#rule-bail)
[Exclude](#rule-exclude)
[Exclude If](#rule-exclude-if)
[Exclude Unless](#rule-exclude-unless)
[Exclude With](#rule-exclude-with)
[Exclude Without](#rule-exclude-without)
[Filled](#rule-filled)
[Missing](#rule-missing)
[Missing If](#rule-missing-if)
[Missing Unless](#rule-missing-unless)
[Missing With](#rule-missing-with)
[Missing With All](#rule-missing-with-all)
[Nullable](#rule-nullable)
[Present](#rule-present)
[Present If](#rule-present-if)
[Present Unless](#rule-present-unless)
[Present With](#rule-present-with)
[Present With All](#rule-present-with-all)
[Prohibited](#rule-prohibited)
[Prohibited If](#rule-prohibited-if)
[Prohibited If Accepted](#rule-prohibited-if-accepted)
[Prohibited If Declined](#rule-prohibited-if-declined)
[Prohibited Unless](#rule-prohibited-unless)
[Prohibits](#rule-prohibits)
[Required](#rule-required)
[Required If](#rule-required-if)
[Required If Accepted](#rule-required-if-accepted)
[Required If Declined](#rule-required-if-declined)
[Required Unless](#rule-required-unless)
[Required With](#rule-required-with)
[Required With All](#rule-required-with-all)
[Required Without](#rule-required-without)
[Required Without All](#rule-required-without-all)
[Required Array Keys](#rule-required-array-keys)
[Sometimes](#validating-when-present)

</div>

<a name="rule-accepted"></a>
#### accepted

The field under validation must be `"yes"`, `"on"`, `1`, `"1"`, `true`, or `"true"`. This is useful for validating "Terms of Service" acceptance or similar fields.

<a name="rule-accepted-if"></a>
#### accepted_if:anotherfield,value,...

The field under validation must be `"yes"`, `"on"`, `1`, `"1"`, `true`, or `"true"` if another field under validation is equal to a specified value. This is useful for validating "Terms of Service" acceptance or similar fields.

<a name="rule-active-url"></a>
#### active_url

The field under validation must have a valid A or AAAA record according to the `dns_get_record` PHP function. The hostname of the provided URL is extracted using the `parse_url` PHP function before being passed to `dns_get_record`.

When testing validation rules that perform DNS lookups, such as `active_url` and `email:dns`, you may use the `Validator::fakeDnsLookups` method. This fakes DNS lookups while preserving the rules' other validation behavior:

```php
use Illuminate\Support\Facades\Validator;

Validator::fakeDnsLookups();
```

<a name="rule-after"></a>
#### after:_date_

The field under validation must be a value after a given date. The dates will be passed into the `strtotime` PHP function in order to be converted to a valid `DateTime` instance:

```php
'start_date' => ['required', 'date', 'after:tomorrow']
```

Instead of passing a date string to be evaluated by `strtotime`, you may specify another field to compare against the date:

```php
'finish_date' => ['required', 'date', 'after:start_date']
```

For convenience, date-based rules may be constructed using the fluent `date` rule builder:

```php
use Illuminate\Validation\Rule;

'start_date' => [
    'required',
    Rule::date()->after(today()->addDays(7)),
],
```

The `afterToday` and `todayOrAfter` methods may be used to fluently express the date and must be after today, or today or after, respectively:

```php
'start_date' => [
    'required',
    Rule::date()->afterToday(),
],
```

<a name="rule-after-or-equal"></a>
#### after\_or\_equal:_date_

The field under validation must be a value after or equal to the given date. For more information, see the [after](#rule-after) rule.

For convenience, date-based rules may be constructed using the fluent `date` rule builder:

```php
use Illuminate\Validation\Rule;

'start_date' => [
    'required',
    Rule::date()->afterOrEqual(today()->addDays(7)),
],
```

<a name="rule-anyof"></a>
#### anyOf

The `Rule::anyOf` validation rule allows you to specify that the field under validation must satisfy any of the given validation rulesets. For example, the following rule will validate that the `username` field is either an email address or an alpha-numeric string (including dashes) that is at least 6 characters long:

```php
use Illuminate\Validation\Rule;

'username' => [
    'required',
    Rule::anyOf([
        ['string', 'email'],
        ['string', 'alpha_dash', 'min:6'],
    ]),
],
```

<a name="rule-alpha"></a>
#### alpha

The field under validation must be entirely Unicode alphabetic characters contained in [\p{L}](https://util.unicode.org/UnicodeJsps/list-unicodeset.jsp?a=%5B%3AL%3A%5D&g=&i=) and [\p{M}](https://util.unicode.org/UnicodeJsps/list-unicodeset.jsp?a=%5B%3AM%3A%5D&g=&i=).

To restrict this validation rule to characters in the ASCII range (`a-z` and `A-Z`), you may provide the `ascii` option to the validation rule:

```php
'username' => ['alpha:ascii'],
```

<a name="rule-alpha-dash"></a>
#### alpha_dash

The field under validation must be entirely Unicode alpha-numeric characters contained in [\p{L}](https://util.unicode.org/UnicodeJsps/list-unicodeset.jsp?a=%5B%3AL%3A%5D&g=&i=), [\p{M}](https://util.unicode.org/UnicodeJsps/list-unicodeset.jsp?a=%5B%3AM%3A%5D&g=&i=), [\p{N}](https://util.unicode.org/UnicodeJsps/list-unicodeset.jsp?a=%5B%3AN%3A%5D&g=&i=), as well as ASCII dashes (`-`) and ASCII underscores (`_`).

To restrict this validation rule to characters in the ASCII range (`a-z`, `A-Z`, and `0-9`), you may provide the `ascii` option to the validation rule:

```php
'username' => ['alpha_dash:ascii'],
```

<a name="rule-alpha-num"></a>
#### alpha_num

The field under validation must be entirely Unicode alpha-numeric characters contained in [\p{L}](https://util.unicode.org/UnicodeJsps/list-unicodeset.jsp?a=%5B%3AL%3A%5D&g=&i=), [\p{M}](https://util.unicode.org/UnicodeJsps/list-unicodeset.jsp?a=%5B%3AM%3A%5D&g=&i=), and [\p{N}](https://util.unicode.org/UnicodeJsps/list-unicodeset.jsp?a=%5B%3AN%3A%5D&g=&i=).

To restrict this validation rule to characters in the ASCII range (`a-z`, `A-Z`, and `0-9`), you may provide the `ascii` option to the validation rule:

```php
'username' => ['alpha_num:ascii'],
```

<a name="rule-array"></a>
#### array

The field under validation must be a PHP `array`.

When additional values are provided to the `array` rule, each key in the input array must be present within the list of values provided to the rule. In the following example, the `admin` key in the input array is invalid since it is not contained in the list of values provided to the `array` rule:

```php
use Illuminate\Support\Facades\Validator;

$input = [
    'user' => [
        'name' => 'Taylor Otwell',
        'username' => 'taylorotwell',
        'admin' => true,
    ],
];

Validator::make($input, [
    'user' => ['array:name,username'],
]);
```

In general, you should always specify the array keys that are allowed to be present within your array.

<a name="rule-array-keys"></a>
#### array_keys:_foo_,_bar_,...

The field under validation must be a PHP `array` whose keys are all included in the given list. At least one key must be provided:

```php
'user' => ['array_keys:name,username'],
```

For convenience, you may use the `Rule::arrayKeys` method:

```php
'user' => [Rule::arrayKeys('name', 'username')],
```

<a name="rule-ascii"></a>
#### ascii

The field under validation must be entirely 7-bit ASCII characters.

<a name="rule-bail"></a>
#### bail

Stop running validation rules for the field after the first validation failure.

While the `bail` rule will only stop validating a specific field when it encounters a validation failure, the `stopOnFirstFailure` method will inform the validator that it should stop validating all attributes once a single validation failure has occurred:

```php
if ($validator->stopOnFirstFailure()->fails()) {
    // ...
}
```

<a name="rule-before"></a>
#### before:_date_

The field under validation must be a value preceding the given date. The dates will be passed into the PHP `strtotime` function in order to be converted into a valid `DateTime` instance. In addition, like the [after](#rule-after) rule, the name of another field under validation may be supplied as the value of `date`.

For convenience, date-based rules may also be constructed using the fluent `date` rule builder:

```php
use Illuminate\Validation\Rule;

'start_date' => [
    'required',
    Rule::date()->before(today()->subDays(7)),
],
```

The `beforeToday` and `todayOrBefore` methods may be used to fluently express the date and must be before today, or today or before, respectively:

```php
'start_date' => [
    'required',
    Rule::date()->beforeToday(),
],
```

<a name="rule-before-or-equal"></a>
#### before\_or\_equal:_date_

The field under validation must be a value preceding or equal to the given date. The dates will be passed into the PHP `strtotime` function in order to be converted into a valid `DateTime` instance. In addition, like the [after](#rule-after) rule, the name of another field under validation may be supplied as the value of `date`.

For convenience, date-based rules may also be constructed using the fluent `date` rule builder:

```php
use Illuminate\Validation\Rule;

'start_date' => [
    'required',
    Rule::date()->beforeOrEqual(today()->subDays(7)),
],
```

<a name="rule-between"></a>
#### between:_min_,_max_

The field under validation must have a size between the given _min_ and _max_ (inclusive). Strings, numerics, arrays, and files are evaluated in the same fashion as the [size](#rule-size) rule.

<a name="rule-boolean"></a>
#### boolean

The field under validation must be able to be cast as a boolean. Accepted input are `true`, `false`, `1`, `0`, `"1"`, and `"0"`.

You may use the `strict` parameter to only consider the field valid if its value is `true` or `false`:

```php
'foo' => ['boolean:strict']
```

<a name="rule-confirmed"></a>
#### confirmed

The field under validation must have a matching field of `{field}_confirmation`. For example, if the field under validation is `password`, a matching `password_confirmation` field must be present in the input.

You may also pass a custom confirmation field name. For example, `confirmed:repeat_username` will expect the field `repeat_username` to match the field under validation.

<a name="rule-contains"></a>
#### contains:_foo_,_bar_,...

The field under validation must be an array that contains all of the given parameter values. Since this rule often requires you to `implode` an array, the `Rule::contains` method may be used to fluently construct the rule:

```php
use Illuminate\Support\Facades\Validator;
use Illuminate\Validation\Rule;

Validator::make($data, [
    'roles' => [
        'required',
        'array',
        Rule::contains(['admin', 'editor']),
    ],
]);
```

<a name="rule-doesnt-contain"></a>
#### doesnt_contain:_foo_,_bar_,...

The field under validation must be an array that does not contain any of the given parameter values. Since this rule often requires you to `implode` an array, the `Rule::doesntContain` method may be used to fluently construct the rule:

```php
use Illuminate\Support\Facades\Validator;
use Illuminate\Validation\Rule;

Validator::make($data, [
    'roles' => [
        'required',
        'array',
        Rule::doesntContain(['admin', 'editor']),
    ],
]);
```

<a name="rule-current-password"></a>
#### current_password

The field under validation must match the authenticated user's password. You may specify an [authentication guard](/docs/{{version}}/authentication) using the rule's first parameter:

```php
'password' => ['current_password:api']
```

<a name="rule-date"></a>
#### date

The field under validation must be a valid, non-relative date according to the `strtotime` PHP function.

<a name="rule-date-equals"></a>
#### date_equals:_date_

The field under validation must be equal to the given date. The dates will be passed into the PHP `strtotime` function in order to be converted into a valid `DateTime` instance.

<a name="rule-date-format"></a>
#### date_format:_format_,...

The field under validation must match one of the given _formats_. You should use **either** `date` or `date_format` when validating a field, not both. This validation rule supports all formats supported by PHP's [DateTime](https://www.php.net/manual/en/class.datetime.php) class.

For convenience, date-based rules may be constructed using the fluent `date` rule builder:

```php
use Illuminate\Validation\Rule;

'start_date' => [
    'required',
    Rule::date()->format('Y-m-d'),
],
```

<a name="rule-decimal"></a>
#### decimal:_min_,_max_

The field under validation must be numeric and must contain the specified number of decimal places:

```php
// Must have exactly two decimal places (9.99)...
'price' => ['decimal:2']

// Must have between 2 and 4 decimal places...
'price' => ['decimal:2,4']
```

<a name="rule-declined"></a>
#### declined

The field under validation must be `"no"`, `"off"`, `0`, `"0"`, `false`, or `"false"`.

<a name="rule-declined-if"></a>
#### declined_if:anotherfield,value,...

The field under validation must be `"no"`, `"off"`, `0`, `"0"`, `false`, or `"false"` if another field under validation is equal to a specified value.

<a name="rule-different"></a>
#### different:_field_

The field under validation must have a different value than _field_.

<a name="rule-digits"></a>
#### digits:_value_

The integer under validation must have an exact length of _value_.

<a name="rule-digits-between"></a>
#### digits_between:_min_,_max_

The integer under validation must have a length between the given _min_ and _max_.

<a name="rule-dimensions"></a>
#### dimensions

The file under validation must be an image meeting the dimension constraints as specified by the rule's parameters:

```php
'avatar' => ['dimensions:min_width=100,min_height=200']
```

Available constraints are: _min\_width_, _max\_width_, _min\_height_, _max\_height_, _width_, _height_, _ratio_, _min\_ratio_, _max\_ratio_.

A _ratio_ constraint should be represented as width divided by height. This can be specified either by a fraction like `3/2` or a float like `1.5`:

```php
'avatar' => ['dimensions:ratio=3/2']
```

The _min\_ratio_ and _max\_ratio_ constraints may be used to define a range of acceptable aspect ratios:

```php
'avatar' => ['dimensions:min_ratio=1/2,max_ratio=3/2']
```

Since this rule requires several arguments, it is often more convenient to use the `Rule::dimensions` method to fluently construct the rule:

```php
use Illuminate\Support\Facades\Validator;
use Illuminate\Validation\Rule;

Validator::make($data, [
    'avatar' => [
        'required',
        Rule::dimensions()
            ->maxWidth(1000)
            ->maxHeight(500)
            ->ratio(3 / 2),
    ],
]);
```

You may also use the `minRatio`, `maxRatio`, and `ratioBetween` methods to fluently define ratio constraints:

```php
Rule::dimensions()->ratioBetween(min: 1 / 2, max: 3 / 2)
```

<a name="rule-distinct"></a>
#### distinct

When validating arrays, the field under validation must not have any duplicate values:

```php
'foo.*.id' => ['distinct']
```

Distinct uses loose variable comparisons by default. To use strict comparisons, you may add the `strict` parameter to your validation rule definition:

```php
'foo.*.id' => ['distinct:strict']
```

You may add `ignore_case` to the validation rule's arguments to make the rule ignore capitalization differences:

```php
'foo.*.id' => ['distinct:ignore_case']
```

<a name="rule-doesnt-start-with"></a>
#### doesnt_start_with:_foo_,_bar_,...

The field under validation must not start with one of the given values.

<a name="rule-doesnt-end-with"></a>
#### doesnt_end_with:_foo_,_bar_,...

The field under validation must not end with one of the given values.

<a name="rule-email"></a>
#### email

The field under validation must be formatted as an email address. This validation rule utilizes the [egulias/email-validator](https://github.com/egulias/EmailValidator) package for validating the email address. By default, the `RFCValidation` validator is applied, but you can apply other validation styles as well:

```php
'email' => ['email:rfc,dns']
```

The example above will apply the `RFCValidation` and `DNSCheckValidation` validations. Here's a full list of validation styles you can apply:

<div class="content-list" markdown="1">

- `rfc`: `RFCValidation` - Validate the email address according to [supported RFCs](https://github.com/egulias/EmailValidator?tab=readme-ov-file#supported-rfcs).
- `strict`: `NoRFCWarningsValidation` - Validate the email according to [supported RFCs](https://github.com/egulias/EmailValidator?tab=readme-ov-file#supported-rfcs), failing when warnings are found (e.g. trailing periods and multiple consecutive periods).
- `dns`: `DNSCheckValidation` - Ensure the email address's domain has a valid MX record.
- `spoof`: `SpoofCheckValidation` - Ensure the email address does not contain homograph or deceptive Unicode characters.
- `filter`: `FilterEmailValidation` - Ensure the email address is valid according to PHP's `filter_var` function.
- `filter_unicode`: `FilterEmailValidation::unicode()` - Ensure the email address is valid according to PHP's `filter_var` function, allowing some Unicode characters.

</div>

For convenience, email validation rules may be built using the fluent rule builder:

```php
use Illuminate\Validation\Rule;

$request->validate([
    'email' => [
        'required',
        Rule::email()
            ->rfcCompliant(strict: false)
            ->validateMxRecord()
            ->preventSpoofing()
    ],
]);
```

The `dns` validator performs a real DNS lookup to confirm the address's domain has a valid MX record. It does not determine whether an individual mailbox exists.

Since your tests should not rely on live DNS lookups, you may use the `Validator::fakeDnsLookups` method to [fake DNS lookups](#rule-active-url) while any other requested validations, such as `rfc`, continue to run:

```php
use Illuminate\Support\Facades\Validator;

Validator::fakeDnsLookups();
```

This allows your application to keep using its existing validation rules while testing:

```php
'email' => ['required', 'email:rfc,dns'],
```

> [!WARNING]
> The `dns` and `spoof` validators require the PHP `intl` extension.

<a name="rule-encoding"></a>
#### encoding:*encoding_type*

The field under validation must match the specified character encoding. This rule uses PHP's `mb_check_encoding` function to verify the encoding of the given file or string value. For convenience, the `encoding` rule may be constructed using Laravel's fluent file rule builder:

```php
use Illuminate\Support\Facades\Validator;
use Illuminate\Validation\Rules\File;

Validator::validate($input, [
    'attachment' => [
        'required',
        File::types(['csv'])
            ->encoding('utf-8'),
    ],
]);
```

<a name="rule-ends-with"></a>
#### ends_with:_foo_,_bar_,...

The field under validation must end with one of the given values.

<a name="rule-enum"></a>
#### enum

The `Enum` rule is a class-based rule that validates whether the field under validation contains a valid enum value. The `Enum` rule accepts the name of the enum as its only constructor argument. When validating primitive values, a backed Enum should be provided to the `Enum` rule:

```php
use App\Enums\ServerStatus;
use Illuminate\Validation\Rule;

$request->validate([
    'status' => [Rule::enum(ServerStatus::class)],
]);
```

The `Enum` rule's `only` and `except` methods may be used to limit which enum cases should be considered valid:

```php
Rule::enum(ServerStatus::class)
    ->only([ServerStatus::Pending, ServerStatus::Active]);

Rule::enum(ServerStatus::class)
    ->except([ServerStatus::Pending, ServerStatus::Active]);
```

The `when` method may be used to conditionally modify the `Enum` rule:

```php
use Illuminate\Support\Facades\Auth;
use Illuminate\Validation\Rule;

Rule::enum(ServerStatus::class)
    ->when(
        Auth::user()->isAdmin(),
        fn ($rule) => $rule->only(...),
        fn ($rule) => $rule->only(...),
    );
```

<a name="rule-exclude"></a>
#### exclude

The field under validation will be excluded from the request data returned by the `validate` and `validated` methods.

<a name="rule-exclude-if"></a>
#### exclude_if:_anotherfield_,_value_

The field under validation will be excluded from the request data returned by the `validate` and `validated` methods if the _anotherfield_ field is equal to _value_.

If complex conditional exclusion logic is required, you may utilize the `Rule::excludeIf` method. This method accepts a boolean or a closure. When given a closure, the closure should return `true` or `false` to indicate if the field under validation should be excluded:

```php
use Illuminate\Support\Facades\Validator;
use Illuminate\Validation\Rule;

Validator::make($request->all(), [
    'role_id' => [Rule::excludeIf($request->user()->is_admin)],
]);

Validator::make($request->all(), [
    'role_id' => [Rule::excludeIf(fn () => $request->user()->is_admin)],
]);
```

<a name="rule-exclude-unless"></a>
#### exclude_unless:_anotherfield_,_value_

The field under validation will be excluded from the request data returned by the `validate` and `validated` methods unless _anotherfield_'s field is equal to _value_. If _value_ is `null` (`exclude_unless:name,null`), the field under validation will be excluded unless the comparison field is `null` or the comparison field is missing from the request data.

If complex conditional exclusion logic is required, you may utilize the `Rule::excludeUnless` method. This method accepts a boolean or a closure. When given a closure, the closure should return `true` or `false` to indicate if the field under validation should not be excluded:

```php
use Illuminate\Support\Facades\Validator;
use Illuminate\Validation\Rule;

Validator::make($request->all(), [
    'role_id' => [Rule::excludeUnless($request->user()->is_admin)],
]);

Validator::make($request->all(), [
    'role_id' => [Rule::excludeUnless(fn () => $request->user()->is_admin)],
]);
```

<a name="rule-exclude-with"></a>
#### exclude_with:_anotherfield_

The field under validation will be excluded from the request data returned by the `validate` and `validated` methods if the _anotherfield_ field is present.

<a name="rule-exclude-without"></a>
#### exclude_without:_anotherfield_

The field under validation will be excluded from the request data returned by the `validate` and `validated` methods if the _anotherfield_ field is not present.

<a name="rule-exists"></a>
#### exists:_table_,_column_

The field under validation must exist in a given database table.

<a name="basic-usage-of-exists-rule"></a>
#### Basic Usage of Exists Rule

```php
'state' => ['exists:states']
```

If the `column` option is not specified, the field name will be used. So, in this case, the rule will validate that the `states` database table contains a record with a `state` column value matching the request's `state` attribute value.

<a name="specifying-a-custom-column-name"></a>
#### Specifying a Custom Column Name

You may explicitly specify the database column name that should be used by the validation rule by placing it after the database table name:

```php
'state' => ['exists:states,abbreviation']
```

Occasionally, you may need to specify a specific database connection to be used for the `exists` query. You can accomplish this by prepending the connection name to the table name:

```php
'email' => ['exists:connection.staff,email']
```

Instead of specifying the table name directly, you may specify the Eloquent model which should be used to determine the table name:

```php
'user_id' => ['exists:App\Models\User,id']
```

If you would like to customize the query executed by the validation rule, you may use the `Rule` class to fluently define the rule.

```php
use Illuminate\Database\Query\Builder;
use Illuminate\Support\Facades\Validator;
use Illuminate\Validation\Rule;

Validator::make($data, [
    'email' => [
        'required',
        Rule::exists('staff')->where(function (Builder $query) {
            $query->where('account_id', 1);
        }),
    ],
]);
```

You may explicitly specify the database column name that should be used by the `exists` rule generated by the `Rule::exists` method by providing the column name as the second argument to the `exists` method:

```php
'state' => [Rule::exists('states', 'abbreviation')],
```

Sometimes, you may wish to validate whether an array of values exists in the database. You can do so by adding both the `exists` and [array](#rule-array) rules to the field being validated:

```php
'states' => ['array', Rule::exists('states', 'abbreviation')],
```

When both of these rules are assigned to a field, Laravel will automatically build a single query to determine if all of the given values exist in the specified table.

<a name="rule-extensions"></a>
#### extensions:_foo_,_bar_,...

The file under validation must have a user-assigned extension corresponding to one of the listed extensions:

```php
'photo' => ['required', 'extensions:jpg,png'],
```

> [!WARNING]
> You should never rely on validating a file by its user-assigned extension alone. This rule should typically always be used in combination with the [mimes](#rule-mimes) or [mimetypes](#rule-mimetypes) rules.

<a name="rule-file"></a>
#### file

The field under validation must be a successfully uploaded file.

<a name="rule-filled"></a>
#### filled

The field under validation must not be empty when it is present.

<a name="rule-gt"></a>
#### gt:_field_

The field under validation must be greater than the given _field_ or _value_. The two fields must be of the same type. Strings, numerics, arrays, and files are evaluated using the same conventions as the [size](#rule-size) rule.

<a name="rule-gte"></a>
#### gte:_field_

The field under validation must be greater than or equal to the given _field_ or _value_. The two fields must be of the same type. Strings, numerics, arrays, and files are evaluated using the same conventions as the [size](#rule-size) rule.

<a name="rule-hex-color"></a>
#### hex_color

The field under validation must contain a valid color value in [hexadecimal](https://developer.mozilla.org/en-US/docs/Web/CSS/hex-color) format.

<a name="rule-image"></a>
#### image

The file under validation must be an image (jpg, jpeg, png, bmp, gif, or webp).

> [!WARNING]
> By default, the image rule does not allow SVG files due to the possibility of XSS vulnerabilities. If you need to allow SVG files, you may provide the `allow_svg` directive to the `image` rule (`image:allow_svg`).

<a name="rule-in"></a>
#### in:_foo_,_bar_,...

The field under validation must be included in the given list of values. Since this rule often requires you to `implode` an array, the `Rule::in` method may be used to fluently construct the rule:

```php
use Illuminate\Support\Facades\Validator;
use Illuminate\Validation\Rule;

Validator::make($data, [
    'zones' => [
        'required',
        Rule::in(['first-zone', 'second-zone']),
    ],
]);
```

When the `in` rule is combined with the `array` rule, each value in the input array must be present within the list of values provided to the `in` rule. In the following example, the `LAS` airport code in the input array is invalid since it is not contained in the list of airports provided to the `in` rule:

```php
use Illuminate\Support\Facades\Validator;
use Illuminate\Validation\Rule;

$input = [
    'airports' => ['NYC', 'LAS'],
];

Validator::make($input, [
    'airports' => [
        'required',
        'array',
    ],
    'airports.*' => Rule::in(['NYC', 'LIT']),
]);
```

<a name="rule-in-array"></a>
#### in_array:_anotherfield_.*

The field under validation must exist in _anotherfield_'s values.

<a name="rule-in-array-keys"></a>
#### in_array_keys:_value_.*

The field under validation must be an array having at least one of the given _values_ as a key within the array:

```php
'config' => ['array', 'in_array_keys:timezone']
```

<a name="rule-integer"></a>
#### integer

The field under validation must be an integer.

You may use the `strict` parameter to only consider the field valid if its type is `integer`. Strings with integer values will be considered invalid:

```php
'age' => ['integer:strict']
```

> [!WARNING]
> This validation rule does not verify that the input is of the "integer" variable type, only that the input is of a type accepted by PHP's `FILTER_VALIDATE_INT` rule. If you need to validate the input as being a number please use this rule in combination with [the `numeric` validation rule](#rule-numeric).

<a name="rule-ip"></a>
#### ip

The field under validation must be an IP address.

<a name="ipv4"></a>
#### ipv4

The field under validation must be an IPv4 address.

<a name="ipv6"></a>
#### ipv6

The field under validation must be an IPv6 address.

<a name="rule-json"></a>
#### json

The field under validation must be a valid JSON string.

<a name="rule-lt"></a>
#### lt:_field_

The field under validation must be less than the given _field_. The two fields must be of the same type. Strings, numerics, arrays, and files are evaluated using the same conventions as the [size](#rule-size) rule.

<a name="rule-lte"></a>
#### lte:_field_

The field under validation must be less than or equal to the given _field_. The two fields must be of the same type. Strings, numerics, arrays, and files are evaluated using the same conventions as the [size](#rule-size) rule.

<a name="rule-lowercase"></a>
#### lowercase

The field under validation must be lowercase.

<a name="rule-list"></a>
#### list

The field under validation must be an array that is a list. An array is considered a list if its keys consist of consecutive numbers from 0 to `count($array) - 1`.

<a name="rule-mac"></a>
#### mac_address

The field under validation must be a MAC address.

<a name="rule-max"></a>
#### max:_value_

The field under validation must be less than or equal to a maximum _value_. Strings, numerics, arrays, and files are evaluated in the same fashion as the [size](#rule-size) rule.

<a name="rule-max-digits"></a>
#### max_digits:_value_

The integer under validation must have a maximum length of _value_.

<a name="rule-mimetypes"></a>
#### mimetypes:_text/plain_,...

The file under validation must match one of the given MIME types:

```php
'video' => ['mimetypes:video/avi,video/mpeg,video/quicktime'],

'media' => ['mimetypes:image/*,video/*'],
```

To determine the MIME type of the uploaded file, the file's contents will be read and the framework will attempt to guess the MIME type, which may be different from the client's provided MIME type.

<a name="rule-mimes"></a>
#### mimes:_foo_,_bar_,...

The file under validation must have a MIME type corresponding to one of the listed extensions:

```php
'photo' => ['mimes:jpg,bmp,png']
```

Even though you only need to specify the extensions, this rule actually validates the MIME type of the file by reading the file's contents and guessing its MIME type. A full listing of MIME types and their corresponding extensions may be found at the following location:

[https://svn.apache.org/repos/asf/httpd/httpd/trunk/docs/conf/mime.types](https://svn.apache.org/repos/asf/httpd/httpd/trunk/docs/conf/mime.types)

<a name="mime-types-and-extensions"></a>
#### MIME Types and Extensions

This validation rule does not verify agreement between the MIME type and the extension the user assigned to the file. For example, the `mimes:png` validation rule would consider a file containing valid PNG content to be a valid PNG image, even if the file is named `photo.txt`. If you would like to validate the user-assigned extension of the file, you may use the [extensions](#rule-extensions) rule.

<a name="rule-min"></a>
#### min:_value_

The field under validation must have a minimum _value_. Strings, numerics, arrays, and files are evaluated in the same fashion as the [size](#rule-size) rule.

<a name="rule-min-digits"></a>
#### min_digits:_value_

The integer under validation must have a minimum length of _value_.

<a name="rule-multiple-of"></a>
#### multiple_of:_value_

The field under validation must be a multiple of _value_.

<a name="rule-missing"></a>
#### missing

The field under validation must not be present in the input data.

<a name="rule-missing-if"></a>
#### missing_if:_anotherfield_,_value_,...

The field under validation must not be present if the _anotherfield_ field is equal to any _value_.

<a name="rule-missing-unless"></a>
#### missing_unless:_anotherfield_,_value_

The field under validation must not be present unless the _anotherfield_ field is equal to any _value_.

<a name="rule-missing-with"></a>
#### missing_with:_foo_,_bar_,...

The field under validation must not be present _only if_ any of the other specified fields are present.

<a name="rule-missing-with-all"></a>
#### missing_with_all:_foo_,_bar_,...

The field under validation must not be present _only if_ all of the other specified fields are present.

<a name="rule-not-in"></a>
#### not_in:_foo_,_bar_,...

The field under validation must not be included in the given list of values. The `Rule::notIn` method may be used to fluently construct the rule:

```php
use Illuminate\Validation\Rule;

Validator::make($data, [
    'toppings' => [
        'required',
        Rule::notIn(['sprinkles', 'cherries']),
    ],
]);
```

<a name="rule-not-regex"></a>
#### not_regex:_pattern_

The field under validation must not match the given regular expression.

Internally, this rule uses the PHP `preg_match` function. The pattern specified should obey the same formatting required by `preg_match` and thus also include valid delimiters. For example: `'email' => ['not_regex:/^.+$/i']`.

<a name="rule-nullable"></a>
#### nullable

The field under validation may be `null`.

<a name="rule-numeric"></a>
#### numeric

The field under validation must be [numeric](https://www.php.net/manual/en/function.is-numeric.php).

You may use the `strict` parameter to only consider the field valid if its value is an integer or float type. Numeric strings will be considered invalid:

```php
'amount' => ['numeric:strict']
```

<a name="rule-present"></a>
#### present

The field under validation must exist in the input data.

<a name="rule-present-if"></a>
#### present_if:_anotherfield_,_value_,...

The field under validation must be present if the _anotherfield_ field is equal to any _value_.

<a name="rule-present-unless"></a>
#### present_unless:_anotherfield_,_value_

The field under validation must be present unless the _anotherfield_ field is equal to any _value_.

<a name="rule-present-with"></a>
#### present_with:_foo_,_bar_,...

The field under validation must be present _only if_ any of the other specified fields are present.

<a name="rule-present-with-all"></a>
#### present_with_all:_foo_,_bar_,...

The field under validation must be present _only if_ all of the other specified fields are present.

<a name="rule-prohibited"></a>
#### prohibited

The field under validation must be missing or empty. A field is "empty" if it meets one of the following criteria:

<div class="content-list" markdown="1">

- The value is `null`.
- The value is an empty string.
- The value is an empty array or empty `Countable` object.
- The value is an uploaded file with an empty path.

</div>

<a name="rule-prohibited-if"></a>
#### prohibited_if:_anotherfield_,_value_,...

The field under validation must be missing or empty if the _anotherfield_ field is equal to any _value_. A field is "empty" if it meets one of the following criteria:

<div class="content-list" markdown="1">

- The value is `null`.
- The value is an empty string.
- The value is an empty array or empty `Countable` object.
- The value is an uploaded file with an empty path.

</div>

If complex conditional prohibition logic is required, you may utilize the `Rule::prohibitedIf` method. This method accepts a boolean or a closure. When given a closure, the closure should return `true` or `false` to indicate if the field under validation should be prohibited:

```php
use Illuminate\Support\Facades\Validator;
use Illuminate\Validation\Rule;

Validator::make($request->all(), [
    'role_id' => [Rule::prohibitedIf($request->user()->is_admin)],
]);

Validator::make($request->all(), [
    'role_id' => [Rule::prohibitedIf(fn () => $request->user()->is_admin)],
]);
```
<a name="rule-prohibited-if-accepted"></a>
#### prohibited_if_accepted:_anotherfield_,...

The field under validation must be missing or empty if the _anotherfield_ field is equal to `"yes"`, `"on"`, `1`, `"1"`, `true`, or `"true"`.

<a name="rule-prohibited-if-declined"></a>
#### prohibited_if_declined:_anotherfield_,...

The field under validation must be missing or empty if the _anotherfield_ field is equal to `"no"`, `"off"`, `0`, `"0"`, `false`, or `"false"`.

<a name="rule-prohibited-unless"></a>
#### prohibited_unless:_anotherfield_,_value_,...

The field under validation must be missing or empty unless the _anotherfield_ field is equal to any _value_. A field is "empty" if it meets one of the following criteria:

<div class="content-list" markdown="1">

- The value is `null`.
- The value is an empty string.
- The value is an empty array or empty `Countable` object.
- The value is an uploaded file with an empty path.

</div>

If complex conditional prohibition logic is required, you may utilize the `Rule::prohibitedUnless` method. This method accepts a boolean or a closure. When given a closure, the closure should return `true` or `false` to indicate if the field under validation should not be prohibited:

```php
use Illuminate\Support\Facades\Validator;
use Illuminate\Validation\Rule;

Validator::make($request->all(), [
    'role_id' => [Rule::prohibitedUnless($request->user()->is_admin)],
]);

Validator::make($request->all(), [
    'role_id' => [Rule::prohibitedUnless(fn () => $request->user()->is_admin)],
]);
```

<a name="rule-prohibits"></a>
#### prohibits:_anotherfield_,...

If the field under validation is not missing or empty, all fields in _anotherfield_ must be missing or empty. A field is "empty" if it meets one of the following criteria:

<div class="content-list" markdown="1">

- The value is `null`.
- The value is an empty string.
- The value is an empty array or empty `Countable` object.
- The value is an uploaded file with an empty path.

</div>

<a name="rule-regex"></a>
#### regex:_pattern_

The field under validation must match the given regular expression.

Internally, this rule uses the PHP `preg_match` function. The pattern specified should obey the same formatting required by `preg_match` and thus also include valid delimiters. For example: `'email' => ['regex:/^.+@.+$/i']`.

<a name="rule-required"></a>
#### required

The field under validation must be present in the input data and not empty. A field is "empty" if it meets one of the following criteria:

<div class="content-list" markdown="1">

- The value is `null`.
- The value is an empty string.
- The value is an empty array or empty `Countable` object.
- The value is an uploaded file with no path.

</div>

<a name="rule-required-if"></a>
#### required_if:_anotherfield_,_value_,...

The field under validation must be present and not empty if the _anotherfield_ field is equal to any _value_.

If you would like to construct a more complex condition for the `required_if` rule, you may use the `Rule::requiredIf` method. This method accepts a boolean or a closure. When passed a closure, the closure should return `true` or `false` to indicate if the field under validation is required:

```php
use Illuminate\Support\Facades\Validator;
use Illuminate\Validation\Rule;

Validator::make($request->all(), [
    'role_id' => [Rule::requiredIf($request->user()->is_admin)],
]);

Validator::make($request->all(), [
    'role_id' => [Rule::requiredIf(fn () => $request->user()->is_admin)],
]);
```

<a name="rule-required-if-accepted"></a>
#### required_if_accepted:_anotherfield_,...

The field under validation must be present and not empty if the _anotherfield_ field is equal to `"yes"`, `"on"`, `1`, `"1"`, `true`, or `"true"`.

<a name="rule-required-if-declined"></a>
#### required_if_declined:_anotherfield_,...

The field under validation must be present and not empty if the _anotherfield_ field is equal to `"no"`, `"off"`, `0`, `"0"`, `false`, or `"false"`.

<a name="rule-required-unless"></a>
#### required_unless:_anotherfield_,_value_,...

The field under validation must be present and not empty unless the _anotherfield_ field is equal to any _value_. This also means _anotherfield_ must be present in the request data unless _value_ is `null`. If _value_ is `null` (`required_unless:name,null`), the field under validation will be required unless the comparison field is `null` or the comparison field is missing from the request data.

If you would like to construct a more complex condition for the `required_unless` rule, you may use the `Rule::requiredUnless` method. This method accepts a boolean or a closure. When passed a closure, the closure should return `true` or `false` to indicate if the field under validation is not required:

```php
use Illuminate\Support\Facades\Validator;
use Illuminate\Validation\Rule;

Validator::make($request->all(), [
    'role_id' => [Rule::requiredUnless($request->user()->is_admin)],
]);

Validator::make($request->all(), [
    'role_id' => [Rule::requiredUnless(fn () => $request->user()->is_admin)],
]);
```

<a name="rule-required-with"></a>
#### required_with:_foo_,_bar_,...

The field under validation must be present and not empty _only if_ any of the other specified fields are present and not empty.

<a name="rule-required-with-all"></a>
#### required_with_all:_foo_,_bar_,...

The field under validation must be present and not empty _only if_ all of the other specified fields are present and not empty.

<a name="rule-required-without"></a>
#### required_without:_foo_,_bar_,...

The field under validation must be present and not empty _only when_ any of the other specified fields are empty or not present.

<a name="rule-required-without-all"></a>
#### required_without_all:_foo_,_bar_,...

The field under validation must be present and not empty _only when_ all of the other specified fields are empty or not present.

<a name="rule-required-array-keys"></a>
#### required_array_keys:_foo_,_bar_,...

The field under validation must be an array and must contain at least the specified keys.

<a name="rule-same"></a>
#### same:_field_

The given _field_ must match the field under validation.

<a name="rule-size"></a>
#### size:_value_

The field under validation must have a size matching the given _value_. For string data, _value_ corresponds to the number of characters. For numeric data, _value_ corresponds to a given integer value (the attribute must also have the `numeric` or `integer` rule). For an array, _size_ corresponds to the `count` of the array. For files, _size_ corresponds to the file size in kilobytes. Let's look at some examples:

```php
// Validate that a string is exactly 12 characters long...
'title' => ['size:12'];

// Validate that a provided integer equals 10...
'seats' => ['integer', 'size:10'];

// Validate that an array has exactly 5 elements...
'tags' => ['array', 'size:5'];

// Validate that an uploaded file is exactly 512 kilobytes...
'image' => ['file', 'size:512'];
```

<a name="rule-starts-with"></a>
#### starts_with:_foo_,_bar_,...

The field under validation must start with one of the given values.

<a name="rule-string"></a>
#### string

The field under validation must be a string. If you would like to allow the field to also be `null`, you should assign the `nullable` rule to the field.

For convenience, string validation rules may also be constructed using the fluent `Rule::string()` rule builder:

```php
use Illuminate\Validation\Rule;

'title' => [
    'required',
    Rule::string()
        ->min(3)
        ->max(255)
        ->alphaDash(ascii: true),
],
```

The string rule builder provides methods for common string constraints, including `alpha`, `alphaDash`, `alphaNumeric`, `ascii`, `between`, `doesntEndWith`, `doesntStartWith`, `endsWith`, `exactly`, `lowercase`, `max`, `min`, `startsWith`, and `uppercase`. Since the rule builder is conditionable, you may also use the `when` and `unless` methods to conditionally apply constraints.

<a name="rule-timezone"></a>
#### timezone

The field under validation must be a valid timezone identifier according to the `DateTimeZone::listIdentifiers` method.

The arguments [accepted by the `DateTimeZone::listIdentifiers` method](https://www.php.net/manual/en/datetimezone.listidentifiers.php) may also be provided to this validation rule:

```php
'timezone' => ['required', 'timezone:all'];

'timezone' => ['required', 'timezone:Africa'];

'timezone' => ['required', 'timezone:per_country,US'];
```

<a name="rule-unique"></a>
#### unique:_table_,_column_

The field under validation must not exist within the given database table.

**Specifying a Custom Table / Column Name:**

Instead of specifying the table name directly, you may specify the Eloquent model which should be used to determine the table name:

```php
'email' => ['unique:App\Models\User,email_address']
```

The `column` option may be used to specify the field's corresponding database column. If the `column` option is not specified, the name of the field under validation will be used.

```php
'email' => ['unique:users,email_address']
```

**Specifying a Custom Database Connection**

Occasionally, you may need to set a custom connection for database queries made by the Validator. To accomplish this, you may prepend the connection name to the table name:

```php
'email' => ['unique:connection.users,email_address']
```

**Forcing a Unique Rule to Ignore a Given ID:**

Sometimes, you may wish to ignore a given ID during unique validation. For example, consider an "update profile" screen that includes the user's name, email address, and location. You will probably want to verify that the email address is unique. However, if the user only changes the name field and not the email field, you do not want a validation error to be thrown because the user is already the owner of the email address in question.

To instruct the validator to ignore the user's ID, we'll use the `Rule` class to fluently define the rule.

```php
use Illuminate\Support\Facades\Validator;
use Illuminate\Validation\Rule;

Validator::make($data, [
    'email' => [
        'required',
        Rule::unique('users')->ignore($user->id),
    ],
]);
```

> [!WARNING]
> You should never pass any user controlled request input into the `ignore` method. Instead, you should only pass a system generated unique ID such as an auto-incrementing ID or UUID from an Eloquent model instance. Otherwise, your application will be vulnerable to an SQL injection attack.

Instead of passing the model key's value to the `ignore` method, you may also pass the entire model instance. Laravel will automatically extract the key from the model:

```php
Rule::unique('users')->ignore($user)
```

If your table uses a primary key column name other than `id`, you may specify the name of the column when calling the `ignore` method:

```php
Rule::unique('users')->ignore($user->id, 'user_id')
```

By default, the `unique` rule will check the uniqueness of the column matching the name of the attribute being validated. However, you may pass a different column name as the second argument to the `unique` method:

```php
Rule::unique('users', 'email_address')->ignore($user->id)
```

**Adding Additional Where Clauses:**

You may specify additional query conditions by customizing the query using the `where` method. For example, let's add a query condition that scopes the query to only search records that have an `account_id` column value of `1`:

```php
'email' => Rule::unique('users')->where(fn (Builder $query) => $query->where('account_id', 1))
```

**Ignoring Soft Deleted Records in Unique Checks:**

By default, the unique rule includes soft deleted records when determining uniqueness. To exclude soft deleted records from the uniqueness check, you may invoke the `withoutTrashed` method:

```php
Rule::unique('users')->withoutTrashed();
```

If your model uses a column name other than `deleted_at` for soft deleted records, you may provide the column name when invoking the `withoutTrashed` method:

```php
Rule::unique('users')->withoutTrashed('was_deleted_at');
```

<a name="rule-uppercase"></a>
#### uppercase

The field under validation must be uppercase.

<a name="rule-url"></a>
#### url

The field under validation must be a valid URL.

If you would like to specify the URL protocols that should be considered valid, you may pass the protocols as validation rule parameters:

```php
'url' => ['url:http,https'],

'game' => ['url:minecraft,steam'],
```

<a name="rule-ulid"></a>
#### ulid

The field under validation must be a valid [Universally Unique Lexicographically Sortable Identifier](https://github.com/ulid/spec) (ULID).

<a name="rule-uuid"></a>
#### uuid

The field under validation must be a valid RFC 9562 (version 1, 3, 4, 5, 6, 7, or 8) universally unique identifier (UUID).

You may also validate that the given UUID matches a UUID specification by version:

```php
'uuid' => ['uuid:4']
```

<a name="conditionally-adding-rules"></a>
## Conditionally Adding Rules

<a name="skipping-validation-when-fields-have-certain-values"></a>
#### Skipping Validation When Fields Have Certain Values

You may occasionally wish to not validate a given field if another field has a given value. You may accomplish this using the `exclude_if` validation rule. In this example, the `appointment_date` and `doctor_name` fields will not be validated if the `has_appointment` field has a value of `false`:

```php
use Illuminate\Support\Facades\Validator;

$validator = Validator::make($data, [
    'has_appointment' => ['required', 'boolean'],
    'appointment_date' => ['exclude_if:has_appointment,false', 'required', 'date'],
    'doctor_name' => ['exclude_if:has_appointment,false', 'required', 'string'],
]);
```

Alternatively, you may use the `exclude_unless` rule to not validate a given field unless another field has a given value:

```php
$validator = Validator::make($data, [
    'has_appointment' => ['required', 'boolean'],
    'appointment_date' => ['exclude_unless:has_appointment,true', 'required', 'date'],
    'doctor_name' => ['exclude_unless:has_appointment,true', 'required', 'string'],
]);
```

<a name="validating-when-present"></a>
#### Validating When Present

In some situations, you may wish to run validation checks against a field **only** if that field is present in the data being validated. To quickly accomplish this, add the `sometimes` rule to your rule list:

```php
$validator = Validator::make($data, [
    'email' => ['sometimes', 'required', 'email'],
]);
```

In the example above, the `email` field will only be validated if it is present in the `$data` array.

> [!NOTE]
> If you are attempting to validate a field that should always be present but may be empty, check out [this note on optional fields](#a-note-on-optional-fields).

<a name="complex-conditional-validation"></a>
#### Complex Conditional Validation

Sometimes you may wish to add validation rules based on more complex conditional logic. For example, you may wish to require a given field only if another field has a greater value than 100. Or, you may need two fields to have a given value only when another field is present. Adding these validation rules doesn't have to be a pain. First, create a `Validator` instance with your _static rules_ that never change:

```php
use Illuminate\Support\Facades\Validator;

$validator = Validator::make($request->all(), [
    'email' => ['required', 'email'],
    'games' => ['required', 'integer', 'min:0'],
]);
```

Let's assume our web application is for game collectors. If a game collector registers with our application and they own more than 100 games, we want them to explain why they own so many games. For example, perhaps they run a game resale shop, or maybe they just enjoy collecting games. To conditionally add this requirement, we can use the `sometimes` method on the `Validator` instance.

```php
use Illuminate\Support\Fluent;

$validator->sometimes('reason', ['required', 'max:500'], function (Fluent $input) {
    return $input->games >= 100;
});
```

The first argument passed to the `sometimes` method is the name of the field we are conditionally validating. The second argument is a list of the rules we want to add. If the closure passed as the third argument returns `true`, the rules will be added. This method makes it a breeze to build complex conditional validations. You may even add conditional validations for several fields at once:

```php
$validator->sometimes(['reason', 'cost'], 'required', function (Fluent $input) {
    return $input->games >= 100;
});
```

> [!NOTE]
> The `$input` parameter passed to your closure will be an instance of `Illuminate\Support\Fluent` and may be used to access your input and files under validation.

<a name="complex-conditional-array-validation"></a>
#### Complex Conditional Array Validation

Sometimes you may want to validate a field based on another field in the same nested array whose index you do not know. In these situations, you may allow your closure to receive a second argument which will be the current individual item in the array being validated:

```php
$input = [
    'channels' => [
        [
            'type' => 'email',
            'address' => 'abigail@example.com',
        ],
        [
            'type' => 'url',
            'address' => 'https://example.com',
        ],
    ],
];

$validator->sometimes('channels.*.address', 'email', function (Fluent $input, Fluent $item) {
    return $item->type === 'email';
});

$validator->sometimes('channels.*.address', 'url', function (Fluent $input, Fluent $item) {
    return $item->type !== 'email';
});
```

Like the `$input` parameter passed to the closure, the `$item` parameter is an instance of `Illuminate\Support\Fluent` when the attribute data is an array; otherwise, it is a string.

<a name="validating-arrays"></a>
## Validating Arrays

As discussed in the [array validation rule documentation](#rule-array), the `array` rule accepts a list of allowed array keys. If any additional keys are present within the array, validation will fail:

```php
use Illuminate\Support\Facades\Validator;

$input = [
    'user' => [
        'name' => 'Taylor Otwell',
        'username' => 'taylorotwell',
        'admin' => true,
    ],
];

Validator::make($input, [
    'user' => ['array:name,username'],
]);
```

In general, you should always specify the array keys that are allowed to be present within your array. Otherwise, the validator's `validate` and `validated` methods will return all of the validated data, including the array and all of its keys, even if those keys were not validated by other nested array validation rules.

<a name="validating-nested-array-input"></a>
### Validating Nested Array Input

Validating nested array-based form input fields doesn't have to be a pain. You may use "dot notation" to validate attributes within an array. For example, if the incoming HTTP request contains a `photos[profile]` field, you may validate it like so:

```php
use Illuminate\Support\Facades\Validator;

$validator = Validator::make($request->all(), [
    'photos.profile' => ['required', 'image'],
]);
```

You may also validate each element of an array. For example, to validate that each email in a given array input field is unique, you may do the following:

```php
$validator = Validator::make($request->all(), [
    'users.*.email' => ['email', 'unique:users'],
    'users.*.first_name' => ['required_with:users.*.last_name'],
]);
```

Likewise, you may use the `*` character when specifying [custom validation messages in your language files](#custom-messages-for-specific-attributes), making it a breeze to use a single validation message for array-based fields:

```php
'custom' => [
    'users.*.email' => [
        'unique' => 'Each user must have a unique email address',
    ]
],
```

<a name="accessing-nested-array-data"></a>
#### Accessing Nested Array Data

Sometimes you may need to access the value for a given nested array element when assigning validation rules to the attribute. You may accomplish this using the `Rule::forEach` method. The `forEach` method accepts a closure that will be invoked for each iteration of the array attribute under validation and will receive the attribute's value and explicit, fully-expanded attribute name. The closure should return an array of rules to assign to the array element:

```php
use App\Rules\HasPermission;
use Illuminate\Support\Facades\Validator;
use Illuminate\Validation\Rule;

$validator = Validator::make($request->all(), [
    'companies.*.id' => Rule::forEach(function (string|null $value, string $attribute) {
        return [
            Rule::exists(Company::class, 'id'),
            new HasPermission('manage-company', $value),
        ];
    }),
]);
```

<a name="error-message-indexes-and-positions"></a>
### Error Message Indexes and Positions

When validating arrays, you may want to reference the index or position of a particular item that failed validation within the error message displayed by your application. To accomplish this, you may include the `:index` (starts from `0`), `:position` (starts from `1`), or `:ordinal-position` (starts from `1st`) placeholders within your [custom validation message](#manual-customizing-the-error-messages):

```php
use Illuminate\Support\Facades\Validator;

$input = [
    'photos' => [
        [
            'name' => 'BeachVacation.jpg',
            'description' => 'A photo of my beach vacation!',
        ],
        [
            'name' => 'GrandCanyon.jpg',
            'description' => '',
        ],
    ],
];

Validator::validate($input, [
    'photos.*.description' => ['required'],
], [
    'photos.*.description.required' => 'Please describe photo #:position.',
]);
```

Given the example above, validation will fail and the user will be presented with the following error of _"Please describe photo #2."_

If necessary, you may reference more deeply nested indexes and positions via `second-index`, `second-position`, `third-index`, `third-position`, etc.

```php
'photos.*.attributes.*.string' => 'Invalid attribute for photo #:second-position.',
```

<a name="validating-files"></a>
## Validating Files

Laravel provides a variety of validation rules that may be used to validate uploaded files, such as `mimes`, `image`, `min`, and `max`. While you are free to specify these rules individually when validating files, Laravel also offers a fluent file validation rule builder that you may find convenient:

```php
use Illuminate\Support\Facades\Validator;
use Illuminate\Validation\Rules\File;

Validator::validate($input, [
    'attachment' => [
        'required',
        File::types(['mp3', 'wav'])
            ->min(1024)
            ->max(12 * 1024),
    ],
]);
```

<a name="validating-files-file-types"></a>
#### Validating File Types

Even though you only need to specify the extensions when invoking the `types` method, this method actually validates the MIME type of the file by reading the file's contents and guessing its MIME type. A full listing of MIME types and their corresponding extensions may be found at the following location:

[https://svn.apache.org/repos/asf/httpd/httpd/trunk/docs/conf/mime.types](https://svn.apache.org/repos/asf/httpd/httpd/trunk/docs/conf/mime.types)

<a name="validating-files-file-sizes"></a>
#### Validating File Sizes

For convenience, minimum and maximum file sizes may be specified as a string with a suffix indicating the file size units. The `kb`, `mb`, `gb`, and `tb` suffixes are supported:

```php
File::types(['mp3', 'wav'])
    ->min('1kb')
    ->max('10mb');
```

<a name="validating-files-image-files"></a>
#### Validating Image Files

If your application accepts images uploaded by your users, you may use the `File` rule's `image` constructor method to ensure that the file under validation is an image (jpg, jpeg, png, bmp, gif, or webp).

In addition, the `dimensions` rule may be used to limit the dimensions of the image:

```php
use Illuminate\Support\Facades\Validator;
use Illuminate\Validation\Rule;
use Illuminate\Validation\Rules\File;

Validator::validate($input, [
    'photo' => [
        'required',
        File::image()
            ->min(1024)
            ->max(12 * 1024)
            ->dimensions(Rule::dimensions()->maxWidth(1000)->maxHeight(500)),
    ],
]);
```

> [!NOTE]
> More information regarding validating image dimensions may be found in the [dimension rule documentation](#rule-dimensions).

> [!WARNING]
> By default, the `image` rule does not allow SVG files due to the possibility of XSS vulnerabilities. If you need to allow SVG files, you may pass `allowSvg: true` to the `image` rule: `File::image(allowSvg: true)`.

<a name="validating-files-image-dimensions"></a>
#### Validating Image Dimensions

You may also validate the dimensions of an image. For example, to validate that an uploaded image is at least 1000 pixels wide and 500 pixels tall, you may use the `dimensions` rule:

```php
use Illuminate\Validation\Rule;
use Illuminate\Validation\Rules\File;

File::image()->dimensions(
    Rule::dimensions()
        ->maxWidth(1000)
        ->maxHeight(500)
)
```

> [!NOTE]
> More information regarding validating image dimensions may be found in the [dimension rule documentation](#rule-dimensions).

<a name="validating-passwords"></a>
## Validating Passwords

To ensure that passwords have an adequate level of complexity, you may use Laravel's `Password` rule object:

```php
use Illuminate\Support\Facades\Validator;
use Illuminate\Validation\Rules\Password;

$validator = Validator::make($request->all(), [
    'password' => ['required', 'confirmed', Password::min(8)],
]);
```

The `Password` rule object allows you to easily customize the password complexity requirements for your application, such as specifying that passwords require at least one letter, number, symbol, or characters with mixed casing:

```php
// Require at least 8 characters...
Password::min(8)

// Require at most 256 characters...
Password::min(16)->max(256)

// Require at least one letter...
Password::min(8)->letters()

// Require at least one uppercase and one lowercase letter...
Password::min(8)->mixedCase()

// Require at least one number...
Password::min(8)->numbers()

// Require at least one symbol...
Password::min(8)->symbols()
```

In addition, you may ensure that a password has not been compromised in a public password data breach leak using the `uncompromised` method:

```php
Password::min(8)->uncompromised()
```

Internally, the `Password` rule object uses the [k-Anonymity](https://en.wikipedia.org/wiki/K-anonymity) model to determine if a password has been leaked via the [haveibeenpwned.com](https://haveibeenpwned.com) service without sacrificing the user's privacy or security.

By default, if a password appears at least once in a data leak, it will be considered compromised. You can customize this threshold using the first argument of the `uncompromised` method:

```php
// Ensure the password appears less than 3 times in the same data leak...
Password::min(8)->uncompromised(3);
```

Of course, you may chain all the methods in the examples above:

```php
Password::min(8)
    ->max(256)
    ->letters()
    ->mixedCase()
    ->numbers()
    ->symbols()
    ->uncompromised()
```

You may convert a `Password` rule object to a string suitable for the HTML `passwordrules` attribute using the `toPasswordRulesString` method:

```blade
<input
    type="password"
    name="password"
    autocomplete="new-password"
    passwordrules="{{ Password::defaults()->toPasswordRulesString() }}"
/>
```

<a name="defining-default-password-rules"></a>
#### Defining Default Password Rules

You may find it convenient to specify the default validation rules for passwords in a single location of your application. You can easily accomplish this using the `Password::defaults` method, which accepts a closure. The closure given to the `defaults` method should return the default configuration of the Password rule. Typically, the `defaults` rule should be called within the `boot` method of one of your application's service providers:

```php
use Illuminate\Validation\Rules\Password;

/**
 * Bootstrap any application services.
 */
public function boot(): void
{
    Password::defaults(function () {
        $rule = Password::min(8);

        return $this->app->isProduction()
            ? $rule->mixedCase()->uncompromised()
            : $rule;
    });
}
```

Then, when you would like to apply the default rules to a particular password undergoing validation, you may invoke the `defaults` method with no arguments:

```php
'password' => ['required', Password::defaults()],
```

Occasionally, you may want to attach additional validation rules to your default password validation rules. You may use the `rules` method to accomplish this:

```php
use App\Rules\ZxcvbnRule;

Password::defaults(function () {
    $rule = Password::min(8)->rules([new ZxcvbnRule]);

    // ...
});
```

<a name="custom-validation-rules"></a>
## Custom Validation Rules

<a name="using-rule-objects"></a>
### Using Rule Objects

Laravel provides a variety of helpful validation rules; however, you may wish to specify some of your own. One method of registering custom validation rules is using rule objects. To generate a new rule object, you may use the `make:rule` Artisan command. Let's use this command to generate a rule that verifies a string is uppercase. Laravel will place the new rule in the `app/Rules` directory. If this directory does not exist, Laravel will create it when you execute the Artisan command to create your rule:

```shell
php artisan make:rule Uppercase
```

Once the rule has been created, we are ready to define its behavior. A rule object contains a single method: `validate`. This method receives the attribute name, its value, and a callback that should be invoked on failure with the validation error message:

```php
<?php

namespace App\Rules;

use Closure;
use Illuminate\Contracts\Validation\ValidationRule;

class Uppercase implements ValidationRule
{
    /**
     * Run the validation rule.
     */
    public function validate(string $attribute, mixed $value, Closure $fail): void
    {
        if (strtoupper($value) !== $value) {
            $fail('The :attribute must be uppercase.');
        }
    }
}
```

Once the rule has been defined, you may attach it to a validator by passing an instance of the rule object with your other validation rules:

```php
use App\Rules\Uppercase;

$request->validate([
    'name' => ['required', 'string', new Uppercase],
]);
```

#### Translating Validation Messages

Instead of providing a literal error message to the `$fail` closure, you may also provide a [translation string key](/docs/{{version}}/localization) and instruct Laravel to translate the error message:

```php
if (strtoupper($value) !== $value) {
    $fail('validation.uppercase')->translate();
}
```

If necessary, you may provide placeholder replacements and the preferred language as the first and second arguments to the `translate` method:

```php
$fail('validation.location')->translate([
    'value' => $this->value,
], 'fr');
```

#### Accessing Additional Data

If your custom validation rule class needs to access all of the other data undergoing validation, your rule class may implement the `Illuminate\Contracts\Validation\DataAwareRule` interface. This interface requires your class to define a `setData` method. This method will automatically be invoked by Laravel (before validation proceeds) with all of the data under validation:

```php
<?php

namespace App\Rules;

use Illuminate\Contracts\Validation\DataAwareRule;
use Illuminate\Contracts\Validation\ValidationRule;

class Uppercase implements DataAwareRule, ValidationRule
{
    /**
     * All of the data under validation.
     *
     * @var array<string, mixed>
     */
    protected $data = [];

    // ...

    /**
     * Set the data under validation.
     *
     * @param  array<string, mixed>  $data
     */
    public function setData(array $data): static
    {
        $this->data = $data;

        return $this;
    }
}
```

Or, if your validation rule requires access to the validator instance performing the validation, you may implement the `ValidatorAwareRule` interface:

```php
<?php

namespace App\Rules;

use Illuminate\Contracts\Validation\ValidationRule;
use Illuminate\Contracts\Validation\ValidatorAwareRule;
use Illuminate\Validation\Validator;

class Uppercase implements ValidationRule, ValidatorAwareRule
{
    /**
     * The validator instance.
     *
     * @var \Illuminate\Validation\Validator
     */
    protected $validator;

    // ...

    /**
     * Set the current validator.
     */
    public function setValidator(Validator $validator): static
    {
        $this->validator = $validator;

        return $this;
    }
}
```

<a name="using-closures"></a>
### Using Closures

If you only need the functionality of a custom rule once throughout your application, you may use a closure instead of a rule object. The closure receives the attribute's name, the attribute's value, and a `$fail` callback that should be called if validation fails:

```php
use Illuminate\Support\Facades\Validator;
use Closure;

$validator = Validator::make($request->all(), [
    'title' => [
        'required',
        'max:255',
        function (string $attribute, mixed $value, Closure $fail) {
            if ($value === 'foo') {
                $fail("The {$attribute} is invalid.");
            }
        },
    ],
]);
```

<a name="implicit-rules"></a>
### Implicit Rules

By default, when an attribute being validated is not present or contains an empty string, normal validation rules, including custom rules, are not run. For example, the [unique](#rule-unique) rule will not be run against an empty string:

```php
use Illuminate\Support\Facades\Validator;

$rules = ['name' => ['unique:users,name']];

$input = ['name' => ''];

Validator::make($input, $rules)->passes(); // true
```

For a custom rule to run even when an attribute is empty, the rule must imply that the attribute is required. To quickly generate a new implicit rule object, you may use the `make:rule` Artisan command with the `--implicit` option:

```shell
php artisan make:rule Uppercase --implicit
```

> [!WARNING]
> An "implicit" rule only _implies_ that the attribute is required. Whether it actually invalidates a missing or empty attribute is up to you.


---

# Email Verification

*Sección: Laravel | Origen: https://laravel.com/docs/13.x/verification*

- [Introduction](#introduction)
    - [Model Preparation](#model-preparation)
    - [Database Preparation](#database-preparation)
- [Routing](#verification-routing)
    - [The Email Verification Notice](#the-email-verification-notice)
    - [The Email Verification Handler](#the-email-verification-handler)
    - [Resending the Verification Email](#resending-the-verification-email)
    - [Protecting Routes](#protecting-routes)
- [Customization](#customization)
- [Events](#events)

<a name="introduction"></a>
## Introduction

Many web applications require users to verify their email addresses before using the application. Rather than forcing you to re-implement this feature by hand for each application you create, Laravel provides convenient built-in services for sending and verifying email verification requests.

> [!NOTE]
> Want to get started fast? Install one of the [Laravel application starter kits](/docs/{{version}}/starter-kits) in a fresh Laravel application. The starter kits will take care of scaffolding your entire authentication system, including email verification support.

<a name="model-preparation"></a>
### Model Preparation

Before getting started, verify that your `App\Models\User` model implements the `Illuminate\Contracts\Auth\MustVerifyEmail` contract:

```php
<?php

namespace App\Models;

use Illuminate\Contracts\Auth\MustVerifyEmail;
use Illuminate\Foundation\Auth\User as Authenticatable;
use Illuminate\Notifications\Notifiable;

class User extends Authenticatable implements MustVerifyEmail
{
    use Notifiable;

    // ...
}
```

Once this interface has been added to your model, newly registered users will automatically be sent an email containing an email verification link. This happens seamlessly because Laravel automatically registers the `Illuminate\Auth\Listeners\SendEmailVerificationNotification` [listener](/docs/{{version}}/events) for the `Illuminate\Auth\Events\Registered` event.

If you are manually implementing registration within your application instead of using [a starter kit](/docs/{{version}}/starter-kits), you should ensure that you are dispatching the `Illuminate\Auth\Events\Registered` event after a user's registration is successful:

```php
use Illuminate\Auth\Events\Registered;

event(new Registered($user));
```

<a name="database-preparation"></a>
### Database Preparation

Next, your `users` table must contain an `email_verified_at` column to store the date and time that the user's email address was verified. Typically, this is included in Laravel's default `0001_01_01_000000_create_users_table.php` database migration.

<a name="verification-routing"></a>
## Routing

To properly implement email verification, three routes will need to be defined. First, a route will be needed to display a notice to the user that they should click the email verification link in the verification email that Laravel sent them after registration.

Second, a route will be needed to handle requests generated when the user clicks the email verification link in the email.

Third, a route will be needed to resend a verification link if the user accidentally loses the first verification link.

<a name="the-email-verification-notice"></a>
### The Email Verification Notice

As mentioned previously, a route should be defined that will return a view instructing the user to click the email verification link that was emailed to them by Laravel after registration. This view will be displayed to users when they try to access other parts of the application without verifying their email address first. Remember, the link is automatically emailed to the user as long as your `App\Models\User` model implements the `MustVerifyEmail` interface:

```php
Route::get('/email/verify', function () {
    return view('auth.verify-email');
})->middleware('auth')->name('verification.notice');
```

The route that returns the email verification notice should be named `verification.notice`. It is important that the route is assigned this exact name since the `verified` middleware [included with Laravel](#protecting-routes) will automatically redirect to this route name if a user has not verified their email address.

> [!NOTE]
> When manually implementing email verification, you are required to define the contents of the verification notice view yourself. If you would like scaffolding that includes all necessary authentication and verification views, check out the [Laravel application starter kits](/docs/{{version}}/starter-kits).

<a name="the-email-verification-handler"></a>
### The Email Verification Handler

Next, we need to define a route that will handle requests generated when the user clicks the email verification link that was emailed to them. This route should be named `verification.verify` and be assigned the `auth` and `signed` middlewares:

```php
use Illuminate\Foundation\Auth\EmailVerificationRequest;

Route::get('/email/verify/{id}/{hash}', function (EmailVerificationRequest $request) {
    $request->fulfill();

    return redirect('/home');
})->middleware(['auth', 'signed'])->name('verification.verify');
```

Before moving on, let's take a closer look at this route. First, you'll notice we are using an `EmailVerificationRequest` request type instead of the typical `Illuminate\Http\Request` instance. The `EmailVerificationRequest` is a [form request](/docs/{{version}}/validation#form-request-validation) that is included with Laravel. This request will automatically take care of validating the request's `id` and `hash` parameters.

Next, we can proceed directly to calling the `fulfill` method on the request. This method will call the `markEmailAsVerified` method on the authenticated user and dispatch the `Illuminate\Auth\Events\Verified` event. The `markEmailAsVerified` method is available to the default `App\Models\User` model via the `Illuminate\Foundation\Auth\User` base class. Once the user's email address has been verified, you may redirect them wherever you wish.

<a name="resending-the-verification-email"></a>
### Resending the Verification Email

Sometimes a user may misplace or accidentally delete the email address verification email. To accommodate this, you may wish to define a route to allow the user to request that the verification email be resent. You may then make a request to this route by placing a simple form submission button within your [verification notice view](#the-email-verification-notice):

```php
use Illuminate\Http\Request;

Route::post('/email/verification-notification', function (Request $request) {
    $request->user()->sendEmailVerificationNotification();

    return back()->with('message', 'Verification link sent!');
})->middleware(['auth', 'throttle:6,1'])->name('verification.send');
```

<a name="protecting-routes"></a>
### Protecting Routes

[Route middleware](/docs/{{version}}/middleware) may be used to only allow verified users to access a given route. Laravel includes a `verified` [middleware alias](/docs/{{version}}/middleware#middleware-aliases), which is an alias for the `Illuminate\Auth\Middleware\EnsureEmailIsVerified` middleware class. Since this alias is already automatically registered by Laravel, all you need to do is attach the `verified` middleware to a route definition. Typically, this middleware is paired with the `auth` middleware:

```php
Route::get('/profile', function () {
    // Only verified users may access this route...
})->middleware(['auth', 'verified']);
```

If an unverified user attempts to access a route that has been assigned this middleware, they will automatically be redirected to the `verification.notice` [named route](/docs/{{version}}/routing#named-routes).

<a name="customization"></a>
## Customization

<a name="verification-email-customization"></a>
#### Verification Email Customization

Although the default email verification notification should satisfy the requirements of most applications, Laravel allows you to customize how the email verification mail message is constructed.

To get started, pass a closure to the `toMailUsing` method provided by the `Illuminate\Auth\Notifications\VerifyEmail` notification. The closure will receive the notifiable model instance that is receiving the notification as well as the signed email verification URL that the user must visit to verify their email address. The closure should return an instance of `Illuminate\Notifications\Messages\MailMessage`. Typically, you should call the `toMailUsing` method from the `boot` method of your application's `AppServiceProvider` class:

```php
use Illuminate\Auth\Notifications\VerifyEmail;
use Illuminate\Notifications\Messages\MailMessage;

/**
 * Bootstrap any application services.
 */
public function boot(): void
{
    // ...

    VerifyEmail::toMailUsing(function (object $notifiable, string $url) {
        return (new MailMessage)
            ->subject('Verify Email Address')
            ->line('Click the button below to verify your email address.')
            ->action('Verify Email Address', $url);
    });
}
```

> [!NOTE]
> To learn more about mail notifications, please consult the [mail notification documentation](/docs/{{version}}/notifications#mail-notifications).

<a name="events"></a>
## Events

When using the [Laravel application starter kits](/docs/{{version}}/starter-kits), Laravel dispatches an `Illuminate\Auth\Events\Verified` [event](/docs/{{version}}/events) during the email verification process. If you are manually handling email verification for your application, you may wish to manually dispatch these events after verification is completed.


---

# Views

*Sección: Laravel | Origen: https://laravel.com/docs/13.x/views*

- [Introduction](#introduction)
    - [Writing Views in React / Svelte / Vue](#writing-views-in-react-svelte-or-vue)
- [Creating and Rendering Views](#creating-and-rendering-views)
    - [Nested View Directories](#nested-view-directories)
    - [Creating the First Available View](#creating-the-first-available-view)
    - [Determining if a View Exists](#determining-if-a-view-exists)
- [Passing Data to Views](#passing-data-to-views)
    - [Sharing Data With All Views](#sharing-data-with-all-views)
- [View Composers](#view-composers)
    - [View Creators](#view-creators)
- [Optimizing Views](#optimizing-views)

<a name="introduction"></a>
## Introduction

Of course, it's not practical to return entire HTML documents strings directly from your routes and controllers. Thankfully, views provide a convenient way to place all of our HTML in separate files.

Views separate your controller / application logic from your presentation logic and are stored in the `resources/views` directory. When using Laravel, view templates are usually written using the [Blade templating language](/docs/{{version}}/blade). A simple view might look something like this:

```blade
<!-- View stored in resources/views/greeting.blade.php -->

<html>
    <body>
        <h1>Hello, {{ $name }}</h1>
    </body>
</html>
```

Since this view is stored at `resources/views/greeting.blade.php`, we may return it using the global `view` helper like so:

```php
Route::get('/', function () {
    return view('greeting', ['name' => 'James']);
});
```

> [!NOTE]
> Looking for more information on how to write Blade templates? Check out the full [Blade documentation](/docs/{{version}}/blade) to get started.

<a name="writing-views-in-react-svelte-or-vue"></a>
### Writing Views in React / Svelte / Vue

Instead of writing their frontend templates in PHP via Blade, many developers have begun to prefer to write their templates using React, Svelte, or Vue. Laravel makes this painless thanks to [Inertia](https://inertiajs.com/), a library that makes it a cinch to tie your React / Svelte / Vue frontend to your Laravel backend without the typical complexities of building an SPA.

Our [React, Svelte, and Vue application starter kits](/docs/{{version}}/starter-kits) give you a great starting point for your next Laravel application powered by Inertia.

<a name="creating-and-rendering-views"></a>
## Creating and Rendering Views

You may create a view by placing a file with the `.blade.php` extension in your application's `resources/views` directory or by using the `make:view` Artisan command:

```shell
php artisan make:view greeting
```

The `.blade.php` extension informs the framework that the file contains a [Blade template](/docs/{{version}}/blade). Blade templates contain HTML as well as Blade directives that allow you to easily echo values, create "if" statements, iterate over data, and more.

Once you have created a view, you may return it from one of your application's routes or controllers using the global `view` helper:

```php
Route::get('/', function () {
    return view('greeting', ['name' => 'James']);
});
```

Views may also be returned using the `View` facade:

```php
use Illuminate\Support\Facades\View;

return View::make('greeting', ['name' => 'James']);
```

As you can see, the first argument passed to the `view` helper corresponds to the name of the view file in the `resources/views` directory. The second argument is an array of data that should be made available to the view. In this case, we are passing the `name` variable, which is displayed in the view using [Blade syntax](/docs/{{version}}/blade).

<a name="nested-view-directories"></a>
### Nested View Directories

Views may also be nested within subdirectories of the `resources/views` directory. "Dot" notation may be used to reference nested views. For example, if your view is stored at `resources/views/admin/profile.blade.php`, you may return it from one of your application's routes / controllers like so:

```php
return view('admin.profile', $data);
```

> [!WARNING]
> View directory names should not contain the `.` character.

<a name="creating-the-first-available-view"></a>
### Creating the First Available View

Using the `View` facade's `first` method, you may create the first view that exists in a given array of views. This may be useful if your application or package allows views to be customized or overwritten:

```php
use Illuminate\Support\Facades\View;

return View::first(['custom.admin', 'admin'], $data);
```

<a name="determining-if-a-view-exists"></a>
### Determining if a View Exists

If you need to determine if a view exists, you may use the `View` facade. The `exists` method will return `true` if the view exists:

```php
use Illuminate\Support\Facades\View;

if (View::exists('admin.profile')) {
    // ...
}
```

<a name="passing-data-to-views"></a>
## Passing Data to Views

As you saw in the previous examples, you may pass an array of data to views to make that data available to the view:

```php
return view('greetings', ['name' => 'Victoria']);
```

When passing information in this manner, the data should be an array with key / value pairs. After providing data to a view, you can then access each value within your view using the data's keys, such as `<?php echo $name; ?>`.

As an alternative to passing a complete array of data to the `view` helper function, you may use the `with` method to add individual pieces of data to the view. The `with` method returns an instance of the view object so that you can continue chaining methods before returning the view:

```php
return view('greeting')
    ->with('name', 'Victoria')
    ->with('occupation', 'Astronaut');
```

<a name="sharing-data-with-all-views"></a>
### Sharing Data With All Views

Occasionally, you may need to share data with all views that are rendered by your application. You may do so using the `View` facade's `share` method. Typically, you should place calls to the `share` method within a service provider's `boot` method. You are free to add them to the `App\Providers\AppServiceProvider` class or generate a separate service provider to house them:

```php
<?php

namespace App\Providers;

use Illuminate\Support\Facades\View;

class AppServiceProvider extends ServiceProvider
{
    /**
     * Register any application services.
     */
    public function register(): void
    {
        // ...
    }

    /**
     * Bootstrap any application services.
     */
    public function boot(): void
    {
        View::share('key', 'value');
    }
}
```

<a name="view-composers"></a>
## View Composers

View composers are callbacks or class methods that are called when a view is rendered. If you have data that you want to be bound to a view each time that view is rendered, a view composer can help you organize that logic into a single location. View composers may prove particularly useful if the same view is returned by multiple routes or controllers within your application and always needs a particular piece of data.

Typically, view composers will be registered within one of your application's [service providers](/docs/{{version}}/providers). In this example, we'll assume that the `App\Providers\AppServiceProvider` will house this logic.

We'll use the `View` facade's `composer` method to register the view composer. Laravel does not include a default directory for class-based view composers, so you are free to organize them however you wish. For example, you could create an `app/View/Composers` directory to house all of your application's view composers:

```php
<?php

namespace App\Providers;

use App\View\Composers\ProfileComposer;
use Illuminate\Support\Facades;
use Illuminate\Support\ServiceProvider;
use Illuminate\View\View;

class AppServiceProvider extends ServiceProvider
{
    /**
     * Register any application services.
     */
    public function register(): void
    {
        // ...
    }

    /**
     * Bootstrap any application services.
     */
    public function boot(): void
    {
        // Using class-based composers...
        Facades\View::composer('profile', ProfileComposer::class);

        // Using closure-based composers...
        Facades\View::composer('welcome', function (View $view) {
            // ...
        });

        Facades\View::composer('dashboard', function (View $view) {
            // ...
        });
    }
}
```

Now that we have registered the composer, the `compose` method of the `App\View\Composers\ProfileComposer` class will be executed each time the `profile` view is being rendered. Let's take a look at an example of the composer class:

```php
<?php

namespace App\View\Composers;

use App\Repositories\UserRepository;
use Illuminate\View\View;

class ProfileComposer
{
    /**
     * Create a new profile composer.
     */
    public function __construct(
        protected UserRepository $users,
    ) {}

    /**
     * Bind data to the view.
     */
    public function compose(View $view): void
    {
        $view->with('count', $this->users->count());
    }
}
```

As you can see, all view composers are resolved via the [service container](/docs/{{version}}/container), so you may type-hint any dependencies you need within a composer's constructor.

<a name="attaching-a-composer-to-multiple-views"></a>
#### Attaching a Composer to Multiple Views

You may attach a view composer to multiple views at once by passing an array of views as the first argument to the `composer` method:

```php
use App\Views\Composers\MultiComposer;
use Illuminate\Support\Facades\View;

View::composer(
    ['profile', 'dashboard'],
    MultiComposer::class
);
```

The `composer` method also accepts the `*` character as a wildcard, allowing you to attach a composer to all views:

```php
use Illuminate\Support\Facades;
use Illuminate\View\View;

Facades\View::composer('*', function (View $view) {
    // ...
});
```

<a name="view-creators"></a>
### View Creators

View "creators" are very similar to view composers; however, they are executed immediately after the view is instantiated instead of waiting until the view is about to render. To register a view creator, use the `creator` method:

```php
use App\View\Creators\ProfileCreator;
use Illuminate\Support\Facades\View;

View::creator('profile', ProfileCreator::class);
```

<a name="optimizing-views"></a>
## Optimizing Views

By default, Blade template views are compiled on demand. When a request is executed that renders a view, Laravel will determine if a compiled version of the view exists. If the file exists, Laravel will then determine if the uncompiled view has been modified more recently than the compiled view. If the compiled view either does not exist, or the uncompiled view has been modified, Laravel will recompile the view.

Compiling views during the request may have a small negative impact on performance, so Laravel provides the `view:cache` Artisan command to precompile all of the views utilized by your application. For increased performance, you may wish to run this command as part of your deployment process:

```shell
php artisan view:cache
```

You may use the `view:clear` command to clear the view cache:

```shell
php artisan view:clear
```


---

# Asset Bundling (Vite)

*Sección: Laravel | Origen: https://laravel.com/docs/13.x/vite*

- [Introduction](#introduction)
- [Installation & Setup](#installation)
  - [Installing Node](#installing-node)
  - [Installing Vite and the Laravel Plugin](#installing-vite-and-laravel-plugin)
  - [Configuring Vite](#configuring-vite)
  - [Loading Your Scripts and Styles](#loading-your-scripts-and-styles)
- [Running Vite](#running-vite)
- [Working With JavaScript](#working-with-scripts)
  - [Aliases](#aliases)
  - [Vue](#vue)
  - [React](#react)
  - [Svelte](#svelte)
  - [Inertia](#inertia)
  - [URL Processing](#url-processing)
- [Working With Stylesheets](#working-with-stylesheets)
- [Working With Fonts](#working-with-fonts)
  - [Font Providers](#font-providers)
  - [Local Fonts](#local-fonts)
  - [Font Options](#font-options)
- [Working With Blade and Routes](#working-with-blade-and-routes)
  - [Processing Static Assets With Vite](#blade-processing-static-assets)
  - [Refreshing on Save](#blade-refreshing-on-save)
  - [Aliases](#blade-aliases)
- [Asset Prefetching](#asset-prefetching)
- [Custom Base URLs](#custom-base-urls)
- [Environment Variables](#environment-variables)
- [Disabling Vite in Tests](#disabling-vite-in-tests)
- [Server-Side Rendering (SSR)](#ssr)
- [Script and Style Tag Attributes](#script-and-style-attributes)
  - [Content Security Policy (CSP) Nonce](#content-security-policy-csp-nonce)
  - [Subresource Integrity (SRI)](#subresource-integrity-sri)
  - [Arbitrary Attributes](#arbitrary-attributes)
- [Advanced Customization](#advanced-customization)
  - [Dev Server Cross-Origin Resource Sharing (CORS)](#cors)
  - [Correcting Dev Server URLs](#correcting-dev-server-urls)

<a name="introduction"></a>
## Introduction

[Vite](https://vitejs.dev) is a modern frontend build tool that provides an extremely fast development environment and bundles your code for production. When building applications with Laravel, you will typically use Vite to bundle your application's CSS and JavaScript files into production-ready assets.

Laravel integrates seamlessly with Vite by providing an official plugin and Blade directive to load your assets for development and production.

<a name="installation"></a>
## Installation & Setup

> [!NOTE]
> The following documentation discusses how to manually install and configure the Laravel Vite plugin. However, Laravel's [starter kits](/docs/{{version}}/starter-kits) already include all of this scaffolding and are the fastest way to get started with Laravel and Vite.

<a name="installing-node"></a>
### Installing Node

You must ensure that Node.js (16+) and NPM are installed before running Vite and the Laravel plugin:

```shell
node -v
npm -v
```

You can easily install the latest version of Node and NPM using simple graphical installers from [the official Node website](https://nodejs.org/en/download/). Or, if you are using [Laravel Sail](https://laravel.com/docs/{{version}}/sail), you may invoke Node and NPM through Sail:

```shell
./vendor/bin/sail node -v
./vendor/bin/sail npm -v
```

<a name="installing-vite-and-laravel-plugin"></a>
### Installing Vite and the Laravel Plugin

Within a fresh installation of Laravel, you will find a `package.json` file in the root of your application's directory structure. The default `package.json` file already includes everything you need to get started using Vite and the Laravel plugin. You may install your application's frontend dependencies via NPM:

```shell
npm install
```

<a name="configuring-vite"></a>
### Configuring Vite

Vite is configured via a `vite.config.js` file in the root of your project. You are free to customize this file based on your needs, and you may also install any other plugins your application requires, such as `@vitejs/plugin-react`, `@sveltejs/vite-plugin-svelte` or `@vitejs/plugin-vue`.

The Laravel Vite plugin requires you to specify the entry points for your application. These may be JavaScript or CSS files, and include preprocessed languages such as TypeScript, JSX, TSX, and Sass.

```js
import { defineConfig } from 'vite';
import laravel from 'laravel-vite-plugin';

export default defineConfig({
    plugins: [
        laravel([
            'resources/css/app.css',
            'resources/js/app.js',
        ]),
    ],
});
```

If you are building an SPA, including applications built using Inertia, Vite works best without CSS entry points:

```js
import { defineConfig } from 'vite';
import laravel from 'laravel-vite-plugin';

export default defineConfig({
    plugins: [
        laravel([
            'resources/css/app.css', // [tl! remove]
            'resources/js/app.js',
        ]),
    ],
});
```

Instead, you should import your CSS via JavaScript. Typically, this would be done in your application's `resources/js/app.js` file:

```js
import './bootstrap';
import '../css/app.css'; // [tl! add]
```

The Laravel plugin also supports multiple entry points and advanced configuration options such as [SSR entry points](#ssr).

<a name="working-with-a-secure-development-server"></a>
#### Working With a Secure Development Server

If your local development web server is serving your application via HTTPS, you may run into issues connecting to the Vite development server.

If you are using [Laravel Herd](https://herd.laravel.com) and have secured the site or you are using [Laravel Valet](/docs/{{version}}/valet) and have run the [secure command](/docs/{{version}}/valet#securing-sites) against your application, the Laravel Vite plugin will automatically detect and use the generated TLS certificate for you.

If you secured the site using a host that does not match the application's directory name, you may manually specify the host in your application's `vite.config.js` file:

```js
import { defineConfig } from 'vite';
import laravel from 'laravel-vite-plugin';

export default defineConfig({
    plugins: [
        laravel({
            // ...
            detectTls: 'my-app.test', // [tl! add]
        }),
    ],
});
```

When using another web server, you should generate a trusted certificate and manually configure Vite to use the generated certificates:

```js
// ...
import fs from 'fs'; // [tl! add]

const host = 'my-app.test'; // [tl! add]

export default defineConfig({
    // ...
    server: { // [tl! add]
        host, // [tl! add]
        hmr: { host }, // [tl! add]
        https: { // [tl! add]
            key: fs.readFileSync(`/path/to/${host}.key`), // [tl! add]
            cert: fs.readFileSync(`/path/to/${host}.crt`), // [tl! add]
        }, // [tl! add]
    }, // [tl! add]
});
```

If you are unable to generate a trusted certificate for your system, you may install and configure the [@vitejs/plugin-basic-ssl plugin](https://github.com/vitejs/vite-plugin-basic-ssl). When using untrusted certificates, you will need to accept the certificate warning for Vite's development server in your browser by following the "Local" link in your console when running the `npm run dev` command.

<a name="configuring-hmr-in-sail-on-wsl2"></a>
#### Running the Development Server in Sail on WSL2

When running the Vite development server within [Laravel Sail](/docs/{{version}}/sail) on Windows Subsystem for Linux 2 (WSL2), you should add the following configuration to your `vite.config.js` file to ensure the browser can communicate with the development server:

```js
// ...

export default defineConfig({
    // ...
    server: { // [tl! add:start]
        hmr: {
            host: 'localhost',
        },
    }, // [tl! add:end]
});
```

If your file changes are not being reflected in the browser while the development server is running, you may also need to configure Vite's [server.watch.usePolling option](https://vitejs.dev/config/server-options.html#server-watch).

<a name="loading-your-scripts-and-styles"></a>
### Loading Your Scripts and Styles

With your Vite entry points configured, you may now reference them in a `@vite()` Blade directive that you add to the `<head>` of your application's root template:

```blade
<!DOCTYPE html>
<head>
    {{-- ... --}}

    @vite(['resources/css/app.css', 'resources/js/app.js'])
</head>
```

If you're importing your CSS via JavaScript, you only need to include the JavaScript entry point:

```blade
<!DOCTYPE html>
<head>
    {{-- ... --}}

    @vite('resources/js/app.js')
</head>
```

The `@vite` directive will automatically detect the Vite development server and inject the Vite client to enable Hot Module Replacement. In build mode, the directive will load your compiled and versioned assets, including any imported CSS.

If needed, you may also specify the build path of your compiled assets when invoking the `@vite` directive:

```blade
<!doctype html>
<head>
    {{-- Given build path is relative to public path. --}}

    @vite('resources/js/app.js', 'vendor/courier/build')
</head>
```

<a name="inline-assets"></a>
#### Inline Assets

Sometimes it may be necessary to include the raw content of assets rather than linking to the versioned URL of the asset. For example, you may need to include asset content directly into your page when passing HTML content to a PDF generator. You may output the content of Vite assets using the `content` method provided by the `Vite` facade:

```blade
@use('Illuminate\Support\Facades\Vite')

<!doctype html>
<head>
    {{-- ... --}}

    <style>
        {!! Vite::content('resources/css/app.css') !!}
    </style>
    <script>
        {!! Vite::content('resources/js/app.js') !!}
    </script>
</head>
```

<a name="running-vite"></a>
## Running Vite

There are two ways you can run Vite. You may run the development server via the `dev` command, which is useful while developing locally. The development server will automatically detect changes to your files and instantly reflect them in any open browser windows.

Or, running the `build` command will version and bundle your application's assets and get them ready for you to deploy to production:

```shell
# Run the Vite development server...
npm run dev

# Build and version the assets for production...
npm run build
```

If you are running the development server in [Sail](/docs/{{version}}/sail) on WSL2, you may need some [additional configuration](#configuring-hmr-in-sail-on-wsl2) options.

<a name="working-with-scripts"></a>
## Working With JavaScript

<a name="aliases"></a>
### Aliases

By default, The Laravel plugin provides a common alias to help you hit the ground running and conveniently import your application's assets:

```js
{
    '@' => '/resources/js'
}
```

You may overwrite the `'@'` alias by adding your own to the `vite.config.js` configuration file:

```js
import { defineConfig } from 'vite';
import laravel from 'laravel-vite-plugin';

export default defineConfig({
    plugins: [
        laravel(['resources/ts/app.tsx']),
    ],
    resolve: {
        alias: {
            '@': '/resources/ts',
        },
    },
});
```

<a name="vue"></a>
### Vue

If you would like to build your frontend using the [Vue](https://vuejs.org/) framework, then you will also need to install the `@vitejs/plugin-vue` plugin:

```shell
npm install --save-dev @vitejs/plugin-vue
```

You may then include the plugin in your `vite.config.js` configuration file. There are a few additional options you will need when using the Vue plugin with Laravel:

```js
import { defineConfig } from 'vite';
import laravel from 'laravel-vite-plugin';
import vue from '@vitejs/plugin-vue';

export default defineConfig({
    plugins: [
        laravel(['resources/js/app.js']),
        vue({
            template: {
                transformAssetUrls: {
                    // The Vue plugin will re-write asset URLs, when referenced
                    // in Single File Components, to point to the Laravel web
                    // server. Setting this to `null` allows the Laravel plugin
                    // to instead re-write asset URLs to point to the Vite
                    // server instead.
                    base: null,

                    // The Vue plugin will parse absolute URLs and treat them
                    // as absolute paths to files on disk. Setting this to
                    // `false` will leave absolute URLs un-touched so they can
                    // reference assets in the public directory as expected.
                    includeAbsolute: false,
                },
            },
        }),
    ],
});
```

> [!NOTE]
> Laravel's [starter kits](/docs/{{version}}/starter-kits) already include the proper Laravel, Vue, and Vite configuration. These starter kits offer the fastest way to get started with Laravel, Vue, and Vite.

<a name="react"></a>
### React

If you would like to build your frontend using the [React](https://reactjs.org/) framework, then you will also need to install the `@vitejs/plugin-react` plugin:

```shell
npm install --save-dev @vitejs/plugin-react
```

You may then include the plugin in your `vite.config.js` configuration file:

```js
import { defineConfig } from 'vite';
import laravel from 'laravel-vite-plugin';
import react from '@vitejs/plugin-react';

export default defineConfig({
    plugins: [
        laravel(['resources/js/app.jsx']),
        react(),
    ],
});
```

You will need to ensure that any files containing JSX have a `.jsx` or `.tsx` extension, remembering to update your entry point, if required, as [shown above](#configuring-vite).

You will also need to include the additional `@viteReactRefresh` Blade directive alongside your existing `@vite` directive.

```blade
@viteReactRefresh
@vite('resources/js/app.jsx')
```

The `@viteReactRefresh` directive must be called before the `@vite` directive.

> [!NOTE]
> Laravel's [starter kits](/docs/{{version}}/starter-kits) already include the proper Laravel, React, and Vite configuration. These starter kits offer the fastest way to get started with Laravel, React, and Vite.

<a name="svelte"></a>
### Svelte

If you would like to build your frontend using the [Svelte](https://svelte.dev/) framework, then you will also need to install the `@sveltejs/vite-plugin-svelte` plugin:

```shell
npm install --save-dev @sveltejs/vite-plugin-svelte
```

You may then include the plugin in your `vite.config.js` configuration file.

```js
import { svelte } from '@sveltejs/vite-plugin-svelte';
import laravel from 'laravel-vite-plugin';
import { defineConfig } from 'vite';

export default defineConfig({
  plugins: [
    laravel({
      input: ['resources/js/app.ts'],
      ssr: 'resources/js/ssr.ts',
      refresh: true,
    }),
    svelte(),
  ],
});
```

> [!NOTE]
> Laravel's [starter kits](/docs/{{version}}/starter-kits) already include the proper Laravel, Svelte, and Vite configuration. These starter kits offer the fastest way to get started with Laravel, Svelte, and Vite.

<a name="inertia"></a>
### Inertia

The Laravel Vite plugin provides a convenient `resolvePageComponent` function to help you resolve your Inertia page components. Below is an example of the helper in use with Vue 3; however, you may also utilize the function in other frameworks such as React or Svelte:

```js
import { createApp, h } from 'vue';
import { createInertiaApp } from '@inertiajs/vue3';
import { resolvePageComponent } from 'laravel-vite-plugin/inertia-helpers';

createInertiaApp({
  resolve: (name) => resolvePageComponent(`./Pages/${name}.vue`, import.meta.glob('./Pages/**/*.vue')),
  setup({ el, App, props, plugin }) {
    createApp({ render: () => h(App, props) })
      .use(plugin)
      .mount(el)
  },
});
```

If you are using Vite's code splitting feature with Inertia, we recommend configuring [asset prefetching](#asset-prefetching).

> [!NOTE]
> Laravel's [starter kits](/docs/{{version}}/starter-kits) already include the proper Laravel, Inertia, and Vite configuration. These starter kits offer the fastest way to get started with Laravel, Inertia, and Vite.

<a name="url-processing"></a>
### URL Processing

When using Vite and referencing assets in your application's HTML, CSS, or JS, there are a couple of caveats to consider. First, if you reference assets with an absolute path, Vite will not include the asset in the build; therefore, you should ensure that the asset is available in your public directory. You should avoid using absolute paths when using a [dedicated CSS entrypoint](#configuring-vite) because, during development, browsers will try to load these paths from the Vite development server, where the CSS is hosted, rather than from your public directory.

When referencing relative asset paths, you should remember that the paths are relative to the file where they are referenced. Any assets referenced via a relative path will be re-written, versioned, and bundled by Vite.

Consider the following project structure:

```text
public/
  taylor.png
resources/
  js/
    Pages/
      Welcome.vue
  images/
    abigail.png
```

The following example demonstrates how Vite will treat relative and absolute URLs:

```html
<!-- This asset is not handled by Vite and will not be included in the build -->
<img src="/taylor.png">

<!-- This asset will be re-written, versioned, and bundled by Vite -->
<img src="../../images/abigail.png">
```

<a name="working-with-stylesheets"></a>
## Working With Stylesheets

> [!NOTE]
> Laravel's [starter kits](/docs/{{version}}/starter-kits) already include the proper Tailwind and Vite configuration. Or, if you would like to use Tailwind and Laravel without using one of our starter kits, check out [Tailwind's installation guide for Laravel](https://tailwindcss.com/docs/guides/laravel).

All Laravel applications already include Tailwind and a properly configured `vite.config.js` file. So, you only need to start the Vite development server or run the `dev` Composer command, which will start both the Laravel and Vite development servers:

```shell
composer run dev
```

Your application's CSS may be placed within the `resources/css/app.css` file.

<a name="working-with-fonts"></a>
## Working With Fonts

The Laravel Vite plugin can serve optimized, self-hosted fonts for your application. When fonts are configured, the plugin resolves the requested font files, emits them as Vite assets, generates font CSS, and writes a font manifest that may be consumed by Blade's [`@fonts` directive](/docs/{{version}}/blade#fonts).

To configure fonts, import one or more provider helpers from `laravel-vite-plugin/fonts` and add them to the Laravel plugin's `fonts` option:

```js
import { defineConfig } from 'vite';
import laravel from 'laravel-vite-plugin';
import { google } from 'laravel-vite-plugin/fonts';

export default defineConfig({
    plugins: [
        laravel({
            input: 'resources/js/app.js',
            fonts: [
                google('Inter', {
                    alias: 'sans',
                    weights: [400, 500, 600, 700],
                    styles: ['normal', 'italic'],
                    subsets: ['latin'],
                    display: 'swap',
                    preload: [
                        { weight: 400 },
                        { weight: 700 },
                    ],
                    fallbacks: ['system-ui', 'sans-serif'],
                }),
            ],
        }),
    ],
});
```

In this example, the `Inter` font will be available through the `sans` alias. The plugin will generate a `--font-sans` CSS variable and a `.font-sans` utility class that applies the generated font stack.

<a name="font-providers"></a>
### Font Providers

The Laravel Vite plugin includes provider helpers for Google Fonts, Bunny Fonts, Fontsource, and local fonts:

```js
import { defineConfig } from 'vite';
import laravel from 'laravel-vite-plugin';
import { bunny, fontsource, google, local } from 'laravel-vite-plugin/fonts';

export default defineConfig({
    plugins: [
        laravel({
            input: 'resources/js/app.js',
            fonts: [
                google('Inter', { alias: 'sans' }),
                bunny('Figtree', { alias: 'body' }),
                fontsource('JetBrains Mono', { alias: 'mono' }),
                local('Brand Sans', {
                    alias: 'brand',
                    src: 'resources/fonts/brand-sans',
                }),
            ],
        }),
    ],
});
```

The `fontsource` provider reads fonts from an installed Fontsource package. By default, the package name is derived from the font family, such as `@fontsource/jetbrains-mono`. If your application uses a different package name, you may specify it using the `package` option.

<a name="local-fonts"></a>
### Local Fonts

When using local fonts, the `src` option may point to a single font file, a directory, or a glob pattern. The plugin will discover supported font files and infer their weight and style from their filenames:

```js
local('Brand Sans', {
    alias: 'brand',
    src: 'resources/fonts/brand-sans/*.woff2',
})
```

If you need full control over the available variants, you may define them explicitly using the `variants` option:

```js
local('Brand Sans', {
    alias: 'brand',
    variants: [
        { src: 'resources/fonts/BrandSans-Regular.woff2', weight: 400 },
        { src: 'resources/fonts/BrandSans-Italic.woff2', weight: 400, style: 'italic' },
        { src: ['resources/fonts/BrandSans-Bold.woff2', 'resources/fonts/BrandSans-Bold.ttf'], weight: 700 },
    ],
})
```

<a name="font-options"></a>
### Font Options

Depending on the provider, font definitions may accept several options that allow you to customize the generated font CSS:

<div class="content-list" markdown="1">

- `alias` defines the name used by Blade's `@fonts` directive and defaults to a slug of the font family.
- `variable` defines the generated CSS variable and defaults to `--font-{alias}`.
- `weights` defines the remote or Fontsource font weights that should be resolved and defaults to `[400]`.
- `styles` defines the remote or Fontsource font styles that should be resolved and defaults to `['normal']`.
- `subsets` defines the remote or Fontsource font subsets that should be resolved and defaults to `['latin']`.
- `display` defines the `font-display` value and defaults to `swap`.
- `preload` controls which WOFF2 font variants should be preloaded. This option may be `true`, `false`, or an array of `{ weight, style }` selectors.
- `fallbacks` defines additional fallback fonts that should be appended to the generated font stack.
- `optimizedFallbacks` attempts to generate metric-adjusted fallback font faces using the optional `fontaine` package and defaults to `true`.

</div>

Optimized fallbacks require the `fontaine` package, which is not installed by default. If you want Laravel to generate metric-adjusted fallback font faces, you should install `fontaine` as a development dependency:

```shell
npm install --save-dev fontaine
```

If `fontaine` is not installed or cannot read a font file, Laravel will skip the optimized fallback for that font and continue using any fonts configured via the `fallbacks` option.

Local fonts are resolved from the `src` or `variants` options described above instead of using `weights`, `styles`, and `subsets`.

<a name="working-with-blade-and-routes"></a>
## Working With Blade and Routes

<a name="blade-processing-static-assets"></a>
### Processing Static Assets With Vite

When referencing assets in your JavaScript or CSS, Vite automatically processes and versions them. In addition, when building Blade-based applications, Vite can also process and version static assets that you reference solely in Blade templates.

However, to accomplish this, you need to make Vite aware of your assets by specifying them in the plugin's `assets` option. This option is intended for static files that you want to reference directly with `Vite::asset`. If you want Laravel to generate font CSS and preload links, use the [`fonts` option](#working-with-fonts) instead.

For example, if you want to process and version all images stored in `resources/images` and all fonts stored in `resources/fonts`, you should add the following to your Vite configuration:

```js
laravel({
    input: 'resources/js/app.js',
    assets: ['resources/images/**', 'resources/fonts/**'],
})
```

These assets will now be processed by Vite when running `npm run build`. You can then reference these assets in Blade templates using the `Vite::asset` method, which will return the versioned URL for a given asset:

```blade
<img src="{{ Vite::asset('resources/images/logo.png') }}">
```

> [!NOTE]
> Prior to version 3 of the Laravel Vite plugin, static assets had to be imported in your application's entry point using `import.meta.glob`. The `assets` option was introduced due to changes in Vite 8.

<a name="blade-refreshing-on-save"></a>
### Refreshing on Save

When your application is built using traditional server-side rendering with Blade, Vite can improve your development workflow by automatically refreshing the browser when you make changes to view files in your application. To get started, you can simply specify the `refresh` option as `true`.

```js
import { defineConfig } from 'vite';
import laravel from 'laravel-vite-plugin';

export default defineConfig({
    plugins: [
        laravel({
            // ...
            refresh: true,
        }),
    ],
});
```

When the `refresh` option is `true`, saving files in the following directories will trigger the browser to perform a full page refresh while you are running `npm run dev`:

- `app/Livewire/**`
- `app/View/Components/**`
- `lang/**`
- `resources/lang/**`
- `resources/views/**`
- `routes/**`

Watching the `routes/**` directory is useful if you are utilizing [Ziggy](https://github.com/tighten/ziggy) to generate route links within your application's frontend.

If these default paths do not suit your needs, you can specify your own list of paths to watch:

```js
import { defineConfig } from 'vite';
import laravel from 'laravel-vite-plugin';

export default defineConfig({
    plugins: [
        laravel({
            // ...
            refresh: ['resources/views/**'],
        }),
    ],
});
```

Under the hood, the Laravel Vite plugin uses the [vite-plugin-full-reload](https://github.com/ElMassimo/vite-plugin-full-reload) package, which offers some advanced configuration options to fine-tune this feature's behavior. If you need this level of customization, you may provide a `config` definition:

```js
import { defineConfig } from 'vite';
import laravel from 'laravel-vite-plugin';

export default defineConfig({
    plugins: [
        laravel({
            // ...
            refresh: [{
                paths: ['path/to/watch/**'],
                config: { delay: 300 }
            }],
        }),
    ],
});
```

<a name="blade-aliases"></a>
### Aliases

It is common in JavaScript applications to [create aliases](#aliases) to regularly referenced directories. But, you may also create aliases to use in Blade by using the `macro` method on the `Illuminate\Support\Facades\Vite` class. Typically, "macros" should be defined within the `boot` method of a [service provider](/docs/{{version}}/providers):

```php
/**
 * Bootstrap any application services.
 */
public function boot(): void
{
    Vite::macro('image', fn (string $asset) => $this->asset("resources/images/{$asset}"));
}
```

Once a macro has been defined, it can be invoked within your templates. For example, we can use the `image` macro defined above to reference an asset located at `resources/images/logo.png`:

```blade
<img src="{{ Vite::image('logo.png') }}" alt="Laravel Logo">
```

<a name="asset-prefetching"></a>
## Asset Prefetching

When building an SPA using Vite's code splitting feature, required assets are fetched on each page navigation. This behavior can lead to delayed UI rendering. If this is a problem for your frontend framework of choice, Laravel offers the ability to eagerly prefetch your application's JavaScript and CSS assets on initial page load.

You can instruct Laravel to eagerly prefetch your assets by invoking the `Vite::prefetch` method in the `boot` method of a [service provider](/docs/{{version}}/providers):

```php
<?php

namespace App\Providers;

use Illuminate\Support\Facades\Vite;
use Illuminate\Support\ServiceProvider;

class AppServiceProvider extends ServiceProvider
{
    /**
     * Register any application services.
     */
    public function register(): void
    {
        // ...
    }

    /**
     * Bootstrap any application services.
     */
    public function boot(): void
    {
        Vite::prefetch(concurrency: 3);
    }
}
```

In the example above, assets will be prefetched with a maximum of `3` concurrent downloads on each page load. You can modify the concurrency to suit your application's needs or specify no concurrency limit if the application should download all assets at once:

```php
/**
 * Bootstrap any application services.
 */
public function boot(): void
{
    Vite::prefetch();
}
```

By default, prefetching will begin when the [page _load_ event](https://developer.mozilla.org/en-US/docs/Web/API/Window/load_event) fires. If you would like to customize when prefetching begins, you may specify an event that Vite will listen for:

```php
/**
 * Bootstrap any application services.
 */
public function boot(): void
{
    Vite::prefetch(event: 'vite:prefetch');
}
```

Given the code above, prefetching will now begin when you manually dispatch the `vite:prefetch` event on the `window` object. For example, you could have prefetching begin three seconds after the page loads:

```html
<script>
    addEventListener('load', () => setTimeout(() => {
        dispatchEvent(new Event('vite:prefetch'))
    }, 3000))
</script>
```

<a name="custom-base-urls"></a>
## Custom Base URLs

If your Vite compiled assets are deployed to a domain separate from your application, such as via a CDN, you must specify the `ASSET_URL` environment variable within your application's `.env` file:

```env
ASSET_URL=https://cdn.example.com
```

After configuring the asset URL, all re-written URLs to your assets will be prefixed with the configured value:

```text
https://cdn.example.com/build/assets/app.9dce8d17.js
```

Remember that [absolute URLs are not re-written by Vite](#url-processing), so they will not be prefixed.

<a name="environment-variables"></a>
## Environment Variables

You may inject environment variables into your JavaScript by prefixing them with `VITE_` in your application's `.env` file:

```env
VITE_SENTRY_DSN_PUBLIC=http://example.com
```

You may access injected environment variables via the `import.meta.env` object:

```js
import.meta.env.VITE_SENTRY_DSN_PUBLIC
```

<a name="disabling-vite-in-tests"></a>
## Disabling Vite in Tests

Laravel's Vite integration will attempt to resolve your assets while running your tests, which requires you to either run the Vite development server or build your assets.

If you would prefer to mock Vite during testing, you may call the `withoutVite` method, which is available for any tests that extend Laravel's `TestCase` class:

```php tab=Pest
test('without vite example', function () {
    $this->withoutVite();

    // ...
});
```

```php tab=PHPUnit
use Tests\TestCase;

class ExampleTest extends TestCase
{
    public function test_without_vite_example(): void
    {
        $this->withoutVite();

        // ...
    }
}
```

If you would like to disable Vite for all tests, you may call the `withoutVite` method from the `setUp` method on your base `TestCase` class:

```php
<?php

namespace Tests;

use Illuminate\Foundation\Testing\TestCase as BaseTestCase;

abstract class TestCase extends BaseTestCase
{
    protected function setUp(): void// [tl! add:start]
    {
        parent::setUp();

        $this->withoutVite();
    }// [tl! add:end]
}
```

<a name="ssr"></a>
## Server-Side Rendering (SSR)

The Laravel Vite plugin makes it painless to set up server-side rendering with Vite. To get started, create an SSR entry point at `resources/js/ssr.js` and specify the entry point by passing a configuration option to the Laravel plugin:

```js
import { defineConfig } from 'vite';
import laravel from 'laravel-vite-plugin';

export default defineConfig({
    plugins: [
        laravel({
            input: 'resources/js/app.js',
            ssr: 'resources/js/ssr.js',
        }),
    ],
});
```

To ensure you don't forget to rebuild the SSR entry point, we recommend augmenting the "build" script in your application's `package.json` to create your SSR build:

```json
"scripts": {
     "dev": "vite",
     "build": "vite build" // [tl! remove]
     "build": "vite build && vite build --ssr" // [tl! add]
}
```

Then, to build and start the SSR server, you may run the following commands:

```shell
npm run build
node bootstrap/ssr/ssr.js
```

If you are using [SSR with Inertia](https://inertiajs.com/server-side-rendering), you may instead use the `inertia:start-ssr` Artisan command to start the SSR server:

```shell
php artisan inertia:start-ssr
```

> [!NOTE]
> Laravel's [starter kits](/docs/{{version}}/starter-kits) already include the proper Laravel, Inertia SSR, and Vite configuration. These starter kits offer the fastest way to get started with Laravel, Inertia SSR, and Vite.

<a name="script-and-style-attributes"></a>
## Script and Style Tag Attributes

<a name="content-security-policy-csp-nonce"></a>
### Content Security Policy (CSP) Nonce

If you wish to include a [nonce attribute](https://developer.mozilla.org/en-US/docs/Web/HTML/Global_attributes/nonce) on your script and style tags as part of your [Content Security Policy](https://developer.mozilla.org/en-US/docs/Web/HTTP/CSP), you may generate or specify a nonce using the `useCspNonce` method within a custom [middleware](/docs/{{version}}/middleware):

```php
<?php

namespace App\Http\Middleware;

use Closure;
use Illuminate\Http\Request;
use Illuminate\Support\Facades\Vite;
use Symfony\Component\HttpFoundation\Response;

class AddContentSecurityPolicyHeaders
{
    /**
     * Handle an incoming request.
     *
     * @param  \Closure(\Illuminate\Http\Request): (\Symfony\Component\HttpFoundation\Response)  $next
     */
    public function handle(Request $request, Closure $next): Response
    {
        Vite::useCspNonce();

        return $next($request)->withHeaders([
            'Content-Security-Policy' => "script-src 'nonce-".Vite::cspNonce()."'",
        ]);
    }
}
```

After invoking the `useCspNonce` method, Laravel will automatically include the `nonce` attributes on all generated script and style tags.

If you need to specify the nonce elsewhere, including the [Ziggy `@route` directive](https://github.com/tighten/ziggy#using-routes-with-a-content-security-policy) included with Laravel's [starter kits](/docs/{{version}}/starter-kits), you may retrieve it using the `cspNonce` method:

```blade
@routes(nonce: Vite::cspNonce())
```

If you already have a nonce that you would like to instruct Laravel to use, you may pass the nonce to the `useCspNonce` method:

```php
Vite::useCspNonce($nonce);
```

<a name="subresource-integrity-sri"></a>
### Subresource Integrity (SRI)

If your Vite manifest includes `integrity` hashes for your assets, Laravel will automatically add the `integrity` attribute on any script and style tags it generates in order to enforce [Subresource Integrity](https://developer.mozilla.org/en-US/docs/Web/Security/Subresource_Integrity). By default, Vite does not include the `integrity` hash in its manifest, but you may enable it by installing the [vite-plugin-manifest-sri](https://www.npmjs.com/package/vite-plugin-manifest-sri) NPM plugin:

```shell
npm install --save-dev vite-plugin-manifest-sri
```

You may then enable this plugin in your `vite.config.js` file:

```js
import { defineConfig } from 'vite';
import laravel from 'laravel-vite-plugin';
import manifestSRI from 'vite-plugin-manifest-sri';// [tl! add]

export default defineConfig({
    plugins: [
        laravel({
            // ...
        }),
        manifestSRI(),// [tl! add]
    ],
});
```

If required, you may also customize the manifest key where the integrity hash can be found:

```php
use Illuminate\Support\Facades\Vite;

Vite::useIntegrityKey('custom-integrity-key');
```

If you would like to disable this auto-detection completely, you may pass `false` to the `useIntegrityKey` method:

```php
Vite::useIntegrityKey(false);
```

<a name="arbitrary-attributes"></a>
### Arbitrary Attributes

If you need to include additional attributes on your script and style tags, such as the [data-turbo-track](https://turbo.hotwired.dev/handbook/drive#reloading-when-assets-change) attribute, you may specify them via the `useScriptTagAttributes` and `useStyleTagAttributes` methods. Typically, this methods should be invoked from a [service provider](/docs/{{version}}/providers):

```php
use Illuminate\Support\Facades\Vite;

Vite::useScriptTagAttributes([
    'data-turbo-track' => 'reload', // Specify a value for the attribute...
    'async' => true, // Specify an attribute without a value...
    'integrity' => false, // Exclude an attribute that would otherwise be included...
]);

Vite::useStyleTagAttributes([
    'data-turbo-track' => 'reload',
]);
```

If you need to conditionally add attributes, you may pass a callback that will receive the asset source path, its URL, its manifest chunk, and the entire manifest:

```php
use Illuminate\Support\Facades\Vite;

Vite::useScriptTagAttributes(fn (string $src, string $url, array|null $chunk, array|null $manifest) => [
    'data-turbo-track' => $src === 'resources/js/app.js' ? 'reload' : false,
]);

Vite::useStyleTagAttributes(fn (string $src, string $url, array|null $chunk, array|null $manifest) => [
    'data-turbo-track' => $chunk && $chunk['isEntry'] ? 'reload' : false,
]);
```

> [!WARNING]
> The `$chunk` and `$manifest` arguments will be `null` while the Vite development server is running.

<a name="advanced-customization"></a>
## Advanced Customization

Out of the box, Laravel's Vite plugin uses sensible conventions that should work for the majority of applications; however, sometimes you may need to customize Vite's behavior. To enable additional customization options, we offer the following methods and options which can be used in place of the `@vite` Blade directive:

```blade
<!doctype html>
<head>
    {{-- ... --}}

    {{
        Vite::useHotFile(storage_path('vite.hot')) // Customize the "hot" file...
            ->useBuildDirectory('bundle') // Customize the build directory...
            ->useManifestFilename('assets.json') // Customize the manifest filename...
            ->withEntryPoints(['resources/js/app.js']) // Specify the entry points...
            ->createAssetPathsUsing(function (string $path, ?bool $secure) { // Customize the backend path generation for built assets...
                return "https://cdn.example.com/{$path}";
            })
    }}
</head>
```

Within the `vite.config.js` file, you should then specify the same configuration:

```js
import { defineConfig } from 'vite';
import laravel from 'laravel-vite-plugin';

export default defineConfig({
    plugins: [
        laravel({
            hotFile: 'storage/vite.hot', // Customize the "hot" file...
            buildDirectory: 'bundle', // Customize the build directory...
            input: ['resources/js/app.js'], // Specify the entry points...
        }),
    ],
    build: {
      manifest: 'assets.json', // Customize the manifest filename...
    },
});
```

<a name="cors"></a>
### Dev Server Cross-Origin Resource Sharing (CORS)

If you are experiencing Cross-Origin Resource Sharing (CORS) issues in the browser while fetching assets from the Vite dev server, you may need to grant your custom origin access to the dev server. Vite combined with the Laravel plugin allows the following origins without any additional configuration:

- `::1`
- `127.0.0.1`
- `localhost`
- `*.test`
- `*.localhost`
- `APP_URL` in the project's `.env`

The easiest way to allow a custom origin for your project is to ensure that your application's `APP_URL` environment variable matches the origin you are visiting in your browser. For example, if you visiting `https://my-app.laravel`, you should update your `.env` to match:

```env
APP_URL=https://my-app.laravel
```

If you need more fine-grained control over the origins, such as supporting multiple origins, you should utilize [Vite's comprehensive and flexible built-in CORS server configuration](https://vite.dev/config/server-options.html#server-cors). For example, you may specify multiple origins in the `server.cors.origin` configuration option in the project's `vite.config.js` file:

```js
import { defineConfig } from 'vite';
import laravel from 'laravel-vite-plugin';

export default defineConfig({
    plugins: [
        laravel({
            input: 'resources/js/app.js',
            refresh: true,
        }),
    ],
    server: {  // [tl! add]
        cors: {  // [tl! add]
            origin: [  // [tl! add]
                'https://backend.laravel',  // [tl! add]
                'http://admin.laravel:8566',  // [tl! add]
            ],  // [tl! add]
        },  // [tl! add]
    },  // [tl! add]
});
```

You may also include regex patterns, which can be helpful if you would like to allow all origins for a given top-level domain, such as `*.laravel`:

```js
import { defineConfig } from 'vite';
import laravel from 'laravel-vite-plugin';

export default defineConfig({
    plugins: [
        laravel({
            input: 'resources/js/app.js',
            refresh: true,
        }),
    ],
    server: {  // [tl! add]
        cors: {  // [tl! add]
            origin: [ // [tl! add]
                // Supports: SCHEME://DOMAIN.laravel[:PORT] [tl! add]
                /^https?:\/\/.*\.laravel(:\d+)?$/, //[tl! add]
            ], // [tl! add]
        }, // [tl! add]
    }, // [tl! add]
});
```

<a name="correcting-dev-server-urls"></a>
### Correcting Dev Server URLs

Some plugins within the Vite ecosystem assume that URLs which begin with a forward-slash will always point to the Vite dev server. However, due to the nature of the Laravel integration, this is not the case.

For example, the `vite-imagetools` plugin outputs URLs like the following while Vite is serving your assets:

```html
<img src="/@imagetools/f0b2f404b13f052c604e632f2fb60381bf61a520">
```

The `vite-imagetools` plugin is expecting that the output URL will be intercepted by Vite and the plugin may then handle all URLs that start with `/@imagetools`. If you are using plugins that are expecting this behavior, you will need to manually correct the URLs. You can do this in your `vite.config.js` file by using the `transformOnServe` option.

In this particular example, we will prepend the dev server URL to all occurrences of `/@imagetools` within the generated code:

```js
import { defineConfig } from 'vite';
import laravel from 'laravel-vite-plugin';
import { imagetools } from 'vite-imagetools';

export default defineConfig({
    plugins: [
        laravel({
            // ...
            transformOnServe: (code, devServerUrl) => code.replaceAll('/@imagetools', devServerUrl+'/@imagetools'),
        }),
        imagetools(),
    ],
});
```

Now, while Vite is serving Assets, it will output URLs that point to the Vite dev server:

```html
- <img src="/@imagetools/f0b2f404b13f052c604e632f2fb60381bf61a520"><!-- [tl! remove] -->
+ <img src="http://[::1]:5173/@imagetools/f0b2f404b13f052c604e632f2fb60381bf61a520"><!-- [tl! add] -->
```
